Pumpkin Cheesecake Brownie Cups Irresistible Delight

WANT TO SAVE THIS RECIPE?

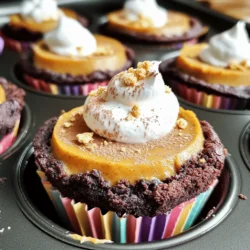
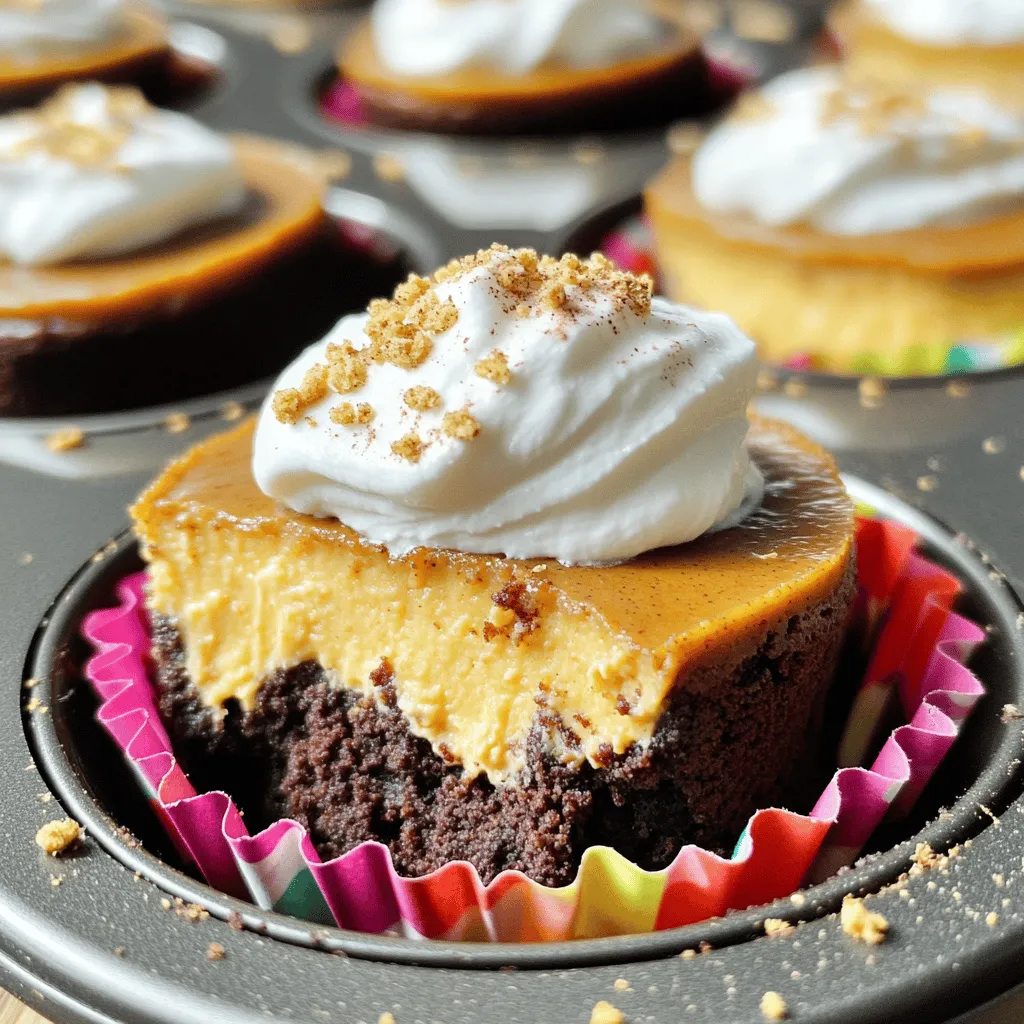
Get ready to fall in love with Pumpkin Cheesecake Brownie Cups! These bite-sized delights blend rich chocolate brownies and creamy pumpkin cheesecake for a treat that’s hard to resist. Whether you’re hosting a gathering or enjoying a cozy night in, these cups are sure to impress. Let’s dive into the delicious world of flavors and textures, where I’ll walk you through every step to make these irresistible delights!

Ingredients

Brownie Base Ingredients

– 1 ½ cups brownie mix

– ⅓ cup vegetable oil

– 1 large egg

– 1 teaspoon vanilla extract

Pumpkin Cheesecake Layer Ingredients

– 1 cup cream cheese, softened

– ½ cup pumpkin puree

– 1 cup powdered sugar

– 1 teaspoon cinnamon

– 1 teaspoon nutmeg

– ½ teaspoon vanilla extract (for cheesecake layer)

– ½ cup crushed graham crackers (for crust)

Optional Toppings and Garnishes

– Whipped cream (for topping, optional)

– Cinnamon stick (for garnish, optional)

I love using these simple ingredients. The brownie mix gives a rich base. The pumpkin cheesecake layer adds a creamy texture and flavor. The spices make it warm and cozy. You can top with whipped cream for extra fun. A cinnamon stick adds a nice touch too. These small details make the dessert shine.

Step-by-Step Instructions

Prepping the Oven and Muffin Tin

First, set your oven to 350°F (175°C). This is the perfect temperature for baking. Next, grab your muffin tin and line it with cupcake liners. These liners help the brownie cups pop out easily.

Making the Brownie Base

In a medium bowl, mix 1 ½ cups of brownie mix. Add in ⅓ cup of vegetable oil and 1 large egg. Don’t forget the 1 teaspoon of vanilla extract! Stir until well combined. The mixture should be thick and smooth. Now, scoop the brownie batter into the lined muffin tins. Fill each cup about halfway full. This allows room for the cheesecake layer.

Preparing the Pumpkin Cheesecake Mixture

In another bowl, beat together 1 cup of softened cream cheese and ½ cup of pumpkin puree. Add 1 cup of powdered sugar to sweeten it up. Then, sprinkle in 1 teaspoon of cinnamon and 1 teaspoon of nutmeg for warm flavors. Mix in ½ teaspoon of vanilla extract. Keep beating until the mixture is smooth and creamy. This will be the delicious topping for your brownie base.

Assembling the Cups

Now it’s time to layer! Spoon the pumpkin cheesecake mixture over the brownie base in each muffin cup. Fill them to the top. This makes for a nice, tall dessert. Make sure to spread it evenly for a great look.

Baking and Cooling Instructions

Place the muffin tin in the preheated oven. Bake for 20-25 minutes. You want the edges to set while the center has a slight wobble. Once they’re done, take them out and let them cool completely on a wire rack. After cooling, refrigerate for at least 2 hours. This helps the cups set up nicely. When you’re ready to serve, top with whipped cream and a sprinkle of crushed graham crackers. A cinnamon stick makes a fun garnish!

Tips & Tricks

Ensuring Perfectly Moist Brownies

To get moist brownies, use a good quality brownie mix. Mix the oil, egg, and vanilla well. Avoid overmixing, as it can make brownies tough. When baking, check them around 20 minutes. Take them out when the edges are firm and the center is slightly soft. This helps keep them moist.

Avoiding Cracked Cheesecake

To prevent cracks in your cheesecake layer, make sure your cream cheese is soft. Beat it well before adding other ingredients. Also, don’t overmix once you add pumpkin and sugar. Bake the cheesecake at a lower temperature if needed. A gentle bake helps keep the top smooth.

Best Practices for Decoration

For decoration, cool your brownie cups first. Then, add whipped cream on top for a tasty look. Sprinkle crushed graham crackers for crunch. You might also use a cinnamon stick as a fun garnish. These touches make your dessert look and taste even better.

Variations

Gluten-Free Pumpkin Cheesecake Brownie Cups

You can make these brownie cups gluten-free. Use a gluten-free brownie mix. Check the label to ensure it meets your needs. The rest of the ingredients are usually gluten-free. This way, everyone can enjoy them!

Healthier Ingredient Substitutions

Want a lighter version? Swap the cream cheese for Greek yogurt. Use a sugar substitute instead of powdered sugar. You can also replace the vegetable oil with applesauce. These changes keep the taste while cutting calories.

Flavor Variations

You can mix in chocolate chips for an extra treat. Add ½ cup of mini chocolate chips to the brownie mix. For a warm spice, add more nutmeg or even ginger. You can also use pumpkin spice instead of cinnamon. Each tweak offers a new twist on this classic dessert!

Storage Info

Best Practices for Storing Leftovers

Store your Pumpkin Cheesecake Brownie Cups in an airtight container. Keep them in the fridge for up to five days. If you want to keep them longer, freezing is a great option. Make sure each cup is well-wrapped to avoid freezer burn.

How to Freeze Pumpkin Cheesecake Brownie Cups

To freeze, let the cups cool completely. Place them in a single layer on a tray. Once frozen, move them into a freezer-safe bag or container. Label the bag with the date. They can last up to three months in the freezer. When you’re ready to enjoy, just thaw them overnight in the fridge.

Reheating Instructions

To reheat, take a cup out of the fridge. You can warm it in the microwave for about 15-20 seconds. If you prefer, you can also use an oven. Preheat to 350°F (175°C) and place the cup in for about 5-10 minutes. Enjoy them warm, topped with whipped cream for extra delight.

FAQs

Can I use homemade brownie mix?

Yes, you can use homemade brownie mix. Just make sure it has a similar texture and sweetness. I often use my favorite homemade recipe. It adds a nice personal touch to the cups. Plus, you can adjust the flavors to your liking.

What can I substitute for pumpkin puree?

If you don’t have pumpkin puree, use mashed sweet potatoes or butternut squash. Both options give a similar taste and texture. You can also use applesauce in a pinch, but it will change the flavor a bit.

How long do Pumpkin Cheesecake Brownie Cups last in the fridge?

These cups last about 5 days in the fridge. Store them in an airtight container to keep them fresh. I recommend enjoying them within the first few days for the best taste.

Can I make these in advance for a party?

Absolutely! You can make these cups a day or two ahead. Just keep them in the fridge until you’re ready to serve. They taste even better after chilling, as the flavors meld nicely.

We explored how to make Pumpkin Cheesecake Brownie Cups from scratch. You gathered the right ingredients and followed easy steps for a great treat. I shared tips for moist brownies and avoiding cracks in the cheesecake. You can even try fun variations for different flavors.

Now, with storage tips and answers to your questions, you’re ready to impress. Enjoy these tasty cups at your next gathering or as a sweet snack!

- 1 ½ cups brownie mix - ⅓ cup vegetable oil - 1 large egg - 1 teaspoon vanilla extract - 1 cup cream cheese, softened - ½ cup pumpkin puree - 1 cup powdered sugar - 1 teaspoon cinnamon - 1 teaspoon nutmeg - ½ teaspoon vanilla extract (for cheesecake layer) - ½ cup crushed graham crackers (for crust) - Whipped cream (for topping, optional) - Cinnamon stick (for garnish, optional) I love using these simple ingredients. The brownie mix gives a rich base. The pumpkin cheesecake layer adds a creamy texture and flavor. The spices make it warm and cozy. You can top with whipped cream for extra fun. A cinnamon stick adds a nice touch too. These small details make the dessert shine. First, set your oven to 350°F (175°C). This is the perfect temperature for baking. Next, grab your muffin tin and line it with cupcake liners. These liners help the brownie cups pop out easily. In a medium bowl, mix 1 ½ cups of brownie mix. Add in ⅓ cup of vegetable oil and 1 large egg. Don't forget the 1 teaspoon of vanilla extract! Stir until well combined. The mixture should be thick and smooth. Now, scoop the brownie batter into the lined muffin tins. Fill each cup about halfway full. This allows room for the cheesecake layer. In another bowl, beat together 1 cup of softened cream cheese and ½ cup of pumpkin puree. Add 1 cup of powdered sugar to sweeten it up. Then, sprinkle in 1 teaspoon of cinnamon and 1 teaspoon of nutmeg for warm flavors. Mix in ½ teaspoon of vanilla extract. Keep beating until the mixture is smooth and creamy. This will be the delicious topping for your brownie base. Now it’s time to layer! Spoon the pumpkin cheesecake mixture over the brownie base in each muffin cup. Fill them to the top. This makes for a nice, tall dessert. Make sure to spread it evenly for a great look. Place the muffin tin in the preheated oven. Bake for 20-25 minutes. You want the edges to set while the center has a slight wobble. Once they’re done, take them out and let them cool completely on a wire rack. After cooling, refrigerate for at least 2 hours. This helps the cups set up nicely. When you're ready to serve, top with whipped cream and a sprinkle of crushed graham crackers. A cinnamon stick makes a fun garnish! To get moist brownies, use a good quality brownie mix. Mix the oil, egg, and vanilla well. Avoid overmixing, as it can make brownies tough. When baking, check them around 20 minutes. Take them out when the edges are firm and the center is slightly soft. This helps keep them moist. To prevent cracks in your cheesecake layer, make sure your cream cheese is soft. Beat it well before adding other ingredients. Also, don’t overmix once you add pumpkin and sugar. Bake the cheesecake at a lower temperature if needed. A gentle bake helps keep the top smooth. For decoration, cool your brownie cups first. Then, add whipped cream on top for a tasty look. Sprinkle crushed graham crackers for crunch. You might also use a cinnamon stick as a fun garnish. These touches make your dessert look and taste even better. {{image_2}} You can make these brownie cups gluten-free. Use a gluten-free brownie mix. Check the label to ensure it meets your needs. The rest of the ingredients are usually gluten-free. This way, everyone can enjoy them! Want a lighter version? Swap the cream cheese for Greek yogurt. Use a sugar substitute instead of powdered sugar. You can also replace the vegetable oil with applesauce. These changes keep the taste while cutting calories. You can mix in chocolate chips for an extra treat. Add ½ cup of mini chocolate chips to the brownie mix. For a warm spice, add more nutmeg or even ginger. You can also use pumpkin spice instead of cinnamon. Each tweak offers a new twist on this classic dessert! Store your Pumpkin Cheesecake Brownie Cups in an airtight container. Keep them in the fridge for up to five days. If you want to keep them longer, freezing is a great option. Make sure each cup is well-wrapped to avoid freezer burn. To freeze, let the cups cool completely. Place them in a single layer on a tray. Once frozen, move them into a freezer-safe bag or container. Label the bag with the date. They can last up to three months in the freezer. When you're ready to enjoy, just thaw them overnight in the fridge. To reheat, take a cup out of the fridge. You can warm it in the microwave for about 15-20 seconds. If you prefer, you can also use an oven. Preheat to 350°F (175°C) and place the cup in for about 5-10 minutes. Enjoy them warm, topped with whipped cream for extra delight. Yes, you can use homemade brownie mix. Just make sure it has a similar texture and sweetness. I often use my favorite homemade recipe. It adds a nice personal touch to the cups. Plus, you can adjust the flavors to your liking. If you don't have pumpkin puree, use mashed sweet potatoes or butternut squash. Both options give a similar taste and texture. You can also use applesauce in a pinch, but it will change the flavor a bit. These cups last about 5 days in the fridge. Store them in an airtight container to keep them fresh. I recommend enjoying them within the first few days for the best taste. Absolutely! You can make these cups a day or two ahead. Just keep them in the fridge until you're ready to serve. They taste even better after chilling, as the flavors meld nicely. We explored how to make Pumpkin Cheesecake Brownie Cups from scratch. You gathered the right ingredients and followed easy steps for a great treat. I shared tips for moist brownies and avoiding cracks in the cheesecake. You can even try fun variations for different flavors. Now, with storage tips and answers to your questions, you’re ready to impress. Enjoy these tasty cups at your next gathering or as a sweet snack!

Pumpkin Cheesecake Brownie Cups

Get ready to indulge in the perfect fall treat with these delightful Pumpkin Cheesecake Brownie Cups! Combining rich brownie goodness with creamy pumpkin cheesecake, this recipe is sure to impress at any gathering. Easy to make and irresistibly tasty, these mini desserts are perfect for the season. Click through to discover the full recipe and treat yourself and your loved ones to this delicious dessert!

Ingredients
  

1 ½ cups brownie mix

⅓ cup vegetable oil

1 large egg

1 teaspoon vanilla extract

1 cup cream cheese, softened

½ cup pumpkin puree

1 cup powdered sugar

1 teaspoon cinnamon

1 teaspoon nutmeg

½ teaspoon vanilla extract (for cheesecake layer)

½ cup crushed graham crackers (for crust)

Whipped cream (for topping, optional)

Cinnamon stick (for garnish, optional)

Instructions
 

Preheat the oven to 350°F (175°C). Line a muffin tin with cupcake liners.

    Prepare the brownie base: In a medium bowl, mix the brownie mix, vegetable oil, egg, and 1 teaspoon of vanilla extract until well combined.

      Scoop the brownie batter into the lined muffin tins, filling each cup about halfway full.

        In a separate bowl, beat together the cream cheese, pumpkin puree, powdered sugar, cinnamon, nutmeg, and ½ teaspoon of vanilla extract until smooth and creamy.

          Layer the cheesecake mixture: Spoon the pumpkin cheesecake mixture over the brownie base in each muffin cup, filling to the top.

            Bake in the preheated oven for 20-25 minutes, or until the edges are set and the center has a slight wobble.

              Cool completely on a wire rack before refrigerating for at least 2 hours to set.

                Serve chilled, topped with whipped cream and a sprinkle of crushed graham crackers for added texture. Optionally, garnish with a cinnamon stick for a festive touch.

                  Prep Time: 15 min | Total Time: 2 hrs 40 min | Servings: 12

                    WANT TO SAVE THIS RECIPE?

                    Leave a Comment

                    Recipe Rating