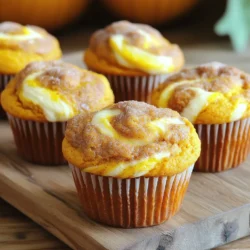
Are you ready to indulge in fall’s favorite treat? My Pumpkin Cream Cheese Swirl Muffins are a game-changer for breakfast or snack time. This easy recipe combines rich pumpkin flavors with a creamy swirl that will make your taste buds dance. In this post, I’ll guide you through simple steps, essential tips, and fun variations. Let’s turn your kitchen into a cozy bakery with these irresistible muffins!
Ingredients
Essential ingredients list
To make these tasty pumpkin cream cheese swirl muffins, gather these items:
– 1 ½ cups pumpkin puree
– 1 cup all-purpose flour
– 1 cup whole wheat flour
– 1 teaspoon baking powder
– 1 teaspoon baking soda
– 1 teaspoon ground cinnamon
– ½ teaspoon ground nutmeg
– ½ teaspoon ground ginger
– ½ teaspoon salt
– 1 cup granulated sugar
– ½ cup brown sugar, packed
– 2 large eggs
– ⅓ cup vegetable oil
– 1 teaspoon vanilla extract
– 8 oz cream cheese, softened
– ¼ cup powdered sugar
– 1 teaspoon lemon zest
These ingredients create a perfect mix of flavors and textures. The pumpkin puree adds moisture and flavor, while the cream cheese gives a rich swirl.
Key substitutions for versatility
You can easily swap some ingredients for different flavors or to meet dietary needs:
– Use almond flour instead of all-purpose flour for a gluten-free option.
– Replace vegetable oil with coconut oil for a tropical twist.
– Try maple syrup instead of granulated sugar for a unique sweetness.
– Swap cream cheese with Greek yogurt for a lighter option.
– Use pumpkin spice mix instead of individual spices for a quicker choice.
These swaps keep the muffins delicious while adding personal flair.
Measurement tips for accuracy
Accurate measurements matter for great muffins. Here are some tips:
– Use a kitchen scale for precise measurements, especially for flour.
– Spoon flour into measuring cups and level off with a knife for accuracy.
– Ensure your baking powder and baking soda are fresh. Old leavening agents can lead to flat muffins.
– For sticky ingredients like pumpkin puree, use a rubber spatula to scrape the bowl clean.
Following these tips helps ensure your muffins rise perfectly and taste amazing!
Step-by-Step Instructions
Prepping the oven and muffin tin
Start by preheating your oven to 350°F (175°C). This step is key to making sure the muffins rise well. Line a muffin tin with paper liners, or lightly grease it. This will help the muffins release easily after baking.
Combining dry ingredients
In a large bowl, mix the dry ingredients. Combine 1 cup of all-purpose flour, 1 cup of whole wheat flour, 1 teaspoon of baking powder, 1 teaspoon of baking soda, 1 teaspoon of ground cinnamon, ½ teaspoon of ground nutmeg, ½ teaspoon of ground ginger, and ½ teaspoon of salt. Whisk them together until they are well blended. This mix gives the muffins their great texture and flavor.
Mixing wet ingredients
In another bowl, it’s time to mix the wet ingredients. Combine 1 ½ cups of pumpkin puree, 1 cup of granulated sugar, ½ cup of packed brown sugar, 2 large eggs, ⅓ cup of vegetable oil, and 1 teaspoon of vanilla extract. Beat them until the mixture is smooth. This mix adds moisture and sweetness to your muffins.
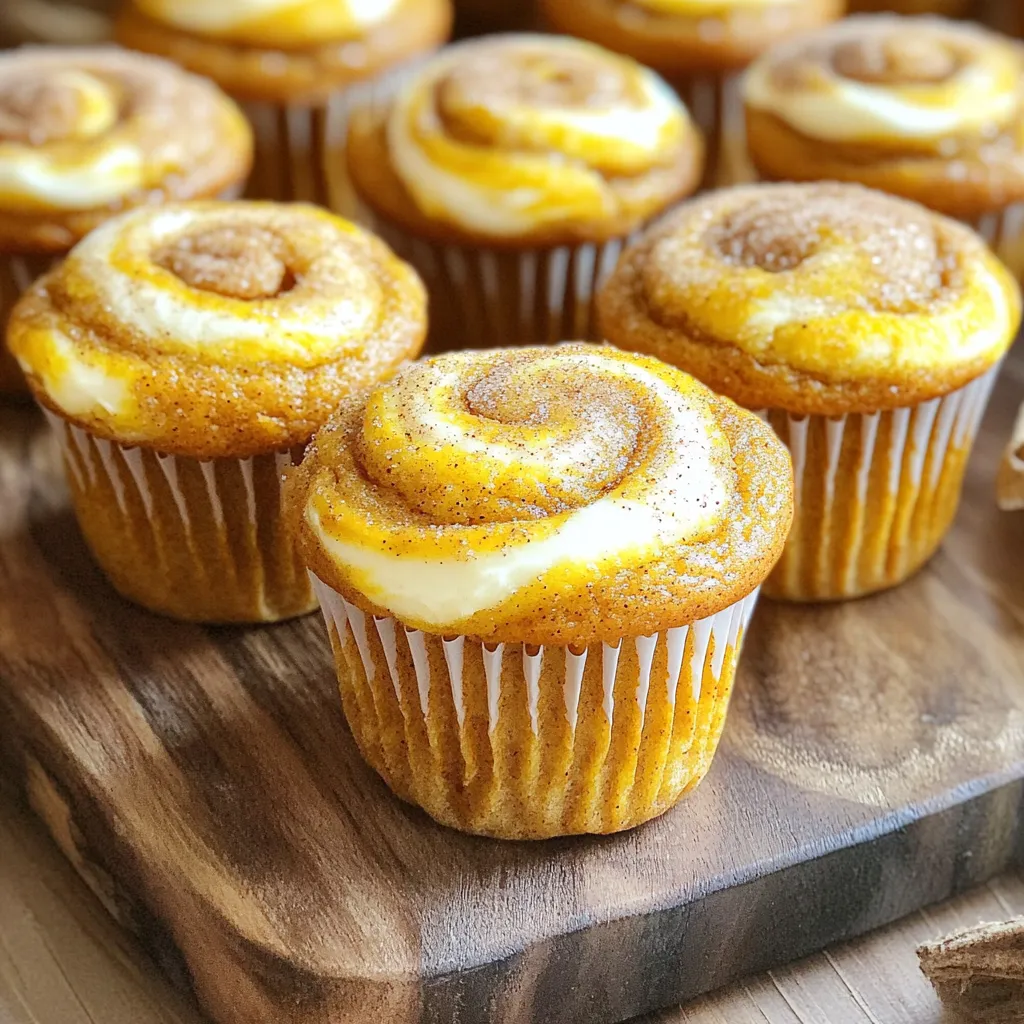
Creating the cream cheese swirl
Now, let’s prepare the cream cheese swirl. In a small bowl, beat together 8 oz of softened cream cheese, ¼ cup of powdered sugar, and 1 teaspoon of lemon zest. Mix until creamy and smooth. This will create a lovely swirl in your muffins that adds richness.
Filling muffin cups
Spoon 1 tablespoon of the pumpkin batter into each muffin cup. Next, add 1 teaspoon of the cream cheese mixture on top. Finally, add another tablespoon of pumpkin batter to cover the cream cheese. This layering creates that delightful surprise when you bite into the muffins.
Baking and cooling process
Using a toothpick or a small knife, gently swirl the cream cheese mixture into the muffin batter. This creates a marbled effect. Bake the muffins in the preheated oven for 20-25 minutes. Check if they are done by inserting a toothpick into the center. If it comes out clean, they are ready. Let the muffins cool in the tin for about 5 minutes. Then, transfer them to a wire rack to cool completely. Enjoy the warm smell filling your kitchen!
Tips & Tricks
How to avoid overmixing
To avoid overmixing, mix the wet and dry ingredients gently. Stir until you see no dry flour. It’s okay to have some lumps. Overmixing makes the muffins tough. Keep it light and simple!
Best practices for achieving the perfect swirl
For the perfect swirl, use a toothpick or a small knife. After adding the cream cheese on top, gently swirl it into the pumpkin batter. Don’t mix too much; a little contrast looks lovely. Aim for a marbled effect, not a blended one.
Ingredient temperature tips for best results
Use room temperature ingredients for the best texture. Take the cream cheese and eggs out early. Cold eggs and cream cheese can lead to lumps. This small step makes your muffins rise better and taste fluffier.
Variations
Gluten-free adaptation
You can make these muffins gluten-free. Use a gluten-free flour blend instead of all-purpose and whole wheat flour. Ensure your baking powder is gluten-free, too. This twist keeps the muffins soft and tasty.
Adding chocolate chips or nuts
For a fun twist, mix in chocolate chips or nuts. Add about ½ cup of chocolate chips or chopped nuts to the batter. This change adds a rich flavor and a nice crunch.
Spice variations for flavor enhancement
Feel free to change the spices to match your taste. Try adding allspice or cloves for extra warmth. You can also increase the cinnamon for a bolder flavor. Experiment with spices to create your perfect muffin!
Storage Info
Best ways to store leftover muffins
To keep your pumpkin cream cheese swirl muffins fresh, store them in an airtight container. This helps protect them from air and moisture. Place a paper towel in the container to absorb any extra moisture. You can keep them at room temperature for up to three days. If you want to keep them longer, refrigeration is an option. Just know that the muffins may dry out a bit.
How to freeze for later use
Freezing muffins is easy and a great way to save some for later. First, let the muffins cool completely. Then, wrap each muffin in plastic wrap. Place them in a freezer-safe bag or container. Be sure to label the bag with the date. They can stay in the freezer for up to three months. When you’re ready to enjoy them, just take out as many as you need.
Reheating tips for optimal freshness
To enjoy your muffins at their best, reheat them before serving. You can use a microwave, oven, or toaster oven. For the microwave, heat for about 15-20 seconds. For the oven, preheat to 350°F (175°C) and warm for about 5-10 minutes. This helps restore their soft texture and makes the cream cheese swirl delightful again. Don’t forget to check if they are warm enough before serving.
FAQs
Can I use canned pumpkin instead of fresh?
Yes, you can use canned pumpkin. It saves time and works well. Canned pumpkin has a smooth texture and rich flavor. Just make sure to use 100% pumpkin puree, not pumpkin pie filling.
How do I know when the muffins are done?
The muffins are done when a toothpick comes out clean. Insert it into the center of a muffin. If it comes out with wet batter, bake them a bit longer. They should feel firm and spring back when touched.
Can I make mini muffins using this recipe?
Yes, you can! Just adjust the baking time. Mini muffins usually bake for 12 to 15 minutes. Keep an eye on them to avoid overbaking.
What can I substitute for cream cheese?
You can use Greek yogurt or ricotta cheese. Both give a creamy texture. For a dairy-free option, try a vegan cream cheese.
How long do these muffins last?
These muffins stay fresh for about 3 days at room temperature. Store them in an airtight container. For longer storage, freeze them for up to 3 months. Just thaw them before eating.
In this blog post, we explored key ingredients, step-by-step instructions, and helpful tips for making delicious muffins. I shared ways to adapt the recipe for various diets and how to store extras for later. Remember, practicing these tips will help you create a perfect batch each time. Now, you have the tools to impress your friends and family with tasty muffins. Enjoy baking and experimenting with flavors!