![The berry smoothie bowl is a tasty treat that packs a punch. It takes only ten minutes to make. This recipe serves two and is perfect for breakfast or a snack. You will blend fruit, yogurt, and milk to create a creamy base. Then, you can add your favorite toppings for extra flavor and fun. Check out the full recipe above for all the details. To make a great berry smoothie bowl, you need the following key ingredients: - 1 cup frozen mixed berries (strawberries, blueberries, raspberries) - 1 banana, sliced - ½ cup Greek yogurt (or dairy-free alternative) - ½ cup almond milk (or any milk of choice) - 1 tablespoon honey or maple syrup (optional) These ingredients give you a smooth and creamy base, full of flavor and nutrients. The berries add sweetness and vibrant color. The banana helps thicken the mix while adding a natural sweetness. Greek yogurt gives it a creamy texture and adds protein. Almond milk makes the mix easy to blend. You can also use some optional ingredients to boost your smoothie bowl: - Fresh berries for topping - Sliced banana for extra sweetness - Granola for crunch - Chia seeds for added nutrition - Shredded coconut for a tropical twist - Mint leaves for a fresh touch These extras allow you to customize your bowl. You can create a different flavor or texture with each topping you choose. Enjoy mixing and matching to find your favorite combination! To make your berry smoothie bowl, start with the right ingredients. Gather these items: - 1 cup frozen mixed berries (strawberries, blueberries, raspberries) - 1 banana, sliced - ½ cup Greek yogurt (or a dairy-free alternative) - ½ cup almond milk (or any milk you like) - 1 tablespoon honey or maple syrup (optional) In a high-speed blender, add the frozen mixed berries, sliced banana, Greek yogurt, almond milk, and honey or maple syrup. Ensure the blender is clean for the best taste. Blend the mixture on high until it is smooth and creamy. You want no lumps. If the smoothie is too thick, add a little more almond milk. This will help you reach the perfect consistency. You can stop and scrape down the sides to mix everything well. Pour the smoothie mixture into a bowl. This is where you can show your creativity. Use your favorite toppings to make it look nice. I recommend adding fresh berries, sliced banana, granola, chia seeds, or shredded coconut. You can even use mint leaves for a pop of color. The Full Recipe provides all the steps and tips to make your bowl look great! When selecting berries, freshness is key. Look for bright colors and no soft spots. Choose berries that smell sweet. They should feel firm and plump. Frozen berries are great if fresh ones are not available. They keep their taste and nutrients well. Always wash fresh berries before use. This step helps remove dirt and pesticides. A good blender makes a big difference. Look for a high-speed blender that crushes ice easily. Brands like Vitamix or Ninja are popular choices. They blend smoothly and quickly. If you want to save money, a personal blender will work too. Just ensure it has enough power to mix frozen fruits. Presentation can make your bowl special. Use a wide bowl for easy topping placement. Pour the smoothie mixture gently to avoid splashing. Arrange your toppings in sections for a colorful look. Use fresh fruits, nuts, and seeds for texture. A sprinkle of chia seeds adds a nice touch. Finish with a mint leaf for a pop of color. Enjoy the beauty as much as the taste! {{image_2}} You can easily make this berry smoothie bowl dairy-free and vegan. To do this, just swap the Greek yogurt for a dairy-free alternative. Almond, coconut, or cashew yogurt works great. Use plant-based milk, like almond or oat milk, to keep it vegan. This way, you enjoy all the creamy goodness without any dairy. Get creative with flavor! For a tropical twist, add pineapple or mango to the mix. Blend these fruits with your berries for a sunny vibe. If you love chocolate, stir in cocoa powder or chocolate protein powder. You can also add nut butter, like almond or peanut, for a nutty flavor. These options keep your smoothie bowl exciting and fun! Seasonal toppings bring freshness and variety to your smoothie bowl. In summer, use fresh strawberries, blueberries, and peaches. In fall, consider pumpkin seeds or sliced apples. Winter can welcome pomegranate seeds or citrus slices. You can also add nuts, seeds, or granola for a crunchy texture. This keeps your bowl not only tasty but also colorful and appealing. Check out the Full Recipe for more ideas! If you have leftover smoothie bowl, store it in the fridge. Use an airtight container to keep it fresh. Smoothie bowls are best eaten within a day. After that, the texture may change. If you want to save it longer, freezing is a better option. You can freeze smoothie ingredients in advance to save time. Just prepare your fruit and yogurt. Place them in a freezer bag. Push out as much air as you can to avoid freezer burn. This makes it easy to blend your smoothie bowl later. When you’re ready, simply grab the bag and blend it frozen. It’s quick and easy! To keep your smoothie bowl fresh, store it properly. Always use clean tools when serving. This helps prevent spoilage. If you add toppings, keep them separate until you eat. Fresh fruit, nuts, or seeds can go bad quickly. Enjoy your delicious berry smoothie bowl from the [Full Recipe] with these easy tips! Smoothie bowls are great for your health. They pack a lot of nutrients. Here are some key benefits: - Vitamins and Minerals: Frozen mixed berries are rich in vitamins C and K. - Fiber: The fruit and yogurt add fiber, which helps digestion. - Protein: Greek yogurt boosts protein, keeping you full longer. - Antioxidants: Berries contain antioxidants that help your body fight free radicals. Eating a smoothie bowl can give you energy and improve your mood. Plus, they can help you reach your daily fruit intake. Yes, you can! Customizing your toppings makes your smoothie bowl unique. Here are some ideas for toppings: - Fresh Berries: Strawberries, blueberries, and raspberries add color and flavor. - Sliced Banana: Bananas add sweetness and creaminess. - Granola: Granola gives a nice crunch and adds fiber. - Chia Seeds: Chia seeds are rich in omega-3 fatty acids. - Shredded Coconut: Coconut adds a tropical taste. - Mint Leaves: Mint gives a fresh flavor and brightens the bowl. Feel free to mix and match. Use what you love! You can control the thickness of your smoothie bowl easily. Here’s how: - To Make Thicker: Use less liquid, like almond milk. You can also add more frozen fruit. - To Make Thinner: Add more liquid, like almond milk or water. Blend until you reach your desired consistency. Adjusting the thickness lets you enjoy your smoothie bowl just how you like it. For the full recipe, check out the Berry Bliss Smoothie Bowl! This blog post covered the right ingredients and steps for a tasty berry smoothie bowl. You learned essential ingredients, blending tips, and how to serve it nicely. I shared ways to pick the best berries and ideas for flavor twists. Remember, you can store leftovers and freeze extras for later. Smoothie bowls are healthy and fun to make. Enjoy creating your perfect blend and topping it just how you like! With practice, your smoothie bowls will impress everyone.](https://easycookingbite.com/wp-content/uploads/2025/05/b5c6bc92-ab02-44e1-b8b7-9023eda8c976.webp)
Berry Smoothie Bowl Energizing and Nutritious Recipe
Looking for a quick, tasty way to boost your energy? You’re in the right place! My Berry Smoothie Bowl recipe
Looking for a quick, tasty way to boost your energy? You’re in the right place! My Berry Smoothie Bowl recipe
![- 1 lb baby carrots - 1/2 cup freshly squeezed orange juice - 2 tablespoons honey or maple syrup - 2 tablespoons unsalted butter or coconut oil For the best orange glazed carrots, you need fresh and bright ingredients. I love using baby carrots because they are sweet and tender. If you can't find them, regular carrots work, too. Just peel and cut them into sticks. Fresh orange juice gives a bright flavor that pairs so well with the carrots. You can use honey or maple syrup for sweetness. The butter or coconut oil adds a rich flavor and helps the glaze stick. - 1 teaspoon orange zest - 1/2 teaspoon ground cinnamon - Salt and pepper to taste Adding orange zest brings out the citrus flavor, making the dish pop. A little ground cinnamon adds warmth and depth. Don't forget to season with salt and pepper to balance the sweetness and enhance the taste. - Fresh parsley or mint Garnishing with fresh herbs makes the dish look nice and adds a touch of freshness. You can use parsley for a mild flavor or mint for something a bit different. This adds color and makes your dish more appealing. For the full recipe, check out the details above! Start by washing your carrots. If you use baby carrots, they are ready to go. If you pick regular carrots, peel them first. Cut them into sticks that are 2-3 inches long. This size helps them cook evenly. Baby carrots stay sweet and tender, while regular carrots give a great crunch. Both options are tasty, so choose what you like best. Next, let’s get cooking! In a medium saucepan, melt the butter or coconut oil over medium heat. This will add rich flavor to our dish. Once melted, add the carrots to the pan. Sauté them for about 5 minutes. You want them to become slightly tender but not mushy yet. Now, pour in the freshly squeezed orange juice and honey or maple syrup. Mix it well to coat all the carrots. Add the orange zest and ground cinnamon. These ingredients will create a lovely glaze. Finally, season with salt and pepper to taste. Allow the mixture to simmer for 10-15 minutes. Stir occasionally to keep the glaze from sticking. You want the carrots to become tender and the glaze to thicken. Once cooked, remove the pan from heat. Transfer the carrots to a serving dish. For a pop of color, garnish with fresh parsley or mint. This step makes your dish look even better! For the full recipe, check out the complete guide above. To get the right glaze, aim for a syrupy texture. You want it to coat the carrots, not drown them. If your glaze is too runny, let it simmer longer to thicken. Adding more orange juice can help, but it may need extra time to cook down. For sweetness, adjust honey or maple syrup to your taste. Start with the amounts in the recipe and add more if you like. You can boost flavor with spices and herbs. Try adding a pinch of nutmeg or a dash of ginger for warmth. Fresh herbs like thyme or rosemary can also add depth. For extra zing, squeeze in more orange juice or add lemon juice. This will help balance sweetness with a bright acidity. Roasting is a great alternative to sautéing. It gives a nice caramelization to the carrots. Just toss them in oil, salt, and pepper before roasting. Use a different variety of carrots, like rainbow or purple ones, for a colorful twist. Each variety adds its own unique taste and texture. Enjoy experimenting with different methods and flavors. For the full recipe, check the earlier section. {{image_2}} You can switch up sweeteners to fit your taste. Brown sugar adds a rich flavor. Agave syrup is a great substitute too. For a fruitier touch, try using apple or pineapple juice. These options will change the taste while keeping it sweet. Spice things up by adding ginger or nutmeg. They give warmth and depth. If you want a savory twist, add a bit of minced garlic. This will balance the sweetness of the glaze. Experimenting with these flavors can lead to new favorites. If you want a vegan dish, swap butter for coconut oil. Use maple syrup instead of honey to keep it plant-based. This recipe is also gluten-free. All the ingredients are naturally gluten-free, making it a great choice for everyone. To keep your orange glazed carrots fresh, use airtight containers. Glass or plastic containers work well. Let the carrots cool before sealing. This helps avoid steam build-up, which can lead to sogginess. You can reheat your carrots in the oven or microwave. For the oven, place them in a baking dish. Heat at 350°F until warm, about 10 minutes. This method keeps the glaze thick. If using a microwave, place carrots in a bowl. Heat for 1-2 minutes, stirring halfway. It’s quick, but may make them a bit softer. To freeze, let the carrots cool completely. Pack them in freezer bags, removing as much air as possible. Label the bags with the date. When ready to eat, thaw overnight in the fridge. Reheat using the oven or microwave to restore their flavor. Yes, you can use frozen carrots. They are easy and quick to use. However, fresh carrots taste better. Fresh carrots have a nice crunch and bright flavor. Frozen carrots can be softer and lose some taste. If you use frozen, thaw them first. Then, cook them just like fresh carrots. The orange glaze will still be tasty. Orange glazed carrots pair well with many main dishes. Try serving them with roasted chicken or grilled fish. They also go great with pork chops or steak. The sweet flavor of the carrots balances well with savory meats. You can even enjoy them with a grain dish like quinoa or rice. They add color and flavor to any plate. If you find the glaze too sweet, there are simple ways to fix this. First, cut back on the honey or maple syrup. You can also add a splash of vinegar or lemon juice. This will add acidity and balance the sweetness. Another option is to add more salt. A pinch of salt can help tone down the sweet flavor. Taste as you go to find the right balance for you. Orange glazed carrots can last up to four days in the fridge. Make sure to store them in an airtight container. This helps keep them fresh and tasty. When you're ready to eat them, reheat gently. You can use the microwave or a pan on low heat. This keeps them tender and flavorful. For the full recipe, check here: [Full Recipe]. You learned how to make orange glazed carrots with simple ingredients. We covered prep and cooking steps to get tender, sweet carrots. I shared tips for perfect glazing and fun variations for everyone. Remember, cooking should be enjoyable and easy. Feel free to adjust flavors to match your taste. With these tips, you can create a colorful and tasty side dish that impresses. Enjoy your cooking journey!](https://easycookingbite.com/wp-content/uploads/2025/05/db6a3c3c-f35b-4f3a-82e0-0fb04fd78de6.webp)
Are you ready to transform ordinary carrots into a sweet, tangy delight? This simple Orange Glazed Carrots recipe elevates baby
![To make this dish, you need some key ingredients. Here is what you will need: - 500g beef sirloin, thinly sliced - 1 medium onion, finely chopped - 2 cloves garlic, minced - 250g mushrooms, sliced - 1 cup beef broth (low sodium) - 1 tablespoon Worcestershire sauce - 1 tablespoon soy sauce - 1 cup sour cream - 2 tablespoons all-purpose flour - 2 tablespoons olive oil - Salt and pepper, to taste - Fresh parsley, chopped (for garnish) - 300g egg noodles or fettuccine, cooked These ingredients come together to create a rich and creamy sauce that coats the beef and noodles beautifully. You can add extra flavor with these optional ingredients: - A splash of white wine for depth - Fresh thyme or dill for herbal notes - A dash of hot sauce for a kick - Creamy goat cheese for a unique twist These ingredients can elevate your beef stroganoff and make it your own. To round out your meal, consider these pairings: - A crisp green salad with a light vinaigrette - Steamed vegetables like green beans or broccoli - Crusty bread for dipping in the sauce Each of these options complements the flavors of beef stroganoff and enhances your dining experience. For the full recipe, jump to the cooking section of this article. Start by slicing 500g of beef sirloin thinly. This helps the beef cook evenly. Heat 1 tablespoon of olive oil in a large skillet over medium-high heat. Add the sliced beef to the hot skillet. Season it with salt and pepper. Sear the beef for about 3-4 minutes until it gets a nice brown color. Once browned, remove the beef from the skillet and set it aside. This step locks in the flavors before adding more ingredients. In the same skillet, add the remaining tablespoon of olive oil. Now, toss in 1 medium onion, finely chopped, along with 2 cloves of minced garlic. Sauté these for 2-3 minutes until the onion turns translucent. This adds depth to the dish. Next, add 250g of sliced mushrooms to the skillet. Cook them for 5-6 minutes until they become soft and browned. This step brings out the rich flavors of the mushrooms. Once your mushrooms are ready, sprinkle 2 tablespoons of all-purpose flour over the mixture. Stir it well to combine. Gradually pour in 1 cup of low-sodium beef broth, along with 1 tablespoon of Worcestershire sauce and 1 tablespoon of soy sauce. Keep stirring until the sauce thickens, which should take about 5 minutes. This sauce will be the heart of your Beef Stroganoff. Now, it's time to bring everything together. Return the seared beef to the skillet. Stir well to coat the beef in the sauce. Lower the heat and add 1 cup of sour cream. Mix everything until heated through. Taste and adjust the seasoning with salt and pepper as needed. Serve the stroganoff over 300g of cooked egg noodles or fettuccine. Garnish with freshly chopped parsley for a touch of color. Enjoy the warm, hearty flavors of this classic dish! For the full recipe, check out the detailed steps above. To start, choose good beef. I suggest using sirloin for its flavor. Make sure the beef is dry. Pat it with a paper towel. This helps it sear well. Heat your skillet to medium-high. Add olive oil, then the beef. Avoid crowding the pan. Cook for about 3-4 minutes. Look for a nice brown color. Remove the beef and let it rest. This keeps it juicy. Seasoning is key for making beef stroganoff great. Use salt and pepper while cooking. These simple spices highlight the beef's taste. You can also add garlic for extra flavor. A splash of Worcestershire sauce adds depth. Just a tablespoon goes a long way. Lastly, taste your sauce before serving. Adjust the seasoning as needed. This can make all the difference. A creamy sauce is what makes stroganoff special. Start by adding flour to the sautéed onions and mushrooms. This helps thicken the sauce. Gradually stir in beef broth while mixing. This prevents lumps from forming. Once thick, lower the heat before adding sour cream. Mix it gently. If the sauce is too thick, add more broth. Aim for a smooth, rich consistency. Remember, the sauce should coat the noodles well. For the complete process, check the Full Recipe. {{image_2}} You can make a tasty vegetarian version of Beef Stroganoff. Replace the beef with hearty mushrooms. Use portobello or cremini mushrooms for a meaty texture. You can also add lentils or beans for protein. Swap the beef broth with vegetable broth. This gives you a rich flavor without meat. If you prefer other proteins, chicken works well in this dish. Thinly slice chicken breast and follow the same cooking steps. You can also try tofu for a plant-based twist. Press tofu to remove moisture, then cut it into cubes. Sauté it until golden brown, just like the beef. Both options will still give you that comforting taste. To make Beef Stroganoff gluten-free, substitute regular flour with rice flour or cornstarch. This helps thicken the sauce without gluten. Use gluten-free noodles or serve over rice. Check the labels of broth and sauces to ensure they are gluten-free. These small changes make this dish suitable for everyone. For the full recipe, check out the [Full Recipe]. After you enjoy your beef stroganoff, store the leftovers in an airtight container. This helps keep the flavors fresh. Let the stroganoff cool before sealing it. Place it in the fridge. It will stay good for about three to four days. If you want to keep it longer, consider freezing it. When you are ready to eat the leftovers, reheat them gently. Use a skillet over low heat. Stir often to make sure it warms evenly. You can add a splash of beef broth or water to keep it creamy. Avoid using high heat, as it can dry out the sauce and beef. To freeze your beef stroganoff, first cool it completely. Place it in a freezer-safe container. Make sure to leave some space at the top. The stroganoff expands when frozen. It can last up to three months in the freezer. When you want to eat it, thaw it in the fridge overnight. Reheat as mentioned above. Enjoy your delicious meal again without hassle! For the full recipe, check out the details above. Beef Stroganoff comes from Russia. It dates back to the 19th century. A chef made it for a count named Stroganov. The dish has beef, mushrooms, and a creamy sauce. It became popular in many countries over time. Yes, you can make Beef Stroganoff in advance. Cook the dish and let it cool. Store it in the fridge for up to three days. The flavors will blend well during this time. Just reheat it on the stove or in the microwave when ready to serve. Beef Stroganoff pairs well with several sides. Here are some great options: - Egg noodles or fettuccine - Rice or mashed potatoes - Steamed green beans or broccoli - A fresh garden salad - Crusty bread for dipping These sides complement the rich flavors of the dish. Making Beef Stroganoff in a slow cooker is easy. Here’s how to do it: 1. Brown the Beef: Sear the beef in a skillet first. This adds flavor. 2. Combine Ingredients: Place the beef in the slow cooker. Add sliced onions, garlic, and mushrooms. 3. Add Liquids: Pour in beef broth, Worcestershire sauce, and soy sauce. 4. Cook: Set the slow cooker on low for 6-8 hours or high for 3-4 hours. 5. Finish with Sour Cream: Stir in sour cream just before serving. You can find the full recipe [Full Recipe]. Enjoy your meal! Beef Stroganoff is a great dish for home cooks. We discussed key ingredients, easy steps, and tips for the best flavor. You can try variations like vegetarian options or gluten-free adaptations. Storing leftovers correctly helps keep taste intact. Remember, learning to make this dish is fun and rewarding. You can enjoy it with your favorite sides. Embrace the joy of cooking and create your own classic Beef Stroganoff masterpiece!](https://easycookingbite.com/wp-content/uploads/2025/05/9d21644a-cad9-4727-8b74-122e7b263e83.webp)
If you’re craving a warm, hearty meal, look no further than Classic Beef Stroganoff. This comforting dish blends tender beef
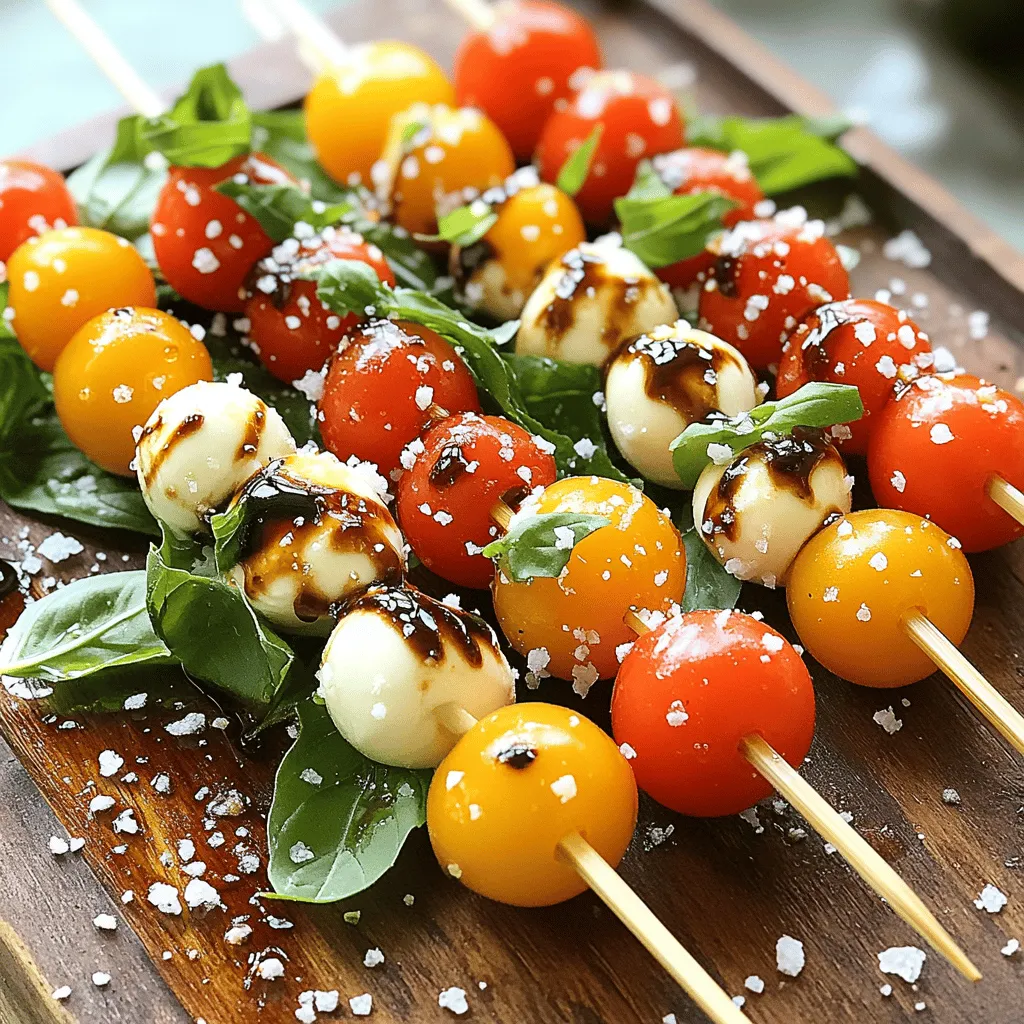
Caprese Salad Skewers are a fresh and fun twist on the classic salad. They burst with flavor and are easy
![- 4 medium zucchinis, spiralized - 1 cup fresh basil leaves - 1/2 cup toasted pine nuts - 1/2 cup grated Parmesan cheese (or nutritional yeast) - 2 cloves garlic, minced - 1/2 cup extra virgin olive oil - Juice of 1 lemon - Salt and pepper to taste - Cherry tomatoes, halved - Fresh basil leaves When making zucchini noodles with pesto, you want fresh ingredients. The zucchinis should feel firm and smooth. Fresh basil gives the best flavor. Look for bright green leaves. Toasted pine nuts add a nice crunch. If you prefer a vegan option, use nutritional yeast instead of Parmesan. For the pantry staples, extra virgin olive oil is key. It adds richness to the dish. Fresh lemon juice brightens the flavors. Salt and pepper help bring everything together. Optional garnishes like cherry tomatoes add color and sweetness. Fresh basil leaves on top make the dish look beautiful. You can find the full recipe to guide you through each step. Enjoy creating this fresh and flavorful dish! To make the pesto, start by gathering your key ingredients. You need fresh basil leaves, toasted pine nuts, grated Parmesan cheese, minced garlic, lemon juice, and some salt and pepper. Place all these into a food processor. Next, blend the mixture until it is finely chopped. Keep blending until it becomes creamy. This process brings out the fresh flavors. Taste it. If you want more salt, add it now. This pesto will be the star of your dish. Now, let’s make the zucchini noodles. You can use a spiralizer or a julienne peeler. Both tools will give you nice noodle shapes. Make sure your zucchini is firm for the best results. As you spiralize, aim for a thickness you enjoy. Thin noodles cook faster, while thicker ones have a nice bite. Prepare enough to fill your plate. This step is fun, and the noodles look great! It’s time to cook your zoodles. Heat a tablespoon of olive oil in a skillet over medium heat. Once hot, add the zucchini noodles. Sauté them for just 2-3 minutes. You want them to be warm and slightly soft. Be careful not to overcook them. Overcooked zoodles become mushy, and that’s not what we want. Keep an eye on them, and stir gently. When done, they will still have a nice crunch. Now, you can combine the warm zoodles with your creamy pesto. Toss well until every noodle is coated. This step makes your dish come alive with flavor! Check out the [Full Recipe] for more details. For the best flavor, always choose ripe basil. Look for bright green leaves with no brown spots. Fresh basil gives your pesto a rich taste. Next, pick firm zucchinis. They should feel heavy and smooth. Avoid zucchinis with soft spots or wrinkles. To adjust your pesto, taste as you go. If it’s too thick, add more olive oil. You can also add a splash of lemon juice for brightness. If you have nut allergies, try sunflower seeds or pumpkin seeds. They blend well and give a nice crunch. To avoid overcooking zucchini noodles, heat them just until they soften. This takes about 2-3 minutes. If you cook them too long, they become mushy. Keep an eye on them as they cook. Stir gently to maintain their shape and texture. Enjoy your fresh dish! {{image_2}} To make a vegan version, swap the Parmesan cheese for nutritional yeast. Nutritional yeast gives the dish a cheesy flavor without using dairy. You can add 1/2 cup of nutritional yeast to the pesto mix. This keeps the meal creamy and delicious. Want to make this dish heartier? You can add grilled chicken or shrimp. Simply grill your protein of choice, slice it, and toss it with the zucchini noodles and pesto. For a plant-based option, consider adding chickpeas or tofu. Both of these options provide protein while keeping it meat-free. Get creative by mixing in more veggies. Bell peppers add a sweet crunch. Spinach brings extra nutrients and color. If you like a little heat, add some red pepper flakes. This will give your dish a spicy kick, making it even more exciting to eat. Explore these variations to find your favorite way to enjoy zucchini noodles with pesto. For the full recipe, check out the previous section! To keep leftover zucchini noodles fresh, place them in an airtight container. Make sure to cover them well to prevent drying out. Store them in the fridge for up to three days. After that, the texture can change, and they may become mushy. Can you freeze zoodles? Yes, you can freeze zucchini noodles, but it’s better to blanch them first. Bring a pot of water to a boil and cook the zoodles for two minutes. Then, plunge them into ice water to stop cooking. Drain and dry them before placing in freezer bags. For pesto, freeze in ice cube trays for easy use later. To reheat zucchini noodles without losing texture, avoid the microwave. Instead, heat them in a skillet over medium-low heat. Add a splash of olive oil and toss gently for two to three minutes. This method keeps them firm and tasty. For pesto, gently warm it on the stove or in the microwave in short bursts. This keeps it fresh and flavorful. Zucchini noodles, or zoodles, are thin strips made from zucchini. They serve as a low-carb pasta alternative. Zoodles are light, fresh, and packed with nutrients. They provide vitamins A and C, plus potassium. Using zucchini noodles can help you eat more veggies. They soak up flavors well, making them a great base for sauces like pesto. You can enjoy them raw or cooked, but don’t overdo it! Yes, you can prepare pesto a few days in advance. Keep it in an airtight container in the fridge. To prevent browning, drizzle a thin layer of olive oil on top. This keeps the color bright and fresh. If you want to store it longer, freeze the pesto. Ice cube trays work well. Once frozen, transfer the cubes to a bag. This way, you can use just what you need later. You can make zoodles without a spiralizer using simple tools. A vegetable peeler works great. Just peel thin strips from the zucchini. Another option is a box grater. Use the julienne side for thin noodles. You can also use a knife. Cut the zucchini into thin, long strips. All these methods give you delicious zoodles without extra gadgets. Enjoy your cooking! For the full recipe, check out the [Full Recipe]. You now have a great recipe for zucchinis and pesto. We covered key ingredients, cooking steps, and tips to make it a success. You can swap ingredients for your preferences, like using nutritional yeast instead of cheese. Keep your zoodles fresh or freeze leftovers for later. Enjoy cooking these healthy meals with ease. Dive in, have fun, and share this dish with friends!](https://easycookingbite.com/wp-content/uploads/2025/05/774dbd3e-6598-4ca3-863a-b756137cb3cd.webp)
Looking for a fresh and flavorful dish that’s quick to make? Zucchini Noodles with Pesto is your answer! You’ll love
![- 1 cup rolled oats - 1/2 cup natural peanut butter (or any nut butter of choice) - 1/4 cup honey or maple syrup - 1/4 cup chocolate protein powder - 2 tablespoons cocoa powder - 1/4 cup mini chocolate chips - 1/4 teaspoon salt - 1 teaspoon vanilla extract Each ingredient plays a key role in making these protein balls both tasty and healthy. - Rolled oats provide fiber and help bind the balls together. They add a chewy texture too. - Natural peanut butter or any nut butter gives creaminess and healthy fats. It also adds flavor. - Honey or maple syrup acts as a sweetener and keeps the mixture moist. It helps to hold the balls together. - Chocolate protein powder boosts protein content. This makes the balls a great snack for energy. - Cocoa powder adds rich chocolate flavor. It pairs well with the other ingredients. - Mini chocolate chips add a sweet touch. They make each bite more enjoyable. - Salt enhances all the flavors. It balances the sweetness. - Vanilla extract adds depth and warmth to the taste. For the best flavor and quality, I recommend using these brands: - For oats, Bob's Red Mill is a great choice. - For peanut butter, try Justin's or Skippy Natural. - For protein powder, Orgain offers a tasty chocolate flavor. - For honey, Manuka Health is a pure option, while Maple Grove Farms is great for maple syrup. With these ingredients, you’ll create a treat that is not only energizing but also fun to eat! For the complete recipe, check the [Full Recipe]. To make chocolate peanut butter protein balls, start with the dry ingredients. In a large bowl, combine: - 1 cup rolled oats - 1/4 cup chocolate protein powder - 2 tablespoons cocoa powder - 1/4 teaspoon salt Stir until they mix well. This step is key for even flavor. Next, take a separate bowl for the wet ingredients. Mix together: - 1/2 cup natural peanut butter - 1/4 cup honey or maple syrup - 1 teaspoon vanilla extract Stir until smooth. This ensures a creamy texture in the final mix. Now, pour the wet mix into the dry ingredients. Stir until they combine fully. Sometimes, using your hands helps blend everything together. After that, fold in: - 1/4 cup mini chocolate chips This adds a delightful surprise in every bite. Finally, scoop tablespoon-sized portions. Roll them into balls with your hands. Place them on a parchment-lined baking sheet. Refrigeration is essential for these protein balls. It helps them firm up and hold their shape. Chill the balls for at least 30 minutes. This step improves the texture and makes them easier to eat. After chilling, store your protein balls in an airtight container. They can stay fresh in the fridge for up to one week. For the full recipe, check the section above. Overmixing vs. Undermixing the Mixture Mixing the ingredients well is key. If you overmix, the protein balls can become tough. If you undermix, they may fall apart. Aim for a good balance. When the mixture looks even, stop mixing. Use your hands to combine it, ensuring all ingredients blend well. Choosing the Right Texture A good texture makes these protein balls enjoyable. You want a sticky but firm mix. If it feels too dry, add a bit more peanut butter or honey. If it’s too wet, add a little more oats or protein powder. Adjust until it holds together but is not too sticky. Additional Ingredients for Customization You can make these protein balls your own. Try adding some ground flaxseed or chia seeds for extra nutrition. Dried fruits like cranberries or raisins can add sweetness. Nuts or seeds can give a nice crunch. Feel free to experiment with flavors to suit your taste. Recommended Toppings or Garnishes Toppings can make your protein balls pop! Roll them in shredded coconut or crushed nuts for added texture. A light dusting of cocoa powder gives a nice touch. You can even drizzle a bit of melted dark chocolate on top for a sweet finish. These simple changes can elevate the look and taste of your treats. {{image_2}} You can change up the nut butter in this recipe. Try almond, cashew, or sunflower seed butter. Each brings a different taste. If you want to spice things up, add a pinch of cinnamon or nutmeg. You can also add a splash of almond or coconut extract for extra flavor. These little tweaks make every batch unique. If you want to lower the sugar, you can swap honey with mashed banana. This keeps the balls sweet while cutting calories. You can also use a sugar substitute if you like. For a vegan option, replace honey with maple syrup. Use plant-based protein powder to keep it all vegan-friendly. These changes let everyone enjoy these tasty treats! To keep your chocolate peanut butter protein balls fresh, use an airtight container. Glass or plastic containers work well. Choose one that seals tightly to keep out air. If you store them this way, they stay tasty longer. You can keep the protein balls at room temperature for a short time. However, I recommend putting them in the fridge. The cool air helps them stay firm and fresh. In the fridge, these protein balls last about one week. Make sure to check for any signs of spoilage before eating. If you want to keep them longer, you can freeze them. To freeze, place the protein balls in a single layer on a baking sheet. After they freeze for about an hour, move them to a freezer bag. This method stops them from sticking together. To reheat, just take out what you need and let them thaw at room temperature. You can also pop them in the fridge overnight. Enjoy these tasty treats anytime! To make these tasty protein balls, follow these simple steps: 1. Mix Dry Ingredients: In a large bowl, add rolled oats, chocolate protein powder, cocoa powder, and salt. Stir well. 2. Combine Wet Ingredients: In another bowl, mix peanut butter, honey (or maple syrup), and vanilla until smooth. 3. Combine Both Mixtures: Pour the wet mix into the dry mix. Stir until well mixed. You might need to use your hands here. 4. Add Chocolate Chips: Fold in the mini chocolate chips until evenly spread. 5. Form Balls: Take small scoops of the mixture and roll them into balls with your hands. 6. Chill: Place the balls on a parchment-lined baking sheet. Refrigerate for at least 30 minutes to firm up. 7. Store: Keep the protein balls in an airtight container in the fridge for up to a week. These protein balls pack a nutritional punch. They are great for snacks or post-workout fuel. - Calories: Each ball has about 100 calories, depending on size. - Protein: They contain around 5 grams of protein per ball, thanks to the protein powder and peanut butter. The oats add fiber, while the peanut butter provides healthy fats. Yes! If you prefer to skip protein powder, you have options. Here are some alternatives: - Greek Yogurt: It adds creaminess and protein. - Chopped Nuts: Use finely chopped nuts for added crunch and protein. - Nut Butter: Increase the amount of peanut butter or use almond butter for a different flavor. These options keep the protein balls tasty and nutritious! For the full recipe, check out the section above. In this article, we explored how to make delicious protein balls, highlighting key ingredients, preparation steps, and tips. Each ingredient plays an important role in flavor and texture. I've shared essential techniques for mixing and chilling, so your protein balls turn out perfectly. We covered common mistakes and clever ways to enhance flavor. You can also customize your balls with different nut butters or toppings. Remember to store them correctly to keep them fresh. Try these suggestions, and enjoy your healthy snack!](https://easycookingbite.com/wp-content/uploads/2025/05/986e2715-37d9-4d59-850f-596954f805b2.webp)
Fuel your day with my delicious Chocolate Peanut Butter Protein Balls! These tasty treats combine rich chocolate and smooth peanut

Are you ready to bake a simple, tasty treat? Banana oatmeal muffins are nutritious and packed with flavor. In this
![- 1 lb Brussels sprouts, trimmed and halved - 3 tablespoons olive oil - 4 cloves garlic, minced - Juice of 1 lemon - Zest of 1 lemon - 1 teaspoon honey - Salt and pepper, to taste - 1/4 teaspoon red pepper flakes (optional) - Fresh parsley, chopped for garnish You can switch up the oils you use. Instead of olive oil, try avocado oil or melted coconut oil. These oils can add unique flavors and health benefits. If you prefer a sweeter taste but want to avoid honey, you can use maple syrup or agave nectar. Both options work well in this recipe and still provide that lovely sweetness. When it comes to herbs, fresh is best. However, if you have dried herbs, they work too. Just remember, dried herbs are stronger than fresh. Use one-third of the amount if you are using dried. For the full recipe, check the section above. To start, we need to prep the Brussels sprouts. Take 1 pound of Brussels sprouts and trim off the ends. Then, cut each sprout in half. This helps them cook evenly and lets the flavors soak in. Next, prepare the garlic. Grab 4 cloves of garlic and mince them finely. The more you chop, the stronger the flavor. You'll also need to zest and juice 1 lemon. The zest adds a nice bright taste, while the juice brings in the tang. Now, let's roast the Brussels sprouts. Preheat your oven to 400°F (200°C). In a large bowl, mix the halved Brussels sprouts, 3 tablespoons of olive oil, minced garlic, lemon juice, lemon zest, 1 teaspoon of honey, salt, pepper, and red pepper flakes if you want some heat. Toss everything together until the sprouts are fully coated. Spread them out on a baking sheet lined with parchment paper. This helps with easy cleanup. Roast them for 25 to 30 minutes. Stir them halfway through to ensure even cooking. You want them golden brown and crispy on the edges. After roasting, remove the sprouts from the oven and transfer them to a serving dish. For the final touch, garnish with fresh chopped parsley. This gives a pop of color and adds freshness to the dish. Serve these Brussels sprouts warm. They pair well with grilled meats or as a side to any meal. Don't forget to add lemon wedges for an extra burst of flavor. For the full recipe, check out the [Full Recipe]. To get the best roasted Brussels sprouts, follow these tips: - Ensuring even cooking: Cut the Brussels sprouts in half. This helps them cook evenly. Place them cut-side down on your baking sheet. This way, they get nice and crispy. - How to avoid sogginess: Make sure to dry the sprouts after washing. Any extra water can make them soggy. Use a clean kitchen towel or paper towel to pat them dry. Adding flavors can make your dish even better. Here are some ideas: - Additional spices or herbs to try: Try adding thyme or rosemary for a fragrant touch. A dash of smoked paprika can add depth, too. - Using vinegar for extra tang: A splash of balsamic vinegar before roasting gives a nice tang. It complements the lemon flavor well. The right tools can make cooking easier: - Ideal baking sheets or trays: Use a heavy-duty baking sheet. This helps with even heat distribution. A parchment-lined sheet makes for easy cleanup. - Recommended kitchen tools for prep: A sharp knife is essential for cutting the sprouts. A mixing bowl helps you toss the ingredients evenly. A spatula is great for flipping them halfway through roasting. {{image_2}} You can make this dish even better by adding seasonal vegetables. Try carrots, sweet potatoes, or squash in the fall. In spring, fresh asparagus or peas pair well. Each season brings new flavors. You can mix and match based on what you find at the market. For flavor pairings, think about the occasion. If it's a festive meal, add some crispy bacon bits or toasted nuts for crunch. For a summer BBQ, serve it with grilled meats. The bright lemon and garlic will shine in any season. If you want to make this dish vegan, skip the honey. You can use maple syrup instead. It gives a nice sweetness that works well. This dish is also great for vegetarians. Just serve it with a hearty grain salad for a complete meal. For low-carb diets, you can replace Brussels sprouts with cauliflower. It roasts similarly and takes on the same great flavors. You can still use the lemon and garlic for a tasty dish. To make your dish look stunning, serve it in a colorful bowl. The golden brown Brussels sprouts look beautiful against a bright dish. Add a sprinkle of parsley on top for a fresh touch. You can even add lemon wedges on the side for extra zing. If you want to get creative, drizzle some balsamic glaze over the top. This adds a nice sweetness and depth. Another option is to pair it with a creamy dressing. A yogurt-based sauce can elevate the flavors and make it extra special. For the full recipe, check out the detailed steps and tips! To store your leftover Lemon Garlic Roasted Brussels Sprouts, place them in an airtight container. Keep them in the fridge for up to three days. This method helps to seal in the flavors. To keep the Brussels sprouts crispy, avoid stacking them too high. If you lay them flat, they will stay firm and fresh. When you are ready to enjoy your leftovers, preheat your oven to 350°F (175°C). Spread the Brussels sprouts in a single layer on a baking sheet. Heat them for about 10-15 minutes. This method keeps their texture and flavor intact. You can also use a skillet. Just warm them over medium heat for a few minutes, stirring gently. Yes, you can freeze cooked Brussels sprouts! To freeze them, let them cool completely first. Then, place them in a freezer-safe bag. Remove as much air as possible. They can last for up to three months in the freezer. When you're ready to use them, thaw overnight in the fridge. Reheat as mentioned earlier for best results. How long to roast Brussels sprouts? You should roast Brussels sprouts for 25 to 30 minutes at 400°F (200°C). This time gives them a nice brown color and crisp edges. Make sure to stir them halfway through. This helps them cook evenly. What goes well with Brussels sprouts? Brussels sprouts pair well with many foods. Try them with roasted meats like chicken or pork. They also work great with grains like quinoa or rice. Add a sprinkle of cheese for extra flavor. Can I prepare this dish ahead of time? Yes, you can prep Brussels sprouts ahead of time. Just trim and halve them. Store them in the fridge in an airtight container. When you are ready, coat them with oil and seasonings before roasting. What are the best serving ideas? Serve Brussels sprouts hot from the oven. You can garnish them with fresh parsley for color. Add lemon wedges on the side for a zesty kick. They also taste great on a bed of grains. Are Brussels sprouts healthy? Yes, Brussels sprouts are very healthy. They are low in calories and high in fiber. They also provide vitamins like K and C. These nutrients support your immune system and bone health. What are the benefits of lemon and garlic? Lemon adds fresh flavor and vitamin C. It helps boost your immune system. Garlic has many health benefits, too. It can lower blood pressure and improve heart health. Together, they add amazing taste and nutrition to your dish. In this blog post, we explored how to make delicious roasted Brussels sprouts. I shared key ingredients, helpful tips, and step-by-step instructions to ensure success. We also looked at storage techniques and common questions to help you along the way. Roasting Brussels sprouts is simple and rewarding. You can customize them to suit your taste and dietary needs. Enjoy experimenting with flavors and share this dish with others!](https://easycookingbite.com/wp-content/uploads/2025/05/91930b69-c00e-446f-ad25-d5bda9ed4f24.webp)
If you want a dish that’s both easy and packed with flavor, you’re in the right place! This Lemon Garlic

If you’re craving a treat that’s both crispy and sweet, you’re in for a treat! Cinnamon Sugar Churros are the

Looking for a fresh and tasty dish? You’ve come to the right place! My Margherita Zucchini Boats are easy to
