Skip to content
DisclaimerTerms Of UseGDPR PolicyCookie Policy

easycookingbite

  • Home
  • Drinks
  • Appetizers
  • Dinner
  • Dessert
  • About
  • Contact
  • Privacy Policy
DisclaimerTerms Of UseGDPR PolicyCookie Policy

Lily

- 1 pound large shrimp, peeled and deveined - 4 cloves garlic, minced - 1 lemon, zested and juiced - 2 tablespoons olive oil - 1 teaspoon smoked paprika - 1 teaspoon dried oregano - Salt and pepper to taste The main ingredients form the base of this dish. Large shrimp bring a sweet taste. Garlic adds a strong, savory kick. Fresh lemon gives a bright, zesty flavor. Olive oil helps mix the spices and keeps shrimp moist. Smoked paprika and oregano add depth and warmth to each bite. Season with salt and pepper to balance the flavors. - 2 cups cherry tomatoes, halved - 1 bell pepper, sliced (red or yellow) Cherry tomatoes burst with juiciness and sweetness when roasted. They complement the shrimp perfectly. The bell pepper adds crunch and color. You can use either red or yellow. Both options work well and taste great! - Fresh parsley, chopped (for garnish) Fresh parsley is the finishing touch. It adds a pop of green and freshness. Just sprinkle it over the dish before serving. This small step makes your meal look even better! {{ingredient_image_1}} 1. Preheat your oven to 400°F (200°C). This heat makes the shrimp cook perfectly. 2. In a large bowl, mix the shrimp, minced garlic, lemon zest, lemon juice, olive oil, smoked paprika, oregano, salt, and pepper. Toss well so the shrimp get coated in all those tasty flavors. 1. On a large sheet pan, spread the halved cherry tomatoes and sliced bell pepper evenly. Drizzle a little olive oil over them. Add a pinch of salt and pepper to bring out their natural taste. 2. Next, arrange the marinated shrimp over the vegetables on the sheet pan. This helps the shrimp soak up the flavor from the veggies as they cook. 1. Roast the dish in the preheated oven for 10-12 minutes. You’ll know it’s done when the shrimp turn pink and the veggies become tender. 2. Check for doneness by cutting into a shrimp. If it’s opaque and firm, it’s perfect! Remove the pan from the oven and sprinkle with fresh parsley for a pop of color and flavor before serving. Choosing the right shrimp Select large shrimp for this dish. They cook quickly and hold flavor well. Fresh shrimp is best, but frozen works too. Just thaw them safely before cooking. Look for shrimp that have a firm texture and a mild sea scent. Importance of marinating Marinating shrimp is key to great taste. The lemon juice and garlic add flavor. Let the shrimp soak for at least 15 minutes. This gives them time to absorb all the delicious flavors. Don't skip this step! Oven temperature Set your oven to 400°F (200°C). This high heat helps the shrimp cook fast. It also gives the veggies a nice char. Make sure your oven is fully preheated before putting in the sheet pan. Timing for best results Cook the shrimp for 10-12 minutes. Keep an eye on them. They turn pink when done. Overcooking makes them tough, so check early if you're unsure. Remember, the shrimp cook quickly! Pairing with sides Serve this dish with rice or crusty bread. Both soak up the tasty juices. A fresh salad is also a great side. It adds crunch and balances the meal. Presentation ideas Garnish with fresh parsley for color. Serve right from the sheet pan for a rustic look. You can also use lemon wedges for a zesty touch. This makes the meal look inviting and fresh! Pro Tips Fresh Shrimp is Best: Always choose the freshest shrimp you can find for the best flavor and texture. Look for shrimp that smell like the ocean and have a firm texture. Marinate for More Flavor: If you have time, let the shrimp marinate for up to 30 minutes before cooking. This allows the flavors to penetrate the shrimp for a more delicious dish. Use a Hot Oven: Make sure your oven is fully preheated before putting the sheet pan in. A hot oven helps to achieve that perfect roast and caramelization on the vegetables. Add a Kick with Spice: For an extra layer of flavor, consider adding a pinch of red pepper flakes or a drizzle of hot sauce to the shrimp mixture before roasting. {{image_2}} You can swap the bell pepper and tomatoes with other veggies. Try zucchini, asparagus, or broccoli for a new taste. Seasonal options like squash or green beans work well too. Use what you have on hand. Fresh, colorful veggies make your dish pop! Want to spice things up? Add red pepper flakes for heat. If you like a smoky taste, try adding chipotle powder. You can also switch herbs. Fresh thyme or dill can bring a new twist. Experiment with flavors that you love! This recipe is easy to adapt for different diets. For a gluten-free meal, ensure your spices are gluten-free. Low-carb? Skip the tomatoes and use leafy greens like spinach. Feel free to adjust ingredients to fit your needs. This dish remains delicious no matter how you change it! - Place the shrimp in an airtight container. - Add any leftover vegetables to the container. - Store in the fridge for up to three days. - Make sure to cool the dish before sealing. - You can use a microwave or oven to reheat. - For the microwave, place the shrimp in a bowl. - Heat in 30-second bursts until warm. - For the oven, preheat to 350°F (175°C). - Place the shrimp on a baking sheet. - Heat for about 5-7 minutes. - This method keeps shrimp tender and juicy. - To freeze, place leftovers in a freezer-safe bag. - Remove as much air as possible before sealing. - Label the bag with the date before freezing. - To thaw, place the bag in the fridge overnight. - You can also thaw in cold water for quicker results. Cooking shrimp takes about 10 to 12 minutes. You want them to turn pink. When they curl up, they are done. This quick cooking time keeps shrimp juicy and tender. Yes, you can use frozen shrimp. Just thaw them first. Place them in cold water for about 15 minutes. Pat them dry before marinating. This helps the flavors stick better. You can serve lemon garlic shrimp with rice or pasta. A fresh salad pairs well too. Some crusty bread is great for soaking up the juices. You can even add more veggies for a colorful plate. You can prepare the shrimp and marinade ahead. Store them in the fridge for a few hours. Just cook them when you are ready. This makes your meal quick and easy. Cooked shrimp should be pink and opaque. They should also feel firm to the touch. If they are still gray or translucent, they need more time. Yes, feel free to swap vegetables. Zucchini, asparagus, or broccoli work well. Just make sure they cook in the same time frame as the shrimp. You can add red pepper flakes for heat. A dash of cayenne pepper is great too. Just a little will enhance the flavor without overpowering it. Yes, this dish is healthy! Shrimp is low in calories and high in protein. The vegetables add vitamins and fiber. Plus, olive oil is a good fat that supports heart health. This dish features shrimp, vegetables, and bold flavors. We explored main ingredients like shrimp, garlic, and olive oil. I shared tips to ensure perfect cooking. You learned how to easily roast this meal step by step. I also offered variations and storage ideas. In the end, making lemon garlic shrimp is simple and fun. Enjoy experimenting with your favorite flavors and veggies!

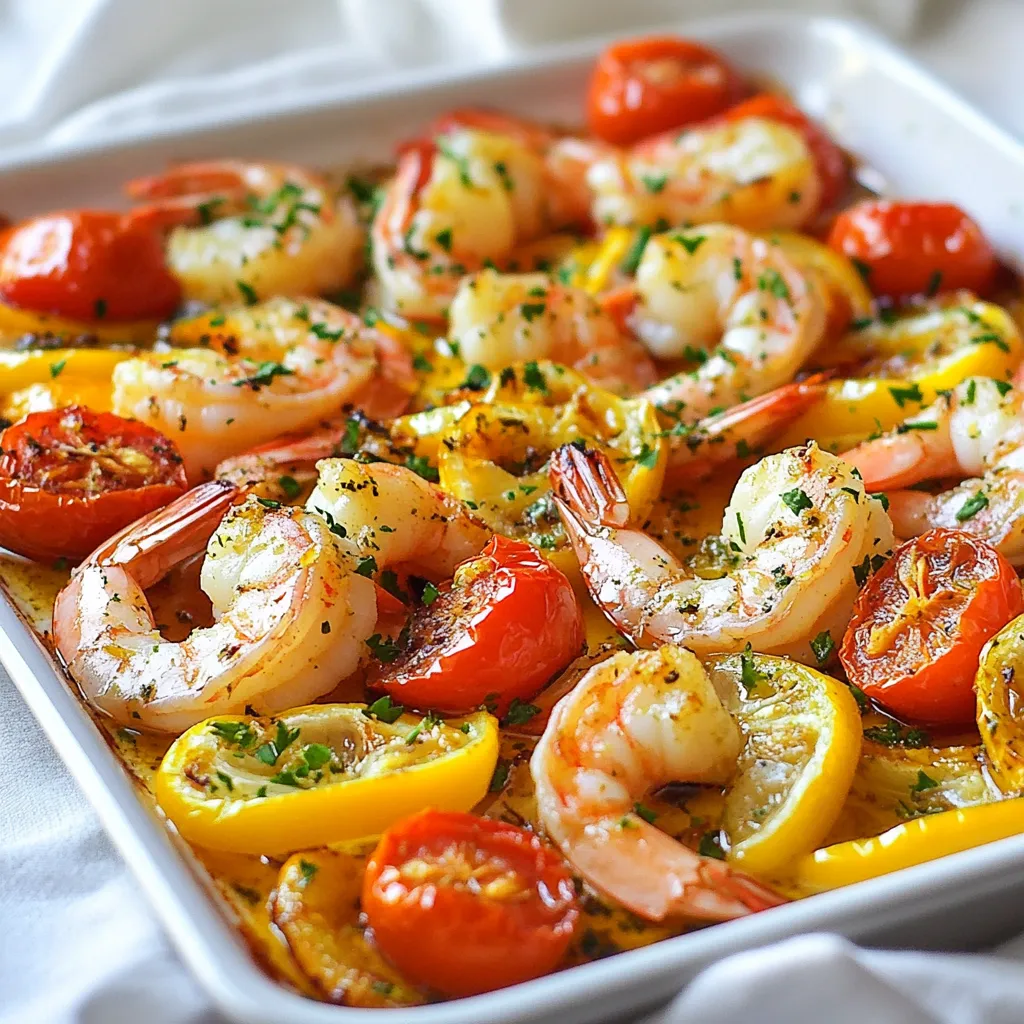
Sheet Pan Lemon Garlic Shrimp Quick and Tasty Meal

Looking for a quick and tasty meal? You’ve found it! This Sheet Pan Lemon Garlic Shrimp dish is easy to

- 1 can (15 oz) chickpeas, drained and rinsed - 4 cups mixed greens (e.g., spinach, arugula, and lettuce) - 1 cup cherry tomatoes, halved - 1 cucumber, diced - ½ red onion, thinly sliced - ½ avocado, diced - 2 tablespoons olive oil - 1 teaspoon smoked paprika - 1 teaspoon garlic powder - Salt and pepper to taste - Juice of 1 lemon - 2 tablespoons tahini - 1 tablespoon water (to thin the dressing) - Fresh parsley, chopped (for garnish) When I make this crispy chickpea salad, I focus on fresh ingredients. The chickpeas form the base of the dish. They offer protein and fiber. I use a can of chickpeas. Just drain and rinse them. This step is key to getting rid of excess salt. Mixed greens bring crunch and color. I love using a blend of spinach, arugula, and lettuce. Each green adds its own flavor. Cherry tomatoes provide sweetness. I slice them in half for easy bites. The cucumber adds freshness. Diced, it pairs well with other veggies. I slice the red onion thinly for a mild kick. Finally, I add avocado for creaminess. It balances the salad's texture perfectly. For the dressing, I mix olive oil, lemon juice, and tahini. I love the creamy texture tahini gives. Smoked paprika and garlic powder add depth. Adjust salt and pepper to taste. Garnish with chopped parsley for added color. This salad is not just healthy; it’s filling and delicious. You can explore the [Full Recipe](#) for detailed steps and tips! - Preheat the oven to 400°F (200°C). - In a mixing bowl, combine 1 can of drained chickpeas with 2 tablespoons of olive oil, 1 teaspoon of smoked paprika, 1 teaspoon of garlic powder, salt, and pepper. Toss until the chickpeas are well-coated. - Spread the chickpeas evenly on a baking sheet lined with parchment paper. Bake for 20-25 minutes. Shake the pan halfway through baking. This helps them crisp well. - While the chickpeas bake, prepare the salad base. In a large bowl, mix 4 cups of mixed greens, 1 cup of halved cherry tomatoes, 1 diced cucumber, ½ a thinly sliced red onion, and ½ a diced avocado. - In a small bowl, whisk together the juice of 1 lemon, 2 tablespoons of tahini, and 1 tablespoon of water until smooth. This is your tasty tahini dressing. - Once the chickpeas are crispy, remove them from the oven. Let them cool slightly. - Pour the tahini dressing over the salad and toss gently to combine. Top with the crispy chickpeas. - Garnish the salad with freshly chopped parsley before serving. Enjoy your crispy chickpea salad! You can find the full recipe for more details. - Use a clean, dry baking sheet for optimal crispiness. - Shake the pan halfway through baking for even crisping. To make the best crispy chickpeas, it’s vital to dry them well. If they are wet, they won’t crisp up nicely. After rinsing, pat them dry with a towel. A dry baking sheet helps them get that golden crunch. When you shake the pan during baking, you let the heat move around. This helps all sides of the chickpeas cook evenly. - Experiment with different spices (like cumin or chili powder). - Add nuts or seeds for added crunch. Adding spices can change the taste of your salad. Try cumin for warmth, or chili powder for heat. You can even mix different spices for a unique flavor. Nuts and seeds are also great! They give an extra crunch and boost the nutrition of your salad. Think about adding sunflower seeds or chopped almonds for a delightful twist. - Serve with crusty bread or pita on the side. - Pair with a light white wine for a refreshing meal. For a complete meal, serve this salad with crusty bread or warm pita. The bread adds texture and makes it feel more filling. A light white wine can enhance the flavor. It refreshes your palate and makes the meal even more enjoyable. If you want a cozy dinner, this pairing will surely delight! Be sure to check out the Full Recipe for all the steps to create this dish at home! {{image_2}} - Substitute kale or romaine for the mixed greens. - Use olive oil alternatives, such as avocado or sesame oil. You can change up the greens to suit your taste. Kale adds a nice crunch, while romaine gives a fresh bite. Both options work well in this salad. If you want a different flavor, try avocado or sesame oil instead of olive oil. These oils can add a unique twist to the dish. - Add grilled chicken or tofu for extra protein. - Incorporate feta or goat cheese for creaminess. To make your salad even heartier, consider adding grilled chicken or tofu. Both are great ways to boost protein. If you want a creamy touch, feta or goat cheese can work wonders. These ingredients not only add richness but also enhance the overall flavor. - Opt for a yogurt-based dressing for a tangy twist. - Try balsamic vinaigrette instead of tahini dressing. If you're looking for a different dressing, a yogurt-based option adds a tangy flavor. This can lighten the salad and offer a refreshing taste. Alternatively, balsamic vinaigrette is a popular choice, bringing a sweet and tart balance. Both options can elevate your crispy chickpea salad to new heights. For the full recipe, be sure to check the details above! Store leftover salad in an airtight container for up to 2 days. Keeping it sealed helps maintain freshness. Always keep the crispy chickpeas separate. This keeps them crunchy and avoids sogginess. Reheat the chickpeas in the oven for 5-10 minutes. This restores their crispiness. Avoid using the microwave. It can make the chickpeas soft and chewy. You can freeze prepared chickpeas for up to 3 months. Place them in a freezer-safe bag or container. When you're ready to use them, thaw in the fridge overnight. Re-crisp them in the oven before adding to your salad. Enjoy a delicious meal even days later! For the Full Recipe, check out the complete process. To make your chickpeas crispier, ensure they are completely dried before seasoning. After rinsing the canned chickpeas, pat them down with a clean towel. This step removes excess moisture, which helps them crisp better in the oven. Yes, canned chickpeas are perfect for convenience. They save time and still taste great! Just be sure to drain and rinse them well before using. This will enhance their flavor and texture in the salad. Absolutely! It's great for make-ahead meals. You can store the components separately to keep things fresh. Store the crispy chickpeas in a separate container for the best crunch when you’re ready to eat. Yes, tahini is vegan, and you can substitute other plant-based ingredients as needed. For example, use lemon juice or a splash of vinegar to add zing. These options keep the flavor bright and fresh without dairy. This salad is high in fiber and protein, making it filling and great for weight management. The chickpeas provide plant-based protein, while the veggies add vitamins and minerals. It's a wholesome choice for a healthy meal. For the complete recipe, check the Full Recipe section! This salad combines healthy ingredients, easy steps, and tasty flavors. You learned how to make crispy chickpeas, mix the dressing, and assemble a vibrant salad. Remember, you can swap ingredients and add proteins for variety. Enjoy making this meal for yourself and your family. It's not just good for you; it's fun to prepare! Embrace the healthy choices and get creative. You’ll find new favorites in no time.

Crispy Chickpea Salad Healthy and Filling Delight

Looking for a tasty salad that’s both healthy and filling? Your search ends here! This Crispy Chickpea Salad combines crunchy

To make these tasty granola bars, gather the following items: - 2 cups rolled oats - 1 cup mixed nuts (almonds, cashews, walnuts, roughly chopped) - 1/2 cup honey or maple syrup - 1/4 cup peanut butter or almond butter - 1/2 cup dried fruits (cranberries, apricots, or raisins) - 1/4 cup mini dark chocolate chips (optional for a touch of sweetness) - 1/2 teaspoon vanilla extract - 1/4 teaspoon sea salt - 1/4 teaspoon cinnamon You will need a few tools to make this recipe: - An 8x8 inch baking dish - Parchment paper - Mixing bowls - A spatula - A microwave-safe bowl You can easily swap some ingredients. Here are a few ideas: - Use agave syrup instead of honey or maple syrup. - Sunflower seed butter is a great option in place of peanut butter. - For nut-free bars, skip the nuts and add seeds like pumpkin or sunflower seeds. - You can replace dried fruits with chocolate chips or seeds for different flavors. Feel free to mix and match based on what you like! These swaps keep your homemade granola bars fun and tasty. Check the Full Recipe for more details. Start by preheating your oven to 350°F (175°C). Grab an 8x8 inch baking dish. Line the dish with parchment paper. Leave some paper hanging over the sides. This helps you lift the bars out later. In a large bowl, add 2 cups of rolled oats. Toss in 1 cup of mixed nuts. I like almonds, cashews, and walnuts. Add 1/4 teaspoon of sea salt and 1/4 teaspoon of cinnamon. Mix these dry ingredients well. This blend gives your bars flavor and crunch. Next, take a microwave-safe bowl. Add 1/2 cup of honey or maple syrup and 1/4 cup of peanut butter or almond butter. Heat these together for about 30 seconds. Stir until the mixture is smooth. Then, add 1/2 teaspoon of vanilla extract. This adds a lovely scent and flavor. Pour the wet mixture over the dry ingredients. Mix everything until the dry ingredients are well-coated. Fold in 1/2 cup of dried fruits and 1/4 cup of mini dark chocolate chips, if you want some sweetness. Transfer this mixture to the lined baking dish. Press it down firmly using the back of a spatula or your damp hands. Bake for 20 to 25 minutes until the edges turn golden. Let the bars cool completely in the dish. Once cool, lift them out using the parchment paper. Cut them into bars or squares. You can find the Full Recipe to guide you through this process. Store the bars in an airtight container at room temperature for about a week. To get the best texture in your granola bars, stick to the right mix. Use rolled oats for chewiness. Chopped nuts add crunch. The honey or maple syrup acts as glue, holding everything together. Want chewier bars? Add more nut butter or honey. This keeps them soft. For crunchier bars, bake them a bit longer. You can also use less nut butter. The choice is yours! Pressing the mixture is key. Use damp hands or a spatula to pack it down. Make sure it is even across the dish. A tight press helps the bars stay together. If they’re loose, they may crumble when cut. {{image_2}} If you or someone you know has nut allergies, don't worry! You can still make tasty granola bars. Replace the mixed nuts with seeds like pumpkin or sunflower seeds. These seeds add crunch and good nutrients. You could also use puffed rice or oats for extra texture. This nut-free version keeps the bars safe and delicious. Want to mix things up? You can add fun flavors! For a chocolate twist, stir in mini chocolate chips. They melt and add a sweet touch. If you love coconut, add shredded coconut. This gives your bars a tropical flavor. You can even blend the two! Try half chocolate and half coconut for a fun treat. Need more protein in your snack? Add protein powder to the mix. A scoop of vanilla or chocolate protein powder works well. You can also use additional nut or seed butters. This gives the bars a creamy texture and boosts protein. Another option is to include hemp seeds or chia seeds. They are small but pack a protein punch! For a complete guide, check out the Full Recipe. After you bake your granola bars, let them cool completely. Once cool, cut them into bars or squares. Place them in an airtight container. This keeps them fresh for up to one week. You can store them at room temperature. If your kitchen is warm, the fridge is a good option. Freezing is a great way to keep granola bars longer. Wrap each bar in plastic wrap. Then, place them in a freezer-safe bag. This helps keep out air and moisture. You can freeze them for up to three months. When you want a bar, take one out and let it thaw. You can enjoy it cold or heat it for a few seconds in the microwave. Check your granola bars for signs of spoilage. If they smell off or look moldy, it's best to toss them. If they feel very hard or crumbly, they may not taste good anymore. Always trust your nose and eyes. Fresh bars should be chewy and smell yummy. Homemade granola bars last about one week at room temperature. If you store them in the fridge, they can stay fresh for two weeks. Use an airtight container to keep them safe from air. This helps maintain their taste and texture. Yes, you can use maple syrup or agave syrup. Both options add sweetness and work well in the recipe. If you are vegan, these sweeteners are great choices. Just remember that the flavor might change a bit based on what you choose. Making your own granola bars has many benefits. You control the ingredients, which means no hidden sugars or additives. Homemade bars are often healthier than store-bought ones. They can also fit your taste and dietary needs. Plus, they are easy to make and fun to customize. To customize for dietary needs, swap out nuts for seeds if you have a nut allergy. Use gluten-free oats for a gluten-free option. You can also choose different sweeteners or add protein powder. Dried fruits can be replaced with seeds or fresh fruits. This makes the bars fit your diet perfectly. Making homemade granola bars is easy and fun. We covered the basic ingredients, equipment, and how to substitute items. I shared detailed steps for mixing and baking, plus tips for texture and flavor. You can try many variations, from nut-free options to protein-packed bars. Remember to store them well for freshness. Homemade granola bars are tasty and offer many health benefits. Enjoy creating your own unique snacks!

Homemade Granola Bars Easy Recipe for Healthy Snacks

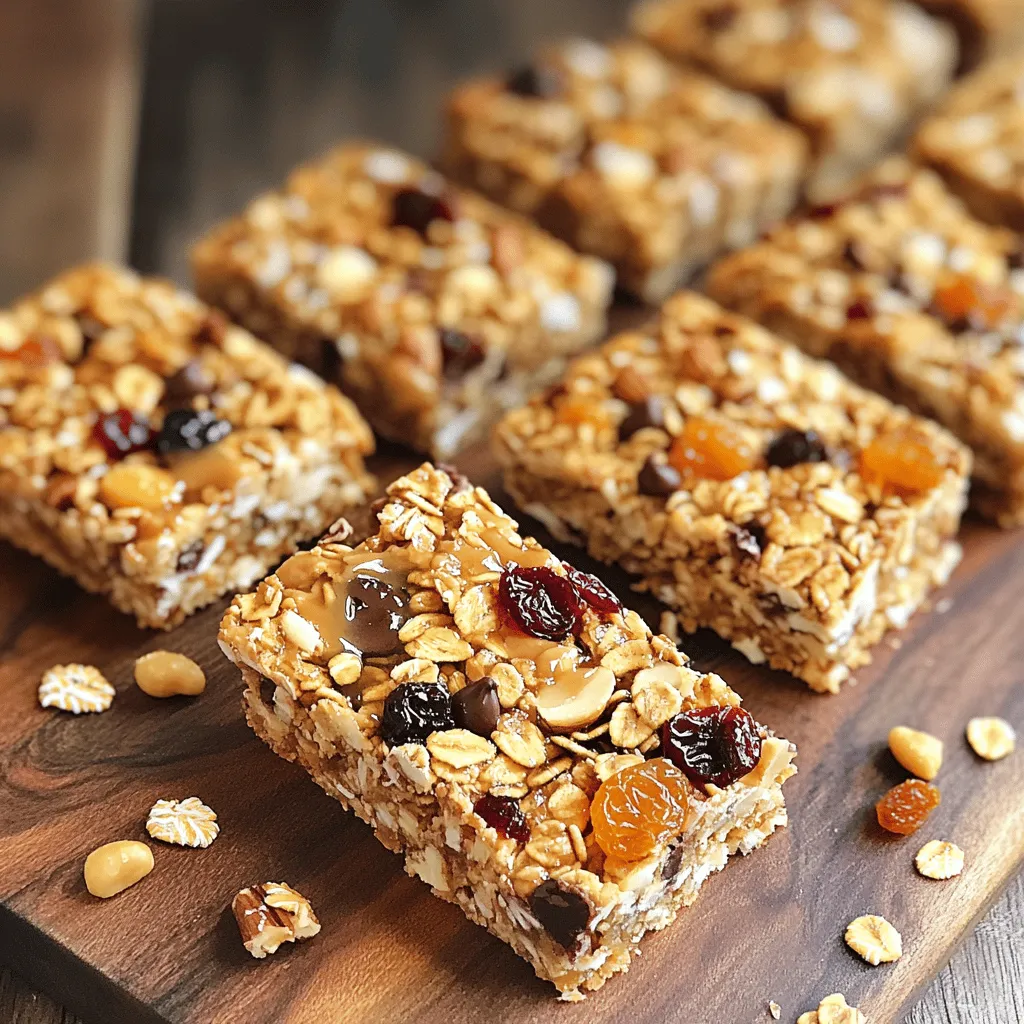
Are you ready to make your own healthy snacks? In this blog post, I’ll share an easy homemade granola bar

- 2 medium sweet potatoes, peeled and diced - 1 can (15 oz) black beans, rinsed and drained - 1 can (14 oz) diced tomatoes (with juices) - 1 medium onion, chopped - 2 cloves garlic, minced - 1 bell pepper (any color), chopped - 1 tablespoon chili powder - 1 teaspoon cumin - 1 teaspoon smoked paprika - 1/2 teaspoon cinnamon - 2 cups vegetable broth - 1 tablespoon olive oil - Salt and pepper to taste Sweet potatoes bring a natural sweetness and creamy texture. Black beans add protein and fiber, making this chili hearty. Diced tomatoes offer acidity and balance. Onions and garlic provide a base of flavor that makes every bite satisfying. Bell peppers add a crunch and sweetness that complements the other ingredients. The spices, like chili powder and cumin, create warmth and depth. - Fresh cilantro - Sour cream or Greek yogurt - Tortilla chips or crusty bread Garnishing your chili adds a pop of color and flavor. Fresh cilantro brightens each bowl. A dollop of sour cream or Greek yogurt adds creaminess and cuts through the spice. Pairing with tortilla chips or crusty bread gives you that satisfying crunch. For the full recipe, refer to the earlier section. Start by gathering your ingredients. You will need sweet potatoes, black beans, diced tomatoes, onion, garlic, and bell pepper. - Sweet Potatoes: Peel and dice two medium sweet potatoes into small cubes. - Onion and Garlic: Chop one medium onion and mince two cloves of garlic. - Bell Pepper: Chop one bell pepper. You can choose any color you like. - Spices: Measure out chili powder, cumin, smoked paprika, and cinnamon. This preparation helps your cooking flow smoothly. 1. Heat the Oil: In a large pot, heat one tablespoon of olive oil over medium heat. 2. Sauté Onion and Garlic: Add the chopped onion. Cook until it is soft and translucent, about five minutes. Then, stir in the minced garlic and chopped bell pepper. Cook for another two to three minutes until fragrant. 3. Add Sweet Potatoes and Spices: Next, add your diced sweet potatoes, chili powder, cumin, smoked paprika, and cinnamon. Stir everything well so that the sweet potatoes get coated with the spices. 4. Combine with Tomatoes and Broth: Pour in one can of diced tomatoes with their juices and two cups of vegetable broth. Stir to mix. Bring this mixture to a boil. 5. Simmer Until Tender: Once it boils, lower the heat. Cover the pot and let it simmer for about 25 minutes. Check the sweet potatoes; they should be tender. 1. Stir in Black Beans: After the sweet potatoes are done, add one can of rinsed and drained black beans. 2. Adjust Seasonings: Taste your chili. Add salt and pepper as needed to enhance the flavor. 3. Presentation Recommendations: Serve your chili in bowls. Garnish with fresh cilantro. A dollop of sour cream or Greek yogurt adds creaminess. Pair it with crusty bread or tortilla chips for some extra crunch. This recipe makes a warm, comforting meal that you and your loved ones will enjoy. For the full recipe, check out Sweet Potato & Black Bean Chili. To make your sweet potato and black bean chili even tastier, try adjusting the spices. If you like more heat, add a pinch of cayenne pepper or some diced jalapeños. For a richer taste, use smoked paprika instead of regular paprika. Fresh herbs can also boost flavor. Fresh cilantro adds zest, while fresh lime juice brightens every bite. When it comes to ingredients, using fresh veggies will give your chili a vibrant taste. However, canned black beans and diced tomatoes save time and still work well. Rinse the beans well to remove excess salt. This helps keep the chili balanced. For the best chili, choose a heavy-bottomed pot or a Dutch oven. These pots heat evenly, preventing burning. Start by sautéing your onions and garlic until soft. This step adds depth to your chili. After adding your sweet potatoes and spices, remember to stir well. Simmering is key to blending flavors. Let the chili cook slowly over low heat. This allows the sweet potatoes to soften and the spices to infuse. Don't rush this step—good chili takes time! Meal prep can make cooking easier. Chop your sweet potatoes, onions, and peppers ahead of time. Store them in the fridge for quick access. You can also cook a larger batch and freeze half for later. Using a slow cooker or Instant Pot can save time too. Just toss all ingredients in and let them cook while you do other things. This method also makes the flavors meld beautifully. For a full recipe, check out the Sweet Potato & Black Bean Chili. {{image_2}} You can easily make this Sweet Potato and Black Bean Chili vegan. The recipe is already plant-based. Just skip any dairy toppings. Instead, try avocado or lime juice for added flavor. For gluten-free options, this chili is perfect as is. All the ingredients are naturally gluten-free. Just ensure your vegetable broth is also gluten-free. Feel free to swap out black beans for other beans like kidney or pinto beans. Each bean adds its own flavor and texture. You can also add more vegetables. Corn, zucchini, or carrots work well. Changing spices can boost your chili’s taste. Add cayenne for heat or oregano for earthiness. Experiment with fresh herbs like basil or thyme for a twist. This chili pairs well with crusty bread or tortilla chips. These options add great crunch and flavor. You can also serve it over rice or quinoa for a hearty meal. If you have leftovers, think outside the bowl. Use the chili as a filling for tacos or burritos. You can even mix it into scrambled eggs or on top of baked potatoes. For the full recipe, check out the earlier section. It will guide you through making this delicious chili step-by-step. Store your chili in an airtight container. This keeps it fresh and tasty. You can keep it in the fridge for up to five days. If you want it to last longer, consider freezing it. To freeze your chili, let it cool completely first. Then, use freezer-safe containers or bags. Remove as much air as possible before sealing. This helps prevent freezer burn. When you're ready to eat, thaw it overnight in the fridge. You can reheat chili on the stovetop or in the microwave. For the stovetop, pour it into a pot and heat over medium. Stir often to keep it from sticking. For the microwave, use a microwave-safe bowl. Heat in one-minute bursts, stirring in between. This keeps the texture nice and smooth. Enjoy your Sweet Potato and Black Bean Chili warm and flavorful! You can serve this chili with many sides. Here are some great options: - Crusty bread or rolls - Tortilla chips - Rice or quinoa - A fresh green salad - Cornbread These sides add texture and balance the flavors of the chili. Yes, you can make this chili ahead of time. It's a great meal prep option. The flavors deepen as it sits. Store it in the fridge for up to four days. You can also freeze it for up to three months. Just thaw and reheat before serving. Meal prepping makes busy nights easier. To add heat, try these options: - Add diced jalapeños to the pot. - Stir in cayenne pepper. - Use hot chili powder instead of regular. - Top with spicy salsa or hot sauce. These adjustments will give your chili a nice kick. Yes, you can use fresh black beans. However, cooking dried beans takes longer. Soak them overnight and boil until tender. Canned beans are quicker and easier. They are already cooked, just rinse and add them to the chili. This chili can be kid-friendly. To adjust the flavors: - Reduce the spice level by using less chili powder. - Serve it with toppings like cheese or sour cream. - Pair it with mild sides like bread or rice. These tips help make it more appealing to children. Sweet potato and black bean chili is nourishing and easy to make. We covered main ingredients, prep, and cooking steps, plus tips to enhance flavor. You can adapt the recipe for your diet and store leftovers well. Enjoy this chili alone or with toppings like sour cream or fresh cilantro. With simple swaps and additions, this dish can fit any palate. Dive in and make this chili today; it's a warm hug in a bowl.

Sweet Potato and Black Bean Chili Flavorful Comfort Food

Craving a hearty meal that warms your soul? Sweet Potato and Black Bean Chili is the perfect comfort food. It’s

- 1 pound ground turkey - 1/2 cup bread crumbs - 1/4 cup grated Parmesan cheese - 1/4 cup fresh parsley, chopped - 1 egg, beaten - 2 cloves garlic, minced - 1 teaspoon onion powder - 1 teaspoon Italian seasoning - 2 cups marinara sauce (store-bought or homemade) - 1 tablespoon olive oil When making turkey meatballs, I start with fresh, quality ground turkey. It gives the meatballs a nice flavor and keeps them moist. I mix in bread crumbs for texture. This helps the meatballs hold their shape. Next, I add grated Parmesan cheese. It adds a salty, nutty taste. Fresh parsley brings a bright note. I always use a beaten egg to bind everything together. For seasoning, I use minced garlic for a rich aroma. Onion powder gives depth, while Italian seasoning brings classic flavor notes. Salt and pepper enhance all the tastes. Don’t forget the marinara sauce! You can use store-bought or homemade. Olive oil adds a nice finish. When I drizzle it over the meatballs before baking, it helps them brown beautifully. For the full recipe, check out the complete guide. Enjoy your cooking! 1. Preheat the oven to 400°F (200°C). This step ensures the meatballs cook evenly. 2. In a large bowl, combine: - 1 pound ground turkey - 1/2 cup bread crumbs - 1/4 cup grated Parmesan cheese - 1/4 cup fresh parsley, chopped - 1 egg, beaten - 2 cloves garlic, minced - 1 teaspoon onion powder - 1 teaspoon Italian seasoning - Salt and pepper to taste Mix until just combined. Don’t overwork the meat; this keeps them tender. 3. Form the mixture into 1-inch meatballs using your hands. Place them on a baking sheet. 1. Arrange the meatballs on the baking sheet, giving them space. 2. Drizzle with 1 tablespoon of olive oil. This helps them get golden brown. 3. Bake the meatballs for about 20 minutes. They should be cooked through and lightly browned. 1. While the meatballs bake, heat 2 cups of marinara sauce in a saucepan over medium heat. Stir occasionally. 2. Once the meatballs are ready, add them to the sauce. Gently stir to coat them well. Let them simmer for 5 minutes. This method creates a rich flavor in the meatballs and sauce. You can find the Full Recipe to guide you through each step. - Avoid overmixing: Mix just until combined. Overmixing makes meatballs tough. - Best baking temperature and time: Bake at 400°F (200°C) for about 20 minutes. This gives a nice brown color. - Meatball size recommendations: Aim for 1-inch meatballs. This size cooks evenly and is easy to eat. - Homemade vs. store-bought sauce: Homemade sauce is great, but store-bought saves time. Both can be tasty. - Enhancing jarred marinara: Add garlic, herbs, or red pepper flakes to boost flavor. A splash of wine can also add depth. For the full details on making these meatballs shine, check the Full Recipe. {{image_2}} You can give your turkey meatballs a unique twist by adding different spices or herbs. For a warm kick, try adding red pepper flakes. If you want a fresh taste, use chopped basil or thyme. These small changes can make a big difference in flavor. Cheese-stuffed meatballs are another fun idea. To make these, take a small piece of mozzarella cheese and wrap the meat around it. When you bake them, the cheese melts and adds a creamy center. This makes each bite a tasty surprise! When it comes to serving turkey meatballs, you have plenty of choices. For pasta, you can use spaghetti, penne, or even zoodles for a low-carb option. Each type of pasta can change the meal's feel and texture. If you're in the mood for something different, try serving the meatballs on sub rolls. Top them with marinara sauce and melted cheese for a hearty sandwich. This makes a great lunch or dinner option. You can find the full recipe to help you create these delicious meals. To keep your turkey meatballs fresh, store them in the fridge. Place them in an airtight container. This way, they stay moist and tasty. You can store them for up to three days. If you want to keep them longer, consider freezing. Just make sure they cool down first. This helps prevent ice crystals. When it’s time to enjoy your leftovers, reheating is easy. The best way is to use the oven. Preheat it to 350°F (175°C). Place the meatballs on a baking sheet and cover them with foil. Heat for about 15 minutes. If you prefer the microwave, use a microwave-safe dish. Heat in short bursts, checking often to avoid overcooking. For longer storage, freeze your meatballs. Place them in a freezer-safe bag or container. They can last up to three months. When you're ready to eat, thaw them overnight in the fridge. Then follow the reheating steps above. Enjoy your Easy Turkey Meatballs with Marinara from the Full Recipe! To keep your turkey meatballs moist, use these tips: - Add ingredients: Use bread crumbs, cheese, and egg to bind and add moisture. - Don’t overmix: Mix gently. Overworking the meat makes it tough. - Use fat: Add olive oil to the mixture for richness. - Bake properly: Bake at 400°F (200°C) for 20 minutes to keep them juicy. - Simmer in sauce: After baking, let the meatballs sit in marinara. This adds moisture and flavor. Yes, you can use chicken! Here’s what to know: - Flavor: Chicken has a milder taste. You might want to add more spices. - Texture: Ground chicken may be softer than turkey. Adjust your cooking time. - Cooking: Follow the same steps in the recipe. Just swap the turkey for chicken. Serving turkey meatballs can be fun and creative. Here are some ideas: - Pasta: Serve over spaghetti or your favorite pasta with marinara. - Sub rolls: Place meatballs in a sub roll, top with melted cheese for a meatball sub. - Salad: Add meatballs to a salad for a protein boost. - Skewers: Make meatball skewers for a fun appetizer at parties. For the full recipe, check out the Zesty Turkey Meatballs with Marinara. Enjoy cooking! Making turkey meatballs is simple and fun. You can create moist, tasty meatballs with just a few ingredients. We covered everything from the main ingredients to tips for perfect cooking. Don’t forget to try some variations to keep it exciting. You can easily store leftovers for later. Enjoy delicious meals by following these steps and tricks. Now you have all you need to impress with your cooking skills!

Easy Turkey Meatballs with Marinara Flavor Boost

If you’re looking for a simple and tasty meal, you’ve come to the right place! These easy turkey meatballs with

- 2 medium zucchinis, grated - 1 cup shredded mozzarella cheese - 1/2 cup grated Parmesan cheese - 1/2 cup all-purpose flour - 2 large eggs - 1/4 cup green onions, finely chopped - 2 cloves garlic, minced - 1 teaspoon dried oregano - 1/2 teaspoon salt - 1/4 teaspoon black pepper - Olive oil for frying - Fresh herbs (parsley, cilantro) - Red pepper flakes for heat These ingredients create a tasty base for savory cheesy zucchini fritters. Start with fresh zucchinis; they need to be grated well. This step helps to bring out their flavor. Next, the mozzarella and Parmesan add a rich, cheesy taste. The flour binds everything together, while the eggs help with structure. Green onions and garlic give each bite a burst of flavor. Oregano adds a nice touch of herbiness. Salt and pepper balance the flavors perfectly. For frying, olive oil gives a great crispiness and flavor to the fritters. If you want to enhance the taste, consider adding fresh herbs or red pepper flakes. Fresh herbs like parsley or cilantro brighten the dish. Red pepper flakes add a nice kick for those who enjoy some heat. For the full recipe, follow the steps to make these delightful fritters. To start, you need to prepare the zucchini. Grate the zucchinis using a box grater or a food processor. After grating, put the zucchini in a clean kitchen towel. Squeeze out as much moisture as possible. Removing this moisture is very important. If you don’t, your fritters will be soggy. You want them crispy and light. Next, let’s mix the ingredients. In a large bowl, combine the grated zucchini, shredded mozzarella, grated Parmesan, all-purpose flour, eggs, chopped green onions, minced garlic, oregano, salt, and black pepper. Use a spatula or spoon to mix well. Make sure everything is evenly mixed. The mixture should be thick but not dry. If it feels too loose, add a little more flour. Now, it’s time to cook the fritters. Heat a large skillet over medium heat. Add a few tablespoons of olive oil to the skillet. You need enough oil to coat the bottom but not drown the fritters. Once the oil is hot, use a tablespoon or small scoop to drop the zucchini mixture into the skillet. Flatten each dollop slightly with the back of the spoon. Cook for about 3-4 minutes on each side. Look for a golden brown color for perfect crispiness. When done, place the fritters on a plate lined with paper towels. This will soak up any extra oil. Repeat until you cook all the mixture. Add more olive oil as needed. For the full recipe, check out the Savory Cheesy Zucchini Fritters section. Squeezing out moisture is key to great fritters. Zucchinis hold a lot of water. If you skip this step, your fritters turn mushy. Here’s how to do it right: - Grate the zucchinis and place them in a clean kitchen towel or cheesecloth. - Squeeze it tightly to remove as much liquid as you can. Watch out for these pitfalls: - Don’t rush the squeezing; it makes a big difference. - Avoid adding too many other wet ingredients. Stick to the recipe to keep it balanced. Getting the right texture is all about balance. You need to mix the cheese and flour just right. Here are my tips: - Use equal parts cheese and flour for a good base. - Too much cheese can make them too soft, while too little will be dry. For crispy edges, try these cooking tips: - Heat your skillet well before adding oil. - Cook each fritter for about 3-4 minutes on each side. This gives a nice golden crust. These fritters shine with the right dips and sides. Here are my favorites: - Serve with sour cream or Greek yogurt for a creamy touch. - A sprinkle of fresh herbs adds color and taste. For a complete meal, pair the fritters with: - A light salad with citrus dressing. - Roasted veggies for added flavor and nutrition. For the full recipe, check out the complete guide. {{image_2}} You can add more veggies to boost nutrition. Carrots and bell peppers work well. Grate a carrot and mix it in with the zucchini. This adds color and sweetness. You can also chop bell peppers finely and include them. They bring a nice crunch and flavor. Herbs are another great way to change the taste. Consider adding fresh parsley or cilantro. These herbs can brighten up the dish. You might also try basil or thyme for a different twist. Just chop them finely and mix them into the batter. If you need a gluten-free option, switch the all-purpose flour. Almond flour or chickpea flour can be great substitutes. These alternatives add flavor and nutrition. They also keep the fritters light and crispy. Cheese choices can vary too. Try using a dairy-free cheese if you prefer. Look for options that melt well. Nutritional yeast can give a cheesy taste without dairy. It’s a smart choice for flavor and health. To make these fritters vegan, you need substitutes for eggs and cheese. For eggs, use flaxseed meal mixed with water. This mix binds the ingredients well. You can also use unsweetened applesauce as a binder. For cheese, opt for plant-based cheese. This keeps the cheesy flavor without animal products. You can also add nutritional yeast for extra flavor. This helps maintain the rich taste of the fritters. Check out the Full Recipe for more ideas on how to customize your fritters. To keep your fritters fresh, choose the right containers. Use airtight containers. This helps prevent moisture loss. For the best results, let the fritters cool completely before storing. Place parchment paper between layers to avoid sticking. For refrigeration, store them in the fridge. They will stay good for up to three days. If you want to keep them longer, freezing is the way to go. Use freezer-safe bags or containers. Make sure to squeeze out as much air as possible. When it's time to eat your fritters again, reheating is key. The best way to keep them crispy is by using a skillet. Heat a small amount of oil over medium heat. Add the fritters and cook for a few minutes on each side. This method keeps the edges nice and crunchy. You can also use a microwave, but it may not keep them crispy. If you choose this method, place a paper towel under the fritters. This helps absorb moisture. Heat them in short bursts of 30 seconds. Check often to avoid overcooking. For the full recipe of these delicious Savory Cheesy Zucchini Fritters, make sure to check out the complete guide! To prepare these fritters in advance, start by grating your zucchinis. After grating, squeeze out the moisture using a clean towel. This step helps keep the fritters crispy. Next, mix all the ingredients in a bowl as per the Full Recipe. You can store this mix in the fridge for up to a day. When you're ready to cook, just heat the skillet and fry the fritters. This way, you save time while keeping the taste fresh and delicious. Yes, you can bake these fritters for a healthier option! Preheat your oven to 400°F (200°C). Line a baking sheet with parchment paper. Shape the fritters and place them on the sheet. Brush the tops lightly with olive oil for a nice crisp. Bake for about 20-25 minutes, flipping halfway. This method gives you a lighter fritter while still keeping some crunch. You can boost the flavor of your fritters with many spices! Consider adding: - Fresh herbs like parsley or dill for a bright taste. - Red pepper flakes for a spicy kick. - Paprika for a smoky flavor. - Lemon zest for a fresh zing. These additions can really enhance your fritters and make them unique. Leftover fritters can last up to three days in the fridge. Store them in an airtight container to maintain freshness. If you want to keep them longer, you can freeze them. Just make sure to place parchment paper between layers. They can last up to three months in the freezer. When you're ready to enjoy them, reheat in a skillet to keep them crispy. This article shared a simple recipe for savory cheesy zucchini fritters. You learned about key ingredients and preparation steps. We covered tips to avoid sogginess and variations for diets like gluten-free and vegan. Creating these fritters can be fun and tasty. With the right techniques, you achieve a crispy texture and rich flavor. Explore different ingredients to make it your own. Enjoy these fritters as a snack or side dish!

Savory Cheesy Zucchini Fritters Crispy and Delicious

If you’re tired of boring snacks, it’s time to spice things up! My Savory Cheesy Zucchini Fritters are crispy, tasty,

To create the perfect creamy spinach and artichoke dip, you need a few simple ingredients. Each one adds unique flavor and texture. Here’s what you will need: - 1 cup fresh spinach, chopped - 1 cup canned artichoke hearts, drained and chopped - 1/2 cup cream cheese, softened - 1/2 cup sour cream - 1/2 cup mayonnaise - 1 cup shredded mozzarella cheese, divided - 1/4 cup grated Parmesan cheese - 2 cloves garlic, minced - 1/4 teaspoon red pepper flakes (optional for heat) - Salt and pepper to taste - Fresh parsley, chopped for garnish These ingredients blend together to create a rich and creamy dip. The artichokes give a nice bite, while the spinach adds freshness. The cheeses melt into a gooey goodness that makes this dip a hit. You can find the full recipe for this delightful dish in the Full Recipe section. 1. Preheat oven and mix base ingredients: Start by preheating your oven to 375°F (190°C). In a mixing bowl, combine 1/2 cup cream cheese, 1/2 cup sour cream, and 1/2 cup mayonnaise. You want this mixture to be creamy and smooth. 2. Incorporate remaining ingredients: Next, stir in 1 cup of chopped spinach, 1 cup of drained and chopped artichoke hearts, and 2 minced garlic cloves. Add half of the 1 cup of shredded mozzarella cheese, 1/4 cup grated Parmesan cheese, and season with salt, pepper, and optional red pepper flakes. Mix until everything is well blended. 3. Transfer and bake the mixture: Pour the mixture into a baking dish. Spread it evenly and top with the remaining mozzarella cheese. Bake for 20-25 minutes. Look for a golden, bubbling dip. - Oven baking method: This is the classic way to make creamy spinach and artichoke dip. It gives the dip a rich, warm texture and a nice golden crust. - Stovetop variation: If you're short on time, you can cook the dip on the stovetop. Simply mix all ingredients in a skillet over low heat. Stir until melted and creamy. - Slow cooker instructions: For a party, consider using a slow cooker. Combine all ingredients in the slow cooker. Cook on low for 2-3 hours. This method keeps the dip warm and ready to serve. Remember to check the [Full Recipe] for more details and tips! To get that perfect creamy texture, you need to pick the right cheeses. I love using cream cheese, sour cream, and mozzarella. Cream cheese gives a rich base, while mozzarella adds a lovely stretch. You can also switch things up by trying ricotta or goat cheese for a different taste. If you want to skip cream cheese, consider using Greek yogurt. It adds creaminess and a bit of tang. Adding herbs and spices can really boost the flavor of your dip. Fresh garlic adds a nice punch. You can also try adding a pinch of cayenne pepper for a kick. For a herby twist, mix in some chopped basil or oregano. You can also add optional ingredients like diced jalapeños or cooked bacon. Each choice adds a unique touch to your dip. You can make this dip ahead for easy hosting. To freeze it, prepare the dip and place it in an airtight container. When you’re ready to serve, just thaw it in the fridge overnight. Bake it as usual for a warm, creamy treat. If you want to prep early but not freeze, mix everything and keep it in the fridge. Just bake it right before your guests arrive. This way, you’ll have more time to enjoy the party. For the complete recipe, check the Full Recipe section. {{image_2}} You can make this dip fit different diets. For a gluten-free option, just use gluten-free chips or bread for dipping. The dip itself is naturally gluten-free. If you want a vegan version, swap the cream cheese, sour cream, and mayonnaise for plant-based alternatives. Use cashew cream or tofu for the creamy base. Also, choose a vegan mozzarella cheese. These changes keep the dip creamy and delicious. You can play around with the cheeses in this dip. Try using gouda or cheddar for a new flavor. Mixing different cheeses can create a rich taste. You can also add more veggies. Consider bell peppers, mushrooms, or kale. These vegetables add color and nutrition. They will also blend well with the spinach and artichokes. If you want to add some meat, cooked chicken or bacon works great. These ingredients add a savory touch to the dip. For spice lovers, mix in some diced jalapeños or extra red pepper flakes. This will give the dip a nice kick. You can adjust the heat to your liking. For the full recipe, check out the Creamy Spinach and Artichoke Dip. After you enjoy the dip, store any leftovers in the fridge. Use an airtight container. This keeps the dip fresh for up to three days. If you want to save it longer, freezing is a great option. To freeze, place the dip in a freezer-safe container. Leave some space at the top for expansion. You can freeze it for up to three months. When you’re ready to eat, thaw it in the fridge overnight before reheating. To reheat your dip without drying it out, use the oven for best results. Preheat the oven to 350°F (175°C). Place the dip in an oven-safe dish. Cover it with foil to keep it moist. Heat for about 15-20 minutes or until warm. If you’re in a hurry, you can use the microwave. Place the dip in a microwave-safe bowl. Heat it in 30-second intervals, stirring between each. This helps heat it evenly and keeps it creamy. For a delicious treat, enjoy your creamy spinach and artichoke dip warm with chips or veggies. For the full recipe, check the earlier section. You can serve this dip with many tasty dippers. Here are some great options: - Tortilla chips - Pita bread - Sliced veggies like carrots, celery, or bell peppers - Breadsticks - Crackers These dippers add crunch and fun. You can mix and match based on what you like. Yes, you can prepare this dip ahead. Here’s how: - Make the dip mix and put it in a baking dish. - Cover it and store in the fridge for up to two days. - When ready, just bake it as directed in the Full Recipe. This makes it easy for parties or gatherings. You’ll know the dip is done when it looks bubbly and golden. Look for these signs: - The cheese on top should be melted and slightly browned. - The edges may bubble, showing it’s hot inside. Let it cool a little before serving. This dip can be a bit rich, but you can make it healthier. Here are some tips: - Use low-fat cream cheese or Greek yogurt instead of sour cream. - Add more spinach for extra nutrients. - Use less cheese to cut down on calories. These small changes can help make it lighter while keeping the flavor. This blog post outlined a delicious Creamy Spinach and Artichoke Dip. We covered key ingredients, step-by-step cooking methods, and helpful tips for flavor and storage. Whether you make it creamy, spicy, or healthy, there’s a version for everyone. Don't forget to try different cheeses or serve it with your favorite dippers. Enjoy this dip at your next gathering or simply as a tasty snack. With all these options, you can create something special every time. Happy cooking!

Creamy Spinach and Artichoke Dip Flavorful Delight

Craving a tasty treat that will wow your friends? Let me introduce you to my Creamy Spinach and Artichoke Dip.

To make Nutella-Stuffed Banana Bread, gather the following ingredients: - 3 ripe bananas, mashed - 1/2 cup unsalted butter, melted - 1/2 cup brown sugar - 1/4 cup granulated sugar - 2 large eggs - 1 tsp vanilla extract - 1 tsp baking soda - 1/2 tsp salt - 1 1/2 cups all-purpose flour - 1/2 cup Nutella (or more to taste) - Optional: chopped hazelnuts for topping These ingredients create a moist and rich bread. The ripe bananas are key. They add natural sweetness and make the bread soft. The combination of brown and granulated sugar gives a nice balance of flavor. Melted butter brings richness, while eggs provide structure. Nutella is the star here. It adds a creamy, chocolatey surprise in every slice. You can adjust the amount of Nutella based on your taste. If you love chocolate, add more! Using optional chopped hazelnuts on top gives a nice crunch. It also adds a nutty flavor that pairs well with Nutella. You can find all these ingredients in your local grocery store. For the full recipe, you can check the detailed instructions to bring this delightful dish to life. 1. Preheat the oven and prepare the loaf pan: Start by setting your oven to 350°F (175°C). Grease a 9x5 inch loaf pan with butter or non-stick spray. This step helps the bread slide out easily later on. 2. Mash bananas and mix with other wet ingredients: In a bowl, mash 3 ripe bananas with a fork. Aim for a smooth texture. Next, add 1/2 cup of melted unsalted butter. Stir until they blend well. Then, mix in 1/2 cup of brown sugar and 1/4 cup of granulated sugar. Follow with 2 large eggs and 1 tsp of vanilla extract. Make sure everything is well combined. 3. Combine dry ingredients and fold into the batter: In another bowl, sprinkle 1 tsp of baking soda and 1/2 tsp of salt over 1 1/2 cups of all-purpose flour. Stir these dry ingredients together. Gradually fold this mix into your wet batter. Be gentle! Over-mixing can make the bread tough. 1. Pouring and spreading Nutella: Pour half of your banana bread batter into the loaf pan. Create a well in the middle. Now, take 1/2 cup of Nutella and spoon it into the well you made. Spread it evenly for a gooey center. 2. Topping the batter before baking: Carefully pour the rest of the batter over the Nutella. Use a spatula to smooth the top. If you like, you can sprinkle chopped hazelnuts on top for extra crunch. 1. Ideal baking times and temperature: Place the loaf pan in the preheated oven. Bake for 55-65 minutes. The bread should rise and turn a golden brown color. 2. Checking for doneness with a toothpick: To check if your banana bread is done, insert a toothpick in the center. If it comes out clean, your bread is ready. If not, give it a few more minutes and test again. For the full recipe, you can always refer back to the complete list of ingredients and instructions. Enjoy the process of creating this delightful treat! To ensure your banana bread stays moist, always use very ripe bananas. The riper the bananas, the more flavor and moisture they add. Look for bananas that are brown and soft. They will mix well into the batter. Avoid over-mixing the batter. When you add flour, mix just until it is combined. Over-mixing can make the bread tough. A few lumps are okay! Serve the banana bread warm for the best taste. Drizzle some melted Nutella on top. This adds a rich touch. A sprinkle of powdered sugar makes it look fancy. You can also add chopped hazelnuts for a nice crunch and extra flavor. Do not use unripe bananas. This makes the bread less sweet and moist. Always check the ripeness before you start. Make sure your oven temperature is correct. An oven that is too hot can burn the bread. Use an oven thermometer if needed. This helps to bake the banana bread evenly. {{image_2}} You can easily customize your Nutella-stuffed banana bread! Adding spices like cinnamon or nutmeg gives it a warm taste. Just a teaspoon of cinnamon can make a big difference. If you love nuts, try adding chopped walnuts or pecans. They add crunch and flavor, making each bite even better. If you need gluten-free banana bread, swap regular flour for gluten-free flour. It works well and keeps the bread soft. For those who prefer vegan options, use flax eggs instead of regular eggs. Mix one tablespoon of flaxseed meal with three tablespoons of water for each egg. Also, choose dairy-free butter to keep it vegan-friendly. If you want to change the chocolate flavor, try using different spreads. Peanut butter or almond butter can be delicious substitutes for Nutella. They bring a different taste but still pair well with bananas. Additionally, using dark chocolate chips can enhance the richness of the bread. They melt beautifully and create a decadent experience. For the full recipe, check out the details above! You can store leftover banana bread at room temperature. Wrap it in plastic wrap to keep it fresh. Place it in a cool, dry spot. If you want to keep it longer, put it in the fridge. This helps it last a bit more. Just remember, the bread may become a bit dry in the fridge. Freezing banana bread is easy. First, let it cool completely. Then, wrap it tightly in plastic wrap. After that, place it in a freezer bag or an airtight container. This keeps out air and moisture. When you want to eat it, take it out of the freezer. Let it thaw in the fridge overnight or at room temperature for a few hours. Banana bread lasts about 3 to 4 days at room temperature. In the fridge, it can last up to a week. If you freeze it, it can last for about 3 months. Watch for signs of spoilage. If you see mold or if it smells off, throw it away. Enjoy your Nutella-stuffed banana bread fresh and tasty! For the full recipe, check out the earlier sections. To check if your banana bread is done, use a toothpick. Insert it into the center of the loaf. If it comes out clean, your bread is ready. You can also look for some visual cues. The top should be golden brown and slightly springy to the touch. A well-baked loaf will pull away from the sides of the pan. Yes, you can prepare this banana bread in advance. Make the batter and store it in the fridge for up to 24 hours. Just don’t add the Nutella yet. When you're ready to bake, pour the batter into the pan and add Nutella as directed. You can also bake the bread ahead of time. Just cool it completely and wrap it tightly. Store it at room temperature for up to three days. Overripe bananas are perfect for many recipes! You can use them in smoothies, pancakes, or oatmeal. You could also make banana muffins or banana pancakes. If you want something different, try making banana ice cream. Just freeze the bananas and blend them until creamy. They are a great base for many sweet treats! You’ve learned how to make delicious Nutella-stuffed banana bread, from gathering ingredients to baking the perfect loaf. I shared tips for keeping it moist and avoiding common mistakes. Try different flavors and toppings to make it your own. Remember, you can store leftovers or even freeze them for later. Enjoy baking this tasty treat, and let your creativity shine in the kitchen!

Nutella-Stuffed Banana Bread Irresistible Delight

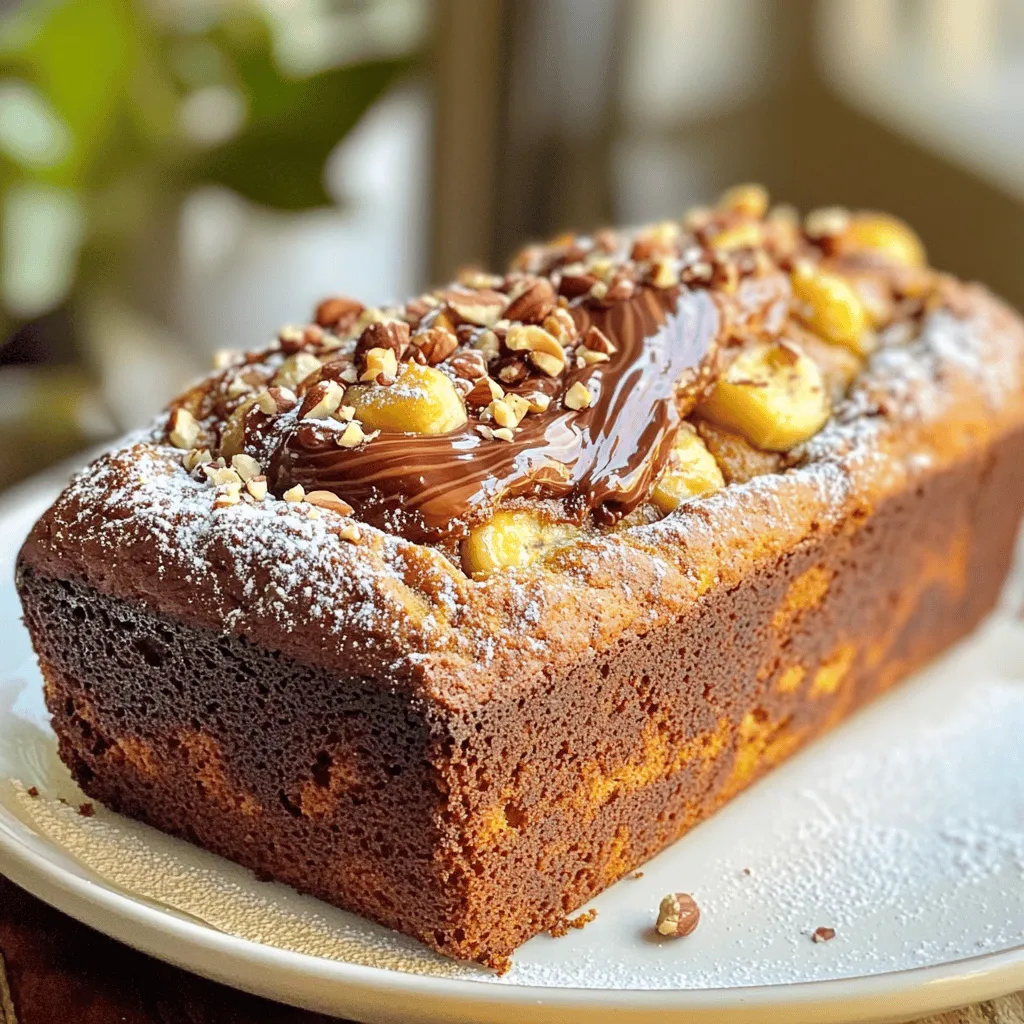
If you love banana bread, wait until you try this Nutella-stuffed version! Imagine tender, sweet bananas baked to perfection with

To make Zesty Lemon Garlic Shrimp, gather these simple ingredients: - 1 pound large shrimp, deveined and peeled - 4 cloves garlic, minced - 2 tablespoons olive oil - 1 tablespoon unsalted butter - Zest of 1 lemon - Juice of 2 lemons - 1 teaspoon red pepper flakes (adjust to taste) - Salt and pepper to taste - 2 tablespoons fresh parsley, chopped - Lemon wedges for serving You can easily swap some ingredients. Here are a few ideas: - Instead of fresh shrimp, use frozen shrimp. Just thaw them first. - If you don’t have garlic, garlic powder works too. Use about 1 teaspoon. - You can replace olive oil with any cooking oil you prefer. - For a richer taste, use ghee instead of butter. - If you like it less spicy, skip the red pepper flakes. Choosing the right shrimp is key. Here’s how to pick the best: - Look for shrimp with a firm texture. They should feel springy when pressed. - Fresh shrimp should have a mild sea smell, not a strong fishy odor. - Check the color. Fresh shrimp often have a pink hue or a slight sheen. - If possible, buy shrimp with the shells on. They stay fresher longer. - Ask your fishmonger about the shrimp’s origin. Wild-caught shrimp often taste better. For the full recipe, follow the steps to create this zesty dish! First, gather all your ingredients. You will need: - 1 pound large shrimp, deveined and peeled - 4 cloves garlic, minced - 2 tablespoons olive oil - 1 tablespoon unsalted butter - Zest of 1 lemon - Juice of 2 lemons - 1 teaspoon red pepper flakes (adjust to taste) - Salt and pepper to taste - 2 tablespoons fresh parsley, chopped - Lemon wedges for serving Next, mix the shrimp with garlic, lemon zest, lemon juice, and red pepper flakes in a large bowl. Add salt and pepper to taste. Make sure to coat the shrimp well. Let this mix sit for about 15 minutes. This step helps the shrimp soak up all the zesty flavors. Now, heat the olive oil and butter in a large skillet over medium heat. Wait until the butter melts and starts to bubble. Then, add the marinated shrimp. Spread them out in a single layer. This helps them cook evenly. Cook the shrimp for 2-3 minutes on each side. You want them to turn pink and opaque. Once they are cooked, take the skillet off the heat. Stir in the chopped parsley for a fresh flavor boost. To get the best shrimp, keep these tips in mind: - Use fresh shrimp for the best taste. - Do not overcrowd the pan. This allows even cooking. - Cook until just pink and opaque. Overcooking makes shrimp tough. - Adjust red pepper flakes to your spice level. For the full recipe, check out the complete instructions! Enjoy your cooking! When making Zesty Lemon Garlic Shrimp, avoid cooking shrimp too long. Overcooked shrimp turn tough and rubbery. Always watch the color change closely. They should be pink and opaque when done. Also, don’t skip the marinating step. This helps the shrimp soak up the lemon and garlic flavors. To add a twist, try adding herbs like thyme or basil. You can also mix in a splash of white wine while cooking. For a smoky taste, consider adding smoked paprika. Want heat? Increase the red pepper flakes. Each adjustment gives your dish a unique flair. Serve your shrimp over a bed of fluffy rice or pasta. They pair well with a fresh green salad. You can also add crusty bread to soak up the delicious sauce. For a complete meal, serve with grilled veggies or a lemony quinoa salad. Check out the Full Recipe for more ideas! {{image_2}} You can add vegetables to boost the flavor and nutrition of your dish. Bell peppers, zucchini, or asparagus work well. Just chop them into bite-sized pieces. Sauté them in the skillet before adding the shrimp. This adds color and texture. You can also use broccoli or snap peas for a fresh crunch. Want a kick? Add more red pepper flakes! Start with one teaspoon and taste. If you like heat, add more. You can also try fresh chopped chili peppers. Jalapeños or serranos add great flavor. For a smoky touch, use smoked paprika. Just remember to adjust the other spices to balance the heat. Grilling is a fun way to cook this dish. Marinate the shrimp as before. Then, thread them onto skewers. Grill for about 2-3 minutes on each side. This gives a nice char and smoky flavor. If you prefer baking, place the shrimp on a baking sheet. Bake at 400°F for 8-10 minutes. This method keeps the shrimp juicy and tender. You can try these methods for a tasty twist on the classic recipe. For the full recipe, check out the section above. After enjoying your zesty lemon garlic shrimp, let any leftovers cool. Place them in an airtight container. Store in the fridge for up to three days. Make sure to keep the shrimp and sauce together for best taste. When you're ready to eat the leftovers, reheat them gently. You can use a skillet on low heat. Add a splash of water or olive oil to keep them moist. Stir often until they are hot. Avoid using high heat, as it can overcook the shrimp. If you want to save your shrimp for later, freezing is a great option. Place cooled shrimp in a freezer-safe bag. Remove as much air as you can before sealing. They can last up to three months in the freezer. When you're ready to use them, thaw in the fridge overnight. Reheat gently as mentioned before. Enjoy your meal anytime! For the full recipe, check out the details above. Cooking shrimp is quick! It takes about 2-3 minutes per side. You want them pink and opaque. Overcooking makes them tough. Keep an eye on your shrimp as they cook. Yes, you can use frozen shrimp! Just thaw them first. Place shrimp in cold water for about 10-15 minutes. Then, pat them dry before cooking. This helps the shrimp absorb the lemon and garlic flavors better. You have many tasty options! Here are some ideas: - Rice or quinoa for a filling base - Pasta tossed in olive oil or garlic - A fresh green salad with lemon dressing - Crusty bread to soak up the juices - Steamed vegetables for a healthy side These pairings make your meal balanced and delicious. Check out the Full Recipe for more details! This blog post shows you how to make Zesty Lemon Garlic Shrimp. We covered ingredients, cooking steps, and tips for tasty shrimp. Remember to choose fresh shrimp for the best flavor. Avoid common mistakes to get it right every time. You can tweak the recipe by adding veggies or making it spicy. Store leftovers well to enjoy later. Now, you're ready to make this dish with confidence. Happy cooking!

Zesty Lemon Garlic Shrimp Flavorful and Easy Recipe

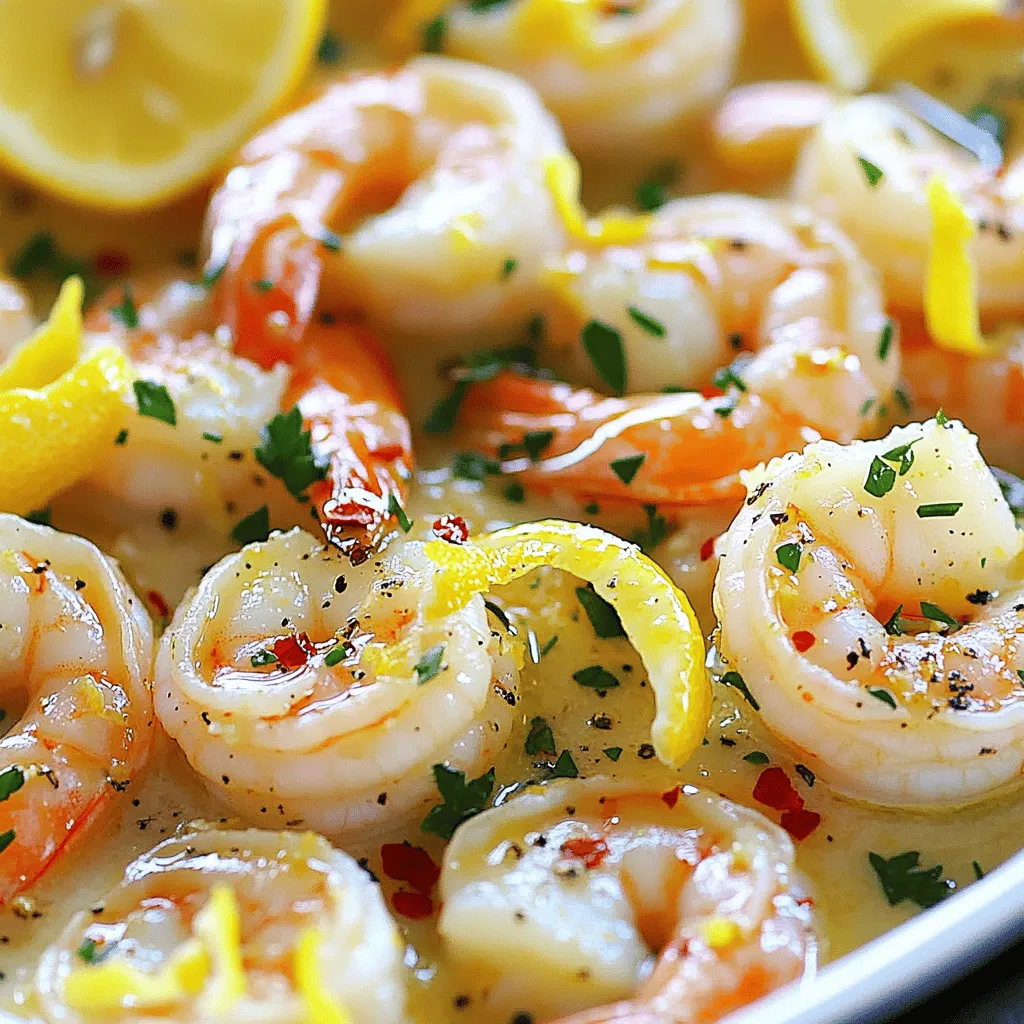
If you’re craving a quick and tasty meal, look no further than my Zesty Lemon Garlic Shrimp. This dish is

- 2 cups all-purpose flour - 1/2 cup warm milk - 1/4 cup granulated sugar - 2 1/4 teaspoons active dry yeast (1 packet) - 1/4 cup unsalted butter, melted - 1 large egg - 1/2 teaspoon salt The base of these cinnamon rolls is simple but essential. All-purpose flour gives the rolls structure. Warm milk helps activate the yeast, making the rolls fluffy. Sugar feeds the yeast and adds sweetness. Active dry yeast is key for rising. Unsalted butter provides rich flavor, and the egg adds moisture. Salt balances the sweetness. - 1/2 cup Biscoff cookie butter - 1/4 cup brown sugar - 1 tablespoon cinnamon - 1/4 cup chopped walnuts or pecans (optional) - 1/2 cup powdered sugar (for icing) - 2 tablespoons milk (for icing) The star of this recipe is Biscoff cookie butter. It adds a unique flavor that makes these rolls special. Brown sugar and cinnamon create a warm, sweet topping. You can add nuts for a nice crunch if you like. For icing, powdered sugar and milk mix perfectly for a sweet drizzle. For the full list of ingredients and steps, check out the Full Recipe. To start, I activate the yeast. In a small bowl, I mix warm milk with sugar. Next, I sprinkle the yeast on top and let it sit for about 5-10 minutes. You'll see it bubble and foam, which means it's ready. In a large bowl, I mix the flour and salt. I create a well in the center. Then, I add the melted butter, egg, and the yeast mixture. I mix it all together until combined. Now, I knead the dough for about 5-7 minutes. I want it smooth and elastic. If it feels too sticky, I add a bit more flour. After kneading, I place the dough in a greased bowl and cover it with a damp cloth. I let it rise in a warm spot for about 1 hour, or until it doubles in size. Once the dough is ready, I punch it down to release the air. I roll it out on a floured surface into a rectangle, about 1/4 inch thick. Next, I spread Biscoff cookie butter evenly over the dough. I leave a small border around the edges for easier rolling. In a small bowl, I mix brown sugar with cinnamon. I sprinkle this mix all over the Biscoff cookie butter. If I want some crunch, I add chopped nuts too. Starting from one edge, I roll the dough tightly into a log. I slice it into 12 equal pieces and place them in a greased baking dish. I cover them with a cloth and let them rise for another 30 minutes. While the rolls rise, I preheat my oven to 350°F (175°C). After the second rise, I place the rolls in the oven. I bake them for about 20-25 minutes. They should turn golden brown when done. For extra sweetness, I prepare the icing. I whisk together powdered sugar and milk until smooth. Once the rolls cool for a few minutes, I drizzle the icing over them. This method ensures that you get soft, gooey rolls full of flavor. For the full recipe, check out the complete instructions. To get the best texture, knead the dough for about six minutes. This makes it smooth and elastic. If the dough sticks to your hands, add a little flour. The right amount of flour is key, especially with humidity. If it’s humid, you may need a bit more flour. In dry weather, use less. You can make these rolls even tastier by adding spices like nutmeg or ginger. A splash of vanilla extract can boost the flavor too. If you want a crunch, mix in some chopped walnuts or pecans. They add a nice texture and complement the Biscoff cookie butter well. Serve your rolls warm for the best flavor. Drizzle icing over the top for a sweet touch. You can also add extra Biscoff cookie butter on the side for dipping. For a fun look, sprinkle some crushed cookies on top. This adds color and makes your rolls stand out on the table. {{image_2}} You can easily mix up the flavors of your Biscoff cookie butter cinnamon rolls. One fun twist is adding chocolate chips. Just sprinkle them on top of the cookie butter before rolling. The sweet chocolate pairs well with the spiced cookie butter. You can also make these rolls a fall favorite. Adding pumpkin spice to the filling gives them a warm, cozy taste. It’s perfect for cool autumn days when you want something special. If you need to make these rolls vegan, it's simple! Swap the egg with a flax egg made from one tablespoon of ground flaxseed mixed with three tablespoons of water. Use plant-based milk and vegan butter instead of regular. You can also make these rolls gluten-free. Just replace the all-purpose flour with a gluten-free blend. Make sure the blend has xanthan gum for the best texture. These adjustments let everyone enjoy the deliciousness! To keep your Biscoff cookie butter cinnamon rolls fresh, store them in an airtight container. Make sure to cool them completely before sealing. This helps avoid sogginess. You can keep them at room temperature for about two days. If you want them to last longer, store them in the fridge for up to a week. To enjoy warm rolls again, use the oven or microwave. For the oven, preheat it to 350°F (175°C). Place the rolls on a baking sheet and cover them with foil. Heat for about 10 minutes. This keeps them soft and fluffy. If you prefer the microwave, place a roll on a plate and cover it with a damp paper towel. Heat it for 15-20 seconds. This helps keep the texture nice. Enjoy your rolls like they are fresh from the oven! Can I use homemade Biscoff cookie butter? Yes, you can use homemade Biscoff cookie butter. Just make sure it has a similar texture and flavor. This can give your rolls a personal touch. What can I do with leftover Biscoff cookie butter? Leftover Biscoff cookie butter is great on toast, pancakes, or as a dip for fruits. You can also swirl it into yogurt or oatmeal for added flavor. How can I make these ahead of time? You can prepare the dough a day before. Let it rise, then store it in the fridge. The next day, let it come to room temperature and bake. Can I freeze the cinnamon rolls? Yes, you can freeze the cinnamon rolls. After baking, let them cool completely. Wrap them tightly in plastic wrap and foil. They last up to three months in the freezer. Why didn’t my rolls rise? If your rolls didn’t rise, check the yeast. It might be old or not activated. Make sure the milk is warm, not hot, when mixing. How to fix dry or dense rolls? Dry or dense rolls can happen from too much flour or not enough liquid. Next time, measure flour carefully and add a bit more liquid if needed. What if I overbaked my cinnamon rolls? If you overbake your cinnamon rolls, they may be dry. To help, drizzle some icing over them. This adds moisture and sweetness to each bite. For the full recipe and more details, see the [Full Recipe]. Making Biscoff cookie butter cinnamon rolls is simple and fun. You learned about key ingredients, step-by-step instructions, and helpful tips. I shared flavor variations and storage tips to keep your rolls fresh. Remember, baking is about experimenting, so feel free to try new things. Enjoy the delicious taste of your rolls and share them with others. It’s a treat everyone will love!

Biscoff Cookie Butter Cinnamon Rolls Delightful Treat

Biscoff Cookie Butter Cinnamon Rolls are the perfect blend of sweet and spice. Imagine fluffy, warm rolls filled with rich

Older posts
Newer posts
← Previous Page1 … Page108 Page109 Page110 … Page137 Next →

dsad

© 2025 easycookingbite • Built with GeneratePress

Our Policies

  • Copyright Policy
  • Cookie Policy
  • GDPR Policy
  • Privacy Policy
  • Disclaimer
  • Terms Of Use

More Information

  • Home
  • About
  • Contact
  • Appetizers
  • Dessert
  • Dinner
  • Drinks
©2025, easycookingbite About Back To Top