Skip to content
DisclaimerTerms Of UseGDPR PolicyCookie Policy

easycookingbite

  • Home
  • Drinks
  • Appetizers
  • Dinner
  • Dessert
  • About
  • Contact
  • Privacy Policy
DisclaimerTerms Of UseGDPR PolicyCookie Policy

Lily

- 1 large loaf of Italian bread - 1 cup cooked chicken, shredded - 1 cup Alfredo sauce - 1 cup mozzarella cheese, shredded - 1/2 cup Parmesan cheese, grated - 4 cloves garlic, minced - 1/2 cup unsalted butter, softened - 2 tablespoons fresh parsley, finely chopped - Salt and pepper to taste When making Chicken Alfredo Stuffed Garlic Bread, choosing the right ingredients is key. The Italian bread should be crusty on the outside and soft inside. This helps hold the filling and gives a great texture. - Alternatives for chicken: You can use rotisserie chicken for ease or even shredded turkey. Pulled pork or mushrooms can work for different flavors. - Options for Alfredo sauce: You can use store-bought Alfredo sauce for quick prep. If you prefer homemade, a simple mix of butter, cream, and cheese works well. - Dairy-free cheese options: If you want a dairy-free version, look for plant-based cheese that melts well. Nut-based cheeses can also be a good option. Using the right ingredients makes this dish shine. The blend of flavors gives you that creamy, cheesy goodness. Each bite is a delightful experience that you won't forget. For the full recipe, check out the details above. 1. Preheating the oven Start by preheating your oven to 375°F (190°C). This ensures even cooking and a nice crisp. 2. Preparing the chicken Alfredo mixture In a bowl, mix together the shredded chicken, Alfredo sauce, mozzarella, and Parmesan. Add salt and pepper to taste. Stir until everything is well blended. 3. Preparing the garlic butter In a separate bowl, combine the softened butter, minced garlic, and chopped parsley. Mix until smooth. This garlic butter will give the bread a rich flavor. 1. Cutting and hollowing the Italian bread Take your large loaf of Italian bread and cut it in half lengthwise. Use your hands or a spoon to scoop out most of the soft inside. Keep the bread you scoop out for later use, like making bread crumbs. 2. Stuffing the bread with the Alfredo mixture Generously spoon the chicken Alfredo mixture into each half of the hollowed bread. Make sure to spread it evenly for the best taste. 1. Baking time and temperature Place the stuffed bread halves on a baking sheet lined with parchment paper. Bake in the preheated oven for about 15-20 minutes. Look for a bubbly and golden top. 2. Tips for achieving a golden top To get that perfect golden crust, you can broil the bread for the last minute. Just watch closely so it doesn’t burn. Enjoy your Chicken Alfredo Stuffed Garlic Bread! For the complete recipe, check out the Full Recipe section above. To ensure your cheese melts just right, use fresh mozzarella. Fresh cheese melts beautifully and gives a nice stretch. Grate your cheese instead of using pre-shredded. Pre-shredded cheese has additives that can affect melting. Mix in a bit of cornstarch with the cheese to keep it from clumping. This trick helps the cheese stay smooth and creamy in your Chicken Alfredo stuffed garlic bread. For flavor, add a pinch of garlic powder and some Italian herbs. They boost the taste and make each bite delicious. A touch of cayenne pepper gives a nice kick. Fresh herbs like basil or oregano brighten the dish, making it even more special. Pair your Chicken Alfredo stuffed garlic bread with a crisp green salad. A simple side of mixed greens with a light vinaigrette works well. You can also serve it with roasted vegetables for a hearty meal. For a fun twist, try adding a side of marinara sauce for dipping. For presentation, serve the bread on a wooden board. It adds warmth and charm. Garnish with chopped parsley for a pop of color. You can slice the bread into pieces for easy sharing, making it a perfect party food. If your bread ends up soggy, try toasting it lightly before stuffing. This creates a barrier that helps keep the bread crisp. Make sure your Alfredo sauce isn't too watery. If it is, reduce it on the stove until thick. For cheese clumping, ensure your cheese is finely shredded. Mixing it with cornstarch before adding it to the sauce also helps. If you notice clumps while baking, stir the mixture well before stuffing. This simple fix can save your dish from a cheesy disaster. {{image_2}} You can easily change the filling in your Chicken Alfredo Stuffed Garlic Bread. - Vegetarian options: Swap the chicken for sautéed mushrooms, spinach, or artichokes. Add extra cheese for a rich taste. - Spicy chicken Alfredo: Use spicy chicken seasoning or add diced jalapeños. This packs a punch and makes it exciting. You can transform this dish into something new and fun. - Transforming the recipe into a casserole: Layer your chicken Alfredo mixture in a baking dish. Top it with garlic bread crumbs and bake until golden. This gives a crunchy top and is great for sharing. - Making mini stuffed breads for appetizers: Use small rolls instead of a large loaf. Stuff them with the same mixture. They are perfect for parties and easy to eat. Feel free to explore these variations to create your own perfect dish, based on the full recipe! To keep your Chicken Alfredo Stuffed Garlic Bread fresh, follow these steps: - Refrigeration guidelines: Store leftover stuffed garlic bread in an airtight container. It lasts up to 3 days in the fridge. Make sure it cools down first. This keeps it from getting soggy. - Freezing instructions: If you want to freeze it, wrap the bread tightly in plastic wrap. Then, place it in a freezer bag. It can stay frozen for up to 3 months. When you’re ready to eat, just thaw it in the fridge overnight. - Best methods for reheating stuffed garlic bread: The best way to reheat is in the oven. Preheat to 350°F (175°C). Place the bread on a baking sheet. Heat it for about 10-15 minutes. This restores the crispy crust. - Maintaining texture and flavor: If you use a microwave, the bread may get soft. To avoid this, place a damp paper towel over the bread. Heat in short bursts of 30 seconds. Check often to keep it from getting too hot. Enjoy your tasty leftovers! Can I make Chicken Alfredo Stuffed Garlic Bread ahead of time? Yes, you can prepare Chicken Alfredo Stuffed Garlic Bread in advance. Just make the filling and spread the garlic butter on the bread. Cover it tightly and store it in the fridge. Bake it when you're ready to eat. This saves time and keeps it fresh. What can I serve with Chicken Alfredo Stuffed Garlic Bread? You can pair it with a fresh green salad or a side of steamed veggies. A light tomato soup also works well. These sides balance the rich flavors of the stuffed bread. How long does it take to cook from frozen? If you freeze the stuffed bread, it takes about 25 to 30 minutes to bake. Preheat the oven to 375°F (190°C) and bake until golden and bubbly. This way, you enjoy a warm meal without much wait. Dietary considerations and ingredient modifications For dietary needs, you can use gluten-free bread. Also, consider dairy-free cheese and Alfredo sauce. These options help make this dish suitable for various diets. Can I substitute the bread type? Yes, feel free to use different bread types. French bread or ciabatta works well. Just pick a loaf that can hold the filling without breaking apart. This adds a fun twist to the classic recipe. For the full recipe, check out the details above. Enjoy your cooking! This blog post guided you through making Chicken Alfredo Stuffed Garlic Bread. We covered key ingredients, how to prep, assemble, and bake the dish. I shared valuable tips, like ingredient swaps and serving ideas. You can also explore variations, storage, and common questions to enhance your cooking. In my view, this recipe is a fun twist on classic flavors. Try it, share, and enjoy!

Chicken Alfredo Stuffed Garlic Bread Simple Delight

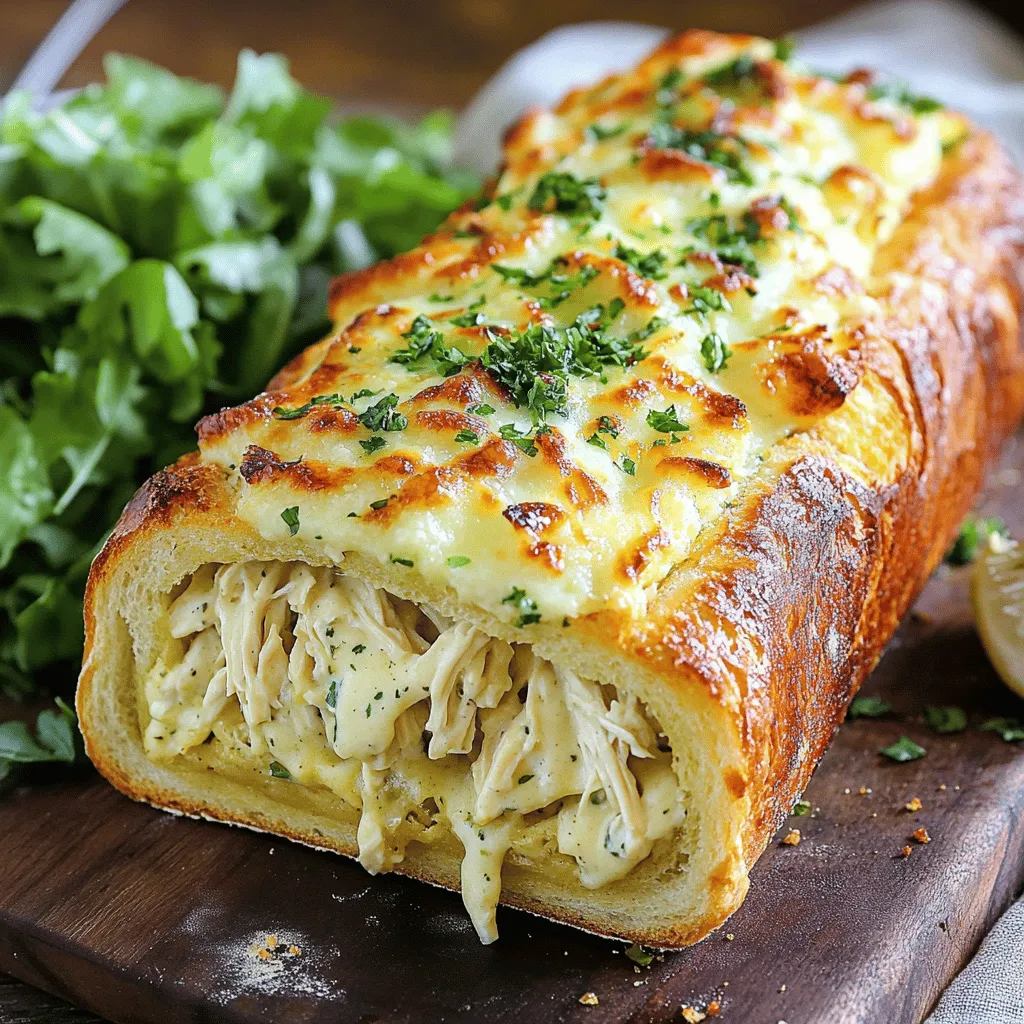
Are you ready for a dish that will wow your taste buds? Chicken Alfredo Stuffed Garlic Bread is a fun

To make Voodoo Fries, you need simple and tasty ingredients. Here’s the full list: - 4 large russet potatoes, cut into fries - 2 tablespoons olive oil - 1 teaspoon smoked paprika - 1 teaspoon garlic powder - 1 teaspoon onion powder - 1 teaspoon cayenne pepper (adjust to taste) - Salt to taste - 1 cup shredded pepper jack cheese - 1 jalapeño, sliced (optional for garnish) - ¼ cup sour cream - 2 tablespoons green onions, sliced - 1 tablespoon fresh cilantro, chopped You can swap russet potatoes for sweet potatoes for a healthier option. Olive oil can be replaced with canola oil or avocado oil if you prefer. If you want less spice, use less cayenne pepper or pick a milder cheese like mozzarella. For a creamier touch, substitute sour cream with Greek yogurt. This gives you a lighter feel but still keeps the taste. Feel free to mix and match to fit your taste! 1. Preheat the Oven: Start by preheating your oven to 425°F (220°C). This step is key for crispiness. 2. Prepare the Potatoes: Rinse the cut fries under cold water. This helps remove starch, making fries crispier. Pat them dry with a kitchen towel. 3. Season the Fries: In a large bowl, toss the fries with: - 2 tablespoons olive oil - 1 teaspoon smoked paprika - 1 teaspoon garlic powder - 1 teaspoon onion powder - 1 teaspoon cayenne pepper (adjust to taste) - Salt to taste Mix until the fries are evenly coated. This blend gives Voodoo Fries their unique flavor. 1. Spread the Fries: Lay the seasoned fries in a single layer on a baking sheet lined with parchment paper. Avoid stacking them to promote even cooking. 2. Bake for Crispiness: Bake for 30-35 minutes. Halfway through, flip the fries. This is crucial for getting that golden brown color. 1. Assemble the Voodoo Fries: After baking, take the fries out. Immediately sprinkle 1 cup shredded pepper jack cheese over them. Return to the oven for about 5 minutes. This melts the cheese perfectly. 2. Garnish for Presentation: While the cheese melts, prepare the toppings. Slice 1 jalapeño, chop 1 tablespoon fresh cilantro, and slice 2 tablespoons green onions. 3. Complete the Dish: Once the cheese is bubbly, take the fries out. Top with jalapeños, a drizzle of ¼ cup sour cream, green onions, and cilantro. Serve your Voodoo Fries hot for the best taste. For a fun touch, place them in a rustic bowl or on a colorful platter. To make great Voodoo Fries, start with the right technique. Use russet potatoes for the best texture. Cut them evenly so they cook uniformly. Rinse the fries to remove extra starch. This helps them crisp up nicely. After rinsing, dry them well with a towel. Toss the fries with olive oil and spices in a big bowl. Adjust the spice level to suit your taste. If you love heat, add more cayenne pepper. For a milder flavor, cut back on the cayenne. You can also try other spices like chili powder or cumin to mix things up. Getting the cheese to melt just right makes a big difference. After baking the fries, sprinkle the cheese on top while they are still hot. This helps the cheese melt perfectly. Bake for five more minutes to achieve that gooey texture. If you want to switch things up, try other cheese options. Cheddar adds a sharp flavor. Mozzarella gives a stretchy texture. You can even use a vegan cheese if you prefer. Use a sturdy baking sheet lined with parchment paper. This helps prevent sticking and makes cleanup easier. A large bowl is perfect for mixing the fries and spices. You'll want a good knife for cutting the potatoes. A cutting board is essential for safety. Consider a mandoline slicer for even fry sizes. This tool helps you cut the potatoes quickly and uniformly. A spatula is great for flipping the fries halfway through cooking. With the right tools, you can make your Voodoo Fries even better. Check out the Full Recipe for more tips! {{image_2}} You can customize Voodoo Fries with many tasty toppings. Try adding crispy bacon for a savory crunch. Guacamole adds a creamy touch and fresh flavor. Other great toppings include jalapeños, diced tomatoes, or even chili. Each choice boosts the flavor and texture. Mix and match to find your favorite combo! You can cook Voodoo Fries in different ways. Baking gives them a crispy texture without much oil. Frying makes them extra crunchy but uses more oil. If you have an air fryer, use it for a healthier option. The air fryer cooks the fries quickly and keeps them crispy. Whichever method you choose, the flavor stays amazing! Want to make this dish vegetarian? Swap out the cheese for a plant-based version. You can also use sweet potatoes for a twist. For a low-carb option, try using zucchini or eggplant instead of potatoes. These swaps keep the spirit of Voodoo Fries while fitting your diet. Enjoy experimenting with flavors and textures! To keep your Voodoo Fries fresh, store them in an airtight container. This helps prevent moisture and keeps them crispy. Let the fries cool to room temperature. Then, transfer them to the container and seal it tight. You can keep them in the fridge for up to three days. This way, you can enjoy those great flavors later! To reheat your fries and keep them crispy, use the oven. Preheat it to 400°F (200°C). Spread the fries on a baking sheet in a single layer. Heat them for about 10-15 minutes. This helps restore their crunch. If you prefer a quicker method, you can use the microwave, but they may turn soft. For the best results, the oven is your friend! If you want to freeze your Voodoo Fries, first, let them cool completely. Spread them out on a baking sheet in a single layer. Place the sheet in the freezer for about an hour. This prevents them from sticking together. Once frozen, transfer the fries to a freezer bag. They can last for up to three months. To enjoy, thaw them in the fridge overnight. Then reheat them in the oven for that crispy texture. Voodoo Fries are loaded fries with a spicy twist. They originated from Louisiana, where flavors mix. You can find them in many restaurants and food trucks. These fries often feature cheese, spices, and tasty toppings. Yes, you can prep Voodoo Fries ahead of time. Cut the potatoes and soak them in water. This keeps them crisp. Season the fries and store them in the fridge. Just remember to bake them fresh for the best taste. The spice level can vary in Voodoo Fries. Cayenne pepper adds heat, but you can adjust it. Use less cayenne for milder fries. You can also add more toppings like sour cream to cool it down. Enjoy the flavor! In this article, we broke down how to make Voodoo Fries from start to finish. We covered the ingredients, offered step-by-step baking instructions, and shared top tips for perfect fries. You learned about variations, storage info, and answered common questions. Voodoo Fries are fun and easy to make. They can be customized to fit your tastes. With the right techniques, you can enjoy these crispy fries anytime. Now it’s your turn to bring some spice and creativity into your kitchen!

Voodoo Fries Irresistible Flavor You Can’t Resist

Are you ready to dive into the world of Voodoo Fries? This dish bursts with flavors you won’t forget. Combining

To make Louisiana BBQ shrimp, you need some key items. Here’s the list: - 1 lb large shrimp, deveined and shell-on - 4 tablespoons unsalted butter - 4 tablespoons olive oil - 5 cloves garlic, minced - 1 tablespoon Cajun seasoning - 1 teaspoon smoked paprika - 1 teaspoon Worcestershire sauce - 1 teaspoon hot sauce - 1 tablespoon lemon juice - 1/4 cup chicken broth - 2 green onions, chopped (for garnish) - Fresh parsley, chopped (for garnish) - Crusty French bread (for serving) These ingredients work together to create a rich, flavorful dish. You can change this recipe to fit your taste. Here are some optional ideas: - Add diced bell peppers for crunch. - Toss in some chopped tomatoes for freshness. - Use different hot sauces for unique heat levels. - Substitute shrimp with chicken or fish for variety. These options allow you to make the dish your own. Having the right tools makes cooking easier. Here’s what I recommend: - A large skillet for cooking the shrimp. - A sharp knife for chopping and mincing. - A cutting board for safe prep. - Measuring spoons for accuracy. - Tongs for flipping the shrimp. - A spoon for stirring the sauce. With these tools, you will be ready to create a delicious meal. For the full recipe, check the details above. To start, gather your ingredients. Here’s what you need: - 1 lb large shrimp, deveined and shell-on - 4 tablespoons unsalted butter - 4 tablespoons olive oil - 5 cloves garlic, minced - 1 tablespoon Cajun seasoning - 1 teaspoon smoked paprika - 1 teaspoon Worcestershire sauce - 1 teaspoon hot sauce - 1 tablespoon lemon juice - 1/4 cup chicken broth - 2 green onions, chopped (for garnish) - Fresh parsley, chopped (for garnish) - Crusty French bread (for serving) Now, heat a large skillet over medium heat. Add the olive oil and butter. Let them melt until bubbly. This mix gives a great base for your shrimp. Next, toss in the minced garlic. Sauté for one minute. Watch closely, so the garlic does not burn. After that, stir in your Cajun seasoning, smoked paprika, Worcestershire sauce, and hot sauce. Let the spices bloom for about 30 seconds. This step makes the flavors pop! Then, add the shrimp. Arrange them in a single layer. Cook for 2-3 minutes on one side. When they turn pink, flip them over. Next, pour in the chicken broth and lemon juice. Reduce the heat slightly and let it simmer for 3-4 minutes. This allows the shrimp to soak up all the tasty sauce. Now, taste the mixture. If you want more heat, add a dash of hot sauce. Once the shrimp are cooked and curled, remove the skillet from heat. Top it off with chopped green onions and parsley. Serve this dish hot with crusty French bread. You’ll want to soak up all that delicious sauce! To cook shrimp perfectly, always use fresh shrimp. They taste best and have a nice texture. Avoid overcooking your shrimp. They cook quickly, so stay close. Once they turn pink and curl, they’re done. Using a meat thermometer can help too. Cook shrimp to an internal temperature of 120°F. This ensures they are tender and juicy. Louisiana BBQ shrimp pairs well with several sides. Here are a few ideas: - Crusty French bread (to soak up the sauce) - Steamed rice (to balance the flavors) - A fresh green salad (for a light touch) - Grilled vegetables (to add more color) These sides will elevate your meal and balance the bold flavors of the shrimp. Enjoy! When making Louisiana BBQ shrimp, seasoning is key. Start with the Cajun seasoning. This blend brings a warm kick. If you want to make your own, mix paprika, cayenne, garlic powder, and thyme. Use fresh garlic, as it adds a rich flavor. Don't rush the spices; let them bloom in the oil. This step enhances the taste. Taste your sauce before adding shrimp. Adjust the seasoning to suit your preference. Some like it hot, while others prefer mild. To adjust the spice level, add hot sauce slowly. Start with one teaspoon and taste. You can always add more if needed. If you want less heat, skip the hot sauce or use less Cajun seasoning. Lemon juice can help balance strong spices too. It adds brightness and cuts through heat. One common mistake is overcooking the shrimp. Shrimp cook fast. They turn pink in just a few minutes. Remove them from heat once they curl. Another mistake is using dull spices. Fresh spices give the best flavor. Store spices in a cool, dark place. Also, don’t skip the crusty French bread. It’s perfect for soaking up the sauce. Enjoy every last drop! {{image_2}} You can change the flavor by using different spice blends. If you want a milder taste, try a mix of garlic powder, onion powder, and thyme. For a bolder flavor, use extra cayenne pepper or even a dash of curry powder. Each blend gives the dish a unique twist. This makes it fun to experiment. You don’t have to stick to just the skillet. You can grill the shrimp for a smoky flavor! To do this, marinate the shrimp first and place them on skewers. Baking is also a great option. Simply spread the shrimp in a baking dish and pour the sauce over them. Bake at 375°F for about 15 minutes. Both methods create tasty results. Serve Louisiana BBQ shrimp with crusty French bread. The bread is perfect for soaking up that rich sauce. You can also pair it with rice for a filling meal. A fresh green salad or coleslaw works well too. These sides balance the dish and add a nice crunch. If you want a drink, a cold beer or sweet tea complements the shrimp perfectly. Enjoy your meal! After you enjoy your Louisiana BBQ shrimp, let any leftovers cool down. Place them in an airtight container. This helps keep them fresh. Store the container in the fridge. Use the leftovers within three days for the best taste. To reheat, I suggest using a skillet. Add a splash of chicken broth to the pan. Heat over medium heat. This keeps the shrimp moist and flavorful. Stir gently until the shrimp are warm. Avoid using the microwave if you can. It tends to make shrimp rubbery. If you want to save your shrimp for later, freezing works well. First, cool the shrimp completely. Then, place them in a freezer-safe bag. Squeeze out as much air as possible before sealing. They can last up to three months in the freezer. When ready to eat, thaw in the fridge overnight before reheating. This keeps the texture nice and tender. Louisiana BBQ Shrimp comes from New Orleans. It mixes Cajun and Creole styles. The dish has roots in coastal cooking. Chefs made it using shrimp and spices they had. It is not grilled, despite the name. Instead, it is cooked in a rich sauce. The sauce often has butter, garlic, and spices. This dish shows the bold flavors of Louisiana. Yes, you can use peeled shrimp. However, shell-on shrimp adds flavor. The shells hold in the juices. If you remove them, you may miss some taste. If you prefer peeled shrimp, use them in the recipe. Just adjust cooking time to avoid overcooking. Cook them until they turn pink. Some top spots for this dish include: - Casamento's: Known for its fresh seafood. - Mr. B's Bistro: A classic choice with great sauce. - The Olde Nola Cookery: Offers a unique twist on the dish. Each place has its own take on Louisiana BBQ Shrimp. Trying different spots can be fun and tasty. To make a vegetarian version, use mushrooms instead of shrimp. Mushrooms have a great texture and soak up flavors well. Use the same spices and sauce from the original recipe. You may also add veggies like bell peppers or zucchini. Cook them until tender, then serve with crusty bread. The full recipe for Louisiana BBQ Shrimp takes about 25 minutes. You need just 10 minutes to prep. This recipe serves four people. Enjoy the rich flavors and aromas as you cook. The ingredients include: - 1 lb large shrimp, deveined and shell-on - 4 tablespoons unsalted butter - 4 tablespoons olive oil - 5 cloves garlic, minced - 1 tablespoon Cajun seasoning - 1 teaspoon smoked paprika - 1 teaspoon Worcestershire sauce - 1 teaspoon hot sauce - 1 tablespoon lemon juice - 1/4 cup chicken broth - 2 green onions, chopped - Fresh parsley, chopped - Crusty French bread for serving This dish is delicious and simple to make! In this blog post, we explored the essential ingredients and tools to perfect Louisiana BBQ Shrimp. You learned the preparation steps, tips for tender shrimp, and common mistakes to avoid. We also discussed variations and how to store leftovers. As you cook, remember to have fun and get creative. Adjust flavors to suit your taste. The joy of cooking lies in experimenting, so dive in and enjoy every bite of your delicious shrimp dish!

Louisiana BBQ Shrimp Delightful and Easy Recipe

Are you ready to spice up your dinner table? Louisiana BBQ Shrimp is a rich, flavorful dish that’s surprisingly easy

- 1 lb (450g) ground beef - 12 oz (340g) penne pasta - 4 cups beef broth - 1 cup heavy cream - 1 cup cherry tomatoes, halved - 1 medium onion, chopped - 3 cloves garlic, minced - 1 cup frozen peas - 1 tablespoon Italian seasoning - 2 tablespoons olive oil - Salt and pepper to taste - Grated Parmesan cheese for serving - Fresh basil leaves for garnish (optional) Ground beef is the star of this dish. It gives the pasta a rich flavor. Penne pasta holds sauce well, making each bite creamy and satisfying. Beef broth adds depth. It enriches the sauce and ties the flavors together. Cherry tomatoes bring a fresh sweetness. They add color and a juicy burst. Heavy cream creates that luxurious creamy texture. It makes the dish feel special yet simple. Garlic and onion boost flavor. Their aroma fills your kitchen as they cook. Finally, frozen peas add a pop of color and nutrition. If you want to change things up, here are some good swaps. For ground beef, use ground turkey or chicken. They are leaner but still tasty. For pasta, any short pasta works well. Try rotini or fusilli if you prefer. Instead of beef broth, use vegetable broth for a lighter option. If you need a dairy-free choice, coconut cream can replace heavy cream. For a fresh twist, add spinach or bell peppers instead of peas. These options keep the dish fun and creative. Check out the Full Recipe for more details! To start, gather all your ingredients. You need ground beef, penne pasta, beef broth, and more. Measure each item out before you begin. This makes cooking smooth and easy. Chop the onion and mince the garlic. Prepare the cherry tomatoes by halving them. This prep will save you time later. First, heat the olive oil in a large pot over medium heat. Add the chopped onion and sauté until soft, about 3-4 minutes. Next, add the minced garlic and cook for 1 minute. Be careful not to burn it. Add the ground beef and break it apart with a spoon. Cook until browned, about 5-7 minutes. Season with salt, pepper, and Italian seasoning. Pour in the beef broth and bring it to a boil. Add the penne pasta and cherry tomatoes. Stir well, then reduce to a simmer. Cover the pot and cook for 10-12 minutes. Stir occasionally to keep the pasta from sticking. You want the pasta to be al dente, and most of the liquid absorbed. After that, stir in the heavy cream and frozen peas. Heat through for another 3-4 minutes. Taste and adjust the seasoning if needed. Remove the pot from heat and let it sit for 2 minutes. This helps the flavors blend together. When ready to serve, dish out the creamy beef pasta. Top each serving with grated Parmesan cheese and fresh basil leaves. This adds color and taste. Enjoy your meal! For the complete recipe, check out the Full Recipe. To make your pasta creamy, use heavy cream. It adds rich flavor. After cooking the pasta, stir in the cream slowly. This helps it blend well. Let it heat through but don’t boil it again. A little patience goes a long way. You can also add cheese for extra creaminess. Grated Parmesan melts nicely and enhances the taste. For more flavor, try adding fresh herbs. Basil and parsley give a fresh taste. You can also mix in a dash of hot sauce for heat. If you want depth, sauté some mushrooms with the onions. They add umami that complements the beef. Another option is to include a splash of Worcestershire sauce. This adds a savory kick that rounds out the dish. One big mistake is overcooking the pasta. You want it al dente, not mushy. Stir the pasta occasionally while cooking. This prevents it from sticking together. Also, don't skip the seasoning. Salt and pepper boost the overall flavor. Lastly, avoid rushing the addition of cream. Let the pasta cool slightly before adding it. This will help keep the cream from separating. Follow these tips for a perfect One-Pot Creamy Beef Pasta. For detailed cooking steps, check out the Full Recipe. {{image_2}} You can swap the ground beef for turkey or chicken. These meats are leaner. They still pack a punch in flavor. You could also use plant-based meat for a vegetarian meal. Look for options made from beans or lentils. They give a rich taste without meat. This choice is great for meatless Mondays! Adding veggies to your dish boosts nutrition. You can mix in bell peppers, spinach, or zucchini. Toss in some mushrooms for an earthy flavor. Carrots add sweetness and color. Just chop them small so they cook fast. The more colors, the better your meal looks and tastes! If you need a gluten-free meal, choose gluten-free pasta. It cooks just like regular pasta. You can find it in most stores now. Check the package for cooking times, as they may differ. Use gluten-free broth too. This way, you keep the creamy taste without the gluten! For the full recipe, check out the section above. Store your One-Pot Creamy Beef Pasta in an airtight container. Let it cool down first. Place it in the fridge for up to three days. Make sure to label the container with the date. This helps you keep track of how fresh it is. To reheat, scoop out what you need. Place it in a pot over medium heat. Stir often to heat it evenly. You might need to add a splash of water or cream to keep it creamy. Heat until hot, then serve. You can also use a microwave. Just cover it to avoid splatters. Heat it in short bursts, stirring in between. If you want to freeze your creamy beef pasta, do it right after cooking. Let it cool completely, then transfer to a freezer-safe container. It can last up to three months in the freezer. When ready to eat, thaw it overnight in the fridge. Reheat it on the stove or microwave. Be sure to stir in a bit of cream to revive the sauce's texture. For the best taste, enjoy it fresh. But freezing works well for busy days ahead. Check out the Full Recipe for more details! To make One-Pot Creamy Beef Pasta, follow these steps closely. First, heat olive oil in a large pot. Add chopped onion and cook for 3-4 minutes. Then, add minced garlic and stir for around 1 minute. Next, add ground beef and break it up as it cooks. Brown the beef for 5-7 minutes. Season with salt, pepper, and Italian seasoning. After browning the beef, pour in beef broth and bring to a boil. Add penne pasta and halved cherry tomatoes. Stir well and reduce heat to a simmer. Cover and cook for 10-12 minutes until the pasta is tender. Stir in heavy cream and frozen peas for 3-4 more minutes. Adjust seasoning and let the dish sit for 2 minutes before serving. You can find the full recipe in the article above. Yes, you can easily customize this recipe. Change the pasta type based on what you have. Use fusilli, rotini, or even spaghetti. You can also add your favorite vegetables like spinach, bell peppers, or zucchini. For a spicy kick, add red pepper flakes. If you want more protein, try adding cooked sausage or chicken. Ground beef works best for this dish. I recommend using 80/20 ground beef, as it has enough fat for flavor. You can also use lean ground beef if you prefer a lighter option. For a different taste, try ground turkey or chicken. These options will still give you great flavor in your creamy pasta. This blog post explored making a One-Pot Creamy Beef Pasta. We discussed ingredients, key insights, and substitute options. The step-by-step instructions guided you through each preparation and cooking phase. You learned tips for the perfect creamy texture and flavor enhancements. We covered variations like meat alternatives and gluten-free options. Finally, storage tips helped you manage leftovers. Remember, this recipe can be a fun way to customize meals while avoiding common mistakes. Enjoy experimenting with your version!

One-Pot Creamy Beef Pasta Easy Weeknight Meal

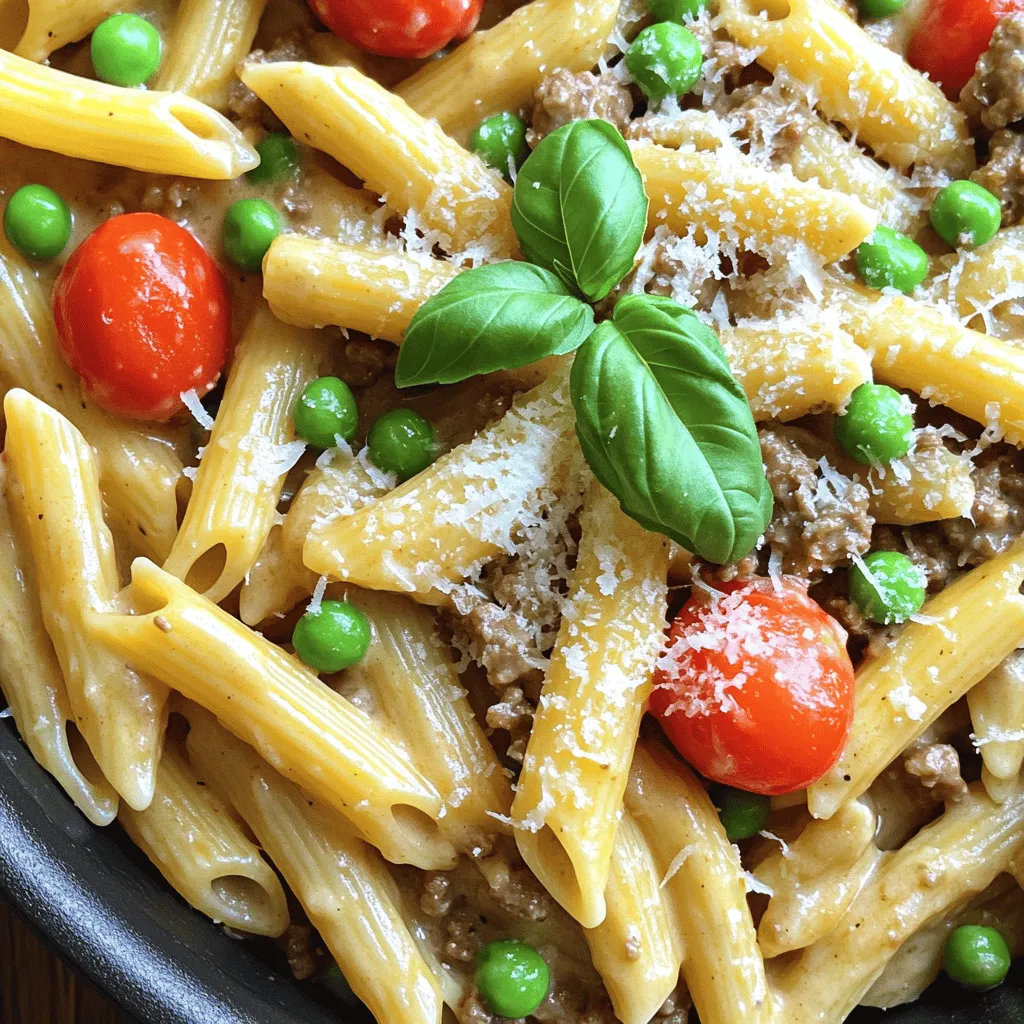
If you crave a quick, delicious meal, your search ends here! One-Pot Creamy Beef Pasta is the answer for busy

For this tasty dish, you need: - 2 lbs beef chuck roast, cut into cubes - 2 dried guajillo chiles, stems and seeds removed - 2 dried ancho chiles, stems and seeds removed - 1 teaspoon cumin powder - 1 teaspoon oregano - 1 tablespoon chili powder - 5 cloves garlic, minced - 1 onion, quartered - 4 cups beef broth - 1 can (14 oz) diced tomatoes - 2 bay leaves - Salt and pepper to taste These main items build the rich flavor of the Birria tacos. The beef chuck roast gives a tender and juicy texture. Dried chiles add a smoky taste that makes the dish special. The spices and broth blend well, creating a savory base. You’ll want these fresh items for garnish: - Fresh cilantro - Diced onions - Lime wedges These garnishes brighten the tacos. Cilantro adds a fresh touch. Diced onions give a nice crunch, while lime wedges enhance the flavor with a zesty kick. Feel free to mix it up with these options: - Cheese for a melty layer - Avocado slices for creaminess - Pickled jalapeños for heat These optional ingredients let you personalize your tacos. Cheese adds richness, while avocado brings smoothness. Pickled jalapeños can spice things up if you like heat. For the full recipe, check out the detailed steps to make these delightful Crock Pot Birria Tacos! - Toasting the chiles: Start with a dry skillet. Set it over medium heat. Add the guajillo and ancho chiles. Toast them for 2-3 minutes until they smell great. Watch closely to avoid burning. - Blending the marinade: Put the toasted chiles into a blender. Add the minced garlic, quartered onion, cumin, oregano, and chili powder. Pour in 1/2 cup of beef broth. Blend until it is smooth and thick. - Preparing the meat and combining ingredients: Take the beef chuck roast and cut it into cubes. Season with salt and pepper. Place the seasoned meat into the Crock Pot. Pour the blended marinade over the beef. Add the diced tomatoes, remaining beef broth, and bay leaves. Stir gently to mix everything well. - Cooking times and methods for best results: Cover the Crock Pot. Cook on low for 8 hours or high for 4 hours. The beef should be tender and easy to shred. - Shredding the beef and assembling the tacos: Once cooked, take the beef out of the Crock Pot. Use two forks to shred the beef into pieces. Strain the broth and keep it for dipping. - Serving tips for optimal presentation: Heat corn tortillas in a skillet until warm. Spoon the shredded beef onto each tortilla. Garnish with fresh cilantro and diced onions. Serve with lime wedges and a small bowl of reserved broth for dipping. For a vibrant look, arrange the tacos on a large platter, adding extra cilantro and lime wedges. Enjoy making your crunchy, flavorful Crock Pot Birria Tacos with this easy Full Recipe! To make your Birria tacos truly pop, think about marinating the meat. I suggest marinating the beef overnight if you can. This lets the flavors soak in. Use a mix of spices like cumin and oregano. These spices bring depth to the dish. You can also add a splash of vinegar for a tangy kick. When you blend your chiles, add some of the beef broth for a smoother texture. This will help coat the meat evenly with flavor. Cooking in a slow cooker is key to tender meat. I recommend cooking on low for 8 hours. This long cook time breaks down the meat fibers well. If you are short on time, you can set it to high for 4 hours. Just keep an eye on it. You want the beef to shred easily. Use a meat thermometer to check the internal temperature; it should be at least 195°F for the best results. These tacos shine when paired with the right sides. I love serving them with Mexican rice or refried beans. A fresh salad can also balance the richness. For drinks, a cold Mexican beer or a refreshing agua fresca works well. Don’t forget to add lime wedges for extra zest! Enjoy your meal with a small bowl of the reserved broth for dipping. This adds a nice touch and enhances the flavor. For the full recipe, check out the details above! {{image_2}} If you want to switch up the beef, try lamb or goat. These meats add rich flavor. You can also use chicken for a lighter dish. When it comes to spices, chili powder can be swapped with paprika for less heat. You can use smoked paprika for a twist. If you can't find guajillo or ancho chiles, use chipotle chiles for a smoky taste. You can make Birria tacos in an Instant Pot too. Cook it on high pressure for about 45 minutes. This method saves time while still giving you tender meat. If you prefer, you can also use the stove-top. Brown the meat in a pot, add the marinade, and simmer for about two hours. This method lets you control the heat closely. Birria tacos vary by region in Mexico. In Jalisco, they often use goat meat and serve it with a rich broth. In Tijuana, they add cheese inside the tacos for extra flavor. Each region has its own twist, so feel free to explore. You can create your own version based on your taste. Check out the Full Recipe for inspiration. Store your leftover Birria tacos in an airtight container. Make sure they cool down first. Refrigerate them if you plan to eat them in the next few days. For longer storage, freeze them. Wrap each taco tightly in plastic wrap and then place them in a freezer bag. This helps prevent freezer burn. To reheat, I recommend using the oven for the best texture. Preheat your oven to 350°F (175°C). Place the tacos on a baking sheet and cover them with foil. Heat for about 10-15 minutes. You can also use a skillet over medium heat. Heat for about 3-4 minutes on each side until warm. If you want to enjoy the broth, heat it in a small pot until hot. In the fridge, your tacos will last for about 3-4 days. If you freeze them, they can last for up to 3 months. Just remember to label your containers with the date. This way, you know when to enjoy your tasty leftovers. What is the origin of Birria tacos? Birria tacos come from Mexico. They started in the state of Jalisco. Originally, they were made with goat meat. Now, beef is often used. The dish is rich and flavorful. People love it for its taste and comfort. Can I use chicken or pork instead of beef? Yes, you can use chicken or pork. Both will give a different flavor. Chicken is lighter, while pork adds richness. Adjust cooking times as needed. Always ensure the meat is tender before serving. How do I know when the meat is done? The meat is done when it is very tender. It should shred easily with a fork. If it feels tough, cook it a bit longer. Check it after the recommended cooking time. Can I make this recipe ahead of time? Yes, you can make this ahead. The flavors will deepen after sitting. Store it in the fridge after cooking. Reheat before serving for the best taste. What toppings are traditional for Birria tacos? Traditional toppings include fresh cilantro, diced onions, and lime wedges. You can also add cheese for extra flavor. These toppings balance the rich, savory meat. What drinks complement this dish well? Birria tacos pair well with refreshing drinks. Try a cold Mexican beer or a tangy agua fresca. A light red wine can also work nicely. These drinks enhance the meal without overpowering it. This post walked you through making Birria tacos. We covered key ingredients, preparation, and cooking steps. You learned tips for enhancing flavor and serving suggestions. The variations section offered options for personalizing your tacos. Remember to store leftovers properly for the best taste later. Enjoy your cooking and impress with each tasty bite!

Crock Pot Birria Tacos Flavorful and Easy Recipe

Love tacos? Get ready to spice up your meals with my easy Crock Pot Birria Tacos! This flavorful recipe features

- 2 boneless, skinless chicken thighs - 1 cup panko breadcrumbs - 2 cups cooked Japanese rice Katsu bowls are hearty and full of flavor. The main star is the chicken thighs, which I find juicier and more tender than other cuts. The panko breadcrumbs give a nice crunch that contrasts well with the soft rice. You need Japanese rice for its stickiness, which holds everything together. - 1 tablespoon soy sauce - 1 tablespoon Dijon mustard - 1/4 cup pickled ginger - 2 tablespoons teriyaki sauce - Sesame seeds for garnish - Green onions, chopped for garnish Soy sauce and Dijon mustard bring out the umami taste. I love adding pickled ginger for a tangy kick. The teriyaki sauce adds sweetness, while sesame seeds and green onions finish the dish with a fresh touch. These ingredients make every bite a delight. - Tofu or pork as protein alternatives - Vegan options using plant-based sauces - Gluten-free substitutes for flour and breadcrumbs You can switch the protein if you want. Tofu works great for a veggie version, while pork is classic for katsu. If you need vegan or gluten-free options, there are many great substitutes available. These variations let you enjoy katsu bowls no matter your diet. For the full recipe, check out the Crispy Chicken Katsu Bowls section! To start, you need to pound the chicken. Take the boneless, skinless thighs and place them between two sheets of plastic wrap. Use a meat mallet or a rolling pin to pound them evenly to about 1/2 inch thick. This makes sure they cook evenly. After that, season both sides with salt and pepper. This adds great flavor to the meat. Next, create a breading station. You need three shallow dishes. In the first dish, add the flour. In the second dish, mix a large egg with soy sauce and Dijon mustard. In the last dish, pour in the panko breadcrumbs. This three-part breading system helps the chicken get that perfect crispy coating. When you dredge the chicken, do it in order. First, coat it in flour. Shake off any extra flour. Then, dip it in the egg mixture, making sure every part gets covered. Finally, press it into the panko breadcrumbs. This step is key for a crunchy crust. Now it’s time to fry the chicken. In a large skillet, heat about 1/2 inch of vegetable oil over medium-high heat. To know if it's hot enough, you can drop a small piece of bread in the oil. If it sizzles, you’re ready. Carefully add the breaded chicken to the skillet. Fry for about 3-4 minutes on each side. Look for that golden-brown color. The chicken should reach an internal temperature of 165°F. Once done, place the chicken on paper towels to drain excess oil. This process gives you a delicious, crispy chicken katsu that will make your bowl truly special. For the full recipe, check out the recipe section. To keep your chicken moist, choose thighs over breasts. Thighs have more fat, so they stay juicy. Pound the chicken evenly. This helps it cook at the same rate. Season with salt and pepper before you bread it. This adds flavor throughout the meat. For even frying, heat the oil properly. Aim for 350°F to 375°F. If the oil is too cool, the katsu will soak up grease. Fry in small batches. This keeps the oil hot and helps achieve that perfect golden color. When you arrange your katsu bowls, think visually. Start with a base of rice. Then, layer the toppings on top. Place the chicken katsu in the center. Add shredded cabbage around it for crunch. Sliced avocado adds creaminess and color. Finally, drizzle teriyaki sauce over everything. This adds shine and flavor. Use contrasting colors. Bright green onions and pink pickled ginger make the dish pop. A sprinkle of sesame seeds adds texture. You can even add a lime wedge for a nice touch. You can bake katsu if you want a healthier option. Preheat your oven to 400°F. Place the breaded chicken on a baking sheet. Spray lightly with oil. Bake for about 20 minutes or until golden. This method reduces oil but still gives a nice crunch. An air fryer is another great choice. It cooks the katsu quickly with less oil. Set it to 375°F and cook for about 12 minutes. Flip halfway through for even cooking. This gives you crispy katsu with less mess. For the full recipe, check out the detailed steps to create your own katsu bowls! {{image_2}} You can use tofu or tempeh instead of chicken for a veggie version. Both absorb flavor well. For the breading, follow the same steps as with chicken. You can also try different sauces. A vegan mayo or spicy miso can add a unique twist. If you need a gluten-free option, swap all-purpose flour with rice flour. Use gluten-free breadcrumbs instead of panko. For sauces, look for gluten-free teriyaki or soy sauce. Always check labels to ensure they are safe. Katsu varies by region. Tonkatsu is a pork version, often served with a special sauce. Chicken katsu is lighter and crispier. Some regions add unique toppings like grated daikon or spicy mayo. Experiment with local flavors to make your bowl special. To keep your Katsu bowls fresh, store leftovers right away. Place the food in airtight containers. This will help keep moisture in and odors out. Make sure to refrigerate within two hours of cooking. This keeps your meal safe to eat later. I recommend using glass containers. They help avoid stains and odors from strong flavors. When it's time to enjoy leftovers, you have a few good options. The microwave is fast and easy. Just cover the bowl with a damp paper towel to keep it moist. Heat for about one to two minutes. If you prefer a crispier texture, use the oven. Preheat it to 350°F. Place the bowl on a baking sheet and heat for about 10 minutes. This helps maintain the crunch of the katsu. If you want to save Katsu bowls for later, freezing is a great choice. First, freeze the katsu and rice separately. Wrap the katsu in plastic wrap, then place it in a freezer bag. For rice, use a freezer-safe container. When you're ready to eat, thaw the katsu in the fridge overnight. Heat it up in the oven or microwave, and serve with fresh rice. This keeps your meal tasting great! Katsu is a Japanese dish made with breaded and fried meat. It often uses pork or chicken. The meat gets coated in flour, egg, and panko breadcrumbs. When cooked, it becomes crispy and golden. Katsu is usually served with rice and a tangy sauce. Tonkatsu is the pork version, while chicken katsu is popular too. Both are delicious and easy to make! Yes, you can prepare katsu ahead of time. You can bread the chicken and store it in the fridge for a day. Just make sure to keep it covered. When ready, fry it fresh for best taste. You can also cook the katsu and store it in the fridge. Reheat it just before serving. This keeps it crispy and tasty. Katsu bowls are great with many sides. You can add steamed veggies or a salad for color. Miso soup complements the meal well. Pickled vegetables add a crunchy contrast. You might also enjoy some edamame or seaweed salad on the side. Each of these pairs well with the rich flavors of katsu. Katsu bowls can be part of a balanced diet, but watch the portion sizes. The chicken provides protein, while rice gives carbs. However, frying adds extra fat and calories. You can make it healthier by using less oil or baking the chicken instead. Adding fresh veggies boosts nutrition too. Enjoy katsu in moderation for a tasty treat! Katsu bowls are simple to make and packed with flavor. We've covered key ingredients like chicken thighs and panko breadcrumbs, along with essential seasonings and toppings. The steps to prepare and cook are important for a great meal. I also shared tips for perfecting your katsu and creative variations. Remember, you can customize your bowl to fit dietary needs. This dish offers tasty options and the chance to impress at your table. Enjoy making and sharing delicious katsu bowls with family and friends!

Japanese Katsu Bowls Tasty and Easy Meal Idea

If you’re craving a meal that’s both tasty and easy to make, Japanese Katsu Bowls are perfect! These bowls combine

To make these tasty mini cheesecakes, you need the following main ingredients: - 1 cup graham cracker crumbs - 3 tablespoons unsalted butter, melted - 2 tablespoons sugar - 12 oz cream cheese, softened - 1/2 cup sour cream - 1/4 cup granulated sugar - 1 teaspoon vanilla extract - 2 large eggs - 1/4 cup heavy cream - Extra granulated sugar for caramelizing These items come together to create a rich and creamy dessert that everyone will love. If you want to add a twist to your mini crème brûlée cheesecakes, consider these optional ingredients: - Pinch of salt to balance the sweetness - Zest of one lemon or orange for a fresh note - 1/2 teaspoon almond extract for a nutty flavor - A splash of coffee or espresso for depth These additions can elevate your dessert and impress your guests. You may need to make substitutions based on availability or dietary needs. Here are some ideas: - Use digestive biscuits instead of graham crackers for the crust. - Swap sour cream with plain Greek yogurt for a healthier option. - For a dairy-free version, use vegan cream cheese and coconut cream. - If you don’t have heavy cream, you can use full-fat coconut milk. These swaps will help you make this recipe your own while keeping the flavors intact. For full details on how to prepare this dessert, check the Full Recipe. To start, gather your ingredients. You will need graham cracker crumbs, melted butter, and sugar. Mix 1 cup of graham cracker crumbs, 3 tablespoons of melted butter, and 2 tablespoons of sugar in a medium bowl. Stir until the mixture looks wet and sandy. Next, press about 1 tablespoon of this mixture into each cupcake liner. Make sure it’s packed well. Then, bake the crusts at 325°F (160°C) for 8 minutes. Once done, take them out and let them cool. Now, let’s make the filling. In a large bowl, beat 12 ounces of softened cream cheese until smooth. This step is key for a creamy texture. Add 1/2 cup of sour cream, 1/4 cup of granulated sugar, and 1 teaspoon of vanilla extract. Mix until creamy and well combined. Beat in 2 large eggs one at a time. It’s important not to overmix here. Finally, add 1/4 cup of heavy cream and mix just until blended. This will make your cheesecake rich and smooth. Pour the cheesecake batter over the cooled crusts, filling each liner about 3/4 full. Bake them for 20-25 minutes. You want the centers to be set but still have a slight jiggle. Once baked, let them cool at room temperature. After cooling, refrigerate your cheesecakes for at least 4 hours. For the best results, leave them overnight. This helps develop the flavor and texture. You can find the full recipe in the earlier sections. Enjoy these delightful bites! To get a smooth and creamy cheesecake, start with soft cream cheese. I let mine sit out for about 30 minutes before mixing. This helps avoid lumps. When you mix, do not overbeat. Just mix until smooth. Overbeating can add too much air, causing cracks. After baking, let the cheesecakes cool at room temperature. Then, chill them in the fridge for at least four hours. This chilling time improves the texture and flavor. For the perfect crunchy topping, sprinkle sugar evenly on each cheesecake. Use about one teaspoon per cheesecake. A kitchen torch works best for caramelizing. Hold it about six inches away and move in small circles. Watch closely so you don’t burn the sugar. If you don’t have a torch, use your oven’s broiler. Place the cheesecakes on a baking sheet. Broil for just a minute or two, keeping an eye on them. Let the topping cool before serving. These mini cheesecakes are great on their own, but you can enhance them. Serve with fresh berries for a pop of color and flavor. A berry sauce adds a nice touch too. You can also pair them with a scoop of vanilla ice cream. For drinks, try serving with coffee or a sweet dessert wine. This balance brings out the rich flavors of the cheesecake. For the full recipe and to explore more options, check the [Full Recipe]. {{image_2}} You can switch up the flavor of your mini crème brûlée cheesecakes easily. For a chocolate version, add 1/2 cup of melted chocolate to the cream cheese mix. This gives it a rich, smooth taste. You can also use fruit puree for a fruity twist. Try blending in strawberry, raspberry, or mango puree. Just replace some of the sour cream with your chosen fruit for a fun change. These mini cheesecakes work for any event. They are great for birthdays, holidays, or dinner parties. For a festive touch, add seasonal flavors. Use pumpkin spice in the fall or peppermint in winter. You can also decorate them with fresh fruit or chocolate shavings for a special occasion. They look fancy but are easy to make. You can adapt this dessert for dietary needs. To make it gluten-free, use gluten-free graham cracker crumbs. For a vegan option, swap cream cheese with a plant-based cream cheese alternative. Use coconut cream instead of heavy cream and flax eggs instead of regular eggs. These changes keep the flavor while making the dessert fit different diets. You can find the full recipe for these delicious cheesecakes above, making it easy to explore your favorite variations! After you enjoy your Mini Crème Brûlée Cheesecakes, you might have leftovers. Store them in an airtight container. Keep them in the fridge. They last up to 5 days. Make sure to cover the tops well to protect the caramel. This keeps the sugar crunchy and fresh. You can freeze these tasty treats for later. First, let them cool completely. Then, wrap each cheesecake in plastic wrap. Place them in a freezer-safe bag. They will stay good for about 2 months. When you're ready to eat, just take them out and let them thaw in the fridge overnight. If you want to enjoy your cheesecakes warm, here’s how to do it right. First, take them out of the fridge. Let them sit at room temperature for about 30 minutes. This helps them warm up evenly. If you like, you can reheat them in a microwave for about 10-15 seconds. Just be careful not to overheat. This can change the texture. After reheating, always re-caramelize the sugar for that perfect crunch. For the best results, use a kitchen torch or broil them for a short time. Enjoy your Mini Crème Brûlée Cheesecakes again with all their delightful flavor! Mini Crème Brûlée Cheesecakes can last up to five days in the fridge. Store them in an airtight container to keep them fresh. This way, they won’t dry out or soak up other fridge odors. Always check for any changes in texture or smell before enjoying them after a few days. Yes, you can use a different crust. Shortbread cookies or Oreos work well. If you want a gluten-free option, try almond flour mixed with butter. Just make sure the crust is firm enough to hold the cheesecake filling. Each crust type adds its own flavor, making your cheesecakes unique. If you need a substitute for heavy cream, use coconut cream or Greek yogurt. Both add creaminess but change the taste a bit. You can also mix milk with butter to mimic heavy cream. Just keep in mind that these substitutes may alter the final texture slightly. For the best results, choose a substitute that fits your taste and dietary needs. You can find the full recipe to get started on these delightful treats! Making mini crème brûlée cheesecakes is easy and fun. We explored key ingredients, from the crust to optional flavors. I shared step-by-step cooking instructions to ensure you get a perfect result. With tips for texture and caramelizing, you can impress anyone. Experiment with different flavors and dietary needs to suit your taste. Remember to store leftovers correctly for the best flavor. Enjoy sharing these delightful treats! Make them your own and have fun in the kitchen.

Mini Crème Brûlée Cheesecakes Delicious Dessert Recipe

If you love creamy desserts, you’ll adore my Mini Crème Brûlée Cheesecakes! This recipe combines the rich, creamy texture of

- 1 pound sea scallops, patted dry - 2 tablespoons olive oil - Salt and pepper to taste - 4 tablespoons unsalted butter - 1 tablespoon fresh lemon juice - Zest of 1 lemon - 2 cloves garlic, minced - 1 tablespoon fresh parsley, finely chopped - Fresh thyme leaves (optional for garnish) - Large skillet - Tongs - Paper towels - Measuring spoons When making crispy pan-seared scallops, fresh ingredients are key. The scallops should be as dry as possible. Pat them with paper towels to soak up moisture. This makes the scallops crisp when cooked. I use sea scallops for their sweet flavor. You can find them at most fish markets. Next, I heat olive oil in a large skillet. You want it to shimmer but not smoke. This means the oil is ready for the scallops. Salt and pepper enhance the flavor. I recommend seasoning both sides of the scallops. Lemon juice and zest bring brightness to the dish. Fresh garlic adds aroma and flavor. Chopping fresh parsley gives a nice touch. It adds color and freshness to the final plate. Optional thyme leaves can be added as a garnish. They add a lovely herbal note. With these ingredients and tools, you are ready to create a delicious meal. For the full recipe, check out the details above. First, you need to pat the scallops dry. Use paper towels to remove any moisture. This step is key for getting a nice crispy crust. If scallops are wet, they will steam instead of sear. Season both sides with salt and pepper. This adds flavor and helps create that golden crust. Now, heat the olive oil in a large skillet. Set the heat to medium-high. Wait until the oil shimmers. This shows it is hot enough for cooking. Carefully place the scallops in the skillet. Make sure to leave space between each one. Sear the scallops for about 2-3 minutes. Do not move them during this time. You want a beautiful golden color. After searing, it’s time to flip the scallops. Use tongs to turn them gently. Cook the other side for about 2 minutes. The scallops should be opaque and cooked through. Once done, remove them from the skillet and set aside on a plate. What comes next is the lemon herb butter. Lower the heat to medium. Add the unsalted butter to the same skillet. Let it melt down while scraping up any brown bits stuck to the bottom. These bits add great flavor to the sauce. Stir in the minced garlic and let it cook for 30 seconds. This will make your kitchen smell amazing! Now, add the fresh lemon juice and lemon zest. Sprinkle in the chopped parsley too. Stir well to combine everything. Allow the sauce to bubble for a minute. This will help meld the flavors together nicely. For the full recipe, follow the steps above and enjoy a delightful dish! To get the best crispy scallops, I recommend using olive oil. It has a high smoke point, which works well for searing. Heat the oil until it shimmers in the pan. This shows it's hot enough for cooking. If the pan isn’t hot, the scallops will stick and won’t brown. Plating your scallops can be fun! I love serving them on a bed of sautéed spinach. The green adds color and a nice touch. You can also pair them with a fresh citrus salad. A drizzle of lemon herb butter around the plate looks great too! One big mistake is overcrowding the pan. When you add too many scallops, they steam instead of sear. Another mistake is not drying the scallops well. Moisture keeps them from getting that nice golden crust. For the best results, pat them dry with paper towels before cooking. For a complete guide on making this dish, check out the Full Recipe. {{image_2}} You can make your crispy pan-seared scallops even better by adding more flavors. Here are some ideas: - Herbs: Try adding fresh herbs like dill or basil. Just chop them finely and mix them into your butter sauce. The herbs give a fresh taste to the dish. - Spices: You can also add spices for a kick. Paprika brings a mild warmth, while chili flakes add heat. Sprinkle these on the scallops before cooking for extra flavor. Not only can you use lemon herb butter, but there are other tasty sauces you can try: - Creamy garlic sauce: This sauce is rich and smooth. Just mix heavy cream with minced garlic, salt, and pepper. Cook it on low heat until it thickens, then pour it over your scallops. - Tomato-based sauce: For a different flavor, consider a tomato-based sauce. You can sauté garlic and onions, then add crushed tomatoes and herbs. Let it simmer for a while, and pour it over the scallops for a bright, zesty finish. The right sides can make your scallops shine. Here are some great options: - Seasonal vegetables: Choose fresh, seasonal veggies like asparagus or green beans. Sauté them lightly in olive oil and serve them alongside your scallops for a colorful plate. - Different types of grains: Grains like quinoa or rice can add heartiness to your meal. Cook them in vegetable broth for extra flavor, and serve them under the scallops for a satisfying dish. For the complete dish, check the Full Recipe. To keep your crispy pan-seared scallops fresh, place them in an airtight container. This helps avoid moisture. Store them in the fridge for up to two days. After that, the texture may not be as good. Always check for any off smells before eating leftovers. When reheating scallops, use a skillet over low heat. This method helps restore some crispiness. Heat them for a few minutes until warm, flipping gently. Avoid using a microwave. It often makes scallops rubbery and soggy. For best results, enjoy them fresh! If you want to explore the full recipe, check it out here. Cook scallops for about 4 to 6 minutes total. Sear them for 2 to 3 minutes on one side. Once they are golden brown, flip them. Cook for an additional 2 minutes or until they turn opaque. You can tell they are done when they feel firm to the touch. Scallops may not be crispy if they are wet or overcrowded. Make sure to pat them dry before cooking. Use a large skillet to give them space. Avoid flipping them too soon; let them sear undisturbed for the best crust. Yes, you can use frozen scallops. Thaw them in the fridge overnight or place them in cold water for about an hour. Once thawed, pat them dry well. This will help you achieve that crispy texture. Crispy pan-seared scallops pair well with many sides. Try sautéed spinach or a fresh citrus salad. You can also serve them with rice or quinoa for a filling meal. A drizzle of the lemon herb butter adds great flavor too. For more ideas, check the full recipe. In this post, we explored how to cook sea scallops to perfection. We looked at the ingredients needed, essential tools, and detailed instructions from preparation to serving. You learned valuable tips to avoid common mistakes and variations to enhance flavors. Remember, crispy scallops depend on proper drying and pan temperature. With practice, you can serve a delightful dish that impresses everyone. Happy cooking!

Crispy Pan-Seared Scallops Flavorful Delight Recipe

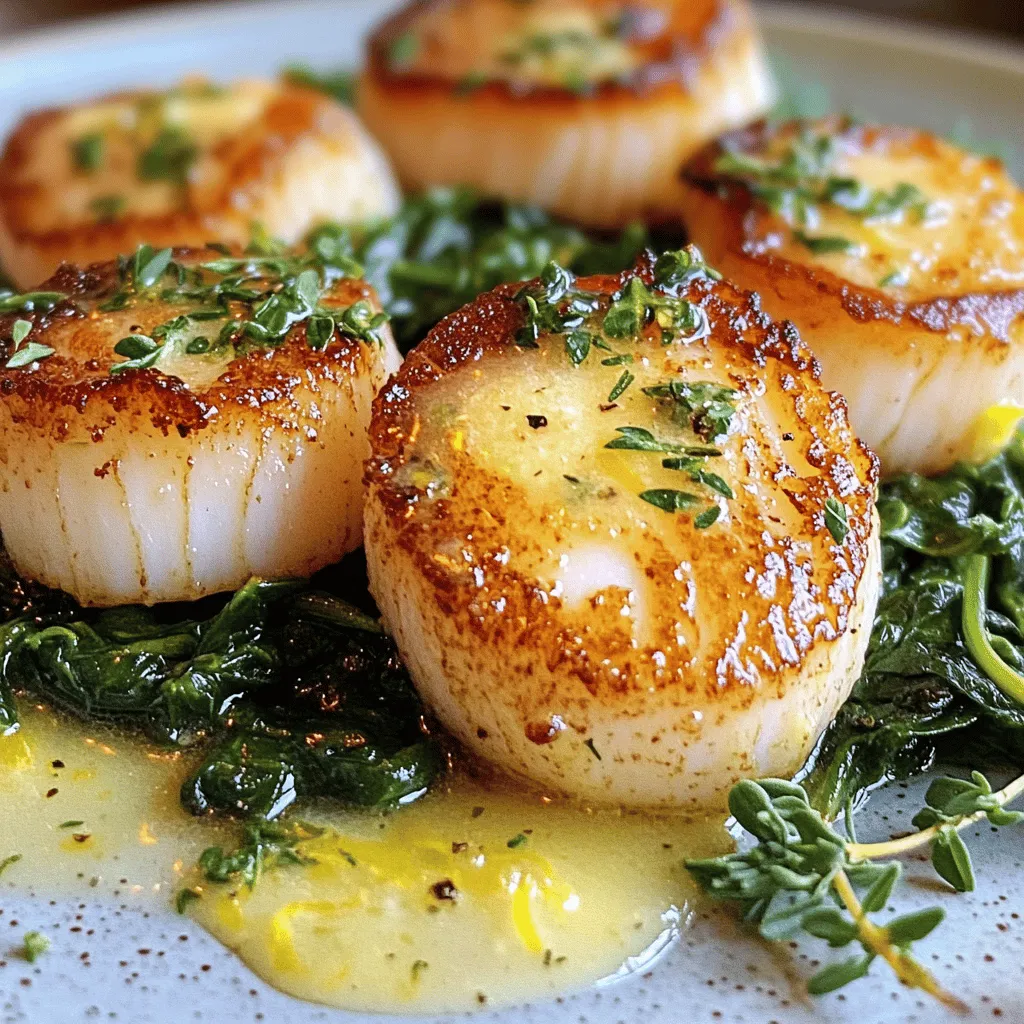
If you’re ready to elevate your dinner game, crispy pan-seared scallops are a must-try! With a golden crust and a

To create the perfect Bang Bang Shrimp, gather these main ingredients: - 1 pound large shrimp, peeled and deveined - 1 cup buttermilk - 1 cup all-purpose flour - 1 cup panko breadcrumbs - 1 teaspoon garlic powder - 1 teaspoon paprika - 1/2 teaspoon cayenne pepper (adjust for heat preference) - 1/2 teaspoon salt - 1/2 teaspoon black pepper - Oil for frying These ingredients will help you make shrimp that is crispy, flavorful, and fun to eat. This sauce is the star of the dish. You need: - 1/2 cup mayonnaise - 1/4 cup sweet chili sauce - 1 tablespoon sriracha (or to taste) - 1 teaspoon lime juice - 1 teaspoon honey This sauce adds a sweet and spicy kick that pairs well with the shrimp. If you have trouble finding some items, here are a few swaps: - For buttermilk, mix 1 cup milk with 1 tablespoon vinegar or lemon juice. - You can use gluten-free flour instead of all-purpose flour. - If you want less spice, leave out the cayenne pepper or reduce the sriracha. - Substitute Greek yogurt for mayonnaise to make it lighter. These options ensure you can still enjoy Bang Bang Shrimp, no matter your kitchen situation. For the full recipe, check out the details above. Start by preparing the shrimp. In a medium bowl, soak 1 pound of peeled and deveined shrimp in 1 cup of buttermilk. Let the shrimp sit for at least 30 minutes. This step adds flavor and keeps the shrimp juicy. While the shrimp soaks, set up your breading station. Use three bowls: - In the first bowl, mix 1 cup of all-purpose flour with 1 teaspoon of garlic powder, 1 teaspoon of paprika, 1/2 teaspoon of cayenne pepper, 1/2 teaspoon of salt, and 1/2 teaspoon of black pepper. - In the second bowl, pour in 1 cup of panko breadcrumbs. - In the third bowl, keep the remaining buttermilk ready. Now, it's time to fry the shrimp. Heat oil in a deep pan over medium-high heat. Make sure the oil is hot, around 350°F or 175°C. 1. Remove the shrimp from the buttermilk. 2. Dip each shrimp in the flour mixture, coating it fully. 3. Shake off any extra flour. 4. Dip the shrimp in the buttermilk again. 5. Roll it in panko breadcrumbs until well covered. Once the shrimp are breaded, gently place a few shrimp in the hot oil. Fry until they turn golden brown, about 2-3 minutes on each side. Use a slotted spoon to remove the shrimp and let them drain on a paper towel. Now, your crispy Bang Bang shrimp are ready! For the full recipe, check out the details above. To get that perfect crispy coating, follow these steps: - Buttermilk Soak: Soak your shrimp in buttermilk. This keeps them moist. - Triple Dipping: Dip shrimp in flour, then buttermilk, and finally panko. This adds layers. - Oil Temperature: Make sure your oil is hot enough. Aim for 350°F. If it's too cold, the shrimp will soak up oil. - Batch Frying: Fry in small batches to keep the oil temperature steady. This helps them stay crispy. You can easily change the heat in your Bang Bang Shrimp: - Cayenne Pepper: Use less if you want milder shrimp. A sprinkle is enough for a kick. - Sriracha: Add more sriracha to the sauce for extra heat. Taste as you mix. - Sweet Chili Sauce: This balances heat. Use more for a sweeter flavor without heat. Here are some fun ways to serve your Bang Bang Shrimp: - On a Plate: Serve shrimp on a bed of shredded cabbage. This adds a nice crunch. - Garnish: Top with sliced green onions or sesame seeds for flair. - Lime Wedges: Add lime wedges on the side for a fresh squeeze. This brightens the dish. - Dipping Sauce: Serve extra Bang Bang sauce on the side for dipping. For the full recipe, check out the Bang Bang Shrimp Delight . Enjoy these tips to make your dish shine! {{image_2}} Bang Bang shrimp work great in tacos. To make these, prepare your shrimp as usual. Then, place them in warm corn or flour tortillas. Add shredded cabbage for crunch. Top with avocado slices and fresh cilantro. Drizzle extra Bang Bang sauce on top for flavor. This twist brings a fun, fresh vibe to your meal. For a lighter option, try a Bang Bang shrimp salad. Start with a bed of mixed greens. Add cucumbers, cherry tomatoes, and red onions for color. Toss in your crispy shrimp and drizzle with the Bang Bang sauce. This salad is not just tasty; it’s also healthy and refreshing. You can enjoy Bang Bang flavors without shrimp. Use cauliflower or tofu as a substitute. Cut them into bite-sized pieces and follow the same breading and frying process. For a vegan sauce, swap mayonnaise with a plant-based alternative. This way, you keep the crunch and flavor without seafood. For the full recipe, check out the Full Recipe section above. To store leftover Bang Bang Shrimp, let them cool first. Place them in an airtight container. This keeps them fresh and prevents sogginess. Store the container in the fridge for up to two days. Make sure not to stack them too high to avoid crushing the crispy coating. When you’re ready to enjoy your leftovers, reheating is key. Preheat your oven to 350°F (175°C). Spread the shrimp on a baking sheet. Bake for about 10-12 minutes, or until they're hot and crispy again. Avoid using the microwave; it can make the shrimp soggy. For extra crispiness, you can use an air fryer at 375°F (190°C) for 6-8 minutes. Yes, you can freeze Bang Bang Shrimp! First, let them cool completely. Arrange them in a single layer on a baking sheet. Freeze for about an hour, then transfer them to a freezer bag. Remove as much air as possible to prevent freezer burn. They can stay in the freezer for up to three months. When ready to eat, thaw in the fridge overnight before reheating. For the best flavor, try to eat them sooner rather than later. For the full recipe, check out the detailed steps to make this crispy delight! Bang Bang Shrimp is a popular appetizer. It features crispy shrimp tossed in a spicy and sweet sauce. The dish combines flavors of mayonnaise, sweet chili sauce, and a hint of sriracha. This mix gives the shrimp a delightful kick. You can serve it as a starter or a snack. I love how easy it is to make at home. You can find the full recipe for a step-by-step guide. Yes, you can make Bang Bang Shrimp without frying. Baking or air frying is a great alternative. For baking, preheat your oven to 425°F (220°C). Place the breaded shrimp on a lined baking sheet. Spray them lightly with oil for crispiness. Bake for about 12-15 minutes or until golden. If you choose air frying, cook at 400°F (200°C) for 8-10 minutes, flipping halfway through. This method keeps the shrimp tasty while reducing the oil. Many restaurants serve Bang Bang Shrimp, especially seafood places. You often find it on the appetizer menu. Some chain restaurants have popular versions too. If you want to try it before making it, check local eateries or seafood restaurants. Many chefs put their twist on the dish, so it’s fun to try different styles. This blog post explored how to make Bang Bang Shrimp from scratch. We covered the main ingredients, including shrimp and sauce, plus substitutes if needed. You learned step-by-step instructions for cooking, tips for crispy coating, and serving ideas. We also discussed fun variations like tacos and salads. Finally, I shared how to store and reheat leftovers. With this guide, you can enjoy delicious Bang Bang Shrimp at home. Now, go ahead and try these methods to impress everyone with your cooking skills!

Bang Bang Shrimp Crispy and Flavorful Delight

If you love bold flavors and crispy textures, Bang Bang Shrimp is your new favorite dish! This tasty treat is

Let's gather all the tasty ingredients you need to make S'mores Cookies. Each part plays a vital role in creating that delicious flavor you crave. - Butter, sugars, and eggs - 1 cup unsalted butter, softened - 1 cup brown sugar - 1/2 cup granulated sugar - 2 large eggs - 1 teaspoon vanilla extract These ingredients form the base of your cookie dough. The butter adds richness, while the sugars provide sweetness. Eggs help bind the dough and give it a nice texture. - Dry ingredients: flour, baking soda, and salt - 3 cups all-purpose flour - 1 teaspoon baking soda - 1/2 teaspoon salt The flour gives your cookies structure. Baking soda helps them rise, and salt balances the sweetness. - Mix-ins: mini marshmallows, chocolate chips, and crushed graham crackers - 1 cup mini marshmallows - 1 cup chocolate chips (semi-sweet or milk chocolate) - 1 cup crushed graham crackers These fun mix-ins create that classic s'mores flavor. The marshmallows add chewiness, while the chocolate brings a sweet, melty goodness. The graham crackers add a nice crunch and flavor, making each bite unforgettable. For the full recipe, be sure to check the detailed instructions. Now, let’s get ready to bake those amazing cookies! To start, you need to preheat your oven to 350°F (175°C). This temperature helps the cookies bake evenly. While the oven heats, line two baking sheets with parchment paper. This step stops the cookies from sticking. You will need a few essential tools. A large mixing bowl, measuring cups, and a cookie scoop are key. A whisk and a spatula will also help mix your ingredients well. Begin by mixing your wet ingredients. In a large bowl, cream together the softened butter, brown sugar, and granulated sugar. Mix until the mixture looks light and fluffy. Add the eggs, one at a time. Make sure to mix well after each egg. Finally, stir in the vanilla extract. In a separate bowl, whisk together your dry ingredients: flour, baking soda, and salt. This step makes sure everything blends well. Gradually add the dry mix to the wet mix. Be careful not to overmix. You want to combine them until just mixed. Now it's time to scoop your cookies. Use a cookie scoop or a tablespoon to drop rounded balls of dough onto your baking sheets. Make sure to leave about 2 inches of space between each cookie. This space allows them to spread. Bake your cookies in the preheated oven for about 10 to 12 minutes. Look for lightly golden edges. The centers may seem soft, but they will firm up as they cool. When done, let the cookies cool on the baking sheets for 5 minutes before moving them to a wire rack. This helps them set perfectly. For the full recipe, check out the details above. To get the right cookie texture, start with your butter. Use softened butter at room temperature. This helps it blend smoothly with sugars. The sugar ratios matter too. Use more brown sugar for chewiness and granulated sugar for crispness. This mix gives you a nice balance. Do not overmix your dough. Once you add the dry ingredients, mix just until combined. Overmixing can make your cookies tough and dry, which is not what we want. You can add fun flavors to your cookies. A pinch of cinnamon or a dash of almond extract can enhance the taste. Experiment with spices, but do not overpower the s'mores flavor. Let’s talk about chocolate. Semi-sweet chocolate chips work well, but milk chocolate is sweeter. Pair them with mini marshmallows for that classic s'mores taste. You can also try flavored marshmallows for a twist! Baking cookies can be tricky. One common mistake is not measuring ingredients correctly. Always use the right tools to measure flour and sugar. Too much flour can lead to dry cookies. If your cookies are underbaked, put them back in the oven for a few minutes. For overbaked cookies, you can try to soften them by adding a slice of bread in the container. This can help them retain moisture. When you follow these tips, you will bake amazing s'mores cookies. For the full recipe, check out the details above. Enjoy the process! {{image_2}} You can easily make gluten-free s'mores cookies. Start by using gluten-free flour. Options like almond flour or coconut flour work well. Look for a blend that mimics regular flour. This helps keep the taste and texture similar to the classic version. When you swap flours, you may need to adjust your recipe a bit. Sometimes, gluten-free flour absorbs more moisture. Add a little extra butter or an egg. This will keep your cookies soft and chewy. Making vegan s'mores cookies is fun and simple. Replace the butter with vegan margarine or coconut oil. Use flaxseed or chia seeds mixed with water instead of eggs. This creates a great binding effect. For the chocolate chips, look for dairy-free options. Brands like Enjoy Life offer tasty plant-based chocolate that pairs well with the other flavors. You won’t miss the dairy in your cookies! Want to switch things up? Try adding nuts or dried fruits. Chopped pecans or walnuts add a nice crunch. Dried cranberries or cherries bring some sweetness. You can also experiment with flavored marshmallows or chocolate chips. Try mint or caramel flavored options for a fun twist. Combining these flavors can take your s'mores cookies to a whole new level! For the full recipe, check out the complete instructions above. To keep your s'mores cookie dough fresh, you can refrigerate or freeze it. If you plan to bake later, shape the dough into balls and place them on a baking sheet. Freeze the balls for about 30 minutes. Once firm, transfer them to a zip-top bag. This method keeps the dough fresh for up to three months. When refrigerating dough, wrap it tightly in plastic wrap. This prevents it from drying out. Use the dough within one week for the best taste. Once your cookies are baked, let them cool completely. Store them in an airtight container to keep them soft. A glass jar or a plastic container works well. If you want the cookies to last longer, freeze them. Layer the cookies with parchment paper in an airtight bag. They can stay fresh for up to three months. To enjoy your cookies warm, reheat them in the oven. Set your oven to 300°F (150°C) and bake for about 5 minutes. You can also microwave a cookie for about 10-15 seconds. This warms them up nicely. For a fun twist, try making s'mores ice cream sandwiches. Take two cookies and add a scoop of your favorite ice cream in between. Press gently and enjoy a delicious treat. For more ideas, check out the Full Recipe for s'mores cookies. S'mores cookies stay fresh for about five days at room temperature. Store them in an airtight container to keep them soft and chewy. If you want them to last longer, freeze them. Just place them in a freezer bag and remove as much air as possible. They can last up to three months in the freezer. When you're ready to eat them, let them thaw at room temperature. Yes! You can prepare the dough a day in advance. Just cover the bowl with plastic wrap and place it in the fridge. This helps the flavors blend well. If you want to freeze the dough, scoop the cookie balls onto a baking sheet and freeze until solid. Then, transfer them to a freezer bag. You can bake them straight from the freezer, just add a minute or two to the baking time. If you're not a fan of chocolate, try using peanut butter chips or butterscotch chips instead. You can also mix in dried fruits like cranberries or cherries for a fruity twist. For a fun crunch, add some toffee bits or crushed Oreos. Customize your s'mores cookies to fit your taste! Absolutely! To make nut-free s'mores cookies, simply skip any nuts in your mix-ins. Use chocolate chips that are labeled nut-free. If you want added crunch, consider using sunflower seeds or pumpkin seeds instead. Always check labels to ensure your ingredients are free from cross-contamination. Enjoy your nut-free treat without worry! In this post, I shared how to make delicious s'mores cookies. You learned about key ingredients, step-by-step baking steps, and helpful tips. I also covered fun variations, storage advice, and answers to common questions. Remember, the perfect cookie texture comes from careful mixing and baking times. Experimenting with flavors can create unique treats. Whether you choose classic or gluten-free options, enjoy baking these goodies. Your kitchen will soon smell amazing!

S’mores Cookies Irresistible and Simple Treat Recipe

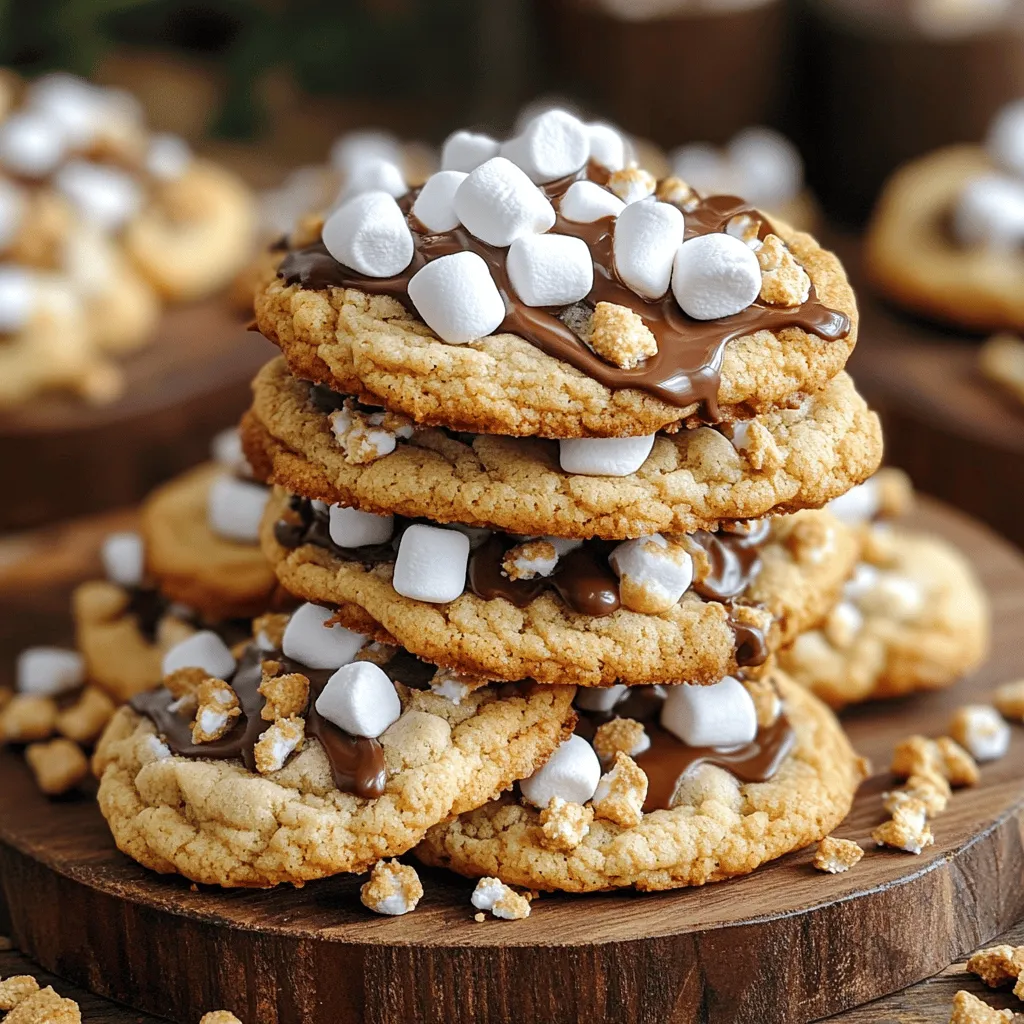
Get ready to indulge in a sweet treat that combines all your favorite campfire flavors! My S’mores Cookies recipe is

Older posts
Newer posts
← Previous Page1 … Page113 Page114 Page115 … Page137 Next →

dsad

© 2025 easycookingbite • Built with GeneratePress

Our Policies

  • Copyright Policy
  • Cookie Policy
  • GDPR Policy
  • Privacy Policy
  • Disclaimer
  • Terms Of Use

More Information

  • Home
  • About
  • Contact
  • Appetizers
  • Dessert
  • Dinner
  • Drinks
©2025, easycookingbite About Back To Top