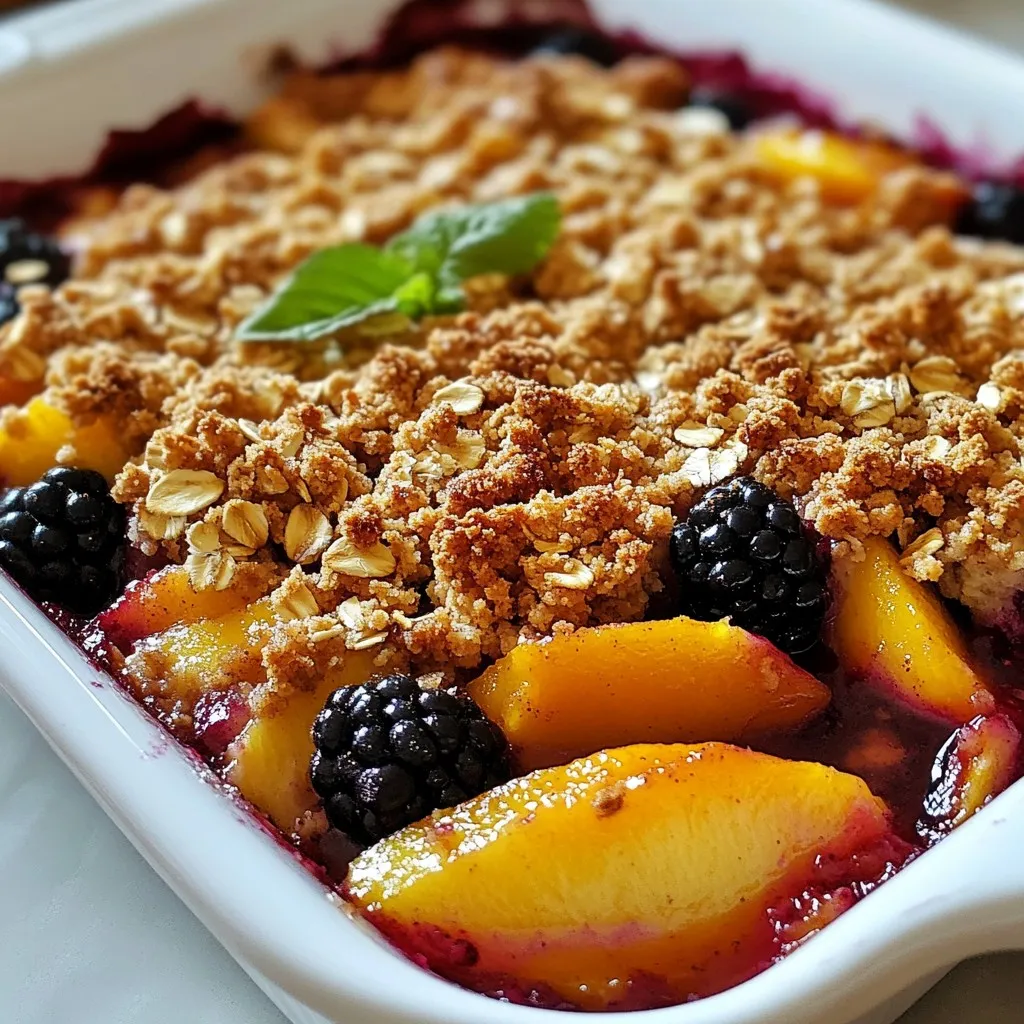
Blackberry Peach Crisp Delicious and Easy Dessert Recipe
Are you ready to indulge in a warm, sweet treat? This Blackberry Peach Crisp recipe combines juicy blackberries and tender
Are you ready to indulge in a warm, sweet treat? This Blackberry Peach Crisp recipe combines juicy blackberries and tender
![- 1 lb chicken breasts - 1 red bell pepper - 1 green bell pepper - 1 large onion - 2 teaspoons chili powder - 1 teaspoon cumin - 1 teaspoon paprika - 1 teaspoon garlic powder - 3 tablespoons olive oil - Salt and pepper to taste - Fresh cilantro - Lime wedges - 8 small flour tortillas Gather these items for the most tasty chicken fajitas. Chicken breasts bring protein and flavor. Red and green bell peppers add crunch and color. The onion gives a sweet touch when cooked. The spices make your fajitas shine. Chili powder adds heat, while cumin brings a warm earthiness. Paprika enhances the color and flavor, and garlic powder gives a punch. Olive oil helps cook everything evenly. Salt and pepper balance the flavors perfectly. For garnishes, fresh cilantro adds brightness. Lime wedges bring a zesty kick that pairs well with the dish. And don't forget those warm flour tortillas. They hold all the tasty fillings together. You can find the full recipe to guide you through the cooking process! Start by taking your sliced chicken and placing it in a bowl. Add olive oil, chili powder, cumin, paprika, garlic powder, salt, and pepper. Mix everything well. You want each piece of chicken coated with the spices. Let the chicken marinate for at least 15 minutes. The longer it sits, the more flavor it gains. Next, heat a large skillet over medium-high heat. Once it’s hot, add the marinated chicken strips. Cook the chicken for about 5 to 7 minutes. Stir it occasionally to make sure it cooks evenly. You know it's done when it is no longer pink in the center. After the chicken is cooked, add the sliced bell peppers and onions to the skillet. Stir them in with the chicken. Cook until the vegetables are soft and slightly charred, about 5 to 7 minutes. This adds a nice texture and flavor to your fajitas. For the full recipe, check out the [Full Recipe]. - Overcooking the chicken: This can make it dry. Cook until just done. - Not marinating long enough: Marinate for at least 15 minutes. Longer adds more flavor. - Experiment with different spices: Try adding cayenne for heat or oregano for depth. - Add a dash of lime juice before serving: This brightens up the dish wonderfully. - Grilling versus skillet cooking: Grilling gives a smoky taste, while skillet cooking is easier. - Using a slow cooker: This method allows flavors to meld beautifully over time. For a full recipe, check out the complete instructions to make these easy chicken fajitas! {{image_2}} You can make a tasty vegetarian version of chicken fajitas. Simply swap out the chicken for mushrooms or tofu. Both options soak up flavors well. For mushrooms, use portobello or shiitake for a meaty texture. If you choose tofu, press it first to remove excess water. Cut it into strips and marinate just like the chicken. This keeps the dish vibrant and full of flavor. If you like heat, kick up the spice in your fajitas. Add sliced jalapeños or a pinch of cayenne pepper to the marinade. You can also sprinkle more chili powder for extra flair. This gives your meal a nice kick. Just remember to taste as you go. You can always add more spice, but it’s hard to take it out. Chicken isn’t the only choice for fajitas. You can use beef or shrimp for a different twist. For beef, flank steak or sirloin works well. Slice it thin and marinate like you would the chicken. For shrimp, peel and devein them first. Cook them quickly until they turn pink, about 3-4 minutes. Using these proteins can change the whole meal vibe. You can explore and find what you love best! For the full recipe, be sure to check out the detailed steps and ingredients. To keep your chicken fajitas fresh, store leftovers in an airtight container. Refrigerate them within two hours of cooking. This helps prevent bacteria growth. Consume the leftovers within three days for best taste. - Refrigeration guidelines: Use a container that seals well. Label it with the date. - Best practices for keeping ingredients fresh: Separate chicken from veggies if you can. It helps maintain texture. When reheating, aim to keep that juicy texture. Use a skillet over medium heat. Add a splash of water to help steam the chicken and veggies. Stir often to heat evenly. - Recommended methods to maintain texture and flavor: Microwaving is quick, but it may dry them out. If you use a microwave, cover the dish to trap steam. Freezing is great for longer storage. Let the fajitas cool completely before freezing. Pack them in freezer-safe bags or containers. Make sure to remove as much air as possible. - Instructions for freezing cooked fajitas: You can freeze the chicken and veggies together. They will keep for up to three months. - Thawing and reheating tips: Thaw in the fridge overnight. Reheat in a skillet for best results. This keeps the flavors bright. For the complete recipe and tips, check the [Full Recipe]. Yes, you can use frozen chicken for fajitas. It’s safe and easy. To cook it, follow these steps: - Thaw the chicken in the fridge overnight. - If you are short on time, use the microwave to defrost it. - Cook the chicken in a skillet over medium heat until fully cooked. - This may take a bit longer than fresh chicken, about 10 to 15 minutes. Using frozen chicken can save time. Just ensure it reaches an internal temperature of 165°F. Making fajitas ahead of time is simple. Here are some tips: - Slice the chicken, peppers, and onions. - Store them in separate containers in the fridge. - Marinate the chicken for up to 24 hours for better flavor. - You can also cook the chicken and veggies ahead of time. Just reheat when ready to serve. This way, you save time and enjoy fresh fajitas any day! Fajitas pair well with many sides and toppings. Here are some ideas: - Serve with rice or beans for a hearty meal. - Guacamole adds creaminess and flavor. - Sour cream provides a cool contrast. - Fresh salsa or pico de gallo adds zest. - Shredded cheese can make fajitas even more tasty. These sides enhance your fajita experience. Enjoy your meal with family and friends! Check out the Full Recipe for detailed steps and ingredients. In this article, we explored easy chicken fajitas. We covered the main ingredients like chicken, peppers, and onions. You learned how to marinate the chicken and cook it perfectly. I shared tips to avoid common mistakes and enhance flavors. Lastly, we discussed variations and storage methods. With these steps, you can make tasty fajitas your way. Enjoy cooking and sharing your fajitas with friends and family!](https://easycookingbite.com/wp-content/uploads/2025/05/ca6ca842-d353-4ffb-b92e-f2275e1deb55.webp)
Are you ready to spice up your dinner routine? This easy chicken fajitas recipe is simple, tasty, and perfect for
![To make tasty maple pecan granola bars, you need a few simple ingredients. Here’s the list: - 2 cups rolled oats - 1 cup chopped pecans - 1/2 cup almond butter (or peanut butter) - 1/2 cup pure maple syrup - 1/4 cup honey or agave syrup - 1/2 teaspoon vanilla extract - 1/2 teaspoon salt - Optional: 1/2 cup dried cranberries or raisins - Optional: 1/4 teaspoon ground cinnamon These ingredients come together to create a delicious snack. The rolled oats provide a hearty base. Chopped pecans add a nice crunch and rich flavor. Almond or peanut butter binds everything and adds creaminess. Maple syrup and honey bring sweetness and depth. The salt balances the flavors, while vanilla adds warmth. You can even toss in dried fruit or cinnamon for extra taste. This recipe is quite flexible. Feel free to swap in your favorite nuts or sweeteners. You can find the full recipe in the article. Enjoy creating your own tasty granola bars! - Set the oven to 350°F (175°C). - Line an 8x8 inch baking dish with parchment paper. This helps with easy removal later. - In a large bowl, combine 2 cups of rolled oats, 1 cup of chopped pecans, and 1/4 teaspoon of ground cinnamon if you want. Mix well to blend them. - In a small saucepan, blend 1/2 cup of almond butter, 1/2 cup of pure maple syrup, 1/4 cup of honey, 1/2 teaspoon of vanilla extract, and 1/2 teaspoon of salt over low heat. Stir constantly for 2-3 minutes until warm. - Pour the warm mixture over the dry ingredients. - If you like, add 1/2 cup of dried cranberries or raisins. Mix until all dry ingredients are coated. - Transfer the mixture to your prepared dish and press down firmly. - Bake for 20-25 minutes or until the edges turn golden brown. - Let the bars cool completely in the pan. - Once cool, lift them out using the parchment paper. Cut into bars or squares as you like. Enjoy making these tasty Maple Pecan Granola Bars! For the full recipe, check the ingredients and steps above. To make great granola bars, mix the ingredients well. This ensures every bite has flavor. You want the oats, nuts, and sweeteners to blend fully. Next, press the mixture firmly into the baking dish. This step is key for compact bars that hold together. If you skip this, your bars may crumble. Store your granola bars in an airtight container. This keeps them fresh for up to a week. You can also freeze them for longer storage. Just wrap each bar in plastic wrap. Then place them in a freezer bag. When you want to eat one, thaw it in the fridge overnight. Want to boost the flavor? Try adding spices like cinnamon or nutmeg. These can add warmth and depth. You can also include chocolate chips or seeds. They give a nice crunch and can make your bars even tastier. For a twist, consider using different nuts or dried fruits. This recipe is flexible, so have fun with it! For the full recipe, check out the section above. {{image_2}} You can change the nuts in your granola bars. Try almonds or walnuts for a new flavor. Both nuts add crunch and taste. You can also include seeds. Chia seeds or sunflower seeds work great. They add extra nutrients and texture. If you want to switch up the sweetness, you have options. Honey is a classic choice, but agave syrup is also good. You can use maple syrup too, but adjust the amount based on your taste. Each sweetener gives a unique flavor to the bars. Fruits can change the whole taste of your granola bars. Try adding dried apples or bananas instead of cranberries. They add sweetness and a chewy texture. You can also swap the nut butter. Use peanut butter or cashew butter for different flavors. Each choice makes the bars unique and tasty. To learn how to make these delicious treats, check out the [Full Recipe]. To keep your maple pecan granola bars fresh, use an airtight container. This helps seal in moisture and flavor. You can choose a glass jar or a plastic container with a tight lid. These bars can last up to a week at room temperature. If you notice them getting a bit soft, it’s time to eat them. Keep them cool and away from direct sunlight. This will help maintain their crunch and taste. Freezing is a great way to store granola bars for longer. To freeze them, first cut your bars into squares. Then, wrap each piece in plastic wrap. This keeps them from sticking together in the freezer. Place the wrapped bars into a freezer-safe bag or container. Make sure to label it with the date. Your bars can stay frozen for up to three months. When you want to enjoy them, take a bar out and let it thaw at room temperature. For the best texture, don't microwave them. Instead, let them sit for about 30 minutes. This keeps the bars from becoming too soft or mushy. By storing them right, you can enjoy your delicious maple pecan granola bars whenever you want! For the full recipe, check out the earlier section. To make these bars vegan, you can replace honey with more maple syrup. This keeps the sweet flavor and adds a nice touch. You can also use agave syrup, which is a great option. Ensure that your nut butter is vegan too, like almond or peanut butter. Yes, you can use old-fashioned oats in this recipe. The texture will be a bit chewier. Adjust the baking time slightly if needed. Keep an eye on them to ensure they don’t get too hard. Homemade granola bars last about one week at room temperature. Store them in an airtight container to keep them fresh. You can also freeze them for up to three months. Just wrap them well to avoid freezer burn. Absolutely! You can swap out pecans for almonds or walnuts. Feel free to add seeds like chia or sunflower for more crunch. You can even change the dried fruit to your favorite type, like blueberries or apricots. The options are endless! Check the Full Recipe for more ideas. You’ve learned how to make delicious granola bars using simple ingredients. We covered each step, from mixing to baking, and even how to store them. Remember, you can change the nuts, sweeteners, or fruits to fit your taste. These bars are not just tasty but also easy to customize. Enjoy your homemade treats and feel proud of your creation. Happy snacking!](https://easycookingbite.com/wp-content/uploads/2025/05/a956aacd-eec7-4ead-91bc-2cf903e9a9a9.webp)
Are you craving a crunchy snack that’s both tasty and easy to make? Look no further! My Maple Pecan Granola
![- 1 cup frozen strawberries - 1 banana, sliced (plus extra for topping) - 1/2 cup Greek yogurt - 1/2 cup almond milk (or any milk of choice) - 1 tablespoon honey (or maple syrup) - 1/4 teaspoon vanilla extract For the Strawberry Banana Smoothie Bowl, you need simple and fresh ingredients. Frozen strawberries give the bowl a chilly and fruity base. Using a ripe banana adds creaminess and natural sweetness. Greek yogurt adds protein and a nice tang. Almond milk keeps it light, but you can use any milk you like. Honey or maple syrup is great for extra sweetness, while vanilla extract gives a warm flavor. - 1/4 cup granola - 1 tablespoon chia seeds (optional, for topping) - Fresh mint leaves (for garnish) - Additional fruits (like blueberries or kiwi) Toppings make your smoothie bowl fun and tasty! Granola adds a crunch, while chia seeds boost nutrition. Fresh mint leaves bring a fresh touch. You can also add other fruits to your bowl for a colorful look and extra flavor. Each topping lets you customize your bowl and makes it more exciting to eat. For the full recipe, refer to the complete guide. To make the smoothie base, I start with the blender. I add 1 cup of frozen strawberries, 1 sliced banana, 1/2 cup of Greek yogurt, and 1/2 cup of almond milk. Then, I drizzle in 1 tablespoon of honey and 1/4 teaspoon of vanilla extract. I blend this mix on high speed until it’s creamy and smooth. If I want it thinner, I simply add more almond milk and blend again. Once my smoothie is ready, I pour it into a bowl. The next step is to slice another banana. I arrange those slices neatly on top of the smoothie, making it look pretty and inviting. Now comes the fun part—adding toppings! I sprinkle 1/4 cup of granola and 1 tablespoon of chia seeds over the banana slices. This adds a nice crunch and boosts the nutrients. Finally, I garnish with fresh mint leaves for a lovely touch of color and flavor. And just like that, my Strawberry Banana Smoothie Bowl is ready to enjoy! For a full recipe, you can check the details above. To get the right thickness for your smoothie bowl, start with frozen fruit. Frozen strawberries and bananas blend into a creamy base. If your mix is too thick, add more almond milk, a little at a time. Blend again until you reach your desired consistency. For best results, blend for at least 30 seconds. When blending frozen fruit, I suggest using a powerful blender. This helps break down the ice crystals and make a smooth mix. If your blender struggles, try letting the fruit sit out for a few minutes to soften slightly. This little trick makes blending easier. For yogurt, Greek yogurt is my go-to. It adds creaminess and protein. If you want a dairy-free option, try coconut yogurt. It’s rich and tasty. For milk, almond milk is light and nutty. You can also use oat milk or soy milk based on your taste. When picking fruits, fresh strawberries are great when in season. However, frozen fruits often have a stronger flavor. They are picked at peak ripeness and are easy to store. Choose what works best for your needs, but don’t shy away from frozen options. Smoothie bowls are perfect for breakfast or a snack. You can enjoy them at any time of day. They are also fun to share at brunch with friends. Pair your smoothie bowl with whole-grain toast or a light salad for a balanced meal. If you want something sweet, serve it with a piece of dark chocolate. This adds a nice contrast to your fresh bowl and makes it feel special. For the full recipe, check out the full recipe section. {{image_2}} You can easily change up the flavor of your smoothie bowl. Adding spinach gives it a green twist. Spinach adds nutrients without changing the taste much. You can also mix in nut butters. Almond or peanut butter adds creaminess and protein. Just a spoonful gives a nice flavor boost. If you want a dairy-free option, use coconut yogurt instead of Greek yogurt. Almond milk works well, but oat milk is a great choice too. For sweeteners, honey is nice, but maple syrup is a good alternative. You can even use agave syrup for a different taste. Using seasonal fruits can make your bowl exciting. In summer, try adding fresh peaches or berries. In winter, use apples or pears for a cozy vibe. You can also create a tropical version. Use mangoes, pineapples, or even coconut. Feel free to mix and match to find your favorite combo. Try these variations to keep your Strawberry Banana Smoothie Bowl fresh and fun! For the complete recipe, check out the [Full Recipe]. To store a smoothie bowl, place any leftovers in an airtight container. This keeps it fresh. You should eat it within one day for the best taste. If you keep it longer, it may lose flavor and texture. Always store it in the refrigerator. You can freeze a smoothie bowl if you have extras. Pour the smoothie into a freezer-safe container. Leave some space at the top because it will expand. To thaw, place it in the fridge overnight. Stir it well before eating to get the right texture. Enjoy it as a quick breakfast or snack! You can easily make this bowl vegan. Start by swapping Greek yogurt for coconut yogurt or almond yogurt. Replace almond milk with any plant-based milk, like oat or soy milk. Use maple syrup instead of honey for sweetness. These swaps keep the creaminess and flavor you love. Yes, you can prep ahead. Blend the smoothie base and store it in the fridge for up to 24 hours. When you’re ready to eat, just pour it into a bowl and add your toppings. For best flavor, add fresh fruits and granola just before serving. This smoothie bowl offers many health benefits. Strawberries are high in vitamin C and antioxidants. Bananas provide potassium and fiber. Greek yogurt adds protein and probiotics for gut health. Almond milk is low in calories and dairy-free. Together, they make a nutritious meal. Absolutely, adding protein is easy. You can mix in protein powder while blending. Greek yogurt also boosts protein content. For a nutty flavor, add a scoop of almond butter or peanut butter. These options enhance taste and nutrition. You learned how to make a delicious Strawberry Banana Smoothie Bowl. We covered the main ingredients, optional toppings, and step-by-step instructions. I shared tips for perfecting texture and selecting the best ingredients. You also discovered tasty variations and storage options. This smoothie bowl is not just tasty; it’s healthy and fun to make. Enjoy customizing it to suit your taste. Dive in and savor each bite!](https://easycookingbite.com/wp-content/uploads/2025/05/9a6c81d5-375c-4751-8265-3c93c7489549.webp)
Are you ready to blend up a delicious Strawberry Banana Smoothie Bowl? This easy and healthy recipe packs nutrients while
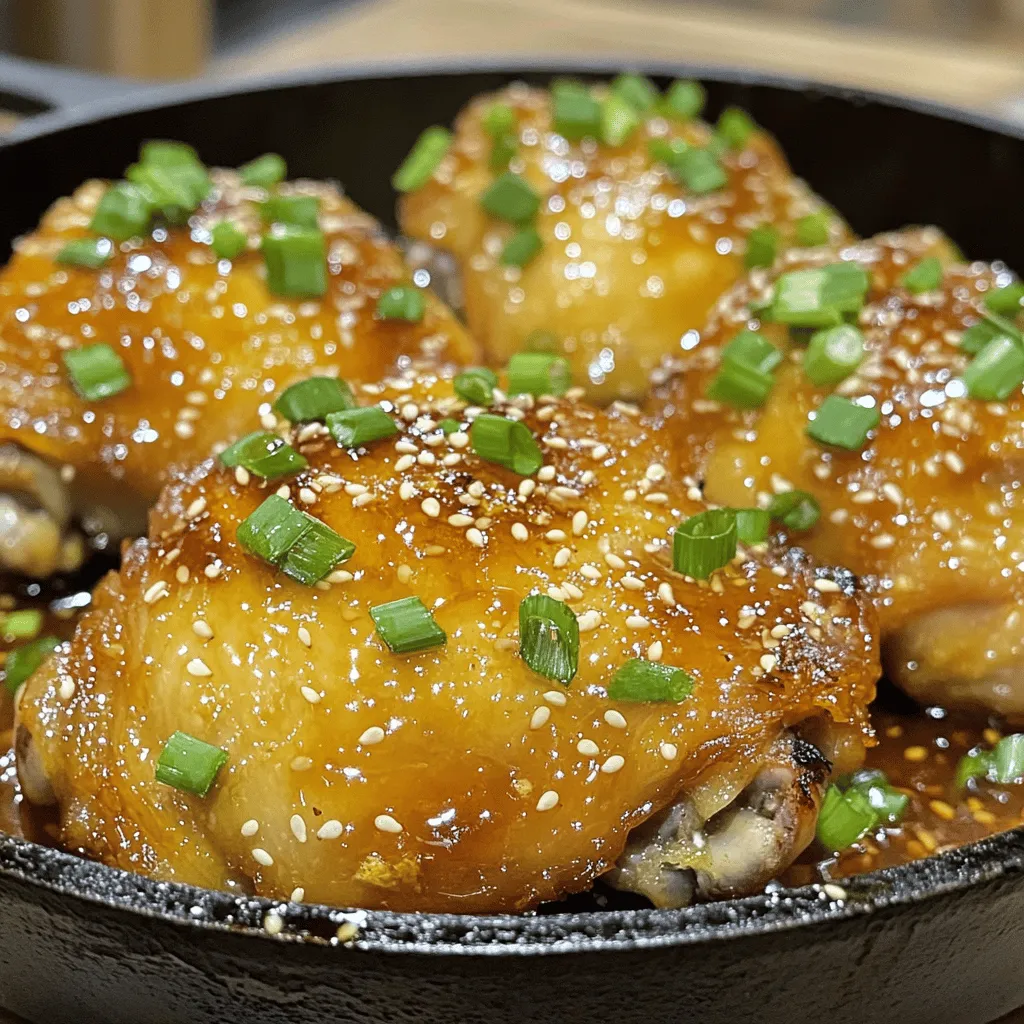
Ready to spice up your weeknight meals? My Honey Garlic Chicken Thighs recipe is here to save the day! This
![- 1 medium head of cauliflower, riced (about 4 cups) - 1 cup mixed vegetables (peas, carrots, bell peppers) - 1 small onion, finely chopped - 2 cloves garlic, minced - 2 tablespoons soy sauce (or tamari) - 2 tablespoons sesame oil - Optional: 1 tablespoon fresh ginger, grated - Salt and pepper to taste - 2 large eggs (or tofu for a vegan option) - 3 green onions, sliced for garnish Cauliflower is the star of this dish. It is low in carbs and high in nutrients. Riced cauliflower is easy to make and adds great texture. Mixed vegetables give color and nutrition. Onions and garlic add depth to the flavor. For flavor, use soy sauce or tamari. Sesame oil gives a nutty taste. Adding ginger can boost the dish's flavor profile. You can adjust salt and pepper to suit your taste. If you want more protein, add eggs or tofu. Green onions make a great topping. They add freshness and crunch. For the full recipe, check the earlier section. Enjoy making this dish! To start, you need to rice the cauliflower. First, remove the leaves and stem. Then, cut the head into smaller florets. You can use a food processor or a box grater to make the cauliflower rice. If using a food processor, pulse the florets until they look like rice. If you prefer the grater, grate the florets until they are small pieces. Set the riced cauliflower aside for later. Next, heat 1 tablespoon of sesame oil in a large skillet or wok over medium heat. Add the chopped onion and cook for 2-3 minutes. You want the onion to turn translucent. After that, add the minced garlic. If you like, you can add fresh ginger here too. Cook for about one minute until it smells good. Push the onion and garlic to one side of the skillet. Crack the eggs into the pan, or add your crumbled tofu if you want a vegan meal. Scramble the eggs or tofu until they are fully cooked. Then, mix them with the onion and garlic. Now, it’s time to add the mixed vegetables. Stir-fry these for about 2-3 minutes until they are heated through. After that, add the riced cauliflower to the skillet. Stir everything together well. Pour the soy sauce over the mixture. Cook for about 5-7 minutes. You want the cauliflower to be tender but not mushy. Finally, drizzle the rest of the sesame oil. Season with salt and pepper to taste. Before you serve, fold in the sliced green onions. This adds a nice touch. For the full recipe, check out the details above. Enjoy your flavorful and nutritious cauliflower fried rice! When you choose cauliflower, look for firm heads. The leaves should be bright and fresh. A good cauliflower feels heavy for its size. Avoid any brown spots or soft areas. This ensures you get the best flavor in your dish. Fresh cauliflower will give you a crisp and tasty bite. To make the best cauliflower fried rice, use a hot skillet or wok. Heat the pan before adding oil. This helps to seal in flavors. Stir-fry the onion and garlic until they are soft. Don’t forget to push them to the side when adding eggs or tofu. This keeps the texture right. Avoid overcooking the cauliflower. Cook it until just tender, not mushy. If it gets too soft, it loses its texture. Stir-fry for about 5 to 7 minutes. This gives you a great crunch with every bite. To add depth to your dish, use spices and herbs. A pinch of ginger gives a fresh kick. Try adding black pepper for a slight heat. You can also sprinkle in some chili flakes for spice lovers. Fresh herbs like cilantro or basil can brighten the taste. Experiment to find what you like best. These simple additions transform your meal into something special. For the full recipe, check out the details provided above. {{image_2}} To make cauliflower fried rice plant-based, switch eggs for tofu. Use firm tofu for the best texture. Simply crumble the tofu before cooking. Sauté it like you would the eggs. This gives you protein without losing flavor. The tofu absorbs the savory taste of soy sauce well. It works perfectly with the other fresh veggies. For a keto-friendly version, focus on low-carb swaps. You can replace the mixed vegetables with zucchini or bell peppers. These are low in carbs and add crunch. You can also skip the soy sauce and use coconut aminos instead. This option cuts down on carbs and adds a hint of sweetness. Feel free to mix and match flavors for variety. Add cooked shrimp or chicken for protein. For a spicy kick, toss in some red pepper flakes. You could also use different sauces, like teriyaki or sweet chili. Each swap can change the dish's taste, keeping it exciting. Always adjust the seasonings based on your preferences. For more ideas, check the Full Recipe. To store cauliflower fried rice, place it in an airtight container. Make sure it cools down first to avoid steam buildup. Store it in the fridge for up to four days. If you want to keep it fresher, add a layer of plastic wrap before sealing the lid. This helps lock in moisture and keep the dish tasty. Freezing cauliflower fried rice is easy. Portion the leftovers into freezer bags or containers. Remove as much air as possible to prevent freezer burn. You can freeze it for up to three months. To defrost, place it in the fridge overnight or microwave it for quicker results. Just remember to stir it well after defrosting. Reheating cauliflower fried rice is simple. You can use a skillet or microwave. For a skillet, heat a little oil over medium heat. Add the fried rice and stir it often until it's hot. In the microwave, cover it with a damp paper towel to keep it moist. Heat in short bursts, stirring in between. This helps keep the rice from getting dry. Enjoy your tasty meal! Yes, you can use frozen cauliflower rice. It saves time and is easy to use. Here are some advantages and tips: - Convenience: Frozen cauliflower rice is pre-riced and ready to cook. - Longer shelf life: It lasts longer than fresh cauliflower. - Quick cooking: It cooks faster than fresh, so watch your cooking time. - Thawing: You can add it straight from the freezer to the pan. Avoid thawing to prevent sogginess. To spice up your cauliflower fried rice, try these additions: - Red pepper flakes: Sprinkle some in while cooking for heat. - Sriracha or chili paste: Stir in a spoonful for a bold kick. - Jalapeños: Add diced jalapeños for fresh heat. - Hot sauce: Drizzle your favorite hot sauce just before serving. Cauliflower fried rice is a healthy choice. Here’s why: - Low in carbs: Cauliflower is a great low-carb alternative to regular rice. - High in fiber: It supports digestion and keeps you full. - Rich in vitamins: Cauliflower is packed with vitamin C and K. - Antioxidants: It contains compounds that help fight inflammation. - Low calories: This dish is lower in calories compared to traditional fried rice. These benefits make cauliflower fried rice a tasty, nutritious meal. For the full recipe, check out the [Full Recipe]. This blog post covered how to make delicious cauliflower fried rice. We looked at key ingredients and how to prepare them. I shared tips on choosing fresh cauliflower and cooking techniques for better flavor. We also explored variations to fit different diets, plus how to store and reheat leftovers. In conclusion, you can create a healthy dish that bursts with flavor. Enjoy experimenting with different ingredients to customize your fried rice!](https://easycookingbite.com/wp-content/uploads/2025/05/4a81371d-8408-4480-809a-b041ae985c16.webp)
Looking for a healthy twist on a classic favorite? My Cauliflower Fried Rice is not just a tasty dish; it’s
. {{image_2}} You can easily customize the flavor of your spinach feta stuffed chicken breasts. - Add sun-dried tomatoes for an extra flavor punch. They bring a sweet and tangy taste. - Incorporate herbs like basil or thyme for a unique twist. These herbs add freshness and depth. Switching up the cheese can change the whole dish. - Substitute feta with goat cheese for a different flavor profile. Goat cheese offers a creamier texture and tangy taste. - Try cream cheese with herbs for a creamy filling. It makes the stuffing rich and smooth. You can adapt this recipe to fit different diets. - Replace chicken with turkey for a leaner option. Turkey is just as delicious and healthy. - Make a vegetarian version using mushrooms instead of chicken. Stuff large portobello mushrooms with the filling for a tasty dish. For the full recipe, check out the Spinach Feta Stuffed Chicken Breasts. Store leftover stuffed chicken in an airtight container in the fridge. Make sure it cools down first. This way, it stays fresh for up to three days. When you want to eat it again, simply take it out and enjoy. You can freeze stuffed chicken before baking for later use. Wrap each piece in plastic wrap and then in aluminum foil. This helps avoid freezer burn. It can stay frozen for up to three months. When you’re ready, thaw it overnight in the fridge before cooking. Reheat in the oven or microwave until warmed through. If using the oven, set it to 350°F (175°C). Place the chicken in a baking dish and cover with foil. Bake for about 15-20 minutes, or until hot. In the microwave, heat in short bursts, stirring between each. Enjoy your meal! How do I know when the stuffed chicken is cooked? You can check if the chicken is done by using a meat thermometer. The internal temperature should reach 165°F (74°C). If you do not have a thermometer, cut into the chicken. The meat should be white with no pink inside, and the juices should run clear. Can I make Spinach Feta Stuffed Chicken Breasts ahead of time? Yes, you can prepare the stuffed chicken breasts in advance. Stuff the chicken and keep it in the fridge for up to 24 hours before cooking. Just remember to take it out of the fridge and let it sit at room temperature for 15 minutes before baking. What can I serve with Spinach Feta Stuffed Chicken Breasts? This dish pairs well with a light salad or roasted veggies. You can also serve it with crusty bread or rice for a hearty meal. Can I use frozen spinach instead of fresh? Yes, you can use frozen spinach. Just make sure to thaw and drain it well before mixing it into the stuffing. This keeps your filling from being too watery. What can I substitute for cream cheese? If you need a substitute for cream cheese, you can use ricotta cheese or Greek yogurt. Both options will give you a creamy texture with a slightly different taste. Can I grill Spinach Feta Stuffed Chicken Breasts? Yes, you can grill these stuffed chicken breasts. Just make sure to use medium heat and monitor the chicken closely. It may take a little longer than baking, around 25-30 minutes. Is it possible to make this dish in a slow cooker? Absolutely! You can place the stuffed chicken breasts in a slow cooker. Cook on low for 4-5 hours or until the chicken is fully cooked. This method keeps the chicken very moist. For the full recipe, check out the [Full Recipe]. In this blog post, we explored a simple and tasty recipe for Spinach Feta Stuffed Chicken Breasts. I shared key ingredients like chicken, spinach, and feta, along with preparation and cooking tips. You can customize this dish with various flavors and store leftovers easily. Enjoy trying out this recipe. It's packed with flavor and fun to make. Cooking can be a joy, and this dish is a great way to start. You’ll impress your family and friends with your cooking skills!](https://easycookingbite.com/wp-content/uploads/2025/05/87e6a02c-60b2-4fd6-8b44-eb41e350a50f.webp)
Get ready to elevate dinner with my Savory Spinach Feta Stuffed Chicken Breasts! This dish features tender chicken filled with
![To make a delicious Mediterranean quinoa salad, gather these fresh ingredients: - 1 cup quinoa, rinsed - 2 cups vegetable broth or water - 1 cup cherry tomatoes, halved - 1 cucumber, diced - 1 bell pepper (red or yellow), diced - 1/2 red onion, finely chopped - 1/2 cup kalamata olives, pitted and halved - 1/2 cup feta cheese, crumbled (optional for a vegan version) - 1/4 cup fresh parsley, chopped - 1/4 cup olive oil - 2 tablespoons lemon juice - 1 teaspoon dried oregano - Salt and pepper to taste You can swap some ingredients for different flavors. Try these options: - Use quinoa blend instead of plain quinoa for a nutty taste. - Replace vegetable broth with chicken broth for richer flavor. - Use black olives instead of kalamata olives for a milder taste. - Substitute feta cheese with avocado for a creamy vegan twist. Want to make your salad even tastier? Add these extras: - Sun-dried tomatoes for a sweet and tangy kick. - Chickpeas for added protein and heartiness. - Arugula or spinach for extra greens and nutrients. - Nuts like pine nuts or walnuts for crunch and flavor. This Mediterranean quinoa salad is easy to make and packed with fresh flavors. Check out the Full Recipe for more details! To cook the quinoa, start by boiling two cups of vegetable broth or water in a medium pan. Once it boils, add one cup of rinsed quinoa. Lower the heat to low, cover the pan, and let it simmer for about 15 minutes. The quinoa will absorb the liquid and become fluffy. After cooking, take it off the heat and set it aside to cool slightly. While the quinoa cools, prepare your vegetables. Halve one cup of cherry tomatoes and set them aside. Dice one cucumber and one bell pepper, either red or yellow. Finely chop half a red onion and a quarter cup of fresh parsley. These fresh veggies add great flavor and color to the salad. In a large bowl, combine the cooled quinoa, cherry tomatoes, cucumber, bell pepper, red onion, and kalamata olives. For a special touch, add a quarter cup of chopped parsley. In a small bowl, whisk together a quarter cup of olive oil, two tablespoons of lemon juice, one teaspoon of dried oregano, and a pinch of salt and pepper. Pour this dressing over the quinoa salad and toss it gently until everything is mixed well. If you like, sprinkle crumbled feta cheese on top just before serving. Let the salad sit for about 10 minutes. This helps the flavors come together nicely. For the full recipe, refer to the previous sections. To make perfect quinoa, start with rinsed grains. Rinsing removes bitter saponins. Use two cups of water or broth for each cup of quinoa. Bring it to a boil, then lower the heat. Cover and let it simmer for about 15 minutes. When done, the quinoa should look fluffy. If you see little white tails, that’s normal. Let it cool before mixing it into the salad. The dressing is key to flavor. A mix of olive oil and lemon juice works well. Add a pinch of salt and pepper for taste. If you like herbs, try adding fresh basil or dill. For a kick, add minced garlic or a dash of red pepper flakes. You can also swap lemon juice for balsamic vinegar for a different taste. Serve the salad in a big bowl for sharing. A platter with extra parsley and lemon wedges looks great. You can also pair it with grilled chicken or fish for a hearty meal. For a picnic, pack it in a jar with layers. This keeps everything fresh and tasty. You can find the full recipe for Mediterranean Quinoa Salad [Full Recipe]. {{image_2}} To make this salad vegan, simply leave out the feta cheese. You can also add a bit of nutritional yeast for a cheesy flavor. The rest of the ingredients are already plant-based. This dish is colorful and fresh, making it perfect for any meal. If you want more protein, add chickpeas or black beans. These legumes not only boost protein but also add texture. You can toss in grilled chicken or shrimp if you prefer animal protein. Just be sure to chop them into bite-sized pieces. Using seasonal ingredients keeps the salad fresh and exciting. In summer, add ripe peaches or strawberries for sweetness. In fall, try roasted butternut squash or apples for a warm touch. You can swap out the bell pepper for roasted red peppers or even use different herbs like basil or mint for a twist. Store leftover Mediterranean quinoa salad in an airtight container. Keep it in the fridge. It stays fresh for up to three days. If you know you won't eat it all, hold off on adding feta cheese. This keeps it from getting soggy. Use glass or plastic containers with tight-fitting lids. These help keep air out and flavors in. If you have smaller portions, use smaller containers. This makes it easy to grab a quick snack. You can enjoy this salad cold or at room temperature. If you prefer it warm, use the microwave. Heat it in 30-second bursts to avoid overheating. Stir between bursts for even warmth. Do not reheat it too much to maintain texture and taste. For the complete recipe, check out the Full Recipe section. Mediterranean Quinoa Salad is packed with nutrients. It provides protein, fiber, and healthy fats. One serving contains: - Calories: About 220 - Protein: 6 grams - Carbohydrates: 30 grams - Fiber: 5 grams - Fat: 10 grams (mainly from olive oil and olives) This salad is a great choice for a balanced meal. Quinoa adds plant-based protein. Fresh vegetables boost vitamins and minerals. Feta cheese adds calcium but is optional. Yes, you can make this salad ahead of time. In fact, it tastes even better after sitting. Prepare it up to a day in advance. Just store it in the fridge in an airtight container. When ready to serve, give it a quick stir. Add more dressing if needed. If you use feta, add it just before serving to keep it fresh. Yes, Mediterranean Quinoa Salad is gluten-free. Quinoa itself is a gluten-free grain. Ensure that all other ingredients are also gluten-free, like the vegetable broth. This makes it a safe choice for those with gluten sensitivities. Enjoy this fresh and flavorful dish without worry. For the full recipe, check out the earlier section. This blog post explored how to make a delicious Mediterranean Quinoa Salad. We discussed ingredients, cooking tips, and variations to fit your taste. I shared how to cook quinoa perfectly and prepare fresh veggies, plus suggestions for dressings. Storing your leftovers was also covered for tasty meals later. Embrace this easy, healthy dish and make it your own! You'll enjoy every bite.](https://easycookingbite.com/wp-content/uploads/2025/05/5e6ae6df-1cc8-45b1-9db8-73ed8e74861c.webp)
Are you craving a dish that’s both fresh and packed with flavor? Look no further than this Mediterranean Quinoa Salad!

If you’re craving a sweet, chewy treat that’s simple to make, look no further! Coconut Macaroon Cookies are delightful and
![- 1 cup all-purpose flour - 1/2 teaspoon baking powder - 1/2 teaspoon baking soda - 1/4 teaspoon salt - 1 tablespoon pumpkin spice blend - 1/2 cup unsalted butter, softened - 1 cup granulated sugar - 2 large eggs - 1/2 cup pure pumpkin puree - 1/2 cup brewed coffee, cooled - 1 teaspoon vanilla extract - 1/4 cup milk (or dairy-free alternative) - 1/2 cup cream cheese, softened - 1/4 cup butter, softened - 2 cups powdered sugar - 1 tablespoon brewed coffee - Additional pumpkin spice for garnish I love using fresh ingredients for my Pumpkin Spice Latte Cupcakes. The dry ingredients create a soft base. The flour, baking powder, and pumpkin spice blend add warmth and flavor. The baking soda helps the cupcakes rise, giving them a light texture. The wet ingredients are where the magic happens. Unsalted butter makes the cupcakes rich. Granulated sugar adds sweetness. Eggs provide structure and moisture. Pure pumpkin puree gives a cozy fall flavor. Brewed coffee enhances the taste, making it a true latte experience. Finally, vanilla extract and milk round out the mix for a creamy finish. For the frosting, I use cream cheese and butter, which create a rich and tangy topping. Powdered sugar adds sweetness, while a splash of brewed coffee brings out the latte flavor. Don't forget to sprinkle extra pumpkin spice on top for that perfect fall touch. You can find the full recipe [here]. Enjoy baking! 1. Preheat your oven to 350°F (175°C). Line a muffin tin with cupcake liners. 2. In a bowl, whisk together the all-purpose flour, baking powder, baking soda, salt, and pumpkin spice blend. Set this aside. 3. In another large bowl, cream the softened butter and granulated sugar until it looks light and fluffy. 4. Add the eggs one at a time. Mix well after each egg. Then, stir in the pumpkin puree, brewed coffee, and vanilla extract until they are well combined. 1. Gradually mix the dry ingredients into the wet ingredients. Be gentle to keep it light. 2. Alternate adding milk to the batter to reach a smooth consistency. 1. Divide the batter evenly among the cupcake liners. Fill each about two-thirds full. 2. Bake for 18-20 minutes. Check if a toothpick inserted in the center comes out clean. 3. Let the cupcakes cool in the pan for 5 minutes. Then, transfer them to a wire rack to cool completely before frosting. Once you have your cupcakes ready, you can move on to the frosting for your Pumpkin Spice Latte Cupcakes. For the full recipe, check out the details above! Using pumpkin puree and brewed coffee keeps these cupcakes moist and soft. Pumpkin puree adds a rich texture and a lovely flavor. Brewed coffee brings out the spices and enhances the pumpkin taste. It is important to avoid overmixing the batter. Mix just until the ingredients combine. This helps keep the cupcakes light and fluffy. For cream cheese frosting, start with softened cream cheese and butter. Beat them together until smooth. Gradually add powdered sugar for sweetness and brewed coffee for flavor. You can frost your cupcakes using a piping bag or a knife. A piping bag gives a pretty swirl, while a knife allows for a quick spread. Both methods work well, so choose what you like best. To make these cupcakes, you need some basic baking tools. A good muffin tin, cupcake liners, and mixing bowls are key. Measuring cups and spoons should be accurate for best results. Using the right tools helps ensure your cupcakes come out perfect every time. Remember to have fun while baking! For the complete recipe, refer to the Full Recipe section. {{image_2}} You can customize your Pumpkin Spice Latte Cupcakes to suit your taste. Here are two fun ideas: - Adding Chocolate or Caramel Drizzle: Drizzle melted chocolate or rich caramel on top of the frosting. This adds a sweet twist and makes the cupcakes even more decadent. - Incorporating Nuts or Chocolate Chips: Add chopped nuts like walnuts or pecans for a crunchy texture. You can also mix in chocolate chips for extra sweetness and a surprise in every bite. Not everyone can enjoy regular cupcakes. Here are ways to adapt this recipe: - Gluten-Free Options: Use a gluten-free all-purpose flour blend instead of regular flour. This keeps the cupcakes soft and tasty. - Vegan Substitutes for Eggs and Dairy: Replace eggs with flax eggs (1 tablespoon flaxseed meal and 2.5 tablespoons water). Use almond milk or coconut milk in place of regular milk and vegan butter for the frosting. Make your cupcakes look as good as they taste. Here are some creative suggestions: - Decorating with Seasonal Toppings: Top each cupcake with whipped cream and a sprinkle of pumpkin spice. You can also add candy corn or mini pumpkins for a festive touch. - Creative Serving Suggestions for Fall-Themed Gatherings: Serve your cupcakes on a wooden board with small pumpkins and autumn leaves. This fun display will impress your guests and fit the fall theme perfectly. To keep your pumpkin spice latte cupcakes fresh, use a few simple methods. For short-term storage, place them in an airtight container. This keeps moisture in and air out. Store at room temperature for up to three days. If you want to keep them longer, freezing is a great option. Wrap each cupcake in plastic wrap and place them in a freezer-safe bag. They can last up to three months in the freezer. If you have leftover frosting, store it in an airtight container. You can keep it in the fridge for up to a week. When you want to use it again, let it sit at room temperature for about 30 minutes. Then, mix it well before applying. If the frosting is too stiff, add a little milk or brewed coffee to loosen it up. These delicious cupcakes stay fresh for about three days at room temperature. After that, they start to lose taste and texture. Signs of spoilage include a dry texture or a sour smell. If you notice any of these signs, it’s best to toss them out. Enjoy these treats while they’re at their best! To make gluten-free Pumpkin Spice Latte Cupcakes, you can use a gluten-free flour blend. Look for blends that include xanthan gum. Just replace all-purpose flour with the gluten-free blend in the Full Recipe. The rest of the ingredients remain the same. This swap will help you keep the same texture. You can use pumpkin pie filling, but it will change the taste. Pumpkin pie filling has added spices and sugar. If you prefer a sweeter cupcake, this might work for you. Just remember to reduce the pumpkin spice in the recipe. Using pure pumpkin puree gives a more natural flavor. You can add nutmeg, cloves, or allspice for extra flavor. Each spice will bring its unique taste. Just add a pinch or two, based on your liking. This addition can make your cupcakes even more special. Experimenting with spices can lead to delightful surprises. Yes, you can make these cupcakes a day ahead. Just store them in an airtight container. If you plan to frost them, wait until the day of the party. This keeps the frosting fresh and beautiful. Your guests will love the taste. Store leftovers in an airtight container at room temperature. If your kitchen is warm, place them in the fridge. They will stay fresh for about three days. You can also freeze them for longer storage. Just remember to wrap them well before freezing. In this post, we covered how to make delicious Pumpkin Spice Latte Cupcakes. We started with the right ingredients and detailed each step from batter preparation to baking. I shared tips for keeping your cupcakes moist and creating perfect frosting. Don’t forget to explore fun variations and storage tips to enjoy later. With these guidelines, you can easily impress friends and family with your baking skills. Enjoy every bite of your pumpkin spice creations!](https://easycookingbite.com/wp-content/uploads/2025/05/8ecb6e3d-416f-454a-bf8c-ff8726831ded.webp)
Get ready to treat your taste buds! Pumpkin Spice Latte Cupcakes combine fall’s favorite flavors into one delightful bite. With
