Skip to content
DisclaimerTerms Of UseGDPR PolicyCookie Policy

easycookingbite

  • Home
  • Drinks
  • Appetizers
  • Dinner
  • Dessert
  • About
  • Contact
  • Privacy Policy
DisclaimerTerms Of UseGDPR PolicyCookie Policy

Lily

To make a fantastic banana pudding cheesecake, gather these key ingredients: - 1 ½ cups graham cracker crumbs - ½ cup unsalted butter, melted - ¼ cup granulated sugar - 3 (8 oz) packages cream cheese, softened - 1 cup granulated sugar - 1 teaspoon vanilla extract - 3 large eggs - 1 cup ripe bananas, mashed (about 2-3 bananas) - 1 cup heavy cream - ¼ cup powdered sugar - 1 teaspoon vanilla extract (for whipped cream) - Vanilla wafer cookies and banana slices for garnish These ingredients work together to create rich and creamy layers. The cream cheese gives it a smooth texture, while the bananas add natural sweetness. Garnishes can make your cheesecake even more appealing. Here are some ideas: - Sliced fresh bananas - Crushed vanilla wafers - Chocolate shavings - Whipped cream dollops These extras can enhance the look and taste of your dessert. Feel free to mix and match based on your own taste. If you need to swap any ingredients, here are some easy options: - Use coconut cream instead of heavy cream for a dairy-free version. - Swap granulated sugar with brown sugar for a deeper flavor. - Use gluten-free graham crackers to make it gluten-free. These substitutions can help you cater to different diets or flavor preferences. Enjoy experimenting with your banana pudding cheesecake! For the full recipe, check out the Full Recipe section. Start by preheating your oven to 325°F (160°C). While the oven warms up, grab a 9-inch springform pan. Grease the pan with non-stick spray or butter. This helps the cheesecake release easily later. In a mixing bowl, mix 1 ½ cups of graham cracker crumbs, ½ cup of melted unsalted butter, and ¼ cup of granulated sugar. Stir until everything blends well. Press this mixture into the bottom of your springform pan. Bake this crust for 10 minutes. After that, take it out and let it cool. In a large bowl, beat 3 packages of softened cream cheese with 1 cup of granulated sugar. Mix until it’s smooth and creamy, which should take about 2-3 minutes. Don’t forget to scrape down the bowl sides to mix everything well. Next, mix in 1 cup of mashed ripe bananas and 1 teaspoon of vanilla extract. Make sure it’s all combined. Then, add the eggs one at a time. Mix on low speed so you don’t overmix. Pour this batter over your cooled crust. Tap the pan gently to remove any air bubbles. Bake in your preheated oven for 55-60 minutes. The edges should be set, and the center will jiggle a bit. Once baked, turn off the oven and leave the cheesecake inside for 1 hour. This helps it cool down slowly. After an hour, take it out and let it cool to room temperature. Once cooled, place it in the fridge for at least 4 hours, or overnight if you can wait. This will improve the texture. While the cheesecake chills, you can make the whipped cream. In a medium bowl, whip 1 cup of heavy cream with ¼ cup of powdered sugar and 1 teaspoon of vanilla extract. Whip until stiff peaks form. Once the cheesecake has chilled, spread the whipped cream over the top. Add banana slices and vanilla wafer cookies for a lovely look. Remember to check the Full Recipe for detailed steps. To get a creamy texture, use soft cream cheese. Let it sit at room temp for 30 minutes. This helps it blend better. Beat the cheese well, so it’s smooth before adding anything else. Mix on low speed once you add eggs. This keeps air out, which can cause cracks. Cracks can spoil the look of your cheesecake. To avoid this, don’t open the oven door while baking. Use a water bath. Place the springform pan in a larger pan with water. This keeps the temperature steady. After baking, let the cheesecake cool slowly in the oven. This helps it set without cracking. For the best whipped cream, use cold heavy cream. Whip it on high speed until you see stiff peaks. Add powdered sugar and vanilla for flavor. Mix just until combined. Don’t overwhip, or it could turn into butter. Spread the whipped cream on the cheesecake right before serving for a fresh look. For the complete steps and measurements, check out the Full Recipe. {{image_2}} You can make your banana pudding cheesecake even better by adding chocolate or peanut butter. Just mix in melted chocolate or peanut butter with the cream cheese. This adds a rich flavor that pairs well with bananas. For a chocolate version, use dark or milk chocolate. For peanut butter, try using creamy or crunchy. Both options make your dessert unique and tasty. Another fun twist is to mix in other fruits. You can add chopped strawberries, blueberries, or even mango. Just make sure to keep the total fruit amount the same as the bananas. This way, you still have that creamy texture. The added fruits can bring freshness and new flavors to your cheesecake. Get creative and have fun with your choices! If you need gluten-free options, use gluten-free graham crackers for the crust. You can also swap cream cheese with dairy-free cream cheese. For the whipped cream, try coconut cream as a great substitute. Both options allow everyone to enjoy this dessert without missing out. Just make sure to check labels to ensure all ingredients fit your diet. Feel free to explore these variations and create your own special banana pudding cheesecake! You can find the full recipe to get started. To keep your banana pudding cheesecake fresh, follow these steps: - Allow the cheesecake to cool completely at room temperature. - Cover it tightly with plastic wrap or aluminum foil. - Store it in the fridge for best results. - If you have a springform pan, it’s best to leave it in the pan until serving. When stored properly, banana pudding cheesecake can last: - In the fridge: about 4 to 5 days. - It’s best to enjoy it within the first couple of days for the best flavor. Yes, you can freeze banana pudding cheesecake! Here’s how: - Allow the cheesecake to cool completely before freezing. - Slice the cheesecake into wedges for easy serving later. - Wrap each piece in plastic wrap, then place in a freezer-safe bag. - It can last in the freezer for up to 3 months. - Thaw it in the fridge overnight before serving. For the full recipe, check the detailed instructions above! Yes, you can make Banana Pudding Cheesecake ahead of time. It actually tastes better after chilling. I suggest making it one day in advance. This gives the flavors time to blend and deepen. Just wrap it well and store it in the fridge. If your cheesecake cracks, don’t worry! This happens to many cooks. To fix it, you can cover it with whipped cream or fruit. This hides the cracks and adds flavor. Next time, try baking it at a lower temperature. This can help prevent cracks. To enhance the flavor of your cheesecake, use ripe bananas. Ripe bananas add a richer taste. You can also add a pinch of cinnamon or nutmeg for warmth. Mixing in a bit of lemon juice can brighten the flavor too. While it's not strictly necessary, I highly recommend chilling the cheesecake overnight. This allows it to set properly. A well-chilled cheesecake slices better and tastes amazing. If you can, let it chill overnight for the best results. For the full recipe, check out the detailed instructions above. In this post, you learned about making Banana Pudding Cheesecake. We covered key ingredients, optional garnishes, and substitutions. I walked you through each step, from the crust to chilling the dessert. You also found tips to ensure a creamy texture and avoid cracks. Variations like adding chocolate or fruits make it fun. Finally, I shared storage tips and answered common questions. This cheesecake is a treat you can customize and enjoy. With these ideas, you’re ready to make a delicious dessert that impresses everyone. Happy baking!

Banana Pudding Cheesecake Irresistible Dessert Recipe

Are you ready to indulge in a dessert that combines the best of two worlds? This Banana Pudding Cheesecake is

To make a tasty Chinese Style Shrimp Fried Rice, you need the right ingredients. Here’s what you’ll need: - 2 cups cooked jasmine rice (preferably cold) - 1 cup medium shrimp, peeled and deveined - 2 tablespoons vegetable oil - 2 eggs, beaten - 1 cup mixed vegetables (peas, carrots, corn) - 3 green onions, sliced (white and green parts separated) - 3 garlic cloves, minced - 2 tablespoons soy sauce (low sodium) - 1 tablespoon oyster sauce (optional) - 1 teaspoon sesame oil - Salt and pepper to taste - Fresh cilantro for garnish (optional) These ingredients work together to create bold flavors. The cold jasmine rice helps achieve the perfect texture. Using shrimp adds a nice protein boost. Fresh vegetables and green onions bring color and crunch. The soy sauce and oyster sauce provide that classic umami taste. Garlic gives a punch of flavor, while sesame oil adds richness. Feel free to adjust the ingredients based on your taste. For a full recipe, check out the details above. Enjoy making your shrimp fried rice! - Prepare Shrimp: Start by seasoning the shrimp in a bowl with salt and pepper. This simple step makes a big taste difference. Set the shrimp aside to soak in those flavors. - Scramble Eggs: Heat 1 tablespoon of vegetable oil in a large skillet over medium heat. Pour in the beaten eggs. Stir until they are fully cooked and fluffy. Remove the eggs from the pan and set them aside. - Cook Shrimp: In the same skillet, add the remaining tablespoon of oil. When it’s hot, add your seasoned shrimp. Cook for about 2-3 minutes. The shrimp should turn pink and opaque. Remove them from the skillet and set aside. - Sauté Vegetables: Using the same skillet, toss in the minced garlic, the white parts of the green onions, and the mixed vegetables. Sauté for about 2-3 minutes. You want the veggies to be tender but still bright. - Combine Ingredients: Add the cold jasmine rice to the skillet. Break up any clumps as you stir. Mix the rice with the vegetables until everything is well combined. - Flavor the Rice: Pour in the soy sauce and the optional oyster sauce. Mix well to coat the rice evenly. Add the scrambled eggs and cooked shrimp back into the pan. Stir everything together and heat through. - Finish with Sesame Oil: Drizzle sesame oil over the fried rice. This adds a nutty flavor. Toss everything again to incorporate the oil. - Garnish and Serve: Taste your dish and adjust seasoning if needed. Garnish with the green parts of the green onions and fresh cilantro if you like. Serve hot and enjoy! For the full recipe, check the details above. Choosing the Right Rice Use jasmine rice for the best flavor and texture. It has a nice aroma and a slightly sticky quality. Day-old rice works best since it dries out a bit, making it easy to fry. Perfecting Shrimp Texture To keep shrimp tender, avoid overcooking them. Cook just until they turn pink. This usually takes 2 to 3 minutes. Make sure they are peeled and deveined for a better bite. Achieving Authentic Flavor Use soy sauce for saltiness. Add oyster sauce for depth if you like. Fresh garlic adds a kick, while sesame oil gives a nice finish. Don’t skip the green onions; they add freshness. Importance of Cold Rice Cold rice helps prevent clumping. It fries better and mixes well with other ingredients. If you don’t have leftover rice, spread freshly cooked rice on a tray to cool it down quickly. For more details on making this dish, check the Full Recipe. {{image_2}} Vegetarian Option: Replacing Shrimp and Adding Tofu If you want a vegetarian dish, swap the shrimp for tofu. Use firm tofu for the best texture. Cut the tofu into small cubes and sauté it until golden. This gives you a protein boost while keeping the dish tasty. Add the tofu after cooking the vegetables for a nice blend of flavors. Different Proteins: Chicken or Pork Fried Rice You can also use chicken or pork instead of shrimp. Dice the meat into small pieces. Cook it in the same way as shrimp, until it is no longer pink. Chicken or pork adds a different flavor and makes the dish heartier. Flavor Enhancements: Adding Spices or Hot Sauce Want to spice things up? Add your favorite spices or hot sauce. A pinch of chili flakes or a splash of sriracha can add a nice kick. Experiment with different sauces, like teriyaki or sweet chili, for unique flavors. These changes can make your fried rice even more exciting. For a full recipe and detailed instructions, check out the [Full Recipe]. Refrigeration Guidelines After enjoying your shrimp fried rice, let it cool for about 30 minutes. Place it in an airtight container. Store it in the fridge for up to 3 days. Always ensure the container is tightly sealed to keep it fresh. Freezing Instructions If you need to store it longer, you can freeze the fried rice. Use a freezer-safe container or bag. Remove as much air as possible. It can last in the freezer for up to 3 months. When ready to eat, thaw it in the fridge overnight. Reheating Tips for Maintaining Flavor and Texture To reheat, use a skillet or wok. Heat a little oil over medium heat. Add the fried rice straight from the fridge or thawed. Stir frequently to heat it evenly. You can add a splash of soy sauce to boost the flavor. Enjoy your meal just like the first time! For the complete recipe, check the Full Recipe above. Yes, you can use frozen shrimp. Just make sure to thaw them first. Place them in a bowl of cold water for about 15 minutes. This way, they cook evenly and taste great. To make this dish gluten-free, use gluten-free soy sauce. Many brands offer this option. You can also skip oyster sauce, as it often contains gluten. I recommend using low-sodium soy sauce. It adds flavor without being too salty. This way, you can enjoy the taste without overpowering the dish. To add some heat, try using chili sauce or a pinch of red pepper flakes. You can also add diced jalapeños for a fresh kick. Adjust the spice level to your liking. This dish pairs well with steamed vegetables or a light salad. You can also enjoy it with egg rolls or spring rolls for a complete meal. For the full recipe, check out the steps above. In this post, we explored the ingredients and steps for making Chinese Style Shrimp Fried Rice. You learned about the key ingredients needed and step-by-step instructions to cook this dish perfectly. We shared tips for choosing rice and cooking shrimp, plus variations to try. You now know how to store leftovers well and answers to common questions. With this knowledge, you're ready to create a delicious meal at home. Enjoy the process and experiment with flavors to make it your own.

Chinese Style Shrimp Fried Rice Flavorful Dinner Dish

If you’re craving a quick and tasty dinner, you’ve come to the right place! Chinese Style Shrimp Fried Rice is

- 2 pounds starchy potatoes (like Russet) - 1 cup all-purpose flour - 2 large eggs - 1 teaspoon salt - 1/2 teaspoon nutmeg - 1 tablespoon finely chopped fresh chives - 1/4 cup breadcrumbs (for frying) - Butter or oil for frying For this recipe, choose starchy potatoes. They give the dumplings a fluffy texture. You need flour to bind everything together and eggs for richness. Salt brings out the flavor. You can add nutmeg for warmth. Fresh chives add a nice touch of flavor. If you want a crispy outside, use breadcrumbs and fry the dumplings. Butter or oil will help them crisp up nicely. When gathering your ingredients, remember that fresh is best. Using high-quality ingredients makes a big difference. For the full recipe, check the earlier section. First, you need to boil the potatoes. Place the quartered potatoes in a large pot. Add enough salted water to cover them. Bring the water to a boil. Then, reduce the heat and let them simmer for about 15 to 20 minutes. The potatoes should be fork-tender. Once done, drain the potatoes and let them cool slightly. It is very important to mash the potatoes while they are still warm. If you wait too long, the texture will not be right. Use a potato masher for a smooth result. Make sure there are no lumps. Let the mashed potatoes cool completely before moving on to the next step. Now, it's time to make the dough. In a mixing bowl, combine the smooth mashed potatoes, flour, eggs, salt, and any optional ingredients like nutmeg or chives. Mix everything gently. You want a soft dough that is not sticky. If it feels too wet, add a tiny bit of flour. Be careful not to overwork the dough, or it will become tough. Next, shape the dumplings. Dust your hands lightly with flour. Take small portions of dough, about 2 to 3 tablespoons each. Roll them into smooth balls. Repeat this until all the dough is shaped into dumplings. Now, let's cook the dumplings. Bring a large pot of salted water to a gentle boil. Gently drop the dumplings into the water. Be careful not to overcrowd the pot. Cook the dumplings for about 10 to 15 minutes. They will float to the top when done. Once they float, let them cook for 2 to 3 more minutes. Remove the dumplings with a slotted spoon and let them drain. If you want crispy dumplings, here’s an optional step. Heat butter or oil in a skillet over medium heat. Roll each dumpling in breadcrumbs and fry them until golden brown. This takes about 2 to 3 minutes on each side. For the full recipe, check the previous section. Enjoy your delicious German potato dumplings! To make great dumplings, cooling your mashed potatoes is key. Warm potatoes can make your dough too sticky. After mashing, let them cool completely. This helps form a nice texture. Adjusting the flour is also important. If your dough feels wet, add a little more flour. Aim for a soft but not sticky consistency. Too much flour can make your dumplings dense. One common mistake is overworking the dough. If you knead it too much, the dumplings can turn out tough. Mix just enough to combine the ingredients. Another mistake is overcrowding the pot. If you add too many dumplings at once, they won't cook evenly. Always cook in batches, giving each dumpling room to float freely. You can serve your dumplings with rich gravies for added flavor. A smooth mushroom gravy works great. It soaks into the dumplings and makes each bite delightful. For extra taste, try adding toppings like fresh chives or crispy onions. These add a nice crunch and enhance the overall dish. {{image_2}} You can easily add flavor to your potato dumplings. Fresh herbs like parsley or thyme work well. You can also try spices such as garlic powder or paprika. Another fun option is to stuff them with cheese. Just take a small ball of dough, add cheese in the center, and shape it into a dumpling. The cheese melts and creates a delicious surprise inside. German potato dumplings can shine in many dishes. You can serve them in soups or stews for a hearty meal. They soak up flavors and make the dish more filling. Alternatively, you can use them as a side dish. They pair well with roasted meats or rich gravies. You can even make them the main entrée, topped with sautéed mushrooms or a creamy sauce. If you need gluten-free dumplings, try using gluten-free flour. It works just as well as regular flour. For a vegan option, replace the eggs with flaxseed meal or applesauce. This substitution keeps the texture nice while making it plant-based. These alternatives ensure everyone can enjoy your delicious dumplings. For the full recipe, check out the section above. To store leftovers safely, let the dumplings cool first. Place them in an airtight container. They will stay fresh in the fridge for up to three days. If you want to keep them longer, freezing is a great option. You can freeze both raw and cooked dumplings. For raw dumplings, arrange them on a baking sheet. Freeze them for about an hour, then transfer to a freezer bag. This keeps them from sticking together. If you freeze cooked dumplings, let them cool completely before placing them in a container. They can last up to three months in the freezer. When you're ready to eat, reheating is simple. For frozen cooked dumplings, steam them for about 10 minutes. This keeps them moist. You can also microwave them for a quick option. Just add a little water to a bowl and cover it. Heat in short bursts to avoid drying them out. If you like crispy dumplings, pan-fry them in some butter until golden. You can enjoy your delicious dumplings again in no time! German potato dumplings can last in the fridge for about three days. Make sure to store them in an airtight container. This helps keep them fresh and prevents them from drying out. Yes, you can make German potato dumplings ahead of time. You can prepare the dough and shape the dumplings. Store them in the fridge for up to a day before cooking. This saves time, especially when you have guests. German potato dumplings go well with many dishes. They pair perfectly with rich gravies, like beef stew or mushroom sauce. You can also serve them with sautéed mushrooms or roasted meats. They complement any hearty meal nicely. You can tell when the dumplings are fully cooked by watching them in the water. When they float to the top, they are almost done. Let them cook for an extra 2-3 minutes before removing them. This ensures they are cooked through and ready to serve. Making German potato dumplings is fun and rewarding. We covered all the key steps: starting with the right ingredients, cooking the potatoes, and shaping the dumplings. Remember to cool your potatoes and avoid overworking the dough. You can add fresh herbs or cheese for more flavor. Don’t forget that leftover dumplings freeze well for later use. Enjoy creating a delicious dish that can be a side or a main meal. Happy cooking!

German Potato Dumplings Easy Recipe for Beginners

Are you ready to master a classic dish with ease? German potato dumplings are a warm and filling delight that

- 1 pound ground beef or turkey - 1 cup fresh spinach, finely chopped - 1/2 cup mozzarella cheese, shredded - 1/2 cup breadcrumbs (preferably Italian-style) - 2 cloves garlic, minced - 1/4 cup grated Parmesan cheese - 1 teaspoon dried oregano - 1 teaspoon dried basil - 1/2 teaspoon red pepper flakes (optional) - Salt and pepper to taste - Olive oil for frying - Baking sheet - Skillet When cooking these spinach garlic mozzarella meatballs, gather all your ingredients first. This helps keep the process smooth. Use fresh spinach for the best flavor and nutrition. The mozzarella adds a lovely, melty texture. Breadcrumbs help bind the meatballs together. For seasoning, garlic gives a nice kick. Parmesan cheese adds depth to the flavor. The dried herbs, oregano and basil, enhance the taste. You can add red pepper flakes if you like some heat. Always season with salt and pepper to bring out the flavors. You will need olive oil for frying. A baking sheet is useful if you choose to bake the meatballs instead. A skillet is great for frying them to a golden brown. For the full recipe, check out the detailed instructions included above. First, you need to prepare the spinach. Take 1 cup of fresh spinach and chop it finely. Heat a small saucepan over medium heat. Add a drizzle of olive oil. Then, toss in the chopped spinach. Sauté for about 2-3 minutes until it wilts down. This process brings out the flavor. Once done, remove the pan from heat. Let the spinach cool slightly before mixing it with the other ingredients. This step is key to keeping the meatballs moist. Now it's time to mix all the ingredients together. In a large bowl, combine the ground beef or turkey, sautéed spinach, shredded mozzarella, grated Parmesan, and breadcrumbs. Add 2 cloves of minced garlic, 1 large egg, and your dried herbs: 1 teaspoon of oregano and 1 teaspoon of basil. If you like a little heat, add 1/2 teaspoon of red pepper flakes. Don’t forget to sprinkle in some salt and pepper to taste. Mix gently with your hands. Be careful not to overmix, or your meatballs may turn tough. Next, shape the meatballs. Scoop out about 1/4 cup of the mixture at a time. Roll it into a ball with clean hands. Place each meatball onto a parchment-lined baking sheet. You should end up with about 12-15 meatballs. Now, let’s talk about cooking methods. You can fry or bake your meatballs. For frying, heat olive oil in a large skillet over medium heat. Once hot, add the meatballs in batches. Cook them for 4-5 minutes on each side until browned. Alternatively, you can bake them. Preheat your oven to 375°F (190°C). Place the meatballs on a lined baking sheet and bake for about 20-25 minutes. Turn them halfway through for even cooking. Either method will leave you with tasty meatballs. The right mix of ingredients makes great meatballs. Use equal parts meat, cheese, and breadcrumbs. This balance gives a nice texture and keeps them moist. For moist meatballs, add a good amount of spinach and cheese. The moisture from these ingredients helps keep them juicy. When frying meatballs, use a medium heat. This method helps get a nice brown crust without burning them. Fry in batches to avoid overcrowding the pan. This rule also works for baking. Bake at 375°F for an even cook. Turn them halfway through for perfect browning. You can serve meatballs with many sauces. Marinara and pesto work great. For sides, try spaghetti, rice, or a fresh salad. Each pair adds flavors and makes the meal complete. A sprinkle of fresh basil on top makes it look nice too. For the full recipe, check out the detailed instructions provided above. {{image_2}} You can switch up the meat in this recipe. Ground chicken works great. It gives a lighter touch. You can also try plant-based options. There are many good choices out there. Ground turkey is another excellent option. It keeps the meatballs moist and tasty. Each of these proteins brings its own flavor. Feel free to experiment! Mozzarella is a classic choice, but there are others. Try using provolone or cheddar for a different taste. Each cheese melts well and adds flavor. You can mix in some feta for a tangy kick. If you want a stronger flavor, add some blue cheese. This gives a unique twist to your meatballs. Want to add some extra nutrition? You can mix in more veggies! Chopped bell peppers or mushrooms work well. Both add great flavor and texture. You can also try grated carrots or zucchini. These will make the meatballs even softer. Keep in mind that more veggies mean more flavor. You can get creative here! To store leftovers, place the meatballs in an airtight container. Make sure they cool down before sealing. This keeps them fresh and prevents moisture loss. You can store spinach garlic mozzarella meatballs in the fridge for about three to four days. This way, you can enjoy them again without losing flavor. For proper freezing, lay the cooked meatballs on a baking sheet. Make sure they are not touching each other. Freeze them for about two hours until solid. After that, transfer the meatballs into a freezer bag. Remove as much air as possible to avoid freezer burn. When you're ready to enjoy them, thaw the meatballs in the fridge overnight. To reheat, you can bake them at 350°F (175°C) for about 20 minutes, or until heated through. You can also warm them in a skillet over low heat with a splash of sauce. This keeps them moist and tasty. Yes, you can make these meatballs ahead of time. Here’s how: - Prepare the meatball mixture: Follow the recipe steps up to shaping the meatballs. - Shape the meatballs: Roll them into balls as directed. - Store correctly: Place them on a baking sheet and freeze them for about an hour. Then, transfer them to a freezer bag. - Refrigerate option: If you plan to use them soon, keep them in the fridge for 1-2 days. Making them ahead saves time on busy days. You can simply cook them when you need a quick meal. Cooking time varies based on your method: - Pan-frying: Cook meatballs for 4-5 minutes on each side. They should brown nicely. - Baking: Bake at 375°F (190°C) for 20-25 minutes. Flip halfway for even cooking. Always check that the meatballs reach an internal temperature of 160°F (71°C) to ensure they are safe to eat. You can use frozen spinach, but some adjustments are needed: - Thaw first: Make sure to thaw and drain any extra water from the spinach. - Flavor difference: Frozen spinach can be milder than fresh. You may want to add extra garlic or spices for more flavor. - Texture: Frozen spinach tends to be softer. Keep that in mind when mixing with other ingredients. Both fresh and frozen spinach work, but fresh often gives a brighter taste. For the full recipe, refer to the details above. This blog post guides you through making delicious meatballs. We covered key ingredients like ground meat, spinach, and cheese. You learned how to prepare, mix, and cook them perfectly. Tips on texture, cooking methods, and serving ideas help enhance your dish. Don't hesitate to try variations with different proteins or veggies. These meatballs are easy to store and delicious to serve. With this knowledge, you can create a tasty meal that impresses everyone. Enjoy cooking and experimenting with your meatball recipes!

Spinach Garlic Mozzarella Meatballs Tasty and Simple

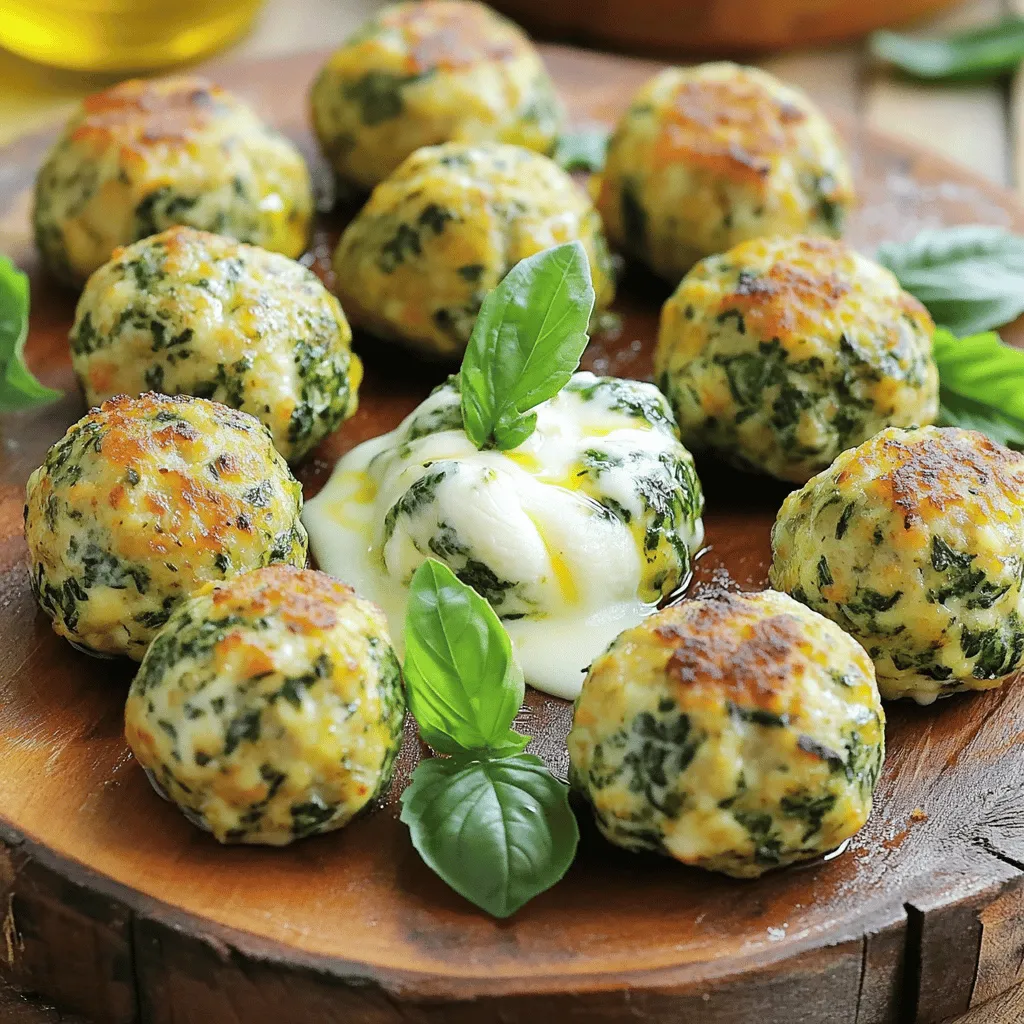
Are you ready to spice up your dinner routine? Discover my Spinach Garlic Mozzarella Meatballs, a simple and tasty way

To make these delightful Raspberry Cheesecake Mousse Cups, you need a few simple ingredients. Each one plays a key role in creating the rich, creamy texture and fresh flavor. Here is what you will need: - 1 cup fresh raspberries (plus extra for garnish) - 1 cup cream cheese, softened - 1/2 cup powdered sugar - 1 teaspoon vanilla extract - 1 cup heavy whipping cream - 1/4 cup graham cracker crumbs - 1 tablespoon unsalted butter, melted - Pinch of salt These ingredients blend together to create a dessert that is both light and indulgent. Fresh raspberries add a burst of flavor, while cream cheese gives it that classic cheesecake taste. The whipped cream makes it airy and fluffy. The graham cracker crumbs provide a delightful crunch. Feel free to use any leftover raspberries as a garnish. They not only look pretty but also add more flavor. Each ingredient contributes to a delicious end product, making this dessert a perfect treat for any occasion. {{ingredient_image_1}} To start, you need to make the raspberry sauce. Grab a small saucepan and put it on medium heat. Add 1 cup of fresh raspberries and 2 tablespoons of powdered sugar. Stir the mixture as it heats up. Cook until the raspberries break down and the sauce thickens. This should take about 5 minutes. Once it thickens, remove the pan from the heat. Let the sauce cool before using it in the mousse. Next, let's make the cheesecake mousse. In a large mixing bowl, beat together 1 cup of softened cream cheese and the remaining 1/2 cup of powdered sugar. Add 1 teaspoon of vanilla extract for flavor. Mix until the mixture is smooth and creamy. In a separate bowl, whip 1 cup of heavy cream until soft peaks form. Gently fold this whipped cream into the cream cheese mixture. Be careful not to deflate the whipped cream. Now it's time to assemble the mousse cups. First, create the graham cracker base. In a small bowl, combine 1/4 cup of graham cracker crumbs, 1 tablespoon of melted unsalted butter, and a pinch of salt. Mix until it’s crumbly. Divide this crumb mixture evenly among your serving cups. Press it down slightly with a spoon. Next, layer the raspberry cheesecake mousse over the crumb base, filling each cup halfway. Add a swirl of the raspberry sauce on top of the mousse. Then, add another layer of the mousse to fill the cups. For the final touch, dollop a bit more raspberry sauce on top. Garnish with fresh raspberries. Finally, chill the mousse cups in the refrigerator for at least 2 hours. This step is important to let everything set properly. Enjoy your delicious creation! Achieving the right consistency is key. Whip the heavy cream until you see soft peaks form. This means the cream holds its shape but is still light. Take care not to whip too long, or it will turn into butter. When you fold the whipped cream into the cream cheese mixture, use a gentle touch. Start by adding a bit of whipped cream to lighten the cream cheese. Then, fold the rest in slowly. This keeps the mousse airy and light. Garnishing your mousse cups makes them look special. Use fresh raspberries on top for a pop of color. You can also add a sprig of mint for a fresh look. For serving suggestions, think about your occasion. If it's a party, use clear cups to show off the layers. For a cozy family dinner, use fun bowls. Your guests will love it! One common mistake is overmixing the mousse. If you mix too much after adding the whipped cream, you lose that fluffy texture. Just fold until combined. Another mistake is not chilling enough before serving. The mousse needs at least two hours in the fridge to set properly. If you skip this step, it may not hold its shape. Pro Tips Use Fresh Raspberries: Fresh raspberries provide the best flavor and texture for the mousse. If you can't find fresh ones, frozen raspberries can be used, but make sure to thaw and drain them well to avoid excess moisture. Chill Your Mixing Bowls: For an even fluffier mousse, chill your mixing bowls and beaters in the fridge before whipping the cream. This helps the cream to whip faster and hold its shape better. Layering Techniques: For a visually appealing presentation, use a piping bag to layer the mousse and raspberry sauce in the cups. This creates beautiful swirls and enhances the overall look of your dessert. Let It Set: Be sure to chill the mousse cups for at least 2 hours before serving. This allows the flavors to meld together and the mousse to firm up to the perfect consistency. {{image_2}} You can change the fruit in this recipe. Try strawberries or blueberries for a twist. Both fruits mix well with the cream cheese. You can also add citrus flavors. A touch of lemon or lime juice brightens the mousse. It adds a fresh zing that pairs nicely with the sweetness of the cheese. Need a gluten-free option? Use gluten-free graham crackers. You can find these at most stores. For a dairy-free version, try cream cheese made from nuts. Brands like Tofutti or Kite Hill work great. They give the same creamy texture without dairy. You can serve the mousse in many ways. Individual cups look cute and are easy to grab. You can also use a large dessert bowl for a family-style option. This way, everyone can scoop their own. Try different glassware too. Clear glasses show off the pretty layers. Use dessert jars or even small bowls for a fun look. To keep your Raspberry Cheesecake Mousse Cups fresh, store them in the fridge. Use an airtight container to cover the cups. This helps maintain the texture and flavor. They will stay good for about 3 days in the fridge. If you want to freeze them, it’s easy! First, make sure the cups are tightly wrapped in plastic wrap. Then, place them in a freezer-safe container. They can last for about 2 months in the freezer. To thaw, just move them to the fridge overnight. Avoid using a microwave, as it can change the texture. Check for any changes in smell or texture. If the mousse smells sour or looks watery, it’s best to throw it away. Fresh berries on top should also look bright and firm. If they shrivel up or turn dark, that’s a sign the dessert is no longer good. Raspberry Cheesecake Mousse Cups last about 3 days in the fridge. Keep them covered to stay fresh. If they sit too long, the mousse may lose its texture. Yes, you can make these cups a day ahead. Just store them in the fridge. Chilling them overnight enhances the flavors. It also helps the mousse set nicely. Absolutely! Frozen raspberries work well. They are often sweeter and just as tasty. Thaw them before cooking to make the sauce. This keeps the texture lovely. The mousse is set when it feels firm but still a bit soft. It should hold its shape in the cup. If the mousse jiggles slightly, it is ready. You can serve these cups with whipped cream or extra fresh raspberries. A sprinkle of graham cracker crumbs adds crunch. A mint leaf also makes a pretty garnish. This blog post explained how to make delicious Raspberry Cheesecake Mousse Cups. You learned about the key ingredients and step-by-step instructions. I also shared some tips for perfecting your mousse and ideas for variations. Remember, proper storage keeps your dessert fresh for longer. Enjoy creating this treat for yourself or a special occasion. These mousse cups will impress anyone who tries them! Happy cooking!

Raspberry Cheesecake Mousse Cups Decadent and Easy Dessert

Looking for a dessert that combines rich cheesecake and fresh fruit in a simple way? You’ll love my Raspberry Cheesecake

To make Chocolate Caramel Pretzel Bark, gather these simple ingredients: - 2 cups pretzel twists - 1 cup semi-sweet chocolate chips - 1 cup caramels, unwrapped - 1/4 cup heavy cream - 1/2 teaspoon sea salt - 1/4 cup chopped pecans or peanuts (optional) You can easily swap ingredients to fit your taste. Here are some ideas: - Use milk chocolate chips instead of semi-sweet for a sweeter bark. - Swap caramels for toffee bits for a different flavor. - Try almond milk or coconut cream in place of heavy cream for a lighter option. - If you don’t like pecans, use walnuts or leave them out entirely. Choosing the best ingredients makes a big difference. Here’s what I suggest: - Pick pretzels that are fresh. Look for a crispy crunch. - Use high-quality chocolate chips. They melt better and taste richer. - Choose soft, chewy caramels. They will blend well with the cream. - Use coarse sea salt for a nice finish. It adds a great contrast to the sweet flavors. With these tips, you’ll create a delicious treat that everyone will love. {{ingredient_image_1}} Start by preheating your oven to 350°F (175°C). Line a baking sheet with parchment paper. Take 2 cups of pretzel twists and spread them on the sheet in a single layer. Bake them for 5-7 minutes. You want them warm and a bit crisp. When done, remove them from the oven and let them cool slightly. In a medium saucepan, add 1 cup of unwrapped caramels and 1/4 cup of heavy cream. Heat over low heat. Stir the mix until it is smooth. This step is key for a creamy texture. Once it’s ready, take it off the heat. You will pour this over the pretzels soon! Grab a microwave-safe bowl and add 1 cup of semi-sweet chocolate chips. Heat them in 30-second intervals. Stir after each interval until melted and smooth. This part is fun! Once melted, drizzle the chocolate over the caramel pretzel layer. Use a spatula or the back of a spoon to spread it evenly. If you want to add a crunch, sprinkle 1/4 cup of chopped pecans or peanuts on top. Then, add a pinch of sea salt over the entire bark. This will enhance the flavor. Now, refrigerate the bark for about 1-2 hours. Once it sets, you can break it into pieces and serve. Enjoy this crunchy sweet treat! Melting chocolate can be tricky. I find that using a microwave works well. Heat semi-sweet chocolate chips in 30-second bursts. Stir the chocolate after each burst. This keeps it from burning. You want smooth, creamy chocolate. If it’s too thick, add a teaspoon of vegetable oil. This will help with the texture. Even layering makes your bark look great. Start with warm pretzels on the baking sheet. Pour the caramel slowly over the pretzels. Use a spatula to spread it out. Make sure it covers all the pretzels. When you drizzle chocolate, do it gently. Use the back of a spoon for a smooth finish. Try to cover the caramel fully for a neat look. Toppings can take your bark to the next level. I love adding chopped pecans or peanuts. They give a nice crunch and extra flavor. You can also try sea salt to balance the sweetness. If you want a fun twist, add sprinkles or shredded coconut. Get creative! Each topping adds a new taste to your bark. Pro Tips Use Fresh Ingredients: Ensure your pretzels, caramels, and chocolate chips are fresh for the best flavor and texture. Adjust Salt to Taste: The sea salt enhances the sweetness, so feel free to adjust the amount based on your preference. Chill for Perfect Texture: Refrigerating the bark is crucial for a firm texture that makes it easy to break into pieces. Experiment with Toppings: Get creative by adding different nuts, or even sprinkles, to customize your bark! {{image_2}} If you want a nut-free version, skip the pecans or peanuts. You can substitute them with more pretzels or add seeds. Try sunflower seeds or pumpkin seeds for a fun crunch. These options keep the bark tasty and safe for those with nut allergies. To make your bark stand out, add unique flavors. Consider lavender or rose petals for a floral hint. You can also sprinkle cinnamon or nutmeg on top. This adds warmth and depth. Experiment with what you like best. These twists will surprise your taste buds! You can use various chocolates for your bark. Dark chocolate gives a rich taste while milk chocolate is sweet and creamy. For a fun twist, try white chocolate or a mix of different chocolates. Each choice brings its flavor and texture. Don't be afraid to mix and match! To store your Chocolate Caramel Pretzel Bark, place it in an airtight container. Use parchment paper between layers to avoid sticking. This keeps the bark fresh and easy to serve. When stored properly, this bark lasts about two weeks. After that, it may lose its crunch and flavor. If you want to enjoy it longer, consider freezing it. To keep your bark fresh, avoid heat and moisture. Store it in a cool, dry place. If you live in a humid area, the fridge works too. Just remember to wrap it well to prevent moisture from getting in. Yes, you can use different types of pretzels. Stick pretzels work well too. You can even try chocolate-covered pretzels for a fun twist. Each type will change the taste and texture a bit. Experiment and see what you like best! It takes about 1 to 2 hours for the bark to set. Make sure to refrigerate it for the best results. The colder temperature helps the chocolate and caramel harden properly. You can check it after an hour to see if it’s ready. Yes, you can make this bark ahead of time. It keeps well in the fridge for several days. Just store it in an airtight container. This makes it a great treat for parties or snack time later. Yes, you can create a vegan version. Use dairy-free chocolate chips and a vegan caramel alternative. Check labels to ensure all ingredients are vegan-friendly. This allows everyone to enjoy this tasty treat! You now have all the tools to make Chocolate Caramel Pretzel Bark. We covered the best ingredients, tips for prep, and step-by-step instructions. Don't forget the variations to try. This treat is easy to store and lasts well, making it great for sharing. You can even customize it to fit your taste. Start making it today and enjoy every bite!

Chocolate Caramel Pretzel Bark Crunchy Sweet Treat

Craving a sweet and salty snack? Look no further than Chocolate Caramel Pretzel Bark! This crunchy treat combines rich chocolate,

- 1 cup rolled oats - 2 cups almond milk (or any milk of choice) - 2 tablespoons peanut butter (smooth or crunchy) - 2 tablespoons unsweetened cocoa powder - 2 tablespoons maple syrup (or honey) - 1 teaspoon vanilla extract - Pinch of salt - ¼ cup Greek yogurt (optional, for creaminess) - Chopped dark chocolate or chocolate chips (for topping) - Sliced banana or berries (for garnish) If you have nut allergies, you can use sunflower seed butter. For dairy-free options, replace Greek yogurt with coconut yogurt. You can swap almond milk with oat milk or soy milk. If you need a gluten-free option, make sure to use certified gluten-free oats. - Rolled oats provide fiber, which helps with digestion and keeps you full. - Peanut butter adds protein and healthy fats, making the dish rich and satisfying. - Cocoa powder gives antioxidants, which can boost heart health. - Maple syrup or honey offers natural sweetness without refined sugar. - Greek yogurt increases protein content and adds creaminess, perfect for texture. These ingredients combine to make a tasty and filling breakfast, packed with nutrients to start your day right! {{ingredient_image_1}} Start by gathering your ingredients. You will need rolled oats, almond milk, peanut butter, cocoa powder, maple syrup, and vanilla extract. If you like creaminess, grab some Greek yogurt too. In a large bowl, combine these ingredients. Mix in a pinch of salt to enhance the flavors. If you're using Greek yogurt, add it now. This makes the oats rich and creamy. Use a whisk to mix everything well. Make sure the peanut butter and cocoa powder blend smoothly. This step is key; it ensures you get a tasty bite every time. If you see lumps, keep whisking until the mixture is smooth. You want a thick, even texture. Once mixed, divide the oats into two jars or containers. Seal them tightly. Place them in the fridge overnight. This allows the oats to soak up the milk and flavors. In the morning, stir the oats again. If they are too thick, add a little more milk. Top with chopped chocolate or fruit. Enjoy your tasty treat! To get the best texture in your oats, use rolled oats. They soak up the liquid well. Avoid instant oats; they can get mushy. If you want a creamier mix, add Greek yogurt. It makes the oats rich and smooth. For a thicker mix, lessen the liquid a bit. If you like it thinner, add more milk in the morning. Stir well after soaking to break up any clumps. To boost flavor, try adding a sprinkle of cinnamon. It pairs well with peanut butter and chocolate. You can also add a scoop of protein powder. This makes your oats more filling. For added nutrition, toss in some chia seeds or flaxseeds. They bring healthy fats and fiber. Lastly, top your oats with sliced banana or fresh berries for a fruity twist. A common mistake is not measuring the liquid right. Too much milk makes the mix soupy. Too little can dry it out. Always use the right ratios for best results. Another mistake is skipping the overnight soak. This step softens the oats. If you skip it, your oats may be too hard. Lastly, don't forget to stir before serving. This helps mix in any toppings and ensures each bite is tasty. Pro Tips Soak for Extra Creaminess: If you prefer a creamier texture, let the oats soak for more than just overnight, up to 24 hours for the ultimate indulgence. Customize Your Sweetness: Adjust the sweetness by adding more or less maple syrup or honey according to your taste preferences. Mix and Match Toppings: Get creative with toppings! Try adding nuts, seeds, or other fruits to keep things interesting. Meal Prep Friendly: Make a batch of these oats at the beginning of the week for a quick and nutritious breakfast option each morning. {{image_2}} You can switch peanut butter for other nut butters. Try almond, cashew, or sunflower seed butter. Each nut butter adds a unique taste and texture. You can also play with flavors. Add a pinch of cinnamon or a dash of coconut extract. These little changes make a big difference in taste. Fruits add flavor and nutrition. You can mix in sliced bananas, berries, or apples. Fresh fruit makes the oats feel bright and fresh. You can also add nuts or seeds. Walnuts or chia seeds give a nice crunch. Top with chopped dark chocolate or chocolate chips for extra sweetness. This makes each bite a treat! To make it vegan, use maple syrup and almond milk. Both are great choices. For a low-sugar option, cut back on the syrup. You can also use ripe bananas for natural sweetness. This keeps the oats tasty without added sugar. Adjusting ingredients helps you meet your diet needs while enjoying a delicious meal! Overnight oats can last up to five days in the fridge. They stay fresh in airtight containers. After this time, they may lose flavor and texture. Always check for any off smells or visible signs of spoilage. Store your peanut butter chocolate overnight oats in glass jars or airtight containers. Glass jars help keep the oats fresh. Make sure to seal them tightly. You can also layer toppings like fruits or chocolate on top. This keeps them separate until you are ready to eat. You can freeze overnight oats for up to three months. Use freezer-safe containers to prevent freezer burn. To reheat, move the oats to the fridge overnight. In the morning, add a splash of milk and stir well. If you want, you can microwave them for a quick warm-up. Enjoy them cold or warm, depending on your taste! Yes, you can use quick oats. They will cook faster and become softer. Quick oats absorb liquid quickly, so your oats may be mushier. If you prefer a chewier texture, stick with rolled oats. You can change the sweetness by adding more or less maple syrup. Honey is another option. If you like it sweeter, add a bit more syrup. For less sweetness, reduce the amount. You can also mix in ripe bananas for natural sweetness. To reheat, place your oats in a microwave-safe bowl. Heat in short bursts, stirring in between. Use 30-second intervals to avoid overheating. If the oats are too thick, add a splash of milk to loosen them up. Enjoy warm! In this post, we explored how to make overnight oats. We covered ingredients, substitutions, and nutrition. You learned step-by-step instructions and key tips for texture and flavor. Variations let you customize for your tastes, including vegan options. We discussed how to store your oats safely and answered common questions, too. By trying these tips and tricks, you can create delicious oats every time. Enjoy your healthy breakfast!

Peanut Butter Chocolate Overnight Oats Simple Treat

Do you crave a quick, tasty breakfast? Peanut Butter Chocolate Overnight Oats are perfect for you! This simple treat combines

Here is what you need for a delicious bowl of Asian Mushroom Ramen: - 200g ramen noodles - 200g mixed mushrooms (shiitake, portobello, and enoki) - 1 tablespoon sesame oil - 3 garlic cloves - 1 inch ginger - 4 cups vegetable broth - 2 tablespoons soy sauce - 1 tablespoon miso paste - 1 teaspoon chili paste - 1 cup baby spinach - 2 green onions - 1 boiled egg - Sesame seeds - Fresh cilantro These ingredients create a rich, flavorful dish. The mix of mushrooms adds depth. The garlic and ginger bring warmth. Sesame oil enhances the dish with a nutty taste. Miso paste gives a savory kick. Spinach brightens the bowl with color and nutrition. For the complete cooking process, check the Full Recipe. This dish is simple yet satisfying. You can easily adjust the flavors to what you like best. Enjoy your cooking adventure! To cook the ramen noodles, follow the package instructions. Usually, this means boiling them in water for just a few minutes. Once cooked, drain the noodles and rinse them under cold water. Rinsing stops the cooking process. This step helps keep the noodles firm and prevents them from sticking together. Next, heat sesame oil in a large pot over medium heat. Add minced garlic and grated ginger. Sauté these for about 1-2 minutes until they release a strong aroma. This adds depth to your dish. After that, add the sliced mixed mushrooms. Cook them until they soften, which takes about 5-7 minutes. This step enhances the umami flavor in your ramen. Now, it’s time to mix the broth ingredients. Pour in vegetable broth, soy sauce, miso paste, and chili paste. Stir everything well. Bring this mix to a boil, then reduce the heat to a simmer. Let it cook for about 10 minutes. This time allows the flavors to meld and deepen. Once the broth is ready, add baby spinach and the cooked ramen noodles to the pot. Stir gently to mix everything well. Heat this for an additional 3-4 minutes. This step warms the spinach and noodles while keeping their texture. When ready to serve, ladle the ramen into bowls. Top each bowl with a halved boiled egg and sliced green onions. Add a sprinkle of sesame seeds for crunch. Finally, garnish with fresh cilantro for extra flavor. This makes your ramen not just tasty but also visually appealing. For the complete recipe, check out the Full Recipe! - To cook perfect noodles, follow the package directions. - Rinse the noodles with cold water to stop cooking. - Use a large pot to prevent sticking. - Stir occasionally while cooking to ensure even cooking. To enhance the umami flavor, add soy sauce and miso paste early. These ingredients build a rich taste as they cook. You can also try adding dried shiitake mushrooms for extra depth. For a complete meal, pair your ramen with a side salad. A simple cucumber salad adds a crunchy texture. You can also serve it with gyoza for a delightful combo. You can switch up toppings for variety. Try adding roasted corn, sliced bell peppers, or even tofu for extra protein. Fresh herbs like basil or mint can add a refreshing twist. To make this dish vegan, swap the boiled egg with extra tofu or avocado. You can also use vegetable broth to keep it plant-based. To maintain flavor, use high-quality vegetable broth. Adding a splash of lime juice can brighten the dish. If you miss the richness, try a vegan egg substitute or nutritional yeast. For the full recipe, check the earlier section. Enjoy your cooking journey! {{image_2}} You can easily make your Asian mushroom ramen spicy. To adjust heat levels, start with less chili paste. Taste the broth and add more if you want it hotter. For extra spice, consider adding these ingredients: - 1 tablespoon sriracha - 1 teaspoon crushed red pepper flakes - Fresh sliced jalapeños Adding proteins can make your ramen heartier. You can use chicken, beef, shrimp, or tofu. For chicken, cook for about 10 minutes. Beef can take up to 15 minutes, while shrimp cooks in just 3-5 minutes. Tofu needs about 5-7 minutes to warm through. For a vegetarian twist, think of adding more vegetables. You can include: - Bell peppers - Carrots - Broccoli - Snap peas Adding these veggies boosts nutrition and flavor. You may want to adjust the broth to keep it balanced. Adding more vegetable broth can help if you add lots of veggies. To store leftover ramen, place it in an airtight container. Keep the broth and noodles separate. This way, the noodles stay firm and do not get mushy. You can refrigerate leftovers for up to three days. When you’re ready to eat, reheat the broth first. Reheating broth helps revive the flavors. Use a pot on medium heat and stir often. For noodles, add them to the boiling broth for about one minute. This method keeps your dish fresh and tasty. If you want to freeze ramen, prepare the broth and noodles separately. Let them cool completely. Pour the broth into freezer-safe bags or containers. Label them with the date. You can freeze the broth for up to three months. To freeze noodles, place them in a bag and remove the air. When you’re ready to eat, thaw the broth overnight in the fridge. For noodles, place them in hot water for a few minutes. This method helps maintain the texture. You can enjoy your Asian mushroom ramen again, just like the first time! For ramen, you want noodles that are springy and chewy. The best options are: - Fresh ramen noodles - Dried ramen noodles - Instant ramen noodles Fresh noodles are often the best choice. They cook quickly and add a great texture. If you can't find fresh, dried noodles work well too. Instant ramen is easy but usually lacks that authentic bite. Yes, you can! Here are some great gluten-free options: - Rice noodles - Gluten-free ramen noodles Rice noodles are a good substitute. They have a nice texture and hold up well. Gluten-free ramen noodles are now more available and can mimic the original taste. Just be mindful of the cooking times, as they may vary. You can change flavors in many ways. Here are some ideas: - Add more garlic or ginger for a bolder taste. - Experiment with different mushrooms for unique flavors. - Use different broths like chicken or beef for variety. - Spice it up with more chili paste or hot sauce. Each choice alters the dish. Think of it as a fun way to make your bowl special! This blog post covered how to make delicious ramen from scratch. We discussed ingredients, step-by-step cooking instructions, tips for success, and variations to suit your taste. Always remember to rinse your noodles and sauté your aromatics for the best flavor. You can adapt this recipe to be vegan or add your favorite proteins. Enjoying ramen is all about personal touches. With the right techniques, you can create a bowl that warms your soul. Happy cooking!

Asian Mushroom Ramen Noodles Flavorful and Simple Dish

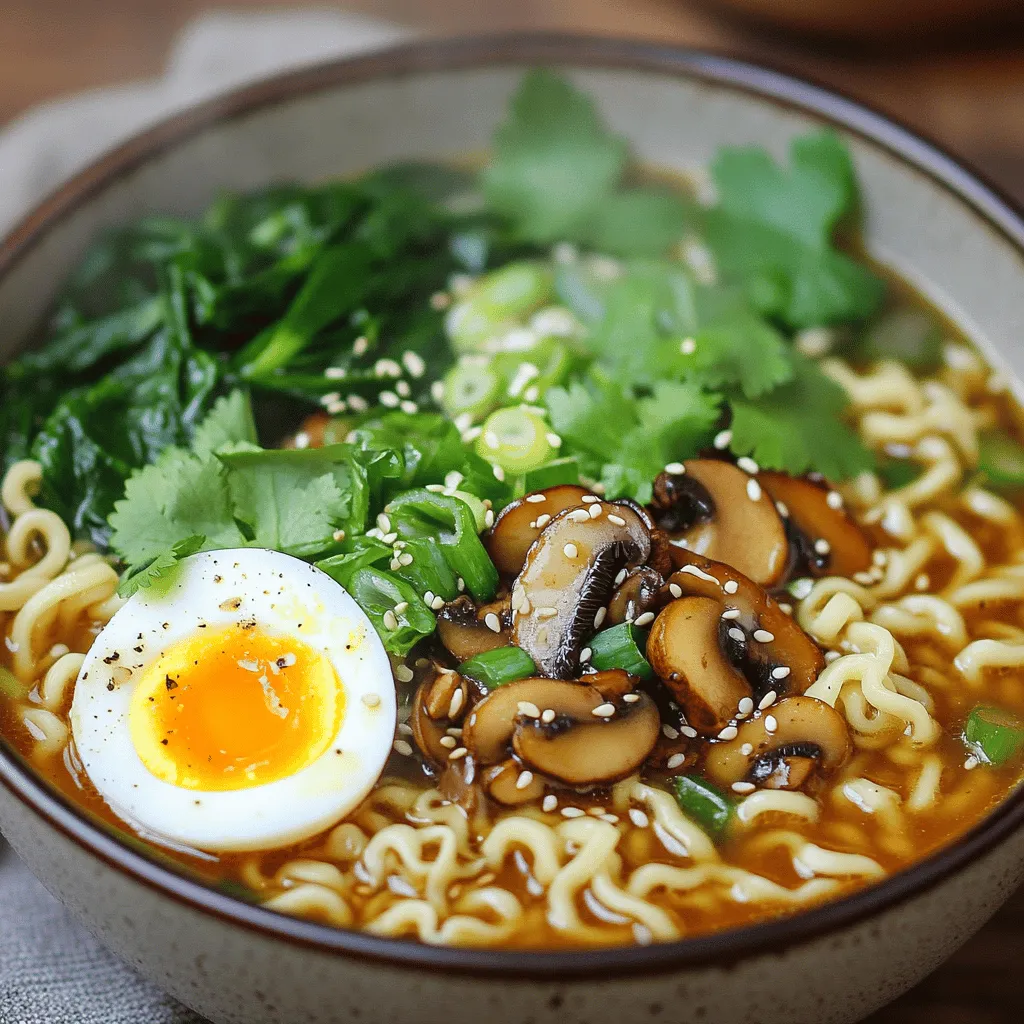
Are you ready to dive into a bowl of comfort? Asian Mushroom Ramen Noodles offer you a tasty and simple

- 3 cups all-purpose flour - 1 packet (2 ¼ teaspoons) active dry yeast - 1 teaspoon sugar - 1 teaspoon salt - 1 cup warm water (about 110°F or 43°C) - ¼ cup olive oil - 4 cloves garlic, minced - 2 tablespoons fresh parsley, chopped - 2 tablespoons fresh basil, chopped - 1 tablespoon fresh rosemary, chopped - ½ teaspoon black pepper - 1 tablespoon melted butter (for brushing) Gather these ingredients to create your herb and garlic swirl rolls. The blend of fresh herbs and garlic gives these rolls a wonderful aroma and taste. The warm water helps the yeast activate, giving the dough its rise. You can find the full recipe later in this article to guide you step by step. To make the rolls rise, we start by activating the yeast. Mix warm water, sugar, and yeast in a small bowl. Let it sit for about 5-10 minutes. You want it to get frothy. This means your yeast is alive and ready to work. Next, we make the dough. In a large bowl, combine the flour and salt. Make a well in the center. Pour in the activated yeast mixture and olive oil. Stir until a shaggy dough forms. This dough will be the base for your rolls. Now it’s time to knead the dough. Transfer it to a floured surface. Knead for about 8-10 minutes. You want it to be smooth and elastic. After that, place it in a greased bowl. Cover it with a clean cloth and let it rise in a warm place. This should take about 1 hour until it doubles in size. While the dough rises, prepare the filling. In a small bowl, mix the minced garlic with chopped herbs and black pepper. This mixture will add great flavor to your rolls. Use fresh herbs for the best taste. Once your dough has risen, punch it down. Transfer it to a floured surface and roll it out into a rectangle about ¼-inch thick. Spread the herb and garlic mixture evenly over the surface of the dough. Starting from one long side, tightly roll the dough into a log. Pinch the seam to seal it. Use a sharp knife or kitchen string to cut the log into 12 equal pieces. Place the rolls in a greased baking dish with the cut side up. Cover and let them rise for another 30 minutes until puffy. While the rolls rise, preheat your oven to 375°F (190°C). Brush the tops of the rolls with melted butter. Bake them for 25-30 minutes or until golden brown. For the full recipe, check out the link provided. Enjoy your warm, fluffy Herb & Garlic Swirl Rolls! To get the best fluffy texture, knead the dough well. Knead it for 8-10 minutes. This helps develop gluten. Gluten gives the rolls their light and airy feel. After kneading, let the dough rise in a warm place. Cover it with a clean cloth. This will keep moisture in and help it rise. Wait until the dough doubles in size, which takes about one hour. You can change up the herbs to fit your taste. Try adding thyme or dill for a different twist. You can also use dried herbs if fresh ones are not available. Experiment with spices like paprika or chili flakes for some heat. These changes can make each batch unique and fun to try. Serve your Herb & Garlic Swirl Rolls warm. They are great on their own or with a dip. Olive oil mixed with balsamic vinegar is a perfect choice. You can also pair them with soups or salads. For a fun touch, garnish with extra fresh herbs on top. This makes for a lovely presentation. Enjoy these rolls fresh from the oven for the best taste! For the complete recipe, check out the Full Recipe section. {{image_2}} You can make these rolls even better by adding cheese. Cheese adds a creamy and rich taste that blends well with the herbs. Try mozzarella for a gooey melt or cheddar for sharp flavor. Simply spread the cheese over the herb mixture before rolling the dough. This small change makes a big difference! If you need a gluten-free version, you can use gluten-free flour. Look for a blend that contains xanthan gum for the best texture. Brands like Bob's Red Mill offer good options. Just replace the all-purpose flour with the gluten-free flour in the same amount. The result is still fluffy and tasty! To create a vegan version, swap the butter for plant-based margarine. You can also use almond milk or oat milk instead of regular milk if needed. This keeps the rolls soft and flavorful without any animal products. Enjoy your vegan Herb & Garlic Swirl Rolls just like the original. For the full recipe, check the link above! To store your Herb & Garlic Swirl Rolls at room temperature, place them in an airtight container. This keeps them soft and moist. You can also wrap them in plastic wrap. Make sure to eat them within two days for the best taste and texture. If you have leftovers, freezing is a great option. Let the rolls cool completely before freezing. Place them in a freezer-safe bag or container. They can last for up to three months. To reheat, thaw them in the fridge overnight. Then, warm them in the oven at 350°F (175°C) for about 10 minutes. To keep your rolls fresh longer, try these simple tips: - Store them in a cool, dry place. - Avoid placing them near direct sunlight. - If you notice any moisture, add a paper towel inside the container. This helps absorb excess moisture and keeps the rolls from getting soggy. These steps ensure your Herb & Garlic Swirl Rolls stay delicious and fluffy. For the full recipe, check out the earlier section. Yes, you can use instant yeast. You can simply replace active dry yeast with instant yeast in a 1:1 ratio. There’s no need to activate instant yeast in water first. Just add it directly to your dry ingredients. This saves time and makes the process easier. These rolls pair well with many dishes. Here are some great options: - Olive oil and balsamic vinegar for dipping - A warm bowl of soup, like tomato or minestrone - A fresh salad with vinaigrette - A hearty stew to soak up flavors Look for these signs to know your rolls are done: - They should be golden brown on top - The tops will feel firm and slightly spring back when touched - When you tap the bottom, it sounds hollow. These signs ensure the rolls are cooked through and fluffy. Yes, you can make the dough in advance. After kneading, let it rise once, then punch it down. Wrap it tightly and store it in the fridge for up to 24 hours. When ready, let it come to room temperature before rolling out and adding the filling. This method makes it easy to enjoy fresh rolls anytime! For the complete recipe, check out the Full Recipe section. In this blog post, we explored the joy of making Herb & Garlic Swirl Rolls. From selecting the right ingredients to the step-by-step process, you now have the tools to create delicious rolls. Remember to play with flavors and variations, whether adding cheese or going gluten-free. Proper storage ensures your rolls stay fresh. With these tips and tricks, you'll impress everyone with your baking skills. Enjoy making and sharing these tasty rolls!

Herb & Garlic Swirl Rolls Fluffy and Flavorful Delight

Welcome to your new favorite recipe: Herb & Garlic Swirl Rolls! These rolls are light, fluffy, and packed with flavor.

To make Cajun Potato Soup, gather these fresh ingredients: - 4 large russet potatoes, peeled and diced - 1 medium onion, finely chopped - 2 cloves garlic, minced - 1 bell pepper (any color), chopped - 2 stalks celery, diced - 4 cups vegetable broth - 1 cup heavy cream (or coconut cream for a dairy-free option) - 2 tablespoons Cajun seasoning - 1 teaspoon smoked paprika - 1 tablespoon olive oil - Salt and pepper to taste - ¼ cup green onions, sliced (for garnish) - ¼ cup crispy bacon bits (optional, for topping) Cajun seasoning and smoked paprika are essential. They give the soup its warm and spicy flavor. If you like it spicy, add a bit more seasoning. For toppings, green onions add a fresh crunch. Bacon bits give a nice salty bite, but they are optional. Check out the full recipe for step-by-step instructions and tips. Enjoy your cooking! 1. Sauté the aromatics: Start by heating the olive oil in a large pot over medium heat. Add the chopped onion, minced garlic, chopped bell pepper, and diced celery. Cook for about 5 minutes. You want the veggies to be soft and smell great. Stir them often to avoid burning. 2. Adding potatoes and broth: Next, stir in the diced russet potatoes, vegetable broth, Cajun seasoning, and smoked paprika. Turn up the heat and bring the mix to a boil. Once boiling, lower the heat and let it simmer for about 20 minutes. You want the potatoes to be tender enough to pierce with a fork. 3. Blending for creaminess: After the potatoes are tender, grab your immersion blender. Blend the soup right in the pot until it’s smooth. If you don’t have an immersion blender, pour half of the soup into a traditional blender. Blend it well and return it to the pot. This gives you that creamy texture everyone loves. 1. Stirring in the cream: Now, it’s time to add the heavy cream. This makes your soup rich and velvety. Stir it in and heat the soup for another 5 minutes. Taste it and add salt and pepper as needed. If you want more spice, adjust the Cajun seasoning. 2. Serving suggestions: Serve the soup in wide bowls for a nice touch. Top each serving with sliced green onions and crispy bacon bits if you like. For a perfect pairing, consider serving crusty bread on the side. It’s great for dipping! For the full recipe, check out the detailed list above! To make your Cajun potato soup just right, focus on the texture. You want it creamy but not too thick. Here are some tips: - Use an immersion blender: This helps you keep some potato chunks for texture while making it creamy. - Adjust the broth: If your soup is too thick, add more vegetable broth to reach the desired consistency. To balance the spices, start with the Cajun seasoning. It packs a punch! Here’s how to enhance the flavor: - Taste as you cook: Add seasoning gradually and taste along the way. This helps you find the perfect heat level. - Add a splash of vinegar: A little acidity can brighten flavors and enhance the spice. When serving your soup, think about sides and presentation to wow your guests. Here are a few ideas: - Perfect sides: Pair the soup with crusty bread or a fresh salad. A simple green salad adds a nice crunch. - Garnish for flair: Top the soup with green onions and crispy bacon bits. They add color and texture. For presentation, use wide bowls. This gives an elegant look. Drizzle some cream on top and sprinkle more green onions for a pop of color. {{image_2}} You can easily change the spice level of your Cajun potato soup. If you like it mild, use less Cajun seasoning. Start with one tablespoon and taste as you go. For a spicy kick, add more seasoning or a pinch of cayenne pepper. You can also add some hot sauce to boost the heat. For a dairy-free option, use coconut cream instead of heavy cream. The coconut adds a subtle sweetness and a rich texture. It works well with the spices and still keeps the soup creamy. Feel free to mix in other vegetables to change the flavor. Carrots, corn, or even spinach can add a nice twist. You can also use sweet potatoes instead of russet potatoes for a sweeter taste. If you want to switch up the broth, try chicken broth for a heartier flavor. You can also use cream alternatives, like almond or oat milk, if you prefer. These swaps keep your soup fresh and exciting while still tasting amazing. For the full recipe, check out the details shared previously. Enjoy exploring these variations! To store leftover Cajun Potato Soup, let it cool first. Pour the soup into an airtight container. Seal it well to keep out air. Place it in the fridge. Leftover soup will stay fresh for about 3 to 4 days. If you want to enjoy it later, make sure to check for any signs of spoilage before eating. For freezing, use a freezer-safe container. Leave some space at the top, as soup expands when frozen. Label the container with the date. The soup can last in the freezer for up to 3 months. When you're ready to eat, move the container to the fridge to thaw overnight. For a quick option, you can thaw it in the microwave. Reheat it on the stove over low heat until it's warm. Stir occasionally to get an even heat. Add some extra cream if it seems too thick after freezing. Enjoy your comforting bowl of Cajun Potato Soup! What can I serve with Cajun Potato Soup? You can serve the soup with crusty bread or cornbread. A side salad also pairs well. Add some spicy sausage for a heartier meal. For a fun twist, try pairing it with a classic gumbo. Can I make this soup vegetarian or vegan? Yes! To make it vegetarian, use vegetable broth and skip the bacon. For a vegan version, replace heavy cream with coconut cream. Make sure your Cajun seasoning is vegan too, as some blends may contain animal products. How long does Cajun Potato Soup last in the fridge? Cajun Potato Soup lasts about 3 to 4 days in the fridge. Store it in an airtight container for the best results. Always reheat it thoroughly before serving. How to scale the recipe for larger servings? If you want to make more soup, double or triple the ingredients. Keep the same cooking times but check the potatoes for doneness. A larger pot can help prevent spills. Can I use instant potatoes instead of fresh? Yes, you can use instant potatoes. They will cook faster, so add them after sautéing the aromatics. Follow the package instructions for the right water amounts. What if I don't have Cajun seasoning? If you don’t have Cajun seasoning, mix paprika, garlic powder, and cayenne pepper. This blend can mimic the flavors well. Adjust the spice levels to match your taste preferences. For the complete preparation guide, check out the [Full Recipe]. Cajun Potato Soup blends bright flavors and easy steps. You learned about key ingredients, from potatoes to spices. I walked you through preparation, blending for creaminess, and final touches. The tips enhance your cooking and serving experience. You discovered variations for any taste and helpful storage methods for leftovers. In closing, this soup is more than just comfort food; it’s a creative dish for all. Enjoy making it your own!

Cajun Potato Soup Hearty and Comforting Delight

Cajun Potato Soup is a warm hug in a bowl, perfect for any day. This hearty dish blends creamy potatoes

Older posts
Newer posts
← Previous Page1 … Page133 Page134 Page135 … Page164 Next →

dsad

© 2026 easycookingbite • Built with GeneratePress

Our Policies

  • Copyright Policy
  • Cookie Policy
  • GDPR Policy
  • Privacy Policy
  • Disclaimer
  • Terms Of Use

More Information

  • Home
  • About
  • Contact
  • Appetizers
  • Dessert
  • Dinner
  • Drinks
©2026, easycookingbite About Back To Top