Skip to content
DisclaimerTerms Of UseGDPR PolicyCookie Policy

easycookingbite

  • Home
  • Drinks
  • Appetizers
  • Dinner
  • Dessert
  • About
  • Contact
  • Privacy Policy
DisclaimerTerms Of UseGDPR PolicyCookie Policy

Lily

- 1 cup all-purpose flour - 1 cup buttermilk (or milk with 1 tablespoon lemon juice added) - 1 large egg - 1 teaspoon baking powder - 1/2 teaspoon baking soda - 1/2 teaspoon salt - 1/2 cup shredded cheese (cheddar or your choice) - 1/2 cup cooked crumbled sausage (or plant-based substitute) - 1/2 cup chopped bell peppers (any color) - 1/4 cup finely chopped green onions - Olive oil or butter for cooking - Sour cream and salsa for serving The main ingredients form the base of our savory pancake tacos. The flour gives structure, while buttermilk adds a nice tang. Eggs bind the mix together and help it rise. Baking powder and baking soda create fluffiness. Salt enhances all the flavors. Next, we have our flavorful add-ins. Shredded cheese brings creaminess and richness. Cooked crumbled sausage adds heartiness, but you can swap it for a plant-based option. Bell peppers add color and crunch, while green onions give a fresh bite. For cooking, you need olive oil or butter. Both create a nice, crispy edge on the pancakes. Sour cream and salsa serve as tasty dips, adding a creamy and zesty touch. This combination makes each bite a delightful experience. {{ingredient_image_1}} Start by gathering your mixing bowl. In this bowl, whisk together: - 1 cup all-purpose flour - 1 teaspoon baking powder - 1/2 teaspoon baking soda - 1/2 teaspoon salt Once mixed, add the wet ingredients: - 1 cup buttermilk (or milk with 1 tablespoon lemon juice) - 1 large egg Whisk until the batter is smooth. Now, stir in: - 1/2 cup shredded cheese - 1/2 cup cooked crumbled sausage - 1/2 cup chopped bell peppers - 1/4 cup finely chopped green onions Mix gently until everything is well combined. Next, heat your non-stick skillet over medium heat. Add a small amount of olive oil or butter to grease the pan. Once hot, pour about 1/4 cup of batter onto the skillet for each pancake taco. Use the back of a spatula to flatten it slightly. Cook for 2-3 minutes. Look for bubbles forming on the surface. When the edges look set, it's time to flip the pancake. Cook for another 1-2 minutes until golden brown. Repeat this step until all the batter is used. Take a cooked pancake and fold it in half like a taco. Do this with each pancake. Serve them warm on a plate. Pair with sour cream and salsa for dipping. Enjoy each bite of this savory delight! For the best texture, make sure your batter is smooth. If it's too thick, add a splash of buttermilk. Aim for a consistency like a thick smoothie. Cook your pancakes on medium heat. This helps them cook evenly without burning. Spices can bring your pancakes to life. Try adding a pinch of paprika or garlic powder for extra zest. Fresh herbs like chopped parsley or cilantro also work great. For cheese, cheddar is a classic choice, but feel free to mix it up. You can swap sausage for crumbled tempeh or black beans for a tasty plant-based option. Presentation matters! Stack your pancake tacos neatly on a plate. A sprinkle of fresh herbs adds color and charm. You can also drizzle sour cream on top or serve it in a small bowl for dipping. A side of bright salsa will make the dish pop and look even more inviting. Pro Tips Use Fresh Ingredients: For the best flavor, use fresh vegetables and high-quality cheese. This will enhance the overall taste of your savory pancake tacos. Customize Your Fillings: Feel free to swap out the sausage and cheese for your favorite proteins or add-ins, such as diced tomatoes, spinach, or mushrooms to make it your own. Adjust the Cooking Temperature: If your pancakes are browning too quickly, reduce the heat slightly. A steady medium heat will ensure they cook evenly without burning. Perfect Pancake Size: Use a 1/4 cup measuring cup for consistent pancake sizes. This will help them cook evenly and make for easier folding. {{image_2}} You can easily make savory pancake tacos vegetarian. Start by using plant-based sausage instead of meat. This keeps the texture and taste similar. You can also add more veggies for extra flavor. Here are some great vegetable fillings: - Spinach - Mushrooms - Zucchini - Corn These options bring color and taste to your tacos. If you like some heat, try adding jalapeños or a splash of hot sauce. This will make your taco pancakes spicy and fun. For a sweet-savory mix, consider adding fruits like diced apples or pineapple. They balance the savory flavors beautifully. For a gluten-free option, swap all-purpose flour with almond flour or rice flour. You may need to adjust the liquid in the batter. Watch cooking time carefully. Gluten-free flours can cook differently. Enjoy your tasty, gluten-free pancake tacos! To store your savory pancake tacos, follow these steps: - Allow pancakes to cool completely. - Place them in an airtight container. - Store in the fridge for up to 3 days. Check for signs of spoilage. If they smell sour or look moldy, discard them. Reheat your pancakes using these methods: - Microwave: Place on a plate and cover with a damp paper towel. Heat for 30 seconds. - Skillet: Heat on low with a little oil for 1-2 minutes. To keep them fluffy, avoid high heat. Moisture helps retain the texture. You can freeze pancake tacos for later use. Here’s how: - Stack pancakes with parchment paper between them. - Place in a freezer bag or container. For quick meal prep, consider filling pancakes with your favorite ingredients ahead of time. These can be a fast meal option. Yes, you can use whole wheat flour or gluten-free flour. Each type gives a unique flavor and texture. Whole wheat adds nuttiness, while gluten-free flour makes the pancakes light. Make sure to adjust the liquid if needed. You can prepare the batter and store it in the fridge for up to 24 hours. Cook the pancakes right before serving for the best taste. You can also cook them ahead and freeze. Just reheat them in a skillet or microwave. A variety of toppings work well. Try fresh sour cream, zesty salsa, or avocado slices. You can also add fresh herbs like cilantro or parsley. For a spicy kick, jalapeños or hot sauce are great. Yes, you can make them dairy-free. Use plant-based milk like almond or soy. Replace buttermilk with a mix of plant milk and lemon juice. Choose dairy-free cheese and skip sour cream for toppings. To make more servings, simply multiply the ingredient amounts. Double or triple the recipe based on your needs. Keep in mind the cooking time may vary with larger batches. This blog post showed you how to make tasty pancake tacos. We covered the key ingredients and step-by-step cooking tips. You learned about flavorful add-ins and how to perfect the pancake texture. With hints for storage and meal prep, you can enjoy these pancakes anytime. Try different flavors and options that suit your tastes. Enjoy creating your own delicious pancake tacos!

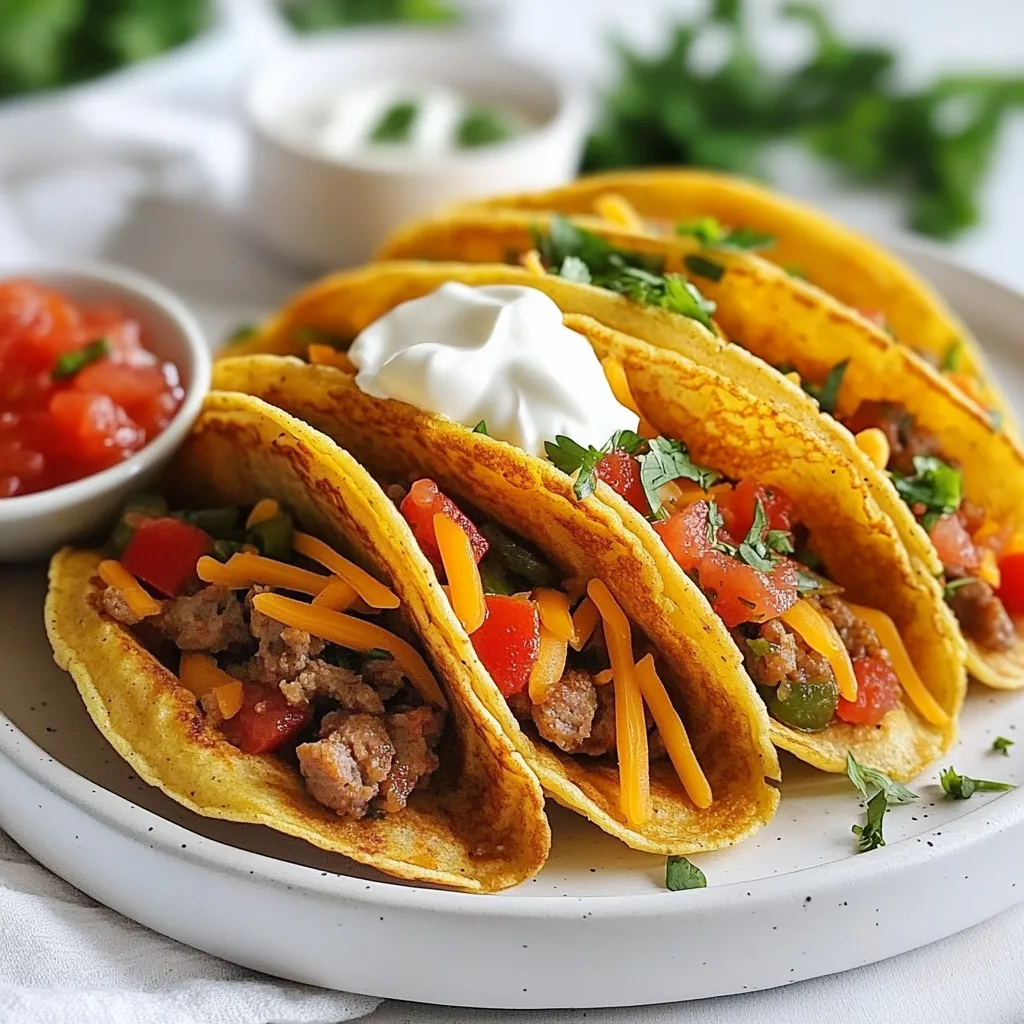
Savory Pancake Tacos Easy and Flavorful Recipe

Are you ready to take your taco game to a whole new level? In this post, I’ll show you how

- 4 boneless, skinless chicken thighs - 2 cups broccoli florets - 1 bell pepper (red or yellow), sliced - 1 cup snap peas - 1 carrot, thinly sliced - 1 tablespoon olive oil - Salt and pepper to taste For this dish, I love using boneless, skinless chicken thighs. They cook evenly and stay juicy. You can swap them out for chicken breasts if you prefer. Using fresh veggies makes a big difference too. I recommend broccoli, bell pepper, snap peas, and carrot. These add great color and crunch. You can mix in other veggies based on what you have at home. - 1/4 cup soy sauce (low sodium) - 1/4 cup honey - 2 tablespoons rice vinegar - 1 tablespoon grated fresh ginger - 2 cloves garlic, minced - 1 tablespoon cornstarch mixed with 1 tablespoon water (slurry) The teriyaki sauce brings all the flavors together. I use low-sodium soy sauce to keep it balanced. Honey adds sweetness, while rice vinegar gives it a nice tang. Ginger and garlic bring lots of flavor. To thicken the sauce, I mix cornstarch with water. This makes the sauce nice and glossy. - Sesame seeds - Green onions, chopped For a pretty finish, I sprinkle sesame seeds on top. Chopped green onions add a nice pop of color and flavor. These simple garnishes make your dish look special without extra work. {{ingredient_image_1}} - Preheat your oven to 400°F (200°C). - Line a large baking sheet with parchment paper for easy cleanup. - In a small saucepan over medium heat, combine: - 1/4 cup soy sauce (low sodium) - 1/4 cup honey - 2 tablespoons rice vinegar - 1 tablespoon grated fresh ginger - 2 cloves garlic, minced - Stir these ingredients well and let them come to a simmer. - To thicken the sauce, whisk in a cornstarch slurry made with: - 1 tablespoon cornstarch mixed with 1 tablespoon water. - Cook for 1-2 minutes until thickened, then remove from heat. - Place 4 boneless, skinless chicken thighs in a large bowl. - Drizzle the chicken with 1 tablespoon olive oil and season with salt and pepper to taste. - Add: - 2 cups broccoli florets - 1 sliced bell pepper (red or yellow) - 1 cup snap peas - 1 thinly sliced carrot - Pour half of the teriyaki sauce over the chicken and vegetables. - Toss everything to coat evenly. - Spread the chicken and veggies evenly on the lined baking sheet. - Make sure they are in a single layer for even cooking. - Bake in the preheated oven for 25-30 minutes, or until the chicken is cooked through (165°F internal temperature) and the veggies are tender-crisp. - In the last 5 minutes of baking, drizzle the remaining teriyaki sauce over the chicken and vegetables. - Once done, remove from the oven and let it cool for a couple of minutes. - Garnish with sesame seeds and chopped green onions before serving. To make a great teriyaki sauce, you must balance sweetness and saltiness. Start with low-sodium soy sauce to control salt levels. Then, add honey for sweetness. You can adjust the amount of each until you get it just right. If you want a twist, try using maple syrup instead of honey. This adds a unique flavor. When you arrange the chicken and veggies on the baking sheet, keep them in a single layer. This step helps everything cook evenly. If the pieces overlap, some may not cook through. To check if the chicken is done, use a meat thermometer. The internal temperature should reach 165°F. Once it hits this mark, your chicken is safe to eat. Pair your sheet pan teriyaki chicken with simple side dishes. Jasmine rice or quinoa works well to soak up extra sauce. You can also add a fresh salad for a crunchy contrast. For a beautiful meal, garnish with sesame seeds and green onions. This not only adds color but also enhances the flavor. Pro Tips Marinate for More Flavor: Let the chicken marinate in the teriyaki sauce for at least 30 minutes or overnight in the refrigerator for a deeper flavor. Vegetable Variations: Feel free to swap in seasonal vegetables like zucchini or asparagus for a different twist on this dish. Check for Doneness: Always use a meat thermometer to ensure your chicken reaches an internal temperature of 165°F for safe consumption. Serve with Rice: This dish pairs wonderfully with steamed rice or quinoa to soak up the delicious teriyaki sauce. {{image_2}} You can switch up the protein in this dish easily. Chicken thighs are great, but chicken breasts work well too. They will still stay juicy if you don’t overcook them. If you want a meatless meal, try using tofu. Just cube it and toss it in with the veggies. For seafood lovers, shrimp is a tasty choice. Cook it for a shorter time so it stays tender. Beef can also shine in this dish. Use thinly sliced steak for a quick-cooking option. Feel free to mix in other vegetables. Zucchini, asparagus, or cauliflower can add nice flavors. You can also use green beans or mushrooms. They will cook well with the chicken and sauce. Seasonal veggies can change the dish too. In summer, try fresh corn or bell peppers. In fall, use squash or Brussels sprouts. This makes the dish fun and fresh all year round. You can make your teriyaki sauce from scratch. If you need a quick fix, store-bought options work too. Just check the label for sodium levels. You might want to adjust the sweetness. If you like less sugar, use less honey. If you want spice, add some red pepper flakes or sriracha. This will give your dish a nice kick. You can also try adding citrus zest for a bright flavor. To store leftovers, let the dish cool first. Place the chicken and veggies in an airtight container. This keeps them fresh for up to four days. I recommend using glass containers. They help maintain flavor and are easy to clean. You can freeze portions for later meals. Divide the leftovers into smaller containers. Make sure to leave some space at the top, as food expands when frozen. To thaw, place the container in the fridge overnight. Reheat in the microwave or oven until it's hot all the way through. To keep your meal at its best, store it properly. In the fridge, aim to eat it within four days. If frozen, try to use it within three months. Always check for any changes in smell or color before eating. Enjoy the same great taste every time! Yes, you can make teriyaki sauce ahead of time. To do this, follow these steps: - Cook the sauce: Combine soy sauce, honey, rice vinegar, ginger, and garlic in a pan. - Cool it down: Once thickened, let it cool to room temperature. - Store it: Pour the sauce into an airtight container. It can stay in the fridge for up to a week. Making the sauce ahead saves time. You can use it for other dishes too. Just shake it well before using. Baking chicken thighs at 400°F takes about 25 to 30 minutes. Here are some tips: - Check the internal temperature: It should reach 165°F for safety. - Use a meat thermometer: This tool helps ensure perfect cooking. Different cuts of chicken may take longer. For example, chicken breasts usually need about 30 to 35 minutes. Always check for doneness. You can use many vegetables for sheet pan meals. Here are some great options: - Broccoli: Adds crunch and pairs well with teriyaki. - Bell Peppers: Use red or yellow for color and sweetness. - Snap Peas: They add a nice snap and freshness. - Carrots: Thin slices cook quickly and add sweetness. Feel free to mix and match. Seasonal veggies work great too! Just ensure they cook at the same rate as the chicken. To wrap up, we explored how to make a delicious sheet pan teriyaki chicken. You learned about the key ingredients, such as chicken thighs, fresh veggies, and a tasty sauce. I shared simple steps to create this dish and tips to make it even better. Feel free to customize it with different proteins or veggies. Remember to store leftovers safely for later meals. With this knowledge, you can enjoy a healthy, vibrant meal anytime.

Sheet Pan Teriyaki Chicken and Veggies Tasty Meal

Are you looking for a quick and tasty dinner idea? Look no further than this Sheet Pan Teriyaki Chicken and

To make Sticky Sesame Chickpeas, you will need: - 1 can (15 oz) chickpeas, drained and rinsed - 3 tablespoons sesame oil - 2 tablespoons soy sauce (or tamari for gluten-free) - 1 tablespoon honey or maple syrup - 1 tablespoon rice vinegar - 2 teaspoons minced garlic - 2 teaspoons grated ginger - 1 tablespoon sesame seeds - 2 green onions, chopped - Salt and pepper to taste - Fresh cilantro for garnish (optional) If you want to swap out some ingredients, here are some ideas: - Use olive oil instead of sesame oil for a different flavor. - Try coconut aminos instead of soy sauce for a sweeter taste. - Maple syrup can replace honey for a vegan option. - If you dislike garlic, leave it out or use garlic powder. These swaps can help you adjust the dish to your taste. Sticky Sesame Chickpeas are not only tasty but also packed with nutrients. Here’s a rough breakdown per serving: - Calories: 200 - Protein: 8g - Carbohydrates: 22g - Fat: 10g - Fiber: 6g - Sugar: 5g Chickpeas provide protein and fiber, making this dish filling and healthy. Enjoy this dish as a snack or a side! {{ingredient_image_1}} First, gather your ingredients. You will need: - 1 can (15 oz) chickpeas, drained and rinsed - 3 tablespoons sesame oil - 2 tablespoons soy sauce (or tamari for gluten-free) - 1 tablespoon honey or maple syrup - 1 tablespoon rice vinegar - 2 teaspoons minced garlic - 2 teaspoons grated ginger - 1 tablespoon sesame seeds - 2 green onions, chopped - Salt and pepper to taste - Fresh cilantro for garnish (optional) Make sure to rinse the chickpeas well. This step helps remove excess sodium and improves flavor. Heat sesame oil in a large skillet over medium heat. Add the minced garlic and grated ginger. Sauté for about one minute until you smell the aroma. This step boosts the flavors in your dish. Next, add the drained chickpeas to the skillet. Cook them for 5 to 7 minutes. Stir occasionally so they get slightly crispy on the outside. This adds a nice texture. In a small bowl, mix soy sauce, honey (or maple syrup), and rice vinegar. Pour this mixture over the chickpeas. Stir well to coat them evenly. Let the mixture simmer for 3-4 minutes. This allows the sauce to thicken and caramelize. Sprinkle sesame seeds over the chickpeas and cook for another minute. Stir frequently to avoid burning. Remove from heat and add salt and pepper to taste. Transfer your sticky chickpeas to a serving dish. Garnish with chopped green onions and fresh cilantro if desired. Sticky sesame chickpeas are great on their own or served over rice. You can also add them to wraps or salads for extra flavor. These chickpeas are perfect for meal prep, too. Enjoy them warm or chill for later! To get crispy chickpeas, start with a can of chickpeas. Drain and rinse them well. Pat them dry with a towel to remove excess moisture. This step is key. Heat sesame oil in your skillet over medium heat. Add the minced garlic and ginger. Sauté them for about a minute until they smell great. Then, toss in the dried chickpeas. Cook them for 5 to 7 minutes, stirring often. This helps them turn golden and crispy. You can play with flavors to make this dish even better. Try adding red pepper flakes for a spicy kick. A splash of lime juice adds brightness, balancing the sweetness of honey. Fresh herbs like mint or basil can lift the dish. You can also mix in some cooked vegetables. Bell peppers or snap peas would add crunch and color. A few mistakes can ruin your sticky sesame chickpeas. First, don’t skip drying the chickpeas. Wet chickpeas won’t crisp up well. Another mistake is not cooking long enough. Ensure they get that nice golden color. Be careful with the sauce. If you add it too early, it can make the chickpeas soggy. Finally, taste before serving. Adjust the salt and pepper to your liking for the best flavor. Pro Tips Use Fresh Ingredients: Fresh garlic and ginger provide a more vibrant flavor compared to dried versions. Always opt for fresh when possible. Adjust Sweetness: Depending on your preference, feel free to adjust the amount of honey or maple syrup to make the dish sweeter or less sweet. Experiment with Toppings: Try adding other toppings like crushed peanuts or chili flakes for an extra kick and texture. Serving Suggestions: These sticky chickpeas make a great filling for wraps or can be served over rice or quinoa for a complete meal. {{image_2}} You can easily make Sticky Sesame Chickpeas vegan. Just use maple syrup instead of honey. For a gluten-free option, choose tamari instead of soy sauce. Both swaps keep the dish tasty and safe for different diets. Get creative with your Sticky Sesame Chickpeas! You can swap sesame oil for olive oil if you want a milder taste. Try adding some red pepper flakes for a kick. You can also use different sweeteners like agave nectar. If you want a nutty flavor, add some chopped peanuts or cashews. Sticky Sesame Chickpeas taste great over fluffy rice. You can also serve them in a wrap with fresh veggies. They make a nice topping for a salad too. Want a fun snack? Serve them in lettuce cups for a crunchy bite. To store leftover sticky sesame chickpeas, let them cool first. Transfer them to an airtight container. You can keep them in the fridge for up to three days. Make sure to label the container with the date. This way, you won't forget when you made them. When reheating, I suggest using a skillet. Warm a bit of oil over medium heat. Add the chickpeas and stir them gently. This helps them regain their crispy texture. You can also use a microwave if you are in a hurry. Place the chickpeas on a microwave-safe dish and cover it. Heat in short bursts, stirring in between. Yes, you can freeze sticky sesame chickpeas! Place the cooled chickpeas in a freezer-safe bag. Remove as much air as possible before sealing. They can last up to three months in the freezer. When you're ready to eat, thaw them overnight in the fridge. Reheat them in a skillet for the best taste. To add spice to Sticky Sesame Chickpeas, use chili flakes or hot sauce. Start with a small amount and taste. You can also mix in diced jalapeños for a fresh kick. The heat balances well with the sweetness of honey or maple syrup. Yes, you can use dried chickpeas! First, soak them overnight. After soaking, cook them until tender before using. This process takes longer but gives a fresh taste. Remember to drain and rinse them just like canned chickpeas. Sticky Sesame Chickpeas pair well with rice or quinoa. You can also serve them in a wrap with fresh veggies. Another idea is to add them to a salad for extra protein. They make a great side dish or a main meal. This blog post covered how to make Sticky Sesame Chickpeas. We looked at key ingredients, options for substitutes, and nutritional info. I shared step-by-step instructions for preparing and cooking this dish. You learned tips for getting crispy chickpeas and avoiding common mistakes. We explored variations for different diets and tasty serving ideas. Finally, I provided storage tips for leftovers. In closing, enjoy experimenting with this dish. Make it your own and share it with friends.

Sticky Sesame Chickpeas Flavorful and Simple Dish

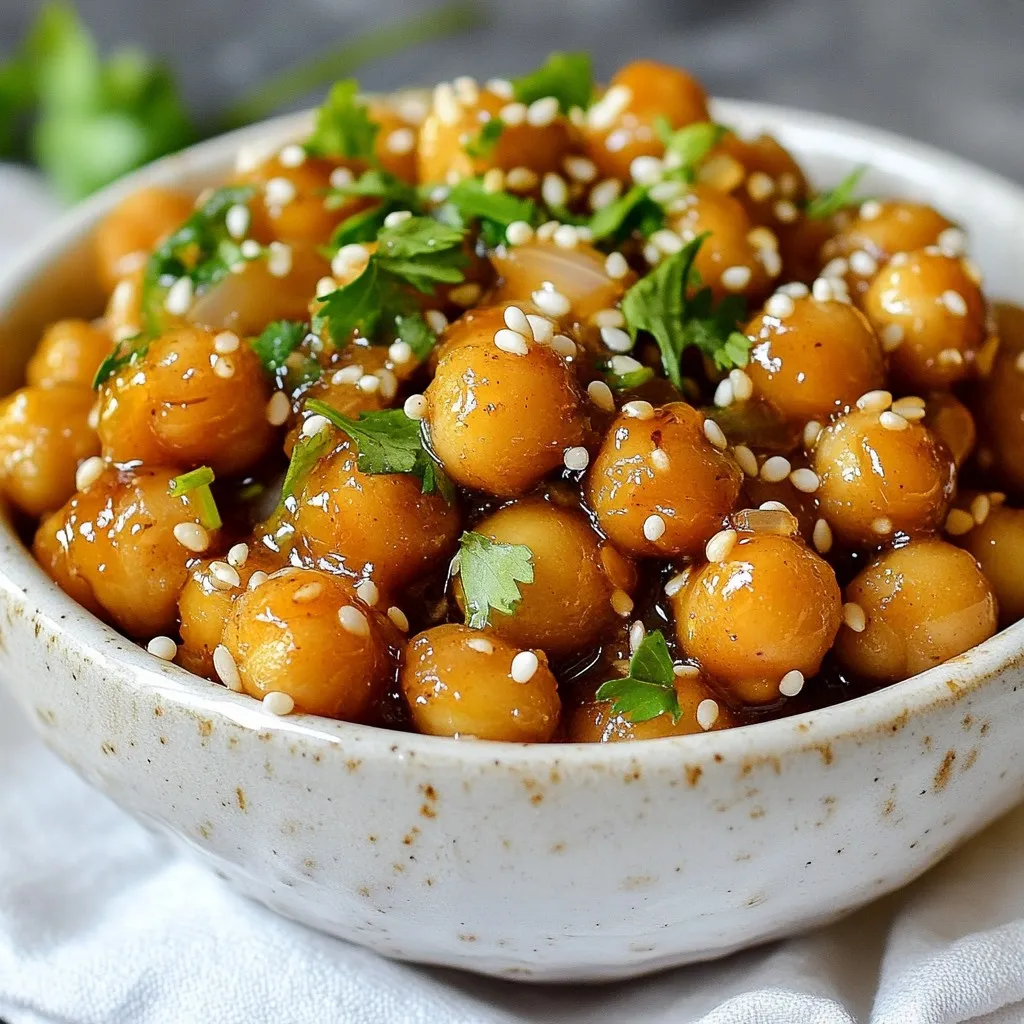
Are you ready to turn a simple can of chickpeas into a delicious meal? My Sticky Sesame Chickpeas are not

You need 1 cup of fresh blackberries. These berries give your drink a sweet and tart flavor. Choose ripe, firm blackberries for the best taste. Use 1 tablespoon of fresh thyme leaves. Thyme adds a nice herb taste that pairs well with blackberries. Fresh thyme will make your mocktail shine. You will need 2 tablespoons of honey or agave syrup. This sweetener helps balance the sourness of the lemon juice. Use honey for a richer taste or agave for a lighter option. Get 1 cup of sparkling water. This will add fizz and make your drink refreshing. The bubbles keep the drink lively and fun. Add 1 tablespoon of lemon juice. This gives the mocktail a zesty kick. Freshly squeezed lemon juice works best for a bright flavor. Have some ice cubes on hand. They keep your mocktail cold and refreshing. Fill your glass with ice before pouring in the drink. Use fresh thyme sprigs and whole blackberries to garnish. These make your drink look pretty and add extra flavor. A few berries and a sprig of thyme on top will impress your guests. {{ingredient_image_1}} First, grab a cocktail shaker. Place one cup of fresh blackberries inside. Add one tablespoon of fresh thyme leaves. Use a muddler to crush the blackberries and thyme. Press down gently until you smell the thyme and see the juice from the blackberries. This step brings out the flavors. Next, pour in two tablespoons of honey or agave syrup. Then, add one tablespoon of lemon juice. Muddle the mixture again for about 30 seconds. This helps blend the sweet and tart flavors. Mixing these ingredients first enhances the taste of the mocktail. Now, fill the shaker with ice cubes. Pour in one cup of sparkling water. Secure the lid tightly and shake it gently. Shaking too hard can lose the fizz, so be careful. You want a nice mix without losing the bubbles. After shaking, it’s time to strain the drink. Grab a glass filled with ice. Pour the mixture slowly into the glass. Use a fine mesh strainer to catch any bits. This step gives you a smooth and refreshing drink. For the final touch, garnish your mocktail. Add fresh thyme sprigs and a few whole blackberries. This not only looks nice but also adds extra flavor. The vibrant colors make the drink inviting. Enjoy your delicious Blackberry Thyme Mocktail! Choose ripe blackberries. Look for deep color and slight softness. Avoid any that are hard or mushy. Fresh berries will give your drink the best taste. Always wash them gently to keep their shape. You can change the sweetness to your liking. If you like it sweeter, add more honey or agave syrup. For a lighter drink, use less. You can also try adding a splash of lemon juice to balance the sweetness. To keep the fizz, add sparkling water last. Shake the drink gently. This way, you won’t lose the bubbles. Serve it right after mixing for the best sparkle. Select tall glasses for a nice look. Clear glasses show off the drink's color. You can use mason jars or elegant cocktail glasses, too. The right glass adds fun to your drink experience. Pro Tips Use Fresh Ingredients: Always opt for fresh blackberries and thyme for the best flavor and aroma in your mocktail. Adjust Sweetness: Feel free to tweak the amount of honey or agave syrup according to your taste preference. You can also substitute with a sugar alternative if desired. Chill Your Glass: For an extra refreshing experience, chill your glass beforehand to keep your drink cool for longer. Experiment with Herbs: Try adding other herbs like mint or basil for a unique twist on the flavor profile of your mocktail. {{image_2}} You can add a splash of citrus to your mocktail. Lime or orange juice brightens the drink. Just mix in one tablespoon of your favorite juice. Citrus adds zing and balances the sweetness of honey. It makes the drink more refreshing and lively. Try it out for a fun twist on your blackberry thyme mocktail! Herbs add depth and fun to your drink. Mint gives a cool touch while basil adds a unique flavor. You can muddle about five mint leaves or a few basil leaves with the blackberries. This change brings a new taste that surprises your palate. Experimenting with herbs can lead to your new favorite flavor! Want a smoothie-like mocktail? Blend the blackberries instead of muddling them. This creates a thicker drink with a rich berry flavor. Use one cup of blackberries and blend them until smooth. Then, mix it with the other ingredients. This version is perfect for hot days when you need a cold treat! Planning a get-together? You can easily make a larger batch! Just multiply the ingredients by the number of servings you need. For example, if you want to make four servings, use two cups of blackberries and two tablespoons of honey. Mix everything in a pitcher, and serve it over ice. Guests will love the fresh taste and colorful look of this mocktail! If you have leftover mocktail mix, store it in the fridge. Use a clean, airtight jar or bottle. This keeps the flavors fresh and tasty. Make sure to consume it within two days for the best taste. Chill your ingredients before mixing. Place blackberries and thyme in the fridge. Cold ingredients blend better and taste more refreshing. If you can, chill your glassware too. This adds a nice touch to your drink. Use glass containers for the best flavor. They do not absorb smells or tastes. If you use plastic, ensure it is food-safe. Always label your containers with the date. This way, you won't forget when you made your delicious mocktail mix. A mocktail is a non-alcoholic drink that looks and tastes fancy. It has fun flavors and often uses fresh fruits, herbs, and sparkling water. Mocktails are perfect for anyone who wants a special drink without alcohol. Yes, you can prep parts of the mocktail ahead. You can muddle the blackberries and thyme, then store them in the fridge. Just add the sparkling water and ice before serving. This keeps your drink fresh and bubbly. To make this mocktail sugar-free, you can use a sugar substitute. Options like stevia or erythritol work well. You can also skip the sweetener if the blackberries are sweet enough for your taste. Many flavors go well with blackberry and thyme. Citrus fruits like lemon or lime add brightness. Mint or basil can add a fresh twist. Ginger can give a spicy kick too. Experiment and find your favorite combo! Absolutely! This mocktail is great for kids. It has no alcohol and uses fresh ingredients. Kids will love the fruity taste and fun colors. Serve it at parties or family gatherings for a special treat. This blog post covers how to make a delicious blackberry thyme mocktail. We explored all the ingredients, highlighted key steps, and shared useful tips. You can customize the drink with citrus or herbs for added flavor. Remember, storing your mix correctly keeps it fresh longer. As you try this recipe, think about what your unique version could be. Enjoy creating a refreshing drink that everyone can love!

Blackberry Thyme Mocktail Refreshing and Simply Delicious

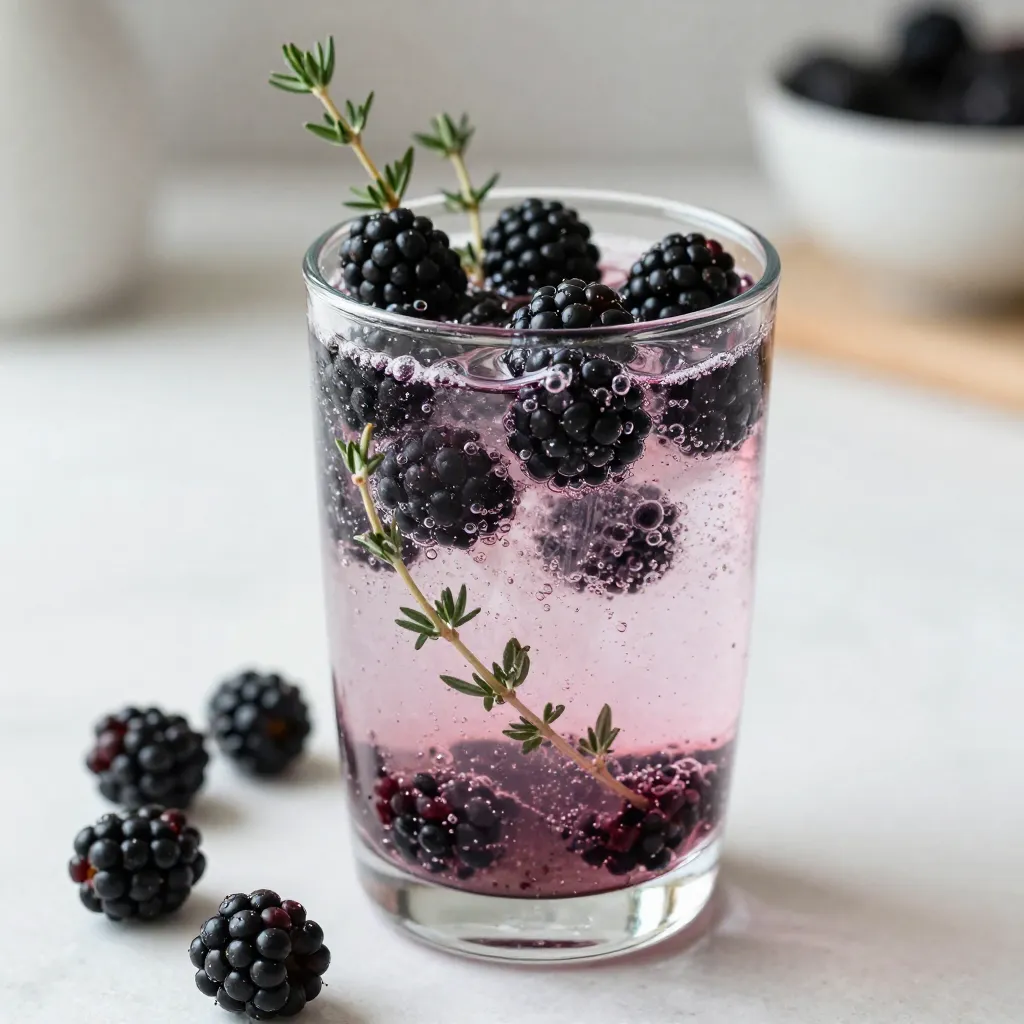
Looking for a drink that’s both delicious and refreshing? You’ll love the Blackberry Thyme Mocktail! This easy recipe combines fresh

When making classic chicken noodle soup, fresh and quality ingredients shine. Here’s what you need: - Chicken: Use 2 boneless, skinless chicken breasts for a tender base. - Vegetables: Gather 2 medium carrots, sliced, 2 celery stalks, diced, and 1 medium onion, chopped. These add great flavor and texture. - Herbs and spices: Grab 1 teaspoon of dried thyme, 1 teaspoon of dried oregano, and 1 bay leaf. These herbs bring warmth to the soup. - Broth and noodles: You will need 8 cups of chicken broth and 2 cups of egg noodles. They create the heart of the dish. - Additional seasonings: Keep salt, pepper, and 2 tablespoons of olive oil on hand. They enhance the taste. - Garnish options: Fresh parsley or dill adds a nice touch once the soup is served. With these ingredients, you can create a soup that comforts and warms. Each item plays a vital role in making this dish special. {{ingredient_image_1}} 1. Sautéing vegetables and aromatics Start by heating 2 tablespoons of olive oil in a large pot over medium heat. Add 1 chopped onion, 2 sliced carrots, and 2 diced celery stalks. Cook these for about 5 minutes. You want them to soften but not brown. Next, stir in 3 minced garlic cloves, 1 teaspoon of dried thyme, and 1 teaspoon of dried oregano. Cook for another 2 minutes. The smell will be amazing! 2. Adding chicken and broth Now, it's time to add the star of the show! Place 2 boneless, skinless chicken breasts into the pot. Pour in 8 cups of chicken broth along with 1 bay leaf, salt, and pepper to taste. Bring everything to a boil. 3. Shredding the chicken Once boiling, reduce the heat and let it simmer for 20-25 minutes. This lets the flavors blend. After that, take out the chicken and shred it using two forks. It should be tender and easy to pull apart. Put the shredded chicken back into the pot. 4. Cooking noodles Add 2 cups of egg noodles to the pot. Let the soup simmer for another 10 minutes. This cooks the noodles until they are tender. Make sure to taste the soup and adjust the seasoning if needed. Don’t forget to remove the bay leaf before you serve! - Importance of simmering time Simmering is key to making rich soup. It allows the flavors to meld perfectly. If you rush this step, you might lose depth in taste. - How to ensure chicken is cooked properly The chicken should be cooked through and easy to shred. Make sure it reaches an internal temperature of 165°F. Use a meat thermometer for best results! Using homemade chicken broth boosts the soup's taste. It adds depth and richness. You can make broth by simmering chicken bones, veggies, and herbs. It takes time, but the flavor is worth it. You can also use store-bought broth in a pinch. Consider adding more herbs and spices for extra flavor. Fresh thyme or dill can brighten the soup. You might also try a pinch of paprika for warmth. A squeeze of lemon juice adds a nice zing. Experiment to find what you like best. To make the soup kid-friendly, adjust the flavors. Kids often prefer milder tastes. Reduce the garlic and herbs if needed. You can also add some sweet corn for a fun twist. For noodles, consider using fun shapes like stars or hearts. Kids enjoy these playful options. Egg noodles are great, but you can use whole wheat or gluten-free noodles too. Just ensure the noodles are tender, so they are easy to eat. Pro Tips Use Homemade Broth: For an even richer flavor, use homemade chicken broth instead of store-bought. It enhances the overall taste and nutrition of the soup. Adjust Noodle Cooking Time: If you prefer firmer noodles, add them to the pot later in the cooking process. This prevents them from becoming too soft. Herb Variations: Feel free to experiment with fresh herbs like thyme or dill instead of dried. Fresh herbs can provide a more vibrant flavor. Leftover Storage: Store leftover soup in an airtight container in the fridge for up to 3 days. Reheat gently to enjoy later. {{image_2}} You can swap chicken for other meats. Turkey works great if you want a change. If you prefer pork, use tender pork loin. For something different, try shrimp. They cook fast and add a nice flavor. For a vegetarian or vegan option, use chickpeas or lentils. They give protein and texture. You can also use tofu, which absorbs flavors well. Replace chicken broth with vegetable broth for a tasty base. You can choose whole wheat noodles for more fiber. They add a hearty touch to the soup. If you need a gluten-free choice, look for rice noodles or gluten-free pasta. They work fine and keep the soup light. Making your own noodles can be fun. Mix flour and eggs to create fresh egg noodles. Roll and cut them to your liking. Homemade noodles add a special touch to your dish. They soak up the flavors nicely, making each bite delightful. To keep chicken noodle soup fresh, follow these tips. First, let the soup cool down before storing. Pour it into airtight containers. Store it in the fridge if you plan to eat it soon. Chicken noodle soup stays fresh for about 3 to 4 days in the fridge. If you want to keep it longer, freeze the soup. Pour it into freezer-safe containers, leaving some space at the top. This space allows for expansion as it freezes. Chicken noodle soup can last up to 3 months in the freezer. When it’s time to eat, reheating soup is easy. You can use a pot or microwave. If you use the stove, heat it over medium heat. Stir it often to ensure even heating. When reheating in the microwave, use a microwave-safe bowl. Heat it for 1 to 2 minutes. Stir halfway to warm it evenly. Be careful with the noodles. They can get mushy if they cook too long. Add the noodles when you first make the soup. If you freeze it, cook the noodles separately when you reheat. Then mix them in to keep them firm. Enjoy your warm soup! You can keep chicken noodle soup in the fridge for about three to four days. Store it in an airtight container. If you want to keep it longer, freeze the soup. When frozen, it can last for about two to three months. Make sure to let it cool before freezing. Yes, rotisserie chicken is great for this soup. It saves time and adds flavor. Just shred the chicken and add it when you would normally add the raw chicken. This will cut down on cooking time. You can add many vegetables to chicken noodle soup. Here are some tasty options: - Peas - Corn - Green beans - Spinach - Mushrooms Feel free to mix and match based on your taste and what you have on hand. Absolutely! Making chicken noodle soup ahead of time is a great idea. The flavors blend together and taste even better the next day. Just remember to cook the noodles separately if you plan to store leftovers. This way, they won’t get mushy when you reheat the soup. This post covered all you need for delicious chicken noodle soup. We discussed key ingredients, preparation steps, and helpful cooking tips. You learned some tricks to boost flavor and ways to make it kid-friendly. We explored variations using different proteins and noodles, along with storage advice. In summary, with simple steps and choices, you can create a warm bowl of comfort. Enjoy experimenting with flavors and sharing this classic dish. It's a meal that brings smiles and warmth to any table.

Classic Chicken Noodle Soup Hearty and Comforting Meal

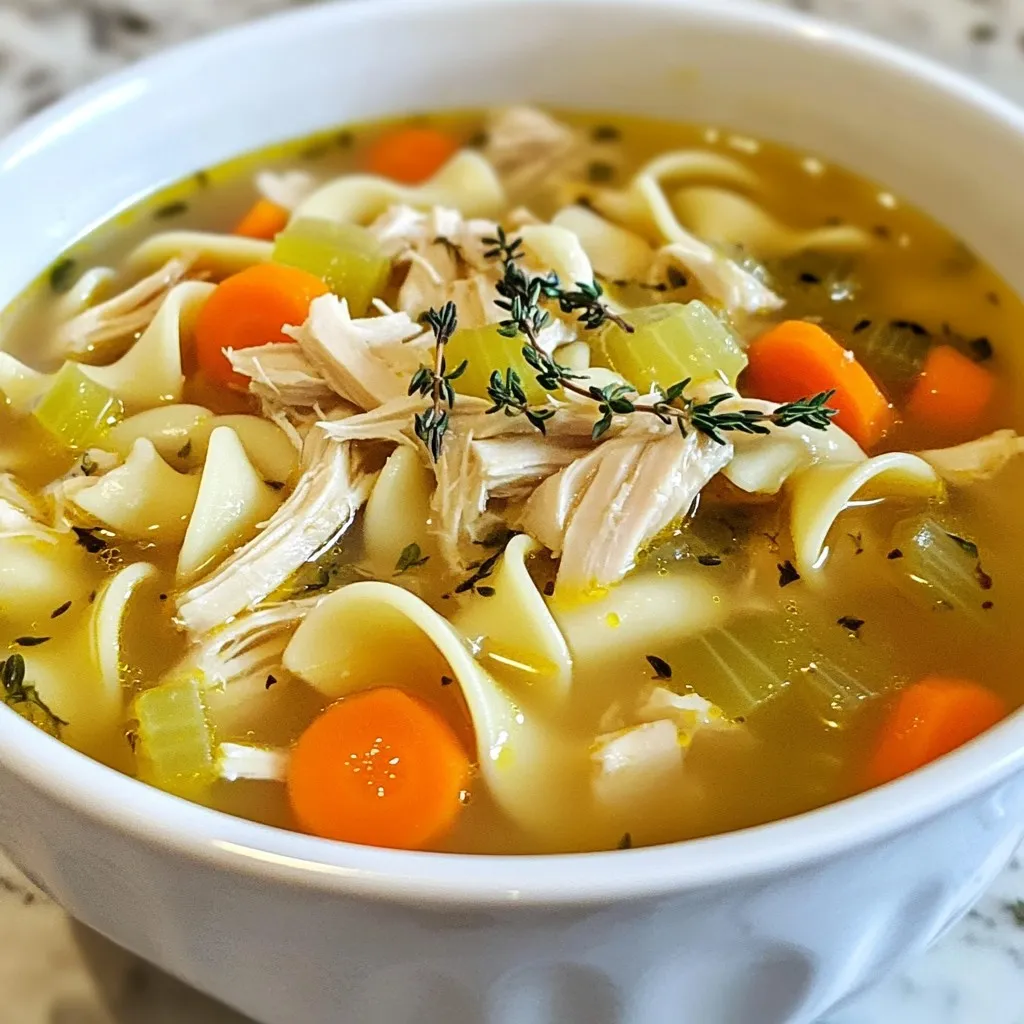
There’s nothing quite like a warm bowl of Classic Chicken Noodle Soup to soothe the soul. This recipe captures that

- 4 boneless, skinless chicken breasts - 3 tablespoons olive oil - 4 cloves garlic, minced - Zest and juice of 2 lemons To start, chicken breasts are our main protein. I love using boneless and skinless pieces. They cook fast and stay juicy. Olive oil gives richness and helps the flavors mix. Garlic adds a punch of taste. The lemon zest and juice brighten the dish. - 1 teaspoon dried oregano - 1 teaspoon paprika - Salt and pepper to taste Next, we need seasonings. Oregano and paprika bring warmth and depth. Salt and pepper are key for balance. These simple spices make the chicken shine. - 1 cup broccoli florets - 1 cup cherry tomatoes, halved - 1 cup cooked quinoa For sides, I choose broccoli florets. They add a nice crunch. Cherry tomatoes bring sweetness and color. Quinoa is a great grain choice. It’s filling and adds texture. Each side pairs well with the chicken. {{ingredient_image_1}} To start, I mix together simple ingredients for the marinade. In a small bowl, I combine: - 3 tablespoons olive oil - 4 cloves garlic, minced - Zest and juice of 2 lemons - 1 teaspoon dried oregano - 1 teaspoon paprika - Salt and pepper to taste I whisk everything until smooth. Then, I take the 4 boneless, skinless chicken breasts and place them in a large resealable bag or glass dish. I pour the marinade over the chicken, ensuring each piece is coated well. I seal the bag or cover the dish and let it marinate in the refrigerator. I usually let it sit for at least 30 minutes, but 2 hours gives it even more flavor. While the chicken marinates, I preheat my oven to 400°F (200°C). This step is crucial for even cooking. I line a baking sheet with parchment paper for easy cleanup. Once the oven is hot, I remove the chicken from the marinade. I place it on the prepared baking sheet. Next, I scatter 1 cup of broccoli florets and 1 cup of halved cherry tomatoes around the chicken. I drizzle a bit of olive oil over the veggies and sprinkle them with salt and pepper. This adds flavor and helps them roast nicely. I bake everything in the oven for 20 to 25 minutes. I check the chicken's internal temperature to ensure it reaches 165°F (75°C) for safety. While the chicken and veggies bake, I prepare the quinoa. I usually cook 1 cup of quinoa according to the package instructions. Typically, this means boiling it in water for about 15 minutes. Timing is key here; I start cooking the quinoa when I put the chicken in the oven. This way, both the chicken and quinoa finish cooking around the same time, making meal prep smooth and quick. To save time, plan your meals for the week. Choose a day to prep. I like Sundays for this. Cook in batches to make it easy. Grill or bake all your chicken at once. This cuts down on your cooking time during the week. You can also prepare side dishes at the same time. Cook quinoa while the chicken bakes. This method uses your oven efficiently. Marinating chicken adds great flavor. The lemon juice and garlic work well together. You can marinate for at least 30 minutes. For even better taste, try marinating for up to 2 hours. If you want to change it up, try different herbs. Use thyme or rosemary instead of oregano. You can also switch the lemon for lime for a fresh twist. Leftovers can be just as good. Try slicing the chicken for wraps or salads. Add some fresh greens for a healthy touch. Pair the chicken with rice or couscous for a different meal. You can also use the roasted veggies in a stir-fry. Garnish with fresh parsley for a pop of color. This makes every serving look nice and fresh. Pro Tips Marinating Time: For the best flavor, marinate the chicken for at least 2 hours, or even overnight if you have the time. Cooking Temperature: Ensure your oven is fully preheated to get a nice roast on the chicken and veggies. Resting the Chicken: Allow the chicken to rest for a few minutes after baking; this helps retain its juices when sliced. Quinoa Cooking: Use broth instead of water to cook your quinoa for added flavor. {{image_2}} You can switch out the chicken for different proteins. Tofu works well for a plant-based option. Fish like salmon or tilapia can add a nice twist, too. Just keep the marinade the same for great flavor. When it comes to veggies, the sky is the limit. You can use bell peppers, zucchini, or asparagus instead of broccoli and tomatoes. Each choice brings its own taste and color to your meal prep. To boost the taste, think about adding spices. A pinch of cumin or a dash of chili powder can make it more exciting. Fresh herbs like basil or rosemary also add depth. You can also play around with citrus. Try lime or orange juice for a new zing. Each fruit brings its unique flavor, making the dish fresh and fun. If you want to grill, it’s easy! Just marinate the chicken as usual and grill for about 6-8 minutes on each side. Grilling adds a smoky flavor that many love. An Instant Pot or slow cooker can save time, too. For the Instant Pot, cook on high pressure for 10 minutes. For a slow cooker, set it on low for 4-6 hours. Both methods keep the chicken juicy and tender. To keep your Lemon Garlic Chicken fresh, use good containers. I recommend airtight glass or BPA-free plastic containers. They help prevent spills and keep flavors locked in. When packing, fill each container evenly. Start with quinoa at the bottom, then layer the chicken, broccoli, and tomatoes. Make sure to leave some space at the top. This helps with cooling and avoids mess. If you want to freeze your meal prep, do it right. Let the cooked chicken and veggies cool completely. Place them in freezer-safe containers or bags. Squeeze out excess air before sealing. This prevents freezer burn. When it’s time to eat, thaw in the fridge overnight. For reheating, place the meal in a microwave-safe dish. Heat on medium power until warm. Stir halfway through for even heating. You can store your Lemon Garlic Chicken in the fridge for up to four days. In the freezer, it lasts about three months. Check your meals for spoilage signs. If you see any mold, off smells, or changes in texture, throw it away. Fresh food is key to staying healthy. You can marinate Lemon Garlic Chicken for at least 30 minutes. For better flavor, I suggest marinating it for up to 2 hours. The longer you marinate, the more the chicken absorbs the flavors of garlic and lemon. Just be careful not to marinate it too long. Acidic ingredients, like lemon juice, can make the chicken tough if left too long. Yes, you can prepare this meal ahead of time. I often meal prep for the whole week. Cook the chicken and veggies, then store them in separate containers. This makes it easy to grab and go. Make sure to refrigerate your meal prep containers right after they cool down. You can enjoy this meal all week long. You can mix up the sides to keep things interesting. Here are some great options: - Mixed greens salad - Roasted sweet potatoes - Steamed green beans - Brown rice or farro These sides add color and nutrition. Feel free to get creative! This post covered a simple recipe and helpful tips for lemon garlic chicken. We explored the key ingredients, like chicken, olive oil, and spices, plus cooking methods. Meal prep also plays a big role in saving time. You can swap ingredients and customize this dish easily. Remember to store your meals correctly to keep them fresh longer. With these ideas, you can enjoy tasty dishes while saving time and effort in the kitchen. Now, it’s time for you to try it out!

Lemon Garlic Chicken Meal Prep for Easy Weeknight Dinners

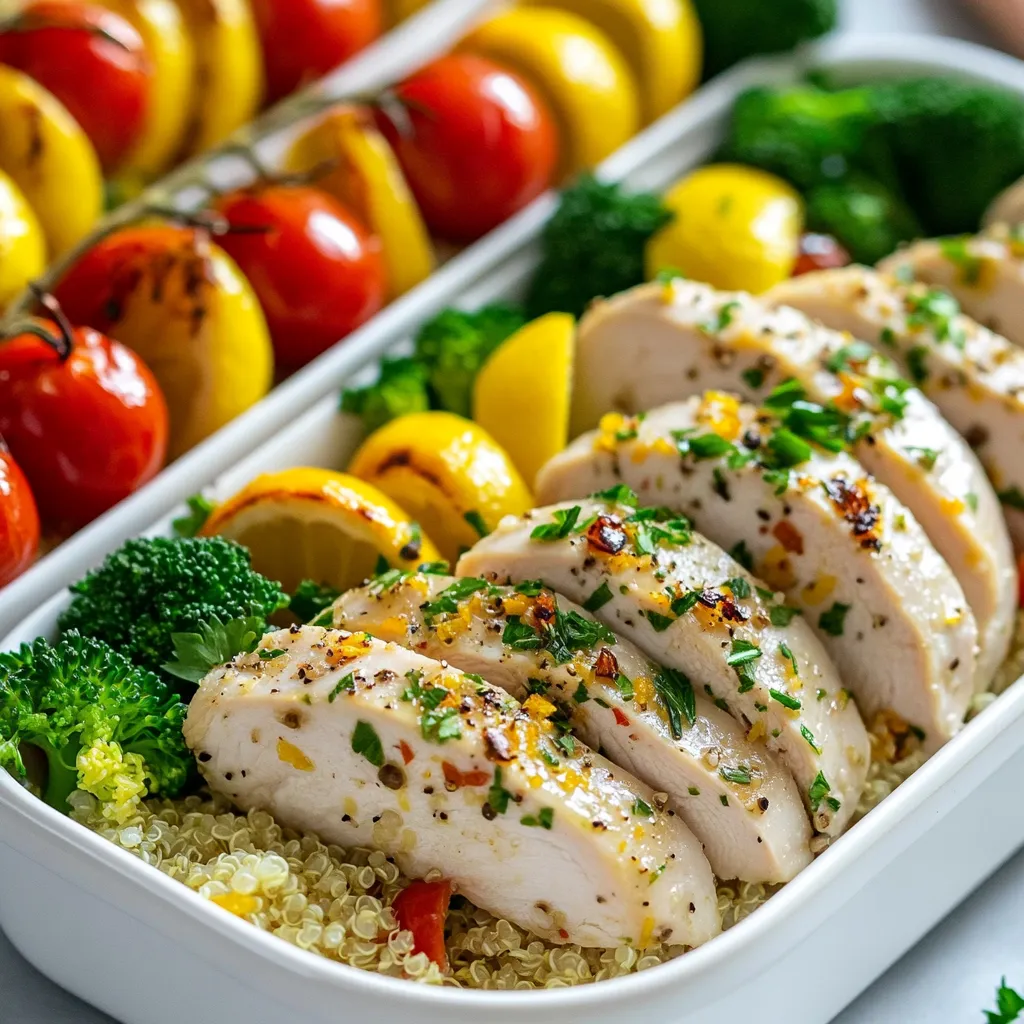
Are you looking for fast, delicious dinners? My Lemon Garlic Chicken Meal Prep is your answer! This easy recipe combines

Making gingerbread hot chocolate starts with a few simple ingredients. Here’s what you need: - 2 cups whole milk - 2 tablespoons unsweetened cocoa powder - 2 tablespoons brown sugar - 1 teaspoon ground ginger - 1 teaspoon ground cinnamon - 1/4 teaspoon ground nutmeg - 1/4 teaspoon vanilla extract - Pinch of salt - Whipped cream for topping - Crushed gingerbread cookies for garnish - Chocolate shavings (optional) These ingredients blend together to create a cozy drink that warms you up. Whole milk gives a creamy base. Cocoa powder adds rich chocolate flavor. Brown sugar enhances sweetness and adds a hint of caramel. The spices transform your drink. Ground ginger gives that classic gingerbread taste. Ground cinnamon and nutmeg add warmth and depth. A pinch of salt balances the sweetness. Vanilla extract rounds out the flavor. It adds a fragrant note that complements the spices. For topping, whipped cream adds a fluffy texture. Crushed gingerbread cookies add a festive crunch. If you want extra chocolate, sprinkle some chocolate shavings on top. With these ingredients, you’re ready to create a gingerbread hot chocolate that everyone will love. {{ingredient_image_1}} - Combine milk and cocoa powder In a medium saucepan, pour in 2 cups of whole milk. Add 2 tablespoons of unsweetened cocoa powder. Use a whisk to blend them well. Heat the mixture over medium-low heat. Keep stirring until the cocoa dissolves and the milk warms up. - Add spices and sugar Once the milk is warm, stir in 2 tablespoons of brown sugar. Add 1 teaspoon of ground ginger, 1 teaspoon of ground cinnamon, and 1/4 teaspoon of ground nutmeg. Don’t forget the pinch of salt! Mix everything until it's smooth and steamy. - Whisk and heat the mixture Keep the heat low and continue whisking. You want it hot, but not boiling. Take the saucepan off the heat and let it rest for one minute. - Pour into mugs Grab your favorite mugs and pour the gingerbread hot chocolate in, filling each about three-quarters full. - Top with whipped cream Add a generous swirl of whipped cream on top of each mug. This will make it extra rich and creamy. - Garnish with cookies and chocolate For a festive touch, sprinkle crushed gingerbread cookies on top. If you want, add chocolate shavings for a special treat. Enjoy your cozy drink! - Adjust sweetness: You can change the brown sugar amount. Add more for sweet flavor. Less sugar gives a richer taste. Find the sweet spot that works for you. - Experiment with spices: Try adding a pinch of clove or allspice. You can even use fresh ginger for a kick. Mix and match spices to find your favorite blend. - Use alternative milks: If you want a lighter drink, try almond or oat milk. These options can add unique flavors. Just ensure the milk is unsweetened to keep the balance. - Serving suggestions: Serve in festive mugs for a fun touch. You can even create a hot chocolate bar with toppings. This makes it fun for everyone to customize their drink. - Recommended mug types: Choose wide mugs for easy topping. Clear glass mugs show off the layers. You can pick colorful mugs to match the season's spirit. - Thematic garnishing ideas: Use crushed gingerbread cookies for crunch. Drizzle caramel or chocolate sauce for a sweet twist. Add a sprinkle of cinnamon on top for a warm finish. Pro Tips Use Fresh Spices: Freshly ground spices will enhance the flavor of your hot chocolate, giving it a more vibrant and aromatic profile. Adjust Sweetness: Feel free to adjust the brown sugar to your preference. You can also substitute with maple syrup or honey for a different sweetness profile. Milk Variations: Experiment with different types of milk such as almond, oat, or coconut for a unique twist on the classic recipe. Garnish Creatively: Mix and match your toppings—try crushed peppermint candies or a drizzle of caramel sauce for a festive variation! {{image_2}} You can twist the classic gingerbread hot chocolate in fun ways. Here are some ideas to get you started. - Peppermint gingerbread hot chocolate: Add a splash of peppermint extract. It gives a minty kick that pairs well with gingerbread. - Spiced pumpkin gingerbread hot chocolate: Mix in some pumpkin puree and pumpkin pie spice. This variation brings autumn flavors into each sip. - Vegan gingerbread hot chocolate: Use almond milk or oat milk instead of whole milk. Be sure to choose vegan whipped cream for a dairy-free treat. Toppings can elevate your gingerbread hot chocolate to new heights. - Different whipped cream flavors: Try flavored whipped creams like cinnamon or vanilla. These add extra taste and fun. - Various cookie toppings: Crushed cookies are a must. You can use gingerbread, chocolate, or even graham crackers for crunch. - Use of flavored syrups: Drizzle chocolate or caramel syrup on top. This adds a sweet finish and makes it look stunning. To store leftover gingerbread hot chocolate, use a clean container. Refrigerate it for up to three days. When you're ready to enjoy it again, pour it into a saucepan. Heat it gently over low heat. Stir well to mix the flavors back together. Avoid boiling to keep it smooth. Can you freeze gingerbread hot chocolate? Yes, you can freeze it! Use an airtight container or freezer bag. Leave some space for expansion as it freezes. It can last up to three months in the freezer. For the best taste, thaw it in the fridge overnight before reheating. Reheat it gently on the stove, stirring to ensure even warmth. This method keeps the flavors intact and ready for you! How long does gingerbread hot chocolate last? Gingerbread hot chocolate stays fresh for about three days in the fridge. Keep it in a sealed container. When you want to drink it again, just heat it gently on the stove or in the microwave. Stir well before serving. Can I use chocolate milk instead of whole milk? Yes, you can use chocolate milk instead of whole milk. This choice will give your drink a richer chocolate flavor. It may also make the drink sweeter, so be ready to adjust the sugar. Is gingerbread hot chocolate suitable for kids? Absolutely! Gingerbread hot chocolate is fun and tasty for kids. Just be sure to watch the sugar content. You can adjust the sweetness to fit their tastes. What is the origin of gingerbread hot chocolate? Gingerbread hot chocolate combines two popular holiday treats: gingerbread and hot chocolate. Many cultures enjoy gingerbread during winter celebrations. The mix of spices and cocoa creates a cozy drink perfect for cold days. Can I make gingerbread hot chocolate ahead of time? Yes, you can make gingerbread hot chocolate ahead of time. Just prepare it, let it cool, and store it in the fridge. Reheat it when you are ready to serve. This makes it great for parties or gatherings. You can make a delightful gingerbread hot chocolate by mixing whole milk, cocoa, and spices. From customizing sweetness to adding fun toppings, this drink is versatile. Remember, you can refrigerate leftovers or even freeze them for later. Feel free to experiment with flavors like peppermint or pumpkin. With these tips and variations, you can enjoy a unique treat any time. Embrace the joy of crafting this cozy beverage, and make it your own!

Gingerbread Hot Chocolate Irresistible Festive Treat

Craving a festive warm drink that brings winter cheer? Look no further than Gingerbread Hot Chocolate! This cozy cup of

You need one package of Oreo cookies, which weighs 18 ounces. These cookies form the base and the topping of our dessert. Their rich chocolate flavor gives a nice contrast to the creamy layers. Crushing them finely is key. You can use a food processor or a rolling pin for this task. For the creamy filling, you will need a few dairy items: - 1/2 cup unsalted butter, melted - 1 package (8 oz) cream cheese, softened - 1 cup powdered sugar - 1 cup whipped topping, like Cool Whip - 2 cups milk The cream cheese gives a rich texture, while the whipped topping adds airiness. The milk helps to make the pudding smooth and delicious. To make your Oreo Dirt Pudding Cups fun and tasty, add some fun toppings: - Gummy worms for a playful touch - Edible soil or crushed graham crackers for texture These toppings not only add flavor but also make the dessert look like real dirt! The gummy worms sneak in a playful vibe that kids will love. {{ingredient_image_1}} To start, you need to crush the Oreos. Take 1 package of Oreo cookies and place them in a food processor. Pulse until they turn into fine crumbs. If you don’t have a food processor, you can use a zip-top bag. Just add the Oreos, seal the bag, and crush them with a rolling pin. You want nice, small pieces for the best texture. Next, we will make the Oreo base. In a medium bowl, mix the crushed Oreos with 1/2 cup of melted butter. Stir well until the crumbs are fully coated. Set aside about 1 cup of this mixture. You will use this for topping later. This base gives the dessert that classic dirt look. Now, it’s time to prepare the cream cheese mixture. In a large mixing bowl, add 1 package of softened cream cheese. Beat it with an electric mixer until it's creamy. Gradually add in 1 cup of powdered sugar. Mix until smooth and well combined. This mixture will add a rich flavor to your dessert. In another bowl, whisk together 2 cups of milk and 1 package of instant chocolate pudding mix. Mix for about 2 minutes until it thickens. This step is key to achieving the right pudding texture. Once it’s thick, gently fold this pudding into the cream cheese mixture. Make sure everything is smooth and well combined. Finally, let’s assemble the dessert. Grab your serving cups or bowls. Start with a layer of the Oreo crust mixture at the bottom. Then add a layer of the chocolate pudding mixture on top. Repeat these layers until the cups are filled. Make sure to end with pudding on top. Sprinkle the reserved Oreo crust mixture over the pudding. Add a layer of edible soil or crushed graham crackers. Top it all off with a gummy worm for a fun touch that kids will love! You can change the sweetness to fit your taste. If you like less sweet, use less powdered sugar. Try adding more cream cheese for a richer flavor. This mix will balance the dessert well. Taste as you go to find the right mix for you. Layering is key for a great look. Start with the Oreo crust at the bottom of your cup. Then add a layer of the creamy pudding mix. Repeat these layers until your cup is full. Make sure to end with pudding on top. This helps to hold your toppings better. For a fun look, use clear cups. This way, you can see the layers. Add a gummy worm on top for a playful touch. You can also sprinkle edible soil or crushed graham crackers for texture. Chill the cups before serving to keep them fresh and tasty. Pro Tips Crush Oreos Evenly: Ensure the Oreo cookies are crushed uniformly for a consistent texture throughout the pudding cups. Chill Before Serving: Allow the pudding cups to chill for at least 2 hours; this helps the layers set properly and enhances the flavors. Use Clear Cups: Opt for clear cups to showcase the beautiful layers of the dessert; it adds visual appeal and excitement for the guests. Experiment with Toppings: Try different toppings like crushed nuts or sprinkles for added crunch and color to your dirt pudding cups. {{image_2}} You can change the flavor of the pudding to mix things up. Instead of chocolate, try vanilla or butterscotch pudding. You can make this dessert your own by picking your favorite flavor. Just follow the same steps using your chosen pudding mix. The creamy layers will still taste great! You can easily make this dessert gluten-free. Use gluten-free Oreo cookies, which are available at many stores. Check the packaging to ensure they are safe for your diet. The rest of the recipe stays the same. Your friends will never know the difference! For a dairy-free version, you can swap out some ingredients. Use dairy-free cream cheese and whipped topping. Almond or soy milk works well in place of regular milk. These simple changes keep the dessert tasty and creamy. You will enjoy the same fun flavors without the dairy! Store your Oreo Dirt Pudding Cups in the fridge. Use an airtight container to keep them fresh. Make sure they chill for at least two hours before serving. This helps the flavors blend well. You can enjoy them cold, which makes each bite refreshing and creamy. You can freeze the Oreo Dirt Pudding Cups if you want to save some for later. Just cover each cup tightly with plastic wrap or place them in a freezer-safe container. They can last up to two months in the freezer. When you're ready to eat them, transfer the cups to the fridge overnight to thaw. Do not freeze the gummy worms; add them after thawing. If you have leftovers, keep them stored in the fridge. They should stay fresh for about three days. Check for any changes in texture or flavor before eating. You can add more crushed Oreos on top for a fresh look and taste. Enjoy the layers of chocolate and cream even after the first day! Yes, you can make Oreo Dirt Pudding Cups ahead of time. They taste great after a few hours in the fridge. I like to make them the night before a party. This way, they chill well and the layers set nicely. Oreo Dirt Pudding Cups last about three days in the fridge. Keep them covered to stay fresh. If you add gummy worms, they may get a bit soggy. So, I suggest adding them just before serving. The best way to crush Oreo cookies is to use a food processor. Just pulse until they are fine crumbs. If you don’t have one, place them in a zip-top bag. Then, use a rolling pin to crush them. This method works just as well! In this post, we explored how to create delicious Oreo Dirt Pudding Cups. We covered ingredients like Oreo cookies, dairy products, and toppings. I shared simple steps for making the base and cream cheese mix. You learned tips for adjusting sweetness and presenting your cups well. We also discussed variations and storage methods to keep your dessert fresh. Now, you’re ready to wow family and friends with this fun treat! Enjoy making your Oreo Dirt Pudding Cups, and don’t be afraid to mix things up!

Oreo Dirt Pudding Cups Simple and Tasty Dessert

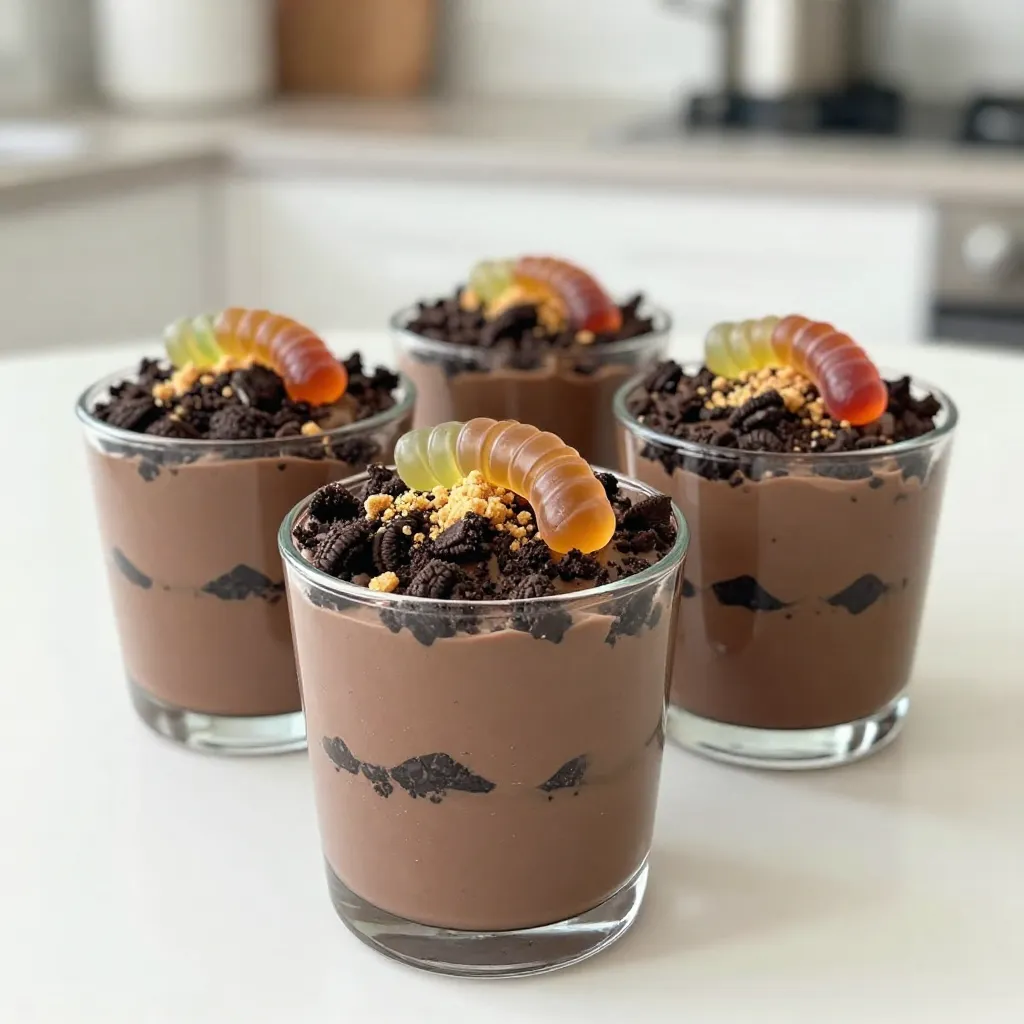
Looking for a fun and easy dessert? Let me show you how to make Oreo Dirt Pudding Cups! This simple

- 2 cans of refrigerated cinnamon rolls (with icing) - 6 large eggs - 1 cup milk (whole or your choice) - 1/4 cup maple syrup - 1 teaspoon vanilla extract - 1 teaspoon ground cinnamon - 1/4 teaspoon nutmeg - 1/2 cup pecans, chopped (optional) - Powdered sugar for dusting (optional) You can switch the milk. Use almond, soy, or oat milk if you like. For maple syrup, honey or agave nectar works too. You can replace eggs with flaxseed meal or applesauce if needed. Use a 9x13 inch baking dish. You’ll need mixing bowls for the egg mix. A whisk and measuring cups help with precise amounts. {{ingredient_image_1}} First, preheat your oven to 350°F (175°C). This step warms up the oven for even baking. Next, grab a 9x13 inch baking dish and lightly grease it. Use butter or cooking spray for easy cleanup. This helps the cinnamon rolls not stick to the dish. Open the two cans of cinnamon rolls. Each roll needs to be cut into quarters. A sharp knife works best. By cutting them evenly, you help them bake at the same rate. Spread the cut pieces in the greased dish. Make sure they are in a single layer. In a large mixing bowl, add six large eggs. Pour in one cup of milk. You can use whole milk or any milk you like. Next, add 1/4 cup of maple syrup, one teaspoon of vanilla extract, one teaspoon of ground cinnamon, and 1/4 teaspoon of nutmeg. Whisk all the ingredients together until they are smooth and well mixed. This helps every bite taste great. Now, pour the egg mixture over the cinnamon roll pieces. Make sure to cover as many pieces as you can. Use a spatula to spread it out if needed. If you like pecans, sprinkle 1/2 cup of chopped pecans on top. Gently press the cinnamon roll pieces down into the liquid. This step helps them soak up the egg mixture. Place the baking dish in the preheated oven. Bake for 25-30 minutes. Keep an eye on it. You want the top to be golden brown and the center to be set. You can check doneness by inserting a toothpick. If it comes out clean, it’s ready. Once done, remove it from the oven and let it cool for five minutes. To ensure even cooking, spread the cinnamon roll pieces well in the dish. Cut each roll into quarters to make sure they soak evenly. This helps every part cook the same way. Press them down gently in the egg mix. This step keeps them moist. To avoid dryness, don't bake too long. Check at 25 minutes. The top should be golden, and the center should not jiggle. If it's too dry, try adding an extra egg next time. This will keep it richer and moister. You can easily add fruits to your bake. Sliced apples or berries work great. Toss them with a bit of cinnamon for extra flavor. Place them on top of the cinnamon rolls before pouring the egg mixture. This will give your dish a nice, fruity twist. Consider nuts for a crunchy texture. Chopped pecans add a lovely flavor. Sprinkle them on top for a delightful crunch. You can also use walnuts or almonds if you prefer. Drizzling icing is simple. Heat the icing in the microwave for a few seconds. This makes it easier to spread. Then, use a spoon to drizzle it over the top. Start from the center and move outward. This method gives a nice look and covers more area. If you want more sweetness, dust with powdered sugar after icing. This adds a beautiful finish. Pro Tips Use Day-Old Cinnamon Rolls: Using slightly stale cinnamon rolls will help them absorb the egg mixture better, resulting in a more cohesive bake. Experiment with Toppings: Feel free to add your favorite toppings like chocolate chips, dried fruits, or different nuts to customize your bake. Let it Rest: Allow the dish to cool for a few minutes before serving; this helps the cinnamon rolls set and makes it easier to cut into squares. Make Ahead: Prepare the dish the night before, cover it, and refrigerate. Bake it in the morning for an easy breakfast option. {{image_2}} You can get creative with this dish! Adding chocolate chips gives a sweet twist. Toss in a cup of fresh berries for a fruity kick. Bananas or apples work great too. They add flavor and moisture, making every bite exciting. If you need gluten-free, use gluten-free cinnamon rolls. There are many tasty options available now. For a vegan version, replace eggs with flax eggs and use plant-based milk. Maple syrup stays the same, adding that sweet touch. Pair this dish with a hot cup of coffee or sweet tea. A dollop of whipped cream on top makes it extra special. Serve it with fresh fruit on the side for a balanced meal. You can also add crispy bacon for a savory contrast. To keep your Cinnamon Roll French Toast Bake fresh, store leftovers in an airtight container. I recommend using glass or plastic containers with tight lids. Make sure the dish has cooled to room temperature before sealing it. This helps avoid moisture buildup. Place the container in the fridge. It will stay fresh for 3 to 4 days. To reheat, the best method is to use the oven. Preheat your oven to 350°F (175°C). Place the leftover squares in a baking dish. Cover them with foil to keep them moist. Heat for about 15-20 minutes until warm. You can also use a microwave, but this may change the texture. Heat it in short bursts of 30 seconds, checking often. You can freeze this dish before or after baking. If freezing before baking, assemble it in your dish, cover it well, and freeze. When ready to bake, let it thaw in the fridge overnight. If you freeze it after baking, allow it to cool first. Wrap it tightly in plastic wrap, then foil, to prevent freezer burn. It can last for up to 2 months in the freezer. Yes, you can prepare this dish ahead of time. To do this, follow these tips: - Mix the egg mixture: Whisk the eggs, milk, syrup, vanilla, cinnamon, and nutmeg. - Prep the cinnamon rolls: Cut the rolls and place them in the baking dish. - Combine: Pour the egg mixture over the rolls. - Cover: Wrap the dish tightly with foil or plastic wrap. - Chill: Store it in the fridge overnight. When you are ready, bake it straight from the fridge. Just add a few extra minutes to the baking time. To check if your bake is ready, look for these signs: - The top should be golden brown. - The center should feel firm, not jiggly. - Insert a toothpick in the center; it should come out clean. These steps ensure you get a perfectly baked cinnamon roll French toast bake. Yes, you can switch it up! Here are some fun alternatives: - Brioche: This bread adds a rich flavor. - Challah: A sweet option that works well. - Bagels: For a unique twist, use bagels cut into pieces. Feel free to experiment with your favorite breads to create new tastes. This blog post walks you through making a delicious cinnamon roll bake. We covered the key ingredients, tools, and step-by-step instructions. You learned tips for baking and how to store leftovers properly. Feel free to customize the recipe with different flavors or dietary options. With these simple steps and tricks, you can create a delightful dish for any occasion. Enjoy your baking adventure and share the joy with others!

Cinnamon Roll French Toast Bake Easy Breakfast Recipe

Are you looking for an easy breakfast recipe that will impress your family? This Cinnamon Roll French Toast Bake combines

To make Chocolate Chip S’mores Bars, gather these ingredients: - 1 cup graham cracker crumbs - 1/2 cup unsalted butter, melted - 1/4 cup brown sugar, packed - 1/2 teaspoon vanilla extract - 1 cup all-purpose flour - 1/2 teaspoon baking powder - 1/4 teaspoon salt - 1 cup semi-sweet chocolate chips - 1 cup mini marshmallows - 1/2 cup sweetened shredded coconut (optional) These ingredients create a sweet, gooey treat that everyone loves. You can make the bars even more fun with these optional ingredients: - 1/2 cup sweetened shredded coconut adds a tropical twist. - Drizzle melted chocolate on top for extra richness. - Use different types of chocolate chips, like dark or white chocolate. These additions can change the flavor and make your bars unique. To prepare your bars, you will need some basic kitchen tools: - Mixing bowls for combining ingredients - A spatula for mixing and spreading - An 8x8 inch baking pan to bake the bars - Parchment paper to line the pan for easy removal Having the right tools makes baking simple and fun! {{ingredient_image_1}} To start, preheat your oven to 350°F (175°C). Grease an 8x8 inch pan and line it with parchment paper. Leave some paper hanging over the edges. This helps with easy removal later. In a bowl, mix 1 cup of graham cracker crumbs, 1/2 cup of melted unsalted butter, and 1/4 cup of packed brown sugar. Stir until everything is blended. Then, press this mixture firmly into the bottom of the pan. Bake this crust for 10 minutes until it turns slightly golden. While the crust bakes, grab another bowl. Whisk together 1 cup of all-purpose flour, 1/2 teaspoon of baking powder, and 1/4 teaspoon of salt. Once your crust is ready, take it out of the oven. Sprinkle 1 cup of semi-sweet chocolate chips evenly over the crust. Next, add 1 cup of mini marshmallows, spreading them out. If you want to add flavor, sprinkle 1/2 cup of sweetened shredded coconut on top. Finally, pour the flour mixture over these layers without mixing them. Now, return the pan to the oven. Bake for another 15 to 20 minutes. Look for a golden top and toasted marshmallows. Once done, let the bars cool in the pan for at least 10 minutes. Use the parchment paper to lift the bars out. Once out, cut them into squares. You can serve them warm or at room temperature. To make the best chocolate chip s'mores bars, a few key steps help. Start with fresh ingredients for the best flavor. When mixing the graham cracker crumbs, butter, and brown sugar, ensure it's blended well. Press the crust firmly into the pan. This helps create a sturdy base. Bake the crust until it’s slightly golden. This gives your bars a nice crunch. For the chocolate layer, use semi-sweet chocolate chips. They melt perfectly and add rich flavor. Spread the mini marshmallows evenly so every bite has that gooey goodness. If you like texture, sprinkle shredded coconut on top for a fun twist. One common mistake is overmixing the flour mixture. Mix just until combined to keep your bars soft. Another pitfall is not baking the crust long enough. An undercooked crust can lead to soggy bars. Make sure to watch the baking time closely. Avoid skipping the cooling step. Letting the bars cool helps them set up correctly. If you cut them too soon, they may fall apart. You can serve these bars warm or at room temperature. Warm bars are extra gooey and delicious. For a fun twist, add a scoop of vanilla ice cream on top. This adds a creamy contrast to the chocolate. For a pretty presentation, place the bars on a rustic wooden board. Sprinkle some graham cracker crumbs and extra chocolate chips on top. This makes them look as good as they taste! Pro Tips Crust Perfection: Make sure to press the graham cracker mixture firmly to create a sturdy base that won't crumble when you cut the bars. Chocolate Choices: For a richer flavor, consider using dark chocolate chips or a mix of dark and semi-sweet chocolate. Marshmallow Magic: For extra gooeyness, add a few more mini marshmallows on top before baking; they will expand and create delicious pockets of fluffiness. Serving Suggestions: Enjoy these bars warm with a scoop of vanilla ice cream on the side for an indulgent treat! {{image_2}} You can mix up the flavors of your Chocolate Chip S’mores Bars. Try adding peanut butter to the graham cracker crust. This gives a nutty twist. You can also use dark chocolate or milk chocolate instead of semi-sweet chocolate chips. Each choice changes the taste and makes it fun to experiment. For gluten-free bars, swap all-purpose flour with a gluten-free blend. Use gluten-free graham cracker crumbs too. To make these bars vegan, replace the butter with coconut oil or a vegan butter. You can also use dairy-free chocolate chips and skip the marshmallows or use vegan marshmallows. These swaps keep the bars tasty and friendly for all diets. You can create seasonal flavors with these bars. In fall, add pumpkin spice to the flour mix. This gives a warm, cozy flavor. During winter, try using peppermint extract for a festive touch. You can mix crushed candy canes into the chocolate layer, too. These twists keep your S’mores Bars exciting all year round! To keep your Chocolate Chip S’mores Bars fresh, store them in an airtight container. Place parchment paper between layers to prevent sticking. Keep them at room temperature for up to three days. If you want them to last longer, refrigerate them for up to a week. Just remember to let them sit out for a bit before serving. This will help them regain their soft texture. If you want to save some for later, freezing is a great option. Cut the bars into squares before freezing. Wrap each square tightly in plastic wrap, then place them in a freezer bag. They can last for up to three months in the freezer. When you crave a sweet treat, just take out a square. Let it thaw in the fridge overnight or at room temperature for a few hours. To enjoy your bars warm, preheat the oven to 350°F (175°C). Place the bars on a baking sheet and cover them with foil. Heat for about 10 minutes. This helps melt the chocolate and warms the marshmallows. For a quick fix, you can also use the microwave. Heat a square for about 15-20 seconds, checking to avoid overheating. This way, your bars stay gooey and delicious! If you want to change the crust, here are some ideas: - Digestive biscuits: These are a great choice. They offer a similar flavor. - Vanilla wafers: They add a sweet taste to the crust. - Crushed cookies: Use Oreos or any chocolate cookie for a fun twist. - Almond flour: For a gluten-free option, mix it with a bit of sugar. Yes, you can make these bars a day or two in advance. Just store them in an airtight container at room temperature. If you need to keep them longer, they can last up to a week. These bars taste great even after a few days. Look for a golden-brown top with toasted marshmallows. The bars should feel firm but slightly soft. If you poke them, they should spring back. You want a nice texture that is not too hard or too gooey. This blog post covered how to make delicious bars step by step. We explored the key ingredients and tools you need. I provided tips for perfect texture and flavor, plus ways to avoid mistakes. You can even customize these bars with fun flavors and dietary options. Finally, I shared how to store and reheat them for later enjoyment. Follow these instructions, and you’ll create tasty bars every time! Enjoy the process and the tasty treats you make!

Chocolate Chip S’mores Bars Simple and Delicious Treat

Craving a sweet treat that’s both easy to make and delicious? Look no further than my Chocolate Chip S’mores Bars!

Older posts
Newer posts
← Previous Page1 … Page144 Page145 Page146 … Page164 Next →

dsad

© 2026 easycookingbite • Built with GeneratePress

Our Policies

  • Copyright Policy
  • Cookie Policy
  • GDPR Policy
  • Privacy Policy
  • Disclaimer
  • Terms Of Use

More Information

  • Home
  • About
  • Contact
  • Appetizers
  • Dessert
  • Dinner
  • Drinks
©2026, easycookingbite About Back To Top