Skip to content
DisclaimerTerms Of UseGDPR PolicyCookie Policy

easycookingbite

  • Home
  • Drinks
  • Appetizers
  • Dinner
  • Dessert
  • About
  • Contact
  • Privacy Policy
DisclaimerTerms Of UseGDPR PolicyCookie Policy

Lily

To make this delightful coffee cake, gather these ingredients: - 2 cups all-purpose flour - 1 cup granulated sugar - 1/2 cup unsalted butter, softened - 1 cup sour cream - 2 large eggs - 1 teaspoon vanilla extract - 1 teaspoon baking powder - 1 teaspoon baking soda - 1/2 teaspoon salt - For the streusel topping: - 1/2 cup all-purpose flour - 1/3 cup brown sugar, packed - 1 tablespoon ground cinnamon - 1/4 cup unsalted butter, melted - 1/2 cup chopped pecans or walnuts (optional) You can swap some ingredients if needed. Here are a few ideas: - Butter: Use coconut oil or vegetable oil for dairy-free options. - Sour Cream: Greek yogurt works well. It adds creaminess and tang. - Sugar: You might use coconut sugar or honey, but adjust the wet ingredients. - Eggs: For a vegan option, use flax eggs (1 tablespoon flaxseed meal + 2.5 tablespoons water per egg). To make your coffee cake even better, consider these add-ins: - Fruits: Blueberries or diced apples can add freshness and moisture. - Spices: A pinch of nutmeg or allspice can enhance the flavor. - Chocolate: Add chocolate chips for a sweet twist. - Citrus Zest: Lemon or orange zest brightens the cake with a zesty kick. Feel free to mix and match these ingredients to create a coffee cake that fits your taste! {{ingredient_image_1}} To start, preheat your oven to 350°F (175°C). Grease a 9x13-inch baking pan. This step ensures the cake comes out easily. In a large bowl, cream together the softened butter and granulated sugar. Mix until it is light and fluffy. Next, add the eggs one by one. Mix well after each egg to keep it smooth. Then, beat in the sour cream and vanilla extract. This adds moisture and flavor. In another bowl, whisk together the flour, baking powder, baking soda, and salt. Gradually add this dry mix to the wet mix. Stir just until combined. Be careful here; don’t overmix. Overmixing makes the cake tough. Make sure your butter is softened. Cold butter will not mix well. If your eggs are cold, place them in warm water for a few minutes. This helps them blend in better. Use a spatula to scrape the sides of the bowl while mixing. This ensures all ingredients are well combined. When adding the dry ingredients, do it slowly. This helps avoid lumps. If you want a lighter cake, fold the flour in gently. It makes a big difference in texture. For the streusel, combine the flour, brown sugar, and cinnamon in a bowl. Mix well, then pour in the melted butter. Stir until it looks crumbly. If you love nuts, add chopped pecans or walnuts. Mix these in evenly. Once your batter is ready, pour half into the prepared pan. Spread it out smoothly. Sprinkle half of the streusel topping over this layer. Then, pour the rest of the batter on top. Finish with the remaining streusel. Now you’re all set to bake! Place the pan in the oven and bake for 30-35 minutes. Check if it’s done by inserting a toothpick. If it comes out clean, your cake is ready. Enjoy the lovely smell as it bakes! To make your coffee cake perfect, follow these simple tips: - Use room temperature ingredients. This helps the batter mix well. - Don’t overmix your batter. Stir just until combined for a light cake. - Preheat your oven. This ensures even baking and a nice rise. - Grease your baking pan well. It helps the cake release easily. If your coffee cake does not turn out right, here’s what to check: - Cake too dry: This can happen from overbaking or too much flour. - Cake too dense: This could be due to overmixing or not enough leavening. - Cake sinking in the middle: Ensure your oven is at the right temp. Check with an oven thermometer. To keep your coffee cake moist, try these tips: - Use sour cream. It adds moisture and richness to the cake. - Store in an airtight container. This keeps the cake from drying out. - Add a little extra butter. This can boost moisture and flavor. - Serve with a drizzle of glaze or whipped cream. This adds a lovely touch! Pro Tips Use Room Temperature Ingredients: Ensure that your butter, eggs, and sour cream are at room temperature for a smoother batter and better mixing. Don’t Overmix the Batter: Mix until just combined to keep the cake tender and fluffy. Overmixing can lead to a dense texture. Customize Your Nuts: Feel free to substitute pecans with walnuts or leave them out entirely for a nut-free version. Check for Doneness: Use a toothpick inserted in the center to check for doneness; it should come out clean or with a few crumbs attached. {{image_2}} You can easily add fruits to your coffee cake. Fresh berries, like blueberries or raspberries, work great. Try adding a cup of chopped apples for a sweet twist. If you prefer a nutty flavor, add chopped pecans or walnuts to the batter. You can also enhance the flavor by mixing in a teaspoon of almond extract or a splash of orange juice. If you need a gluten-free option, swap the all-purpose flour for a gluten-free blend. Look for a blend that has xanthan gum for the best results. Just make sure to check the ingredients on the package. You can use a 1:1 gluten-free flour mix, which is easy to find. This way, everyone can enjoy a slice of this tasty coffee cake. You can make your coffee cake a bit healthier by making some simple swaps. Use Greek yogurt instead of sour cream to lower the fat. You can also replace half of the sugar with applesauce. This adds natural sweetness and moisture. If you want a dairy-free option, use coconut oil instead of butter. These swaps keep the taste great while being a bit lighter. To keep your coffee cake fresh, first let it cool completely. Wrap it tightly in plastic wrap or foil. Store it at room temperature for up to three days. If you have leftovers, place them in an airtight container. This way, the cake stays moist and tasty. You can freeze your coffee cake for longer storage. Cut the cake into slices for easy serving. Wrap each slice in plastic wrap, then place them in a freezer-safe bag. Label the bag with the date. Your cake will stay good for about three months. To thaw, simply move the slices to the fridge for several hours or overnight. For the best taste, reheat your coffee cake in the oven. Preheat the oven to 350°F (175°C). Place the cake on a baking sheet and cover it lightly with foil. Heat for about 10-15 minutes, or until warm. You can also microwave individual slices for 15-20 seconds. Enjoy it warm, with a cup of coffee or tea! You can use plain yogurt or buttermilk as a substitute. Both add moisture and tang. Yogurt works well because it has a similar texture. If you want a lighter option, mix 1 cup of milk with 1 tablespoon of lemon juice. Let it sit for 5 minutes before using. This creates a buttermilk-like effect. To check if your coffee cake is ready, insert a toothpick in the center. It should come out clean or with a few crumbs. If it has wet batter on it, bake for a few more minutes. The top should be golden brown and spring back when you touch it lightly. Yes, you can prepare the batter a day ahead. Cover it tightly and store it in the fridge. You can also bake the cake and let it cool completely. Wrap it well in plastic wrap and store it. When you're ready, just reheat it in the oven for a warm treat. This blog post provided a clear guide on making delicious cinnamon streusel coffee cake. We covered essential ingredients, helpful substitutions, and tips for perfecting your bake. You learned how to store and reheat coffee cake for the best taste. You can make variations to suit your cravings and dietary needs. Remember, baking is fun and offers room to be creative. Trust your taste and enjoy this delightful treat with friends and family. Happy baking!

Cinnamon Streusel Coffee Cake Irresistible Easy Recipe

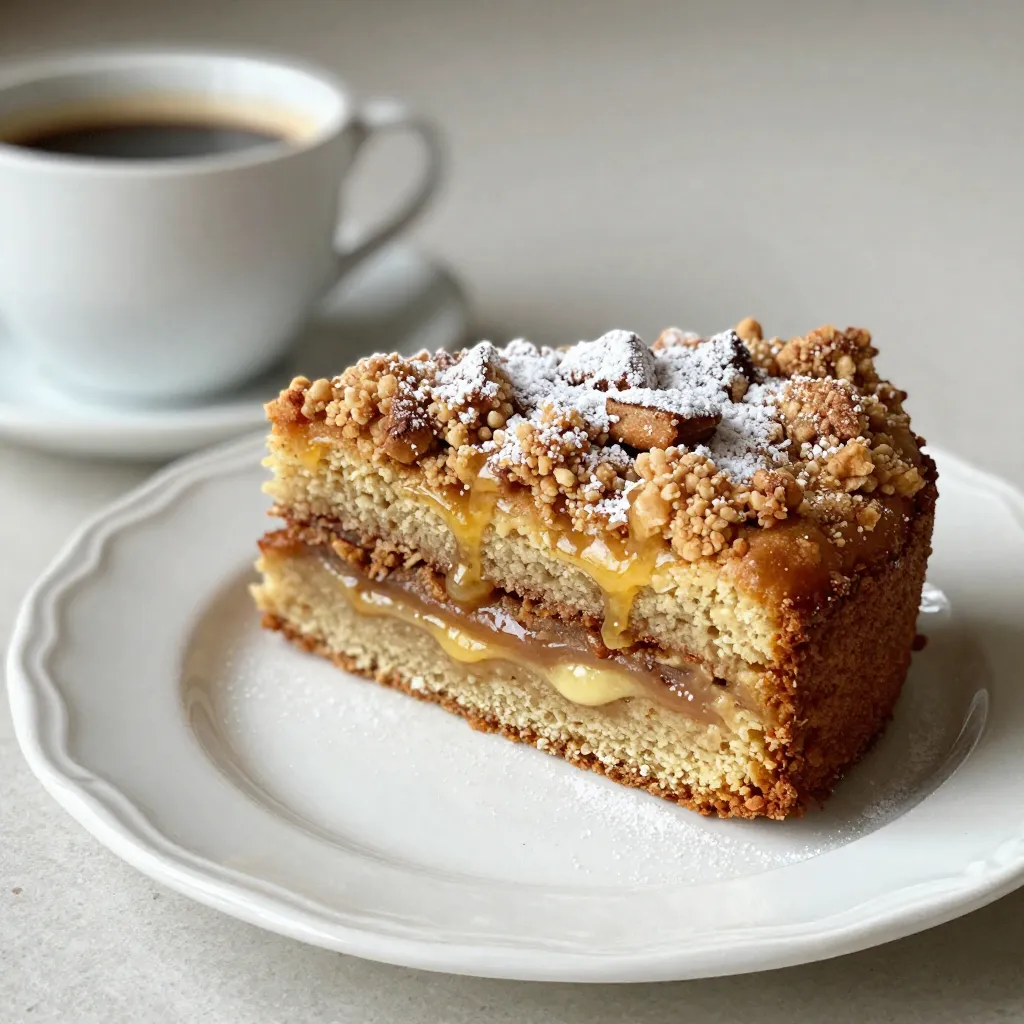
Craving a warm, sweet treat? Look no further than this easy Cinnamon Streusel Coffee Cake. With its soft cake and

- 1 package (8 oz) refrigerated crescent roll dough - 1 cup brie cheese, cut into small cubes - 1 cup cranberry sauce (homemade or store-bought) - 1 tablespoon honey - 1 teaspoon fresh thyme leaves - Sea salt for sprinkling - Baking sheet - Parchment paper - Mixing bowl To make delicious Cranberry Brie Crescent Bites, you'll need some simple ingredients. First, grab a package of refrigerated crescent roll dough. This dough gives the bites their flaky texture. Next, you need brie cheese. Cut it into small cubes for easy filling. You'll also want cranberry sauce, which can be homemade or store-bought. This sauce adds a sweet and tart flavor. Lastly, honey will enhance the taste with its sweetness. For extra flavor, consider adding fresh thyme leaves. They bring a nice herb taste that pairs well with the cheese. A sprinkle of sea salt on top boosts the flavors even more. To prepare, gather your equipment. You will need a baking sheet to hold your bites while they bake. Line it with parchment paper for easy cleanup. A mixing bowl will help you combine any optional ingredients, like thyme. With these ingredients and tools, you are ready to create a tasty holiday appetizer that everyone will love! {{ingredient_image_1}} First, set your oven to 375°F (190°C). This is the perfect temperature for golden bites. While the oven heats, grab a baking sheet and line it with parchment paper. This will stop the bites from sticking and make clean-up easy. Next, open your package of refrigerated crescent roll dough. Carefully unroll it on a clean surface. You will see that the dough is made of triangles. Separate each triangle gently. This step is quick and simple. Now it’s time to fill the rolls. Take a triangle and place a small cube of brie cheese at the wide end. On top of the cheese, add a teaspoon of cranberry sauce. Drizzle a bit of honey over the sauce for a touch of sweetness. If you like, sprinkle fresh thyme leaves on top. This adds great flavor. Starting at the wide end, roll the triangle up toward the point. Make sure the filling stays tucked inside as you roll. Arrange the rolled bites on your prepared baking sheet. Take a beaten egg and brush it on top of each bite. This will give them a nice shine. Then, sprinkle a pinch of sea salt over each one. Bake them in your preheated oven for 12-15 minutes. Look for a golden brown color and puffiness. Once done, remove them and let them cool for a few moments before serving. To ensure the cheese melts properly, use small cubes of brie. This helps the cheese melt evenly. If you want a richer taste, let the brie sit at room temperature for 15 minutes before using. This step helps it soften even more. Be sure to tuck the filling well inside the crescent roll. This prevents any cheese from leaking out as they bake. You can easily customize the flavor of these bites. Try adding a sprinkle of cinnamon or nutmeg to the cranberry sauce for warmth. If you like a little heat, add a pinch of red pepper flakes. You can also swap the honey for maple syrup for a different sweetness. Consider using different herbs, like rosemary or basil, for unique twists. For serving, place the bites on a festive platter. Add some fresh herbs around them for color. A drizzle of honey or balsamic glaze over the bites can make them look fancy. You might also consider serving them with a side of extra cranberry sauce for dipping. This adds a fun touch and extra flavor. Pro Tips Use Cold Brie: For easier handling, ensure the brie is chilled before cutting it into cubes. Customize the Filling: Feel free to experiment with other fruit preserves or nuts to personalize the flavor. Watch the Baking Time: Oven times may vary, so keep an eye on the bites to prevent over-browning. Serve with a Garnish: A sprig of thyme on top adds a beautiful presentation and enhances flavor. {{image_2}} You can swap brie for many other cheeses. Creamy goat cheese works well. It adds a tangy taste. You might also try sharp cheddar for a bolder flavor. Camembert is another nice choice. It has a similar texture to brie. Each cheese gives a unique twist to the bites. Cranberry sauce is sweet and tart, but you can change it up. Try using raspberry or apricot preserves. These fruit preserves add a fruity zing. You could even use apple butter for a cozy taste. Each swap brings a new layer of flavor to your bites. Explore different options to find your favorite. Making a vegan version is easy and fun. Use plant-based cheese instead of brie. Many brands offer tasty vegan cheese options. Replace honey with maple syrup or agave nectar. These substitutes keep the sweetness without animal products. Your guests won’t even miss the dairy! After enjoying your Cranberry Brie Crescent Bites, store any leftovers in the fridge. Use an airtight container to keep them fresh. They will taste best if eaten within three days. When you are ready to eat them again, reheat in the oven. Set your oven to 350°F (175°C) and bake for about 10 minutes. This will help them regain their crispy texture. To freeze these bites, allow them to cool completely. Place them in a single layer on a baking sheet and freeze for about an hour. Once frozen, transfer them to a freezer-safe bag. Be sure to push out any extra air before sealing. When you want to enjoy them, thaw them overnight in the fridge. Reheat them in the oven until warm and crispy. Cranberry Brie Crescent Bites can stay fresh in the fridge for up to three days. If you freeze them, they can last for about two months. Always check for any signs of spoilage before eating. Enjoy your bites while they are still tasty! Yes, you can prepare these bites before your guests arrive. Assemble them and store them in the fridge. Just cover them with plastic wrap to keep them fresh. Bake them right before serving. If you want to prep even more, you can make the filling a day ahead. Just store it in the fridge, and it will be ready when you are. These bites pair well with many dishes and drinks. You might try serving them with a light salad. A mixed greens salad with a simple vinaigrette works great. For drinks, a sparkling wine or apple cider complements the flavors nicely. You could also serve these bites with a cheese board for a fun spread. Yes, you can make these bites gluten-free! Look for gluten-free crescent roll dough at your local store. Brands like Pillsbury offer gluten-free options. Just follow the same steps as the regular dough. The taste and texture will still be delicious! This blog post covered how to make delicious Cranberry Brie Crescent Bites. You learned about the main ingredients like crescent roll dough, brie, and cranberry sauce. I shared step-by-step instructions, tips for perfect bites, and variations to try. Remember, these bites can be customized to fit any taste. Whether you stick with the classic or try new flavors, you’ll impress everyone. Enjoy making these tasty treats that are perfect for any occasion!

Cranberry Brie Crescent Bites Tasty Holiday Appetizer

Looking for a festive treat that wows guests? Try Cranberry Brie Crescent Bites! These little bites are simple yet delicious,

- 2 cups mashed potatoes (preferably leftover) - 1 cup shredded cheddar cheese - ½ cup cooked and crumbled spicy sausage or a plant-based alternative - ½ cup green onions, chopped - 1 teaspoon garlic powder - 1 teaspoon onion powder - Salt and pepper to taste - 1 cup all-purpose flour - 2 large eggs, beaten - 1 cup breadcrumbs (preferably panko for extra crunch) - Vegetable oil for frying To make crispy stuffed mashed potato balls, I use simple and tasty ingredients. The mashed potatoes are the base. Using leftovers makes this dish easy and fun. Cheddar cheese adds a nice gooeyness when you bite into them. The spicy sausage gives a kick, but you can swap it for a plant-based option if you want. Green onions add a fresh crunch. Garlic and onion powder boost flavors without being too strong. Don't forget to season with salt and pepper for balance. The flour, eggs, and breadcrumbs help create that crispy outer layer. If you don’t have mashed potatoes, you can use instant mashed potatoes, but the flavor may differ. For cheese, mozzarella or pepper jack works great too. Instead of sausage, you can try bacon bits or even mushrooms for a vegetarian option. Chives can replace green onions if you want a milder taste. You can also try different spices like paprika for a smoky flavor. To take your crispy stuffed mashed potato balls up a notch, serve them with a dip. A spicy aioli or ranch dressing pairs well. You can sprinkle parsley or extra chopped green onions on top for a pop of color. If you like heat, add some hot sauce to your dipping sauce for a zing. These little touches can make your dish feel special and inviting. {{ingredient_image_1}} To start, grab a mixing bowl. Add 2 cups of mashed potatoes. If you have leftovers, that works great! Next, mix in 1 cup of shredded cheddar cheese. Then, add ½ cup of cooked and crumbled spicy sausage, or a plant-based choice if you prefer. Toss in ½ cup of chopped green onions too. Add 1 teaspoon of garlic powder, 1 teaspoon of onion powder, and season with salt and pepper to taste. Mix everything well until it combines nicely. Now, using your hands, take a spoonful of the potato mix. Shape it into a ball, about the size of a golf ball. This part is fun, and you can get a little messy! Continue this process until all the mixture is shaped into balls. Place them on a baking sheet as you go. Next, set up your breading station. You will need three separate bowls. Fill the first bowl with 1 cup of all-purpose flour. In the second bowl, place 2 large beaten eggs. Finally, add 1 cup of breadcrumbs, preferably panko, to the last bowl. This will help you get that nice crunch! Now it’s time to bread the potato balls. Take one ball and roll it in the flour first. Make sure it’s fully coated. Then dip it in the beaten eggs, allowing any extra to drip off. Lastly, roll it in the breadcrumbs until it’s well covered. Repeat this for all the potato balls. In a large, deep skillet, heat about 2 inches of vegetable oil. You want it to be at medium heat and reach 350°F (175°C). A thermometer helps ensure the oil is hot enough. Once it’s ready, carefully add a few potato balls at a time. Fry them for about 3-4 minutes, or until they turn golden brown and crispy. Use a slotted spoon to take them out and place them on a paper towel-lined plate to drain any excess oil. These crispy stuffed mashed potato balls are best served hot. You can enjoy them as a snack or a side dish. Try pairing them with your favorite dipping sauce for extra flavor. They make a great addition to any meal! To get that perfect crunch, choose panko breadcrumbs. They create a light, crispy shell. Make sure to coat each ball well. Roll them in flour first, then dip in egg, and finally coat in breadcrumbs. This three-step process helps lock in the crunch. Fry in hot oil at 350°F for the best results. If the oil is not hot enough, the balls can become soggy. You can prepare these potato balls in advance. After forming them, place the balls on a baking sheet. Freeze them for about an hour. Once they are firm, transfer them to a freezer bag. This method helps them keep their shape. When you are ready to cook, fry them straight from the freezer. Just add a minute or two to the cooking time. One common error is overmixing the filling. This can make the potatoes gummy. Stick to mixing just until blended. Another mistake is overcrowding the frying pan. Fry only a few at a time. This keeps the oil temperature steady. Finally, don’t skip the draining step. Placing them on paper towels helps remove excess oil, keeping them crisp. Pro Tips Use Cold Mashed Potatoes: For the best texture, make sure your mashed potatoes are cold; this helps them hold their shape better when forming the balls. Experiment with Fillings: Feel free to customize your potato balls with different cheeses, meats, or veggies to suit your taste preferences. Test the Oil Temperature: Always use a thermometer to check the oil temperature; if it's too hot, the outside will burn before the inside cooks. Drain Properly: After frying, let the potato balls rest on a paper towel-lined plate to ensure they remain crispy by absorbing excess oil. {{image_2}} You can get creative with the fillings in your crispy stuffed mashed potato balls. Try adding cooked bacon for a smoky taste. You can also use diced ham or even chopped mushrooms for a different twist. Cheese lovers can mix in mozzarella or pepper jack for extra flavor. Don't forget to experiment with herbs or spices to match your taste. If you're looking for vegetarian options, you can skip the meat and add more veggies. Chopped spinach, bell peppers, or even corn can work great. For a vegan version, replace the cheese with a plant-based alternative. You can also use flaxseed meal mixed with water instead of eggs for binding. Adding spices and herbs can elevate your potato balls. Try mixing in smoked paprika, cumin, or Italian seasoning for a new flavor profile. Fresh herbs like chives or parsley can add a nice touch. Don't be shy to experiment! A little extra garlic powder or onion powder can also boost the taste. To keep your crispy stuffed mashed potato balls fresh, let them cool first. Then, place them in an airtight container. You can store them in the fridge for up to three days. Make sure they are not stacked on top of one another to avoid crushing. When it's time to enjoy your leftovers, reheating is easy. Preheat your oven to 350°F (175°C). Spread the potato balls on a baking sheet. Heat them for about 10-15 minutes until they are warm and crispy again. This method keeps them crunchy and tasty. If you want to save some for later, freezing works great! First, place the formed but un-fried potato balls on a baking sheet. Freeze them for about an hour. Once they are firm, transfer them to a freezer bag. They can stay frozen for up to three months. When ready to cook, fry them straight from the freezer. Just add an extra minute of cooking time for best results. Yes, you can use instant mashed potatoes for this recipe. They save time and still taste good. But, fresh mashed potatoes give a better flavor and texture. If you want a more homemade feel, use the real thing when you can. Vegetable oil is the best choice for frying. It has a high smoke point, so it won't burn. You can also use canola oil or peanut oil. Both work well and give a nice crisp to the potato balls. To keep your potato balls from falling apart, follow these tips: - Make sure your mixture is well combined. - Chill the formed balls in the fridge for at least 30 minutes. - Don't overcrowd the pan when frying. Fry in small batches to keep them intact. Yes, you can bake the potato balls. Preheat your oven to 400°F (200°C). Place the breaded balls on a baking sheet lined with parchment paper. Bake for 20-25 minutes, flipping halfway through. They won't be as crispy, but they still taste great. You can serve these potato balls with many dips and sides. Here are some ideas: - Sour cream or ranch dressing - Ketchup or barbecue sauce - A fresh salad for a light side - Your favorite dipping sauce for extra flavor Crispy stuffed mashed potato balls are fun and tasty. We covered key ingredients, step-by-step steps to make them, and tips for the best results. I shared ways to mix flavors and store leftovers, too. Use this guide to make your own versions. Experiment and find what you love best. Enjoy serving these delights at your next meal or party!

Crispy Stuffed Mashed Potato Balls Flavorful Delight

Looking for a snack that’s both fun and full of flavor? Crispy stuffed mashed potato balls bring joy to any

To make this creamy spinach artichoke dip, gather these ingredients: - 1 cup frozen spinach, thawed and drained - 1 can (14 oz) artichoke hearts, drained and chopped - 1 cup cream cheese, softened - 1/2 cup sour cream - 1/2 cup mayonnaise - 1 cup shredded mozzarella cheese - 1/2 cup grated Parmesan cheese - 2 cloves garlic, minced - 1/2 teaspoon onion powder - 1/2 teaspoon red pepper flakes (optional) - Salt and black pepper to taste - Tortilla chips or sliced baguette for serving You can easily swap some ingredients if needed. For a lighter dip, use Greek yogurt instead of sour cream or mayonnaise. If you want a dairy-free option, try cashew cream for the cream cheese. You can also use fresh spinach instead of frozen. Just remember to cook and chop it first. If you don’t have red pepper flakes, leave them out or use paprika for a milder taste. When choosing artichoke hearts, look for cans with no added preservatives. If using fresh spinach, choose vibrant, dark green leaves with no yellow spots. For the cheeses, opt for blocks rather than pre-shredded. Blocks melt better and give a creamier texture. Fresh garlic should feel firm and have no soft spots. These tips will help you create a dip that tastes fresh and delicious. {{ingredient_image_1}} 1. First, preheat your oven to 350°F (175°C). This helps the dip bake evenly. 2. Next, take a large bowl and add the softened cream cheese, sour cream, and mayonnaise. Mix them until smooth. 3. Then, add the thawed spinach and chopped artichoke hearts. Don't forget the minced garlic, mozzarella, and Parmesan cheese! 4. Now, season your mixture with onion powder, red pepper flakes, salt, and black pepper. Mix everything well. 1. Transfer the mixture to a baking dish. Spread it out evenly. 2. Place the dish in the oven. Bake for 25 to 30 minutes. Look for a bubbly and golden top. 3. Once baked, take it out and let it cool for a few minutes. This makes it easier to serve. - Use softened cream cheese. It mixes better and creates a smooth dip. - Drain the spinach well to avoid a watery dip. - Mix in the cheeses thoroughly for a creamy and cheesy texture. - Don’t overbake. Keep an eye on it to prevent burning. - Serve warm for the best flavor and texture. Serve your creamy spinach artichoke dip warm. This keeps it gooey and delicious. Sprinkle extra Parmesan cheese on top for a tasty touch. Fresh parsley adds color and flavor, making your dish look great. Use a large spoon for serving. It helps everyone get a good scoop! Tortilla chips work well with this dip. Their crunch balances the creaminess. Sliced baguette is another tasty option. You can also try fresh veggies like carrots or celery. They add a nice crunch and are healthy! Use a large mixing bowl to combine your dip ingredients. A sturdy spoon or spatula helps mix everything well. A baking dish is key for even cooking. I recommend a 9x9 inch dish for this recipe. An oven mitt is a must when you take the hot dish out. Enjoy making and sharing this dip! Pro Tips Use Fresh Ingredients: Whenever possible, opt for fresh spinach and artichokes instead of frozen or canned to enhance the flavor and texture of the dip. Customize Your Cheese: Feel free to experiment with different cheese blends, such as adding cheddar or gouda for a unique twist on the classic flavor. Make Ahead: This dip can be prepared a day in advance. Simply assemble it, cover, and refrigerate until you’re ready to bake. Just add a few extra minutes to the baking time. Serving Suggestions: Serve with a variety of dippers like pita chips, fresh vegetables, or even crusty bread to offer your guests a delightful choice. {{image_2}} To make a vegan version, swap the cream cheese, sour cream, and mayo. Use cashew cream or a store-bought vegan cream cheese. You can also add nutritional yeast for a cheesy flavor. Blend the ingredients until smooth. This way, everyone can enjoy this tasty dip. For a gluten-free dip, ensure your mayonnaise is gluten-free. Use gluten-free tortilla chips or sliced veggies for dipping. Most cheeses are naturally gluten-free, so you can keep the original cheese mix. Always check labels to be sure. Want to spice it up? Add a pinch of cayenne pepper or smoked paprika. You can mix in different cheeses too. Try adding goat cheese for tang or pepper jack for heat. Each choice adds a unique twist to the classic dip. To store your creamy spinach artichoke dip, let it cool first. Then, place it in an airtight container. You can keep it in the fridge for up to three days. Make sure to cover it well. This keeps it fresh and tasty for later. When you're ready to enjoy your dip again, you can reheat it easily. Preheat your oven to 350°F (175°C). Place the dip in a baking dish. Heat it for about 15-20 minutes. Stir halfway through so it warms evenly. You can also use a microwave; just heat it in short bursts. Stir between each burst until warm. If you want to save some dip for later, freezing is a great option. After cooling, place the dip in a freezer-safe container. It can stay good in the freezer for up to three months. When you want to eat it, move it to the fridge for a night to thaw. After it's thawed, reheat as mentioned above. This keeps the flavors and texture nice. To make Spinach Artichoke Dip in a slow cooker, first, mix all the dip ingredients in the slow cooker. Use the same ingredients from the oven recipe. Cook on low for 2 to 3 hours or on high for 1 to 1.5 hours. Stir every 30 minutes to keep it even. This method makes it creamy and warm throughout. You can enjoy this dip at any gathering without worrying about the oven. Yes, you can use fresh spinach! If you choose fresh spinach, you need to cook it first. Sauté it in a pan with a little water until it wilts. This should take about 2 to 3 minutes. Let it cool and then drain it well. Make sure to chop it before mixing it into the dip. Fresh spinach adds a nice texture and taste. You can serve Spinach Artichoke Dip with many tasty options. Here are some ideas: - Tortilla chips - Sliced baguette - Fresh vegetables like carrots and celery - Pita chips - Crackers These options make it easy for everyone to enjoy the dip. Mix and match to find your favorite pairing! In this post, you learned about making Spinach Artichoke Dip. We covered key ingredients, useful swaps, and how to choose fresh ones. You followed step-by-step instructions to prepare and bake, ensuring perfect texture. I shared tips for serving, pairing, and selecting the right tools. Variations included vegan and gluten-free options to suit all tastes. Lastly, you discovered how to store leftovers and reheat them. With these tips, you can create a delicious dip everyone will love. Now, get cooking and enjoy your tasty creation!

Creamy Spinach Artichoke Dip Tasty and Easy Recipe

Get ready for a creamy and delicious treat that’s perfect for any gathering! My Creamy Spinach Artichoke Dip is not

- 2 cups cooked rice (white or brown) - 2 cups cooked chicken, shredded - 2 cups broccoli florets (fresh or frozen) - 1 cup shredded cheddar cheese - 1 cup cream of mushroom soup - 1/2 cup milk - 1 teaspoon garlic powder - 1 teaspoon onion powder - 1/2 teaspoon black pepper - 1/2 teaspoon salt - 1/2 cup breadcrumbs - 2 tablespoons olive oil - 1/4 cup grated Parmesan cheese Options for alternative proteins: You can swap chicken for turkey or even tofu. Each option adds a unique flavor while keeping it filling. Vegan substitutions for cheese and cream of mushroom soup: Use cashew cheese or nutritional yeast for cheese. Replace the cream of mushroom soup with coconut cream mixed with mushrooms. Gluten-free breadcrumb options: Try using almond flour or crushed gluten-free crackers. They give a nice crunch without gluten. {{ingredient_image_1}} First, preheat your oven to 350°F (175°C). This step helps cook the casserole evenly. While the oven heats, grease a 9x13 inch casserole dish using a bit of olive oil. This keeps the casserole from sticking. Next, gather a large mixing bowl. In this bowl, combine the cooked rice, shredded chicken, and broccoli florets. Add the shredded cheddar cheese, cream of mushroom soup, and milk. Sprinkle in the garlic powder, onion powder, black pepper, and salt. Mix everything well. You want it all to blend nicely. Now, pour the mixture into the greased casserole dish. Spread it evenly across the dish. In a small bowl, mix the breadcrumbs with the remaining olive oil and Parmesan cheese. Sprinkle this mixture evenly on top of the casserole. Bake the casserole in the preheated oven for about 30-35 minutes. Look for bubbles and a golden brown topping. These are signs that it is ready. Once done, remove it from the oven. Let the casserole sit for about 5 minutes. This helps it set and makes serving easier. For this casserole, I recommend using long-grain white rice or brown rice. Both types hold up well and mix nicely. It's best to use cooked rice. This way, you avoid mushy rice in your dish. Mixing the ingredients is key for even flavor. Start by adding all the main ingredients in a big bowl. Use a spatula to gently fold them together. Be careful not to crush the broccoli. You want each bite to taste great. Adding spices can really boost flavors. I suggest a pinch of paprika for warmth. You could also try dried thyme or basil for a fresh twist. Adding these can make your casserole even more delicious. When it comes to cheese, cheddar is a classic choice. But feel free to mix it up! Try mozzarella for a gooey texture or pepper jack for some heat. You can even blend different cheeses for a richer taste. Pro Tips Use Fresh Broccoli: Fresh broccoli not only enhances the flavor but also adds a vibrant color to your casserole. If using frozen, make sure to thaw and drain excess moisture to avoid a watery dish. Shred Your Chicken: For better texture and flavor distribution, shred your chicken instead of cubing it. This allows the chicken to blend seamlessly with the other ingredients. Experiment with Cheese: While cheddar is classic, feel free to mix it up! Adding mozzarella or pepper jack can create a unique flavor profile and add creaminess to the casserole. Let it Rest: Allow the casserole to cool for a few minutes before serving. This helps it set properly, making it easier to cut and serve without falling apart. {{image_2}} You can make this cheesy broccoli chicken rice casserole your own. Try adding other veggies like bell peppers or carrots. They bring a nice crunch and color. Just chop them small and mix them in with the other ingredients. You can also switch up the protein. If you have leftover turkey or ham, use that instead of chicken. These meats add a different taste and keep it exciting. If you want a hands-off approach, try a slow cooker version. Just mix all the ingredients and set your slow cooker on low for 4-6 hours. Your casserole will be ready when you come home. You can also use a stovetop or instant pot. For the stovetop, cook the rice and add all ingredients in a pot. Stir well until heated through. If using an instant pot, cook on high pressure for 10 minutes, then let it release naturally for 5 minutes. This way, you can enjoy your casserole in less time! After you enjoy your cheesy broccoli chicken rice casserole, store any leftovers right away. First, let the casserole cool to room temperature. Then, transfer it to an airtight container. This helps keep the flavors fresh. You can refrigerate it for up to three days. If you want to keep it longer, freeze it instead. Make sure to wrap it tightly in plastic wrap, then place it in a freezer-safe container. It can last up to three months in the freezer. When you’re ready to eat it, just take it out and let it thaw in the fridge overnight. Reheating your casserole is simple. For the best texture, I suggest using the oven. Preheat your oven to 350°F (175°C). Place the casserole in an oven-safe dish. Cover it with foil to keep the moisture in. Heat it for about 20 to 25 minutes. If you want a crispy top, remove the foil for the last 5 minutes. You can also use a microwave. Just place a portion on a microwave-safe plate. Heat it in 1-minute intervals until hot. Enjoy the creamy, cheesy goodness again! Can I use uncooked rice in the casserole? No, you should not use uncooked rice. Uncooked rice will not cook properly in the casserole. It needs time and liquid to soften. Always use cooked rice for best results. This makes the dish creamy and delicious. How do I know when the casserole is fully cooked? Check the edges of the casserole. They should bubble and be golden brown. You can also poke it with a fork. If it is hot all the way through, it is done. The topping should be crispy and inviting. Can this dish be made ahead of time? Yes, you can prepare this casserole a day before. Just mix all the ingredients and place them in the dish. Cover it and store it in the fridge. When ready to bake, let it sit at room temperature for a bit before cooking. This helps it bake evenly. This casserole is easy to make and full of flavor. You learned about the key ingredients and how to mix them right. I shared tips for texture and ways to change it up for your taste. Don't forget, you can store leftovers and reheat them to keep them tasty. When cooking, trust your senses for doneness. This dish is flexible, so be creative! Enjoy your cooking and make it your own.

Cheesy Broccoli Chicken Rice Casserole Delight

If you’re craving a warm and hearty meal, this Cheesy Broccoli Chicken Rice Casserole is your answer! With tender chicken,

To make Sun Dried Tomato Sausage Rigatoni, you need: - 300g rigatoni pasta - 200g Italian sausage, casings removed - 100g sun-dried tomatoes, chopped - 1 medium onion, finely diced - 2 cloves garlic, minced - 200ml chicken or vegetable broth - 100ml heavy cream - 1 teaspoon dried Italian herbs (oregano, basil) - 50g grated Parmesan cheese, plus extra for serving - 2 tablespoons olive oil - Salt and pepper to taste - Fresh basil leaves for garnish If you can't find certain ingredients, don't worry! You can make easy swaps: - Use penne or fusilli instead of rigatoni for different pasta shapes. - Swap Italian sausage with turkey or chicken sausage for a lighter dish. - Use sun-dried tomatoes packed in oil for a richer taste. - Replace heavy cream with half-and-half or a plant-based cream for a lighter sauce. - Fresh herbs like thyme or parsley can replace dried Italian herbs. Fresh ingredients make a big difference in taste. They add bright flavors and aromas to your dish. For example, fresh basil gives a lovely scent and a pop of color. Fresh sausage has better texture and flavor than older options. Using fresh garlic and onion enhances the sauce's depth. Always choose the best quality ingredients you can find. This will help you create a meal that you and your loved ones will enjoy. {{ingredient_image_1}} To start, bring a large pot of salted water to a boil. Add the rigatoni pasta. Cook it according to the package instructions until it is al dente. This usually takes about 10-12 minutes. When it's ready, drain the pasta and set it aside. Make sure to save a cup of pasta water for later. This water helps adjust the sauce's thickness. Next, grab a large skillet and heat two tablespoons of olive oil over medium heat. Add the Italian sausage, making sure to break it apart with a wooden spoon. Cook the sausage for about 5 to 7 minutes. You want it browned and fully cooked. The aroma will fill your kitchen, making it hard to wait! Once the sausage is cooked, add one finely diced onion to the skillet. Stir and cook for about 3 to 4 minutes until the onion is soft. Then, add two minced garlic cloves and cook for another minute. This step adds a great depth of flavor. Next, toss in 100 grams of chopped sun-dried tomatoes. Stir everything together and let it cook for about 2 minutes. Now, pour in 200 milliliters of chicken or vegetable broth. Bring it to a gentle simmer and let it reduce for about 5 minutes. This will concentrate the flavors. After that, stir in 100 milliliters of heavy cream and a teaspoon of dried Italian herbs. Let the sauce simmer for another 3 to 4 minutes until it thickens. Finally, add the drained rigatoni to the skillet and toss it all together. If the sauce feels too thick, add a little reserved pasta water to reach your desired consistency. Before serving, mix in 50 grams of grated Parmesan cheese. Season with salt and pepper to taste. Your Sun Dried Tomato Sausage Rigatoni is now ready to enjoy! Always use a big pot with a lot of water. This helps the pasta cook evenly. Add salt to the water. It should taste like the sea. Stir the rigatoni often while cooking. This keeps it from sticking together. Cook until it's al dente, or firm to the bite. Drain it well, but keep a cup of the water. You might need this later. Start with medium heat and add olive oil to your skillet. Sauté the sausage until it’s browned. Then, add onion and garlic to build flavor. When you pour in the broth, let it simmer. This helps the sauce thicken. Adding heavy cream makes the sauce rich. Stir it well and let it bubble gently. Don’t rush this step; patience leads to creaminess. Use sun-dried tomatoes for a sweet and tangy kick. Fresh basil leaves add brightness when you serve. Don’t forget to season with salt and pepper. A pinch of red pepper flakes can add heat, too. For an extra flavor boost, use fresh herbs instead of dried. Finally, always finish with freshly grated Parmesan. It brings everything together beautifully. Pro Tips Perfect Pasta Cooking: Always cook your rigatoni in salted water to enhance flavor. Aim for al dente texture to ensure the pasta holds up in the sauce. Enhance the Flavor: Use high-quality Italian sausage for richer flavor. You can also add a pinch of red pepper flakes for a touch of heat! Thickening the Sauce: If your sauce is too thin, simmer it longer to reduce. Alternatively, add a bit of grated cheese to help thicken it. Garnishing Wisely: For a fresh touch, always garnish with fresh basil right before serving. It adds color and a burst of aroma! {{image_2}} You can swap out the Italian sausage for plant-based sausage. Many brands offer tasty options. Look for ones made from soy or pea protein. They provide a similar flavor and texture. This change makes the dish friendly for vegetarians. You can still enjoy all the rich flavors of sun-dried tomatoes and cream. Use the same cooking steps. Cook the plant-based sausage just like the meat version. It will create a satisfying meal for everyone. Rigatoni works great, but you can try other pasta types. Penne, fusilli, or even farfalle add fun shapes. Each pasta holds the sauce differently. Choose a pasta that you love or have on hand. Just remember to cook it until al dente. This ensures your pasta stays firm and tasty. Adding veggies is a simple way to boost nutrition. Spinach, zucchini, or bell peppers are great choices. You can toss them in while cooking the sausage. This will give them time to soften. If you prefer a more vibrant dish, add cherry tomatoes. They’ll provide extra flavor and color. Feel free to mix in any vegetables you like. They will enhance the meal and keep it fresh. To keep your Sun-Dried Tomato Sausage Rigatoni fresh, place it in an airtight container. Make sure to let it cool down to room temperature first. This step helps prevent moisture build-up that can lead to soggy pasta. Store the container in the fridge, where it will last for about 3-4 days. Always label it with the date you made it, so you know when to eat it. When you’re ready to enjoy your leftovers, reheating them carefully is key. You can use the microwave or stovetop. If using a microwave, place your pasta in a bowl, add a splash of water, and cover it. Heat in short bursts and stir often to avoid hot spots. If using the stovetop, add a bit of broth or cream to a skillet over low heat. Stir until heated through, keeping it creamy and flavorful. If you want to save your rigatoni for longer, freezing is a great option. First, let the pasta cool completely. Then, portion it into freezer-safe bags or containers. Remove as much air as possible to prevent freezer burn. Label each bag with the date. Your rigatoni can stay good in the freezer for up to three months. When you’re ready to eat it, thaw it in the fridge overnight before reheating it. To change the serving size, you can easily scale the ingredients. If you need more servings, simply multiply each ingredient by the number of servings you want. For fewer servings, divide the amounts by the same number. For example, if you want to serve six, multiply each amount by 1.5. Keep in mind that cooking times may vary slightly, so watch your pasta and sauce closely. Yes, you can use other cheeses based on your taste. Mozzarella adds a nice stretch, while goat cheese brings a tangy flavor. Feta can add a salty kick, and ricotta makes it creamy. Just remember to adjust the amount to keep the dish balanced. Grated cheese melts well, so feel free to mix and match! This dish pairs well with a fresh salad. A simple mixed greens salad with a light vinaigrette works great. Garlic bread is also a wonderful side, adding a crunchy texture. For a heartier option, serve it with roasted vegetables or a side of steamed broccoli. You can even top it with extra basil for a fresh touch. This blog post covered how to make a delicious Sun Dried Tomato Sausage Rigatoni. We explored key ingredients and how fresh items make a big difference. I shared step-by-step cooking tips for making the best pasta and sauce. You can also find fun variations and smart storage tips. Always try to adjust the recipe to fit your taste. Use this guide to enjoy great meals with ease. Cooking can be fun and rewarding. Now, get in the kitchen and make this tasty dish!

Sun Dried Tomato Sausage Rigatoni Flavorful Delight

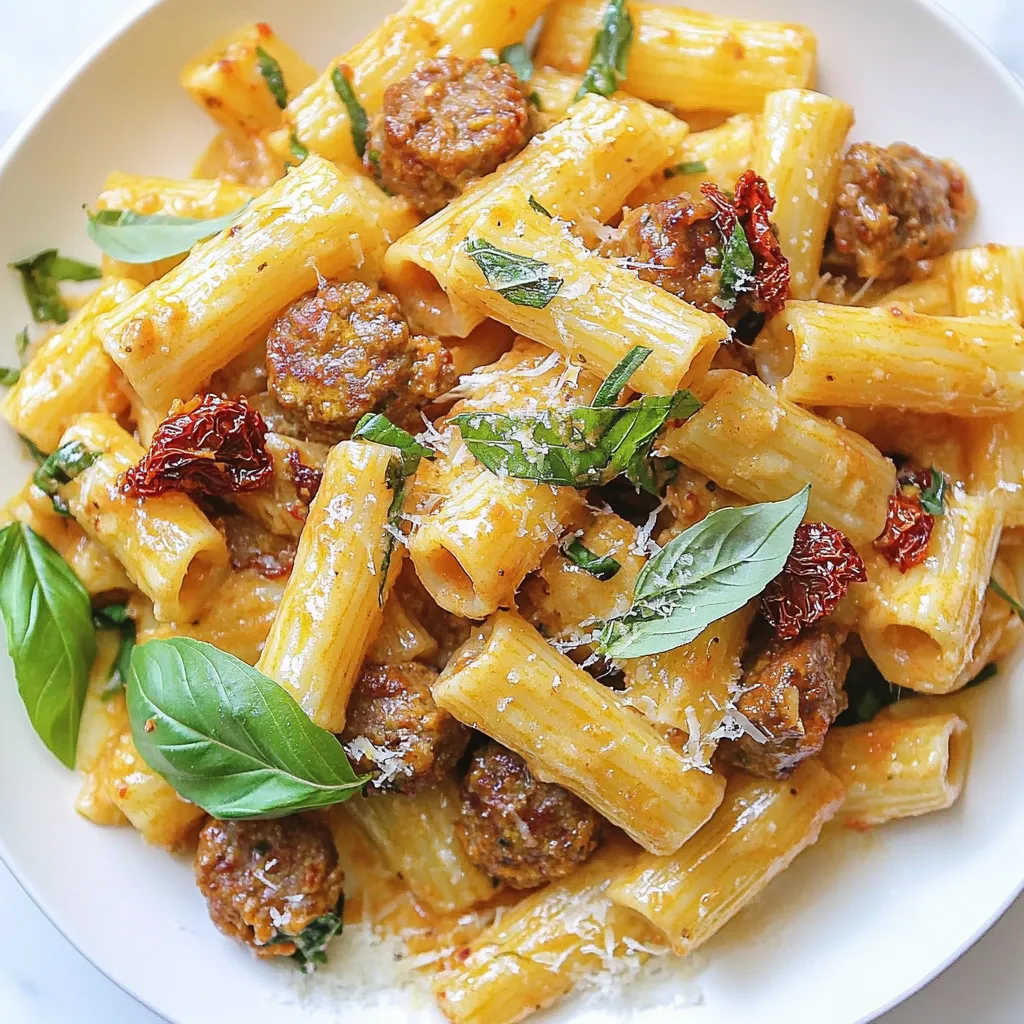
Are you ready to try a delicious pasta dish? My Sun Dried Tomato Sausage Rigatoni will bring joy to your

- 1 pound ground turkey - 1 cup fresh spinach, finely chopped - 1/2 cup feta cheese, crumbled - 1/4 cup breadcrumbs (whole wheat preferred) - 1 small onion, finely chopped - 2 cloves garlic, minced - 1 tablespoon olive oil - 1 teaspoon dried oregano - 1/2 teaspoon black pepper - Salt to taste These ingredients bring a burst of flavor to your turkey burgers. Ground turkey gives a lean protein base. Fresh spinach adds a pop of color and nutrients. Feta cheese provides a salty, creamy texture. Breadcrumbs help hold the mixture together. - Whole wheat burger buns - Toppings (lettuce, tomato, cucumber, tzatziki sauce) Using whole wheat buns boosts fiber. Toppings like lettuce and tomato add crunch and freshness. Tzatziki sauce brings a cool and tangy flavor that pairs perfectly with the burgers. - Each serving has about 250 calories. - Ground turkey is low in fat and high in protein. - Spinach is rich in iron and vitamins A and C. - Feta cheese adds calcium and flavor without too many calories. These burgers are not only tasty but also good for you. They fit well into a balanced diet. Enjoying these burgers can help you eat healthier while still feeling satisfied. {{ingredient_image_1}} To start, heat one tablespoon of olive oil in a skillet over medium heat. Once hot, add one small onion, finely chopped. Sauté the onion for about four to five minutes. You want it to become translucent. Next, add two cloves of minced garlic and stir for one more minute. This will make your kitchen smell amazing! After cooking, allow the mixture to cool slightly. This step helps blend the flavors without cooking the turkey too early. In a large mixing bowl, combine one pound of ground turkey with the cooled onion and garlic. Then, add one cup of finely chopped spinach and half a cup of crumbled feta cheese. Don’t forget to throw in a quarter cup of whole wheat breadcrumbs, one teaspoon of dried oregano, and half a teaspoon of black pepper. Add salt to taste. Use your hands to mix everything together until just combined. Be careful not to overmix. If you mix too much, your burgers can become tough. Now, it’s time to shape the patties. Divide the mixture into equal portions. You should get about four to five patties. Make each one about one inch thick. This thickness helps them cook evenly. Next, preheat your grill or skillet over medium-high heat. Place the patties on the grill or skillet. Cook them for about five to seven minutes on each side. You want them to be golden brown and reach an internal temperature of 165°F (74°C). To check doneness, you can use a meat thermometer. This ensures your burgers are safe and juicy. If you want, you can toast whole wheat burger buns while the patties cook. This adds a nice crunch to your meal. Enjoy your cooking adventure! To make juicy burgers, start with fresh ground turkey. Use dark meat if you want more fat and flavor. Don’t overmix your turkey and veggies. Mix gently until just combined. This keeps the burgers tender. Cook the patties on medium-high heat. Grill or pan-fry for about 5-7 minutes on each side. Make sure the internal temperature is 165°F. This means they are safe to eat and juicy. To boost flavor, try adding fresh herbs like basil or parsley. A pinch of red pepper flakes can also add a kick. If you want a twist, use smoked paprika for a deeper taste. If you're dairy-free, try using plant-based feta. You can also use crumbled tofu mixed with herbs. This keeps the taste but fits your diet. Pair your burgers with a fresh salad or sweet potato fries. These sides add color and crunch. You can also serve them with roasted vegetables for a healthy touch. For fun accompaniments, add tzatziki sauce or hummus. These dips bring extra flavor and creaminess. You can also try pickled cucumbers for a tangy bite. Pro Tips Use Fresh Ingredients: Always opt for fresh spinach and quality feta cheese to enhance the flavor and nutritional value of your burgers. Chill the Patties: After forming your patties, refrigerate them for about 30 minutes before cooking. This helps them hold their shape better on the grill or skillet. Experiment with Spices: Feel free to add other herbs and spices like cumin or paprika for additional flavor complexity in your turkey burgers. Check Internal Temperature: Always use a meat thermometer to ensure your turkey burgers reach an internal temperature of 165°F (74°C) for safe eating. {{image_2}} You can easily swap the ground turkey for other meats. Chicken or beef works great. If you want a plant-based option, try using lentils or black beans. Each choice brings its own flavor and texture. Cheese is another easy swap. Use goat cheese for a tangy taste. Cream cheese can add creaminess without the feta flavor. Want to spice things up? Add cumin or red pepper flakes. These spices give the burgers a nice kick. You can also mix in different vegetables. Try bell peppers or mushrooms for added texture and flavor. For a fun twist, serve these burgers as sliders. Mini burgers are great for parties or snacks. You can also make a salad using the turkey mixture. Just add greens and your favorite dressing. It’s a light and tasty meal option. After cooking, let the spinach feta turkey burgers cool down. Place them in an airtight container. Store them in the fridge. They will stay fresh for up to three days. This helps keep the flavors intact. You can freeze both raw and cooked burgers. For raw burgers, wrap each patty in plastic wrap. Place them in a freezer bag. They can last up to three months in the freezer. For cooked burgers, let them cool first. Then, store them in an airtight container. They can also last for three months. To thaw, put the frozen burgers in the fridge overnight. You can also use the microwave for quick thawing. Just be careful not to cook them while thawing. Reheat the burgers in a skillet over medium heat. This method helps keep them juicy. You can also use the oven at 350°F (175°C). Heat for about 10 minutes. Cover them with foil to avoid dryness. You can add a little broth to keep them moist. Enjoy your juicy and flavorful turkey burgers! Yes, you can use frozen spinach. First, thaw the spinach and squeeze out the extra water. This step helps keep your burgers from getting too soggy. When using frozen spinach, aim for about 1 cup. This amount matches the fresh spinach in the recipe. Frozen spinach works well, but fresh spinach has a better taste and texture. If you need a gluten-free option, try using oats or crushed nuts. Almond flour is another great choice. You can also use crushed rice cakes or cornflakes. Just make sure to adjust the amount based on how they absorb moisture. These options will still bind your turkey burger mix together nicely. Check the internal temperature. The burgers should reach 165°F (74°C). Use a meat thermometer to be sure. Look for a golden brown color on the outside. If the juices run clear when you cut into one, they are likely done. These signs help ensure safe and tasty burgers. This blog post covered everything you need to make tasty turkey burgers. We went over key ingredients, cooking steps, and helpful tips to ensure success. You learned how to enhance flavors and create fun variations. Don’t forget storage tips for leftovers, too! With these ideas, you can enjoy delicious, healthy meals with ease. Dive in and get cooking!

Spinach Feta Turkey Burgers Juicy and Flavorful Treat

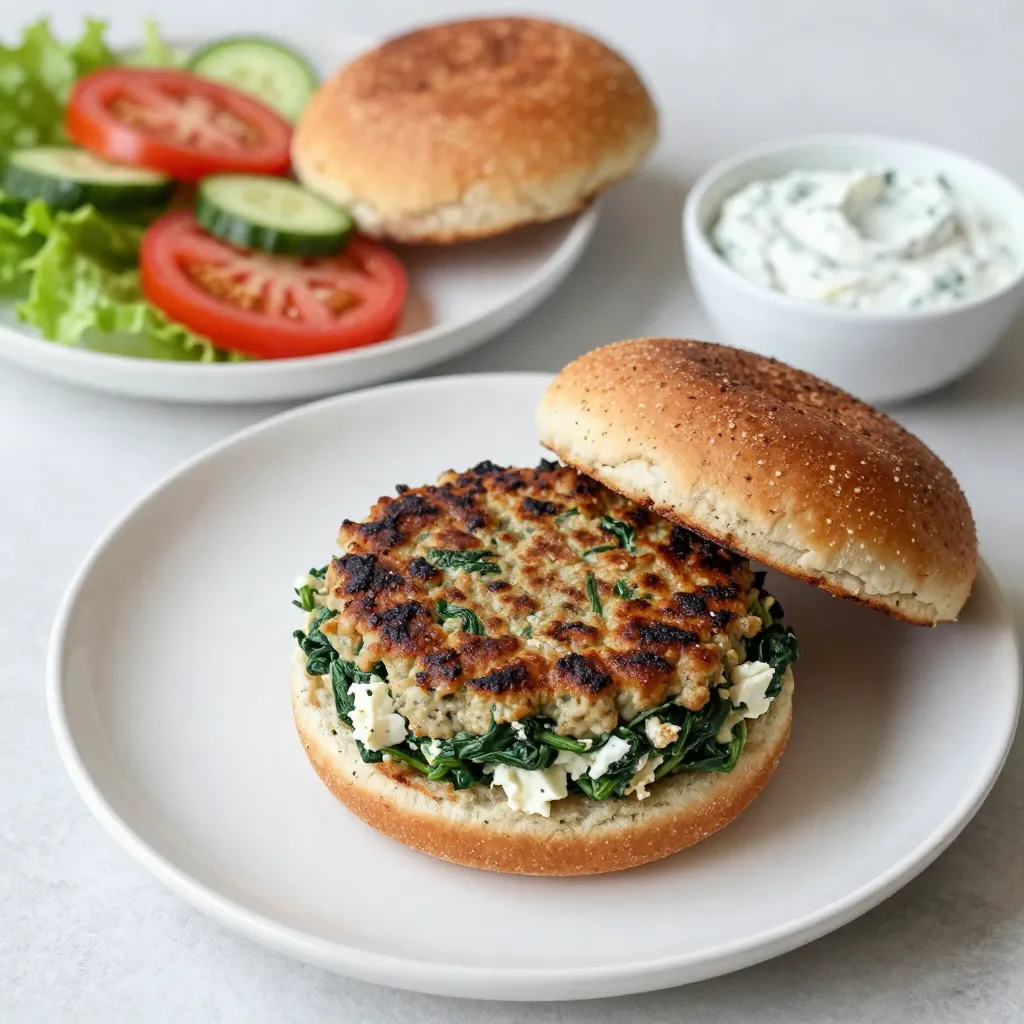
Are you ready to elevate your burger game? My Spinach Feta Turkey Burgers are juicy and packed with flavor! With

To make Crockpot Lemon Garlic Chicken, gather these main items: - 4 boneless, skinless chicken breasts - 1/4 cup fresh lemon juice - 4 cloves garlic, minced - 1 teaspoon dried thyme - 1 teaspoon dried oregano - 1/2 teaspoon salt - 1/2 teaspoon black pepper - 1/4 cup chicken broth - 1 tablespoon olive oil - Zest of 1 lemon - Fresh parsley, chopped (for garnish) These ingredients blend to create a bright and savory dish. The lemon juice adds a tangy kick, while the garlic gives it a warm depth. You can add optional ingredients to enhance the dish: - 1 teaspoon red pepper flakes for heat - 1/2 cup chopped onions for sweetness - 1/2 cup bell peppers for crunch - Fresh herbs like basil or rosemary for more aroma These extras can take your chicken to the next level. Feel free to mix and match based on what you like. Here are some tools that will make cooking easier: - A crockpot for slow cooking - A mixing bowl for combining ingredients - A measuring cup and spoons for accuracy - A cutting board and knife for prepping - Tongs to handle the chicken Using the right tools helps you stay organized and efficient. Enjoy the process of making this tasty meal! {{ingredient_image_1}} Start by gathering your ingredients. You need lemon juice, garlic, thyme, oregano, salt, pepper, chicken broth, olive oil, and lemon zest. In a medium bowl, mix the lemon juice and minced garlic. Add the dried thyme, oregano, salt, and black pepper. Pour in the chicken broth and olive oil. Finally, add the lemon zest. Stir everything well. This mixture will give your chicken a bright, tasty flavor. Next, take your four boneless, skinless chicken breasts. Place them in the crockpot. Pour the lemon garlic mixture over the chicken. Make sure to coat the chicken evenly. Cover the crockpot with a lid. Cook on low for 6-7 hours or on high for 3-4 hours. The chicken is ready when it reaches 165°F (75°C). This slow cooking helps the flavors blend beautifully. Once the chicken is cooked, carefully remove it from the crockpot. Use two forks to shred the chicken if you want. This makes it easier to serve. Drizzle some of the tasty cooking liquid over the chicken. For a nice touch, sprinkle chopped parsley on top. This adds color and flavor to your dish. Enjoy your delicious meal! To get juicy chicken, start with fresh, high-quality meat. Always season your chicken well. The lemon juice and garlic mix adds moisture. Cook on low heat when possible. This method helps keep the chicken tender. If you want to shred the chicken, let it rest for a few minutes after cooking. This step helps keep it juicy. Different slow cookers have varying heat levels. A newer model may cook food faster. If your cooker runs hot, check the chicken sooner. For low settings, cook for 6-7 hours. If set to high, 3-4 hours works well. Always check the chicken's internal temperature. It should reach 165°F (75°C) for safe eating. Use a meat thermometer for accuracy. To boost the flavor of your dish, try adding fresh herbs. Rosemary and basil pair well with lemon and garlic. You can also add a splash of white wine for depth. A bit of red pepper flakes gives a nice kick. For a twist, mix in some sun-dried tomatoes or olives. These additions make the meal even more exciting. Experiment with flavors to find your favorite mix! Pro Tips Marinate for Extra Flavor: Allow the chicken to marinate in the lemon garlic mixture for at least 30 minutes before cooking for a more intense flavor. Use Fresh Herbs: If possible, substitute dried thyme and oregano with fresh herbs for a brighter and more aromatic dish. Adjust the Garlic: For a milder garlic flavor, roast the garlic before adding it to the mixture. This gives a sweeter, less pungent taste. Serve with Sides: This dish pairs beautifully with rice, quinoa, or steamed vegetables to soak up the delicious cooking juices. {{image_2}} You can add vegetables to your dish. This makes it colorful and healthy. Try carrots, bell peppers, or zucchini. Cut the veggies into bite-sized pieces. Mix them with the chicken in the crockpot. The veggies soak up the lemon garlic flavor. This adds more taste and nutrition to your meal. You can make this dish in an Instant Pot or oven. For the Instant Pot, use the same ingredients. Cook on high pressure for about 10 minutes. Let the pressure release naturally for 5 minutes. If using the oven, preheat it to 375°F (190°C). Place the chicken in a baking dish. Bake for 25-30 minutes or until it’s cooked through. Both methods keep the chicken juicy and flavorful. You can switch up the protein in this recipe. Chicken thighs work great and add more flavor. They stay juicy even if cooked longer. You can also use fish like salmon. Fish cooks faster, so reduce the time to 2-3 hours on low. Each protein brings its own taste to the dish. Experiment with what you like best! After enjoying your meal, cool the chicken first. Place the leftovers in an airtight container. Store them in the fridge for up to three days. Make sure to keep the cooking liquid with the chicken to keep it moist. When you’re ready to eat again, gently reheat the chicken. You can use a microwave or a skillet. If using a microwave, place the chicken on a plate and cover it. Heat on medium for about one to two minutes. If using a skillet, add a splash of chicken broth and heat on low until warm. To freeze, place the cooled chicken in a freezer-safe bag. Remove as much air as possible before sealing. This helps prevent freezer burn. You can freeze it for up to three months. To thaw, move the chicken to the fridge overnight. If you're in a hurry, you can use the microwave's defrost setting. Yes, you can use frozen chicken breasts. Just increase the cooking time. If you use frozen chicken, cook it on high for 4-5 hours. Always check that the chicken reaches 165°F (75°C) before serving. This will ensure your chicken is safe to eat and fully cooked. To check if the chicken is done, use a meat thermometer. The chicken should reach an internal temperature of 165°F (75°C). If you don’t have a thermometer, cut into the chicken. It should be white throughout, with no pink. Juices should run clear as well. Crockpot Lemon Garlic Chicken goes great with many sides. Here are some tasty options: - Steamed rice - Quinoa - Roasted vegetables - Garlic bread - Fresh salad These sides will complement the flavors of the chicken well. Enjoy your meal! This blog post covered how to make Lemon Garlic Chicken in a Crockpot. We discussed the key ingredients and the tools you need. I shared step-by-step instructions for preparing, cooking, and serving. Tips for juicy chicken and cooking adjustments were also provided. You learned about variations and how to store leftovers. Remember, this dish is easy and flavorful, making it a great choice for dinner. Enjoy trying the recipe with your own twist!

Crockpot Lemon Garlic Chicken Flavorful Dinner Delight

Are you ready to make dinner time a breeze? My Crockpot Lemon Garlic Chicken is a simple, tasty dish that

- 1 lb boneless, skinless chicken breasts, cut into bite-sized pieces - 1 cup orzo pasta - 2 cups chicken broth - 1 cup cherry tomatoes, halved - 1 medium onion, diced - 3 cloves garlic, minced - 1 cup fresh spinach - 1 teaspoon dried oregano - 1 teaspoon paprika - 2 tablespoons olive oil - Salt and pepper to taste - Fresh basil leaves for garnish (optional) Chicken breasts are the star here. They give the dish protein and flavor. I recommend using boneless and skinless chicken for quick cooking. Orzo pasta is small and fun to eat. It cooks fast and absorbs flavors well. Cherry tomatoes add sweetness and color. They burst with juice when you bite into them. Onion and garlic bring a base of flavor. They create a warm, savory taste in the dish. Fresh spinach adds a nice pop of green and nutrients. Oregano and paprika give a lovely, earthy touch. Olive oil helps cook the ingredients and adds richness. Use fresh chicken for the best taste. Check for a pink color and no bad smell. Choose orzo that is not broken; this ensures even cooking. Fresh spinach should be bright green and crisp. Look for cherry tomatoes that are plump and firm. Fresh herbs, like basil, enhance the dish’s presentation and flavor. Always use high-quality chicken broth for a rich taste. If possible, choose low-sodium broth to control the saltiness in your meal. {{ingredient_image_1}} Start by gathering all your ingredients. You want everything close by for easy cooking. Cut the chicken into bite-sized pieces. Dice the onion and halve the cherry tomatoes. Mince the garlic. This will help the flavors blend well. Wash the fresh spinach and set it aside. Heat two tablespoons of olive oil in a large skillet over medium heat. Add the diced onion and cook until it turns clear, which takes about 3-4 minutes. Next, add the minced garlic and stir for one minute to keep it from burning. Raise the heat to medium-high and add the chicken. Season the chicken with salt, pepper, oregano, and paprika. Cook it for 6-8 minutes until it is brown and cooked through. After the chicken is ready, stir in the orzo pasta and halved cherry tomatoes. Mix them well with the chicken. Pour in the chicken broth and bring it to a boil. Once it boils, lower the heat, cover the skillet, and let it simmer for 10-12 minutes. The orzo should be tender and soak up most of the broth. Finally, stir in the fresh spinach and cook until it wilts, which takes about 2 minutes. Remove the skillet from the heat and let it rest for a couple of minutes. This helps the flavors settle. To serve, scoop the mixture into bowls. You can garnish with fresh basil leaves for color and extra taste. If you like, drizzle a little olive oil on top. Enjoy your meal! To cook chicken well, start with even-sized pieces. This helps them cook evenly. Use a hot skillet to get a nice brown on the chicken. Season it well with salt and pepper before cooking. Make sure to stir it often. This keeps it from sticking and ensures it cooks evenly. Always check that the chicken is cooked through. The inside should be 165°F. This makes sure it is safe to eat. Cooking orzo is simple, but it needs attention. Add it to the skillet with the chicken and broth. It will soak up the flavors while cooking. Keep the heat low after it boils. This helps the orzo cook gently. Stir it occasionally to prevent it from clumping. Cook until it is tender but still has a little bite, known as al dente. This makes the dish more interesting. To boost flavor, add herbs like fresh basil or parsley at the end. You can also mix in a squeeze of lemon juice for brightness. If you like heat, try adding red pepper flakes. A dash of balsamic vinegar can add depth. Always taste your dish as you go. Adjust salt, pepper, or spices to match your taste. This way, you’ll create a meal that is just right for you. Pro Tips Marinate the Chicken: For even more flavor, marinate the chicken pieces in olive oil, oregano, paprika, salt, and pepper for at least 30 minutes before cooking. Use Homemade Broth: If possible, use homemade chicken broth for a richer and more authentic taste. Don’t Overcook the Orzo: Keep an eye on the orzo while it simmers; it should be al dente and absorb the broth without becoming mushy. Add Cheese: For a creamy finish, stir in some grated Parmesan cheese just before serving for added richness. {{image_2}} You can easily make this dish vegetarian. Substitute the chicken with chickpeas or lentils. Use vegetable broth instead of chicken broth. This keeps the flavor rich and tasty. Add more veggies like zucchini or bell peppers for extra color and texture. You can also use tofu for protein. If you want to switch up the protein, try shrimp or sausage. Shrimp cooks quickly and adds a nice touch. If you use sausage, slice it and cook it first. Remove it and then add it back in with the orzo. You can also use turkey instead of chicken for a lighter option. You can change the flavors to suit your taste. Try adding lemon juice for a fresh zing. A splash of balsamic vinegar can add depth. You can also mix in different herbs like thyme or rosemary. For a spicy kick, add red pepper flakes. Adjust the flavors to make it your own! To store your Chicken Orzo Skillet, let it cool first. Transfer it to an airtight container. This helps keep it fresh. You can store it in the fridge for up to four days. If you want to keep it longer, freezing is a great option. When ready to enjoy your leftovers, reheat them on the stove. Add a splash of chicken broth to keep it moist. Heat it over low to medium heat. Stir often until it warms through. You can also use the microwave. Just cover it and heat in short bursts, stirring in between. In the fridge, your Chicken Orzo Skillet lasts about four days. If frozen, it can last up to three months. To freeze, use a freezer-safe container. Label it with the date so you remember when you made it. Thaw it overnight in the fridge before reheating for the best texture. Yes, you can use other types of pasta. Small shapes work best. Try ditalini or small shells. They cook well and blend nicely with chicken. Keep an eye on the cooking time. You may need to adjust it based on the pasta. If you can't find orzo, use quinoa or couscous. Both options are great. They add a nice texture to the dish. Rice is another option, but it may need more cooking time. Just make sure to adjust the liquid. Yes, you can prepare this dish ahead of time! Cook it fully, then cool it down. Store it in the fridge for up to three days. When you're ready to eat, just reheat it on the stove. Add a splash of broth to keep it moist. To add heat, toss in red pepper flakes while cooking. You can also use spicy sausage instead of chicken. Another option is to add diced jalapeños. Adjust the spice level to your taste. Enjoy the kick! This dish goes well with a simple green salad. Roasted vegetables also make a great side. You can serve it with garlic bread for a hearty meal. A side of steamed broccoli or asparagus adds color and nutrition. In this article, we explored the key ingredients and steps to make Chicken Orzo Skillet. You learned about selecting fresh ingredients, cooking techniques, and how to add your personal twist. We shared tips for perfect chicken and creative variations. Finally, we covered storage and reheating for leftovers. Whether you stick to the classic recipe or try new flavors, you now have the knowledge to enjoy this dish. Dive in and make your meal a success!

Chicken Orzo Skillet Simple and Tasty Recipe

Are you ready for a meal that’s both simple and delicious? In this blog post, I’ll share my Chicken Orzo

- 1 cup rolled oats - 1 ½ cups almond milk (or milk of your choice) - 1 medium apple, peeled and diced - 1 tablespoon maple syrup - 1 teaspoon vanilla extract - 1 teaspoon ground cinnamon - ½ teaspoon nutmeg - 2 tablespoons chia seeds - ¼ cup walnuts or pecans, chopped (optional) - Pinch of salt To make Apple Pie Overnight Oats, you need simple, fresh ingredients. First, you will need 1 cup of rolled oats. They provide the base and texture. Next, grab 1 ½ cups of almond milk or any milk you prefer. This adds creaminess. You will also need 1 medium apple, peeled and diced. The apple gives a sweet and fruity taste. For sweetness, use 1 tablespoon of maple syrup. It pairs well with the spices. You will also need 1 teaspoon of vanilla extract for flavor. Ground cinnamon is a key spice in this dish, so add 1 teaspoon. Nutmeg, another warm spice, calls for ½ teaspoon. Chia seeds are important for texture, so include 2 tablespoons. If you like nuts, use ¼ cup of walnuts or pecans, chopped. Finally, add a pinch of salt to enhance all the flavors. With these ingredients, you can create a tasty and healthy breakfast that reminds you of apple pie! {{ingredient_image_1}} First, take a large bowl. In this bowl, combine 1 cup of rolled oats, 2 tablespoons of chia seeds, 1 teaspoon of ground cinnamon, ½ teaspoon of nutmeg, and a pinch of salt. Mix these ingredients well. This blend gives your oats flavor and texture. The chia seeds add a nice creaminess once soaked. Next, grab another bowl. Whisk together 1 ½ cups of almond milk, 1 tablespoon of maple syrup, and 1 teaspoon of vanilla extract. Make sure all ingredients blend smoothly. The almond milk makes it creamy, while the maple syrup adds sweetness. Now, pour the wet mixture into the bowl with the dry ingredients. Stir until everything is evenly coated. Then, gently fold in 1 medium diced apple and chopped nuts, like walnuts or pecans. This adds crunch and fruity goodness. Divide the mixture into jars or containers. Seal them tightly with lids and refrigerate overnight. This soaking time helps the oats absorb the flavors. In the morning, stir the oats and add a splash of milk if you want them creamier. Enjoy your tasty breakfast! To make the best overnight oats, seal your jars tightly. This helps the oats soak up the liquid well. When the jars are sealed, they stay fresh. It also helps keep the flavors together. You can change the sweetness to your taste. Add more maple syrup or honey if you like. This lets you find the perfect balance for your palate. You can also try different nuts. Walnuts or pecans add a nice crunch. Experiment with other add-ins too, like dried fruit or seeds. When you serve your oats, make it pretty! Add fresh apple slices on top. A sprinkle of cinnamon will enhance the flavor. You could also drizzle some maple syrup for extra sweetness. These little touches make your breakfast even more delightful. Pro Tips Use Fresh Apples: For the best flavor and texture, choose crisp, fresh apples like Honeycrisp or Granny Smith. Customize Your Sweetness: Adjust the amount of maple syrup based on your apple's sweetness; taste before mixing in. Double the Batch: Make a larger batch to enjoy throughout the week; simply store in the fridge for quick breakfasts. Experiment with Spices: Enhance the flavor by adding nutmeg, ginger, or cardamom for a unique twist on your oats. {{image_2}} If you're looking for a nut-free option, you can easily swap nuts for sunflower seeds. Sunflower seeds add a nice crunch and a bit of protein. They also complement the apple flavor well. Just use about ¼ cup of sunflower seeds. This keeps your breakfast tasty and safe for folks with nut allergies. For a vegan and dairy-free version, choose plant-based milk. Almond milk is great, but you can also use oat milk or soy milk. Each type of milk brings its own flavor. For a creamier texture, try coconut milk. This keeps the recipe in line with vegan diets while still being delicious. Want to mix things up? You can add extra spices or fruits. Try a pinch of ginger or cardamom for a warm touch. You could also add diced pears or berries for added sweetness. This way, you can create new flavors every time you make your oats. Get creative and find your favorite combination! To keep your apple pie overnight oats fresh, store them in airtight containers. Glass jars work great. Make sure to seal them tightly. Refrigerate the jars right after you prepare them. This helps the oats soak up the milk and flavors. The oats can stay fresh for up to five days in the fridge. If you notice any strange smells or colors, it’s best to toss them. You can freeze your prepared overnight oats if you want to keep them longer. To do this, fill freezer-safe containers with the mixture. Leave some space at the top for expansion. When you’re ready to eat, take a jar out of the freezer. Let it thaw overnight in the fridge. You can also heat it in the microwave for a warm breakfast. Just add a splash of milk to loosen it up. Overnight oats are safe to eat for about five days when stored in the fridge. For the best taste, eat them within three days. If you freeze them, you can keep them for up to three months. Always check for signs of spoilage before eating leftovers. If the oats look dry or have any off smells, it’s best to discard them. Yes, you can use quick oats. They cook faster than rolled oats. Quick oats will absorb liquid more quickly, so your overnight oats may be softer. If you like a creamier texture, quick oats work well. Just remember, they may not hold their shape as much as rolled oats. You can keep overnight oats in the fridge for up to five days. This makes them a great meal prep option. The flavors will blend well, and the oats will stay fresh. If you add fruits or nuts, consider adding them just before eating. This keeps them crunchy and fresh. Yes, you can make overnight oats without chia seeds. Chia seeds add thickness and a nice texture. If you skip them, your oats will be a bit runnier. You could add more rolled oats or a little ground flaxseed instead. This helps maintain a good texture while still being tasty. This blog post covers the essentials for making delicious overnight oats. You learned about the key ingredients, step-by-step instructions, and helpful tips to customize your oats. I shared storage advice to keep your oats fresh. Whether you prefer a nut-free or vegan version, there's an option for everyone. Enjoy preparing and personalizing your overnight oats, making breakfast easy and tasty. Dive in and make it your way!

Apple Pie Overnight Oats Tasty and Simple Breakfast

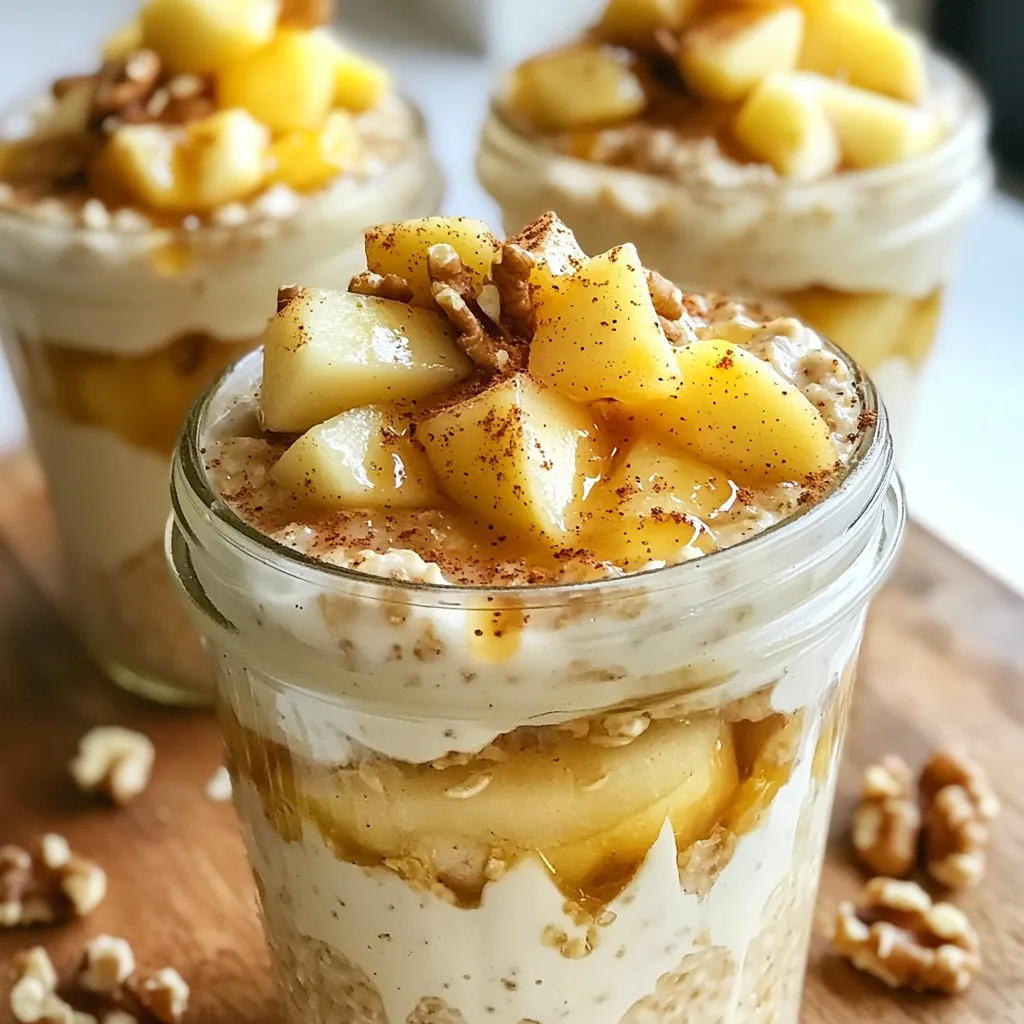
Looking for a quick breakfast that tastes like dessert? Apple Pie Overnight Oats are your answer! In just a few

Older posts
Newer posts
← Previous Page1 … Page145 Page146 Page147 … Page164 Next →

dsad

© 2026 easycookingbite • Built with GeneratePress

Our Policies

  • Copyright Policy
  • Cookie Policy
  • GDPR Policy
  • Privacy Policy
  • Disclaimer
  • Terms Of Use

More Information

  • Home
  • About
  • Contact
  • Appetizers
  • Dessert
  • Dinner
  • Drinks
©2026, easycookingbite About Back To Top