Skip to content
DisclaimerTerms Of UseGDPR PolicyCookie Policy

easycookingbite

  • Home
  • Drinks
  • Appetizers
  • Dinner
  • Dessert
  • About
  • Contact
  • Privacy Policy
DisclaimerTerms Of UseGDPR PolicyCookie Policy

Lily

- 1 cup quinoa, rinsed - 2 cups vegetable broth - 1 cup cherry tomatoes, halved - 1 cup black beans, drained and rinsed - 1 avocado, diced - 1 cup corn (fresh or frozen) - 1/2 cup red onion, finely chopped - 1/2 cup fresh cilantro, chopped - 1/4 cup lime juice (about 2 limes) - 2 tablespoons olive oil - 1 teaspoon cumin - Salt and pepper to taste Quinoa is a great source of protein and fiber. It helps keep you full. Vegetable broth adds flavor without extra calories. Cherry tomatoes give vitamins C and K, plus antioxidants. Black beans boost protein and fiber, supporting heart health. Avocado adds healthy fats and vitamins. Corn provides fiber and a touch of sweetness. Red onion offers antioxidants and may improve heart health. Cilantro adds freshness and can aid digestion. Lime juice gives vitamin C and brightens flavors. Olive oil contains healthy fats and can benefit heart health. Cumin adds flavor and may aid digestion. Salt and pepper enhance taste, but use them wisely. If you don’t have quinoa, try brown rice or couscous. Use chicken broth if you prefer a non-vegetarian option. Any tomatoes work; you can chop larger ones. If black beans are not available, use kidney beans or chickpeas. For a different taste, try a different avocado type or omit it. Frozen corn works well if fresh isn’t available. Green onions can replace red onion for a milder flavor. If you’re not a fan of cilantro, parsley or basil can be good substitutes. If lime juice is out, lemon juice can work in a pinch. {{ingredient_image_1}} First, rinse 1 cup of quinoa under cold water. This step removes any bitter taste. Next, add the rinsed quinoa to a medium saucepan. Pour in 2 cups of vegetable broth. Bring this to a boil over high heat. Once boiling, reduce the heat to low. Cover the saucepan with a lid and let it simmer for 15 minutes. The quinoa is ready when it looks fluffy and the broth is gone. After cooking, take it off the heat and let it cool. While the quinoa cools, chop your vegetables. Start with 1 cup of cherry tomatoes. Cut them in half and place them in a large mixing bowl. Next, drain and rinse 1 cup of black beans and add them to the bowl. Then, dice 1 avocado and add it too. Measure out 1 cup of corn, fresh or frozen, and toss it in. Finally, finely chop 1/2 cup of red onion and 1/2 cup of fresh cilantro, adding both to the mix. This colorful blend makes the salad vibrant and fresh. Now, let’s make the dressing. In a small bowl, whisk together 1/4 cup of lime juice, which is about 2 limes, and 2 tablespoons of olive oil. Add 1 teaspoon of cumin, along with salt and pepper to taste. Mix until smooth. Once the quinoa has cooled, add it to the large bowl with the veggies. Pour the dressing over the salad and gently toss everything together. Make sure all the ingredients are coated well in the dressing. Taste the salad and adjust the seasoning if you like. For best results, refrigerate the salad for at least 30 minutes before serving. This allows the flavors to mix beautifully. To cook quinoa, use a two-to-one ratio of liquid to quinoa. For our salad, use 1 cup of quinoa and 2 cups of vegetable broth. Rinse the quinoa well to remove its bitter coating. Bring the broth to a boil, then lower the heat. Cover and simmer for about 15 minutes. The quinoa should be fluffy and the liquid should be gone. Let it sit off the heat to cool. If you have leftovers, store them in a sealed container. You can keep them in the fridge for about three days. The flavors will continue to blend in the fridge. If you want to freeze it, place it in an airtight bag. It can last up to three months in the freezer. Just thaw it in the fridge before eating. To enhance the flavor of your salad, you can add more lime juice or salt based on your taste. Fresh herbs like mint or parsley can add a new twist. You might also try adding a pinch of chili powder for heat. This salad is all about balance, so taste as you go and adjust. It’s a fun way to make it your own! Pro Tips Rinse Your Quinoa: Always rinse quinoa under cold water before cooking to remove its natural coating, called saponin, which can make it taste bitter. Use Fresh Ingredients: For the best flavor, use fresh lime juice and ripe avocados. Fresh ingredients elevate the taste of the salad significantly. Let It Chill: Allowing the salad to chill for at least 30 minutes in the refrigerator helps the flavors to meld together beautifully. Customize Your Add-Ins: Feel free to add other ingredients like bell peppers, corn, or jalapeños to customize the salad to your taste. {{image_2}} You can make this salad heartier by adding protein. Here are some great choices: - Grilled chicken adds a nice boost. - Shrimp brings a tasty twist. - Tofu makes it plant-based and filling. - Chickpeas add fiber and texture. Mix and match these options based on what you have or prefer. Protein makes the dish more filling and satisfying. You can adjust this salad based on what’s fresh. Here are some ideas: - Use fresh peaches in summer for sweetness. - Swap in butternut squash in fall for warmth. - Add pomegranate seeds in winter for a pop of color. Changing the ingredients with the seasons keeps the dish exciting and flavorful. It also helps you use fresh produce. The dressing can change the salad's flavor profile. Here are some alternatives: - Try a balsamic vinaigrette for a different taste. - A honey mustard dressing adds sweetness. - A spicy chipotle dressing can give it a kick. Feel free to experiment with dressings. This will change each bite and keep the salad fresh. You can store your cilantro lime quinoa salad in the fridge for up to five days. Make sure to keep it in an airtight container. This keeps the salad fresh and tasty. After a few days, the flavors will change. It may not taste as bright. To store the salad well, let it cool first. Avoid putting hot food directly in the fridge. This can raise the fridge's temperature. Place the salad in a glass or plastic container. Seal it tightly to keep air out. This helps keep the ingredients crisp and fresh. While I don’t recommend freezing the whole salad, you can freeze the quinoa. To do this, let the quinoa cool completely. Then, place it in a freezer bag. Squeeze out the air and seal it. The quinoa will stay good for up to three months. When ready to use, thaw it overnight in the fridge. Then, mix it with fresh veggies and dressing for a quick meal! Yes, you can make this salad ahead of time. I often prepare it a few hours before serving. This salad tastes even better after resting. The flavors blend together nicely when it sits in the fridge. Just make sure to keep the salad covered. It stays fresh and tasty for up to two days. Yes, this salad is gluten-free. Quinoa is a great gluten-free grain. It is light and fluffy, making it perfect for salads. All the other ingredients, like beans and veggies, are also gluten-free. This dish works well for those with gluten sensitivities or allergies. You can serve this salad with many dishes. It pairs well with grilled chicken, shrimp, or fish. You can also enjoy it as a side with tacos or burritos. If you're vegetarian or vegan, serve it with roasted veggies or a hearty soup. The options are endless! This blog post covered how to make a delicious Cilantro Lime Quinoa Salad. We looked at key ingredients and their nutrition, plus smart swaps. I shared clear steps for cooking and mixing, along with tips for perfecting your dish. You can add proteins, change seasonal items, or try different dressings. Finally, I detailed storage tips to keep leftovers fresh. With these insights, you can create a tasty, healthy salad anytime. Enjoy making it your own!

Cilantro Lime Quinoa Salad Fresh and Flavorful Dish

Get ready to brighten your meal plans with my Cilantro Lime Quinoa Salad! This fresh and flavorful dish packs a

- 2 salmon fillets - 1 cup jasmine rice - 2 cups vegetable broth or water - 1/4 cup soy sauce - 2 tablespoons honey or maple syrup - 1 tablespoon rice vinegar - 1 teaspoon grated ginger - 2 cloves garlic, minced - 1 tablespoon sesame oil - 1 cup broccoli florets - 1 carrot, julienned - 2 green onions, sliced - Sesame seeds for garnish - Salt and pepper to taste Gather these ingredients before you start cooking. Fresh salmon is key for a great flavor. Jasmine rice gives a nice aroma and pairs well with the sauce. Vegetable broth adds extra taste to the rice. The teriyaki sauce is simple yet powerful. Soy sauce brings saltiness, while honey or maple syrup adds sweetness. Rice vinegar adds a bit of tang. Grated ginger and minced garlic give it depth. For toppings, broccoli and carrots add color and crunch. Green onions brighten the dish and sesame seeds offer a nice finishing touch. Each ingredient plays a role in making this meal tasty and satisfying. {{ingredient_image_1}} To start, rinse your jasmine rice under cold water. Keep rinsing until the water runs clear. This step removes extra starch. It helps the rice stay fluffy. Next, combine the rinsed rice with 2 cups of water or vegetable broth in a medium saucepan. Bring it to a boil. Once boiling, reduce the heat. Cover the pot and simmer for about 15 minutes. The rice is ready when it’s tender and the liquid is absorbed. Finally, fluff the rice with a fork. While the rice cooks, let’s make the teriyaki sauce. In a small bowl, whisk together the following ingredients: - 1/4 cup soy sauce - 2 tablespoons honey or maple syrup - 1 tablespoon rice vinegar - 1 teaspoon grated ginger - 2 cloves garlic, minced Once mixed, set the sauce aside for later use. This sauce will add a sweet and savory flavor to your dish. Now, heat sesame oil in a skillet over medium heat. Season your salmon fillets with salt and pepper. Place the fillets in the skillet, skin-side down. Cook for about 4 to 5 minutes. You want the skin to be crispy. Carefully flip the salmon and pour the teriyaki sauce over it. Let it cook for another 3 to 4 minutes. Baste the salmon occasionally with the sauce. It should reach an internal temperature of 145°F when done. In the same skillet, add your broccoli florets and julienned carrots to the remaining teriyaki sauce. Cook for about 3 to 4 minutes. You want the veggies to be tender yet vibrant. This will give your bowl a nice crunch and color. To put your bowls together, start with a generous scoop of fluffy jasmine rice at the bottom. Layer your teriyaki salmon on top. Next, add the cooked broccoli and carrots. Finish with a sprinkle of sliced green onions and sesame seeds. This adds flavor and a nice crunch to your meal. Enjoy your colorful and tasty teriyaki salmon rice bowls! To get crispy skin on your salmon, start with dry fillets. Pat them with a paper towel. This helps the skin crisp up nicely. Heat the skillet before adding the salmon. Use medium heat and place the salmon skin-side down. Cook for about 4–5 minutes without moving it. This gives the skin a great crunch. To ensure your salmon is cooked through, check the internal temperature. It should reach 145°F. If you don’t have a thermometer, look for the flesh to turn opaque and flake easily with a fork. Flip the salmon only once to keep it moist and tender. You can try different sweeteners in your teriyaki sauce. Honey and maple syrup work well, but you can also use agave syrup or brown sugar. Each sweetener gives a unique taste to the sauce. Adding spices can also boost the flavor. Consider using red pepper flakes for heat or sesame seeds for crunch. A hint of black pepper or five-spice powder can add depth. Mix and match to find your favorite flavor! Pair your teriyaki salmon rice bowl with side dishes like edamame or a simple salad. A light cucumber salad adds a nice crunch. You can also serve it with pickled vegetables for extra zing. For presentation, use a wide, shallow bowl. Start with rice, then carefully add the salmon on top. Arrange colorful veggies around the salmon. Finish with a sprinkle of green onions and sesame seeds. This makes your bowl look as good as it tastes. Pro Tips Fresh Salmon is Best: Opt for wild-caught salmon if possible for superior flavor and texture. Rinse Your Rice: Rinsing jasmine rice removes excess starch, resulting in fluffier cooked rice. Adjust the Sauce: Feel free to tweak the teriyaki sauce ingredients to suit your taste; add more honey for sweetness or soy sauce for saltiness. Don’t Overcook the Vegetables: Keep your broccoli and carrots slightly crisp for the best texture and color. {{image_2}} You can switch out salmon for chicken or tofu. Chicken thighs or breasts work well. Just follow the same cooking steps. For tofu, press it first to remove excess water. Then, cut it into cubes and cook it in the sesame oil until golden. Vegetarian-friendly options are great too. Try using tempeh or chickpeas. Both soak up flavors well. They will make your teriyaki bowls tasty and filling. While jasmine rice is soft and fragrant, you can use brown rice for a nutty flavor. Brown rice takes longer to cook, so adjust your time. Alternatively, cauliflower rice is a low-carb choice. It cooks quickly and adds a light texture. Feel free to mix and match rice types based on your diet. Each option brings its own charm to the dish. You can add different vegetables to your bowl. Snow peas, bell peppers, or snap peas are great options. They add color and crunch. If fresh veggies aren't available, frozen ones work too. Just toss them in the skillet for a few extra minutes. They heat up nicely and maintain their nutrients. To keep your teriyaki salmon rice bowls fresh, use airtight containers. Glass containers work well, as they don’t absorb odors. Store the salmon, rice, and veggies in separate sections. This helps maintain their textures. Refrigerate the leftovers within two hours of cooking. They will stay good for up to three days. For reheating, the microwave is quick. Place the rice and salmon in a bowl. Add a splash of water to the rice to keep it moist. Cover it with a damp paper towel. Heat in short bursts of 30 seconds, stirring in between. Alternatively, you can use a skillet. Heat it on low and add a bit of oil. This helps keep the salmon crispy. Yes, you can freeze teriyaki salmon! Wrap the salmon tightly in plastic wrap and then in foil. This prevents freezer burn. For the rice, let it cool completely. Portion it into freezer bags and remove as much air as possible. For the sauce, use small containers or ice cube trays. This makes it easy to thaw just what you need later. To make a quick teriyaki sauce, follow this simple recipe: - 1/4 cup soy sauce - 2 tablespoons honey or maple syrup - 1 tablespoon rice vinegar - 1 teaspoon grated ginger - 2 cloves garlic, minced Mix all the ingredients in a bowl. Whisk until smooth. This sauce is sweet and savory, perfect for salmon. Yes, you can prepare teriyaki salmon in advance. Here are some best practices: - Cook the salmon and let it cool. - Store in an airtight container in the fridge. - Reheat gently when ready to eat. I recommend consuming it within three days for the best taste. Pair your teriyaki salmon rice bowl with these tasty options: - Steamed edamame - Miso soup - Cucumber salad - Green tea These sides balance the meal and add freshness. Teriyaki salmon is healthy for many reasons: - Salmon is rich in omega-3 fatty acids. - It supports heart health and brain function. - Broccoli and carrots provide vitamins and minerals. This dish is a nutritious choice for a balanced meal. In this article, we explored how to make a delicious teriyaki salmon rice bowl. We covered the key ingredients like salmon, jasmine rice, and a simple teriyaki sauce. I detailed how to cook the rice and salmon perfectly while adding tasty vegetables. You also learned tips to elevate your dish and variations to fit your needs. For a healthy meal with rich flavors, this rice bowl hits the mark. Enjoy your cooking, and feel free to get creative with it!

Teriyaki Salmon Rice Bowls Flavorful and Simple Meal

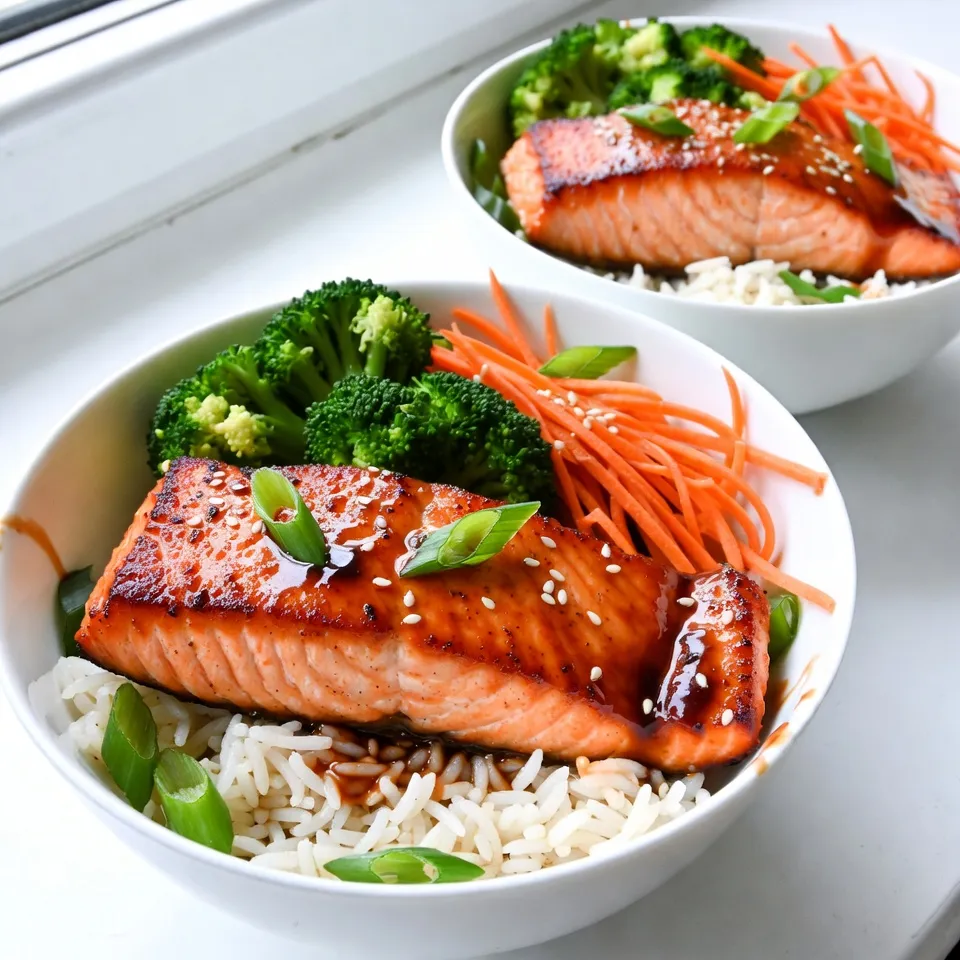
If you’re searching for a quick, tasty meal, look no further! Teriyaki salmon rice bowls are both flavorful and easy

- 1 lb baby carrots (or cut regular carrots into sticks) - 3 tablespoons pure maple syrup - 2 tablespoons unsalted butter - 1 teaspoon cinnamon - 1/2 teaspoon nutmeg - Salt and pepper to taste - Fresh parsley for garnish When measuring ingredients, use a standard dry measuring cup for solids. Use a liquid measuring cup for liquids like maple syrup. This ensures accuracy and helps your dish turn out great. A tablespoon is equal to three teaspoons, which is helpful for smaller amounts. If you don’t have maple syrup, try honey or agave syrup. For a dairy-free version, use olive oil instead of butter. You can switch up the spices too. Try ginger for a warm kick or add a pinch of chili powder for heat. If you want more texture, sprinkle in some chopped nuts like walnuts or pecans. {{ingredient_image_1}} 1. Start by washing the baby carrots. If you use regular carrots, peel and cut them into sticks. Aim for uniformity so they cook evenly. 2. Gather your other ingredients: maple syrup, butter, cinnamon, nutmeg, salt, and pepper. 3. Measure out 3 tablespoons of maple syrup and 2 tablespoons of unsalted butter. This will give your carrots their sweet glaze. 4. Get your spices ready. You’ll need 1 teaspoon of cinnamon and 1/2 teaspoon of nutmeg. These spices add warmth and flavor to your dish. 1. In a large skillet, melt the butter over medium heat. Wait until it bubbles, which means it’s hot enough. 2. Add the carrots to the skillet. Sauté them for about 5 minutes. Stir occasionally to help them soften. 3. Pour the maple syrup over the carrots. Sprinkle the cinnamon and nutmeg on top. Stir until every carrot gets a nice coating. 4. Season with salt and pepper to taste. Cover the skillet with a lid. Let the carrots cook for 8 to 10 minutes. Stir now and then. They should be tender and glazed. 5. After they are cooked, remove the lid. Cook uncovered for 1 to 2 minutes. This helps thicken the glaze. 6. Transfer the glazed carrots to a serving dish. Garnish with chopped fresh parsley. This adds color and fresh flavor. - Use fresh, high-quality maple syrup for the best flavor. - Stir the carrots well after adding the syrup and spices. This helps them get an even glaze. - Keep an eye on the cooking time. Overcooked carrots can become mushy. You want them tender but still firm. - If you want a thicker glaze, let the carrots cook uncovered a bit longer. This will help reduce the sauce. - Always taste as you go. Adjust seasoning to match your preferences. To make your maple glazed carrots shine, think about adding a splash of lemon juice. It can brighten the sweet flavors. You can also try adding garlic for a savory twist. Fresh herbs, like thyme or rosemary, work well too. They add depth and freshness to the dish. One common mistake is overcooking the carrots. Keep an eye on them. You want them tender but not mushy. Another mistake is using low-quality maple syrup. Always choose pure maple syrup. The flavor makes a big difference. Lastly, don’t skip the salt and pepper. They help balance the sweetness. Serve these carrots as a side dish with roasted chicken or fish. They pair well with grains, like quinoa or rice. For a festive touch, sprinkle some chopped nuts on top for crunch. You can also serve them warm or at room temperature. They are great for meal prep too! Enjoy them in salads or wraps throughout the week. Pro Tips Choose Fresh Carrots: Opt for fresh, vibrant baby carrots for the best flavor and texture. If using regular carrots, select firm ones without blemishes. Adjust Sweetness: Feel free to adjust the amount of maple syrup based on your preference for sweetness. You can also add a splash of orange juice for a citrusy twist. Even Cooking: Cut carrots into uniform sizes to ensure even cooking. This will help them to be perfectly tender and glazed. Garnish for Color: Don't skip the fresh parsley garnish! It adds a lovely color contrast and a hint of freshness that enhances the dish. {{image_2}} You can make maple glazed carrots even better by adding a few mix-ins. Nuts add a nice crunch. Try chopped walnuts or pecans. They bring a great texture. You can also add spices for a twist. A pinch of ginger or cayenne can add warmth. If you like a bit of zest, add orange zest. It pairs well with maple. While the skillet method is quick, there are other ways to cook these carrots. Roasting them in the oven enhances their sweetness. To roast, toss the carrots in maple syrup and butter. Spread them on a baking sheet. Bake at 400°F for about 20-25 minutes. This method gives a nice caramelized finish. You can also steam them. Steaming keeps them tender while locking in flavor. Maple syrup is delicious, but you can try other sweeteners too. Honey works well if you want a different taste. Agave nectar is a great vegan option. You can also use brown sugar for a deeper flavor. Just remember to adjust the amount based on sweetness. Each sweetener changes the flavor a bit, so have fun testing! After you enjoy your maple glazed carrots, store any leftovers in a sealed container. Keep them in the fridge. They stay fresh for about three to four days. Make sure they cool down to room temperature before sealing them. This helps prevent moisture and keeps them from getting soggy. To reheat, you can use a skillet or microwave. If using a skillet, add a splash of water or broth. Heat on medium until warm, stirring often. If using a microwave, place the carrots in a microwave-safe dish. Cover it loosely to allow steam to escape, and heat in short bursts of 30 seconds. Check often to avoid overheating. You can freeze maple glazed carrots, but they may lose some texture. First, allow them to cool. Then, place them in a freezer-safe bag or container. Remove as much air as possible to prevent freezer burn. They can last up to three months in the freezer. When you're ready to eat, thaw them in the fridge overnight before reheating. Yes, you can use other vegetables. Think about using peas, green beans, or sweet potatoes. They all taste great with maple syrup. Just cut them to a similar size for even cooking. To make this dish vegan, swap the butter for coconut oil or vegan butter. The maple syrup is already vegan, so you’re good there. This change keeps the dish rich and tasty without dairy. Maple glazed carrots pair well with many dishes. Try them with roasted chicken or grilled fish. They also go great with quinoa or a fresh salad. The sweetness of the carrots balances savory flavors nicely. This blog post covered the main ingredients and their measurements, plus how to substitute and modify them. I shared step-by-step instructions to prepare and cook your dish, with tips for perfecting the glaze. We discussed tricks for enhancing flavors and avoiding common mistakes, as well as serving ideas. You learned about variations like different cooking methods and add-ins. Finally, I provided storage advice, including how to freeze leftovers. Use these insights to create the best maple-glazed carrots and impress your guests with ease. Happy cooking!

Maple Glazed Carrots Flavorful and Simple Recipe

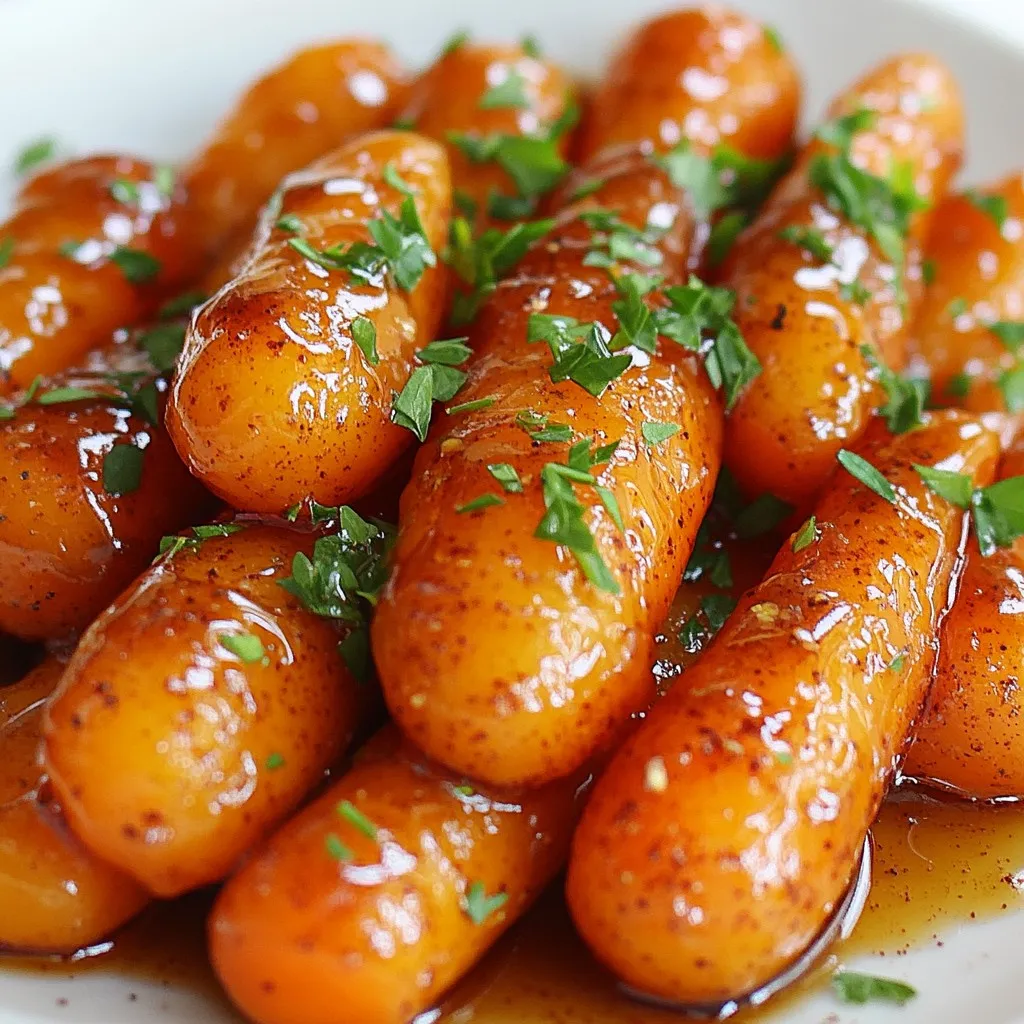
Maple glazed carrots are a sweet and savory delight that anyone can master. This simple recipe brings out the natural

For this dish, you need 1 pound of chicken tenderloins. They are juicy and cook quickly. You can find them at any grocery store. Choose tenderloins that are fresh and look good. You will use 2 fresh jalapenos for heat and flavor. Chop them finely, and if you like it hotter, keep the seeds. Fresh ingredients make the dish vibrant. You also need 1 garlic clove, minced, to add depth to the glaze. For the glaze, gather these ingredients: - 1/4 cup honey - 2 tablespoons soy sauce - 1 tablespoon apple cider vinegar - 1 teaspoon ground cumin - Salt and pepper to taste - 1 tablespoon olive oil Honey gives sweetness, and soy sauce adds umami. Apple cider vinegar brings a touch of tanginess. Ground cumin adds warmth to the flavor. Salt and pepper enhance everything. Olive oil helps to cook the chicken nicely. With these ingredients, you will create a tasty glaze that coats the chicken perfectly. {{ingredient_image_1}} To start, grab a medium bowl. Add the finely chopped jalapenos, honey, soy sauce, apple cider vinegar, minced garlic, and ground cumin. Use a spoon to mix everything well. This glaze brings sweet and spicy flavors together. Next, take your chicken tenderloins and place them in a shallow dish or a zip-top bag. Pour half of the jalapeno glaze over the chicken. Make sure the chicken is well-coated. Cover the dish or seal the bag, then let it marinate. Aim for at least 30 minutes. You can also let it sit for up to 2 hours. This step makes the chicken taste even better. Now, it’s time to cook! Preheat your grill or frying pan to medium-high heat. Add the olive oil to the pan. Take the chicken from the marinade. Let any extra glaze drip off. Discard the leftover marinade to keep things safe. Cook the chicken tenderloins for about 5 to 7 minutes on each side. Use a meat thermometer to check; the inside should reach 165°F (75°C). You want a nice char on the outside. In the last minute of cooking, brush the remaining glaze on top. This adds more flavor and makes your chicken shiny. Once cooked, remove the chicken from the heat and let it rest for a couple of minutes. Slice the tenderloins and place them on a serving platter. Drizzle any leftover glaze on top. Finish by garnishing with fresh cilantro. Serve with lime wedges for a zesty kick. Enjoy your flavorful dish! To get the glaze just right, you want a nice balance. Start with equal parts honey and soy sauce. Honey adds sweetness, while soy sauce gives saltiness. If the glaze is too thick, add a splash of apple cider vinegar. This will help it flow better. If it’s too thin, add more honey. Stir until smooth. You want it to coat the chicken well but not drip off. Cooking chicken tenderloins can be simple. I prefer grilling or pan-frying. Both methods create a great char. Make sure your grill or pan is hot before adding the chicken. This helps lock in juices. Cook each side for 5-7 minutes. Check the internal temperature with a meat thermometer. It should reach 165°F (75°C). Letting the chicken rest for a few minutes keeps it juicy. Marinating is key for flavor. I recommend marinating the tenderloins for at least 30 minutes. For a deeper taste, go for 2 hours. The longer you marinate, the more the flavors soak in. Make sure to coat the chicken fully in the glaze. This will give you the best taste and help create a sticky, flavorful crust when cooked. Pro Tips Marination Time: For the best flavor, marinate the chicken for at least 2 hours, or even overnight if you have the time. Heat Level: Adjust the number of jalapenos based on your heat preference. Removing the seeds will reduce the spiciness. Grill Marks: To achieve beautiful grill marks, ensure your grill is preheated properly before adding the chicken. Resting the Chicken: Let the chicken rest for a few minutes after cooking to allow the juices to redistribute for more tender meat. {{image_2}} You can change the spice level to suit your taste. If you want more heat, leave the seeds in the jalapenos. For a milder dish, use fewer jalapenos or remove the seeds. You could also add a pinch of cayenne pepper or use a milder pepper like poblano. This way, everyone can enjoy the dish! Chicken tenderloins work great, but you can try other proteins too. Thin cuts of pork or beef can hold the glaze well. If you prefer seafood, shrimp or fish fillets can soak up the flavor. Just adjust the cooking time to ensure they cook through. Pair your jalapeno glazed chicken with tasty side dishes. A fresh salad with lime dressing adds a nice crunch. Rice or quinoa works well to soak up the glaze. Grilled vegetables like corn or bell peppers can also complement the meal. Don’t forget some warm tortillas for a fun twist! After you cook the jalapeno glazed chicken tenderloin, let it cool down first. Place the chicken in an airtight container. Make sure to store it in the fridge. It will stay fresh for about 3 to 4 days. If you have extra glaze, store it separately in a jar. To reheat the chicken, you can use a microwave or a skillet. If using a microwave, cover the chicken to keep it moist. Heat it for about 1-2 minutes. If using a skillet, add a bit of olive oil. Heat the chicken on medium heat for about 3-4 minutes, turning it often. You can freeze jalapeno glazed chicken tenderloin for up to 3 months. Wrap the chicken tightly in plastic wrap, then in foil. This keeps it from freezer burn. When you’re ready to eat it, thaw the chicken in the fridge overnight. After that, reheat it as mentioned above. If you need a honey substitute, try agave syrup or maple syrup. Both add sweetness like honey. You can also use brown sugar mixed with water for a similar effect. Each option will change the taste slightly, but they all work well in the glaze. To boost the spice, add more jalapenos to the glaze. You can leave the seeds in for extra heat. Another option is to mix in a pinch of cayenne pepper or red pepper flakes. If you want a different flavor, try adding sriracha or hot sauce. Yes, you can cook the chicken in the oven. Preheat the oven to 400°F (200°C). Place the marinated chicken on a baking sheet lined with parchment paper. Bake for about 20-25 minutes, or until the chicken reaches an internal temperature of 165°F (75°C). Brush additional glaze on before serving for more flavor. This blog post covered how to make delicious chicken tenderloins with a spicy jalapeno glaze. We looked at key ingredients, step-by-step cooking instructions, and helpful tips. I shared ways to adapt flavors and suggested storage methods for leftovers. Cooking can be fun and tasty with these easy ideas. Try out these tips and enjoy your meals! You’ll impress your family and friends with your skills.

Jalapeno Glazed Chicken Tenderloin Flavorful Dish

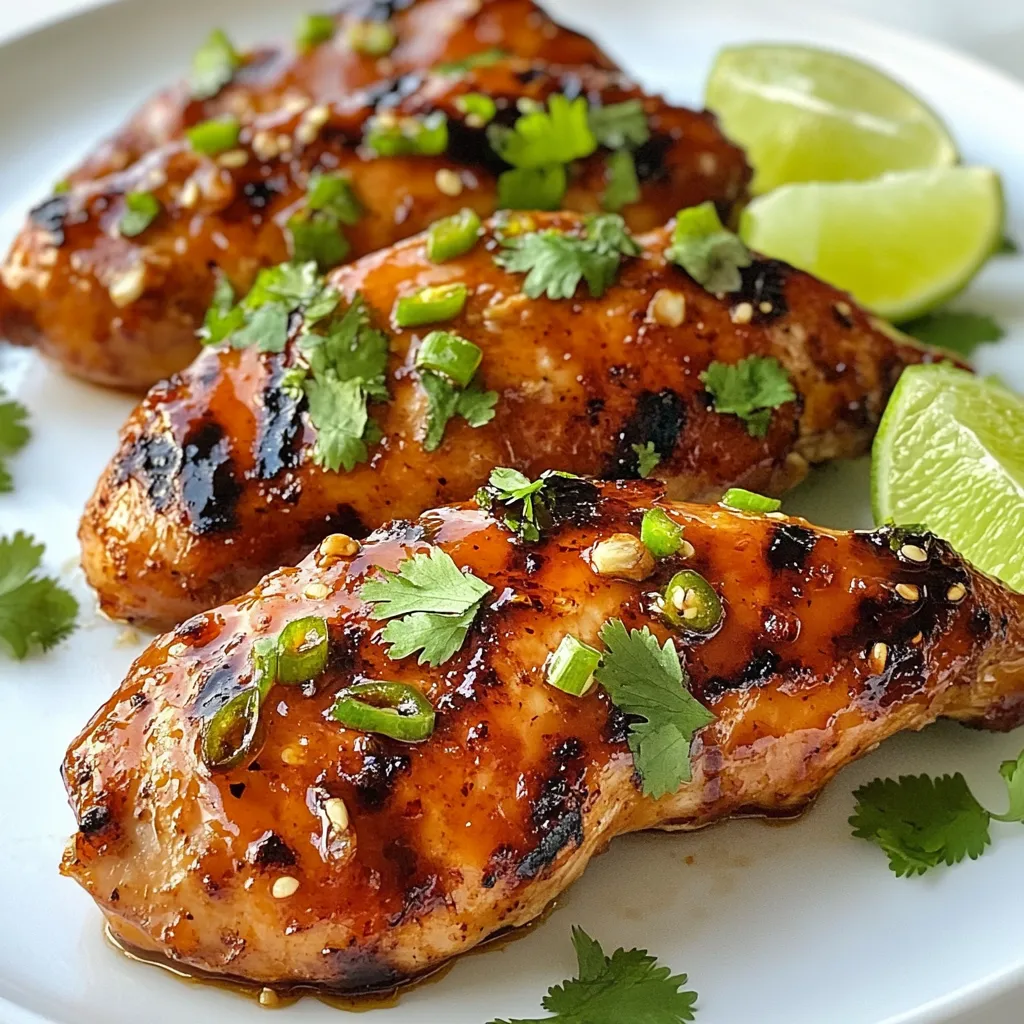
Looking to spice up your dinner routine? This Jalapeno Glazed Chicken Tenderloin is a must-try! With juicy chicken tenderloins paired

- 2 ripe avocados, peeled and pitted - 1/2 cup unsweetened cocoa powder - 1/3 cup maple syrup (adjust based on sweetness preference) - 1/2 cup almond milk (or any plant-based milk) - 1 teaspoon vanilla extract - 1/4 teaspoon salt - 1-2 tablespoons of coconut oil (melted, optional for extra creaminess) - Fresh berries - Mint leaves Using ripe avocados is key for creamy texture. They should feel soft but not mushy. Cocoa powder gives the mousse its rich taste. Adjust the maple syrup to fit your sweetness level. Almond milk works well, but any plant-based milk can be used. If you want an extra creamy mousse, add melted coconut oil. {{ingredient_image_1}} Start by gathering your ingredients. You will need: - 2 ripe avocados, peeled and pitted - 1/2 cup unsweetened cocoa powder - 1/3 cup maple syrup - 1/2 cup almond milk - 1 teaspoon vanilla extract - 1/4 teaspoon salt - 1-2 tablespoons of melted coconut oil (optional) - Fresh berries and mint leaves for garnish (optional) Make sure your avocados are ripe. They should feel soft when you press them. This is key for a smooth mousse. Next, add the avocados, cocoa powder, maple syrup, almond milk, vanilla extract, and salt into a food processor or blender. If you want extra creaminess, add the melted coconut oil too. Blend everything until it is smooth and creamy. Stop to scrape down the sides if needed. Taste the mousse once blended. If you want it sweeter, add more maple syrup. Blend again to mix it well. Now, transfer the mousse into serving bowls or glasses. Chill them in the fridge for at least 30 minutes. This helps the flavors blend and the mousse to firm up. When ready to serve, you can garnish with fresh berries and mint leaves for a nice touch. Enjoy your rich and creamy vegan chocolate avocado mousse! To get a smooth and creamy mousse, start with ripe avocados. They should feel soft but not mushy. When you blend, make sure to scrape down the sides often. This ensures even mixing. If your mousse is too thick, add a splash more almond milk. Blend again until it is just right. Not everyone likes the same sweetness. Start with 1/3 cup of maple syrup. Taste it after blending. If you want it sweeter, add more syrup a little at a time. Blend again. Remember, the flavor will deepen as it chills, so don’t overdo it at first. Always pick ripe avocados for the best flavor. Look for dark skin and gentle give when you press. If your avocados are not ripe, place them in a paper bag. This speeds up the ripening process. Store any leftover avocado in lemon juice to stop browning. Pro Tips Choose Ripe Avocados: Make sure your avocados are ripe for the creamiest texture; they should yield slightly to gentle pressure when squeezed. Adjust Sweetness to Taste: Everyone’s sweetness preference is different, so feel free to add more maple syrup gradually until you reach your desired level. Chill for Best Flavor: Allowing the mousse to chill for at least 30 minutes not only firms up the texture but also enhances the flavors. Add a Pinch of Spice: For an extra flavor boost, consider adding a pinch of cinnamon or cayenne pepper to the mixture for a unique twist. {{image_2}} You can enhance your vegan chocolate avocado mousse by adding flavors. A splash of espresso gives a deep coffee taste. This pairs well with chocolate. Just add one tablespoon of espresso powder when blending. If you love mint, try mint extract. Add just a few drops for a fresh twist. This will make your mousse taste like a dessert from a fancy restaurant. Maple syrup is great, but there are other options. You can use agave nectar or date syrup. Both work well with the mousse. They add sweetness without changing the flavor too much. Honey is not vegan, but if you don’t mind, it’s a good choice too. Adjust the amount based on how sweet you want your mousse. To make this mousse nut-free, swap almond milk for oat milk or coconut milk. Both are creamy and delicious. You can also leave out any nuts if you want a simpler recipe. Be sure to check for any soy in your other ingredients. This way, everyone can enjoy the mousse without worry. To store your Vegan Chocolate Avocado Mousse, place it in an airtight container. This keeps it fresh and prevents it from absorbing other smells. If you plan to serve it later, cover the top with plastic wrap. This helps avoid oxidation, which can change the color. When stored properly in the fridge, this mousse lasts about 3 to 5 days. The avocado may darken slightly, but it will still taste great. Always check for any off smells before eating. If it smells bad, it's best to throw it away. You can freeze the mousse if you want to save some for later. Just transfer it to a freezer-safe container. Make sure to leave some room at the top, as it may expand. To thaw, place it in the fridge overnight. Before serving, stir it well to get the texture back to creamy. Yes, you can use different types of milk. Almond milk works well, but you can try oat, soy, or coconut milk too. Each type gives a different flavor and creaminess. Just pick what you like best! To make the mousse less rich, reduce the amount of avocado. You can also add more almond milk. This will help lighten the texture while keeping it creamy. Adjust the cocoa powder to keep the chocolate flavor strong. Yes, avocado mousse is healthy! Avocados provide good fats, fiber, and vitamins. The cocoa powder is full of antioxidants. Using maple syrup as a sweetener adds minerals. This dessert is a tasty way to enjoy healthy ingredients. You can keep leftovers in the fridge for up to three days. Make sure to store it in an airtight container. The mousse may darken slightly but will still taste great. Just give it a good stir before serving. Absolutely! This mousse works well as a cake layer or filling. It adds a rich, creamy texture to cakes. Just make sure it is chilled and firm enough to hold its shape. Your guests will love this unique twist! This blog post covered making a delicious vegan chocolate avocado mousse. We looked at the key ingredients and how to prepare them. You learned step-by-step instructions, helpful tips for the perfect texture, and fun variations to try. We also discussed how to store your mousse properly. In conclusion, making this treat can be simple and rewarding. Enjoy your mousse, and feel free to experiment with flavors. You’ll impress everyone with your dessert skills and keep it healthy!

Vegan Chocolate Avocado Mousse Rich and Creamy Delight

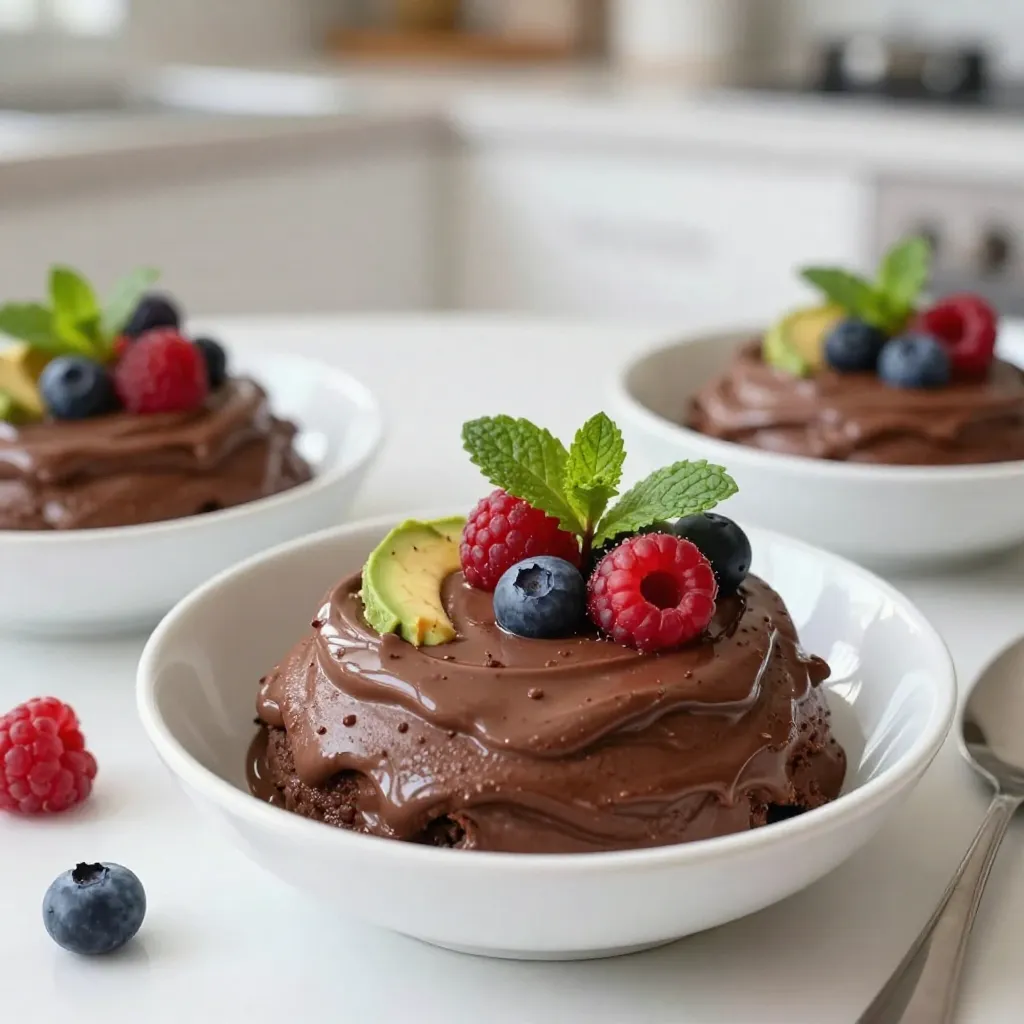
If you love rich desserts but want to stay healthy, you’ll adore this Vegan Chocolate Avocado Mousse. This creamy delight

To make delicious Raspberry Almond Linzer Cookies, you need several key ingredients. Here’s the list: - 2 cups all-purpose flour - 1 cup unsalted butter, softened - 2/3 cup powdered sugar - 1/2 cup almond meal - 1 egg yolk - 1 teaspoon vanilla extract - 1 teaspoon almond extract - 1/4 teaspoon salt - 1 cup raspberry jam - Powdered sugar for dusting These ingredients work together to create a rich, buttery cookie with a burst of raspberry flavor. The almond meal adds a nutty taste and a delicate texture, while the extracts enhance the cookie’s overall profile. The jam brings sweetness that balances the buttery and nutty elements perfectly. These cookies not only taste great but also look stunning with their jam-filled centers. {{ingredient_image_1}} - Preheat your oven to 350°F (175°C). Line two baking sheets with parchment paper. - In a large bowl, cream together 1 cup of softened butter and 2/3 cup of powdered sugar. Mix until light and fluffy. - Add 1 egg yolk, 1 teaspoon of vanilla extract, and 1 teaspoon of almond extract. Mix until fully combined. - Gradually sift in 2 cups of all-purpose flour, 1/2 cup of almond meal, and 1/4 teaspoon of salt. Mix on low speed until the dough comes together. - Divide the dough into two equal parts. Flatten each part into a disk and wrap in plastic wrap. Chill in the fridge for at least 30 minutes. - Take one disk out of the fridge. Roll it out on a lightly floured surface to about 1/8-inch thick. - Cut out cookie shapes with a cookie cutter. For half of the cookies, use a smaller cutter to create a window. - Place the cookies on the lined baking sheets. Bake for 10-12 minutes or until they are lightly golden. - Allow the cookies to cool completely on a wire rack. To make great dough, use softened butter. This helps it mix well with powdered sugar. It gives your cookies a nice texture. When you roll out the dough, keep it thick and even. Use a floured surface and a rolling pin. This makes cutting shapes easier. Try to keep the dough about 1/8-inch thick for the best results. To avoid over-baking, watch your cookies closely. Bake them until they are lightly golden. This usually takes 10 to 12 minutes. Check for doneness by looking at the edges. They should be firm but not hard. Remove them from the oven and let them cool on a wire rack. Dusting with powdered sugar adds a nice touch. Use a fine sieve to sprinkle it on top. This creates a lovely, snowy look. When layering your cookies, spread about 1 teaspoon of raspberry jam on the solid cookies. Then, gently place the cutout cookies on top. This makes each cookie look pretty and delicious. Pro Tips Chill the Dough: Chilling the dough for at least 30 minutes helps to solidify the butter, making it easier to roll out and cut into shapes without sticking. Use Fresh Jam: For the best flavor, opt for high-quality, fresh raspberry jam. Homemade jam can elevate these cookies to the next level! Even Baking: To ensure even baking, rotate the baking sheets halfway through the baking time, especially if your oven has hot spots. Dust Just Before Serving: Dust the cookies with powdered sugar just before serving to keep the sugar from dissolving into the jam. {{image_2}} You can change the jam in these cookies. While raspberry is my favorite, try strawberry, apricot, or even lemon curd. Each jam gives a new taste and adds fun. You can also mix in citrus zest. A little lemon or orange zest will brighten the cookies. It adds a fresh twist that pairs well with almond. If you need gluten-free cookies, substitute the all-purpose flour with a gluten-free blend. Make sure it has xanthan gum for the right texture. For a vegan version, use vegan butter instead of regular butter. Replace the egg yolk with a flaxseed meal mixed with water. These swaps keep the cookies tasty and perfect for all diets. Get creative with shapes! Use different cookie cutters for fun designs. You can even stack two cookies with jam in between for a sandwich look. For decoration, drizzle melted chocolate on top. Sprinkles or edible glitter can make them festive for parties. These small touches make your cookies stand out! To keep your Raspberry Almond Linzer Cookies fresh, choose the right container. I recommend using an airtight container. This will help lock in moisture. You can also use a cookie jar with a tight lid. Store them at room temperature. They will stay fresh for about one week. If you want them to last longer, consider freezing them. You can freeze unbaked dough to save time later. First, wrap the dough tightly in plastic wrap. Place it in a freezer-safe bag or container. It can stay fresh for up to three months. When you want to bake, thaw it overnight in the fridge. For baked cookies, let them cool completely before freezing. Layer them between parchment paper in an airtight container. They will keep well for up to three months, too. Just thaw them at room temperature before serving. Enjoy your cookies fresh and tasty! What can I substitute for almond meal? You can use ground walnuts or hazelnuts. They add a nice flavor. You can also use all-purpose flour if you want a nut-free option. Can I use store-bought dough? Yes, you can. Store-bought dough saves time. Just make sure it’s a sweet dough for best results. How do I store leftover raspberry jam? Keep it in an airtight container in the fridge. It lasts about two weeks. You can also freeze it for longer storage. Why are my cookies spreading too much? Cookies spread due to too much butter or warm dough. Make sure to chill the dough well. Also, check your oven temperature. How can I adjust baking time for a softer cookie? Reduce the baking time by one or two minutes. Check the cookies often. They should be light golden and soft to the touch. Best drinks to pair with Raspberry Almond Linzer Cookies Tea or coffee works well. A sweet dessert wine can also enhance the flavors. Try pairing with a fruity tea for a refreshing twist. Ideas for serving at various occasions These cookies shine at holiday parties or tea time. They also make great gifts. Present them in a cute box for friends and family. These Raspberry Almond Linzer Cookies are a delight to make and eat. You learned about the essential ingredients, easy steps, and tips for success. Experiment with flavors and decorations to make each batch unique. Store or freeze them to enjoy later. Baking should be fun, so don’t worry if things don’t go perfectly. With practice, you’ll create delicious cookies that impress everyone. Keep this guide handy, and let your baking journey continue!

Raspberry Almond Linzer Cookies Tasty and Delightful

If you love cookies that are both tasty and fun to make, you’re in the right place! Raspberry Almond Linzer

- 1 tablespoon olive oil - 1 onion, diced - 3 cloves garlic, minced - 2 medium carrots, diced - 2 celery stalks, diced - 1 lb (450g) cooked chicken, shredded - 4 cups chicken broth - 1 cup heavy cream - 1 cup frozen peas - 1 teaspoon dried thyme - 1 teaspoon dried rosemary - Salt and pepper to taste - 1/4 cup all-purpose flour (for thickening) - 2 tablespoons fresh parsley, chopped (for garnish) - 1 cup puff pastry sheets, thawed These ingredients create a warm and tasty soup. The olive oil adds flavor and helps cook the veggies. Onion and garlic bring a nice aroma. Carrots and celery add sweetness and crunch. Using cooked chicken makes it quick and easy. You can use leftover chicken from dinner. Chicken broth gives the soup depth. Heavy cream makes it rich and creamy. Frozen peas add color and sweetness. Thyme and rosemary provide a lovely herbal taste. Salt and pepper bring out all the flavors. All-purpose flour helps thicken the soup. Fresh parsley adds a pop of color on top. Finally, puff pastry sheets give a fun, flaky topping. They puff up in the oven, adding to the dish's charm. This comforting soup is perfect for any day. Enjoy making it with these simple and fresh ingredients! {{ingredient_image_1}} 1. Heat the olive oil in a large pot over medium heat. 2. Add the diced onion and sauté for about 3-4 minutes. You want it to turn translucent. 3. Next, stir in the minced garlic along with the diced carrots and celery. 4. Cook these veggies for 5-7 minutes. Stir occasionally until they become tender. 1. Now, add the shredded chicken to the pot. Mix it well to heat through. 2. Sprinkle the flour over the chicken and veggies. Stir to combine and cook for 1 minute. This helps cook off the raw flour taste. 3. Gradually pour in the chicken broth while you stir. This helps stop lumps from forming. 1. Bring the soup to a gentle boil and let it simmer for about 10 minutes. This is when the flavors meld together. 2. Reduce the heat to low. Stir in the heavy cream, frozen peas, thyme, rosemary, salt, and pepper. 3. Let it simmer for another 5 minutes. This will heat the peas through and let the flavors grow. 1. Preheat your oven to 400°F (200°C). 2. Roll out the puff pastry sheets. Cut them into rounds that fit over your soup bowls. 3. Spoon the hot soup into individual oven-safe bowls. Top each bowl with a puff pastry round. 4. Make a few small slits in the pastry. This lets steam escape while baking. 5. Bake in the oven for 15-20 minutes. Look for golden brown and puffed pastry. To make the best creamy chicken pot pie soup, pay attention to cooking times. Sauté the onions and garlic for 3-4 minutes. This step builds a strong flavor base. After adding carrots and celery, cook for 5-7 minutes. This keeps the veggies tender and tasty. Simmer the soup for at least 10 minutes after adding broth. This allows all the flavors to come together. The texture of the soup improves with proper simmering. When working with puff pastry, ensure it is cold but not frozen. Roll it out on a floured surface to avoid sticking. Cut it into rounds that fit your soup bowls. For a fun twist, use biscuit dough or phyllo dough if puff pastry is not available. These alternatives still give a nice texture on top of the soup. Add fresh herbs like parsley for a beautiful touch. It brightens the dish and adds flavor. You can also serve the soup on rustic wooden boards. This adds a homespun feel. For a complete meal, a side salad pairs nicely with this soup. Pro Tips Use Rotisserie Chicken: For a quicker option, use store-bought rotisserie chicken. It adds flavor and saves time on cooking the chicken from scratch. Season Gradually: Taste the soup as you go and adjust the seasoning gradually. This ensures you achieve the perfect flavor balance. Customize Vegetables: Feel free to add or substitute other vegetables like potatoes or green beans for variety and additional nutrients. Perfect Puff Pastry: To ensure a golden and crispy puff pastry, brush it with an egg wash before baking for an appealing finish. {{image_2}} You can swap chicken for turkey or tofu. Both options work well in this soup. Turkey adds a rich flavor, while tofu makes it lighter. For a creamy base, if you want a dairy-free option, use coconut milk or almond milk instead of heavy cream. This keeps the soup rich while meeting dietary needs. To boost flavor, add spices like paprika or cumin. These spices give the soup warmth and depth. You can also mix in veggies like corn or green beans for extra texture and color. Both options add a nice crunch and make the soup more filling. For a simpler cleanup, cook everything in one pot. Just sauté the veggies, add the chicken and broth, and finish with cream. This method saves time and still gives you a great dish. Adjust cooking times as needed. If you use a slow cooker, let it cook for 6 to 8 hours on low for a rich flavor. To store leftovers, let the soup cool first. Then, place it in an airtight container. This keeps it fresh. The soup stays good for about 3 to 4 days in the fridge. When you’re ready to eat, just heat it on the stove. Stir it well to keep it creamy. You can freeze the soup for up to 3 months. Make sure to let it cool completely. Pour it into freezer-safe containers, leaving space at the top. This helps it expand when frozen. For reheating, thaw it in the fridge overnight. Heat it on low in a pot, stirring often. If you plan to use puff pastry, store it separately. Freeze the pastry in its original packaging. This will keep it crisp when you bake it later. When you're ready, just thaw it in the fridge before use. Enjoy your creamy chicken pot pie soup fresh! You can pair this soup with many sides. A fresh green salad works great. The crisp greens balance the soup's creaminess. You can also serve warm bread or rolls. They soak up the soup and add texture. For a heartier meal, try serving it with mashed potatoes. The creamy soup and fluffy potatoes make a perfect match. Yes, you can prepare this soup ahead. Make the soup and let it cool down. Store it in an airtight container in the fridge. It stays fresh for up to three days. When you're ready to serve, reheat it on the stove. Add a splash of cream for extra richness. If your soup is too thin, there's an easy fix. Mix a bit of flour with cold water to form a paste. Stir it into the soup while it simmers. This helps thicken the soup without lumps. You can also let it simmer longer. This reduces the liquid and makes it creamier. Absolutely! Using rotisserie chicken saves time. It adds great flavor to your soup. Just shred the chicken and toss it in. This way, you skip cooking the chicken from scratch. It makes this dish quick and easy. Plus, you still get that delicious chicken taste. This article outlined how to create a delicious Creamy Chicken Pot Pie Soup. We covered ingredients, step-by-step instructions, and helpful tips. You can adapt the recipe with different proteins or healthy swaps. Remember to simmer for great flavor and keep your puff pastry fresh for the best results. With these insights, you can confidently make this comforting dish. Enjoy its warmth and flavor any time you want a quick meal at home. Happy cooking!

Creamy Chicken Pot Pie Soup Hearty and Comforting Dish

Looking for a warm, comforting dish that feels like a hug in a bowl? Try my Creamy Chicken Pot Pie

For this tasty dish, you will need: - 1 lb Brussels sprouts, halved - 2 tablespoons olive oil - Salt and pepper to taste - 3 tablespoons honey - 2 tablespoons Sriracha sauce - 1 tablespoon soy sauce - 1 tablespoon apple cider vinegar - 2 cloves garlic, minced - 1 teaspoon sesame seeds (for garnish) - 2 green onions, thinly sliced (for garnish) When measuring ingredients, use dry measuring cups for solids and liquid measuring cups for liquids. Quality matters! Choose fresh Brussels sprouts that are firm and bright green. Check honey for purity; raw honey offers great flavor. For Sriracha, pick a brand you enjoy. If you don't have Brussels sprouts, try green beans or cauliflower. You can swap olive oil with avocado oil for a different taste. Agave syrup or maple syrup can replace honey if needed. To make it gluten-free, use tamari instead of soy sauce. {{ingredient_image_1}} Start by washing the Brussels sprouts. Trim the ends and slice them in half. This helps them cook evenly. In a big bowl, mix the halved Brussels sprouts with olive oil, salt, and pepper. Make sure they are well coated. This will add flavor and help them roast nicely. While the Brussels sprouts roast, it's time to make the honey Sriracha sauce. In a small bowl, whisk together three tablespoons of honey, two tablespoons of Sriracha sauce, one tablespoon of soy sauce, one tablespoon of apple cider vinegar, and two minced garlic cloves. Taste the sauce. If you want it spicier, add more Sriracha. This sauce is sweet, spicy, and tangy, making it perfect for the sprouts. Preheat your oven to 400°F (200°C). Line a baking sheet with parchment paper for easy cleanup. Spread the Brussels sprouts cut side down on the sheet. Roast them for about 20-25 minutes. Flip them halfway so they cook evenly. Look for a golden brown color and a tender texture. After roasting, drizzle the honey Sriracha sauce over the sprouts while they are warm. Toss gently to coat them in the sauce. Then, return them to the oven for another 5-7 minutes. This caramelizes the sauce, adding extra flavor. Finally, garnishing with sesame seeds and sliced green onions adds a nice touch before serving. To get the best taste, aim for a sweet and spicy mix. Honey adds sweetness, while Sriracha brings heat. Use equal parts honey and Sriracha for a good start. Adjust the heat by adding more Sriracha if needed. The soy sauce adds umami, and the vinegar gives a nice zing. Taste as you mix the sauce to find your perfect balance. Avoid overcooking the Brussels sprouts. They should be tender but not mushy. If they cook too long, they lose flavor. Make sure to coat them well with olive oil before roasting. This helps them crisp up nicely. Also, don’t skip the extra roasting time after adding the sauce. This step caramelizes the sauce and adds flavor. Serve these sprouts as a side dish or main. They pair well with grilled chicken or fish. For a vegetarian option, try them with quinoa or rice. Garnish with sesame seeds and green onions for extra crunch. You can also serve them on a bed of greens for a fresh salad. Enjoy the sweet and spicy taste that everyone will love! Pro Tips Choose Fresh Brussels Sprouts: Look for bright green sprouts that are firm and compact. Avoid any that are yellow or wilted for the best flavor and texture. Adjust the Heat Level: If you prefer a milder dish, reduce the amount of Sriracha or substitute with a mild chili sauce for a similar flavor without the heat. Even Roasting: For uniform cooking, ensure the Brussels sprouts are spread out in a single layer on the baking sheet, cut side down, to achieve that perfect caramelization. Serve Immediately: For the best taste and texture, serve the Brussels sprouts right after roasting and coating with the sauce while they are still warm. {{image_2}} You can easily add protein to your Honey Sriracha Brussels sprouts. Cooked chicken, shrimp, or tofu work great. Try using one cup of cooked chicken, cut into pieces. For shrimp, use about 12 oz, peeled and deveined. If you prefer tofu, use firm tofu and cube it. Add your protein when you mix in the sauce. This makes the dish filling and tasty. If you want a vegan version, swap honey for maple syrup. This keeps the sweet taste without using animal products. You can also use coconut aminos instead of soy sauce for a soy-free option. The flavor will still be rich and delightful. This way, everyone can enjoy this amazing dish! To make the dish even more exciting, try adding different sauces or spices. You can mix in some lime juice for a fresh twist. Adding ginger gives a nice kick too. If you love heat, try chili flakes or cayenne pepper. These little changes can make a big difference. Get creative and make it your own! After enjoying your Honey Sriracha Brussels sprouts, let them cool completely. Place them in an airtight container. This keeps them fresh and prevents any odors in your fridge. Store them in the fridge for up to 3 days. Make sure you label the container with the date. This way, you will know when to eat them. To reheat the Brussels sprouts, use an oven for the best taste. Preheat it to 350°F (175°C). Spread the sprouts on a baking sheet and heat for about 10-15 minutes. You can also microwave them. Just place them in a microwave-safe dish, cover, and heat for 1-2 minutes. Stir halfway to ensure even warming. This keeps them tender without losing flavor. You can freeze the Brussels sprouts for longer storage. First, cool them completely and place them in a freezer-safe bag. Press out as much air as possible before sealing. They will stay good for up to 3 months. To enjoy them later, thaw them overnight in the fridge. Reheat them as mentioned above for the best results. Yes, you can prepare Honey Sriracha Brussels sprouts ahead of time. Roast the sprouts and let them cool. Store them in an airtight container in the fridge for up to three days. When you’re ready to serve, reheat them in the oven. This will help keep them crispy. These Brussels sprouts pair well with many dishes. Here are some ideas: - Grilled chicken or steak - Quinoa or rice bowls - Tofu or tempeh for a plant-based meal - A fresh salad for a light side These options will make your meal balanced and tasty. You can easily adjust the spice level. If you like it mild, use less Sriracha. If you want more heat, add more Sriracha sauce. Taste the sauce while mixing to find your perfect level of spice. Remember, you can always add more, but you can't take it out! We explored the key components for making delicious Honey Sriracha Brussels sprouts. You learned about the ingredients, how to prep, and the best roasting methods. I shared tips on flavor balance and common mistakes. You also discovered variations, storage methods, and answered common questions. Remember, cooking is about fun and creativity. Enjoy trying new twists and flavors while making this dish. Happy cooking!

Honey Sriracha Brussels Sprouts Flavorful and Simple Dish

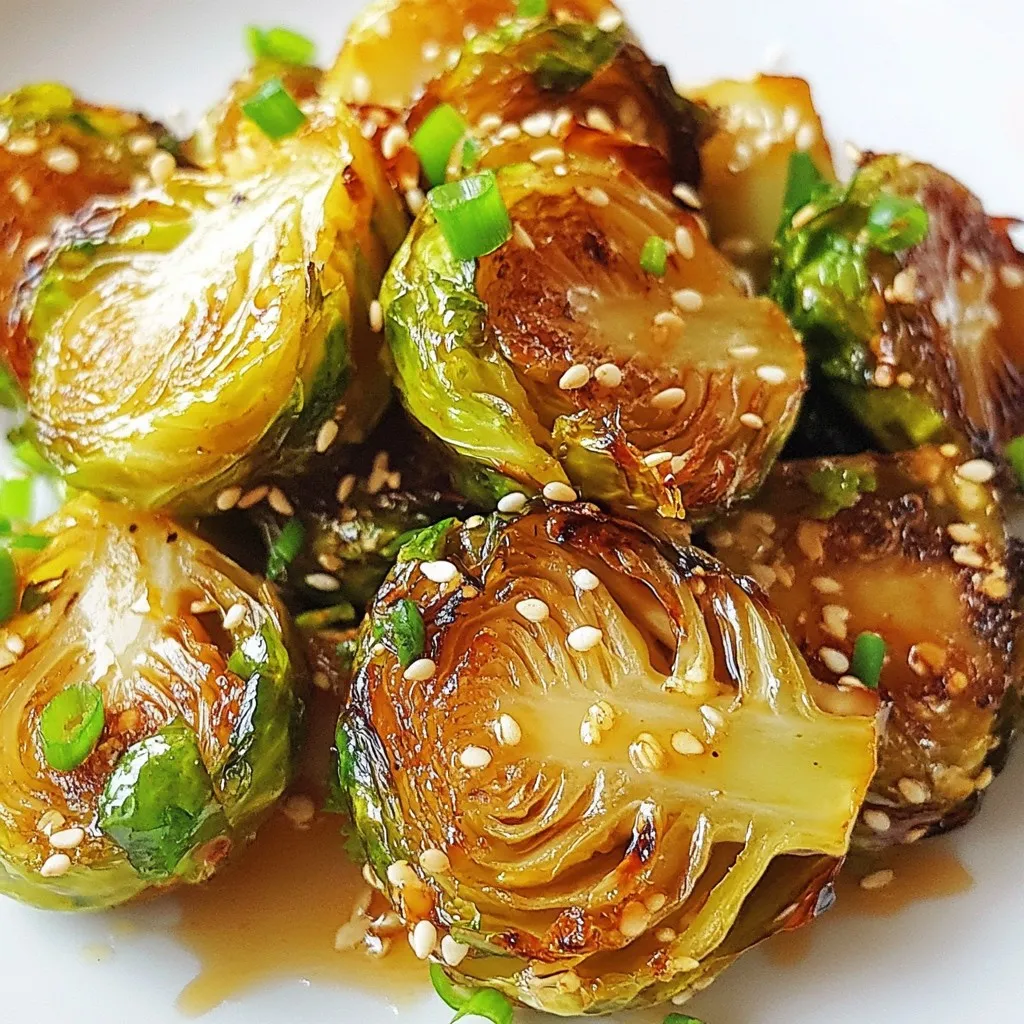
Looking for a dish that’s both sweet and spicy? Honey Sriracha Brussels sprouts are the answer! This simple recipe packs

- 1 cup almond butter - 1 cup rolled oats - ½ cup unsweetened shredded coconut The base of these bites starts with almond butter. It adds a creamy texture and nutty flavor. Rolled oats give these snacks a hearty feel. They also provide fiber, making you feel full. Unsweetened shredded coconut brings sweetness without added sugar. It adds a chewy texture that complements the other ingredients. - ¼ cup honey or maple syrup - 1 teaspoon vanilla extract For sweetness, you can choose honey or maple syrup. Both options add natural sugars that enhance flavor. Honey offers a floral taste, while maple syrup provides a warm note. Vanilla extract rounds out the flavors, adding a comforting aroma. This combination makes these bites taste like dessert but keeps them healthy. - ⅓ cup mini chocolate chips - ¼ cup chopped almonds - A pinch of sea salt Mini chocolate chips add a fun chocolatey bite. They make these snacks feel like a treat. Chopped almonds add crunch and more nutty flavor. Sea salt brings all the flavors together. Just a pinch enhances the sweetness and balances the mix. These mix-ins create a delightful combination of taste and texture. {{ingredient_image_1}} To start, gather your ingredients. You need almond butter, rolled oats, shredded coconut, honey or maple syrup, and vanilla extract. 1. In a large bowl, combine the almond butter, rolled oats, shredded coconut, honey (or maple syrup), and vanilla extract. 2. Use a spatula to mix well. Mix until every ingredient blends into a thick batter. 3. Next, add the mini chocolate chips, chopped almonds, and a pinch of sea salt. Stir these in until evenly mixed. Mixing well ensures that each bite has a burst of flavor. I always use a spatula to make sure I get every last bit of goodness. After mixing, cover the bowl and refrigerate the mixture for about 30 minutes. Chilling is important. It helps the mixture firm up, making it easier to handle. If you skip this step, the mixture might be too sticky. Taking this time to chill will save you from a messy kitchen. A well-chilled mix rolls better into bite-sized balls. Once chilled, it’s time to shape your energy bites. 1. Remove the bowl from the fridge. 2. Using your hands, scoop out small portions, about 1 tablespoon each. 3. Roll each portion into a ball. Aim for a size that fits nicely in your palm. A tip: Wet your hands slightly to prevent the mixture from sticking. Place the rolled bites on a parchment-lined baking sheet. This keeps them from sticking to the surface. Store the energy bites in the fridge until you're ready to enjoy them. They make for a quick and tasty snack! Before you roll your bites, chill the mixture. Refrigerate it for about 30 minutes. This helps the mixture firm up. A firmer mixture means less mess when you shape them. If it feels too sticky, a quick chill does wonders. You can make these bites even better. Try adding more mix-ins. Dried fruit like raisins or cranberries adds chewiness. You can also add seeds like chia or flax for crunch. If you want a sweeter bite, add more honey or maple syrup. Adjust sweetness to fit your taste. Serve your energy bites in a colorful bowl. A wooden platter gives a nice rustic touch. For fun, sprinkle extra chocolate chips and coconut flakes on top. This adds color and makes them look fancy. Enjoy them as a tasty snack or after a workout! Pro Tips Use Natural Sweeteners: Instead of honey or maple syrup, try using agave syrup or date syrup for a vegan-friendly option. Customize Your Mix-ins: Feel free to add in any nuts, seeds, or dried fruits for added flavor and texture—get creative! Storage Tips: Store the energy bites in an airtight container in the fridge for up to a week, or freeze them for longer storage. Make it a Family Activity: Involve kids by letting them roll the mixture into balls—it's a fun way to bond while making a healthy snack! {{image_2}} If you want a nut-free version, use sunflower seed butter. This butter gives a similar texture and taste. You can also try tahini. It adds a unique flavor while keeping it nut-free. Both options work well in this recipe. You can add spices to change the taste. Try a pinch of cinnamon for warmth. A little nutmeg gives a cozy vibe too. For a fun twist, add a drop of almond or coconut extract. These small changes can make your bites taste special. To make these bites gluten-free, use gluten-free oats. Most rolled oats are safe, but check the label. You can also swap honey for agave syrup for a vegan option. These adjustments will keep your energy bites tasty and friendly for all diets. Store your Almond Joy Energy Bites in the fridge. This keeps them fresh for longer. Place them in an airtight container. This helps prevent them from drying out. You can stack the bites in layers, but separate them with parchment paper. This way, they won’t stick together. You can also freeze these energy bites. To freeze, place them on a baking sheet. Make sure they are not touching. Freeze for about an hour until solid. Once frozen, transfer them to an airtight container or a freezer bag. Label the bag with the date to keep track. When you want to eat them, take out the bites and let them thaw. You can leave them at room temperature for about 30 minutes. If you want a quick snack, you can eat them frozen, too! They still taste great. Almond Joy Energy Bites last about one week in the fridge. Keep them in an airtight container. If you freeze them, they can last up to three months. Just thaw them in the fridge before eating. Yes, you can use different nut butters. Almond butter adds a nice flavor, but peanut butter works too. Cashew butter is another great option if you want a milder taste. Just remember that the texture may change slightly. Yes, these bites can be vegan-friendly. Use maple syrup instead of honey. All the other ingredients are plant-based. It’s a tasty snack for anyone following a vegan diet. Each Almond Joy Energy Bite has about 100 calories. They contain 4 grams of protein and 7 grams of healthy fats. The bites also have around 10 grams of carbs. They provide a good balance of nutrients for a quick snack. You can make tasty Almond Joy Energy Bites using simple ingredients like almond butter, oats, and coconut. I shared easy steps to mix, chill, and shape these snacks. Remember to try different flavors and mix-ins to keep things fun. Storing bites properly helps them last longer. These bites are great for a quick snack or healthy treat. Enjoy making them your own with the tips provided. Healthy snacking has never been so easy!

Almond Joy Energy Bites Healthy Snack Alternative

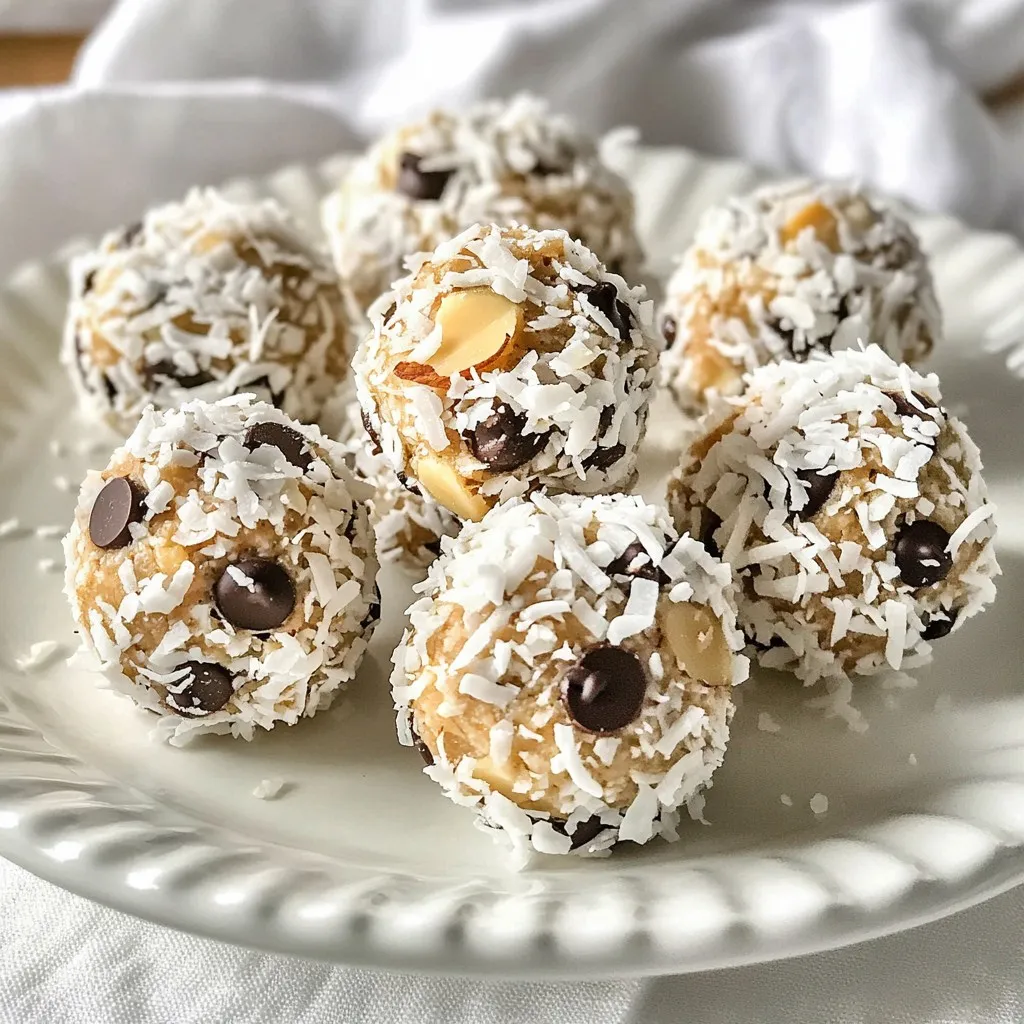
Looking for a healthy snack that’s quick to make and satisfies your cravings? I have just the treat for you:

To make Hamburger Potato Casserole, gather these items: - 1 lb ground beef - 4 medium potatoes, thinly sliced - 1 medium onion, chopped - 2 cloves garlic, minced - 2 cups shredded cheddar cheese - 1 cup sour cream - 1 cup beef broth - 1 teaspoon paprika - Salt and pepper to taste - 2 tablespoons olive oil - Fresh parsley for garnish (optional) You can swap some ingredients based on what you have. Ground turkey or chicken works well instead of beef. For a creamy twist, use Greek yogurt in place of sour cream. If you don't have cheddar cheese, try mozzarella or Monterey Jack for a different taste. To prepare this dish, you will need: - A large skillet for cooking the beef and onions - A 9x13 inch baking dish for layering - A sharp knife for slicing potatoes and chopping onions - A cutting board for safe food prep - Aluminum foil to cover the dish while baking These simple tools will help you create a tasty casserole with ease. Enjoy your cooking! {{ingredient_image_1}} Start by slicing the potatoes into thin rounds. Use a sharp knife for even cuts. Thin slices cook better and soak up flavor. Next, chop the onion into small pieces. This helps it mix well with the beef later. Set both the sliced potatoes and chopped onion aside. Heat olive oil in a large skillet over medium heat. Add the chopped onions to the pan. Cook them until they are soft and clear, about 3 minutes. Then, add minced garlic and stir for 30 seconds. This brings out the garlic flavor. Now, add the ground beef. Use a spoon to break it apart. Season with paprika, salt, and pepper. Cook until the beef is brown and no longer pink, about 5-7 minutes. Drain any fat from the skillet before using it. Grease a 9x13 inch baking dish with oil. Start with half of the sliced potatoes at the bottom. Spread half of the cooked beef mixture over the potatoes. Next, add half of the sour cream and half of the cheddar cheese. Repeat this layering with the remaining potatoes, beef, sour cream, and cheese. Finally, pour beef broth evenly over the whole dish. This liquid helps keep the casserole moist. Cover it with foil and bake at 375°F for 45 minutes. Remove the foil and bake for 15 more minutes until the cheese is bubbly and golden. Let it cool for 10 minutes before serving. Enjoy! For the best potatoes, use medium-sized ones. Slice them thin, about 1/8 inch thick. This helps them cook evenly. Layer them in the dish without over-crowding. If you want more flavor, soak them in cold water for 30 minutes. This removes excess starch. It helps them get a lovely texture when baked. To make your casserole super cheesy, use a mix of cheeses. Cheddar is great, but add mozzarella for extra stretch. Grate your cheese fresh instead of using pre-shredded. Fresh cheese melts better and tastes creamier. You can also add cheese in layers, not just on top. This gives every bite a cheesy surprise! To cut down on prep time, use a food processor for slicing. It saves you lots of time and effort. You can also prepare the beef mixture ahead of time. Store it in the fridge overnight. When you're ready to bake, just layer the ingredients and pop it in the oven. This makes for an easy weeknight dinner! Pro Tips Pre-cook your potatoes: To ensure your potatoes are perfectly tender, consider parboiling them for a few minutes before layering them in the casserole. This will help them cook evenly and absorb more flavor. Cheese variations: Feel free to mix different types of cheese for added flavor. A combination of cheddar and mozzarella can give a delightful texture and taste. Make it ahead: This casserole can be assembled a day in advance. Just cover it tightly and store it in the fridge. When ready to bake, add a few extra minutes to the cooking time. Garnish for freshness: Fresh herbs like chives or thyme can elevate the dish's presentation and add a pop of freshness. Sprinkle them on just before serving. {{image_2}} You can easily make a vegetarian version of this dish. Instead of ground beef, use lentils or mushrooms. Both add a hearty texture. For cheese lovers, swap the cheddar for a plant-based cheese. Also, add some chopped bell peppers for extra flavor. This version keeps all the comfort while being meat-free. For those who enjoy heat, try adding jalapeños. Chop up one or two fresh jalapeños and mix them into the beef layer. You can also sprinkle some crushed red pepper flakes for an extra kick. This spicy twist adds a fun zing to the dish. Just be sure to adjust the heat level to your taste. If you want a lighter meal, consider using ground turkey instead of beef. It has less fat and works well in this recipe. You can also use low-fat cheese to cut calories. Another tip is to add more vegetables like spinach or zucchini. These changes keep the dish healthy without losing flavor. Store leftover Hamburger Potato Casserole in an airtight container. Make sure it cools first. Keeping it sealed helps prevent moisture loss and keeps it fresh. The casserole stays good in the fridge for about three to four days. To reheat, preheat your oven to 350°F (175°C). Place the casserole in a baking dish. Cover it with foil to keep it moist. Heat for about 20 to 25 minutes. If you want it extra crispy, uncover it for the last 10 minutes. You can freeze Hamburger Potato Casserole for later use. First, let it cool completely. Then, wrap it tightly in plastic wrap and foil. This way, it stays fresh for up to three months. When ready to eat, thaw it in the fridge overnight before reheating. Yes, you can prepare this casserole ahead. Make it up to the point before baking. Cover it tightly and store it in the fridge for up to 24 hours. When ready to cook, bake it straight from the fridge. You may need to add a few extra minutes to the bake time. This casserole pairs well with many sides. I love serving it with a fresh green salad. You could also add some crusty bread or steamed vegetables. If you want a bit of crunch, consider serving it with pickles or coleslaw. To change the serving size, you can easily adjust the ingredients. If you want more servings, double the amounts. For fewer servings, cut the amounts in half. Just remember to keep the same layers and baking times. You might need to change the pan size to fit the new amounts. In this post, we covered the key ingredients for Hamburger Potato Casserole. You learned about ingredient swaps and the tools needed. I walked you through step-by-step instructions, from preparing the ingredients to layering the dish. You also found handy tips for cooking and variations, including vegetarian options. Lastly, I shared best practices for storage and answered common questions. Making this dish can be easy and fun. Enjoy creating your own version!

Hamburger Potato Casserole Delightful Comfort Meal

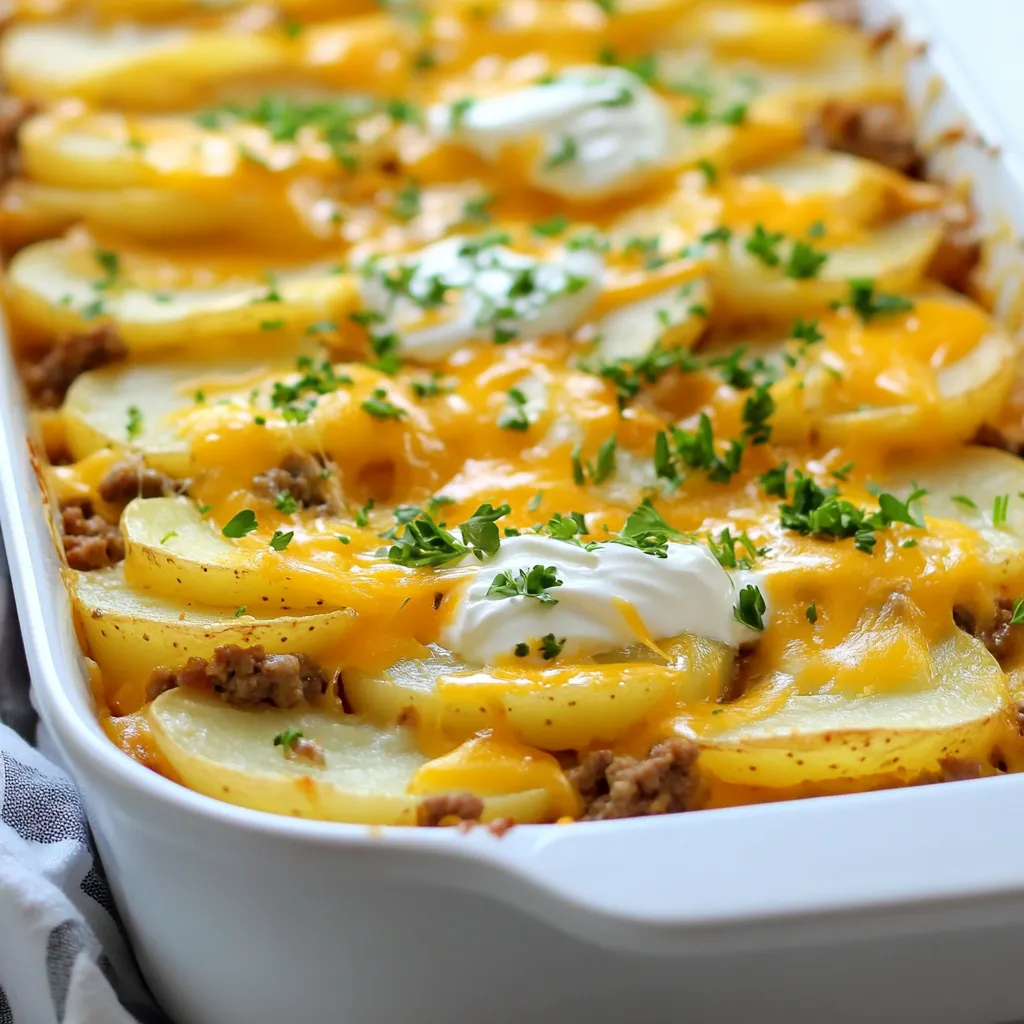
Welcome to the world of comfort food! In this post, I’ll show you how to make a Hamburger Potato Casserole

Older posts
Newer posts
← Previous Page1 … Page146 Page147 Page148 … Page164 Next →

dsad

© 2026 easycookingbite • Built with GeneratePress

Our Policies

  • Copyright Policy
  • Cookie Policy
  • GDPR Policy
  • Privacy Policy
  • Disclaimer
  • Terms Of Use

More Information

  • Home
  • About
  • Contact
  • Appetizers
  • Dessert
  • Dinner
  • Drinks
©2026, easycookingbite About Back To Top