Skip to content
DisclaimerTerms Of UseGDPR PolicyCookie Policy

easycookingbite

  • Home
  • Drinks
  • Appetizers
  • Dinner
  • Dessert
  • About
  • Contact
  • Privacy Policy
DisclaimerTerms Of UseGDPR PolicyCookie Policy

Lily

To make this delicious vegan sweet potato curry, you need some key items: - 2 medium sweet potatoes, peeled and diced - 1 can (400ml) coconut milk - 1 cup vegetable broth - 1 tablespoon coconut oil - 1 onion, finely chopped - 3 cloves garlic, minced - 1 inch ginger, grated - 1 tablespoon red curry paste - 1 teaspoon ground turmeric - 1 teaspoon ground cumin - 1 red bell pepper, diced - 1 cup spinach, fresh - Salt and pepper to taste These ingredients create a creamy base and rich taste. Sweet potatoes add natural sweetness and nutrients. The coconut milk gives the dish a smooth texture. You might already have some of these staples at home: - Salt - Pepper - Coconut oil - Ground turmeric - Ground cumin - Red curry paste These staples are easy to find. They help build a strong flavor for your curry. Garnishes can enhance your meal and add color. Here are some ideas: - Fresh coriander, for garnish - Cooked rice or quinoa, for serving You can also add a squeeze of lime for brightness. Serve the curry over rice or quinoa for a hearty meal. Enjoying it this way makes every bite even better! {{ingredient_image_1}} 1. Start with two medium sweet potatoes. Peel and dice them into small cubes. 2. Finely chop one onion. This adds great flavor to your curry. 3. Mince three cloves of garlic. Fresh garlic gives a nice aroma. 4. Grate one inch of ginger. This adds warmth and depth. 5. Dice one red bell pepper. This will add color and sweetness. 6. Gather the remaining ingredients: coconut milk, vegetable broth, coconut oil, curry paste, turmeric, cumin, spinach, salt, and pepper. 1. In a large pot, heat one tablespoon of coconut oil over medium heat. 2. Add the chopped onion and sauté for about 3-4 minutes. It should turn translucent. 3. Stir in the minced garlic and grated ginger. Cook for one more minute until it smells great. 4. Add one tablespoon of red curry paste, one teaspoon of ground turmeric, and one teaspoon of ground cumin. Mix these into the onions for two minutes. 5. Toss in the diced sweet potatoes and red bell pepper. Stir to coat them with the spices. 6. Pour in one can of coconut milk and one cup of vegetable broth. Stir well and bring to a simmer. 7. Cover the pot and let it cook for 20-25 minutes. Check that the sweet potatoes are tender. 8. Once done, mix in one cup of fresh spinach. Stir until it wilts. Season with salt and pepper to your liking. 1. Serve the curry hot over cooked rice or quinoa. This adds a nice base. 2. For garnish, sprinkle fresh coriander leaves on top. It looks beautiful and adds flavor. 3. Enjoy your creamy vegan sweet potato curry with family and friends. It’s perfect for sharing! To get the best texture in your curry, start with the right sweet potatoes. Choose firm, fresh sweet potatoes. Dice them into even cubes. This helps them cook evenly. When you simmer them in the coconut milk, they soften perfectly. You want a creamy sauce that coats the sweet potatoes well. Stir the curry gently during cooking to avoid breaking them apart. To boost the flavors, use fresh spices. Ground spices lose their strength over time. Use fresh ginger and garlic for a bright taste. The red curry paste adds heat and depth. Feel free to add a splash of lime juice at the end. This adds brightness to the dish. Fresh coriander on top also brings a fresh note. You can taste the layers of flavor with each bite. One common mistake is overcooking the sweet potatoes. They should be tender but not mushy. Keep an eye on the pot while it simmers. Another mistake is not seasoning enough. Taste your curry before serving. If it needs more salt or pepper, adjust it. Lastly, avoid using low-quality coconut milk. A good brand makes the curry rich and creamy. With these tips, you’ll create a delicious vegan sweet potato curry every time! Pro Tips Use Fresh Ingredients: Fresh spices and vegetables will enhance the flavor of your curry, making it more aromatic and vibrant. Adjust Spice Levels: Tailor the heat of your curry by adding more or less red curry paste according to your taste preference. Perfect Coconut Milk: For a creamier texture, use full-fat coconut milk. Shake the can well before opening to mix the cream and liquid. Leftover Love: This curry tastes even better the next day! Store it in the fridge for a quick, delicious meal. {{image_2}} You can add many vegetables to your vegan sweet potato curry. They enhance flavor and nutrition. Try adding: - Carrots, diced - Zucchini, diced - Cauliflower, florets - Peas, fresh or frozen These veggies cook well and blend nicely with sweet potatoes. They also add a nice crunch and color to the dish. Feel free to mix and match based on what you have at home. If you want extra protein, consider these options. Chickpeas add a great texture and flavor. They pair well with sweet potatoes. - Tofu, diced and fried - Tempeh, crumbled - Lentils, cooked and added at the end Each option gives a different taste and makes the meal heartier. It's easy to customize based on your taste and needs. You can adjust the heat level to suit your taste buds. If you love spice, add more red curry paste. For less heat, use less or skip it. - Try adding sliced jalapeños for fresh heat. - For a milder flavor, add more coconut milk. Taste as you go. This way, you can find the perfect balance for your curry. After enjoying your vegan sweet potato curry, you may have leftovers. To store them, let the curry cool to room temperature. Then, transfer it to an airtight container. This keeps the flavors fresh. You can store it in the fridge for up to three days. Just make sure the lid is on tight to prevent spills. If you want to keep the curry longer, freezing is a great option. Pour the cooled curry into a freezer-safe container. Leave some space at the top, as liquids expand when frozen. Seal the container well. You can freeze it for up to three months. When you're ready to eat, simply thaw it in the fridge overnight. To reheat your curry, you can use the stove or microwave. If using the stove, heat it in a pot over low heat. Stir it often to warm it evenly. If you prefer the microwave, place the curry in a microwave-safe bowl. Heat it in short bursts, stirring in between. This way, it warms up nicely without drying out. Enjoy your flavorful curry again! Yes, you can make this curry ahead of time. It tastes even better the next day! Just cook it as directed, let it cool, and store it in an airtight container in the fridge. When you’re ready to eat, simply reheat it on the stove. The flavors will blend more, making it extra tasty. If you want to change the coconut milk, you have options. Almond milk, cashew milk, or soy milk can work. For a creamier texture, use cashew cream. Just remember, this will change the flavor a bit. Try to pick a milk that is unsweetened to keep the curry savory. Yes, this recipe is gluten-free! All the ingredients, such as sweet potatoes, coconut milk, and spices, do not contain gluten. Just make sure any broth or red curry paste you use is gluten-free. It’s always good to check labels if you need to avoid gluten. This blog post covered a vegan sweet potato curry, from key ingredients to cooking tips. You learned which pantry staples to gather and how to enhance flavors. The step-by-step guide made it easy to follow along. Remember to store your leftovers properly, and you can even freeze portions. With these insights, you'll create a tasty dish that fits your needs. Enjoy your cooking adventure and have fun trying different spices and veggies! Your perfect curry awaits!

Vegan Sweet Potato Curry Flavorful and Easy Recipe

If you’re craving a warm, hearty meal that’s packed with flavor, this Vegan Sweet Potato Curry is the answer! This

To make delicious Chocolate Chip Banana Protein Muffins, you'll need simple ingredients that pack a punch. Here's what you need: - 2 ripe bananas, mashed - 1 cup rolled oats (or oat flour) - 1/2 cup vanilla protein powder - 1/2 cup almond milk (or any milk of choice) - 1/4 cup honey or maple syrup - 1/4 cup unsweetened cocoa powder - 1 teaspoon baking powder - 1/2 teaspoon baking soda - 1/2 teaspoon ground cinnamon - 1/2 cup dark chocolate chips - 1/4 teaspoon salt These ingredients blend together to create muffins that are moist and tasty. Ripe bananas add natural sweetness and moisture. Rolled oats or oat flour makes a great base, giving a hearty texture. The protein powder boosts nutrition, while almond milk keeps it light. Honey or maple syrup adds a hint of sweetness, and cocoa powder gives a rich flavor. Baking powder and baking soda help the muffins rise. Ground cinnamon adds warmth and spice. Dark chocolate chips are the star, providing bursts of sweet chocolate in every bite. With these ingredients, you’re ready to create muffins that are not just healthy but also fun to eat! {{ingredient_image_1}} First, preheat your oven to 350°F (175°C). This is key to getting even cooking. Next, line a muffin tin with paper liners or grease it with cooking spray. This step helps the muffins release easily after baking. In a large bowl, mash two ripe bananas. Add one cup of almond milk and a quarter cup of honey or maple syrup. Mix these until well blended. The bananas give moisture and natural sweetness. In another bowl, combine one cup of rolled oats, half a cup of vanilla protein powder, a quarter cup of cocoa powder, one teaspoon of baking powder, half a teaspoon of baking soda, half a teaspoon of cinnamon, and a quarter teaspoon of salt. Mixing these dry ingredients well ensures even flavor throughout the muffins. Gradually add the dry mixture to the wet ingredients. Stir gently until just combined. Be careful not to over-mix, as this can make the muffins tough. Then, fold in half a cup of dark chocolate chips. This adds a delightful chocolatey flavor. Divide the batter evenly among the muffin cups, filling each about three-quarters full. Bake in the preheated oven for 15-20 minutes. Check for doneness by inserting a toothpick into the center. If it comes out clean, the muffins are ready! Once baked, remove the muffins from the oven. Let them cool in the pan for about five minutes. Then, transfer them to a wire rack to cool completely. Enjoy them warm for the best flavor! To make perfect muffins, avoid over-mixing the batter. Mix just until you see no dry flour. Over-mixing makes the muffins tough. Proper baking time is also key. Bake for 15-20 minutes at 350°F. Check with a toothpick; it should come out clean. You can try different sweeteners in this recipe. Use coconut sugar or agave syrup instead of honey. Adding nuts or seeds can also boost texture. Chopped walnuts or chia seeds add great crunch and nutrition. Serve these muffins warm for the best taste. You can dust them with cocoa powder for a fancy touch. Add a few extra chocolate chips on top for a sweet look. For a creamy side, pair with a scoop of Greek yogurt. Pro Tips Use Overripe Bananas: The riper the bananas, the sweeter and more flavorful your muffins will be. Look for bananas with brown spots for the best results. Experiment with Sweeteners: Feel free to substitute honey or maple syrup with other sweeteners like agave or stevia, depending on your dietary preferences. Storing Muffins: Keep your muffins fresh by storing them in an airtight container at room temperature for up to 3 days, or refrigerate for up to a week. Freeze for Later: These muffins freeze well! Place them in a freezer-safe bag or container for up to 3 months. Simply thaw and enjoy whenever you crave a healthy snack! {{image_2}} To make these muffins vegan, swap the honey for maple syrup. Use plant-based protein powder. You can also choose almond milk or any plant milk you like. This keeps them tasty and healthy. For gluten-free options, use oat flour instead of rolled oats. Ensure your protein powder is gluten-free too. These changes make the muffins safe for those with gluten issues. You can switch up the fruits too. Try applesauce or diced peaches for a new taste. Mashed sweet potatoes also work well. Each fruit brings its own flavor to your muffins. When it comes to chocolate, dark chocolate chips are great, but feel free to mix it up. Use milk chocolate or even white chocolate chips. Each choice adds a unique twist to the muffins. If you want different protein powder flavors, go for chocolate or peanut butter. This adds a fun flavor kick. You can also use plant-based protein to keep it vegan. Natural protein boosters can enhance your muffins too. Try ground flaxseed or chia seeds. They boost protein and add more fiber. This makes your muffins even healthier while keeping them delicious. To keep your muffins fresh, use an airtight container. This helps them stay soft and tasty. You can store them at room temperature for up to three days. If you want to keep them longer, place them in the fridge. In the fridge, they will last about a week. If you want to save some muffins for later, freezing works great. First, let the muffins cool completely. Then, wrap each muffin in plastic wrap. Place the wrapped muffins in a freezer bag. This keeps them fresh and prevents freezer burn. When you are ready to eat them, take one out. Let it thaw at room temperature for about 30 minutes. You can also warm it in the microwave for 15-20 seconds for a delicious treat. To make your muffins fluffy, use fresh baking powder and baking soda. Mix the wet and dry ingredients separately before combining them. Be careful not to over-mix your batter. Over-mixing can lead to dense muffins. Stir just enough to blend the ingredients. You can use peanut butter, but it will change the texture. Peanut butter adds richness but can make the batter thicker. If you decide to use it, mix it with some water to thin it out. This way, your muffins will still bake evenly. You can use agave nectar or brown sugar as substitutes. If you prefer a sugar-free option, try using stevia or erythritol. Just remember to adjust the amount based on sweetness. Each sweetener has a different level of sweetness. These muffins can last up to five days at room temperature. Store them in an airtight container to keep them fresh. If you want to keep them longer, they can be frozen for up to three months. Yes, you can! Adding nuts or dried fruit can enhance the flavor and texture. Try walnuts, pecans, or raisins for different tastes. Just be sure to keep the total amount of mix-ins to about one cup. This helps the muffins rise properly. These muffins are simple and delicious. We used ripe bananas, oats, and chocolate chips for great flavor. The step-by-step guide makes baking easy. Don’t forget the tips for getting the best texture! You can customize these muffins for any diet too. Remember to store them right for freshness. Enjoy your baking, and feel free to get creative with flavors and add-ins!

Chocolate Chip Banana Protein Muffins Simple Recipe

Are you craving a tasty treat that’s both healthy and satisfying? Look no further! My simple recipe for Chocolate Chip

For this dish, you need just a few key ingredients: - 2 large chicken breasts - 1 cup fresh mozzarella cheese, shredded or cubed - 1/2 cup basil pesto (store-bought or homemade) - 1/2 cup sun-dried tomatoes, chopped These items blend well and create great flavors. Chicken breasts form the base. Mozzarella adds creaminess. Pesto gives it a fresh herb taste. Sun-dried tomatoes bring a sweet and tangy kick. To enhance the taste, use: - 1 teaspoon garlic powder - 1 teaspoon Italian seasoning - Salt and pepper to taste These seasonings are simple but powerful. Garlic powder adds depth. Italian seasoning brings warmth. Salt and pepper balance the flavors perfectly. You will also need: - 2 tablespoons olive oil - Fresh basil leaves for garnish (optional) Olive oil is key for cooking. It helps the chicken brown nicely. Fresh basil adds a pop of color and flavor at the end. This dish looks great and tastes even better. {{ingredient_image_1}} First, preheat your oven to 375°F (190°C). This helps cook the chicken evenly. Next, take the chicken breasts and lay them flat. Carefully slice each breast horizontally to create a pocket. Be careful not to cut all the way through. This pocket will hold the tasty filling later on. In a mixing bowl, combine 1 cup of shredded mozzarella cheese, 1/2 cup of basil pesto, and 1/2 cup of chopped sun-dried tomatoes. Mix these ingredients together until they blend well. This mixture adds great flavor and makes the chicken juicy. Now, take a large oven-safe skillet and heat 2 tablespoons of olive oil over medium heat. Once the oil is hot, gently place the stuffed chicken breasts into the skillet. Sear the chicken for about 4-5 minutes on each side until they turn golden brown. This step adds a nice crust. After searing, transfer the skillet to your preheated oven. Bake for 15-20 minutes, or until the chicken reaches an internal temperature of 165°F (75°C). Once done, let the chicken rest for a few minutes before slicing. This helps keep the juices inside. Enjoy your delicious Pesto Mozzarella Stuffed Chicken! To keep your chicken juicy, choose large, fresh breasts. Avoid overcooking them. Cook until they reach 165°F. Use a meat thermometer for best results. Searing the chicken first will lock in moisture. This method gives a nice, golden crust. Always let the chicken rest after baking. This step helps the juices stay inside. You can mix things up with the pesto filling. Try adding spinach for extra greens. Swap out mozzarella for goat cheese for a tangy twist. Add chopped olives for a salty bite. If you like heat, mix in red pepper flakes. This adds a nice kick to the flavor. Experiment with different herbs like thyme or oregano for a unique taste. To serve your dish beautifully, slice the chicken diagonally. This makes the filling visible and appealing. Drizzle extra pesto over the top for color and flavor. Add fresh basil leaves for garnish to brighten the plate. Serve on a nice platter to impress your guests. You can also pair it with a light salad or roasted veggies for a complete meal. Pro Tips Resting the Chicken: Allow the stuffed chicken to rest for a few minutes after baking. This helps the juices redistribute, ensuring a moist and flavorful bite. Homemade Pesto Option: If you have the time, consider making your own basil pesto. It enhances the flavor and freshness of the dish compared to store-bought versions. Adding More Veggies: Feel free to add spinach or arugula to the stuffing mixture for added flavor and nutrition. These greens complement the pesto beautifully. Serving Suggestions: Pair the stuffed chicken with a light salad or roasted vegetables for a complete meal. A side of garlic bread also makes a great accompaniment. {{image_2}} You can change up the cheese and pesto in this dish. Instead of mozzarella, try goat cheese or provolone for a different taste. For the pesto, you can use sun-dried tomato pesto or even spinach pesto. These swaps add new flavors to your meal while keeping it fun! You can cook the stuffed chicken in different ways. Grilling gives it a nice smoky flavor and crispy skin. To grill, preheat your grill and cook the chicken for about 6-7 minutes per side. Baking is another great option. It keeps the chicken juicy and is easy to do in the oven. Just follow the baking steps in the recipe for a perfect result. If you want a gluten-free version, just ensure your pesto and any other sauces are gluten-free. You can also make it dairy-free by using dairy-free cheese or omitting cheese altogether. For a vegan option, replace chicken with portobello mushrooms, and use vegan pesto. There are many ways to enjoy this dish while meeting different dietary needs! To keep your Pesto Mozzarella Stuffed Chicken fresh, place it in an airtight container. Make sure to let it cool first. Store it in the fridge for up to three days. If you see any signs of spoilage, such as a strange smell or color, it’s best to discard it. You can freeze this stuffed chicken for later use. Wrap each piece tightly in plastic wrap or foil. Then, place them in a freezer-safe bag. This method keeps out air and prevents freezer burn. You can freeze it for up to three months. To use, thaw it overnight in the fridge before reheating. To reheat your chicken without drying it out, use the oven. Preheat it to 350°F (175°C). Place the chicken in a baking dish and cover it with foil. Heat for about 15-20 minutes, or until it’s warm throughout. You can also use a microwave, but be careful not to overheat. This dish tastes best when it’s moist and flavorful. Pesto Mozzarella Stuffed Chicken will last for about 3 to 4 days in the fridge. To keep it fresh, store it in an airtight container. Make sure the chicken cools down before you put it in the fridge. This way, it won't spoil as quickly. Yes, you can make the filling ahead of time. Mix the mozzarella, pesto, and sun-dried tomatoes, then store it in the fridge. This will save you time when you're ready to cook. Just remember to use it within a day or two for the best taste. This dish pairs well with many sides. You could serve it with: - A fresh salad - Steamed vegetables - Garlic bread - Quinoa or rice These sides will balance the flavors and make your meal more complete. Enjoy your meal! In this post, I covered how to make Pesto Mozzarella Stuffed Chicken. You learned about the key ingredients like chicken, mozzarella, and basil pesto. I shared simple cooking steps and helpful tips to keep it juicy. You can try different fillings or cooking methods for variety. Remember, leftovers store well and can be frozen. Keeping these tips in mind, you can enjoy a delicious meal again or impress your guests. Now go ahead and cook up this flavorful dish!

Pesto Mozzarella Stuffed Chicken Simple and Flavorful

Want a dinner that impresses and satisfies? Pesto Mozzarella Stuffed Chicken is it! This dish is simple yet bursting with

To make creamy sun-dried tomato gnocchi, you need the following: - 1 pound gnocchi (store-bought or homemade) - 1 cup sun-dried tomatoes packed in oil, drained and chopped - 2 cups heavy cream - 1 cup grated Parmesan cheese - 3 cloves garlic, minced - 1 teaspoon dried basil - 1 teaspoon dried oregano - Salt and pepper to taste - Fresh basil leaves for garnish - 2 tablespoons olive oil If you want to switch things up, here are some great swaps: - Use cashew cream instead of heavy cream for a lighter option. - Try feta cheese instead of Parmesan for a tangy kick. - Use fresh tomatoes instead of sun-dried for a fresh burst of flavor. - Swap dried herbs with fresh ones if you have them on hand. Using fresh ingredients makes a big difference in taste. Fresh garlic packs more flavor than the dried stuff. Fresh basil adds a bright note that dried herbs can't match. Plus, fresh gnocchi is often softer and tastier than the packaged kind. Fresh ingredients help you create a dish that is not just good but truly delightful. Enjoying fresh flavors makes every bite special. {{ingredient_image_1}} First, boil water in a large pot. Add salt to the water. This adds flavor. Once it's boiling, add the gnocchi. Cook them until they float to the top. This takes about 2-3 minutes. Floating means they are done. Drain the gnocchi and set them aside for now. Next, heat olive oil in a large skillet over medium heat. Once the oil is hot, add minced garlic. Sauté it for about one minute. You want it fragrant but not burnt. Then, add the chopped sun-dried tomatoes, dried basil, and oregano. Stir and cook this for another 2 minutes. This lets the flavors mix well. Now, pour in the heavy cream and let it simmer. Lower the heat and add grated Parmesan cheese. Stir continuously until the cheese melts. If the sauce is too thick, add a splash of pasta water. This keeps the sauce creamy and smooth. Finally, add the cooked gnocchi to the skillet. Toss them gently in the creamy sauce until they are fully coated. Season with salt and pepper to taste. Once everything looks delicious, divide the gnocchi onto plates. Garnish with fresh basil leaves and a sprinkle of Parmesan. Enjoy your creamy sun-dried tomato gnocchi! When making creamy sun-dried tomato gnocchi, watch out for a few common slip-ups. First, don’t overcook the gnocchi. They should float in boiling water for only 2-3 minutes. If you leave them too long, they’ll turn mushy. Second, be careful with the garlic. Sauté it until fragrant, but don’t let it burn. Burnt garlic can make your dish taste bitter. Lastly, when mixing the gnocchi with the sauce, stir gently. This way, you won’t break the soft gnocchi. To make the flavors pop, add a bit of fresh lemon juice. A squeeze at the end brightens the dish. You can also toss in some red pepper flakes for heat. This adds a nice kick without overwhelming the dish. Don’t forget fresh basil leaves as a garnish. They add color and a burst of freshness. If you want a richer taste, try using aged Parmesan cheese. Its deeper flavor will elevate your creamy sauce. Serve your creamy sun-dried tomato gnocchi hot, right from the pan. It looks stunning on a white plate, garnished with basil. Pair it with a simple green salad for a fresh crunch. A crisp side of garlic bread is great too, perfect for soaking up extra sauce. For a drink, a light white wine like Pinot Grigio complements the dish well. This way, you create a lovely balance of flavors that makes each bite delightful. Pro Tips Use Quality Ingredients: Opt for high-quality sun-dried tomatoes and fresh Parmesan cheese for a richer flavor in your sauce. Don't Overcook the Gnocchi: Gnocchi should be cooked just until they float in the boiling water to maintain a soft texture. Customize the Creaminess: Adjust the amount of heavy cream based on your preference for a lighter or richer sauce. Garnish for Freshness: Always garnish with fresh basil just before serving for a burst of color and flavor. {{image_2}} You can add protein to your creamy sun-dried tomato gnocchi in many ways. Chicken is a great choice. Simply cook diced chicken breast in the skillet before adding garlic. Cook it until it’s golden brown. Shrimp is another tasty option. Sauté shrimp in olive oil until pink and tender. For a heartier meal, consider adding crispy bacon or sausage. Just cook them first, then mix them into the dish. This makes your meal more filling and flavorful. If you want a vegetarian version, skip the meat and add more veggies. Spinach or kale adds great color and nutrition. You can also use mushrooms for a hearty texture. For a vegan option, swap heavy cream with coconut cream or a cashew cream. Use vegan Parmesan cheese to keep the flavor. This way, you still enjoy a rich taste without animal products. Seasonal veggies can make your gnocchi even better. In spring, try adding asparagus or peas for fresh flavor. Summer is perfect for zucchini or bell peppers. In fall, add roasted butternut squash or mushrooms. Winter calls for hearty greens like Swiss chard or Brussels sprouts. Just sauté them with garlic before adding to the sauce. This keeps your dish exciting and full of seasonal goodness. Store your creamy sun-dried tomato gnocchi in an airtight container. Let it cool to room temperature first. Then, place it in the fridge. It stays fresh for about three days. If you want to keep it longer, freezing is a great option. When it's time to enjoy your leftovers, use a skillet. Heat it over medium heat. Add a splash of cream or water to keep it moist. Stir the gnocchi gently to warm it up. You can also use the microwave. Just cover it to avoid drying out. Heat in short bursts, checking often. To freeze, pack the gnocchi tightly in a freezer-safe container. Separate layers with parchment paper. It can last up to three months in the freezer. When ready to eat, thaw it overnight in the fridge. Then reheat it as mentioned. This keeps the flavors intact. Yes, you can! To make creamy sun-dried tomato gnocchi gluten-free, use gluten-free gnocchi. Many brands offer gluten-free options made from potato, rice, or a blend of flours. Check the label to ensure it fits your needs. The rest of the ingredients, like cream and sun-dried tomatoes, are naturally gluten-free. This way, everyone can enjoy this tasty dish. Making gnocchi from scratch is simple and fun. Here’s how: 1. Gather Ingredients: You need 2 pounds of russet potatoes, 1 cup of all-purpose flour, and 1 egg. 2. Cook Potatoes: Boil the potatoes in their skins until tender. This takes about 30 minutes. 3. Mash: Peel the potatoes and mash them until smooth. 4. Mix: In a bowl, combine the mashed potatoes, flour, and egg. Form a dough. 5. Shape: Divide the dough into small pieces. Roll each piece into a rope and cut into small pieces. 6. Indent: Use a fork to create ridges on each piece. This helps sauce stick better. 7. Cook: Cook the gnocchi in boiling water until they float, about 2-3 minutes. Now you have homemade gnocchi ready for your creamy sauce! When serving creamy sun-dried tomato gnocchi, think about light and fresh sides. Here are some great options: - Garlic Bread: Perfect for soaking up the creamy sauce. - Green Salad: A simple salad with mixed greens and vinaigrette adds freshness. - Roasted Vegetables: Colorful veggies like zucchini and bell peppers complement the dish well. - Steamed Broccoli: Adds a healthy crunch and balances the creaminess. These sides enhance your meal and create a lovely dining experience! This blog post covered everything you need for making creamy sun-dried tomato gnocchi. We explored the key ingredients, step-by-step instructions, and helpful tips. You learned to avoid common mistakes and enhance flavors. I shared variations for dietary needs and details on storage. In summary, this dish is fun and easy to make, with fresh ingredients bringing it to life. Enjoy trying new variations and sharing your cooking moments!

Creamy Sun-Dried Tomato Gnocchi Flavorful Delight

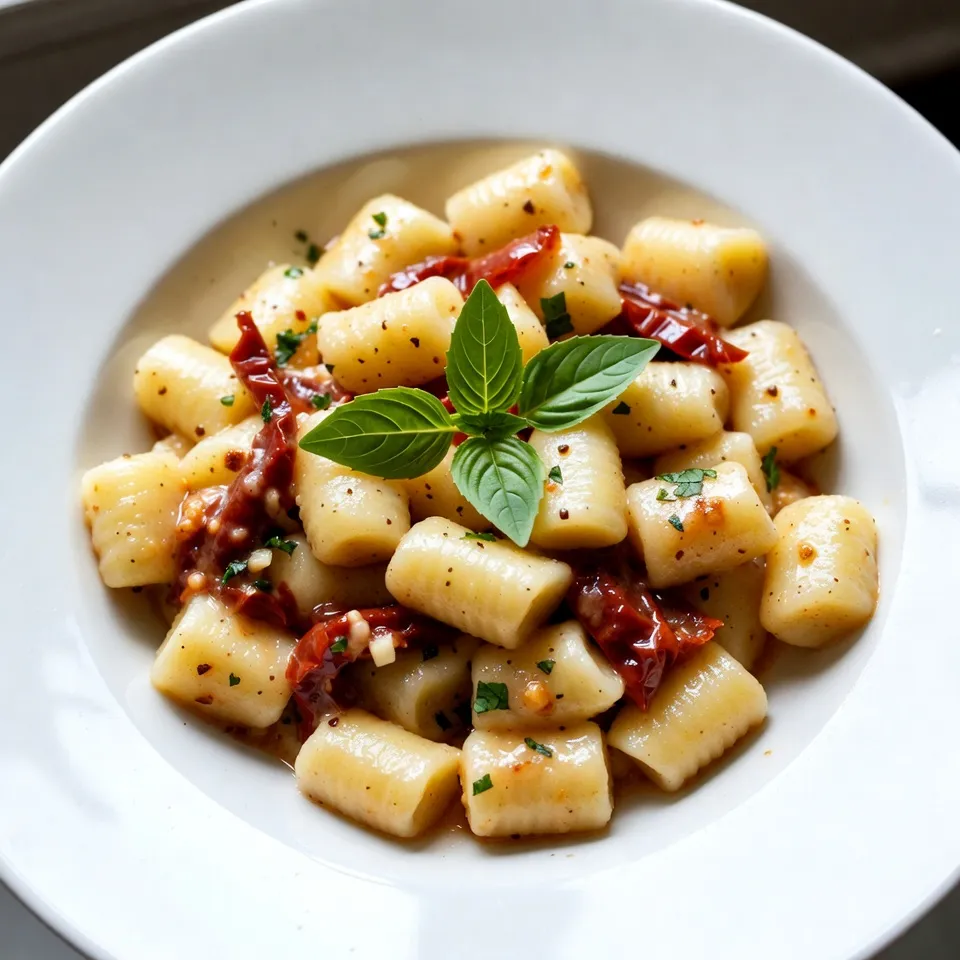
If you’re craving a tasty and cozy dish, look no further than creamy sun-dried tomato gnocchi! This recipe is rich,

- 1 cup unsalted butter (melted) - 2 cups granulated sugar - 4 large eggs - 1 teaspoon vanilla extract - 1 cup all-purpose flour - 1/2 cup unsweetened cocoa powder - 1/2 teaspoon baking powder - 1/4 teaspoon salt - 1/2 cup dark chocolate chips - 1/2 teaspoon peppermint extract - 1/4 cup crushed peppermint candies (for topping) - Optional: Whipped cream for serving In this recipe, I use simple ingredients to create a rich flavor. The melted butter adds moisture, while sugar gives sweetness. Eggs help bind everything together. The vanilla and peppermint extracts add a lovely aroma and taste. For the dry mix, I use all-purpose flour and cocoa powder. They create a chewy texture and a deep chocolate flavor. Baking powder helps the brownies rise. Salt enhances the sweetness, making the flavors pop. Dark chocolate chips give extra chocolatey goodness. They melt slightly in the oven, creating little pockets of chocolate. The crushed peppermint candies on top finish the brownies with a festive crunch. You can add whipped cream when serving for a creamy touch. This rich mix of flavors makes peppermint mocha brownies a perfect treat for the holidays. {{ingredient_image_1}} 1. Preheating the Oven Start by preheating your oven to 350°F (175°C). This makes sure your brownies cook evenly. Grease a 9x13 inch baking pan or line it with parchment paper. 2. Mixing Wet Ingredients In a large bowl, combine 1 cup of melted butter and 2 cups of granulated sugar. Mix until the mixture is smooth and glossy. Add 4 large eggs, one at a time, mixing well after each addition. Stir in 1 teaspoon of vanilla extract and 1/2 teaspoon of peppermint extract for that festive flavor. 3. Combining Dry Ingredients In a separate bowl, sift together 1 cup of all-purpose flour, 1/2 cup of unsweetened cocoa powder, 1/2 teaspoon of baking powder, and 1/4 teaspoon of salt. This helps to avoid lumps and ensures a nice texture. 4. Folding the Batter Gradually add the dry mixture to the wet ingredients. Use a spatula to fold gently until everything is combined. Avoid overmixing to keep your brownies soft. Then, fold in 1/2 cup of dark chocolate chips for extra richness. 1. Pouring Batter into Baking Pan Pour the brownie batter into the prepared baking pan. Use a spatula to spread it evenly. This helps them bake uniformly. 2. Baking Time and Temperature Bake in the preheated oven for 25-30 minutes. Keep an eye on them! A toothpick inserted in the center should come out with a few moist crumbs but not wet batter. 3. Checking for Doneness When done, remove the brownies from the oven. Let them cool in the pan for about 15 minutes. This cooling time makes them easier to cut. 1. Cooling Time After 15 minutes, let the brownies cool completely in the pan. This helps them firm up. 2. Topping with Crushed Peppermint Once cooled, sprinkle 1/4 cup of crushed peppermint candies on top. This adds a festive touch and a nice crunch. 3. Serving Suggestions Cut the brownies into squares. For a special treat, top each piece with whipped cream. Enjoy these festive delights with family and friends! To make the best peppermint mocha brownies, focus on texture. You want them soft and fudgy. Mix your batter just until you see no dry flour. Overmixing can make them tough. Store your brownies in an airtight container. This keeps them fresh for up to a week. If you want them to last longer, you can freeze them. Just wrap them well in plastic wrap. Add a bit of espresso powder to boost the mocha taste. Just one teaspoon can make a big difference. For chocolate, use a mix of dark and semi-sweet chips. This gives a nice depth of flavor. If you love peppermint, feel free to adjust the amount of peppermint extract. Start with half a teaspoon, and add more if you want a stronger flavor. The crushed peppermint candies on top add extra crunch and festivity! Pro Tips Use Quality Ingredients: The flavor of your brownies will greatly depend on the quality of the cocoa powder and chocolate chips you use. Opt for high-quality brands for the best results. Don't Overmix: When combining the wet and dry ingredients, mix just until combined to ensure your brownies remain fudgy and moist. Cool Before Cutting: Allow the brownies to cool completely in the pan before cutting them into squares. This will help them hold their shape and prevent them from falling apart. Experiment with Toppings: Feel free to get creative with the toppings! Consider adding chocolate ganache, marshmallows, or a drizzle of caramel for an extra special treat. {{image_2}} You can make this recipe your own with easy swaps. - Using coconut oil instead of butter: Coconut oil gives a rich flavor. Melt it like butter. Use it in the same amount for a fun twist. - Gluten-free options with almond flour: Almond flour works well for gluten-free brownies. Use one cup to replace all-purpose flour. It adds a nutty taste too! - Vegan substitutions for eggs: If you want a vegan treat, try using flax eggs. Mix one tablespoon of flaxseed meal with three tablespoons of water. Let it sit for five minutes before adding it to your mixture. Feel free to change up the flavors in your brownies. - Swapping out peppermint for other extracts: If peppermint isn’t your thing, try using orange or almond extract. Each brings a unique flavor that pairs well with chocolate. - Adding nuts or other candies to the mix: Chopped walnuts, pecans, or even caramel bits can enhance your brownies. Just fold them in gently after mixing the batter. - Creating a layered brownie dessert: You can layer your brownies with whipped cream or ice cream. Add chocolate sauce for a rich treat that impresses everyone! To keep your peppermint mocha brownies fresh, store them at room temperature. Place them in an airtight container. This helps prevent them from drying out. They will stay good this way for about three days. If you want them to last longer, refrigerate them. In the fridge, they can stay fresh for up to a week. If you choose to refrigerate, wrap the brownies tightly in plastic wrap first. This keeps the moisture in and the flavors intact. Just remember, cold brownies might be a bit firmer. Give them a few minutes at room temperature before serving. Freezing brownies is a great way to save them for later. First, cool the brownies completely. Then, cut them into squares. Wrap each square tightly in plastic wrap. After that, place them in a freezer-safe bag. This way, they won’t stick together. To defrost, take out the squares you want. Leave them in the fridge overnight or at room temperature for about an hour. Avoid using the microwave, as it can make them dry. Enjoy your brownies later without losing any flavor! Can I use chocolate syrup instead of cocoa powder? No, chocolate syrup will change the recipe. Cocoa powder gives brownies a deep flavor. If you use syrup, reduce the sugar and add flour to balance. How do I know when my brownies are done baking? Check the center with a toothpick. If it comes out with a few moist crumbs, they are ready. Don’t wait for clean, dry crumbs. What can I substitute for eggs in this recipe? You can use applesauce or mashed bananas. Use 1/4 cup for each egg. This keeps the brownies moist and adds a hint of sweetness. How can I make these brownies more festive for the holidays? Add holiday sprinkles on top or swirl in some white chocolate. You can also use crushed candy canes for extra peppermint flavor and a colorful look. Making brownies can be fun and easy with the right steps. We discussed key ingredients, mixing methods, and tips for perfecting your batch. Remember to avoid overmixing and try out different flavors or ingredients. You can even customize your brownies with fun toppings. Lastly, store them correctly to keep them fresh. Whether you want a classic or unique treat, you now have the tools to succeed. Enjoy your baking adventure and impress your friends and family with your tasty brownies!

Peppermint Mocha Brownies Irresistible Holiday Delight

Peppermint Mocha Brownies are the perfect treat for the holiday season! With rich chocolate and cool peppermint flavors, these brownies

- 1 lb sirloin steak, cut into 1-inch cubes - 4 tablespoons unsalted butter - 4 cloves garlic, minced - 1 teaspoon fresh rosemary, chopped - 1 teaspoon fresh thyme, chopped - 1 teaspoon smoked paprika - Salt and pepper to taste - Fresh parsley, chopped For this recipe, I use sirloin steak. It is tender and flavorful. Cut it into 1-inch cubes for even cooking. Next, I add unsalted butter. This gives the dish a rich taste. Garlic is a must for that savory punch. I always use fresh garlic, minced for the best flavor. For seasoning, I add chopped rosemary and thyme. They pair well with steak. Smoked paprika adds a nice depth. I season with salt and pepper to enhance all flavors. Finally, I use fresh parsley for garnish. It adds a pop of color and freshness. {{ingredient_image_1}} - Cut 1 pound of sirloin steak into 1-inch cubes. - Season the cubes with salt, pepper, and 1 teaspoon of smoked paprika. - Let the seasoned steak sit for about 15 minutes. This helps the flavors blend and brings out the taste. - In a large skillet, melt 2 tablespoons of unsalted butter over medium-high heat. - Wait until the butter bubbles. This means it's ready for the steak. - Add the steak bites in a single layer. - Sear them for 2-3 minutes without moving them. This creates a nice crust. - Flip the steak and sear for another 2 minutes for medium-rare. Cook longer if you want it more done. - Lower the heat to medium after searing. - Push the steak bites to one side of the skillet. - Add the remaining 2 tablespoons of butter, 4 minced garlic cloves, 1 teaspoon of chopped rosemary, and 1 teaspoon of chopped thyme. - Cook for 1 minute until you smell the garlic. Stir to mix it with the steak. - Drizzle the garlic butter over the steak bites and toss gently to coat. To get your steak bites just right, understand how steak cooks. The best doneness is medium-rare. This means the inside stays pink and juicy. Use a meat thermometer for accuracy. Aim for 130-135°F. Searing is key. Heat your skillet until it’s very hot. Add the steak in a single layer. Don’t move them too soon. Let them sear for 2-3 minutes. When they brown, flip them and repeat. This creates a tasty crust. Seasoning sets your dish apart. Adjust salt and pepper to your taste. Smoked paprika adds depth, but you can use more or less. Consider other herbs too. Fresh basil or oregano can brighten your bites. Mix and match to find what you love. Don’t be afraid to experiment with flavors. Make your dish look as good as it tastes. Use a large, clean plate for serving. Arrange the steak bites neatly. This makes the meal inviting. Garnish with fresh parsley for color. A sprinkle of herbs adds a nice touch. You can also drizzle extra garlic butter over the top. This highlights the flavors and makes it shine. Pro Tips Resting the Steak: Always let the steak rest for a few minutes after cooking. This allows the juices to redistribute, ensuring a juicier bite. Use a Hot Pan: Make sure your skillet is hot enough before adding the steak. A hot pan creates a great sear, locking in flavor and moisture. Quality Ingredients: Choose high-quality butter and fresh herbs for the best flavor. It makes a noticeable difference in the finished dish. Adjust to Preference: Feel free to adjust the cooking time based on your preferred doneness. Use a meat thermometer for precision—130°F for medium-rare. {{image_2}} You can try different cuts of steak for this dish. While sirloin is great, consider using flank steak or ribeye. Flank steak has a rich flavor, while ribeye is very tender. Both cuts will still give you tasty bites. You can even use pork or chicken if you prefer. Just adjust cooking times as needed. Want to spice things up? Add chili flakes for a kick. They enhance the flavor and make the dish exciting. You can also mix in fresh herbs like basil or oregano for a twist. Each herb brings its own unique taste. Experiment with what you have on hand! Think about what to serve with your steak bites. Pair them with roasted vegetables for a healthy side. Mashed potatoes are also a classic choice. If you want some sauce, a creamy garlic dip or chimichurri works well. These options make your meal more enjoyable and complete! Store any leftover Garlic Butter Steak Bites in an airtight container. They will stay fresh for up to three days in the fridge. When reheating, use a skillet over medium heat. This helps keep the steak juicy. Add a little butter to the pan for extra flavor. Heat for about 5 minutes or until warm. If you want to keep your steak bites longer, freezing is a great option. Place them in a freezer-safe bag. Be sure to remove as much air as possible. They can last for up to three months in the freezer. When you're ready to eat, thaw them overnight in the fridge. This method helps maintain texture and taste. Garlic Butter Steak Bites can last three days in the fridge. If kept in the freezer, they can be good for about three months. Check for signs of spoilage like a sour smell or discoloration. If you notice these, it's best to toss them out. Always trust your senses when it comes to food safety. Yes, you can use other cuts of steak. Here are some good substitutes: - Ribeye steak: This cut is rich and tender. - Filet mignon: Very tender and buttery. - Flank steak: Leaner but still flavorful. - Skirt steak: Great for quick cooking and flavor. Using these alternatives can change the taste and texture, so pick what you love. To make steak bites tender, follow these tips: - Choose the right cut: Look for cuts like sirloin or ribeye. - Don’t overcook: Aim for medium-rare to keep them juicy. - Let them rest: After cooking, let the steak rest for a few minutes. This helps the juices stay inside, making each bite tender and tasty. Steak bites pair well with many sides. Consider these popular options: - Garlic mashed potatoes: Creamy and rich, they complement the steak well. - Roasted vegetables: Carrots, broccoli, or asparagus add color and flavor. - Salad: A fresh salad can balance the richness of the steak. - Rice or quinoa: These grains soak up the delicious garlic butter. Mix and match these sides for a fun and tasty meal! In this blog post, we covered how to make delicious Garlic Butter Steak Bites. We explored key ingredients like sirloin steak, garlic, and herbs. You learned step-by-step instructions for preparation, cooking, and adding flavor. We also shared tips for achieving the perfect cook, variations to try, and storage tips for leftovers. Remember, small changes can elevate your dish. Enjoy experimenting with flavors and sides to make each meal special. Happy cooking!

Garlic Butter Steak Bites Savory and Quick Recipe

Love a meal that’s quick, tasty, and packed with flavor? You’ll adore my Garlic Butter Steak Bites! This savory recipe

- 1 lb fresh salmon, skinless and chopped - 1/2 cup breadcrumbs (preferably whole wheat) - 1/4 cup finely chopped fresh parsley - 2 green onions, finely sliced - 1 clove garlic, minced - 1 teaspoon Dijon mustard - 1 tablespoon lemon juice - Salt and pepper to taste - Olive oil for frying - 1 large ripe avocado - 1 tablespoon lime juice - 1 clove garlic, minced - Salt and pepper to taste - 2 tablespoons water (to thin if necessary) - Chopped herbs (dill or cilantro) - Different types of breadcrumbs - Alternative fish options (e.g., tuna, trout) The main ingredients set the stage for a tasty dish. Fresh salmon gives a rich flavor. Whole wheat breadcrumbs add texture and nutrition. Herbs like parsley and green onions brighten each bite. Garlic and mustard bring depth. Lemon juice adds a zesty kick. Don’t forget the salt and pepper to taste. Olive oil helps to fry the balls until golden. For the avocado sauce, ripe avocado is key. It adds creaminess and healthy fats. Lime juice brightens the flavor. Garlic gives a nice kick. Adjust salt and pepper for your taste. If the sauce is thick, add water to reach the right creaminess. Feel free to add chopped herbs to the salmon mix. Dill or cilantro can give new twists. You can swap breadcrumbs or use other fish. Tuna or trout can work just as well. This makes the dish flexible and fun! {{ingredient_image_1}} First, gather your ingredients. In a large mixing bowl, combine: - 1 lb fresh salmon, skinless and chopped - 1/2 cup breadcrumbs (preferably whole wheat) - 1/4 cup finely chopped fresh parsley - 2 green onions, finely sliced - 1 clove garlic, minced - 1 teaspoon Dijon mustard - 1 tablespoon lemon juice - Salt and pepper to taste Mix these ingredients well. Use your hands to combine them for the best result. You want a thick, sticky texture. If the mixture feels too dry, add a splash of water or more lemon juice. Now, it’s time to shape the mixture into balls. Take a handful of the mixture and roll it into a ball, about 1.5 inches in diameter. Use your palms to keep the shape round. To make sure they hold together during cooking, avoid overworking the mixture. If they seem too crumbly, add a bit more mustard or some olive oil. Set the formed balls aside on a plate while you heat the oil. Heat a generous amount of olive oil in a large skillet over medium heat. You need enough oil to cover the bottom of the pan. Once the oil is hot, gently place the salmon balls into the skillet. Do not overcrowd the pan; this helps them cook evenly. Cook each side for about 3-4 minutes until they turn golden brown. Make sure they are cooked through. Once done, remove them and drain on paper towels to absorb excess oil. - Use fresh herbs like parsley for a bright taste. - Dried herbs can work, but fresh packs more punch. - Add spices like garlic powder or paprika for warmth. - Experiment with salt and pepper to get the right balance. - Pan frying gives a crispy outside and soft inside. - Baking is healthier but may not be as crispy. - Use enough oil to cover the bottom of the pan. - Avoid overcrowding; leave space for even cooking. - If they stick, gently use a spatula to lift them. - Plate salmon balls on a colorful dish for a nice look. - Drizzle avocado sauce over the top for a pop of green. - Try adding a sprinkle of fresh herbs as a garnish. - Serve with sides like salad or roasted vegetables for balance. - Rice or quinoa also pairs well with these tasty bites. Pro Tips Fresh Salmon is Key: Always opt for the freshest salmon you can find to enhance the flavor and texture of your bliss balls. Breadcrumbs for Texture: Use whole wheat breadcrumbs for added nutrition and a delightful crunch in your salmon balls. Don’t Overcrowd the Pan: Fry the salmon balls in batches to ensure they cook evenly and achieve a perfect golden brown color. Adjust Avocado Sauce Consistency: If the avocado sauce is too thick, add water gradually until you reach a smooth, creamy consistency that’s perfect for drizzling. {{image_2}} You can add heat by mixing in chili flakes or diced jalapeños. This gives the salmon balls a nice kick. If you like smoky flavors, try adding smoked paprika or Old Bay seasoning. Both options enhance the taste without overwhelming it. Experimenting with spices can make the dish truly your own. While avocado sauce is great, you can try other dips too. A yogurt-based dip or tzatziki offers a refreshing twist. You can also explore different flavors for the avocado sauce. For example, adding herbs like cilantro or dill can change the taste. This way, every meal can be a new adventure. If you need a gluten-free version, there are easy swaps for breadcrumbs. You can use ground almonds or gluten-free breadcrumbs. Both maintain the texture and flavor of the salmon balls. To keep the taste rich, add more herbs or spices. This way, you won’t miss the gluten at all. To store leftover salmon balls, place them in an airtight container. Keep them in the fridge. They stay fresh for about 2-3 days. When reheating, use a skillet on medium heat. Add a little olive oil to help them warm evenly. This keeps them crispy. You can freeze salmon balls raw or cooked. For raw, shape them and place them on a baking sheet. Freeze until firm, then transfer to a freezer bag. For cooked balls, let them cool first. Then, place them in a container. Use them within three months for best taste. To thaw, place them in the fridge overnight. Reheat in a skillet for the best texture. Cooked salmon balls last 2-3 days in the fridge. Look for signs like a strange smell or change in color. If you notice either, toss them out. Trust your senses; they help keep you safe. Yes, you can use canned salmon. Just make sure it is drained and flaked. Canned salmon is a great time-saver. It also has a similar flavor profile. You can use crushed crackers or oats instead of breadcrumbs. Almond flour or cornmeal also works well. These options can add unique flavors and textures. To keep salmon balls from falling apart, ensure you're using enough binder. Breadcrumbs and mustard help hold them together. Chilling the mixture before shaping can also help. Yes, you can make the avocado sauce in advance. Store it in an airtight container. To prevent browning, add a little extra lime juice on top. Salmon balls are healthy! They are high in protein and omega-3 fatty acids. Omega-3s support heart health and brain function. The fresh ingredients also add vitamins and minerals. This blog post showed you how to make tasty salmon balls and a delicious avocado sauce. We discussed important ingredients, easy steps, and tips to enhance flavor. You learned how to store leftovers and even make gluten-free options. Make these salmon balls your own by trying different herbs, spices, or fish. Whether you share them with friends or enjoy them solo, these bites will impress. Happy cooking!

Savory Salmon Balls with Avocado Sauce Recipe

Are you ready to impress your family with a tasty treat? These savory salmon balls with creamy avocado sauce are

- 1 cup brewed espresso (or strong coffee) - 1 cup milk (dairy or non-dairy) - 2 tablespoons vanilla syrup - 2 tablespoons caramel sauce - Ice cubes - Whipped cream (optional for topping) - Extra caramel sauce for drizzling You will need a few simple ingredients to make your iced caramel macchiato. Start with one cup of brewed espresso or strong coffee. The coffee gives the drink its rich flavor. Next, you will need one cup of milk. You can use dairy milk or non-dairy options like almond or oat milk. The milk makes the drink creamy and smooth. For sweetness, grab two tablespoons of vanilla syrup. This adds a lovely flavor that blends well with the coffee. You will also need two tablespoons of caramel sauce. This is what makes the drink deliciously sweet and sticky. Don’t forget the ice cubes! They chill your drink and keep it refreshing. If you want to make it extra special, add whipped cream on top. Finally, drizzle some extra caramel sauce for that gourmet touch. With these ingredients, you are ready to create a delightful iced caramel macchiato at home. Enjoy the process, and get ready for a tasty treat! {{ingredient_image_1}} To start, brew your espresso or strong coffee. Use a coffee maker, espresso machine, or French press. The key is to have a rich, strong flavor. After brewing, let your coffee cool for a few minutes. This step keeps the ice from melting too fast. Grab a large glass. Pour 2 tablespoons of vanilla syrup into the bottom. This syrup adds sweetness and flavor. Next, fill the glass halfway with ice cubes. The ice keeps your drink cold. Now, pour in the milk until it reaches about an inch from the top. You can use any milk you like, such as dairy or almond. Finally, slowly pour the cooled espresso over the milk. This creates a lovely layered effect that looks beautiful. Now comes the fun part! Drizzle 2 tablespoons of caramel sauce over the top. This adds a sweet and sticky finish. If you want, you can also add whipped cream on top. It makes your drink feel even more special. Before you enjoy your drink, stir it gently. This mixes the flavors without losing the lovely layers. Now your iced caramel macchiato is ready to sip! To get that beautiful layered look, pour your espresso slowly over the milk. This helps keep the layers apart. Use a spoon to guide the espresso. Hold it just above the milk, then let it flow down. This method keeps the espresso on top. It makes your drink look fancy and inviting. Want to tweak the sweetness? You can add more or less vanilla syrup. Start with two tablespoons, then adjust to your taste. If you enjoy flavor, try different syrups like hazelnut or caramel. This lets you create your own unique drink every time. The milk you choose can change the taste. Whole milk gives a rich, creamy feel. Almond milk is lighter and adds a nutty taste. Oat milk is smooth and sweet. Each option changes the drink's flavor. Try different types to find your favorite. Pro Tips Fresh Espresso is Key: For the best flavor, use freshly brewed espresso or strong coffee. The richness will enhance the overall taste of your drink. Layering for Aesthetics: Pour the espresso slowly over the milk to create a beautiful layered effect. This not only looks appealing but also allows for a gradual mixing of flavors as you sip. Experiment with Milk Alternatives: Try using different types of milk, such as almond, oat, or soy, to find your preferred flavor and texture. Each will bring a unique twist to the classic macchiato. Customize Your Sweetness: Adjust the amount of vanilla syrup and caramel sauce to suit your taste. You can also try flavored syrups for a new dimension of flavor. {{image_2}} To make a classic Iced Caramel Macchiato, follow the traditional Starbucks style. Start with a cup of brewed espresso or strong coffee. Use one cup of milk, either dairy or non-dairy. In the bottom of a tall glass, add two tablespoons of vanilla syrup. Fill the glass with ice cubes, then add the milk. Pour the espresso over the milk slowly. This creates a beautiful layered look. Finally, drizzle two tablespoons of caramel sauce on top. Enjoy the rich flavors in every sip. You can add fun seasonal flavors to your Iced Caramel Macchiato. For a fall twist, try pumpkin spice. Simply add a pump of pumpkin spice syrup along with the vanilla syrup. In winter, peppermint syrup works great. Just replace the vanilla syrup with peppermint syrup for a refreshing taste. These small changes can make your drink feel festive and exciting. If you want a lighter option, there are simple swaps you can make. Use low-calorie sweeteners instead of regular syrup. Look for sugar-free vanilla and caramel syrups. You can also replace whole milk with almond or oat milk. These choices keep the flavor while reducing calories. This way, you can enjoy your drink and feel good about it too. To keep your drink fresh, store brewed espresso or coffee in the fridge. Use an airtight container. It stays good for up to three days. For the milk, keep it sealed in its original container. It needs to be refrigerated and used within a week. You can make parts of the drink ahead of time. Brew your espresso and cool it down. Store it in the fridge. This way, you save time on busy mornings. You can also measure out the vanilla syrup and caramel sauce. Just keep them ready for quick use. If you want to enjoy this drink later, you can freeze your espresso or coffee. Pour it into ice cube trays and freeze. When you are ready, blend the cubes into smoothies or other drinks. This gives you a tasty coffee flavor without brewing again. To make a dairy-free Iced Caramel Macchiato, use non-dairy milk. Some great options are: - Almond milk - Oat milk - Soy milk - Coconut milk Each of these milks adds its own taste. Almond milk is light and nutty. Oat milk is creamy and sweet. Soy milk offers a rich texture. Coconut milk gives a tropical vibe. Choose what you like best! Yes, you can make this drink without espresso. If you don’t have espresso, use strong brewed coffee instead. Look for coffee that is bold and rich. You can also try these alternatives: - Cold brew coffee for a smoother taste - Coffee concentrate for a stronger flavor These options will still give you a nice coffee taste in your drink. You can change the sweetness to fit your taste. Here are some easy tips: - Add more vanilla syrup for extra sweetness. - Use less vanilla syrup if you prefer it less sweet. - Try adding flavored syrups, like hazelnut or caramel, for a twist. Taste your drink as you go. This will help you find the perfect balance! You learned how to make a tasty iced caramel macchiato. Start with brewed espresso or coffee and choose your milk. Add sweeteners and layer your drink for a nice look. Customize it with different flavors or make a healthier version. Remember, practice will help you master this drink. Follow these tips for a great taste. Enjoy your drink today or save some for later. You can impress friends with your skills, too!

Iced Caramel Macchiato Copycat Deliciously Easy Recipe

Craving the sweet, creamy goodness of an Iced Caramel Macchiato? You’re in luck! I’ll show you how to make a

- 1 pound ground beef or turkey - 1 cup breadcrumbs - 1/4 cup finely chopped onion - 1/4 cup grated Parmesan cheese - 1 egg - 2 cloves garlic, minced In this recipe, I often use ground beef or turkey. They both add great flavor and texture. Breadcrumbs help bind the meat together, while Parmesan cheese gives a nice savory taste. Don't forget the onion and garlic; they add depth to your meatballs. The egg keeps everything moist and helps the meatballs hold their shape. - 1/4 cup soy sauce - 1/4 cup brown sugar - 1/4 cup ketchup - 1 tablespoon apple cider vinegar - 1 teaspoon cornstarch (optional for thickening) - 1/2 cup pineapple chunks - 1/2 cup chopped bell peppers For the sweet and sour sauce, I combine soy sauce, brown sugar, and ketchup. This mix creates a perfect balance of flavors. Apple cider vinegar adds tang and brightness. If you want your sauce thicker, use cornstarch. Pineapple chunks and chopped bell peppers bring sweetness and crunch, making each bite exciting. - Sliced green onions - Sesame seeds Adding sliced green onions and sesame seeds makes the dish pop. They add color and a bit of crunch. You can sprinkle them right before serving for the best look. Enjoy making your sweet and sour meatballs a fun family meal! {{ingredient_image_1}} To start, gather your ingredients. In a large bowl, combine: - 1 pound ground beef (or turkey) - 1 cup breadcrumbs - 1/4 cup finely chopped onion - 1/4 cup grated Parmesan cheese - 1 egg - 2 cloves garlic, minced - Salt and pepper to taste Mix everything well. Make sure to blend all the ingredients until they are evenly combined. Use your hands for the best results. This helps the meatballs hold together. If you overmix, they may turn tough. Just mix until you see no dry spots. Next, shape the mixture into meatballs. Aim for 1-inch balls. This size helps them cook evenly. Place the meatballs on a baking sheet lined with parchment paper. Make sure they have space between them. Preheat your oven to 400°F (200°C). Bake the meatballs for 20 minutes. They should be browned and cooked through. You can check doneness by cutting one open. It should not be pink inside. While the meatballs bake, let’s make the sauce. In a saucepan over medium heat, combine: - 1/4 cup soy sauce - 1/4 cup brown sugar - 1/4 cup ketchup - 1 tablespoon apple cider vinegar - 1 teaspoon cornstarch (optional) Stir well to mix. Bring the sauce to a simmer. Cook for 5-7 minutes. You want it to thicken slightly. If you find it too thin, add more cornstarch. If it’s too thick, just add a little water. This sauce will bring the sweet and sour flavor to your meatballs. To avoid dryness, use a mix of beef and breadcrumbs. This keeps the meatballs juicy. Make them about one inch wide. Bake them at 400°F for 20 minutes. Check they are golden brown and firm. If they feel too soft, they need more time. Taste your sauce as you cook. If it’s too sweet, add a splash of vinegar. If it’s too sour, stir in a little brown sugar. Fresh ingredients make a big difference. Use ripe pineapple and colorful bell peppers for the best taste. Serve meatballs on a bed of fluffy rice. This makes a nice base. You can also add steamed veggies for color and nutrition. For fun, sprinkle sliced green onions and sesame seeds on top. This adds crunch and looks great! Pro Tips Use Fresh Ingredients: Fresh pineapple and bell peppers not only enhance the flavor but also add vibrant color to your dish. Adjust the Sweetness: Feel free to tweak the amount of brown sugar based on your taste preference for a sweeter or tangier sauce. Experiment with Proteins: Try using ground chicken or even plant-based meat alternatives for different flavor profiles. Serve with Sides: Pair these meatballs with jasmine rice or quinoa for a complete meal that balances flavors and textures. {{image_2}} You can swap ground beef for ground turkey or chicken. This change makes the meatballs lighter. Ground turkey keeps the taste but cuts down on fat. If you prefer plant-based, use lentils or chickpeas. These options can make delicious vegetarian or vegan meatballs. Just add some oats or breadcrumbs to help bind them. The sweet and sour sauce can change with different fruits. Try mango, peach, or even orange for a fresh twist. Each fruit adds a unique flavor. Want a kick? Add some sriracha or chili flakes to the sauce. This gives the dish a spicy kick that many enjoy. For a fun party treat, make meatball skewers. Just thread cooked meatballs onto sticks with bell peppers and pineapple. Serve with the sauce on the side. You can also put meatballs in sandwiches or wraps. This creates a hearty meal that everyone loves. After enjoying your sweet and sour meatballs, store leftovers safely. Place them in an airtight container. You can also use a resealable plastic bag. Keep them in the fridge for up to three days. If you want to save them longer, freeze them. They can last up to three months in the freezer. To enjoy your meatballs again, reheat them properly. The best way is to use the oven. Preheat it to 350°F (175°C). Place the meatballs in a baking dish and cover them with foil. Heat for about 15 to 20 minutes. You can also use the microwave. Heat them in short bursts. Stir in between to keep them moist. This way, they will stay flavorful and tender. Making meatballs ahead is a great idea. You can shape them and freeze them before cooking. Place the raw meatballs on a baking sheet and freeze them for an hour. Once frozen, transfer them to a bag. Label the bag with the date. For cooking, bake them straight from the freezer. This saves time on busy days. You can use oats or crushed crackers. Both options work well in meatballs. Oats add a wholesome touch. Crushed crackers give a nice crunch. You can also try crushed cornflakes for a twist. Just use the same amount as breadcrumbs. Yes, you can absolutely use a slow cooker. To do this, first, shape your meatballs and then brown them in a skillet. This step adds flavor. After browning, place them in the slow cooker. Pour the sweet and sour sauce over them. Cook on low for 4-6 hours. This method makes the meatballs very tender. Check the meatballs for a few signs. They should be browned on the outside. The best way is to use a meat thermometer. The inside should reach 165°F (74°C). If you cut one open, it should be no longer pink. These tips help ensure you serve safe and delicious meatballs. Sweet and sour meatballs are a tasty dish everyone can enjoy. We covered the main ingredients, from the meatballs to the sauce. I shared step-by-step instructions for making them, including tips for texture and flavor. You can even customize the recipe with variations in protein or sauce. Store leftovers properly to keep them fresh. Whether for a family meal or a party, these meatballs are sure to please. Now, grab your ingredients and enjoy this dish that blends sweet and sour flavors perfectly!

Sweet and Sour Meatballs Flavorful Family Favorite

If you’re looking for a dish that the whole family will love, you’ve found it! Sweet and sour meatballs are

- 2 cups chow mein noodles - 1 cup butterscotch chips - 1/2 cup creamy peanut butter - 1/2 cup unsweetened shredded coconut - 1/2 cup mini marshmallows - 1/2 teaspoon vanilla extract - Pinch of sea salt To make Butterscotch Haystack Cookies, you need some fun and tasty ingredients. First, chow mein noodles give the cookies their unique shape and crunch. Butterscotch chips add sweetness and a rich flavor. Creamy peanut butter brings a smooth texture and adds depth. Unsweetened shredded coconut gives a tropical twist. Mini marshmallows add chewy bites that kids love. Vanilla extract boosts the flavors, and a pinch of sea salt balances the sweetness. You can find these ingredients at any grocery store. I recommend using high-quality butterscotch chips for the best flavor. If you want to try something new, swap creamy peanut butter for crunchy. This change adds texture and extra flavor. Get ready to create a delightful treat that everyone will enjoy! {{ingredient_image_1}} Start by melting the butterscotch chips and peanut butter. Take a medium microwave-safe bowl. Add the butterscotch chips and creamy peanut butter into the bowl. Microwave the mixture in 30-second intervals. Stir between each interval. Keep going until it’s smooth and melted, which takes about 1 to 1.5 minutes. Once melted, remove the bowl from the microwave. Now, stir in the vanilla extract and a pinch of sea salt. Mix it well until everything blends together. This mixture creates a rich and sweet base for your cookies. Next, it’s time to fold in the other ingredients. Gently add the chow mein noodles, shredded coconut, and mini marshmallows into the butterscotch mixture. Use a spatula to mix everything together. Make sure each piece is well coated with the butterscotch. This step gives your cookies their unique texture and taste. Now, drop the mixture onto a baking sheet. Use a spoon or cookie scoop to form heaping tablespoons. Shape them into little haystack forms. Line the baking sheet with parchment paper for easy cleanup. Once you’ve shaped all the cookies, it’s time to let them set. Allow the cookies to cool at room temperature for about 30 minutes. If you want to speed things up, place them in the refrigerator for about 10 to 15 minutes. After they cool, you can enjoy your tasty butterscotch haystack cookies! To get the right consistency, melt the butterscotch chips and peanut butter slowly. Use 30-second bursts in the microwave. Stir well in between. This helps avoid lumps. Once melted, add vanilla and salt for flavor. Cooling time is key. Let cookies cool at room temperature for about 30 minutes. If you’re in a hurry, the fridge works too. Just ten to fifteen minutes will set them nicely. One big mistake is overheating the mixture. If it gets too hot, the texture changes. It may become too runny or too hard. Always monitor your microwave time. Another mistake is not coating everything evenly. Make sure you fold in the chow mein noodles and other ingredients well. This ensures each bite is tasty. For serving, use a fun platter. You can add extra shredded coconut on top for flair. A drizzle of melted chocolate also adds a nice touch. Consider different shapes! If you want, form them into nests or other fun designs. This makes your cookies look even more inviting and special. Pro Tips Use Fresh Ingredients: Ensure that your coconut and marshmallows are fresh for the best flavor and texture in your cookies. Experiment with Add-ins: Feel free to add chopped nuts or dried fruits to customize your haystack cookies for a unique twist. Proper Melting Technique: When melting butterscotch chips and peanut butter, do it slowly and stir often to prevent burning. Storage Tips: Store cookies in an airtight container at room temperature to keep them fresh for longer. {{image_2}} You can change the nut butter in this recipe. Use almond butter or sunflower seed butter if you want a twist. Each choice adds its own taste and texture. Coconut is a fun ingredient too. If you don't like shredded coconut, try using chopped nuts or seeds. You can also mix in some chocolate chips for a sweet surprise. To spice things up, add a dash of cinnamon or nutmeg. These warm spices give the cookies a cozy flavor. You can also use a few drops of almond or coconut extract for extra depth. Fruits can enhance your cookies as well. Try adding dried cranberries or raisins. Fresh fruit like diced apples or bananas can also work, but be careful with moisture. For gluten-free cookies, use gluten-free chow mein noodles. Check the labels to ensure they are safe for your diet. This small swap keeps the taste while making it gluten-free. If you want vegan cookies, use dairy-free butterscotch chips. Replace the peanut butter with a nut-free option, like sunflower seed butter. This way, everyone can enjoy the cookies! To keep your Butterscotch Haystack Cookies fresh, store them at room temperature. Use an airtight container to shield them from air and moisture. This helps maintain their tasty crunch. You can keep them this way for up to a week. If you want to save them for later, refrigeration works too. Place the cookies in a sealed container and pop them in the fridge. They can last about two weeks this way. For even longer storage, consider freezing. Lay the cookies on a baking sheet until firm. Then transfer them to a freezer bag. They can stay fresh for up to three months in the freezer. Butterscotch Haystack Cookies are best enjoyed fresh but can last. When stored at room temperature, they last about a week. In the fridge, they last around two weeks. If frozen, they can be good for three months. Keep an eye out for signs of spoilage. If the cookies feel soft or have an off smell, it’s time to toss them. Always check for any changes in color or texture. Fresh cookies should be crunchy and look vibrant. To make these cookies gluten-free, swap chow mein noodles for gluten-free noodles. You can find them in most grocery stores. Be sure to check the labels to confirm they are gluten-free. Yes, you can use other chips if you want. Try chocolate chips or peanut butter chips for a different flavor. Your cookies will still be tasty and fun. To set the cookies fast, chill them in the fridge. Just 10 to 15 minutes will help them firm up nicely. This helps the cookies hold their shape better. If you are in a hurry, this is the best trick! This blog gave you all you need to make Butterscotch Haystack Cookies. You learned the ingredients, how to prepare the mix, and tips for perfect cookies. Remember, avoid common mistakes like overheating and uneven coating. Explore variations for unique flavors and dietary needs. Proper storage helps keep your cookies fresh longer. With these steps, you can enjoy tasty treats anytime. Now, it’s your turn to bake and share these fun cookies with others!

Butterscotch Haystack Cookies Quick and Tasty Treat

If you’re craving a sweet treat that’s easy to make, you’ve come to the right place! Butterscotch Haystack Cookies are

Older posts
Newer posts
← Previous Page1 … Page148 Page149 Page150 … Page164 Next →

dsad

© 2026 easycookingbite • Built with GeneratePress

Our Policies

  • Copyright Policy
  • Cookie Policy
  • GDPR Policy
  • Privacy Policy
  • Disclaimer
  • Terms Of Use

More Information

  • Home
  • About
  • Contact
  • Appetizers
  • Dessert
  • Dinner
  • Drinks
©2026, easycookingbite About Back To Top