Skip to content
DisclaimerTerms Of UseGDPR PolicyCookie Policy

easycookingbite

  • Home
  • Drinks
  • Appetizers
  • Dinner
  • Dessert
  • About
  • Contact
  • Privacy Policy
DisclaimerTerms Of UseGDPR PolicyCookie Policy

Lily

- 250g pasta (penne or fusilli works best) - 200g block of feta cheese - 2 cups cherry tomatoes, halved - 1/4 cup extra virgin olive oil - 3 cloves garlic, minced - 1 teaspoon dried oregano - 1 teaspoon dried basil - Freshly cracked black pepper to taste - Salt to taste - Fresh basil leaves for garnish For this baked feta pasta, you need just a few key ingredients. The pasta options I love are penne or fusilli. Both shapes hold the creamy sauce well. The star of this dish is a block of feta cheese. It melts beautifully and adds a rich flavor. You also need two cups of cherry tomatoes. Halving them helps them cook faster and burst with flavor. You will use extra virgin olive oil to coat the tomatoes. This oil brings out the best taste in the dish. Garlic adds a nice aroma and flavor, while oregano and basil round out the herbs. Salt and black pepper are essential for seasoning. Finally, fresh basil leaves are perfect as a garnish, giving a fresh touch. - Red pepper flakes for added heat - Garnishes: Fresh basil leaves If you like a bit of heat, consider adding red pepper flakes. They give a nice kick that balances the creaminess of the feta. Fresh basil leaves are not just for looks; they add a burst of flavor. You can make this dish your own by adjusting these optional ingredients. {{ingredient_image_1}} 1. Preheat your oven to 200°C (400°F). This step makes sure your dish cooks evenly. 2. Grab a large baking dish. In it, mix the halved cherry tomatoes with 1/4 cup of extra virgin olive oil. Use your hands or a spoon to coat each tomato. This helps them roast nicely. 1. Place the block of feta cheese right in the center of the baking dish. 2. Drizzle a bit more olive oil on the feta. Then, sprinkle 3 cloves of minced garlic, 1 teaspoon of dried oregano, and 1 teaspoon of dried basil on top. Season with salt and freshly cracked black pepper. 3. Bake the dish in your preheated oven for 30 minutes. Look for the feta to turn golden and the tomatoes to blister. This shows they are ready. 1. While the feta and tomatoes bake, cook 250g of pasta according to the package. Aim for al dente, which means it should have a slight bite to it. Drain the pasta and set it aside. 2. Once baking is done, remove the dish from the oven. Use a fork to mash the feta and mix it with the tomatoes. This forms a creamy sauce. 3. Add your cooked pasta to the baked mixture. Toss everything together well. Your pasta should be well-coated in that delicious sauce. Adjust seasoning if needed. For some heat, add red pepper flakes if you like. Now, you’re ready to serve this delightful dish! - Choosing the right pasta for the perfect texture I recommend using penne or fusilli for this dish. These shapes hold sauce well. They create a lovely bite with each forkful. Other shapes like rigatoni can also work, but stick to those for the best results. - Achieving the best feta consistency after baking Bake your feta until it turns golden and soft, about 30 minutes. This makes it easy to mash into the sauce. If it looks dry, it may need a few more minutes. Watch it closely to keep it creamy. - Suggestions for additional herbs or spices Try adding thyme or rosemary for an extra flavor boost. Fresh herbs like parsley work too. A sprinkle of red pepper flakes adds a nice kick if you like heat. - Alternative cheeses to use If feta isn't your favorite, try goat cheese or ricotta. They melt nicely and provide a different taste. You can even mix cheeses for a unique flavor. - Overbaking the feta Don’t let your feta bake too long. If it becomes too brown, it can taste bitter. You want it soft and creamy, perfect for mixing. - Undercooking the pasta Always cook your pasta al dente. If it is too soft, it will turn mushy when mixed with the sauce. Follow the package instructions closely for the best texture. Pro Tips Use High-Quality Feta: For the best flavor, choose a high-quality feta cheese. Greek feta made from sheep's milk offers a creamier texture and richer taste compared to others. Customize Your Pasta: Feel free to use any pasta shape you like! While penne and fusilli are great choices, farfalle or spaghetti will work just as well. Add Vegetables: Enhance the nutritional value by adding vegetables such as spinach, zucchini, or bell peppers. They can be tossed in the baking dish for added flavor. Store Leftovers Properly: If you have leftovers, store them in an airtight container in the refrigerator. Reheat gently on the stove or in the microwave, adding a splash of water if needed to loosen the sauce. {{image_2}} You can switch out cherry tomatoes for other tasty options. Try grape tomatoes or sun-dried tomatoes for a different flavor. If you prefer something milder, consider using roasted red peppers. For those who need dairy-free or vegan options, feta cheese can be replaced with a plant-based feta. Look for brands that mimic the texture and flavor of real feta. You can also use tofu, seasoned well, to create a creamy base. While penne and fusilli are great, feel free to explore other shapes. Bowtie, rigatoni, or even spaghetti can work nicely. Each shape brings its unique texture to the dish. If you need a gluten-free version, many pasta brands offer rice, quinoa, or chickpea-based options. These alternatives taste great and hold up well in this baked dish. Adding vegetables can really enhance this recipe. Spinach or kale adds a lovely green touch and boosts nutrition. Bell peppers bring sweetness and crunch, making the dish more colorful and vibrant. For a protein boost, consider adding chicken or shrimp. Cook them separately and mix them in with the pasta after baking. This not only adds flavor but also makes the meal more filling. To keep your baked feta pasta fresh, follow these steps. First, let it cool down to room temperature. Then, transfer it to an airtight container. Store it in the fridge for up to three days. For longer storage, freeze the dish. Use a freezer-safe container. It can last in the freezer for up to two months. When you want to enjoy your leftovers, reheating is key. To keep the texture nice, use the oven. Preheat the oven to 180°C (350°F). Place the pasta in an oven-safe dish, cover it with foil, and heat for about 15-20 minutes. You can also use the microwave. Heat in short bursts, stirring in between, until warm. However, the oven gives a better taste. How long can you keep leftovers in the fridge? If stored well, they can last about three days. After that, the flavor and safety might decline. Watch for signs of spoilage. If it smells off or looks unusual, it’s best to throw it away. Always trust your nose and eyes when checking food. For Baked Feta Pasta, I suggest using penne or fusilli. Both types hold sauce well. Penne has ridges that catch the sauce nicely. Fusilli's spiral shape helps mix with the creamy feta. Other options include rotini or any short pasta you like. Avoid long pasta, as it won't mix as well with the sauce. Yes, you can prep Baked Feta Pasta ahead. Start by roasting the feta and tomatoes. Allow it to cool, then store it in the fridge. When you're ready to eat, cook the pasta and mix it with the cold feta-tomato mix. This method keeps flavors fresh and saves time. Absolutely! Baked Feta Pasta is great for meal prep. Cook a larger batch and divide it into portions. Store in airtight containers in the fridge. It stays tasty for about three days. To reheat, use the microwave or oven. Add a splash of olive oil to keep it moist and delicious. You've learned how to make a tasty Baked Feta Pasta with simple steps. Start with cooking the pasta and preparing the sauce. Remember to avoid common mistakes like overbaking the feta. You can even try different variations and store leftovers correctly. This dish is easy to make and fun to tweak. Enjoy your cooking, and let your flavors shine!

Baked Feta Pasta Flavorful and Simple Delight

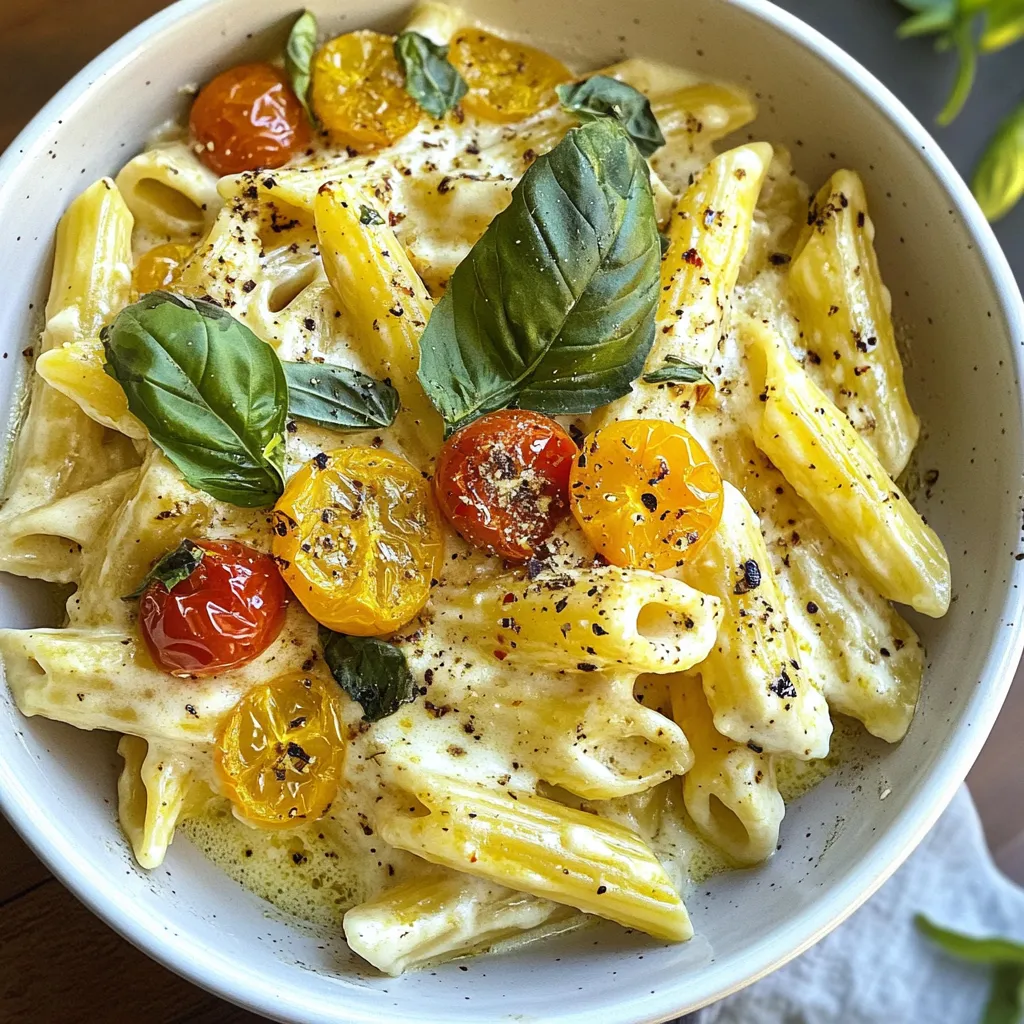
If you’re looking for a dish that’s easy to make and full of flavor, you’ve found it! Baked Feta Pasta

For this creamy avocado cilantro dressing, gather these simple ingredients: - 1 ripe avocado - 1 cup fresh cilantro leaves, packed - 1 tablespoon lime juice - 1/2 cup Greek yogurt (or dairy-free yogurt) - 1 clove garlic, minced - 1/4 cup water (adjust for desired consistency) - 1/4 teaspoon cumin - Salt and pepper to taste If you don’t have an ingredient, here’s what you can use: - Instead of Greek yogurt, use regular yogurt or a plant-based yogurt. - Swap lime juice for lemon juice if you prefer. - For garlic, you can use garlic powder, about 1/8 teaspoon. - If fresh cilantro is hard to find, use parsley for a different flavor. This dressing is not just tasty; it is also healthy: - Avocado is full of good fats. It helps keep your heart healthy. - Cilantro has antioxidants and may help with digestion. - Greek yogurt provides protein and probiotics for gut health. - Lime juice adds vitamin C, which boosts your immune system. - Garlic can help lower blood pressure and improve heart health. Each ingredient adds flavor and health benefits to your meals. Enjoy this dressing on salads, tacos, or as a dip! {{ingredient_image_1}} To make creamy avocado cilantro dressing, gather your ingredients first. Here’s what you need: - 1 ripe avocado - 1 cup fresh cilantro leaves, packed - 1 tablespoon lime juice - 1/2 cup Greek yogurt (or dairy-free yogurt) - 1 clove garlic, minced - 1/4 cup water (adjust for desired consistency) - 1/4 teaspoon cumin - Salt and pepper to taste Start by cutting the avocado in half. Remove the pit and scoop out the flesh. Place it in a blender or food processor. Next, add the cilantro, lime juice, Greek yogurt, minced garlic, and cumin. When blending, the key is to ensure everything mixes well. I recommend starting on a low speed. Gradually increase to high speed. This helps all the ingredients blend smoothly without splattering. If the mixture is too thick, add a little water—about 1/4 cup to start. Blend until you reach a creamy texture. Scrape down the sides if needed, and blend again. To get the best consistency, it’s important to adjust the water. If your dressing is too thick, keep adding water slowly. Taste as you go. It should be creamy but pourable. Once you have the right texture, season with salt and pepper. Blend once more to mix the seasoning well. Your dressing is now ready to enjoy! This dressing is so versatile! You can drizzle it over your favorite salad or use it as a dip. It pairs well with grilled chicken or shrimp. Try it with tacos or burritos for a fresh twist. You can also mix it into grain bowls for added flavor. Want to boost the taste? Add more lime juice for tang or a pinch of cayenne for heat. You can also toss in a bit of honey for sweetness. Experiment with other herbs like parsley or basil to change things up. Avoid using unripe avocados; they won’t blend well. If you skip the lime juice, the dressing may turn brown quickly. Don’t forget to taste and adjust the seasoning. A little salt and pepper can make a big difference. Lastly, be careful not to add too much water at once; this can make your dressing too thin. Pro Tips Choose the Right Avocado: Make sure to select a ripe avocado that yields slightly to pressure for a creamy texture in the dressing. Adjust Consistency: Feel free to adjust the amount of water to achieve your preferred dressing thickness, whether you want it thicker for a dip or thinner for a salad drizzle. Freshness is Key: Use fresh cilantro and lime juice for the best flavor; dried herbs won't provide the same vibrant taste. Storage Tips: To prevent browning, store the dressing in an airtight container and press plastic wrap directly against the surface before sealing. {{image_2}} You can easily make this dressing dairy-free. Instead of Greek yogurt, use dairy-free yogurt. Almond, coconut, or soy yogurt works well. These options keep the creaminess while making it vegan. You can also skip the yogurt altogether. Just add a bit more avocado and water for a smooth texture. To add some heat, toss in jalapeños. Start with one small jalapeño, seeds removed. Blend it in with the other ingredients. This spicy twist adds a kick to your dressing. Adjust the amount of jalapeño based on your heat preference. It’s perfect for those who love bold flavors. Feel free to switch up the herbs. Instead of cilantro, try parsley or basil. Each herb brings a new taste. You can also add a splash of apple cider vinegar for tang. If you want a different flavor, mix in a bit of green onion or dill. These changes give you endless options for delicious dressings. To keep your creamy avocado cilantro dressing fresh, store it in an airtight container. Glass jars work best. Make sure to seal it tightly. This helps prevent air from getting in and causing spoilage. Always use a clean spoon when serving. This keeps the dressing free from bacteria. You can keep this dressing in the fridge for up to three days. After this, it may spoil. Look for changes in color or smell. If it starts to turn brown or smells off, it’s time to toss it. You might also see separation; this is normal. Just give it a good stir, but if it smells bad, don’t take the risk. If you want to save it longer, freezing is a great option. Pour the dressing into an ice cube tray for easy use later. Once frozen, transfer the cubes to a freezer bag. Label the bag with the date. You can store it for up to three months. When you need some, just thaw a few cubes in the fridge or at room temperature. Yes, you can use other types of yogurt. Greek yogurt gives a thick texture and tangy flavor. If you want a lighter option, try regular yogurt. You can also use dairy-free yogurt if you're vegan or lactose intolerant. Each type will change the creaminess and taste a bit, but they all work well. To adjust the flavor, start with lime juice. Add more for a tangier taste. If you like heat, try adding a pinch of chili powder or a slice of jalapeño. Garlic also adds a strong flavor; you can use less if it’s too much. Taste as you go, and blend until it fits your liking. This dressing works great on green salads. Try it on a simple mix of lettuce, tomatoes, and cucumbers. It also pairs well with grain salads, like quinoa or farro. For a heartier option, drizzle it over a taco salad. The creamy dressing adds richness to fresh ingredients, making every bite tasty. This blog post covered key points on making a great dressing. We discussed the ingredients, their benefits, and swaps you can use. I shared step-by-step instructions and tips for perfecting your dressing's texture. You learned about different variations, including dairy-free options, and how to store your dressing properly. Experiment with flavors and find what you enjoy most. With a few techniques and ideas, you can elevate your salads and meals. Enjoy cooking and make your dressing unique!

Creamy Avocado Cilantro Dressing Fresh and Flavorful

Are you ready to elevate your salads with a creamy avocado cilantro dressing? This fresh and flavorful sauce adds a

To make the One-Pot Creamy Tuscan Gnocchi, gather these simple ingredients: - 1 pound potato gnocchi - 2 tablespoons olive oil - 3 cloves garlic, minced - 1 cup cherry tomatoes, halved - 1 cup baby spinach - 1 cup heavy cream - 1 cup vegetable broth - 1 teaspoon dried basil - 1 teaspoon dried oregano - Salt and pepper to taste - ½ cup grated Parmesan cheese - Fresh basil leaves for garnish Each ingredient plays a key role in creating the rich and creamy flavor of this dish. The gnocchi brings a soft texture that complements the creamy sauce. Olive oil adds a nice depth. Garlic gives a fragrant kick. Cherry tomatoes add sweetness and color. Baby spinach offers a fresh touch. Heavy cream makes the sauce rich, while vegetable broth adds flavor. Dried herbs like basil and oregano enhance the taste. Finally, Parmesan cheese brings a savory finish. Don't forget the fresh basil leaves to garnish, adding a pop of color and aroma. {{ingredient_image_1}} First, grab a large pot. Heat 2 tablespoons of olive oil over medium heat. Once hot, add 3 cloves of minced garlic. Cook it for about 1 minute. The kitchen will smell great! Next, toss in 1 cup of halved cherry tomatoes. Cook these for 3-4 minutes. You want them to soften and burst with flavor. Now, stir in 1 cup of baby spinach. Cook until it wilts, which takes about 2 minutes. This adds a nice green color. After that, pour in 1 cup of heavy cream and 1 cup of vegetable broth. Add 1 teaspoon of dried basil, 1 teaspoon of dried oregano, and salt and pepper to taste. Mix everything well. Bring this mixture to a gentle simmer. Now, it's time to add 1 pound of potato gnocchi. Stir it well so the gnocchi get coated. Cook for about 5-7 minutes. You know the gnocchi are done when they float to the top and feel tender. Finally, stir in ½ cup of grated Parmesan cheese. This makes the dish creamy and rich! To make your One-Pot Creamy Tuscan Gnocchi even better, use spices wisely. I recommend adding a pinch of red pepper flakes for heat. A sprinkle of smoked paprika gives a nice depth. Fresh herbs can brighten your dish too. You can use fresh basil or even thyme. As for cheese, Parmesan is a classic choice. It melts well and adds creaminess. You can also try Pecorino Romano for a sharper taste. Mixing some cream cheese can give it extra richness. Want to add protein? Grilled chicken or shrimp works great in this dish. Just cook them before adding the gnocchi. You can also use cooked sausage for a hearty twist. For dietary needs, make this dish gluten-free. Use gluten-free gnocchi, and you're set. If you're dairy-free, try coconut cream instead of heavy cream. This keeps the dish creamy while being kind to your tummy. Pro Tips Use Fresh Ingredients: Fresh cherry tomatoes and spinach will enhance the flavor of this dish, making it more vibrant and delicious. Adjust the Creaminess: If you prefer a lighter version, you can substitute half of the heavy cream with more vegetable broth. Season to Taste: Always taste the sauce before serving and adjust the seasoning with salt and pepper as needed for the best flavor. Leftover Storage: This dish can be stored in the refrigerator for up to 3 days. Reheat gently on the stove with a splash of broth to loosen it up. {{image_2}} For a vegetarian twist, you can swap out heavy cream. Try using half-and-half or whole milk. If you want a lighter dish, coconut milk is a great choice. It adds a nice flavor too. When it comes to veggies, you can mix it up. Besides baby spinach, add zucchini or bell peppers for color and crunch. Mushrooms bring an earthy taste that many love. Don’t forget to think about seasonal veggies. They can boost freshness and flavor. To go vegan, look for plant-based gnocchi. Many brands make these from sweet potatoes or other veggies. They taste just as good, and you won't miss the regular ones. For the cream, use a dairy-free option. Cashew cream is rich and creamy, while almond milk keeps it light. If you have a nut allergy, oat milk is a safe choice. It blends well into the sauce and gives a nice texture. These variations make the dish flexible. You can enjoy it in many ways, no matter your diet! To store your creamy Tuscan gnocchi, let it cool first. Then, place it in an airtight container. This method keeps it fresh in the fridge for up to three days. For longer storage, you can freeze it. Use a freezer-safe container or a heavy-duty freezer bag. Be sure to remove as much air as you can. Frozen gnocchi can stay good for about three months. When it comes to reheating, a stovetop is best. This method helps keep the texture nice. Add a splash of vegetable broth or cream to help it stay creamy. Stir often over low heat until it's hot. If you use a microwave, heat it in short bursts. Stir in between to prevent hot spots. Both methods work, but the stovetop keeps it closer to the original taste and feel. You should use potato gnocchi for this recipe. Potato gnocchi has a soft texture. It absorbs flavors well, making it perfect for creamy sauces. Look for fresh or frozen options at your store. Avoid gnocchi made from other ingredients, as they may not work as well. Yes, you can prepare this dish ahead. Cook the gnocchi and sauce, then store them separately. Keep them in airtight containers in the fridge. When you're ready to eat, just reheat and combine them. The creamy sauce will still taste great. Gnocchi cooks quickly. You know they are done when they float to the top. This usually takes about 5 to 7 minutes. If they are tender, they are ready to eat. Keep an eye on them while they cook for the best results. Absolutely! You can add any veggies you like. Bell peppers, zucchini, or mushrooms work well. Just chop them small and add them with the tomatoes. This will make the dish even more colorful and tasty. Yes, this dish is great for kids. The creamy sauce and soft gnocchi are kid-friendly. You can adjust spices to make it milder if needed. Kids often enjoy helping prepare this meal too. This dish pairs well with a simple salad or garlic bread. A fresh green salad adds crunch and brightness. Garlic bread complements the creamy sauce nicely and is a fun side. Yes, you can easily make this dish dairy-free. Use a plant-based cream instead of heavy cream. Nutritional yeast can replace Parmesan cheese for a cheesy flavor. Just ensure your gnocchi is dairy-free as well. This dish lasts about 3 to 4 days in the fridge. Store it in an airtight container to keep it fresh. If you have leftovers, enjoy them for lunch or dinner the next day! This blog post detailed a simple and delicious gnocchi dish. We covered key ingredients, step-by-step cooking instructions, and helpful tips. I showed how to enhance flavors and tailor the recipe to your needs. Feel free to explore variations for vegetarian or vegan diets. Don't forget to store leftovers safely for later enjoyment. With these insights, you will create a tasty meal that impresses. Enjoy cooking!

One-Pot Creamy Tuscan Gnocchi Simple Weeknight Meal

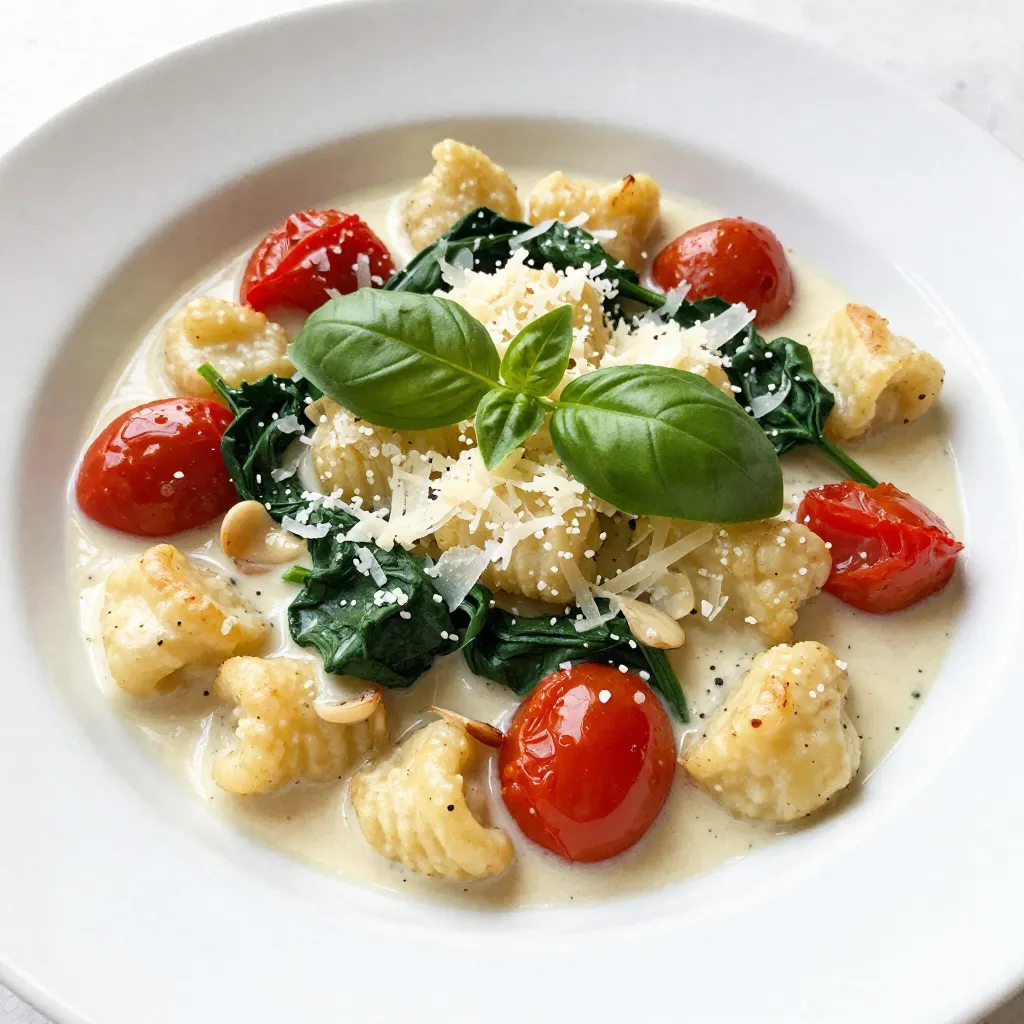
Looking for a quick, delicious weeknight meal? This One-Pot Creamy Tuscan Gnocchi is perfect for you! It combines soft gnocchi,

To make this delightful soup, gather these ingredients: - 1 lb boneless, skinless chicken breasts - 8 cups chicken broth - 1 medium onion, finely chopped - 3 cloves garlic, minced - 2 large carrots, diced - 1 cup celery, diced - 1 cup orzo pasta - 3 large eggs - 1/2 cup fresh lemon juice (about 3 lemons) - 1 teaspoon dried oregano - Salt and freshly ground black pepper, to taste - Fresh dill or parsley, chopped for garnish Using fresh ingredients makes the soup taste vibrant. Fresh chicken adds flavor and good texture. Fresh herbs, like dill or parsley, enhance the aroma. Always choose fresh vegetables for the best taste. They keep the soup bright and healthy. The quality of your ingredients impacts the dish greatly. You can try adding a few optional ingredients for more flavor. Consider adding bay leaves while cooking. They give a lovely depth to the broth. You might also add a pinch of red pepper flakes for some heat. Another option is to mix in chopped spinach for extra nutrients. Each of these can elevate your Greek lemon chicken soup! {{ingredient_image_1}} Start by heating a large pot over medium heat. Add the chopped onion and minced garlic. Sauté them for about 3 to 4 minutes. You want the onion to turn translucent. Next, add the diced carrots and celery. Stir these for another 5 minutes. Now, pour in the chicken broth and bring it to a gentle boil. Once boiling, add the chicken breasts and reduce the heat to a simmer. Cover the pot and cook for 20 minutes. This will cook the chicken through. After 20 minutes, remove the chicken from the pot. Use two forks to shred the chicken into pieces. Set this aside for later. Now, add the orzo pasta to the broth. Cook it according to the package instructions, usually about 8 to 10 minutes. While the orzo cooks, whisk the eggs and lemon juice in a mixing bowl until combined. When the orzo is ready, ladle some hot broth into the egg mixture. Whisk continuously to temper the eggs. This step stops the eggs from curdling. Slowly pour this tempered mixture back into the pot. Stir constantly to combine everything well. Finally, add the shredded chicken, dried oregano, and season with salt and pepper to taste. Let it warm for a few more minutes before serving. Watch the onion closely. It should become soft and clear. This shows you sautéed it long enough. When the chicken is done, it will be firm and no longer pink inside. The orzo will expand and become tender when it's cooked. After adding the egg mixture, the soup should appear creamy but not thick. The final texture should be smooth and inviting. Do not rush the sautéing step. If you cook the onion too fast, it may burn. Ensure the chicken cooks fully; undercooked chicken can ruin your meal. Remember to temper the eggs well. Pouring them in too fast can cause them to scramble. Lastly, avoid skipping the seasoning step. A little salt and pepper can greatly enhance the flavor. To get the best flavor from your Greek Lemon Chicken Soup, use fresh ingredients. Fresh lemon juice brings brightness. Use good quality chicken broth for depth. Don’t skip the oregano; it adds warmth and aroma. If you want it zestier, add more lemon juice or lemon zest. Taste as you go and adjust the salt and pepper. This will help you find the right balance. You can make this soup ahead of time. Cook it fully and store it in the fridge. The flavors blend well after a day. Reheat it gently over low heat. Add a splash of broth if it seems thick. If you know you will store it, don’t add the orzo right away. It can get mushy in the fridge. Instead, cook the orzo when you’re ready to serve. If your soup is too thick, add more broth or water. Stir well and heat it through. For a thicker soup, add less broth at the start. You can also mash some of the carrots or celery. This will create a creamy texture without using cream. If you want a smoother soup, blend it for a few seconds. Adjust the texture to fit your taste! Pro Tips Use Fresh Ingredients: Fresh chicken and vegetables will enhance the flavor and nutrition of your soup. Tempering the Eggs: Always temper the egg mixture with hot broth before adding it to the soup to prevent curdling. Adjust Lemon to Taste: Depending on your preference, feel free to adjust the amount of lemon juice for a more or less zesty flavor. Garnish for Freshness: Fresh dill or parsley not only adds color but also brightens the overall flavor of the soup. {{image_2}} You can easily make this soup gluten-free. Simply swap out the orzo for rice. Use about 1 cup of uncooked rice. Add it to the broth after you remove the chicken. It will add a nice texture. Adjust the cooking time based on the rice type. Brown rice takes longer, while white rice cooks faster. To create a vegetarian version, skip the chicken and use vegetable broth. You can add extra veggies like zucchini or bell peppers for flavor. Chickpeas are a great protein source to include. They add heartiness to the soup. Just heat everything together until the vegetables are tender, and you’ll have a warm, comforting dish. Feel free to play with spices and herbs. You can add red pepper flakes for heat. Fresh herbs like thyme or basil can add a new twist. A pinch of smoked paprika gives a nice depth. Try different combinations to discover your favorite flavor profile. Each variation can make the soup feel fresh and exciting. After enjoying your Greek Lemon Chicken Soup, store any leftovers in an airtight container. Let the soup cool completely before sealing it up. This helps keep the flavors fresh. Place the container in the fridge where it can stay for up to three days. If you notice any leftover herbs on top, remove them before storing. This keeps the soup from becoming too strong. To freeze Greek Lemon Chicken Soup, first cool it down. Pour the soup into freezer-safe containers. Leave some space at the top since liquids expand when frozen. You can freeze the soup for up to three months. Label the containers with the date so you know when to use them. Remember, the orzo might change texture when thawed, but the taste will still be great. When you’re ready to enjoy your soup again, reheat it gently. You can use a pot on the stove or the microwave. If using the stove, warm it over low heat, stirring often to avoid sticking. If using a microwave, heat in short bursts, stirring in between. If the soup seems thick, add a little broth or water to thin it out. This keeps your soup comforting and delicious, just like the first time! Yes, you can use rotisserie chicken. It saves time and adds great flavor. Just shred the chicken and add it to the soup. This shortcut makes the recipe even easier. To make the soup creamier, add a splash of cream or milk. You can also use more eggs in the mixture. Whisk the eggs well with lemon juice and temper them slowly. This gives a rich texture to the soup. This soup pairs well with crusty bread or a fresh salad. You can also serve it with a side of rice for a heartier meal. A sprinkle of feta cheese adds a nice touch too. The soup lasts about 3 to 4 days in the fridge. Make sure to store it in an airtight container. If the soup thickens, add a little broth when reheating. This keeps it tasty and enjoyable. This article covered how to make Greek Lemon Chicken Soup from start to finish. We talked about the best fresh ingredients and optional flavors. You learned step-by-step cooking methods and tips to avoid mistakes. We explored variations like gluten-free and vegetarian options too. Lastly, we shared storage tips for leftovers and answers to common questions. Enjoy this soup often. It’s tasty, comforting, and good for sharing.

Greek Lemon Chicken Soup Comforting and Simple Recipe

Craving a warm, hearty dish? Greek Lemon Chicken Soup is your answer. This simple recipe packs cozy flavor into every

To make this creamy tomato basil soup, gather these key ingredients: - 2 tablespoons olive oil - 1 medium onion, chopped - 3 cloves garlic, minced - 1 can (28 oz) crushed tomatoes - 2 cups vegetable broth - 1 teaspoon sugar - 1 teaspoon dried oregano - Salt and pepper to taste - 1 cup heavy cream - ½ cup fresh basil leaves, chopped - Croutons or fresh basil leaves for garnish You can swap some ingredients if needed: - Use coconut milk instead of heavy cream for a dairy-free option. - If you lack fresh basil, dried basil works too; use about one-third the amount. - Any broth works; chicken broth is great if you’re not vegetarian. - Instead of sugar, try honey or maple syrup to add sweetness. Having the right tools makes cooking easier. Here’s what you need: - A large pot for cooking the soup. - A sharp knife and cutting board for chopping. - A wooden spoon for stirring. - An immersion blender for smooth soup. - Measuring cups and spoons for precise amounts. This soup is simple yet tasty. With these ingredients and tools, you can create a comforting meal. Enjoy! {{ingredient_image_1}} To make creamy tomato basil soup, gather your ingredients. You need olive oil, onion, garlic, crushed tomatoes, vegetable broth, sugar, dried oregano, salt, pepper, heavy cream, and fresh basil. Get your croutons or extra basil for garnish. 1. First, heat a large pot over medium heat. Add 2 tablespoons of olive oil. 2. Next, chop one medium onion. Add it to the pot and sauté for about 5 minutes. The onion should look clear. 3. Mince 3 cloves of garlic and stir them in. Cook for 1 to 2 minutes until you smell it. 4. Open a 28 oz can of crushed tomatoes and pour it into the pot. 5. Add 2 cups of vegetable broth, 1 teaspoon of sugar, and 1 teaspoon of dried oregano. Stir everything well. 6. Bring the pot to a simmer. Lower the heat and let it cook for 15 to 20 minutes. This helps the flavors blend. 7. Blend the soup until smooth using an immersion blender. If you don’t have one, use a regular blender in batches. 8. Stir in 1 cup of heavy cream and ½ cup of chopped fresh basil. Heat for another 5 minutes. 9. Finally, add salt and pepper to taste. Adjust as needed. Serve hot with croutons or extra fresh basil. When blending, do it slowly to avoid splashes. If you want a creamier soup, add more heavy cream. For a thicker soup, blend less. You can also adjust seasoning at the end. Taste it first before adding more salt or pepper. To boost the flavor of your creamy tomato basil soup, try these tips: - Use fresh garlic. Fresh garlic adds a bright taste. - Add a splash of balsamic vinegar. It gives a nice depth. - Use homemade vegetable broth. This can make the soup richer. - Experiment with fresh herbs. Thyme or parsley can add new notes. - Add a pinch of red pepper flakes. This gives a slight kick. Here are a few common mistakes that can ruin your soup: - Overcooking the garlic. This can make it bitter. - Skipping the sugar. It balances the acidity of tomatoes. - Not blending enough. You want a smooth, creamy texture. - Underseasoning. Always taste and adjust with salt and pepper. - Using low-quality canned tomatoes. Good tomatoes make a big difference. Serving your soup can be a fun part of the meal: - Serve it hot. Warm soup tastes best and feels cozy. - Add croutons for crunch. They add a fun texture. - Garnish with fresh basil. This makes the soup look beautiful. - Pair it with grilled cheese. This classic combo is a crowd-pleaser. - Use a nice bowl. A simple, lovely bowl can elevate your dish. Pro Tips Use Fresh Basil: Fresh basil adds a vibrant flavor to the soup. Add it at the end of cooking to preserve its aroma and color. Adjust Cream for Richness: If you prefer a lighter soup, you can reduce the amount of heavy cream or substitute it with half-and-half. Perfectly Smooth Texture: For an ultra-smooth soup, blend thoroughly with an immersion blender or in batches using a regular blender. Customize Seasonings: Feel free to enhance the flavor with additional herbs or spices, such as a pinch of red pepper flakes for a spicy kick. {{image_2}} To make a vegan version of creamy tomato basil soup, swap the heavy cream for coconut cream or cashew cream. This keeps the soup rich and creamy without any dairy. Use vegetable broth to enhance the flavor. The fresh basil still adds a lovely touch that brightens the soup. This soup can easily fit a gluten-free diet. Just check the vegetable broth for gluten. Most brands are safe to use. Ensure your croutons are gluten-free or leave them out. The soup remains delicious and comforting without them! Get creative with your soup! You can add cooked lentils for extra protein. Throw in some roasted red peppers for a smoky taste. A splash of balsamic vinegar can add depth. For spice lovers, try adding red pepper flakes. Each of these twists brings out new flavors! Store leftover creamy tomato basil soup in an airtight container. Let it cool first. Place it in the fridge if you plan to eat it within three days. Make sure to label the container with the date. This helps you keep track of freshness. To freeze the soup, use freezer-safe containers. Leave some space at the top for expansion. You can also use freezer bags. Pour the cooled soup in and squeeze out the air. Seal tightly and label with the date. It can last up to three months in the freezer. When you’re ready to eat, thaw the soup overnight in the fridge if frozen. To reheat, pour it into a pot over low heat. Stir often to prevent sticking. You can also use the microwave. Heat in short bursts, stirring in between. Add a splash of cream if it looks too thick. Enjoy your comforting soup! Creamy tomato basil soup can last for about 3 to 5 days in the fridge. Store it in an airtight container. Always let it cool first before you place it in the fridge. If you notice any off-smells or changes in color, it's best to toss it out. Yes, you can use fresh tomatoes. You will need about 2 pounds of ripe tomatoes. First, you should blanch them. This means boiling them for a short time, then placing them in ice water. After that, peel the skins off, chop the tomatoes, and use them in your recipe. Fresh tomatoes give a bright taste, but they may need longer to cook down. Absolutely! This soup is great for meal prep. You can make a large batch and store it for the week. Just remember to cool it down before placing it in containers. It reheats well, so you can enjoy it anytime you want. Tomato basil soup pairs well with many sides. Here are some ideas: - Grilled cheese sandwiches for a classic combo. - A fresh green salad for added crunch. - Crusty bread to dip into the soup. - Garlic bread for a tasty twist. These options can make your meal even more satisfying! You now have all the tools to make creamy tomato basil soup. We covered important ingredients, substitutions, and tools to use. The step-by-step instructions will guide you through cooking with ease. I shared tips to boost flavor and avoid mistakes. You can even try tasty variations and know how to store leftovers. Now, enjoy this soup warm, paired with your favorite bread. Keep experimenting to find your unique twist!

Creamy Tomato Basil Soup Simple and Tasty Recipe

Are you ready to enjoy a bowl of warm, delicious comfort? This Creamy Tomato Basil Soup is both simple and

- 1/2 cup unsalted butter - 1 cup granulated sugar - 2 large eggs - 1 teaspoon vanilla extract - 1/3 cup unsweetened cocoa powder - 1/2 cup all-purpose flour - 1/4 teaspoon salt - 1/4 teaspoon baking powder - 1 cup fresh raspberries To make the brownie base, start with unsalted butter. This gives the brownies a rich flavor. You will need 1/2 cup, melted. Next, grab 1 cup of granulated sugar. This adds sweetness and helps with texture. Add in 2 large eggs. They provide moisture and richness. A teaspoon of vanilla extract gives a warm, sweet note. The cocoa powder, at 1/3 cup, gives the brownies their chocolatey base. For the dry mix, use 1/2 cup of all-purpose flour. This helps bind the brownies. You’ll also need a pinch of salt (1/4 teaspoon) to enhance flavor. The baking powder (1/4 teaspoon) helps the brownies rise. Lastly, toss in 1 cup of fresh raspberries. They add a tart burst that balances the sweetness. - 8 oz cream cheese - 1/4 cup granulated sugar - 1 large egg - 1 teaspoon vanilla extract - 1/2 cup fresh raspberries (for swirls) The cheesecake layer starts with 8 oz of softened cream cheese. This creates a creamy, dreamy texture. Add 1/4 cup of granulated sugar for sweetness. It helps balance the tartness of the raspberries. Next, use 1 large egg. This adds richness and helps set the cheesecake. A teaspoon of vanilla extract adds a lovely aroma. For the swirls, you’ll need 1/2 cup of fresh raspberries. These make the cheesecake layer pop with color and flavor. With these ingredients, you create a delightful treat. The contrast of chocolate brownies and creamy cheesecake is simply divine. {{ingredient_image_1}} 1. Step 1: Preheat and prepare the baking pan Start by preheating your oven to 350°F (175°C). Grease an 8x8 inch baking pan or line it with parchment paper for easy removal later. 2. Step 2: Mixing butter and sugar In a bowl, mix 1/2 cup of melted unsalted butter with 1 cup of granulated sugar. Whisk until the mixture is smooth and creamy. 3. Step 3: Adding eggs and vanilla extract Add 2 large eggs to the bowl, one at a time. Mix in 1 teaspoon of vanilla extract. Beat until well combined. 4. Step 4: Combining cream cheese and sugar In another bowl, combine 8 oz of softened cream cheese with 1/4 cup of granulated sugar. Mix until smooth. 5. Step 5: Incorporating egg and vanilla extract Add 1 large egg and 1 teaspoon of vanilla extract to the cream cheese mixture. Blend until it’s creamy and free of lumps. 6. Step 6: Preparing for the swirl Reserve 1/2 cup of fresh raspberries for swirling later. You will use them to create beautiful patterns in your cheesecake layer. 7. Step 7: Pouring half of the brownie mix Pour half of the brownie batter into your prepared baking pan. Spread it evenly across the bottom to form a solid base. 8. Step 8: Layering cream cheese and raspberries Drop spoonfuls of the cream cheese mixture over the brownie layer. Scatter half of the fresh raspberries on top. 9. Step 9: Finishing the top layer and swirling Pour the remaining brownie batter over the cream cheese layer. Add more spoonfuls of the cream cheese mixture and the remaining raspberries. Swirl gently with a knife. 10. Step 10: Baking instructions Bake in the preheated oven for about 30-35 minutes. Check if a toothpick comes out with a few moist crumbs. 11. Step 11: Cooling down and refrigerating Let the brownies cool in the pan for a bit. Then, refrigerate for at least 2 hours before cutting them into squares. To make the best brownies, avoid overmixing. Mix just until you see no dry flour. This keeps your brownies soft and chewy. For a smooth cheesecake layer, blend the cream cheese well. Make sure it's soft first. Add sugar, egg, and vanilla, then mix until creamy. This will help you achieve a nice, even layer. Garnish your brownies with powdered sugar. This adds a nice touch and looks great. You can also serve them with a scoop of ice cream or a dollop of whipped cream. The cold creaminess pairs well with the rich chocolate and tangy raspberries. Store your brownies in the fridge. Use an airtight container to keep them fresh. They taste best within three days. If you want to reheat them, warm them in the microwave for just a few seconds. This makes them soft and gooey again, perfect for enjoying. Pro Tips Use Room Temperature Cream Cheese: This ensures a smoother cheesecake layer, making it easier to swirl into the brownie batter. Don’t Overmix the Brownie Batter: Overmixing can lead to dense brownies. Fold just until the ingredients are combined for a fudgier texture. Fresh Raspberries are Key: Using fresh raspberries instead of frozen ones will give your brownies a bright flavor and lovely texture. Chill Before Serving: Allowing the brownies to chill in the refrigerator for a couple of hours helps set the layers and enhances the flavor. {{image_2}} You can play with flavors in your Raspberry Cheesecake Brownies. Try using different berries like blueberries or strawberries for a fresh twist. These berries will add unique tastes and colors. If you want to switch up the chocolate, you can use dark or white chocolate. Each type brings its own charm to the brownies. For those who need gluten-free treats, you can use almond flour or coconut flour. These flours work well and give great results. Just remember to adjust the baking time a bit. Gluten-free baking can be tricky, but it’s worth it for these brownies! Swirling the cheesecake layer can be fun. You can create different designs by using a knife or toothpick. Just draw gentle lines through the cream cheese and brownie layers. For a marble effect, make sure to swirl lightly. This will make your brownies look amazing and taste even better! To keep your Raspberry Cheesecake Brownies fresh, use an airtight container. This helps prevent them from drying out. Store them at room temperature for up to three days. If you want them to last longer, place them in the fridge. They will stay fresh in the fridge for about a week. If you want to freeze your brownies, wrap them tightly in plastic wrap. Then, place them in a freezer-safe bag. They can stay frozen for up to three months. When you're ready to enjoy them, take them out and let them thaw in the fridge overnight. This keeps the taste and texture just right. To check if your brownies are done, use a toothpick. Insert it into the center of the pan. If it comes out with a few moist crumbs, the brownies are ready. Look for a slightly firm texture on the top. The edges should pull away from the pan a bit, too. Yes, you can use frozen raspberries. They work well in this recipe. However, be aware that they may add extra moisture. This could change the texture a little. If you use frozen berries, do not thaw them. Add them straight from the freezer to keep the brownies firm. If you have leftover cream cheese mixture, don’t waste it! You can use it to make a small cheesecake. Just pour it into a crust and bake. You might also add it to pancakes or waffles for a tasty topping. Another idea is to mix it into yogurt for a sweet treat. In this post, I shared how to make delicious raspberry cheesecake brownies. We covered the key ingredients for both the brownie and cheesecake layers, along with simple, step-by-step instructions. I included essential tips for perfecting your brownies, serving ideas, and even storage advice. Remember, using fresh ingredients makes a big difference in taste. Enjoy experimenting with flavors and sharing these treats. You’ll impress friends and family with your baking skills! Trust me, these brownies are worth making.

Raspberry Cheesecake Brownies Delightful Dessert Treat

If you’re craving a dessert that combines rich brownies with tangy cheesecake, you’re in for a treat! My Raspberry Cheesecake

For my classic stuffed peppers, you will need the following: - 4 large bell peppers (any color) - 1 cup quinoa (or rice of choice) - 1 can (15 oz) black beans, rinsed and drained - 1 cup corn kernels (fresh, frozen, or canned) - 1 cup diced tomatoes (fresh or canned) - 1 onion, finely chopped - 2 cloves garlic, minced - 1 teaspoon cumin - 1 teaspoon paprika - 1 tablespoon olive oil - 1 cup shredded cheese (cheddar or mozzarella) - Fresh cilantro or parsley for garnish - Salt and pepper to taste These stuffed peppers are not just tasty; they are also good for you. Each serving provides a mix of protein, fiber, and vitamins. Quinoa adds protein and fiber, while black beans boost the protein even more. The peppers are packed with vitamins A and C. Cheese gives you calcium and makes everything creamy and delicious. You can swap some ingredients based on what you have. Try brown rice or couscous instead of quinoa. If you want a different flavor, use chickpeas instead of black beans. You can also mix in other veggies like zucchini or spinach. For a vegan option, skip the cheese or use a plant-based cheese. Make it your own! {{ingredient_image_1}} Start by preheating your oven to 375°F (190°C). Next, take four large bell peppers. Cut off their tops and remove the seeds. Place the peppers upright in a baking dish. This helps keep the filling inside. In a medium saucepan, cook one cup of quinoa or rice. Follow the package instructions. Once it is cooked, set it aside. In a large skillet, heat one tablespoon of olive oil over medium heat. Add one finely chopped onion and sauté it for three to five minutes. You want it translucent. Now, add two minced garlic cloves and cook for one more minute. This will make your kitchen smell great! Stir in one cup of corn, one can of rinsed black beans, and one cup of diced tomatoes. Mix well. Add the cooked quinoa or rice, one teaspoon of cumin, one teaspoon of paprika, and salt and pepper to taste. Cook this mixture for about five minutes until it is heated through. Remove the skillet from heat and mix in half of one cup of shredded cheese. This should melt into the filling. Spoon the filling into each bell pepper. Press down slightly to pack it in. Top each pepper with the remaining cheese. Cover your baking dish with foil and bake for 25 minutes. After that, remove the foil and bake for an extra 10-15 minutes. This will make the peppers tender and the cheese bubbly. When ready, take them out of the oven. Let them cool for a few minutes before serving. Garnish with fresh cilantro or parsley for a bright touch. Enjoy your delicious stuffed peppers! To get the best texture in your stuffed peppers, cook your quinoa or rice fully. Make sure it is fluffy, not mushy. When mixing the filling, let everything heat through before stuffing. This helps the flavors meld nicely. Bake with foil for the first part. This keeps the peppers soft. Remove the foil later to let the cheese brown. Cheese adds great flavor and creaminess. I love using cheddar for its sharp taste. Mozzarella works well too, giving a nice stretch. You can mix the two for a unique taste. For a twist, try pepper jack for some heat. Always sprinkle cheese on top for a bubbly finish. Stuffed peppers are great on their own, but you can add sides for more fun. A simple salad pairs well and adds crunch. You might also serve it with crusty bread for a hearty meal. Garnish your dish with fresh cilantro or parsley for color. This makes it look and taste fresh. Don't forget to drizzle some lime juice for a zesty kick! Pro Tips Choose Colorful Peppers: Using a mix of colored bell peppers not only adds visual appeal but also provides different flavors and nutrients. Customize the Filling: Feel free to experiment with the filling by adding cooked ground meat, different beans, or even veggies like zucchini for added texture and flavor. Make Ahead: These stuffed peppers can be prepared ahead of time. Assemble the peppers and store them in the fridge until you’re ready to bake them for a quick meal. Garnish for Flavor: Don't skip the garnish! Fresh cilantro or parsley not only enhances the presentation but also adds a burst of fresh flavor that complements the dish. {{image_2}} If you want a vegetarian twist, skip the meat. Use more beans or lentils. You can add chopped mushrooms or zucchini for extra flavor. Try using different veggies as your base. Eggplants or tomatoes work well. You can also use cheese as a filling. It adds creaminess and taste. For those who enjoy meat, add ground beef, turkey, or chicken. Cook the meat in the skillet with the onion and garlic. This will give your dish a hearty flavor. Mix the meat with the beans and grains for a complete meal. You can also use sausage for a spicy kick. You don’t have to stick with quinoa or rice. Try barley, farro, or bulgur wheat instead. These grains add unique textures and flavors. They also boost the nutrition profile of your meal. Each grain cooks a little differently, so check the package. Adjust your cooking time as needed. To store leftover stuffed peppers, let them cool first. Place them in an airtight container. They will stay fresh in the fridge for up to 4 days. Make sure to seal the container tightly to keep out air. This helps retain their flavor and texture. Reheating stuffed peppers is quick and easy. Preheat your oven to 350°F (175°C). Place the peppers in a baking dish. Cover them with foil to keep moisture in. Heat for about 20 minutes or until warm. You can also use a microwave. Heat on medium for 2 to 3 minutes. Check to ensure they are hot all the way through. Freezing stuffed peppers is a great way to save time. Wrap each pepper in plastic wrap or foil. Place them in a freezer-safe bag or container. They can last for up to 3 months in the freezer. To reheat, thaw them overnight in the fridge. Then, follow the reheating instructions above. Enjoy your meal anytime you want! To cut bell peppers, first wash them. Then, slice off the tops. Next, remove the seeds and white parts inside. You can use a small knife to help. Make sure to leave the sides thick enough for support. This way, the peppers will hold the filling well. Yes, you can prepare stuffed peppers the day before. Just stuff the peppers and cover them tightly with plastic wrap. Store them in the fridge. When you are ready to cook, bake them straight from the fridge. This saves time on busy days. Stuffed peppers pair well with many sides. You can serve a fresh salad or some crusty bread. Rice or quinoa works great too. For something warm, try a bowl of soup. These options balance the meal and add more flavor. In this blog, we explored classic stuffed peppers, from the ingredients to storage tips. You learned how to prep, cook, and bake them for a tasty meal. We also discussed variations for different diets and how to serve them well. Remember, you can swap ingredients and customize to your taste. Stuffed peppers can fit any preference, making them a versatile dish. Enjoy creating and sharing this delicious meal with others!

Classic Stuffed Peppers Quick and Easy Recipe

Stuffed peppers are a classic dish that’s both easy and delicious. In this quick and easy recipe, I’ll show you

To make this dish, you need four salmon fillets. Each fillet should weigh about six ounces. Look for fresh, pink salmon for the best taste. The marinade is key to flavor. You will need: - 1/4 cup honey - 3 cloves garlic, minced - 1 tablespoon soy sauce (or tamari for gluten-free) - 1 tablespoon fresh ginger, grated - 1 tablespoon olive oil - Salt and pepper to taste Mix these ingredients together well. This mix adds a sweet and savory taste to the salmon. You can make your dish look nice with these garnishes: - 1 tablespoon sesame seeds - 2 green onions, chopped Adding these on top gives extra flavor and a nice look. Enjoy your cooking! {{ingredient_image_1}} To start, gather your ingredients. You need honey, garlic, soy sauce, ginger, and olive oil. In a small bowl, mix them together. Whisk until smooth and combined. This mixture is your marinade. It will add great flavor to the salmon. Next, take the salmon fillets. Place them in a shallow dish. Pour the marinade over the fish. Make sure each fillet is coated well. Cover the dish and refrigerate it. Let the salmon sit for at least 30 minutes. You can marinate it for up to 2 hours. This helps the fish absorb all that tasty flavor. Now, preheat your oven to 400°F (200°C). While it heats, line a baking dish with parchment paper. This makes cleanup easier. Arrange the salmon fillets skin-side down in the dish. Drizzle any leftover marinade over the top. Bake the salmon for about 12-15 minutes. The fish is done when it flakes easily with a fork. For a nice glaze, switch to broil for 2-3 minutes. Keep an eye on it to avoid burning. To get the best flavor, marinate the salmon correctly. Use a shallow dish for even coating. Pour the marinade over the salmon fillets. Make sure each piece is covered well. I recommend marinating for 30 minutes to 2 hours. If you marinate too long, the salmon may become mushy. Always cover the dish while it sits in the fridge. This keeps the flavors fresh. Cooking salmon can be simple. Preheat your oven to 400°F (200°C). Line your baking dish with parchment paper. This makes cleanup easy. Arrange the salmon skin-side down in the dish. Drizzle any leftover marinade over the top. Bake for 12-15 minutes. The salmon is done when it flakes easily with a fork. If you want a nice crust, broil it for the last few minutes. Watch closely to avoid burning. To get that sweet glaze, broiling is key. After baking, switch your oven to broil. Broil for 2-3 minutes, but don’t walk away! Keep an eye on the salmon. The glaze should bubble and turn golden brown. This adds a rich flavor and a lovely look. Let it rest for a couple of minutes before serving. This helps the juices settle back into the fish. Enjoy your beautiful honey garlic glazed salmon! Pro Tips Marinating Time: Allow the salmon to marinate for at least 30 minutes, but no longer than 2 hours. This ensures the flavors penetrate the fish without compromising its texture. Oven Temperature: Preheating the oven to 400°F (200°C) is crucial for achieving perfectly cooked salmon. A hot oven helps to caramelize the glaze. Checking Doneness: Salmon is done when it flakes easily with a fork and reaches an internal temperature of 145°F (63°C). Use a meat thermometer for accuracy. Garnishing: For added texture and flavor, sprinkle sesame seeds and chopped green onions just before serving. This enhances both the appearance and taste of the dish. {{image_2}} You can easily swap some ingredients for different flavors. If you need a gluten-free option, use tamari instead of soy sauce. For a vegan twist, try maple syrup in place of honey. You can also use agave syrup if you want a lighter sweetness. If you don't have fresh ginger, ground ginger works too, but use less. To make it even better, add some spices. A pinch of red pepper flakes gives heat. You can mix in orange juice for a citrus touch. A splash of rice vinegar adds a nice zing. Fresh herbs like cilantro or basil give a fresh taste. You can also add sesame oil for extra richness. You can cook honey garlic glazed salmon in various ways. Baking is easy and keeps the fish moist. Grilling adds a smoky flavor and nice grill marks. Pan-searing gives you a crisp skin and quick cooking time. You can also use an air fryer for a quick, crispy finish. Each method brings out different tastes and textures. To keep your honey garlic glazed salmon fresh, let it cool first. Place it in an airtight container. Store it in the fridge for up to three days. Make sure to keep it sealed to avoid drying out. If you have extra sauce, store that separately. It adds great flavor when you reheat! You can freeze the salmon, too! Wrap each fillet tightly in plastic wrap. Then, place them in a freezer-safe bag. Remove as much air as you can. This helps prevent freezer burn. Frozen salmon will stay good for up to three months. Just remember to label the bag with the date! When you're ready to enjoy leftovers, reheat with care. Place the salmon in a baking dish. Cover it with foil to keep it moist. Heat in the oven at 350°F (175°C) for about 15 minutes. If you prefer the microwave, use a low power setting. Heat for 30 seconds at a time until warm. Enjoy the delicious flavor again! You should marinate the salmon for at least 30 minutes. This gives the flavors time to soak in. However, you can marinate it for up to 2 hours. This longer time will deepen the taste. Avoid marinating for more than 2 hours. The fish can become too salty or mushy. You can serve this salmon with a variety of sides. Here are some great ideas: - Steamed broccoli - Brown rice - Quinoa - Mashed potatoes - Mixed green salad These sides balance the sweet and savory flavors of the salmon. You can also add a squeeze of lemon for a fresh kick. Yes, you can use skinless salmon fillets. The glaze will still stick well and taste great. Skin adds texture and helps keep the fish moist, but skinless works just fine. Make sure to watch the cooking time closely, as skinless fillets may cook faster. You learned about the key ingredients for a tasty honey garlic glazed salmon. We covered how to prepare the marinade, marinate the salmon, and bake and broil it perfectly. I shared tips for marinating and cooking techniques to get a nice glaze. You also got options for ingredient swaps and storage tips for leftovers. In conclusion, this dish is easy and delicious. Try it today for a tasty meal!

Honey Garlic Glazed Salmon Tasty and Simple Recipe

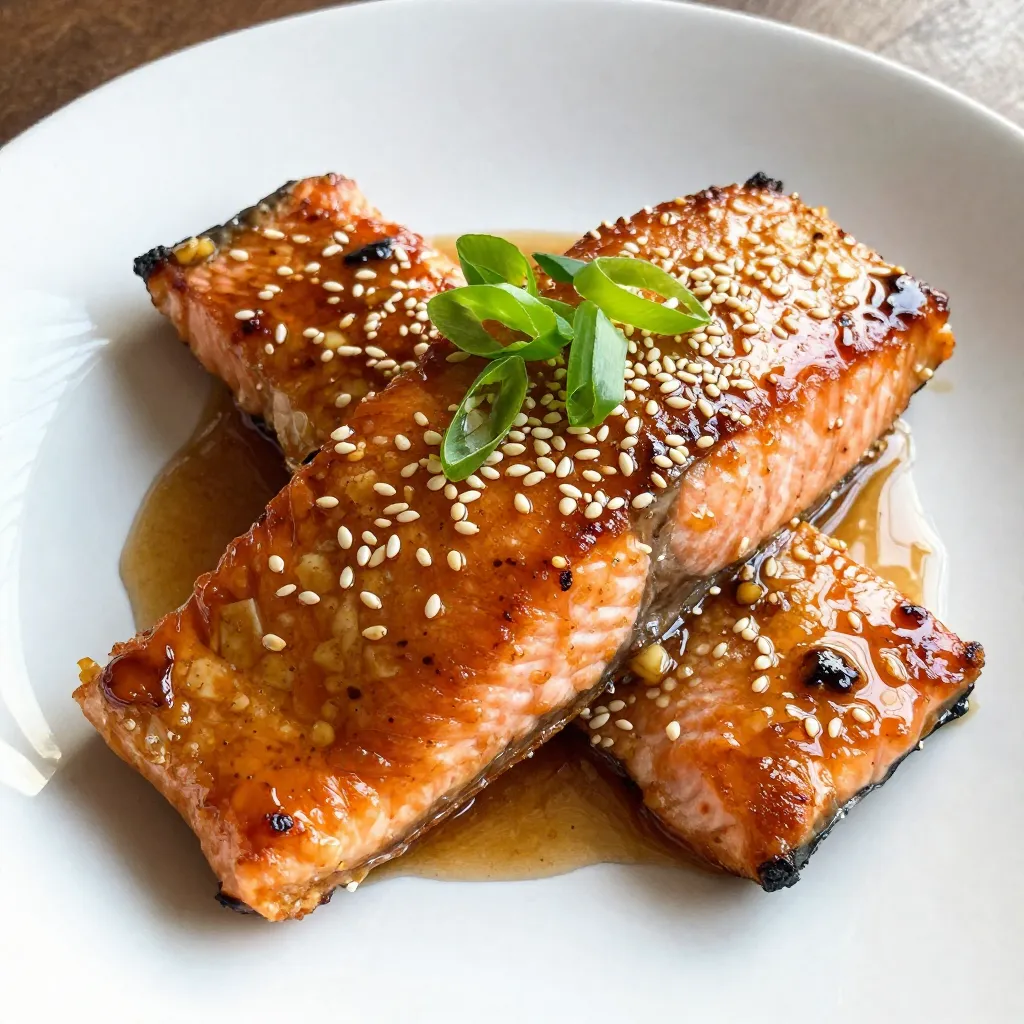
Looking for a dish that’s simple, tasty, and sure to impress? Honey garlic glazed salmon is your answer! With just

To make coconut lime rice, gather these simple ingredients: - 1 cup jasmine rice - 1 cup coconut milk - 1 cup vegetable broth or water - 1 tablespoon lime juice - Zest of 1 lime - 1 tablespoon sugar (optional, for sweetness) - 1/2 teaspoon salt - Fresh cilantro, chopped (for garnish) - Lime wedges (for serving) If you need to swap some items, here are good options: - Use basmati rice instead of jasmine rice for a different flavor. - Replace coconut milk with almond milk for a lighter taste. - Water can work instead of vegetable broth if you want a simpler base. - For a less sweet dish, skip the sugar. Feel free to get creative with these add-ins: - Add diced bell peppers for color and crunch. - Mix in peas for a pop of green and sweetness. - For spice, toss in a pinch of red pepper flakes. - You can also stir in some toasted coconut for extra texture. This coconut lime rice pairs well with many dishes. Enjoy experimenting with your own twists! {{ingredient_image_1}} Start by rinsing the jasmine rice. Place the rice in a fine mesh strainer. Run cold water over it until the water runs clear. This step washes away excess starch. It helps the rice stay fluffy and not sticky. In a medium saucepan, combine the rinsed rice with coconut milk, vegetable broth, lime juice, lime zest, and salt. If you like a bit of sweetness, add sugar. Stir until everything is mixed well. Now, bring the mixture to a boil over medium-high heat. As soon as it boils, reduce the heat to low. Cover the pot and let it simmer for about 15 to 20 minutes. The rice will absorb the liquid and become tender. After cooking, remove the pot from heat. Let it sit covered for another 5 to 10 minutes. This resting time helps the rice fluff up nicely. Once the rice has rested, use a fork to fluff it gently. This helps separate the grains. Serve the coconut lime rice warm. Garnish with fresh cilantro on top and add lime wedges on the side for extra flavor. This dish pairs well with grilled meats or spicy dishes. Enjoy the bright and zesty taste! To get fluffy rice, always rinse jasmine rice first. This step helps remove excess starch. Rinse until the water runs clear. This helps keep your rice from clumping together. After cooking, let the rice sit covered for 5-10 minutes. This extra time allows it to steam and become light. Add lime zest to give a bright flavor. If you like things sweeter, try adding sugar. A tablespoon works well, but you can skip it if you want. Fresh cilantro makes a great garnish. It adds color and a fresh taste. If you love heat, add chopped jalapeños for a spicy kick. Don’t skip rinsing the rice. It can lead to sticky rice. Also, make sure to measure liquids carefully. Too much liquid can make the rice mushy. Avoid lifting the lid while cooking. Each time you lift it, steam escapes, and this can affect cooking time. Lastly, always fluff the rice gently with a fork. This keeps it light and fluffy. Pro Tips Rinse the Rice: Rinsing jasmine rice helps to remove excess starch, resulting in fluffier rice that doesn't stick together. Use Full-Fat Coconut Milk: For a richer and creamier texture, opt for full-fat coconut milk instead of light versions. Adjust Sweetness: The sugar is optional; adjust according to your taste preference for a balanced flavor between sweet and tangy. Garnish Generously: Fresh cilantro and lime wedges not only enhance presentation but also add a fresh burst of flavor to the dish. {{image_2}} You can use different types of rice for coconut lime rice. Jasmine rice is the best choice. It has a nice floral aroma and a soft texture. If you want a nutty flavor, try basmati rice. You can also use long-grain white rice. It cooks well and has a light texture. For a healthier option, use brown rice. Just remember, brown rice takes longer to cook. This dish is naturally vegan since it uses coconut milk. If you want to make it gluten-free, ensure your broth is gluten-free. You can also swap the sugar for maple syrup or agave nectar for a different sweet taste. For a low-carb option, use cauliflower rice. It absorbs flavors well and gives a nice base for the dish. Coconut lime rice pairs well with many proteins. Try it with grilled chicken or shrimp for a tasty meal. It also goes great with tofu for a vegan option. Add some sautéed vegetables like bell peppers or snap peas for extra color and nutrition. Serve it with lime wedges for a fresh kick. This dish is versatile and can complete any meal. To store Coconut Lime Rice, let it cool first. Place it in an airtight container. Make sure to keep it in the fridge. It will stay fresh for about three to four days. If you want to keep it longer, freezing is a great option. When you reheat coconut lime rice, use a microwave or a stovetop. For the microwave, put the rice in a bowl. Add a splash of water or broth. Heat for about 1-2 minutes, stirring halfway. On the stovetop, add the rice to a pan. Add a little water and heat it over low heat. Stir until warm. To freeze coconut lime rice, place the cooled rice in a freezer bag. Squeeze out as much air as you can and seal it. Write the date on the bag. The rice can last up to three months in the freezer. When you're ready to eat it, thaw it overnight in the fridge. Then, reheat it as mentioned above. Coconut lime rice is a tasty side dish. It combines jasmine rice with coconut milk and lime. The rice has a creamy texture and a bright flavor. You cook it with lime juice and zest to add a zesty touch. It’s great with many meals. I love serving it with grilled chicken or fish. Yes, you can use brown rice instead of jasmine rice. Brown rice takes longer to cook. You will need to adjust the cooking time. Use 1 and a half cups of liquid for each cup of brown rice. Keep cooking until the rice is tender and water is absorbed. The flavor will be different, but still delicious! To make coconut lime rice less sweet, skip the sugar. The coconut milk provides some natural sweetness. You can also add a bit more lime juice. This will give it a nice tangy taste. Another option is to use low-sugar coconut milk. Adjust the balance to fit your taste. This post covered all you need to know about making Coconut Lime Rice. We explored the ingredients, cooking steps, and even tips for perfection. I shared ways to customize the dish to fit your taste and diet. You learned how to store and reheat it for later enjoyment. Coconut Lime Rice can be a fun, easy dish to make. Perfect for meals or gatherings, it brings a burst of flavor that everyone will love. Happy cooking!

Coconut Lime Rice Flavorful and Easy Side Dish

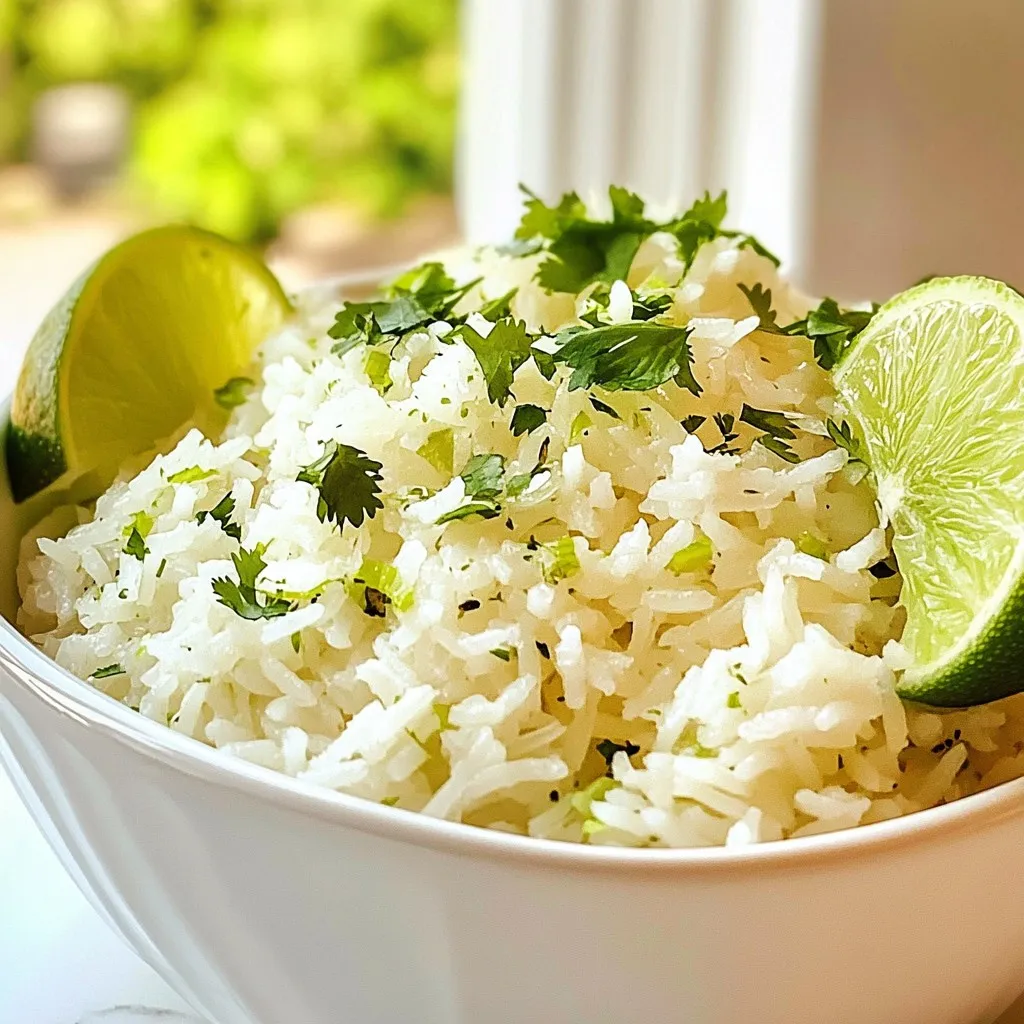
Are you ready to elevate your meal game? Coconut Lime Rice is a flavorful and easy side dish that pairs

To make Minute Lemon Pepper Chicken, gather these key ingredients: - 4 boneless, skinless chicken breasts - 2 tablespoons olive oil - 1 teaspoon lemon zest - 2 tablespoons fresh lemon juice - 2 teaspoons freshly cracked black pepper - 1 teaspoon garlic powder - Salt to taste These basics create a tasty and quick meal for everyone. Fresh ingredients bring this dish to life. The lemon zest adds bright notes. Fresh lemon juice balances the rich taste of chicken. Black pepper gives a nice kick. Garlic powder adds depth without being overpowering. Together, they create a burst of flavor in every bite. Garnishing makes the dish more appealing. I love to use fresh parsley. It adds a lovely green color and fresh taste. You can also use lemon slices for extra zest. These small touches make your plate look and taste better. {{ingredient_image_1}} To make a great marinade, start with a large bowl. Add 2 tablespoons of olive oil. Then, mix in 1 teaspoon of lemon zest. Next, pour in 2 tablespoons of fresh lemon juice. Now, add 2 teaspoons of black pepper and 1 teaspoon of garlic powder. Don't forget to add salt to taste. Stir everything well. This mix will give your chicken a zesty flavor. Now, take 4 boneless, skinless chicken breasts. Place them in the bowl with the marinade. Make sure each breast is covered well. Let the chicken sit in the marinade for 15 minutes. This helps the flavors soak in. Heat a large skillet over medium-high heat. Once the skillet is hot, add the marinated chicken breasts. Make sure they are in a single layer. Cook for 5 minutes on one side. Flip the chicken and cook for another 5 minutes. The chicken should be golden brown and cooked through. Check that the internal temperature reaches 165°F (75°C). When done, take the chicken out of the skillet. Let it rest for a few minutes. This helps keep the juices inside. After resting, slice the chicken into pieces. Arrange the sliced chicken on a nice platter. Drizzle any remaining pan juices over the top. This adds extra flavor and keeps it moist. If you want, you can garnish with fresh parsley. It adds a nice color and freshness to the dish. Serve your Minute Lemon Pepper Chicken with sides like rice or salad for a full meal. Enjoy your delicious creation! To marinate chicken well, mix the marinade in a bowl first. Use olive oil, lemon zest, lemon juice, black pepper, garlic powder, and salt. Ensure all ingredients blend well. Add the chicken and coat each piece evenly. Let it soak for at least 15 minutes. This step adds flavor and moisture to the chicken. Juicy chicken breasts need careful cooking. First, use medium-high heat on your skillet. This helps to sear the chicken well. Cook each side for about five minutes. Check the internal temperature with a meat thermometer. It should reach 165°F (75°C). After cooking, let the chicken rest. This lets the juices distribute evenly, making each bite tender. To save time, prepare your marinade while the skillet heats. This cuts down on wait time. Also, use a large skillet to cook all chicken pieces at once. If you have leftovers, slice them to cool faster. You can also double the recipe for meal prep. Enjoy your delicious meal in just 30 minutes! Pro Tips Marinate Longer for Intense Flavor: If time permits, marinate the chicken for at least 30 minutes or even up to 2 hours. This will enhance the flavors, making the chicken even more delicious. Don’t Crowd the Pan: Ensure the chicken breasts are spaced out in the skillet. Crowding can lead to steaming instead of searing, preventing that lovely golden crust. Use a Meat Thermometer: To ensure the chicken is perfectly cooked, use a meat thermometer. The internal temperature should reach 165°F (75°C) for safe consumption. Rest the Chicken: After cooking, let the chicken rest for 5 minutes before slicing. This allows the juices to redistribute, keeping the meat moist and tender. {{image_2}} You can change the flavor of Minute Lemon Pepper Chicken by adding herbs. Fresh herbs like rosemary or thyme can add a nice touch. Just chop them up and mix them into the marinade. You can also try dry herbs, like oregano or basil, for a different taste. If you love heat, add a pinch of red pepper flakes. They will bring a nice kick to the dish. You don't have to use a skillet to cook this chicken. You can grill it for a smoky flavor. Just heat the grill and cook the chicken for about five minutes on each side. You can also bake it in the oven. Preheat the oven to 375°F (190°C) and bake for 25 minutes. Both methods keep the chicken juicy and full of flavor. Pairing your chicken with the right sides makes the meal special. A fresh salad with greens adds crunch and color. You can also serve it with rice or quinoa for a filling option. Roasted vegetables, like asparagus or broccoli, add health benefits and taste. For a comforting dish, mashed potatoes work well too. Each side brings a new layer to this tasty chicken. After you enjoy your Minute Lemon Pepper Chicken, store any leftovers in an airtight container. This keeps the flavors fresh. Let the chicken cool to room temperature first. Refrigerate it within two hours to prevent bacteria growth. Properly stored, it will last for up to three days. When you’re ready to eat the leftovers, reheat them gently. You can use the microwave or a skillet. If you use a microwave, cover the chicken to keep it moist. Heat in short bursts, checking often. In a skillet, add a splash of water or broth to keep it juicy. Heat on medium until warm. If you want to save your lemon pepper chicken for later, freezing is a great option. Cut the chicken into slices and place it in a freezer-safe bag. Remove as much air as possible. Label the bag with the date. You can freeze it for up to three months. Thaw it overnight in the fridge before reheating. This helps keep the flavor intact. You should marinate the chicken for at least 15 minutes. This short time allows the flavors to seep in. The olive oil, lemon juice, and spices create a tasty mix. If you have more time, marinate it for up to an hour. This will deepen the flavor even more. Yes, you can use chicken thighs instead of breasts. Thighs have more fat, making them juicier. They also add a rich taste to the dish. Just keep in mind that cooking times may vary. Cook thighs until they reach an internal temperature of 165°F (75°C). Lemon pepper chicken pairs well with many sides. Here are some tasty ideas: - Steamed broccoli or green beans for freshness - Rice or quinoa for a filling base - A crisp salad with lemon vinaigrette for a light touch - Mashed potatoes for comfort and heartiness These sides balance the zesty chicken well and make your meal complete. Enjoy your cooking! This blog post walked you through making delicious lemon pepper chicken. You learned about essential ingredients, fresh flavors, and tasty garnishes. The step-by-step guide showed how to prepare, cook, and serve the chicken. Tips helped you marinate well and keep the meat juicy. You discovered variations and storage info for leftovers, making this dish flexible. By using these methods, you can enjoy a fantastic meal every time. Happy cooking!

Minute Lemon Pepper Chicken Quick and Tasty Meal

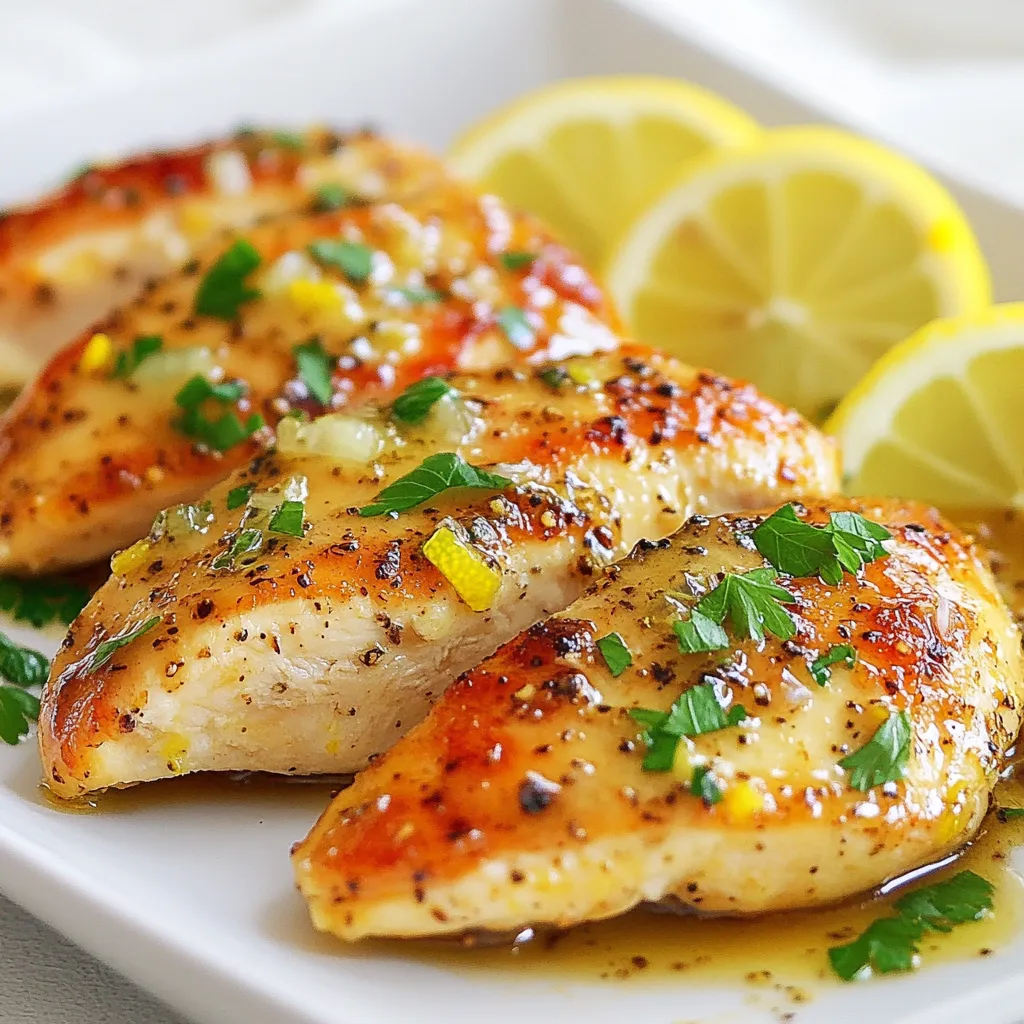
Looking for a quick and tasty recipe that bursts with flavor? You’ll love this Minute Lemon Pepper Chicken! This dish

Older posts
Newer posts
← Previous Page1 … Page150 Page151 Page152 … Page164 Next →

dsad

© 2026 easycookingbite • Built with GeneratePress

Our Policies

  • Copyright Policy
  • Cookie Policy
  • GDPR Policy
  • Privacy Policy
  • Disclaimer
  • Terms Of Use

More Information

  • Home
  • About
  • Contact
  • Appetizers
  • Dessert
  • Dinner
  • Drinks
©2026, easycookingbite About Back To Top