Skip to content
DisclaimerTerms Of UseGDPR PolicyCookie Policy

easycookingbite

  • Home
  • Drinks
  • Appetizers
  • Dinner
  • Dessert
  • About
  • Contact
  • Privacy Policy
DisclaimerTerms Of UseGDPR PolicyCookie Policy

Lily

- 1 lb ground beef (or turkey) - 1 teaspoon garlic powder - 1 teaspoon onion powder - 1 teaspoon paprika - Salt and pepper to taste - 4 large flour tortillas - 1 cup shredded cheddar cheese - 1 cup lettuce, shredded - 1 large tomato, diced - 1/2 cup pickles, sliced To start, you need the main ingredients for the cheeseburger wrap. Ground beef or turkey is your protein base. Garlic powder, onion powder, and paprika add great flavor. I suggest using large flour tortillas, as they hold everything nicely. Shredded cheddar cheese melts well and adds richness. You can’t forget the veggies! Use shredded lettuce, diced tomato, and sliced pickles for crunch. - 1/2 cup mayonnaise - 1 tablespoon ketchup - 1 tablespoon mustard For the sauce, mix mayonnaise, ketchup, and mustard. This special sauce ties all the flavors together. You can adjust the amounts to your taste. The toppings add color and texture to your wrap. - Alternative proteins (chicken, plant-based) - Spices and herbs for extra flavor You can customize these wraps easily. Try ground chicken or plant-based options for a different twist. Add spices like cumin or herbs like cilantro for more flavor. The choice is yours! {{ingredient_image_1}} To start, heat a large skillet over medium heat. Add 1 pound of ground beef or turkey. Break it apart with a spatula as it cooks. Season it well with 1 teaspoon each of garlic powder, onion powder, and paprika. Don't forget to add salt and pepper to taste. Cook until the meat turns brown and is no longer pink. After that, drain any excess grease. This keeps your wrap from being soggy. Grab a small bowl. Mix together 1/2 cup of mayonnaise, 1 tablespoon of ketchup, and 1 tablespoon of mustard. Stir until well combined. This special sauce adds a tasty kick to your wrap. It's creamy and tangy, just like a classic burger sauce. Now, warm your tortillas. You can use a dry skillet or microwave them for a few seconds. Lay each tortilla flat on a clean surface. Spread a spoonful of the special sauce in the center of each tortilla. Next, spoon some cooked ground beef on top of the sauce. Layer on 1 cup of shredded cheddar cheese, followed by the shredded lettuce, diced tomato, and sliced pickles. To fold the wrap, first, fold in the sides of the tortilla. Then, roll it up from the bottom tightly. This helps keep all the tasty fillings inside. Place the wrapped tortillas seam-side down in the skillet over medium heat. Cook each side for about 2 to 3 minutes. You want them to be golden brown and crispy. This adds a nice crunch to your wrap. Once done, remove them from the skillet. Let them cool for a minute before cutting them in half. This reveals the gooey cheese and colorful fillings inside. Enjoy! To cook ground meat well, start with a hot skillet. This helps sear the meat and lock in juices. Stir the meat often to ensure even cooking. Use a spatula to break up any large clumps. Season it with garlic powder, onion powder, and paprika. This enhances the flavor. Watch for any excess grease and drain it away before using the meat in your wraps. You can heat tortillas in a few ways. Skillet heating gives them a nice crisp. Simply place them in a dry, hot skillet for a few seconds. In the microwave, warm them for 10-15 seconds. This keeps them soft and easy to roll. Avoid the oven unless you want them very crispy. Each method has its charm, so choose what you like best. When serving your cheeseburger wraps, think about presentation. Cut them in half to show off the colorful filling. Serve with extra pickles on the side. A small bowl of the special sauce makes a great dip. You can also add a side salad or some fries for extra crunch. These small touches make your meal look fun and inviting. Pro Tips Use Lean Meat: Opt for lean ground beef or turkey to reduce excess grease and make the wraps lighter and healthier. Customize Your Sauce: Feel free to add spices like smoked paprika or a dash of hot sauce to the special sauce for an extra flavor kick! Cooking the Wraps: Ensure the skillet is preheated for a perfect golden-brown crust. Don't overcrowd the skillet; cook in batches if necessary. Extra Crunch: Add crispy bacon bits or fried onions inside for an added crunch and flavor dimension to your wraps. {{image_2}} You can switch up the protein in your cheeseburger wrap. Instead of ground beef, try ground chicken or turkey. These options have less fat and can still pack a great flavor. If you want to go plant-based, use lentils or a meat substitute. Each choice brings its own taste and texture to the wrap. To make your wrap even better, add some sautéed onions or jalapeños. These ingredients bring a nice kick and add depth. Avocado is another tasty choice. It adds creaminess and pairs well with the other flavors. Be bold and mix in your favorite toppings to make it your own. If you need gluten-free options, look for gluten-free tortillas. They work just as well, and you won’t miss the gluten. For a low-carb option, try lettuce wraps instead. They are fresh and light, making your meal healthier. Each of these choices allows you to enjoy the wrap while sticking to your dietary needs. To store your cheeseburger wraps, let them cool first. Place them in an airtight container. You can keep them in the fridge for up to three days. If you want to keep them fresh, wrap each one in plastic wrap or aluminum foil before placing them in the container. This helps prevent them from getting soggy. To reheat your wraps and keep them crispy, use a skillet. Heat it over medium heat and place the wrap seam-side down. Cook for about two minutes on each side until warm and crispy. You can also use an air fryer. Set it to 350°F and heat for about five minutes. This method keeps the outside nice and crunchy. If you want to make wraps ahead of time, freezing is a great option. First, let the cooked wraps cool completely. Then, wrap each one tightly in plastic wrap. Place them in a freezer bag or airtight container. They can last for up to three months in the freezer. To eat, thaw in the fridge overnight and reheat as mentioned above. Yes, you can make these wraps ahead of time. Here are some tips: - Prep the filling: Cook the ground beef and mix the special sauce. - Store separately: Keep the filling and tortillas apart to prevent sogginess. - Refrigerate: Place the filling in an airtight container. Store tortillas in a zip-top bag. - Assemble before serving: Wrap just before you eat to keep everything fresh. If you want alternatives to flour tortillas, here are some ideas: - Corn tortillas: Great for gluten-free options. - Lettuce wraps: Perfect for low-carb diets. - Whole wheat tortillas: A healthier choice packed with fiber. - Spinach or tomato wraps: Add color and flavor to your meal. To check if your ground meat is fully cooked, follow these guidelines: - Use a thermometer: Ground beef should reach 160°F (71°C) for safety. - Look for color: The meat should be brown with no pink spots. - Check texture: It should be firm and crumbly, not mushy. - Smell test: It should smell rich and savory, not off or sour. You now have all the steps to create a tasty cheeseburger wrap. You learned about the main ingredients, how to prepare them, and the best tips. Remember, you can customize the wraps with different proteins and toppings. Store any leftovers correctly to keep them fresh. Try these easy recipes and make meal prep fun. Enjoy your cooking, and let your creativity shine!

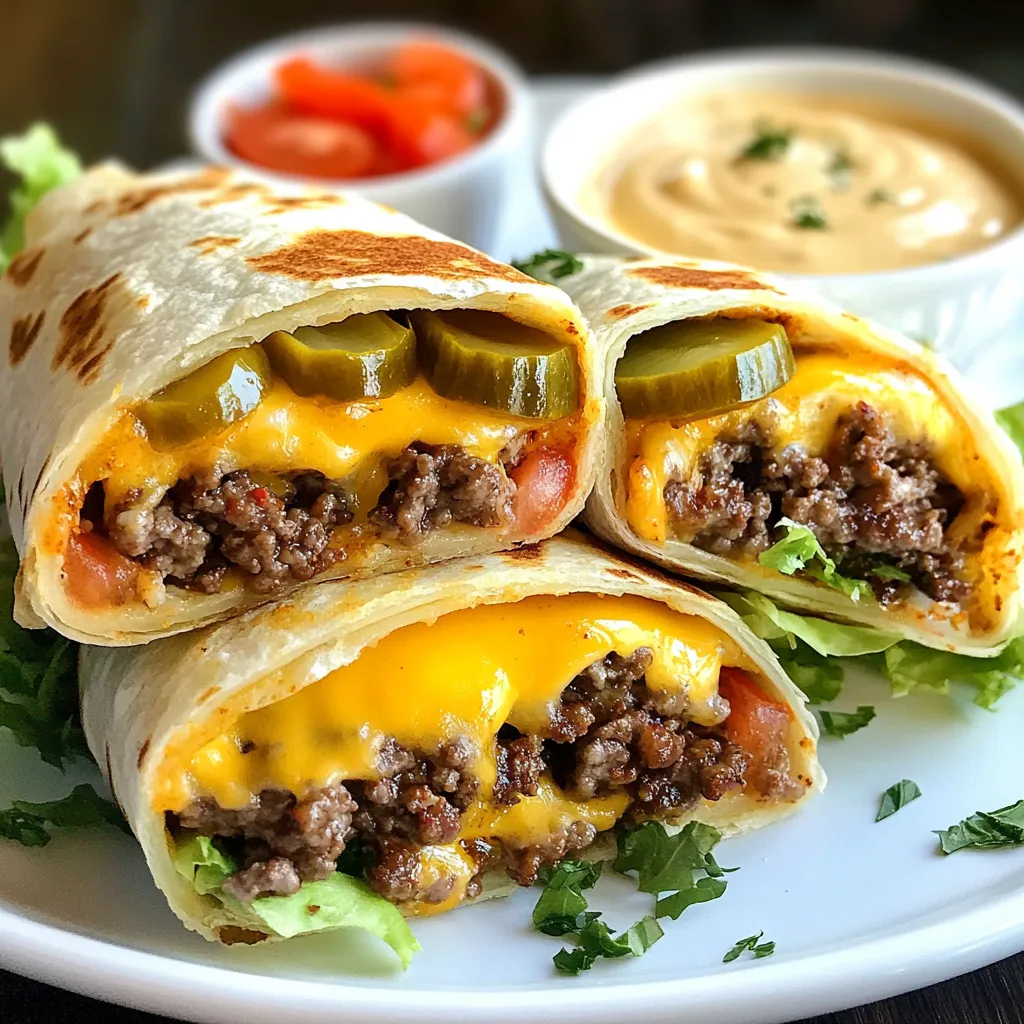
Cheeseburger Wrap Hack Flavorful and Simple Recipe

Are you craving a tasty, easy meal that’s packed with flavor? The Cheeseburger Wrap Hack is your new go-to recipe!

- 1 lb ground chicken (or turkey) - 1/2 cup breadcrumbs - 1/4 cup fresh cilantro, chopped - 2 garlic cloves, minced - 1 can (14 oz) coconut milk - 2 tablespoons red curry paste - 1 tablespoon fish sauce (or soy sauce) - 1 tablespoon brown sugar - 1 bell pepper, sliced - 1 cup spinach leaves - Juice of 1 lime - Optional: Cooked jasmine rice or quinoa for serving The ingredients for Thai coconut curry meatballs are simple yet packed with flavor. You start with ground chicken or turkey, which keeps the dish light and tender. The breadcrumbs help bind everything together. Fresh cilantro and garlic add a burst of freshness that really shines through. Next, the coconut milk creates a creamy base. The red curry paste gives it that signature kick. You can choose fish sauce for a savory depth or soy sauce for a vegetarian twist. Brown sugar balances the spice with a hint of sweetness. For the veggies, bell pepper adds crunch and color, while spinach gives a nice green boost. The lime juice at the end brightens the dish and ties all the flavors together. If you want to make it a meal, serve it over jasmine rice or quinoa. It's a perfect way to soak up that delicious sauce! {{ingredient_image_1}} In a large bowl, I start by combining ground chicken, breadcrumbs, chopped cilantro, minced garlic, grated ginger, lime zest, salt, and pepper. I mix these ingredients until just combined. This step is key for flavor and texture. Next, I shape the mixture into small meatballs, about 1 inch wide. I place them on a plate and set them aside. This allows me to prepare for cooking without delay. I heat a splash of oil in a large skillet over medium heat. I add the meatballs in batches, browning them for 5-7 minutes until golden all over. Once done, I remove them and set them aside. This step locks in the flavor. In the same skillet, I reduce the heat to low. I add coconut milk, red curry paste, fish sauce, and brown sugar. I whisk these ingredients until smooth and combined. This sauce will bring all the flavors together. I add sliced bell pepper to the sauce and cook for about 5 minutes until it softens. Then, I return the meatballs to the skillet. I cover it and let it simmer for 10-15 minutes. This helps the meatballs cook through and soak up the sauce. In the last few minutes, I stir in the spinach leaves until they wilt. I squeeze fresh lime juice over the dish just before serving. This adds a bright finish and enhances all the flavors. To make great meatballs, mix the ingredients well but don’t overwork them. Overmixing makes them tough. Use your hands gently to combine ground chicken, breadcrumbs, cilantro, garlic, ginger, lime zest, salt, and pepper. This keeps the meatballs tender and juicy. The curry sauce is where the magic happens. Start with red curry paste and adjust it to your taste. If you like heat, add more paste. For a milder flavor, use less. The balance of coconut milk, fish sauce, and brown sugar enhances the sauce's depth. Whisk until smooth for a creamy texture. Garnish your dish for a pop of color and flavor. Fresh cilantro and lime wedges brighten the plate. Serve the meatballs over fluffy jasmine rice or quinoa. The grains soak up the sauce well, making each bite delicious. You can add sliced bell peppers for extra crunch on top. Enjoy this dish with your favorite sides, like steamed greens or a fresh salad. Pro Tips Use Fresh Herbs: Fresh cilantro adds a burst of flavor to your meatballs, but you can also experiment with mint or basil for a unique twist. Control the Spice: Adjust the amount of red curry paste based on your spice preference. Start with a smaller amount and add more if desired. Perfectly Cooked Meatballs: Ensure your meatballs are cooked through by using a meat thermometer; they should reach an internal temperature of 165°F (75°C). Serving Suggestions: For a complete meal, serve these meatballs over steamed jasmine rice or quinoa, and don’t forget a wedge of lime for extra zest! {{image_2}} You can switch up the meat for your Thai coconut curry meatballs. Using ground turkey is a great option. It keeps the dish light yet tasty. Ground pork also works well and adds a nice richness. If you want to try something plant-based, use lentils or chickpeas. They provide protein and a hearty texture. Just make sure to adjust your cooking times based on what you choose. Making a vegan version is simple and fun. Instead of meat, use chickpeas or lentils. Both of these ingredients soak up the curry flavors. Start with cooked chickpeas or lentils to save time. You can also add more vegetables like zucchini or carrots for extra nutrition. Don’t forget to use soy sauce instead of fish sauce for that umami punch. To make your dish even more exciting, consider adding flavor boosters. Lime leaves give a fresh, zesty note. You can find them at many grocery stores. Fresh basil is another great addition. It brings a lovely aroma and bright flavor. You can also try adding a splash of lime juice just before serving. This adds a nice kick to the dish! To keep your Thai Coconut Curry Meatballs fresh, store leftovers in the fridge. Place them in an airtight container. They stay good for about three to four days. Make sure to cool them down before sealing. If you want to save some for later, freezing is a great option. First, let the meatballs and sauce cool. Then, put them in freezer-safe bags or containers. Squeeze out as much air as you can. They can last up to three months in the freezer. When you're ready to enjoy your meatballs again, reheat them gently. You can use the stove or microwave. If using the stove, add a splash of water to keep the sauce moist. Heat on low until warmed through. This way, the meatballs stay soft and the sauce stays flavorful. Yes, you can use frozen meatballs. They will need longer cooking time. I suggest adding them to the sauce for about 20 minutes. This will help the meatballs heat through and soak up some flavor. However, fresh meatballs provide better taste and texture. This dish works great for meal prep. You can make it ahead and store in the fridge. It stays fresh for about three days. Just reheat it gently and add a splash of water if needed. You can also freeze it for up to three months. If you want a substitute for fish sauce, try soy sauce. It adds a similar savory taste. Another option is mushroom sauce, which is great for vegetarians. Both will still give you a tasty dish. The spice level can vary based on the red curry paste. If you like it mild, use less paste. For more heat, add more paste or some chili flakes. Taste the sauce as you go to find your perfect heat. This blog post covered a tasty meatball and coconut curry recipe. You learned to blend chicken, fresh herbs, and spices for perfect meatballs. Cooking them in a rich coconut sauce with vegetables enhances flavor and texture. Tips on variations, storing, and reheating ensure your dish remains delectable. By trying this recipe, you can impress your family and friends. Enjoy your culinary adventure, and don’t hesitate to modify it to fit your taste!

Thai Coconut Curry Meatballs Flavorful and Simple Dish

If you love bold flavors and easy cooking, you’ll adore these Thai Coconut Curry Meatballs. This dish combines tender meatballs

- 1 lb sirloin steak, cut into bite-sized cubes - 4 tablespoons unsalted butter - 5 cloves garlic, minced - 1 teaspoon fresh rosemary, chopped (or ½ teaspoon dried) - 1 teaspoon fresh thyme, chopped (or ½ teaspoon dried) The main ingredients for garlic butter steak bites are simple yet impactful. Sirloin steak is tender and full of flavor. It’s easy to find and cooks quickly. Unsalted butter gives a rich taste. Fresh garlic adds a strong aroma and taste. Using fresh herbs like rosemary and thyme makes the dish pop. Fresh herbs bring brightness, while dried versions are a good backup. - Salt and pepper - Fresh parsley, chopped (for garnish) Seasoning with salt and pepper is key. It enhances the meat's natural flavor. Fresh parsley adds color and a hint of freshness when you serve the dish. Don’t skip these garnishes; they elevate the meal. - Choosing the right steak: Look for a cut with good marbling. Marbling gives flavor and tenderness. Sirloin is a great choice, but ribeye or filet mignon can work too. - Alternatives for fresh herbs: If you can’t find fresh herbs, dried ones are fine. Use half the amount of dried herbs to keep the taste balanced. You can also try other herbs like oregano or basil for a twist. {{ingredient_image_1}} - Seasoning the steak Start by cutting the sirloin steak into bite-sized cubes. Take a bowl and sprinkle salt and pepper all over the steak. Make sure to coat each piece well. This seasoning makes the steak tasty. - Letting the steak rest After seasoning, let the steak sit at room temperature for 15-20 minutes. This step helps the flavors blend in better. It also helps the steak cook evenly when you put it in the pan. - Melting butter in the skillet Grab a large skillet and place it on the stove. Turn the heat to medium-high and add 2 tablespoons of unsalted butter. Wait until the butter starts to sizzle. Be careful not to let it brown. - Searing the steak bites Once the butter is hot, add the steak cubes in a single layer. If you have a lot, cook them in batches. Sear for 2-3 minutes without moving them. This gives a nice brown crust. Then, flip them over and cook for another 1-2 minutes. Aim for a nice medium-rare doneness. - Adding garlic and herbs After searing, turn the heat down to medium. Push the steak bites to one side of the skillet. In the empty side, add the rest of the butter, minced garlic, rosemary, and thyme. Stir them for 1-2 minutes until you smell the garlic. - Tossing in garlic butter Mix the steak bites into the garlic butter mixture. Make sure every piece gets coated. Cook for another minute to let those flavors mix well. - Plating and garnishing Remove the skillet from the heat. Grab a serving plate and carefully transfer the steak bites. Sprinkle fresh parsley on top for a pop of color. Enjoy your delicious garlic butter steak bites! How do I achieve perfect doneness? To get perfect doneness, use a meat thermometer. For medium-rare, aim for 130°F. This method ensures you cook the steak just right every time. You can check the temperature by inserting the probe into the thickest part of the meat. Remember to pull the steak off the heat a bit early. It continues to cook while resting. How do I avoid overcooking steak? Avoid overcooking steak by keeping an eye on the time. Sear the steak bites for only 2-3 minutes on one side. Flipping them too soon can prevent that nice crust. Use a timer to stay on track. If you're unsure, take a bite. The texture will guide you. How can I add extra herbs and spices? To enhance flavor, experiment with herbs and spices. Fresh herbs like basil or oregano can add a new twist. Try adding a pinch of red pepper flakes for heat. Mix and match based on your taste. Just remember to balance flavors so one doesn't overpower the others. How can I incorporate different fats? Different fats can change the taste of your dish. Instead of butter, try olive oil for a lighter feel. You can also use ghee for a nutty flavor. Each fat adds its own unique touch. Don't be afraid to switch things up based on what you have on hand. What sides pair well with garlic butter steak bites? Garlic butter steak bites go well with many sides. Consider mashed potatoes for a creamy blend. Roasted veggies add color and crunch. A fresh salad brings a nice balance. You can even serve them with a garlic bread twist for extra flavor. What are ideal presentation tips? For presentation, use a clean white plate to make the colors pop. Arrange the steak bites neatly, allowing space for garnishes. Sprinkle chopped parsley on top for a fresh look. Adding a lemon wedge can bring a bright touch. A beautiful dish elevates the dining experience. Pro Tips Resting the Steak: Letting the steak cubes sit at room temperature before cooking helps them cook evenly and enhances their flavor. Batch Cooking: Avoid overcrowding the skillet when searing the steak bites. Cooking in batches allows for better browning and prevents steaming. Use Fresh Herbs: Fresh herbs like rosemary and thyme will provide a more vibrant flavor compared to dried ones. If using dried herbs, use them sparingly. Finishing Touch: For an extra flavor boost, squeeze a little fresh lemon juice over the steak bites just before serving to brighten the dish. {{image_2}} You can switch up the protein in your garlic butter steak bites. Sirloin steak is great, but other meats work well too. - Alternatives to Sirloin Steak Try using ribeye or tenderloin for a richer flavor. Flank steak is another option. It’s easy to cut and cooks fast. - Using Chicken or Shrimp Chicken bites are a leaner choice. Cut chicken breast into cubes and use the same method. Shrimp is also delicious! Use large shrimp and cook them for just a few minutes. Changing the flavor can make your meal exciting. Garlic butter is classic, but there are fun twists. - Spicy Garlic Butter Steak Bites Add red pepper flakes to the butter for heat. This gives a nice kick to the dish. You can also use hot sauce mixed in for extra spice. - Italian Herb-Flavored Variations Instead of just rosemary and thyme, try adding oregano and basil. This gives a fresh Italian taste. You can even use a pinch of grated Parmesan for a cheesy twist. How you cook these bites can change the taste and texture. Here are two great methods. - Grilling Versus Pan-Searing Grilling adds a smoky flavor. It’s perfect for summer! Just make sure to oil the grill well. Pan-searing gives a nice crust and is great for any time of year. - Oven-Baked Garlic Butter Steak Bites You can bake the steak bites too! Toss them in garlic butter and spread them on a baking sheet. Bake at 400°F for about 10-15 minutes. This method is simple and keeps the kitchen cool. Experiment with these options to find your favorite! To store leftovers, let the steak bites cool completely. Place them in an airtight container. You can keep them in the fridge for up to three days. Glass or plastic containers work well. Just make sure they seal tightly to keep the steak fresh. For reheating steak bites, the skillet is best. Heat a little butter or oil in the pan. Add the steak bites and cook on medium heat for about 2-3 minutes. This helps keep the steak juicy and flavorful. You can also use a microwave, but it may not keep the texture as nice. If you want to freeze the steak bites, let them cool first. Place them in a freezer-safe bag or container. Remove as much air as possible before sealing. They can last for up to three months in the freezer. When you're ready to eat, thaw them overnight in the fridge. To heat, use a skillet for the best flavor and texture. The best cut for garlic butter steak bites is sirloin. Sirloin is tender and flavorful. It cooks well and gives great bites. You can also use ribeye or tenderloin for extra richness. You can prepare garlic butter steak bites in advance. However, I suggest cooking them fresh for best flavor. You can season the steak ahead of time. Store it in the fridge for up to 24 hours. To check if steak is cooked perfectly, use a meat thermometer. Aim for 130°F for medium-rare. If you don't have a thermometer, use the touch test. Press the steak; it should feel firm but springy. Garlic butter steak bites pair well with many sides. I love serving them with garlic mashed potatoes. You can also try roasted vegetables or a fresh salad. Rice or pasta with a light sauce works too. Yes, you can use different types of butter. Try using herb-infused butter for extra flavor. You can also use ghee for a richer taste. Remember, different butters may change the taste slightly. You learned how to make delicious garlic butter steak bites. We covered key ingredients and prep steps. I shared cooking techniques and tips for great flavor. You found ideas for variations using different proteins and herbs. Remember to store and reheat leftovers properly for the best taste. Enjoy your cooking journey, and don't hesitate to get creative with your ingredients. Happy cooking!

Garlic Butter Steak Bites Savory Quick Dinner Treat

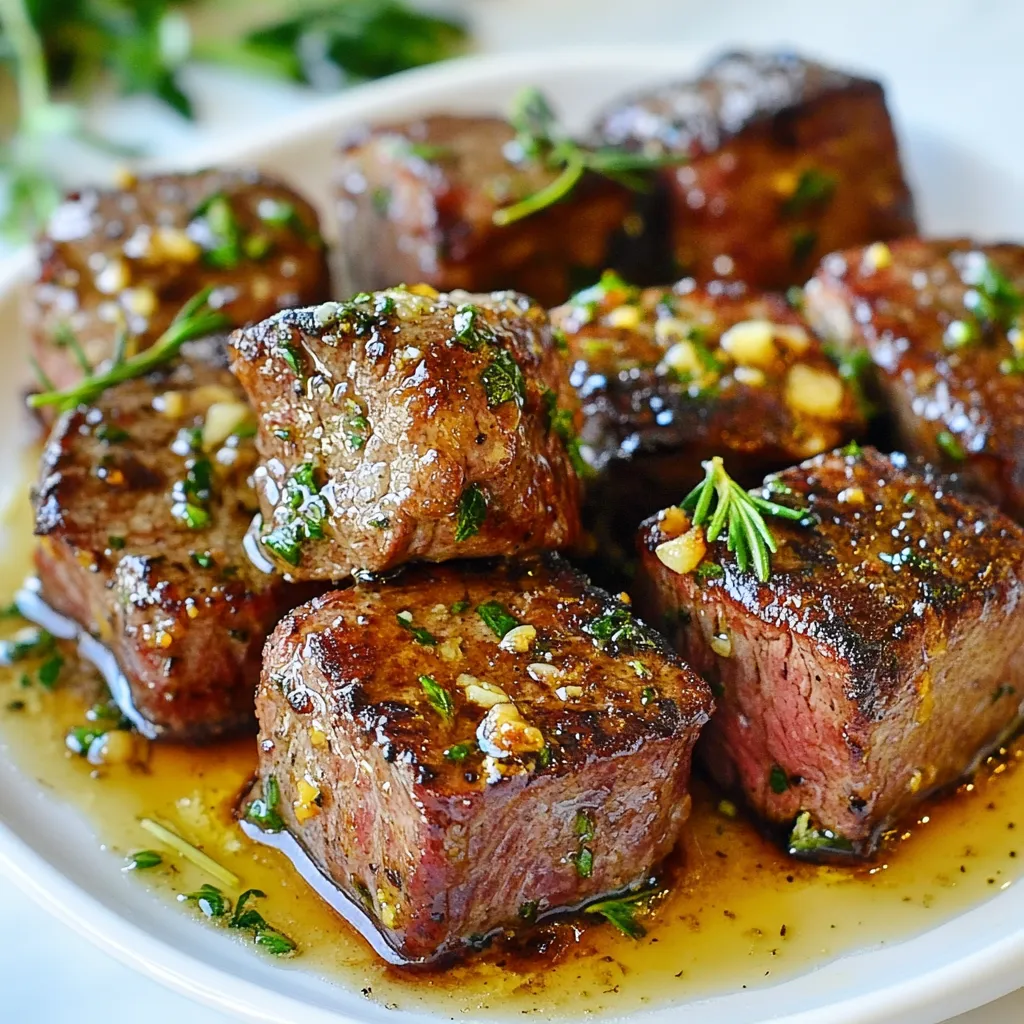
If you’re craving a quick and tasty dinner, garlic butter steak bites are a game changer. These juicy steak pieces,

- 1 pound ground turkey - 1/4 cup breadcrumbs - 1/4 cup green onions, finely chopped - 1/4 cup fresh cilantro, chopped - 1 egg, beaten - 2 cloves garlic, minced - 1 tablespoon ginger, grated - 3 tablespoons soy sauce - 2 tablespoons honey - 1 tablespoon sesame oil - 1 tablespoon rice vinegar - Salt and pepper to taste - Sesame seeds, for garnish The main base of this dish is ground turkey. It is lean and packs protein. I love using fresh herbs like cilantro and green onions for flavor. Garlic and ginger add a warm touch. The soy sauce, honey, sesame oil, and rice vinegar blend into a sweet and savory glaze. - Additional spices - Alternative coatings You can spice things up with extra flavors. Try adding red pepper flakes for heat or smoked paprika for depth. If you want a crunchy bite, consider using panko instead of regular breadcrumbs. - Rice options - Vegetable sides Serve these meatballs over fluffy rice. Jasmine or brown rice works great. For a healthy side, steamed broccoli adds color and nutrients. You could also try sautéed greens for a nice contrast. {{ingredient_image_1}} Start by gathering your ingredients in a large bowl. You need: - 1 pound ground turkey - 1/4 cup breadcrumbs - 1/4 cup green onions, finely chopped - 1/4 cup fresh cilantro, chopped - 1 egg, beaten - 2 cloves garlic, minced - 1 tablespoon ginger, grated - 3 tablespoons soy sauce - Salt and pepper to taste Combine the ground turkey, breadcrumbs, green onions, cilantro, beaten egg, garlic, ginger, and 1 tablespoon of soy sauce. Use your hands to mix well. This ensures all the flavors blend nicely. Season with salt and pepper to your liking. Now it’s time to shape the meatballs. Take a small amount of the mixture and roll it into a ball about 1 inch in diameter. This helps them cook evenly. Place each meatball on a baking sheet lined with parchment paper. Preheat your oven to 400°F (200°C). Bake the meatballs for about 20 minutes. They should be cooked through and golden brown on the outside. For the teriyaki glaze, gather these ingredients: - 2 tablespoons honey - 1 tablespoon sesame oil - 1 tablespoon rice vinegar - 2 tablespoons soy sauce In a small saucepan, combine the honey, sesame oil, rice vinegar, and the remaining soy sauce. Heat over medium heat. Stir the mixture until it simmers gently. Let it cook for about 5 minutes until it thickens slightly. Once the meatballs are baked, add them to the saucepan. Gently toss them to coat with the glaze. Serve the meatballs over rice or alongside steamed broccoli. Enjoy the flavor! To make tender meatballs, you need the right ingredient ratios. Use equal amounts of meat and breadcrumbs. This helps keep them moist. Adding chopped herbs also adds flavor and moisture. Avoid overmixing the meatball mixture. Mix just until combined. Overmixing makes the meatballs tough. When serving, a nice plate can impress. Use a white plate to make the colors pop. Place the meatballs in the center and add rice or broccoli around them. For garnishing, sprinkle sesame seeds on top. Fresh cilantro or green onions also add a bright touch. Store leftover meatballs in an airtight container. Keep them in the fridge for up to three days. To reheat, place them in a pan on low heat. Add a splash of water or broth. This helps keep them moist while warming. You can also use the microwave. Cover them with a damp paper towel to avoid drying out. Pro Tips Use Fresh Ingredients: Fresh garlic and ginger will elevate the flavor of your meatballs significantly compared to dried or powdered versions. Adjust the Sweetness: If you prefer a less sweet teriyaki glaze, reduce the amount of honey or substitute with a low-calorie sweetener. Experiment with Spices: Feel free to add spices like red pepper flakes or ground black pepper to the meatball mixture for a little heat. Meal Prep Friendly: These meatballs freeze well! Make a double batch and freeze some for an easy meal later. {{image_2}} You can swap ground turkey for other lean meats. Ground chicken or pork works well. You can also try plant-based options like lentils or chickpeas for a veggie twist. For gluten-free meals, use gluten-free breadcrumbs. You can also replace soy sauce with tamari, which is gluten-free. This keeps the flavor but meets dietary needs. Adding different herbs or spices can change the taste. Try parsley or basil for a fresh touch. A pinch of chili powder adds heat, while smoked paprika gives a nice smoky flavor. Experiment with sauces too! You can mix teriyaki with barbecue sauce for a sweet, tangy kick. Or try a spicy sriracha blend for a bolder flavor. For Asian-inspired adaptations, add sesame seeds and green onions on top. You can also serve the meatballs with rice noodles instead of rice. To give a Western-style twist, mix in Italian herbs like oregano and thyme. Serve with marinara sauce instead of teriyaki for a fun change. Teriyaki turkey meatballs are tasty and good for you. Each serving has about 250 calories. You get around 20 grams of protein, which helps build muscles. The dish has about 12 grams of fat, mostly from healthy sources like sesame oil. These meatballs also pack vitamins and minerals. Green onions and cilantro add Vitamin K. Garlic and ginger bring antioxidants. The soy sauce gives a little sodium, so keep that in mind. If you seek low-carb or low-fat meals, these meatballs fit well. Ground turkey is lean, so it has less fat than beef. You can swap breadcrumbs for almond flour to reduce carbs. Be careful with soy sauce if you have allergies. It contains soy, which is a common allergen. Use a gluten-free soy sauce if you need it. A recommended serving size is about four meatballs. This makes it easy to share with friends or family. If you need more portions, double the recipe. Just keep the meatball size the same. This way, they cook evenly and stay juicy. To make teriyaki turkey meatballs gluten-free, you can use gluten-free breadcrumbs. Many stores sell these, or you can make your own. Just pulse gluten-free bread in a food processor. Also, choose gluten-free soy sauce, like tamari. This simple swap keeps the flavor but removes gluten. Yes, you can freeze teriyaki turkey meatballs. After baking, let them cool completely. Place the meatballs in a single layer on a baking sheet. Freeze them for about an hour. Once frozen, transfer them to a freezer-safe bag. To thaw, put them in the fridge overnight. Reheat in a pan with a little sauce or in the oven at 350°F (175°C) until warm. If you want to replace the egg, there are great options. You can use a flaxseed meal. Mix 1 tablespoon of flaxseed with 2.5 tablespoons of water. Let it sit for about 5 minutes. Another option is unsweetened applesauce. Use 1/4 cup for each egg. Both work well to bind the meatballs together. Now you have all you need to make teriyaki turkey meatballs, from ingredients to serving options. You learned how to carefully mix and bake the meatballs for perfect texture. We explored tips for tender meatballs and fun flavor variations. Don't forget the nutritional facts, too, so you can enjoy them guilt-free. Remember, you can customize these meatballs to fit your taste. Get creative! Happy cooking!

Teriyaki Turkey Meatballs Flavorful and Simple Dish

Looking for a tasty and simple dish? You’re in the right place! Teriyaki turkey meatballs are packed with flavor and

- 1 ½ cups all-purpose flour - ½ cup granulated sugar - 2 teaspoons baking powder - ½ teaspoon salt - 1 teaspoon ground cinnamon - 1 large egg - ½ cup milk - ¼ cup unsalted butter, melted - 1 teaspoon vanilla extract - Cinnamon Sugar Coating Ingredients - ½ cup granulated sugar - 1 tablespoon ground cinnamon - 2 tablespoons unsalted butter, melted When making these cinnamon sugar baked donuts, it’s key to gather all your ingredients first. This helps you work smoothly. Start with all-purpose flour. It forms the base of the donuts. Granulated sugar adds the right sweetness. Baking powder gives them a nice rise. Salt enhances all the flavors. Ground cinnamon, the star spice, brings warmth. Next, you’ll need a large egg for richness. Milk adds moisture and softness. Unsalted butter, melted, adds flavor and helps with texture. Finally, for the cinnamon sugar coating, you’ll mix more granulated sugar with ground cinnamon and melted butter. This coating makes every bite a sweet treat. Having everything ready will make your baking fun and easy! Remember, the right ingredients lead to soft and fluffy donuts. Enjoy the process! {{ingredient_image_1}} - Preheat the oven to 350°F (175°C). - Grease the donut pan with a little butter or non-stick spray. - In a large bowl, combine 1 ½ cups all-purpose flour, ½ cup granulated sugar, 2 teaspoons baking powder, ½ teaspoon salt, and 1 teaspoon ground cinnamon. - Whisk these ingredients until they blend well. - In another bowl, beat 1 large egg. - Add ½ cup milk, ¼ cup melted unsalted butter, and 1 teaspoon vanilla extract to the egg. - Mix everything until smooth and creamy. - Pour the wet mix into the dry mix. - Stir gently until just combined. A few lumps are okay; do not over mix. - Use a piping bag or zip-top bag with a corner snipped off to fill each donut cavity about ¾ full. - Place the filled donut pan in the oven. - Bake for 10-12 minutes. They are ready when golden and a toothpick comes out clean. - While the donuts cool, prepare the cinnamon sugar. - In a bowl, mix ½ cup granulated sugar and 1 tablespoon ground cinnamon. - Brush each warm donut with 2 tablespoons melted butter. - Roll or dip the donuts in the cinnamon sugar until fully coated. To make your donuts soft and fluffy, avoid overmixing the batter. When you mix the wet and dry ingredients, stop as soon as they come together. A few lumps are okay. This keeps the donuts light. Also, ensure your oven is at the right temperature. An oven thermometer helps to confirm this. Using a piping bag makes filling the donut pan easier. If you don't have one, a zip-top bag works too. Just snip off a corner to pipe the batter. Monitor your baking time closely. Donuts bake quickly, so check them at 10 minutes. They should be golden and firm. Serve your warm donuts with coffee or tea. They make a great pair! For a pretty touch, add a sprig of mint to your plate. This adds color and flavor. Enjoy your treats fresh for the best taste! Pro Tips Use Room Temperature Ingredients: Allow your egg and milk to reach room temperature before mixing. This helps create a smoother batter and contributes to a fluffier donut. Don’t Overmix: When combining wet and dry ingredients, mix just until combined. Overmixing can lead to dense donuts, so keep it gentle! Experiment with Flavors: Feel free to add a pinch of nutmeg or a splash of almond extract to the batter for a unique flavor twist. Store Properly: Keep any leftover donuts in an airtight container at room temperature. They’re best enjoyed fresh but can last for a day or two. {{image_2}} You can make these donuts even more fun by adding extra flavors. Consider adding chocolate chips to the batter. This adds a sweet and rich taste. You can also incorporate nuts for crunch. Walnuts or pecans work great here. Want something seasonal? Try adding pumpkin spice instead of cinnamon. This gives a warm, cozy flavor perfect for fall. If you want a different finish, consider a glaze. A simple vanilla glaze adds sweetness. Mix powdered sugar with milk and vanilla. For chocolate lovers, a chocolate glaze is great. Melt chocolate and mix it with cream. You can also use toppings like sprinkles for color. This makes the donuts look festive and fun. You can make these donuts a bit healthier too. Try using whole wheat flour instead of all-purpose flour. This adds fiber and nutrients. If you want to cut sugar, use substitutes like honey or maple syrup. For those who prefer vegan options, swap the egg for flaxseed meal. Use plant milk instead of regular milk too. These swaps keep the taste yummy while making them lighter. Keep your baked donuts in an airtight container. This helps keep them fresh. Store them at room temperature, away from sunlight. They stay good for about 2 days. After that, they may lose some of their softness. To keep your donuts fresh for longer, use the fridge. Place them in an airtight container. They can last up to one week this way. When you want to eat one, take it out and warm it. You can microwave it for about 10-15 seconds. This will help bring back some of the soft texture. Freezing is a great way to store baked donuts. Wrap each donut in plastic wrap tightly. Then place them in a freezer-safe bag. They can last for about 3 months in the freezer. When you want to enjoy them, take them out and let them thaw. You can leave them at room temperature. Or, if you want, warm them in the oven at 350°F for about 5-7 minutes. This method keeps them soft and delicious! You can use a muffin tin instead. Just fill each muffin cup about halfway with batter. Bake as you would donuts. This makes round treats but not the classic donut shape. Use a knife to cut a hole in the center if you want. Yes, but keep in mind that almond flour is denser. You may need to adjust liquids. Start with a bit less almond flour to see how it works. This change can make a moister donut with a nice flavor. Baked donuts are lighter and fluffier. They use less oil and are often healthier. Fried donuts are richer, denser, and have a crispy outer layer. Both are tasty, but baked donuts are easier to make at home. Swap some flour for whole wheat flour. This adds fiber and nutrients. You can also reduce sugar or add applesauce for moisture. Adding nuts or fruits can boost the health factor too. Baked donuts stay fresh for about 2 days at room temperature. Store them in an airtight container. You can also refrigerate them for up to a week. For longer storage, freeze them for up to 3 months, then thaw when ready to eat. These baked donuts are easy and fun to make. We covered the best ingredients, step-by-step instructions, and helpful tips. You can change the flavor or make them healthier. Remember to store them right for the best taste. Enjoy serving these donuts warm with coffee. They will impress family and friends. Try out your favorite variations and have fun in the kitchen!

Cinnamon Sugar Baked Donuts Soft and Fluffy Treat

If you crave sweet treats, you’ll love these Cinnamon Sugar Baked Donuts. They are soft, fluffy, and coated in a

- 2 whole grain bagels - 4 large egg whites - 1/2 cup cottage cheese - 1/2 cup cooked spinach, drained and chopped - 1/4 cup diced tomatoes - 1/4 teaspoon garlic powder - Salt and pepper to taste - 1/4 cup shredded reduced-fat cheese (e.g., mozzarella or cheddar) - Fresh herbs for garnish (such as chives or parsley) This recipe starts with whole grain bagels. They add fiber and nutrients. Next, we use egg whites. They provide protein without extra fat. Cottage cheese adds creaminess and even more protein. For flavor, I add cooked spinach. It’s rich in vitamins. Diced tomatoes bring freshness and a bit of sweetness. Garlic powder adds a warm taste. Finally, we top the bagels. A pinch of salt and pepper enhances all flavors. Shredded reduced-fat cheese melts beautifully on top. Fresh herbs like chives or parsley brighten the dish. Gathering these ingredients will lead you to a tasty, high-protein breakfast! {{ingredient_image_1}} - Preheat oven to 375°F (190°C). - Prepare baking tray with parchment paper. First, you need to preheat your oven. This step helps cook the bagels evenly. While the oven warms, line a small baking tray with parchment paper. This keeps your bagels from sticking. - Combine egg whites, cottage cheese, spinach, tomatoes, and seasonings. In a medium bowl, whisk together the egg whites and cottage cheese. Add in the cooked spinach and diced tomatoes. Don't forget the garlic powder, salt, and pepper! Mix everything well until smooth. This mixture is packed with protein and flavor. - Assemble bagels and bake for 15-20 minutes. Slice the whole grain bagels in half. Place them cut side up on the prepared tray. Spoon the egg mixture over each half. Make sure to divide it evenly. Top each bagel with shredded cheese. If you love cheese, feel free to add more! Now, bake in the preheated oven for 15-20 minutes. Keep an eye on them. You want the egg to set and the cheese to melt and bubble. Once done, let them cool a bit. Enjoy your high-protein breakfast bagels! To boost the flavor of your breakfast bagels, try these ideas: - Add cooked mushrooms for a rich taste. - Mix in bell peppers for a sweet crunch. - Use fresh herbs like basil or oregano for a pop of flavor. - Experiment with spices like paprika or cumin for warmth. For seasoning, always use salt and pepper. Taste as you go for the best balance. For a great cheese melt, use shredded cheese. It melts evenly and covers well. Bake until the cheese is bubbly and slightly browned. This adds a nice crunch. To avoid soggy bagels, drain spinach well before mixing. Also, don’t overload the bagel with the egg mixture. A thin layer works best. Prep ingredients ahead of time. Chop veggies the night before. Store them in the fridge for quick access. Consider batch cooking. Make several bagels at once and store leftovers. You can enjoy a quick breakfast all week long! Just reheat them in the oven or microwave. Pro Tips Use Fresh Spinach: For the best flavor and nutrients, use fresh spinach instead of frozen. This will give your bagels a vibrant color and fresh taste. Customize Your Toppings: Feel free to add your favorite vegetables or proteins like bell peppers or turkey bacon for extra flavor and nutrition. Bake Until Just Set: Keep an eye on the bagels while baking; remove them when the egg is just set to avoid overcooking and maintain a moist texture. Experiment with Cheese: Try different types of cheese such as feta or pepper jack for a unique twist on flavor and texture. {{image_2}} You can switch up the bagel type if you want. Try gluten-free bagels for a different texture. They still taste great and work well with the toppings. If you prefer dairy-free options, use a vegan cheese. There are many tasty brands available that melt nicely. For a Mediterranean twist, add toppings like olives, feta, or artichokes. These flavors mix well with the base. If you like it smoky, try adding smoked paprika or diced bacon. For a spicy kick, sprinkle on some red pepper flakes or jalapeños. You can pair these bagels with fresh fruit or a smoothie for a balanced meal. A side of yogurt adds more protein and creaminess. For extra protein, top your bagels with sliced avocado or smoked salmon. Both options amp up the flavor and nutrition. To store baked bagels, let them cool to room temperature. Place them in an airtight container. This keeps them fresh and safe. You can also wrap them in plastic wrap for extra protection. Store the bagels in the fridge for up to three days. If you want to keep them longer, freezing is a great option. To reheat bagels, you have a few simple options. You can use a toaster, an oven, or a microwave. For the toaster, just pop them in until warm. If using an oven, preheat it to 350°F (175°C) and heat for about 5-10 minutes. The microwave works, but it might make the bagels a bit soggy. To keep the texture nice, wrap them in a paper towel while microwaving. You can freeze both uncooked and cooked bagels. For uncooked bagels, prepare them but do not bake them. Place them on a tray and freeze until firm. Then, wrap each bagel in plastic wrap and store in a freezer bag. For cooked bagels, let them cool, then wrap and freeze. To thaw, place them in the fridge overnight. Reheat them in the oven or toaster for best results. These bagels get their high protein from several sources. First, we use four large egg whites. They provide about 14 grams of protein. Next, cottage cheese adds another 14 grams. It is creamy and tasty. Cooked spinach adds some protein too, along with vitamins. Lastly, the reduced-fat cheese adds extra protein and flavor. Together, these ingredients make a filling meal. Yes, you can make these bagels ahead of time. They are great for meal prep. You can prepare the egg mixture the night before. Just mix the egg whites, cottage cheese, spinach, and tomatoes. Store it in the fridge. The next morning, assemble and bake the bagels. They stay fresh for a few days in the fridge. Absolutely! These bagels are great for meal prep. You can make a batch for the week. Store them in individual containers. Just grab one and reheat it when you need a quick meal. They fit well into a busy schedule. Add a side of fruit or yogurt for a complete breakfast. Making high-protein bagels is easy and fun. We covered the basics: ingredients like whole grain bagels and egg whites, plus tasty add-ins like spinach and garlic. I shared steps on mixing, baking, and storing these bagels. You can even switch things up with different tastes or toppings. Remember, meal prep can save you time, so make extras to enjoy later. With these tips, you can whip up a delicious and healthy meal in no time!

High Protein Breakfast Bagels Easy and Delicious Option

Looking for a simple way to boost your morning protein? Try these High Protein Breakfast Bagels! Packed with egg whites

- 4 boneless, skinless chicken breasts - 1/4 cup pure maple syrup - 2 tablespoons soy sauce (or tamari for gluten-free) - 1 tablespoon Dijon mustard - 1 tablespoon olive oil - 2 garlic cloves, minced - 1 teaspoon ginger, grated - Salt and pepper to taste For the maple chicken, you need simple, fresh ingredients. The maple syrup gives sweetness. The soy sauce adds saltiness. Dijon mustard brings a nice tang. Garlic and ginger add depth. - 1 cup jasmine rice - 1 can (13.5 oz) coconut milk - 1 cup water - 1/4 teaspoon salt Coconut rice is creamy and fragrant. Jasmine rice works best since it is soft and fluffy. Coconut milk brings a rich flavor. Salt enhances the taste of the rice. - 1/4 cup chopped fresh cilantro - Lime wedges for serving Garnishing makes the dish pop. Fresh cilantro adds color and freshness. Lime wedges give a zesty kick. You can squeeze lime over the chicken for extra flavor. This dish combines sweet, savory, and creamy elements. It’s a balanced meal that feels special. {{ingredient_image_1}} First, gather your marinade ingredients. In a bowl, whisk together 1/4 cup pure maple syrup, 2 tablespoons soy sauce, 1 tablespoon Dijon mustard, 1 tablespoon olive oil, 2 minced garlic cloves, and 1 teaspoon grated ginger. Add a pinch of salt and pepper for taste. Now, coat the 4 boneless, skinless chicken breasts well in the marinade. Make sure they are covered nicely. Cover the bowl and let it marinate for at least 30 minutes, or even overnight for more flavor. While your chicken marinates, let's prepare the coconut rice. Rinse 1 cup jasmine rice under cold water until the water runs clear. This step helps remove extra starch. In a medium saucepan, combine the rinsed rice with 1 can of coconut milk, 1 cup of water, and 1/4 teaspoon salt. Bring this mix to a boil over high heat. Once your rice is cooking, preheat your grill or a large skillet over medium heat. Take the chicken out of the marinade, letting any excess drip off. Grill or sauté the chicken for 6-7 minutes on each side. You want it to be fully cooked, reaching an internal temperature of 165°F. Keep an eye on it to ensure it doesn’t burn. In the last few minutes of cooking, take the remaining marinade and brush it onto the chicken. This will create a nice glaze. Cook until it bubbles and coats the chicken well. Now it’s time to plate your dish! Spoon a generous amount of coconut rice onto each plate. Slice the chicken and place it on top or beside the rice. For a pop of color, garnish with 1/4 cup chopped fresh cilantro and serve with lime wedges on the side. Squeeze the lime over the chicken for a fresh zing! Marinating your chicken is key. I suggest a marinating time of at least 30 minutes. For the best flavor, try to marinate overnight. This allows the flavors to soak in. When cooking chicken, always check the temperature. The chicken should reach 165°F. Use a meat thermometer for accuracy. This ensures that your chicken is safe to eat and juicy. Getting the rice right is simple. Use a water-to-rice ratio of 1:1 when cooking jasmine rice. This means you’ll need 1 cup of water for every cup of rice. After cooking, let the rice rest for 5 minutes. This helps the rice become fluffy. It allows the moisture to settle evenly throughout. For sides, consider serving a fresh salad or steamed veggies. These add color and crunch to your meal. You can also try roasted vegetables for extra flavor. As for drinks, a light white wine pairs well. If you prefer non-alcoholic, try coconut water or a refreshing lemonade. These drinks complement the dish nicely. Pro Tips Marinate for Maximum Flavor: Allow the chicken to marinate for at least 1 hour or overnight for deeper flavor penetration. Perfect Rice Texture: Rinse the jasmine rice thoroughly to remove excess starch, resulting in fluffy, non-sticky rice. Check Chicken Doneness: Use a meat thermometer to ensure the chicken reaches an internal temperature of 165°F for safe consumption. Garnish for Freshness: Don't skip the cilantro and lime wedges; they add a refreshing contrast to the sweet and savory flavors of the dish. {{image_2}} You can switch the chicken for tofu or shrimp. Tofu works great for a plant-based meal. Choose firm tofu for the best texture. Press the tofu to remove excess water. Then, cut it into cubes and marinate just like the chicken. You can cook it in a pan or grill it for extra flavor. Shrimp is another tasty choice. Use large shrimp and marinate them for about 15 minutes. Cook them for 2-3 minutes on each side until they turn pink. Both options add a unique twist to the dish. If you want more flavor, try adding spices or herbs. A pinch of chili flakes can add heat. Fresh herbs like basil or mint also work well. You can mix in some smoked paprika for a deeper taste. For rice, jasmine is perfect, but other varieties can shine too. Try basmati for a nutty flavor or brown rice for more fiber. Each choice changes the dish’s overall taste in a fun way. For gluten-free needs, just use tamari instead of soy sauce. This keeps the dish safe for those avoiding gluten. Want a vegan version? Simply swap out the chicken for tofu and use coconut aminos in place of soy sauce. This keeps the flavors rich while meeting dietary needs. Enjoy these options and find what you love best! To keep your Maple Chicken and Coconut Rice fresh, store leftovers properly. First, let the dish cool down to room temperature. Next, transfer the chicken and rice to airtight containers. This helps keep moisture in and prevents odors from mixing. For refrigeration, place the containers in the fridge. They will stay good for about three to four days. If you want to keep them longer, consider freezing. To freeze, use freezer-safe bags or containers. This will help avoid freezer burn. Leftovers can last up to three months in the freezer. When it's time to enjoy leftovers, reheating is key. For the chicken, the best methods are the oven or a skillet. In the oven, preheat it to 350°F (175°C). Place the chicken in an oven-safe dish and cover it with foil. Heat for about 15-20 minutes until warm. In a skillet, heat a small amount of oil over medium heat. Add the chicken and cover. This helps keep it moist. Cook for about 5-7 minutes, turning once. For the coconut rice, use the microwave or stovetop. In the microwave, place rice in a bowl with a splash of water. Cover and heat for about 1-2 minutes. Stir halfway through. On the stovetop, add rice and a little water to a pan. Heat on low, stirring often until warm. This keeps the rice fluffy and tasty. Enjoy your meal just like it was fresh! Yes, you can use other rice types. Brown rice works well but needs longer cooking. If you want a nutty flavor, try basmati rice. You can also use sushi rice for a stickier texture. Just adjust the water ratio based on the rice type. For example, brown rice usually needs more water. Check the chicken for clear juices. The meat should not be pink inside. Use a meat thermometer for best results. The internal temperature should be 165°F. If you do not have a thermometer, cut into the thickest part. If the juices run clear, your chicken is done. Yes, you can prepare this recipe in advance. Marinate the chicken a day before. Cook the rice and chicken the same day or store them separately. Keep the chicken in the fridge for up to three days. Cooked rice can last up to five days. Just reheat before serving for the best taste. This recipe for maple chicken with coconut rice is simple and tasty. We covered key ingredients and step-by-step instructions for perfect results. I shared tips to ensure juicy chicken and fluffy rice. You can also explore variations for protein or spices to fit your taste. Don't forget storage tips, so leftovers stay fresh. Whether you try this dish tonight or save it for later, it’s sure to impress. Enjoy cooking and savor every bite!

Maple Chicken with Coconut Rice Flavorful Dish Guide

Looking for a tasty meal that combines sweet and savory? Try my Maple Chicken with Coconut Rice! This delightfully simple

To make the perfect Chocolate Peanut Butter Mug Cake, you need these key ingredients: - 4 tablespoons all-purpose flour - 4 tablespoons granulated sugar - 2 tablespoons unsweetened cocoa powder - 1/8 teaspoon baking powder - 1/8 teaspoon salt - 3 tablespoons milk (any kind) - 2 tablespoons peanut butter - 1 tablespoon vegetable oil - 1/4 teaspoon vanilla extract These ingredients work together to create a rich, moist cake right in your mug. You can make this mug cake even better by adding: - Chocolate chips for extra chocolatey goodness - A sprinkle of sea salt for a sweet-salty mix - A dollop of whipped cream for a creamy finish These optional ingredients can elevate your dessert and make it more fun. If you don't have some ingredients, here are easy swaps: - Use whole wheat flour instead of all-purpose flour for added fiber. - Swap granulated sugar with brown sugar for a deeper flavor. - You can use any nut butter instead of peanut butter, like almond or cashew. - If you want a dairy-free option, try almond milk or coconut milk. These substitutions allow you to customize the cake while keeping it delicious. {{ingredient_image_1}} First, grab a large microwave-safe mug. It should hold about 12 ounces. Add the dry ingredients: - 4 tablespoons all-purpose flour - 4 tablespoons granulated sugar - 2 tablespoons unsweetened cocoa powder - 1/8 teaspoon baking powder - 1/8 teaspoon salt Mix these ingredients well with a fork. Make sure there are no lumps. This step sets the base for your cake. Next, add the wet ingredients to your dry mix: - 3 tablespoons milk (any kind) - 2 tablespoons peanut butter - 1 tablespoon vegetable oil - 1/4 teaspoon vanilla extract Stir everything until it forms a smooth batter. You want it creamy and lump-free. If you like chocolate chips, add a few now. They will melt and make your cake even richer. Now comes the fun part. Place your mug in the microwave. Cook it on high for 40 to 60 seconds. Start checking it at 40 seconds. The cake should be set but still moist in the center. Cooking times can change based on your microwave's power. You might need to adjust the time a bit. Carefully take the mug out of the microwave. It will be hot! Let it cool for one minute. Now, you can dig in. If you want a special touch, top it with whipped cream or a drizzle of melted peanut butter. Enjoy your quick and tasty dessert! To get the best texture in your mug cake, mix your dry and wet ingredients well. Make sure there are no lumps. A smooth batter leads to a fluffier cake. Use a microwave-safe mug that holds at least 12 ounces. This size gives the cake space to rise. When microwaving, check at 40 seconds. The cake should look set but still soft in the center. If it cooks too long, it can become tough. One common mistake is overmixing the batter. This can make the cake dense. Also, don't skip the baking powder; it helps the cake rise. Be careful not to overcook it; every microwave varies. Start with 40 seconds, then check. If your mug is too small, the batter might overflow. Always choose a large enough mug to prevent spills. You can change up the flavors easily. Try adding vanilla extract or almond extract for a twist. If you love chocolate, mix in some chocolate chips. You can also use different nut butters, like almond or cashew. To make it healthier, swap out sugar for a sweetener. You can also replace regular flour with almond or oat flour for a gluten-free option. The fun part is making it your own! Pro Tips Use a Larger Mug: Opt for a mug that holds at least 12 oz to prevent overflow during microwaving. Check Your Microwave: Microwaves vary in power; start with 40 seconds and add time if necessary for a perfectly set center. Experiment with Toppings: Enhance your mug cake with various toppings like whipped cream, melted chocolate, or crushed nuts for added flavor. Let It Cool: Allow the mug cake to cool for a minute before eating; this helps the texture firm up and makes it easier to enjoy. {{image_2}} You can change the flavor of your mug cake easily. Try using vanilla extract instead of the regular one. This gives a sweet, warm taste. Almond extract adds a nutty twist that pairs well with chocolate. You can also add a bit of almond flour for a fun texture. Toppings can take your mug cake to the next level. A scoop of ice cream on top makes it a treat. You can add whipped cream for a light touch. Drizzling melted chocolate or extra peanut butter adds richness. You might also try adding nuts or berries for extra flavor and crunch. You can make this cake fit many diets. Use almond flour or coconut flour instead of regular flour for a gluten-free option. For dairy-free, try almond milk or oat milk instead of regular milk. Look for dairy-free chocolate chips if you want to add chocolate. These swaps keep the taste great while fitting your needs. If you have leftover chocolate peanut butter mug cake, store it in an airtight container. This keeps the cake fresh and moist. Allow the cake to cool completely before sealing it. You can keep it at room temperature for one day. If you want it to last longer, place it in the fridge for up to three days. To reheat, use the microwave for about 10 to 15 seconds. This warms it up without drying it out. If it feels too cold, add a few more seconds. You can also add a tiny splash of milk while reheating. This adds moisture and keeps the cake soft. The ingredients in this mug cake vary in shelf life. All-purpose flour can last for one year if stored properly. Granulated sugar has an indefinite shelf life when kept dry. Cocoa powder can last up to two years. Peanut butter usually stays fresh for six months after opening, especially if you store it in the fridge. Always check for any signs of spoilage before using. The cooking time for this mug cake varies. Most microwaves cook in 40 to 60 seconds. Lower wattage microwaves may need more time. Higher wattage microwaves might cook it faster. Always start checking at 40 seconds. The cake should be firm but soft in the center. If it's too wet, give it another 10 seconds. You can mix the dry ingredients ahead of time. Just store them in a sealed container. When you're ready to eat, add the wet ingredients and microwave. I don't recommend making the whole cake in advance. It tastes best when fresh and warm. To make a larger batch, use a bigger bowl instead of a mug. Multiply each ingredient by the number of servings you want. For example, double the ingredients for two cakes. Mix everything in the bowl, then divide it into mugs. Microwave each mug separately. This keeps the texture perfect for each serving. You now have all the tools to make a fantastic mug cake. We covered key ingredients, helpful steps, and great tips for the best results. Remember, little changes can boost flavor. Don’t forget to store any extras right to keep them fresh. Try different flavors and toppings to find your favorite. This treat is easy to make, so enjoy experimenting. Have fun baking, and impress yourself with your tasty mug cake creations!

Chocolate Peanut Butter Mug Cake Quick and Tasty Dessert

Craving a sweet treat but short on time? This Chocolate Peanut Butter Mug Cake is your answer! In just minutes,

To make creamy Polish potato soup, gather these ingredients: - 4 medium-sized potatoes, peeled and diced - 1 onion, finely chopped - 2 cloves garlic, minced - 3 cups vegetable broth - 1 cup heavy cream - 1 tablespoon butter - 1 teaspoon fresh dill, chopped - Salt and pepper to taste - Fresh chives for garnish When cooking, precise measurements matter. Use dry measuring cups for solids like potatoes. For liquids, use liquid measuring cups. Always check for level measurements. A kitchen scale can help you weigh ingredients. This keeps your soup consistent every time you make it. Fresh ingredients make a big difference in flavor. Use fresh potatoes, as they provide a creamy texture. Fresh dill adds a bright taste that enhances the soup. Always choose high-quality broth for a rich base. Fresh onions and garlic also bring out the soup's best features. Using fresh ingredients leads to a better, more enjoyable meal. {{ingredient_image_1}} First, gather your ingredients. You need: - 4 medium-sized potatoes, peeled and diced - 1 onion, finely chopped - 2 cloves garlic, minced - 3 cups vegetable broth - 1 cup heavy cream - 1 tablespoon butter - 1 teaspoon fresh dill, chopped - Salt and pepper to taste - Fresh chives for garnish Wash the potatoes under cold water and peel them. Dice the potatoes into small pieces. This helps them cook evenly. Chop the onion finely to release its flavor. Mince the garlic cloves to add a nice aroma. Heat a large pot over medium heat. Melt the butter until it bubbles. Add the chopped onion and sauté it for about 5 minutes. You want it to turn soft and translucent. Then, add the minced garlic. Cook it for one more minute. Stir constantly to keep it from burning. Next, add your diced potatoes to the pot. Stir them well so they coat in the butter and onion mix. Pour in the vegetable broth, which will give your soup depth. Bring everything to a boil. Lower the heat and let it simmer for 15-20 minutes. Check if the potatoes are tender by poking them with a fork. Once your potatoes are soft, it's time to blend. Use an immersion blender for a smooth finish. If you like some chunks, blend only half of the soup. This way, you get a mix of creamy and chunky textures. After blending, stir in the heavy cream and chopped dill. Heat it gently, but do not boil. Lastly, season with salt and pepper to your taste. Now your creamy Polish potato soup is ready to serve. Garnish with fresh chives for an added burst of flavor. Enjoy! To boost the flavor of your Polish potato soup, focus on fresh ingredients. Use quality potatoes, onions, and herbs. Fresh dill adds a lovely taste. You can also try adding a splash of lemon juice. This brightens the soup and balances the creaminess. Don't skip the salt and pepper. They bring out the flavors in your soup. One common mistake is overcooking the garlic. It turns bitter if burned. Make sure to stir it for just one minute. Another mistake is blending the soup too much. If you prefer texture, blend only half. Lastly, be careful with the salt. Taste the soup before adding more. Too much salt can ruin your dish. If your soup is too thick, add more vegetable broth. This will make it creamy and smooth. If it’s too thin, you can cook it longer. This helps to reduce the liquid. For flavor adjustments, taste as you go. You can add more dill or even a pinch of paprika for warmth. This way, you create a soup that fits your taste perfectly. Pro Tips Choose the Right Potatoes: For a creamier texture, use starchy potatoes like Russets or Yukon Golds. Adjust Consistency: If you prefer a thicker soup, blend less of the potato mixture or add more cream. Add Flavor Depth: Consider adding a splash of white wine or a dash of smoked paprika for extra flavor. Garnish for Freshness: Fresh herbs like parsley or basil can elevate the soup's flavor and presentation. {{image_2}} You can add protein to the soup for extra flavor. Bacon gives a nice smoky taste. Cook it first, then set it aside. Add the drippings to the pot after cooking the onion. You can also use sausage. Cook it until browned, then slice it and add it to the soup before blending. Both options make the soup heartier and more filling. To make this soup vegetarian, use vegetable broth. You can also replace the heavy cream with coconut milk or cashew cream. These alternatives keep the soup rich while making it vegan-friendly. Use plant-based butter for sautéing the onion. You’ll still get a creamy texture and delightful taste. Spices and herbs can change the soup's flavor. Adding smoked paprika gives a warm, earthy note. If you like heat, a pinch of red pepper flakes works well. Fresh herbs like thyme or parsley can brighten the dish. You can mix in some chives or green onions for more freshness. Adjust these according to your taste. To store your Polish potato soup, let it cool first. Then, place it in a clean, airtight container. Make sure to use a container that fits the amount you have. This keeps your soup fresh and prevents spills. Store it in the fridge for up to three days. Remember to label your container with the date. This way, you know when to use it. When you're ready to enjoy your leftovers, take the soup out of the fridge. Pour it into a pot and heat it over medium-low heat. Stir often to prevent it from sticking to the pot. If it seems too thick, add a splash of vegetable broth or some water. This helps bring back that creamy texture. Taste it before serving and adjust the salt and pepper if needed. You can freeze Polish potato soup if you want to save some for later. First, let the soup cool completely. Then, transfer it into freezer-safe bags or containers. Make sure to leave some space at the top, as liquids expand when frozen. You can freeze it for up to three months. When you're ready to eat, thaw it in the fridge overnight and reheat it on the stove. You can use milk or a non-dairy cream. Coconut milk works well, too. If you want a thicker soup, blend in some silken tofu. These options keep the soup creamy without heavy cream. Yes, you can make this soup ahead of time. It tastes even better the next day. Just cool it down and store it in the fridge. Reheat it gently before serving to keep the flavors fresh. Serve this soup hot with fresh bread. A sprinkle of chives adds a nice touch. You can pair it with a side salad for a complete meal. Enjoy it with friends for a cozy dinner! In this article, we explored key ingredients and steps for cooking a great dish. Fresh ingredients shine and help enhance flavor. I shared tips on measuring and cooking techniques to achieve the best results. We discussed variations to cater to different diets too. Don't forget to store leftovers correctly and reheat them well. Following these tips will elevate your cooking. Enjoy experimenting and making your meals truly delicious!

Polish Potato Soup Rich and Comforting Recipe Guide

Are you ready for a warm and hearty meal? Polish potato soup is the perfect dish for cozy nights. This

To make these tasty meatballs, you need: - 1 pound ground turkey - 1/2 cup breadcrumbs - 1/4 cup grated Parmesan cheese - 1 egg, beaten - 2 tablespoons fresh parsley, chopped - 3 cloves garlic, minced - 1/4 teaspoon red pepper flakes (optional) - Salt and pepper to taste These ingredients work together to create a juicy meatball. The ground turkey gives a lean protein base. Breadcrumbs and Parmesan add flavor and texture. The egg acts as a binder, keeping everything together. Fresh parsley brightens the taste, while garlic adds a strong kick. Red pepper flakes give just a hint of heat. For the sauce, gather these items: - 1/3 cup honey - 1/4 cup soy sauce - 1 tablespoon apple cider vinegar - 1 teaspoon ginger, minced - 1 teaspoon sesame oil This sauce is sweet and savory. Honey brings natural sweetness. Soy sauce adds saltiness and depth. Apple cider vinegar gives a nice tang. Ginger adds warmth, while sesame oil rounds out the flavor with a nutty note. To make cooking easier, use these tools: - Mixing bowls - Baking sheet - Parchment paper - Small saucepan - Wooden spoon or spatula With these tools, you can mix the meatball ingredients quickly. The baking sheet lined with parchment helps with cleanup. A saucepan is perfect for making the sauce. A wooden spoon or spatula helps stir everything well. These tools make the process smooth and fun. {{ingredient_image_1}} To start, gather your ingredients. You need one pound of ground turkey, breadcrumbs, and Parmesan cheese. Also, grab one beaten egg, chopped parsley, minced garlic, and optional red pepper flakes. Don't forget salt and pepper to taste! In a large bowl, mix the ground turkey, breadcrumbs, and cheese together. Add the beaten egg, parsley, garlic, and red pepper flakes. Season with salt and pepper. Use your hands for the best mix. Make sure everything blends well. Next, form the mixture into meatballs. Each should be about the size of a golf ball. Arrange them on a lined baking sheet. This step is crucial for even cooking and easy cleanup. Preheat your oven to 400°F (200°C). This heat is perfect for baking meatballs. Once the oven is ready, place your baking sheet inside. Bake the meatballs for 20-25 minutes. They should turn lightly brown and be fully cooked. To check if they're done, cut one in half. The center should no longer be pink. This ensures safety and great taste! While the meatballs bake, prepare the honey garlic sauce. In a small saucepan, combine one-third cup of honey and one-quarter cup of soy sauce. Add one tablespoon of apple cider vinegar, one teaspoon of minced ginger, and one teaspoon of sesame oil. Heat the mixture over medium heat, stirring occasionally. Bring it to a simmer and let it cook for about five minutes. The sauce will thicken slightly and become very fragrant. After the meatballs are done, let them cool for a few minutes. Toss them in the honey garlic sauce until they are fully coated. This step adds rich flavor and shine to your meatballs. Serve the meatballs warm, drizzled with leftover sauce if you like. Enjoy every bite! To make your meatballs juicy, use ground turkey with a bit of fat. A blend of dark and light meat works great. Mix just enough, but don’t overwork the meat. Overmixing makes them tough. Keep your hands wet when shaping the meatballs. It helps prevent sticking and creates a smooth surface. You can add more flavor to the honey garlic sauce. Try adding a splash of lime juice for a zesty kick. A pinch of black pepper can also enhance the taste. For a spicy twist, increase the red pepper flakes. If you like sesame, sprinkle toasted sesame seeds on top before serving. Serve your meatballs on a large platter for a nice touch. Garnish with chopped parsley for color. Offer toothpicks if you plan to use them as appetizers. You can pair them with rice or noodles for a full meal. Drizzle extra sauce over the top to impress your guests. Pro Tips Use a Meat Thermometer: To ensure your turkey meatballs are perfectly cooked, use a meat thermometer to check that the internal temperature reaches 165°F (74°C). Chill the Mixture: For easier handling, chill the meatball mixture in the refrigerator for about 30 minutes before forming them into balls. This helps them hold their shape while baking. Customize the Sauce: Feel free to adjust the honey garlic sauce to your taste. Add more honey for sweetness or more soy sauce for saltiness, depending on your preference. Make Ahead: These meatballs can be made ahead of time! Prepare and bake them, then store in the refrigerator for up to 3 days or freeze for up to 3 months. {{image_2}} You can sneak in veggies to boost flavor and nutrition. Try adding finely chopped spinach or grated zucchini. Carrots also work well; just grate them up. Mix them right into the turkey and other ingredients. This keeps the meatballs moist and tasty while adding color. If you want to switch things up, consider using different sauces. A sweet chili sauce adds a nice kick. Teriyaki sauce gives a rich, savory taste. For a tangy twist, use a barbecue sauce. Each sauce can change the vibe of your dish, so feel free to play around! You can easily make these meatballs gluten-free. Just swap regular breadcrumbs for gluten-free ones. For a dairy-free option, skip the Parmesan cheese or use a dairy-free cheese alternative. These swaps keep the dish tasty but cater to different diets. Enjoy delicious meatballs that everyone can savor! Store leftover meatballs in an airtight container. Let them cool first to keep them fresh. You can keep them in the fridge for up to three days. If you want them to last longer, freezing is a great option. To freeze meatballs, place them on a baking sheet. Make sure they are not touching. Freeze them for about one hour. Once frozen, transfer them to a freezer-safe bag. Label the bag with the date. They can last up to three months in the freezer. For best flavor, reheat meatballs in the oven. Preheat to 350°F (175°C). Place meatballs on a baking sheet and cover with foil. Heat for about 15-20 minutes. You can also reheat them in the microwave. Just place them in a bowl and cover. Heat for one to two minutes, checking often. Enjoy them warm, coated in more sauce if you like! Yes, you can use other meats. Ground chicken or pork work well. Beef is also an option. Just keep in mind that cooking times might change. Make sure the meatballs reach a safe temperature. To check if the meatballs are done, use a meat thermometer. The center should reach 165°F (74°C). If you don't have a thermometer, cut one open. It should be no longer pink inside. Absolutely! You can prepare the honey garlic sauce ahead. Store it in the fridge for up to a week. Just warm it up on the stove when you're ready to use it. This makes meal prep easy and quick. We covered the key ingredients for honey garlic turkey meatballs and sauce. You learned step-by-step instructions for baking and making the sauce, plus tips for juicy meatballs. We explored variations and ideas to store leftovers and reheat them properly. These easy meatballs add flavor to meals and can fit many diets. Try them and enjoy their sweet, savory taste.

Honey Garlic Turkey Meatballs Tasty and Simple Recipe

Craving a quick and tasty meal? You’re in the right place! This Honey Garlic Turkey Meatballs recipe is simple and

Older posts
Newer posts
← Previous Page1 … Page152 Page153 Page154 … Page164 Next →

dsad

© 2026 easycookingbite • Built with GeneratePress

Our Policies

  • Copyright Policy
  • Cookie Policy
  • GDPR Policy
  • Privacy Policy
  • Disclaimer
  • Terms Of Use

More Information

  • Home
  • About
  • Contact
  • Appetizers
  • Dessert
  • Dinner
  • Drinks
©2026, easycookingbite About Back To Top