Skip to content
DisclaimerTerms Of UseGDPR PolicyCookie Policy

easycookingbite

  • Home
  • Drinks
  • Appetizers
  • Dinner
  • Dessert
  • About
  • Contact
  • Privacy Policy
DisclaimerTerms Of UseGDPR PolicyCookie Policy

Lily

- 1 block of extra-firm tofu, pressed and cubed - 2 tablespoons vegetable oil - 4 cloves garlic, minced - 1/4 cup sweet chili sauce - 2 tablespoons soy sauce - 1 tablespoon brown sugar - 1 tablespoon rice vinegar - 1 teaspoon cornstarch mixed with 2 tablespoons water - 1 green onion, sliced - Sesame seeds Let’s dive into the key ingredients for making sweet chili garlic tofu. This dish starts with a block of extra-firm tofu. It holds its shape well and absorbs flavors nicely. I recommend pressing the tofu first. This will help get rid of excess water. When you cube it, aim for bite-sized pieces. They cook evenly and soak up the sauce perfectly. Next, you need vegetable oil for frying. It creates a nice, crispy texture on the tofu. You'll also need garlic cloves. Mince them finely to release their full flavor. Now, let’s talk about the sauce. The sweet chili sauce gives a nice balance of sweetness and spice. Soy sauce adds saltiness, while brown sugar brings extra sweetness. Rice vinegar adds a tangy kick. Finally, cornstarch mixed with water thickens the sauce. This creates a nice glaze for your tofu. To finish your dish, you’ll use green onion and sesame seeds as garnishes. The green onion adds freshness, and sesame seeds give a nice crunch. Each ingredient plays a role in making this dish flavorful and fun to eat. {{ingredient_image_1}} First, you need to press the tofu. This helps remove excess water. Wrap the tofu in a clean cloth. Place a heavy pan on top for 15-20 minutes. This step is key for crispy tofu. After pressing, cut the tofu into bite-sized cubes. Next, heat the vegetable oil in a large skillet over medium heat. Once the oil is hot, add the cubed tofu. Cook each side for about 4-5 minutes. You want the tofu to turn golden brown and crispy. Once done, remove the tofu from the pan and set it aside. Now it's time to make the sauce. In the same pan, add the minced garlic. Sauté it for about 30 seconds until it smells great. Be careful not to burn the garlic. In a small bowl, mix the sweet chili sauce, soy sauce, brown sugar, rice vinegar, and red pepper flakes if you want some heat. Pour this mixture into the pan with the garlic. Bring it to a simmer. To thicken the sauce, add the cornstarch mixed with water. Stir it continuously for about 2-3 minutes. You'll know it's thick enough when it coats the back of a spoon. Carefully add the crispy tofu back into the pan. Toss it in the sauce to coat every piece evenly. Cook for an additional 2-3 minutes so the tofu absorbs all the flavors. When it's done, remove it from the heat. Garnish with sliced green onion and sesame seeds before serving. Enjoy your sweet chili garlic tofu! To get the best tofu, you must press it well. - Wrap your tofu in a clean towel. - Place a heavy pan on top for 15-20 minutes. This removes excess water. A dryer tofu absorbs flavors better. For crispy tofu, follow these steps: - Cut your pressed tofu into bite-sized cubes. - Heat your oil in a skillet until hot. - Cook tofu in a single layer for 4-5 minutes per side. You want it golden brown and crispy. Sweet chili garlic tofu pairs well with rice or noodles. - Jasmine rice adds a nice touch. - Lo mein noodles soak up the sauce well. Add some vegetables for color and crunch: - Broccoli and bell peppers work great. - Snap peas or bok choy add freshness. Overcooking tofu makes it tough. - Keep an eye on it while cooking. - Remove it from the pan once golden brown. Don’t skip thickening the sauce. - Mix cornstarch with water before adding it to the sauce. - This step gives the sauce a nice, sticky texture. Following these tips will help you create a dish that is flavorful and satisfying! Pro Tips Press the Tofu Well: Make sure to press the tofu for at least 15-20 minutes to remove excess moisture, ensuring it becomes crispy when cooked. Use High Heat: Cooking the tofu on medium-high heat helps achieve a golden crust. Avoid overcrowding the pan to ensure even cooking. Customize the Heat Level: Adjust the amount of red pepper flakes according to your heat preference, or omit them entirely for a milder dish. Garnish for Presentation: Always finish your dish with fresh garnishes like green onions and sesame seeds to add color and texture. {{image_2}} You can make this dish even better by adding vegetables. Some great options are bell peppers, broccoli, or snap peas. These veggies add color and crunch. Just chop them into small pieces and toss them in the pan after you add the garlic. If you want to add more protein, consider chickpeas or edamame. Both options work well and boost the nutrition of your meal. Cook them with the tofu for a hearty dish. You can use homemade sweet chili sauce for a fresher taste. To make your own, mix sugar, vinegar, and chili paste. This gives you total control over the flavors. If you want a gluten-free option, swap soy sauce for tamari. It tastes similar but is safe for those with gluten issues. To spice things up, try adding fresh peppers. Jalapeños or serranos work great. Just chop them finely and toss them in with the garlic. This will give the dish a nice kick. If you prefer a milder flavor, you can skip the red pepper flakes. You can also use less sweet chili sauce. This way, you can enjoy the dish without too much heat. To keep your sweet chili garlic tofu fresh, follow these tips: - Refrigeration Guidelines: Place leftover tofu in an airtight container. Store it in the fridge for up to three days. Always let it cool before sealing to avoid moisture buildup. - Best Containers for Storage: Use glass or BPA-free plastic containers. These materials help keep your food fresh. Make sure the container has a tight seal to prevent air from entering. When you are ready to enjoy your leftovers, reheating is key: - Methods for Reheating Tofu: You can reheat tofu in a skillet over medium heat. This method helps restore some of its original crispiness. Alternatively, use a microwave for quick warming, but be careful not to overheat. - Tips to Maintain Texture: If you use a microwave, cover the tofu with a damp paper towel. This step helps retain moisture and prevents it from drying out. For the skillet, add a splash of water to create steam. If you want to save some tofu for later, freezing is an option: - How to Freeze Cooked Tofu: Allow the tofu to cool completely. Then, place it in a freezer-safe bag or container. Squeeze out as much air as possible to avoid freezer burn. Label the bag with the date. - Implications for Texture After Thawing: Freezing may change the texture of the tofu. It can become a bit spongy after thawing. This change can be great for absorbing flavors in soups or stews, but it might not be ideal for frying. The best type of tofu for Sweet Chili Garlic Tofu is extra-firm tofu. It holds its shape well and gets crispy when cooked. Firm tofu can work too, but it won’t be as sturdy. Soft or silken tofu is not ideal here since it falls apart easily. Extra-firm tofu has less water, so it absorbs flavors better and gives a nice bite. Yes, you can make this dish vegan. All the ingredients listed are plant-based. The sweet chili sauce and soy sauce are typically vegan, but always check labels to be sure. Brown sugar is usually vegan, but some brands use bone char in processing, so look for organic options. This recipe is perfect for anyone who wants a tasty vegan meal. You can serve Sweet Chili Garlic Tofu with many sides. Here are some ideas: - Steamed jasmine or basmati rice - Stir-fried vegetables like broccoli or bell peppers - Noodles tossed in sesame oil - A fresh green salad for crunch - Cauliflower rice for a low-carb option Mix and match these sides to create a balanced and colorful meal! This blog post covered how to make Sweet Chili Garlic Tofu. You learned about main ingredients, sauces, garnishes, and step-by-step instructions. I included tips to perfect the tofu's texture and common mistakes to avoid. You also discovered variations with vegetables and sauces, along with storage tips for leftovers. In the end, this simple dish is both tasty and flexible. With practice, you can impress anyone with this easy meal. Enjoy your cooking!

Sweet Chili Garlic Tofu Flavorful and Simple Recipe

Looking for a quick and tasty meal? This Sweet Chili Garlic Tofu recipe is just what you need. With simple

- 1 pound large shrimp, peeled and deveined - 1 cup shredded coconut (unsweetened) - 1 cup panko breadcrumbs - 1/2 cup all-purpose flour - 2 large eggs - 1 teaspoon garlic powder - 1 teaspoon paprika - Salt and pepper to taste - Cooking spray for air frying When I make air fryer coconut shrimp, I focus on using fresh and high-quality ingredients. The shrimp should be large, peeled, and deveined for the best results. This helps them cook evenly and gives a nice bite. The coating is key to achieving that crunchy texture. I love using unsweetened shredded coconut. It provides a rich flavor without extra sweetness. Panko breadcrumbs add an airy crispness that’s hard to resist. For seasoning, I use all-purpose flour, garlic powder, and paprika. This mix gives the shrimp a great taste. I also add salt and pepper to balance the flavors. The eggs bind everything together, ensuring the coating sticks well. Finally, don't forget the cooking spray. It helps the shrimp brown nicely in the air fryer. With these ingredients, you can create a delightful snack that’s crispy and packed with flavor. {{ingredient_image_1}} - In a shallow bowl, mix together 1/2 cup of all-purpose flour, 1 teaspoon of garlic powder, 1 teaspoon of paprika, salt, and pepper. This is your seasoned flour. - In a second bowl, crack and beat 2 large eggs until they are well mixed. - In a third bowl, combine 1 cup of shredded coconut and 1 cup of panko breadcrumbs. This mixture is your coconut coating. - Take one pound of large shrimp, peeled and deveined. Start by coating the shrimp in the seasoned flour. Shake off any extra flour. - Next, dip the floured shrimp into the beaten eggs. Let any excess egg drip off. - Finally, coat the shrimp in the coconut and panko mixture. Press gently so the coating sticks well. - Preheat your air fryer to 400°F (200°C). - Place the coated shrimp in a single layer in the air fryer basket. Make sure they do not touch. - Lightly spray the shrimp with cooking spray. This helps them brown evenly. - Cook the shrimp for about 8-10 minutes. Flip them halfway through for even cooking. They should be golden and cooked through. - Once done, take the shrimp out and let them cool slightly before serving. To get that perfect crispiness, you must avoid sogginess. Here are some tips: - Use dry shrimp: Pat the shrimp with paper towels before coating. This helps remove excess moisture. - Layering matters: Do not stack the shrimp in the air fryer. Keep them in a single layer for even cooking. Cooking spray is key! It promotes browning and gives a nice crunch. Lightly spray the shrimp before cooking. This small step makes a big difference. Dipping sauces enhance the flavor of coconut shrimp. Here are my top picks: - Sweet chili sauce: Its sweet and spicy balance pairs well with the shrimp. - Tartar sauce: A creamy option for those who love a classic touch. For presentation, serve the shrimp on a nice platter. Add lime wedges and fresh cilantro for color. This not only looks great but also adds fresh flavor. To ensure even cooking, follow these tips: - Preheat your air fryer: This step helps the shrimp cook evenly. - Don’t overcrowd: Air needs space to circulate. This ensures all sides get crispy. For air fryer models, I recommend brands like Philips or Ninja. They offer great performance and even heating. Choose one that fits your kitchen and cooking style. Pro Tips Use Fresh Shrimp: Fresh shrimp will provide the best flavor and texture. If using frozen shrimp, ensure they are fully thawed and patted dry before breading. Adjust Coconut Sweetness: If you prefer a sweeter coconut shrimp, consider using sweetened shredded coconut or serving with a sweet dipping sauce. Don’t Overcrowd the Air Fryer: For optimal cooking, arrange the shrimp in a single layer without overlapping. This allows for even cooking and crispiness. Experiment with Seasonings: Feel free to customize the seasoning in the flour mixture by adding spices like cayenne pepper for heat or lemon zest for brightness. {{image_2}} You can change up the flavor of your coconut shrimp easily. Try adding spices to the breading mix. A touch of cayenne pepper adds heat. Some fresh herbs like cilantro or parsley can bring a fresh taste. Using different types of shrimp also helps. You can use smaller shrimp for bite-sized snacks. Larger shrimp give a more satisfying crunch. Just remember to adjust the cooking time based on size. If you need gluten-free options, swap the regular flour and breadcrumbs. Use almond flour in place of all-purpose flour. For the coating, crushed gluten-free cereal works well too. For vegan alternatives, use chickpea flour instead of eggs. You can also coat the shrimp in coconut milk. This keeps the shrimp moist and helps the breading stick. Coconut shrimp pairs well with many sides. Try serving it with rice or a fresh salad. A tangy mango salsa adds a nice touch too. You can also explore complementary recipes. A zesty coleslaw or roasted veggies make great companions. Consider making a dipping sauce, like sweet chili or a spicy aioli. These add extra flavor and excitement to your meal! After you enjoy your air fryer coconut shrimp, store any leftovers in the fridge. Place the shrimp in an airtight container. This keeps them fresh and tasty. Try to eat them within three days for the best flavor. When reheating, I recommend using the air fryer. Set it to 350°F (175°C) and heat for about 5 minutes. This helps restore the crispiness. You can also use a microwave, but it may make the shrimp soggy. If you want to save shrimp for later, freezing is a great option. First, let the shrimp cool completely. Then, place them in a single layer on a baking sheet. Freeze for about one hour. After that, transfer them to a freezer-safe bag. This helps prevent sticking. When you’re ready to eat, thaw them in the fridge overnight. To reheat, use the air fryer at 350°F (175°C) for about 8-10 minutes. In the refrigerator, your coconut shrimp can last for about three days. Be sure to check for signs of spoilage. If the shrimp smell off or look discolored, it’s best to throw them away. Always trust your senses when it comes to food safety. Keeping shrimp properly stored helps maintain their delicious flavor. To make air fryer coconut shrimp gluten-free, you can swap regular flour and breadcrumbs. Use almond flour or coconut flour instead of all-purpose flour. For breading, use gluten-free panko breadcrumbs. These options keep the texture crispy while ensuring no gluten is present. To prevent sticking, I recommend using parchment paper or silicone mats. Cut the parchment to fit your air fryer basket. This helps make cleanup easy and stops the shrimp from sticking. Also, spray a light coat of cooking spray on the basket before adding shrimp. This adds a nice crisp and keeps everything moving smoothly. Yes, you can prepare air fryer coconut shrimp ahead of time. You can coat the shrimp and store them in the fridge for a few hours. When you're ready to cook, just pull them out and air fry as usual. If you want to freeze, lay them flat on a baking sheet first and freeze for an hour. Once frozen, transfer to a bag. Reheat directly in the air fryer for best results. This blog covered how to make crispy air fryer coconut shrimp. We explored ingredients, step-by-step cooking, and helpful tips for perfect results. Remember to choose the right coating and seasonings for taste. You can also try variations to suit your diet or add flair. With proper storage, leftovers can be enjoyed later. Use the FAQs to guide your cooking journey. Enjoy your shrimp and share your delicious results!

Air Fryer Coconut Shrimp Crispy and Flavorful Snack

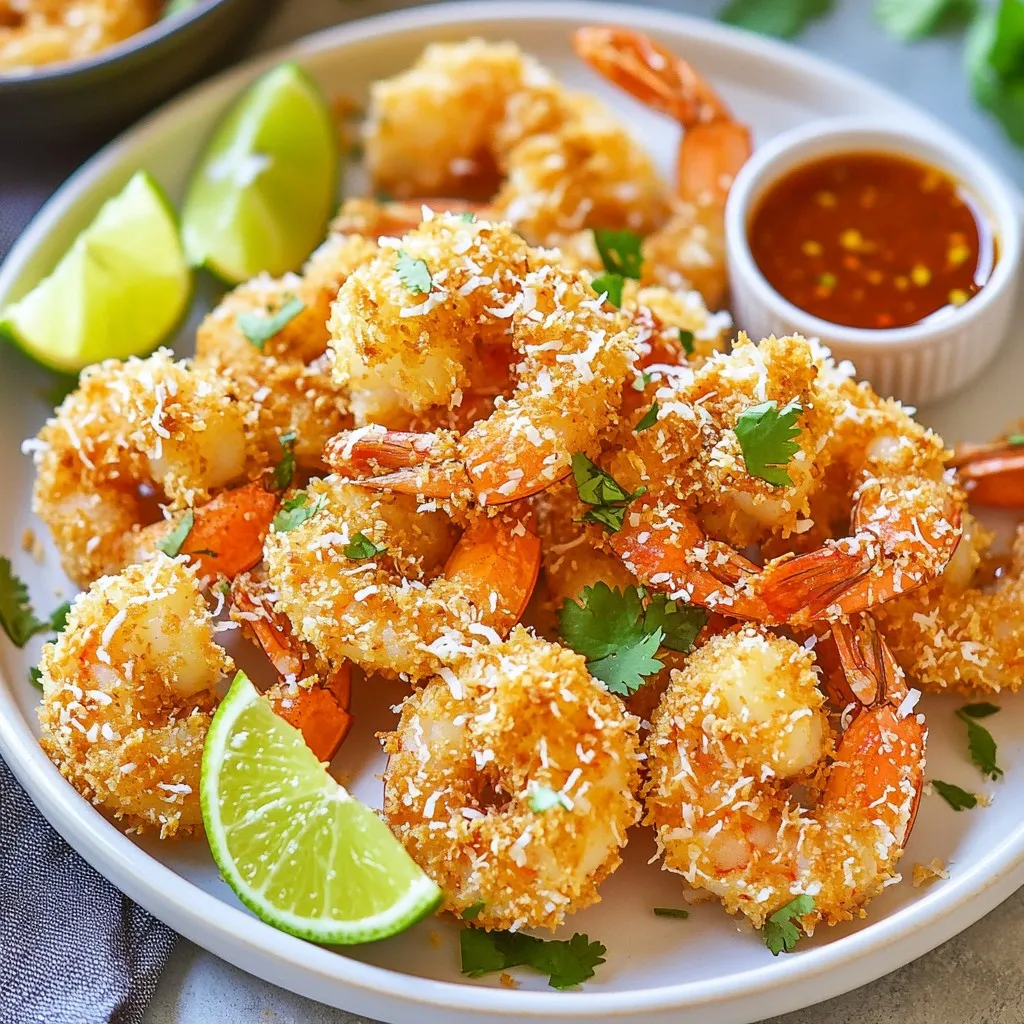
Are you ready to enjoy a crispy and delicious snack that’s easy to make? This Air Fryer Coconut Shrimp recipe

- 4 cups mixed salad greens (spinach, arugula, and romaine) - 1 cup cherry tomatoes, halved - 1 cup black beans, rinsed and drained - 1 cup corn kernels (fresh or frozen, thawed) - 1 avocado, diced - 1/2 red onion, thinly sliced - 1/2 cup diced bell peppers (red, yellow, or green) - 1/2 cup crumbled feta cheese - 1/4 cup fresh cilantro leaves, chopped - 1/4 cup lime juice - 2 tablespoons olive oil - 1 teaspoon ground cumin - Salt and pepper, to taste Each serving of Santa Fe Salad is packed with nutrients. Here’s a quick look: - Calories: 300 - Protein: 10g - Carbs: 30g - Fat: 15g - Fiber: 8g This salad provides a good mix of protein, healthy fats, and fiber. It makes a great choice for lunch or dinner. You can change up some ingredients in the Santa Fe Salad. Here are a few ideas: - Greens: Use kale or mixed baby greens instead. - Beans: Swap black beans for pinto or kidney beans. - Cheese: Try goat cheese if you want a different flavor. - Dressing: For a zestier kick, add some hot sauce to the lime dressing. - Vegetables: Add cucumber or radishes for extra crunch. These swaps keep the salad fresh and exciting! {{ingredient_image_1}} Begin by washing your salad greens. I like to mix spinach, arugula, and romaine. Use about four cups for a nice base. Place the greens in a large bowl. This base adds freshness and crunch to your salad. Next, it’s time to add the veggies. Start with the halved cherry tomatoes. They bring sweetness and color. Then, add a cup of rinsed black beans. These beans add protein and fiber. Follow with a cup of corn kernels, fresh or thawed. Now, add the diced avocado. It gives creaminess and healthy fats. Then, sprinkle in the thinly sliced red onion and diced bell peppers. This adds a nice crunch and flavor. Make sure to layer the veggies evenly for a great look. To make the dressing, grab a small bowl. Whisk together a quarter cup of lime juice and two tablespoons of olive oil. Add one teaspoon of ground cumin, salt, and pepper to taste. Mix well until everything blends together. This dressing gives a zesty kick to the salad. Once your dressing is ready, drizzle it over the salad. Gently toss everything together to coat the veggies evenly. Finally, add the chopped cilantro leaves on top for a fresh finish. Enjoy your vibrant Santa Fe Salad! Serve Santa Fe Salad in colorful bowls. This adds fun to your meal. Pair it with grilled chicken or shrimp for protein. You can also enjoy it with tortilla chips for a crunchy side. If you want a light lunch, serve it alone. For a heartier dinner, add a slice of cornbread. To make your salad pop, use bright bowls. Sprinkle extra cilantro on top for color. Add lime wedges on the side for a fresh touch. Arrange each ingredient neatly. This creates a beautiful and inviting dish. A well-presented salad makes it even more enjoyable to eat. You can easily change this salad to fit your needs. For a vegan option, skip the feta cheese. Use a plant-based cheese instead. If you need gluten-free, just check your ingredients. All items in this salad are naturally gluten-free. You can also add cooked quinoa for extra fiber and protein. Pro Tips Use Fresh Ingredients: Fresh vegetables and herbs will enhance the flavor and texture of your salad, making it more vibrant and delicious. Customize Your Dressing: Feel free to adjust the lime juice and olive oil ratio in the dressing to suit your taste, or add a touch of honey for a hint of sweetness. Chill Before Serving: Letting the salad sit in the refrigerator for about 10 minutes before serving allows the flavors to meld and improves the overall taste. Experiment with Toppings: Try adding grilled chicken, shrimp, or nuts for extra protein and texture, making the salad more filling and nutritious. {{image_2}} You can easily make a vegetarian Santa Fe salad. Start with the base of mixed greens, like spinach, arugula, and romaine. Add in the fresh veggies: cherry tomatoes, black beans, corn, avocado, red onion, and bell peppers. For a tasty twist, swap feta cheese for goat cheese or leave it out. You can also use extra beans or add nuts for crunch. To make the salad vegan, omit the feta cheese. You can replace it with a creamy avocado dressing. Blend avocados with lime juice and a little water for smoothness. You can also add tahini for a nutty flavor. Use the same fresh veggies, and you’ll have a delicious vegan meal. If you want a heartier salad, add protein. Grilled chicken or shrimp works great. You can also use tofu or tempeh for a vegetarian option. Cook the protein with spices for extra flavor. Mix it into the salad for a filling meal that packs a punch! To store leftover Santa Fe salad, place it in an airtight container. Be sure to keep the dressing separate. This helps prevent wilting. You can store it in the fridge for up to three days. To keep your salad ingredients fresh, store greens and veggies in separate bags. Use paper towels to absorb excess moisture. Place them in the crisper drawer. This helps maintain their crunch and flavor. For the avocado, sprinkle lime juice on the cut side before sealing. This prevents browning. If you have leftover black beans or corn, you can reheat them gently. Use a microwave or stovetop. Heat them just until warm, but avoid overcooking. This keeps the texture nice. Remember, it’s best to serve the salad cold, so add warm ingredients just before eating. If you want to swap out feta cheese, try goat cheese. It has a similar creamy texture. You can also use ricotta for a milder taste. For a dairy-free option, consider using crumbled tofu. Just add a bit of lemon juice for flavor. Yes, you can make Santa Fe Salad ahead of time. Prepare the salad base and store it in the fridge. Keep the dressing separate to add later. This keeps the greens fresh and crisp. You can mix everything just before serving. Making a gluten-free Santa Fe Salad is easy! All the ingredients are naturally gluten-free. Just ensure that the canned black beans and corn have no gluten added. It’s a fresh and healthy meal that everyone can enjoy, gluten-free or not. This blog post detailed how to create a tasty Santa Fe Salad. We covered the right ingredients and nutritional facts. I shared tips for preparation, layering, and dressing, helping you build a vibrant dish. You learned about variations for different diets, like vegetarian or vegan options. Proper storage methods keep your salad fresh. With these insights, you can enjoy this salad any time while making it your own. Create, share, and savor!

Santa Fe Salad Fresh and Flavorful Meal Idea

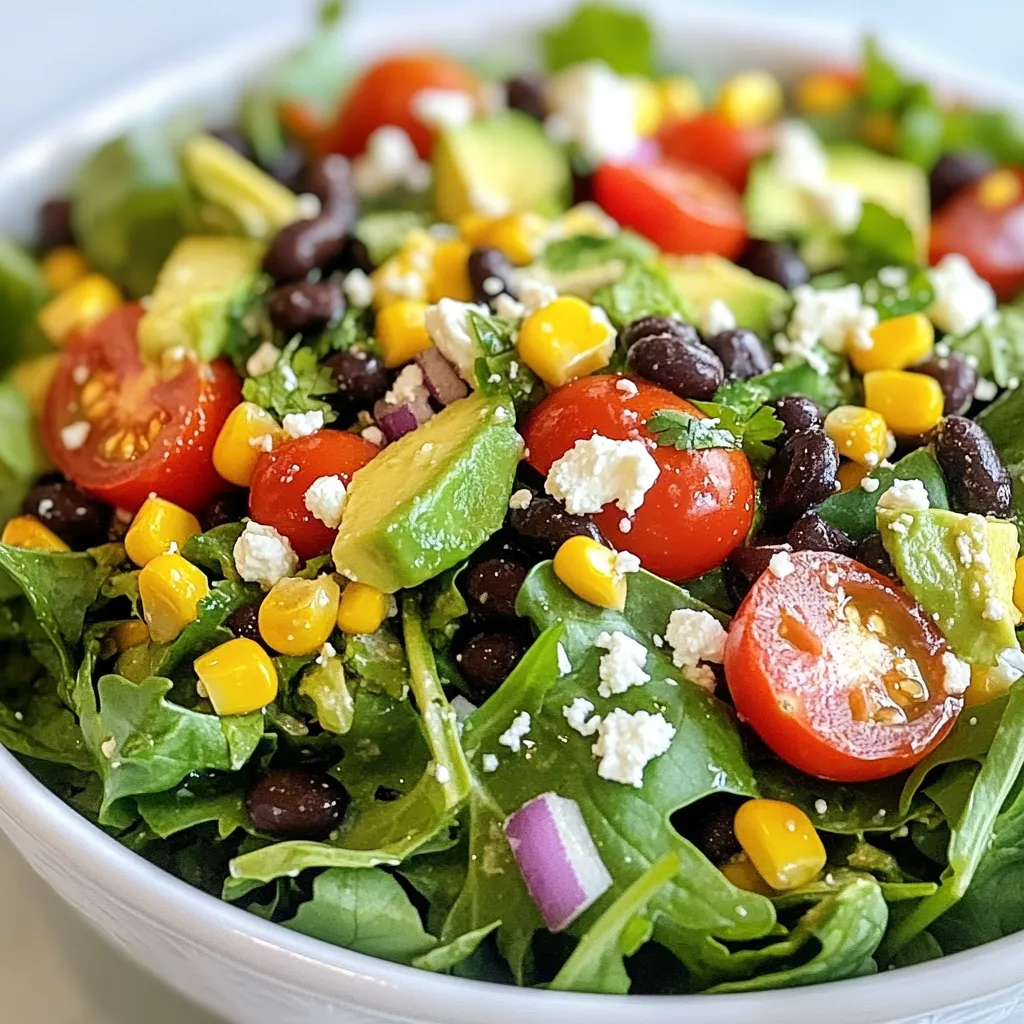
Looking for a tasty meal that’s easy to make and full of flavor? The Santa Fe Salad is your answer!

- 1 ½ cups all-purpose flour - 1 teaspoon baking powder - ½ teaspoon baking soda - ½ teaspoon salt - ½ cup unsalted butter, softened - 1 cup granulated sugar - 2 large eggs - 1 teaspoon vanilla extract - ½ cup buttermilk - Zest of 1 lemon - 1 tablespoon freshly squeezed lemon juice - 1 cup fresh strawberries, pureed - 1 cup unsalted butter, softened - 4 cups powdered sugar - 2 tablespoons heavy cream - 1 tablespoon freshly squeezed lemon juice - ½ cup fresh strawberries, finely chopped When baking, I always ensure I have the right ingredients. For these cupcakes, I gather all the dry and wet items first. This keeps everything organized and makes the process smooth. The dry mix includes all-purpose flour, baking powder, baking soda, and salt. These ingredients form the base of the cupcakes. The baking powder and soda help them rise. Next, I focus on the wet ingredients. I cream the softened butter and sugar until light. Then I add the eggs, vanilla, buttermilk, lemon zest, and lemon juice. Each adds a special flavor to the mix. The fresh strawberries are key. I puree them for a bright, sweet taste. For the frosting, I use softened butter and powdered sugar. These create a fluffy texture. Adding heavy cream and lemon juice enhances flavor. Finally, I mix in finely chopped strawberries for extra sweetness. Optional garnishes like strawberry slices or lemon zest can make the cupcakes look even prettier. These small touches add freshness and color. With these ingredients ready, you will create delightful strawberry lemonade cupcakes! {{ingredient_image_1}} Preheat your oven to 350°F (175°C). Line your cupcake pan with cupcake liners. This will help the cupcakes come out easily. In a large bowl, cream ½ cup of softened butter with 1 cup of granulated sugar. Mix this for about 3-4 minutes until it's light and fluffy. Next, add 2 large eggs one at a time. Make sure to mix well after each egg. Now, stir in 1 teaspoon of vanilla extract and the zest of 1 lemon. This adds a bright flavor to your batter. In another bowl, whisk together 1 ½ cups of all-purpose flour, 1 teaspoon of baking powder, ½ teaspoon of baking soda, and ½ teaspoon of salt. This is your dry mix. Gradually add this dry mix to your wet mixture. Alternate this with ½ cup of buttermilk and 1 tablespoon of freshly squeezed lemon juice. Mix until just combined. Now, gently fold in 1 cup of fresh strawberry puree. This will give your batter a lovely pink color and sweet taste. Divide the batter evenly among the cupcake liners. Fill each liner about 2/3 full. Bake them in your preheated oven for 18-20 minutes. To check if they are done, insert a toothpick in the center. If it comes out clean, they are ready. Let the cupcakes cool in the pan for 5 minutes. After that, transfer them to a wire rack to cool completely. This cooling step is important before you add the frosting. To ensure your strawberry lemonade cupcakes rise properly, use fresh ingredients. Make sure your baking powder and baking soda are not expired. This helps the cupcakes rise and stay fluffy. When mixing, do not overmix the batter. This will keep your cupcakes light. To check for doneness, insert a toothpick into the center of a cupcake. If it comes out clean, they are ready. If it has batter on it, bake for a few more minutes. Achieving the perfect frosting consistency is key. Start with softened butter for easy mixing. Gradually add powdered sugar, mixing on low. After that, add lemon juice and heavy cream. Beat until fluffy and smooth. When piping frosting, use a piping bag with your favorite tip. Start from the outside edge of the cupcake and work your way in. This creates a beautiful swirl. You can also use a spatula for a more rustic look. For garnishing cupcakes, add a fresh strawberry slice on top. You can also sprinkle some lemon zest for a pop of color. This adds a nice touch and makes them look appealing. When serving, place the cupcakes on a pretty plate. You can arrange them in a circle for a fun display. Consider adding a few extra strawberries around the cupcakes for a festive look. Pro Tips Use Fresh Ingredients: Always opt for fresh strawberries and lemons to enhance the flavor of your cupcakes. Do Not Overmix: When combining the wet and dry ingredients, mix just until incorporated to keep your cupcakes light and fluffy. Cool Completely: Ensure your cupcakes are fully cooled before frosting to prevent the frosting from melting. Experiment with Frosting: Feel free to add a hint of lemon zest or additional strawberry puree to the frosting for an extra flavor boost. {{image_2}} Vegan strawberry lemonade cupcakes You can easily make vegan strawberry lemonade cupcakes. Replace eggs with flaxseed meal or applesauce. Use coconut or almond milk instead of buttermilk. For butter, choose a vegan option like coconut oil. This way, everyone can enjoy these tasty treats! Gluten-free options for the recipe To make gluten-free cupcakes, swap all-purpose flour for a gluten-free blend. Look for a mix that includes xanthan gum. This will help the cupcakes rise and stay moist. Just be sure to check labels for any hidden gluten in your other ingredients. Adding different fruits like raspberries or blueberries Want to mix it up? Try adding raspberries or blueberries to the batter. These fruits bring a new twist to the flavor. Just make sure to chop them finely and fold them gently into the batter. This keeps the cupcakes light and fluffy. Alternative frosting flavors You can also change up the frosting. Try adding lime juice for a zesty kick. Or mix in a bit of orange zest for a fresh twist. These small changes can make your cupcakes stand out at any gathering. Making mini cupcakes instead If you want bite-sized treats, make mini cupcakes! Just fill the liners less than you would for regular cupcakes. Bake for about 10-12 minutes instead of 18-20 minutes. They are perfect for parties or as a sweet snack! Creative serving ideas for parties For a fun twist, serve your cupcakes on a tiered stand. Add colorful decorations like fresh strawberries or lemon slices on top. This makes your treats not only tasty but also beautiful to look at! To keep your strawberry lemonade cupcakes fresh, store them in an airtight container. This method helps seal in moisture. If you have frosting on them, keep them at room temperature for up to two days. For longer storage, place the cupcakes in the fridge. Remember to let them return to room temp before serving. This way, the flavors stay bright and yummy. You can freeze these cupcakes for later enjoyment. First, let them cool completely. Then, wrap each cupcake tightly in plastic wrap. Place them in a freezer-safe bag or container. They can last up to three months in the freezer. If you want to freeze the frosting, store it separately in a sealed container. To thaw, just take the cupcakes out and leave them at room temperature for about an hour. If you froze the frosting, let it sit out for 30 minutes. Then, re-whip it for the best taste and texture. Enjoy your delightful treats any time! Can I use frozen strawberries? Yes, you can use frozen strawberries. Just thaw and puree them. Drain any extra liquid. This keeps the cupcakes moist and flavorful. How can I make these cupcakes without eggs? You can replace eggs with applesauce or a flaxseed mixture. Use 1/4 cup applesauce for each egg. For flaxseed, mix 1 tablespoon ground flax with 2.5 tablespoons water. Let it sit until gel-like. What to do if cupcakes are too dense? If your cupcakes are too dense, check your baking powder and baking soda. They should be fresh. Also, make sure you didn’t overmix the batter. Mix until just combined. How to fix frosting that is too runny? If your frosting is runny, add more powdered sugar. Start with a little at a time. Beat it well until it thickens. You can also chill it for a short time. What flavors pair well with strawberry lemonade cupcakes? These cupcakes go well with lemon, mint, and vanilla. You can also try pairing them with whipped cream or fresh fruit. They add a nice touch. Ideas for serving at events or gatherings Serve these cupcakes on a colorful platter for a bright look. Add fresh strawberries or lemon slices on top. You can also offer drinks like lemonade or iced tea alongside. In this article, we explored the tasty world of strawberry lemonade cupcakes. We covered essential ingredients, from flour and sugar to fresh strawberries. I shared step-by-step instructions to make the batter and bake your cupcakes perfectly. We also tackled frosting techniques and offered tips for presentation. You can even try different variations to fit dietary needs. Remember, baking is fun! Enjoy the process, experiment, and share your delicious results. Happy baking!

Strawberry Lemonade Cupcakes Flavorful Delight Recipe

Are you ready to indulge in a fruity treat? Strawberry lemonade cupcakes blend vibrant flavors into every bite. This recipe

To make a tasty Instant Pot beef stroganoff, you'll need these key items: - 1 lb beef stew meat (cut into bite-sized pieces) - 1 medium onion, diced - 2 cloves garlic, minced - 8 oz mushrooms, sliced - 1 cup beef broth - 1 tablespoon Worcestershire sauce - 1 teaspoon Dijon mustard - 1 teaspoon dried thyme - 1 tablespoon olive oil - Salt and pepper to taste - 1 cup sour cream - 2 tablespoons cornstarch (optional for thickening) - 8 oz egg noodles - Fresh parsley, chopped (for garnish) These ingredients create a rich, creamy dish that warms your heart. You can switch things up with these optional ingredients: - 1 cup of frozen peas for color and sweetness - 1 tablespoon of soy sauce for added umami - 1 teaspoon of smoked paprika for a hint of smokiness Feel free to mix and match based on what you have at home! If you need to use different items, here are some good swaps: - Use chicken or turkey instead of beef for a lighter dish. - Swap egg noodles for gluten-free pasta or rice. - Greek yogurt can replace sour cream for a healthier option. These substitutions still keep your beef stroganoff delicious while fitting your needs. {{ingredient_image_1}} To start, set your Instant Pot to Sauté mode. Add one tablespoon of olive oil to the pot. While it heats, season one pound of beef stew meat with salt and pepper. Cut your beef into bite-sized pieces for even cooking. Brown the beef in batches for about 3-4 minutes. Make sure not to overcrowd the pot. Once browned, remove the beef and set it aside. In the same pot, add one medium diced onion. Sauté for 2-3 minutes until it turns translucent. Next, add two minced garlic cloves and eight ounces of sliced mushrooms. Cook this mixture for another 3 minutes. The mushrooms should soften and add great flavor. Now, pour in one cup of beef broth to deglaze the pot. Scrape up any brown bits from the bottom. This step is key for adding rich flavor to your dish. After deglazing, return the browned beef to the pot. Add one tablespoon of Worcestershire sauce, one teaspoon of Dijon mustard, and one teaspoon of dried thyme. Stir to mix everything well. Close the lid and set the valve to Sealing. Choose Manual or Pressure Cook and set it to high pressure for 15 minutes. When cooking is complete, allow for a natural release for 10 minutes. Then, do a quick release for any remaining pressure. Open the lid and stir in the egg noodles. If needed, add another cup of beef broth to cover the noodles. Close the lid again and pressure cook for an additional 5 minutes. After this time, do a quick release. Finally, stir in one cup of sour cream until combined. For a thicker sauce, mix two tablespoons of cornstarch with water and add it while stirring. Adjust seasoning with more salt and pepper if needed. Serve this creamy dish in deep bowls, topped with chopped parsley. Enjoy! To get the best texture in your beef stroganoff, you need to brown the beef well. When you sauté it, let it get golden on all sides. This adds depth to the flavor. After cooking, the beef should be tender, not tough. If you want a thicker sauce, mix cornstarch with water to create a slurry. Stir it in before serving to get that rich, creamy feel. For a boost in flavor, consider adding fresh herbs like thyme or rosemary. You can also try a splash of red wine for a deeper taste. If you enjoy a bit of spice, add a pinch of cayenne pepper. Don’t forget to taste as you go! Adjust salt and pepper to find your perfect balance. This will make your dish stand out. Serve your beef stroganoff in deep bowls for a hearty presentation. Garnish with fresh parsley to add color and freshness. Pair it with a slice of crusty bread to soak up the sauce. You can also add a light salad on the side for freshness. This makes your meal more complete and enjoyable. Pro Tips Brown the Beef: For maximum flavor, ensure you brown the beef in batches. This prevents steaming and allows for a nice caramelization. Deglazing is Key: Scrape up any browned bits from the bottom of the pot when adding the broth; these bits add incredible depth of flavor to your stroganoff. Adjust Consistency: If you prefer a thicker sauce, use the cornstarch slurry method right before adding the sour cream to achieve your desired texture. Garnish Smartly: Always finish your dish with fresh herbs like parsley or chives for a pop of color and freshness that enhances the overall taste. {{image_2}} If you want a beef stroganoff without mushrooms, skip them. You can replace the mushrooms with more onion or include bell peppers for added flavor. Try zucchini or carrots for a fresh taste. These options keep the meal tasty and satisfying. Adding vegetables to your stroganoff can boost its nutrition. You can mix in peas, green beans, or spinach. Add these during the last pressure cook step to keep them crisp. This makes the dish colorful and full of flavor. To make a gluten-free beef stroganoff, swap the egg noodles for gluten-free pasta. You can also use cauliflower rice or zucchini noodles. Use gluten-free Worcestershire sauce to ensure every bite is safe and delicious. These changes let everyone enjoy this meal. After making beef stroganoff, let it cool down. Place leftovers in an airtight container. This keeps the dish fresh and tasty. You can store it in the fridge for 3 to 4 days. If you want to keep it longer, try freezing it. To reheat, you can use the microwave or the stove. If using the microwave, put it in a safe bowl. Heat it in short bursts, stirring in between. This helps it heat evenly. On the stove, warm it on low heat. Add a splash of broth if it seems too thick. For freezing, use a freezer-safe container. Leave some space at the top, as it will expand. Beef stroganoff can last up to 3 months in the freezer. When ready to eat, thaw it in the fridge overnight. Then, reheat as explained above for a quick meal. Yes, you can use other cuts of beef. Cuts like sirloin or round work well. Just remember, tougher cuts need longer cooking times. This will help them become tender. Always cut the beef into bite-sized pieces. This ensures even cooking and better texture in your dish. If you need a substitute for sour cream, try plain Greek yogurt. It gives a similar tangy flavor. You can also use cream cheese or a mix of milk and vinegar. Both options will still add creaminess to the sauce. Just remember, the taste may vary slightly. To keep the noodles from getting mushy, add them at the right time. Stir them in just before the final pressure cook. If you’re unsure, test a noodle after cooking. This way, you can adjust the cooking time for your taste. Use enough beef broth to cover the noodles too. This helps them cook evenly and stay firm. This article covered key ingredients and step-by-step instructions for cooking a great dish. We discussed essential and optional items, plus tasty substitutions. I shared tips on texture, flavor, and serving options. You learned about variations for different diets and how to store leftovers properly. Remember, cooking is about experimenting. Don’t be afraid to try new ingredients or methods. Enjoy your culinary journey!

Instant Pot Beef Stroganoff Flavorful and Quick Meal

Looking for a quick and tasty dinner? My Instant Pot Beef Stroganoff is the answer! This dish combines tender beef,

- 2 lbs beef chuck roast, cut into large chunks - 1 lb lamb shoulder, cut into large chunks - 4 dried guajillo chilies, stems and seeds removed - 2 dried ancho chilies, stems and seeds removed - 2 teaspoons ground cumin - 2 teaspoons dried oregano - 1 teaspoon smoked paprika - Salt and pepper, to taste - Corn tortillas (10-12) - Chopped fresh cilantro, for garnish - Lime wedges, for serving I love using beef chuck roast and lamb shoulder in my Birria Tacos. Their rich flavors make each bite special. The dried guajillo and ancho chilies add a lovely depth. Toasting these chilies brings out their true taste. It’s a simple step, but it makes a big difference. The spices are just as important. Ground cumin gives warmth, while oregano adds earthiness. Smoked paprika adds a nice, subtle smoky flavor. Salt and pepper help balance everything. Don't skip these; they tie the dish together. For the tacos, corn tortillas are a must. They hold the juicy meat well and add a nice texture. Fresh cilantro adds a pop of color and freshness. Lime wedges bring a bright zing that cuts through the richness of the meat. Gather these ingredients before you start cooking. It makes the whole process easier and more fun! {{ingredient_image_1}} Toasting the chilies Start by toasting the guajillo and ancho chilies. Heat a dry skillet over medium heat. Add the dried chilies and toast them for 2 minutes. You want them to be fragrant. This step brings out their flavor. Remove the pan from heat and let the chilies cool a bit. Blending the chili mixture Next, place the toasted chilies in a blender. Add the quartered onion, garlic cloves, ground cumin, oregano, smoked paprika, and a pinch of salt. Pour in about 1 cup of beef broth. Blend until smooth. This chili mixture will be the heart of your sauce. Browning the beef and lamb In a large pot, heat a tablespoon of oil over medium-high heat. Take your beef and lamb chunks and season them with salt and pepper. Brown the meat in batches. Make sure not to overcrowd the pot, as this will keep the meat from browning well. Combining meat with chili sauce and broth Once the meat is browned, return it to the pot. Pour the blended chili sauce over the meat. Add the rest of the beef broth and bring it to a boil. Lower the heat to a simmer. Cover the pot and cook for about 2 hours. The meat should be tender and shred easily. Shredding the meat After cooking, take the meat out of the pot. Use two forks to shred the meat. It should come apart easily. Strain the remaining broth to separate the solids. Keep this yummy consomé for dipping. Heating and dipping tortillas Now, heat the corn tortillas in a skillet over medium heat until they are soft and pliable. Take each tortilla and dip it in the consomé. Then, fill it with the shredded meat and fold. Your tacos are now ready to serve! To get the best taste, you need to toast your chilies. Here’s how I do it: - Use a dry skillet over medium heat. - Toast the dried guajillo and ancho chilies for about 2 minutes. - Keep an eye on them; you want them fragrant, not burnt. Once toasted, let them cool a bit before blending. This step brings out their rich flavor. Next, let’s brown the meat. Here’s my technique: - Use a large pot or Dutch oven. - Heat a tablespoon of oil over medium-high heat. - Season the beef and lamb with salt and pepper. - Brown the meat in batches. Overcrowding the pot makes it steam, not brown. Brown each piece for about 4–5 minutes. This step adds depth to your tacos. When it comes to serving Birria Tacos, presentation matters. Here’s what I do: - Serve the tacos on a rustic wooden board. - Place a small bowl of consomé for dipping next to the tacos. - Garnish with fresh lime wedges and chopped cilantro. This makes it look appealing and inviting. You can also add some spicy salsa on the side for extra flavor. Having the right tools makes cooking easier. Here’s what I recommend: - A large pot or Dutch oven for cooking the meat. - A blender for mixing the chili sauce. - A skillet to heat the tortillas. Keep your kitchen organized by gathering all your ingredients and tools before you start. This makes the cooking process smooth and fun. Pro Tips Chili Toasting Technique: Toasting the chilies enhances their flavor, bringing out smoky and rich notes that elevate your dish. Broth Consistency: Adjust the consistency of the consomé by adding more broth if it’s too thick or simmering longer if it’s too thin. Meat Marination: For deeper flavor, marinate the meat in the chili sauce for a few hours or overnight before cooking. Tortilla Technique: Lightly char the tortillas on an open flame for added flavor and texture before filling them with the meat. {{image_2}} You can make Birria tacos without meat. Use jackfruit or mushrooms instead. Both options soak up flavors well. Jackfruit has a shredded texture similar to meat. Mushrooms add a nice umami taste. Use the same spices and sauce from the original recipe. This keeps the flavor strong. Serve with the same tasty garnishes like cilantro and lime. For a low-carb option, use cheese or almond flour tortillas. These will lower the carbs in your meal. The flavor still shines through with the meat and sauce. You can also skip the tortillas entirely. Instead, serve the meat with a side of consomé for dipping. This keeps it keto-friendly while still being delicious. Birria varies across Mexico, each region adding its twist. In Jalisco, they often use goat meat. In Tijuana, they serve it with cheese inside the taco. Each version brings unique spices and flavors. Explore these styles to find your favorite. You can even mix and match to create your own signature Birria taco! To keep your Birria Tacos fresh, store them right. Place leftovers in an airtight container. You can refrigerate them for up to three days. If you want to save them longer, freeze the meat and consomé separately. The meat stays tasty for about three months in the freezer. To reheat Birria Tacos, use a skillet. Heat the skillet over medium heat. Add a little water or broth to keep them moist. Warm the tacos for about three to five minutes. This method keeps the flavor and texture spot on. You can also use the microwave, but heat in short bursts. This prevents them from getting soggy. Birria Tacos can last in the fridge for three days. If kept in the freezer, they stay good for three months. Always check for any signs of spoilage before eating. If they smell off or look different, it’s best to toss them. Birria is a dish from the state of Jalisco in Mexico. It dates back to the 16th century. Originally, people made it with goat meat. Over time, beef and lamb became popular choices. The dish is often served at special events and gatherings. Birria means "a mess," which fits the rich, flavorful stew. The tacos we enjoy today come from this tasty stew. Chefs then fill corn tortillas with the tender meat and spicy sauce. Yes, you can use chicken or other meats for Birria Tacos. Chicken cooks faster than beef or lamb. If you choose chicken, use thighs for better flavor. Cook it for about 1 to 1.5 hours. You can also try pork or even a mix of meats. Just adjust the cooking time based on your choice. Each meat will give a unique flavor to the tacos. The spice level in Birria Tacos can vary. Dried guajillo and ancho chilies give a mild heat. If you like more spice, add extra chilies or hot sauce. You can also remove the seeds for less heat. Always taste your sauce before adding it to the meat. This way, you can find the right balance for your taste. In this blog post, we covered how to make delicious Birria Tacos. You learned about the main ingredients like beef chuck and lamb shoulder, plus the spices that boost flavor. We shared step-by-step cooking methods, tips for great taste, and ways to serve your tacos. With these insights, you can now create your own tasty Birria Tacos at home. Experiment with variations to suit your taste, and enjoy the rich flavors of this Mexican classic. Happy cooking!

Savory Birria Tacos Tasty Flavorful Experience

Are you ready to dive into the world of Birria Tacos? These tasty bites bring a mix of beef and

- 1 lb large shrimp, peeled and deveined - 2 tablespoons Sriracha sauce - Juice of 2 limes - 1 tablespoon olive oil The main ingredients are the stars of your tacos. Fresh shrimp brings a sweet taste. Sriracha sauce adds heat and flavor. Lime juice gives a nice tang. Olive oil keeps everything moist and tasty. - 1 teaspoon garlic powder - 1 teaspoon cumin - Salt and pepper to taste - 1 cup red cabbage, shredded - 1 avocado, sliced For seasonings, garlic powder adds depth, and cumin gives warmth. Salt and pepper make all the flavors pop. Shredded red cabbage adds crunch and color. Sliced avocado offers creaminess and health benefits too. - 8 small corn or flour tortillas - 1/4 cup fresh cilantro, chopped - Lime wedges for serving You can use either corn or flour tortillas. Both types are soft and delicious. Fresh cilantro adds a bright flavor. Lime wedges are perfect for extra zest on top. {{ingredient_image_1}} Start by marinating the shrimp. In a bowl, mix 1 pound of large shrimp with 2 tablespoons of Sriracha sauce, the juice of 2 limes, 1 tablespoon of olive oil, 1 teaspoon of garlic powder, 1 teaspoon of cumin, and salt and pepper to taste. Make sure each shrimp is coated well. Let the shrimp sit for 15 to 20 minutes. This helps build the flavor. Heat a skillet over medium-high heat. Add the marinated shrimp to the skillet. Cook them for 2 to 3 minutes on each side. You want them to turn pink and opaque. This quick cooking keeps the shrimp juicy and tender. Don't overcrowd the pan; cook the shrimp in batches if needed. While the shrimp cooks, warm the tortillas. You can use another skillet or heat them over an open flame. Just warm them until they are soft and pliable. This makes them easy to fold and fill. If you like a bit of char, let them sit on the flame for a few seconds. To get the most flavor, marinate the shrimp. Mix the shrimp with Sriracha sauce, lime juice, olive oil, garlic powder, cumin, salt, and pepper. Let it sit for 15-20 minutes. This time allows the shrimp to soak up the spices. The lime juice adds a fresh zing, while Sriracha gives it a nice kick. Cooking shrimp can be tricky. You want them juicy, not rubbery. Heat the skillet to medium-high. Cook the shrimp for 2-3 minutes on each side. Look for them to turn pink and opaque. If you see them curling tightly, they are overcooked. Keep an eye on them! These tacos shine with fresh sides. Try pairing them with a light salad or some chips and salsa. You can also serve them with a creamy dip like avocado sauce. Lime wedges on the side boost the flavors even more. Enjoy the crunch of the cabbage and the creaminess of the avocado. Each bite will be a delight! Pro Tips Marinate the shrimp longer: For an even bolder flavor, consider marinating the shrimp for up to an hour. This allows the spices and Sriracha to penetrate deeper into the shrimp. Use fresh lime juice: Freshly squeezed lime juice enhances the flavor profile of the tacos significantly compared to bottled lime juice. Grill the shrimp: For a smoky flavor, grill the shrimp instead of sautéing. This adds an extra layer of taste and enhances the overall taco experience. Customize toppings: Feel free to add other toppings such as diced tomatoes, jalapeños, or a drizzle of creamy sauce to personalize your tacos. {{image_2}} You can swap shrimp for chicken or tofu. Chicken adds a hearty bite, while tofu brings a plant-based twist. For chicken, use boneless thighs or breasts. Marinate just like the shrimp. Cook until golden brown. For tofu, use firm blocks. Press it to remove water, then cut into cubes. Marinate and sauté until crispy. Both options keep the flavor bright. Feel free to change the spice levels. Add more Sriracha for a bolder kick. If you prefer milder flavors, reduce the Sriracha. You can also try adding other sauces. A splash of soy sauce or a dollop of hoisin can enhance taste. Mixing in some honey balances heat and brings sweetness. Experimenting with flavors makes each taco unique. Toppings can transform your tacos. Try fresh salsa for a zesty bite. Pico de gallo adds a fresh crunch. You can also use cheese for extra creaminess. Feta or queso fresco pairs well with the shrimp. Don’t forget to add a squeeze of lime on top. Each topping brings its own flair to the dish. To keep your shrimp tacos fresh, store leftovers in an airtight container. Place the shrimp and toppings separately. This helps maintain texture and flavor. Shrimp can stay good for two days in the fridge. If you have extra tortillas, keep them in a zip-top bag. They will last about three days. To reheat your shrimp without losing texture, use a skillet. Heat it over medium-low heat. Add the shrimp and cook for one to two minutes. Stir gently to warm evenly. For tortillas, warm them in a dry skillet for about 30 seconds per side. This keeps them soft and pliable. You can freeze Sriracha Lime Shrimp Tacos, but it’s best to freeze shrimp and toppings separately. Place shrimp in a freezer-safe bag. Squeeze out excess air and seal. They can last for up to three months. When ready to eat, thaw shrimp overnight in the fridge. Reheat as described above. The best way to cook shrimp is to sauté them. This method gives the shrimp a nice, tender texture. First, marinate the shrimp in Sriracha, lime juice, and spices. Let them sit for 15-20 minutes. Then, heat a skillet over medium-high heat. Cook the shrimp for 2-3 minutes on each side. They are done when they turn pink and opaque. - Use fresh shrimp for the best flavor. - Avoid overcrowding the pan to ensure even cooking. - Cook until just done to keep them juicy. Yes, you can prepare shrimp tacos ahead of time. You can marinate the shrimp hours in advance. Keep them in the fridge until you’re ready to cook. You can also chop the veggies ahead. Store them in airtight containers. This saves time and makes the meal easier to assemble. - Marinate shrimp up to 2 hours before cooking. - Pre-chop cabbage, avocado, and cilantro. - Warm tortillas just before serving for the best taste. You can enjoy many side dishes with shrimp tacos. Here are some great options: - Mexican rice: Fluffy and flavorful, it pairs well. - Black beans: Rich in protein and easy to make. - Corn salad: Adds a fresh crunch to your meal. - Chips and salsa: A fun, crunchy side that everyone loves. These sides will make your meal complete and satisfying. In this post, we explored making Sriracha lime shrimp tacos. We covered key ingredients like shrimp, tortillas, and seasonings. The step-by-step guide detailed shrimp prep, cooking, and how to warm tortillas. I shared tips for the best flavor and storage methods, along with tasty variations to try. These tacos are quick, fun to make, and packed with flavor. Now you can create a delicious meal that impresses your family and friends. Enjoy experimenting with different proteins and toppings to make it your own!

Sriracha Lime Shrimp Tacos Flavorful Zesty Delight

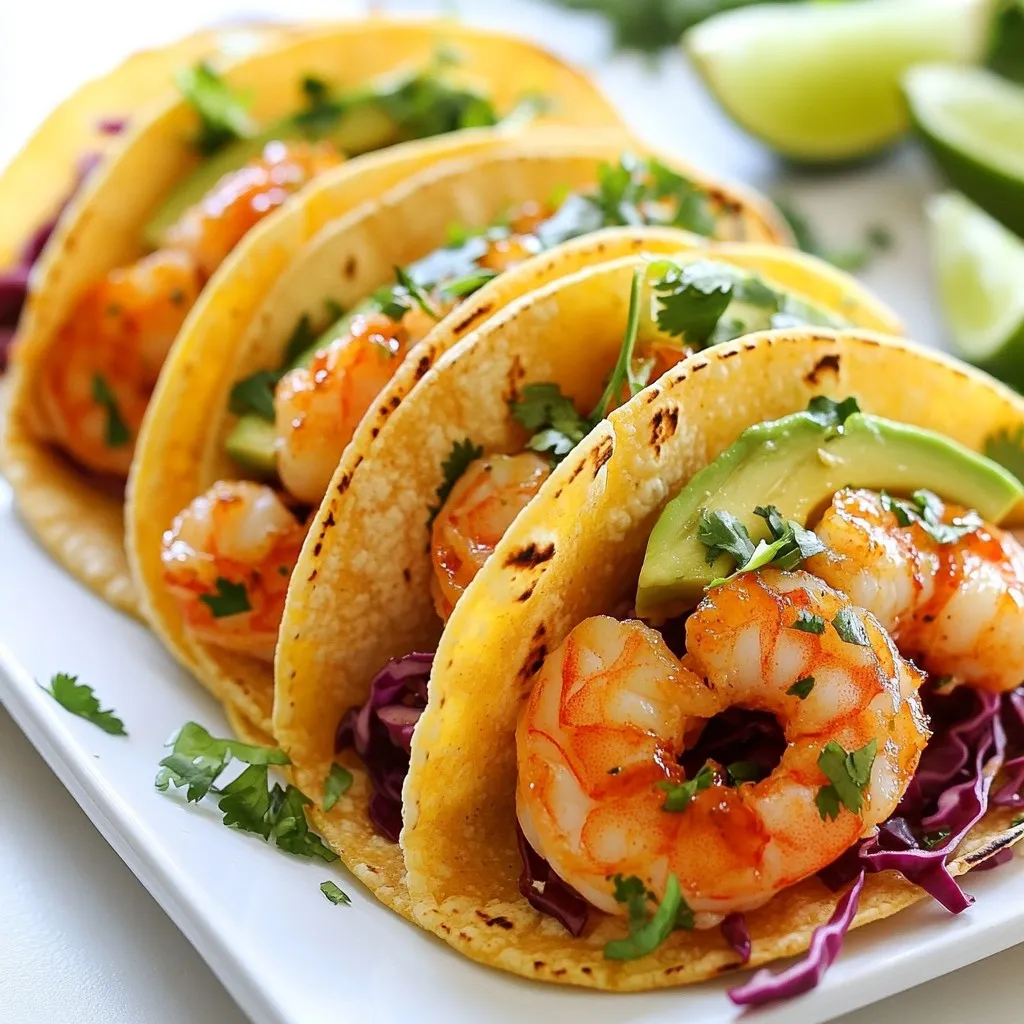
Are you ready to spice up your taco night? These Sriracha Lime Shrimp Tacos pack a punch of flavor and

For this refreshing drink, you will need: - 4 cups boiling water - 4 black tea bags - 2 ripe peaches, pitted and sliced - 1/4 cup honey (adjust to taste) - 1/4 cup fresh lemon juice - 2 cups cold water - Ice cubes These ingredients work together to give your iced tea a sweet and fruity flavor. The black tea forms a strong base. The peaches add a delightful sweetness. Honey brings in a smooth, natural taste. Fresh lemon juice gives it a nice tang. You can add fun touches to your drink: - Fresh mint leaves for garnish - Additional peach slices for decoration Mint leaves not only look nice but also add a fresh scent. Extra peach slices make the drink look pretty in the glass. They also give a hint of flavor as you sip. Each ingredient offers great health benefits: - Black tea is rich in antioxidants. It can boost heart health and improve focus. - Peaches are low in calories and high in vitamins. They help with digestion and skin health. - Honey has natural antibacterial properties. It can soothe a sore throat and add energy. - Lemon juice is packed with vitamin C. It can boost your immune system and aid digestion. These ingredients not only taste good but also support your overall health. Enjoying this iced tea can refresh you on hot days while offering some health perks. {{ingredient_image_1}} Start by boiling 4 cups of water in a large pot. Once it boils, remove it from heat. Place 4 black tea bags into the hot water. Let them steep for 5 minutes. This step is key for strong flavor. After 5 minutes, take out the tea bags. Allow the tea to cool to room temperature. This cooling step is important; it helps blend the flavors later. While the tea cools, grab 2 ripe peaches. First, pit and slice them. Next, place the slices in a blender. Blend until the peaches are smooth. If you want bits of peach, pulse the blender a few times. This will create a nice texture. You can adjust how smooth you want the puree based on your taste. In a separate bowl or pitcher, mix the peach puree, 1/4 cup honey, and 1/4 cup fresh lemon juice. Stir well until the honey dissolves. This mixture adds sweetness and tang to your tea. Once your tea has cooled, pour the peach mixture into the tea. Stir until everything is combined. Finally, add 2 cups of cold water. Place the mixture in the refrigerator for at least 1 hour. This helps the flavors blend together and taste even better. To adjust the sweetness of your Honey Peach Iced Tea, start with the honey. I recommend using 1/4 cup of honey, but you can add more or less. If you like it sweeter, add a spoonful at a time. Stir well after each addition. You can also swap honey for agave syrup or maple syrup. These options provide sweetness without the same flavor. Taste as you go to find your perfect level. Steeping tea well is key for good flavor. Use boiling water for black tea to bring out the best taste. Steep the tea bags for about 5 minutes. If you steep too long, the tea may taste bitter. After steeping, remove the bags right away. Let the tea cool to room temperature before mixing it with the peach puree. This helps keep your drink refreshing and not too warm. Peaches are great, but you can try other fruits too! Nectarines can add a similar taste. Strawberries give a sweet twist, while raspberries add a fun tartness. You can even mix fruits for a unique flavor. Blend them into a puree just like you do with peaches. This opens up many fresh, fruity options for your iced tea! Pro Tips Choose Ripe Peaches: Make sure the peaches are ripe and fragrant for the best flavor in your iced tea. Adjust Sweetness: Taste the mixture before refrigerating and adjust the honey to your preferred sweetness level. Experiment with Teas: Feel free to substitute black tea with green tea or herbal tea for a different flavor profile. Garnish Creatively: Use additional fruit slices or other herbs like basil for a unique garnish that enhances presentation. {{image_2}} You can change this drink by using herbal teas. Try chamomile or hibiscus. These teas add unique tastes and aromas. They also make the drink caffeine-free. To use herbal tea, steep it just like black tea. The result will be a fruity and floral delight. To make a fun summer cocktail, add some vodka or rum. Use about 1 to 2 ounces per glass. Mix it in before you pour over ice. This twist is great for parties or relaxing on the porch. You can also try adding a splash of sparkling wine for some fizz. You can switch out peaches for other fruits based on the season. In spring, use strawberries for a fresh taste. In fall, apples or pears work well. Just make sure the fruit is ripe and sweet. Blend it the same way you do with peaches. Each fruit brings its own flavor, making your iced tea unique. You can store Honey Peach Iced Tea in a pitcher or jar. Make sure it has a lid. This keeps the tea fresh and free from odors. Store it in the fridge. It will stay cool and tasty. Honey Peach Iced Tea lasts about 3 to 5 days in the fridge. After a few days, the flavor may change. To keep it fresh, always seal it well. If you notice any strange smells or flavors, throw it out. Always trust your senses when it comes to food. You can freeze Honey Peach Iced Tea if you want to save it. Pour the tea into ice cube trays. Once frozen, move the cubes to a bag. This way, you can use them later in drinks. It’s a fun way to keep that summer flavor all year long! For Honey Peach Iced Tea, I recommend using black tea. Black tea gives a rich flavor that pairs well with the sweet peaches and honey. You can also try green tea for a lighter taste. If you want a caffeine-free option, use herbal tea instead. Just ensure it has a strong flavor to stand up to the peach. Yes, you can make Honey Peach Iced Tea ahead of time. In fact, making it a few hours or even a day before serving can enhance the flavor. Just follow the recipe, then store it in the fridge. Keep it in a sealed container to keep it fresh. Serve it over ice when you're ready. To make Honey Peach Iced Tea sugar-free, replace honey with a sugar-free sweetener. You can use stevia or monk fruit sweetener. Adjust the amount to your taste. These sweeteners blend well with the tea and peach. Check product labels to ensure they are natural and suit your dietary needs. This article covered how to make Honey Peach Iced Tea step by step. We explored the main ingredients, health benefits, and fun variations. You learned tips for perfect sweetness and storage practices. In conclusion, this drink is refreshing and easy to make. You can customize it to fit your taste. So gather your ingredients, enjoy the process, and sip on something delightful.

Honey Peach Iced Tea Refreshing Summer Beverage Recipe

Looking for the perfect summer drink? Honey Peach Iced Tea is both refreshing and easy to make. The sweet flavor

- 3 cups sweetened shredded coconut - 1/2 cup sweetened condensed milk - 1 teaspoon vanilla extract - 1/4 teaspoon almond extract - 2 large egg whites - 1/4 teaspoon salt - 6 ounces semi-sweet chocolate chips - 1 tablespoon coconut oil To make about 20 macaroons, you need simple amounts. The main star is the shredded coconut. You want three cups for that chewy texture. The sweetened condensed milk adds the right amount of sweetness. You only need half a cup. The flavor comes from one teaspoon of vanilla and a dash of almond extract. The egg whites help bind the macaroons. You use two large egg whites and a pinch of salt to make them fluffy. For the chocolate coating, six ounces of semi-sweet chocolate chips mixed with one tablespoon of coconut oil provide a shiny finish. If you run out of an ingredient, don’t worry! You can replace sweetened condensed milk with coconut cream for a dairy-free option. For flavor, substitute almond extract with more vanilla if you prefer. If you want a different chocolate flavor, use dark or milk chocolate instead of semi-sweet. These small swaps keep the recipe flexible while still tasting great! {{ingredient_image_1}} Start by preheating your oven to 325°F (160°C). While the oven heats, line a baking sheet with parchment paper. This step helps the macaroons not stick. A clean sheet makes cleanup easy. In a large mixing bowl, combine 3 cups of sweetened shredded coconut with 1/2 cup of sweetened condensed milk. Add 1 teaspoon of vanilla extract and 1/4 teaspoon of almond extract. Stir the mixture well until it's fully blended and sticky. This mixture brings a sweet and rich flavor. In a separate bowl, whip 2 large egg whites with 1/4 teaspoon of salt. Use an electric mixer for about 2-3 minutes until you see soft peaks. This step adds fluffiness to your macaroons. Gently fold the whipped egg whites into the coconut mixture. Use a spatula to combine slowly. Be careful not to deflate the egg whites too much. Take a tablespoon or a small ice cream scoop to form small mounds of the mixture. Place these mounds on the baking sheet, spaced about 1 inch apart. This spacing helps them bake evenly. Bake them for 20-25 minutes or until the edges turn golden brown. Once baked, let them cool on the sheet for about 10 minutes. Then, transfer them to a wire rack to cool completely. For the chocolate, take 6 ounces of semi-sweet chocolate chips and 1 tablespoon of coconut oil. In a microwave-safe bowl, combine these together. Microwave in 30-second intervals, stirring in between until the chocolate is smooth and melted. Once the macaroons are cool, dip the bottom half of each macaroon into the melted chocolate. Allow any excess chocolate to drip off. Place the dipped macaroons back on the wire rack or a parchment-lined tray. Let the chocolate set at room temperature. If you want to speed things up, place the tray in the refrigerator for 15-20 minutes. This helps the chocolate harden perfectly. To make your macaroons soft and chewy, use sweetened shredded coconut. This type adds moisture. When mixing, do not rush. Stir until the coconut and condensed milk blend well. When you whip the egg whites, make sure to reach soft peaks. This helps add air and lightness to your macaroons. Gently fold the whipped egg whites into the coconut mix. Be careful not to deflate them. This step is key to achieving that perfect chewy texture. For a smooth chocolate coating, start with quality chocolate chips. Semi-sweet works best for flavor. When melting, use a microwave-safe bowl. Heat in short bursts of 30 seconds. Stir in between to avoid burning. If the chocolate is too thick, add a bit of coconut oil. This helps it melt evenly. When dipping the macaroons, make sure they are cool. This allows the chocolate to cling well. Allow any excess to drip off before placing them on the rack. Presentation is important for any dessert. Arrange your macaroons on a nice platter. You can sprinkle a little extra shredded coconut on top. This adds color and charm. For a special touch, place each macaroon in a paper liner. It makes them look fancy and keeps them tidy. If you want to impress, drizzle melted chocolate over them after they set. This small step adds a lovely finish. Enjoy serving them at parties or gatherings! Pro Tips Use Fresh Ingredients: Always use fresh shredded coconut for the best flavor and texture in your macaroons. Perfect Egg Whites: Make sure there’s no yolk in the egg whites for them to whip up properly. Clean bowls and beaters are a must! Chocolate Quality: Use high-quality chocolate for dipping; it will make a significant difference in taste. Storage Tips: Store macaroons in an airtight container at room temperature for up to a week. They can also be frozen for longer storage. {{image_2}} You can change the chocolate you use for dipping. Semi-sweet chocolate gives a nice balance of sweet and rich. Dark chocolate adds a more intense flavor. If you love white chocolate, it adds a sweet and creamy touch. You can even mix chocolates for a fun look. Adding flavors can change your macaroons. Chopped nuts give a lovely crunch. Almonds or pecans work great. You can also use extracts. Try coconut or mint for a new taste. For a tropical twist, add some pineapple juice to the coconut mix. These small changes can make a big difference. Making mini macaroons is fun! Use a smaller scoop to create bite-sized treats. These are perfect for parties or gifts. You can serve them on a platter, looking cute and dainty. They are easy to pop into your mouth. Kids and adults will love them! After making these tasty macaroons, you might have some left. Place them in an airtight container. This helps keep them fresh. Store the container at room temperature. They can last for about 3 to 5 days. If you want to keep them longer, consider freezing. Freezing macaroons is simple. First, let them cool completely. Next, place them in a single layer on a baking sheet. Freeze them for about 1 hour. Once frozen, transfer them to a freezer-safe bag. They can last up to 3 months in the freezer. When you want to enjoy them, just thaw them at room temperature. To keep your chocolate dipped treats fresh, avoid humidity. Store them in a cool, dry place. If you live in a warm area, consider the fridge. Place wax paper between layers of macaroons to prevent sticking. Always seal the container tightly to keep air out. This will help maintain their flavor and texture. Yes, you can make macaroons without egg whites. You can use aquafaba, which is the liquid from canned chickpeas. This will help bind the ingredients together. Use about 3 tablespoons of aquafaba for each egg white. Whip it until it forms soft peaks, just like you would with egg whites. If your chocolate isn't melting smoothly, try a few tips. First, make sure your bowl is dry. Any water can cause chocolate to seize. Second, use a microwave in short bursts, about 30 seconds each. Stir between each burst to help it melt evenly. If it still isn’t smooth, add a little coconut oil to help. Chocolate dipped macaroons can last about a week at room temperature. Store them in an airtight container to keep them fresh. If you put them in the fridge, they may last up to two weeks. Just remember, the chocolate may get a bit dull in the fridge. You can use unsweetened coconut, but it will change the taste. The macaroons will be less sweet and may need more sweetened condensed milk. Try adding a bit of sugar to balance the flavors. If you like a less sweet cookie, unsweetened coconut works well. In this post, I covered how to make chocolate dipped coconut macaroons. We explored the ingredients, including possible substitutions, and provided simple step-by-step instructions for mixing and baking. I shared helpful tips for texture and presentation. You can also try fun variations to suit your taste. Lastly, I included storage tips to keep your treats fresh. With these guidelines, you can create delicious macaroons that everyone will love. Enjoy your baking journey!

Chocolate Dipped Coconut Macaroons Deliciously Easy

Get ready to indulge in the sweet bliss of Chocolate Dipped Coconut Macaroons! These treats are not just tasty; they’re

- 1 lb ground chicken - 1/2 cup breadcrumbs (preferably whole wheat) - 1/4 cup grated Parmesan cheese - 1/4 cup fresh parsley, finely chopped - 2 cloves garlic, minced - 1 tablespoon Dijon mustard - 1 teaspoon onion powder - 1 teaspoon paprika - Salt and pepper to taste - 1 egg, beaten - Olive oil spray These ingredients come together to create juicy and tasty chicken patties. Ground chicken gives a nice base. Whole wheat breadcrumbs add texture. Parmesan cheese brings a rich flavor. Fresh parsley brightens the dish with color and taste. Garlic adds depth, while Dijon mustard gives a subtle kick. Onion powder and paprika enhance the overall flavor. The egg helps bind everything together. You can mix in some fun additions to make these patties your own. Consider these options: - Chopped green onions - Diced bell peppers - Shredded carrots - Crushed red pepper flakes for heat These add-ins can make your chicken patties unique and exciting. Just keep the total amount similar, so the mixture stays balanced. Seasoning is key to great flavor. Use salt and pepper to taste, but don’t stop there. You can also try: - Italian seasoning for a herby touch - Cumin for warmth - Lemon zest for a bright finish The right seasonings can elevate your chicken patties to new heights. They help the flavors pop and make each bite enjoyable. {{ingredient_image_1}} To start, grab a large mixing bowl. Add 1 pound of ground chicken to the bowl. Next, mix in 1/2 cup of whole wheat breadcrumbs and 1/4 cup of grated Parmesan cheese. Then, add 1/4 cup of finely chopped fresh parsley. This adds great flavor and color to your patties. Now, toss in 2 cloves of minced garlic for some zest. Don't forget 1 tablespoon of Dijon mustard for a tangy kick! Next, sprinkle in 1 teaspoon of onion powder and 1 teaspoon of paprika for warmth. Season with salt and pepper to taste. Finally, pour in 1 beaten egg to bind everything together. Use your hands or a spoon to mix it all until it's combined well. Now that your mixture is ready, it’s time to shape the patties. Take a handful of the chicken mix and form it into a patty. Aim for about 1/2 inch thick and round. You should get around 8 to 10 patties, depending on how big you want them. Make sure they’re evenly packed. This helps them cook well and hold their shape. Preheat your air fryer to 375°F (190°C) for 3 to 5 minutes. While it heats up, lightly coat the air fryer basket with olive oil spray. This keeps the patties from sticking. Place the patties in the basket. Make sure they are in a single layer and not touching each other. If your air fryer is small, cook them in batches. Once they are placed, spray the tops with more olive oil spray. Close the air fryer and cook for 10 to 12 minutes. Flip the patties halfway through to ensure even cooking. Check that each patty reaches an internal temperature of 165°F (74°C). This means they are safe to eat. After cooking, let the patties rest for a few minutes before serving. Enjoy your delicious chicken patties! To get those chicken patties nice and crispy, start with good ingredients. Use fresh ground chicken and whole wheat breadcrumbs. These give great texture. Make sure to shape your patties evenly. This helps them cook evenly too. Preheating your air fryer is key. It helps the patties get a nice crust. Lightly spray the patties with olive oil before cooking. This adds a golden brown finish. Flip them halfway through to crisp both sides. One common mistake is overcrowding the air fryer. Leave space between patties for hot air to flow. If they touch, they won’t cook right. Another mistake is skipping the olive oil spray. It helps with browning and prevents sticking. Always check the internal temperature. It should reach at least 165°F (74°C) for safety. Not checking can lead to undercooked patties. Follow these best practices for perfect patties. Use a clean air fryer basket for each batch. This ensures no leftover bits affect flavor. Mix your chicken mixture well. This helps blend the flavors. Cook in batches if needed. You want to avoid the mess. Lastly, let the patties rest after cooking. This keeps them juicy and flavorful. Enjoy your crispy chicken patties with a side of sauce or fresh veggies! Pro Tips Use Fresh Herbs: Fresh parsley adds a vibrant flavor to the patties. You can also experiment with other herbs like basil or cilantro for a unique twist. Ensure Even Cooking: Make sure the patties are uniformly shaped and of similar thickness to ensure they cook evenly in the air fryer. Experiment with Seasonings: Feel free to customize the spices according to your taste. Adding a pinch of cayenne pepper can give your patties a spicy kick! Rest Before Serving: Let the patties rest for a few minutes after cooking. This helps to redistribute the juices, making them more flavorful and juicy. {{image_2}} You can make chicken patties using other meats. Ground turkey is a great choice. It has a mild flavor and cooks well. You can also use lean ground beef or pork for different tastes. Each option gives a unique twist to the dish. If you want a meat-free option, try using beans or lentils. Mashed chickpeas work well too. Mix in breadcrumbs and spices for flavor. You can add grated veggies like zucchini or carrots for extra nutrition. These ideas make tasty patties without meat. You can change the flavors in your patties easily. Add spices like cumin or chili powder for heat. If you like herbs, try basil or cilantro instead of parsley. You can even mix in cheese, like feta or cheddar, for a tasty surprise. Experimenting with flavors helps you find your favorite combination! To store leftover chicken patties, first let them cool down. Place them in an airtight container. You can keep them in the fridge for up to three days. If you want them to last longer, freezing is a great option. Make sure they are in a single layer to avoid sticking. To reheat the patties, use the air fryer for best results. Preheat the air fryer to 350°F (175°C). Place the patties in the basket and heat for about 5-7 minutes. Check that they are warm all the way through. You can also use a microwave, but the air fryer gives a better crisp. To freeze the patties, first cool them completely. Wrap each patty in plastic wrap, then place them in a freezer bag. Make sure to remove as much air as possible. Label the bag with the date. They will keep well for up to three months. When ready to eat, thaw in the fridge overnight before reheating. The best temperature for air-frying chicken patties is 375°F (190°C). This temperature cooks the patties evenly, making them crispy outside and juicy inside. Always preheat your air fryer for 3-5 minutes before cooking. This step helps achieve that perfect golden-brown crust. Yes, you can cook many types of patties in the air fryer. Try beef, turkey, or even veggie patties! The air fryer works well for all kinds of patties. Just make sure to adjust cooking times based on the type of meat or ingredients used. To check if chicken patties are done, use a meat thermometer. The internal temperature should reach 165°F (74°C). If you don’t have a thermometer, cut one open. The meat should be white, not pink, and juices should run clear. Always ensure they are cooked through for safe eating. In this blog post, we covered how to make delicious chicken patties. We explored the main ingredients, optional add-ins, and important seasonings. I shared a simple step-by-step guide for preparing and cooking the patties in an air fryer. Tips for crispy results, avoiding mistakes, and variations like vegetarian options were also included. Lastly, we discussed proper storage and reheating tips. Now, you have all the tools to create tasty chicken patties anytime you want. Enjoy your cooking!

Air Fryer Chicken Patties Quick and Easy Recipe

If you’re looking for a quick and tasty meal, you’ve found the right place! My Air Fryer Chicken Patties recipe

Older posts
Newer posts
← Previous Page1 … Page154 Page155 Page156 … Page164 Next →

dsad

© 2026 easycookingbite • Built with GeneratePress

Our Policies

  • Copyright Policy
  • Cookie Policy
  • GDPR Policy
  • Privacy Policy
  • Disclaimer
  • Terms Of Use

More Information

  • Home
  • About
  • Contact
  • Appetizers
  • Dessert
  • Dinner
  • Drinks
©2026, easycookingbite About Back To Top