Skip to content
DisclaimerTerms Of UseGDPR PolicyCookie Policy

easycookingbite

  • Home
  • Drinks
  • Appetizers
  • Dinner
  • Dessert
  • About
  • Contact
  • Privacy Policy
DisclaimerTerms Of UseGDPR PolicyCookie Policy

Lily

To make Korean BBQ Chicken Bowls, you need a few key ingredients. These will give your meal rich flavors and fresh textures. Here’s the list: - 2 boneless, skinless chicken breasts - 1/4 cup soy sauce - 2 tablespoons gochujang (Korean chili paste) - 2 tablespoons honey - 1 tablespoon sesame oil - 2 cloves garlic, minced - 1 inch ginger, grated - 2 cups cooked jasmine rice - 1 cup broccoli florets - 1 cup shredded carrots - 1/2 cucumber, thinly sliced - 2 green onions, chopped - Sesame seeds, for garnish Each ingredient plays a special role. The chicken gives protein, while the soy sauce and gochujang add saltiness and heat. Honey balances the spice with sweetness. Sesame oil brings a nutty flavor. Garlic and ginger add depth to the marinade. The jasmine rice serves as a soft bed for the bowl. Broccoli, carrots, and cucumber add crunch and color. Green onions and sesame seeds finish it off with flair. These ingredients make every bite enjoyable. You can easily find them at your local grocery store. {{ingredient_image_1}} To start, I mix the marinade in a bowl. I use soy sauce, gochujang, honey, sesame oil, minced garlic, and grated ginger. This mix gives the chicken great flavor. Once mixed, I place the chicken in a zip-top bag. I pour the marinade over the chicken and seal the bag tight. I let it sit in the fridge for at least 30 minutes. For a stronger flavor, I let it marinate for up to 4 hours. Next, I cook the chicken. I preheat a grill or grill pan over medium-high heat. I take the chicken out of the marinade. I throw away the leftover marinade to keep it safe. I grill the chicken for about 6 to 7 minutes on each side. I check the chicken with a meat thermometer. It should reach 165°F (75°C). After cooking, I let it rest for about 5 minutes before slicing it. Now, I steam the broccoli. I can use a steaming basket or a microwave-safe dish. If using a steaming basket, I steam the broccoli for 5 to 7 minutes. I want it to be tender but still crisp. If I'm using a microwave, I cover the dish tightly with plastic wrap. I steam it for about 3 to 4 minutes. This keeps the broccoli bright and fresh. Finally, I assemble the bowls. I start by placing a scoop of jasmine rice at the bottom. I layer the steamed broccoli over the rice. Next, I add shredded carrots and thin cucumber slices. On top, I place the sliced grilled chicken. For a nice touch, I sprinkle chopped green onions and sesame seeds over each bowl. This makes the dish look pretty and adds extra flavor. To boost the flavor, add more honey for sweetness. You can also use fresh lime juice. This adds a bright zing that complements the chicken. If you want more heat, increase the gochujang. Start with one extra teaspoon and taste. Adjust as you like. To get nice grill marks, preheat your grill well. Place the chicken on the grill and do not move it for a few minutes. This helps sear the meat. Always check the internal temperature with a meat thermometer. It should reach 165°F (75°C) to be safe. Overcooking can dry out the chicken, so keep an eye on the time. For extra crunch, add more toppings. Try sliced radishes or chopped peanuts. You can also serve it with kimchi for a spicy kick. To make it a full meal, consider pairing it with a light salad or spring rolls. These add more colors and flavors to your bowl. Pro Tips Marination Time: For the best flavor, marinate the chicken for at least 2 hours, or overnight if possible. Grilling Technique: To achieve grill marks and a juicy chicken, do not flip the chicken too often. Let it sear for a few minutes on each side. Vegetable Variations: Feel free to mix in other vegetables like bell peppers or snap peas for added color and nutrients. Serving Suggestion: Serve with a side of kimchi or pickled vegetables to enhance the Korean flavors. {{image_2}} You can easily change the protein in your Korean BBQ chicken bowls. Try using tofu for a plant-based option. Firm tofu absorbs flavors well and adds a nice texture. Beef works great too. Use flank steak or sirloin for a tender bite. Switching up the veggies can also make a big difference. Add bell peppers for a sweet crunch, or snap peas for extra color. You can even toss in some mushrooms for an earthy flavor. The best part? You can mix and match based on what you have at home. Explore different Asian flavors to keep things fresh. For a Thai twist, add some peanut sauce and fresh basil. You could also use teriyaki sauce for a sweeter taste. Each sauce brings its own flair to the dish. Seasonal ingredients are worth considering. In fall, add roasted sweet potatoes or Brussels sprouts. During summer, fresh corn or zucchini can brighten the bowl. These swaps keep your meal exciting and fun. To make your Korean BBQ chicken bowls gluten-free, simply swap soy sauce for tamari. It has the same taste without the gluten. For a vegan version, use tofu or tempeh instead of chicken. You can also replace honey with maple syrup or agave for sweetness. These easy changes ensure everyone can enjoy your meal. Whether you're catering to gluten-free friends or vegan family members, there’s a tasty option for everyone. To keep your Korean BBQ chicken bowls fresh, use airtight containers. Glass or plastic containers work well. Store the bowls in the fridge for up to three days. This will help maintain flavor and texture. When reheating, use the microwave or stovetop. Heat slowly to avoid drying out the chicken. Add a splash of water or broth to keep it moist. This will keep the dish flavorful and enjoyable. If you need to freeze, layer the ingredients separately. Cooked chicken and veggies freeze best. Use freezer-safe containers or bags. Make sure to remove as much air as possible. To defrost, place the bowls in the fridge overnight. Reheat gently on the stove or in the microwave. This ensures the best taste and texture. You can add more gochujang to the marinade. This will boost the heat. Try using sliced fresh chilies as a topping. You can also add red pepper flakes for extra spice. Yes, you can use sriracha or chili garlic sauce. These options give a different flavor. You can also mix soy sauce with a bit of hot sauce for heat. I recommend marinating the chicken for at least 30 minutes. For stronger flavor, marinate it up to 4 hours. The longer it sits, the more flavor it absorbs. You can serve the bowls with kimchi for a tangy kick. Pickled vegetables also add crunch. A side of heated dumplings or spring rolls pairs well too. To make more servings, simply double the ingredients. Use four chicken breasts and adjust the rest accordingly. Keep the cooking time similar, but check for doneness. Korean BBQ chicken bowls are simple and fun to make. We covered key ingredients like chicken, gochujang, and fresh veggies. I shared tips on marinating, cooking, and steaming for the best results. You can also explore flavor variations and make this dish fit your diet. Remember to store leftovers properly to enjoy them later. I hope you feel inspired to create your own delicious bowls. Enjoy cooking and sharing with others!

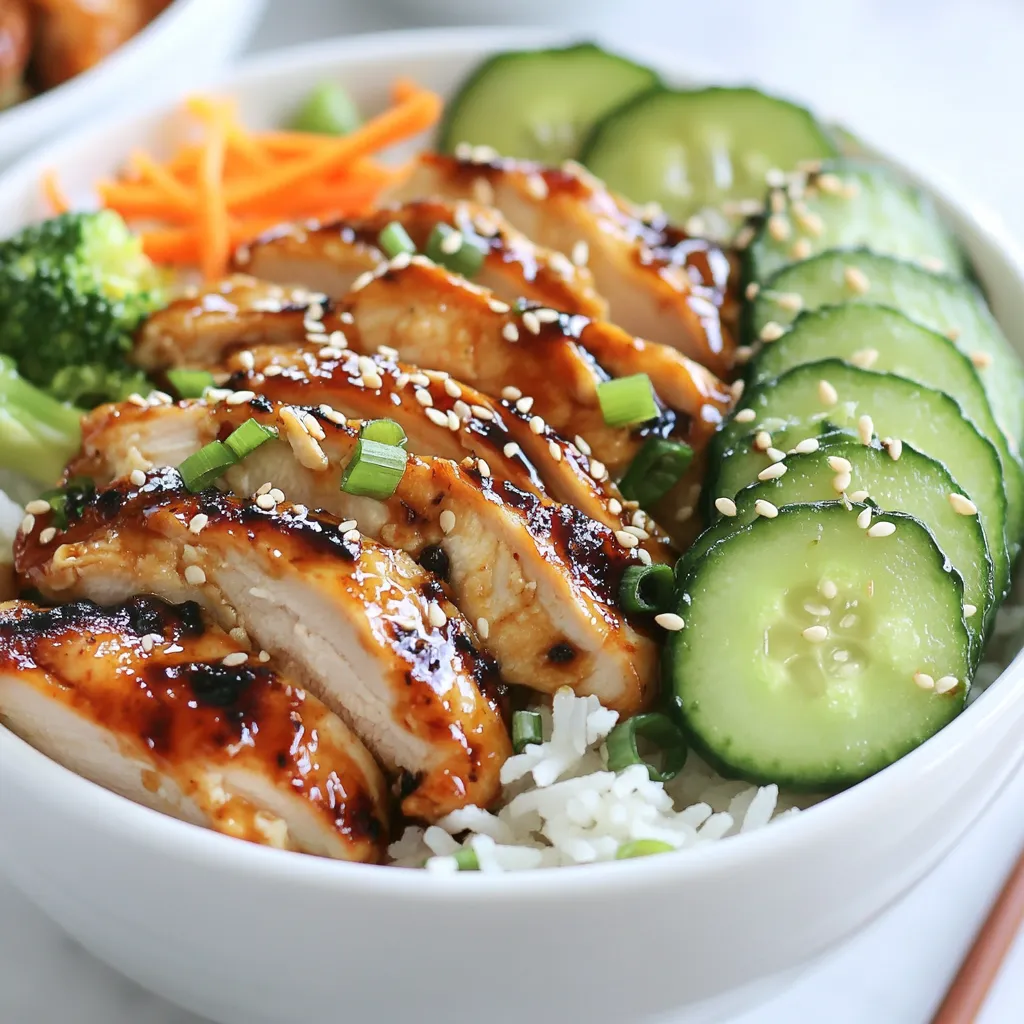
Korean BBQ Chicken Bowls Flavorful Home-Cooked Meal

If you’re craving a delicious and vibrant meal, look no further than Korean BBQ Chicken Bowls. This simple, home-cooked dish

To make this lemon herb couscous salad, you will need: - 1 cup couscous - 1 ½ cups vegetable broth - 1 cup cherry tomatoes, halved - 1 cucumber, diced - 1 bell pepper (red or yellow), diced - ¼ cup red onion, finely chopped - ½ cup fresh parsley, chopped - ½ cup fresh mint, chopped - Juice of 1 lemon - 3 tablespoons olive oil - Salt and pepper to taste - Feta cheese, crumbled (optional) You can make your salad even better with these add-ins: - Chickpeas for protein - Avocado for creaminess - Olives for a salty kick - Nuts or seeds for crunch These options add flavor and texture. Feel free to mix and match! Fresh herbs bring life to any dish. In this salad, parsley and mint shine. - Parsley adds bright flavor and is rich in vitamins A, C, and K. It also helps digestion. - Mint gives a cool taste and fresh aroma. It can soothe your stomach too. Using fresh herbs boosts both taste and health. They enhance the salad, making it vibrant and full of flavor. {{ingredient_image_1}} Start by boiling 1 ½ cups of vegetable broth in a medium saucepan. This broth adds flavor and depth. Once it boils, remove the pan from heat. Stir in 1 cup of couscous. Cover the pan and let it sit for about 5 minutes. The couscous will soak up the broth and become tender. After 5 minutes, fluff the couscous with a fork. Transfer it to a large mixing bowl to cool. While the couscous cools, you can prepare the vegetables. Halve 1 cup of cherry tomatoes and place them in a bowl. Dice 1 cucumber and 1 bell pepper, either red or yellow, and add them to the bowl. Finely chop ¼ cup of red onion and mix it in as well. These veggies add color and crunch to the salad. Once the couscous is cool, it's time to combine everything. Add the prepared vegetables to the bowl with couscous. In a small bowl, whisk together the juice of 1 lemon, 3 tablespoons of olive oil, salt, and pepper. Pour this dressing over the couscous and veggies. Toss the mixture until all ingredients are coated. Finally, add ½ cup of chopped parsley and ½ cup of chopped mint. Toss gently to combine. If you like, sprinkle crumbled feta cheese on top for extra flavor. To fluff couscous, let it sit for five minutes after cooking. Use a fork to gently stir. This helps separate the grains. You want light and airy couscous, not clumpy. If it feels sticky, add a splash of olive oil while fluffing. You can serve Lemon Herb Couscous Salad cold or at room temperature. Letting it chill for a bit makes the flavors blend well. If you want a warm salad, serve it right after mixing. Just be sure not to overheat it, as cold ingredients keep it fresh. Seasoning is key for flavor. I use salt and pepper to taste, but you can add more. Fresh herbs like parsley and mint add a burst of flavor. Don’t skip the lemon juice; it brings brightness to the dish. For extra zing, try adding a pinch of red pepper flakes or a splash of vinegar. Pro Tips Use Fresh Herbs: Fresh parsley and mint not only enhance the flavor but also add a vibrant color to the dish. Chill Before Serving: Allow the salad to chill in the refrigerator for at least 30 minutes before serving to let the flavors meld together. Customize Your Veggies: Feel free to add or substitute other vegetables like bell peppers or avocado based on your preference. Perfectly Fluffed Couscous: Make sure to fluff the couscous with a fork after it absorbs the broth to avoid clumping. {{image_2}} You can boost the protein in your Lemon Herb Couscous Salad easily. Chicken is a great choice. Grilled chicken adds juicy flavors. You can use rotisserie chicken too. Just shred it and mix it in. If you want a plant-based option, try chickpeas. They add texture and protein. Use canned chickpeas for quick prep. Just rinse and toss them in. If you want to keep it vegetarian, you have many choices. Try adding black beans for a rich taste. Edamame adds a fun crunch and bright color. You can also include roasted vegetables. Roasted zucchini or eggplant work well. They add depth and flavor. These options make the salad filling and tasty. Using seasonal ingredients makes your salad even better. In spring, add fresh peas and asparagus. They bring a sweet taste and lovely color. In summer, use ripe peaches or berries. They add a hint of sweetness. In fall, diced apples or roasted squash can shine. These ingredients keep the salad fresh and exciting all year round. After enjoying your Lemon Herb Couscous Salad, store any leftovers in the fridge. Use an airtight container to keep it fresh. This salad tastes great and stays good for about three days. Just make sure it cools down before sealing it up. I recommend glass or BPA-free plastic containers. These materials keep the salad fresh and let you see what’s inside. Choose a container that fits your leftover amount. If you have a lot, use a larger container to avoid squishing the salad. You can freeze couscous salad, but it may change texture. Freezing can make the veggies soggy when thawed. If you want to freeze it, leave out the fresh herbs and dressing. Store it in a freezer-safe container. It can last up to three months. When you’re ready to eat, thaw it overnight in the fridge. Then add fresh herbs and dressing before serving. Couscous is a tiny pasta made from durum wheat. It cooks quickly and has a light, fluffy texture. You prepare it by adding hot liquid, like broth, which it absorbs. This makes it a great base for salads. Couscous is popular in North African dishes but is loved worldwide. Yes, you can make this salad ahead of time! Prepare the couscous and let it cool. After it cools, mix in the vegetables and dressing. Store it in the fridge for up to two days. The flavors will blend nicely, making it even tastier. Just give it a quick toss before serving. To make this salad gluten-free, use gluten-free couscous or quinoa instead. Both options work well. Follow the same cooking method as regular couscous. This way, you enjoy the same great taste without gluten. Just remember to check labels for gluten-free verification. Couscous salad offers endless options for flavor and health. You learned about key ingredients, like fresh herbs, and how to prep them. I shared tips for fluffing couscous and serving it just right. You can mix in proteins or seasonal veggies based on your taste. Store leftovers properly to keep them fresh for later. With this guide, you can create a delicious couscous salad that fits your needs. Enjoy making it your own!

Lemon Herb Couscous Salad Fresh and Flavorful Dish

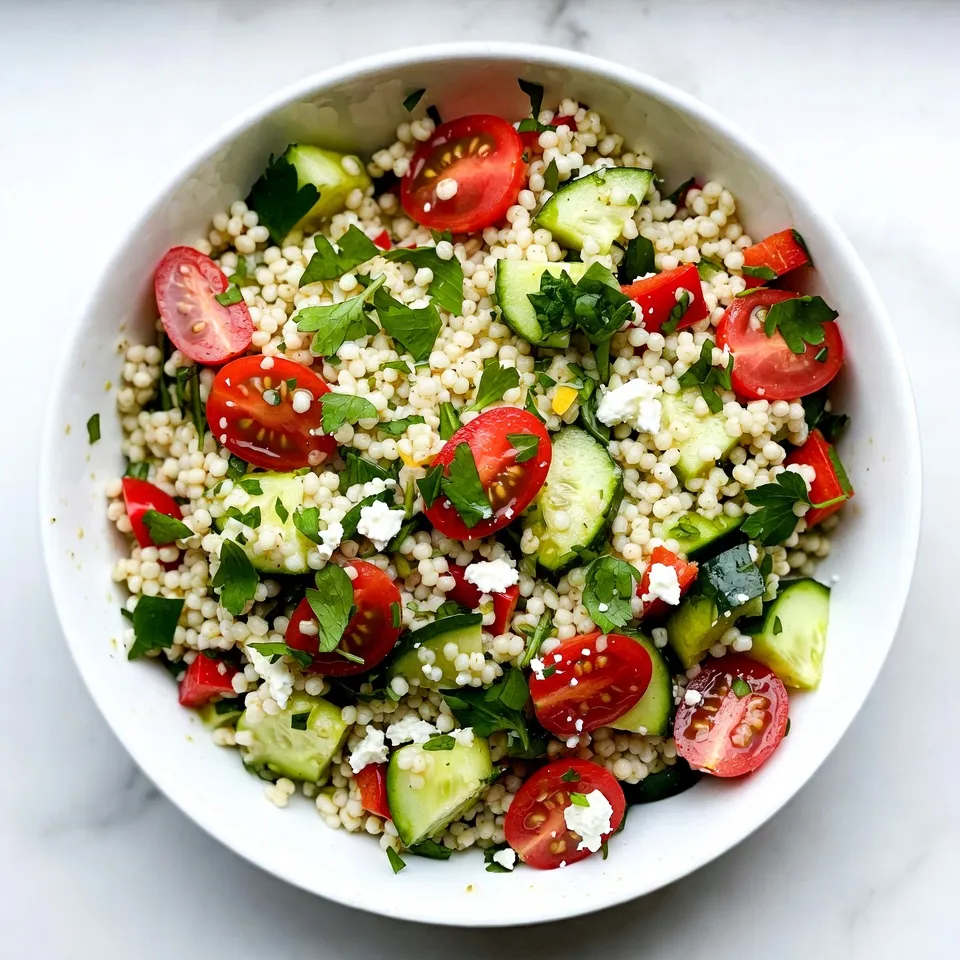
Looking for a quick, fresh, and tasty dish? My Lemon Herb Couscous Salad is just what you need! With zesty

- 2 large apples (such as Granny Smith or Honeycrisp), cored and cut into fries - 1 cup all-purpose flour - 2 large eggs, beaten - 1 cup panko breadcrumbs - 1 teaspoon cinnamon - 1 teaspoon sugar - ½ teaspoon salt - Cooking spray You can swap apples based on your taste. Try Fuji or Gala apples for a sweeter treat. If you want a gluten-free option, use almond flour instead of all-purpose flour. For the eggs, you can use a flaxseed mixture or applesauce as a binder. This keeps the recipe plant-based while still being delicious. Pick firm apples with smooth skin. These apples hold up well during cooking. Granny Smith apples give a nice tart contrast. Honeycrisp apples add great sweetness and crunch. Smell the apples; they should have a fresh scent. Avoid any apples with bruises or soft spots. Select ripe apples for the best flavor and texture. {{ingredient_image_1}} First, preheat your air fryer to 375°F (190°C). This step is key for crispy apple fries. Make sure to set the timer for about 5 minutes. A hot air fryer gives your fries a nice crunch. Next, set up your breading station. Grab three shallow bowls. In the first bowl, add 1 cup of all-purpose flour. In the second bowl, beat 2 large eggs. In the last bowl, mix 1 cup of panko breadcrumbs with 1 teaspoon of cinnamon, 1 teaspoon of sugar, and ½ teaspoon of salt. This setup makes it easy to coat each fry evenly. Now, it’s time to coat the apple fries. Start with 2 large apples, cored and cut into fry shapes. Dip each fry into the flour first. Make sure it’s fully coated, then shake off the extra flour. Next, dip the floured fry into the beaten eggs. Let any excess egg drip off. Finally, coat the fry in the panko mixture. Press gently so the crumbs stick well. Repeat this for all apple fries. Once done, place them in a single layer in the air fryer basket. Spray the tops lightly with cooking spray for extra crispiness. I set my air fryer to 375°F (190°C). This temperature cooks the apple fries perfectly. I let it preheat for about 5 minutes. This step helps the fries get crispy when cooking. Keep an eye on them as they cook. Halfway through cooking, I flip the apple fries. This step ensures both sides cook evenly. I use tongs to turn them gently. It helps keep the coating intact. This quick flip takes only a moment. I check the apple fries after 12 minutes. They should be golden brown and crispy. If they need more time, I add a few extra minutes. Once done, I take them out and let them cool slightly. This step is key to enjoying crispy apple fries. Pro Tips Choose the Right Apples: For the best flavor and texture, opt for tart apples like Granny Smith or sweet ones like Honeycrisp, depending on your preference. Double Dip for Extra Crunch: For a thicker, crunchier coating, consider dipping the apple fries in the egg mixture twice before coating them in panko. Even Cooking: Ensure the apple fries are of similar size for even cooking. Cut them uniformly to guarantee they fry at the same rate. Experiment with Dips: While caramel and chocolate sauces pair well, try serving with yogurt or peanut butter for a fun twist on dipping options! {{image_2}} To get the best crispy apple fries, follow these tips: - Choose the Right Apples: Use tart apples like Granny Smith or sweet ones like Honeycrisp. Their firmness helps create a nice crunch. - Use Panko Breadcrumbs: Panko gives a light and crispy texture compared to regular breadcrumbs. - Don’t Skip the Cooking Spray: A light spray helps the fries crisp up. Without it, they may turn out soggy. - Space Them Out: Avoid overcrowding the air fryer basket. This allows hot air to circulate and crisp all sides evenly. Here are some common errors and how to avoid them: - Skipping the Flour Coating: Always coat the apple fries in flour first. This helps the egg and breadcrumbs stick. - Not Flipping the Fries: Flip the fries halfway through cooking. This ensures they brown evenly on both sides. - Ignoring Cooking Time: Watch the time closely. Overcooking can lead to burnt fries. Aim for golden brown. - Using Wet Apples: Make sure the apple fries are dry before coating. Extra moisture can make them mushy. Try these ideas for serving your apple fries: - With Dipping Sauces: Serve warm with caramel or chocolate sauce for a tasty treat. - Garnish with Powdered Sugar: A light dusting adds sweetness and a lovely look. - Sprinkle Extra Cinnamon: A bit more cinnamon on top enhances flavor and aroma. - Pair with Ice Cream: Enjoy them with a scoop of vanilla ice cream for a fun dessert! You can change the coating for your apple fries. Try crushed nuts like almonds or walnuts. They add crunch and flavor. You can also use different breading. For a gluten-free option, use almond flour or gluten-free breadcrumbs. This makes the fries safe for more diets. Want to spice things up? Add more spices to your breadcrumb mix. Try adding nutmeg or ginger for a warm taste. You can even use vanilla extract in the egg wash for a sweet twist. A little cocoa powder in the panko gives a nice chocolate flavor. Dipping sauces make apple fries even better. Caramel sauce is a classic choice. You can also try a creamy yogurt dip. Mix yogurt with honey and cinnamon for a tasty combo. Another fun option is warm chocolate sauce. It adds a rich touch to each bite. Yes, you can use other fruits. Pears and peaches work well. Just cut them into similar fry shapes. The cooking time may change, so watch them closely. For best results, choose firm fruits. They hold up well in the air fryer. Storing leftover apple fries is easy. First, let them cool completely. Then, place them in an airtight container. They will stay fresh in the fridge for up to three days. To reheat, use the air fryer at 350°F (175°C) for about 5 minutes. This will keep them crispy. Absolutely! You can bake apple fries. Preheat your oven to 425°F (220°C). Arrange the coated apple fries on a baking sheet lined with parchment paper. Bake for 20-25 minutes, flipping halfway. Keep an eye on them to ensure they become golden and crispy. In this blog post, I covered how to make delicious air fryer apple fries. We went over the key ingredients and fun substitutes, as well as tips for choosing the best apples. I shared simple step-by-step instructions and highlighted cooking tips for crispy results. You learned about variations in coating, flavors, and dips. Apple fries are easy to make and perfect for sharing. Enjoy these tasty treats anytime!

Air Fryer Apple Fries Crispy and Tasty Treat

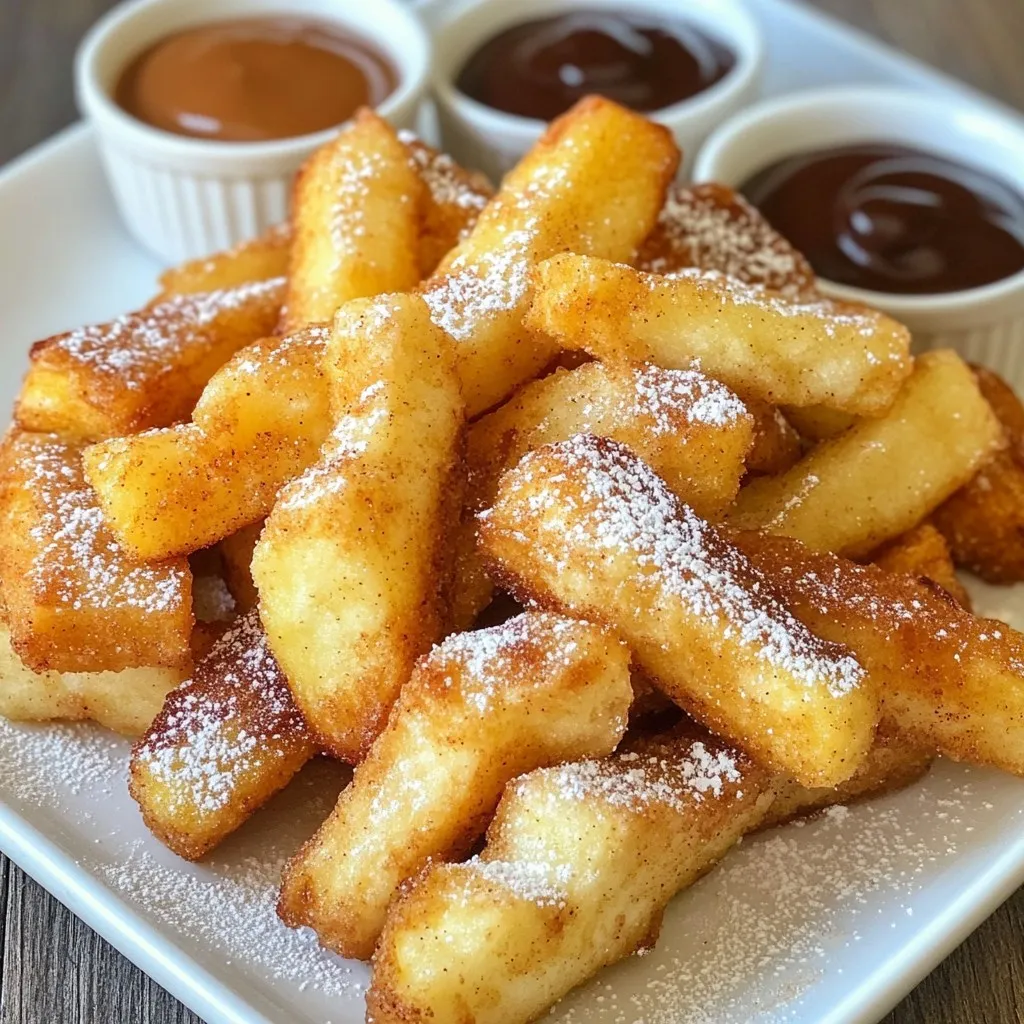
Get ready to bite into a crunchy, sweet delight with my Air Fryer Apple Fries! This simple treat is not

For these blondies, I use 1 cup of unsalted butter. I melt it to make the batter rich and smooth. You need both brown sugar and granulated sugar. Use 1 cup of brown sugar and 1/2 cup of granulated sugar. This mix adds depth and sweetness. Next, I add 2 large eggs to the bowl. One at a time, I mix them in well. Eggs help bind the blondies and keep them soft. I also add 2 teaspoons of vanilla extract for flavor. The vanilla gives a nice aroma and taste. In a separate bowl, I combine the dry ingredients. You will need 2 cups of all-purpose flour, 1 teaspoon of baking powder, and 1/2 teaspoon of salt. These ingredients create the base of the blondies. For flavor, I add the zest of 1 lemon and 1/4 cup of fresh lemon juice. This gives a bright, tangy taste that pairs well with strawberries. Finally, I use 1 cup of fresh strawberries, diced into small pieces. The strawberries make the blondies fresh and juicy. When you fold them into the batter, they add bursts of flavor with every bite. Make sure to handle them gently to keep them intact. {{ingredient_image_1}} First, you need to preheat your oven to 350°F (175°C). This step is key for even baking. While the oven heats, take a 9x9 inch baking pan. Grease it well or line it with parchment paper. This helps your blondies come out easily later. In a large bowl, add one cup of melted butter. Then, mix in one cup of brown sugar and half a cup of granulated sugar. Use a whisk to blend them until smooth. Next, crack in two large eggs. Beat them in one at a time. Finally, stir in two teaspoons of vanilla extract for that lovely flavor. In a different bowl, combine two cups of all-purpose flour, one teaspoon of baking powder, and half a teaspoon of salt. Add the zest of one lemon and a quarter cup of fresh lemon juice. Slowly mix this dry blend into the wet mixture. Stir until just combined; don’t overmix! Now, it’s time for the strawberries! Take one cup of diced fresh strawberries and gently fold them into the batter. Be careful not to mash them. This step adds a burst of flavor and color to your blondies. Pour the batter into your prepared pan. Use a spatula to spread it evenly. Bake your blondies for 25-30 minutes. Check for doneness by inserting a toothpick in the center. If it comes out clean, they are ready. Let them cool in the pan for about 10 minutes. After that, move them to a wire rack to cool completely. Once cool, slice them into squares and dust with powdered sugar if you like! To get the best texture for your blondies, start with melted butter. This helps create a rich and moist base. Use brown sugar for a chewy bite. Granulated sugar adds a bit of lift. Don't overmix the batter when you add the flour. This keeps your blondies soft and tender. Folding in the strawberries gently also preserves their shape and flavor. Make sure your oven is preheated to 350°F (175°C). This step is key for even baking. Grease your baking pan or line it with parchment paper. This helps with easy removal. Spread the batter evenly in the pan. If you want, you can tap the pan on the counter. This releases air bubbles and helps the batter settle. Keep an eye on the edges. They should turn golden brown when done. Once your blondies cool, slice them into squares. A sprinkle of powdered sugar makes them look fancy. They are great warm or at room temperature. You can serve them with whipped cream or a scoop of vanilla ice cream. For an extra touch, add fresh strawberries on the side. These blondies are perfect for picnics, parties, or just a sweet treat at home! Pro Tips Use Fresh Strawberries: For the best flavor and texture, opt for ripe, fresh strawberries. Frozen strawberries may release excess moisture, affecting the blondie texture. Don’t Overmix the Batter: Gently fold in the strawberries and just mix until combined to maintain the blondies' soft and chewy texture. Check for Doneness: Since ovens can vary, start checking your blondies a few minutes before the recommended time. They should be golden around the edges and a toothpick inserted should come out with a few moist crumbs. Add a Lemon Glaze: For an extra zing, consider drizzling a simple lemon glaze made from powdered sugar and lemon juice over the cooled blondies before serving. {{image_2}} You can change the fruit in these blondies for fun. Instead of strawberries, try blueberries or raspberries. Both fruits add a nice tartness. You can also use diced peaches for a sweeter taste. Just make sure to adjust the amount. Keep the fruit fresh for the best flavor. Want to make these blondies gluten-free? Use a gluten-free flour blend instead of regular flour. This swap works well and keeps the texture nice. Look for blends that contain xanthan gum. This helps the blondies stay together. Always check labels to ensure no gluten is hiding. Add some extra flavors to your blondies for a twist. You can mix in a teaspoon of almond extract for a nutty taste. A pinch of cinnamon or nutmeg can warm up the flavor too. For a zesty kick, add more lemon juice or zest. This gives a bright, fresh taste. Feel free to experiment and find your favorite combo! To keep your strawberry lemon blondies fresh, let them cool completely. Once cool, place them in an airtight container. This helps keep them moist and prevents them from drying out. You can store them at room temperature for up to three days. If you want to keep them longer, refrigeration is a good option. Just be sure to seal them well. If you have leftovers, freezing is a great choice. Cut the blondies into squares. Wrap each piece in plastic wrap. Then, place the wrapped pieces in a freezer bag. They can last in the freezer for up to three months. When you’re ready to enjoy them, just take out what you need. To reheat your blondies, preheat your oven to 350°F (175°C). Place the blondies on a baking sheet. Warm them for about 10 minutes. This helps restore their soft texture. You can also use the microwave. Heat for 10 to 15 seconds. Just be careful not to overheat them. Enjoy them warm for the best taste! Yes, you can use frozen strawberries. Just make sure to thaw and drain them first. This will help prevent excess moisture in your blondies. Frozen strawberries work well, but fresh berries give a better taste and texture. If you need a butter substitute, try coconut oil or applesauce. Both will give moisture and flavor. Coconut oil adds a light coconut taste, while applesauce keeps the blondies soft. Choose what fits your diet best. Check the blondies around 25 minutes of baking. The edges should be golden brown. Insert a toothpick in the center. If it comes out clean or with a few crumbs, they are ready. Don’t overbake, or they will dry out. Yes, you can make these blondies a day early. Once cooled, cover them tightly to keep them fresh. Store them at room temperature. If you want to keep them longer, freeze them and thaw when you’re ready to enjoy. This blog post covered all the steps to make delicious blondies. We talked about the needed ingredients, from butter and sugars to fresh strawberries. You learned how to prepare your pan, mix ingredients, and fold in strawberries. Tips for perfect texture and serving ideas were shared, as well as variations to try. Storing and reheating were also discussed to keep your blondies fresh. Now, you can enjoy baking and experimenting with flavors. Happy baking!

Strawberry Lemon Blondies Fresh and Flavorful Treat

If you love a sweet treat that bursts with fresh flavors, you’ll adore my Strawberry Lemon Blondies. These easy-to-make bars

To make Crispy Chilli Beef Rice, you need a few key ingredients. Each one adds flavor and texture to the dish. - Beef sirloin: 200g, thinly sliced. This cut cooks well and stays tender. - Jasmine rice: 1 cup. It has a nice fragrance and fluffy texture. - Sauces and oils: - 2 tablespoons soy sauce for umami. - 1 tablespoon cornstarch for crunch. - 1 tablespoon vegetable oil for frying. - 1 tablespoon sesame oil for flavor at the end. - Vegetables: - 1 red bell pepper, sliced for sweetness. - 1 green bell pepper, sliced for color. - 2 cloves garlic, minced for aroma. - 1 tablespoon ginger, minced for warmth. - Seasoning: - 1 tablespoon chili paste (adjust to your spice level). - Salt and pepper to taste for balance. - Garnish: Fresh cilantro leaves and chopped spring onions add freshness. These ingredients come together to create a dish that is both vibrant and satisfying. {{ingredient_image_1}} To start, you need to marinate the beef. In a bowl, mix soy sauce, cornstarch, and a pinch of salt and pepper. Add the thinly sliced beef and make sure it is well coated. Let it sit for at least 30 minutes. This step helps the meat soak up flavor and stay tender. While the beef marinates, cook your jasmine rice. Follow the package instructions carefully. Typically, you will need to rinse the rice first and then boil it with water. Once done, set it aside and keep it warm. Fluffy rice will be a perfect base for the crispy beef. Now it’s time to fry the beef. Heat vegetable oil in a large skillet or wok over high heat. Add the marinated beef in a single layer. Fry it for about 3-4 minutes until it turns crispy and brown. Once it is ready, remove it from the skillet and set it aside. In the same skillet, add minced garlic and ginger. Sauté them for about 30 seconds until they smell great. Next, toss in the sliced red and green bell peppers. Stir-fry for 2-3 minutes until they soften slightly. This adds a fresh crunch and color to your dish. Now, it’s time to bring it all together. Add the crispy beef back into the skillet. Stir in the chili paste and mix everything well for about 2 minutes. Finally, drizzle sesame oil over the mixture and toss to combine. This step adds depth and richness to the flavors. To serve, place the crispy chili beef over a bed of jasmine rice. Garnish with chopped spring onions and fresh cilantro leaves. This not only makes the dish look beautiful but also adds more flavor. Enjoy your meal! To get beef that is crispy, start with thin slices. I use beef sirloin because it cooks fast and stays tender. Marinate the beef for at least 30 minutes. This helps the cornstarch stick better. When frying, make sure the oil is hot. Place the beef in a single layer in the pan. Avoid crowding it, as this can cause steaming instead of frying. Fry for about 3-4 minutes until it turns brown and crispy. For the vegetables, cut them into even pieces. This way, they cook at the same pace. I always add garlic and ginger first. They add a great flavor. Stir-fry the bell peppers until they are just tender. This usually takes 2-3 minutes on high heat. Keep them bright and colorful for a nice look. You can also add other veggies like broccoli or snap peas if you like. To control the heat, adjust the chili paste. If you prefer mild, start with half a tablespoon. You can always add more later if you want it spicier. Taste as you cook, and don’t be shy to tweak the spice. If you add too much, a little sugar can help balance it out. Fresh cilantro also cools the heat, so don’t skip that garnish! Pro Tips Marinate for Maximum Flavor: Allowing the beef to marinate for at least 30 minutes helps to enhance its flavor and tenderness. High Heat is Key: Cooking the beef and vegetables over high heat ensures they become crispy and caramelized without steaming. Customize Your Heat Level: Adjust the amount of chili paste to suit your taste preference; start with a small amount and add more if needed. Garnish for Freshness: Adding fresh cilantro and spring onions just before serving brightens the dish and adds a burst of freshness. {{image_2}} You can switch the beef for chicken or pork. Use the same marinade. Thinly slice it for quick cooking. You could also try shrimp for a seafood twist. Each protein adds a new flavor and texture. Just make sure to adjust cooking times as needed. To make this dish vegetarian, use tofu or tempeh. Press and cube the tofu for the best texture. Marinate it in the same sauce as the beef. Then, fry it until golden. You can also add more veggies, like broccoli or snap peas, for added nutrition. While jasmine rice is a classic choice, you have many options. Brown rice gives a nutty flavor and is healthier. Quinoa is another great option for a protein boost. You can even use cauliflower rice for a low-carb alternative. Each rice type changes the dish's texture and flavor. Store any leftovers in an airtight container. This keeps the beef and rice fresh. You can refrigerate them for up to three days. Make sure to let the food cool down before sealing it. This avoids extra moisture. When ready to eat, reheat the rice and beef together. Use a microwave or a skillet. For the microwave, heat for one minute, then stir. Check if it is warm all the way through. In a skillet, add a splash of water. Cover and heat on low for about five minutes. This keeps the beef from drying out. You can freeze crispy chili beef rice for up to a month. Place it in a freezer-safe container. Make sure to label it with the date. To thaw, move it to the fridge overnight. You can also use a microwave for quick thawing. Reheat as explained above for the best taste. Crispy Chilli Beef Rice is a tasty dish made with beef, rice, and vegetables. The beef gets crispy from frying, while the rice is soft and fluffy. I use bell peppers and green onions for color and crunch. The dish has a nice kick from chili paste, making it a flavorful meal. It’s easy to make and perfect for a weeknight dinner. Yes, you can prepare parts of this dish a day ahead. Marinate the beef and cook the rice in advance. Store them separately in the fridge. When you’re ready to eat, just fry the beef and mix it with the veggies. This method saves time and keeps the beef crispy. The spice level depends on the chili paste you use. You can adjust it to your liking. If you want it mild, use less chili paste. For a spicier kick, add more. I like to taste as I go to find the perfect balance for my palate. Crispy Chilli Beef Rice is great on its own. However, you can serve it with a simple salad or steamed veggies for extra nutrition. You could also add some spring rolls or dumplings for a fun meal. Enjoy your meal with a drink like iced tea or sparkling water for a refreshing finish. This blog post covered the key ingredients for Crispy Chilli Beef Rice. We shared step-by-step instructions, useful cooking tips, and variations to suit different tastes. You can enjoy leftovers through proper storage and reheating methods. Crispy Chilli Beef Rice is a fun dish. You can make it your own. Explore different proteins or veggies to create new flavors. Happy cooking!

Crispy Chilli Beef Rice Flavorful and Easy Meal Idea

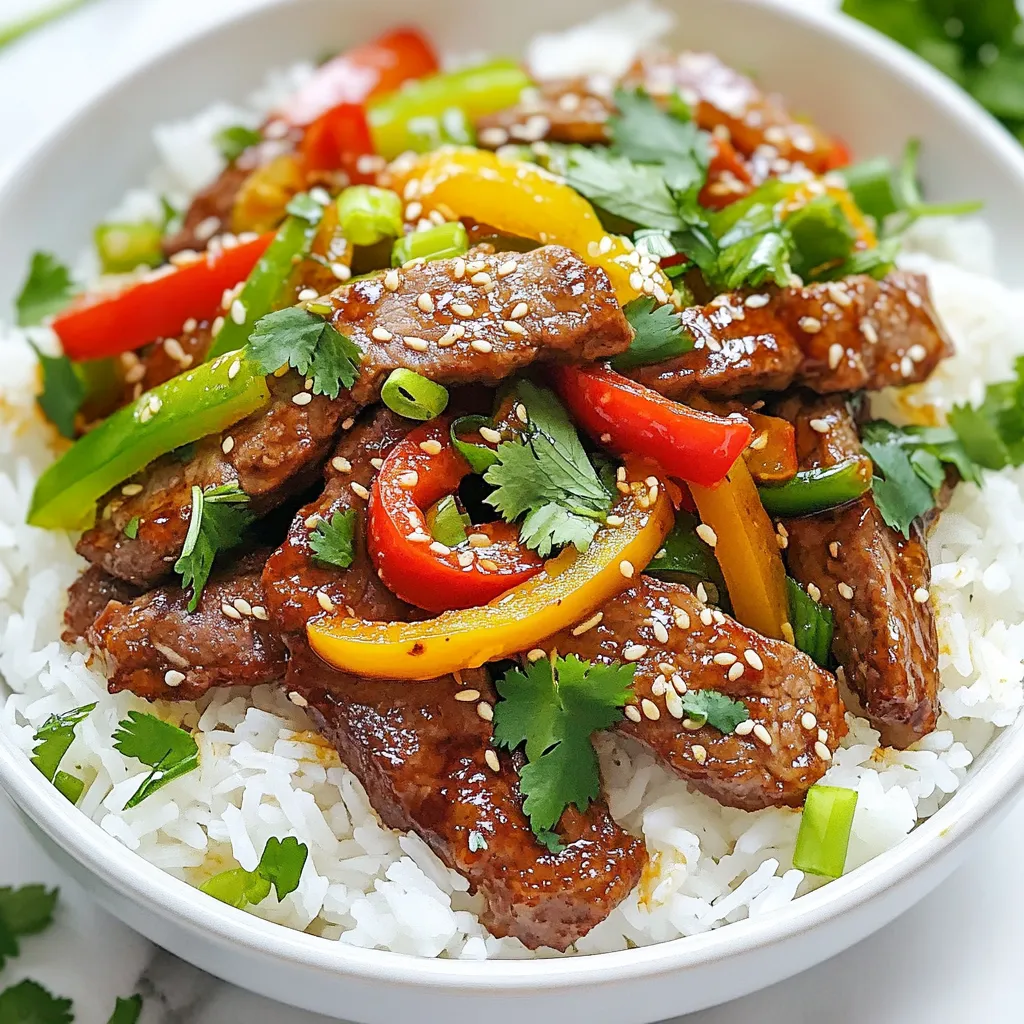
Are you craving a meal that’s both tasty and simple? Look no further! My Crispy Chilli Beef Rice packs bold

To make these tasty donuts, you'll need: - 1 cup all-purpose flour - 1 cup grated carrots (about 2 medium carrots) - 1/2 cup brown sugar, packed - 1/4 cup granulated sugar - 1/2 cup buttermilk - 1/4 cup unsalted butter, melted - 2 large eggs - 1 teaspoon vanilla extract - 1 teaspoon baking powder - 1/2 teaspoon baking soda - 1/2 teaspoon ground cinnamon - 1/4 teaspoon nutmeg - 1/4 teaspoon salt These ingredients come together to create a moist and spiced donut that highlights the carrots. The maple glaze is what makes these donuts special. For the glaze, you will need: - 1 cup powdered sugar - 2-3 tablespoons maple syrup - 1 tablespoon milk (or more as needed for desired consistency) - A pinch of salt This glaze adds a sweet maple flavor that pairs perfectly with the carrot base. You can take these donuts to the next level with some optional add-ins: - 1/2 cup chopped walnuts Adding walnuts gives a great crunch and a nutty flavor. You can mix them into the batter or sprinkle them on top of the glaze for extra texture. {{ingredient_image_1}} Start by preheating your oven to 350°F (175°C). This is key for even baking. Next, lightly grease your donut pan. This helps the donuts release easily after baking. In a mixing bowl, whisk together the dry ingredients. Use 1 cup of all-purpose flour, 1 teaspoon of baking powder, 1/2 teaspoon of baking soda, and a pinch of salt. Add 1/2 teaspoon of ground cinnamon and 1/4 teaspoon of nutmeg. This mix gives the donuts their warm flavor. Set this bowl aside. In another bowl, beat together the wet ingredients. Use 1/4 cup of melted unsalted butter, 1/2 cup of packed brown sugar, and 1/4 cup of granulated sugar. Add 1/2 cup of buttermilk, 2 large eggs, and 1 teaspoon of vanilla extract. Mix until everything is well combined. This step adds moisture and sweetness. Gradually add the dry mix to the wet mix. Stir gently until just combined. Then, fold in 1 cup of grated carrots and 1/2 cup of chopped walnuts, if you like. The carrots add sweetness and texture, while walnuts give a nice crunch. Fill each donut cavity in the pan about 2/3 full. Bake for 12-15 minutes. To check if they are done, insert a toothpick into the center. It should come out clean. Let the donuts cool in the pan for 5 minutes before moving them to a wire rack. This cooling step keeps them fluffy. While the donuts cool, make the maple glaze. In a small bowl, mix 1 cup of powdered sugar, 2-3 tablespoons of maple syrup, and 1 tablespoon of milk. Whisk until smooth. You can adjust thickness by adding more milk or sugar. Once the donuts are cool, dip the tops into the glaze. Let any extra glaze drip back into the bowl. Set the glazed donuts on the wire rack and let them set for a few minutes before serving. To get soft and fluffy donuts, use fresh ingredients. Old baking powder and baking soda can ruin your donuts. Mix the dry and wet ingredients gently. Overmixing makes them tough. Fill the donut pan to about two-thirds full. This gives your donuts room to rise without spilling over. Bake until golden and a toothpick comes out clean. Let them cool for a bit before glazing. If you like your donuts sweeter, add more brown sugar or maple syrup. You can also mix in some finely grated apple for natural sweetness. If you prefer a less sweet donut, cut back on the sugar by a few tablespoons. Remember, the glaze will add sweetness too. Taste as you go to find your perfect balance. To make a smooth glaze, start with powdered sugar. Mix it with maple syrup and a little milk. Whisk until there are no lumps. If your glaze is too thick, add more milk, one teaspoon at a time. If it's too thin, sprinkle in extra powdered sugar. The right glaze should coat the donuts nicely but not drip off too much. Dip the tops of the donuts and let the excess drip back in the bowl. This keeps the glaze thick and tasty! Pro Tips Use Fresh Carrots: For the best flavor and texture, use freshly grated carrots rather than pre-packaged shredded carrots. Don’t Overmix the Batter: Mix the wet and dry ingredients until just combined to ensure your donuts remain light and fluffy. Adjust Glaze Consistency: If your maple glaze is too thick, add a little more milk, or if it's too thin, add more powdered sugar to achieve your desired consistency. Experiment with Spices: Feel free to add other spices like ginger or allspice to customize the flavor of your donuts to your liking. {{image_2}} You can switch the all-purpose flour with whole wheat flour. This adds fiber and nutrients. For a gluten-free option, use almond flour or a gluten-free flour blend. Both work well! When it comes to sugars, you might use coconut sugar instead of brown sugar. This gives a natural sweetness. You can also try honey or agave syrup for a different taste. To boost the flavor, add more spices. Try adding ginger for warmth or allspice for depth. A pinch of cloves can also create a lovely aroma. You might also add orange zest for a bright, citrus note. It pairs nicely with the carrots and maple glaze. Experiment and find what you love! If you want vegan donuts, swap the eggs for flax eggs. Mix one tablespoon of flaxseed meal with three tablespoons of water. Let it sit for a few minutes to thicken. For the buttermilk, use almond milk mixed with a splash of vinegar. This mimics the tangy flavor. To make gluten-free donuts, follow the flour substitutions mentioned. Enjoy your treats without worry! To keep your maple glazed carrot cake donuts fresh, store them in an airtight container. This helps prevent them from drying out. You can keep them at room temperature for up to two days. If you want to keep them longer, the fridge is a good option. Just remember to seal them well to avoid moisture loss. For longer storage, you can freeze the donuts. Allow the donuts to cool completely before freezing. Wrap each donut tightly in plastic wrap. Then, place them in a freezer-safe bag or container. These donuts can last up to three months in the freezer. When you're ready to enjoy them, simply thaw them at room temperature. To enjoy your donuts warm, preheat your oven to 350°F (175°C). Place the donuts on a baking sheet for about five to ten minutes. This helps revive their soft texture. You can also microwave a donut for about 10-15 seconds. Be careful not to overheat, or they may become tough. Enjoy them fresh for a delightful treat! You can use milk mixed with vinegar or lemon juice. Mix 1 cup of milk with 1 tablespoon of vinegar or lemon juice. Let it sit for about five minutes. This will give you a nice buttermilk flavor for your donuts. Yes, store-bought maple syrup works well. Look for pure maple syrup for the best taste. Avoid syrup labeled as “pancake syrup” since it may have artificial flavors. Pure syrup will add the right sweetness to your glaze. Check the donuts at 12 minutes. Insert a toothpick into the center. If it comes out clean, the donuts are done. If not, bake for another minute or two. They should be golden brown and spring back when touched. Serve the donuts warm or at room temperature. Arrange them on a nice plate for a pretty display. You can sprinkle extra walnuts on top or drizzle more maple syrup for added flair. Pair them with coffee or tea for a delightful treat. You now know the ingredients needed for delicious donuts and how to prepare them. We covered how to mix, bake, and glaze with care. I shared tips for perfect texture and sweetness, plus variations to fit your needs. Donuts can be stored or frozen for later enjoyment. Remember, with a few tweaks, you can make them your own. Enjoy creating these tasty treats and share them with friends and family!

Maple Glazed Carrot Cake Donuts Irresistibly Delicious

If you’re looking to elevate your dessert game, you’re in the right place! These Maple Glazed Carrot Cake Donuts are

- 4 boneless, skinless chicken thighs - 1/4 cup pure maple syrup - 2 tablespoons Dijon mustard - 1 tablespoon soy sauce (or tamari for gluten-free) - 2 cloves garlic, minced - 1 teaspoon fresh thyme leaves (or 1/3 teaspoon dried thyme) - Salt and pepper to taste - 1 tablespoon olive oil - Slice of lemon for garnish (optional) Gather these ingredients to make Maple Dijon Chicken Thighs. Each item plays a key role in building flavor. The chicken thighs are tender and juicy. Maple syrup adds sweetness, while Dijon mustard gives a nice tang. Soy sauce brings umami, enhancing the dish's depth. Garlic and thyme add aroma and freshness. I always choose fresh thyme when I can. It gives a bright note to the marinade. If you prefer, you can use dried thyme, but fresh thyme shines in this recipe. Salt and pepper are essential for taste. They help balance the sweetness of the maple syrup. Olive oil helps in cooking, adding moisture and richness to the dish. Lastly, a slice of lemon is a nice touch. It brightens the plate and adds a pop of color when serving. With this list, you are ready to create a delightful meal that is both easy and flavorful. Enjoy the cooking process! {{ingredient_image_1}} - First, whisk together the marinade ingredients. Combine maple syrup, Dijon mustard, soy sauce, garlic, thyme, salt, and pepper in a bowl. - Next, coat the chicken thighs well in the marinade. Make sure every part is covered. - For the best flavor, marinate the chicken in the fridge for 30 minutes to 2 hours. This lets the flavors soak in. - Preheat your oven to 400°F (200°C) so it's ready when you need it. - In an oven-safe skillet, heat olive oil over medium-high heat. Wait until it shimmers. - Remove the chicken from the marinade, letting any extra drip off. Place the thighs in the hot skillet. - Sear the chicken for 4-5 minutes on each side. Look for a golden brown color. - Pour the remaining marinade over the chicken. Carefully transfer the skillet to the preheated oven. - Bake for 20-25 minutes. Check if the chicken is done by using a meat thermometer. It should reach 165°F (75°C). - Once finished, take the skillet out of the oven. Cover the chicken with foil for about 5 minutes. This keeps it moist and juicy before you serve. Marinating is key for great flavor. I suggest at least 30 minutes, but 2 hours is better. This gives the chicken time to soak up the sweet and tangy mix. You can adjust the sweetness with more maple syrup. If you want more tang, add extra Dijon mustard. This balance makes each bite tasty. Choose an oven-safe skillet for searing. A good skillet helps the chicken brown nicely. Heat the oil until it shimmers before adding the chicken. This creates a nice crust. When baking, keep an eye on the chicken. Using a meat thermometer helps ensure even cooking. Aim for an internal temperature of 165°F (75°C). This keeps the chicken juicy. Make your dish pop with garnishes. Fresh thyme and lemon slices add color and freshness. Serve the chicken on a platter. Drizzle the pan sauce over the top for a nice look. This simple touch makes your meal even more inviting. Pro Tips Marinate for Maximum Flavor: Allowing the chicken to marinate for at least 2 hours will enhance the flavor significantly. For best results, marinate overnight in the refrigerator. Use an Instant-Read Thermometer: To ensure your chicken is perfectly cooked, use an instant-read thermometer. It should read 165°F (75°C) when done. Pair with Seasonal Vegetables: Serve the chicken with roasted seasonal vegetables to create a well-rounded meal. Carrots, Brussels sprouts, or green beans complement the flavors beautifully. Leftover Storage: Store any leftover chicken in an airtight container in the refrigerator for up to 3 days. Reheat gently to maintain moisture. {{image_2}} You can change up the mustard in this dish. Whole grain mustard gives a nice crunch and texture. It adds a different taste that works well with maple syrup. If you like heat, try spicy mustard. It gives the chicken a kick. Both options can make your dish more fun and unique. To make your chicken even better, add herbs like rosemary or oregano. These herbs bring fresh flavors that match well with maple. You can also add citrus. Squeeze some lemon or orange juice for a zesty tone. Lime adds a nice twist too. These simple changes can elevate your dish to a new level. You can cook these thighs in different ways. Grilling adds a smoky flavor that many love. It gives a nice char on the outside. Baking works too. It’s easy and allows the chicken to soak in all the tasty juices. If you want to speed things up, use an Instant Pot. Cook on high for about 10 minutes. Let the pressure release naturally. This method makes the chicken tender and juicy. Each cooking style offers a new taste experience. To store leftovers, let the chicken cool first. Place it in an airtight container. You can keep it in the fridge for up to three days. To keep the chicken moist, add a bit of the pan sauce before sealing the container. This method helps to lock in flavor and moisture. For the best results, reheat in the oven. Preheat your oven to 350°F (175°C). Place the chicken in a baking dish and cover it with foil. Heat for about 15-20 minutes. If you're in a hurry, you can use the microwave. Put the chicken on a microwave-safe plate. Heat it for 1-2 minutes, checking to see if it's warm. You can freeze cooked chicken thighs. Let them cool completely, then wrap each piece in plastic wrap. Place them in a freezer bag for extra protection. They will last for up to three months in the freezer. When you're ready to eat, thaw them in the fridge overnight. For quicker thawing, you can use cold water, changing the water every 30 minutes. The best way to marinate chicken is to mix your ingredients well. Use a bowl to whisk together maple syrup, Dijon mustard, soy sauce, minced garlic, thyme, salt, and pepper. After mixing, coat the chicken thighs in the marinade. Cover and refrigerate for at least 30 minutes. For a deeper flavor, marinate for up to 2 hours. Yes, you can use bone-in chicken thighs. They will take longer to cook. Adjust the cooking time by adding 10-15 minutes to the baking time. Always check the internal temperature to ensure it reaches 165°F. This ensures your chicken is juicy and cooked properly. A meat thermometer helps check if chicken is fully cooked. Insert it into the thickest part of the thigh. The chicken is done when it reaches 165°F. This step is important to keep the chicken safe to eat and ensure it is tender. Yes, you can make this dish ahead of time. Marinate the chicken and store it in the fridge for up to 2 hours. You can also cook the chicken and store it in the fridge for up to 3 days. When ready to eat, just reheat it gently in the oven. This blog covered how to make delicious maple mustard chicken thighs. We discussed the right ingredients, marinating tips, cooking methods, and presentation ideas. You now know how to achieve great flavor and texture. Remember to adjust spices to your taste and explore variations. Proper storage is crucial for keeping your chicken juicy. Enjoy cooking this dish and impress friends or family. With practice, you'll master it quickly!

Maple Dijon Chicken Thighs Flavorful and Easy Dish

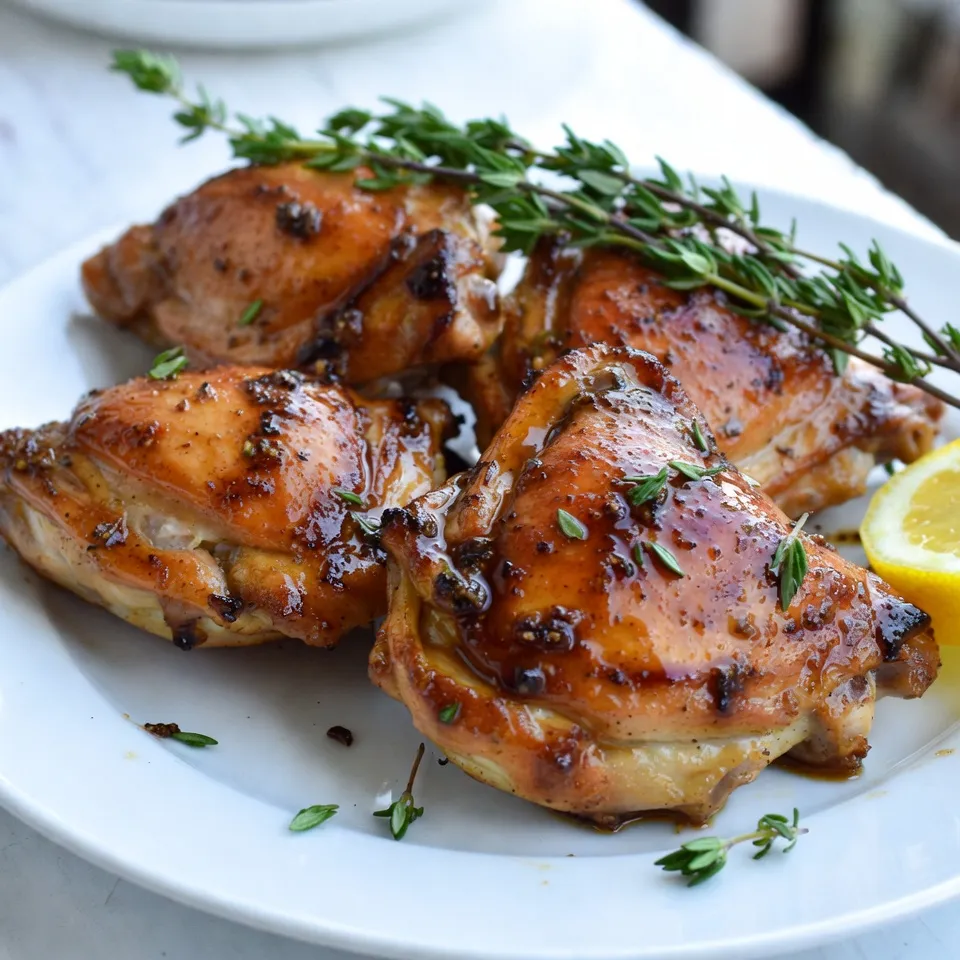
Get ready to tantalize your taste buds with Maple Dijon Chicken Thighs! This dish is simple to make yet big

To make cheesy chicken fritters, you need a few key items. Here’s what you’ll gather: - 1 pound cooked chicken breast, shredded - 1 cup shredded mozzarella cheese - 1/2 cup grated Parmesan cheese - 1/2 cup breadcrumbs - 1/4 cup green onions, finely chopped - 2 large eggs - 1 teaspoon garlic powder - 1 teaspoon onion powder - Salt and pepper to taste - 1/4 cup all-purpose flour (for dredging) - Olive oil (for frying) These ingredients make the fritters rich and flavorful. The blend of cheeses gives a creamy texture, while the chicken provides a nice protein boost. For the garlic aioli, you will need these simple items: - 1/2 cup mayonnaise - 2 cloves garlic, minced - 1 tablespoon lemon juice - Salt to taste This aioli adds a zesty kick to the fritters. The garlic and lemon juice balance the creaminess of the mayonnaise perfectly. You can customize your fritters with these options: - Swap mozzarella for cheddar or gouda for different flavors. - Use fresh herbs like parsley or cilantro for added freshness. - Substitute Greek yogurt for mayonnaise in the aioli for a lighter dip. These changes can make the dish unique to your taste. Feel free to explore and try new flavors! {{ingredient_image_1}} First, get a large bowl. Add 1 pound of shredded cooked chicken. Next, stir in 1 cup of shredded mozzarella cheese and 1/2 cup of grated Parmesan cheese. Toss in 1/2 cup of breadcrumbs and 1/4 cup of finely chopped green onions. Crack 2 large eggs into the mix. Then, add 1 teaspoon each of garlic powder and onion powder. Don’t forget salt and pepper to taste. Mix everything together well. You want a thick, sticky mixture that holds together. Now, take a shallow dish and fill it with 1/4 cup of all-purpose flour. Heat some olive oil in a skillet over medium heat. With your hands, grab a portion of the chicken mixture. Form it into small patties, about 2-3 inches wide. Lightly coat each patty in flour. Shake off any extra flour before frying. Once the oil is hot, place the fritters in the skillet in batches. Fry each side for about 3-4 minutes. They should turn golden brown. Use a paper towel-lined plate to drain any excess oil after frying. For the garlic aioli, take a small bowl. Combine 1/2 cup of mayonnaise with 2 minced garlic cloves. Add in 1 tablespoon of lemon juice and a pinch of salt. Mix until creamy. Taste and adjust the salt if needed. This aioli adds a nice zing to the fritters. Serve it alongside your cheesy chicken fritters for a delightful dip! To get that perfect crunch, use enough oil in the pan. A good rule is to heat about 1/4 inch of oil. This depth helps fry the fritters evenly. Also, don’t overcrowd the pan. Fry in small batches for even cooking. Flip each fritter only once. This way, you get a nice golden crust. One common mistake is not letting the oil heat enough. If the oil isn’t hot, the fritters will soak up too much oil. Another mistake is adding too much flour. A light coat is all you need to keep them crispy. Lastly, make sure to drain the fritters on paper towels. This step removes extra oil and keeps them from becoming soggy. Seasonings can take your fritters to the next level. Besides garlic and onion powder, try adding herbs like parsley or thyme. A pinch of cayenne can add a fun kick. You can also mix in some smoked paprika for a deeper flavor. When you make the garlic aioli, use fresh garlic for a bolder taste. A squeeze of lemon juice brightens the flavor too. Pro Tips Use Leftover Chicken: This recipe is perfect for using up leftover rotisserie chicken or any cooked chicken you have on hand, making it a great way to reduce food waste. Customize the Cheese: Feel free to mix and match different types of cheese, such as cheddar or pepper jack, for a unique flavor twist in your fritters. Chill the Mixture: If the fritter mixture feels too loose, refrigerate it for about 30 minutes before forming patties to help them hold their shape better during frying. Adjust the Aioli: For a spicier kick, add a pinch of cayenne pepper or a dash of hot sauce to the garlic aioli for an extra layer of flavor. {{image_2}} You can switch up the cheese in these fritters. I love using mozzarella for its meltiness. However, you could try cheddar for a sharper taste. Feta adds a nice tang. For a creamier texture, go for cream cheese. Mixing cheeses can create fun flavors too! Want a healthier twist? Use ground turkey instead of chicken for leaner meat. Swap out breadcrumbs for oat flour or almond flour to cut carbs. You can also replace mayonnaise in the aioli with Greek yogurt for a lighter dip. These swaps keep the fritters tasty and nutritious! Get creative by adding veggies! Chopped spinach or grated zucchini blends well. You can also throw in some finely diced bell peppers for color and crunch. If you enjoy heat, add red pepper flakes or a dash of hot sauce. These small changes make your fritters more exciting. To keep your fritters fresh, place them in an airtight container. Make sure they cool down first. This helps avoid steam build-up. You can store them in the fridge for about 3 days. If you want them to last longer, consider freezing them. For reheating, I suggest using an oven. Preheat it to 350°F (175°C). Place the fritters on a baking tray. Heat them for about 10-15 minutes. This method keeps them crispy. You can also use a skillet. Just add a little oil and warm them up on medium heat. To freeze, let the fritters cool completely. Lay them flat on a baking sheet. Freeze until solid, then transfer to a freezer bag. This way, they won’t stick together. They can last up to 3 months in the freezer. When you're ready to eat, thaw in the fridge and reheat as mentioned. No, using raw chicken is not safe here. The recipe calls for cooked chicken. Cooked chicken ensures your fritters are safe to eat. Raw chicken needs longer cooking times. This could leave your fritters undercooked. Always use cooked chicken for best results. To make this recipe gluten-free, swap regular breadcrumbs for gluten-free ones. You can also use crushed gluten-free crackers. For the dredging, use cornstarch or gluten-free flour. This maintains the fritters’ crispiness while keeping them safe for gluten-free diets. If you want an alternative to garlic aioli, try ranch dressing. It adds a creamy touch and nice flavor. You can also serve a simple yogurt dip with herbs. Another option is a spicy sriracha mayo for a kick. Each dip brings a new taste to the fritters. In this post, we covered how to make cheesy chicken fritters from scratch. We discussed the main ingredients needed, the step-by-step instructions for cooking, and tips for perfecting the recipe. Exploring variations and storage options allows you to customize this dish to your taste. Remember to avoid common mistakes for the best results. Enjoy experimenting with flavors and have fun in the kitchen. You can impress everyone with these easy, tasty fritters!

Cheesy Chicken Fritters with Garlic Aioli Delight

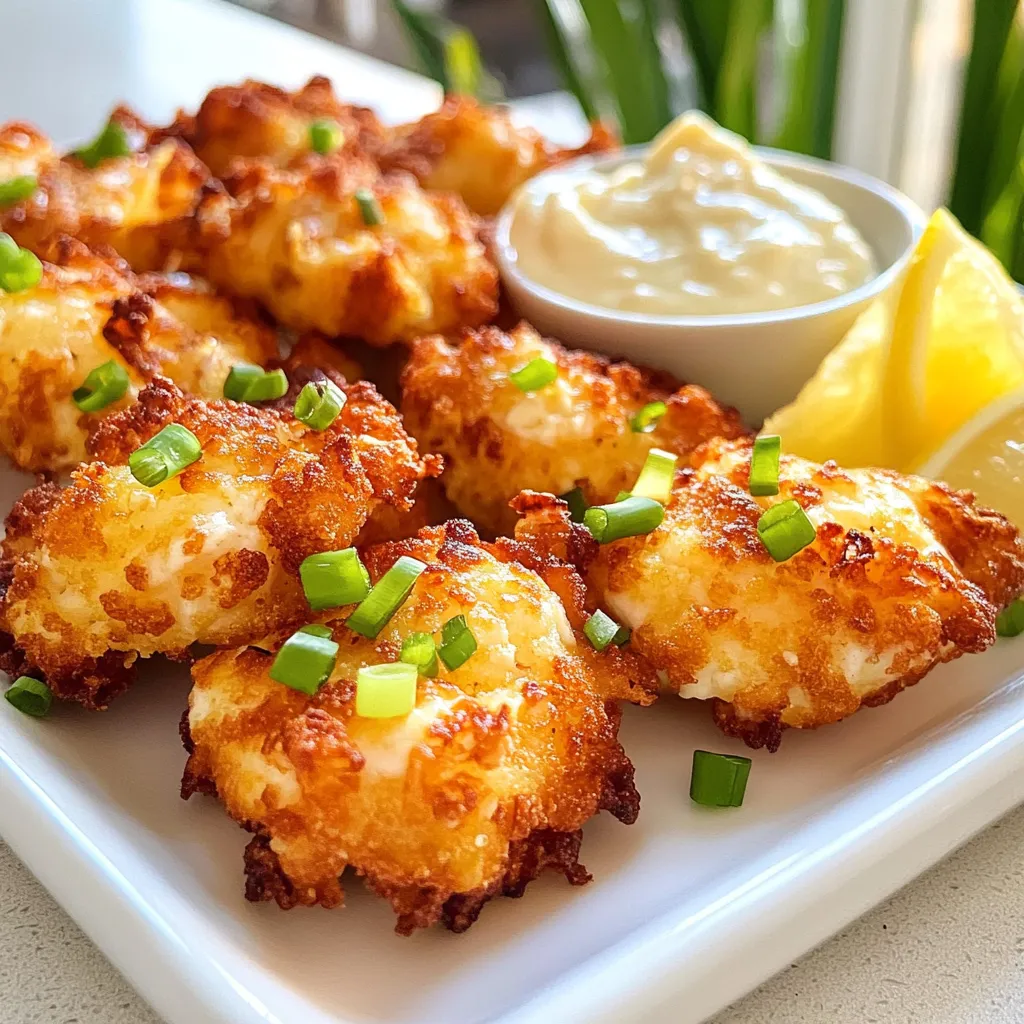
Are you ready to take your snacking game to the next level? These Cheesy Chicken Fritters with Garlic Aioli are

To make Air Fryer Buffalo Cauliflower Wings, you need a few key items: - 1 medium head of cauliflower, chopped into bite-sized florets - 1 cup all-purpose flour - 1 cup plant-based milk (or regular milk) - 1 teaspoon garlic powder - 1 teaspoon onion powder - 1 teaspoon smoked paprika - 1 teaspoon salt - ½ teaspoon pepper - 1 cup buffalo sauce - Cooking spray You will need some simple tools to prepare your wings: - Mixing bowl - Whisk - Air fryer - Cooking spray - Platter for serving If you want to make changes, here are some options: - Use gluten-free flour instead of all-purpose flour. - Swap plant-based milk with almond or oat milk for a dairy-free option. - For a spicy kick, add cayenne pepper to the batter. These ingredients and tools will help you create crispy and flavorful buffalo cauliflower wings that everyone will love. You can easily adjust the recipe to fit your dietary needs. Enjoy making these tasty bites! {{ingredient_image_1}} Start by rinsing the cauliflower. This step removes any dirt. Next, chop the head into small, bite-sized florets. Aim for even pieces. This helps them cook evenly. Grab a mixing bowl for the batter. Add 1 cup of flour, 1 teaspoon of garlic powder, 1 teaspoon of onion powder, 1 teaspoon of smoked paprika, 1 teaspoon of salt, and ½ teaspoon of pepper. Whisk these dry ingredients well. Slowly pour in 1 cup of plant-based milk. Mix until smooth. The batter should be thick but pourable. Preheat your air fryer to 375°F (190°C) for about 5 minutes. Spray the basket with cooking spray. This prevents sticking. Dip each cauliflower floret into the batter. Make sure they are well-coated, then shake off excess batter. Place the florets in the air fryer basket in a single layer. You might need to cook in batches. Cook the wings for 12-15 minutes. Shake the basket halfway through to ensure even cooking. They should look golden and crispy. After cooking, toss the wings in a bowl with buffalo sauce. Coat them evenly. Return them to the air fryer for 5 more minutes. This helps set the sauce. Finally, let the wings cool slightly before serving. To get crispy cauliflower wings, you need to follow some steps. First, make sure to coat each floret well. The batter should stick nicely. If it's too thin, add a little more flour. This helps form a nice crust. Preheat your air fryer to 375°F. This heat makes the wings crispy. Cook them in a single layer, not stacked. This allows hot air to circulate and crisp them up. Batter separation can happen if the mixture sits too long. To avoid this, mix the batter just before coating the cauliflower. After dipping the florets, shake off any extra batter. This helps the coating stay on during cooking. If you see separation, just whisk the batter again. Keep it smooth for the best results. Consistency is key for a good coating. Coating the wings in sauce is easy. After cooking, place the wings in a bowl. Pour the buffalo sauce over the wings. Toss gently to coat each piece well. Make sure all sides are covered. For a thicker sauce layer, toss again. You can return the sauced wings to the air fryer for five more minutes. This helps the sauce stick better and enhances flavor. Enjoy your tasty buffalo cauliflower wings! Pro Tips Use Fresh Cauliflower: For the best flavor and texture, opt for a fresh cauliflower head rather than pre-packaged florets. Adjust the Spice Level: If you prefer a milder flavor, mix buffalo sauce with a little plant-based milk or butter to tone down the heat. Batch Cooking: If cooking for a crowd, consider doing this in batches to avoid overcrowding the air fryer, which can lead to uneven cooking. Experiment with Coatings: Try adding different spices or breadcrumbs to the batter for unique flavors and added crunch. {{image_2}} You can spice up your buffalo cauliflower wings in many ways. Try adding cayenne pepper to the batter for extra heat. You can also use a spicier buffalo sauce if you like a real kick. Another option is to mix in some hot sauce directly into the batter. This adds flavor and heat all at once. Buffalo sauce is great, but feel free to explore other flavors. You can toss the wings in barbecue sauce for a sweet twist. A honey mustard sauce adds a nice tang. For a creamy option, try tossing the wings in ranch dressing after cooking. You can also experiment with sriracha or teriyaki sauce for unique flavors. If you need a gluten-free option, use almond flour instead of all-purpose flour. You can also try chickpea flour, which adds protein. Just make sure your buffalo sauce is gluten-free. This way, you can enjoy the crispy goodness without any gluten worries. After making your Air Fryer Buffalo Cauliflower Wings, let them cool. Place any leftovers in a sealed container. Store them in the fridge for up to 3 days. If they are not cool, moisture can make them soggy. To reheat, use your air fryer again. Preheat it to 350°F (175°C). Place the wings in the basket and heat for 5-7 minutes. This helps them regain their crispiness. You can also use an oven. Heat them at 350°F (175°C) for about 10 minutes. If you want to freeze, do it before adding the buffalo sauce. Place the cooked cauliflower wings in a freezer bag. Remove as much air as you can. They can last up to 2 months in the freezer. When ready to eat, thaw them overnight in the fridge before reheating. Yes, you can use frozen cauliflower for this recipe. Just make sure to thaw it first. Pat the cauliflower dry with a paper towel. This helps remove excess moisture. If it's too wet, the batter won’t stick well. You may need to adjust cooking time. Frozen florets might need a few extra minutes to get crispy. To add more heat, you can mix extra hot sauce into the batter. Use a spicy buffalo sauce or add cayenne pepper to the batter. You can also sprinkle chili powder or red pepper flakes on the wings after tossing them in the sauce. Adjust the spice level to your taste. Just remember, a little spice goes a long way! Buffalo cauliflower wings pair well with ranch or blue cheese dressing. These cool flavors balance the heat from the wings. You can also try a creamy avocado dip or a tangy yogurt sauce. For a fun twist, serve with a peanut sauce or sweet chili sauce. These options add new flavors to your snack! In this blog post, we covered how to make delicious buffalo cauliflower wings. We discussed the needed ingredients and the best equipment for cooking. I shared step-by-step instructions to prepare, batter, and air fry the cauliflower. You learned tips for crispiness and batter that sticks well. We explored fun variations and how to store leftovers. Cauliflower wings are tasty and easy to customize. Enjoy your cooking and make it your own!

Air Fryer Buffalo Cauliflower Wings Crispy and Flavorful

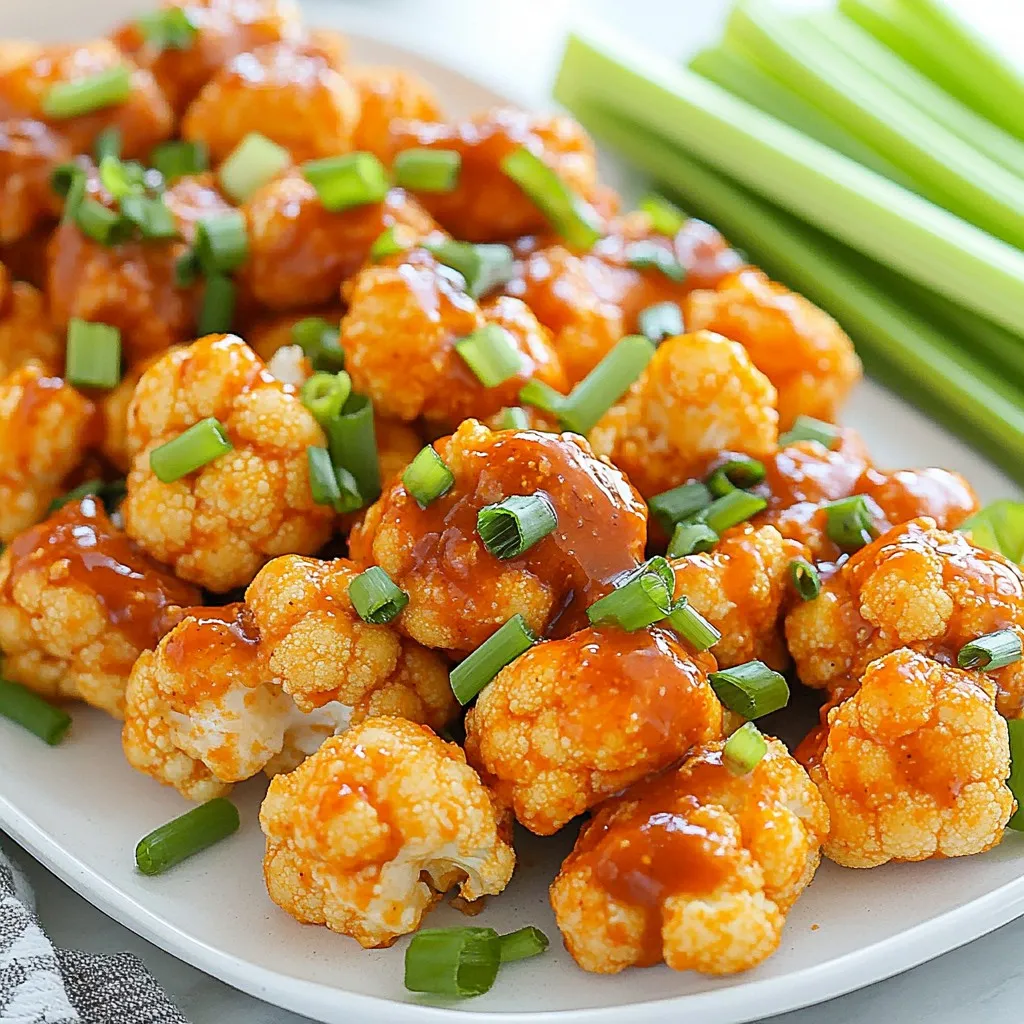
Do you crave a crispy snack that’s packed with flavor? Look no further! Air Fryer Buffalo Cauliflower Wings are your

For a vibrant and tasty Rainbow Spring Roll Bowl, you need: - 1 cup cooked quinoa - 1 cup shredded purple cabbage - 1 cup carrot, julienned - 1 red bell pepper, thinly sliced - 1 cup cucumber, julienned - 1 avocado, sliced - 1 cup fresh mint leaves - 1 cup fresh cilantro leaves - 1/4 cup peanuts, chopped (or your favorite nuts) - 1/4 cup sesame seeds These ingredients provide a mix of colors, textures, and flavors. Quinoa serves as a hearty base, while the fresh veggies add crunch. The herbs bring brightness, and nuts add a nice bite. To make the delicious dressing, gather: - 1/4 cup almond butter - 2 tablespoons soy sauce (or tamari for gluten-free) - 1 tablespoon lime juice - 1 tablespoon maple syrup - 1 teaspoon grated ginger - 1-2 teaspoons sriracha (to taste) This dressing ties the whole bowl together. The almond butter adds creaminess, while lime juice gives a zesty punch. You can adjust the sriracha for spice lovers or keep it mild. You can swap or add ingredients to suit your taste. Try these: - Use brown rice or cauliflower rice instead of quinoa. - Replace purple cabbage with green cabbage or spinach. - Add proteins like tofu, shrimp, or chicken for extra flavor. - Use sunflower seeds instead of peanuts for nut-free bowls. Feel free to get creative! Use what you have on hand to make these bowls your own. {{ingredient_image_1}} To cook quinoa, start by rinsing one cup of dry quinoa under cold water. This helps remove any bitter taste. Then, follow the package instructions for cooking. Usually, you will combine the rinsed quinoa with two cups of water in a pot. Bring it to a boil, then lower the heat. Cover the pot and simmer for about 15 minutes. When done, fluff it with a fork and let it cool. While your quinoa cools, prepare your colorful veggies. First, julienne one cup of carrots and one cup of cucumber. This means cutting them into thin strips. Next, slice one red bell pepper into thin pieces. Then, shred one cup of purple cabbage. You can use a grater or a sharp knife for this. Finally, wash one cup each of fresh mint and cilantro leaves. Set all these vibrant ingredients aside. Now, let’s make a tasty dressing. In a small bowl, add a quarter cup of almond butter. Then, pour in two tablespoons of soy sauce. Next, add one tablespoon of lime juice and one tablespoon of maple syrup. Grate one teaspoon of ginger and add it in. If you like some heat, stir in one to two teaspoons of sriracha. Whisk everything together until it is smooth. You can adjust the flavors to your liking. It’s time to put everything together! Start with a generous scoop of cooled quinoa in each bowl. Next, arrange the shredded cabbage, carrots, red bell pepper, cucumber, and avocado slices on top, making it look like a rainbow. Sprinkle chopped peanuts and sesame seeds over the top for crunch. Finally, add a handful of fresh mint and cilantro leaves. Drizzle the almond butter dressing over the bowls just before serving. Enjoy this bright and tasty meal! To make your Rainbow Spring Roll Bowls pop, use bright veggies. Aim for a mix of colors. I love using purple cabbage, orange carrots, and red bell peppers. Slice them thin for a fun look. Arrange them in sections over the quinoa. This way, each color shines. The more colors, the better! It makes your meal look fresh and inviting. The dressing is key to flavor. Start with almond butter for creaminess. Whisk in soy sauce for saltiness and lime juice for zing. Adjust the sweetness with maple syrup as needed. If you like spice, add sriracha. Taste as you mix to find your perfect balance. This way, each bowl can match your taste buds. When serving, use rustic bowls to enhance the look. Place bowls on a wooden board for a natural feel. Add lime wedges for a pop of color. Fresh mint and cilantro on top add a nice green touch. This makes the dish look fun and fresh. Enjoy the vibrant colors as you dig in! Pro Tips Prep Ahead: To save time during busy days, prepare the quinoa and chop the vegetables the night before. Store them separately in the fridge to maintain freshness. Customize Your Bowl: Feel free to add other vegetables or proteins like grilled chicken or tofu to suit your taste preferences and dietary needs. Fresh Herbs Matter: Using fresh mint and cilantro enhances the flavor profile of the dish. If you don’t like these herbs, consider substituting with basil or parsley. Texture Balance: For a delightful crunch, experiment with different toppings like crispy chickpeas or sunflower seeds in place of peanuts. {{image_2}} You can easily boost your Rainbow Spring Roll Bowls with protein. Here are some great choices: - Tofu: Use firm tofu for a great plant-based option. Press it to remove water, then cube and sauté until golden. This adds a nice texture and absorbs flavors well. - Shrimp: Shrimp cooks fast and adds a pop of flavor. Simply sauté them in a pan with a bit of oil until pink. They work well with the fresh veggies. - Chicken: Grilled or shredded chicken can make your bowl heartier. Season it with salt and pepper, or use a marinade for extra taste. Adding protein not only fills you up but also gives variety to your meal. Making this dish vegan or gluten-free is simple. Here’s how: - Vegan: Stick with plant-based proteins like tofu or chickpeas. Make sure your dressing uses tamari instead of regular soy sauce to keep it gluten-free too. - Gluten-Free: Use tamari sauce instead of soy sauce. This keeps the dressing flavorful without gluten. Always check labels on nuts and other ingredients to ensure they are gluten-free. These options let everyone enjoy the meal without worry. Seasonal swaps can keep your bowls fresh and exciting. Here are a few ideas: - Spring: Add fresh peas or asparagus for a crunchy bite. - Summer: Use fresh corn or heirloom tomatoes for a juicy touch. - Fall: Swap in roasted butternut squash or sweet potatoes. - Winter: Try kale or Brussels sprouts for a hearty option. By changing ingredients with the seasons, you can keep your bowls tasty and colorful all year round. To store your Rainbow Spring Roll Bowls, first let them cool. Use airtight containers for storage. Place the quinoa and veggies in one container. Keep the dressing in a separate small jar. This helps keep everything fresh. Store in the fridge for up to three days. Always check for freshness before eating. For meal prep, start by cooking a larger batch of quinoa. You can prep the veggies in advance too. Slice and julienne your vegetables a day ahead. Store them in separate containers. This keeps them crisp and fresh. Make the dressing and store it in the fridge. Mix it right before serving for the best taste. When ready to eat, take out the quinoa and veggies. You can serve them cold, or warm them up. To reheat, use a microwave for about 30 seconds. Stir to ensure even heating. If you want to warm the veggies, do it in a pan on low heat. Add a little water if needed. Drizzle the dressing on top just before serving. Enjoy your fresh and vibrant meal! Yes, you can make Rainbow Spring Roll Bowls ahead of time. Prepare the quinoa and chop the veggies first. Store them in separate containers. Keep the dressing in a jar in the fridge. When you're ready to eat, assemble your bowls. This way, your ingredients stay fresh. You can use peanut butter or sunflower seed butter. Both options give a rich taste. If you want a nut-free option, sunflower seed butter works well. You can also try tahini for a different flavor twist. Yes, these bowls are perfect for meal prep. You can store each ingredient in separate containers. This keeps them fresh. When you’re ready to eat, just mix and match what you like. It makes your lunch easy and fun! You can add your favorite proteins like tofu or shrimp. Swap out veggies based on your taste. Try adding mango or radishes for extra color. You can mix different herbs too. Use whatever you have at home. The options are endless! Rainbow spring roll bowls offer a fresh, vibrant meal filled with flavor. We explored key ingredients, easy steps, and helpful tips for making these bowls shine. You can customize with proteins and seasonal swaps. Plus, storing leftovers is a breeze with smart meal prep methods. Enjoy experimenting to create your own tasty rainbow rolls. Trust me, you’ll love every bite!

Rainbow Spring Roll Bowls Bright and Flavorful Meal

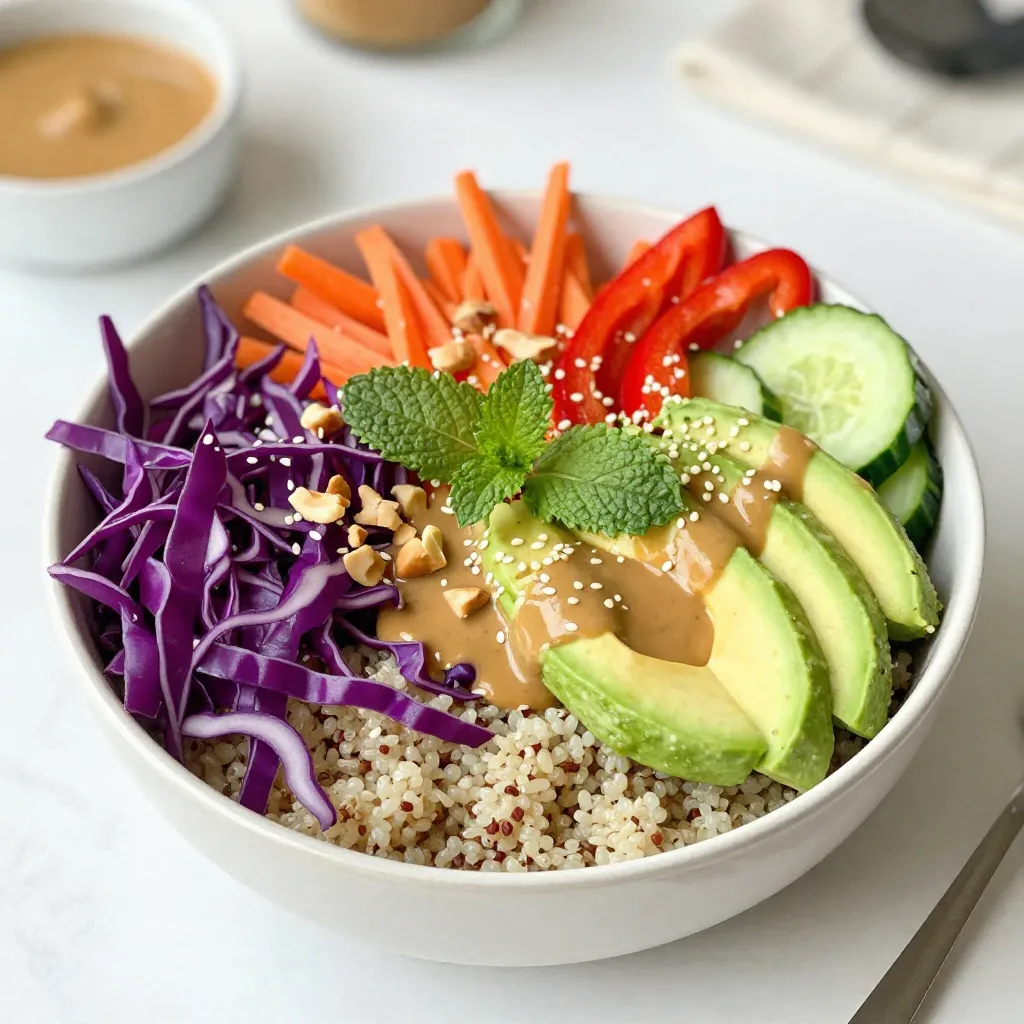
Looking for a meal that’s as colorful as it is tasty? Rainbow Spring Roll Bowls are the answer! Packed with

Older posts
Newer posts
← Previous Page1 … Page155 Page156 Page157 … Page164 Next →

dsad

© 2026 easycookingbite • Built with GeneratePress

Our Policies

  • Copyright Policy
  • Cookie Policy
  • GDPR Policy
  • Privacy Policy
  • Disclaimer
  • Terms Of Use

More Information

  • Home
  • About
  • Contact
  • Appetizers
  • Dessert
  • Dinner
  • Drinks
©2026, easycookingbite About Back To Top