Skip to content
DisclaimerTerms Of UseGDPR PolicyCookie Policy

easycookingbite

  • Home
  • Drinks
  • Appetizers
  • Dinner
  • Dessert
  • About
  • Contact
  • Privacy Policy
DisclaimerTerms Of UseGDPR PolicyCookie Policy

Lily

To make this tasty Strawberry Cheesecake French Toast, you need a few key items: - 4 slices of thick brioche or challah bread - 1/2 cup cream cheese, softened - 1/4 cup powdered sugar - 1 teaspoon vanilla extract - 1 cup fresh strawberries, hulled and sliced - 2 eggs - 1/2 cup milk - 1 teaspoon cinnamon - A pinch of salt - 2 tablespoons unsalted butter These ingredients give the dish its rich and creamy flavor. The brioche or challah bread adds a soft texture that works well with the creamy filling. You can make your French toast even better with these toppings: - Whipped cream - Extra strawberries - Maple syrup These toppings add sweetness and freshness. You can mix and match them to suit your taste. I love adding extra strawberries and a drizzle of maple syrup for a lovely finish! {{ingredient_image_1}} To start, grab a mixing bowl. In it, combine 1/2 cup of softened cream cheese, 1/4 cup of powdered sugar, and 1 teaspoon of vanilla extract. Use a hand mixer or a whisk to mix these ingredients until smooth and creamy. This step is key for the rich flavor you want. Once it reaches a nice texture, set it aside for later. Now, take another bowl and whisk together 2 eggs, 1/2 cup of milk, 1 teaspoon of cinnamon, and a pinch of salt. Make sure to mix well until everything blends together. This mixture will coat the bread, giving it that delicious French toast taste. Next, preheat your skillet or griddle over medium heat. Add 1 tablespoon of unsalted butter and let it melt, coating the surface. Take one slice of thick brioche or challah bread. Spread a generous layer of the cream cheese mixture on one side. Top it with sliced strawberries, then place another slice of bread on top to make a sandwich. Carefully dip the sandwich into the egg mixture. Ensure both sides get coated but avoid making it soggy. Place the sandwich on the skillet and cook for about 3-4 minutes on each side. Look for a golden brown color, which shows it’s ready. Repeat this with the other slices, adding more butter as needed. Once cooked, remove the French toast and slice each sandwich in half. Arrange them on a plate, topping with extra strawberries and a dollop of whipped cream. Enjoy this delightful treat! To prevent sogginess in your French toast, let the bread soak in the egg mix for just a moment. This keeps it from getting too wet. I like to dip each side of the sandwich quickly. For a golden color, cook on medium heat. Too high and the outside burns before the inside cooks. Flip the toast only when the first side is golden. Adding spices gives your French toast a boost. I like to use a pinch of nutmeg or a dash of cardamom. These spices add warmth and depth to the flavor. Using flavored cream cheese can change the game. Try strawberry or vanilla cream cheese for an extra kick. You can even mix in some lemon zest for a fresh twist! Pro Tips Choose the Right Bread: Using thick brioche or challah bread will give your French toast a rich flavor and fluffy texture. These breads soak up the egg mixture beautifully without getting too soggy. Prepare a Flavorful Egg Mixture: Whisking in cinnamon and a pinch of salt enhances the taste of the French toast. Don’t skip the cinnamon, as it adds warmth and depth to the dish. Cook at the Right Temperature: Make sure your skillet is preheated to medium heat. This ensures an even cooking process, resulting in a golden brown crust without burning. Presentation Matters: Dust the finished French toast with powdered sugar and add a drizzle of maple syrup. Garnishing with fresh strawberries and whipped cream not only makes it visually appealing but enhances the overall flavor. {{image_2}} You can switch up the fruit in your Strawberry Cheesecake French Toast. Using other berries or fruits can give you new flavors. Blueberries or raspberries work well. They add a tart taste that balances the sweetness. You can also use bananas or peaches for a different twist. Seasonal fruits are fun to try. In summer, use ripe cherries or blackberries. In fall, think about apples or pears. Each fruit brings its own taste and texture. This way, your dish stays fresh and exciting all year. If you need a gluten-free option, you can substitute the bread. Look for gluten-free brioche or challah. Many brands make tasty gluten-free bread. You can also use gluten-free pancakes for a fun change. When choosing gluten-free bread, check for texture. It should be thick enough to hold the filling. This will help you create a great sandwich. Your Strawberry Cheesecake French Toast will still taste amazing! After you enjoy your Strawberry Cheesecake French Toast, you may have leftovers. To keep them fresh, place the slices in an airtight container. You can store them in the refrigerator for up to three days. Make sure to let them cool completely before sealing the container. This way, they won’t get soggy. If you want to keep them for a longer time, freezing is a great option. Wrap each slice in plastic wrap or aluminum foil. Then, place the wrapped slices in a freezer bag. This method helps prevent freezer burn. You can freeze them for up to two months. Just remember to label the bag with the date. When it's time to enjoy your leftovers, reheating is easy. The best way to reheat Strawberry Cheesecake French Toast is in the oven. Preheat your oven to 350°F (175°C). Place the slices on a baking sheet and cover them with foil. Heat for about 10-15 minutes. This keeps them warm and crispy. You can also reheat them in a skillet. Heat a small amount of butter over medium heat. Add the slices and cook for about 2-3 minutes on each side. This method helps keep the outside crisp while warming the inside. Avoid using the microwave, as it can make the French toast soggy. Yes, you can prepare parts early. Mix the cream cheese, powdered sugar, and vanilla first. Store this filling in the fridge for up to two days. You can also slice the bread ahead of time. Just keep it in an airtight container. This way, you save time when you are ready to cook. If you want a dairy-free option, use a vegan cream cheese. Another choice is to blend silken tofu with a bit of lemon juice. It gives a similar creamy texture. You can also use cashew cream for a nutty flavor. Just soak cashews in water, then blend until smooth. To reduce calories, use whole grain bread instead of brioche. You can cut down on sugar by using less powdered sugar in the cream cheese mix. Try using honey or maple syrup instead. For a lighter touch, swap whole milk for almond milk or skim milk. In this blog, we explored how to make Strawberry Cheesecake French Toast. We covered essential ingredients, like thick brioche and a creamy filling. I shared step-by-step instructions for mixing, cooking, and serving. Tips helped you achieve the perfect texture and flavor. You can simplify this recipe with fruit swaps or gluten-free options. Finally, I gave you storage tips for leftovers. Enjoy this tasty treat with your favorite toppings. Cooking can be fun, and this dish brings joy to any breakfast table.

Strawberry Cheesecake French Toast Delightful Treat

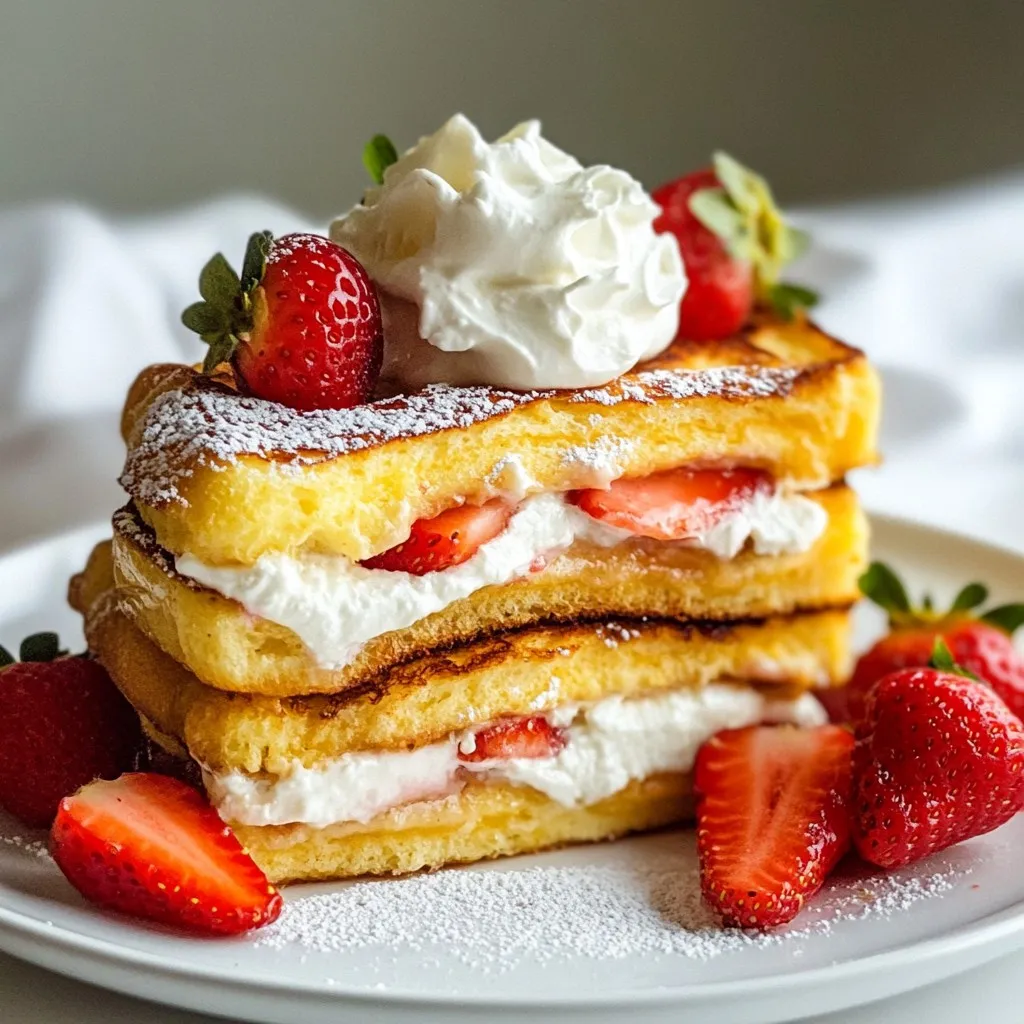
Are you ready to experience a breakfast like no other? Strawberry Cheesecake French Toast combines sweet strawberries with a creamy

- 4 cod fillets (6 oz each) - 4 tablespoons unsalted butter, melted - 4 cloves garlic, minced - 1 teaspoon lemon zest - 1 tablespoon fresh parsley, chopped - 1 teaspoon paprika - Salt and pepper to taste - Lemon wedges for serving To make this dish, you need fresh cod fillets. They should be about 6 ounces each. You'll also need unsalted butter, which you will melt for the garlic butter sauce. Minced garlic adds great flavor. Lemon zest brightens the dish, while fresh parsley gives it color. Paprika adds a nice touch and pairs well with the fish. Don't forget salt and pepper to season your cod. - Capers - Red pepper flakes - Fresh dill or thyme You can add capers for a briny taste. Red pepper flakes give a spicy kick. Fresh dill or thyme can add a nice herbal note. Feel free to mix and match these ingredients based on your taste. - Cod fillets can be replaced with haddock or tilapia. - Use olive oil instead of butter for a lighter version. - If you don't have fresh parsley, dried parsley works too. If you can't find cod, try haddock or tilapia for a similar texture. You can also swap out butter for olive oil. This can make the dish healthier. If fresh parsley is not available, dried parsley can still add flavor, though fresh is best. {{ingredient_image_1}} First, you need to pat the cod fillets dry. Use a paper towel for this task. Drying helps the fish get crispy. Place the fillets on a clean plate. Make sure they are not stacked. This will keep them intact while cooking. Next, grab a small bowl. Combine melted butter with minced garlic. Add the lemon zest for a fresh kick. Then, toss in chopped parsley, paprika, salt, and pepper. Stir until the mixture is well blended. This garlic butter will add amazing flavor to the fish. Preheat your air fryer to 400°F (200°C). Let it warm up for about 5 minutes. While it heats, brush both sides of the cod fillets with garlic butter. Save some for later. Place the fillets in the air fryer basket. Make sure there is space between them. Cook for 10-12 minutes. Check them at the 8-minute mark. The fish is done when it flakes easily. Carefully take the cod out and drizzle with the reserved garlic butter. Serve with lemon wedges on the side. Enjoy your tasty air fryer cod! To get that great crispy skin on your cod, start by patting the fillets dry. Use a paper towel to absorb any moisture. This step is key. Next, brush the cod with the garlic butter mixture. This will help the fish crisp up nicely. Don’t overcrowd the air fryer basket. Give each fillet space to circulate hot air. This ensures an even cook and perfect crisp. Cooking times depend on the thickness of your cod fillets. For fillets about 6 oz, cook for 10-12 minutes at 400°F (200°C). If your fillets are thicker, add a minute or two. Always check at the 8-minute mark. You want the fish to flake easily with a fork. This means it’s cooked just right. If you overcook it, the fish can dry out quickly. To boost the flavor of your cod, don’t skip the garlic butter mixture. The blend of garlic, lemon zest, and herbs packs a punch. If you want more zing, add extra lemon zest or a splash of lemon juice. Fresh herbs like dill or cilantro can also elevate the dish. For a smoky taste, try adding a pinch of smoked paprika instead of regular paprika. Always reserve some garlic butter for drizzling after cooking. This adds an extra layer of flavor and keeps the dish moist. Pro Tips Ensure Freshness: Always use fresh cod fillets for the best flavor and texture. Frozen fillets can work, but make sure they are fully thawed and patted dry before cooking. Perfect Butter Blend: For an extra depth of flavor, consider adding a pinch of red pepper flakes to the garlic butter mixture for a subtle kick. Keep it Crisp: Avoid overcrowding the air fryer basket. Cooking in batches ensures even cooking and a delightful crispiness. Check for Doneness: Use a fork to test for flakiness at the 10-minute mark. Cod is perfectly cooked when it flakes easily and is opaque throughout. {{image_2}} You can change the flavors of your air fryer cod easily. Try using dill, thyme, or even oregano. These herbs pair well with fish. For a spicy kick, add cayenne pepper. You can also mix in some lemon pepper for a zesty touch. Experiment with different seasonings to find what you like best. Sauces can change the taste of your dish. Instead of garlic butter, try a honey mustard glaze. Just mix honey and mustard for a sweet and tangy flavor. You could also use a creamy dill sauce. It adds a rich taste. A squeeze of lime can give a fresh twist. Think about what flavors excite your taste buds. Pair your cod with tasty sides for a complete meal. Roasted vegetables, like carrots and zucchini, make a great choice. You can also serve it with a simple salad. Quinoa or rice adds good texture and fills you up. Consider mashed potatoes for a comforting option. Each side can enhance your meal and make it more enjoyable. After enjoying your air fryer cod, store leftovers in a good way. First, let the cod cool down to room temperature. Then, place the fillets in an airtight container. Make sure to separate layers with parchment paper to avoid sticking. This helps keep the fish fresh. You can store it in the fridge for up to 3 days. When you’re ready to eat the leftovers, reheat them to keep the flavor. Preheat your air fryer to 350°F (175°C). Place the cod fillets in the basket. Heat for about 5-7 minutes. Check if it's warm throughout. The fish should be flaky and not dry. If you want, add a little garlic butter on top to boost the taste. If you have extra cod, freezing is a great option. Wrap each fillet tightly in plastic wrap. Then, place them in a freezer-safe bag. Label the bag with the date. You can freeze the cod for up to 2 months. When you're ready to cook, thaw the fillets in the fridge overnight. This keeps the texture nice when you reheat them. It takes about 10 to 12 minutes to cook cod in an air fryer. At 400°F, the fish cooks quickly and evenly. Check it at the 8-minute mark. This helps ensure it does not overcook. When done, the cod should flake easily with a fork. This quick cooking time makes air frying a great choice for busy days. Yes, you can use frozen cod fillets! Just add a few extra minutes to the cooking time. It’s best to thaw them first for even cooking. If you cook them straight from frozen, check for doneness at 12 to 15 minutes. Ensure they reach an internal temperature of 145°F to be safe. Air fryer cod pairs well with many sides. Here are some great options: - Steamed vegetables like broccoli or asparagus - A fresh green salad with lemon vinaigrette - Quinoa or rice for a hearty meal - Garlic mashed potatoes for comfort food - Crusty bread to soak up extra garlic butter These sides complement the cod's flavors nicely. Enjoy mixing and matching to find your favorite combo! In this blog post, we covered all aspects of cooking cod in an air fryer. We explored required and optional ingredients, including substitutions to suit your taste. You learned step-by-step instructions for preparation, making garlic butter, and cooking. Tips for a crispy texture and flavor enhancements were shared. We also discussed variations, storage info, and addressed common questions about cooking cod. Try these methods to enjoy perfect air-fried cod every time. Cooking can be fun and tasty!

Air Fryer Cod with Garlic Butter Delightful Recipe

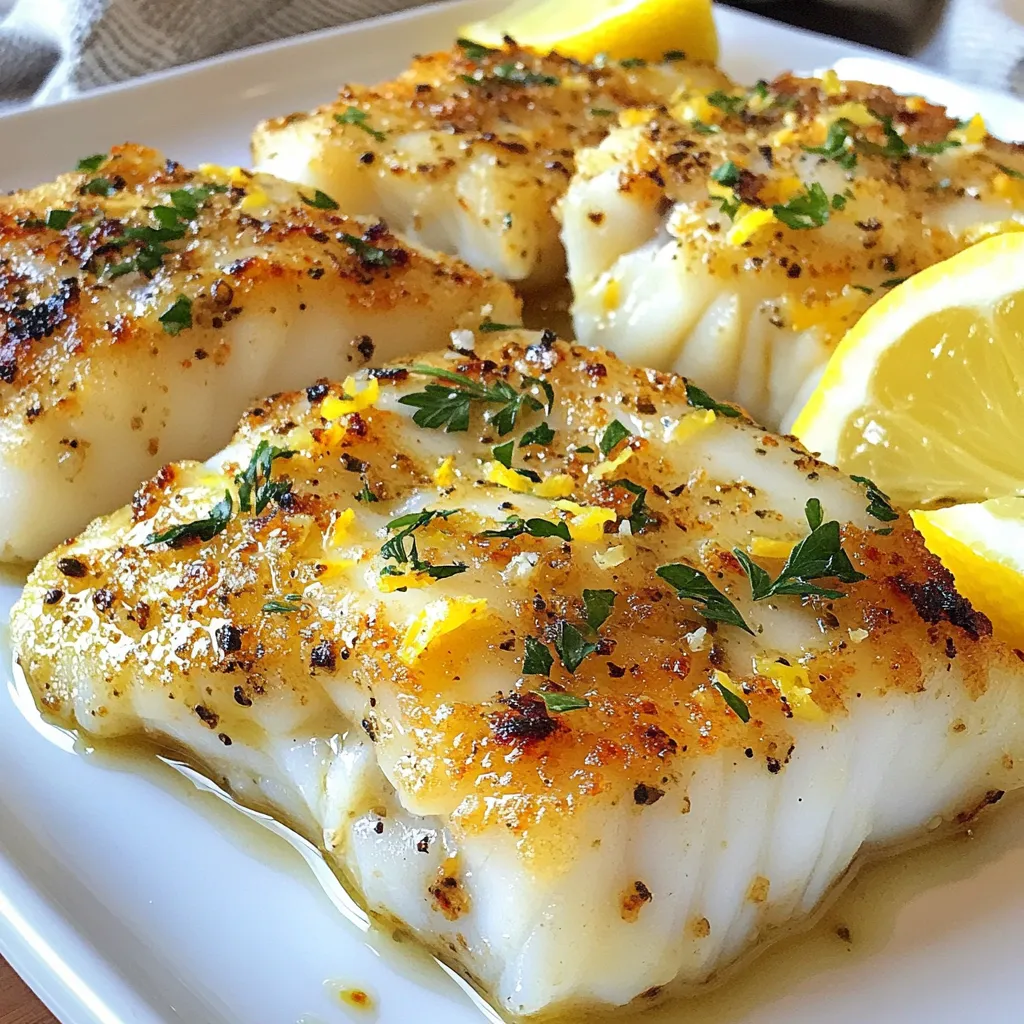
If you’re looking for a quick, tasty meal, you’re in the right place! This Air Fryer Cod with Garlic Butter

- 1.5 lbs boneless, skinless chicken thighs, sliced into strips - 2 bell peppers (red and yellow), sliced - 1 onion, sliced - 2 tablespoons olive oil - 1 tablespoon chili powder - 1 teaspoon cumin - 1 teaspoon paprika - 1/2 teaspoon garlic powder - 1/2 teaspoon onion powder - Salt and pepper to taste - 8 small tortillas (flour or corn) To make great fajitas, start with fresh chicken. I prefer boneless, skinless chicken thighs. They are tender and juicy after baking. Slice them into strips for even cooking. Next, add two bell peppers. I like the colors of red and yellow for a pop. Slice the onion to add sweetness. This mix of chicken and veggies makes the base of the dish. Now, let's talk about the seasonings. Olive oil adds richness. Chili powder gives heat. Cumin and paprika add depth and warmth. Garlic powder and onion powder enhance the flavors. Finally, season with salt and pepper to taste. This blend makes the fajitas flavorful and delicious. - Fresh cilantro - Lime wedges - Guacamole - Sour cream Toppings can make fajitas even better. Fresh cilantro adds brightness. A squeeze of lime juice gives a nice zing. Guacamole brings creaminess and flavor. Sour cream adds a cool touch. You can mix and match these toppings to suit your taste. Enjoy creating your own perfect fajitas! {{ingredient_image_1}} 1. Start by slicing the chicken thighs into strips. Aim for uniform pieces for even cooking. 2. Next, slice the bell peppers and onion. Use a mix of red and yellow peppers for color. 3. In a small bowl, mix the olive oil, chili powder, cumin, paprika, garlic powder, onion powder, salt, and pepper. This blend adds great flavor. 1. In a large mixing bowl, combine the sliced chicken, bell peppers, and onion. 2. Pour the seasoning mixture over the chicken and veggies. Toss everything well to coat. 3. Spread the seasoned mix evenly on a sheet pan. Make sure it is in a single layer for even baking. 4. Bake in a preheated oven at 400°F (200°C) for about 20-25 minutes. The chicken should be cooked through and the veggies tender. 1. While the chicken and veggies bake, warm the tortillas in a dry skillet or the oven for a few minutes. This makes them soft and pliable. 2. Once done, let the mixture cool slightly. You can serve it directly from the sheet pan for a fun, casual meal. 3. For plating, arrange warm tortillas on a plate. Serve the chicken and veggies alongside. Add toppings like cilantro, lime wedges, guacamole, or sour cream for a tasty finish. To ensure even cooking, slice the chicken and vegetables into uniform pieces. This helps everything cook at the same rate. A sharp knife makes cutting easier and safer. Keeping the chicken juicy is key. Marinating your chicken for at least 30 minutes adds flavor and moisture. Use olive oil and spices to coat the chicken well. Another tip is to check the chicken's internal temperature. It should reach 165°F (75°C) to be safe. This way, you avoid any dry bites. For a creative presentation, use a large wooden board. Arrange the fajitas with toppings around them. This makes it fun for everyone to build their own meal. When customizing fajitas for guests, set up a toppings bar. Offer options like fresh cilantro, lime wedges, guacamole, and sour cream. Let everyone choose what they like best! These tips will help you enjoy your Sheet Pan Chicken Fajitas even more. Happy cooking! Pro Tips Marinate for Extra Flavor: For enhanced flavor, marinate the chicken in the seasoning mix for at least 30 minutes or up to overnight in the refrigerator before cooking. Use Fresh Ingredients: Fresh bell peppers and onions add vibrancy and crunch to your fajitas. Choose vegetables that are firm and brightly colored. Don’t Overcrowd the Pan: Ensure there is enough space on the sheet pan for even cooking. Overcrowding can lead to steaming instead of roasting. Customize Your Toppings: Feel free to experiment with different toppings like diced tomatoes, jalapeños, or shredded cheese to personalize your fajitas. {{image_2}} You can switch out chicken for shrimp or tofu. Shrimp cooks fast and adds a nice texture. Tofu is great for a plant-based option. Make sure to press tofu to remove extra water. For veggies, try zucchini, mushrooms, or corn. Each adds a special flavor. You can mix and match based on what you have. Just remember to slice them thin for even cooking. You can play with spice levels. If you love heat, add more chili powder or a pinch of cayenne. For a milder taste, reduce the chili powder. Adding different seasonings is easy too. Try oregano, chili flakes, or even a splash of lime juice. These tweaks can change the whole dish. You can make it just right for your taste buds. To keep your fajitas fresh, use proper storage containers. I recommend airtight containers. They help prevent moisture loss and keep flavors intact. Place the fajitas in the container after they cool. Store them in the fridge. They can last for about 3 to 4 days this way. For the tortillas, keep them in a separate bag or container. This prevents them from getting soggy. If you wish to freeze the fajitas, use freezer-safe bags. Remove as much air as possible before sealing. This method keeps them good for up to 3 months. When it’s time to enjoy your leftovers, reheating is key. The best way to reheat fajitas is in a skillet. Heat it over medium heat and add a splash of water. Cover the skillet to steam the fajitas. This keeps them moist and warm. You can also use the microwave. Place the fajitas on a plate and cover them with a damp paper towel. Heat in short bursts, about 30 seconds each. Check often to avoid overheating. If you froze the fajitas, let them thaw in the fridge overnight. Then, reheat as mentioned above. Enjoying your fajitas again is a breeze! You can prep the chicken and veggies ahead of time. Slice the chicken thighs and vegetables. Place them in a bowl. Mix in the spices and olive oil. Cover the bowl and store it in the fridge for up to two days. When you’re ready to cook, spread the mixture on the sheet pan. Bake as directed. This makes for a quick meal on busy nights. Yes, you can add more vegetables for extra flavor and nutrition. Zucchini and mushrooms work well. You can also use corn or cherry tomatoes. Just make sure to cut them into similar sizes as the peppers and onions. This way, they will cook evenly. Many sides go great with chicken fajitas. Here are a few ideas: - Mexican rice - Refried beans - Black beans - Corn salad - Fresh guacamole - Chips and salsa These sides will make your meal colorful and satisfying. This article covered how to make tasty sheet pan chicken fajitas. You learned about the main ingredients, easy steps to prep and cook, and serving ideas. I hope the tips helped you achieve juicy chicken and creative presentations. You can mix up flavors with different proteins or veggies, too. With proper storage and reheating methods, you can enjoy these fajitas any time. Dive into this fun dish, and make it your own!

Sheet Pan Chicken Fajitas Quick and Tasty Meal

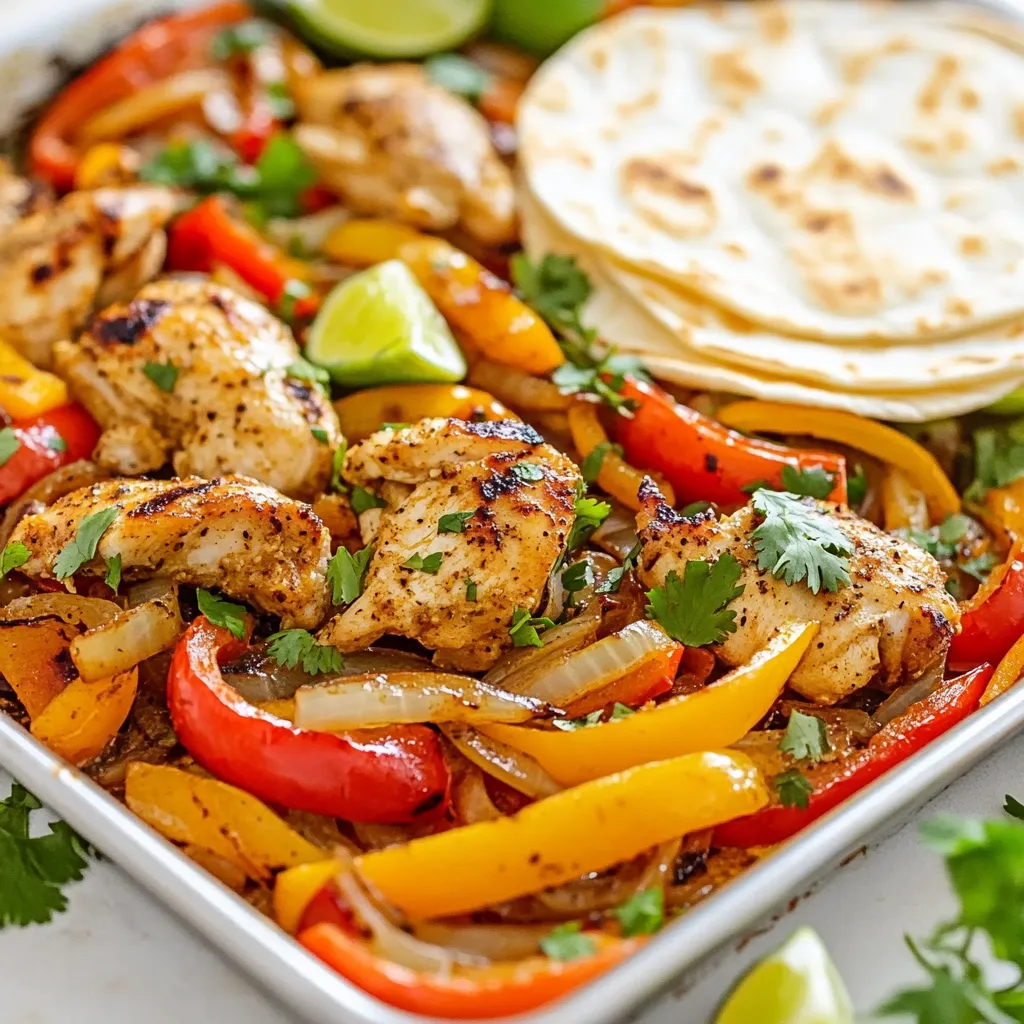
Are you ready for a quick and tasty meal that makes cooking a breeze? Sheet Pan Chicken Fajitas are your

To make honey garlic glazed meatballs, gather these key ingredients: - 1 pound ground beef (or ground turkey) - 1/2 cup breadcrumbs - 1/4 cup grated Parmesan cheese - 1/4 cup chopped fresh parsley - 1 large egg - 2 cloves garlic, minced - Salt and pepper to taste - 1/4 cup honey - 1/4 cup soy sauce - 1 tablespoon rice vinegar - 1 teaspoon sesame oil - 1 tablespoon cornstarch mixed with 2 tablespoons water (for thickening) These ingredients blend together to create juicy meatballs with a sweet and savory glaze. Garnishes add a nice touch to your meatballs. Here are a few options to consider: - Fresh chopped parsley - Sesame seeds - Sliced green onions These garnishes enhance the look and flavor of your dish. If you want to change the meat, use these alternatives: - Ground chicken for a lighter option - Ground pork for a richer flavor - Lentils for a vegetarian choice These options keep the recipe tasty while catering to different diets. {{ingredient_image_1}} Start by preheating your oven to 400°F (200°C). This is key for cooking the meatballs evenly. While the oven heats, grab a large mixing bowl. In this bowl, mix together the ground beef, breadcrumbs, Parmesan cheese, chopped parsley, the egg, minced garlic, and a sprinkle of salt and pepper. Use your hands to blend everything well. Then, roll the mixture into small balls, about one inch wide. Place these meatballs on a baking sheet lined with parchment paper, leaving space between them. Bake the meatballs in your preheated oven for 18-20 minutes. You want them to be golden brown outside and fully cooked inside. Check for doneness by cutting one open; it should have no pink inside. This step ensures that they are safe to eat and taste great. While your meatballs bake, it’s time to make the glaze. In a small saucepan, combine honey, soy sauce, rice vinegar, and sesame oil. Heat this over medium heat and stir until it starts bubbling. Then, take the cornstarch mixed with water and add it to the saucepan. Stir continuously for about 2-3 minutes until the glaze thickens. Once your meatballs are done baking, place them in a large mixing bowl and pour the thick glaze over them. Gently toss until the meatballs are well coated. Enjoy them warm! To make great meatballs, use the right mix of ingredients. Ground beef or turkey gives a nice flavor. Adding breadcrumbs keeps the meatballs moist and light. The Parmesan cheese adds richness. Always mix gently so your meatballs stay tender. Over-mixing can make them tough. Aim for golf ball-sized meatballs, about one inch wide. The glaze is key to these meatballs. Honey brings sweetness, while soy sauce adds depth. Rice vinegar helps balance the flavors. For extra flavor, try adding ginger or chili flakes. Sesame oil gives a nice nutty touch. Make sure to stir the glaze as it heats. This helps blend all the flavors well. Thicken it for a saucy, sticky finish. One common mistake is overcooking the meatballs. Watch them closely in the oven. They should be golden brown, not dry. Another mistake is not mixing the glaze enough. If you skip stirring, the flavors won’t blend well. Lastly, don’t skip the garnishes! They add color and flavor. Fresh parsley or sesame seeds make a big difference. Pro Tips Use Fresh Ingredients: Fresh garlic and parsley can significantly enhance the flavor of your meatballs, giving them a vibrant taste that dried herbs simply can’t match. Control the Size: Make sure all meatballs are uniform in size, about 1 inch in diameter, so they cook evenly and are easy to serve. Experiment with Proteins: Feel free to swap ground beef for ground turkey, chicken, or even plant-based alternatives for a healthier or different flavor profile. Add Some Heat: For a spicy kick, consider adding a pinch of red pepper flakes or a dash of sriracha to the glaze for a delightful contrast to the sweetness of the honey. {{image_2}} You can make this dish lighter by using ground turkey or chicken. These meats are lower in fat but still tasty. Just be aware that turkey and chicken can dry out faster than beef. To keep them moist, add a bit more honey or a splash of broth to the mix. Ground chicken or turkey will still soak up that delicious honey garlic glaze. Want to spice things up? You can add red pepper flakes for heat or sriracha for a kick. If you prefer a sweeter taste, add a splash of orange juice or zest to the glaze. You can also try teriyaki sauce instead of soy sauce for a fun twist. Each flavor change gives you a new way to enjoy these meatballs. You have options when it comes to cooking. A slow cooker is great for busy days. Just mix the meatballs, pour in the glaze, and let it cook on low for several hours. This method makes them extra tender. If you prefer, you can cook them on the stovetop in a skillet. Brown them first, then add the glaze. This way, you can enjoy the rich flavors in less time. Honey garlic glazed meatballs shine on their own but pair well with sides. Here are some great options: - Steamed rice or fried rice: Both soak up the sweet glaze. - Roasted vegetables: Carrots, broccoli, and bell peppers add crunch. - Noodles: Serve with plain or stir-fried noodles for a filling meal. - Salad: A fresh green salad adds a nice balance to the dish. Serving your honey garlic glazed meatballs can be fun! Here are some creative ideas: - Skewers: Thread meatballs on sticks for easy eating at parties. - Sliders: Place meatballs in small buns for tasty sliders. - Taco-style: Use tortillas and top with meatballs, slaw, and sauce. - Over grains: Serve on a bed of quinoa or farro for a healthy twist. These meatballs are perfect for meal prep. Here’s how to do it: - Batch cook: Make a double batch to save time. - Store properly: Place cooled meatballs in airtight containers. - Refrigerate: They last up to four days in the fridge. - Freezing: Freeze meatballs for up to three months. Just thaw before reheating. Using these ideas, you can enjoy honey garlic glazed meatballs in many ways! You can tell meatballs are done when they are golden brown. Use a meat thermometer for safety. The inside should reach 160°F (71°C) for beef and 165°F (74°C) for turkey. If you cut one open, it should be no longer pink inside. The juices should run clear. This ensures they are safe to eat and taste great. Yes, you can freeze these meatballs! Let them cool completely before freezing. Place them in a single layer on a baking sheet. Once frozen, transfer them to a freezer-safe bag or container. They will keep well for up to three months. This is great for quick meals later! For the best results, reheat meatballs in the oven. Preheat the oven to 350°F (175°C). Place meatballs on a baking sheet and cover them with foil. Heat for about 10-15 minutes until warmed through. You can also reheat them in a skillet over medium heat. Add a splash of water to keep them moist. Enjoy your tasty treat! In this post, we explored every aspect of making delicious glazed meatballs. We covered the main ingredients, preparation steps, and helpful tips for perfect texture and flavor. You learned about variations, including healthier options and different cooking methods. Keep these tips in mind to avoid common mistakes and serve your meatballs with the best pairings. With practice, you’ll master this dish and impress everyone at your table. Enjoy experimenting with flavors and making it your own!

Honey Garlic Glazed Meatballs Simple and Tasty Treat

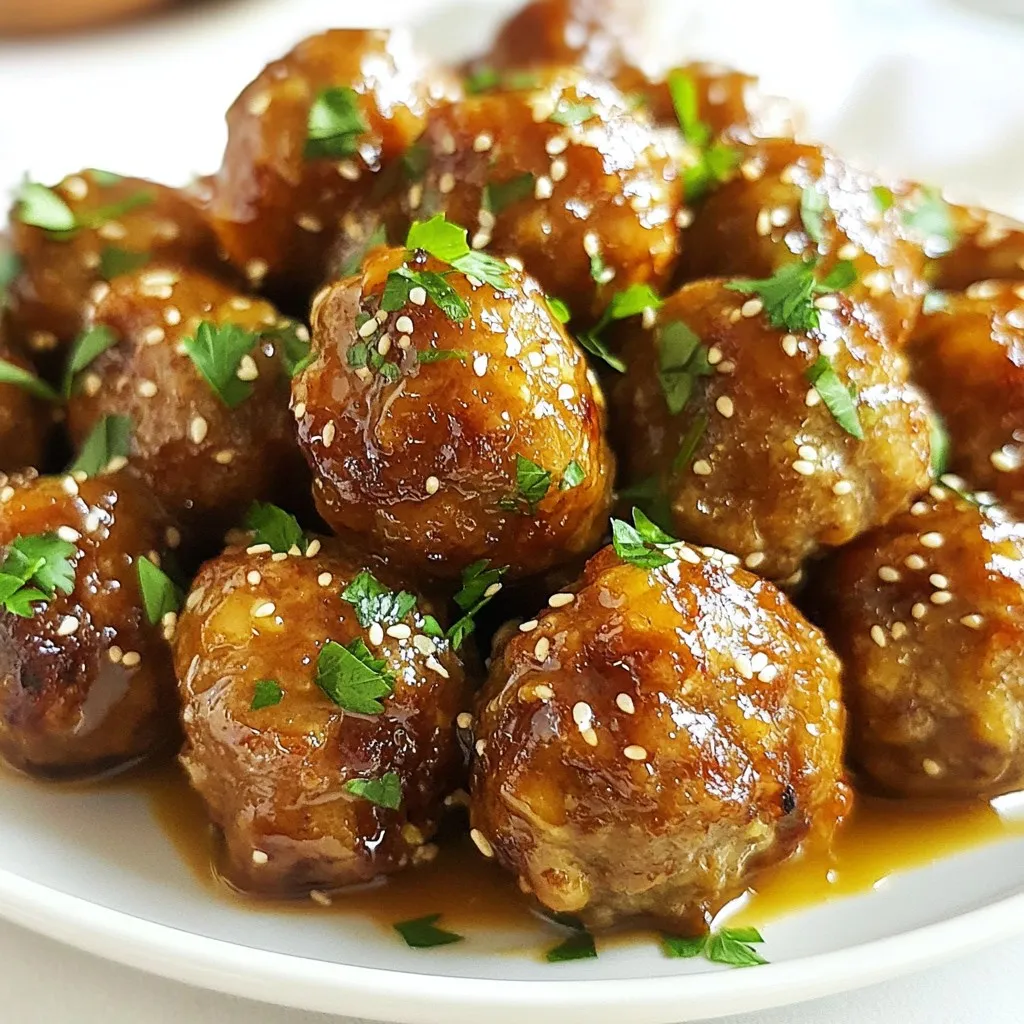
Are you ready to impress your family with a dish that’s both easy and delicious? Honey Garlic Glazed Meatballs are

To make S'mores Rice Krispie Treats, you need a few simple ingredients. Here’s what you will need: - 5 cups Rice Krispies cereal - 1 bag (10 oz) mini marshmallows - 1/4 cup unsalted butter - 1 cup graham cracker crumbs - 1/2 teaspoon vanilla extract - 1 cup chocolate chips (semi-sweet or milk chocolate) - Extra mini marshmallows for topping Each ingredient plays a key role. The Rice Krispies give the treats their crunch. Mini marshmallows provide gooey sweetness. Unsalted butter helps bind the mix and adds flavor. Graham cracker crumbs give that classic s'mores taste. Vanilla extract enhances the overall flavor. Chocolate chips add richness, while extra mini marshmallows on top make it extra fun. With these ingredients, you can create a treat that is easy to make and delicious to eat. You will love how they come together! {{ingredient_image_1}} Start by greasing a 9x13 inch baking dish. Use butter or cooking spray so the treats do not stick. This step is key for easy removal later. In a large saucepan, heat the butter over medium heat. Once melted, add the mini marshmallows. Stir continuously until they melt and become smooth. Remove the pan from the heat. This creates a sticky base for your treats. Next, stir in the vanilla extract and graham cracker crumbs. Mix well until everything is combined. The mixture should feel thick and sticky. This gives your treats that classic s'mores flavor. Now, gradually add the Rice Krispies cereal. Stir gently to coat each piece in the marshmallow mix. The mixture should be sticky but hold together well. This step ensures every bite is delicious. Fold in the chocolate chips until they are evenly mixed in. You can save some chips to sprinkle on top. This adds an extra touch of sweetness and looks great too. Transfer the mixture to the prepared baking dish. Press it down firmly using a spatula or parchment paper. Sprinkle extra mini marshmallows and reserved chocolate chips on top. Allow the treats to cool for about 30 minutes. Once set, cut them into squares or rectangles. Enjoy the sweet and gooey goodness! To melt marshmallows well, use low heat. Start with the butter in your pan. Stir it until it melts. Then add mini marshmallows. Keep stirring until they are smooth. This helps avoid burning. If the mixture is too sticky, add a little more butter. The right texture is key for S'mores Rice Krispie Treats. Mix the marshmallow and cereal well. The mix should be sticky but not too wet. If it feels dry, you can add a bit of melted butter. Press the mixture firmly into the pan. This helps it hold its shape when cooled. Some tools make this recipe easier. A large saucepan is a must for melting. Use a spatula to mix the ingredients. A 9x13 inch baking dish works great for shaping. Parchment paper can help with easy cleanup. If you have a butter spray, use it to grease the pan. This prevents sticking and makes serving simpler. Pro Tips Use Fresh Ingredients: Always use fresh mini marshmallows and chocolate chips for the best flavor and texture in your treats. Don’t Overheat the Marshmallows: Melt the marshmallows gently over medium heat to avoid burning, which can change the flavor. Press Firmly: When pressing the mixture into the baking dish, use a spatula or your hands (dampened with water) to ensure a compact layer that holds together well. Storage Tips: Store your S'mores Rice Krispie Treats in an airtight container to keep them fresh and chewy for longer. {{image_2}} You can make these treats even tastier by adding nut butter. Peanut butter or almond butter works well. Just stir in about 1/2 cup of your favorite nut butter when you melt the marshmallows. This adds a rich flavor and a creamy texture. Plus, it gives a nice twist to the classic S'mores taste. Feel free to switch up the chocolate! Dark chocolate, white chocolate, or even flavored chocolate can change the whole vibe. Use the same amount, about 1 cup, for a new taste. Mixing chocolates can also create a fun marble effect. Don’t be afraid to experiment with chocolate combinations to find your perfect mix. You can add more goodies to your S'mores Rice Krispie Treats. Chopped nuts like pecans or walnuts add crunch. You can also add dried fruit, like cherries or cranberries, for sweetness. Just remember to keep the total mix at about 1 to 1.5 cups. This way, you keep the treats balanced and delicious! To keep your S'mores Rice Krispie Treats fresh, store them in an airtight container. This helps prevent them from getting hard or stale. You can stack them in layers. Just place parchment paper between layers to avoid sticking. These treats taste best within the first week. However, you can keep them in a cool, dry place. Avoid storing them in the fridge, as this can make them too hard. If you notice any signs of dryness, add a slice of bread to the container. The bread will help them stay soft. You can freeze S'mores Rice Krispie Treats if you want to save some for later. Wrap each piece tightly in plastic wrap. Then, place the wrapped pieces in a freezer bag. They can last up to three months in the freezer. When you are ready to enjoy them, let them thaw at room temperature. To make S'mores Rice Krispie Treats, start by greasing a 9x13 inch baking dish. In a large saucepan, melt 1/4 cup of unsalted butter over medium heat. Add 10 oz of mini marshmallows and stir until they melt completely. Remove from heat, then mix in 1/2 teaspoon of vanilla extract and 1 cup of graham cracker crumbs. Gently fold in 5 cups of Rice Krispies cereal, followed by 1 cup of chocolate chips. Press the mixture into the baking dish and top with extra mini marshmallows. Let it cool for about 30 minutes before cutting into squares. Yes, you can use homemade marshmallows! Just ensure they are soft and sticky. This will help them blend well with the butter. Homemade marshmallows can add a fresh flavor to your treats. However, the texture may differ slightly from using store-bought mini marshmallows. Yes, S'mores Rice Krispie Treats can be gluten-free. Simply use gluten-free Rice Krispies and graham crackers. Always check your ingredient labels to confirm they meet your needs. This way, everyone can enjoy these tasty treats without worry. These treats last about one week when stored in an airtight container. Keep them at room temperature. For longer freshness, you can store them in the fridge, but they may become a bit firmer. Absolutely! You can swap out chocolate chips for dairy-free ones if needed. Use coconut oil instead of butter for a dairy-free option. If you have nut allergies, avoid any nut butters or toppings. Always choose replacements that suit your dietary needs. In this post, we explored how to make S'mores Rice Krispie Treats. We covered key ingredients like Rice Krispies, mini marshmallows, and chocolate chips. I shared a simple step-by-step guide to help you create this tasty treat. We also discussed tips for perfect texture and storage techniques. These treats are fun to make and enjoy. Try adding nut butters or different chocolates for variety. Get creative and make this recipe your own!

S’mores Rice Krispie Treats Easy and Delicious Recipe

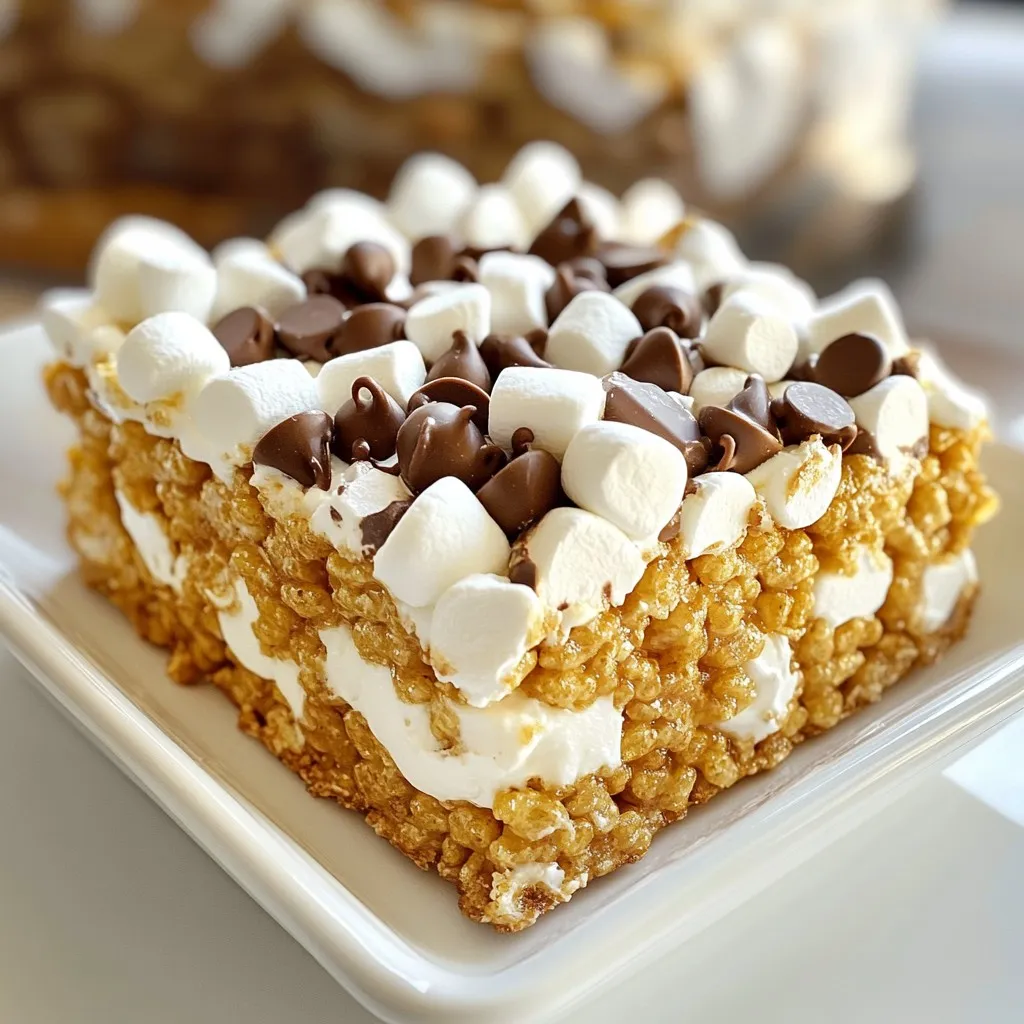
Looking for a quick and fun treat that combines your favorite flavors? You’ll love my S’mores Rice Krispie Treats! This

To make a delicious Iced Matcha Dalgona Latte, you need matcha powder. I recommend using high-quality matcha. It gives the drink a vibrant green color and a rich taste. For this recipe, you will need 2 tablespoons of matcha powder. Combine it with 2 tablespoons of hot water. The hot water helps dissolve the matcha, making it smooth and frothy. Sweetness is key in this drink. You can choose any sugar you like. For this recipe, I use 2 tablespoons of sugar, but you can adjust it to taste. White sugar works well, but you can also try brown sugar or coconut sugar for a different flavor. Experimenting with sugar can change the taste and make it special. Milk adds creaminess to the latte. You can use any milk you prefer. Dairy milk gives a rich texture, while non-dairy milk is a great choice for a lighter option. Almond milk, oat milk, or soy milk all work well. For this recipe, use 1 cup of your chosen milk. Make sure to fill your glass about three-quarters full. This allows room for the ice and the matcha mixture on top. {{ingredient_image_1}} Start by adding 2 tablespoons of matcha powder into a mixing bowl. Next, pour in 2 tablespoons of hot water. Use a bamboo whisk or an electric mixer to blend these together. Whisk until the mixture is smooth and frothy. This step is crucial for the best flavor. Now, it's time to add sweetness. Gradually mix in 2 tablespoons of sugar. Keep whisking until the matcha becomes thick and creamy. This should take around 2 to 4 minutes. When it is ready, it will hold its shape well. The right texture is key for a great drink. Grab a tall glass and fill it with ice cubes. Pour in the milk, leaving some space at the top. Aim to fill the glass about three-quarters full. Now, gently spoon the whipped matcha mixture on top of the milk. This creates a lovely layered look. If you like, sprinkle a pinch of sea salt for extra flavor. You can also add whipped cream on top for a treat. Finally, to enjoy, stir the matcha into the milk before drinking. This blends all the delicious flavors together. To whisk matcha well, use a bamboo whisk or an electric mixer. Start with 2 tablespoons of matcha powder and 2 tablespoons of hot water. Mix until smooth and frothy. I like to use a gentle back-and-forth motion. This helps blend the matcha better. Whisk for about 2-4 minutes until it gets thick and creamy. This step is key for a great Dalgona texture. You can adjust the sweetness to your taste. Start with 2 tablespoons of sugar. Mix it in slowly as you whisk. If you want it sweeter, add more sugar a little at a time. Remember, the matcha flavor can be strong. Finding the right sweetness will make your drink just right. Feel free to use alternatives like honey or agave syrup too. For the best experience, use a tall glass and fill it with ice cubes first. Pour in 1 cup of milk, leaving some space for the matcha. Spoon the whipped matcha mixture on top for a lovely layered look. You can add a pinch of sea salt for extra flavor. If you want to indulge, top it with whipped cream. This drink looks great and tastes even better! Pro Tips Quality Matcha Matters: Use high-quality, finely ground matcha for the best flavor and vibrant color in your latte. Whisking Technique: Whisk vigorously to achieve a frothy texture; a bamboo whisk is traditionally preferred for matcha preparation. Sweetness Adjustments: Start with less sugar and adjust to your taste; you can also experiment with alternatives like honey or agave syrup. Milk Choice: Experiment with different types of milk, such as almond or oat milk, to find your preferred flavor and texture. {{image_2}} You can choose between dairy and non-dairy milk for your Iced Matcha Dalgona Latte. Dairy milk gives a rich, creamy taste. You can use whole, skim, or even oat milk. Non-dairy options like almond, coconut, or soy milk are great too. Each type of milk offers a unique flavor. Experiment to find your favorite! Adding flavors can make your latte even more special. You can stir in vanilla extract for warmth. If you love chocolate, try adding cocoa powder or chocolate syrup. These flavors blend well with matcha. You can also add a sprinkle of cinnamon for a spicy twist. Get creative and mix flavors that you enjoy! To make a vegan Iced Matcha Dalgona Latte, simply use non-dairy milk. Almond, oat, or soy milk work well. For sweetening, you can replace sugar with maple syrup or agave nectar. This keeps your drink plant-based and delicious. You still get all the creamy goodness without any animal products. Enjoy your vegan treat! If you have extra matcha mixture, store it in a sealed container. Keep it in the fridge for up to two days. When you’re ready to use it, just give it a good whisk again. This helps restore its creamy texture. Store matcha powder in a cool, dark place. Use an airtight container to keep it fresh. Sugar can be stored in any dry spot. Milk should stay in the fridge, and use it before the expiration date. Ice cubes can stay in the freezer for long-term use. You can use leftover milk for smoothies or cereal. Leftover sugar can be added to your morning coffee or tea. If you have extra whipped cream, top it on desserts or hot drinks. Be creative and enjoy your ingredients in new ways! Dalgona coffee is a whipped coffee drink. It has a creamy top layer made from coffee, sugar, and hot water. You whip these ingredients together until they form soft peaks. Then, you spoon it over milk. The drink became popular during the pandemic. It is simple yet fun to make. Matcha is a type of green tea with many health benefits. It is rich in antioxidants, which help fight free radicals. Matcha can boost your metabolism, helping with weight control. It also has L-theanine, which promotes calmness and focus. Drinking matcha may support heart health and improve brain function. Yes, you can use flavored syrups in your Iced Matcha Dalgona Latte. Vanilla, caramel, or hazelnut syrups can add sweetness and flavor. Just mix a little syrup into the milk before pouring. This customization can make your drink unique and more enjoyable. Remember to adjust the sugar amount in the matcha mix if you add syrup. In this post, we covered how to make a delicious Iced Matcha Dalgona Latte. You learned about matcha powder, sweetener options, and milk types. We shared step-by-step instructions for preparing the matcha and achieving the perfect consistency. We also gave tips for whisking and customizing your drink. Remember, you can experiment with dairy and non-dairy milks. You have the power to make this drink your own. With quick storage tips and answers to common questions, you'll be ready to enjoy this treat anytime. Dive in, get creative, and elevate your matcha game!

Iced Matcha Dalgona Latte Delightful and Refreshing Drink

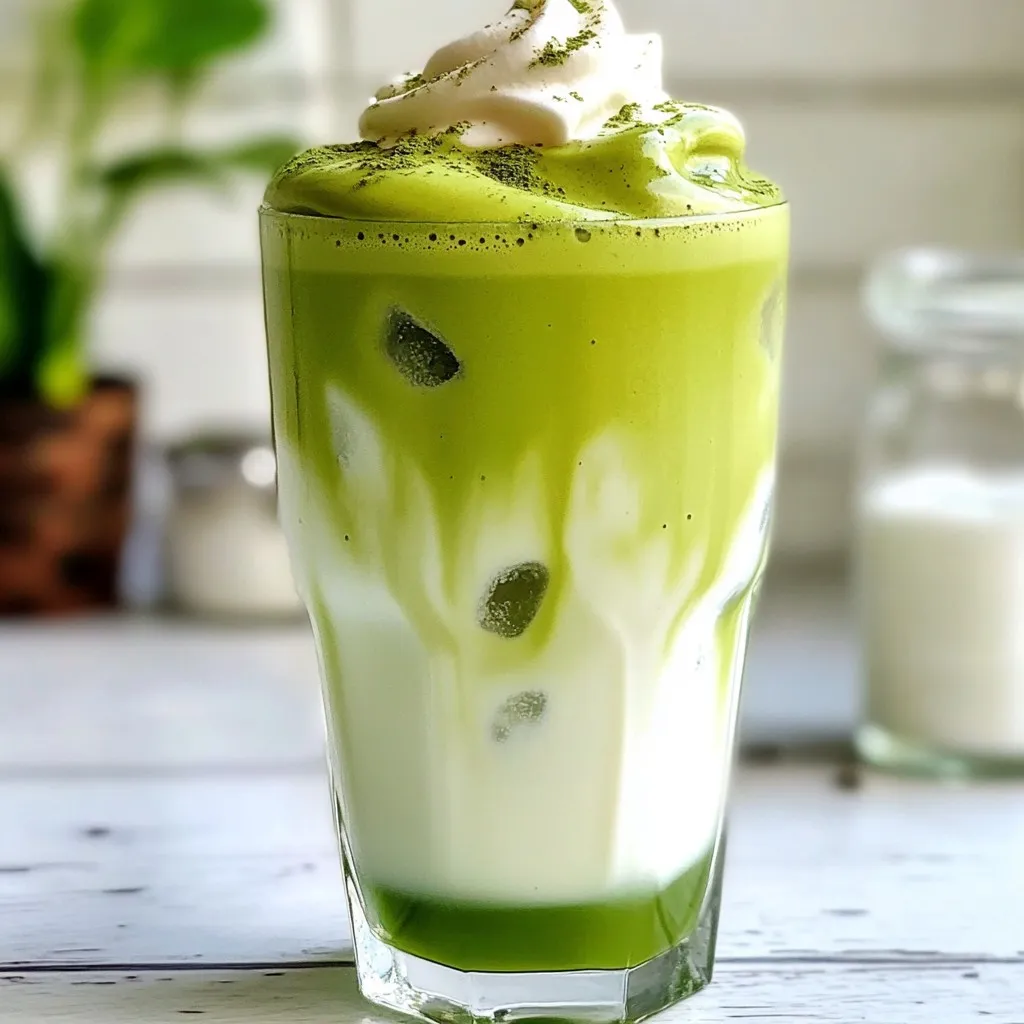
Ready to sip on something both refreshing and delightful? The Iced Matcha Dalgona Latte is your new go-to drink! By

- 1 cup rolled oats - 1/2 cup creamy peanut butter - 1/3 cup honey or maple syrup - 1/4 cup unsweetened cocoa powder - 1/2 cup mini chocolate chips - 1/4 cup chia seeds - 1/2 teaspoon vanilla extract - A pinch of salt You can swap honey for maple syrup if you want a vegan treat. Use crunchy peanut butter for extra texture. Whole oats are great, but quick oats work, too. If you want less sugar, cut back on chocolate chips. You can also use dark chocolate chips for a richer taste. For a nut-free option, try sun butter instead of peanut butter. Choose natural peanut butter with only nuts and salt. Avoid added sugars or oils. For cocoa powder, look for unsweetened and high-quality brands. Chia seeds should be fresh for the best health benefits. Always check for freshness on oats and avoid any that smell off. Quality ingredients boost flavor and nutrition in these energy balls. {{ingredient_image_1}} Start by gathering all your ingredients. You will need rolled oats, cocoa powder, chia seeds, salt, creamy peanut butter, honey or maple syrup, vanilla extract, and mini chocolate chips. In a large mixing bowl, combine the rolled oats, cocoa powder, chia seeds, and a pinch of salt. Mix these dry ingredients well. In another bowl, add the creamy peanut butter, honey (or maple syrup), and vanilla extract. Stir until smooth and creamy. Gradually mix this wet blend into the dry ingredients. Keep stirring until you see no dry oats. Now, fold in the mini chocolate chips. Make sure they are evenly spread throughout the mixture. Once everything is mixed, it’s time to roll the energy balls. Always mix the wet and dry ingredients separately first. This way, you ensure an even blend. When you add the wet mixture to the dry, do it slowly. This helps all the oats and seeds get coated well. If the mixture feels too dry, add a little more peanut butter or honey. If it’s too wet, add more oats. When rolling the balls, wet your hands slightly. This helps prevent the mixture from sticking to your fingers. Aim for about one inch in diameter for each ball. Place them on a tray lined with parchment paper. Once rolled, refrigerate them for at least 30 minutes. This helps them firm up and makes them easier to eat. Store your energy balls in an airtight container to keep them fresh. Chocolate peanut butter energy balls offer many health benefits. They contain rolled oats, which are full of fiber. Fiber helps keep your digestion smooth and steady. Creamy peanut butter gives protein and healthy fats. This helps you feel full longer. Honey or maple syrup adds natural sweetness and energy. Cocoa powder is packed with antioxidants, which are good for your body. Chia seeds provide Omega-3 fatty acids, which support heart health. Each ingredient works together to make these energy balls a smart choice for snacks. Each serving, about one energy ball, has: - Calories: 130 - Protein: 4g - Carbohydrates: 18g - Fiber: 3g - Sugars: 6g - Fats: 6g These numbers can vary based on your exact ingredients. Check your brands for more detail. This breakdown shows that energy balls can fit well into a healthy diet. These energy balls are perfect for a quick boost. The carbs from oats and honey give you fast energy. The protein from peanut butter helps keep your energy steady. Chia seeds provide lasting power, too. When you need a snack before a workout or during the day, these energy balls are a great choice. They are easy to grab and eat on the go, making them a smart option for busy days. Pro Tips Use Natural Sweeteners: Instead of honey or maple syrup, try using agave or date syrup for a different flavor profile and potential health benefits. Experiment with Add-Ins: Feel free to add nuts, seeds, or dried fruits for extra texture and nutritional value in your energy balls. Adjust Consistency: If the mixture is too crumbly, add a bit more peanut butter or a splash of milk. If it's too sticky, sprinkle in a little more oats. Chill Before Serving: Allow the energy balls to chill in the refrigerator for at least 30 minutes to help them firm up and make them easier to handle. {{image_2}} When making these energy balls, avoid using dry oats. They must be rolled oats for the best texture. If your mix is too dry, add a bit more peanut butter or honey. Also, don’t skip the chilling step. This helps the balls hold their shape. If they are too soft, they will fall apart easily. To boost flavor, use high-quality cocoa powder. This makes a big difference. You can also mix in a pinch of sea salt to enhance the sweetness. If you want more crunch, add chopped nuts like almonds or walnuts. For extra sweetness, you can add a bit more honey or maple syrup. You can even swap mini chocolate chips for dark chocolate chunks for a richer taste. Use a good mixing bowl that is big enough for all your ingredients. A silicone spatula works well for mixing. For rolling the balls, your hands are the best tool. If you want to keep your hands clean, use a cookie scoop. Finally, have parchment paper ready for the tray. This makes cleanup easy and keeps the balls from sticking. You can change up the flavor of these energy balls easily. Try adding different nuts, like almonds or walnuts. You can chop them finely and mix them in. Dried fruits, like raisins or cranberries, also work well. They add a nice chewiness and sweetness. If you want a tropical twist, add shredded coconut. You can even swap the mini chocolate chips for white or dark chocolate chips. These energy balls can fit many diets. To make them gluten-free, ensure your oats are labeled as gluten-free. You can also make them vegan by using maple syrup instead of honey. For a nut-free option, use sunflower seed butter instead of peanut butter. This keeps the recipe safe for those with nut allergies. Serve these energy balls as a snack or breakfast on the go. They work great for kids in lunchboxes. You can also enjoy them after a workout for a quick energy boost. Pair them with a piece of fruit or yogurt to make a balanced meal. For a fun touch, roll the balls in crushed nuts or cocoa powder for extra texture. Store your chocolate peanut butter energy balls in an airtight container. This keeps them fresh and tasty. Place a piece of parchment paper between layers if you stack them. This will help avoid sticking. You can keep them in the fridge for up to a week. If you want to keep them longer, freezing is a great option. Place the energy balls in a single layer on a tray. Freeze them for about one hour. Once firm, transfer them to a freezer-safe bag. Remove as much air as possible before sealing. They can last in the freezer for up to three months. Just thaw them in the fridge before enjoying. These energy balls taste best when fresh. However, they do have a decent shelf life. In the fridge, they stay tasty for about seven days. If you freeze them, they can last much longer. Always check for any changes in texture or smell before eating. This way, you enjoy only the best bites. To make these energy balls vegan, swap honey for maple syrup. Both sweeteners work well. Use a plant-based nut butter like almond or cashew. This keeps the recipe free from animal products. Follow the same steps in the recipe, and you'll have tasty vegan energy balls. Yes, you can use other nut butters! Almond butter or cashew butter are great choices. Just keep the same amount as peanut butter. Each nut butter adds its unique flavor and texture. Experiment to find your favorite mix! You can keep these energy balls in the fridge for up to one week. Store them in an airtight container to keep them fresh. If you want them to last longer, freeze them! They can be frozen for about three months. Just thaw them when you want a quick snack. In this post, we explored how to make energy balls. We covered ingredients, preparation steps, and nutritional facts. You learned the best practices for mixing and rolling, plus tips to avoid mistakes. We also shared storage tips to keep them fresh longer. Lastly, we discussed variations to fit your taste and diet. Try out your new skills and enjoy delicious, healthy snacks!

Chocolate Peanut Butter Energy Balls Healthy Snack Idea

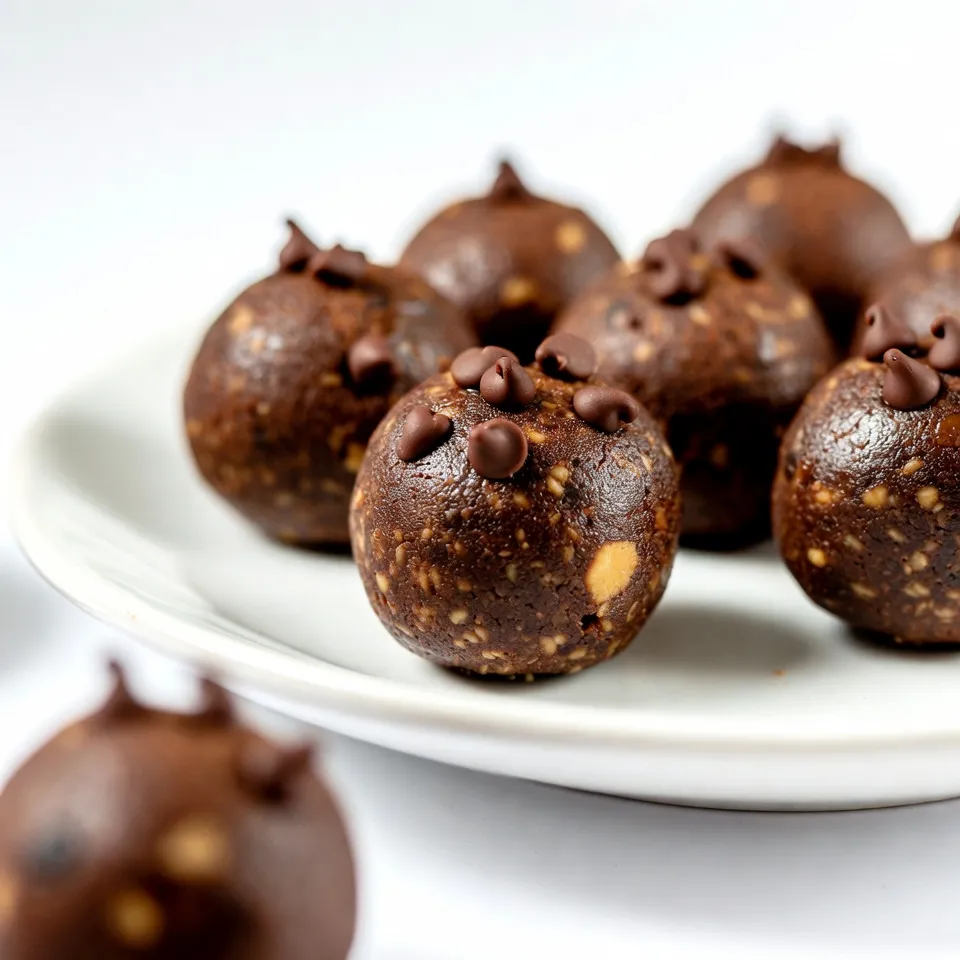
Looking for a quick, tasty snack that fuels your day? Chocolate Peanut Butter Energy Balls pack a punch of flavor

- 3 cups Rice Chex cereal - 3 cups Corn Chex cereal - 3 cups Wheat Chex cereal - 1 cup mini pretzels - 1 cup mixed nuts (almonds, cashews, walnuts) - 1 cup holiday M&M's or chocolate candies - 1 cup popcorn (popped, unsalted) First, gather your main ingredients. Rice Chex, Corn Chex, and Wheat Chex form the base of this snack. They give it a great crunch. The mini pretzels add a salty twist. I love using mixed nuts to bring in some healthy fats and protein. Next, you will want to add some fun! Holiday M&M's or chocolate candies bring sweetness and color. Finally, the popped popcorn adds lightness and a delightful texture. This mix of flavors and textures makes the perfect Chex mix. - 1 stick unsalted butter (melted) - 1/4 cup Worcestershire sauce - 1 teaspoon garlic powder - 1 teaspoon onion powder - 1 teaspoon smoked paprika - 1 teaspoon cayenne pepper (optional for a kick) - Salt to taste Now let’s move on to the coating ingredients. The melted butter adds richness and helps the seasonings stick. Worcestershire sauce gives it a savory depth. Garlic powder and onion powder add warmth and flavor. Smoked paprika brings a hint of smoke. If you like heat, you can add cayenne pepper for a spicy kick. Don’t forget the salt! It helps to balance all the flavors. Using these ingredients, you can create a tasty coating that will make your Chex mix truly special. Happy snacking! {{ingredient_image_1}} 1. Preheating the oven: Start by preheating your oven to 250°F (120°C). This low heat helps the flavors blend well. Line your baking sheet with parchment paper for easy cleanup. 2. Combining dry ingredients: In a large mixing bowl, add 3 cups each of Rice Chex, Corn Chex, and Wheat Chex. Then, toss in 1 cup of mini pretzels, 1 cup of mixed nuts, 1 cup of holiday M&M's, and 1 cup of popped popcorn. Make sure to mix well so everything is spread out evenly. 3. Preparing the coating: In another bowl, mix 1 stick of melted unsalted butter, 1/4 cup of Worcestershire sauce, and spices: 1 teaspoon each of garlic powder, onion powder, smoked paprika, and optional cayenne pepper. Add a pinch of salt. Whisk until it’s smooth and well combined. 1. Mixing everything together: Pour the butter mixture over your dry ingredients. Use a spatula to gently fold everything together. You want to coat each piece lightly without breaking the cereal. 2. Baking instructions: Spread the Chex mix evenly on your prepared baking sheet. Bake in your preheated oven for about 1 hour. Stir the mix every 15 minutes to ensure even toasting and avoid burning. 3. Cooling down the Chex mix: Once the hour is up, take the Chex mix out of the oven. Let it cool completely on the baking sheet. As it cools, it will become crisp and crunchy, making it perfect for snacking. To make the best Holiday Chex Mix, even coating is key. Start by mixing the dry ingredients well. This step helps all the flavors spread evenly. When baking, stir the mix every 15 minutes. This ensures each piece toasts evenly. It also prevents burning and keeps everything crunchy. Cooling is vital for crispiness. Let the mix cool completely on the baking sheet. As it cools, it will become crispier. Don’t rush this step for the best texture. For a festive touch, use a holiday-themed bowl to serve your Chex mix. You can also create small gift bags. Fill them with the mix and tie with ribbons. This makes a great snack for friends and family. Get creative with your packaging. You can use clear bags or small jars. Label them with fun tags. This adds a personal touch to your gifts. Pro Tips Mix It Up: Feel free to customize the nuts and snacks based on your preference or what you have on hand. Different combinations can create unique flavors! Add Some Sweetness: For a sweeter twist, consider adding white chocolate chips or dried fruit to the mix. This can balance the savory flavors beautifully. Storage Solutions: Store the Chex mix in an airtight container at room temperature to keep it fresh. It can last for up to two weeks if stored properly. Perfect for Gifting: Package the Chex mix in mason jars or festive bags with a ribbon for a delightful homemade gift during the holiday season. {{image_2}} You can easily change the taste of your Chex mix. For sweet versions, try adding dried fruits like cranberries or raisins. You can also mix in chocolate chips or holiday M&M's for a fun twist. They add color and joy to each bite. For a savory twist, you can play with spices. Adding ranch seasoning gives a tasty kick. You can also try using paprika or garlic powder for extra flavor. A dash of cayenne pepper can spice things up too. This makes your Chex mix unique and fun for everyone at the party. If you need gluten-free options, you can use gluten-free Chex cereals. They work just as well in this recipe. Make sure to check the labels when you shop. For nut-free alternatives, just skip the mixed nuts. You can replace them with more pretzels or even seeds. This way, everyone can enjoy the snack without worry. Adjusting the recipe makes it friendly for all diets. To keep your Holiday Chex Mix fresh, store it in an airtight container. Glass jars or plastic bins work well. This helps keep moisture out and maintains crunch. When stored properly, your Chex mix lasts up to two weeks. If you want it to stay fresh longer, think about freezing. Yes, you can freeze Chex mix! Freezing keeps it fresh for months. To freeze, first let the mix cool completely. Then, place it in a freezer-safe bag or container. Be sure to push out as much air as possible. When you're ready to eat, take it out and let it thaw at room temperature. Enjoy your Chex mix without losing any taste! How do I make Chex mix without nuts? To make Chex mix without nuts, simply skip the mixed nuts. You can add more pretzels or popcorn. You can also try adding seeds, like pumpkin or sunflower seeds, for crunch. Can I make Chex mix ahead of time? Yes, you can make Chex mix ahead of time. It stays fresh for several days. Just store it in an airtight container. This makes it easy for your holiday parties. What else can I add to my Chex mix? You can add many fun things to your Chex mix. Try including dried fruit, chocolate chips, or cheese crackers. Different spices can also change the flavor. Explore what you like best! How do I store leftover Chex mix? Store leftover Chex mix in an airtight container. Keep it in a cool, dry place. It will stay fresh for about a week. If you want to keep it longer, you can freeze it. You learned how to make a tasty Chex mix. We discussed the main ingredients, coating ingredients, and step-by-step instructions. I shared tips for perfecting your mix and creative variations. You also found ways to store your mix for later. This snack is easy to adapt and fun to make. Enjoy sharing your delicious creation with friends and family. Whether sweet or savory, Chex mix can fit any occasion. Get creative and make it your own!

Holiday Chex Mix Delightful Snack for Festive Gatherings

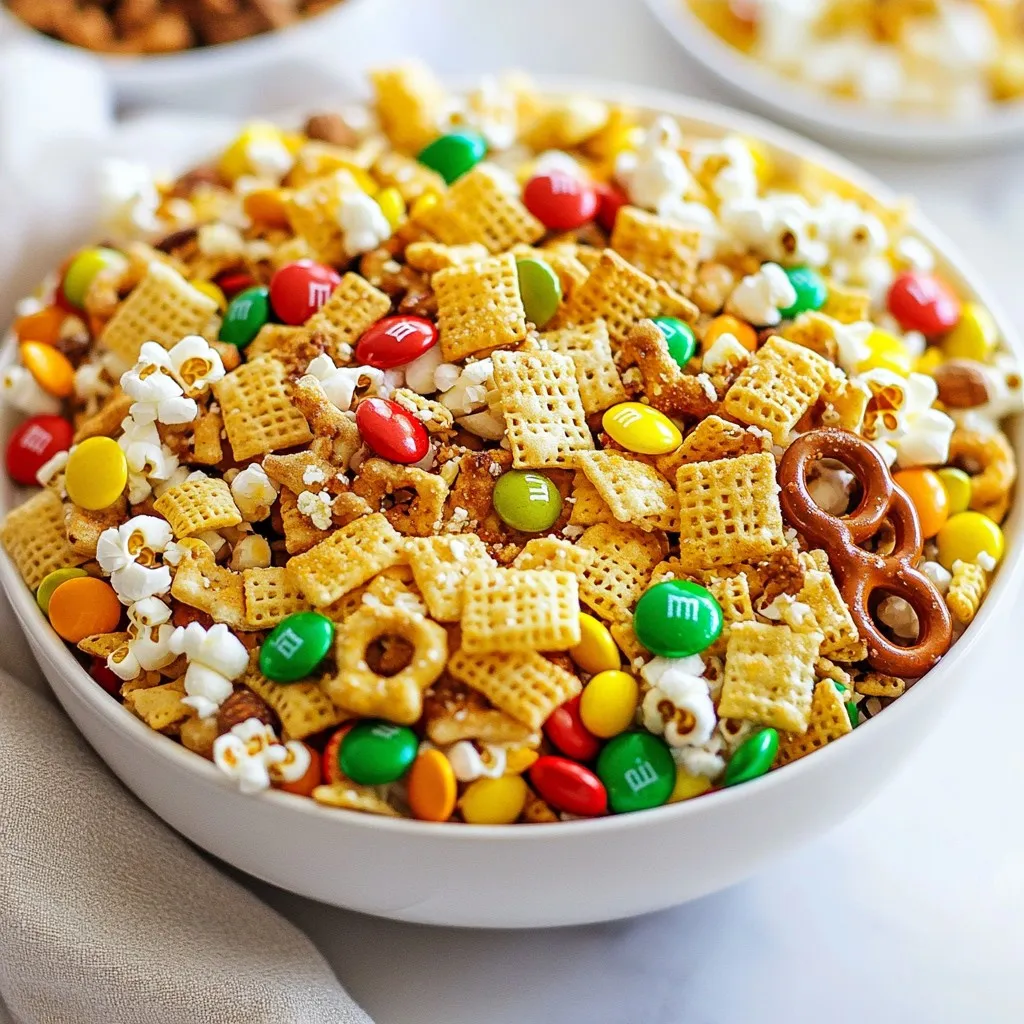
Looking for the perfect snack for your holiday gatherings? Look no further! My Holiday Chex Mix is a delightful blend

I use 1 cup of fresh pineapple chunks. This gives the smoothie a bright, sweet taste. Pineapple also adds a nice tropical flair. When cutting, choose ripe fruit for the best flavor. I like to add 1 cup of coconut milk. You can also use unsweetened coconut yogurt. Both options give a creamy texture and rich flavor. They add healthy fats, making the drink filling and satisfying. One frozen banana is key. It adds natural sweetness and creaminess. Frozen bananas help the smoothie feel cold and thick. I always keep some in my freezer for recipes like this. You might want to sweeten your smoothie. I suggest 1 tablespoon of honey or agave syrup. This step is optional. Adjust the sweetness based on your taste. I add 2 tablespoons of unsweetened shredded coconut. It gives a nice texture and extra coconut flavor. You can sprinkle some on top for a fun garnish. For a hint of warmth, I use 1/2 teaspoon of vanilla extract. It enhances the flavors. Vanilla makes the smoothie feel more indulgent without added calories. If you like your smoothie colder, add a handful of ice cubes. This step is optional but helps with thickness. You can also top it with more shredded coconut or fresh fruit for a beautiful finish. {{ingredient_image_1}} First, gather all your ingredients. You need: - 1 cup fresh pineapple chunks - 1 cup coconut milk (or unsweetened coconut yogurt) - 1 frozen banana - 1 tablespoon honey or agave syrup (optional) - 2 tablespoons shredded coconut (unsweetened) - 1/2 teaspoon vanilla extract - Ice cubes (optional) Next, wash the pineapple and chop it into chunks. Make sure to use fresh pineapple for the best taste. If you don’t have fresh pineapple, frozen works too. Now, add the pineapple chunks to your blender. Pour in the coconut milk next. Then, add the frozen banana. The banana makes the smoothie creamy. If you're using honey or agave, add it now. Sprinkle in the shredded coconut and vanilla extract. Blend everything on high speed until it’s smooth. You want a creamy texture, so check that no lumps remain. After blending, taste the smoothie. If it’s not sweet enough, add more honey or agave syrup. Blend again for a few seconds. If you want it colder, add ice cubes and blend until smooth. This will make the drink thicker and chill it down. Pour the smoothie into glasses. For a nice touch, sprinkle some shredded coconut on top. This adds texture and makes it look pretty. Enjoy your refreshing tropical drink right away! Pick a ripe pineapple for the best taste. Look for a fruit with a sweet smell. The leaves should be green and fresh. A good pineapple has a firm feel but gives slightly when pressed. If you find a yellow color near the base, that's a sign of ripeness. You can adjust the sweetness of your smoothie easily. If you like sweeter drinks, add more honey or agave syrup. Start with one tablespoon and taste it. For thickness, use frozen bananas or add ice cubes. Blend until you reach your favorite consistency. Remember, a thicker smoothie feels more satisfying! A good blender makes all the difference. Use a high-speed blender for the best results. It will blend your pineapple and coconut smoothly. If you have a regular blender, blend in stages. Start with liquids, then add fruits. This helps mix everything well. Clean your blender right after use for easy cleanup! Pro Tips Choose Ripe Pineapple: For the sweetest flavor, select a ripe pineapple with a sweet aroma and slightly soft feel at the base. Frozen Banana Benefits: Using a frozen banana not only chills the smoothie but also adds creaminess without the need for ice. Adjust Sweetness: Taste your smoothie before serving and adjust the sweetness by adding honey or agave syrup to suit your preference. Garnish for Texture: Top your smoothie with extra shredded coconut or a slice of pineapple for added texture and visual appeal. {{image_2}} Pineapple is a juicy, sweet fruit packed with nutrients. It has vitamin C, which helps our immune system. This fruit also has fiber, aiding digestion. Pineapple contains bromelain, a natural enzyme that can reduce inflammation. Eating pineapple may help with recovery after exercise, too. Coconut brings healthy fats to your smoothie. These fats can provide energy and support brain health. Coconut milk or yogurt is rich in vitamins and minerals. It also adds a creamy texture to our drink. Unsweetened shredded coconut is high in fiber, promoting good digestion. This coconut pineapple smoothie is a real treat for your body. Together, pineapple and coconut boost your energy and mood. The mix of flavors delights your taste buds while offering key nutrients. Enjoying this smoothie can support hydration and keep you feeling fresh. It’s a great way to start your day or recharge after a workout! You can easily add greens to your coconut pineapple smoothie. Spinach or kale works great. These greens boost nutrients without changing the flavor much. Just a handful of fresh spinach or a small amount of kale will do. Blend it in with your other ingredients. You won't even notice it’s there! If you want more protein, try adding protein powder or yogurt. A scoop of protein powder can make it filling. Use your favorite flavor, like vanilla or unflavored. Greek yogurt also adds creaminess and protein. This change makes the smoothie a great post-workout drink. You can mix in other tropical fruits like mango or papaya. These fruits add new flavors and textures. Swap out some pineapple or add them alongside it. They pair well with coconut and keep the smoothie fresh and bright. Plus, they increase the health benefits, making your drink even better! Yes, you can use frozen pineapple. It makes the smoothie cold and thick. Just blend it the same way as fresh. Frozen pineapple still gives great flavor. It is also convenient to use. You can use almond milk or soy milk. Unsweetened coconut yogurt works well, too. These options keep the smoothie creamy. They also add different flavors that are tasty. To make it vegan, skip honey and use agave syrup. Make sure to use plant-based yogurt or milk. All other ingredients are already vegan-friendly. This way, everyone can enjoy the smoothie! The smoothie lasts about one day in the fridge. It tastes best fresh, but you can store it. Just put it in a sealed container. Shake it well before drinking. Yes, you can meal prep this smoothie. Mix all the ingredients but skip the liquid. Freeze the mix in bags. When ready to drink, blend with coconut milk. This makes a quick and easy treat! This blog post covers a delightful smoothie recipe that’s easy to make. We looked at all the vital ingredients like fresh pineapple and coconut milk. You learned how to blend and serve your smoothie with tips for custom flavors. Overall, this smoothie not only tastes great but also packs health benefits. Feel free to experiment with toppings and variations to make it your own. Enjoy mixing, blending, and sipping!

Coconut Pineapple Smoothie Refreshing Tropical Drink

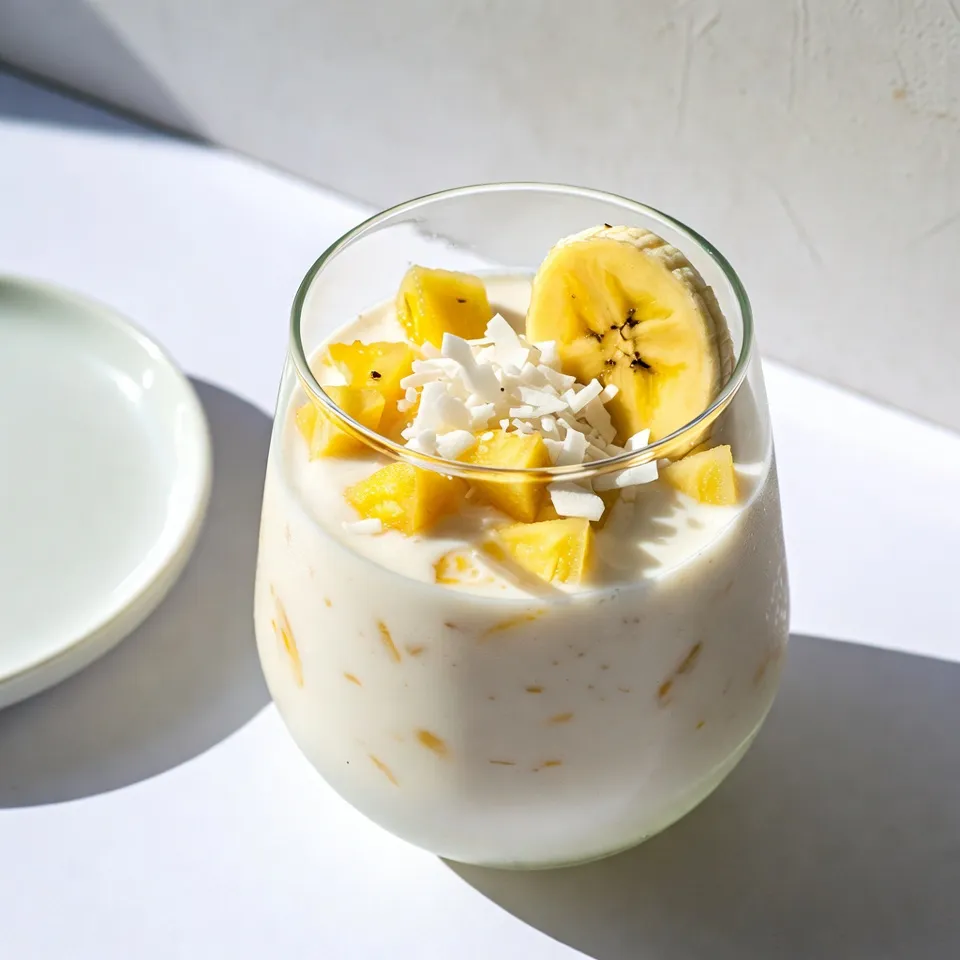
Are you ready to sip on paradise? This Coconut Pineapple Smoothie is your ticket to a refreshing tropical escape. Packed

- 8 ounces rotini pasta - 2 tablespoons olive oil - 1 pound smoked chicken sausage, sliced - 1 bell pepper, diced (any color) - 1 small red onion, chopped - 2 cloves garlic, minced - 1 cup BBQ sauce (preferably honey-flavored) - 1 tablespoon apple cider vinegar - 1 teaspoon smoked paprika - ½ teaspoon black pepper - 1 cup corn kernels (fresh, frozen, or canned) - ½ cup shredded cheese (cheddar or Monterey Jack) - Fresh parsley, chopped (for garnish) - Additional vegetables like zucchini or spinach - Hot sauce for some heat - Different types of cheese, like pepper jack - Chopped green onions for garnish - Large skillet for cooking - Pot for boiling pasta - Cutting board for chopping - Sharp knife for slicing and dicing - Measuring cups and spoons for accuracy - Wooden spoon for mixing Gathering these ingredients and tools makes cooking much easier. You can swap in options you like for a personal touch. Feel free to adjust this list based on what you have at home. {{ingredient_image_1}} To cook the rotini pasta, start by boiling water in a large pot. Add a pinch of salt to the water. Once the water boils, add 8 ounces of rotini pasta. Cook it according to the package instructions until it's al dente. This means it should be firm but not hard. After cooking, drain the pasta and set it aside. This step keeps your pasta ready for the delicious mix ahead. In a large skillet, heat 2 tablespoons of olive oil over medium heat. Once hot, add 1 pound of sliced smoked chicken sausage. Sauté the sausage for about 5 to 7 minutes. You want it to be browned and heated through. Next, add 1 diced bell pepper and 1 chopped small red onion to the skillet. Cook these for 3 to 4 minutes until the vegetables are tender. Then, stir in 2 cloves of minced garlic and cook for 1 more minute. Be careful not to burn the garlic. In a small bowl, mix together 1 cup of BBQ sauce, 1 tablespoon of apple cider vinegar, 1 teaspoon of smoked paprika, and ½ teaspoon of black pepper. This combo gives your pasta a sweet and tangy flavor. Pour this sauce over the sausage and vegetables in the skillet. Finally, add the cooked rotini pasta and 1 cup of corn kernels to the skillet. Toss everything together gently. Make sure the pasta is well-coated with the sauce and heated through for about 2 to 3 minutes. To get your pasta just right, cook the rotini until al dente. This means it should be firm but not hard. Follow the package instructions closely. After cooking, drain the pasta well. You can toss it with a bit of olive oil to keep it from sticking. Spices can really boost the taste of your dish. I love using smoked paprika in this recipe. It adds a nice depth. Black pepper gives a gentle kick. If you want more heat, try adding cayenne or crushed red pepper flakes. These spices work well with the sweet BBQ sauce. For the best cheese melt, sprinkle it on the pasta right after you take the skillet off the heat. Cover the skillet for about a minute. This traps the steam and helps the cheese melt evenly. Cheddar or Monterey Jack are great choices because they melt beautifully. Pro Tips Cook Pasta Al Dente: Make sure to cook the rotini pasta until just al dente for the best texture. It will continue to cook slightly when mixed with the sauce. Customize Your Veggies: Feel free to add your favorite vegetables or whatever you have on hand. Zucchini, mushrooms, or spinach would work beautifully! Choose Quality BBQ Sauce: The flavor of your BBQ sauce will greatly impact the dish. Opt for a high-quality honey-flavored sauce for a sweet and smoky taste. Garnish for Freshness: Don’t skip the fresh parsley! It adds a pop of color and a fresh flavor that balances the richness of the dish. {{image_2}} You can easily switch the sausage type in this dish. Try turkey sausage for a leaner meal. If you prefer pork, that works too! Spicy sausage adds a kick. Choose what fits your taste best. Each type gives a different flavor, keeping it exciting. For a meat-free meal, use plant-based sausage. This keeps the texture and flavor similar. You can also skip the sausage entirely and add more veggies. Chickpeas or lentils are great protein sources. They make the dish filling and nutritious. Feel free to mix in your favorite veggies. Zucchini, spinach, or mushrooms work well. You can also use frozen mixed veggies for convenience. Just make sure to cook them until tender. This allows you to create a unique version every time! To store leftovers, let the pasta cool first. Place it in an airtight container. Make sure to cover it well to keep it fresh. Store it in the fridge for up to three days. If you want to keep it longer, freezing is a great option. When you’re ready to eat, you can reheat the pasta. Use the microwave or a skillet. If using a microwave, cover it to keep moisture in. Heat it for about 1-2 minutes, stirring halfway. In a skillet, add a splash of water and heat over low heat. This keeps it from drying out. To freeze, portion the pasta in freezer bags. Make sure to remove as much air as possible. Label the bags with the date. The pasta can last up to three months in the freezer. When you’re ready to eat, thaw it overnight in the fridge. Then, reheat it as mentioned. Enjoy your tasty meal! Yes, you can use regular BBQ sauce. The flavor will differ. Honey BBQ sauce adds sweetness. If you prefer less sweetness, regular BBQ works well. Just adjust your spices to balance the taste. You can use penne, fusilli, or even spaghetti. Each type changes the texture slightly. Choose what you have on hand. Gluten-free pasta is a great option too. Absolutely! This dish is perfect for meal prep. It stores well in the fridge. Just keep it in an airtight container. Reheat portions in the microwave for quick meals. To make it spicier, add crushed red pepper flakes. You can also use a spicy BBQ sauce. For more heat, include jalapeños or hot sauce. Adjust to your taste for the perfect kick! In this post, we explored the key ingredients, steps, and tips for a delicious dish. You learned how to cook the pasta, sauté sausage, and make the honey BBQ sauce. I shared options for variations and storage to fit your needs. Cooking can be fun and rewarding, so try these tips. Enjoy making your dish perfect each time. Happy cooking!

Honey BBQ Sausage Pasta Skillet Quick and Tasty Meal

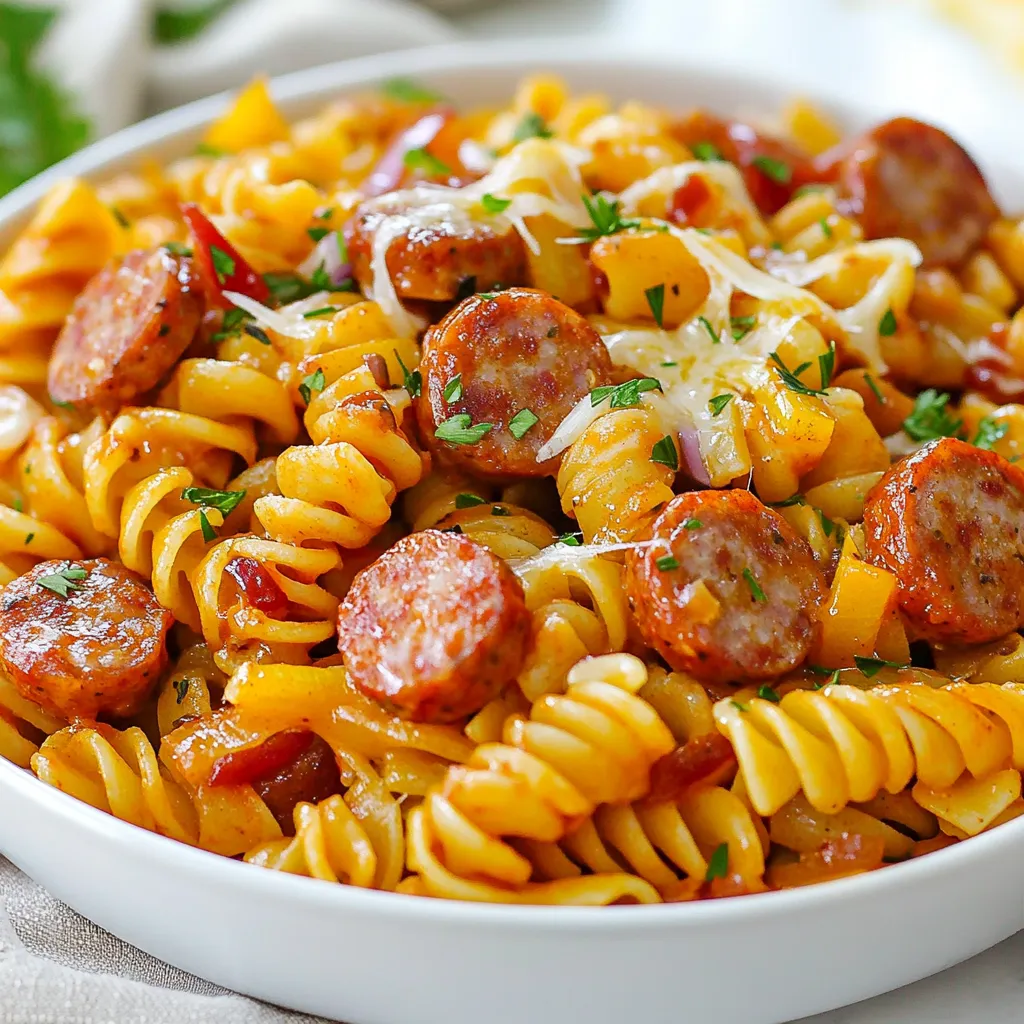
Looking for a quick dinner that bursts with flavor? Try my Honey BBQ Sausage Pasta Skillet! This one-pan meal combines

Older posts
Newer posts
← Previous Page1 … Page156 Page157 Page158 … Page164 Next →

dsad

© 2026 easycookingbite • Built with GeneratePress

Our Policies

  • Copyright Policy
  • Cookie Policy
  • GDPR Policy
  • Privacy Policy
  • Disclaimer
  • Terms Of Use

More Information

  • Home
  • About
  • Contact
  • Appetizers
  • Dessert
  • Dinner
  • Drinks
©2026, easycookingbite About Back To Top