Skip to content
DisclaimerTerms Of UseGDPR PolicyCookie Policy

easycookingbite

  • Home
  • Drinks
  • Appetizers
  • Dinner
  • Dessert
  • About
  • Contact
  • Privacy Policy
DisclaimerTerms Of UseGDPR PolicyCookie Policy

Lily

- 1 block (14 oz) firm tofu, pressed and cubed - 2 tablespoons cornstarch - 2 tablespoons vegetable oil - 1 red bell pepper, sliced - 1 cup snap peas, trimmed - 1 carrot, julienned - 3 green onions, chopped - 4 cloves garlic, minced - 1 teaspoon fresh ginger, grated - 3 tablespoons Sriracha sauce - 2 tablespoons soy sauce - 1 tablespoon honey or maple syrup - Salt and black pepper to taste - Sesame seeds, for garnish - Fresh cilantro, for garnish To make a spicy Sriracha tofu stir-fry, you need fresh ingredients. Start with firm tofu. It gives the best texture. Press it to remove water. This helps it get crispy when you fry it. Next, gather colorful veggies. Red bell pepper adds sweetness and crunch. Snap peas bring a fresh snap. Carrots add a nice color and slight sweetness. You’ll also need some seasoning. Garlic and ginger give great flavor. Soy sauce adds saltiness. Sriracha brings the heat. You can choose honey or maple syrup for a touch of sweetness. Finally, don’t forget the garnishes. Sesame seeds add a nice crunch. Fresh cilantro gives a pop of color and flavor. These ingredients make your stir-fry vibrant and tasty. They work well together for a satisfying meal. {{ingredient_image_1}} First, press the tofu to remove extra water. This helps the tofu get crispy. Cut the tofu into 1-inch cubes. Then, toss the cubes in cornstarch. Make sure each piece gets coated evenly. This coating gives the tofu a nice crunch when cooked. Heat 1 tablespoon of vegetable oil in a skillet over medium-high heat. Once the oil is hot, add the tofu cubes in a single layer. Fry the tofu until it turns golden brown. This takes about 2-3 minutes per side. Remove the tofu from the skillet and set it aside. In the same skillet, add another tablespoon of oil. Now, toss in the sliced red bell pepper, snap peas, and julienned carrot. Stir-fry the veggies for 3-4 minutes. You want them tender but still crisp. Next, add the minced garlic and grated ginger. Cook for another minute until they smell great. Return the crispy tofu to the skillet with the veggies. Pour in the Sriracha sauce, soy sauce, and honey or maple syrup. Toss everything together. Make sure the tofu and veggies are well-coated in the sauce. Cook for an additional 1-2 minutes. This lets the flavors mix well. Finally, season with salt and black pepper to taste. Pressing tofu is key. It removes water and makes it crisp. To press, wrap the tofu in a towel and set a weight on top. After 15-30 minutes, it’s ready. The ideal cooking temperature for tofu is medium-high. This heats the oil and helps the tofu brown nicely. Want more flavor? Add a splash of lime juice or rice vinegar to your sauce. You can also use garlic powder, ginger powder, or even sesame oil. To adjust spice levels, add more or less Sriracha. If it’s too hot, sweeten with extra honey or maple syrup. A large skillet or wok works best for stir-frying. This allows even cooking and easy tossing. If you don’t have a wok, a non-stick skillet is a good choice. For alternative cooking methods, try baking or air frying the tofu for a healthier twist. Pro Tips Press the Tofu: Make sure to press the tofu for at least 30 minutes to remove excess moisture. This step is crucial for achieving a crispy texture when frying. Customize the Heat: If you prefer a milder dish, reduce the amount of Sriracha sauce or add a bit of coconut milk to balance the spice. Add More Vegetables: Feel free to incorporate other vegetables like broccoli, zucchini, or mushrooms for added flavor and nutrition. Garnish for Flavor: Don't skip the sesame seeds and fresh cilantro. They add not only visual appeal but also a burst of flavor to the dish! {{image_2}} You can swap tofu for other proteins. Tempeh and seitan work well in this dish. They both soak up flavors nicely. If you prefer meat, try adding shrimp or chicken. Just ensure you cook them fully before mixing them in. Feel free to add more veggies to your stir-fry. Broccoli, bell peppers, or even zucchini add great flavor and color. You can also swap in seasonal vegetables to keep things fresh. For example, try asparagus in spring or squash in fall. Explore different sauces to change the flavor. Hoisin sauce or teriyaki sauce can give a sweet twist. For a vegan option, use maple syrup in place of honey. This keeps the dish plant-based while still being tasty. To keep your Spicy Sriracha Tofu Stir-Fry fresh, store leftovers in the fridge. Place the stir-fry in an airtight container. This helps prevent moisture loss and keeps flavors intact. Use glass or BPA-free plastic containers for safe storage. Make sure the stir-fry cools down to room temperature before sealing it. This keeps it safe and tasty for up to four days. You can freeze the stir-fry if you have extra. First, let it cool completely. Then, transfer it to a freezer-safe container or bag. Remove as much air as possible to avoid freezer burn. When you want to eat it, thaw it overnight in the fridge. Reheat it in a skillet over medium heat. You may notice a change in texture after freezing. The tofu might be softer, but the flavors will still be great! Yes, you can easily make this dish vegan. Simply swap honey for maple syrup. This change keeps the sweetness without using animal products. You can also use agave nectar or brown sugar if you prefer. To reduce spiciness, use less Sriracha sauce. Start with one tablespoon or even half. You can also add more vegetables like bell peppers or carrots. These will balance the heat. Another option is to include coconut milk, which adds creaminess and cuts spice. This dish lasts about 3 to 4 days in the fridge. Store it in an airtight container for best results. When reheating, add a splash of water to keep it moist. The veggies may soften, but the flavors will stay good. This blog post covered how to make a tasty tofu stir-fry. We discussed key ingredients and provided step-by-step instructions to achieve great flavor and texture. I shared valuable tips for perfecting your dish, suggested variations, and offered storage advice. In conclusion, making this stir-fry is simple and fun. You can easily customize it to suit your tastes. Enjoy creating this healthy meal and impress your friends and family with your cooking skills!

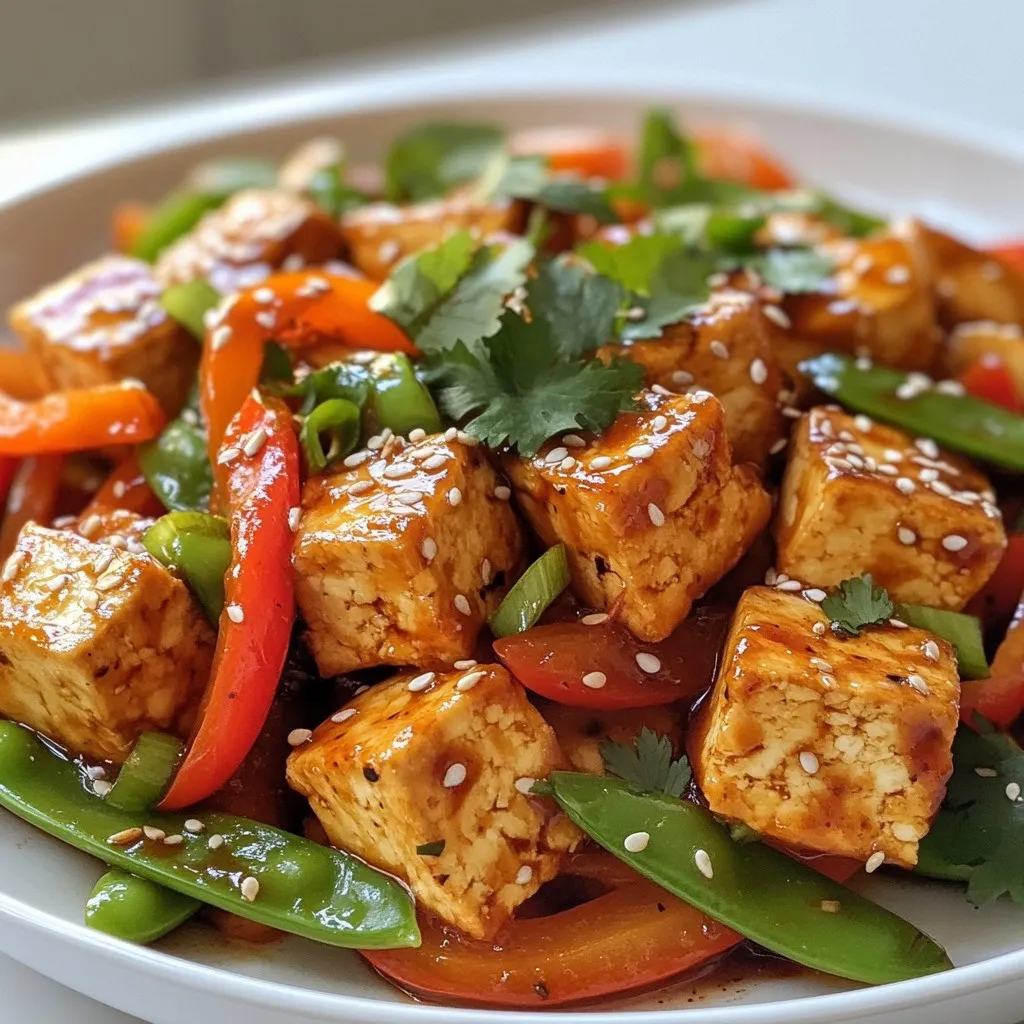
Spicy Sriracha Tofu Stir-Fry Quick and Flavorful Meal

Looking for a quick meal that packs a punch? My Spicy Sriracha Tofu Stir-Fry is just what you need! This

- 1 lb boneless, skinless chicken breasts - 4 cups corn (frozen or fresh) - 3 medium potatoes, diced - 1 small onion, diced - 2 cloves garlic, minced For this chowder, the main ingredients are simple but full of flavor. The chicken breasts add protein and a nice bite. Corn brings sweetness and a hint of crunch. Potatoes make the chowder hearty and filling. Onion and garlic give a warm base for the dish. - 3 cups chicken broth - 1 cup heavy cream or coconut milk - 1 tablespoon olive oil - 1 teaspoon smoked paprika - 1 teaspoon dried thyme - Salt and pepper to taste The chicken broth is key for a rich flavor. You can choose heavy cream for a creamy texture or coconut milk for a lighter feel. Olive oil helps sauté the onions and garlic. Smoked paprika adds a nice depth, while thyme gives a hint of earthiness. Don’t forget salt and pepper to make it all pop! - Fresh chives, chopped Fresh chives are the perfect garnish. They add a bright color and a mild onion flavor. Sprinkle them on top just before serving for a fresh touch. {{ingredient_image_1}} To start, season your boneless chicken breasts. Use salt, pepper, and smoked paprika. This adds a nice flavor to the chicken. Set the seasoned chicken aside while you prepare the rest. Next, heat olive oil in a skillet over medium heat. Add the diced onion and minced garlic. Cook these for about 3 to 4 minutes, or until the onion turns soft and clear. This step builds great flavor for your chowder. In your crockpot, layer the sautéed onions and garlic with the corn and diced potatoes. Place the seasoned chicken on top. Pour in the chicken broth and sprinkle dried thyme over everything. Stir gently to mix all the ingredients. Now, cover the crockpot. You can set it to cook on low for 6 to 7 hours or on high for 3 to 4 hours. The chicken should be cooked through, and the potatoes should be soft when it’s done. Once cooked, take the chicken out of the crockpot. Use two forks to shred the chicken into small pieces. This makes it easy to mix back into the chowder. Then, return the shredded chicken to the pot. Finally, add the heavy cream or coconut milk to the crockpot. Stir everything together well. Let it cook for an extra 15 to 30 minutes on low. This helps the flavors blend nicely. Taste your chowder and adjust the salt and pepper as needed. To make your chowder taste great, focus on seasoning. Start by seasoning the chicken with salt, pepper, and smoked paprika. This adds depth right from the start. The sautéed onion and garlic also play a big role. Cook them until the onion turns soft and clear. This extra step helps to release their flavors. Once combined in the crockpot, adjust the seasoning again at the end. Taste and add more salt or pepper if needed. Fresh chives on top add a nice touch. Creaminess is key for a good chowder. Use heavy cream for a rich, smooth texture, or coconut milk for a lighter option. Add the cream towards the end of cooking. This keeps it from curdling. Stir it well after adding to blend all the flavors. For a thicker chowder, mash some of the potatoes before serving. This method creates a lovely, creamy base without needing flour. Cooking times can change based on your crockpot model. If using the low setting, aim for 6-7 hours. For the high setting, 3-4 hours works well. Always check the chicken for doneness. Shred the chicken and return it to the pot. If you need more time, let it cook longer. The chowder will only get better as the flavors blend. Adjust the time based on how soft you want your potatoes. Pro Tips Use Fresh Ingredients: Whenever possible, opt for fresh corn and herbs to enhance the flavor of your chowder. Customize Your Cream: For a lighter option, substitute heavy cream with half-and-half or plain yogurt for a tangy twist. Make It Spicy: Add diced jalapeños or a dash of cayenne pepper to the chowder for an extra kick. Chill and Store: This chowder tastes even better the next day, so make it ahead of time and store it in the fridge for enhanced flavors. {{image_2}} You can change the main protein in this chowder. Turkey works well if you want a lighter dish. For a vegetarian option, try using tofu or chickpeas. Swap out the potatoes for sweet potatoes to add a touch of sweetness. You can also use different vegetables like carrots or bell peppers for extra color and nutrition. Spices can transform your chowder. Try adding cumin for warmth or cayenne for heat. Fresh herbs like parsley or cilantro can add brightness. A squeeze of lime juice at the end gives a fresh twist. If you love smokiness, consider adding more smoked paprika. Experiment with flavors to find what you enjoy most. For a gluten-free version, ensure your broth is certified gluten-free. Coconut milk is a great swap for heavy cream to make it dairy-free. You can also use almond milk for a lighter feel. If you're low-carb, skip the potatoes and add more corn or cauliflower for texture. These swaps keep the dish tasty while fitting your needs. To store your leftover chowder, let it cool first. Then, place it in an airtight container. This keeps it fresh and tasty. You can keep it in the fridge for up to three days. When you want to eat it, just reheat it on the stove or in the microwave. Stir well to make sure it heats evenly. If you want to save the chowder for later, freezing is a great option. Pour the cooled chowder into freezer-safe bags or containers. Leave some space at the top for the chowder to expand. You can freeze it for up to three months. To reheat, let it thaw in the fridge overnight. Then, warm it on the stove over medium heat, stirring often. Add a splash of broth or water if it seems too thick. Crockpot Chicken Corn Chowder lasts well in storage. In the fridge, it stays good for about three days. If you freeze it, it can last up to three months. However, for the best taste, eat it within a month. Always check for changes in smell or color before you eat. If anything seems off, it's best to toss it out. Yes, you can use other meats! Turkey works well as a substitute for chicken. It has a similar texture and flavor. If you want a plant-based option, try using tofu. Firm tofu holds up nicely in the chowder. Simply cube it and add it in the same way as chicken. Both options will make the dish tasty and satisfying. There are many great sides to enjoy with this chowder! Here are some ideas: - Crusty bread: A slice of sourdough or baguette is perfect for dipping. - Salad: A fresh green salad adds a nice crunch. - Cornbread: Sweet cornbread pairs well with the savory chowder. - Pickles: A side of pickles gives some zest and brightness. These sides will enhance your meal and provide balance to the rich chowder. To add heat to your chowder, consider these options: - Cayenne pepper: Start with a pinch and add more to taste. - Jalapeños: Fresh or pickled jalapeños add a nice kick. - Hot sauce: A splash of your favorite hot sauce can boost the spice level. - Red pepper flakes: Sprinkle some on top before serving for extra heat. Each option offers a different level of spice. Choose what fits your taste! In this blog post, we explored a tasty Crockpot Chicken Corn Chowder. I shared the main ingredients, like chicken, corn, and potatoes, along with the seasonings that bring it to life. The step-by-step instructions ensure that you can easily follow along. I also gave tips for flavor, texture, and storage. Overall, you can make this dish your own with variations. Enjoy experimenting with ingredients and flavors. This chowder is perfect for meals not just on a chilly night, but all year long.

Crockpot Chicken Corn Chowder Easy-Prep Comfort Dish

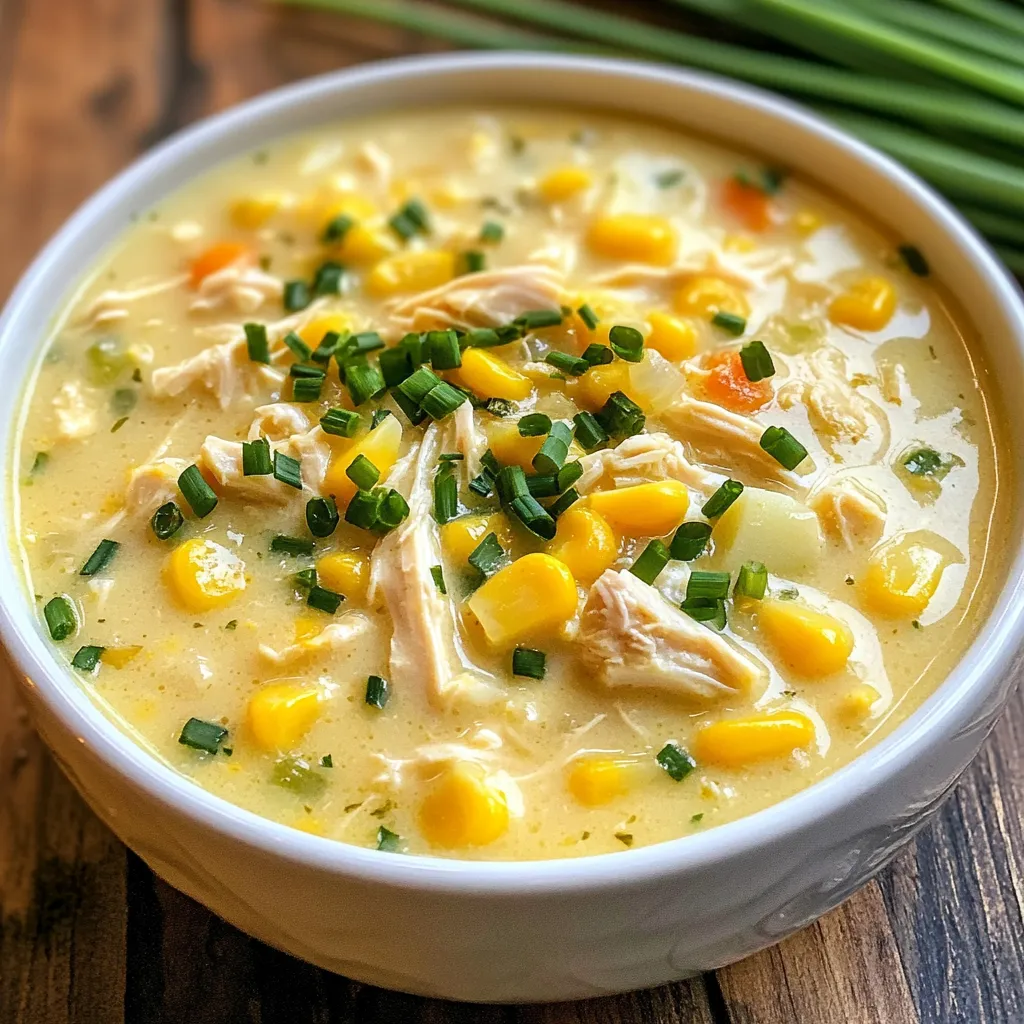
Are you ready for a warm bowl of comfort? My Crockpot Chicken Corn Chowder is an easy-prep delight that brings

- 2 boneless, skinless chicken breasts - 200g egg noodles - 4 cloves garlic - 3 tablespoons soy sauce - 2 tablespoons honey - 1 tablespoon hoisin sauce - 1 tablespoon sesame oil - 1 tablespoon vegetable oil - 1 red bell pepper - 1 cup snap peas - 2 green onions - Sesame seeds - Salt and pepper Choosing the best chicken When picking chicken, look for bright pink meat. Check that it feels firm and moist. Avoid any chicken with a gray hue or an off smell. Selecting ripe bell peppers and snap peas For bell peppers, choose ones that are firm and shiny. The color should be bright and vibrant. For snap peas, look for crispness. The pods should snap easily when bent. Fresh garlic tips Fresh garlic should have tight skin and no sprouting. Choose bulbs that feel heavy and firm. If you can, buy garlic from local markets for the best flavor. {{ingredient_image_1}} To cook egg noodles perfectly: - Bring a large pot of water to a boil. - Add a pinch of salt to the water. - Stir in the egg noodles and cook per the package instructions, usually 4-6 minutes. - Taste a noodle to check for doneness. - Drain the noodles in a colander and set aside. - Reserve about half a cup of pasta water for later. To mix the sticky glaze: - In a bowl, combine 3 tablespoons of soy sauce, 2 tablespoons of honey, and 1 tablespoon of hoisin sauce. - Add 4 cloves of minced garlic to the mix. - Stir well until all ingredients blend into a thick sauce. Garlic adds a strong flavor that makes this dish shine. Without it, the dish would lack depth and aroma. For sautéing chicken: - Heat 1 tablespoon of vegetable oil in a large pan over medium-high heat. - Add the thinly sliced chicken breasts and season with salt and pepper. - Cook for about 5-7 minutes until they are browned and fully cooked. For the bell peppers and snap peas: - Slice one red bell pepper and prepare 1 cup of snap peas. - Add them to the pan and stir for 2-3 minutes. - They should be tender but still crisp. To coat the noodles in sauce: - Pour the sticky glaze over the chicken and veggies. - Toss everything to coat well. If the sauce is too thick, add a splash of the reserved pasta water to thin it out. - Add the cooked noodles to the pan. - Mix everything together until the noodles are warm and covered in sauce. For garnishing your dish: - Drizzle with 1 tablespoon of sesame oil and mix well. - Serve hot and top with chopped green onions and sesame seeds. For pairing with sides: - This dish pairs well with steamed broccoli or a fresh salad. - You can also enjoy it with a light soup for a complete meal. Common mistakes to avoid: When making Sticky Garlic Chicken Noodles, watch out for a few common mistakes. First, do not overcook the chicken. It should be tender and juicy, not dry. Second, avoid using too much sauce. It can make the dish too salty. Lastly, do not skip the garlic. It adds a key flavor. Adjusting sweetness and saltiness: You can easily adjust the sweetness and saltiness of your dish. If you like it sweeter, add a bit more honey. For more salt, add a dash of soy sauce. Remember to taste as you go. This way, you can find the right balance for your taste buds. Adding spice to the dish: If you want to spice things up, try adding red pepper flakes or sriracha. This will give the dish a nice kick. You can also use fresh ginger for a warm flavor. Add it when you cook the chicken for the best result. Alternative sauces for variation: Feel free to switch out the sauces. Try teriyaki or sweet chili sauce for a new twist. You can even mix and match sauces to find your favorite blend. Experimenting keeps the dish fresh and exciting. Best pans or woks for the recipe: A large frying pan or wok works best for this dish. It allows for even cooking and easy mixing. A non-stick surface helps prevent sticking, making cleanup easier. Essential utensils for easy cooking: Use a sharp knife for slicing chicken and veggies. A wooden spoon or spatula is great for stirring. A slotted spoon can help you serve the noodles without excess sauce. These tools make cooking smoother and more enjoyable. Pro Tips Marinate for Extra Flavor: If you have time, marinate the sliced chicken in the soy sauce mixture for at least 30 minutes before cooking. This enhances the flavor and tenderness of the chicken. Vegetable Variations: Feel free to substitute or add your favorite vegetables like broccoli, carrots, or bok choy for a colorful and nutritious twist. Perfect Noodle Texture: Cook the noodles just until al dente; they will continue to cook when added to the pan. This prevents them from becoming mushy. Garnish for Presentation: A sprinkle of sesame seeds and chopped green onions not only adds flavor but also makes the dish visually appealing. Don't skip this step! {{image_2}} You can swap chicken for beef or shrimp. Both add a rich flavor. Thinly slice beef for quick cooking. Shrimp cooks fast and adds a nice texture. For a vegetarian dish, use tofu. Firm tofu absorbs sauce well. Add colorful veggies like carrots and broccoli for crunch. If you need gluten-free options, try rice noodles or zucchini noodles. They work great in this recipe. You can also use whole wheat pasta or even soba noodles. Each type brings a unique taste and texture to the dish. In spring, add fresh asparagus or snap peas for a vibrant touch. Summer calls for zucchini and bell peppers for a light feel. In fall, use roasted squash or mushrooms for warmth. Winter is perfect for adding kale or hearty greens. For special occasions, think about adding chili flakes for heat or a splash of lime for a festive twist. To store your Sticky Garlic Chicken Noodles, let them cool first. Place the noodles in an airtight container. This helps keep them fresh. Store them in the fridge. They last for about three days. When you want to eat them again, use the stovetop. Heat a pan over medium heat. Add a splash of water to help them steam. This keeps the noodles from getting mushy. Stir them gently. You can also use the microwave. Just add a little water and cover it. Heat in short bursts, stirring in between. You can prepare portions in advance to save time. Cook extra chicken and noodles. Store them separately. This way, they stay fresh. For long-term storage, freeze the cooked meal. Use freezer-safe containers. They can last for up to three months. When ready to eat, thaw in the fridge overnight before reheating. Sticky Garlic Chicken Noodles is a quick dish made with tender chicken and egg noodles. The recipe features a sweet and savory glaze with garlic, soy sauce, and honey. Fresh veggies like red bell pepper and snap peas add crunch. The dish is colorful and full of flavor. This dish takes about 30 minutes to make. You spend 15 minutes on prep and 15 minutes cooking. It’s perfect for a busy weeknight meal. Yes, you can prep some parts ahead of time. Slice the chicken and veggies a day before. You can mix the sticky glaze in advance too. Just store everything in the fridge. When you're ready, cook the noodles and heat the rest. You can serve this dish with a simple salad or steamed veggies. It pairs well with a light drink, like iced tea or lemonade. For a fun twist, serve it with spring rolls or dumplings. Absolutely! You can use shrimp or beef instead of chicken. For a vegetarian option, try tofu or more veggies. You can also swap the egg noodles for rice noodles or gluten-free noodles. Adjust the sauces to fit your taste, too! This blog post covered everything you need to make sticky garlic chicken noodles. We discussed key ingredients, like fresh chicken and ripe veggies. I shared step-by-step instructions for perfect noodles, a tasty glaze, and smart serving ideas. You can tailor the recipe for your taste or dietary needs. Remember to store any leftovers properly for future meals. With these tips, you'll enjoy a delicious and easy dish that impresses every time. Happy cooking!

Sticky Garlic Chicken Noodles Quick and Flavorful Dish

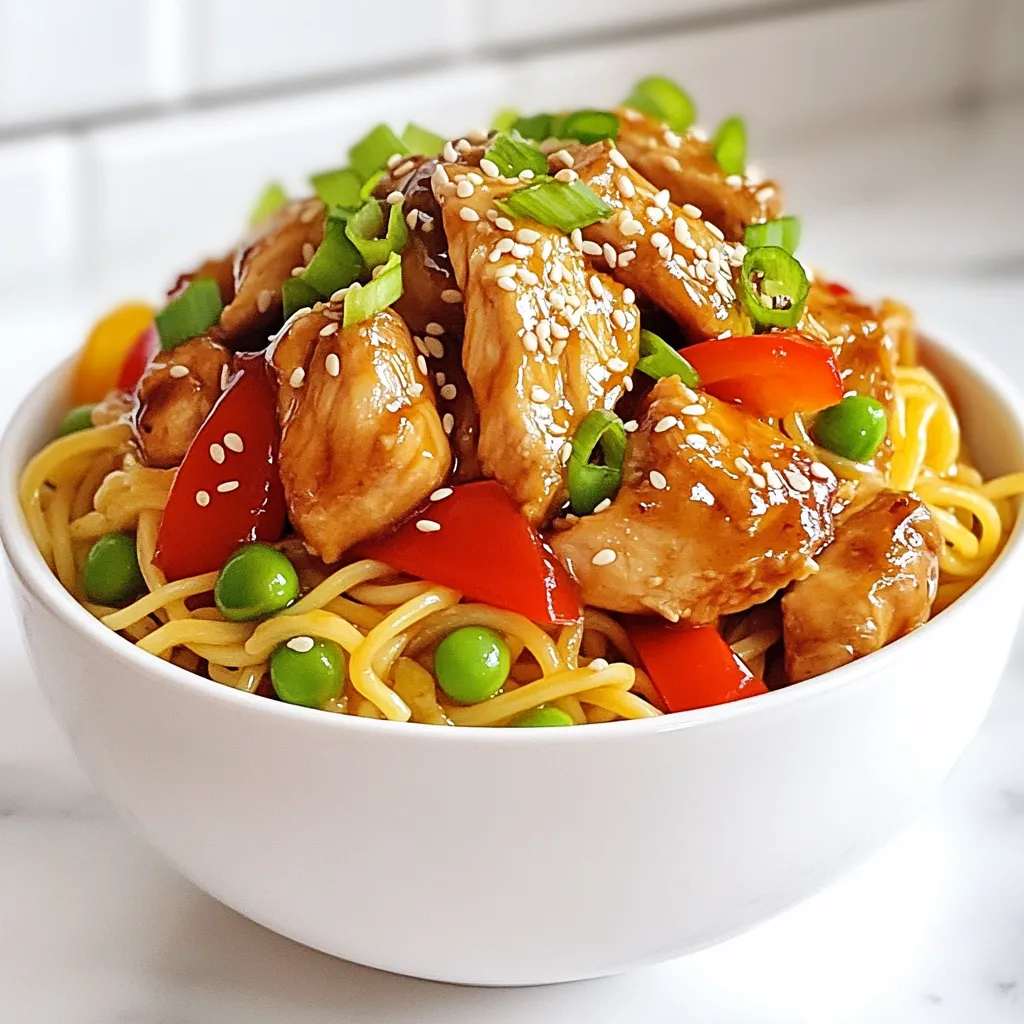
Are you ready for a meal that’s quick, easy, and bursting with flavor? Sticky Garlic Chicken Noodles are about to

For a tasty grilled shrimp bowl, you need these main ingredients: - 1 pound large shrimp, peeled and deveined - 2 tablespoons olive oil - 2 teaspoons smoked paprika - 1 teaspoon garlic powder - 1 teaspoon cumin - Salt and black pepper to taste - 2 cups cooked quinoa - 1 cup cherry tomatoes, halved - 1 cup corn (fresh, frozen, or canned) - 1 avocado, diced - 1/4 cup fresh cilantro, chopped - Juice of 1 lime These ingredients work well together. The shrimp brings protein, while the quinoa adds fiber. The veggies give color and crunch. You can add some extra flavors with these optional ingredients: - Crumbled feta cheese for topping Feta cheese adds a salty flavor. It also gives the dish a creamy texture. Here’s a quick look at the nutrition: - Shrimp: Low in calories and high in protein. Great for muscle health. - Quinoa: Packed with protein and fiber. It keeps you full longer. - Avocado: Offers healthy fats and vitamins. Good for heart health. - Cilantro: Adds flavor with very few calories. These key ingredients make the bowl not just delicious but also nutritious. Enjoying this dish helps you eat balanced meals! {{ingredient_image_1}} First, grab a large bowl. In this bowl, mix together the olive oil, smoked paprika, garlic powder, cumin, salt, and black pepper. This mix will be your marinade. Next, add the shrimp to the marinade. Use a spoon to coat each shrimp well. Let them sit for at least 15 minutes. This helps the flavors soak in. While you wait, you can prepare your grill. Preheat your grill to medium-high heat. If you use wooden skewers, soak them in water for 30 minutes. This helps them not to burn. Now, thread the marinated shrimp onto the skewers. Place them on the grill. Cook for about 2-3 minutes on each side. Watch for the shrimp to turn pink and slightly charred. Once done, remove them from the grill. Set them aside to cool slightly. In a large mixing bowl, add the cooked quinoa, halved cherry tomatoes, corn, diced avocado, chopped cilantro, and lime juice. Toss these ingredients gently to mix. Now, to serve, create a base with the quinoa mixture in a bowl. Top it with the grilled shrimp. If you like, sprinkle some crumbled feta cheese on top. For a fun touch, serve the bowls with lime wedges and extra cilantro. Enjoy your fresh and flavorful Grilled Shrimp Bowl! To grill shrimp well, start with fresh shrimp. Look for large, firm, and bright shrimp. Peel and devein them to keep the flavors strong. Marinate shrimp for at least 15 minutes. Use olive oil, smoked paprika, garlic powder, cumin, salt, and black pepper for taste. When grilling, preheat your grill to medium-high heat. This ensures the shrimp cook evenly. Thread shrimp onto skewers for easy flipping. If using wooden skewers, soak them in water first. This stops them from burning. Grill shrimp for just 2 to 3 minutes on each side. You want them pink and slightly charred. Overcooking makes them tough. A great bowl looks as good as it tastes. Start with a base of quinoa. Layer in cherry tomatoes, corn, and diced avocado. Add the grilled shrimp on top. For a pop of color, sprinkle chopped cilantro. Use lime wedges on the side for a fresh touch. If you like cheese, crumbled feta adds a nice finish. Play with colors and textures to make it fun. A beautiful bowl invites everyone to dig in. Making this dish ahead saves time. Start with the shrimp. Marinate them in advance and store in the fridge. They will soak up the flavors well. Grill them just before serving for the best taste. Cook your quinoa ahead and keep it in an airtight container. You can also chop the veggies early. Store them in the fridge to keep them fresh. When you’re ready to eat, just assemble the bowl. It will be quick and easy, and still delicious! Pro Tips Marinate Longer for Flavor: For even more flavor, let the shrimp marinate for 30 minutes to an hour. This allows the spices to penetrate deeper into the shrimp. Perfectly Grilled Shrimp: Keep an eye on the shrimp while grilling. They cook quickly, and overcooking can make them tough. Aim for a nice pink color and slight char. Fresh Ingredients Matter: Using fresh vegetables and herbs will enhance the flavor and presentation of your Fiesta Bowl. Opt for in-season produce whenever possible. Customize Your Bowl: Feel free to add other toppings like black beans, jalapeños, or salsa to make your bowl even more flavorful and personalized! {{image_2}} You can swap shrimp for tasty proteins. Chicken is a great choice. It works well with the same marinade. Just cut it into cubes before marinating. Fish like salmon or tilapia also taste amazing grilled. If you want a plant-based option, use firm tofu. Make sure to press it to remove water. Then, cut it into cubes and marinate just like the shrimp. Changing the sauce can change the whole bowl. A zesty lime vinaigrette adds brightness. Mix olive oil, lime juice, and a pinch of salt. You can also try a creamy avocado dressing. Simply blend avocado, Greek yogurt, and lime juice until smooth. If you love heat, add some hot sauce or sriracha. Each sauce gives a unique twist to your bowl! Seasonal veggies can add crunch and color. In spring, try asparagus or snap peas. Just grill them for a few minutes. In summer, zucchini and bell peppers shine. For fall, add roasted butternut squash or Brussels sprouts. In winter, use hearty greens like kale or Swiss chard. These veggies not only taste great but also boost the nutrition of your bowl! To store your leftover grilled shrimp bowl, first cool it down. Place the bowl in the fridge within two hours of serving. Use an airtight container to keep the flavors fresh. You can store the shrimp and quinoa mixture separately if you prefer. This will help maintain their textures. When you're ready to enjoy your leftovers, heat them gently. For the best results, use a skillet on low heat. Add a splash of water or olive oil to keep the shrimp moist. Stir occasionally until heated through. Avoid using the microwave, as it can make the shrimp rubbery. Leftover grilled shrimp bowls will last about three days in the fridge. If you want to freeze them, pack the shrimp and quinoa in freezer-safe bags. They can last up to three months in the freezer. When you're ready to eat, thaw in the fridge overnight before reheating. This ensures the best taste and texture. The best shrimp for grilling are large shrimp. They hold up well on the grill. Look for shrimp that are fresh or frozen, peeled and deveined. Wild-caught shrimp often have better flavor. If you can, choose shrimp that are 16 to 20 count per pound. This means there are about 16 to 20 shrimp in a pound, making them the right size for grilling. Yes, you can easily make this dish gluten-free. The ingredients in the grilled shrimp bowl are already gluten-free. Quinoa, shrimp, and fresh veggies are all safe choices. Just be sure to check any sauces you might add. Always look for gluten-free labels on packaged items to be safe. Many sides go well with a grilled shrimp bowl. Here are a few ideas: - Grilled vegetables: Bell peppers and zucchini add color and taste. - Coleslaw: A crunchy slaw can bring a nice contrast. - Cilantro lime rice: It adds a fresh twist to the meal. - Garlic bread: A warm slice can complement the flavors. These sides can enhance your meal and make it more filling. In this post, we explored how to create a delicious grilled shrimp bowl. We covered essential ingredients, preparation steps, and helpful tips to perfect your dish. Variations let you customize flavors and use different proteins or veggies. You also learned how to store leftovers and the best ways to reheat them. Grilled shrimp bowls are easy and fun to make. With practice, you’ll find your favorite twist. Enjoy cooking and get creative with your meals!

Grilled Shrimp Bowl Fresh and Flavorful Delight

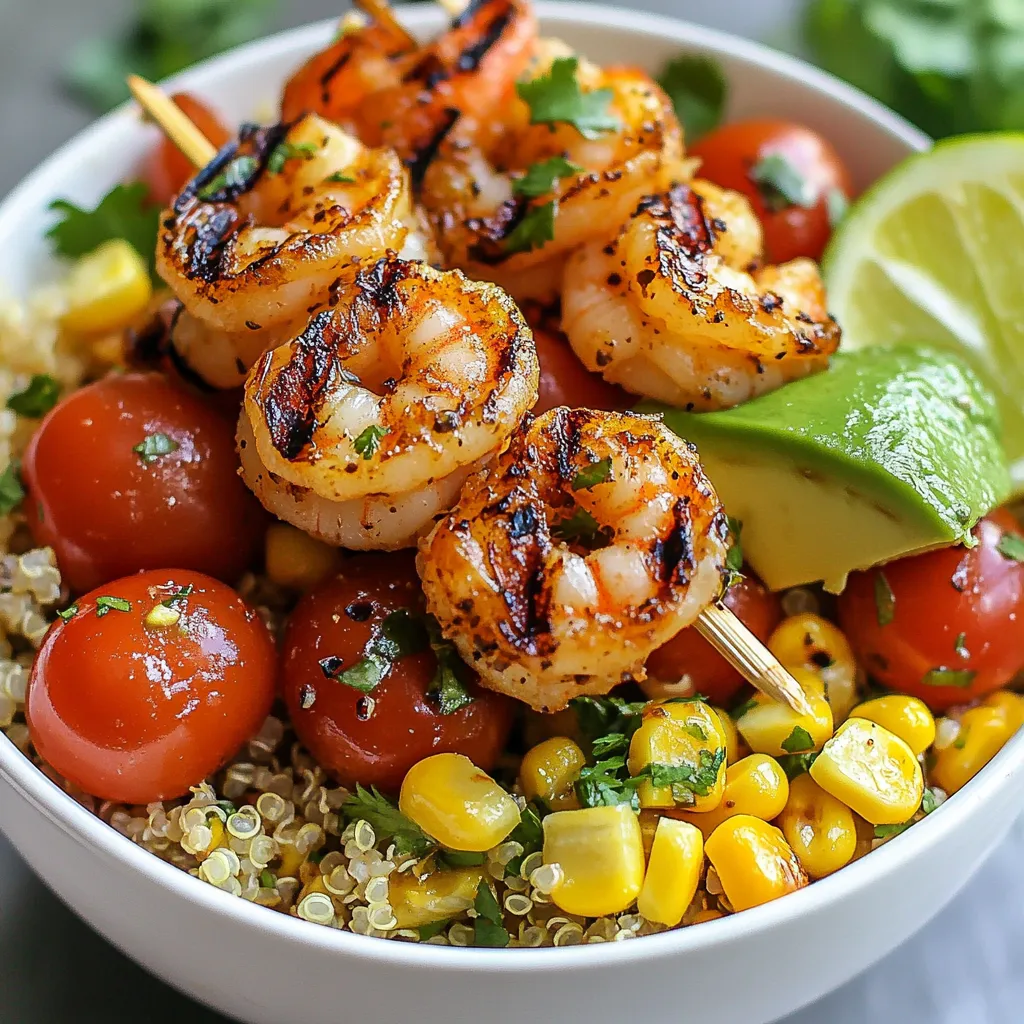
Dive into the fresh and flavorful world of my Grilled Shrimp Bowl! This dish combines juicy shrimp, colorful veggies, and

To make Chicken Onigiri, you need these key items: - 2 cups sushi rice - 2 1/2 cups water - 1 teaspoon salt - 1 tablespoon rice vinegar - 1 tablespoon sugar - 1 cup cooked chicken, shredded - 1/4 cup green onions, finely chopped - 2 tablespoons soy sauce - 1 sheet nori, cut into strips (optional) - Sesame seeds for garnish (optional) These ingredients create a tasty and filling rice ball. You can add fun flavors and textures to your onigiri with these optional items: - Nori strips add a nice crunch. - Sesame seeds give a nutty taste. - Fresh herbs like cilantro or shiso enhance flavor. These extras make your onigiri unique and beautiful. Don't have an ingredient? Here are some easy swaps: - Use brown rice instead of sushi rice for a nuttier flavor. - Replace cooked chicken with tofu for a plant-based twist. - Any soy sauce can work. Try tamari for a gluten-free option. These substitutions let you customize your onigiri to your taste. {{ingredient_image_1}} To start, rinse 2 cups of sushi rice under cold water. Do this until the water runs clear. This step helps to remove excess starch. It will make your rice less sticky. Next, combine the rinsed rice and 2 1/2 cups of water in a rice cooker or a pot. Let the mixture soak for 30 minutes. This soak helps the rice cook evenly. If you’re using a rice cooker, turn it on and let it cook. If you don’t have a rice cooker, bring the pot to a boil. Cover it and reduce the heat. Cook for 18 to 20 minutes. Once cooked, let the rice sit covered for 10 minutes. This resting time makes the rice fluffier. In a bowl, mix 1 cup of shredded chicken with 2 tablespoons of soy sauce and 1/4 cup of finely chopped green onions. You can use teriyaki-flavored or grilled chicken for extra taste. Make sure everything combines well. This chicken filling gives the onigiri its savory flavor. Set this mixture aside while you prepare the rice. Once the rice is cool enough to touch, wet your hands with water. This helps prevent the rice from sticking. Take about 1/4 cup of rice and flatten it in your palm. Leave a small dip in the center. Now, place a spoonful of the chicken mixture into this dip. Mold the rice around the filling to form a shape. You can choose between a triangle or a round shape. Press gently but firmly to hold the onigiri together. If you like, wrap a strip of nori around the base or sprinkle sesame seeds on top. This adds flavor and looks nice too. Repeat this process until all your onigiri are shaped. Enjoy these tasty treats fresh or pack them for a snack! To keep your rice from sticking, rinse it well. Rinse the sushi rice under cold water until the water runs clear. This step helps remove excess starch. Use a rice cooker if you can; it makes cooking easier. If you cook in a pot, let the rice soak for 30 minutes. This allows the grains to absorb water and cook evenly. After cooking, let it sit covered for 10 minutes to finish steaming. Shaping onigiri can be fun. First, wet your hands with water to stop the rice from sticking to your skin. Take about 1/4 cup of rice and flatten it in your palm. Create a small indentation in the center. Next, spoon in some chicken filling. Mold the rice around it carefully. Press gently to form a nice triangle or round shape. This helps keep your onigiri strong and intact. Onigiri is best served fresh, but you can store it too. Arrange your onigiri on a platter, garnished with herbs or cucumber slices. For storage, keep them in an airtight container. If you want to eat them later, wrap them in plastic wrap. This keeps the rice moist. You can also freeze them for later. When ready to eat, just reheat them gently in the microwave. Pro Tips Perfectly Cooked Rice: Always rinse sushi rice thoroughly to remove excess starch, ensuring each grain remains distinct and fluffy after cooking. Flavorful Chicken Filling: Use teriyaki-flavored or grilled chicken for a richer taste; marinating the chicken beforehand can also enhance the flavor. Shaping Onigiri: Wet your hands with water before handling the rice to prevent sticking, making it easier to shape the onigiri without making a mess. Presentation Matters: Garnish your onigiri with fresh herbs or colorful vegetable slices to make the dish visually appealing, enhancing the overall dining experience. {{image_2}} You can switch up the filling in your chicken onigiri. Instead of shredded chicken, try tuna or salmon. For a vegetarian option, use avocado or sautéed mushrooms. You can even mix in some cream cheese for a rich flavor. Just keep it simple and tasty. Onigiri don’t have to be just triangular. You can form them into rounds or squares. This makes them fun for kids or parties. For a great look, stack them in a bento box. Add colorful veggies or fruit around them for a nice touch. If you need gluten-free options, use tamari instead of soy sauce. For vegans, replace chicken with tofu or chickpeas. You can also use vegetable broth when cooking the rice for extra flavor. These tweaks keep the dish tasty and still enjoyable for all diets. To keep your leftover onigiri fresh, wrap each one in plastic wrap. This helps to lock in moisture and keeps them from drying out. Place the wrapped onigiri in an airtight container. Store it in the fridge for up to three days. Remember, the rice will harden when cold. You can freeze onigiri for later. First, wrap each onigiri tightly in plastic wrap. Then, place them in a freezer bag. Remove as much air as possible before sealing. You can freeze onigiri for up to a month. When ready to eat, let them thaw in the fridge overnight. Reheat onigiri in the microwave for about 30 seconds on medium power. Make sure to unwrap them first. Adding a damp paper towel helps keep them moist. If you prefer, you can also reheat them on a skillet over low heat. This gives them a nice crispy outside. Enjoy your tasty onigiri warm! Chicken Onigiri is a Japanese rice ball. It is made with sushi rice and filled with chicken. You can use cooked chicken, like teriyaki or grilled chicken. The rice is seasoned with vinegar and sugar, giving it a unique taste. You can shape it into triangles or balls. It's often wrapped in nori, which adds flavor and crunch. Yes, you can make Chicken Onigiri ahead of time. Prepare the onigiri and store them in the fridge. Keep them in an airtight container to stay fresh. They taste best when eaten within one or two days. If you want to enjoy them later, add the nori just before eating. This keeps the nori crispy. You can find Chicken Onigiri at Japanese grocery stores or sushi shops. Some Asian markets also sell pre-made onigiri. Check local convenience stores; they might have them in the refrigerated section. If you can't find them, you can easily make your own at home with this recipe! In this blog post, we explored making chicken onigiri from scratch. We covered essential ingredients, preparation steps, and helpful tips. You can use various fillings and even find options for special diets. Remember, store leftover onigiri properly to keep it fresh. Making these rice balls is fun and tasty. Now, gather your ingredients and try it out! Enjoy each bite and get creative with your flavors!

Chicken Onigiri Delightful Rice Ball Recipe

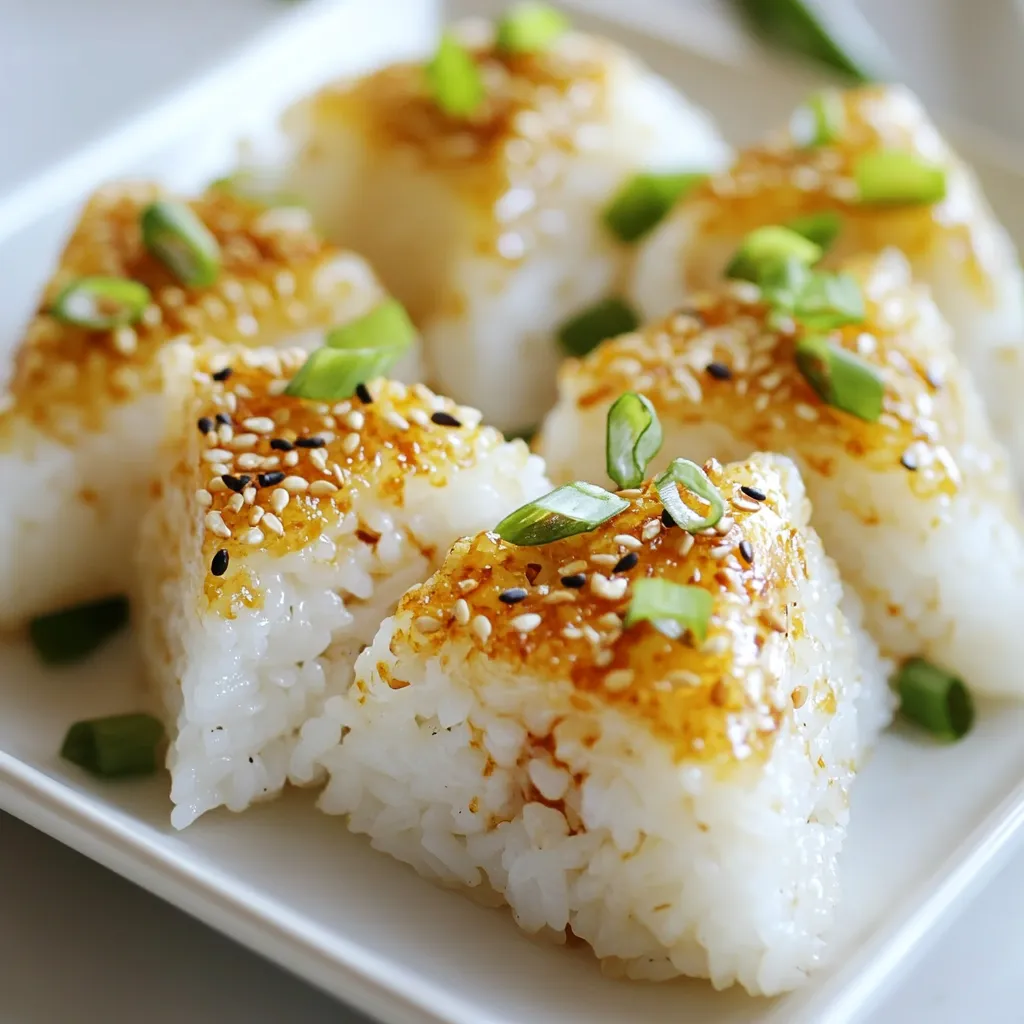
Are you ready to create a delightful snack that’s both fun and easy? Chicken onigiri, a tasty rice ball, is

- 2 cups all-purpose flour - 1/2 cup unsalted butter, chilled and cubed - 1/4 cup granulated sugar - 1/2 teaspoon salt - 6-8 tablespoons cold water - 1 cup apple pie filling (store-bought or homemade) - 1 teaspoon cinnamon - 1/4 teaspoon nutmeg - Oil for frying - Powdered sugar for dusting Measuring is key for great hand pies. Use dry measuring cups for flour and sugar. Spoon the flour into the cup, then level it off with a knife. This step prevents packing, which can make your crust tough. For butter, use a kitchen scale if you have one. If not, look for the markings on the butter wrapper. Cold water should be just that—cold—so keep it in the fridge. - Flour: Use all-purpose flour like Gold Medal or King Arthur for a balanced texture. - Butter: Choose unsalted butter, such as Land O’Lakes, for better control over salt levels. - Sugar: Granulated sugar from C&H or Domino works best for sweetness. - Apple Pie Filling: If you opt for store-bought, I recommend Lucky Leaf or Mott’s for a tasty filling. - Oil for Frying: Use vegetable oil or canola oil. They have high smoke points and fry well. - Spices: McCormick offers reliable cinnamon and nutmeg that will enhance your flavors. These choices help you achieve the best taste and texture in your fried hand pies. Happy cooking! {{ingredient_image_1}} Start by mixing the dry ingredients. In a large bowl, combine 2 cups of flour, 1/4 cup of sugar, and 1/2 teaspoon of salt. Next, add 1/2 cup of chilled, cubed butter. Use your fingers or a pastry cutter to mix it until it looks like coarse crumbs. This step brings out the buttery flavor. Now, add 6 to 8 tablespoons of cold water. Add one tablespoon at a time. Mix until the dough comes together, but don’t over-mix. Form the dough into a disk, wrap it in plastic wrap, and chill for 30 minutes. Chilling helps the dough stay firm when you roll it out. Once your dough is ready, roll it out on a floured surface. Aim for about 1/8 inch thick. Use a round cutter or a glass to cut out circles that are about 4 inches wide. Next, make your filling. In a bowl, mix 1 cup of apple pie filling with 1 teaspoon of cinnamon and 1/4 teaspoon of nutmeg. This gives the filling a warm, spicy flavor. Place a tablespoon of the filling in the center of half the dough circles. To seal the pies, wet the edges of the circles with a little water. Fold the dough over to make a half-moon shape. Press the edges to seal them well. For a nice finish, use a fork to crimp the edges. Heat oil in a deep frying pan over medium heat. You need enough oil to submerge the hand pies. Once hot, carefully add the hand pies in batches. Fry them for about 2 to 3 minutes on each side, or until they turn golden brown. When done, remove the pies and let them drain on paper towels. This helps keep them crispy. Let them cool for a few minutes. Finally, dust them with powdered sugar for a sweet touch. Enjoy this crispy delight! To get a crispy crust, start with cold butter. Use a pastry cutter to blend it into the flour. This creates small bits of butter that will melt and form pockets. Add the cold water slowly. Too much water makes the dough tough. Roll the dough out thin, around 1/8 inch. Thinner dough means a crunchier crust. Fry the hand pies in hot oil, about 350°F. This helps them cook fast and keeps them crispy. One big mistake is over-mixing the dough. Mix just until it comes together. Another mistake is not sealing the edges well. Wet the edges with water before folding. Press them tightly to avoid leaks while frying. Frying at low heat makes the dough soggy. Always check that your oil is hot enough before adding the pies. You will need a few key tools for perfect hand pies. A pastry cutter helps mix the butter into the flour. Use a rolling pin to roll out the dough. A round cutter or glass makes it easy to cut circles. A deep frying pan is best for frying. Finally, have paper towels ready to drain excess oil. Pro Tips Chill Your Dough: Make sure to chill your dough for at least 30 minutes; this helps to keep the butter cold, resulting in a flakier crust. Seal it Well: Ensure that the edges of the hand pies are sealed tightly to prevent the filling from leaking out during frying. Fry in Batches: Fry the hand pies in small batches to avoid overcrowding the pan, which can lower the oil temperature and make them greasy. Experiment with Fillings: Don’t hesitate to try different fillings like cherry, peach, or even savory options like cheese and spinach for a unique twist. {{image_2}} You can fill your fried hand pies with many tasty options. For sweet pies, use fruit fillings like apple, cherry, or peach. You can also mix in spices like cinnamon or nutmeg for extra flavor. For a savory twist, try fillings like cheese, seasoned meat, or veggies. Think of flavors like cheesy spinach or spicy chicken. The choices are endless, so explore what you love! If you need a gluten-free option, use a gluten-free flour blend. Look for one that works well for baking. You can also try almond flour or oat flour for a nutty flavor. For a vegan crust, replace butter with coconut oil or vegan butter. Use cold water as usual. These substitutions create a crust that is just as flaky and delicious. You won’t miss the traditional version at all! Add special touches to your hand pies for a unique taste. Mix herbs like rosemary or thyme into your dough for a savory kick. You can also sprinkle cheese into the crust for a rich flavor. For sweet pies, drizzle honey or maple syrup inside before sealing. Adding a pinch of salt to the filling can balance sweetness nicely. Experiment with these ideas to make your fried hand pies stand out! After making these tasty fried hand pies, you want to keep them fresh. Place them in an airtight container. This helps keep the pies crispy and delicious. If you plan to eat them in a day or two, storing them at room temperature works well. For longer storage, you should refrigerate them. This keeps them safe and tasty for up to a week. When it's time to enjoy your hand pies again, reheating is key. For the best taste, use an oven instead of a microwave. Preheat your oven to 350°F (175°C). Place the hand pies on a baking sheet. Heat them for about 10-15 minutes until they are warm and crispy again. If you want to use a microwave, heat them for 20-30 seconds. However, be aware that they might lose some crispiness. Freezing is a great option for long-term storage of hand pies. Before freezing, let the pies cool completely. Then, wrap each pie in plastic wrap. Place the wrapped pies in a freezer bag or container. This keeps them fresh for up to three months! When you're ready to eat, thaw them in the fridge overnight. After thawing, reheat them in the oven for the best texture. The best oil for frying hand pies is one with a high smoke point. I recommend using vegetable oil or canola oil. These oils heat well and do not change the flavor of the pies. You want the oil to be hot enough for a crispy crust but not too hot to burn them. Yes, you can bake hand pies if you prefer a lighter option. Preheat your oven to 375°F (190°C). Place the filled pies on a baking sheet lined with parchment paper. Brush the tops with an egg wash for a nice golden color. Bake for about 20-25 minutes or until golden brown. They will not be as crispy but will still be delicious. To check if the oil is hot enough, drop a small piece of dough into the oil. If it sizzles and rises to the top, the oil is ready. You can also use a thermometer to check for about 350°F (175°C). This temperature helps the pies cook evenly without burning. Fried hand pies are a fun treat. We covered ingredients, steps, and tips to make them. You can tweak fillings and crusts for your taste. Remember to store and reheat them properly for best flavor. Experiment with oils and cooking methods too. Making these pies is simple and rewarding. Enjoy crafting your crispy snacks and share them with friends!

Fried Hand Pies Crispy Delight for Every Occasion

If you crave a crispy treat for any gathering, fried hand pies are the answer! These delightful snacks are easy

To make this dish, you need a few key ingredients. Here’s what you'll need: - 4 salmon fillets - 2 tablespoons olive oil - 4 cloves garlic, minced - 1 cup cherry tomatoes, halved - 1 cup fresh spinach - 1 cup heavy cream - ½ cup grated Parmesan cheese - 1 teaspoon Italian seasoning - Salt and pepper to taste - Fresh basil leaves for garnish These ingredients bring rich flavors to the dish. The salmon is the star, while the garlic and cream create a lovely sauce. You can add some extra touches to make it unique. Here are some ideas: - Red pepper flakes for heat - Lemon zest for brightness - Chopped parsley for freshness These additions can enhance the flavor profile and give your dish a personal touch. Pair this salmon with sides that balance its richness. Here are some great options: - Garlic bread to soak up the sauce - Pasta tossed in olive oil and herbs - Steamed vegetables for a light contrast These sides not only complement the creamy garlic Tuscan salmon but also make your meal more satisfying. Enjoy experimenting with these combinations! {{ingredient_image_1}} First, heat the olive oil in a large skillet over medium heat. While it warms, season the salmon fillets with salt and pepper. Place the salmon skin-side down into the skillet. Cook for about 5-6 minutes on each side. You want the salmon to be golden brown and cooked through. Once done, remove the salmon from the skillet and set it aside on a plate. In the same skillet, add the minced garlic. Sauté it for about 1 minute until it smells amazing. Be careful not to burn the garlic, as it can turn bitter. Next, add the halved cherry tomatoes. Cook them for about 3-4 minutes. You want them to blister and release their juices. Then, stir in the fresh spinach and cook until it wilts, which takes about 2 minutes. Pour in the heavy cream and add the grated Parmesan cheese. Stir well to mix everything together. Let the sauce simmer for about 4-5 minutes until it thickens slightly. Add the Italian seasoning and adjust the salt and pepper to your taste. Now, it’s time to bring it all together. Carefully place the cooked salmon back into the skillet. Spoon some of the creamy sauce over each fillet. Let everything simmer for another 2-3 minutes to heat through. This step ensures the salmon absorbs all those rich flavors. Finally, remove the skillet from the heat. Garnish your dish with fresh basil leaves before serving. Enjoy your creamy garlic Tuscan salmon with a side of garlic bread or over pasta to soak up that delicious sauce! To cook salmon just right, start with fresh fillets. Look for bright colors and no strong smell. Season your salmon with salt and pepper before cooking. Heat olive oil in your skillet first. Place the salmon skin-side down for a nice sear. Cook for 5-6 minutes before flipping. This method gives a golden crust and keeps it juicy. Use a fork to check if it flakes easily; that's how you know it's done. For a creamier sauce, use heavy cream as the base. You can add a bit more Parmesan cheese too. This cheese adds rich flavor and helps thicken the sauce. Stir the sauce well after adding the cream. Let it simmer to blend all the flavors. If you want even more creaminess, try adding a splash of cream cheese. This will make the sauce even richer and more luxurious. When serving, place the salmon on a large platter. Pour the creamy sauce over the top for a beautiful look. Garnish with fresh basil leaves for a pop of color. You can also sprinkle more Parmesan cheese for extra flavor. Consider serving it with garlic bread or pasta. This will help soak up the delicious sauce. A colorful side salad adds freshness and makes the dish more appealing. Pro Tips Use Fresh Ingredients: Fresh salmon, garlic, and spinach will elevate the flavors of the dish, making it more vibrant and delicious. Don’t Overcook the Salmon: Salmon cooks quickly, so keep an eye on it to avoid dryness. It should flake easily but remain moist. Customize the Sauce: Feel free to add other vegetables like bell peppers or mushrooms to the sauce for added texture and flavor. Let it Rest: After cooking, let the salmon rest for a couple of minutes before serving. This helps retain its juices. {{image_2}} You can swap salmon for other fish like trout or tilapia. These fish cook quickly and absorb the creamy sauce well. Trout has a rich flavor similar to salmon. Tilapia is mild, making it a great choice for those who prefer less fishy tastes. Adjust cooking times based on the thickness of the fish. For a vegan version, use tofu or chickpeas instead of salmon. Both options soak up flavors and add protein. Use coconut cream in place of heavy cream for a rich texture. Nutritional yeast can replace Parmesan cheese, adding a cheesy flavor without dairy. Fresh herbs like basil or parsley will boost the taste. Feel free to add more veggies for color and nutrition. Zucchini, bell peppers, or mushrooms blend well with the dish. You can also toss in capers or olives for a salty kick. A squeeze of lemon juice brightens the flavors nicely. Experiment with herbs like thyme or oregano for a unique twist. To keep your creamy garlic Tuscan salmon fresh, start by letting it cool. Place the salmon in an airtight container. Make sure to include the sauce. Seal the container tightly. Store it in the fridge for up to three days. This will keep the flavors intact and prevent spoilage. When you’re ready to enjoy your leftovers, reheat them gently. The best way is to use a skillet on low heat. Add a splash of cream to keep it moist. Cover the skillet to trap heat and flavor. Stir occasionally until the salmon is warmed through. Avoid using high heat to prevent drying out the salmon. You can freeze creamy garlic Tuscan salmon, but do it with care. First, cool the salmon completely. Then, wrap it tightly in plastic wrap and foil. Place it in a freezer-safe container or bag. This will prevent freezer burn. It will stay good for up to three months. When you’re ready to eat, thaw it overnight in the fridge. Reheat gently as mentioned before for the best taste. You can serve this dish with many tasty sides. Garlic bread pairs well and adds crunch. Pasta is another great choice to soak up the creamy sauce. A fresh salad adds a nice contrast with its crispness. Roasted vegetables can also bring color and flavor to your meal. You want a balance of textures and tastes. Yes, you can use frozen salmon. Just make sure to thaw it first. Place it in the fridge overnight or run it under cold water. Once thawed, pat it dry before cooking. This helps the salmon sear better. The cooking time may change slightly, so check for doneness. To adjust the spice level, add crushed red pepper flakes. Start with a pinch and taste as you go. You can also add black pepper for more heat. If you prefer less spice, skip these additions. Balance the flavors to match your taste buds. This blog post covered how to make creamy garlic Tuscan salmon. You learned about key ingredients, cooking steps, and tips for perfecting the dish. We also looked at fun variations and how to store leftovers. Remember, cooking is about finding what you love. You can adjust flavors and textures to fit your taste. Enjoy trying new sides or swaps for salmon. Now, you have the tools and ideas to create a delicious meal. Dive into your kitchen and start cooking today!

Creamy Garlic Tuscan Salmon Rich and Flavorful Delight

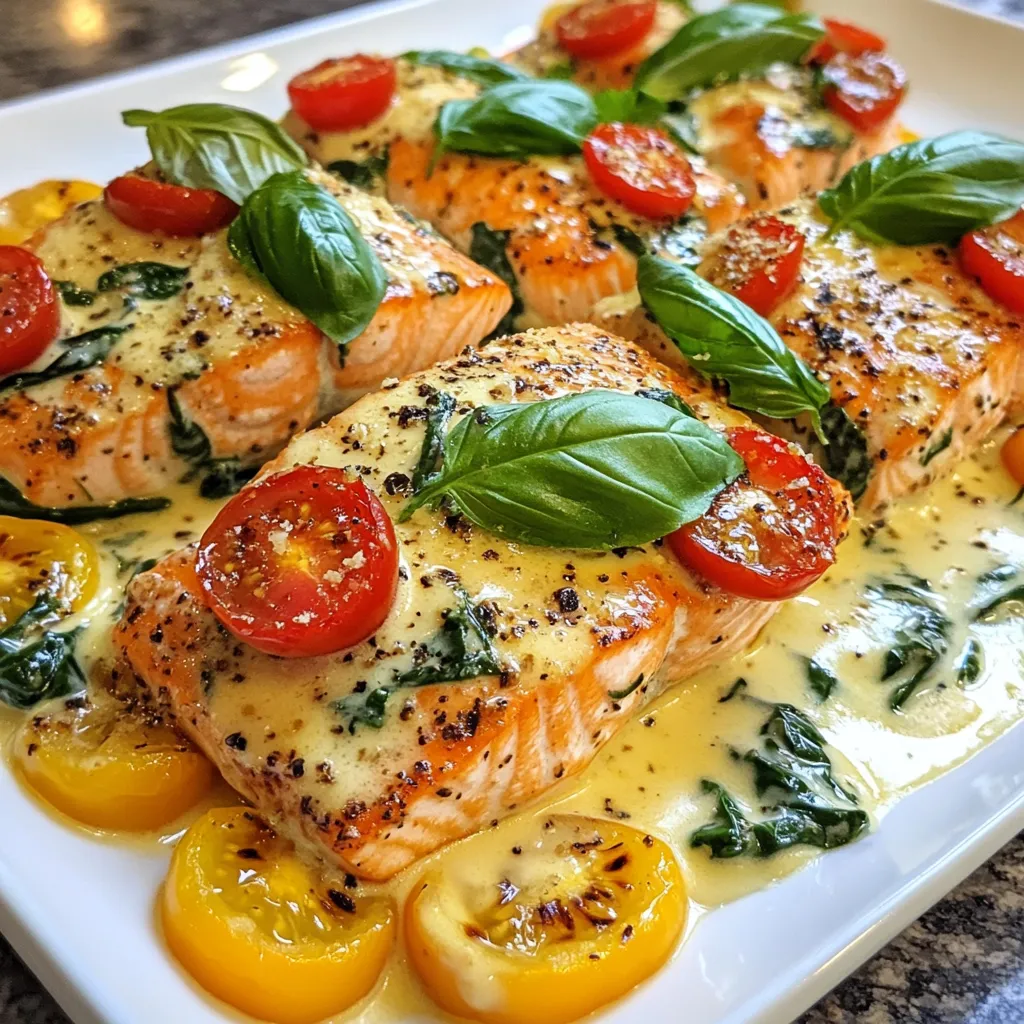
If you want a dish that bursts with flavor, try my Creamy Garlic Tuscan Salmon. This recipe combines tender salmon

For this creamy chicken Alfredo, you need: - 2 chicken breasts, boneless and skinless - 8 oz fettuccine pasta These two main ingredients create a hearty base. The chicken gives protein, while the fettuccine pasta brings a lovely texture. The sauce is where the magic happens. You will need: - 1 cup heavy cream - 1 cup grated Parmesan cheese - 2 tablespoons olive oil - 3 cloves garlic, minced - 1 teaspoon Italian seasoning - Salt and black pepper to taste The heavy cream creates that rich, creamy sauce. Parmesan cheese adds depth and flavor. Garlic and Italian seasoning bring the dish together. To finish your dish, grab: - Fresh parsley, chopped (for garnish) - Extra grated Parmesan cheese (for serving) These garnishes add color and freshness. The extra cheese gives you more of that great flavor we love. Enjoy your creamy chicken Alfredo with these simple yet delightful ingredients! {{ingredient_image_1}} To cook the fettuccine, start with a large pot. Fill it with salted water and bring it to a boil. Once boiling, add the fettuccine. Cook it according to the package instructions until it is al dente. This usually takes about 8 to 10 minutes. After cooking, drain the pasta in a colander. Be sure to save ½ cup of the pasta water. This water will help your sauce later. While the pasta cooks, take your chicken breasts. Season both sides with salt, black pepper, and Italian seasoning. This step adds flavor right to the meat. Next, get a large skillet and heat the olive oil over medium-high heat. Once the oil is hot, add the chicken. Cook the chicken for about 6 to 7 minutes on each side. Look for a golden brown color. Make sure it’s cooked all the way through. After cooking, take the chicken out of the skillet and let it rest for 5 minutes. Then, slice the chicken into strips. In the same skillet where you cooked the chicken, add the minced garlic. Sauté it for about 1 minute until it smells good. Then, pour in the heavy cream and bring it to a gentle simmer. Lower the heat to keep it warm. Gradually whisk in the grated Parmesan cheese. Keep whisking until the cheese melts and the sauce is smooth. If the sauce seems too thick, use the reserved pasta water to make it creamy. Now it’s time to bring it all together. Add the cooked fettuccine to the Alfredo sauce in the skillet. Toss the pasta around so it gets well coated. Place the sliced chicken strips on top of the pasta. Gently toss everything together until mixed. Taste it and adjust the seasoning with salt and pepper as needed. Divide the creamy chicken Alfredo between two plates. For a nice touch, garnish each plate with chopped fresh parsley. Don’t forget to sprinkle extra grated Parmesan on top. This will make your dish look special and taste even better! Enjoy your meal together. To cook chicken breasts right, start with even pieces. This helps them cook evenly. Season both sides well with salt, pepper, and Italian seasoning. Heat olive oil in a skillet over medium-high heat. Add the chicken when the oil is hot. Cook for 6-7 minutes on each side. Look for a golden brown color. Use a meat thermometer to check if it reaches 165°F. After cooking, let the chicken rest for 5 minutes. This helps keep it juicy when you slice it. Your Alfredo sauce might be too thick at times. If it is, don’t worry! Use the reserved pasta water to fix it. Start with a little bit, about 1-2 tablespoons. Stir it into the sauce until it’s just right. The sauce should coat the pasta nicely without being runny. If you want a richer taste, add more grated Parmesan. Always taste your sauce. Adjust with salt and pepper if needed. This way, you get the perfect creamy texture every time. Cooking fettuccine is simple but needs your attention. First, boil a large pot of salted water. This gives flavor to the pasta. Once it’s boiling, add the fettuccine. Stir it occasionally to prevent sticking. Check the pasta after 8-10 minutes for doneness. It should be al dente, or firm to the bite. Reserve some pasta water before draining. This water helps adjust your sauce later. After draining, don’t rinse the pasta. The starch helps the sauce stick better. Enjoy your creamy Chicken Alfredo with perfectly cooked fettuccine! Pro Tips Use Fresh Ingredients: Always opt for fresh chicken and high-quality Parmesan cheese for the best flavor and creaminess in your Alfredo sauce. Do Not Overcook the Pasta: Make sure to cook the fettuccine until al dente, as it will continue to cook slightly when tossed with the hot Alfredo sauce. Adjust Sauce Consistency: If your Alfredo sauce becomes too thick, gradually add the reserved pasta water until you achieve your desired creaminess. Rest the Chicken: Let the chicken rest for a few minutes after cooking to keep it juicy and tender before slicing. {{image_2}} You can make your Chicken Alfredo even better by adding vegetables. Fresh spinach is a great choice. It wilts nicely and adds a pop of color. Broccoli or peas also work well. Just steam them and toss them in with the pasta. This gives you flavor and extra nutrients. If you want a change from chicken, try shrimp or turkey. Shrimp cooks quickly and adds a nice flavor. Turkey is leaner and still tasty. You can even use tofu for a vegetarian option. Season it well for the best taste. These swaps keep your meal exciting and fresh. Cheese is key in Alfredo. While Parmesan is classic, you can use others. Pecorino Romano gives a sharper taste. For a creamier sauce, try adding cream cheese. You can mix a bit of mozzarella for extra gooeyness. Experimenting with cheese keeps the dish fun and flavorful. After enjoying your Chicken Alfredo, let the leftovers cool down. Place the pasta and chicken in an airtight container. This helps keep the dish fresh. Store it in the fridge for up to three days. If you want to keep it longer, consider freezing. To reheat your Chicken Alfredo, use the microwave or stove. If using the microwave, place the pasta in a bowl. Add a splash of milk or cream to keep it moist. Heat in short bursts, stirring often. On the stove, warm it in a pan over low heat. Stir gently, adding a little liquid if needed. This helps the sauce stay creamy. For freezing, place the Chicken Alfredo in a freezer-safe container. You can freeze it for up to three months. When you're ready to eat, thaw it in the fridge overnight. Reheat using the methods mentioned above. Note that the sauce may change in texture, but it will still taste great! Yes, you can use other pasta types! While fettuccine is classic, penne or rigatoni work well too. These shapes hold sauce nicely. Just remember to adjust cooking times based on the pasta type. You can use half-and-half or milk mixed with butter. This gives a creamy texture without all the fat. For a lighter option, use Greek yogurt or a cashew cream if you want a dairy-free choice. You can store Chicken Alfredo in the fridge for about three days. Make sure to keep it in an airtight container. When reheating, add a splash of milk or cream to help revive the sauce. In this post, I covered how to make Chicken Alfredo. We explored the key ingredients like pasta, chicken, and sauce. I shared step-by-step instructions to guide your cooking. You learned tips for perfect chicken and sauce. Variations let you add your own twist, while storage info helps keep leftovers fresh. Remember, cooking is fun and allows for creativity. Don't be afraid to try new things! Enjoy your delicious Chicken Alfredo!

Two Person Chicken Alfredo Creamy Pasta Delight

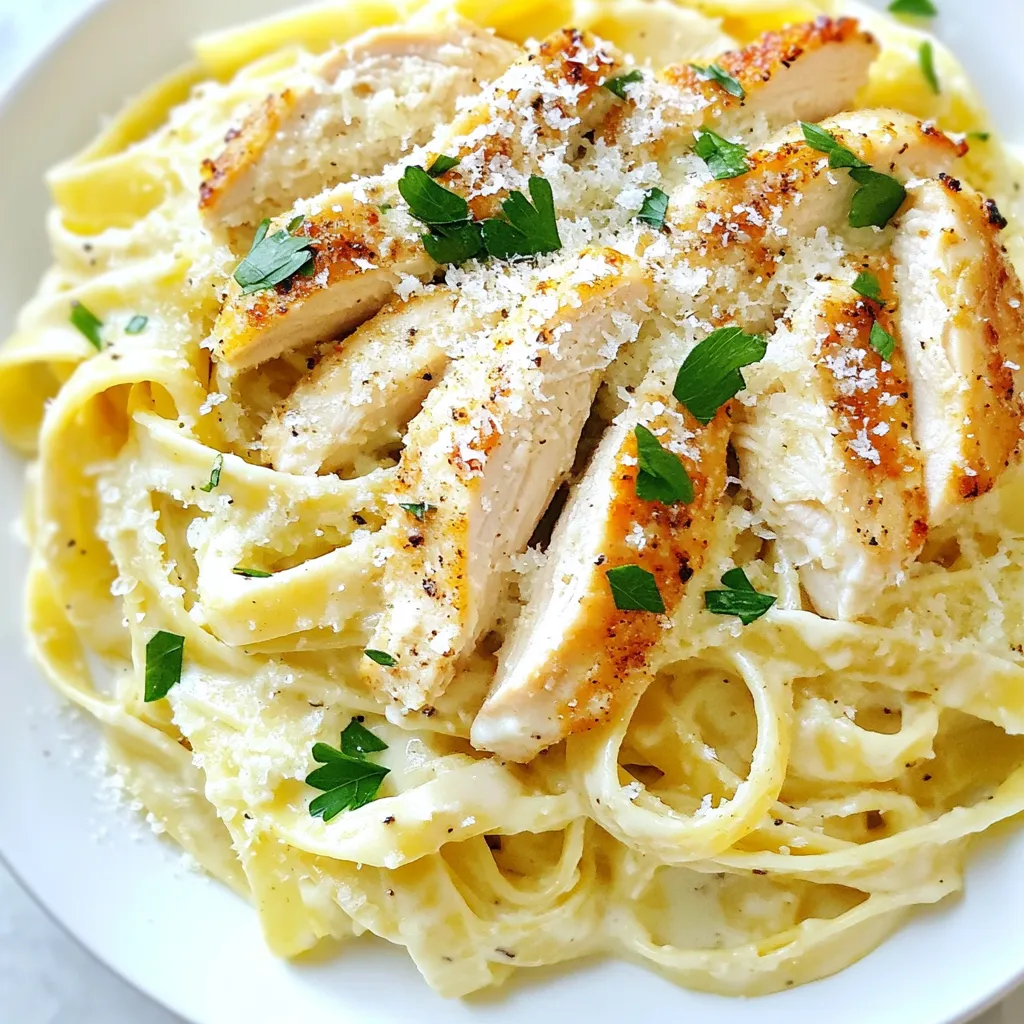
Craving a rich and creamy dish that’s perfect for two? Look no further! My Two Person Chicken Alfredo brings comfort

To create the best sweet and sour chicken, gather these fresh ingredients. Each one plays a key role in adding flavor. - 1 lb chicken breast, cut into bite-sized pieces - 1 cup bell peppers (red, green, and yellow), diced - 1 cup pineapple chunks (fresh or canned) - 1 medium onion, diced - 2 cloves garlic, minced - 1 cup sugar snap peas - Sauce Ingredients: - ½ cup ketchup - ¼ cup apple cider vinegar - 2 tablespoons soy sauce - 2 tablespoons cornstarch - 1 teaspoon ginger, grated - 3 tablespoons vegetable oil - Salt and pepper to taste These ingredients blend together to create a colorful and tasty meal. The chicken gives protein, while the vegetables add crunch and color. Pineapple adds the sweet touch. The sauce brings everything together with its tangy flavor. You can find these ingredients at any grocery store. This dish is easy to make, and it tastes great! {{ingredient_image_1}} Coating with Cornstarch First, take 1 pound of chicken breast. Cut it into bite-sized pieces. Place the chicken in a bowl. Add 2 tablespoons of cornstarch, along with salt and pepper. Mix well to coat each piece evenly. This will help the chicken stay crispy when cooked. Sautéing Chicken Heat 2 tablespoons of vegetable oil in a large skillet or wok over medium-high heat. Once hot, add the coated chicken pieces. Cook until golden brown, about 5 to 7 minutes. Make sure to stir occasionally. Once cooked, remove the chicken from the skillet and set it aside. Sautéing Onion and Garlic In the same skillet, add 1 tablespoon of vegetable oil. Add 1 medium diced onion and 2 minced garlic cloves. Sauté for about 3 minutes. You want the onion to turn translucent and fragrant. Adding Peppers and Sugar Snap Peas Next, add 1 cup of diced bell peppers and 1 cup of sugar snap peas to the skillet. Stir and cook for another 3 to 4 minutes. The veggies should start to soften but still have a nice crunch. Mixing in Pineapple and Chicken Now, stir in 1 cup of pineapple chunks and the browned chicken pieces. Mix everything well so the chicken and veggies combine nicely. Adding Sauce and Cooking Together In a separate bowl, mix together ½ cup of ketchup, ¼ cup of apple cider vinegar, 2 tablespoons of soy sauce, and 1 teaspoon of grated ginger. Pour this sauce over the chicken and veggies. Cook everything together for another 3 to 4 minutes. Stir occasionally until the sauce thickens and coats the chicken and vegetables well. Adjust seasoning if needed. To get the sauce just right, you need to adjust its thickness. If it seems too thin, let it cook a bit longer. The heat will help it thicken. If it's too thick, add a little water or broth. This will help balance your sauce. Balancing sweet and sour flavors is key. Use the right mix of ketchup and apple cider vinegar. If it tastes too sweet, add more vinegar. If it's too sour, add a bit more sugar. Taste as you go to get it just right. Searing chicken gives it a nice brown color and great flavor. Heat your skillet and add oil first. Cook the chicken in batches if needed. This avoids crowding the pan. Crowded chicken steams instead of sears. Stir-frying is quick and keeps the chicken juicy. Cook it on high heat for just a few minutes. This method works well for bite-sized pieces. Both methods can yield tasty results. Presentation makes your meal more inviting. Serve Sweet and Sour Chicken over fluffy rice. This adds a nice base and helps soak up the sauce. For garnishing, use extra pineapple chunks. Chopped green onions add color and freshness. You could also sprinkle sesame seeds for crunch. A beautiful plate makes the meal even better! Pro Tips Choose the Right Chicken: Opt for boneless, skinless chicken breasts for a quicker cooking time and a leaner dish. Fresh vs. Canned Pineapple: Using fresh pineapple will enhance the flavor and add a lovely texture compared to canned varieties. Perfectly Cooked Vegetables: To maintain their crunch, add the bell peppers and sugar snap peas towards the end of cooking. Thickening the Sauce: If the sauce isn't thickening to your liking, mix a little more cornstarch with water and add it to the skillet. {{image_2}} You can switch up the protein in sweet and sour chicken. Shrimp works great for a lighter dish. It cooks fast and adds a nice flavor. Just sauté it until it turns pink. Tofu is another option. Use firm tofu, and press it to remove extra water. Cut it into cubes and sauté until golden. Both options make this dish unique. You don’t have to stick to bell peppers and snap peas. Broccoli adds a nice crunch and absorbs the sauce well. Carrots bring sweetness and color. Toss in zucchini for a softer texture, or add mushrooms for an earthy taste. Feel free to mix and match your favorites. The sauce plays a big role in sweet and sour chicken. You can make your own sauce for fresh flavors. Combine ketchup, vinegar, soy sauce, and ginger for a homemade touch. Store-bought sauces can save time. Look for one with no added preservatives. Both options can make your dish shine. To keep your sweet and sour chicken fresh, place it in an airtight container. You can store it in the fridge for up to three days. Make sure it cools down before sealing the container. This helps keep the flavors intact. If you want to keep it longer, freezing is a great choice. - Refrigerator Guidelines - Store in an airtight container. - Consume within three days for best taste. - Freezer Options - Place in a freezer-safe container or bag. - It can last for up to three months. Reheating sweet and sour chicken is simple. You want to keep the chicken moist and the sauce flavorful. Here are the best methods to reheat it: - Best Methods for Reheating - Microwave: Place the chicken in a microwave-safe dish. Cover it with a damp paper towel. Heat for one to two minutes. Stir halfway through for even heating. - Stovetop: Heat a skillet over low heat. Add a splash of water or broth to keep it moist. Stir often until heated through. - Oven: Preheat to 350°F (175°C). Place the chicken in a baking dish. Cover with foil and heat for about 15 minutes or until warm. Following these steps helps ensure your dish tastes great, even as leftovers! Sweet and sour chicken is a fun dish that mixes flavors. It has juicy chicken pieces, colorful veggies, and sweet pineapple. The sauce combines ketchup, vinegar, and soy sauce, giving it a tangy punch. This dish is bright and tasty, making it a favorite for many! Yes, you can make sweet and sour chicken ahead of time. Here are some meal prep tips: - Cook the chicken and veggies separately. - Store them in airtight containers in the fridge. - Make the sauce ahead and keep it in a jar. - Combine everything when you’re ready to serve. This way, the dish stays fresh and tasty. Sweet and sour chicken pairs well with several sides. Here are some ideas: - Fluffy cooked rice to soak up the sauce. - Steamed broccoli for a healthy crunch. - Fried rice for extra flavor. - A light salad for freshness. These sides will make your meal complete and satisfying! This blog post walked you through making sweet and sour chicken. We covered key ingredients, step-by-step cooking tips, and fun variations. You learned how to store leftovers and reheat them for the best taste. Remember, you can customize this dish with different proteins or vegetables. Sweet and sour chicken is not just great for dinner but a perfect meal prep option too. Enjoy your cooking and share your delicious results!

Sweet and Sour Chicken Flavorful Dinner Delight

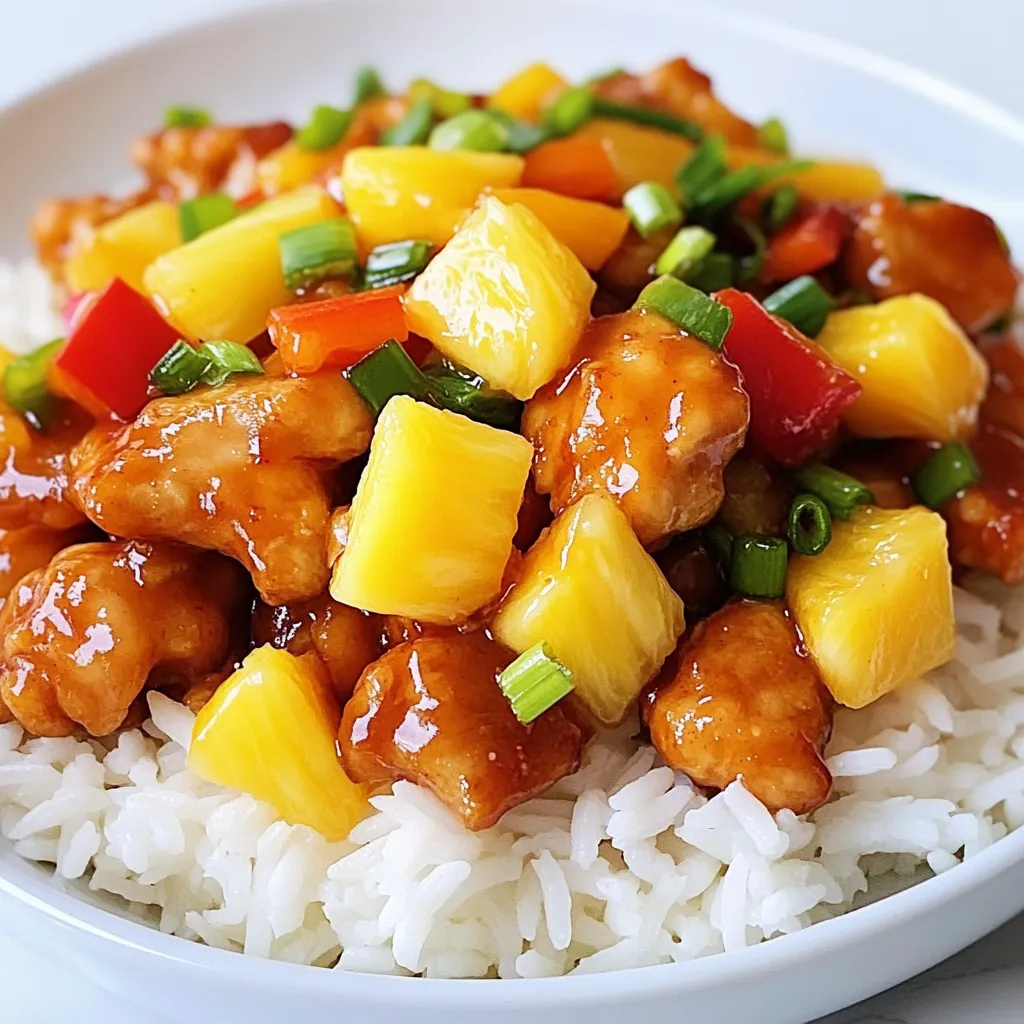
Looking for a dinner idea that balances sweet and tangy flavors? Sweet and Sour Chicken is your answer! This dish

- 1 ½ cups graham cracker crumbs - ½ cup unsalted butter, melted - 2 cups cream cheese, softened - ¾ cup granulated sugar - 2 large eggs - 1 teaspoon vanilla extract - Zest of 1 lemon - ¼ cup freshly squeezed lemon juice - 1 cup fresh blueberries (plus extra for topping) - 1 tablespoon cornstarch - ½ teaspoon salt To make tasty blueberry lemon cheesecake bars, you need some key ingredients. First, graham cracker crumbs create a sweet and crunchy crust. You’ll also need melted unsalted butter to bind these crumbs together. Next, cream cheese is essential for that creamy texture we love. Granulated sugar sweetens the bars just right. You'll add two eggs for structure, and vanilla extract gives a warm flavor. Lemon zest and fresh juice add a bright, tangy kick. Fresh blueberries bring sweetness and color to the bars. Cornstarch helps thicken the filling, while a pinch of salt rounds out the flavors. - Alternative crust options - Dairy-free cream cheese options - Sugar substitutes If you want to switch things up, consider using crushed nuts for the crust. Almonds or pecans can add a nice crunch. For a dairy-free option, look for vegan cream cheese at the store. If you need a sugar substitute, try using stevia or monk fruit. These options can keep the sweetness without the calories. Just check for the right amount to use when swapping. - 9x9 inch baking pan - Mixing bowls - Electric mixer - Parchment paper You will need a few tools to make these bars. A 9x9 inch baking pan is perfect for this recipe. Mixing bowls are important for combining ingredients. An electric mixer helps beat the cream cheese quickly and easily. Don’t forget parchment paper! It makes lifting the bars out of the pan much easier. This way, you can cut them into neat squares without any mess. {{ingredient_image_1}} To start, preheat your oven to 350°F (175°C). This step helps get the crust nice and golden. In a medium bowl, mix together 1 ½ cups of graham cracker crumbs and ½ cup of melted unsalted butter. Stir until the crumbs are fully coated. Next, press this mixture firmly into the bottom of a greased 9x9 inch baking pan. Make sure it’s even. Bake the crust for 8-10 minutes until it looks set. Let it cool while you prepare the filling. In a large mixing bowl, beat 2 cups of softened cream cheese and ¾ cup of granulated sugar. Mix until it’s smooth and creamy, about 2-3 minutes. Then, add in 2 large eggs one at a time. Make sure to beat well after each egg. Next, mix in 1 teaspoon of vanilla extract, the zest of 1 lemon, and ¼ cup of freshly squeezed lemon juice until everything blends well. In a small bowl, toss 1 cup of fresh blueberries with 1 tablespoon of cornstarch. This helps the blueberries stay in place. Gently fold the blueberries into the cheesecake mixture. Now, pour the cheesecake filling over the cooled crust. Spread it evenly to cover the crust. Bake it in your preheated oven for 30-35 minutes. The edges should be set, but the center will still jiggle a bit. After baking, allow the cheesecake bars to cool to room temperature. Then, refrigerate them for at least 4 hours, but overnight is best for perfect texture. Once chilled, lift the bars out using the parchment paper overhang. Cut them into squares or rectangles, and they are ready to serve! Using room temperature ingredients is key. When cream cheese is cold, it stays lumpy. Let it sit out for about 30 minutes before mixing. This helps create a smooth filling. When adding blueberries, coat them in cornstarch first. This helps prevent them from sinking. Gently fold them into the batter with a spatula. Be careful not to mash them. To check if your bars are done, look for set edges. The center should still jiggle slightly. This means it will firm up as it cools. After baking, let the bars cool at room temperature first. Then, refrigerate them for at least 4 hours. Chilling overnight gives the best texture. Top your cheesecake bars with extra blueberries for color. A dusting of powdered sugar adds a nice touch. You can also drizzle with lemon glaze for more flavor. For drinks, serve with iced tea or lemonade. The tartness pairs well with the sweet bars. A cup of coffee also enhances the dessert experience. Pro Tips Use Room Temperature Cream Cheese: This ensures a smooth and creamy texture without lumps in your cheesecake mixture. Don’t Overbake: The center should be slightly jiggly when you take it out of the oven; it will continue to set as it cools. Chill Overnight: For the best flavor and texture, let the cheesecake bars chill in the refrigerator overnight. Fresh Blueberries: Using fresh blueberries will give the bars a burst of flavor; avoid using frozen as they may release too much moisture. {{image_2}} You can swap fruits to change the flavor of your bars. - Using different berries: Try using raspberries or strawberries. They add their own taste and color. - Incorporating citrus flavors: Lime or orange zest can add a fresh twist. They work well with the cream cheese. Changing the base can also make a big difference. - Gluten-free crust options: Use almond flour or gluten-free graham crackers. It tastes great and fits many diets. - Using a thicker or thinner base: Adjust the amount of crumbs and butter. A thicker base feels heartier while a thinner base is lighter. Adding new flavors can bring excitement to your bars. - Adding spices: A pinch of cinnamon or nutmeg can warm up the taste. Just a little can make a big impact. - Chocolate or white chocolate additions: Mix in chocolate chips for a sweet surprise. They pair well with the creamy filling. To keep your cheesecake bars fresh, first let them cool. Once cool, cut them into squares. Place the squares in an airtight container. Store them in the fridge. They will last about 4-5 days this way. If you want to save some for later, you can freeze them. Wrap each square in plastic wrap tightly. Then, place them in a freezer-safe bag or container. They can last up to three months in the freezer. To enjoy them later, take the bars out of the freezer. Let them thaw in the fridge overnight. This helps keep the taste and texture just right. In the fridge, your cheesecake bars stay fresh for about 4-5 days. If you freeze them, they last longer, around three months. Always label your containers with dates. This way, you know when they were made. Yes, you can make blueberry lemon cheesecake bars ahead of time. I often prepare them the day before serving. This allows the flavors to blend well and the texture to set properly. Just store them in the fridge until you are ready to serve. They taste even better after chilling overnight! If the center of your cheesecake bars is still jiggly, it might need more baking. The edges should look set while the center can jiggle a bit. This is normal. However, if it looks too wet, bake for a few more minutes. Just be careful not to overbake, as that can make them dry. To make your cheesecake bars more tart, add extra lemon juice or lemon zest. Start with an additional tablespoon of lemon juice. You can also use a bit of sour cream in the filling for more tang. Taste as you go to find the balance you love. Yes, you can substitute some ingredients. For the crust, try using crushed nuts or cookies instead of graham crackers. You can also use dairy-free cream cheese if needed. If you want less sugar, consider a sugar substitute like honey or agave. Just keep in mind, it may alter the taste and texture. In this blog post, I shared the essential steps to create delicious blueberry lemon cheesecake bars. I covered ingredients, equipment, and provided clear instructions for each stage of the process. Remember to use room temperature ingredients for the best texture. You can customize your bars by swapping fruits or altering the crust. Following my storage tips will keep your treats fresh. Enjoy making this tasty dessert that combines sweet blueberries and zesty lemon!

Blueberry Lemon Cheesecake Bars Tasty Dessert Delight

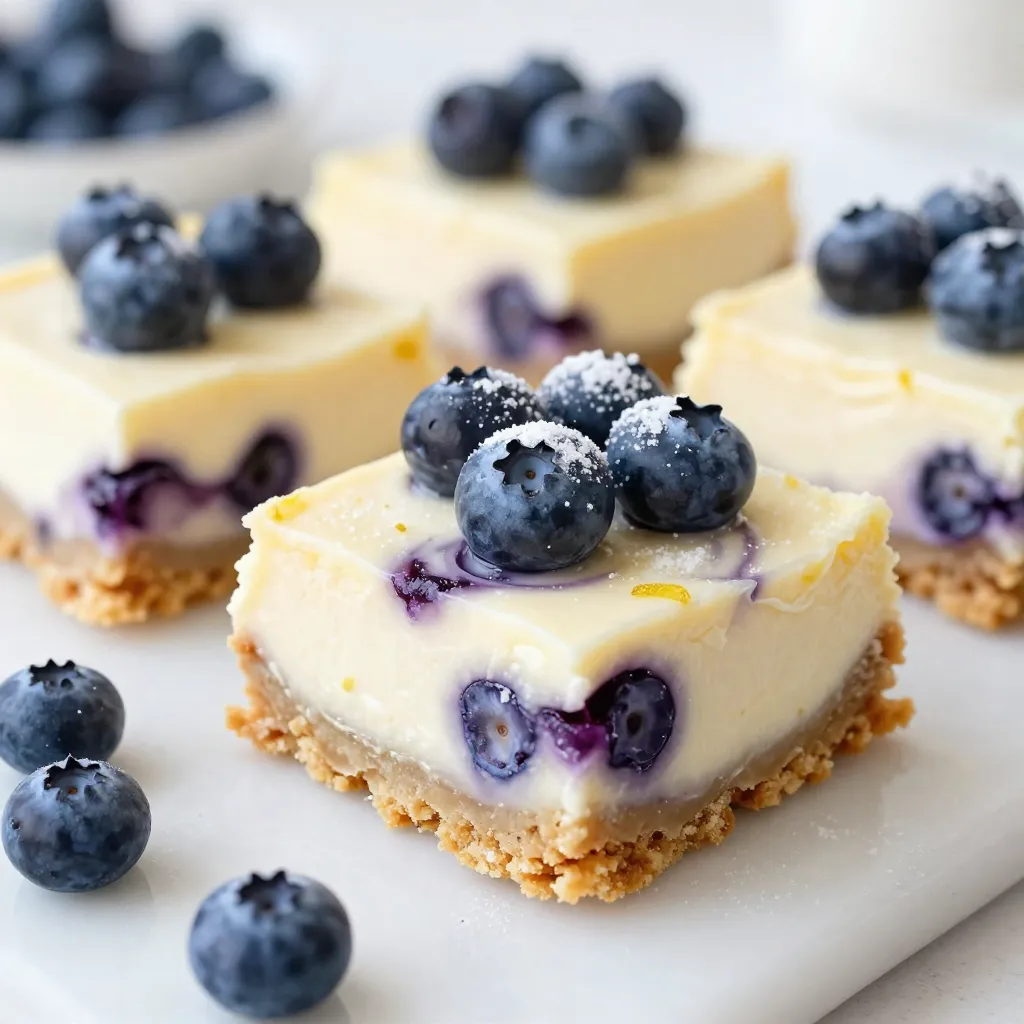
If you love sweet and tangy treats, you’ll adore these Blueberry Lemon Cheesecake Bars! With a buttery graham cracker crust

Older posts
Newer posts
← Previous Page1 … Page157 Page158 Page159 … Page164 Next →

dsad

© 2026 easycookingbite • Built with GeneratePress

Our Policies

  • Copyright Policy
  • Cookie Policy
  • GDPR Policy
  • Privacy Policy
  • Disclaimer
  • Terms Of Use

More Information

  • Home
  • About
  • Contact
  • Appetizers
  • Dessert
  • Dinner
  • Drinks
©2026, easycookingbite About Back To Top