Skip to content
DisclaimerTerms Of UseGDPR PolicyCookie Policy

easycookingbite

  • Home
  • Drinks
  • Appetizers
  • Dinner
  • Dessert
  • About
  • Contact
  • Privacy Policy
DisclaimerTerms Of UseGDPR PolicyCookie Policy

Lily

To make Garlic Parmesan Roasted Cauliflower, you will need a few simple items. Here’s what you'll gather: - 1 medium head of cauliflower, cut into florets - 3 tablespoons olive oil - 4 cloves garlic, minced - 1 teaspoon garlic powder - 1/2 teaspoon paprika - 1/2 teaspoon salt - 1/4 teaspoon black pepper - 1/2 cup grated Parmesan cheese - 2 tablespoons fresh parsley, chopped (for garnish) These ingredients come together to create a dish that is both tasty and easy. The garlic gives a strong flavor, while the Parmesan adds a nice cheesy touch. The spices help to elevate the taste, making this side dish a favorite. You won’t need any fancy tools or hard-to-find items. Just some fresh ingredients from your local store will do. {{ingredient_image_1}} - Preheat your oven to 425°F (220°C). - Prepare the baking sheet with parchment paper. This helps with easy cleanup. - In a large bowl, combine cauliflower florets with olive oil and spices. - Add minced garlic, garlic powder, paprika, salt, and black pepper. - Toss well to ensure even coating. This makes every bite tasty! - Spread the cauliflower on the baking sheet. Make sure the florets are not too close. - Roast in the oven for 20 minutes. Stir halfway to help them cook evenly. - After 20 minutes, take out the baking sheet. - Sprinkle grated Parmesan cheese over the cauliflower. - Return it to the oven and roast for another 10-15 minutes. Look for golden brown cheese. To get the best Garlic Parmesan Roasted Cauliflower, avoid overcrowding the baking sheet. If you pack the florets too tightly, they will not crisp up nicely. Instead, give each piece space to breathe. Stirring halfway through cooking helps too. This step ensures that all sides roast evenly and get golden brown. For extra flavor, consider adding more spices. You can try red pepper flakes for heat or dried thyme for a herbal touch. Another great idea is to drizzle a little olive oil before serving. This adds richness and makes the dish shine. Presentation matters! Garnish your cauliflower with fresh parsley and a sprinkle of Parmesan. This adds color and makes it look appetizing. You can also serve with lemon wedges. A squeeze of fresh lemon brightens the flavors and adds a nice zing. Pro Tips Even Roasting: Make sure to spread the cauliflower florets in a single layer on the baking sheet. Overcrowding can lead to steaming instead of roasting, preventing that desired crispiness. Cheese Variations: Experiment with different types of cheeses like Gruyère or Cheddar for a unique flavor twist. Just remember that the cooking time may vary slightly. Extra Flavor: For a kick, add a pinch of red pepper flakes or a splash of balsamic vinegar before roasting. This will elevate the dish with an extra layer of flavor. Garnishing Tips: Fresh herbs like thyme or basil can be used instead of parsley for a different aroma and taste. Also, consider adding toasted nuts for crunch! {{image_2}} You can swap out Parmesan cheese for other options. Pecorino Romano adds a sharp taste. Grana Padano offers a milder flavor. If you want a dairy-free option, try vegan Parmesan. Nutritional yeast gives a cheesy flavor too! Roasted cauliflower pairs well with other veggies. Try adding broccoli or bell peppers for more color. Carrots can bring sweetness, while zucchini adds moisture. For a tangy twist, drizzle balsamic glaze over the roasted veggies. It adds depth and brightness. Customizing spices can boost your dish. Fresh herbs like thyme or rosemary bring a fragrant touch. For a spicy kick, add chili flakes or cayenne pepper. Adjust the heat to your liking. This way, you can make each batch unique! To keep your Garlic Parmesan roasted cauliflower fresh, place leftovers in an airtight container. It’s best to refrigerate them within two hours of cooking. The cauliflower will stay good for up to three days in the fridge. Make sure to check for any signs of spoilage before eating. To reheat, you can use the oven or an air fryer. Both methods keep the cauliflower crispy. Heat your oven to 375°F (190°C) and bake for about 10 minutes. If you use an air fryer, set it to 350°F (175°C) for about 5-7 minutes. You can also add leftover cauliflower to salads or grain bowls for a quick meal. If you want to save cauliflower for later, freezing is a great option. Make sure to let it cool completely before freezing. Place the cooled cauliflower in a freezer-safe bag or container. It should last about three months in the freezer. When you’re ready to eat, thaw it in the fridge overnight. Reheat as mentioned above for the best results. You can serve Garlic Parmesan Roasted Cauliflower with many dishes. It pairs well with grilled chicken, steak, or fish. It also works great as a side for pasta or risotto. For a vegetarian meal, enjoy it with quinoa or a fresh salad. Consider adding lemon wedges for brightness. Yes, you can use frozen cauliflower. Just make sure to thaw and drain it first. Frozen cauliflower may not get as crispy as fresh. To improve texture, roast it a bit longer. Yes, Garlic Parmesan Roasted Cauliflower is gluten-free. None of the ingredients contain gluten. This makes it a great choice for those with gluten sensitivity. Always check packaging if using pre-made items. To make this dish dairy-free, use a dairy-free cheese. Nutritional yeast is a great option for a cheesy flavor. You can also skip the cheese entirely for a lighter dish. Drizzle with extra olive oil for richness. Cutting cauliflower into florets is easy. Start by removing the leaves from the head. Then, cut the head into quarters. Take each quarter and slice off the stem. Finally, break or cut each piece into bite-sized florets. Aim for uniform sizes for even cooking. This article guided you through making Garlic Parmesan Roasted Cauliflower. We covered important ingredients and easy steps for a flavorful dish. Remember to avoid overcrowding the baking sheet for perfect roasting. Explore variations with cheeses, spices, or even extra veggies for a personal touch. Store leftovers properly to enjoy them later. With these tips in mind, you're ready to create a tasty, healthy side dish. Embrace your cooking journey and have fun in the kitchen!

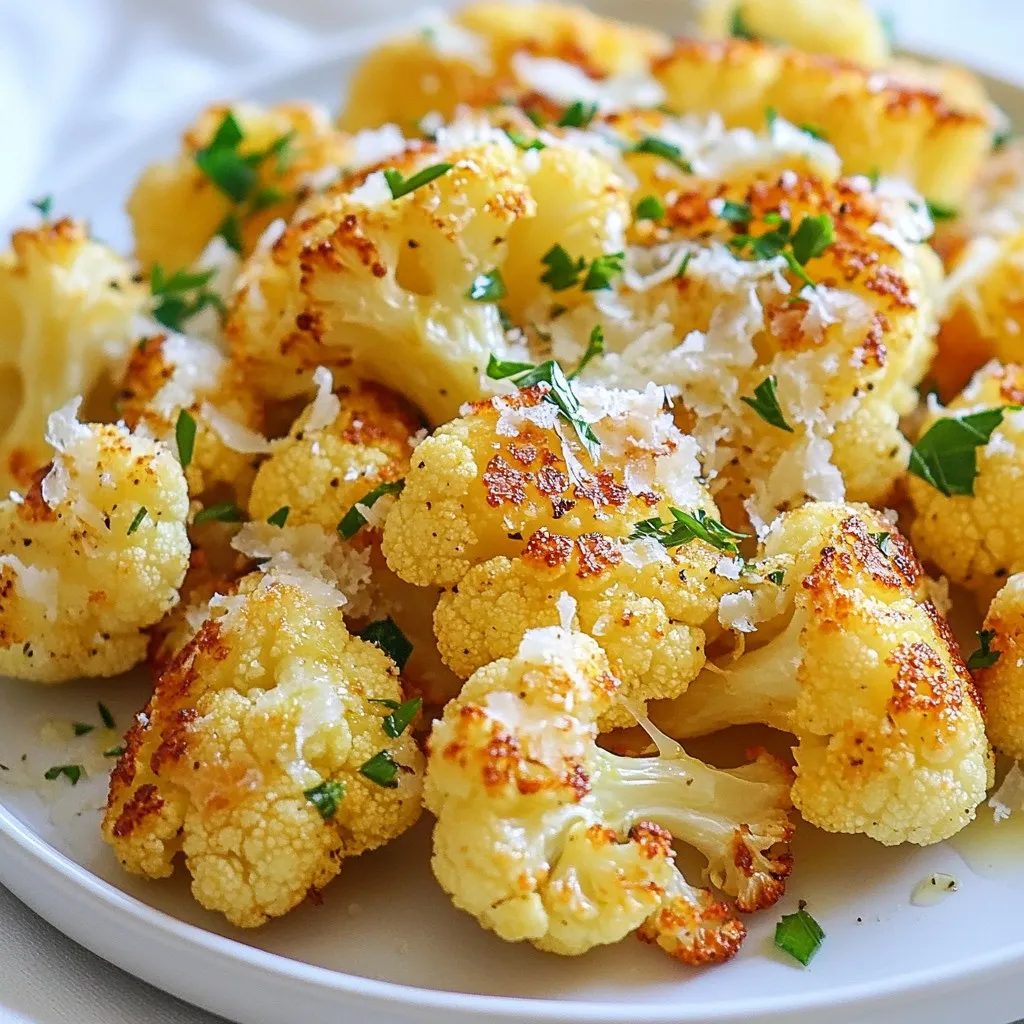
Garlic Parmesan Roasted Cauliflower Easy Side Dish

Looking for a tasty side dish that’s simple to make? Garlic Parmesan Roasted Cauliflower might just be your new favorite!

- 1 pound ground chicken - 1/2 cup grated Parmesan cheese - 1 cup breadcrumbs (preferably Italian seasoned) - 1/4 cup fresh parsley, chopped - 1 large egg - 2 cloves garlic, minced - 1 teaspoon dried oregano - 1 teaspoon salt - 1/2 teaspoon black pepper - 1 cup marinara sauce (store-bought or homemade) - 1 cup shredded mozzarella cheese - Olive oil for frying - Large mixing bowl - Skillet - Baking dish - Measuring cups and spoons - Spoon or scoop for shaping meatballs Gathering the right ingredients is key to making Chicken Parmesan Meatballs. Start with ground chicken as your base. It gives the meatballs a light taste. Next, add grated Parmesan cheese. This will add a nice, cheesy flavor. Breadcrumbs help bind everything together. I like using Italian seasoned breadcrumbs for extra taste. Chopped parsley adds a fresh touch. The egg acts as a binder and keeps the meatballs moist. Garlic brings a punch of flavor, while dried oregano gives it that Italian flair. Don’t forget salt and black pepper for seasoning. For the sauce, marinara is essential. It ties everything together. Lastly, shredded mozzarella cheese melts on top, creating a cheesy finish. For cooking, you’ll need a large mixing bowl to combine everything. A skillet is perfect for frying the meatballs. Use a baking dish to finish them in the oven. Measuring cups and spoons help ensure accuracy. A scoop or spoon will help you shape the meatballs evenly. With these ingredients and tools, you’re ready to create a flavorful dish that’s easy to make and delicious to eat! {{ingredient_image_1}} In a large mixing bowl, combine the following ingredients: - 1 pound ground chicken - 1/2 cup grated Parmesan cheese - 1 cup breadcrumbs - 1/4 cup fresh parsley, chopped - 1 large egg - 2 cloves garlic, minced - 1 teaspoon dried oregano - 1 teaspoon salt - 1/2 teaspoon black pepper Mix these ingredients until they come together. Do not overmix. You want a nice, sticky texture. This helps the meatballs hold their shape during cooking. Next, preheat your skillet over medium heat. Add a few tablespoons of olive oil. Once the oil is hot, shape the mixture into meatballs. Aim for 1 to 1.5 inches in size. Place the meatballs in the skillet but do not crowd them. This lets them cook evenly. Fry each side for about 5-7 minutes until they are golden brown and cooked through. You may need to cook them in batches. While the meatballs cook, preheat your oven to 375°F (190°C). After frying, transfer the meatballs to a baking dish. Pour 1 cup of marinara sauce over the meatballs, covering them well. Then, sprinkle 1 cup of shredded mozzarella cheese on top. Bake for 15-20 minutes. Look for bubbly and golden cheese as a sign they are done. After baking, let them cool for a few minutes before serving. To make great meatballs, avoid overmixing. When you combine the ground chicken with other ingredients, mix just until blended. If you mix too much, the meatballs become tough. When forming meatballs, use your hands. Shape them into balls about 1 to 1.5 inches wide. This size cooks evenly and stays juicy inside. Oil temperature is key. Heat the olive oil over medium heat. When the oil is hot, it sizzles when you add the meatballs. This helps them brown nicely. Do not overcrowd the skillet. Cook in batches if needed. If you add too many meatballs, they will steam instead of fry. This will affect their texture and flavor. You can boost the flavor with spices or herbs. Try adding a pinch of red pepper flakes for heat. Fresh basil or thyme also works well. Pair your meatballs with marinara sauce. The rich sauce complements the cheesy meatballs. Pour it over the meatballs before baking. The sauce keeps them moist and adds great taste. Pro Tips Use Fresh Ingredients: Fresh parsley and garlic will enhance the flavor of your meatballs significantly. If possible, opt for fresh herbs over dried ones. Don’t Overmix: When combining the ingredients, mix just until combined. Overmixing can lead to tough meatballs. Test for Doneness: To ensure the meatballs are fully cooked, you can cut one in half to check that it’s no longer pink inside, or use a meat thermometer to check for an internal temperature of 165°F (75°C). Customize Your Sauce: Feel free to add extra spices or herbs to your marinara sauce for an added flavor boost, or try different cheeses for a unique twist! {{image_2}} You can switch things up by using turkey or beef instead of chicken. Turkey gives a leaner option with a mild taste. Beef adds a rich flavor that many enjoy. If you want a vegetarian version, try using lentils or chickpeas. These options still give you that hearty feel. Adding vegetables can boost flavor and nutrition. Chopped spinach or grated zucchini blend well into the meatball mix. You can also mix in different cheeses. Try using provolone or fontina for a unique twist. These cheeses melt beautifully and add extra creaminess. Serve your meatballs with various side dishes. A fresh garden salad pairs nicely and adds crunch. You can also serve them over a bed of pasta for a classic touch. Drizzle with extra marinara for a tasty finish. For a lighter option, serve with steamed veggies or a quinoa salad. To keep your chicken parmesan meatballs fresh, use airtight containers. Glass or plastic containers work well. Make sure the meatballs cool before sealing. Store them in the fridge. They should last for about three to four days. Label the containers with the date for easy tracking. To freeze meatballs, let them cool first. Place them on a baking sheet in a single layer. Freeze until firm, then transfer to freezer bags. Remove as much air as you can from the bags. For best quality, use them within three months. When ready to eat, thaw in the fridge overnight. Reheat in the oven or on the stove until hot. In the refrigerator, chicken parmesan meatballs last about three to four days. If you freeze them, aim to use them within three months for the best taste. Even after that, they will still be safe to eat, but may lose some flavor. Always check for any signs of spoilage before consuming. Yes, you can use ground turkey. It has a lighter flavor and a different texture. Ground turkey may be drier than chicken. You can add a bit more moisture by mixing in extra marinara sauce or olive oil. This will help keep your meatballs juicy and tasty. Ground chicken tends to be more tender and flavorful, so if you prefer that rich taste, stick with chicken. Making marinara sauce is easy and fun! Here’s a simple recipe: - Ingredients: - 2 tablespoons olive oil - 1 can (28 ounces) crushed tomatoes - 3 cloves garlic, minced - 1 teaspoon dried oregano - 1 teaspoon salt - 1/2 teaspoon black pepper - Fresh basil leaves, chopped (optional) - Instructions: 1. Heat olive oil in a pan over medium heat. 2. Add minced garlic and sauté for about 1 minute. 3. Pour in crushed tomatoes and mix well. 4. Stir in oregano, salt, and pepper. 5. Let it simmer for 20-30 minutes. 6. Add fresh basil before serving for extra flavor. This sauce is great on pasta and really makes the meatballs shine! Many sides work well with Chicken Parmesan Meatballs. Here are some tasty options: - Spaghetti: Classic choice that complements the meatballs and sauce. - Garlic Bread: Perfect for dipping and adds crunch. - Caesar Salad: Fresh greens balance the rich flavors. - Roasted Vegetables: Adds color and health to your plate. These sides make your meal complete and enjoyable! This blog covered how to make tasty Chicken Parmesan Meatballs. You learned about key ingredients, useful tools, and easy steps. I shared tips to enhance texture and flavor. Plus, you discovered variations to try and storage methods to keep them fresh. Remember, cooking is fun and creative. Enjoy making these meatballs your own, and don’t hesitate to experiment. Happy cooking!

Chicken Parmesan Meatballs Flavorful and Easy Recipe

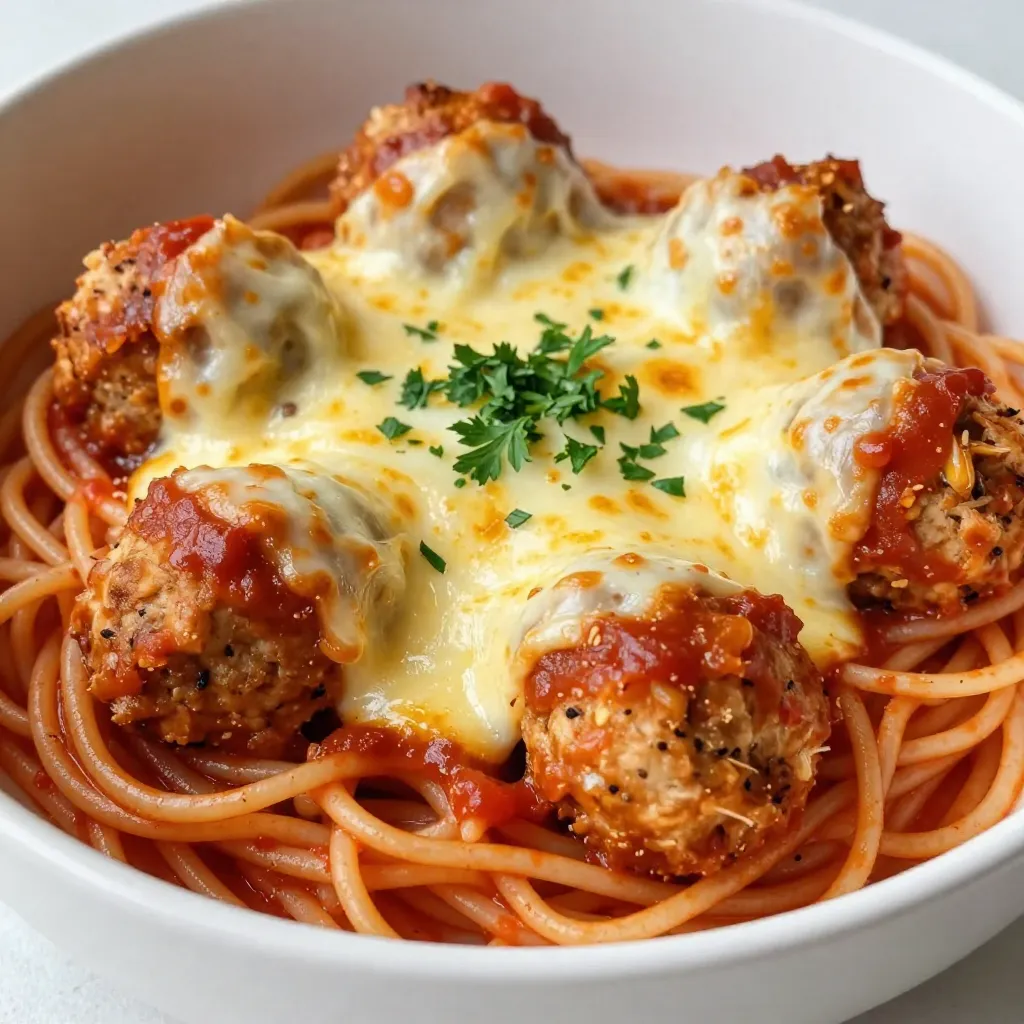
Looking for a tasty, easy dinner idea? These Chicken Parmesan Meatballs are a game changer! Packed with flavor and simple

- 1.5 pounds small or baby potatoes (Yukon Gold or Red) - 4 tablespoons unsalted butter, softened - 4 cloves garlic, minced - 1 tablespoon fresh parsley, chopped - 1 tablespoon fresh chives, chopped - 1 tablespoon fresh rosemary, chopped - 1 teaspoon salt - ½ teaspoon black pepper - Olive oil for drizzling Gathering these ingredients is the first step to creating smashed potatoes with garlic herb butter. The small potatoes are perfect for this dish. They cook quickly and have a nice, creamy texture. Choose Yukon Gold or Red for the best flavor. Unsalted butter is key here. It allows you to control the salt in the dish. Fresh garlic adds a strong, rich taste. Every herb brings its unique flavor. The parsley adds freshness, the chives give a mild onion taste, and rosemary has a pine-like aroma. Salt and black pepper enhance all the flavors. Olive oil is a must for that golden, crispy finish. Remember, quality ingredients make a big difference in your dish. So, select the freshest potatoes and herbs you can find. Happy cooking! {{ingredient_image_1}} To start, take your small potatoes and rinse them under cold water. Place them in a large pot and cover them with cold water. Add a teaspoon of salt to the water. Bring the pot to a boil over high heat. Once boiling, reduce the heat to medium and let the potatoes cook for 15 to 20 minutes. They should be fork-tender, meaning a fork goes in easily. While the potatoes boil, preheat your oven to 425°F (220°C). This step is key for getting the potatoes crispy later. A hot oven ensures even cooking and a nice golden finish. Next, grab a small bowl and mix together 4 tablespoons of softened butter, 4 cloves of minced garlic, 1 tablespoon each of chopped parsley, chives, and rosemary. Add 1 teaspoon of salt and ½ teaspoon of black pepper. Stir everything until well combined. This garlic herb butter will add lots of flavors to your potatoes. Once the potatoes are boiled, drain them and let them cool for a few minutes. Transfer the cooled potatoes to a baking sheet lined with parchment paper. Now, for the fun part! Take a flat surface, like the bottom of a cup or a fork, and gently smash each potato. You want to flatten them a bit, but not break them apart. Drizzle olive oil over the smashed potatoes. Then, take your garlic herb butter and spread it generously over each potato. Make sure every potato gets a good coating. This butter helps create a crispy skin while adding flavor. Bake the potatoes in the preheated oven for 20 to 25 minutes. They should end up crispy and golden brown. Once done, take them out and let them cool slightly. Serve the smashed potatoes warm, and if you like, garnish with extra herbs for a nice touch. Enjoy! To make the best garlic herb butter, use the right ratios. For every four tablespoons of butter, add four cloves of garlic. This mix gives a strong garlic flavor without being too overpowering. The herbs also play a key role. A tablespoon each of fresh parsley, chives, and rosemary adds a fresh, bright taste. Mix these well to ensure the flavors blend perfectly. Taste your garlic herb butter before using it. Adjust the salt and pepper as needed for your taste. Getting that golden-brown texture is all about technique. After boiling and smashing the potatoes, don't skip the olive oil. Drizzle enough to coat each potato before baking. This helps them crisp up nicely. Make sure your oven is at 425°F (220°C) for even cooking. Bake for 20-25 minutes, but keep an eye on them. If they start to look too dark, take them out. You want crispy edges but not burnt bits. Many people overlook the importance of salt. Be sure to add salt to the boiling water. It adds flavor to the potatoes. Also, avoid overcooking the potatoes. They should be fork-tender, not mushy. When smashing them, use gentle pressure. Too much force can turn them into a paste. Lastly, don’t skip the resting time after baking. Let them cool for a few minutes before serving to enhance the flavor. Pro Tips Use Uniform Potatoes: For even cooking, choose potatoes that are similar in size to ensure they boil and roast uniformly. Don’t Over-Steam: While boiling, ensure your potatoes are just fork-tender; overcooking can make them too soft to smash. Experiment with Herbs: Feel free to mix and match your favorite herbs in the garlic butter for different flavor profiles. Optimal Crispiness: For extra crispy potatoes, broil them for the last few minutes of baking, keeping a close eye to prevent burning. {{image_2}} You can easily make smashed potatoes vegan. Swap the butter for a plant-based alternative. Use vegan margarine or olive oil instead. This keeps the dish creamy while being dairy-free. It’s a simple change that works well. To make these potatoes even tastier, add more herbs. Try fresh thyme, dill, or oregano for a different twist. You can also add spices like smoked paprika or cayenne for a kick. Mixing in grated cheese like Parmesan can elevate the flavor too. Experimenting with different combinations keeps the dish exciting. Smashed potatoes pair nicely with many meals. Serve them alongside grilled chicken or steak for a hearty dinner. They also go well with roasted vegetables for a lighter option. For a fun twist, top them with sour cream or a fresh salsa. These potatoes are a great side for any meal you choose. To keep your smashed potatoes fresh, store them in an airtight container. Place the cooled potatoes in the container and seal it tightly. You can keep them in the fridge for up to three days. For best results, try to layer parchment paper between the smashed potatoes. This helps prevent them from sticking together. Reheating smashed potatoes can be easy and fun. For crispiness, the oven works best. Preheat your oven to 400°F (200°C). Place the potatoes on a baking sheet and drizzle a little olive oil on top. Bake for about 10-15 minutes until they are hot and crispy again. You can also use an air fryer for a quick reheat. Just set it to 350°F (175°C) and cook for about 5-7 minutes. Enjoy those golden, crispy potatoes just like they were fresh from the oven! To make garlic herb butter, start with softened butter. Use about 4 tablespoons. Add 4 minced cloves of garlic. Next, mix in 1 tablespoon each of fresh parsley, chives, and rosemary. Season with 1 teaspoon of salt and ½ teaspoon of black pepper. Stir until well blended. You will have a rich, flavorful butter ready for your potatoes. Yes, you can use different potatoes. Yukon Gold and Red potatoes work best. However, you can also use fingerling or even Russet potatoes. Just adjust the cooking time based on the size. Smaller potatoes will cook faster, while larger ones may need more time. Leftovers can be stored in the fridge for up to 3 days. Place them in an airtight container. This keeps them fresh and tasty. Just remember to reheat them properly to maintain their crispiness. Yes, you can prepare some parts ahead. Boil the potatoes a day before. Store them in the fridge after they cool. You can also make the garlic herb butter in advance. When you’re ready, just smash and bake the potatoes. Serve smashed potatoes warm, right from the oven. Drizzle with a bit more olive oil for shine. You can also add fresh herbs on top for color. They pair well with grilled meats or a fresh salad. Freezing smashed potatoes is not ideal. They may lose their texture when thawed. If you must freeze them, do it before baking. Wrap them tightly and store them. When you're ready to bake, thaw them in the fridge overnight before cooking. In this blog post, we explored how to make delicious smashed potatoes. You learned about the key ingredients, the step-by-step instructions, and helpful tips to perfect your dish. By using fresh herbs and mastering the cooking techniques, you can achieve great flavor and texture. Remember, it's all about enjoying the process and sharing your tasty results. Now, you're ready to create a dish that impresses everyone around your table. Happy cooking!

Smashed Potatoes with Garlic Herb Butter Delight

Are you ready to elevate your dinner table with a dish that’s both simple and bursting with flavor? In this

To make these delicious dulce de leche thumbprint cookies, you will need: - 1/2 cup unsalted butter, softened - 1/2 cup granulated sugar - 1/4 cup packed brown sugar - 1 large egg yolk - 1 teaspoon vanilla extract - 1 1/2 cups all-purpose flour - 1/2 teaspoon baking powder - 1/4 teaspoon salt - 1/2 cup dulce de leche - 1/4 cup chopped toasted pecans (optional) Each ingredient plays a key role. The butter adds richness, while the sugars provide sweetness. The egg yolk gives moisture, and the vanilla adds flavor. If you run out of any ingredient, don’t worry! You can make some swaps. Use light brown sugar instead of granulated sugar for a deeper flavor. If you want a dairy-free option, try using coconut oil in place of butter. You can also use maple syrup in place of dulce de leche if you prefer a different taste. Quality matters when it comes to baking. Use real butter, not margarine. This will give your cookies a better taste. Choose fresh eggs for the best texture. When picking dulce de leche, look for creamy brands that have a rich flavor. If you use nuts, select fresh pecans for the best crunch. {{ingredient_image_1}} To make dulce de leche thumbprint cookies, follow these simple steps. Start by preheating your oven to 350°F (175°C). Line a baking sheet with parchment paper. In a large bowl, cream together 1/2 cup of softened unsalted butter, 1/2 cup of granulated sugar, and 1/4 cup of packed brown sugar. Mix until the mixture feels light and fluffy. Next, add 1 large egg yolk and 1 teaspoon of vanilla extract. Mix well until everything is combined. In a separate bowl, whisk together 1 1/2 cups of all-purpose flour, 1/2 teaspoon of baking powder, and 1/4 teaspoon of salt. Gradually add this dry mix to the wet ingredients, stirring gently until just combined. Now, scoop out tablespoons of dough and roll them into balls. Place the balls on the baking sheet, leaving about 2 inches between them. Use your thumb or the back of a teaspoon to press down in the center of each ball, creating a thumbprint. Fill each thumbprint with 1 teaspoon of dulce de leche. Optionally, sprinkle chopped toasted pecans around the edges for a nice crunch. Bake these cookies for 12–15 minutes. Watch for the edges to turn lightly golden. Once done, let them cool on the baking sheet for 5 minutes. After that, transfer them to a wire rack to cool completely. For the best texture, make sure your butter is softened but not melted. This helps create a nice, fluffy base. When mixing, avoid overworking the dough. This keeps your cookies tender. If you want a little crunch, use toasted pecans. They add flavor and texture. Lastly, let the cookies cool completely to set properly. Here are some tools I recommend for making these cookies: - Mixing bowls - Electric mixer or whisk - Measuring cups and spoons - Baking sheet - Parchment paper - Wire rack for cooling These tools make the process smooth and enjoyable, ensuring your dulce de leche thumbprint cookies are a hit! When making dulce de leche thumbprint cookies, some common mistakes can ruin your batch. - Overmixing the dough: This can make your cookies tough. Mix just until combined. - Incorrect oven temperature: An oven that is too hot can burn the edges. Always preheat your oven fully. - Not chilling the dough: If your dough is warm, the cookies may spread too much. Chill for about 30 minutes for best results. - Pressing too hard: When making the thumbprint, press gently. A deep indentation helps hold more dulce de leche. You can prepare these cookies ahead of time. 1. Make the dough: After mixing, scoop and roll the dough into balls. 2. Freeze the dough: Place the dough balls on a baking sheet and freeze until firm. 3. Store in a bag: Once firm, transfer them to a zip-top bag. They can be frozen for up to three months. 4. Baking from frozen: Bake directly from the freezer. Just add a couple of extra minutes to the baking time. Want to give your cookies a twist? Here are some ideas. - Add spices: A pinch of cinnamon or nutmeg can enhance the flavor. - Use flavored dulce de leche: Try vanilla or chocolate dulce de leche for a new taste. - Mix in citrus: Grate some lemon or orange zest into the dough for a hint of freshness. - Top with chocolate: Drizzle melted chocolate over the baked cookies for an extra treat. Each of these tips will help you create delightful dulce de leche thumbprint cookies that impress! Pro Tips Use Room Temperature Butter: Ensure your butter is at room temperature for easier creaming with sugars, resulting in a lighter cookie texture. Chill the Dough: If the dough is too soft to handle, chill it for 30 minutes before rolling into balls to maintain their shape while baking. Fresh Dulce de Leche: For a richer flavor, use homemade dulce de leche or a high-quality store-bought version for the best taste. Experiment with Nuts: Try different nuts like walnuts or almonds instead of pecans for varied flavors and textures in your cookies. {{image_2}} Dulce de leche is a classic filling, but you can switch it up. Try chocolate ganache for a rich taste. You can also use fruit jams like raspberry or apricot. Nut butter, like almond or peanut, adds a fun twist too. Each filling changes the cookie’s flavor profile, making it unique. You can make these cookies gluten-free by using almond or oat flour instead of all-purpose flour. For a vegan option, swap the butter for coconut oil. Use a flax egg in place of the egg yolk. Mix 1 tablespoon of ground flaxseed with 2.5 tablespoons of water. Let it sit until it thickens. These swaps keep the cookie tasty and friendly for all diets. You can enhance the cookies with nuts and spices. Chopped walnuts or hazelnuts work well in place of pecans. For a touch of warmth, add cinnamon or nutmeg to the dough. A pinch of sea salt on top can bring out the sweetness too. These small changes can transform your cookies into something special. To keep your dulce de leche thumbprint cookies fresh, store them in an airtight container. This will prevent them from drying out or picking up other smells from your kitchen. Line the container with parchment paper. Place a layer of cookies, then add another piece of parchment before stacking more cookies. This method helps to keep them safe and tasty. When stored properly, these cookies last about one week at room temperature. If you want them to last longer, you can freeze them. They will keep well in the freezer for up to three months. Just make sure to wrap them tightly in plastic wrap or place them in a freezer bag. If you want to enjoy your cookies warm, you can reheat them. Preheat your oven to 300°F (150°C). Place the cookies on a baking sheet and heat for about 5-10 minutes. This will help restore their soft texture. Avoid using the microwave, as it can make them chewy instead of soft. Enjoy your sweet treats fresh and warm! You can use caramel sauce instead of dulce de leche. Both have a similar sweet, creamy taste. If you want a different flavor, try chocolate ganache or fruit preserves. Each option adds a unique twist to your cookies. Homemade thumbprint cookies last about one week if stored properly. Keep them in an airtight container at room temperature. For longer storage, you can freeze them for up to three months. Just make sure they cool completely before freezing. Yes, you can use different nuts like walnuts or almonds. If you prefer no nuts, just skip them. The cookies will still taste great. You can also try adding coconut or sprinkles for a fun touch. This post covered everything you need for baking perfect dulce de leche thumbprint cookies. We discussed key ingredients, tips for texture, and storage methods. You'll also find ways to switch things up with flavors and variations. Remember, baking can be fun and creative. Use this guide to explore new ideas and enjoy great cookies. Keep experimenting and sharing with friends. Happy baking!

Dulce de Leche Thumbprint Cookies Irresistible Treats

If you crave a sweet treat that’s simple yet packed with flavor, then you’re in for a delight! Dulce de

- 2 medium sweet potatoes, peeled and diced - 1 can (15 oz) black beans, drained and rinsed - 1 can (15 oz) diced tomatoes (with juices) - 1 cup vegetable broth - 1 red bell pepper, diced - 1 green bell pepper, diced - 1 onion, chopped - 3 cloves garlic, minced - 2 tablespoons olive oil - 2 teaspoons ground cumin - 1 teaspoon smoked paprika - 1 teaspoon chili powder - Salt and pepper to taste - Fresh cilantro for garnish - 1 avocado, diced (optional, for serving) I like to use specific brands for the best flavor. For black beans, I recommend Goya. Their beans are rich and tasty. For diced tomatoes, Muir Glen is my go-to brand. Their tomatoes taste fresh and sweet. For broth, I prefer Pacific Organic. It adds depth to the chili. Use extra virgin olive oil, like California Olive Ranch, for the best flavor. You can mix things up if you need to. If you can’t find sweet potatoes, use regular potatoes. They will still work well. For black beans, try kidney beans for a different taste. If you want a kick, add jalapeños or cayenne pepper. No fresh cilantro? Use parsley instead for a fresh touch. You can skip the avocado if you need to keep it simple. {{ingredient_image_1}} 1. Start by heating 2 tablespoons of olive oil in a large pot over medium heat. 2. Add 1 chopped onion and sauté for 3-4 minutes until it looks clear. 3. Next, stir in 3 minced garlic cloves, 2 teaspoons of ground cumin, 1 teaspoon of smoked paprika, and 1 teaspoon of chili powder. Cook this mix for 1-2 minutes until you smell the spices. 4. Now, add 2 diced sweet potatoes and both 1 diced red and 1 diced green bell pepper to the pot. Stir everything well. 5. Pour in 1 can of diced tomatoes (with juices) and 1 cup of vegetable broth. Add 1 can of drained and rinsed black beans. Mix it all together and bring it to a boil. 6. Once boiling, lower the heat to low. Cover the pot and let it simmer for 25-30 minutes. Stir it every now and then to keep it from sticking. 7. When the sweet potatoes are soft, season with salt and pepper. If you want a thicker chili, mash some sweet potatoes with a fork right in the pot. 8. Serve hot! Top with fresh cilantro and diced avocado if you like. - Gather all your ingredients before you start cooking. This saves time and keeps you organized. - Use a sharp knife to speed up chopping tasks. Dicing will be quick and easy. - Keep a trash bowl nearby for scraps. This helps keep your workspace clean. - If you prep your veggies ahead of time, it will make cooking smoother and faster. - Don’t skip sautéing the onion and garlic. This step builds great flavor. - Avoid cooking on high heat. It can burn your chili and ruin the taste. - Don’t forget to stir! This prevents sticking and burning at the bottom of the pot. - Be careful with salt. Start with a little, taste, and adjust as needed. To boost the flavor of your Sweet Potato Black Bean Chili, use fresh spices. Fresh spices, like cumin and smoked paprika, add depth. You can also add a squeeze of lime juice before serving. This adds a bright taste that wakes up the dish. If you like heat, try adding chopped jalapeños or a dash of hot sauce. This will give your chili a nice kick. Serve your chili hot in a bowl. Top it with fresh cilantro for a burst of color. Diced avocado also adds creaminess and richness. You can even add a dollop of sour cream or yogurt. This makes it feel extra special. Pair your chili with crusty bread or warm tortillas. This helps soak up all the delicious flavors. For sides, try a simple green salad. The crunch will balance the chili's warmth. Cornbread is another great choice. It pairs perfectly with the chili's flavors. For drinks, consider a light beer or sparkling water. A refreshing drink will complement the meal well. Red wine can also work nicely if you prefer. It adds a touch of elegance to your dinner. Pro Tips Use Fresh Ingredients: Using fresh sweet potatoes and bell peppers enhances the flavor and nutritional value of your chili. Adjust Spice Levels: Feel free to add more chili powder or a dash of hot sauce if you prefer a spicier chili. Let it Rest: Allowing the chili to sit for 10-15 minutes after cooking lets the flavors meld together for a richer taste. Batch Cooking: This chili freezes well, making it a great option for meal prep. Just store in airtight containers! {{image_2}} You can switch up the main ingredients for fun. Instead of sweet potatoes, try butternut squash. It adds a nice sweetness. You can also use kidney beans or pinto beans in place of black beans. For a different taste, add corn or zucchini. If you want a heartier chili, throw in some diced carrots or mushrooms. Want your chili to pack a punch? Add diced jalapeños or chipotle peppers for heat. You can also increase the chili powder or smoked paprika. For a smoky flavor, add a dash of liquid smoke. If you like it really spicy, finish with hot sauce. Just adjust to your taste. This chili is already vegan and gluten-free. Still, check labels on your broth and tomatoes. Some brands add gluten. For a creamier texture, blend a portion of the chili. You can also top with dairy-free yogurt instead of sour cream. This keeps it light but adds richness. Enjoy your meal without worry! To keep your sweet potato black bean chili fresh, place it in an airtight container. Let it cool first, then cover it tightly. Store it in the fridge if you plan to eat it within a few days. It stays good for about 3 to 5 days this way. When you are ready to heat up your chili, pour it into a pot. Use medium heat on the stove. Stir it often to warm it evenly. You can also use a microwave. Place the chili in a bowl, cover it, and heat in 30-second intervals. Stir after each interval until hot. If you want to save your chili for later, freezing is a great option. Use a freezer-safe container, leaving some space at the top for expansion. It can last up to 3 months in the freezer. When you want to eat it, thaw it overnight in the fridge. Reheat it on the stove or in the microwave as mentioned earlier. Sweet Potato Black Bean Chili lasts about 4 to 5 days in the fridge. Store it in an airtight container. The flavors get better as it sits. Just make sure to keep it cool. Yes, you can make this chili in a slow cooker! Start by sautéing the onion and garlic in a pan. Then, add all the other ingredients to the slow cooker. Cook on low for 6 to 8 hours or high for about 3 to 4 hours. Sweet potatoes are rich in vitamins A and C. They also have fiber, which aids digestion. Black beans are high in protein and iron. They help keep you full and strong. Together, they make a great combination for a healthy meal. In this blog post, we explored how to make Sweet Potato Black Bean Chili. We covered essential ingredients, brands to trust, and clever substitutions. I provided step-by-step cooking instructions and tips to avoid common mistakes. We also discussed flavor enhancers, serving ideas, and pairing options. Variations like spicy adjustments and vegan swaps were outlined. Finally, I shared helpful storage tips and answered common questions. This chili is simple to make and fun to share. You’ll love the flavors and comfort it brings. Enjoy your cooking!

Sweet Potato Black Bean Chili Rich and Flavorful Dish

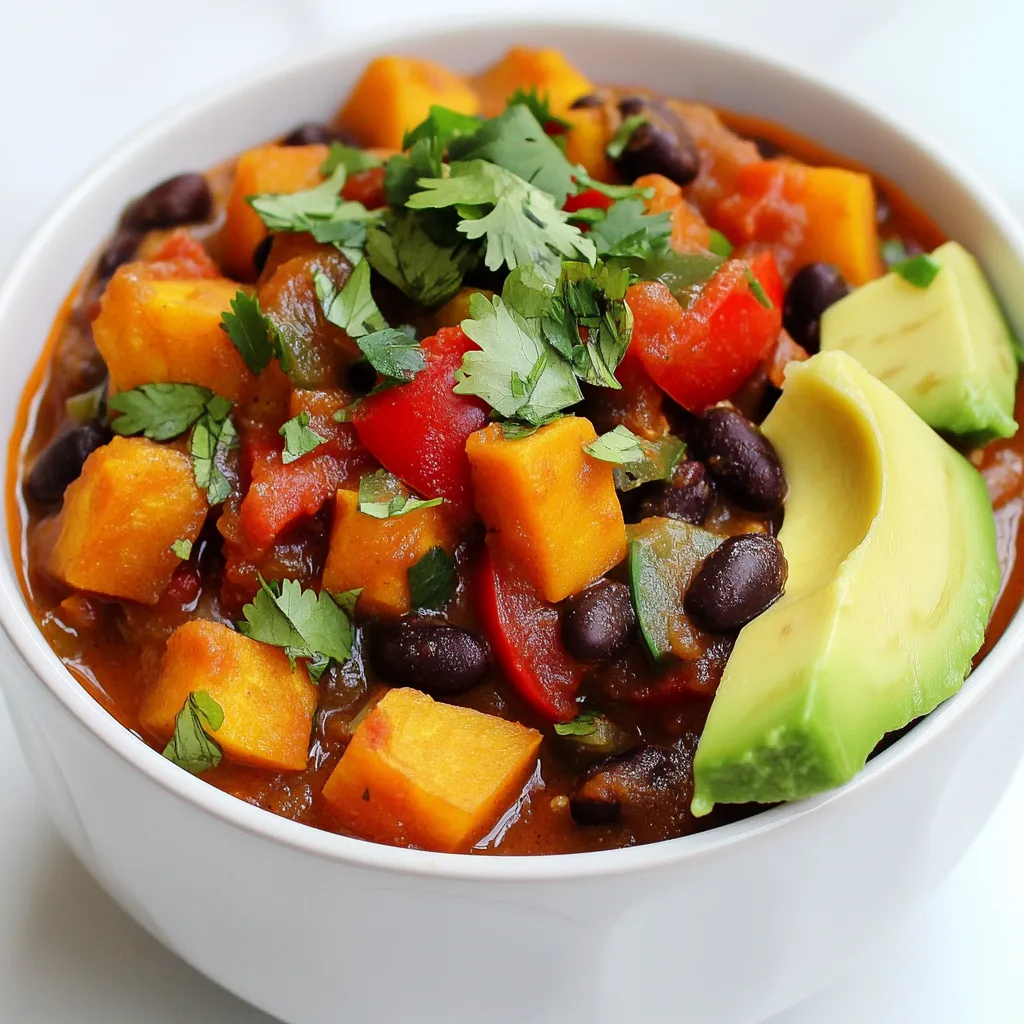
Are you ready to savor a bowl of comfort? My Sweet Potato Black Bean Chili is rich, flavorful, and packed

- 2 cups cooked jasmine rice (preferably day-old) - 1 cup fresh pineapple, diced - 1/2 cup red bell pepper, diced - 1/2 cup green peas (fresh or frozen) - 1/4 cup red onion, finely chopped - 2 cloves garlic, minced - 2 tablespoons soy sauce (or tamari for gluten-free) - 1 tablespoon sesame oil - 1 tablespoon olive oil - 1/4 cup scallions, sliced (for garnish) - 1/4 teaspoon cayenne pepper (optional, for heat) - Salt and pepper to taste - 1/4 cup chopped cashews (for crunch) For a deeper flavor, consider adding: - Fresh ginger, minced, for a spicy kick. - Cooked protein like chicken or shrimp for heartiness. - A squeeze of lime juice to brighten the dish. You can swap ingredients based on what you have: - Use brown rice instead of jasmine for more fiber. - Replace cashews with peanuts or almonds for different crunch. - Swap red onion for green onions if you prefer a milder taste. - Try coconut aminos instead of soy sauce for a sweeter option. These choices keep your dish fresh and fun! {{ingredient_image_1}} Start by gathering all your ingredients. You will need: - 2 cups cooked jasmine rice (preferably day-old) - 1 cup fresh pineapple, diced - 1/2 cup red bell pepper, diced - 1/2 cup green peas (fresh or frozen) - 1/4 cup red onion, finely chopped - 2 cloves garlic, minced - 2 tablespoons soy sauce (or tamari for gluten-free) - 1 tablespoon sesame oil - 1 tablespoon olive oil - 1/4 cup scallions, sliced (for garnish) - 1/4 teaspoon cayenne pepper (optional, for heat) - Salt and pepper to taste - 1/4 cup chopped cashews (for crunch) Next, if you have fresh pineapple, chop it into small pieces. Dice the bell pepper and chop the red onion. Mince the garlic. This prep will help the cooking go smoothly. Heat the olive oil in a large skillet or wok over medium-high heat. When the oil is hot, add the red onion and garlic. Sauté them until the onion becomes clear, which takes about 2-3 minutes. Next, add the diced bell pepper. Cook it for another 2-3 minutes until it softens slightly. Now, push the veggies to one side of the skillet. Pour in the sesame oil and add the cooked rice. Stir to mix everything and heat the rice through. After the rice warms up, add the diced pineapple to the skillet. Let it cook for about 2 minutes. This will caramelize the pineapple and add a sweet flavor. Then, pour in the soy sauce and mix all ingredients well. Make sure everything gets coated nicely. Now, stir in the green peas and cayenne pepper, if you want some heat. Season with salt and pepper to taste. Cook everything for 2 more minutes to let the flavors blend. Once cooked, remove the skillet from the heat. Sprinkle chopped cashews and sliced scallions on top. This gives your dish extra texture and freshness. For an eye-catching presentation, serve the fried rice in hollowed-out pineapple halves. You can also use a colorful bowl and add extra scallions and a slice of lime for garnish. Enjoy this flavorful dinner delight! Using the right rice is key. I prefer jasmine rice for its light flavor and texture. Cook your rice a day ahead. This helps the grains firm up, making them less sticky. Rinse the rice before cooking to remove excess starch. Use a 1:1.5 rice-to-water ratio for perfect cooking. Let it cool completely before storing. This step truly enhances the fried rice. Caramelization adds depth to your dish. It brings out the natural sweetness of the pineapple. Heat your skillet or wok well before adding ingredients. Use medium-high heat for best results. Sauté the pineapple alone for a few minutes. Don’t rush this step! Allow it to brown slightly. This will create a lovely contrast in flavors. To boost tropical vibes, add fresh herbs. Chopped cilantro or mint pairs well. A squeeze of lime juice brightens the dish. Consider using coconut aminos as a soy sauce substitute. It adds a sweet, nutty flavor. Feel free to play with spices too. A pinch of ginger or curry powder can elevate your fried rice. Pro Tips Use Day-Old Rice: Day-old jasmine rice is drier and less sticky, making it ideal for fried rice dishes as it separates better during cooking. Fresh Pineapple for Sweetness: Opt for fresh pineapple instead of canned for a vibrant, juicy flavor that elevates the dish and adds a tropical touch. Customize with Proteins: Enhance your fried rice by adding cooked chicken, shrimp, or tofu for a protein boost and extra heartiness. Garnish for Color and Flavor: Don't skip the scallions and cashews; they add a pop of color and texture, making the dish visually appealing and crunchy. {{image_2}} You can easily make this dish vegetarian or vegan. Just skip any meat and use more veggies. To add protein, use tofu. Firm tofu works best for frying. Press it to remove extra water. Then, cube it and sauté until golden brown. This adds a nice texture. You can also add more green peas or use edamame for extra protein. If you want meat in your fried rice, chicken and shrimp are great choices. For chicken, use diced breast or thigh. Cook it first until no longer pink. Then, add the veggies. Shrimp cooks fast, so add it after the bell pepper. This keeps it tender. Remember, tofu is also a tasty option if you want a plant-based protein. It takes on flavors well and is super filling. Mixing in other fruits can make your fried rice even tastier. Mango adds a sweet twist. Try using diced mango just like pineapple. You can even add small pieces of kiwi or papaya. These fruits give a nice color and flavor. For a tart kick, use some diced lime or orange zest. The choice is yours! You can store leftover Tropical Pineapple Fried Rice in an airtight container. Make sure the rice cools to room temperature before sealing. Place it in the fridge within two hours of cooking. This helps keep the flavors fresh and prevents bacterial growth. The rice will stay good for about 3 to 4 days. For long-term storage, you can freeze the fried rice. Use a freezer-safe bag or container, and remove as much air as possible. Label the bag with the date. The rice can last in the freezer for up to 3 months. When you’re ready to eat it, thaw the rice in the fridge overnight before reheating. To reheat, use a skillet for the best texture. Add a splash of water or oil to help steam the rice. Heat it over medium heat, stirring often until warmed through. You can also use a microwave; just cover the rice with a damp paper towel to retain moisture. Heat in short bursts, stirring in between, until hot. This keeps the rice fluffy and tasty. Jasmine rice is the best choice for fried rice. It has a lovely aroma and a soft texture. Day-old rice works even better. It dries out a bit, making it easier to fry. Fresh rice can be too sticky. Stick with jasmine for the best results. Yes, you can make Tropical Pineapple Fried Rice ahead of time. Prepare it fully and let it cool. Then, store it in an airtight container. Keep it in the fridge for up to three days. When ready to eat, just reheat it in a skillet. This keeps the flavors fresh and tasty. To make this recipe gluten-free, simply use tamari instead of soy sauce. Tamari is a gluten-free soy sauce alternative. Check labels to ensure other ingredients are gluten-free as well. With these simple swaps, you can enjoy the same great taste without gluten. This blog post covered all you need for Tropical Pineapple Fried Rice. We explored the key ingredients, cooking steps, and helpful tips. I shared various options, like vegan swaps and protein additions. Proper storage and reheating instructions ensure long-lasting flavor. Remember, the right rice makes a big difference. It's easy to adapt this recipe for special diets. Enjoy creating your own delicious version of this dish. Your meal will impress everyone at the table!

Tropical Pineapple Fried Rice Flavorful Dinner Delight

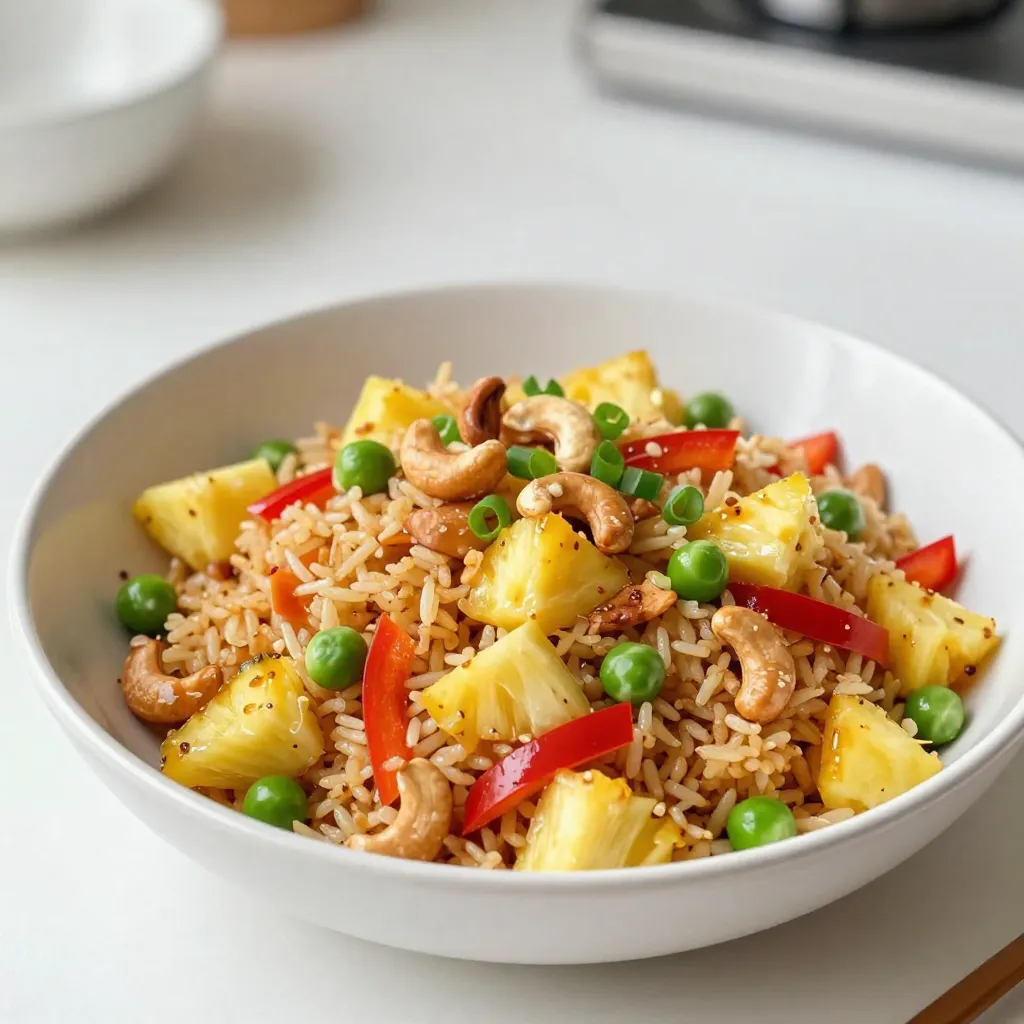
Are you ready to brighten your dinner table with a burst of flavor? Tropical Pineapple Fried Rice is not just

- 8 oz fettuccine pasta - 1 lb ground beef - 5 cloves garlic, minced - 1 medium onion, finely chopped - 1 cup cherry tomatoes, halved To make garlic beef pasta, you need a few key items. First, fettuccine pasta gives the meal a rich, satisfying base. Next, ground beef adds protein and flavor. Fresh garlic and onion create that classic aroma that fills your kitchen. Finally, cherry tomatoes burst with sweetness and color, brightening up the dish. - 1/4 cup beef broth - 1 tablespoon olive oil - 1 teaspoon dried Italian herbs (oregano, basil, thyme) You can enhance your pasta with optional items. Beef broth adds depth and moisture. Olive oil helps in cooking and adds a nice richness. Dried Italian herbs bring warmth and complexity to the dish. - Grated Parmesan cheese - Fresh basil leaves Toppings can make your dish shine. Grated Parmesan cheese adds creaminess and saltiness. Fresh basil leaves offer a pop of color and a fresh taste that balances the flavors. {{ingredient_image_1}} To cook the fettuccine, bring a large pot of salted water to a boil. Add the pasta and cook it according to the package instructions. This usually takes about 8-10 minutes. You want the pasta to be al dente, meaning it should still have a slight bite to it. To check for this, taste a piece a minute or two before the time is up. When done, drain the pasta but save about 1/2 cup of the pasta water for later. In a large skillet, heat 1 tablespoon of olive oil over medium heat. Add the finely chopped onion and sauté for about 2-3 minutes. You want it to become soft and translucent. Next, stir in the minced garlic and cook for about 1 minute. Keep stirring to avoid burning the garlic. Then, increase the heat to medium-high and add 1 pound of ground beef. Cook this for about 5-7 minutes, breaking it apart with a wooden spoon as it cooks. You want it to brown evenly. Once the beef is browned, add in 1 cup of halved cherry tomatoes, 1/4 cup of beef broth, dried Italian herbs, salt, and pepper. Let this mixture simmer for about 5 minutes. This will help the flavors blend together. After that, add the cooked fettuccine to the skillet. Toss everything together well. If the mixture seems dry, use the reserved pasta water to achieve your desired consistency. Taste the dish and adjust the seasoning if needed. Serve it hot, topped with grated Parmesan cheese and fresh basil leaves for a lovely finish. To make your garlic beef pasta even better, consider adding fresh herbs. You can use basil, parsley, or even a bit of rosemary. These herbs bring brightness to your dish. Try adding crushed red pepper for a little heat or a squeeze of lemon for freshness. Remember to taste your food as you cook. This step helps you adjust flavors to your liking. If something tastes flat, a pinch of salt or a dash of pepper can make a big difference. Using the right pans can make cooking easier. A large skillet works great for this dish. It helps cook the beef evenly while allowing room for the sauce. A wooden spoon is perfect for breaking up the meat. You might also want a pasta pot for boiling the fettuccine. A colander will help you drain the pasta well. These tools make prep and cooking simple and fun. Want to save time? Chop your onions and garlic in advance. You can also cook your pasta while browning the beef. This way, you do two tasks at once. If you're busy during the week, consider batch cooking. Make extra servings and store them. You can easily reheat them for quick meals. This method saves time and keeps your weeknight dinners stress-free. Pro Tips Use Fresh Ingredients: Fresh garlic and herbs enhance the flavor of the dish significantly. Opt for fresh basil instead of dried for a more aromatic finish. Don't Overcook the Pasta: Ensure the fettuccine is cooked al dente. It will continue to cook slightly when mixed with the hot beef mixture, preventing it from becoming mushy. Balance the Flavors: Taste the sauce before serving and adjust the seasoning. A pinch of sugar can also help balance acidity from the tomatoes if needed. Reserve Pasta Water: The reserved pasta water is a great way to adjust the sauce's consistency. It adds starch, which helps the sauce cling to the pasta better. {{image_2}} You can swap ground beef for ground turkey or chicken. They will keep the dish light. Both turkey and chicken have a milder taste, making them great for this recipe. Just brown them in the skillet as you would with beef. For a meat-free option, try using lentils or mushrooms. Lentils add protein while mushrooms give a nice, savory flavor. Use one cup of cooked lentils or about two cups of chopped mushrooms to replace the beef. Fettuccine is classic, but you can use other pasta types too. Penne and spaghetti work well in this recipe. Both hold sauce nicely and add fun textures. If you need gluten-free options, many brands offer great choices. Look for gluten-free fettuccine, penne, or spaghetti. They taste great and cook well, so you won’t miss the gluten. To add fresh flavors, mix in seasonal vegetables. In spring, include asparagus or peas. In summer, add zucchini or bell peppers. These veggies brighten the dish and add nutrition. You can also adjust the spices for different occasions. In fall, try adding a pinch of nutmeg or cinnamon for warmth. In winter, a splash of lemon juice can lift the flavors. These simple swaps make the dish new and exciting any time of year. To keep your garlic beef pasta fresh, place it in an airtight container. This method keeps the flavors intact and prevents drying. Make sure to let it cool before sealing. In the fridge, your leftovers will last for about 3 to 4 days. If you want to enjoy this dish later, freezing is a great option. To freeze garlic beef pasta, let it cool completely. Then, divide it into portions. Use freezer bags or airtight containers for storage. Press out as much air as possible to prevent freezer burn. When you're ready to eat, simply take a portion out and thaw it overnight in the fridge. For reheating, heat on low in a saucepan or microwave until warm. For the best taste, reheat your pasta on the stovetop. This method keeps the dish moist. Add a splash of beef broth or reserved pasta water while heating. If using a microwave, cover the dish and heat in short bursts. Stir in between to heat evenly. Avoid overcooking, as it can dry out the pasta. Yes, you can use turkey or chicken instead of beef. Ground turkey has a lighter flavor. It cooks much the same as ground beef. Chicken is also a great choice, but it may need more seasoning for flavor. You can try using pork for a unique twist. Each option will change the dish's taste slightly, but it will still be delicious. To make garlic beef pasta vegetarian, use plant-based ground meat. These options mimic the texture of beef. You can also use mushrooms for a hearty texture. For added protein, use lentils or chickpeas. Swap the beef broth for vegetable broth. This keeps the dish rich and flavorful without meat. Garlic beef pasta pairs well with a fresh salad. A simple green salad with vinaigrette works great. You can also serve garlic bread on the side. It adds a nice crunch and flavor. For a heartier meal, consider steamed vegetables like broccoli or green beans. These sides balance the pasta and create a complete dinner. This blog explores making garlic beef pasta, focusing on key ingredients, cooking steps, and tips. You learned about optional ingredients, flavor enhancement, and various protein options. I shared ideas for storing and reheating leftovers, making sure every bite stays delicious. Experimenting with different pasta types and seasonal veggies keeps the dish fresh. Enjoy this simple meal that brings joy to your table. Cooking should be fun, not stressful, so do not shy away from trying new things. With practice, you'll master this pasta dish!

Garlic Beef Pasta Flavorful and Simple Dinner Recipe

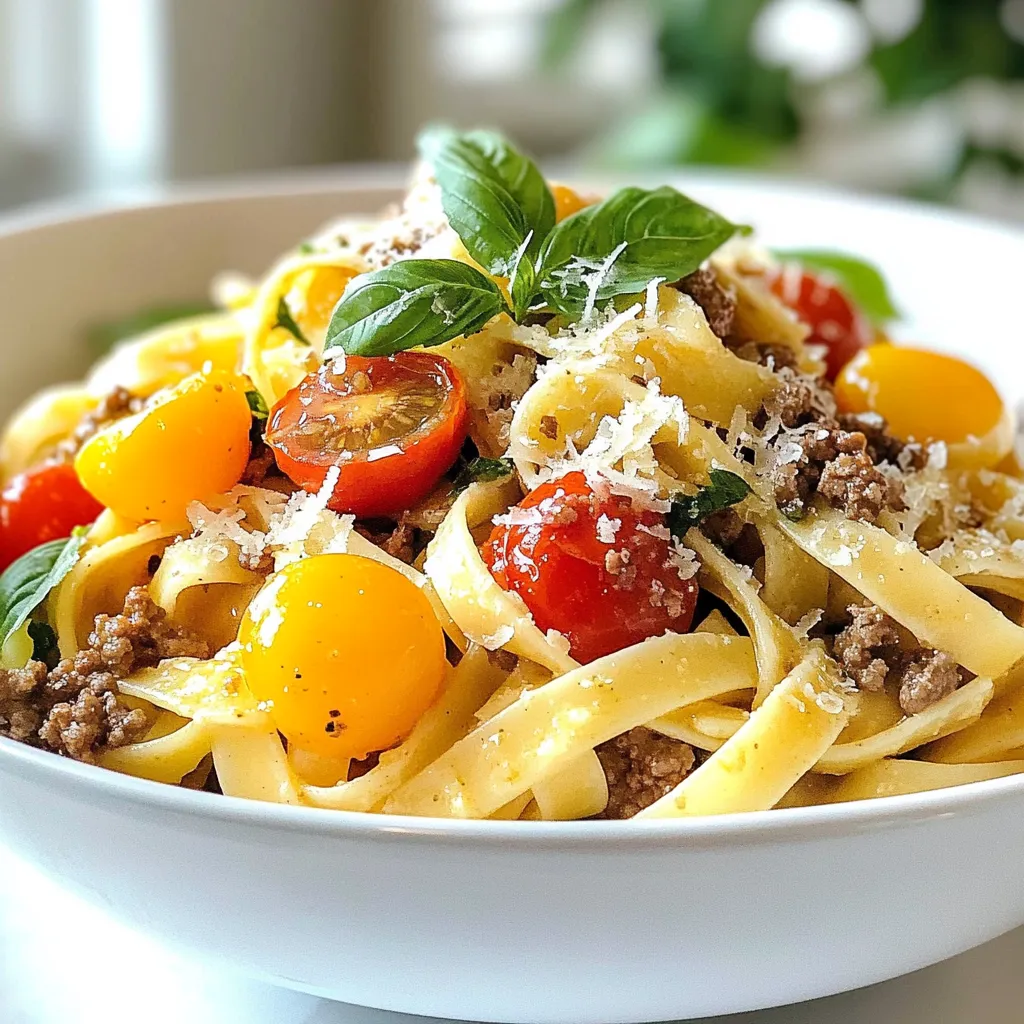
Looking for a quick, delicious dinner? This Garlic Beef Pasta recipe is just what you need! With simple ingredients like

- 1 pound large shrimp, peeled and deveined - 1 cup unsweetened shredded coconut - 1/2 cup Panko breadcrumbs - 1/2 cup all-purpose flour - 2 large eggs Large shrimp are key to this dish. They provide a nice bite and hold flavor well. Use peeled and deveined shrimp for ease in eating. I recommend using fresh shrimp if possible, but frozen works fine too. Unsweetened shredded coconut gives a wonderful texture. It adds a subtle sweetness and crunch. Panko breadcrumbs add extra crispiness. Their lightness helps achieve that perfect crunch in the air fryer. Eggs act as a binder. They help the coconut and Panko stick to the shrimp. All-purpose flour coats the shrimp first. It helps the egg mixture adhere better, leading to a crispy coating. - 1 tablespoon lime juice - 1 teaspoon garlic powder - 1 teaspoon paprika - Salt and pepper to taste Lime juice adds a fresh zing. It brightens the flavors and pairs well with shrimp. Garlic powder gives a savory depth. Paprika adds warmth and a pop of color. Salt and pepper enhance all the flavors, making each bite tasty. - Cooking spray - Tools needed for preparation Cooking spray is vital. It helps achieve that golden brown crust without excess oil. You will need mixing bowls for the coatings. A whisk or fork for the eggs is helpful too. Lastly, make sure to have your air fryer ready for use. Proper tools make cooking fun and easy! {{ingredient_image_1}} To start, preheat your air fryer to 375°F (190°C). This step takes about 5 minutes. Preheating gets the air fryer ready for even cooking. In a large bowl, combine 1 cup of unsweetened shredded coconut and 1/2 cup of Panko breadcrumbs. Mix these two until they blend well. This mixture gives your shrimp a crunchy and tasty coating. Next, in another bowl, beat 2 large eggs. Add 1 tablespoon of lime juice, 1 teaspoon of garlic powder, 1 teaspoon of paprika, and a pinch of salt and pepper. Whisk this mixture until smooth. This egg wash helps the coating stick to the shrimp. Now, prepare a third bowl with 1/2 cup of all-purpose flour. Season it lightly with salt and pepper. Dredging the shrimp in flour helps the egg wash stick better. Take each shrimp and coat it in the flour. Shake off any extra flour. Then, dip the shrimp into the egg mixture, covering it fully. After that, coat the shrimp in the coconut and Panko mixture. Press gently to ensure it sticks well. Place the coated shrimp in a single layer in the air fryer basket. Make sure they do not touch each other. This space allows hot air to circulate, making them crispy. Lightly spray the shrimp with cooking spray. This step adds extra crispiness during cooking. Air fry the shrimp for about 8 to 10 minutes. Flip the shrimp halfway through for even cooking. Once they are golden brown and crispy, remove them from the air fryer. Enjoy them right away with sweet chili sauce or mango salsa! Timing and temperature play a big role in getting your shrimp crispy. Always preheat your air fryer to 375°F (190°C) for about five minutes. This step ensures even cooking. Keep a close eye on the shrimp as they cook. They should take about 8-10 minutes. Flip them halfway for uniform crispiness. Using cooking spray is key for the texture. After placing the shrimp in the basket, lightly spray them. This adds extra crunch and helps the coating stick. Just a few quick sprays will do the trick! One common mistake is overcrowding the air fryer basket. If you pile shrimp on top of each other, they won't cook evenly. Instead, arrange them in a single layer. Give each shrimp space to breathe. Another mistake is not coating the shrimp properly. Make sure you follow the dredging steps closely. Start with flour, then the egg mixture, and finally the coconut and Panko. Press down gently to ensure the coating sticks well. For dipping sauces, sweet chili sauce is a favorite. It balances the coconut's sweetness perfectly. Mango salsa also adds a fresh twist. As for side dishes, try serving your shrimp with a simple salad. A light coleslaw pairs well too. You could also serve it over rice for a hearty meal. Enjoy your crispy coconut shrimp! Pro Tips Use Fresh Shrimp: For the best flavor and texture, make sure to use fresh, high-quality shrimp. Frozen shrimp can work, but be sure to thaw them completely and pat dry before coating. Adjust Seasoning: Feel free to adjust the seasoning in the egg mixture to your taste. Adding a pinch of cayenne pepper can give it a nice kick if you enjoy some heat! Single Layer Cooking: Ensure the shrimp are in a single layer in the air fryer basket. Overcrowding can lead to uneven cooking and less crispiness. Serving Suggestions: Serve your coconut shrimp with a side of sweet chili sauce or a fresh mango salsa to complement the flavors beautifully. {{image_2}} You can take your coconut shrimp to the next level with spices. A pinch of cayenne adds heat and pairs well with the sweetness of the coconut. If you like a warm kick, try mixing in some chili powder or crushed red pepper. You can also switch up the coconut type. Try sweetened coconut for a richer flavor. You could use toasted coconut for a nutty crunch. Each choice gives a new taste to your dish. If you're gluten-free, you can still enjoy this dish. Use almond flour or coconut flour instead of all-purpose flour. These options keep the shrimp crispy and tasty. For vegans, replace shrimp with large pieces of breaded tofu or cauliflower. Use plant-based eggs or a mixture of ground flaxseed and water to bind the coating. This way, everyone can enjoy coconut shrimp! Air frying is quick and gives a great crunch. But you can also bake or fry. Baking takes longer but still tastes good. Frying gives a rich flavor but adds more oil. Air frying cuts down on fat and calories while keeping the shrimp crispy. It’s a smart choice if you want a healthy treat! Each method has its perks, so choose what fits your mood today. To keep your air fryer coconut shrimp fresh, store it in the fridge. Use an airtight container for best results. This will help keep the shrimp from drying out. Make sure to eat leftovers within two days for the best taste. When reheating, you want to keep that crispy texture. The best way is to use the air fryer again. Preheat the air fryer to 350°F (175°C). Place the shrimp in a single layer and heat for about 4-5 minutes. This will make them crispy again. Avoid microwaving, as it makes them soggy. If you want to freeze your coconut shrimp, start by cooling them completely. Place them on a baking sheet in a single layer. Freeze for about one hour until firm. Then, transfer them to a freezer bag. Make sure to remove as much air as possible. They will stay good for up to three months. When ready to eat, thaw in the fridge overnight before reheating. You should cook air fryer coconut shrimp for about 8 to 10 minutes. Set your air fryer to 375°F (190°C). Flip the shrimp halfway through to ensure even cooking. They should turn golden brown and crispy. Keep an eye on them to avoid overcooking. This timing works well for large shrimp. Yes, you can use frozen shrimp. First, thaw the shrimp in cold water for about 15-20 minutes. After thawing, pat them dry with a paper towel. This step helps the coating stick better. If the shrimp are wet, the breading may not adhere well. Follow the same steps to coat and cook them as fresh shrimp. Coconut shrimp tastes great with sweet and tangy dips. Popular choices include sweet chili sauce and mango salsa. You can also try a spicy aioli for a kick. These sauces enhance the shrimp's flavor. Their sweetness balances the coconut's richness. Feel free to experiment with different sauces based on your taste. This blog post gives you everything you need to make delicious air fryer coconut shrimp. You learned about key ingredients, how to prepare and cook the shrimp, and tips for the best texture. We explored flavor variations and storage tips to keep leftovers fresh. Now, you can impress your friends and family with this easy and tasty dish. Take this recipe, try it out, and enjoy the crispy goodness of coconut shrimp at home!

Air Fryer Coconut Shrimp Crispy and Flavorful Treat

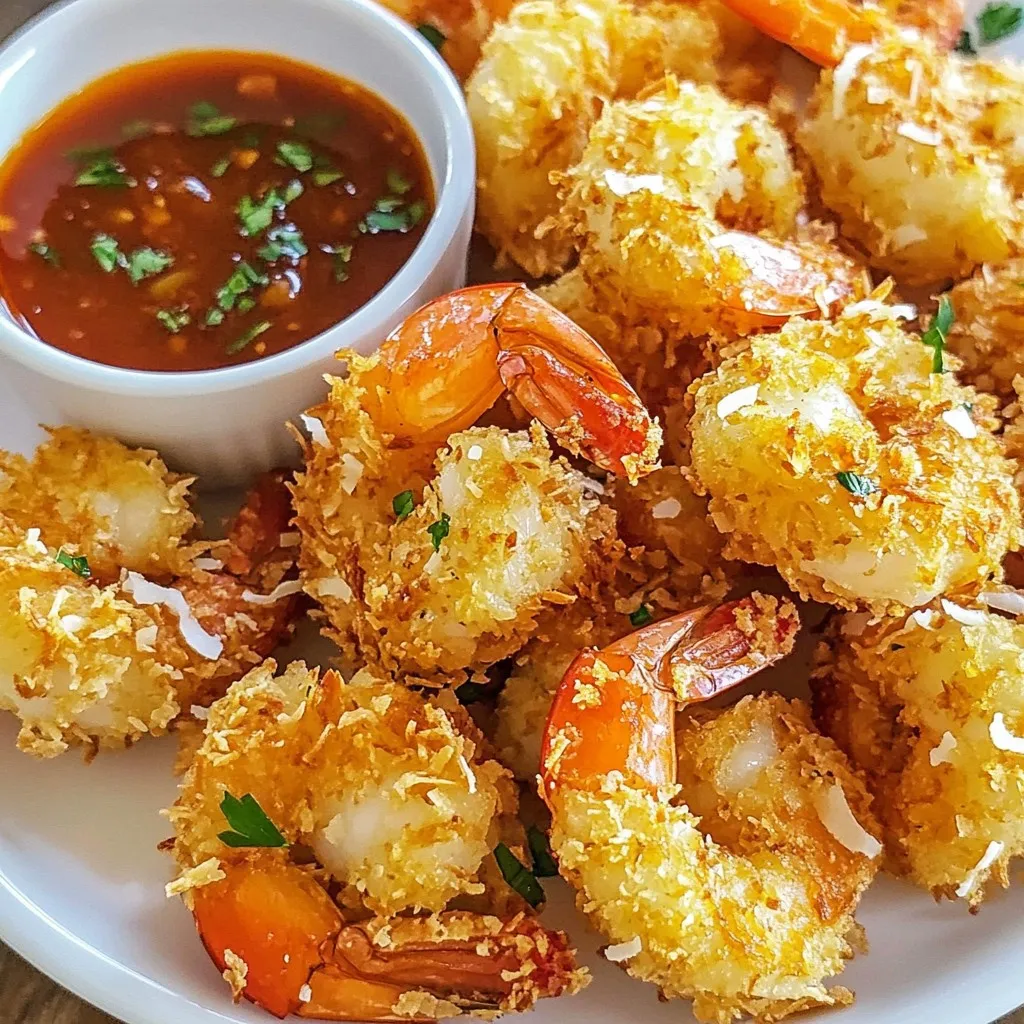
Are you craving a crispy and flavorful treat? Look no further than Air Fryer Coconut Shrimp! This easy recipe combines

- 1 cup all-purpose flour - 2 tablespoons granulated sugar - 1 teaspoon baking powder - 1/4 teaspoon salt - 1/2 cup water - 2 tablespoons unsalted butter - 1/2 teaspoon vanilla extract - Oil for frying To make churro bites, you need basic ingredients. Combine all-purpose flour, sugar, baking powder, and salt. The water and butter create a smooth dough. Vanilla extract adds a nice touch. Oil is crucial for frying and gives that crispy texture we crave. - 1/4 cup granulated sugar (for coating) - 1 teaspoon ground cinnamon (for coating) After frying, churro bites get a sweet finish with cinnamon sugar. The granulated sugar and ground cinnamon blend together perfectly. This coating adds flavor and a delightful crunch. Toss warm churro bites in this mix for the best results. {{ingredient_image_1}} 1. In a medium pot, combine 1/2 cup water, 2 tablespoons of butter, and 2 tablespoons of granulated sugar. Heat this mix on medium heat. Stir until the butter melts completely. 2. Once melted, take the pot off the heat. Add 1 cup of all-purpose flour, 1 teaspoon of baking powder, and 1/4 teaspoon of salt. Mix until the dough is smooth. Let the dough cool for about 10 minutes. 1. While the dough cools, preheat your oil in a deep pan to 350°F (175°C). This is the right temperature for frying. 2. Get a piping bag or a ziplock bag with a cut corner. Put the dough inside. 3. Pipe small blobs of dough, about 1 inch wide, into the hot oil. Fry them in batches. Don’t overcrowd the pan. Fry for 2-3 minutes until they turn golden brown. 1. Use a slotted spoon to remove the churro bites. Place them on a plate lined with paper towels to drain any excess oil. 2. In a bowl, mix 1/4 cup of granulated sugar with 1 teaspoon of ground cinnamon. Toss the warm churro bites in this mix until they are well coated. 3. For a fun look, arrange the churro bites in a small basket lined with parchment paper. Serve with chocolate or caramel sauce for dipping. To make churro bites, the dough must be just right. It should be smooth and not too sticky. This consistency helps create crispy bites. When you mix flour, sugar, and water, stir well to avoid lumps. Let the dough rest for about 10 minutes. This helps it firm up a bit before frying. Frying temperature is crucial. I recommend heating the oil to 350°F (175°C). If the oil is too cool, the churro bites will soak up oil and turn greasy. If it’s too hot, they will burn. Use a thermometer for best results. You can mix things up with flavor extracts. Try using almond or orange extract for a twist. Just a few drops add a new layer of taste to your churro bites. For the cinnamon sugar coating, you can change the ratio. If you love sweetness, use more sugar. If you prefer a stronger cinnamon flavor, increase the cinnamon amount. Experiment to find your perfect blend! Pro Tips Use Fresh Oil: Always use fresh oil for frying to ensure your churro bites are crispy and delicious. Old oil can impart an unpleasant flavor and affect the texture. Piping Technique: When piping the dough, keep the tip submerged in the oil to prevent the churro bites from sticking to the surface. This will help them fry evenly. Adjusting Sweetness: Feel free to adjust the amount of sugar in the cinnamon sugar coating based on your personal preference. You can add a pinch of nutmeg for an extra flavor kick! Serving Suggestions: Serve these churro bites warm with a side of chocolate or caramel sauce for dipping. They also pair well with a scoop of vanilla ice cream for a decadent dessert! {{image_2}} You can make churro bites in many fun ways. Here are two favorites: - Chocolate churro bites: Add cocoa powder to the dough for a rich flavor. Mix in about 2 tablespoons of cocoa powder with the flour. After frying, coat them in cinnamon sugar or dip them in melted chocolate for a sweet treat. - Filled churro bites: You can stuff churro bites with creamy fillings. Try using chocolate ganache or dulce de leche. Just pipe the dough into the oil, then use a small syringe to add filling after frying. Serving churro bites is part of the fun. Here are some tasty ideas: - Pairing with dipping sauces: Offer chocolate, caramel, or even a fruit sauce for dipping. Each sauce adds a new flavor to the bites and makes them extra special. - Serving with ice cream: Place warm churro bites next to a scoop of vanilla or chocolate ice cream. The hot and cold mix gives a delightful contrast that everyone loves. You can even drizzle some sauce over the ice cream for added flavor. To keep your churro bites fresh, store them in an airtight container. This helps prevent them from becoming soggy. If you have leftover churros, let them cool to room temperature first. Then, place them in the container. You can store them at room temperature for one day. For longer storage, place them in the fridge for up to three days. Use a glass or plastic container with a tight lid. These containers keep air out and help your churros stay crisp. If you have a lot of churros, stack them in layers. Place parchment paper between layers to avoid sticking. This method keeps them intact and ready to eat. To enjoy your churro bites again, you can reheat them easily. The best method is to use an oven. Preheat the oven to 350°F (175°C). Spread the churros on a baking sheet. Heat them for about 5 to 7 minutes. This method helps restore their crispiness. If you want extra crispiness, try frying them again. Heat oil in a deep frying pan to about 350°F (175°C). Fry the churros for just 30 seconds to 1 minute. This quick fry gives them that fresh, crunchy texture. Enjoy your churros warm, just like when you made them! Churros are tasty fried dough treats. They have a crunchy outside and a soft inside. This snack comes from Spain. It gained popularity in Latin America too. Churros are often served with chocolate sauce. They can be eaten as breakfast or dessert. The first churros appeared in the 19th century. They are now loved worldwide. Yes, you can prepare churro bites in advance. To do this, make the dough early. You can store it in the fridge for a few hours. When ready to fry, let it sit at room temperature for a bit. This helps the dough to warm up. Fry them just before serving for the best taste. If you have leftovers, store them in an airtight container. For frying churro bites, use oils with high smoke points. Canola oil is a great choice. Peanut oil also works well. Both oils make churros crispy without burning. Avoid using olive oil as it has a lower smoke point. Make sure the oil is hot enough, around 350°F (175°C), for perfect frying. Homemade churro bites are simple and fun to make with basic ingredients. You learned how to prepare the dough, fry until golden, and coat in cinnamon sugar. Don’t forget the tasty variations and storage tips. These little treats can impress anyone. Whether for a snack or a party, churro bites will please every palate. With these steps, you can enjoy warm, fresh flavors at home. Dive in and savor the goodness you created!

Homemade Churro Bites Savory and Sweet Treats

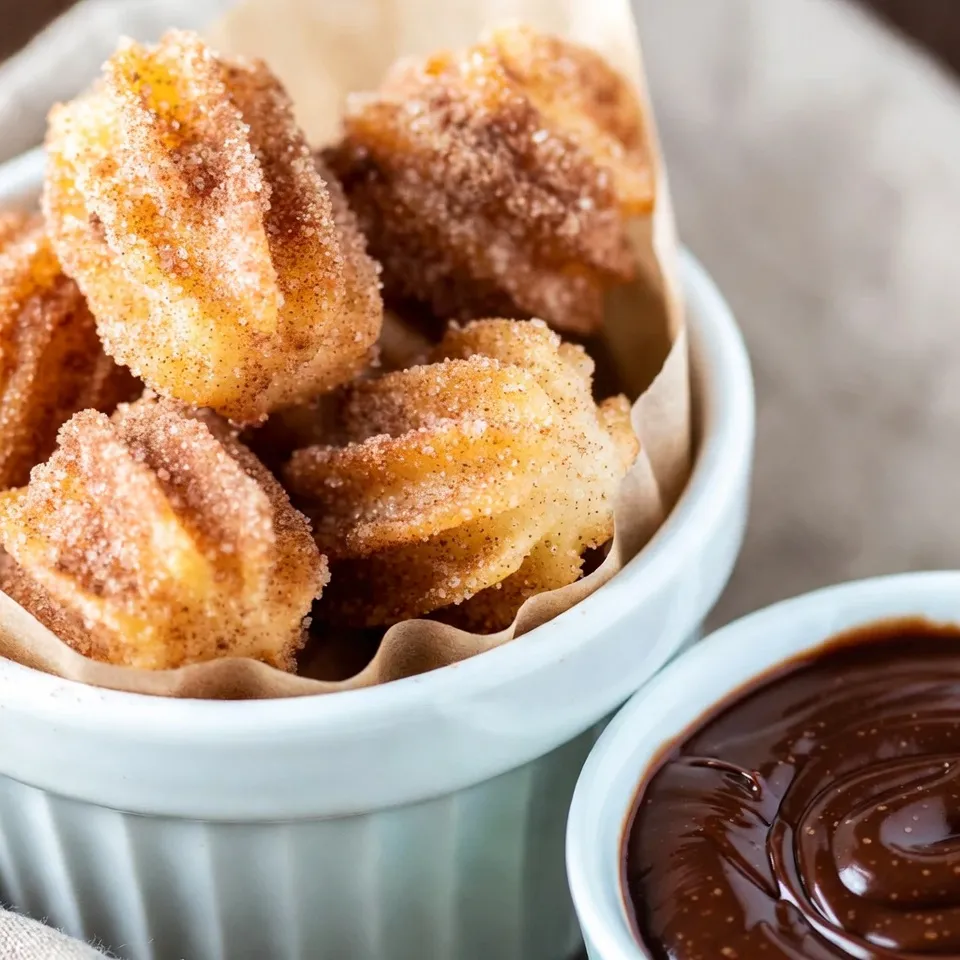
If you’ve ever craved a crunchy, sweet treat, homemade churro bites are your answer! These delightful snacks blend the perfect

- 4 boneless, skinless chicken thighs - 8 ounces egg noodles - 3 tablespoons unsalted butter - 2 tablespoons olive oil - 3 cloves garlic, minced - 1 cup chicken broth - 1 cup baby spinach - 1 teaspoon dried thyme - 1 teaspoon smoked paprika - Salt and pepper to taste - Fresh parsley, chopped (for garnish) You can add a squeeze of lemon juice for zest. Chopped green onions also add a nice crunch. A sprinkle of grated Parmesan cheese gives a rich flavor. These garnishes will elevate your dish. Choose fresh chicken thighs for the best taste. Look for organic options if possible. Select high-quality egg noodles for better texture. Fresh garlic enhances flavor more than jarred. Use low-sodium chicken broth to control salt levels. Fresh spinach wilts better and tastes brighter than frozen. Always check for the best use-by dates on all items. {{ingredient_image_1}} Start by heating 2 tablespoons of olive oil in a large skillet over medium-high heat. While the oil heats, season 4 boneless, skinless chicken thighs with salt, pepper, smoked paprika, and dried thyme. Once the oil is hot, carefully place the chicken thighs in the skillet. Sear them for about 5-7 minutes on each side. You want them golden brown and cooked through. After cooking, remove the chicken from the skillet and set it aside on a plate. In the same skillet, add 3 minced garlic cloves and sauté them for around 30 seconds. You want to smell that garlic aroma! Next, pour in 1 cup of chicken broth and bring it to a simmer. Stir in 8 ounces of egg noodles. Cook the noodles according to the package instructions, which usually takes about 6-8 minutes. Stir occasionally to keep them from sticking. Once they are al dente, you're ready for the next step. After cooking the noodles, lower the heat. Add 3 tablespoons of unsalted butter and 1 cup of baby spinach to the skillet. Stir until the butter melts and the spinach wilts. Now, return the cooked chicken thighs to the skillet, nesting them into the noodles. Allow everything to warm together for an additional 2-3 minutes. Taste your dish and adjust the seasoning if needed. Serve hot, garnished with chopped fresh parsley for a pop of color and flavor. Enjoy your one-pan chicken and buttered noodles! To make your chicken full of flavor, use spices wisely. I like to season the chicken thighs with salt, pepper, smoked paprika, and dried thyme before cooking. This step boosts the taste a lot. Searing the chicken in hot oil gives it a nice brown color and a crispy outside. Cook each side for about 5-7 minutes until golden brown. This method seals in juices and keeps the chicken moist. Remove the chicken from the skillet and let it rest. This helps it stay tender. For the best buttered noodles, start with good-quality egg noodles. Cook them until they are al dente. Follow the package instructions for the right time. When you add the chicken broth to the skillet, it creates a tasty base for the noodles. Stir in the butter at the end. This makes the noodles rich and smooth. Don't forget to add baby spinach! It wilts quickly and adds color and nutrients. When serving, use a large bowl. Place the chicken on top of the noodles for a beautiful look. Garnish with fresh parsley for a pop of color. You can also add a lemon wedge on the side. This adds a fresh touch that brightens the dish. Enjoy your meal with family or friends. It’s a great way to share good food and good times! Pro Tips Perfectly Cooked Chicken: Use a meat thermometer to check the internal temperature of the chicken thighs. They should reach 165°F (75°C) for safe consumption and optimal juiciness. Garlic Flavor Boost: For a deeper flavor, consider adding the minced garlic at the very end of cooking the chicken. This will give the garlic a fresher taste and prevent it from burning. Texture Matters: Make sure to stir the noodles occasionally while they cook to prevent them from sticking together and ensure even cooking. Fresh Spinach Substitute: If baby spinach isn’t available, feel free to use other leafy greens like kale or Swiss chard. Just remember to cook them a minute longer to soften. {{image_2}} You can easily swap out chicken for plant-based proteins. Try using tofu or tempeh. Both absorb flavors well and give you a good texture. Sauté them in the same skillet until golden. Add the same spices for that great taste. You can also use more veggies. Peas, bell peppers, or mushrooms work great in this dish. They add color and nutrients, making your meal vibrant and healthy. If you like spice, consider adding red pepper flakes. Just a pinch can make a big difference. You can also stir in some diced jalapeños for heat. Mix these into the garlic when you sauté it. This step infuses the oil with flavor and heat. For a fun twist, add a splash of hot sauce when you finish cooking. It gives a nice kick to your buttered noodles. While egg noodles are tasty, other noodles can work well too. Try whole wheat noodles for a healthier option. Rice noodles are another great choice, especially for gluten-free meals. Cook them according to package instructions for best results. You can even use spiralized veggies like zucchini or carrots for a fun twist. They add crunch and are low in carbs. After cooking, let your One-Pan Chicken & Buttered Noodles cool down. Once cooled, place the dish in an airtight container. This keeps the meal fresh. Store it in the fridge for up to three days. When you want to eat, you can take it out and enjoy it again. If you want to save some for later, freezing works well. First, cool the dish completely before freezing. Then, transfer it to a freezer-safe container. Make sure to seal it tightly. You can freeze the chicken and noodles for up to three months. When you're ready to eat, just thaw in the fridge overnight. To reheat, you can use the microwave or the stovetop. If using a microwave, place the dish in a bowl. Add a splash of chicken broth or water to keep it moist. Heat it in short bursts, stirring in between. For stovetop reheating, use a skillet over low heat. Add a little broth and stir until heated through. Always check that it’s hot all the way through before serving. Enjoy your meal as if it was just made! Yes, you can use frozen chicken thighs. Just make sure to thaw them first. Thawing helps the chicken cook evenly. You can thaw chicken in the fridge overnight or use the microwave for a quick option. Once thawed, follow the same steps in the recipe. This will give you juicy and tender chicken. If you want to swap the egg noodles, you have options. You can use spaghetti or fettuccine for a different twist. Gluten-free pasta works too if you need it. Just cook the noodles according to package instructions. This way, you keep the dish tasty and satisfying. You can prepare this dish ahead of time with ease. Cook the chicken and noodles as per the recipe. Let them cool, then store in an airtight container. Place the chicken and noodles in the fridge for up to two days. When ready to eat, reheat on the stove or in the microwave. Add a splash of broth to keep it moist and delicious. In this blog post, we explored key ingredients, step-by-step instructions, and tips for a delicious dish. You learned how to prepare chicken and cook noodles perfectly. We shared ways to enhance flavor and suggested variations for all tastes. Lastly, we provided storage and reheating tips. Remember, cooking can be fun and easy with the right steps. Keep these tips close as you create a meal your loved ones will enjoy. Happy cooking!

One-Pan Chicken & Buttered Noodles Quick Dinner Solution

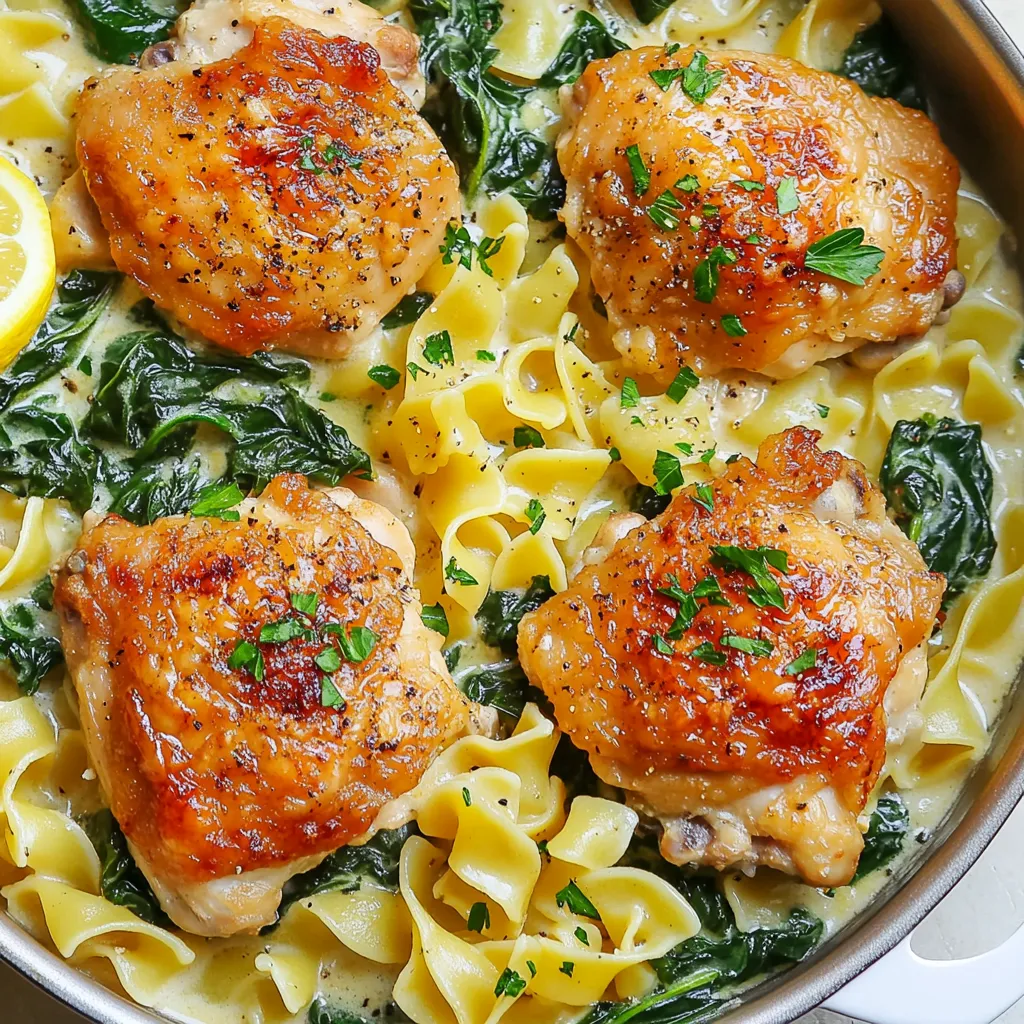
Looking for a quick and tasty dinner? My One-Pan Chicken & Buttered Noodles will save you time and clean-up. You’ll

Older posts
Newer posts
← Previous Page1 … Page158 Page159 Page160 … Page164 Next →

dsad

© 2026 easycookingbite • Built with GeneratePress

Our Policies

  • Copyright Policy
  • Cookie Policy
  • GDPR Policy
  • Privacy Policy
  • Disclaimer
  • Terms Of Use

More Information

  • Home
  • About
  • Contact
  • Appetizers
  • Dessert
  • Dinner
  • Drinks
©2026, easycookingbite About Back To Top