Skip to content
DisclaimerTerms Of UseGDPR PolicyCookie Policy

easycookingbite

  • Home
  • Drinks
  • Appetizers
  • Dinner
  • Dessert
  • About
  • Contact
  • Privacy Policy
DisclaimerTerms Of UseGDPR PolicyCookie Policy

Lily

- 4 large bell peppers (any color) - 1 lb ground chicken - 1 cup marinara sauce - 1 cup shredded mozzarella cheese - 1/2 cup grated Parmesan cheese - 1 cup cooked quinoa (or rice) - 1 teaspoon Italian seasoning - 1/2 teaspoon garlic powder - Salt and pepper to taste - Fresh basil leaves for garnish You need these fresh and tasty ingredients for chicken Parmesan stuffed peppers. Each item adds flavor and makes the dish a delight for the family. I love using colorful bell peppers because they look great on the plate. - 1 small onion, diced - 1/2 cup chopped spinach - Red pepper flakes for heat - 1/4 cup sliced black olives These optional ingredients can boost the taste of your meal. Diced onion gives a sweet flavor. Chopped spinach adds color and nutrients. If you like heat, try adding red pepper flakes. Black olives give a nice briny taste. - Ground turkey instead of ground chicken - Cauliflower rice for a low-carb option - Any cheese blend you enjoy - Tomato sauce if you don't have marinara You can swap ingredients based on what you have. Ground turkey works well if you want a leaner meat. Cauliflower rice is great for a low-carb meal. Feel free to use any cheese you like, and tomato sauce can be a good stand-in for marinara. {{ingredient_image_1}} 1. Preheat your oven to 375°F (190°C). This heat helps cook the peppers well. 2. Slice the tops off each bell pepper. Remove the seeds and membranes gently. Place the peppers cut-side up in a baking dish. This makes a sturdy base for your filling. 3. Gather your ingredients. You need ground chicken, marinara sauce, cooked quinoa or rice, and spices. 1. Heat a drizzle of olive oil in a large skillet over medium heat. This helps the chicken cook nicely. 2. Add the ground chicken to the skillet. Cook it until it is browned and no longer pink, about 5-7 minutes. Stir it often. 3. Mix in the marinara sauce. Add the cooked quinoa, Italian seasoning, garlic powder, salt, and pepper. Stir well to combine everything. 4. Remove from heat. Now, stir in half of the mozzarella cheese and half of the Parmesan cheese. This makes the mixture creamy and tasty. 1. Spoon the chicken mixture into each bell pepper evenly. Make sure to pack it well. 2. Top the peppers with the remaining mozzarella and Parmesan cheeses. This will give a nice cheesy crust. 3. Pour some extra marinara sauce around the base of the peppers. This adds flavor and keeps them moist. 4. Cover the baking dish with aluminum foil. Bake for 25 minutes. 5. Remove the foil and bake for an additional 10-15 minutes. Look for bubbly and lightly golden cheese. 6. Let cool slightly before serving. Garnish with fresh basil leaves for a pop of flavor and color. When picking bell peppers, look for smooth skin. The peppers should feel firm and heavy. Bright colors like red, yellow, and green mean they are fresh. Avoid any with soft spots or wrinkles. These signs show they are old. Choose peppers that are medium to large in size. They will hold the stuffing better. For your chicken, use ground chicken for the best flavor. Cook it until it's no longer pink. This takes about 5 to 7 minutes over medium heat. Stir it often to avoid burning. Mixing in the marinara sauce adds moisture and flavor. Check the internal temperature. It should reach 165°F (74°C) for safety. Use fresh mozzarella for great melting. Mix it in while the chicken is still warm. This helps the cheese melt well. Layer the remaining cheese on top before baking. This creates a nice golden crust. For extra flavor, try blending in some Italian herbs. They enhance the taste of the cheese and chicken. Pro Tips Choose the Right Peppers: Opt for large, firm bell peppers that can hold the stuffing well. Red, yellow, or green peppers all work great for different flavors and presentations. Customize Your Filling: Feel free to add other vegetables or spices to the chicken mixture, such as diced onions, mushrooms, or spinach for extra flavor and nutrition. Use Fresh Herbs: Adding fresh basil or parsley to the filling enhances the flavors. You can also sprinkle some on top right before serving for a fresh touch. Make Ahead: Prepare the stuffed peppers ahead of time and store them in the refrigerator. Just bake them right before serving for a quick meal. {{image_2}} You can make a tasty vegetarian version of chicken parmesan stuffed peppers. Replace the ground chicken with 1 pound of plant-based meat or lentils. Use the same marinara sauce and cheese. This change keeps the dish filling and flavorful. You can also add chopped mushrooms or zucchini for extra veggies. This mix adds great taste and texture. If you love heat, try a spicy twist. Add 1 teaspoon of red pepper flakes to the chicken mix. You can also use spicy marinara sauce to kick up the flavor. If you like it really hot, add diced jalapeños inside the peppers. The spicy taste pairs well with the creamy cheese. Using a slow cooker makes this recipe simple. After you prepare the filling, spoon it into the peppers. Place the stuffed peppers in the slow cooker. Pour some marinara sauce over them. Cook on low for 4-6 hours. This method keeps the peppers soft and flavorful. Plus, it frees up your oven for other dishes! To keep your chicken Parmesan stuffed peppers fresh, place them in an airtight container. Let the peppers cool to room temperature first. Store them in the fridge. They will last for about 3 to 4 days. If you want to keep them longer, freezing is a great option. When you are ready to enjoy the leftovers, preheat your oven to 350°F (175°C). Place the stuffed peppers in a baking dish. Cover them with foil to keep moisture in. Heat for about 20 minutes or until they are warm throughout. You can also use a microwave. Simply heat them on high for about 2-3 minutes. To freeze the stuffed peppers, wrap each one tightly in plastic wrap. Then place them in a freezer-safe bag or container. They will be good for up to 3 months. When you are ready to eat them, thaw them in the fridge overnight. Then reheat as described above. This way, you always have a tasty meal ready to go! Yes, you can use different meats. Ground turkey or beef works well. You can even use shredded rotisserie chicken for a quick option. Each meat brings its own flavor. Just make sure to cook it fully before adding to the peppers. To make these stuffed peppers gluten-free, use gluten-free grains. Quinoa is a great choice. You can also use rice or gluten-free pasta. Check your marinara sauce too. Some sauces may have gluten. Always read the label to be sure. You can get creative with sauces. Alfredo sauce adds a creamy touch. Pesto gives a fresh and herb-like flavor. Salsa can give a spicy kick. Just make sure the sauce complements the chicken. This way, you’ll have a tasty meal every time. This blog post covered all aspects of making tasty stuffed peppers. We explored the key ingredients, step-by-step preparation, and cooking methods for perfect results. I shared tips for choosing bell peppers and cooking chicken just right. You also learned about variations for vegetarians and using a slow cooker. Remember to store leftovers properly and reheat them well. With these insights, you can create delicious stuffed peppers that fit your taste. Enjoy your cooking adventure!

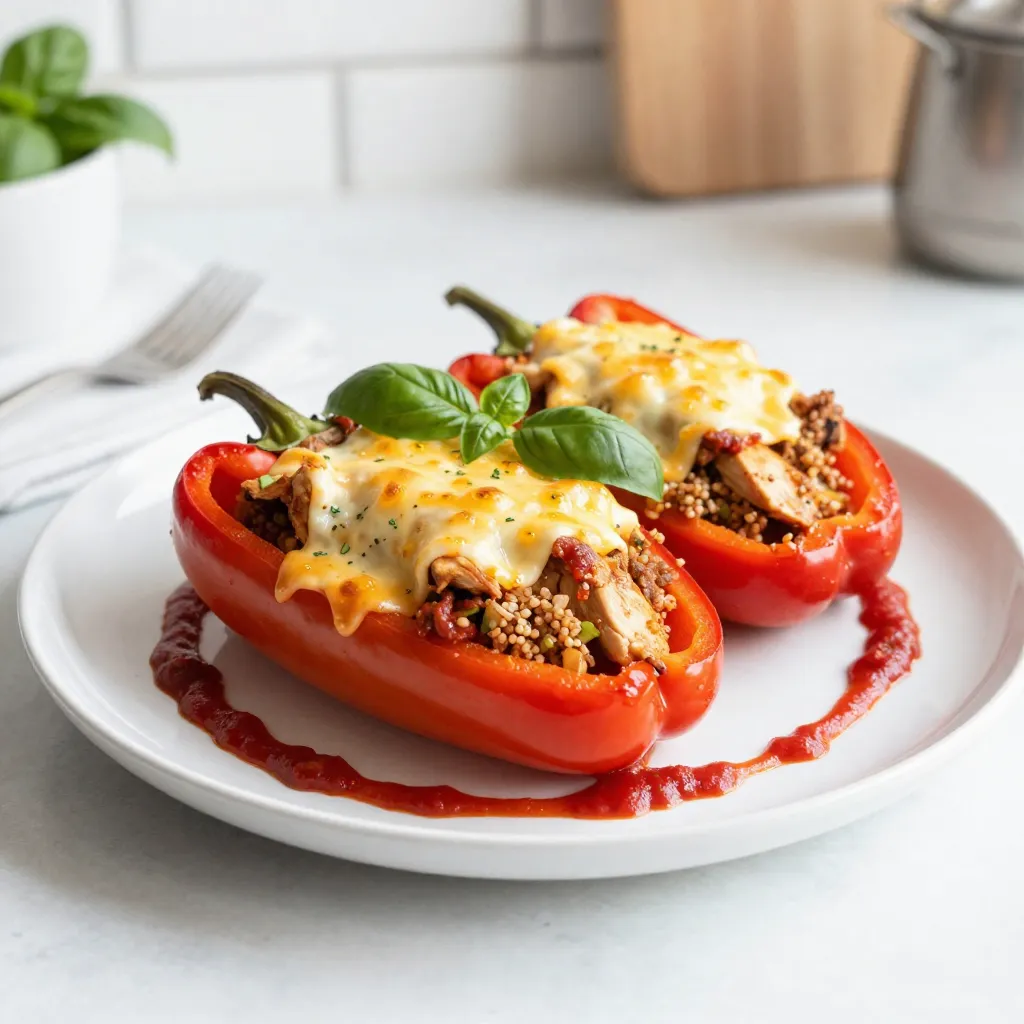
Chicken Parmesan Stuffed Peppers Tasty and Simple Meal

Are you looking for a meal that’s both tasty and simple? Chicken Parmesan Stuffed Peppers are the answer! You can

To make this creamy blueberry cheesecake dip, gather these key items: - 8 oz cream cheese, softened - 1/2 cup sour cream - 1/2 cup powdered sugar - 1 teaspoon vanilla extract - 1 cup fresh blueberries (reserve some for garnish) - 1 tablespoon lemon juice - 1/4 teaspoon cinnamon These ingredients blend together to create a rich and smooth dip. The cream cheese gives a creamy base. Sour cream adds tang, while powdered sugar sweetens the mix. Vanilla extract enhances the flavor, and fresh blueberries bring a burst of fruitiness. To make your dip even more appealing, consider these garnishing ideas: - Extra fresh blueberries - A sprinkle of cinnamon - A drizzle of honey or maple syrup These touches add color and flavor. Fresh blueberries on top look great and taste fresh. Cinnamon gives a warm touch. Honey or maple syrup can add sweetness if you like it sweeter. For the best experience, serve your dip with these tasty dippers: - Graham crackers - Cookies - Fresh fruit like apple slices or strawberries These options add fun and flavor to your dip. Graham crackers offer a crunchy texture. Cookies bring sweetness, and fresh fruit adds a juicy taste. Try mixing and matching to find your favorite combination! {{ingredient_image_1}} To make the cream cheese base, start by softening 8 ounces of cream cheese. Use an electric mixer to beat it until it feels smooth. This step takes just a few minutes. Next, add in 1/2 cup of sour cream, 1/2 cup of powdered sugar, and 1 teaspoon of vanilla extract. Continue mixing until everything blends well. The mixture should feel creamy and fluffy. Now, let’s bring in the blueberries! In a small bowl, take 1 cup of fresh blueberries. Mash half of them with a fork and mix in 1 tablespoon of lemon juice and 1/4 teaspoon of cinnamon. This adds a nice zing. Once blended, gently fold this blueberry mixture into your cream cheese mix. Aim for a marbled look, but don’t overmix! You want to see those lovely blueberry swirls. Transfer your dip into a serving bowl. For a beautiful touch, top it with the reserved fresh blueberries. This makes it look extra inviting. Serve your dip right away with graham crackers, cookies, or fresh fruit. Each bite is a delight, and it’s perfect for sharing with friends! To make your dip shine, always use room-temperature cream cheese. It blends well and stays smooth. Beat it until creamy, then add sour cream and sugar. This mix makes the base rich and sweet. When adding blueberries, mash only half. This gives a nice swirl effect. Gently fold them into the mix; don’t overdo it. You want to see the blue and white mix together. For a hint of zest, use fresh lemon juice. It brightens the flavor. One big mistake is using cold cream cheese. It can make your dip lumpy. Another issue is overmixing the blueberries. Doing this turns the dip purple instead of marbled. Also, don’t skip the cinnamon. It adds warmth and depth. Lastly, remember to save some blueberries for garnishing. This makes your dip look beautiful and fresh. Serving temperature matters for dips. The ideal temperature is cool but not cold. Let the dip sit for a few minutes after making it. This helps the flavors blend better. If you let it sit out too long, it may become too warm. Keep an eye on it. Serve with graham crackers or fruit for the best taste. Enjoy your creamy blueberry cheesecake dip! Pro Tips Use Room Temperature Cream Cheese: Ensure your cream cheese is at room temperature for a smoother and creamier dip. Fresh Blueberries are Best: Opt for fresh blueberries instead of frozen for the best flavor and texture in your dip. Experiment with Flavors: Feel free to add a dash of almond extract or a splash of orange juice for a unique twist on the flavor. Chill Before Serving: For an even better taste, refrigerate the dip for at least 30 minutes before serving to allow the flavors to meld. {{image_2}} You can swap blueberries for other fruits. Strawberries, raspberries, or blackberries work great. Each fruit adds a different flavor. You can even mix fruits for a fun twist. Just remember to mash them as you did with the blueberries. Add extra flavor to your dip with simple add-ins. You can mix in some lemon zest for zing. A little almond extract can add a warm flavor. Try adding mini chocolate chips for a sweet surprise. You can also use a dash of nutmeg for warmth. Make this dip fit your diet with a few changes. For a lighter option, use low-fat cream cheese. You can also swap sour cream for Greek yogurt. If you're vegan, use plant-based cream cheese and yogurt. This way, everyone can enjoy the dip! To keep your blueberry cheesecake dip fresh, store it in an airtight container. Make sure the lid seals well to prevent air from entering. If you have leftovers, cover the dip with plastic wrap before sealing the container. This extra step helps keep it creamy and delicious. The dip lasts up to five days in the fridge. After that, it can lose flavor and texture. If you want to store it longer, you can freeze it. Place the dip in a freezer-safe container. It can stay in the freezer for up to three months. Just remember to thaw it in the fridge overnight before using it again. When you want to enjoy your dip again, check its texture. If it seems too thick, mix in a bit of sour cream or cream cheese. If you want to refresh the flavor, add a squeeze of lemon juice. This will brighten up the taste. Serve it chilled or at room temperature with your favorite dippers. Yes, you can use frozen blueberries. Just make sure to thaw them first. This helps prevent too much water from getting into your dip. Once thawed, mash them as you would with fresh blueberries. The flavor will still be great, and your dip will be tasty. Yes, you can make a vegan version! Swap the cream cheese for vegan cream cheese. Instead of sour cream, use coconut yogurt or soy yogurt. For sweetness, use powdered sugar made from cane sugar. This way, you can enjoy a creamy dip, even without dairy. To make the dip sugar-free, use a sugar substitute like erythritol or stevia. These sweeteners work well and won’t change the taste too much. You can also mash extra blueberries for natural sweetness. This keeps your dip delicious without any added sugar. You learned how to make a tasty blueberry cheesecake dip. We covered the main ingredients, mixing methods, and serving tips. I shared expert advice to steer clear of common mistakes. You can try fun variations and find proper storage methods. Now, create your perfect dip and enjoy with friends and family. This recipe is easy to master. You can impress everyone with your skills. Have fun exploring flavors and making it your own!

Blueberry Cheesecake Dip Decadent and Easy Recipe

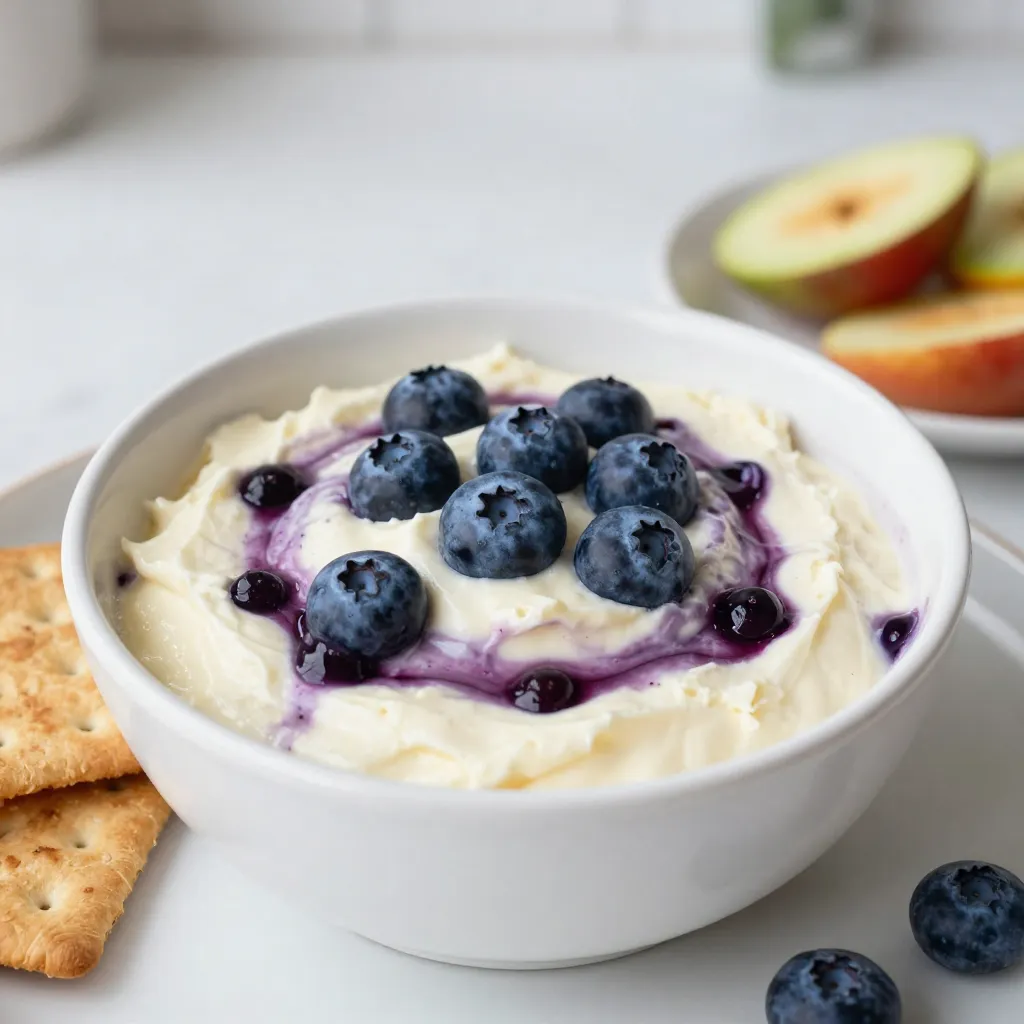
Are you ready to dive into a sweet and creamy treat? My Blueberry Cheesecake Dip is the perfect blend of

- 1 pound boneless, skinless chicken breasts - 1 cup wild rice, rinsed and drained - 1 medium onion, diced - 3 cloves garlic, minced - 3 medium carrots, diced - 3 celery stalks, diced - 4 cups low-sodium chicken broth - 1 cup coconut milk (or heavy cream) - 1 teaspoon dried thyme - 1 teaspoon dried rosemary - 1 teaspoon salt (adjust to taste) - 1/2 teaspoon black pepper - 2 tablespoons olive oil - Fresh parsley, chopped for garnish - Additional seasoning {{ingredient_image_1}} First, set your Instant Pot to sauté mode. Add two tablespoons of olive oil. Once the oil is hot, add one diced onion, three diced carrots, and three diced celery stalks. Sauté these veggies for about five minutes. You want them to soften and turn a bit sweet. Now, add three minced garlic cloves. Sauté for one more minute. The smell will be fantastic! Next, take one pound of boneless, skinless chicken breasts. Season them with one teaspoon of salt, one teaspoon of black pepper, one teaspoon of dried thyme, and one teaspoon of dried rosemary. Place the chicken on top of the sautéed veggies. Add one cup of wild rice that you rinsed and drained. Then, pour in four cups of low-sodium chicken broth. Stir gently to mix everything together. Close the lid of the Instant Pot. Make sure the valve is set to sealing. Select the manual or pressure cook setting. Cook the soup on high pressure for 25 minutes. When the time is up, let the pressure release naturally for about ten minutes. After that, do a quick release for any remaining pressure. Carefully take out the chicken breasts. Use two forks to shred them into bite-sized pieces. Return the shredded chicken back into the pot. Now, stir in one cup of coconut milk or heavy cream. Let the soup heat through for another five minutes on sauté mode. Taste the soup and adjust the seasoning if you need to. Serve it hot, garnished with fresh chopped parsley. Enjoy this warm, creamy delight! To make your soup taste great, use fresh herbs like thyme and rosemary. These add a nice touch. You can also try adding a splash of lemon juice for brightness. Adjust the salt and pepper to suit your taste. This step is important for a balanced flavor. For creaminess, coconut milk works well, but heavy cream is also nice. If you want a thicker soup, let it cook a bit longer. If it’s too thick, just add more broth or water. Wild rice should be tender but not mushy. Rinsing it helps keep the texture just right. When using the Instant Pot, make sure to set the valve to sealing. This helps build pressure. After cooking, allow for a natural pressure release for about 10 minutes. This keeps the soup from being too watery. Common mistakes include overfilling the pot or not sealing it properly. Always follow the fill line for best results. Pro Tips Use Fresh Herbs: Fresh herbs like thyme and rosemary can elevate the flavors of your soup, making it more aromatic and delicious. Customize the Creaminess: For a lighter option, use coconut milk, or for a richer taste, heavy cream works beautifully in this soup. Adjusting the Seasoning: Always taste your soup before serving; adding a touch more salt or pepper can significantly enhance the overall flavor. Store Leftovers Properly: Let any leftovers cool completely before transferring to an airtight container. This soup can be refrigerated for up to 3 days or frozen for up to 3 months. {{image_2}} You can change the rice for this soup. White rice or brown rice works well too. Just keep in mind that cooking times may differ. If you prefer another protein, turkey is a great choice. It gives a nice flavor and works well in soups. Adding more veggies can boost the taste. Spinach or peas are great additions. They add color and nutrition. You can also change the spices. A bit of curry powder can add warmth and depth. Experiment with your favorite herbs to find new flavors. If you need a gluten-free soup, use gluten-free broth. This soup can be vegan too! Replace chicken with chickpeas or tofu. Use vegetable broth instead of chicken broth. Coconut milk gives a great creamy texture without dairy. To store leftovers, let the soup cool first. Place it in an airtight container. Seal it well to keep out air. You can store it in the fridge for up to four days. When reheating, use the stove or microwave. Stir often to heat evenly. Adding a splash of broth can help if it thickens. For freezing, let the soup cool completely. Use freezer-safe bags or containers. Remove as much air as possible. The soup can last up to three months in the freezer. To thaw, move it to the fridge overnight. For reheating, use the stove or microwave. Heat until bubbling, stirring often. In the fridge, the soup lasts about four days. Always check for signs of spoilage. If it smells bad or has a strange color, don’t eat it. For safe consumption, reheat to at least 165°F. This kills any bacteria and keeps your meal safe. Cooking chicken in an Instant Pot takes about 25 minutes on high pressure. This time ensures the chicken is tender and fully cooked. The pot will also need time to come to pressure and release pressure, adding around 20 minutes more to your total. Yes, you can use brown rice. However, brown rice takes longer to cook. You should adjust the cooking time to about 35 minutes on high pressure. Wild rice gives a unique flavor and texture, but brown rice is a good option if that is what you have. No, it is not necessary to use cream or coconut milk. You can skip it for a lighter soup. If you want creaminess, consider using a thick vegetable puree or a splash of milk. These alternatives can still provide great taste. Yes, you can make this soup in a slow cooker. Sauté the vegetables in a pan first, then add all ingredients to the slow cooker. Cook on low for 6-8 hours or on high for 3-4 hours. The result will be just as tasty! This blog covered key ingredients for a delicious Instant Pot soup. You learned about main and optional ingredients, step-by-step cooking methods, and tips for great flavor and texture. We also explored variations and storage methods to keep your soup fresh. Incorporating different ingredients allows you to make this soup your own. Follow the tips for perfect results, and don’t hesitate to get creative. Enjoy your cooking adventure!

Instant Pot Chicken and Wild Rice Soup Comfort Dish

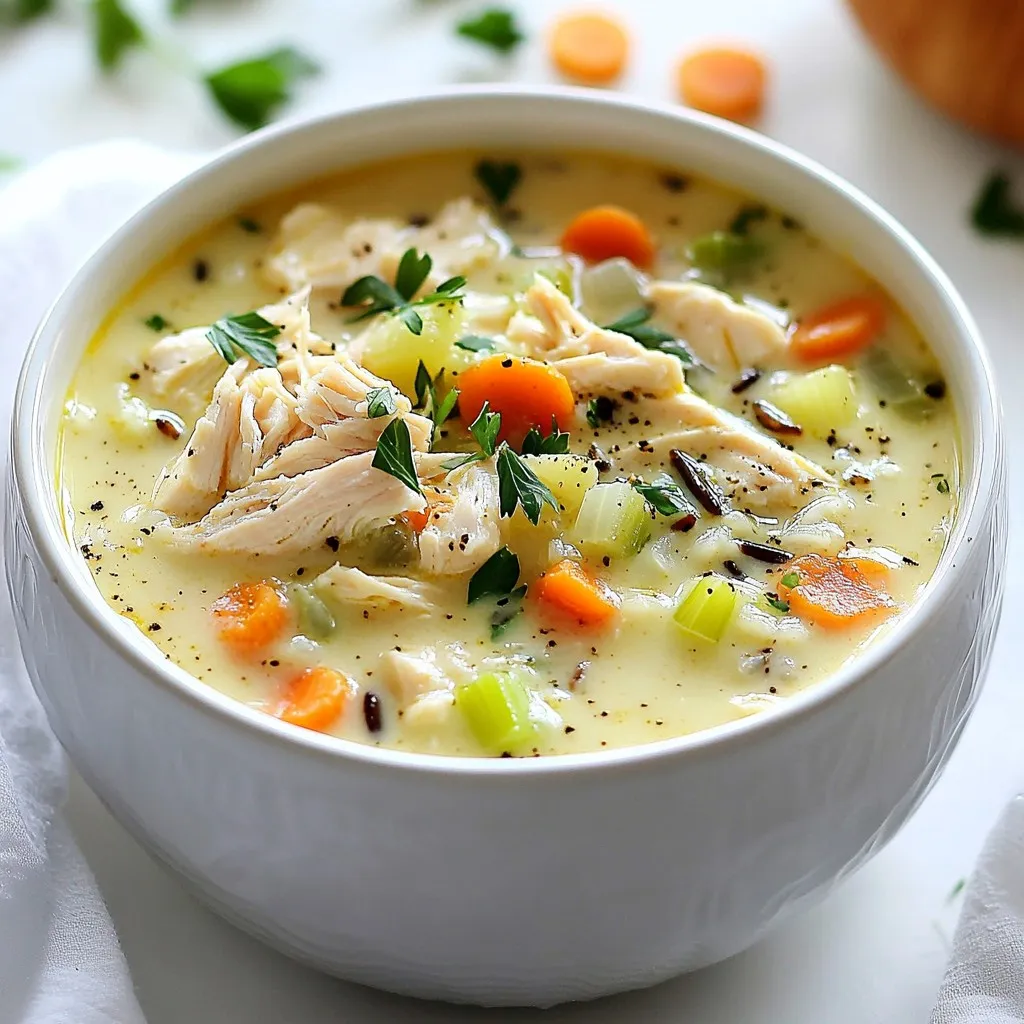
If you crave a warm, hearty dish, look no further than Instant Pot Chicken and Wild Rice Soup. This easy

- 8 oz cream cheese, softened - 1 cup shredded sharp cheddar cheese - 1/2 cup dried cranberries, chopped - 1/4 cup orange zest (freshly grated) - 1/4 cup green onions, finely chopped - 1 tablespoon honey - 1/4 cup walnuts or pecans, chopped - 1/2 teaspoon garlic powder - 1/2 teaspoon salt To create this delightful cheese ball, you start with the main ingredients. Cream cheese gives it a smooth base. Sharp cheddar adds a rich flavor. Chopped dried cranberries bring sweetness and texture. Next, for flavor enhancers, freshly grated orange zest adds a burst of citrus. Green onions give a nice crunch and a bit of bite. Honey sweetens it all, balancing the flavors perfectly. Feel free to add optional ingredients. Chopped walnuts or pecans bring a nutty crunch. Garlic powder adds depth, while salt boosts the overall taste. These extras can make your cheese ball even more special. Gather all these ingredients for a festive treat. You can mix and match based on your taste. This cheese ball is great for any holiday gathering or party. {{ingredient_image_1}} - In a large bowl, combine 8 oz of softened cream cheese and 1 cup of shredded sharp cheddar cheese until smooth. This mix forms the base of your cheese ball. - Next, add 1/2 cup of chopped dried cranberries, 1/4 cup of freshly grated orange zest, 1/4 cup of finely chopped green onions, and 1 tablespoon of honey. If you want extra crunch, add 1/4 cup of chopped walnuts or pecans. Then, sprinkle in 1/2 teaspoon of garlic powder and 1/2 teaspoon of salt. Stir all these ingredients until they are well mixed. - Now, use your hands to form the mixture into a large ball. If the mixture feels sticky, dampen your hands slightly with water. This makes shaping much easier. Keep rolling until you have a smooth, round cheese ball. - Wrap the cheese ball tightly in plastic wrap. Place it in the fridge for at least 2 hours. This time helps the flavors blend and the cheese firm up. - After chilling, unwrap the cheese ball. For extra flair, roll it in chopped cranberries, nuts, or a sprinkle of orange zest. This gives it a festive look! - Serve the cheese ball on a platter with assorted crackers and fresh fruit. This combination brings a bright, joyful touch to your holiday spread. You can make the cranberry orange cheese ball a day ahead. This helps the flavors blend well. After mixing, shape the cheese ball and wrap it tightly in plastic wrap. Chill it in the fridge for at least 2 hours. Letting it rest enhances the taste. The ingredients mingle and create a richer flavor. Serve your cheese ball with assorted crackers and fresh fruit. Choose crunchy crackers like water crackers or buttery ones like Ritz. Fruits like apple slices or grapes add a sweet touch. For a festive look, place the cheese ball on a colorful platter. You can add sprigs of rosemary or slices of orange for decoration. To prevent the cheese ball from leaking, ensure your cream cheese is well-softened but not too warm. If the mixture is sticky, dampen your hands when shaping. If you want to adjust flavors, taste the mixture before chilling. Add more honey for sweetness or salt for a savory kick. Pro Tips Chill for Optimal Flavor: Allow the cheese ball to chill for at least 2 hours to let the flavors meld together for a more delicious taste. Experiment with Cheese: Feel free to mix different types of cheese for a unique flavor profile. Creamy goat cheese or tangy blue cheese can add a delightful twist! Make Ahead: This cheese ball can be made up to 2 days in advance. Just keep it wrapped tightly in the fridge until you're ready to serve. Presentation Matters: For an eye-catching display, roll the cheese ball in extra chopped cranberries or nuts before serving. It adds color and texture! {{image_2}} You can change the taste of your cheese ball easily. Try adding herbs like dill or thyme. These herbs add freshness and depth. For a spicy kick, use cayenne or paprika. You can also mix in spices like cumin for a unique, warm flavor. Switching up cheese types makes a big difference too. Use cream cheese with goat cheese for a tangy bite. Or try a sharp blue cheese for a bold taste. Each cheese will bring its own charm to your spread. If you need a gluten-free option, use gluten-free crackers. This way, everyone can enjoy the cheese ball. You can also make it dairy-free. Use a cream cheese substitute made from nuts. There are many great brands available now. They have similar textures and flavors, making it easy to adapt. Incorporate seasonal fruits for an exciting twist. Fresh berries in summer or diced apples in fall add fun flavors. They also make your plate look colorful and inviting. When it comes to festive themes, think about the holidays. Add chopped pecans and cranberries for a Thanksgiving vibe. Around Christmas, sprinkle some pomegranate seeds for a festive look. These small changes make your cheese ball a true holiday delight! To keep your cheese ball fresh, wrap it tightly in plastic wrap. Store it in the fridge. The cheese ball will stay good for about 5 days. You can freeze the cheese ball for longer storage. First, wrap it in plastic wrap, then place it in an airtight container. This helps keep the flavor. When you want to eat it, take it out and let it thaw in the fridge overnight. When ready to serve, do not heat the cheese ball. It tastes best served cold. Remove it from the fridge and unwrap it. Serve it with your favorite crackers and fresh fruit for a yummy treat. Enjoy! Yes, you can use low-fat cream cheese. It still gives good taste and texture. The cheese ball may be a bit lighter, but the flavors will remain delicious. Low-fat options work well for those watching calories. Just remember, the creaminess may change slightly. It is best to keep the cheese ball out for no more than two hours. After that, it can spoil. If the room is warm, you should limit that time to one hour. Always ensure food safety to prevent any health issues. You can serve many things with your cheese ball. Here are some great options: - Assorted crackers - Fresh fruit like apples or grapes - Veggie sticks, such as carrots or celery - Sliced baguette - A sweet drink like apple cider or a light wine These sides make a fun and tasty spread for your guests. Making a Cranberry Orange Cheese Ball is simple and fun. You combine cream cheese, cheddar, and cranberries for a tasty mix. Add some honey and green onions for extra flavor. You can even try different cheeses or herbs to make it unique. Remember to chill it well and store leftovers correctly. With a few tips, you’ll impress your friends at gatherings. Enjoy sharing this treat with loved ones and creating lasting memories!

Cranberry Orange Cheese Ball Delightful Holiday Spread

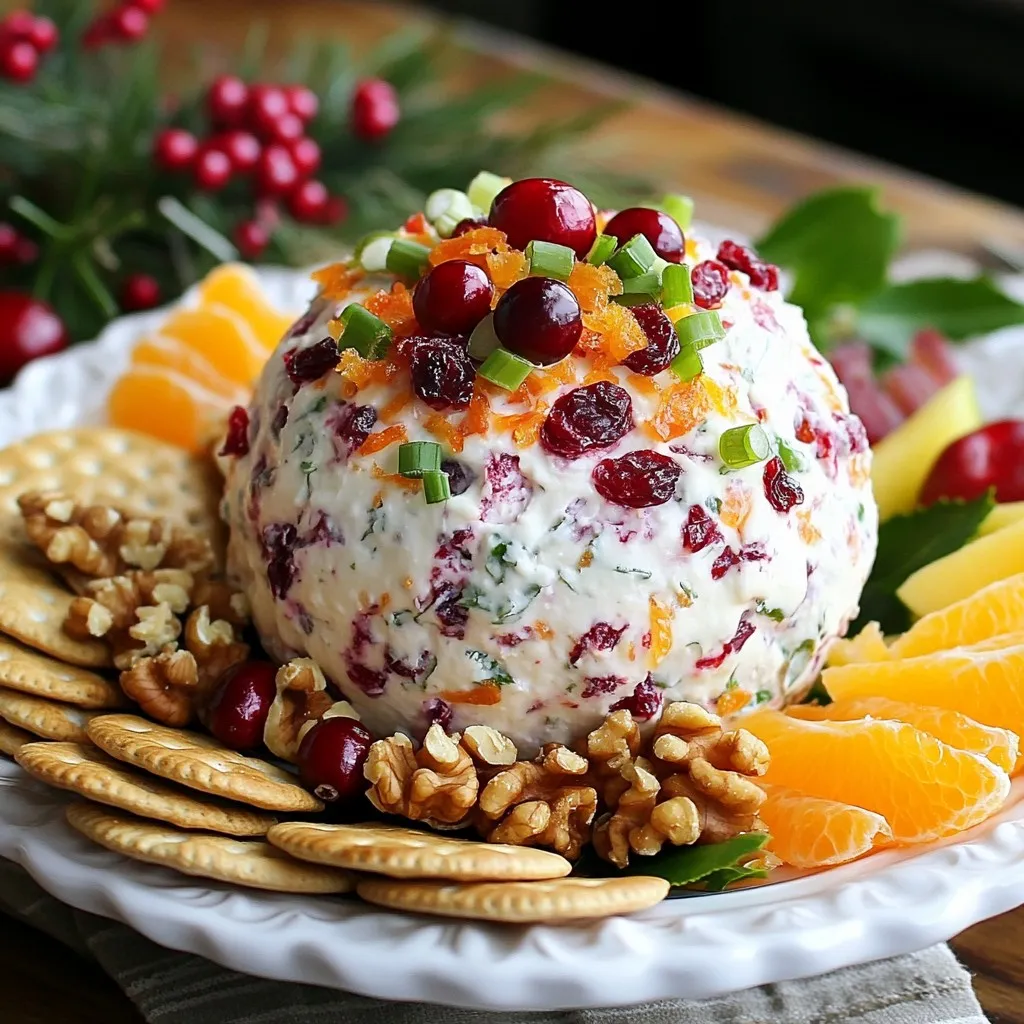
Looking for a festive treat that wows your guests? This Cranberry Orange Cheese Ball is the perfect holiday spread! With

When preparing Chicken Pot Pie Pasta, gathering the right ingredients is key to a delicious dish. Here’s what you need: - Pasta Options: 8 ounces of penne or fusilli - Vegetables: 1 medium onion (diced), 2 cloves garlic (minced), 2 carrots (diced), 1 cup frozen peas - Protein: 2 cups of cooked chicken (shredded) - Liquid Ingredients: 4 cups chicken broth, 1 cup heavy cream - Seasonings: 1 teaspoon dried thyme, 1 teaspoon dried rosemary, salt, and pepper to taste - Optional Ingredients: 2 tablespoons cornstarch (for thickening), ½ cup grated Parmesan cheese, fresh parsley (chopped for garnish) These ingredients come together to create a creamy, hearty dish that warms you up from the inside. Each one plays a vital role, from the tender pasta to the rich chicken and fresh veggies. Enjoy the process of selecting these items, as they set the stage for a comforting meal that feels like a warm hug. {{ingredient_image_1}} Bringing Water to a Boil Start by filling a large pot with water. Add a pinch of salt to the water. Heat the pot on high until it boils. This should take about 5-10 minutes. Cooking Time and Draining Pasta Once the water boils, add 8 ounces of pasta. You can use penne or fusilli for this dish. Cook the pasta according to the package directions until it is al dente. This usually takes 8-10 minutes. Drain the pasta in a colander and set it aside. Heating Olive Oil In a large skillet, pour 2 tablespoons of olive oil. Heat the oil over medium heat. Wait until the oil shimmers before adding the vegetables. Cooking Onions, Garlic, and Carrots Add 1 medium diced onion to the skillet. Sauté the onion for about 3-4 minutes until it looks clear. Then add 2 cloves of minced garlic and 2 diced carrots. Cook for another 3 minutes until the carrots are tender but still crisp. Adding Chicken and Peas Stir in 2 cups of shredded cooked chicken. Next, add 1 cup of frozen peas. Cook for about 2-3 minutes until the peas are warm and bright green. Making the Sauce with Broth and Cream Pour in 4 cups of chicken broth and 1 cup of heavy cream. Add 1 teaspoon of dried thyme, 1 teaspoon of dried rosemary, and salt and pepper to taste. Bring the mixture to a gentle simmer. Let it cook for 5-10 minutes until it thickens slightly. If you want a thicker sauce, mix 2 tablespoons of cornstarch with a bit of water. Stir this slurry into the sauce until it thickens. Mixing Pasta with the Sauce Add the drained pasta to the skillet. Toss everything together gently. Make sure the pasta is well coated with the creamy sauce. Adding Parmesan Cheese Stir in ½ cup of grated Parmesan cheese. Mix until the cheese melts and combines well with the sauce. Garnishing for Presentation Spoon the Chicken Pot Pie Pasta into bowls. Garnish each serving with fresh chopped parsley for a pop of color. You can also add extra Parmesan on top for more flavor. To make your sauce just right, use cornstarch. Mix two tablespoons of cornstarch with a little water. This creates a slurry. Add it to the sauce if you want it thicker. Stir well, and watch the magic happen. The sauce will coat your pasta perfectly. Enhance flavor with herbs and seasonings. Dried thyme and rosemary work great here. They add warmth and depth. You can also try fresh herbs if you have them. Fresh parsley on top adds a nice touch too. Sautéing vegetables brings out their best flavors. Start with olive oil in a skillet. Cook the onions until they are soft. Then add garlic and carrots for a few more minutes. This builds a great base for your dish. Using leftover chicken is smart. It saves time and adds flavor. Shredded chicken from a previous meal works well. It makes this dish even easier to prepare. For a lovely look, serve in wide, shallow bowls. Top with extra Parmesan cheese and fresh parsley. This makes your dish pop visually. You can even add a small biscuit or flaky pastry on the side. It gives that classic pot pie feel. Pair your Chicken Pot Pie Pasta with a simple salad. A green salad with light dressing complements it well. You can also serve with crusty bread for extra comfort. These sides will make your meal even more enjoyable. Pro Tips Use Rotisserie Chicken: For a quicker preparation, opt for store-bought rotisserie chicken. It saves time and adds a delicious flavor to your dish. Veggie Variations: Feel free to add other vegetables like bell peppers, broccoli, or mushrooms to enhance the dish's nutrition and flavor. Thicken the Sauce: For a creamier texture, allow the sauce to simmer longer or add a bit more cornstarch slurry to reach your desired consistency. Cheese Alternatives: Experiment with different types of cheese, such as cheddar or Gruyère, for a unique twist on the flavor profile. {{image_2}} You can swap chicken for other proteins. Turkey is a great choice. It has a similar taste and texture. You can also go for a vegetarian option. Try using chickpeas or cooked lentils. These options add protein and keep the dish hearty. If you want to make it vegan, use tofu or tempeh. These substitutes work well with the creamy sauce. Not all pasta is the same. You can use whole wheat pasta for more fiber. This option adds a nutty taste. If gluten is a concern, gluten-free pasta works too. It cooks well and soaks up the sauce nicely. You could try shapes like rotini or bowties. They hold the sauce better and make each bite fun. Heavy cream gives a rich flavor, but there are lighter options. Greek yogurt is a fantastic substitute. It adds creaminess without all the fat. Just mix it in at the end. You can also use coconut milk for a dairy-free version. It gives a slight sweetness that works well with savory flavors. Your dish will still taste amazing while being a bit healthier. Store any leftovers in airtight containers. This helps keep the pasta fresh. Make sure to let it cool first. Place it in the fridge. It will last about three to four days. To freeze Chicken Pot Pie Pasta, let it cool completely. Then, scoop it into freezer-safe bags. Remove as much air as possible. Label each bag with the date. This dish can stay frozen for up to three months. For the best taste, reheat on the stove. Use a non-stick pan over low heat. Stir in a splash of broth or cream to keep it moist. You can also microwave it in a bowl. Cover the bowl to hold in steam. Heat in short bursts, stirring in between. Enjoy your comforting meal! Yes, you can use uncooked chicken. Start by cutting the chicken into small pieces. Sauté the raw chicken in olive oil until it turns golden brown. This should take about 5-7 minutes. Make sure the chicken is cooked through before adding the vegetables. It adds great flavor and keeps the dish juicy. To make Chicken Pot Pie Pasta vegetarian, you can replace the chicken with plant-based protein. Try using tofu or chickpeas. For a tasty twist, add mushrooms for a meaty texture. You can also increase the number of vegetables. Think about adding bell peppers, zucchini, or spinach. Use vegetable broth instead of chicken broth to keep the flavors rich. Chicken Pot Pie Pasta pairs well with many sides. Consider serving a crisp green salad for freshness. Garlic bread or crusty rolls are also great to soak up the creamy sauce. For a lighter option, steam some broccoli or green beans. These sides will complement the dish nicely. Chicken Pot Pie Pasta lasts about 3-4 days in the fridge. Store it in an airtight container to keep it fresh. If you want to save it longer, you can freeze it. It will keep well for about 2-3 months in the freezer. Just make sure to label the container with the date. To create a great Chicken Pot Pie Pasta, start with the right ingredients. Use penne or fusilli, fresh veggies, and cooked chicken. Follow the steps carefully for cooking and combining these elements. Enhance the sauce for extra flavor. You can also try different proteins or pasta types for variety. Remember to store leftovers well and reheat them properly to enjoy later. This dish is adaptable and simple, making it a perfect weeknight meal. Enjoy your cooking adventure and share it with loved ones!

Chicken Pot Pie Pasta Flavorful Comfort Food Dish

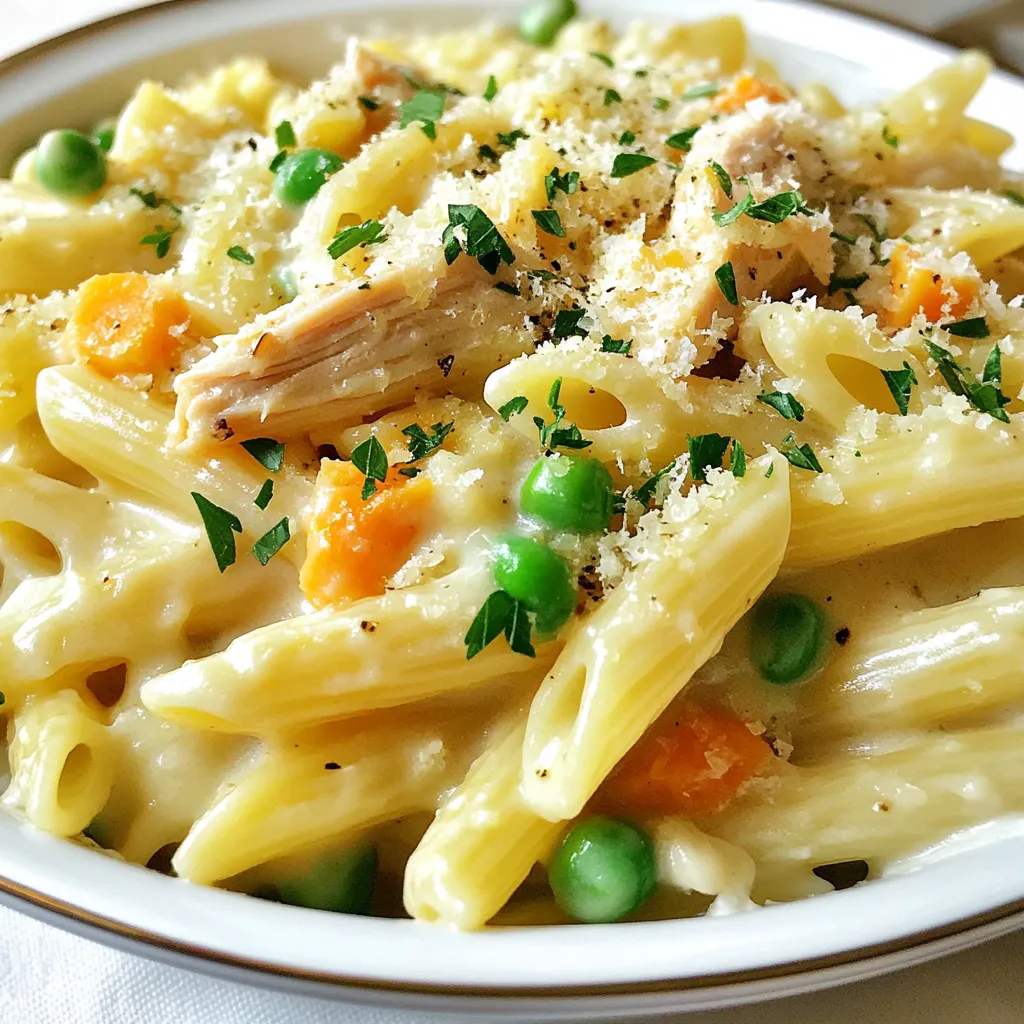
Craving comfort food that warms your soul? Try my Chicken Pot Pie Pasta! This creamy dish blends tender chicken, fresh

- 2 cups jasmine rice - 4 boneless, skinless chicken thighs - 1/4 cup soy sauce (low sodium) - 2 tablespoons honey - 2 tablespoons sesame oil - 1 tablespoon rice vinegar - 2 garlic cloves, minced - 1-inch piece of ginger, grated - 1 tablespoon cornstarch - 1 cup chicken broth - 1/2 cup sliced green onions - 1/4 cup sesame seeds - Optional: Steamed broccoli or snap peas Gather these ingredients before you start cooking. Each item plays a key role. The jasmine rice provides a fluffy base. The chicken thighs add rich flavor and texture. The soy sauce and honey create a sweet and salty glaze. Sesame oil adds depth, while rice vinegar gives a nice tang. Garlic and ginger bring warmth to the dish. Cornstarch helps thicken the sauce. Green onions and sesame seeds are perfect for garnishing. You can include steamed broccoli or snap peas for added color and nutrients. This combination makes the sticky chicken rice bowls both tasty and visually appealing. {{ingredient_image_1}} - Rinse rice until clear. - Cook rice with water or chicken broth. To start, I rinse the jasmine rice under cold water. This step washes away any excess starch. You want the water to run clear. After rinsing, I cook the rice as per the package directions. You can use plain water or chicken broth for added flavor. Once done, I set the rice aside. - Mix soy sauce, honey, sesame oil, rice vinegar, garlic, ginger, salt, and pepper. - Marinate the chicken. Next, I prepare the marinade for the chicken. In a bowl, I combine soy sauce, honey, sesame oil, and rice vinegar. I also add minced garlic, grated ginger, salt, and pepper. This mix creates a tasty base. I coat the chicken thighs in this marinade. I let them soak for at least 30 minutes. For even deeper flavor, you can marinate them for up to 2 hours. - Sear chicken thighs in a pan. - Let rest before slicing. After marinating, I heat a large pan over medium heat. I take the chicken thighs out of the marinade, saving that sauce for later. I place the chicken in the hot pan. It cooks for about 5-6 minutes on each side until golden brown. Once cooked, I remove the chicken and let it rest for a few minutes before slicing it. - Thicken reserved marinade with chicken broth and cornstarch. - Adjust seasoning. In the same pan, I add the saved marinade. I mix it with chicken broth and cornstarch. This combination helps thicken the sauce. I bring it to a gentle simmer while whisking. After about 3-4 minutes, the sauce thickens nicely. I taste it and adjust the seasoning with salt and pepper if needed. - Portion rice into bowls. - Add sliced chicken and sauce on top. Now comes the fun part — assembling the bowls! I scoop a generous portion of jasmine rice into each bowl. Then, I add the sliced chicken on top. Finally, I drizzle the thick sauce over everything. This creates a beautiful and tasty dish. - Sprinkle green onions and sesame seeds. - Serve with optional vegetables. To finish, I sprinkle sliced green onions and sesame seeds over the bowls. This adds color and crunch. I also like to serve the bowls with steamed broccoli or snap peas. These veggies add nutrition and color to the meal. Enjoy your beautiful sticky chicken rice bowls! For the best flavor, I recommend marinating the chicken for at least 30 minutes. This allows the marinade to soak in. If you want a deeper taste, let it marinate for up to 2 hours in the fridge. If you are short on time, you can still get good flavor. Just make sure to cut the chicken into smaller pieces. This speeds up the process and lets the marinade work faster. To ensure the chicken is perfectly cooked, use medium heat. Cook it for about 5-6 minutes on each side. The chicken should be golden brown and fully cooked inside. You can also try grilling or baking the chicken. Grilling adds a nice smoky flavor, while baking can be easier for meal prep. Just remember to check that it reaches an internal temperature of 165°F. To make your sticky chicken rice bowls even better, serve them with sides like steamed broccoli or snap peas. These add color and nutrition. If you have leftover chicken and rice, you can mix them into a stir-fry. Just toss them in a pan with some veggies and a splash of soy sauce for a quick meal. Pro Tips Marination Time: For deeper flavor, marinate the chicken for at least 2 hours or overnight in the refrigerator. Perfect Rice: Rinse the jasmine rice thoroughly to remove excess starch, ensuring fluffy rice when cooked. Thickening Sauce: If the sauce isn't thickening as desired, dissolve an extra teaspoon of cornstarch in water and add it gradually while stirring. Garnish for Extra Flavor: Adding a sprinkle of crushed red pepper flakes can give your dish an extra kick! {{image_2}} You can easily swap chicken for other proteins. Tofu works great for a vegetarian option. Just press and cube the tofu, then marinate it like the chicken. You can also use shrimp or pork if you like. Each protein gives a new taste and texture to your bowl. Try different sauces or marinades to change the flavor. Teriyaki sauce adds a sweet twist, while hoisin sauce can bring a rich depth. You can also add spices like chili flakes for heat. Fresh herbs like cilantro or basil can brighten up the dish. Don’t be afraid to mix flavors to find your favorite! Brown rice or quinoa are excellent replacements for jasmine rice. Brown rice has a nutty flavor and is more fibrous. Quinoa cooks faster and is packed with protein. Just remember to adjust the cooking times. Quinoa cooks in about 15 minutes, while brown rice takes closer to 45 minutes. Enjoy experimenting with these healthy swaps! To keep your sticky chicken rice bowls fresh, store them in airtight containers. Make sure the chicken and rice cool down before sealing. This helps stop moisture build-up. Keep them in the fridge for up to three days. If you plan to eat them later than that, consider freezing. For best results when reheating, use a microwave or stovetop. Place the rice and chicken in a microwave-safe dish. Add a splash of water to help steam it. Heat in short bursts, checking often, until warm. If using the stovetop, add a little water and stir over low heat. Ensure the chicken reaches an internal temperature of 165°F for safety. To freeze sticky chicken rice bowls, portion them into freezer-safe containers. Leave some space at the top for expansion. You can freeze them for up to three months. When ready to eat, move the container to the fridge for a night to thaw. Reheat as mentioned above, ensuring it's heated through before serving. You can use several types of rice instead of jasmine rice. Here are some good options: - Basmati rice - Long-grain white rice - Brown rice - Quinoa - Cauliflower rice for a low-carb option Each of these choices brings its own flavor and texture. Basmati has a nutty taste, while brown rice adds a chewy bite. Quinoa is packed with protein, making it a healthy swap. To make sticky chicken healthier, consider these tips: - Use skinless chicken thighs or breasts. - Opt for low-sodium soy sauce. - Swap honey for a natural sweetener like maple syrup. - Reduce the amount of sesame oil. - Add more vegetables to increase fiber and nutrients. These changes can cut calories and sodium while keeping the flavor intact. Yes, you can prepare sticky chicken rice bowls ahead of time. Here’s how: - Marinate the chicken up to 2 hours before cooking. - Cook the rice and chicken in advance. - Store the rice and chicken in separate containers in the fridge. This meal lasts about 3-4 days in the fridge. Just reheat before serving. To make your chicken extra sticky, try these techniques: - Ensure the sauce simmers long enough to thicken. - Use cornstarch to create a glaze-like texture. - Coat the cooked chicken in the sauce before serving. These steps can help you achieve that perfect sticky finish. Adding vegetables to your sticky chicken rice bowls enhances flavor and nutrition. Here are some great choices: - Steamed broccoli - Snap peas - Bell peppers - Carrots - Bok choy These vegetables add color and crunch to your meal. They also provide vitamins and minerals. This blog post guides you through making delicious sticky chicken rice bowls. You learned the key ingredients, step-by-step cooking methods, and helpful tips. Variations allow you to customize your dish, while storage info ensures your leftovers stay fresh. Enjoy experimenting with flavors and ingredients that suit your taste. Remember, cooking should be fun and creative. These bowls are more than meals; they are a chance to share good food with others. Dive in, and savor every bite!

Sticky Chicken Rice Bowls A Flavorful Dinner Delight

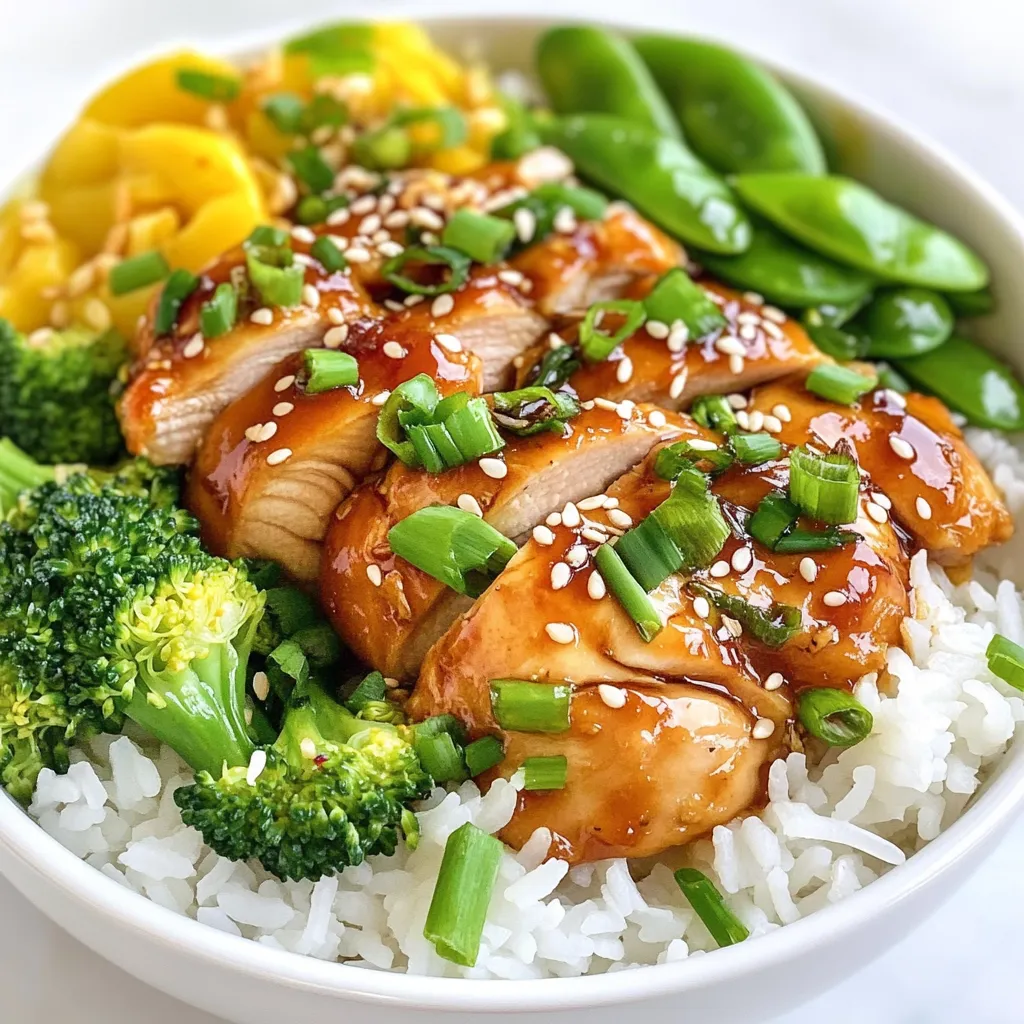
Craving a dinner that bursts with flavor and satisfaction? Let me introduce you to Sticky Chicken Rice Bowls—your new go-to

To make Instant Pot Beef Stroganoff, gather these items: - 1 lb beef stew meat, cut into bite-sized pieces - 1 medium onion, diced - 2 cloves garlic, minced - 8 oz mushrooms, sliced - 1 cup beef broth - 1 tablespoon Worcestershire sauce - 1 teaspoon paprika - 1 teaspoon dried thyme - Salt and pepper to taste - 1 cup sour cream - 2 tablespoons all-purpose flour - 8 oz egg noodles - 2 tablespoons olive oil - Fresh parsley for garnish When choosing your beef, look for meat that is bright red and well-marbled. This ensures tenderness. For mushrooms, pick ones that are firm and smooth. Avoid any that are slimy or discolored. Fresh parsley should be vibrant green and free of wilting. If you cannot find beef stew meat, use cubed chuck roast or sirloin. For a lighter dish, swap sour cream with Greek yogurt. Use vegetable broth instead of beef broth if you prefer a vegetarian option. If you want to skip egg noodles, try wide rice noodles or even spiralized zucchini for a low-carb twist. {{ingredient_image_1}} First, gather all your ingredients. You will need: - 1 lb beef stew meat - 1 medium onion - 2 cloves garlic - 8 oz mushrooms - 1 cup beef broth - 1 tablespoon Worcestershire sauce - 1 teaspoon paprika - 1 teaspoon dried thyme - Salt and pepper - 1 cup sour cream - 2 tablespoons all-purpose flour - 8 oz egg noodles - 2 tablespoons olive oil - Fresh parsley for garnish Next, cut the beef into small pieces. Dice the onion and mince the garlic. Slice the mushrooms. This prep makes cooking fast and easy. Set your Instant Pot to Sauté mode. Add the olive oil and let it heat. Then, add the beef stew meat. Season with salt and pepper. Cook for about 5 minutes until it’s browned. Now, stir in the diced onion and minced garlic. Cook until the onion turns soft and clear, about 2-3 minutes. Next, add the sliced mushrooms, Worcestershire sauce, paprika, and thyme. Mix everything well. Pour in the beef broth. Scrape the pot's bottom to get all the tasty bits. Close the lid and set the valve to sealing. Switch to Pressure Cook mode for 10 minutes. After cooking, let the pot sit for 5 minutes for natural release. Then, quick release any remaining pressure. In a small bowl, mix the flour and sour cream until smooth. Stir this into the beef and mushroom sauce. Mix it well until everything is combined. Now, add the egg noodles directly into the pot. Stir to make sure the noodles are covered. If needed, add a bit more beef broth. Seal the lid again and set to Pressure Cook for 4 minutes. Once done, do a quick release. Stir the stroganoff gently until the noodles are coated in the creamy sauce. Taste and adjust seasoning if you need to. Serve the beef stroganoff on plates, and don’t forget the fresh parsley on top for a nice touch. Enjoy your meal! To make the sauce rich and creamy, blend the sour cream and flour first. This step helps avoid lumps. Slowly mix it into the pot after cooking the beef. Stir well to coat everything in the sauce. Taste your dish before serving. Adjust with salt, pepper, or more Worcestershire sauce if needed. Using the Instant Pot is simple. First, make sure the lid is sealed tight. Always set the valve to sealing before cooking. When it's done, let it release naturally for a few minutes. This helps keep the meat tender. If you have time, let it release fully for best results. When serving beef stroganoff, garnish with fresh parsley for color. This adds a bright touch to the meal. Serve it with a side salad or crusty bread. The bread is great for soaking up the sauce. You can also add a sprinkle of grated cheese on top for extra flavor. Enjoy your delicious meal! Pro Tips Brown the Beef: Ensure the beef is well-browned before adding other ingredients for a richer flavor. Use Quality Broth: A good quality beef broth enhances the overall taste of the stroganoff. Adjust Consistency: If the sauce is too thick, add a splash of beef broth to loosen it up. Garnish for Freshness: Fresh parsley not only adds color but also brightens the flavors of the dish. {{image_2}} To make a vegetarian version, I swap the beef for hearty mushrooms or lentils. Use 16 oz of mushrooms, like cremini or portobello, for a rich taste. Sauté the mushrooms as you would the beef. Add vegetable broth instead of beef broth for a depth of flavor. The sour cream can stay or use a plant-based version. This dish remains creamy and satisfying without meat. If you want to change the protein, chicken works great. Use 1 lb of diced chicken breast or thighs. Cook it in the same way as the beef. You can also try pork. Use 1 lb of pork tenderloin, cut into chunks. For a lighter option, shrimp can be a fun twist. Add shrimp for the last few minutes of cooking to keep them tender. To boost flavor, consider adding fresh herbs. Thyme and rosemary brighten the dish. Try a splash of white wine during cooking for extra depth. You might also add a touch of Dijon mustard or a spoonful of cream cheese for creaminess. For spice lovers, a pinch of red pepper flakes can add a nice kick. After enjoying your Instant Pot Beef Stroganoff, let the leftovers cool. Place them in an airtight container. Store them in the fridge for up to three days. Make sure to label the container with the date. This way, you can track how fresh it is. To reheat, you have a few options. You can use the microwave for quick warming. Place a portion in a bowl and cover it with a paper towel. Heat for about 1-2 minutes, stirring halfway for even warmth. If you prefer the stovetop, add the stroganoff to a pan. Heat it over low heat, stirring until hot. You can add a splash of beef broth if it seems too thick. If you want to freeze your stroganoff, it’s best to do so without the noodles. The sauce freezes well, but cooked noodles can become mushy. Store the sauce in a freezer-safe container. It will last for up to three months. When you're ready to eat, thaw it in the fridge overnight. Reheat it on the stovetop and cook fresh noodles on the side. This keeps everything tasty and fresh. Yes, you can use different types of noodles. Egg noodles are classic, but you can try others. Fettuccine or penne work well, too. Just adjust the cooking time if needed. For example, thinner noodles may cook faster. Always check the package for cooking times. To make beef stroganoff gluten-free, swap out the flour. Use cornstarch or a gluten-free flour blend. You also need gluten-free noodles. Many brands offer great options now. Always read labels to ensure the products are gluten-free. This way, you can enjoy the same great taste! Beef stroganoff is rich and creamy, so serve it with light sides. A simple green salad pairs well. You can also add steamed veggies, like broccoli or green beans. These add color and balance the meal. For a heartier option, serve it with crusty bread or rice. In this blog post, we explored key ingredients and step-by-step instructions for making Beef Stroganoff. I shared tips on selecting ingredients, suggested easy substitutions, and highlighted the best cooking methods. We discussed variations like vegetarian options and how to store leftovers effectively. Remember, custom touches can make your dish your own. With these easy steps, you can create a delicious meal that suits your taste. Enjoy cooking and sharing your Beef Stroganoff!

Instant Pot Beef Stroganoff Flavorful and Quick Meal

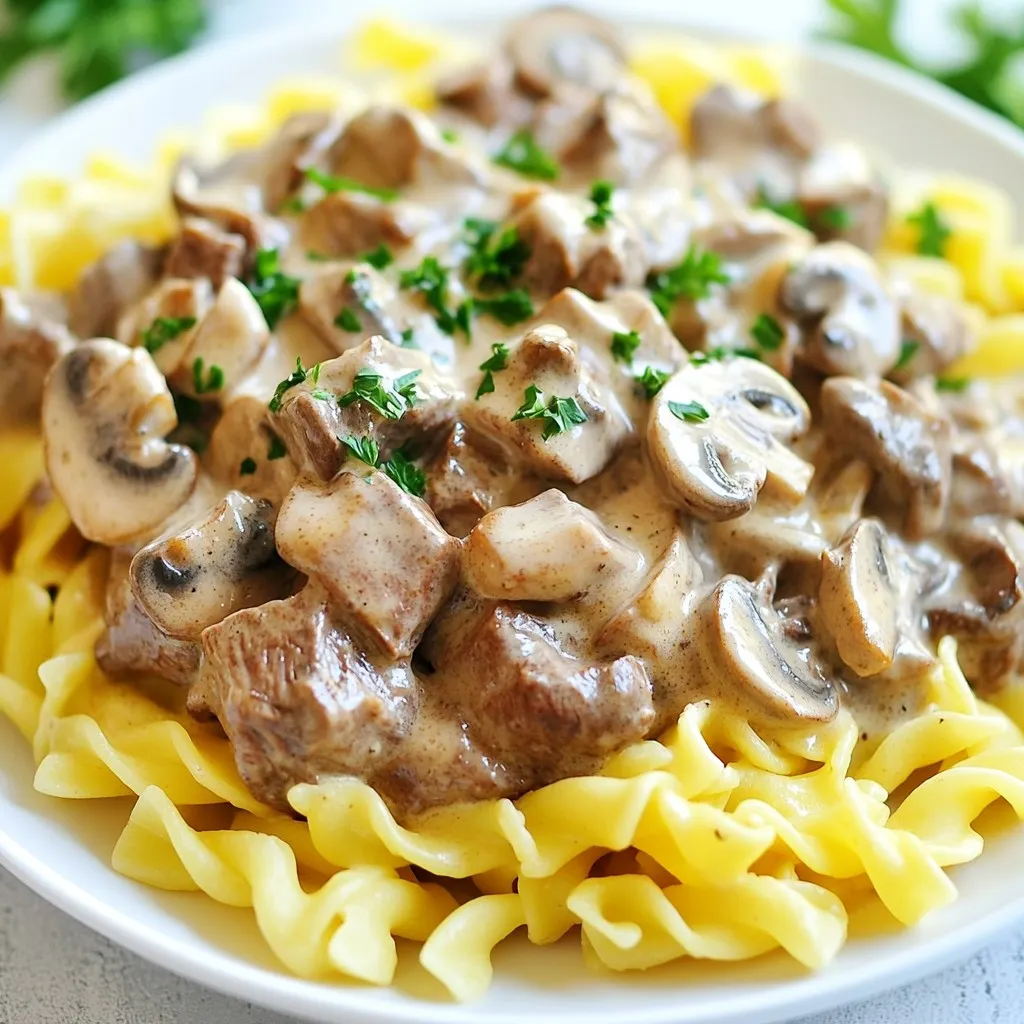
Looking for a tasty, quick meal? This Instant Pot Beef Stroganoff recipe has you covered! I’ll guide you through easy

- 1 cup fresh raspberries (plus extra for garnish) - 1 cup cream cheese, softened - 1 cup heavy cream - 2 tablespoons unsalted butter, melted - 1/2 cup powdered sugar - 1/2 cup crushed graham crackers - 1 tablespoon sugar - Pinch of salt - 1 teaspoon vanilla extract To make these raspberry cheesecake mousse cups, you need fresh, quality ingredients. The fresh raspberries are key for flavor and color. Always choose ripe, vibrant berries. Cream cheese gives the mousse its rich, creamy texture. Heavy cream helps it stay light and fluffy. The graham crackers form the base. They add crunch and a hint of sweetness. Unsalted butter binds the crust together. Using powdered sugar helps achieve a smooth mix without grit. A pinch of salt balances flavors and brightens the sweetness. Lastly, vanilla extract adds warmth to the taste. Together, these ingredients create a perfect blend for a delightful dessert. You can easily find them at your local grocery store. {{ingredient_image_1}} First, we need to macerate the raspberries. Place 1 cup of fresh raspberries in a small bowl. Add 1 tablespoon of sugar. Use a fork to gently mash a few raspberries. This helps to release their juices. Let this sit for about 10 minutes. The sugar draws out sweet juice, making the flavor richer. Next, we make the cream cheese layer. In a mixing bowl, add 1 cup of softened cream cheese. Sprinkle in 1/2 cup of powdered sugar. Add 1 teaspoon of vanilla extract. Beat these together using a hand mixer. Mix until the mixture is smooth and creamy. This will be the base for our mousse. Now, let’s whip the cream. In a separate bowl, pour in 1 cup of heavy cream. Beat it until stiff peaks form. This means the cream holds its shape well. Once ready, gently fold the whipped cream into the cream cheese mixture. Be careful not to deflate the whipped cream. It adds lightness to our mousse. We are now ready to build our cups. In a small bowl, mix 1/2 cup of crushed graham crackers with 2 tablespoons of melted unsalted butter and a pinch of salt. This will be the crust layer. Spoon this mixture into the bottom of small dessert cups. Press it down lightly. Next, layer the raspberry cheesecake mousse on top, filling the cups almost to the brim. Finally, we need to set the mousse. Cover the cups with plastic wrap. Place them in the refrigerator for at least 2 hours. This allows the mousse to firm up. To check if they are set, gently touch the top with a spoon. If it holds shape, they are ready to serve. To make the best mousse, avoid some common mistakes. First, don’t overbeat the heavy cream. If you do, the mousse will turn grainy. Aim for stiff peaks, but stop when you see the right texture. Next, don’t skip the raspberry mashing step. This helps release their sweet juices. If you skip this, the mousse lacks flavor. Make sure to fold the raspberries gently into the cream cheese mix. You want some small chunks for texture. This gives a nice bite. Garnishing can elevate your mousse cups. Use fresh raspberries on top for a pop of color. They add a bright look and a fresh taste. You can also sprinkle crushed graham crackers for a crunch. For a fun twist, try mint leaves. They add a fresh aroma and a splash of green. You can also drizzle chocolate sauce for a rich touch. Be creative with your toppings! Presentation is key to impressing your guests. Use clear dessert cups to show off the lovely layers. This makes the dessert look fancy and inviting. For the best effect, chill the cups well before serving. A cold mousse tastes better. For a final touch, add a sprig of mint on top. It adds color and makes your mousse cups look extra special. Pro Tips Use Fresh Raspberries: Fresh raspberries will provide the best flavor and texture for your mousse. If using frozen, make sure to thaw and drain them well to avoid excess moisture. Chill Your Equipment: For a fluffier whipped cream, chill your mixing bowl and whisk before whipping the cream. This helps it to whip up faster and maintain its structure. Layering Technique: When layering the graham cracker crust and mousse, ensure you press the crust down firmly to create a stable base that won’t crumble when served. Garnish with Care: Garnishing with fresh raspberries not only adds visual appeal but also enhances the flavor. Consider adding a mint leaf for an extra touch of color and freshness. {{image_2}} You can easily swap out raspberries for other berries. Strawberries and blueberries work well. Just remember to adjust the sugar based on the fruit's sweetness. Seasonal fruits like peaches or cherries can also shine in this recipe. Each fruit brings a unique taste and color to your mousse. If you need a gluten-free option, use gluten-free graham crackers for the crust. You can also try almond flour or crushed nuts in place of graham crackers. For a dairy-free version, use vegan cream cheese and coconut cream. This way, you can still enjoy a creamy texture without dairy. Want to spice things up? Add chocolate chips or a drizzle of chocolate sauce to the mousse. You can also mix in some citrus zest, like lemon or lime, for a fresh twist. A dash of cinnamon or nutmeg can elevate the flavor too. These small changes can make a big difference in taste! Raspberry cheesecake mousse cups last up to three days in the fridge. Make sure you cover them well. Use plastic wrap or a lid for best results. This keeps them fresh and prevents odors from other foods. Yes, you can freeze raspberry cheesecake mousse. However, it’s best to freeze them before you add the garnish. To freeze them properly, place the cups in an airtight container. If you stack them, use parchment paper between layers. To thaw, move the mousse cups to the fridge for several hours. This keeps the texture creamy and smooth. Do not thaw them at room temperature, as that can ruin their texture. Enjoy your mousse cups straight from the freezer for a cool treat! To make raspberry cheesecake mousse cups, you need a few simple steps. First, gather your ingredients: - 1 cup fresh raspberries (plus extra for garnish) - 1 tablespoon sugar - 1 cup cream cheese, softened - 1/2 cup powdered sugar - 1 teaspoon vanilla extract - 1 cup heavy cream - 1/2 cup crushed graham crackers - 2 tablespoons unsalted butter, melted - Pinch of salt Start by mixing the raspberries with sugar in a bowl. Let them sit for about 10 minutes. Next, beat the cream cheese, powdered sugar, and vanilla until smooth. In another bowl, whip the heavy cream until it forms stiff peaks. Gently fold the whipped cream into the cream cheese mixture. Then, fold in the mashed raspberries. For the crust, mix graham crackers with melted butter and salt. Layer this at the bottom of your cups, then add the mousse on top. Chill for at least 2 hours before serving. Yes, you can make these mousse cups ahead of time. They stay fresh in the fridge for about 2-3 days. Just cover them tightly with plastic wrap or a lid. This way, the mousse stays creamy and delicious. I recommend making them the night before a gathering. This gives the flavors time to blend well and ensures a perfect dessert for your guests. If you need to replace cream cheese, you have some options. You can use Greek yogurt or mascarpone cheese. Greek yogurt adds a tangy flavor and keeps it creamy. Mascarpone is rich and smooth, giving a lovely texture. Keep in mind that these substitutes may change the taste slightly. Adjust your sugar if needed to balance the flavors. Choose what works best for your diet or preference. This blog post covered how to make delicious raspberry cheesecake mousse cups. We explored the fresh and dry ingredients needed, the process of creating your mousse, and tips to get it just right. Remember to consider your variations for dietary needs and flavor options. With the right techniques, you can impress anyone with these treats. Enjoy making them, and don’t forget to share your creations!

Raspberry Cheesecake Mousse Cups Fresh and Fluffy Delight

Are you ready to treat yourself to a sweet, creamy delight? Our Raspberry Cheesecake Mousse Cups are the perfect blend

To make these tasty red velvet cheesecake brownies, gather these ingredients: - 1 cup unsalted butter, melted - 1 ½ cups granulated sugar - 1 teaspoon vanilla extract - 4 large eggs - 1 ¾ cups all-purpose flour - ¼ cup unsweetened cocoa powder - 1 teaspoon baking powder - ½ teaspoon salt - 1 tablespoon red food coloring - 8 oz cream cheese, softened - ½ cup powdered sugar - 1 teaspoon vanilla extract (for cheesecake layer) The key ingredients for this recipe are butter, sugar, eggs, flour, and cocoa powder. These create a rich brownie base. The red food coloring gives the brownies their signature look. The cream cheese layer is crucial too. It adds a creamy, sweet contrast. Optional additions can include nuts or even chocolate chips if you want some crunch. These can enhance texture but are not needed for the main recipe. Use unsalted butter for a balanced flavor. It helps control the salt level in your brownies. For sugar, granulated is perfect for sweetness. Always use fresh eggs for the best texture. When choosing flour, all-purpose works best. Make sure it is fresh to avoid a flat brownie. The cocoa powder should be unsweetened to balance the sweetness of the sugar. For the red food coloring, gel or liquid options work. Gel gives a more vibrant color. Use high-quality cream cheese for a smooth cheesecake layer. A good brand will ensure a rich flavor. {{ingredient_image_1}} Start by preheating your oven to 350°F (175°C). Grease a 9x13 inch baking pan. In a large bowl, mix 1 cup of melted butter, 1 ½ cups of granulated sugar, and 1 teaspoon of vanilla extract. Stir until smooth. Next, add 4 large eggs, one at a time. Mix well after each egg. In another bowl, sift together 1 ¾ cups of all-purpose flour, ¼ cup of cocoa powder, 1 teaspoon of baking powder, and ½ teaspoon of salt. Gradually add this dry mix to the wet mix. Stir just until combined. Finally, stir in 1 tablespoon of red food coloring. This gives the batter its bright color. In a separate bowl, beat 8 oz of softened cream cheese until it's creamy. Gradually add ½ cup of powdered sugar and 1 teaspoon of vanilla extract for the cheesecake layer. Mix until the cream cheese is smooth and fluffy. This layer adds a rich taste that pairs well with the red velvet brownie. Pour half of the brownie batter into the greased pan and spread it evenly. Spoon the cream cheese mixture over this layer, spreading it out. Then, pour the rest of the brownie batter on top. Use a knife to gently swirl the layers together for a marbled effect. Bake in the oven for 30-35 minutes. Check with a toothpick; it should come out with a few moist crumbs. Once done, let the brownies cool in the pan for about 15 minutes. Then, move them to a wire rack to cool completely before cutting them into squares. When making red velvet cheesecake brownies, keep these points in mind: - Overmixing the batter can lead to tough brownies. Mix just until combined. - Not measuring ingredients correctly can change the texture. Always use a scale or measuring cups. - Skipping the cooling time can make it hard to cut neat squares. Patience pays off! Creating a beautiful swirl is key for presentation. Follow these steps: - When layering the cheesecake mix, do not spread it too thin. - Use a knife or a toothpick to gently create swirls. - Don’t over-swirl! Too much mixing can make it look muddy. Aim for a marbled look. Presentation is important for these brownies. Try these ideas: - Serve on a bright plate to highlight the red color. - Dust the top with powdered sugar for a snowy effect. - Add fresh raspberries or strawberries on the side for color. - A dollop of whipped cream adds richness and looks appealing. Pro Tips Use Room Temperature Ingredients: Ensure that your cream cheese is at room temperature for a smoother cheesecake layer. This helps in achieving a creamy texture without lumps. Don't Overmix the Batter: When combining the dry and wet ingredients, mix until just combined. Overmixing can lead to dense brownies instead of the desired fudgy texture. Swirl Carefully: When creating the marbled effect, use a gentle hand with the knife. Too much swirling can blend the layers too much, losing the striking red and white contrast. Cool Completely Before Cutting: Allow the brownies to cool completely on a wire rack before cutting. This helps them set up properly and makes for cleaner edges when slicing. {{image_2}} You can make your brownies even better by adding nuts or chocolate chips. Walnuts or pecans add a nice crunch. Just chop them up and mix in about half a cup. If you love chocolate, add a cup of chocolate chips. They melt into the brownies and give a rich flavor. Mix these in right before you pour the batter into the pan. This small change makes a big impact. To make these brownies gluten-free, use a gluten-free flour blend. Many stores sell this blend, and it works well in most recipes. Replace the all-purpose flour with the same amount of gluten-free flour. This way, you keep the same chewy texture. Be sure to check that all other ingredients are also gluten-free. This option lets everyone enjoy these treats. You can also try new flavors to change things up. For a minty twist, add a teaspoon of peppermint extract to the cheesecake layer. If you prefer fruit flavors, mix in a bit of orange or lemon zest. This brightens the taste and adds freshness. Experiment with spices too; a pinch of cinnamon can add warmth. Each new flavor gives you a chance to enjoy these brownies in a whole new way. To keep your red velvet cheesecake brownies fresh, store them in an airtight container. Place parchment paper between layers to avoid sticking. You can also wrap them in plastic wrap for extra protection. Store the container in a cool, dry place. Avoid direct sunlight to maintain their texture and flavor. If you want to keep brownies longer, freezing works well. First, let them cool completely. Cut the brownies into squares. Wrap each piece tightly in plastic wrap. Then, place them in a freezer-safe bag or container. They can freeze for up to three months. When ready to eat, thaw them in the fridge overnight. These brownies stay fresh for about 5 to 7 days at room temperature. If you store them in the fridge, they can last up to 10 days. However, the best taste comes when they are a few days old. Enjoy them while they are soft and creamy for the best experience! To boost the flavor of the cheesecake layer, add a splash of lemon juice. This adds a nice tang. You can also mix in some chocolate chips or a hint of almond extract. These flavors blend well and make the cheesecake richer. Try using a flavored cream cheese, like strawberry, for a fun twist. Experiment with your favorite flavors to find what you love most! Yes, you can use other food coloring options! While red is classic, you can try pink or purple for a unique look. Gel food coloring works best, as it gives vibrant color without changing the batter's texture. Just remember to adjust the amount based on the brand and shade. Always start with a small amount and add more until you reach your desired color. Finding pre-made red velvet cheesecake brownies can be fun! Check local bakeries or specialty dessert shops. Many grocery stores also offer them in their bakery section. If you prefer online options, several websites sell gourmet brownie assortments. Just make sure to read reviews to find a trusted source. Enjoy the convenience of having a sweet treat ready to go! This blog post covered how to create delicious red velvet cheesecake brownies. We explored essential and optional ingredients, with a focus on quality. You learned step-by-step instructions for making the batter and cream cheese layer, baking, and cooling. Remember to avoid common mistakes for the best results. Try different flavor combinations and adapt the recipe for gluten-free options. Store brownies correctly to enjoy them longer. With these tips, you can make a tasty treat that impresses. Enjoy sharing your masterpiece!

Red Velvet Cheesecake Brownies Delightful Sweet Treat

Are you ready to whip up a delightful treat that combines two fan favorites? Red Velvet Cheesecake Brownies are the

- 8 rice paper wrappers - 1 cup vibrant red cabbage, shredded - 1 cup carrots, julienned - 1 red bell pepper, thinly sliced - 1 cucumber, julienned - 1 avocado, sliced - 1 cup fresh mint leaves - 1 cup fresh basil leaves - 1 cup cooked vermicelli noodles (optional for a heartier roll) To make these spring rolls pop, I love using fresh, colorful veggies. The rice paper wrappers are key. They hold everything together and add a fun texture. You can find them in most grocery stores. Each vegetable brings its own flavor and crunch. Red cabbage gives a nice bite. Carrots add sweetness. Bell peppers bring crispness, while cucumber adds juiciness. The avocado makes it creamy. Don't forget the herbs! Mint and basil add a fresh touch. If you want more filling, add vermicelli noodles. - ½ cup peanut butter (for dipping sauce) - 2 tablespoons soy sauce (for dipping sauce) - 1 tablespoon lime juice (for dipping sauce) - 1 tablespoon honey or maple syrup (for dipping sauce) The dipping sauce is the star! It pairs perfectly with the fresh rolls. I use creamy peanut butter for richness. Soy sauce adds saltiness, while lime juice gives a tangy kick. Honey or maple syrup sweetens the mix. Whisk them together until smooth. You can add a bit of water if it's too thick. This sauce makes each bite even better! {{ingredient_image_1}} To start, cook the vermicelli noodles as the package says. Usually, this means boiling water, adding the noodles, and cooking for about 3-4 minutes. After that, drain the noodles and rinse them under cold water. This cools them down and stops the cooking. Set them aside. You can skip this step if you want lighter rolls. Next, get a wide, shallow bowl and fill it with warm water. Take one rice paper wrapper and dip it in the water for about 10-15 seconds. You want it to be soft but not too sticky. Then, lay it flat on a clean, slightly damp surface. This will help you roll without tearing the wrapper. Now comes the fun part! In the center of the wrapper, place a small handful of shredded red cabbage. Add a few julienned carrots, thin slices of red bell pepper, and cucumber strips. For creaminess, add some avocado slices. Toss in a few mint and basil leaves for a fresh kick. If you cooked the vermicelli noodles, add some on top for extra heartiness. To fold, start by bringing the two sides of the wrapper over the filling. Then, roll from the bottom up. Make sure to roll it snugly but gently. This way, the filling stays inside without tearing the wrapper. Repeat this for the remaining wrappers and filling. Each roll is a colorful bite of fresh goodness! To keep spring rolls fresh, store them in an airtight container. Use a damp paper towel to cover them. This keeps the wrappers moist and prevents them from drying out. If you plan to serve them later, keep the dipping sauce separate. This helps maintain the spring rolls' crispness and flavor. Tearing the wrappers can ruin your spring rolls. To avoid this, do not soak the rice paper for too long. Dip it in warm water for just 10-15 seconds. It should feel soft but still firm. When rolling, be gentle to prevent tearing. If a wrapper does tear, use it for practice and try again. You can make spring rolls ahead of time. Prepare all your veggies and noodles first. Then, wrap them just before serving. If you must wrap in advance, keep them covered with a damp towel. Use them within 2-3 hours for the best taste. The freshness of the ingredients is key to great flavor. Pro Tips Freshness is Key: Use the freshest vegetables possible to enhance the flavor and crunch of your spring rolls. Moisture Control: Be careful not to over-soak the rice paper; it should be pliable but not too wet to avoid tearing. Perfect Rolling Technique: Start rolling tightly from the bottom and tuck the sides in as you go to prevent the filling from spilling out. Customize Your Dipping Sauce: Feel free to experiment with different ingredients in the dipping sauce, such as sriracha for heat or coconut milk for creaminess. {{image_2}} You can switch up the veggies in your rainbow veggie spring rolls. Use any crunchy vegetables you like. Try bell peppers in different colors, like yellow or green. You can also use zucchini instead of cucumber. If you want more protein, add cooked shrimp, tofu, or chicken. These swaps keep your rolls fresh and tasty. While peanut sauce is a classic, you can try other sauces. A sweet chili sauce adds a nice kick. Soy sauce mixed with sesame oil gives a savory flavor. For a tangy twist, mix lime juice with soy sauce and sesame seeds. Each sauce brings a new taste to your rolls. To make these rolls vegan, skip the honey and use maple syrup instead. For gluten-free options, ensure your soy sauce is gluten-free. You can also check that the rice paper wrappers are safe for your diet. These small changes let everyone enjoy these colorful bites! To keep your rainbow veggie spring rolls fresh, wrap them in damp paper towels. Place them in an airtight container. This method keeps them moist. Store the container in the fridge. Enjoy them within two days for the best taste. You can freeze spring rolls for later enjoyment. Lay each spring roll flat on a baking sheet. Make sure they do not touch each other. Freeze them for about an hour. Once frozen, transfer them to a freezer bag. When ready to eat, thaw in the fridge overnight. Reheat in the oven or air fryer until warm. Most fresh veggies last about a week in the fridge. Red cabbage and bell peppers stay crisp longer. Mint and basil can wilt quickly; use them within three days. Rice paper wrappers and peanut butter last for months if stored properly. Check expiration dates for best results. To keep rice paper wrappers from sticking, store them in a cool, dry place. Use parchment paper between wrappers to prevent sticking. If you have leftover wrappers, wrap them tightly in plastic wrap. This will help keep them fresh. Yes, you can make spring rolls ahead of time. Prepare them a few hours before serving. Store them in an airtight container with a damp paper towel. This keeps them fresh and prevents them from drying out. You can use many different veggies in spring rolls. Try adding bell peppers, zucchini, or radishes. Spinach and kale are great for extra greens. Get creative and use what you love! Rainbow veggie spring rolls are fun and simple to make. You learned the key ingredients, from rice paper to colorful veggies and tasty dipping sauces. I shared steps for preparing noodles, soaking wrappers, and perfecting your rolls. You also discovered tips for freshness, variations, and smart storage options. Now you can enjoy customizing these spring rolls to fit your taste. Experiment with new ingredients and sauces. Your tasty creation awaits!

Rainbow Veggie Spring Rolls Fresh and Colorful Delight

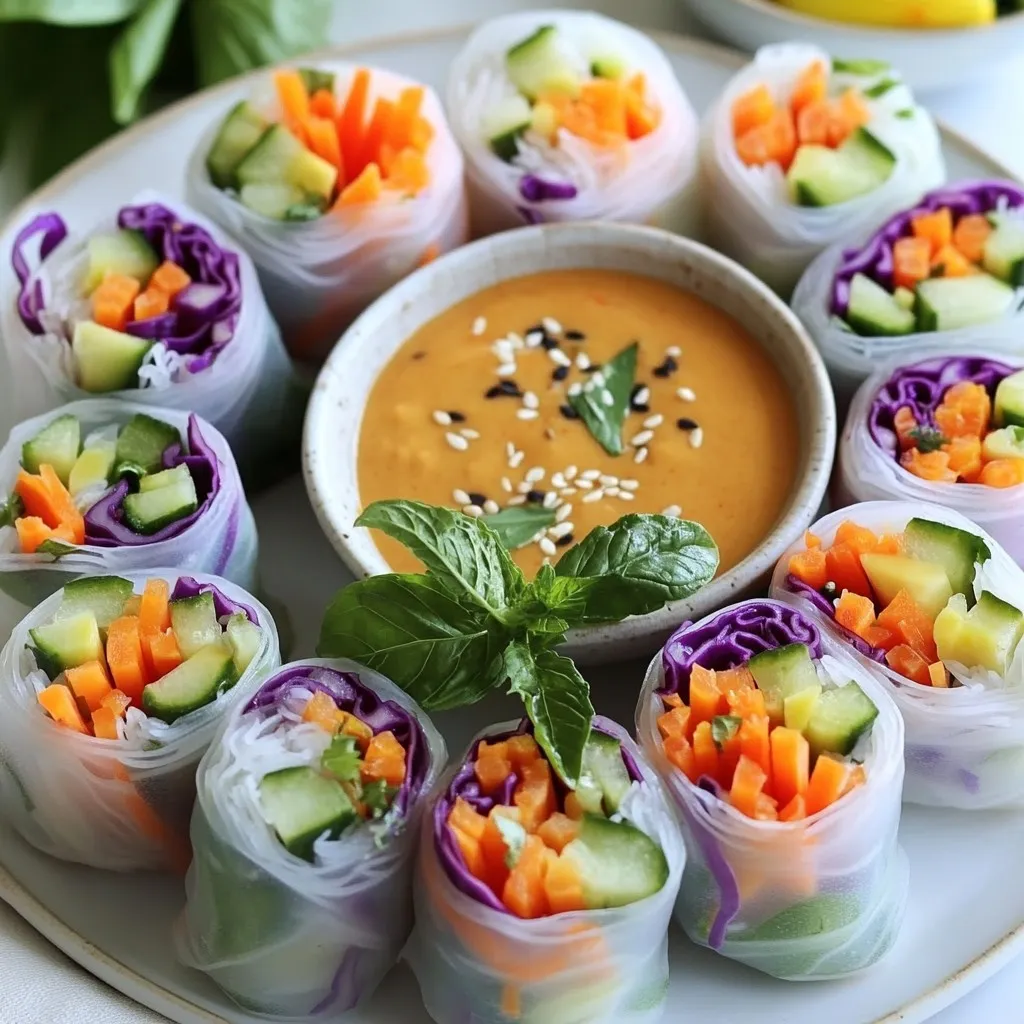
Looking for a fresh and fun way to enjoy your vegetables? Rainbow Veggie Spring Rolls are a vibrant treat that

Older posts
Newer posts
← Previous Page1 … Page159 Page160 Page161 … Page164 Next →

dsad

© 2026 easycookingbite • Built with GeneratePress

Our Policies

  • Copyright Policy
  • Cookie Policy
  • GDPR Policy
  • Privacy Policy
  • Disclaimer
  • Terms Of Use

More Information

  • Home
  • About
  • Contact
  • Appetizers
  • Dessert
  • Dinner
  • Drinks
©2026, easycookingbite About Back To Top