Skip to content
DisclaimerTerms Of UseGDPR PolicyCookie Policy

easycookingbite

  • Home
  • Drinks
  • Appetizers
  • Dinner
  • Dessert
  • About
  • Contact
  • Privacy Policy
DisclaimerTerms Of UseGDPR PolicyCookie Policy

Lily

- 8 oz bowtie pasta - 1 lb ground beef - 1 tablespoon olive oil - 4 cloves garlic, minced - 1 teaspoon Italian seasoning - 1/2 teaspoon red pepper flakes (optional) - 1 cup beef broth - 1 cup heavy cream - 1 cup grated Parmesan cheese For this dish, we use bowtie pasta as our base. It holds sauce well and looks fun on the plate. Ground beef adds a hearty touch. Olive oil helps brown the beef and adds flavor. Next, we need garlic for that rich aroma. Italian seasoning brings a classic touch. Red pepper flakes can add a little heat if you like spice. For creaminess, we use beef broth and heavy cream. They mix well to create a rich sauce. Finally, grated Parmesan cheese takes this dish to a new level. It melts in and adds a savory taste. These ingredients work together to make a dish that is rich and full of flavor. Each bite is satisfying and comforting. {{ingredient_image_1}} To start, boil water in a large pot. Add a pinch of salt. Once boiling, add the 8 oz of bowtie pasta. Cook it for 10 to 12 minutes, or until it is al dente. This means the pasta should be firm but not hard. Drain the pasta in a colander and set it aside. Remember, timing is key! If you overcook, the pasta can become mushy. Next, heat 1 tablespoon of olive oil in a large skillet over medium heat. Add 1 lb of ground beef. Cook it for about 5 to 7 minutes. Use a spatula to break the meat into small pieces. This step is important. Breaking up the meat helps it cook evenly. You want it browned, not just cooked. Now, add 4 cloves of minced garlic to the skillet. Cook for 1 to 2 minutes until you smell that lovely garlic aroma. Then, add 1 teaspoon of Italian seasoning and 1/2 teaspoon of red pepper flakes if you like heat. Mix well. Pour in 1 cup of beef broth and let it simmer for about 5 minutes. This helps bring out the flavors. Next, stir in 1 cup of heavy cream. Bring the mixture back to a gentle simmer. Finally, add 1 cup of grated Parmesan cheese, stirring until the sauce is creamy. Don’t forget to season with salt and pepper to taste. Now, it’s time to bring it all together! Add the cooked bowtie pasta to the skillet with the beef and sauce. Toss everything together until the pasta is well coated. This step ensures every bite is rich and flavorful. Serve it warm, and don't forget to garnish with fresh chopped parsley for that extra touch! *How to avoid overcooked pasta?* To keep your bowtie pasta from becoming mushy, cook it until it's al dente. This means it should have a firm bite. Check the package for timing. Set a timer a minute early to avoid overcooking. *Ensuring a silky sauce* To make your sauce smooth, stir in the Parmesan cheese slowly. This helps it melt evenly. Use medium heat when mixing in the heavy cream. High heat can cause the sauce to separate. *Best practices for leftovers* Cool any leftover pasta to room temperature before storing. Place it in an airtight container. This helps keep it fresh for up to three days in the fridge. *Reheating techniques* To reheat, use a skillet over medium heat. Add a splash of beef broth or cream. This keeps the pasta moist and helps avoid burning. *Fresh parsley alternatives* If you don't have fresh parsley, use basil or chives. Both add a nice pop of color and flavor. *Other toppings to enhance flavor* Consider adding crushed red pepper flakes or extra Parmesan cheese. Toasted pine nuts or sautéed mushrooms can also add a great texture and flavor boost. Pro Tips Use Fresh Garlic: Freshly minced garlic adds a robust flavor that enhances the overall taste of the dish. Reserve Pasta Water: Save a cup of pasta cooking water before draining; it can help adjust the sauce's consistency if needed. Quality Parmesan: Opt for freshly grated Parmesan cheese for the best flavor and texture in your sauce. Garnish Generously: A sprinkle of fresh parsley not only adds color but also a fresh taste that brightens the dish. {{image_2}} You can switch out ground beef for ground turkey or chicken. These meats provide leaner options with great flavor. They cook similarly and blend well with the dish. If you prefer a vegetarian meal, try using plant-based proteins. Options like lentils or veggie crumbles can add texture and taste. Adding vegetables can enhance the dish's nutrition and color. Spinach and bell peppers are excellent choices. They cook quickly and add a fresh taste. You can also experiment with different cheeses. Try using mozzarella for a melty texture or feta for a tangy kick. Adjust the spice level to fit your taste. Adding more red pepper flakes brings heat. For a milder dish, skip them altogether. You can also choose between creamy and tomato-based sauces. A tomato sauce can give a nice twist on flavors and add acidity. To keep your Parmesan Garlic Beef Bowtie Pasta fresh, cool it quickly. Store it in an airtight container. It will stay good for about three to four days in the fridge. Make sure to let it cool to room temperature before sealing it. This helps prevent moisture build-up. Want to save some for later? You can freeze this dish! First, let it cool completely. Then, place it in a freezer-safe container. It’s best to eat it within two to three months. To thaw, move it from the freezer to the fridge overnight. When ready to eat, reheat it on low heat. Stir occasionally to heat it evenly. In the fridge, your pasta can last about three to four days. If you notice any changes in smell or color, it’s best to toss it out. Signs of spoilage include a sour smell or mold. Always check your food before eating, even if it seems fine. You can easily make this dish gluten-free. Start by using gluten-free bowtie pasta. Many brands offer gluten-free options made from rice, corn, or quinoa. Just cook it according to package instructions. Be mindful of the beef broth. Choose a gluten-free brand or make your own. Always check labels for hidden gluten in seasonings. This way, you keep your dish safe and tasty. Yes, you can make this dish ahead of time. Cook the pasta and beef separately, then combine them when you're ready to serve. This keeps the pasta from soaking up too much sauce. Store the cooked pasta and sauce in separate containers. This helps with freshness. When you’re ready to eat, reheat the beef sauce on low heat. You can warm the pasta in boiling water for a minute. This pasta pairs well with many side dishes. A fresh green salad with a light vinaigrette complements the rich flavors. Garlic bread also makes a great choice for soaking up sauce. For a drink, consider red wine. A medium-bodied wine, like Chianti, offers a nice balance. If you prefer non-alcoholic options, try sparkling water with lemon. It refreshes your palate beautifully. This blog post outlined how to make Parmesan Garlic Beef Bowtie Pasta. We covered the key ingredients, from pasta to seasonings. I shared step-by-step cooking instructions to achieve perfect results. Tips for storage and garnishing helped enhance your meal. Finally, we explored variations to suit different tastes. Now you have a delicious recipe to try. Enjoy making this dish your own!

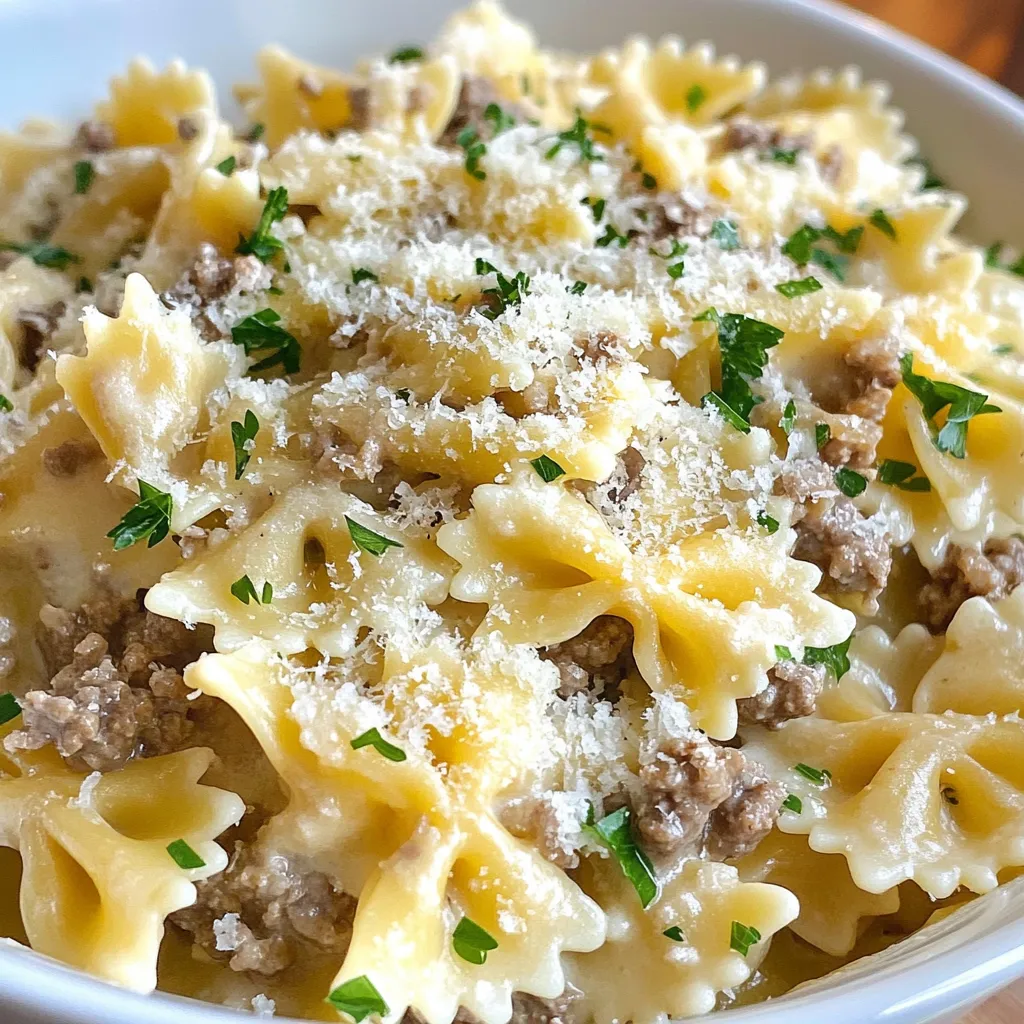
Parmesan Garlic Beef Bowtie Pasta Rich and Flavorful Dish

Are you ready to whip up a dish that’s both rich and flavorful? This Parmesan Garlic Beef Bowtie Pasta will

- 2 pounds baby potatoes - 4 cloves garlic - 1/4 cup olive oil - 2 tablespoons fresh lemon juice - Zest of 1 lemon - 1 teaspoon dried oregano - 1 teaspoon paprika - Salt and pepper to taste - Fresh parsley, chopped (for garnish) - Mixing bowl - Baking sheet - Parchment paper - Measuring cups and spoons Gathering your ingredients is the first step to making these tasty lemon garlic roasted potatoes. Start with 2 pounds of baby potatoes. They are small and cook evenly. Cut them in half so they roast well. Next, get 4 cloves of garlic and mince them. Garlic adds a lovely flavor. You will also need 1/4 cup of olive oil. This will help the potatoes get crispy. You’ll want fresh lemon juice and zest for that bright taste. Measure out 2 tablespoons of lemon juice and zest one lemon. Add 1 teaspoon each of dried oregano and paprika to give it a nice kick. Don’t forget salt and pepper to taste. Finally, chop some fresh parsley for garnish. It makes the dish look great and adds freshness. For tools, you will need a mixing bowl to combine everything. A baking sheet lined with parchment paper helps with cleanup. Use measuring cups and spoons to get the amounts just right. With these ingredients and tools, you're ready to make a delicious dish! {{ingredient_image_1}} - Halve the baby potatoes. - Mince the garlic. - Measure out the olive oil and lemon juice. Start by cutting the baby potatoes in half. This helps them cook evenly. Next, mince the garlic. Fresh garlic adds a strong flavor. Finally, measure out the olive oil and lemon juice. These liquids help the potatoes get crispy. - Combine ingredients in a mixing bowl. - Toss until evenly coated. In a large bowl, add the halved potatoes, minced garlic, olive oil, lemon juice, lemon zest, oregano, paprika, salt, and pepper. Mix all the ingredients together. Toss the potatoes until they are fully coated. This step ensures every bite is full of flavor. - Spread on a baking sheet. - Roast in the oven. - Stir halfway through cooking. Line a baking sheet with parchment paper. This makes cleanup easy. Spread the potatoes in a single layer. Place the baking sheet in the oven. Roast at 425°F (220°C) for 25-30 minutes. Stir the potatoes halfway through to ensure they roast evenly. You’ll know they’re done when they're golden brown and crispy. To get that nice crispy texture, space your potatoes on the baking sheet. If they are too close, they will steam, not roast. Aim for a single layer. This helps them brown evenly. The size of your potatoes matters too. If you use larger potatoes, they may need more time. Cut them smaller if you want them to cook faster. You can switch up the flavors by adding herbs or spices. Try rosemary or thyme for a fresh twist. For a kick, add red pepper flakes. You can also marinate the potatoes in different sauces. A balsamic glaze or a spicy mustard can add a whole new level of taste. These roasted potatoes go great with many main dishes. They pair well with grilled chicken or fish. You can serve them with a fresh salad for a light meal. For leftovers, keep them in the fridge. Reheat them in the oven to keep them crispy. You can also toss them into a breakfast hash or a veggie bowl. Pro Tips Choose the Right Potatoes: For the best texture and flavor, use waxy baby potatoes like Yukon Gold or fingerlings, as they hold their shape well during roasting. Preheat the Baking Sheet: Place your baking sheet in the oven while it's preheating. This helps to give the potatoes a nice crispiness right from the start. Experiment with Seasonings: Don’t hesitate to customize the spices! Try adding rosemary or thyme for a different flavor profile. Let Them Rest: Allow the roasted potatoes to sit for a few minutes after removing them from the oven. This helps to enhance their flavor as they cool slightly. {{image_2}} You can make lemon garlic roasted potatoes even better. Try adding fresh herbs like rosemary or thyme. These herbs bring a nice fragrance and taste. Simply chop them up and mix them in with your potatoes. Use about one to two teaspoons of each herb. This twist adds depth to the flavor and makes the dish more special. If you like a kick, add heat to your roasted potatoes. Red pepper flakes or chili powder work well. Just sprinkle in about half a teaspoon, or more if you enjoy spicy food. This addition gives a bold flavor that complements the lemon and garlic. You’ll enjoy a nice balance with each bite. For a cheesy twist, consider adding cheese on top. Parmesan or feta cheese melts nicely and adds a savory touch. Grate or crumble cheese over the potatoes before roasting. You can use about half a cup of cheese. This variation creates a creamy texture that pairs beautifully with the crispy potatoes. To store leftovers, place the cooled potatoes in an airtight container. You can keep them in the fridge for up to three days. After that, they may lose their taste and texture. Always check for any off smells or signs of spoilage before using. For reheating, the oven works best. Preheat it to 400°F (200°C). Spread the potatoes on a baking sheet and heat for about 10-15 minutes. This method helps them stay crispy. If you're short on time, you can use a microwave, but it may cause sogginess. If you choose this method, heat them in short bursts. Check every 30 seconds to avoid overcooking. Enjoy your lemon garlic roasted potatoes warm! Yes, you can use regular potatoes. Just cut them into smaller pieces. Baby potatoes cook faster than regular ones. If you use larger potatoes, increase the cooking time. Always check for doneness by piercing with a fork. Look for a golden brown color. The potatoes should be crispy on the outside. You can also poke them with a fork. If it slides in easily, the potatoes are done. Stir them halfway through cooking for even browning. You can prep these potatoes ahead of time. Cut and coat them a few hours before cooking. Store them in the fridge until you are ready to roast. To reheat, simply put them back in the oven. This keeps them crispy and tasty. You now have a complete guide to making delicious roasted baby potatoes. We covered all the essential ingredients, tools, and step-by-step instructions. Remember to space your potatoes on the baking sheet for that perfect crunch. You can also explore fun variations, like spicy or cheesy options, to suit your taste. Don't forget the storage tips for maximizing flavor. Try these methods, and enjoy your tasty potatoes! You will impress your friends and family with this simple dish. Happy cooking!

Lemon Garlic Roasted Potatoes Crispy and Flavorful Dish

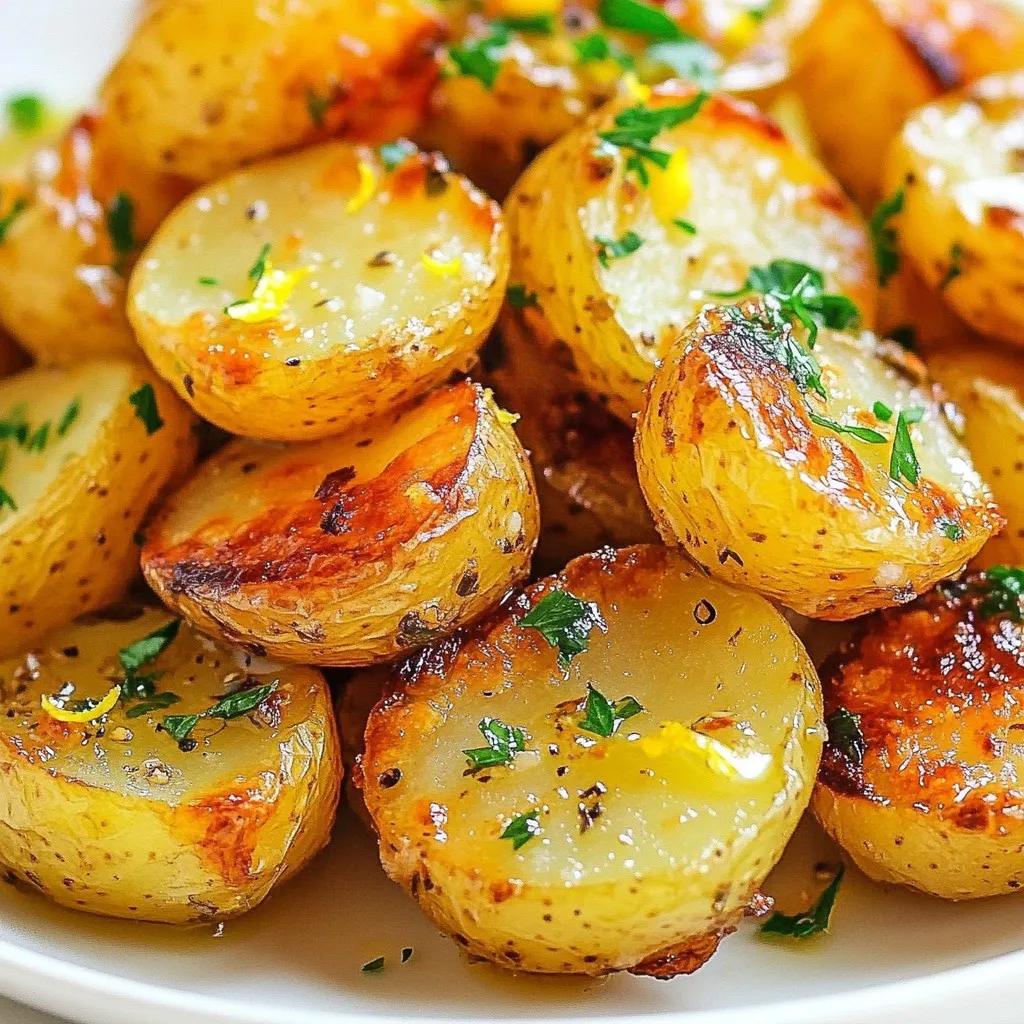
Looking for a simple yet mouthwatering side dish? Lemon Garlic Roasted Potatoes are the answer! With their crispy edges and

- 2 large carrots, peeled and grated - 1 large tart apple (like Granny Smith), cored and grated - 1/4 cup raisins - 1/4 cup chopped walnuts (or pecans) The main ingredients of this slaw give it a fresh and crunchy feel. Grated carrots offer a sweet, earthy taste. The tart apple, like Granny Smith, adds a nice tang. Raisins bring a chewy sweetness, while walnuts give a satisfying crunch. - 1/4 cup plain Greek yogurt - 2 tablespoons honey - 1 tablespoon apple cider vinegar - 1 teaspoon Dijon mustard The dressing is creamy and zesty. Greek yogurt adds richness without being too heavy. Honey sweetens it up, while apple cider vinegar gives a sharp bite. Dijon mustard rounds it out with a nice kick. - Salt and pepper to taste - Fresh parsley, chopped for garnish Salt and pepper enhance the flavors. Fresh parsley not only adds a pop of color but also brightens the dish. It makes the slaw look as good as it tastes. This carrot apple slaw is not just a salad; it’s a blend of flavors and textures. Perfect for a side dish or a light meal, it’s both tasty and fun to make! {{ingredient_image_1}} 1. First, take 2 large carrots, peel them, and grate them into a big bowl. 2. Next, grab 1 large tart apple, core it, and grate it. Add this to the bowl with carrots. 3. Then, mix in 1/4 cup of raisins. This adds a nice sweetness. 4. Finally, add 1/4 cup of chopped walnuts. They give a great crunch. 1. In a small bowl, measure out 1/4 cup of plain Greek yogurt. 2. Add 2 tablespoons of honey to the yogurt for sweetness. 3. Pour in 1 tablespoon of apple cider vinegar for tang. 4. Lastly, add 1 teaspoon of Dijon mustard. 5. Whisk all these together until the mixture is smooth and creamy. 1. Now, pour the dressing over the carrot and apple mixture. 2. Toss everything well to coat all the ingredients in the dressing. 3. Season with salt and pepper to taste, adjusting to your liking. 4. Cover the slaw and chill it in the refrigerator for at least 30 minutes. 5. Just before serving, give the slaw another toss. 6. Garnish with chopped fresh parsley for a splash of color. - You can swap Greek yogurt for a dairy-free option like coconut yogurt. - If you have nut allergies, use seeds or skip the nuts entirely. - Add fresh herbs like mint or cilantro for a pop of flavor. - Adjust the sweetness by adding more or less honey to suit your taste. - Serve your slaw in bright, colorful bowls to catch the eye. - Sprinkle extra parsley on top for a fresh, green touch. These small changes can make your carrot apple slaw even more enjoyable. Have fun experimenting! Pro Tips Fresh Ingredients: Use the freshest carrots and apples you can find for the best flavor and texture. Chill Time: Allow the slaw to chill in the refrigerator for at least 30 minutes to let the flavors meld beautifully. Nut Options: Feel free to substitute walnuts with pecans or even sunflower seeds for a nut-free version. Serving Suggestion: This slaw pairs wonderfully with grilled meats or as a light lunch on its own. {{image_2}} You can switch up the fruits for great taste. Add oranges for a burst of sweetness. Pineapple also brings a nice tropical flavor. Try using a sweet apple like Fuji or Honeycrisp instead of a tart apple. This swap makes the slaw sweeter and more appealing. To make the slaw even more exciting, think about adding texture. Shredded cabbage adds crunch and a different flavor. Bell peppers also work well; they give a nice color and crisp bite. For an extra crunch, top the slaw with sunflower seeds. They add a nutty flavor and more nutrients. If you want a vegan option, swap out Greek yogurt for plant-based yogurt. This keeps the creaminess while making it dairy-free. For a low-carb version, use non-sugary sweeteners like stevia or erythritol. This keeps the sweetness without the extra carbs. To keep your carrot apple slaw fresh, store it in an airtight container. This helps maintain its crunch and flavor. Place the container in the refrigerator right after you make it. For the best taste, eat the slaw within 2-3 days. After that, the texture may start to change. It’s best to enjoy it while it’s still bright and crisp. Freezing carrot apple slaw is not a good idea. The texture will change when thawed. This slaw is best enjoyed fresh and crunchy. Carrot apple slaw is packed with vitamins and minerals. Carrots provide vitamin A, which is great for your eyes and skin. They also contain fiber, which helps digestion. Apples add vitamin C, boosting your immune system. They have antioxidants that help fight disease. The walnuts in the slaw give healthy fats and protein. Greek yogurt adds calcium and probiotics for gut health. Overall, this slaw is a tasty way to get nutrients. Yes, you can make carrot apple slaw ahead of time. It stays fresh in the fridge for 2-3 days. However, mix the dressing just before serving. If you add the dressing early, the slaw may get soggy. By waiting, you keep the crunch and flavor bright. This way, you can enjoy a fresh taste each time. Carrot apple slaw works well for meal prep. You can make a large batch for easy meals. Store it in an airtight container in the fridge. This slaw is a great side dish or snack. You can serve it with sandwiches or grilled meats. Just remember to keep the dressing separate until you are ready to eat. This will help keep your slaw fresh and crunchy. Carrot apple slaw is a simple and tasty dish. We combined crunchy carrots, tart apples, and nuts with a creamy dressing. You can customize it with different fruits, nuts, or dairy-free options. Store it in the fridge to enjoy fresh for a few days. This slaw is perfect for quick meals or gatherings. Try making it your own by adding your favorite flavors. Enjoy your healthy creation and share it with friends!

Carrot Apple Slaw Vibrant and Crunchy Salad Recipe

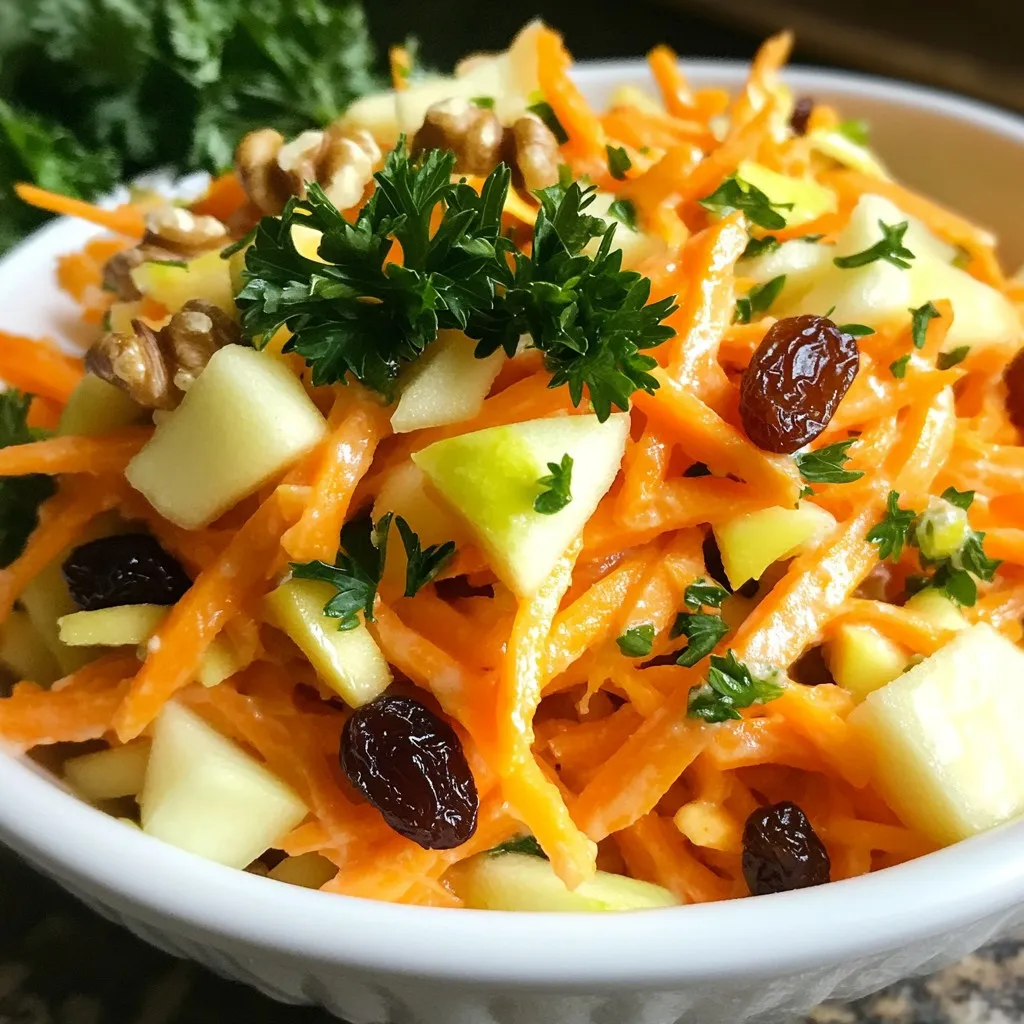
Looking for a fresh and tasty salad? This Carrot Apple Slaw is just what you need! With crunchy carrots, tart

To make Minute Lemon Butter Ricotta Pasta, you need a few simple ingredients. This dish shines with fresh flavors and creamy textures. Here’s what you will need: - Pasta type options: You can choose either 8 oz of fettuccine or spaghetti. Both work well. - Cheese options: Use 1/2 cup of ricotta cheese for creaminess. You can also add 1/4 cup of grated Parmesan cheese for extra flavor. - Flavor enhancers: The zest and juice of 1 lemon give a bright taste. You will also need 1/4 cup of unsalted butter to create a rich sauce. These ingredients blend perfectly to create a quick and tasty meal. {{ingredient_image_1}} To make the perfect pasta, you must cook it al dente. This means the pasta should be firm to the bite. Start by boiling a large pot of salted water. Once it boils, add your fettuccine or spaghetti. Follow the package instructions for timing. Before draining, reserve 1 cup of the pasta water. This water is starchy and helps thicken your sauce later. Now, let’s make the sauce. In a large skillet, melt 1/4 cup of unsalted butter over medium heat. Watch it closely as it melts. You want it to foam but not burn. Once the butter is foamy, add the zest of one lemon. Sauté this mixture for about one minute until it smells great. Next, turn the heat to low and mix in 1/2 cup of ricotta cheese. Stir it well until it is creamy. If the sauce feels too thick, don’t worry. We will fix that soon. It’s time to combine the pasta and sauce. Add the drained pasta to the skillet with the sauce. Now, pour in 1/2 cup of the reserved pasta water. Toss everything together until the pasta is well coated. If you want a creamier sauce, add more pasta water a little at a time. Stir in 2 tablespoons of fresh lemon juice and 1/4 cup of grated Parmesan cheese. Mix well and season with salt and pepper to taste. Your Minute Lemon Butter Ricotta Pasta is almost ready to serve! To boost flavor in your Minute Lemon Butter Ricotta Pasta, try adding spices like black pepper or red pepper flakes. These spices add warmth and a little kick. You can also mix in some garlic for depth. Fresh herbs bring brightness, too. I love using fresh basil or parsley. They add color and a fresh taste. Just sprinkle them on top when serving. To change the creaminess of the sauce, adjust the pasta water. Start with half a cup and stir it in. If you want it creamier, add more water slowly. Balancing flavors is key. Make sure to taste as you go. Add salt to enhance the flavors, but don’t overdo it. The lemon juice adds brightness, so find the right mix between salt and lemon. This balance makes each bite delicious. Pro Tips Choose the Right Pasta: Opt for fettuccine or spaghetti as they hold the creamy sauce well, ensuring every bite is flavorful. Perfect the Sauce Consistency: Reserve pasta water to adjust the sauce's creaminess; add it gradually until you reach your desired texture. Fresh Ingredients Matter: Using fresh lemon juice and zest enhances the dish's brightness, making it more vibrant and flavorful. Garnish for Presentation: Don't skip the fresh herbs and extra lemon zest as they not only add color but also elevate the dish's overall taste. {{image_2}} You can make your Minute Lemon Butter Ricotta Pasta even better by adding veggies. Seasonal vegetables bring color and nutrition. Think about using: - Spinach - Cherry tomatoes - Peas - Zucchini Add these vegetables during the last few minutes of cooking. For example, toss in spinach just before the pasta is done. If you use cherry tomatoes, add them when you melt the butter. Cook them until they are soft. This way, they add flavor and freshness. If you want to add protein, chicken or shrimp are great choices. Cook the chicken in the same skillet before adding the butter. Cut it into small pieces for even cooking. For shrimp, add them right after the butter foams. They cook quickly and add flavor. If you're vegetarian, try chickpeas or white beans. They add protein and blend well with the sauce. Just stir them in when you mix the pasta and sauce. This makes your meal hearty and fulfilling. To store your Minute Lemon Butter Ricotta Pasta, let it cool first. Place it in an airtight container. This keeps it fresh longer. You can store it in the fridge for up to three days. After that, it may lose flavor and texture. Always check for any strange smells or colors before eating leftovers. When you reheat this pasta, do it gently. The best way is using a skillet over low heat. Add a splash of water or olive oil to keep it moist. Stir often to prevent sticking. If you want to boost the flavor, add more lemon juice or fresh herbs while reheating. This makes every bite taste fresh and bright! You can make this pasta in just 15 minutes. The prep time is about 5 minutes. Cooking the pasta takes around 10 minutes. This quick meal is perfect for busy days. Yes, you can use other cheeses if you like. Cream cheese or goat cheese work well as substitutes for ricotta. For Parmesan, try pecorino or nutritional yeast for a vegan twist. Each choice will add a unique flavor to your dish. Absolutely! This recipe is great for meal prep. You can cook the pasta and sauce ahead of time. Store them separately in the fridge. It will last for up to three days. When you want to eat, just reheat and enjoy your tasty meal. This blog post walked you through making the perfect Minute Lemon Butter Ricotta Pasta. We covered ingredient options like pasta and cheese, step-by-step cooking, and tips for enhancing flavor. You learned how to adjust sauce consistency and incorporate proteins or veggies. In closing, this dish is quick, easy, and full of flavor. Try it out with your favorite ingredients, and enjoy a delightful meal tonight. Happy cooking!

Minute Lemon Butter Ricotta Pasta Quick and Tasty Meal

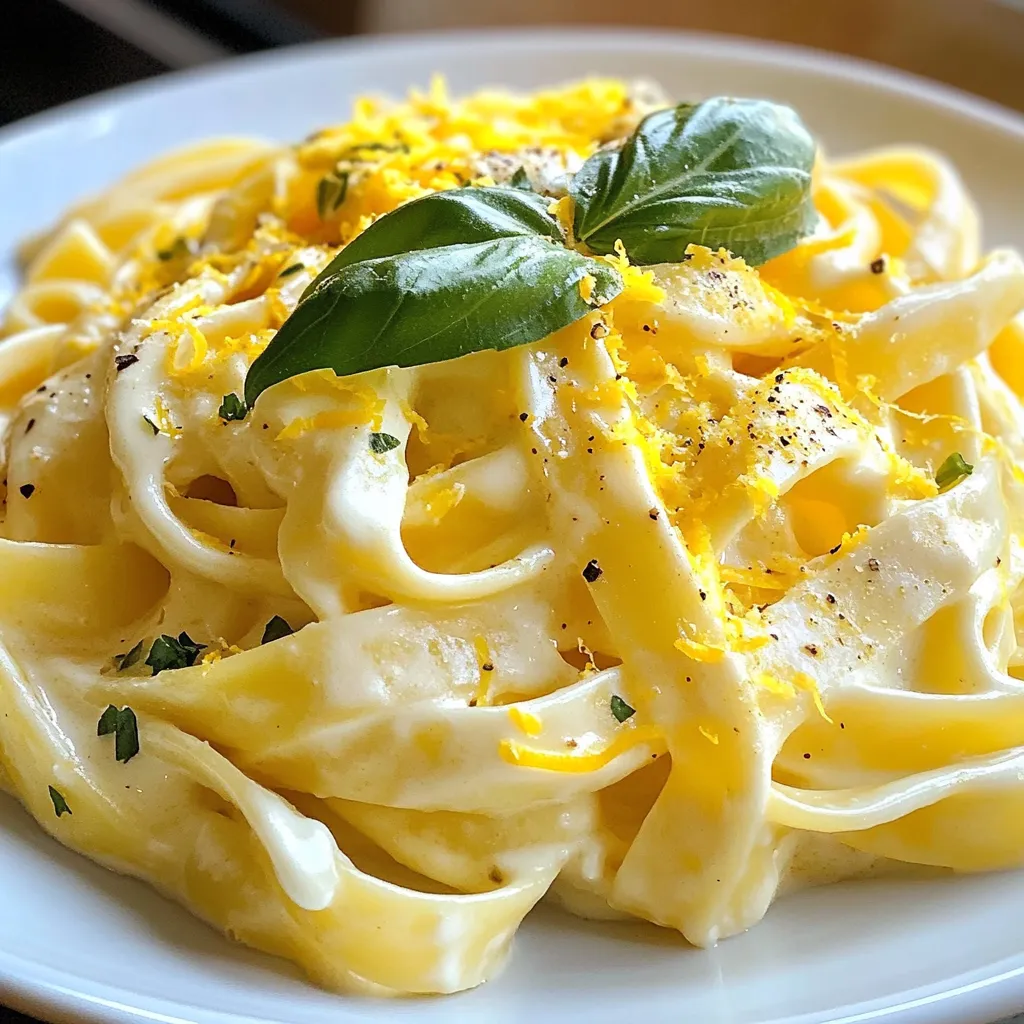
Looking for a quick and tasty meal? You’ve found it! This Minute Lemon Butter Ricotta Pasta is both easy and

To make Greek turkey meatballs, you need some simple and fresh ingredients. Here’s what you’ll need: - 1 pound ground turkey - 1/2 cup breadcrumbs (preferably whole wheat) - 1/4 cup grated Parmesan cheese - 1/4 cup fresh parsley, chopped - 2 cloves garlic, minced - 1 small red onion, finely chopped - 1 teaspoon dried oregano - 1 teaspoon ground cumin - 1/2 teaspoon salt - 1/4 teaspoon black pepper - 1 large egg - 1 tablespoon lemon juice - 1/4 cup tzatziki sauce (for serving) - Fresh cucumber and tomato slices (for garnish) These ingredients work together to create a burst of flavor. Ground turkey keeps the meatballs lean. Breadcrumbs and cheese add texture. Fresh parsley and garlic bring a bright taste. The spices, such as oregano and cumin, give the meatballs a unique flavor. Using fresh lemon juice adds a zesty kick. Tzatziki sauce complements the meatballs perfectly with its cool creaminess. Feel free to adjust the quantities to your taste. You can add more garlic for a stronger flavor. Using whole wheat breadcrumbs makes these meatballs healthier. Enjoy preparing this dish! {{ingredient_image_1}} First, you need to preheat your oven to 400°F (200°C). This step is key to getting the meatballs nice and brown. While the oven heats, line a baking sheet with parchment paper. This will help the meatballs cook evenly and make cleanup easy. Next, gather all your ingredients. You will need ground turkey, breadcrumbs, Parmesan cheese, parsley, garlic, red onion, oregano, cumin, salt, pepper, an egg, and lemon juice. Having everything ready makes mixing easier. In a large mixing bowl, combine the ground turkey, breadcrumbs, and grated Parmesan cheese. Add the chopped parsley, minced garlic, and finely chopped red onion. Sprinkle in the dried oregano, ground cumin, salt, and black pepper. In a separate small bowl, whisk the egg and lemon juice together. Once mixed, pour this into the turkey mixture. Use your hands to mix everything well. Make sure there are no dry spots. The mixture should feel sticky and well combined. Now, it’s time to shape the meatballs. Take small amounts of the mixture and roll them into 1-inch balls. Place the meatballs on the lined baking sheet, leaving some space between them. This helps them cook evenly. Bake the meatballs in the preheated oven for 20-25 minutes. They are done when they are golden brown and cooked through. To check doneness, you can cut one open. It should be no longer pink in the center. After baking, let them cool slightly before serving. Enjoy them warm with tzatziki sauce and fresh cucumber and tomato slices! To keep your meatballs moist, use ground turkey with some fat. This helps maintain juiciness. Adding breadcrumbs and egg also helps. They act as binders and keep the meatballs from drying out. Form meatballs gently. If you pack them too tight, they will be dense. For great flavor, season your meat mixture well. Use salt, pepper, oregano, and cumin. These spices add depth and warmth. Fresh herbs like parsley brighten the dish. Don’t be shy with garlic! It packs a punch and adds a nice kick. Serve these meatballs with tzatziki sauce. The cool sauce complements the warm meatballs. You can also pair them with fresh cucumber and tomato slices. They add crunch and freshness. For a complete meal, try serving with pita bread or a side salad. Pro Tips Use Fresh Herbs: Fresh parsley adds a vibrant flavor and color to the meatballs. Consider adding other fresh herbs like mint or dill for an extra twist. Don’t Overmix: When combining the ingredients, mix just until everything is incorporated. Overmixing can lead to tough meatballs. Check Doneness: Use a meat thermometer to ensure the internal temperature reaches 165°F (74°C) for safe consumption. Serve with Homemade Tzatziki: Elevate your dish by making your own tzatziki sauce using Greek yogurt, cucumber, garlic, and a splash of lemon juice. {{image_2}} If you have dietary needs, you can still enjoy Greek turkey meatballs. Here are some easy swaps: - Gluten-free options: Use gluten-free breadcrumbs or almond flour instead of regular breadcrumbs. This will keep the meatballs tasty and safe for those avoiding gluten. - Low-fat variations: Choose lean ground turkey or ground chicken. You can also cut back on cheese or skip it entirely for a lighter version. Changing up the flavors can make your meatballs exciting. Here’s how to do it: - Alternative herbs and spices: Instead of oregano, try dill or thyme. You can also add a pinch of red pepper flakes for some heat. Experiment with flavors to find what you love. - Adding vegetables: Mix in finely grated zucchini or shredded carrots. These add moisture and extra nutrition without changing the taste much. Meatballs are great for any meal. Here are some serving ideas: - How to serve meatballs as finger food: Make smaller meatballs, about half the size, for easy snacking. Serve them with toothpicks and a side of tzatziki for a fun appetizer. - Pairing meatballs with pasta or salads: Serve the meatballs over whole wheat pasta or a fresh salad. Drizzle with tzatziki or your favorite dressing for a complete meal. This will please everyone at the table! To store leftovers, place the meatballs in an airtight container. Make sure they cool down first. Cover the container tightly to keep moisture in. This way, your meatballs stay fresh and tasty. The best method for refrigerating meatballs is to layer them gently. If you stack them, use parchment paper between layers. This keeps them from sticking together. Freezing meatballs is a great way to save them for future meals. First, let the cooked meatballs cool completely. Then, arrange them in a single layer on a baking sheet. Freeze them for about 1-2 hours. Once frozen, transfer them to a freezer bag. This helps prevent freezer burn. For thawing, move the meatballs to the fridge overnight. Reheat them in the oven or microwave for a quick meal. Greek turkey meatballs can be stored safely in the fridge for up to three days. If frozen, they can last for about three months. Just remember to check for any signs of spoilage before eating. Always trust your senses! If they smell off or look strange, it’s best to throw them out. Keeping an eye on these guidelines helps you enjoy your meatballs at their best. Look for a few signs to tell if your meatballs are cooked. First, they should be golden brown on the outside. Next, use a meat thermometer. The inside should reach 165°F (74°C). If you cut one open, the meat should look white and no longer pink. The juices should run clear too. These signs help you avoid undercooked meat. Yes, you can make these meatballs ahead of time. Prepare them, and then store them in the fridge for up to two days. You can also freeze them. Just freeze the uncooked meatballs on a baking sheet, then transfer them to a freezer bag. They can stay frozen for up to three months. When you're ready, bake them straight from the freezer. Greek turkey meatballs pair well with many sides. You can serve them with a fresh salad. A Greek salad with cucumber, tomato, and feta is great. Another option is to serve them with warm pita bread. You can add tzatziki sauce for extra flavor. Rice or quinoa with herbs also works well. Enjoy them as a main dish or an appetizer. You learned how to make Greek turkey meatballs with common ingredients. We went through the steps to mix, shape, and bake them perfectly. I shared tips to keep them moist and flavorful. You now have options for dietary needs and serving ideas. Remember, these meatballs freeze well for easy meals later. Enjoy creating a tasty dish that satisfies your cravings and fits your needs. Your kitchen is ready for this delicious recipe!

Greek Turkey Meatballs Flavorful and Easy to Make

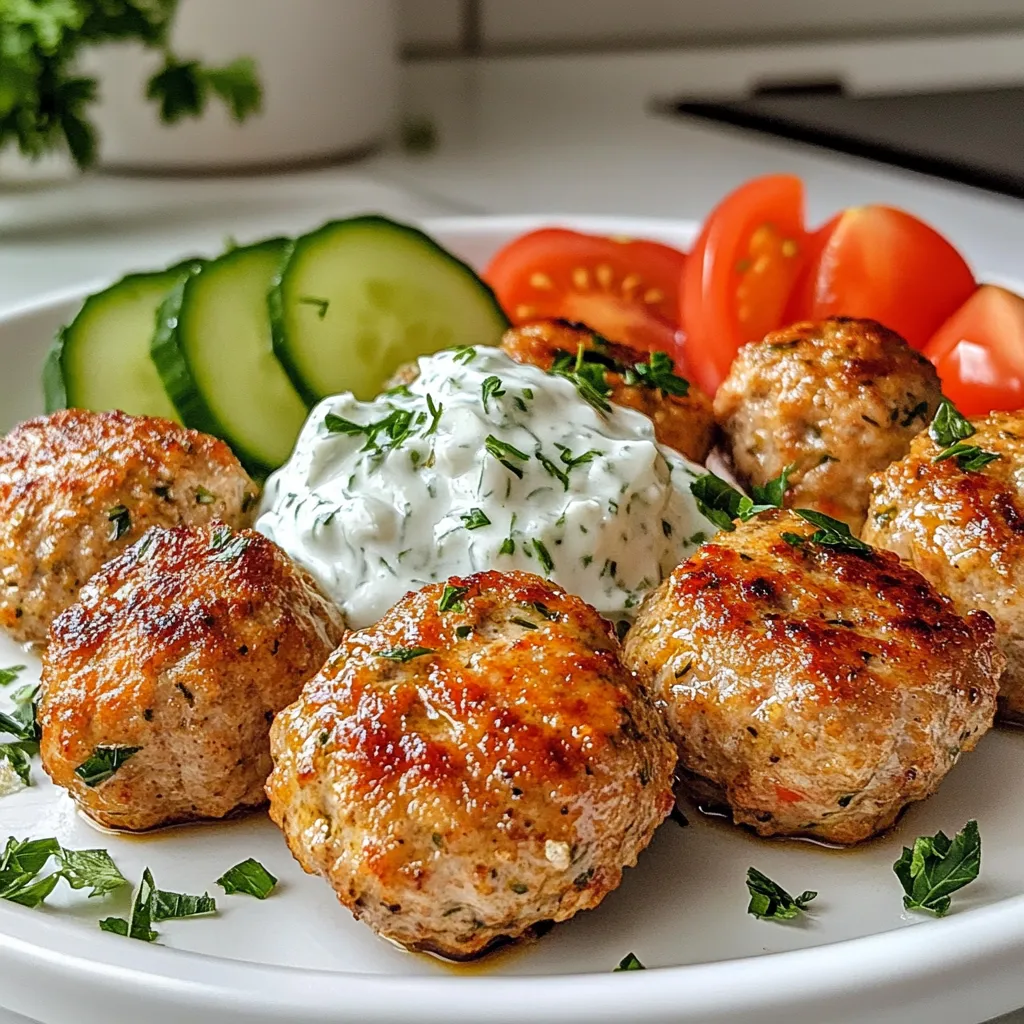
If you’re craving a tasty dish that’s simple to make, you’ve come to the right place. Greek turkey meatballs are

- 2 cups cooked chicken, shredded - 2 medium zucchinis, sliced into half-moons - 1 cup cherry tomatoes, halved The main ingredients in this Chicken Zucchini Bake create a hearty meal. You need cooked chicken for protein. Shredded chicken makes it easy to mix. Zucchini adds a nice crunch and moisture. Cherry tomatoes bring sweetness and color to the dish. - 1 cup shredded mozzarella cheese - 1/2 cup grated Parmesan cheese Dairy brings creaminess to the bake. Mozzarella cheese melts beautifully, creating a gooey layer. Parmesan cheese adds a sharp flavor that enhances the dish. Together, they make each bite rich and satisfying. - 1 teaspoon Italian seasoning - Fresh basil leaves for garnish - 1 tablespoon olive oil - Salt and pepper to taste Seasoning is key for great flavor. Italian seasoning gives the dish a classic taste. Fresh basil adds a pop of color and freshness. Olive oil helps to sauté the veggies and adds richness. Salt and pepper bring all the flavors together. This combination of ingredients makes the Chicken Zucchini Bake simple yet delicious. Each component plays a role in achieving a balanced and flavorful dish. Enjoy the process of cooking and the tasty results! {{ingredient_image_1}} Start with a large skillet. Heat 1 tablespoon of olive oil over medium heat. Once it’s hot, add 1 small red onion, diced, and 2 cloves of minced garlic. Cook them for about 3-4 minutes. You want the onion to turn clear. This step adds sweet and rich flavors to your dish. Next, slice 2 medium zucchinis into half-moons. Add them to the skillet after the onion is ready. Sauté the zucchini for about 5 minutes. They should become a bit soft but still firm. This is key for texture in your bake. Now, it’s time to bring everything together. Stir in 2 cups of shredded chicken and 1 cup of halved cherry tomatoes. Mix well until everything is combined. Season the mix with 1 teaspoon of Italian seasoning, salt, and pepper. This blend will give your dish a lovely Italian flavor. Grab a greased baking dish and layer the chicken and zucchini mixture evenly on the bottom. The even layer helps with cooking. Next, sprinkle 1 cup of shredded mozzarella cheese on top, followed by 1/2 cup of grated Parmesan cheese. The cheese will melt and create a great crust. Cover the dish with aluminum foil. Bake in your preheated oven at 375°F (190°C) for 20 minutes. After this time, remove the foil. Bake it uncovered for another 10-15 minutes. You want the cheese to be bubbly and golden. Once it’s out of the oven, let it sit for 5 minutes before serving. This helps the flavors meld together. Garnish with fresh basil leaves for a nice touch! Use cooked chicken for this dish. Rotisserie chicken works great. It adds flavor and saves time. You can also use leftover chicken. Shred the chicken easily with two forks. Just pull the meat apart into small pieces. This makes it mix well with the veggies. Slice your zucchinis into half-moons for even cooking. A sharp knife helps with clean cuts. Make slices about a quarter-inch thick. To keep zucchini from getting soggy, salt the slices first. Let them sit for 15 minutes, then pat them dry. This step removes excess water and keeps your bake firm. For a perfect cheese melt, use a mix of mozzarella and Parmesan. Mozzarella melts well, while Parmesan gives a nice flavor. Make sure to cover the dish with foil while baking at first. This traps steam and helps melt the cheese. Remove the foil near the end to brown the cheese. Keep an eye on it so it doesn't burn. Pro Tips Use Fresh Zucchini: Fresh zucchini will have a firmer texture and better flavor, making your bake more enjoyable. Cook Chicken Ahead: Shredded chicken can be made in advance and stored in the refrigerator, saving you time during preparation. Experiment with Cheese: Try adding different types of cheese such as cheddar or gouda for a unique flavor twist. Let it Rest: Allow the dish to rest for a few minutes after baking; this helps the layers set and makes serving easier. {{image_2}} You can add more veggies for extra flavor and color. Bell peppers bring a sweet crunch. Just chop them into small pieces and sauté them with the onions. Mushrooms add a savory taste. Slice them thin and mix them in with the zucchinis. You can even try other veggies like spinach or broccoli for a fun twist. Want to switch up the protein? You can use turkey instead of chicken. Ground turkey works well in this dish. For beef lovers, lean ground beef is a tasty choice too. If you prefer a meatless option, tofu is great! Press it to remove water, then cube it and sauté with the veggies. Herbs can really make this dish pop. Try adding thyme or oregano for a fresh taste. These herbs bring out the best in the chicken and veggies. If you like heat, sprinkle in some red pepper flakes. This adds a nice kick without being too spicy. Adjust the amount based on your taste! To store your Chicken Zucchini Bake, let it cool first. Then, place it in an airtight container. You can keep it in the fridge for up to 3-4 days. If you want to freeze it, wrap it tightly in plastic wrap and then in foil. This way, it stays fresh for up to 2-3 months. To reheat without drying it out, use the oven. Preheat your oven to 350°F (175°C). Cover the dish with foil and heat for about 15-20 minutes. You can also use the microwave. Just heat in short bursts, about 1-2 minutes at a time, checking often. If you have leftovers, consider using them in a salad or a wrap for a quick meal. In the fridge, your Chicken Zucchini Bake lasts for about 3-4 days. Signs of spoilage include an off smell or mold. If you see either, it's best to toss it out. Always check leftovers before eating! You can use raw chicken, but it needs more cooking time. Start by cooking the chicken in the skillet with oil before adding other ingredients. This ensures the chicken cooks well and is safe to eat. You can serve this dish with a side salad or garlic bread. A fresh green salad adds crunch. Garlic bread is great for soaking up the cheese. Both options balance the meal nicely. To make this dish gluten-free, skip any gluten-containing sauces or breads. The main ingredients in the recipe are already gluten-free. Focus on fresh veggies and meats. Always check cheese labels to ensure they are gluten-free. This Chicken Zucchini Bake combines simple, tasty ingredients like chicken, zucchini, and cheese. We covered how to prepare the veggies and bake the dish for great results. You can add different vegetables or protein for variety and discover tips for the best flavor. When stored correctly, leftovers can last and taste fresh. With this dish, you can impress your family or enjoy a healthy meal. Dive into the fun of cooking and enjoy every bite of your creation!

Chicken Zucchini Bake Flavorful and Easy Recipe

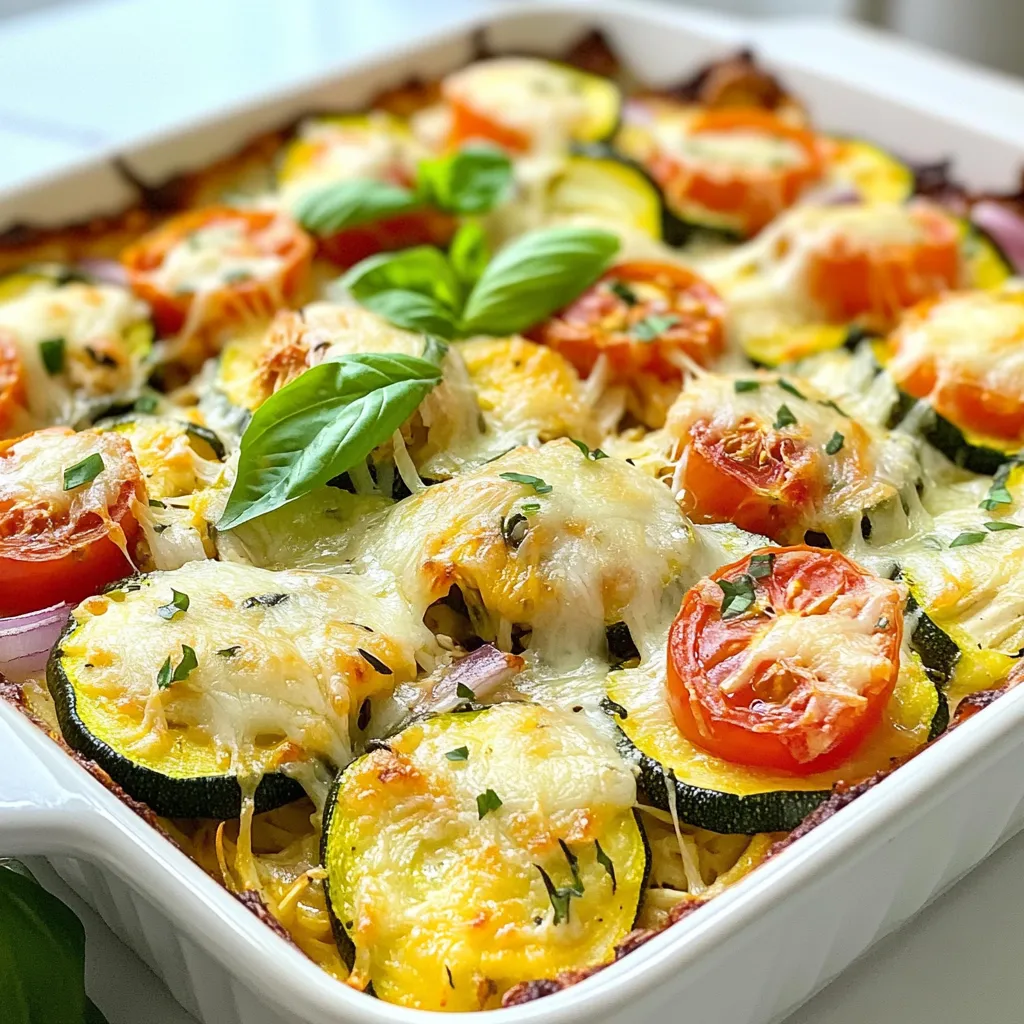
Are you looking for a healthy and tasty meal that’s quick to prepare? Look no further than my Chicken Zucchini

- 1 cup natural unsweetened peanut butter - 1/2 cup coconut oil, melted - 1/4 cup unsweetened cocoa powder - 1/4 cup sugar-free sweetener (like erythritol or stevia) - 1 teaspoon vanilla extract - 1/4 teaspoon salt - 1/2 cup chopped nuts (optional) I use natural unsweetened peanut butter to cut out added sugars. It has a rich, nutty flavor that shines. Coconut oil adds healthy fats and helps the bombs set well. Unsweetened cocoa powder gives a deep chocolate taste without sugar. I choose a sugar-free sweetener for sweetness without the carbs. Vanilla extract adds a lovely aroma and flavor. A little salt enhances all the flavors. Chopped nuts add a nice crunch and extra nutrients. For peanut butter, I like Smucker’s Natural or Crazy Richard’s. They have no added oils or sugars. For coconut oil, Nutiva is great and has a clean taste. I prefer Hershey’s for cocoa powder as it is rich and smooth. For sweeteners, Swerve or Stevia in the Raw are excellent choices. These brands keep the taste high and the carbs low. {{ingredient_image_1}} 1. Start with a mixing bowl. Add 1 cup of natural unsweetened peanut butter. 2. Pour in 1/2 cup of melted coconut oil. Mix them until smooth. 3. Next, add 1/4 cup of unsweetened cocoa powder. Then, add 1/4 cup of sugar-free sweetener. 4. Stir in 1 teaspoon of vanilla extract and 1/4 teaspoon of salt. Mix until smooth. 5. If you like, fold in 1/2 cup of chopped nuts for extra crunch. 6. Prepare a mini muffin tin. Line it with cupcake liners or grease it. 7. Pour the mixture into each cup. Fill them about 2/3 full. 8. Place the tin in the freezer for 30 to 60 minutes. Wait until they harden. 9. Once set, pop the fat bombs out of the molds. Store them in an airtight container. - Step 1: Show the peanut butter and coconut oil in the bowl. - Step 2: Mix until the blend is smooth and creamy. - Step 3: Add cocoa powder and sweetener. It should look rich and dark. - Step 4: Pour in vanilla and salt. The mixture gets shiny and smooth. - Step 5: Add nuts if you want a crunchy bite. - Step 6: Use liners in the muffin tin for easy removal. - Step 7: Each cup should be filled just right. - Step 8: Time to freeze! The bombs will firm up nicely. - Step 9: Remove and store in a pretty container. - Too runny: If the mix is too runny, add more cocoa powder. - Not firming up: Make sure to freeze long enough. - Sticking to molds: Use liners or grease them well next time. - Bitter taste: Adjust the sweetener to your taste. - Crumbly texture: Mix well to ensure all ingredients blend smoothly. To get the best texture, always use natural peanut butter. Avoid brands with added sugar or oils. Mix the melted coconut oil and peanut butter well. This helps create a smooth base. If your mix feels too thick, add a bit more melted coconut oil. This keeps the fat bombs creamy and easy to bite into. You can easily change the flavor to fit your taste. Try adding a dash of cinnamon for warmth. Want a minty twist? Add a few drops of peppermint extract. If you love coconut, toss in some shredded coconut. You can also swap the peanut butter for almond or cashew butter. Each nut butter gives a unique taste and texture. Store your fat bombs in an airtight container. Keep them in the fridge for up to two weeks. For longer storage, keep them in the freezer. They last for about three months there. When you want to enjoy them, just take one out and let it sit for a few minutes. This way, they become soft and tasty again. Pro Tips Use Room Temperature Ingredients: This helps the peanut butter and coconut oil blend smoothly, ensuring a creamy texture for your fat bombs. Experiment with Flavors: Consider adding a pinch of cinnamon or a few drops of peppermint extract for unique flavor variations. Storage Tips: Store your fat bombs in an airtight container in the fridge for up to two weeks or freeze them for longer shelf life. Simplify Cleanup: Use silicone molds to easily pop out the fat bombs without the need for greasing, making cleanup a breeze. {{image_2}} You can use many sweeteners for your fat bombs. I often use erythritol or stevia. Both are low in carbs and have little to no calories. Erythritol tastes sweet like sugar, while stevia is much sweeter. It’s best to start with small amounts of stevia, as it can be very strong. If you prefer a different flavor, try monk fruit sweetener. It is also keto-friendly and has a nice taste. Each sweetener can change the flavor slightly, so feel free to experiment! Peanut butter is the star here, but you can switch it up! Almond butter, cashew butter, or sun butter work well too. Each nut butter has its own flavor and texture. Almond butter adds a nice nutty taste, while cashew butter is creamier. If you have nut allergies, try sunflower seed butter. It’s safe and tasty. Just remember that different nut butters may affect the overall texture of the fat bombs. Want to boost your fat bombs? Add superfoods! Chia seeds are high in fiber and omega-3s. Just mix in a tablespoon or two. You can also try hemp seeds for protein and healthy fats. Cacao nibs can add crunch and a rich chocolate flavor. They are full of antioxidants too! Adding these superfoods can make your fat bombs even better for your health. Enjoy your tasty creations! Store your fat bombs in an airtight container. This keeps them fresh and tasty. You can use glass jars or plastic containers. If you want to keep them longer, label the container with the date. This way, you know when you made them. In the fridge, these fat bombs last about two weeks. The cool air slows down spoilage. However, if you freeze them, they can last up to three months. Just make sure they are well-sealed. When you want to eat one, take it out of the freezer and let it thaw in the fridge. Reheating isn’t usually needed for fat bombs. They are best enjoyed cold. If you want them softer, you can let them sit at room temperature for a few minutes. Avoid using the microwave, as it can melt the fats unevenly. Enjoy them as a quick snack or a sweet treat! Keto Peanut Butter Chocolate Fat Bombs are tasty snacks. They are low in carbs and high in fat. These bites help keep you full and satisfied. Made from peanut butter, coconut oil, and cocoa powder, they are rich and creamy. These fat bombs fit well into a keto diet. Each fat bomb contains about 1-2 grams of carbs. This keeps you within your daily carb limit. The exact number can change based on your sweetener choice. Always check your ingredients for accurate counts. Yes, you can make these fat bombs vegan! Just swap the peanut butter for a nut or seed butter. Use coconut oil as your fat source. Choose a vegan sweetener like stevia or monk fruit. This way, you keep the same great taste. Fat bombs help you stay in ketosis. They provide energy without raising blood sugar. The healthy fats help curb hunger. Plus, they are simple to make and store. These bombs make snacking easy and delicious on a keto diet. The fat bombs are ready when they are firm. After freezing for 30-60 minutes, they should hold their shape. If they feel soft, they need more time in the freezer. Once firm, take them out and enjoy! Keto peanut butter chocolate fat bombs are tasty and easy to make. We covered essential ingredients, step-by-step instructions, and helpful tips. Each section helps you create, store, and enjoy these treats. You can customize flavors and use different nut butters. Remember to store them well for lasting freshness. Now, go ahead and make your own fat bombs. Enjoy the deliciousness while sticking to your keto goals!

Keto Peanut Butter Chocolate Fat Bombs Easy Recipe

Craving a sweet treat that fits your keto diet? Look no further than these Keto Peanut Butter Chocolate Fat Bombs!

- 1 cup unsalted butter, softened - 2 cups granulated sugar - 4 large eggs - 3 cups all-purpose flour - 1 teaspoon baking powder - 1/2 teaspoon baking soda - 1/2 teaspoon salt - 1 cup sour cream - 1 teaspoon vanilla extract - 3 cups fresh peaches, peeled and diced - 1 teaspoon ground cinnamon - 1/2 teaspoon nutmeg - 1/2 cup brown sugar (for topping) Gathering the right ingredients makes your Peach Cobbler Pound Cake shine. You need unsalted butter, so it mixes well. Use two cups of granulated sugar for sweetness. Add four large eggs to give the cake structure. You'll need three cups of all-purpose flour to create the base. Don't forget the baking powder and baking soda to help the cake rise. A touch of salt enhances all the flavors. For creaminess, one cup of sour cream is key. Vanilla extract adds a nice aroma. Fresh peaches are the star of this cake. You'll need three cups, peeled and diced. Ground cinnamon and nutmeg add warmth and depth. Finally, use half a cup of brown sugar for a delightful topping. These ingredients come together to create a moist and flavorful cake. Each adds texture and taste, making every bite a delight. {{ingredient_image_1}} - Preheat the oven to 350°F (175°C). - Grease a 10-inch bundt pan or tube pan. Start by preparing your oven and pan. Preheating the oven ensures even baking. Greasing the bundt pan helps the cake release easily after baking. Use butter or cooking spray to coat the pan well. - Cream together butter and sugar. - Add eggs and vanilla extract. - Combine dry ingredients and alternate mixing with sour cream. Next, you will create the batter. In a large bowl, cream the softened butter with granulated sugar. Mix until it looks light and fluffy. This takes about four to five minutes. Then, add the eggs one at a time. Beat well after each addition and stir in the vanilla extract. In another bowl, whisk the flour, baking powder, baking soda, salt, cinnamon, and nutmeg together. Gradually add this dry mix to the butter mix. Alternate adding the sour cream. Start and end with the flour mix. This helps keep the batter smooth. - Gently fold diced peaches into the batter. - Pour batter into the prepared bundt pan. Now it's time for the stars—fresh peaches! Gently fold the diced peaches into the batter. This ensures they spread evenly. After that, pour the batter into the greased bundt pan. Smooth the top with a spatula to prepare for baking. - Sprinkle brown sugar and cinnamon on top. - Bake for 60-70 minutes, or until a toothpick comes out clean. Before baking, sprinkle brown sugar mixed with a bit of cinnamon on top. This adds a lovely sweet crust. Bake the cake in the preheated oven for 60 to 70 minutes. Check for doneness by inserting a toothpick in the center. If it comes out clean, your cake is ready! - Allow to cool in pan for 15 minutes. - Invert onto a wire rack to cool completely. Once baked, let the cake cool in the pan for 15 minutes. This helps it set. After that, carefully invert the cake onto a wire rack. Allow it to cool completely before serving. Enjoy the sweet aroma of your Peach Cobbler Pound Cake! To get the best texture in your Peach Cobbler Pound Cake, use room-temperature butter. Cold butter will not mix well and can lead to a dense cake. Next, alternate between adding the dry ingredients and the sour cream. This method keeps the batter light and fluffy. The sour cream adds moisture, making each bite rich and tender. For a beautiful presentation, place the cake on a lovely cake stand. Dust the top with powdered sugar for a touch of elegance. To enhance each slice, serve it with a scoop of vanilla ice cream or a dollop of whipped cream. This pairing adds a creamy contrast to the cake’s fruity flavor. To boost the flavor, think about adding more spices. Nutmeg and cardamom can add depth to your cake. Always use ripe, fresh peaches for the best taste. The fruit should be sweet and juicy. This will make all the difference in creating that delightful peach cobbler flavor. Pro Tips Use Ripe Peaches: Ensure that the peaches are ripe for the best flavor and sweetness in your cake. Don’t Overmix: When adding the dry ingredients, mix just until combined to keep the cake light and fluffy. Cool Properly: Allow the cake to cool in the pan for 15 minutes before inverting to prevent it from breaking apart. Enhance Flavor: Add a splash of almond extract for an extra layer of flavor that complements the peaches well. {{image_2}} You can change up the recipe by using different fruits. Substitute peaches with apples, berries, or apricots. Each fruit brings its own flavor and style. You can also try a mixed fruit version. This will give you a fun twist and make it even more tasty! If you need a gluten-free cake, you can easily adapt this recipe. Just use a gluten-free flour blend instead of all-purpose flour. This small switch keeps the cake delicious while meeting dietary needs. It still tastes great! Want a vegan version of this cake? You can easily make some swaps. Replace the butter with coconut oil. For eggs, use flax eggs made from ground flaxseed and water. Also, use plant-based sour cream. These changes will keep your cake moist and yummy without any animal products. Enjoy your new vegan treat! To keep your peach cobbler pound cake fresh, place it in an airtight container. It stays good at room temperature for up to three days. If you want to store it longer, put it in the fridge. It will last for up to one week this way. If you need to freeze the cake, wrap it tightly in plastic wrap. Then, wrap it again in foil to prevent freezer burn. This cake can be frozen for up to three months. When you are ready to enjoy it, let it thaw in the fridge overnight. To reheat individual slices, use your microwave. Heat them for about 15-20 seconds. If you prefer, you can also reheat slices in the oven. Just set the oven to a low temperature and warm them up for about 10 minutes. This will help keep the cake moist and tasty. Yes, but make sure to drain them well before use. Canned peaches can be sweet and soft. Rinsing helps reduce extra juice. This way, your cake won't become soggy. Use the same amount as fresh peaches. This makes it easy if fresh peaches are out of season. A toothpick inserted into the center should come out clean. This means the cake is baked through. If there is wet batter on the toothpick, bake it a bit longer. Checking a few spots helps ensure it is done all the way through. The top will also look golden brown and firm. Yes, it can be baked in advance and stored properly for serving later. Let it cool completely before wrapping. Use plastic wrap or foil to keep it fresh. You can store it at room temperature for a few days. For longer storage, keep it in the fridge. It also freezes well for up to three months. Just thaw it overnight before serving. This peach bundt cake is a delightful treat, made with simple ingredients. You start with butter, sugar, eggs, flour, and fresh peaches. Following clear steps helps you create a moist cake that impresses everyone. Remember, you can tweak the recipe by adding different fruits or making it vegan. Store it well to enjoy later. With this guide, baking becomes fun and easy. I hope you’re excited to try this recipe at home!

Peach Cobbler Pound Cake Delightful and Easy Recipe

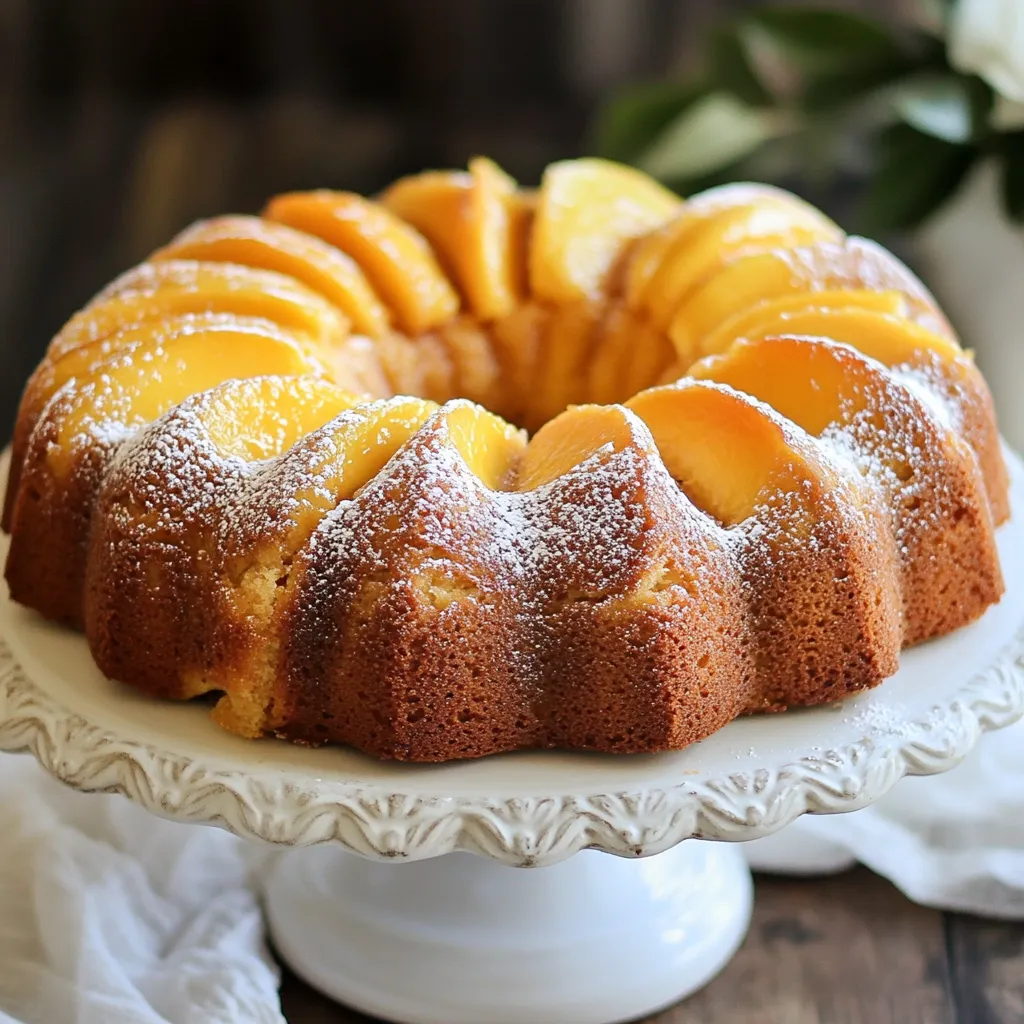
Are you ready to indulge in a sweet, warm treat? This Peach Cobbler Pound Cake is simple and packed with

To make maple glazed Brussels sprouts, gather these simple ingredients: - 1 lb Brussels sprouts, trimmed and halved - 3 tablespoons olive oil - ¼ cup pure maple syrup - 2 tablespoons balsamic vinegar - 2 cloves garlic, minced - Salt and pepper to taste - ¼ cup chopped pecans (optional for crunch) - Fresh thyme leaves, for garnish You can swap some ingredients if needed: - Use avocado oil instead of olive oil for a lighter flavor. - Honey can replace maple syrup for a different sweetness. - Red wine vinegar works well if you don’t have balsamic vinegar. - For a nut-free dish, skip the pecans or use sunflower seeds. Feel free to add more flavor and texture: - Toss in some crispy bacon for a smoky taste. - Add dried cranberries for a sweet and tart bite. - Mix in Parmesan cheese for a savory twist. - Try a pinch of red pepper flakes for heat. These simple ingredients and swaps will help you create a delicious dish that everyone will love! {{ingredient_image_1}} First, gather your ingredients. You will need: - 1 lb Brussels sprouts, trimmed and halved - 3 tablespoons olive oil - ¼ cup pure maple syrup - 2 tablespoons balsamic vinegar - 2 cloves garlic, minced - Salt and pepper to taste - ¼ cup chopped pecans (optional for crunch) - Fresh thyme leaves, for garnish Next, preheat your oven to 400°F (200°C). This step is key for perfect roasting. In a large bowl, add the halved Brussels sprouts. Pour in the olive oil, and sprinkle salt and pepper. Add the minced garlic too. Toss well to coat each sprout evenly. Now, spread the coated Brussels sprouts on a baking sheet lined with parchment paper. Make sure they are in a single layer. This helps them roast evenly. Place the baking sheet in the oven. Roast for 20-25 minutes. Stir them halfway through to ensure they cook well. Look for a nice golden brown color and crispy edges. While the Brussels sprouts roast, prepare the maple glaze. In a small saucepan, combine the maple syrup and balsamic vinegar. Heat this mixture over medium heat. Bring it to a simmer. Reduce the heat and let it cook for 3-4 minutes. You want it to thicken slightly. Once the Brussels sprouts are done, take them out of the oven. Drizzle the warm maple glaze over the sprouts. Toss them gently to coat. If you want extra crunch, sprinkle the chopped pecans on top. Return them to the oven for another 5 minutes. This step adds a lovely texture. Finally, remove the baking sheet from the oven. Garnish with fresh thyme leaves. Your maple glazed Brussels sprouts are now ready to serve! To get that perfect crispy bite, start by trimming and halving your Brussels sprouts. This helps them cook evenly. Use olive oil to coat them well. Don't forget to space them out on the baking sheet. If they are too close, they will steam instead of roast. Stir them halfway through baking. This ensures every side gets nice and brown. Roast at 400°F for 20-25 minutes. You want them golden and crispy on the edges. When mixing your Brussels sprouts, use a large bowl. Combine the trimmed sprouts with olive oil, minced garlic, salt, and pepper. Toss them gently to coat each piece. For the glaze, mix maple syrup and balsamic vinegar in a small pan. Let it simmer until it thickens. Once the Brussels sprouts are done roasting, drizzle the glaze over them. Toss again to make sure every sprout gets a sweet, sticky coat. To boost the flavor, add chopped pecans right before the final bake. They add crunch and nutty taste. Fresh thyme leaves are a great garnish after baking. The thyme gives a fresh touch to the dish. You can also try adding chili flakes for a spicy kick. For more depth, consider using lemon zest. This adds brightness and balances the sweetness of the maple syrup. Pro Tips Choose Fresh Brussels Sprouts: Look for bright green sprouts that are firm to the touch, avoiding any that are yellowing or soft. Adjust the Sweetness: If you prefer a less sweet glaze, reduce the amount of maple syrup or add a splash of lemon juice for balance. Experiment with Nuts: Try using walnuts or almonds instead of pecans for a different flavor and crunch. Serve Immediately: For the best texture and flavor, serve the glazed Brussels sprouts right after roasting while they are still warm and crispy. {{image_2}} If you want a nut-free dish, simply skip the pecans. The Brussels sprouts still shine on their own. Their natural flavor blends well with the sweet maple glaze. You can add more herbs, like rosemary or sage, for extra taste. This recipe is mostly vegan, but you can tweak it even more. Ensure the maple syrup is pure and not mixed with any animal products. You can also add a splash of soy sauce for added depth. This makes the dish savory and rich without any dairy. If you want to mix things up, try different glazes. You can use honey instead of maple syrup for a different sweetness. Another option is a soy sauce and ginger glaze. This adds a nice kick to the Brussels sprouts. You can also try a balsamic glaze alone for a tangy twist. After enjoying your maple glazed Brussels sprouts, store any leftovers right away. Place them in an airtight container. This keeps them fresh for up to three days in the fridge. Make sure the sprouts cool to room temperature before sealing the container. This prevents moisture buildup, which can make them soggy. Reheating your leftovers is simple. You can use the oven or the microwave. For the oven, preheat to 350°F (175°C). Spread the sprouts on a baking sheet and heat for about 10 minutes. This keeps them crispy. If you use the microwave, heat in short bursts. Start with 30 seconds, then check and stir. Avoid overcooking to maintain their texture. If you want to save your maple glazed Brussels sprouts for later, freezing is a great option. First, let them cool completely. Then, place them in a freezer-safe bag. Remove as much air as possible to prevent freezer burn. They can last up to three months in the freezer. When you're ready to eat them, thaw in the fridge overnight before reheating. Yes, you can use frozen Brussels sprouts. However, fresh ones give a better texture. If using frozen, thaw them first. Drain any excess water to avoid sogginess. Adjust cooking time to ensure they crisp up nicely. Brussels sprouts are done when they are golden brown and crispy on the edges. You can pierce them with a fork. If they feel tender inside, they are ready. Keep an eye on them while roasting to avoid burning. Maple glazed Brussels sprouts pair well with many dishes. Try them with roasted chicken or pork. They also work great with quinoa or rice. For a complete meal, serve them alongside a fresh salad. In this article, we covered the key ingredients for maple-glazed Brussels sprouts, including possible substitutions and optional add-ins. We went through step-by-step instructions for preparation, roasting, and making the glaze. I shared my tips for crispy sprouts and flavor boosts. You also learned catchy variations, storage methods, and answered common questions. Now, you can enjoy delicious, easy, and flexible Brussels sprouts any day!

Maple Glazed Brussels Sprouts Savory and Simple Dish

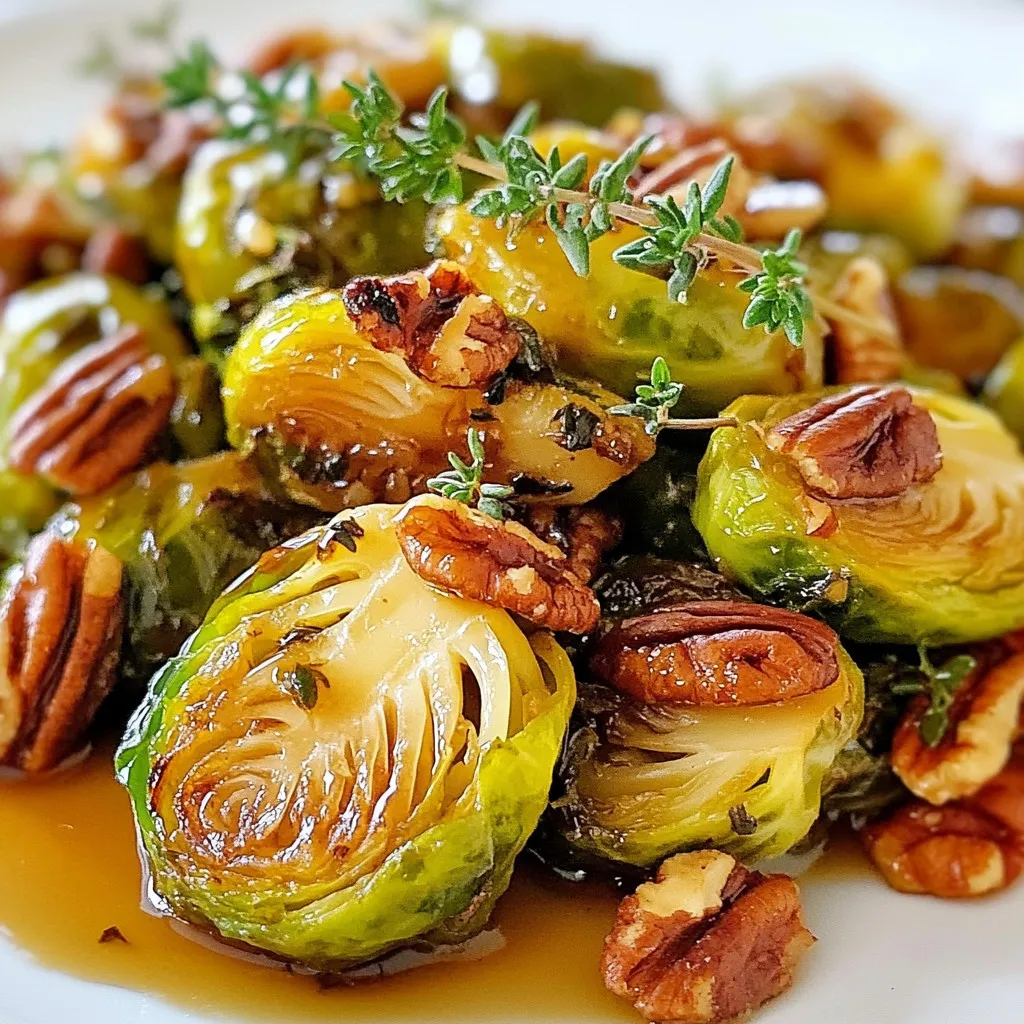
Looking for a tasty side dish that shines at any meal? Maple Glazed Brussels Sprouts are simple yet delicious! In

- 8 oz (225 g) pasta of your choice (penne, fusilli, or spaghetti) - 1 tablespoon olive oil - 2 cloves garlic, minced - 1 can (14 oz) diced tomatoes, undrained - 1/2 cup heavy cream I always start with the right pasta. You can choose penne, fusilli, or spaghetti. Each type adds its own charm to the dish. Next, I use one tablespoon of olive oil for a rich flavor. Minced garlic is a must; it adds a wonderful aroma. A can of diced tomatoes, undrained, brings juiciness. Finally, heavy cream gives the sauce its creamy texture. - 1 teaspoon Italian seasoning (basil, oregano, thyme mix) - 1/4 cup grated Parmesan cheese - Fresh basil leaves for garnish For seasoning, I use Italian seasoning. This mix has basil, oregano, and thyme. It really enhances the tomato flavor. Grated Parmesan cheese adds a nice salty taste. Fresh basil leaves are perfect for garnishing. They not only look great but also add fresh flavor. - Extra Parmesan for serving - Salt and pepper to taste You can add extra Parmesan for serving. It makes the dish even richer. I always suggest tasting for salt and pepper. These simple seasonings can make a big difference in flavor. {{ingredient_image_1}} - Start by boiling a large pot of salted water. - Add 8 ounces of your favorite pasta. - Cook it until al dente, as per package instructions. - Once cooked, reserve 1/2 cup of pasta water. - Drain the pasta and set it aside. - In the same pot, heat 1 tablespoon of olive oil over medium heat. - Add 2 minced garlic cloves and sauté for 1 minute. - Pour in one 14-ounce can of diced tomatoes, undrained. - Bring the mixture to a simmer and cook for 3 to 4 minutes. - Stir in 1/2 cup of heavy cream and 1 teaspoon of Italian seasoning. - Let the sauce simmer for another 2 to 3 minutes to thicken. - Add the drained pasta to the sauce and toss it well. - If the sauce is thick, add some reserved pasta water to adjust. - Finally, mix in 1/4 cup of grated Parmesan cheese and season with salt and pepper. Cooking Pasta Al Dente To cook pasta al dente, boil salted water. Add your pasta and follow the package time. Al dente means it has a slight bite. This texture makes the pasta hold sauce better. It also adds a nice chew. Using Reserved Pasta Water Don’t forget to reserve half a cup of pasta water. This starchy water helps adjust sauce thickness. If your sauce is too thick, add a bit of this water. It will improve the flavor and keep the dish creamy. Best Practices for Mixing Ingredients When making the sauce, mix garlic and olive oil first. Then, add diced tomatoes and let them simmer. Next, stir in the heavy cream slowly. This helps blend flavors well. Always mix the sauce off heat before adding cheese. Tips to Avoid Curdling Cream To keep your cream smooth, avoid high heat. Stir the sauce gently. Adding cream slowly helps too. If it curdles, try whisking it quickly. This can bring it back together. Recommended Seasonings and Herbs Italian seasoning brings great flavor. It has basil, oregano, and thyme. Add salt and pepper to taste. Fresh basil leaves are the best for garnish. They add a bright flavor at the end. Optional Add-ins and Elevation Ideas You can elevate your dish in many ways. Try adding cooked chicken or shrimp for protein. Spinach or bell peppers can add color and nutrition. You can also use sun-dried tomatoes for a zingy taste. Pro Tips Use Fresh Ingredients: For the best flavor, opt for fresh garlic and high-quality canned tomatoes. Fresh herbs can also elevate the dish. Adjust the Creaminess: If you prefer a lighter sauce, you can reduce the amount of heavy cream or substitute it with half-and-half or milk. Customize Your Pasta: Experiment with different types of pasta. Whole grain or gluten-free options work well and can add a unique flavor and texture. Leftover Sauce Magic: If you have leftover sauce, it can be used as a base for soups or as a topping for grilled chicken or fish. {{image_2}} You can change the pasta type to suit your taste. Whole wheat pasta adds fiber and nutrition. Gluten-free options are great for those with allergies. You can try penne, fusilli, or spaghetti. Each shape holds sauce differently, giving you new textures. If you want a lighter dish, try using half-and-half instead of heavy cream. You can also use Greek yogurt for a tangy twist. For dairy-free meals, swap cream with coconut milk or cashew cream. These options give a creamy feel without dairy. To make your dish heartier, add protein. Chicken, shrimp, or tofu work well. Cook the protein first, then mix it into the sauce. You can also add vegetables like spinach or bell peppers. These add color and nutrients, making your meal more balanced. To store your leftover creamy tomato pasta, let it cool first. Place it in an airtight container. This keeps the pasta fresh and prevents it from drying out. You can enjoy it for up to three days in the fridge. Just remember to label the container with the date. If you want to freeze your creamy tomato pasta, follow these tips. Allow the pasta to cool completely. Then, portion it into freezer-safe bags or containers. Remove as much air as you can before sealing. This helps prevent freezer burn. The pasta can last up to three months in the freezer. To thaw, move it to the fridge overnight. If you’re in a hurry, you can also use the microwave for quick defrosting. When it's time to reheat, there are a few great methods. You can use the microwave, stovetop, or oven. If using the microwave, heat in short bursts. Stir it often to get even heat. For stovetop, place it in a pan with a splash of water or broth. This keeps it from sticking. If you want a creamy texture, add a bit more heavy cream or cheese while heating. This will refresh the sauce and keep it delicious. To make creamy tomato pasta vegan, use plant-based cream. You can try coconut cream or cashew cream. For cheese, use nutritional yeast or a vegan cheese substitute. These swaps keep the dish rich and creamy without dairy. Yes, you can use fresh tomatoes. Start with about 2 cups of chopped fresh tomatoes. You may want to cook them a bit longer to break them down. Remove skins if you prefer a smoother sauce. Add a pinch of sugar to balance acidity. This pasta pairs well with a simple green salad or garlic bread. A side of roasted vegetables adds color and flavor. You can also serve it with a light soup for a complete meal. This blog post covered delicious creamy tomato pasta, from main ingredients to storage tips. You learned how to choose pasta, create a rich sauce, and add flavor. I offered options for different diets, like vegan or gluten-free. Remember, cooking is fun. Feel free to experiment with ingredients. Use my tips for the best results. With practice, you'll master this dish and impress your family and friends. Now, it’s time to cook and enjoy your tasty creation!

Creamy Tomato Twenty Minute Pasta Simple and Quick Meal

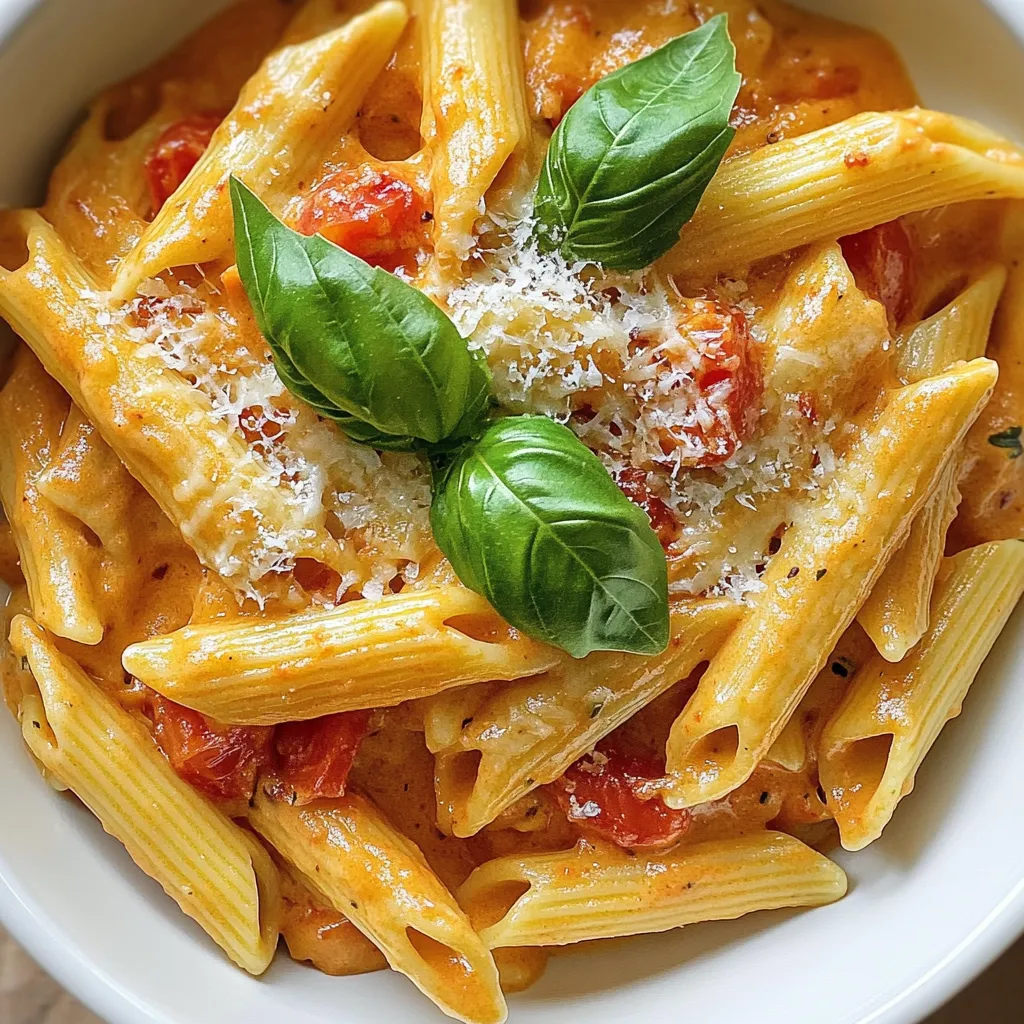
Looking for a quick and tasty dinner? Try my Creamy Tomato Twenty Minute Pasta! This dish is simple, using just

Older posts
Newer posts
← Previous Page1 … Page160 Page161 Page162 … Page164 Next →

dsad

© 2026 easycookingbite • Built with GeneratePress

Our Policies

  • Copyright Policy
  • Cookie Policy
  • GDPR Policy
  • Privacy Policy
  • Disclaimer
  • Terms Of Use

More Information

  • Home
  • About
  • Contact
  • Appetizers
  • Dessert
  • Dinner
  • Drinks
©2026, easycookingbite About Back To Top