Skip to content
DisclaimerTerms Of UseGDPR PolicyCookie Policy

easycookingbite

  • Home
  • Drinks
  • Appetizers
  • Dinner
  • Dessert
  • About
  • Contact
  • Privacy Policy
DisclaimerTerms Of UseGDPR PolicyCookie Policy

Lily

You need 2 cups of fresh spinach for this recipe. Make sure to wash it well. Finely chop the spinach before adding it to the mix. Fresh spinach adds a bright color and a mild taste. It also packs a punch of nutrients. This leafy green is rich in vitamins A and C. For a creamy filling, use 1 cup of ricotta cheese. Ricotta gives a lovely texture and flavor. You will also need 1/2 cup of grated Parmesan cheese. Parmesan adds a sharp taste that balances the dish. Together, these cheeses create a rich, cheesy filling that melts in your mouth. You will need a few simple seasonings. Add 1/2 teaspoon of garlic powder for a hint of spice. A pinch of nutmeg, about 1/4 teaspoon, gives a warm flavor. Don't forget to add salt and pepper to taste. You will also need 1 tablespoon of olive oil for cooking. Finally, use 1 cup of all-purpose flour to help form the dough. Add an egg to bind everything together. For serving, prepare 1 cup of marinara sauce. This sauce brings the whole dish together with its rich, tangy flavor. {{ingredient_image_1}} To start, gather your ingredients. I love using fresh spinach for its flavor and nutrition. In a large mixing bowl, add 2 cups of finely chopped spinach. Next, mix in 1 cup of ricotta cheese and 1/2 cup of grated Parmesan cheese. For added flavor, sprinkle in 1/2 teaspoon of garlic powder and 1/4 teaspoon of nutmeg. Season with salt and pepper to taste. Use a fork to blend everything together until it is well combined. Once your filling looks good, sprinkle some flour on a clean surface. Turn your spinach mixture out onto the flour. Then, add 1 beaten egg to the bowl. Knead the dough gently until it becomes soft. If it feels sticky, add a bit more flour until it is manageable. This dough should be smooth, but not too dry. Now it’s time to shape the dumplings! Divide your dough into small portions. Roll each piece into a thin circle, about 2-3 inches wide. Place a teaspoon of the spinach and cheese filling in the center of each circle. Be careful not to overfill. Fold the dumpling over the filling, creating a half-moon shape. Pinch the edges firmly to seal them. Make sure there are no air pockets inside. This step is key for keeping the filling in while cooking. You have a couple of great cooking options for dumplings. First, bring a large pot of salted water to a boil. Once boiling, reduce the heat to a gentle simmer. Drop the dumplings in batches into the water. Cook them for 3-4 minutes, or until they float to the top. This means they are done! Use a slotted spoon to remove them from the water. For extra flavor, heat 1 tablespoon of olive oil in a skillet over medium heat. Gently sauté the boiled dumplings until they are lightly golden on both sides, about 2-3 minutes. This adds a nice texture. Serve them hot, drizzled with warm marinara sauce for a delicious finish. Enjoy your tasty spinach dumplings! To get the best dough, start with the right balance. Use one cup of all-purpose flour for every two cups of spinach. If the dough feels sticky, add a little more flour. It should feel soft but not wet. Knead gently to keep the dough light. This step is key for fluffy dumplings. Sealing the dumplings well is crucial. After placing the filling in the dough circle, fold it carefully. Pinch the edges tightly to keep the filling inside. Make sure no air pockets remain. If air gets trapped, the dumpling can burst while cooking. A good seal ensures tasty bites every time. When cooking, bring a large pot of salted water to a boil. Lower the heat to a gentle simmer before adding the dumplings. This helps them cook evenly. Cook them for about 3-4 minutes. Look for them to float to the top. That’s when you know they’re ready. After boiling, sauté them in olive oil for a golden finish. Enjoy them hot with marinara sauce! Pro Tips Fresh Spinach is Key: Use fresh spinach for the best flavor and texture. Frozen spinach can work, but it often contains excess water, which can make your dumplings soggy. Don't Overwork the Dough: Knead the dough just until it comes together. Over-kneading can lead to tough dumplings. Sealing the Dumplings: Ensure the edges of the dumplings are sealed tightly to prevent them from opening during cooking. Using a little water on your fingers can help with sealing. Perfect Cooking Time: Dumplings are done when they float to the top of the water. Cooking them longer can make them mushy, so keep an eye on them! {{image_2}} To make spinach and fetta dumplings, swap ricotta for feta cheese. Fetta adds a salty, tangy flavor. Use the same amount of feta as ricotta. Mix it with spinach and Parmesan. This change gives a unique taste. You can also add a squeeze of lemon juice for brightness. These dumplings will take you on a flavor trip! For a vegan version, skip the egg and cheese. Use silken tofu instead of ricotta. Blend it until smooth. Add nutritional yeast for a cheesy flavor. This keeps the dumpling texture soft and creamy. Replace Parmesan with a vegan cheese or simply leave it out. You can still enjoy the same great taste! Herbs and spices can elevate your dumplings. Try adding fresh herbs like basil or parsley. Chop them finely and mix into the dough. You can also use a pinch of red pepper flakes for heat. Experiment with different spices, like cumin or coriander, to add depth. The possibilities are endless! You can store cooked spinach dumplings in the fridge. Place them in an airtight container. They will stay fresh for about three days. If you plan to eat them later, keep them separate from any sauce. This helps prevent sogginess. Freezing is a great option for spinach dumplings. After cooking, let them cool completely. Arrange them in a single layer on a baking sheet. Freeze until solid, then transfer them to a freezer bag. They can last up to three months in the freezer. Just remember to label the bag with the date. Reheating spinach dumplings is simple. For best results, use the oven or a skillet. Preheat your oven to 350°F (175°C). Place the dumplings on a baking sheet and heat for about 10 minutes. If using a skillet, add a little olive oil. Heat over medium heat, turning gently until warm. Avoid using the microwave, as it may make them soggy. You can use cottage cheese as a good substitute for ricotta. It has a similar texture but is less creamy. You can also try cream cheese, which adds richness. If you want a dairy-free option, use silken tofu. Blend it until smooth for the best results. Each substitute will change the flavor slightly, but they will all work well. Spinach dumplings can last in the fridge for about three days. Keep them in an airtight container to maintain freshness. You can also freeze them for up to three months. Make sure to cook them before freezing. They taste great even after freezing, but the texture may change slightly. Yes, you can make the dough ahead of time. Prepare it and wrap it in plastic wrap. Store it in the fridge for up to one day. If you plan to keep it longer, freeze the dough. Just remember to thaw it completely before using. This makes it easier to roll and shape your dumplings. We explored making delicious spinach dumplings today. Fresh spinach, cheese, and the right seasonings create a tasty filling. I showed you how to mix, shape, and cook these dumplings step-by-step. We also discussed tips for smooth dough and sealing. You learned about tasty variations and how to store leftovers. With these great ideas, you can make dumplings that suit your taste. Enjoy your cooking, and remember to have fun experimenting!

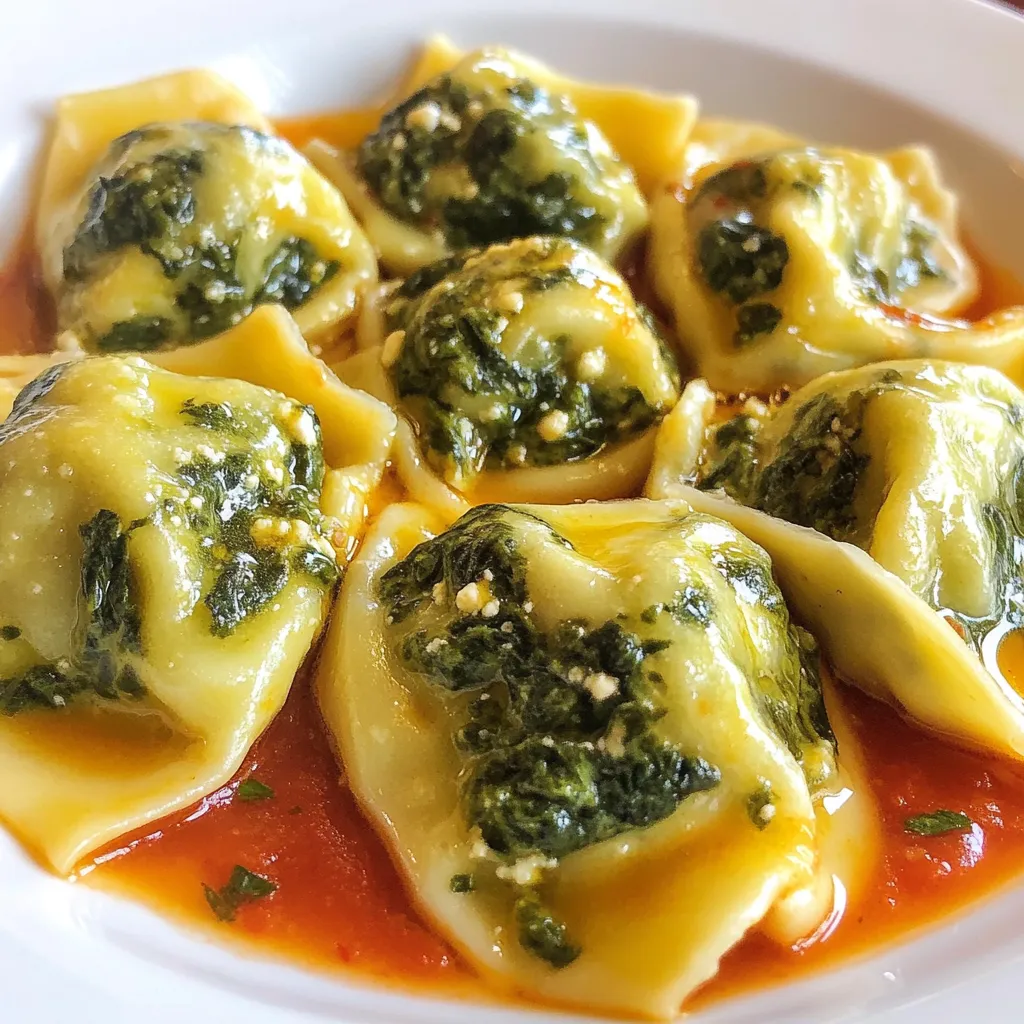
Spinach Dumplings Delightful and Easy Recipe

Are you ready to whip up some delicious spinach dumplings? This delightful and easy recipe will help you serve a

To make a rich and flavorful mushroom lasagna, you will need the following ingredients: - 9 lasagna noodles - 3 tablespoons olive oil - 1 onion, finely chopped - 3 cloves garlic, minced - 500g mixed mushrooms, sliced (cremini, shiitake, button) - 2 cups spinach leaves, roughly chopped - 1 teaspoon dried thyme - 1 teaspoon dried oregano - Salt and pepper to taste - 2 cups ricotta cheese - 1 egg - 3 cups shredded mozzarella cheese - 1 cup grated Parmesan cheese - 2 cups marinara sauce You can easily swap some ingredients for others. Here are some suggestions: - Lasagna noodles: Use no-boil noodles to save time. - Mushrooms: Try other types like portobello or oyster mushrooms for a unique taste. - Ricotta cheese: Cottage cheese can work in a pinch, though it changes texture. - Spinach: Kale or Swiss chard can add a different flavor. - Cheese: Use a mix of cheeses like gouda or fontina for extra richness. Picking the best ingredients makes a big difference. Here are my tips: - Mushrooms: Look for firm, plump mushrooms. They should be dry and not slimy. - Spinach: Choose bright green leaves without brown spots. Fresh spinach tastes better. - Onions and Garlic: Pick onions that feel heavy for their size. Garlic should be firm with no sprouts. - Cheese: Buy cheese from a store with a good reputation for quality. Fresh cheese adds flavor. Using fresh ingredients enhances the taste and texture of your mushroom lasagna. Enjoy your cooking! {{ingredient_image_1}} To start, bring a large pot of salted water to a boil. Add the lasagna noodles and cook them until they are al dente. This usually takes about 8 to 10 minutes. Stir the noodles occasionally to prevent them from sticking. Once cooked, drain the noodles and lay them flat on a clean kitchen towel. This keeps them from sticking together while you prepare the rest of the dish. Next, heat 3 tablespoons of olive oil in a large skillet over medium heat. Add 1 finely chopped onion and 3 minced garlic cloves. Sauté until the onion is soft and translucent, which takes around 3 to 4 minutes. Now, add 500g of sliced mixed mushrooms. Cook them for about 5 to 7 minutes until they are tender and nicely browned. Then, stir in 2 cups of roughly chopped spinach, 1 teaspoon of dried thyme, and 1 teaspoon of dried oregano. Season with salt and pepper to taste. Cook until the spinach wilts, which should take about 2 minutes. Remove from heat and let this mixture cool slightly. In a medium mixing bowl, combine 2 cups of ricotta cheese, 1 egg, and a pinch of salt and pepper. Mix well until the mixture is smooth. This creamy layer adds richness to the lasagna, making each bite delicious. Preheat your oven to 375°F (190°C). Grease a 9x13 inch baking dish. Start by spreading a thin layer of marinara sauce on the bottom. Place three lasagna noodles over the sauce. Then, spread half of the ricotta mixture over the noodles. Follow this with half of the sautéed mushroom mixture and sprinkle with 1 cup of shredded mozzarella cheese. Repeat this process with three more noodles, the remaining ricotta, and mushroom mixture. Add another cup of mozzarella cheese. For the final layer, place the last three noodles on top, cover with marinara sauce, and sprinkle the remaining mozzarella and 1 cup of grated Parmesan cheese. Cover the baking dish with aluminum foil. To prevent sticking, spray the foil with cooking spray. Bake the lasagna in the preheated oven for 25 minutes. After that, remove the foil and bake for another 15 to 20 minutes. The cheese should be bubbly and golden brown. Allow the lasagna to cool for 10-15 minutes before slicing. This helps the layers set, making it easier to serve. Enjoy your mushroom lasagna! To keep your lasagna noodles from sticking, do a few simple steps. First, boil your noodles in salted water until they are al dente. This means they should be firm to the bite. After cooking, drain the noodles and lay them flat on a clean kitchen towel. This helps them cool and keeps them from sticking together. If you are worried, you can also drizzle a bit of olive oil over them. This adds flavor and keeps them separate. For the best cheese melt in your lasagna, use a mix of cheeses. I like to use ricotta, mozzarella, and Parmesan. Each cheese has its own melting properties. When you layer your cheeses, start with a layer of mozzarella on top. This creates a nice golden crust. Cover the dish with foil in the first half of baking. This helps steam the cheese and keeps it moist. Remove the foil in the last 15-20 minutes to let that cheese get bubbly and brown. Herbs and spices can make your mushroom lasagna pop with flavor. I use dried thyme and oregano for a savory base. You can add fresh herbs like basil or parsley for a burst of freshness. A pinch of red pepper flakes can add a bit of heat. Taste your filling before layering. Adjust the salt and pepper to make sure it is just right. These small tweaks can turn a good dish into a great one! Pro Tips Use Fresh Mushrooms: For the best flavor and texture, opt for fresh mushrooms rather than canned. Varieties like shiitake and cremini add a rich, earthy taste. Layer Wisely: Ensure even distribution of ingredients in each layer to avoid dry spots. Spread sauces and cheese evenly for a balanced bite. Let It Rest: Allow the lasagna to cool for at least 10-15 minutes before slicing. This helps the layers set and makes serving easier. Experiment with Cheeses: Feel free to mix different cheeses like goat cheese or fontina for unique flavor profiles and added creaminess. {{image_2}} Mushroom lasagna shines as a vegetarian dish. You can use a variety of mushrooms to boost flavor. Try cremini, shiitake, or portobello. You can also add veggies like zucchini, bell peppers, or eggplant. Each adds a new taste and texture. The key is to sauté your veggies well, letting them soften and release their flavors. For those who enjoy meat, adding protein can enhance the dish. Cooked chicken or sausage works well. Sauté your protein with the mushrooms for great flavor. Ground sausage adds a nice spice, while chicken adds a mild taste. Make sure to season well. This option allows everyone to enjoy their favorite flavors in this dish. If you need a gluten-free option, choose gluten-free lasagna noodles. They are now widely available at many stores. You can also use thin slices of zucchini or eggplant as a noodle substitute. They add a fresh taste and lower carbs. Just ensure to dry them well before layering. This way, you keep your lasagna from becoming too watery. After enjoying your mushroom lasagna, you may have some leftovers. To store, first let the lasagna cool completely. Next, cover it tightly with plastic wrap or aluminum foil. You can also place it in an airtight container. This keeps the flavors fresh and prevents drying. Store the lasagna in the fridge for up to three days. Freezing is a great option if you want to save your mushroom lasagna for later. First, cool the lasagna completely. Cut it into portions for easy serving. Wrap each piece with plastic wrap, then place them in a freezer-safe bag or container. Make sure to remove as much air as possible. This method helps avoid freezer burn. Your lasagna can last in the freezer for about three months. When you're ready to enjoy your frozen or refrigerated lasagna, reheating it right is key. For frozen lasagna, thaw it in the fridge overnight. If you’re in a hurry, you can use the microwave. Heat in short bursts, checking frequently. For best results, reheat in the oven at 350°F (175°C). Cover with foil to keep it moist. Heat for about 20-30 minutes if chilled, or 45-60 minutes if frozen. Remove the foil in the last 10 minutes to crisp the cheese. Enjoy your warm, gooey lasagna! You can use many types of mushrooms in your lasagna. I love using cremini, shiitake, and button mushrooms. Each type has its own flavor. Combining them adds depth to the dish. You can also try portobello for a meatier taste. Remember to slice them thin for even cooking. Yes, you can make mushroom lasagna ahead of time. Prepare it the day before and store it in the fridge. Just cover it tightly with foil. When you are ready to bake, let it sit at room temperature for 30 minutes. This helps it cook evenly. Bake it according to the usual instructions. To keep your lasagna from falling apart, let it cool for 10-15 minutes after baking. This allows the layers to set. Use a sharp knife for clean slices. Cut gently to avoid disturbing the layers. You can also use a spatula to help lift the pieces. Mushroom lasagna pairs well with a crisp green salad. A simple mix of greens, tomatoes, and a light dressing works best. You can also serve garlic bread on the side. It adds a nice crunch and is perfect for dipping in sauce. For a heartier meal, consider a side of roasted vegetables. This article covered everything you need to make a great mushroom lasagna. We talked about key ingredients, substitutions, and how to pick fresh ones. You learned the step-by-step cooking process and some helpful tips to avoid sticking and melt cheese perfectly. We explored variations like vegetarian options and gluten-free alternatives. In the end, a homemade mushroom lasagna is not just a meal; it's art. Each bite brings joy and comfort. Enjoy your cooking journey and the delicious results!

Mushroom Lasagna Rich and Flavorful Comfort Dish

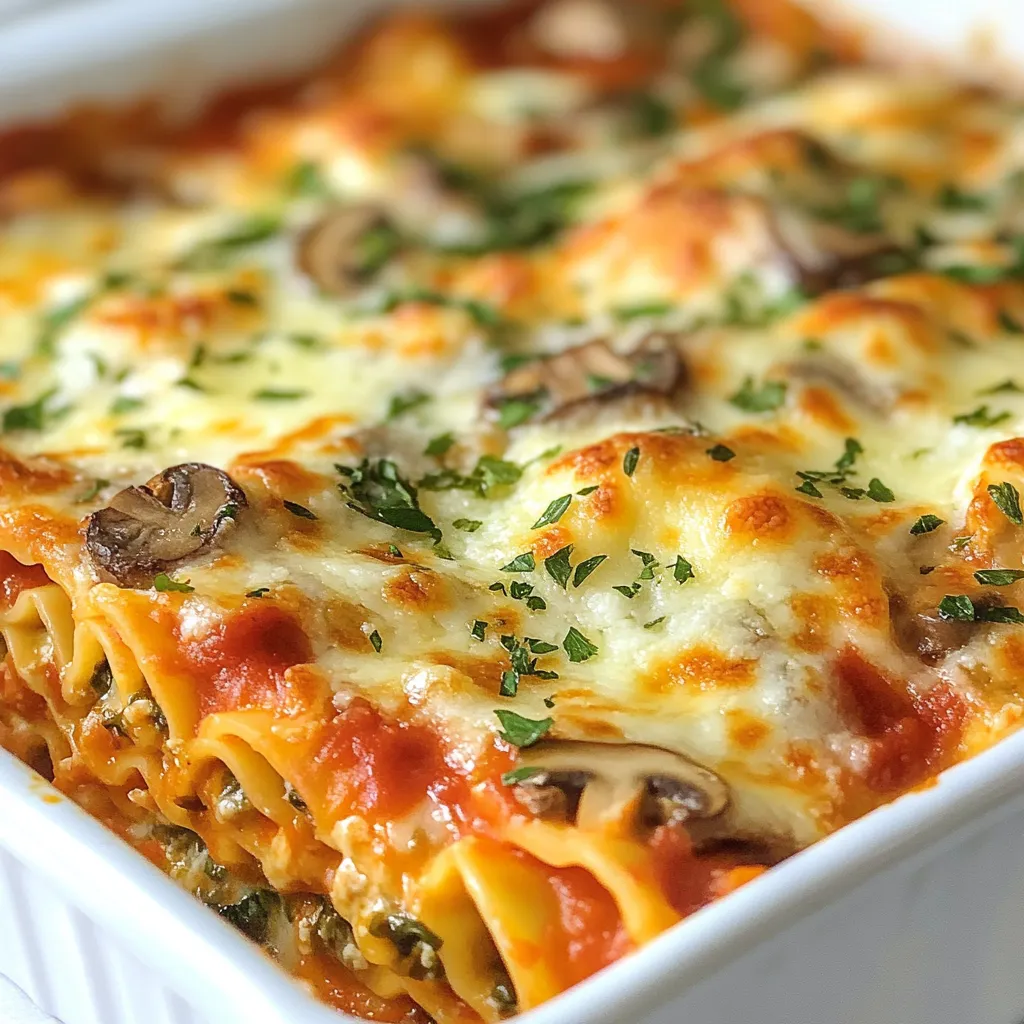
If you’re seeking a dish that’s both rich and comforting, look no further than mushroom lasagna. This hearty meal brings

- 4 boneless, skinless chicken breasts - 1/2 cup unsalted butter - 2 tablespoons olive oil - 4 cloves garlic, minced - Zest and juice of 2 lemons - 1 tablespoon fresh thyme leaves (or 1 teaspoon dried thyme) - 1 teaspoon honey - Salt and pepper to taste - Fresh parsley, chopped (for garnish) - Lemon slices (for garnish) To make Lemon Butter Chicken, you need fresh and simple ingredients. Chicken breasts are the star of the dish. I always choose boneless and skinless for easy cooking. The butter adds richness, while olive oil helps with frying. Garlic gives a great flavor, and lemons add brightness. Herbs like thyme enhance the taste. Honey adds a hint of sweetness. Don’t forget salt and pepper to bring out the flavors. For garnishing, fresh parsley and lemon slices make your dish look lovely. Each ingredient plays a key role in creating a delicious meal. You can find most of these items in your kitchen or local store. {{ingredient_image_1}} Seasoning the Chicken Start with four boneless, skinless chicken breasts. Sprinkle salt and pepper on both sides. This adds flavor to your chicken. Cooking Chicken in Skillet Heat a large skillet over medium heat. Add two tablespoons of olive oil. Melt a quarter cup of unsalted butter in the skillet. Once hot, add the seasoned chicken breasts. Cook for about six to seven minutes on each side. You want them golden brown and cooked through. When done, remove the chicken from the skillet and set it aside. Sautéing Garlic In the same skillet, add four minced garlic cloves. Sauté the garlic for about 30 seconds. You want it to smell fragrant, not burnt. Combining Lemon Juice and Zest Next, pour in the zest and juice of two lemons. Stir well to combine the flavors. The lemon adds a bright taste to your dish. Adding Honey and Thyme Now, add one teaspoon of honey and one tablespoon of fresh thyme leaves. Mix everything well. These ingredients balance the acidity of the lemon. Basting Chicken with Sauce Reduce the heat to low. Return the chicken to the skillet. Add the remaining quarter cup of butter. Let the chicken cook in the sauce for another two to three minutes. Baste the chicken with the sauce as it melts. This makes the chicken rich and flavorful. Once fully coated, remove from heat. Ensuring Even Cooking To ensure even cooking, start with chicken at room temperature. This helps it cook more evenly. Season both sides of the chicken breasts with salt and pepper. This adds flavor and helps with browning. Use a meat thermometer to check for doneness. Chicken should reach 165°F for safety. Achieving Golden Brown Color For a beautiful golden color, use medium heat. Too high heat can burn the chicken. Let the chicken cook undisturbed for about 6-7 minutes before flipping. This allows a nice crust to form. If needed, add more butter to the skillet for extra flavor and color. Ideal Side Dishes Serve Lemon Butter Chicken with sides that complement its bright flavors. Steamed vegetables like broccoli, green beans, or carrots work well. A fresh salad with lemon vinaigrette adds a nice crunch. Mashed potatoes or rice soak up the delicious lemon butter sauce. Presentation Tips Presentation matters! Serve the chicken on a clean plate. Drizzle extra lemon butter sauce over the chicken for a shiny finish. Add fresh parsley and lemon slices for color. This makes the dish look inviting and fresh. Enjoy your meal! Pro Tips Use Fresh Ingredients: Fresh lemons and herbs will enhance the flavor of the dish significantly compared to dried alternatives. Don't Overcook the Chicken: To keep the chicken juicy, aim for an internal temperature of 165°F (75°C) and avoid cooking it too long. Baste for Extra Flavor: Continuously spoon the lemon butter sauce over the chicken while it cooks for a more intense flavor. Perfect Pairings: This dish pairs well with rice, quinoa, or a fresh salad to balance the richness of the butter sauce. {{image_2}} Adding Different Herbs You can change the taste by using different herbs. For example, try rosemary or oregano. Both add a unique twist to the dish. You can also mix fresh and dried herbs for more depth. Fresh basil gives a nice pop of flavor too. Each herb brings its own charm to the lemon butter chicken. Incorporating Other Ingredients Feel free to get creative with other ingredients. Adding capers can give a salty punch. Sun-dried tomatoes add sweetness and color. You can even toss in some spinach for a healthy boost. These additions make the dish more vibrant and tasty. Gluten-Free Options This recipe is naturally gluten-free. Just ensure that all ingredients, like the butter and honey, are gluten-free. You can serve it with quinoa or rice for a complete meal. Both options pair well without adding gluten. Dairy-Free Variants If you need a dairy-free version, swap the butter for a plant-based alternative. Coconut oil works great and adds a hint of sweetness. You can also use a blend of olive oil and vegan butter for a rich flavor. This way, everyone can enjoy lemon butter chicken! Refrigeration Guidelines Store leftover lemon butter chicken in an airtight container. Place it in the fridge within two hours of cooking. This helps keep the chicken fresh. It will last for about three to four days. Make sure to keep the sauce with the chicken to maintain flavor and moisture. Freezing Tips To freeze, let the chicken cool completely. Then, pack it in freezer-safe bags or containers. Remove as much air as possible before sealing. This helps prevent freezer burn. You can freeze the chicken for up to three months. When ready to eat, simply thaw it in the fridge overnight before reheating. Microwave versus Stovetop You can reheat lemon butter chicken in the microwave. Place it on a microwave-safe plate. Cover it loosely with a paper towel. Heat for two to three minutes, checking halfway through. This method is quick but may dry out the chicken. For better flavor, I recommend reheating on the stovetop. Place the chicken in a skillet over low heat. Add a splash of chicken broth or water to keep it moist. Cook for about five to seven minutes, turning occasionally. This method helps restore the sauce's texture and taste. Can I use chicken thighs instead of breasts? Yes, you can use chicken thighs. They stay juicy and tender. Thighs add great flavor too. Just adjust cooking time to ensure they cook through. How do I make the sauce thicker? To thicken the sauce, add a bit of cornstarch mixed with water. Stir it in slowly. Let it simmer for a few minutes. This method will give you a nice, rich sauce. What can I serve with Lemon Butter Chicken? You can serve this dish with rice or pasta. Steamed veggies or a fresh salad work well, too. These sides soak up the tasty sauce, making every bite perfect. How long can I store leftovers? Store leftovers in an airtight container. They will last in the fridge for about three days. For longer storage, freeze them for up to three months. Just reheat when ready to eat! You now have a clear guide to making Lemon Butter Chicken. This dish needs just a few simple ingredients like chicken, garlic, and herbs. I shared tips for cooking and serving, plus fun variations to try. Use these steps to create a meal that impresses. Remember, you can adjust flavors to fit your taste. Enjoy this recipe, and make it your own. Keep it fresh, and you'll always have a winner on your table.

Lemon Butter Chicken Delightfully Simple Recipe

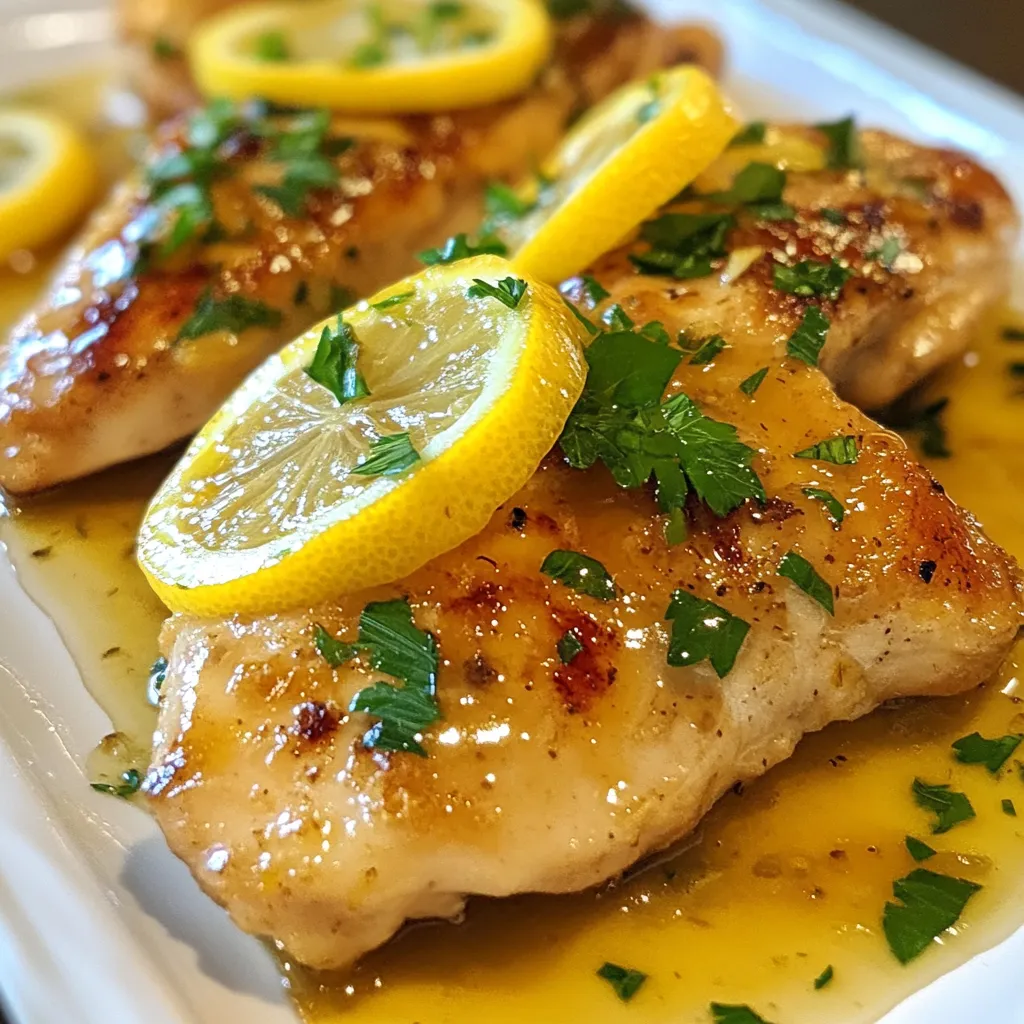
Welcome to a tasty adventure! If you’re looking for a new dinner idea, try my Lemon Butter Chicken. It’s simple,

- 2 salmon fillets (about 6 oz each) - 2 tablespoons honey - 2 tablespoons sriracha sauce - 2 teaspoons soy sauce - 1 teaspoon sesame oil For this dish, the star is the salmon. I love using fresh salmon fillets because they cook quickly and taste great. The honey and sriracha sauce create a sweet and spicy flavor that is simply amazing. Soy sauce adds a savory touch, while sesame oil gives it a nutty flavor. - 1 cup cooked brown rice - 1 cup steamed broccoli florets - 1/2 cup shredded carrots - 1/4 cup edamame (shelled) - 2 green onions, finely sliced - Sesame seeds for garnish - Lime wedges for serving Brown rice acts as a hearty base for the bowls. I enjoy adding steamed broccoli, shredded carrots, and edamame for color and crunch. These veggies bring vitamins and flavor to the meal. Green onions and sesame seeds make for perfect toppings, while lime adds a fresh zing! {{ingredient_image_1}} - Prepare the Marinade In a small bowl, mix honey, sriracha, soy sauce, and sesame oil. Whisk until smooth. This marinade adds a sweet and spicy kick to the salmon. - Coat Salmon and Marinate Take two salmon fillets and place them in a shallow dish. Pour the marinade over the salmon, covering it well. Cover the dish and let it sit in the fridge for at least 20 minutes. This time allows the salmon to soak up all those great flavors. - Grilling Instructions Preheat your grill to medium-high heat. Place the marinated salmon on the grill and cook for about 4-5 minutes per side. When done, the salmon should flake easily with a fork. - Broiling Instructions If you prefer broiling, preheat your oven's broiler. Line a baking sheet with parchment paper. Place the salmon on the sheet and broil for about 6-7 minutes. Keep an eye on it to avoid burning. - Cooking Brown Rice If you haven’t cooked brown rice yet, follow the package instructions. Usually, it takes about 30-40 minutes to cook. The rice serves as a hearty base for your bowl. - Steaming Broccoli While the salmon cooks, steam the broccoli florets for about 5 minutes. They should become bright green and tender. This veggie adds color and crunch to your meal. - Layering Ingredients Start with a layer of cooked brown rice in each bowl. Then, add the steamed broccoli, shredded carrots, and shelled edamame on top of the rice. - Placing Salmon on Top Once the salmon is cooked, place each fillet on top of the veggies and rice. This creates a beautiful and vibrant bowl. - Garnishing with Green Onions and Sesame Seeds Finish your bowls by sprinkling sliced green onions and sesame seeds over the salmon. This adds an extra layer of flavor and a nice crunch. - Serving Suggestions with Lime Serve each bowl with lime wedges on the side. A squeeze of lime adds a fresh, zesty taste that brightens the dish. Cooking Times for Salmon Cooking salmon perfectly is key. For grilling, aim for 4-5 minutes per side. If you broil, it takes about 6-7 minutes. The salmon should flake easily with a fork when done. Keep an eye on it to avoid overcooking. Marination Tips Marinating salmon is simple and adds great flavor. Mix honey, sriracha, soy sauce, and sesame oil in a bowl. Coat your salmon fillets well. Let them sit for at least 20 minutes in the fridge. This helps the flavors soak in deeply. Recommended Seasonings While the marinade is great, you can add more flavor. Try garlic powder or ginger for a spicy kick. A dash of black pepper can also enhance the taste. Don’t be afraid to experiment with flavors you enjoy! Additional Topping Ideas Toppings can make this dish special. Consider adding sliced avocado for creaminess. A handful of fresh cilantro adds a nice touch too. You can also sprinkle crushed peanuts for extra crunch. Lime wedges are perfect for a zesty finish. Prepping Ingredients Ahead To save time, prep your ingredients. Cook the brown rice in advance and store it in the fridge. You can also chop vegetables ahead of time. This makes assembly quick and easy on busy nights. Storage Tips for Leftovers If you have leftovers, store them well. Use airtight containers to keep the salmon and veggies fresh. They can last in the fridge for up to three days. When reheating, do it gently to keep the salmon moist and tasty. Pro Tips Marination Time: Allow the salmon to marinate for at least 20 minutes, but for even more flavor, consider marinating it for up to an hour. This enhances the taste and tenderness of the fish. Cooking Method: Whether grilling or broiling, ensure that the salmon is cooked to an internal temperature of 145°F (63°C) for optimal taste and safety. Use a food thermometer for accuracy. Vegetable Variations: Feel free to mix in other vegetables like bell peppers or snap peas for added color and nutrition. Just ensure they are cooked to your liking. Serving Suggestion: Squeeze fresh lime juice over the assembled bowls just before serving. It brightens the flavors and adds a refreshing zest to the dish. {{image_2}} You can switch the salmon for chicken or tofu. Both options work great. For chicken, use boneless breast fillets. Marinate and cook just like the salmon. For tofu, use firm or extra-firm tofu. Press it to remove water, then cut it into cubes. Marinate and bake or fry until golden. Both proteins soak up the honey sriracha sauce well. If you want a vegetarian bowl, tofu is a top choice. You can also use tempeh or seitan. These options have good texture and flavor. Marinate them the same way. Follow the same cooking method for best results. You can even add chickpeas for extra protein. If you want a different base, try quinoa. It cooks fast and has a nice nutty taste. Just rinse it and follow package instructions. Cauliflower rice is another great choice. It’s low in carbs and cooks quickly. Just sauté it for a few minutes. Want to mix it up? Use white rice for a softer bite. Jasmine or basmati rice adds a fragrant touch. You could also try wild rice. It has a chewier texture and looks lovely in the bowl. Change up your veggies based on what’s in season. In spring, use asparagus or snap peas. In summer, add bell peppers or zucchini. Fall brings in squash or sweet potatoes. Winter is perfect for Brussels sprouts or kale. Think about adding fresh herbs too. Cilantro or basil can add a burst of flavor. You can also add sliced avocados for creaminess. This can make the bowl even tastier and more colorful. - Refrigeration Guidelines: Store leftover salmon bowls in an airtight container. They can last 2-3 days in the fridge. Keep the salmon and vegetables separate from the rice if possible. This helps maintain texture. - Freezing Instructions: If you want to freeze, place the salmon and veggies in a freezer-safe bag. They can last up to 2 months. Cooked rice can also be frozen. Just make sure to cool it completely before sealing. - Best Methods for Reheating Salmon: The oven is great for reheating salmon. Preheat it to 350°F and bake for about 10-15 minutes. You can also use a microwave, but do it in short bursts to avoid drying out the fish. - Keeping Vegetables Fresh: Reheat veggies quickly in a pan with a little water. This helps steam them without making them mushy. You can also serve them cold if you prefer. You should marinate the salmon for at least 20 minutes. This time allows the flavors to soak in. For a stronger taste, you can marinate it for up to 1 hour. Just keep it in the fridge. Yes, you can use other sauces if you prefer. Try using chili garlic sauce for heat. You can also use sweet chili sauce for a milder taste. Just remember to adjust the sweetness to match the honey. You can serve many side dishes with salmon bowls. Some good choices include: - Steamed green beans - Roasted sweet potatoes - A simple green salad These sides pair well with the flavors of the salmon bowls. This recipe can be made gluten-free. Use gluten-free soy sauce instead of regular soy sauce. Check all labels for hidden gluten in sauces and toppings to ensure they are gluten-free. Yes, you can make parts of this recipe ahead of time. Cook the rice and steam the veggies earlier in the day. You can also marinate the salmon and store it in the fridge. Just cook the salmon fresh when you are ready to eat. In this post, we explored how to make delicious honey sriracha salmon bowls. We covered the essential ingredients like salmon, honey, and sriracha. I shared step-by-step instructions, from marinating to cooking and assembling. You also learned tips to achieve the perfect salmon and some fun variations. These bowls are tasty and easy to customize. Try different proteins or veggies based on your preferences. Enjoy creating your own version of this healthy meal.

Honey Sriracha Salmon Bowls Flavorful and Easy Meal

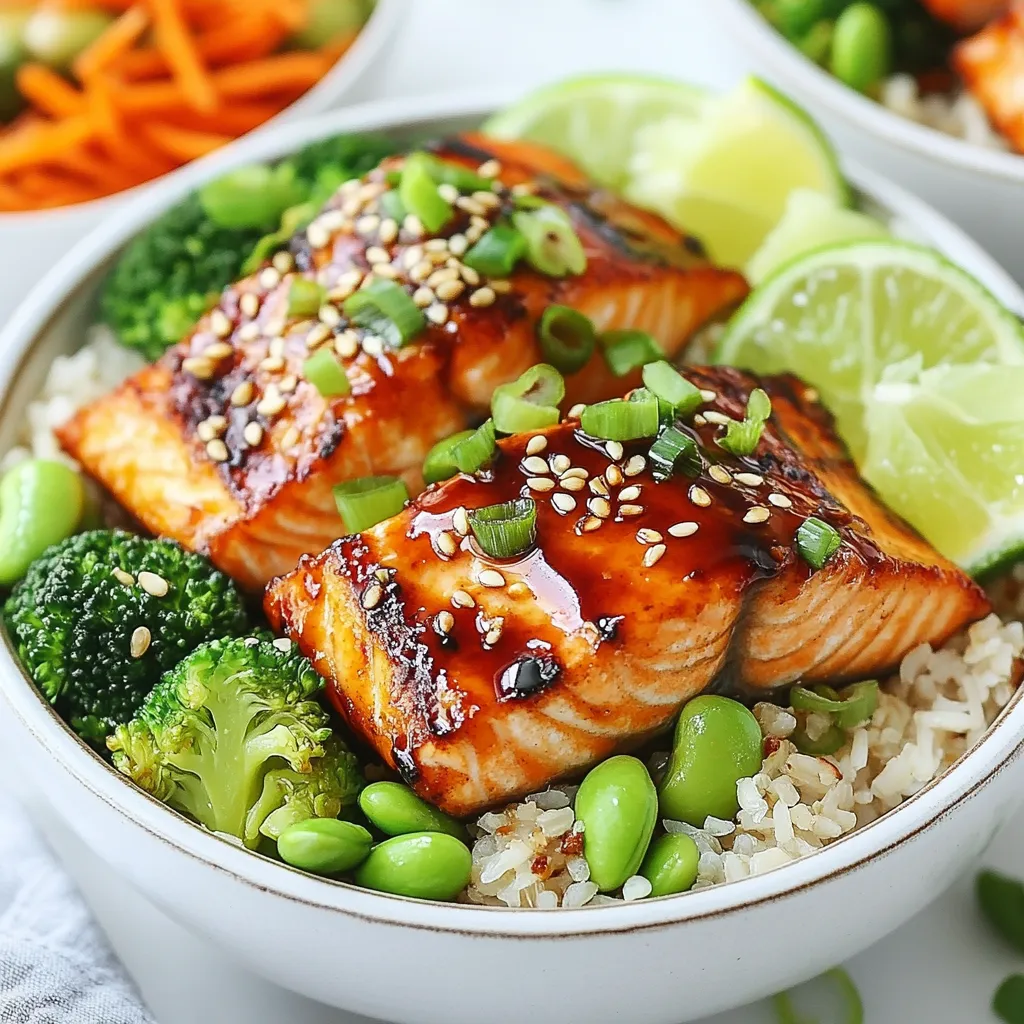
Are you ready for a meal that bursts with flavor and is oh-so-easy to make? Honey Sriracha Salmon Bowls deliver

To make Easy Gnocchi and Tomato Bake, you will need: - 500g store-bought gnocchi - 400g canned diced tomatoes - 1 tablespoon olive oil - 2 cloves garlic, minced - 1 teaspoon dried oregano - 1 teaspoon dried basil - 150g mozzarella cheese, shredded - 50g grated Parmesan cheese - Salt and pepper to taste - Fresh basil leaves for garnish (optional) These ingredients come together to create a warm and comforting dish. You can swap some ingredients for different flavors or dietary needs: - Use fresh tomatoes instead of canned for a brighter taste. - Substitute olive oil with avocado oil for a different flavor. - If you don’t have mozzarella, try using cheddar cheese. - For a dairy-free option, you can use vegan cheese. - Fresh herbs can replace dried ones; just use a bit more of them. These changes allow you to customize the dish while keeping it delicious. When choosing ingredients, freshness makes a big difference: - Look for gnocchi that feels firm and not mushy. - Choose canned tomatoes that have no added sugars or preservatives. - Select garlic that is firm and has no sprouting. - Fresh basil should be vibrant green and not wilted. - For cheese, seek out blocks instead of pre-shredded for better melting. Selecting fresh ingredients will elevate your Easy Gnocchi and Tomato Bake to new heights. {{ingredient_image_1}} First, you need to get your oven ready. Preheat it to 200°C (400°F). This step is key for cooking the dish evenly. While the oven heats, take a large baking dish. You can use glass or ceramic. Make sure it is big enough for the gnocchi and sauce. Grab a large skillet and put it on medium heat. Add one tablespoon of olive oil. Let it heat for a moment. Now, add two minced garlic cloves and stir. Cook it for about one minute until it smells great. Next, pour in 400g of canned diced tomatoes. Add one teaspoon each of dried oregano and dried basil. Don’t forget salt and pepper to taste. Stir everything well and let it simmer for about five minutes. This will blend the flavors nicely. Now, it's time to bring it all together. In your large baking dish, add 500g of cooked gnocchi. Pour the tomato sauce over the gnocchi. Stir gently to coat the gnocchi well. After that, sprinkle 150g of shredded mozzarella cheese and 50g of grated Parmesan cheese on top. This will create a delicious, cheesy layer. Place the baking dish in the oven. Bake it for about 20 minutes. When it's done, the cheese should be bubbly and golden brown. Let it cool for a couple of minutes, then serve. Enjoy your easy gnocchi and tomato bake! For the best cheese melt, use a mix of mozzarella and Parmesan. Mozzarella gives that stretchy pull, while Parmesan adds a nice crust. Make sure to shred the cheese yourself. Pre-shredded cheese often has anti-caking agents that can affect melting. When you layer cheese on top of the gnocchi, ensure it covers evenly. This helps it melt well and creates a golden top. Bake your dish until the cheese is bubbly and has a light brown color. This will give you that perfect cheese melt. To cook gnocchi just right, always follow the package instructions. Boil water in a large pot and add salt. This adds flavor to the gnocchi. Once the water is boiling, drop the gnocchi gently into the pot. They will sink at first, then float to the top. This floating means they are done! Drain them carefully and add them to the sauce right away. This keeps them tender and prevents sticking. Easy Gnocchi and Tomato Bake pairs well with a fresh salad. A simple green salad with a light vinaigrette balances the dish. You can also add garlic bread for a crunchy side. If you want a protein boost, grilled chicken or sausage complements this meal nicely. For a light touch, garnish with fresh basil leaves. They add color and enhance the flavor. Enjoy your meal with a glass of red wine for a cozy night in. Pro Tips Use Fresh Herbs: Fresh basil can elevate the flavor of this dish significantly. Consider adding some chopped fresh herbs just before serving for a burst of freshness. Cheese Variations: Feel free to mix and match different cheeses. Adding a bit of goat cheese or feta can introduce a tangy flavor that complements the tomatoes beautifully. Make It Spicy: If you enjoy a bit of heat, add a pinch of red pepper flakes to the tomato sauce while it simmers for a spicy kick. Pre-Cook Gnocchi: For a firmer texture, consider lightly boiling the gnocchi before adding them to the sauce. This can help prevent them from becoming too soft during baking. {{image_2}} You can boost nutrition by adding vegetables. Spinach, zucchini, and bell peppers fit well. Chop them small to mix easily. Sauté them with garlic before adding tomatoes. This adds color and flavor. Plus, you sneak in more vitamins and minerals. Want more protein? Chicken or sausage works great. Cook the chicken in the skillet until golden. Slice it and mix it with the gnocchi. If you prefer sausage, slice it thin and brown it first. This adds a hearty touch and keeps you full longer. If you need gluten-free, choose gnocchi made from potatoes or rice. They taste just as good! For a dairy-free option, skip the cheese or use vegan cheese. Nutritional yeast can give a cheesy flavor without the dairy. These swaps help make the dish fit your needs. To keep your gnocchi and tomato bake fresh, store it in an airtight container. Let it cool to room temperature first. This way, it won’t steam and get soggy. Place it in the fridge if you plan to eat it within three days. When you're ready to enjoy the leftovers, preheat your oven to 175°C (350°F). Place the bake in an oven-safe dish. Cover it with foil to prevent drying out. Heat for about 15-20 minutes. Check if it’s hot in the center. You can also reheat it in the microwave. Just use a microwave-safe dish and heat in short intervals, stirring in between. If you want to save it for later, freezing is a great option. First, let the dish cool completely. Then, portion it into smaller containers for easy meals. Wrap each container tightly with plastic wrap or foil. Label them with the date. When you're ready to eat, thaw it overnight in the fridge. Reheat as mentioned above. Freezing keeps the dish good for up to three months. Yes, you can use homemade gnocchi. Fresh gnocchi adds a nice touch. Just remember to cook it briefly before adding it to the dish. This will help it mix well with the sauce. Homemade gnocchi may taste richer than store-bought versions. Your gnocchi and tomato bake will last about three to four days in the fridge. To store it, cover it tightly with plastic wrap or foil. This keeps it fresh and prevents it from drying out. Reheating is easy; just pop it in the oven or microwave. You can serve a simple salad with greens and a light dressing. Garlic bread pairs well too, as it soaks up the sauce. For a heartier meal, add grilled chicken or sautéed vegetables. These options make your meal more balanced and tasty. This blog post covered everything you need for an Easy Gnocchi and Tomato Bake. We talked about the best ingredients, cooking steps, and tips for great results. I shared ideas for variations, including adding protein or vegetables. We also discussed how to store and reheat leftovers. In the end, this dish is fun to make and easy to change. Enjoy your tasty creation and share it with friends!

Easy Gnocchi and Tomato Bake Simple Comfort Dish

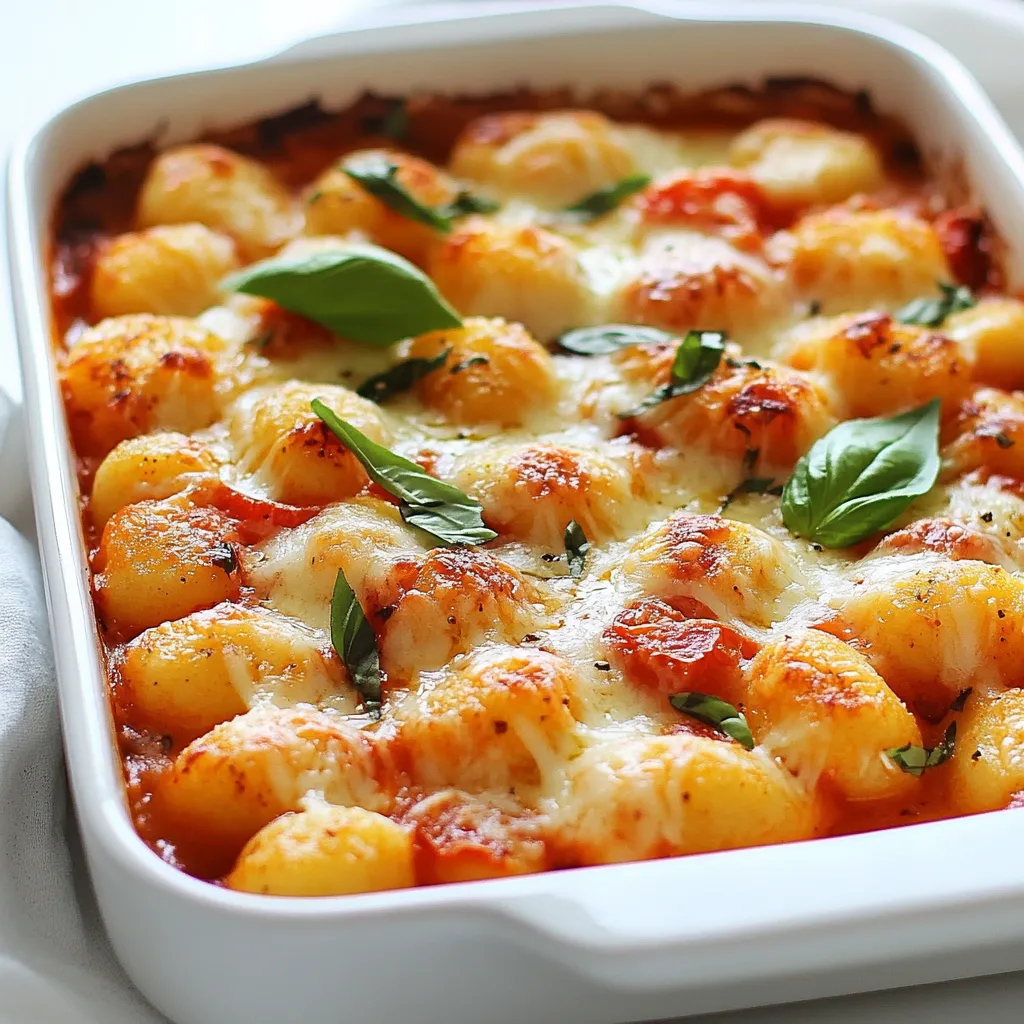
Welcome to your next favorite dish: Easy Gnocchi and Tomato Bake! This simple comfort meal warms the heart and satisfies

To make a tasty Healthy Chicken Veggie Stir Fry, gather these fresh ingredients: - 2 boneless, skinless chicken breasts, sliced thinly - 2 tablespoons olive oil - 1 red bell pepper, sliced - 1 yellow bell pepper, sliced - 1 cup broccoli florets - 1 cup sugar snap peas - 3 cloves garlic, minced - 1 tablespoon fresh ginger, grated - 2 tablespoons low-sodium soy sauce - 1 tablespoon sesame oil - Salt and pepper to taste - 1 teaspoon sesame seeds (for garnish) - Cooked brown rice or quinoa for serving This stir fry offers a balanced meal packed with nutrients. Each serving provides: - Protein from chicken, helping to build and repair tissue. - Fiber from veggies, aiding in digestion and keeping you full. - Healthy fats from olive oil and sesame oil, good for heart health. - Vitamins and minerals from colorful vegetables, boosting your immune system. To keep your ingredients fresh, follow these simple tips: - Choose vibrant, firm vegetables. Look for smooth skin on peppers and bright green broccoli. - Store fresh chicken in the coldest part of your fridge. Use within two days for best taste. - Buy garlic and ginger that feel firm and smell strong. This ensures great flavor in your dish. - If you can, buy organic vegetables. They often have better taste and no harmful chemicals. By using fresh ingredients, you'll create a stir fry that is not only healthy but also bursting with flavor! {{ingredient_image_1}} 1. Gather your ingredients. You need chicken breasts, bell peppers, broccoli, sugar snap peas, garlic, ginger, soy sauce, sesame oil, and olive oil. 2. Slice the chicken. Cut the chicken breasts into thin strips. This helps them cook fast. 3. Chop the veggies. Slice red and yellow bell peppers. Break the broccoli into small florets. This makes them easy to eat. 4. Mince garlic and grate ginger. These add great flavor. Prepare them just before cooking for the best taste. 1. Heat the skillet. In a large skillet or wok, add 1 tablespoon of olive oil. Heat it over medium-high heat. 2. Cook the chicken. Add the sliced chicken to the skillet. Sprinkle with salt and pepper. Cook for about 5-7 minutes. The chicken should be browned and cooked through. Remove it from the skillet and set it aside. 3. Cook the aromatics. In the same skillet, add 1 tablespoon of olive oil. Once hot, add minced garlic and grated ginger. Stir quickly for about 30 seconds until it smells good. 4. Add the veggies. Toss in the sliced bell peppers, broccoli florets, and sugar snap peas. Stir-fry for about 5-6 minutes. The veggies should be tender but still crisp. 5. Mix it all together. Return the chicken to the skillet. Pour in the low-sodium soy sauce and sesame oil. Toss everything together. Cook for another 2-3 minutes until heated through. 6. Taste and adjust. Try a bite and add more salt or pepper if you like it spicier. - Serve on a plate. Place the stir fry over a bed of brown rice or quinoa. This adds a nice base. - Garnish with sesame seeds. Sprinkle 1 teaspoon of sesame seeds on top. This adds a nice crunch and looks pretty. - Add color. Use colorful veggies for a bright and appealing dish. It makes your meal look more inviting. When making a stir fry, avoid these common errors for the best results: - Overcrowding the pan: This makes it hard for the food to cook evenly. Work in batches if needed. - Not prepping ahead: Having your veggies and chicken ready speeds up cooking and keeps it smooth. - Using low heat: Stir frying needs high heat for quick cooking and a nice sear. - Skipping seasoning: Don’t forget salt, pepper, and soy sauce. They boost flavor! To stir-fry like a pro, follow these tips: - Use a large, non-stick skillet or wok: This helps prevent sticking and allows for better heat distribution. - Cook in order: Start with chicken, then add garlic and ginger, followed by veggies. This keeps flavors fresh. - Keep it moving: Stir constantly to avoid burning and ensure even cooking. - Add sauces at the end: This keeps them from burning and makes the dish shine. For a more flavor-packed stir fry, try these ideas: - Experiment with spices: Add crushed red pepper or five-spice powder for a kick. - Use fresh herbs: Cilantro or basil can brighten up the dish. Toss them in right before serving. - Incorporate nuts or seeds: Toasted sesame seeds or cashews add crunch and depth. - Add a splash of citrus: A squeeze of lime or lemon juice brightens flavors and adds freshness. Try these tips to elevate your healthy chicken veggie stir fry. Enjoy the vibrant colors and tastes! Pro Tips Prep Your Ingredients: Having all your ingredients prepped and ready to go makes stir-frying quick and efficient. Don’t Overcrowd the Pan: Cook in batches if necessary to ensure your chicken and vegetables sear properly and don’t steam. Use High Heat: Stir-frying requires high heat to cook the chicken and veggies quickly, preserving their flavor and crunch. Customize Your Veggies: Feel free to swap in your favorite vegetables or whatever you have on hand to make this dish your own. {{image_2}} If you want a change from chicken, try other proteins. Shrimp cooks quickly and adds flavor. Tofu is a great choice for a vegetarian option. You can also use beef or pork. Simply slice them thin and follow the same cooking steps. Each protein brings its own taste and texture. Adjust cooking times based on the protein you choose. Feel free to mix up the veggies in your stir fry. Carrots or zucchini are tasty additions. You can also use bok choy or green beans for variety. Just make sure to cut them into small pieces. This ensures they cook evenly. Choose seasonal vegetables for the best flavor and freshness. The key is to keep the stir fry colorful and nutritious. For gluten-free needs, swap traditional soy sauce with tamari. You can also use coconut aminos for a lighter option. If you're watching carbs, cauliflower rice is a smart substitute for brown rice. For more fiber, add leafy greens like spinach or kale. These adjustments help meet your dietary goals while keeping the dish tasty. To keep your healthy chicken veggie stir fry fresh, let it cool first. Place leftovers in an airtight container. Make sure to store them in the fridge. They will stay good for about 3 to 4 days. Label your container with the date. This helps you track how long they have been stored. When you are ready to eat your leftovers, reheating is simple. You can use a microwave or a skillet. If using a microwave, place the stir fry in a bowl and cover it. Heat it for 1 to 2 minutes, stirring halfway through. If using a skillet, add a splash of water to keep it moist. Cook over medium heat until it is hot. Stir often to ensure even heating. Freezing is a great way to save extra stir fry. First, let it cool completely. Then, place it in a freezer-safe container or bag. Remove as much air as possible to prevent freezer burn. Label it with the date. You can freeze the stir fry for up to 3 months. When you are ready to enjoy it, thaw in the fridge overnight. Reheat as mentioned above. Yes, you can use frozen vegetables. They save time and keep well. Just add them directly to the hot skillet. Cook for a few extra minutes. Frozen veggies may not be as crisp, but they still taste great. You can try cauliflower rice or zucchini noodles. Both options are low in carbs. Cauliflower rice is easy to make. Just pulse cauliflower in a food processor. Zucchini noodles add a fun twist. Use a spiralizer or a vegetable peeler to create them. To spice up your stir fry, add red pepper flakes. Sriracha or chili paste also works well. Start with a small amount. You can always add more if you like it hotter. Fresh jalapeños or serrano peppers can give it a nice kick, too. Stir-frying offers a simple way to enjoy tasty meals. We covered key ingredients, their nutrition, and tips for keeping them fresh. I shared easy preparation and cooking steps, plus how to serve your dish nicely. We also explored tricks to avoid errors, spice things up, and make variations based on your needs. Finally, I provided storage tips for leftovers and answered your most common questions. Use these insights to create delicious stir-fries that fit your lifestyle. Enjoy your cooking journey!

Healthy Chicken Veggie Stir Fry Quick and Tasty Meal

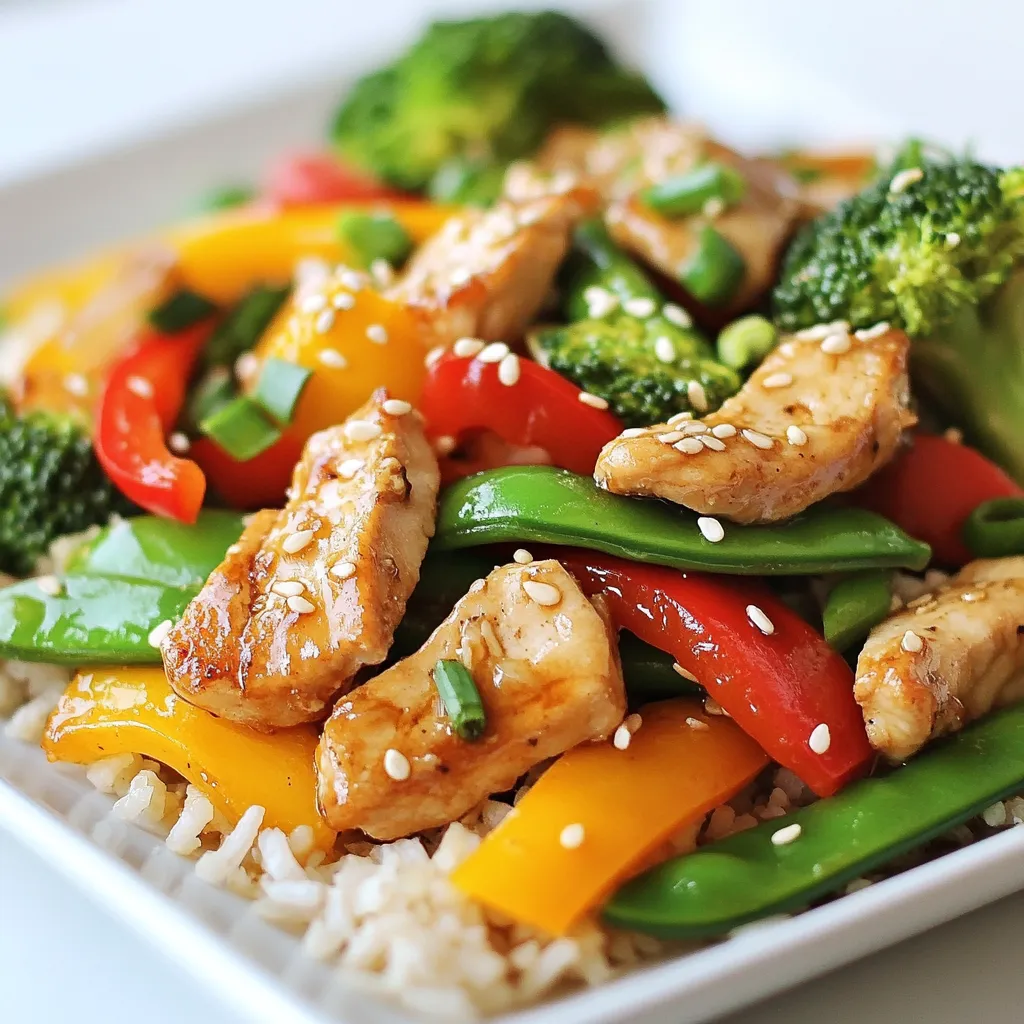
Looking for a quick and tasty meal? You’ve come to the right place! This Healthy Chicken Veggie Stir Fry is

- 1 lb turkey sausage, crumbled - 1 medium onion, diced - 3 cloves garlic, minced - 4 cups chicken broth - 2 large potatoes, thinly sliced - 1 cup kale, chopped - 1 cup heavy cream - 2 tablespoons olive oil To create a rich and hearty soup, start with turkey sausage. It adds great flavor without excess fat. The vegetables bring color and texture. Onions and garlic provide a warm base. Thinly sliced potatoes make the soup filling. Chopped kale adds nutrition and a pop of green. Finally, chicken broth and heavy cream create a creamy, savory blend. - 1 teaspoon red pepper flakes (adjust for spice preference) - Salt and pepper to taste - Fresh parsley, chopped (for garnish) Now, let’s season the soup. Red pepper flakes give it a nice kick. Adjust the amount based on your spice level. Salt and pepper enhance all the flavors, so taste as you go. Fresh parsley adds a burst of color and freshness when sprinkled on top. It makes the soup look as good as it tastes! {{ingredient_image_1}} Start by heating 2 tablespoons of olive oil in a large pot over medium heat. The oil should shimmer but not smoke. Next, add 1 pound of crumbled turkey sausage. Cook it for about 5 to 7 minutes. Stir the sausage often. You want it browned and fully cooked. Use a spoon to break it into small pieces as it cooks. This step adds great flavor to the soup. Once the sausage is ready, it’s time to add the aromatics. Toss in 1 medium diced onion and 3 cloves of minced garlic. Sauté them together for about 3 to 4 minutes. You want the onion to turn translucent and fragrant. This step fills your kitchen with a lovely aroma and builds the soup's base flavor. Now, pour in 4 cups of chicken broth. Add 2 large potatoes, thinly sliced. Bring this mixture to a boil. After it boils, reduce the heat and cover the pot. Let it simmer for about 15 to 20 minutes. You want the potatoes to become tender. This part is crucial. Tender potatoes create a creamy texture in the soup. Next, it’s time for the fun part. Stir in 1 cup of chopped kale and 1 cup of heavy cream. Also, add 1 teaspoon of red pepper flakes if you like some heat. Let the soup simmer for another 5 minutes. This allows all the flavors to meld together. The kale will wilt, adding color and nutrition to the dish. Finally, taste the soup. Adjust the seasoning with salt and pepper as needed. If you want more heat, you can add extra red pepper flakes. Ladle the soup into bowls and garnish with freshly chopped parsley. Serve it warm with crusty bread on the side. Enjoy your savory copycat Zuppa Toscana with turkey sausage! Turkey sausage is a great choice for this soup. It has less fat than pork sausage. This means fewer calories and a lighter flavor. It still gives you that savory taste you want in Zuppa Toscana. When you cook it, make sure to break it up well. This helps it brown evenly and adds more flavor to the soup. For the best taste, look for turkey sausage that is seasoned. A good blend of spices will make your soup pop. If you only have plain turkey sausage, you can add your own spices. A bit of garlic powder or Italian seasoning can work wonders. You can make this soup your own by adjusting the spice levels. If you like heat, add more red pepper flakes. Start with a little, taste, and add more if you want. Always taste before serving; this way, you can get it just right. Adding extra vegetables is also easy. Carrots or celery give a nice crunch. You can toss in some spinach or even zucchini. Feel free to use what you have on hand. This makes the soup more colorful and packed with nutrients. Pro Tips Use Fresh Ingredients: Always opt for fresh kale and potatoes to enhance the flavors of your soup. Fresh ingredients can significantly elevate the taste and texture. Adjust Creaminess: For a lighter version, substitute heavy cream with half-and-half or a non-dairy alternative. This will reduce the calorie count while still keeping the soup rich. Flavor Boost: Consider adding a splash of white wine to the broth after sautéing the sausage for an extra depth of flavor. Let it reduce before adding the broth. Perfect Seasoning: Always taste your soup before serving. Adjust the salt, pepper, and red pepper flakes to suit your preference for spice and seasoning. {{image_2}} To make this Zuppa Toscana gluten-free, use gluten-free sausage. Check labels to ensure no gluten is present. You can also swap regular chicken broth with a gluten-free version. This way, you keep the creamy goodness without the gluten. If you want a dairy-free soup, substitute heavy cream with coconut milk or almond milk. Both options add a nice creaminess. You might want to add a touch of nutritional yeast for a cheesy flavor. This keeps the soup rich, while still being dairy-free. For a vegan version, use plant-based sausage instead of turkey. Many brands offer tasty options that mimic the texture and flavor of meat. Swap heavy cream for cashew cream or silken tofu blended until smooth. This will give you that creamy texture and rich taste, making the soup enjoyable for everyone. You can store this soup in the fridge for up to three days. Make sure to let it cool before putting it in an airtight container. This helps keep the soup fresh and tasty. When you are ready to eat it, just take it out and reheat. If you want to save the soup for later, freezing is a great option. To freeze it, let the soup cool completely. Then, pour it into freezer-safe containers. Leave some space at the top since it will expand when frozen. You can store it in the freezer for up to three months. For the best flavor, reheat the soup on the stove. Pour the soup into a pot and heat it over medium heat. Stir it often to make sure it warms evenly. If the soup is too thick, add a bit of chicken broth or water to reach your desired consistency. You can also use a microwave to reheat it, but be careful not to overheat. Yes, you can use regular sausage. It will change the flavor and fat content. Turkey sausage is leaner and lighter. If you use pork sausage, the soup will be richer and more savory. Keep in mind it may also be higher in calories. Adjust the seasoning if needed, as regular sausage may be saltier. To add spice, you have a few options. Increase the red pepper flakes in the recipe. You can also add fresh jalapeños or a dash of hot sauce. Another way is to stir in cayenne pepper. Start small and taste as you go. You want to hit that perfect spice level! Zuppa Toscana pairs well with crusty bread. A fresh salad is also a nice touch. You can serve it with garlic bread for a tasty treat. For a heartier meal, try a side of roasted vegetables. These options make your meal feel complete and satisfying. This soup combines turkey sausage, fresh veggies, and creamy broth for great flavor. You learned how to cook it step-by-step, from browning the sausage to adjusting seasonings. Remember to try different ingredients and spices to make it your own. Store it well to enjoy later; it tastes even better the next day! Cooking is fun and creative, so don’t hesitate to experiment. Enjoy your bowl of happiness!

Savory Copycat Zuppa Toscana with Turkey Sausage

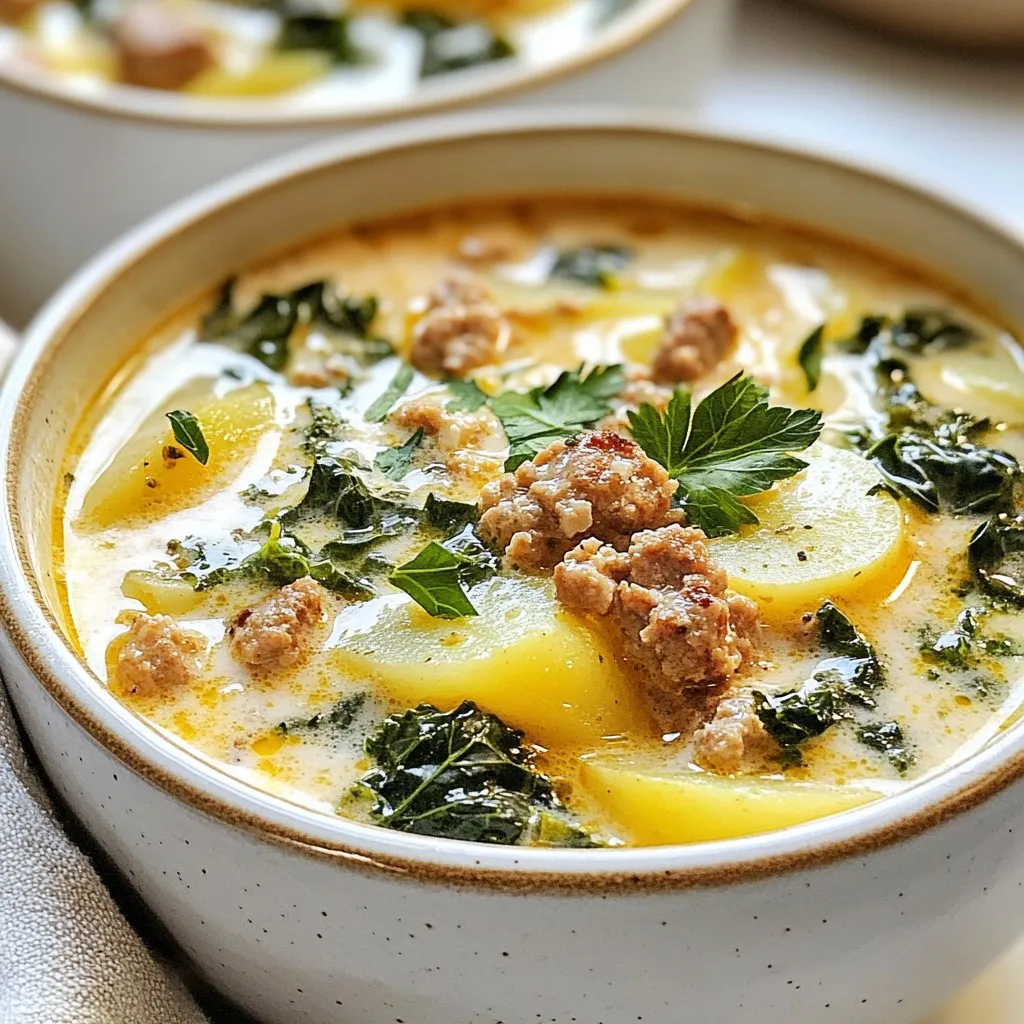
If you love hearty soups that warm you right up, then this Savory Copycat Zuppa Toscana with Turkey Sausage is

- 2 boneless, skinless chicken breasts - 2 medium sweet potatoes - 1 red bell pepper - 1 small yellow onion - 3 cloves garlic - Smoked paprika - Ground cumin - Cayenne pepper - Olive oil - Salt and black pepper - Fresh parsley The Chicken and Sweet Potato Skillet shines due to its simple yet hearty ingredients. The chicken breasts provide lean protein and absorb the seasonings well. Sweet potatoes add a natural sweetness and a creamy texture when cooked. The red bell pepper brings a pop of color and crunch. The small yellow onion and garlic add rich flavors that meld beautifully. Seasoning is vital for this dish. Smoked paprika gives it a warm, earthy taste. Ground cumin adds depth, while cayenne pepper provides just the right kick. Olive oil is essential for cooking and adds richness. Salt and black pepper balance all the flavors. For a finishing touch, fresh parsley adds a bright note. It makes the dish look vibrant and fresh. This mix of ingredients creates a well-rounded meal. {{ingredient_image_1}} Start by heating 1 tablespoon of olive oil in a large skillet over medium heat. Once the oil is hot, add the diced chicken breasts. Season the chicken with salt, black pepper, smoked paprika, and ground cumin. Cook until the chicken is browned and fully cooked, which takes about 6 to 8 minutes. Once done, remove the chicken from the skillet and set it aside on a plate. In the same skillet, add the other tablespoon of olive oil. Next, toss in the finely chopped onion and minced garlic. Cook them for about 2 to 3 minutes. You need to wait until the onion turns translucent. This step is key to building flavor in the dish. Now, add the cubed sweet potatoes to the skillet. Season them with cayenne pepper for some heat, and stir well. Cover the skillet and let the sweet potatoes cook for about 10 to 15 minutes. Stir occasionally to make sure they cook evenly. Check for tenderness by piercing them with a fork. They should be soft but not mushy. Once the sweet potatoes are tender, add the diced red bell pepper to the skillet. Return the cooked chicken back into the skillet too. Stir everything together well and cook for an additional 3 to 4 minutes. This step allows all the flavors to meld together nicely. Make sure the dish is heated through before serving. To ensure chicken is cooked properly, use a meat thermometer. The chicken should reach 165°F (75°C). This keeps it safe and juicy. Cut the chicken into small pieces for even cooking. This helps it brown nicely and cook faster. For perfect sweet potato texture, choose firm sweet potatoes. Peel and cube them into equal sizes. This helps them cook evenly. Stir them often while cooking. Cover the skillet to speed up the softening process. They should be fork-tender but not mushy. To adjust spice levels, start with less cayenne pepper. You can always add more later. Taste the dish before serving. This way, you can find the right balance for your heat preference. Adding fresh herbs can elevate your dish. Try parsley or cilantro for freshness. You can also use thyme or rosemary for an earthy flavor. Add them at the end to keep their taste bright. Serve the skillet dish piping hot. Garnish with fresh parsley to brighten the plate. This adds color and flavor. Pair your Chicken and Sweet Potato Skillet with a side salad. A green salad adds crunch and freshness. You can also serve it with crusty bread. This rounds out the meal. Pro Tips Use Fresh Ingredients: Fresh chicken and seasonal sweet potatoes enhance the flavor and nutritional value of this dish. Customize the Spices: Adjust the amount of cayenne pepper to suit your spice preference or substitute it with a milder spice for a family-friendly version. Meal Prep Friendly: This medley can be made in advance and stored in the fridge for up to 3 days, making it a great choice for meal prep. Pair with Grains: Serve the chicken and sweet potato medley over quinoa or brown rice for a heartier meal. {{image_2}} You can switch up the main protein in this dish. Turkey works great. Use ground turkey instead of chicken. Just adjust the cooking time until it's fully cooked. Shrimp is another tasty option. Cook the shrimp until they turn pink. If you want a vegetarian dish, try chickpeas. They add protein and fiber. Just toss them in when you add the sweet potatoes. Feel free to swap out veggies. Zucchini adds a nice texture. You can also use spinach for a pop of color. Both cook well with the other ingredients. Want to change the potatoes? Yukon gold potatoes are a great choice. They are creamy and sweet. You can even use regular white potatoes if you prefer. To give this dish a twist, try adding different spices. Italian seasoning works well for a fresh taste. Curry powder adds a warm, earthy flavor. You can also change the oils. Instead of olive oil, use avocado oil. It has a high smoke point and a subtle flavor. Vinegars like balsamic can add a nice tang to the dish. Just drizzle a bit before serving for extra zest. To store leftovers, let the dish cool down first. Place it in an airtight container. This keeps the flavors fresh. You can refrigerate it for up to 4 days. Make sure to label the container with the date. You can freeze the Chicken and Sweet Potato Skillet for later use. If you freeze it, do this after cooking. Allow it to cool before packing it in a freezer-safe container. It stays good for up to 3 months. To thaw, move it to the fridge overnight. For quick thawing, use the microwave. When you want to enjoy leftovers, you can use two methods. The microwave is quick and easy. Heat in short bursts until warm. Stir it halfway through to get even heat. The stovetop is great too. Add a splash of water or broth to keep it moist. Cook on low heat, stirring often. Always check that the food is hot all the way through for safety. Yes, you can use frozen chicken. Start by thawing it in the fridge overnight. If you're in a rush, use the microwave's defrost setting. Once thawed, cut it into cubes and follow the steps in the recipe. - Best practices for using frozen chicken: - Always thaw in the fridge when possible. - Cut into small pieces for even cooking. - Cook to a safe internal temperature of 165°F. To make this dish gluten-free, ensure all your ingredients are gluten-free. Most spices and fresh veggies are safe. Double check the labels on any packaged items. - Gluten-free options and ingredient checks: - Use gluten-free spices and seasoning blends. - Check if your olive oil is pure and free of additives. - Ensure no cross-contamination with gluten in your kitchen. This dish pairs well with a fresh side salad or steamed veggies. You can also serve it with rice or quinoa for extra carbs. - Suggesting side dishes or additional recipes: - A simple green salad with lemon dressing. - Steamed broccoli or green beans. - Garlic bread for a heartier meal. Yes, you can prep most of this meal ahead. Chop the veggies and season the chicken a day before. Store them in airtight containers in the fridge. - Tips for meal prep and pre-cooking components: - Cook the chicken and sweet potatoes in advance and reheat. - Store each component separately to keep flavors fresh. - Assemble the skillet and heat it right before serving for the best taste. This blog post explored a delicious Chicken and Sweet Potato Skillet recipe. You learned about the main ingredients, steps to cook, and tips to enhance flavor. I shared ways to store leftovers and answered common questions. You can easily adapt this meal to fit your taste. Whether you change proteins or vegetables, the options are endless. With this knowledge, you can create a tasty dish that suits your needs. Enjoy cooking and impressing your family or friends!

Chicken and Sweet Potato Skillet Flavorful Dinner Dish

Looking for a tasty dinner idea? Try my Chicken and Sweet Potato Skillet! This dish combines juicy chicken and sweet

To make Jalapeño Cheddar Cornbread, gather these ingredients: - 1 cup cornmeal - 1 cup all-purpose flour - 1 tablespoon baking powder - 1/2 teaspoon salt - 1/4 teaspoon black pepper - 1 cup buttermilk (or milk with 1 tablespoon vinegar added) - 2 large eggs - 1/4 cup vegetable oil - 1 cup shredded sharp cheddar cheese - 2-3 jalapeños, finely chopped (seeds removed for less heat) - 2 tablespoons honey (optional, for a touch of sweetness) You can add a few optional ingredients to boost the flavor of your cornbread: - Chopped green onions - Diced red bell peppers - Crumbled bacon - Fresh herbs like cilantro or parsley - Spices like cayenne or smoked paprika These additions can make your dish even more exciting. When choosing jalapeños, look for bright green peppers. They should feel firm and have smooth skin. Avoid any with wrinkles or spots. The heat level can vary, so taste a small piece if you're unsure. For cheese, sharp cheddar adds a great tang. Choose blocks of cheese for shredding, as pre-shredded cheese often contains anti-caking agents. Always check for freshness and smell to ensure you're getting the best flavor. {{ingredient_image_1}} Start by gathering your ingredients. You need cornmeal, flour, baking powder, salt, black pepper, buttermilk, eggs, vegetable oil, cheddar cheese, jalapeños, and optional honey. Preheat your oven to 400°F (200°C). Grease an 8-inch square baking pan. You can also line it with parchment paper for easy removal. In a large bowl, mix the cornmeal, flour, baking powder, salt, and black pepper. Stir these dry ingredients well. In another bowl, whisk together the buttermilk, eggs, vegetable oil, and honey if you want a hint of sweetness. Pour the wet mix into the dry mix. Stir gently until just combined. Avoid over-mixing. Next, fold in the shredded cheddar cheese and chopped jalapeños. Make sure they are spread evenly throughout the batter. Pour the cornbread batter into your prepared baking pan. Smooth out the top with a spatula. Place the baking pan in the preheated oven. Bake for 20 to 25 minutes. The top should turn golden brown, and the edges will pull away from the pan slightly. To check if your cornbread is done, insert a toothpick into the center. If it comes out clean, your cornbread is ready! Allow the cornbread to cool in the pan for about 10 minutes. Then, transfer it to a wire rack to cool completely. Enjoy your warm, cheesy, and spicy cornbread! When making jalapeño cheddar cornbread, avoid overmixing the batter. Overmixing makes the bread tough. Mix just until the flour disappears. Keep an eye on your baking time. If you bake too long, the cornbread can dry out. Use a toothpick to check for doneness. If it comes out clean, it’s ready! You can add more flavor to your cornbread. Consider mixing in cooked bacon bits for a smoky taste. Fresh herbs like cilantro or chives can add a nice touch. For a twist, try adding corn kernels for extra sweetness. If you like it spicy, toss in more jalapeños or even some diced green chilies! Serve your cornbread warm, cut into squares. Top it with a pat of butter for richness. A drizzle of honey adds sweetness. Pair the cornbread with chili for a hearty meal. It also goes well with soups or stews. You can even serve it alongside grilled meats for a tasty barbecue! Pro Tips Use Fresh Jalapeños: For the best flavor and heat, use fresh jalapeños instead of pickled ones. Adjust the Spice Level: If you prefer less heat, make sure to remove all the seeds and membranes from the jalapeños before chopping. Add More Cheese: Feel free to mix in different types of cheese such as pepper jack for extra flavor and a little kick. Storage Tips: Store leftover cornbread in an airtight container at room temperature for up to 2 days, or in the refrigerator for up to a week. {{image_2}} To make a gluten-free jalapeño cheddar cornbread, swap the all-purpose flour for a gluten-free blend. Look for a mix that works well for baking. You can use one that includes rice flour, potato starch, and tapioca flour. This blend helps keep the texture light and fluffy. Always check the package for the correct measurement. You may need to adjust the liquid slightly if the batter seems too thick. When choosing jalapeños, you can go spicy or mild. For heat, keep the seeds and ribs in the pepper. This adds more spice to your cornbread. If you want a milder flavor, remove the seeds and ribs. You can also choose different types of peppers. Poblano or Anaheim peppers are great for a less spicy option. They will still give you that nice flavor without too much heat. Cheddar is classic, but you can try different cheeses too. Monterey Jack adds a nice creaminess. Pepper Jack gives an extra kick with spices. If you want a tangy flavor, use feta or goat cheese. Both add unique tastes and pair well with jalapeños. Mixing cheeses can also create a more complex flavor. Experiment and find your favorite blend for a fun twist! To keep your cornbread fresh, let it cool completely. Wrap it tightly in plastic wrap or foil. You can also place it in an airtight container. Store it at room temperature for up to three days. If you want it to last longer, refrigerate it. Just remember, cold air can dry it out. When you want to enjoy your cornbread again, preheat your oven to 350°F (175°C). Place the cornbread on a baking sheet. Cover it with foil to keep it moist. Heat for about 10-15 minutes. If you prefer, you can also microwave individual pieces for 20-30 seconds. Just check that it’s warm all the way through. To freeze your cornbread, cut it into squares first. Wrap each piece in plastic wrap, then place them in a freezer bag. This keeps them safe from freezer burn. You can freeze the cornbread for up to three months. When you’re ready to eat it, thaw it in the fridge overnight, then reheat as mentioned above. Enjoy that warm, cheesy goodness later! You can replace buttermilk with regular milk. Just add one tablespoon of vinegar to one cup of milk. Let it sit for five minutes to make a homemade buttermilk. This swap keeps the cornbread moist and fluffy. Yes, you can! Prepare the batter and store it in the fridge for up to 24 hours. When you're ready, bake it as normal. This method saves time and makes serving easy. This cornbread pairs well with chili, soups, or grilled meats. You can also serve it with butter or honey for extra flavor. For a fun twist, try it with a fresh salad or as a side for tacos. In this article, we explored how to make delicious Jalapeño Cheddar Cornbread. We covered the ingredients, step-by-step instructions, and helpful tips. We also discussed variations for different diets and storage tips for leftovers. With these insights, you can create the perfect cornbread that suits your taste. Enjoy experimenting and sharing this dish with friends and family. Your kitchen will smell great and everyone will be happy!

Jalapeño Cheddar Cornbread Savory and Simple Recipe

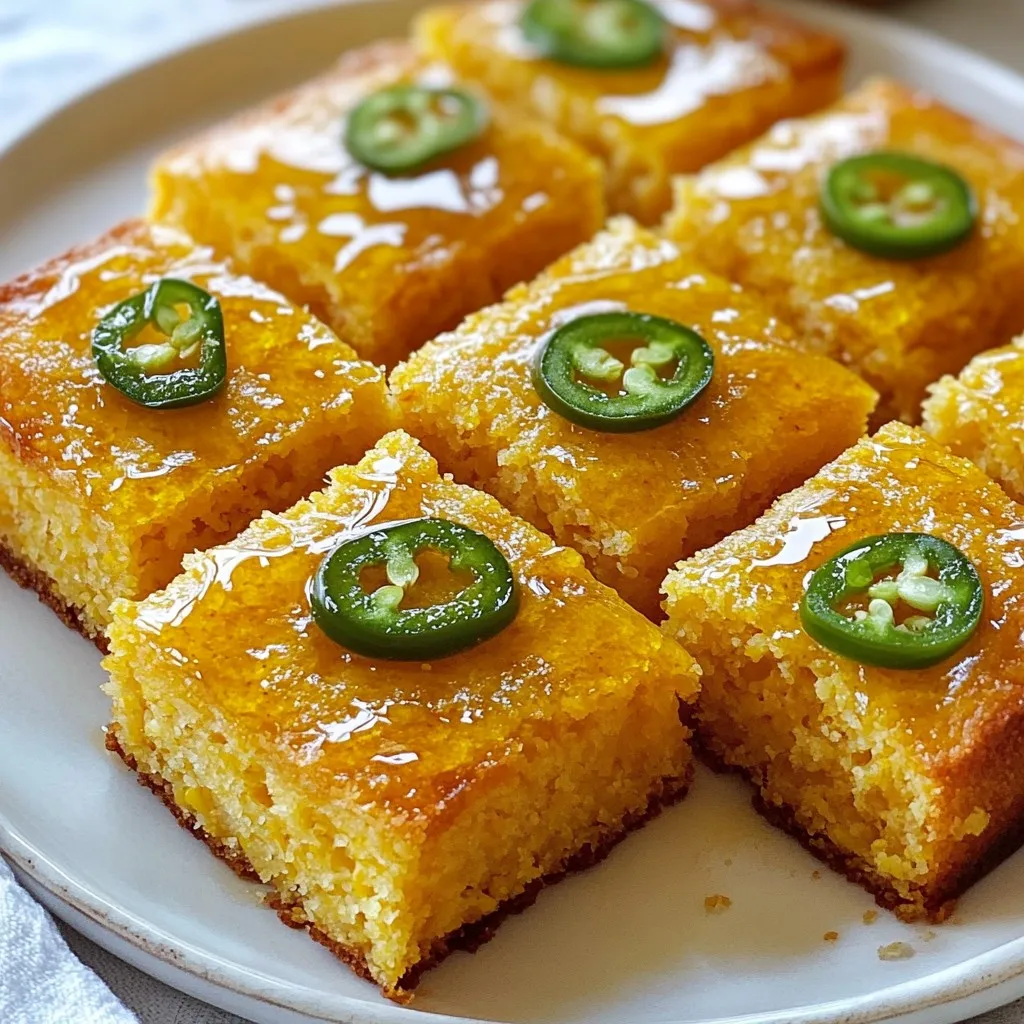
Craving a tasty twist on classic cornbread? My Jalapeño Cheddar Cornbread recipe brings you bold flavors and simple steps. This

- 2 cups cooked chicken breast, shredded - 1 cup dried cranberries - 1/2 cup pecans, roughly chopped - 1/4 cup celery, finely chopped - 1/4 cup red onion, finely chopped - 1/2 cup Greek yogurt (or mayonnaise) - 2 tablespoons honey - 1 tablespoon Dijon mustard - Salt and pepper to taste - Fresh greens for serving For this salad, I start with cooked chicken breast. Shredding it gives the salad a nice texture. Dried cranberries add a sweet and tart flavor. The pecans offer a crunchy bite that contrasts well with the chicken. Celery and red onion give it a fresh crunch. I often use Greek yogurt for creaminess. You can use mayonnaise if you prefer a richer taste. Honey adds a touch of sweetness, while Dijon mustard brings a little zing. Season with salt and pepper to enhance all the flavors. If you want a lighter option, try using low-fat Greek yogurt instead. You can also use avocado or silken tofu for a dairy-free version. For nuts, walnuts or almonds work well in place of pecans. If you prefer different fruits, use raisins, chopped apples, or even orange segments for a twist. Each serving of this salad has about 300 calories. It provides protein from the chicken and healthy fats from the nuts. This salad is gluten-free, making it a good choice for those with gluten sensitivities. You can adjust the ingredients for specific dietary needs, like making it lower in calories or fat. {{ingredient_image_1}} To make cranberry pecan chicken salad, you need a few simple steps: 1. Gather all ingredients. 2. Mix the chicken and other solid ingredients. 3. Whisk the dressing in another bowl. 4. Combine everything and chill. 5. Serve on fresh greens. First, take a large mixing bowl. Add these ingredients: - 2 cups cooked chicken breast, shredded - 1 cup dried cranberries - 1/2 cup pecans, roughly chopped - 1/4 cup celery, finely chopped - 1/4 cup red onion, finely chopped Next, in a small bowl, you will make the dressing. Whisk together: - 1/2 cup Greek yogurt (or mayonnaise) - 2 tablespoons honey - 1 tablespoon Dijon mustard - Salt and pepper to taste Once the dressing is smooth, pour it over the chicken mixture. Gently fold everything together. Make sure all the chicken and veggies get coated. Taste it and add more salt, pepper, or honey if needed. Cover the bowl and refrigerate for at least 30 minutes. This lets the flavors blend well. When you are ready to serve, take a plate. Line it with fresh greens, like spinach or mixed salad greens. Scoop the chicken salad on top of the greens. This adds color and texture to your dish. You can pair this salad with whole grain bread or a side of fruit. It makes for a balanced meal that is both tasty and fresh! You can make the chicken ahead of time. Cook and shred chicken the day before. Store it in the fridge to keep it fresh. Chilling the salad before serving helps the flavors mix well. I recommend letting it chill for at least 30 minutes. This wait makes your salad taste even better. To boost flavor, use fresh herbs like parsley or dill. These add a nice touch. You can also try adding spices such as black pepper or paprika for some heat. If you like a sweeter salad, add more honey. It balances the tart cranberries nicely. Fresh salads taste best when they are cold. Serve your salad right after chilling it. For leftovers, keep them in an airtight container in the fridge. This keeps the chicken and veggies fresh. Always check for any signs of spoilage before eating. Pro Tips Use Rotisserie Chicken: For a quicker option, use store-bought rotisserie chicken to save time on cooking and shredding. Customize Your Nuts: Feel free to substitute walnuts or almonds for the pecans to add a different flavor and texture. Chill for Flavor: Allow the salad to chill in the refrigerator for at least an hour before serving to enhance the flavors. Perfect Pairings: Serve the chicken salad on toasted bread or in a wrap for a delicious sandwich option. {{image_2}} You can make this salad lighter. Use low-fat Greek yogurt instead of regular yogurt. This cuts calories but keeps creaminess. You can also swap honey for a sugar-free sweetener. For a vegan option, use chickpeas or tofu instead of chicken. Both are packed with protein. You can also use vegan yogurt to replace Greek yogurt. To give your salad a global flair, add spices. Try curry powder for an Indian touch or cumin for a Mexican twist. You can also make a Mediterranean version. Use olives, feta cheese, and sun-dried tomatoes. For an Asian twist, add soy sauce, sesame oil, and chopped peanuts. These changes bring exciting flavors. Using fresh fruits and veggies makes this salad pop. In spring, add strawberries or asparagus. In summer, try peaches or bell peppers. In fall, apples or roasted squash work well. In winter, consider pomegranate seeds or citrus fruits. Adjust the recipe based on what’s available for the best taste. To keep your cranberry pecan chicken salad fresh, store it in an airtight container. This prevents air from getting in and keeps your salad tasty. Glass or plastic containers work well. Make sure the lid is sealed tightly. If you plan to eat it later, divide the salad into smaller portions. This way, you can grab just what you need. Your salad will last in the fridge for about 3 to 4 days. Always check for spoilage before eating. Signs of spoilage include an off smell, discoloration, or a slimy texture. If you notice any of these, it’s best to throw it away. Freezing this salad is not recommended. The texture of the chicken and veggies can change when thawed. If you must freeze it, do so without the dressing. When you want to eat it, thaw in the fridge overnight. Mix in fresh dressing before serving for the best taste. Can I use canned chicken for this recipe? Yes, you can use canned chicken. It saves time and effort. Just drain the can and shred the chicken. This makes it easy to mix with the other ingredients. What’s the best way to shred chicken? The best way to shred chicken is with two forks. Hold one fork steady and use the other to pull apart the meat. You can also use your hands if the chicken is cool enough. A stand mixer with a paddle attachment works well too. Is this recipe gluten-free? Yes, this recipe is gluten-free. All the ingredients, like chicken and nuts, are safe. Just double-check the labels on the Greek yogurt or mayonnaise. Can it be made dairy-free? Yes, you can swap out Greek yogurt for dairy-free yogurt. Look for unsweetened versions to keep the taste balanced. You can also use avocado or a vegan mayo. How do I know if my chicken is fully cooked? Your chicken is done when it reaches an internal temperature of 165°F. You can use a meat thermometer to check. The meat should also be white and the juices clear. Can I replace Greek yogurt with something else? Yes, you can replace Greek yogurt with mayonnaise or a dairy-free option. You can also try sour cream for a tangy taste. Adjust the salt and honey to balance flavors. This blog post covered a tasty chicken salad recipe. We explored the needed ingredients, substitutions, and nutrition facts. I shared step-by-step instructions, serving tips, and storage advice. You can adjust flavors and create unique variations. In summary, you can make this salad suit your tastes and dietary needs. Take these ideas to create a meal that's both delicious and easy. Enjoy exploring your culinary skills while making this salad your own!

Cranberry Pecan Chicken Salad Fresh and Tasty Meal

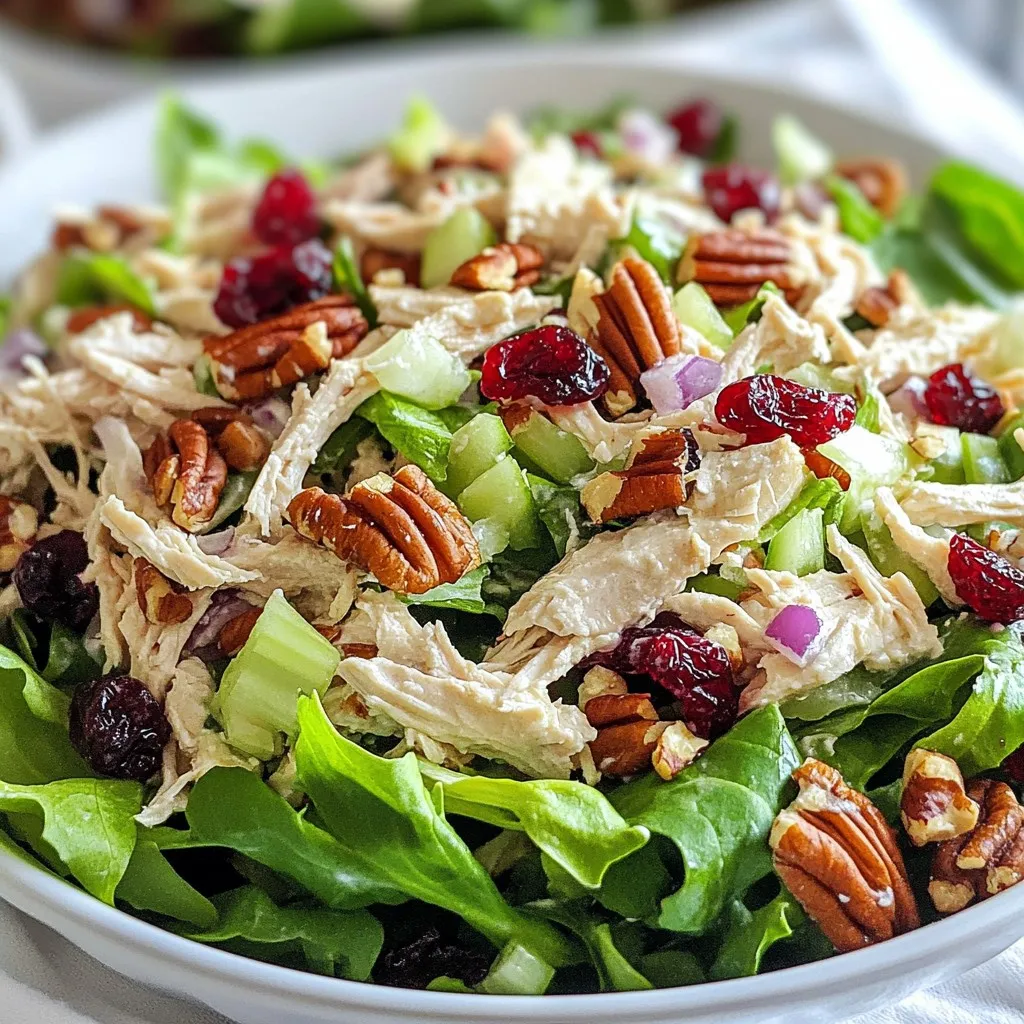
If you’re searching for a fresh and tasty meal, look no further than my Cranberry Pecan Chicken Salad! This delightful

Older posts
Newer posts
← Previous Page1 … Page161 Page162 Page163 Page164 Next →

dsad

© 2026 easycookingbite • Built with GeneratePress

Our Policies

  • Copyright Policy
  • Cookie Policy
  • GDPR Policy
  • Privacy Policy
  • Disclaimer
  • Terms Of Use

More Information

  • Home
  • About
  • Contact
  • Appetizers
  • Dessert
  • Dinner
  • Drinks
©2026, easycookingbite About Back To Top