Skip to content
DisclaimerTerms Of UseGDPR PolicyCookie Policy

easycookingbite

  • Home
  • Drinks
  • Appetizers
  • Dinner
  • Dessert
  • About
  • Contact
  • Privacy Policy
DisclaimerTerms Of UseGDPR PolicyCookie Policy

Lily

To make No-Bake Peanut Butter Chocolate Protein Balls, you need some key ingredients. Here’s what you’ll need: - 1 cup rolled oats - 1/2 cup natural peanut butter - 1/4 cup honey or maple syrup - 1/2 cup chocolate protein powder These ingredients form the base of your protein balls. The rolled oats add a chewy texture. Natural peanut butter gives a rich flavor and creaminess. Honey or maple syrup adds sweetness. Chocolate protein powder packs in the protein. You can enhance your protein balls with some optional ingredients: - 1/4 cup mini dark chocolate chips - 1/4 cup ground flaxseed - 1 teaspoon vanilla extract - A pinch of salt These add extra taste and nutrition. Mini dark chocolate chips bring a sweet crunch. Flaxseed adds healthy fats and fiber. Vanilla extract gives a warm aroma. A pinch of salt balances the sweetness. Each serving of these protein balls is a nutritious snack. On average, one ball contains about: - Calories: 100 - Protein: 4 grams - Fat: 5 grams - Carbohydrates: 10 grams These numbers can vary based on ingredient choices. They provide a quick energy boost. Enjoy them as a post-workout snack or a tasty treat! First, I grab a large mixing bowl. I add 1 cup of rolled oats, 1/2 cup of chocolate protein powder, 1/4 cup of ground flaxseed, and a pinch of salt. I mix these dry ingredients well. This step is key for even distribution. It helps every bite taste great. Next, I add 1/2 cup of natural peanut butter, 1/4 cup of honey (or maple syrup), and 1 teaspoon of vanilla extract to the dry mix. I stir until the mixture becomes thick and sticky. This consistency is important. It helps the balls hold together when I roll them. Now, I scoop about a tablespoon of the mixture. Using my hands, I roll it into a ball. I repeat this until I use all the mixture. I place the balls on a lined baking sheet. After forming them, I refrigerate the balls for at least 30 minutes. This helps them firm up and makes them easier to eat. If your mixture is too dry, add a splash of water or more peanut butter. This will help bind the ingredients. If it’s too wet, add a few more oats or flaxseed. These changes will help your protein balls hold shape. To boost flavor, you can add a pinch of cinnamon or a dash of cocoa powder. You might also try mixing in nuts or seeds like chia or sunflower seeds. For a tropical twist, dried fruits like raisins or cranberries can add sweetness and texture. Arrange the protein balls on a clean platter for a nice look. Drizzle melted dark chocolate on top for extra flair. You can also sprinkle a few extra chocolate chips around to make it more inviting. This small touch makes your snack feel special and appealing. {{image_2}} You can switch peanut butter for other nut butters. Almond butter works great and adds a nice flavor. Cashew butter is creamy and adds a different taste. Sunflower seed butter is a good choice for nut-free diets. Each option brings its own unique flavor and texture to the protein balls. Want to boost nutrition? Consider adding seeds or dried fruits. Chia seeds or pumpkin seeds add crunch and healthy fats. Dried cranberries or raisins can bring sweetness and chewiness. Superfoods like hemp hearts or spirulina can also enhance nutrition. These add-ins make your protein balls even more fun and healthy. You can control how sweet your protein balls are. If you want less sugar, try using sugar-free sweeteners like stevia or erythritol. Maple syrup can be swapped for a low-calorie syrup. This way, you keep the taste you love but cut down on calories. Adjust sweetness to fit your taste and health goals. To keep your no-bake peanut butter chocolate protein balls fresh, use airtight containers. I recommend glass or BPA-free plastic. These containers will block air and moisture. This way, your tasty treats stay soft and delicious. In the fridge, these protein balls last about a week. Store them in the airtight container. If you notice any changes in texture or smell, it's best to toss them. Always check before eating. You can freeze these protein balls for later enjoyment. To freeze, place them in a single layer on a baking sheet. Once frozen, transfer them to an airtight container or freezer bag. This helps prevent them from sticking together. Thaw them in the fridge overnight when you're ready to enjoy. Yes, you can make these protein balls vegan. To do this, substitute honey with maple syrup. This keeps the sweetness without using animal products. You can also switch out the chocolate protein powder for a plant-based protein powder. Look for options like pea or brown rice protein. These changes make the recipe vegan-friendly while keeping it tasty. These protein balls last about a week when stored properly. Keep them in an airtight container in the fridge. This helps keep them fresh and tasty. If you want to store them longer, consider freezing them. They can stay in the freezer for up to three months. Just thaw them in the fridge before you eat. If you want to skip protein powder, try using ground oats. They add texture and fiber. You can also use nut flour, like almond flour, for added flavor. Another option is to use a mix of seeds, like hemp or chia seeds, for protein. These swaps keep the protein balls nutritious and yummy without losing their form. These protein balls are easy to make and packed with nutrients. You start with oats, peanut butter, and a sweetener. Then, you mix, roll, and chill. Feel free to add your favorite flavors or substitute ingredients. Store them in airtight containers to keep them fresh. Enjoy these tasty bites as a quick snack anytime. With the right tips and variations, you can make them just how you like. Now, it's time for you to try making your own protein balls!

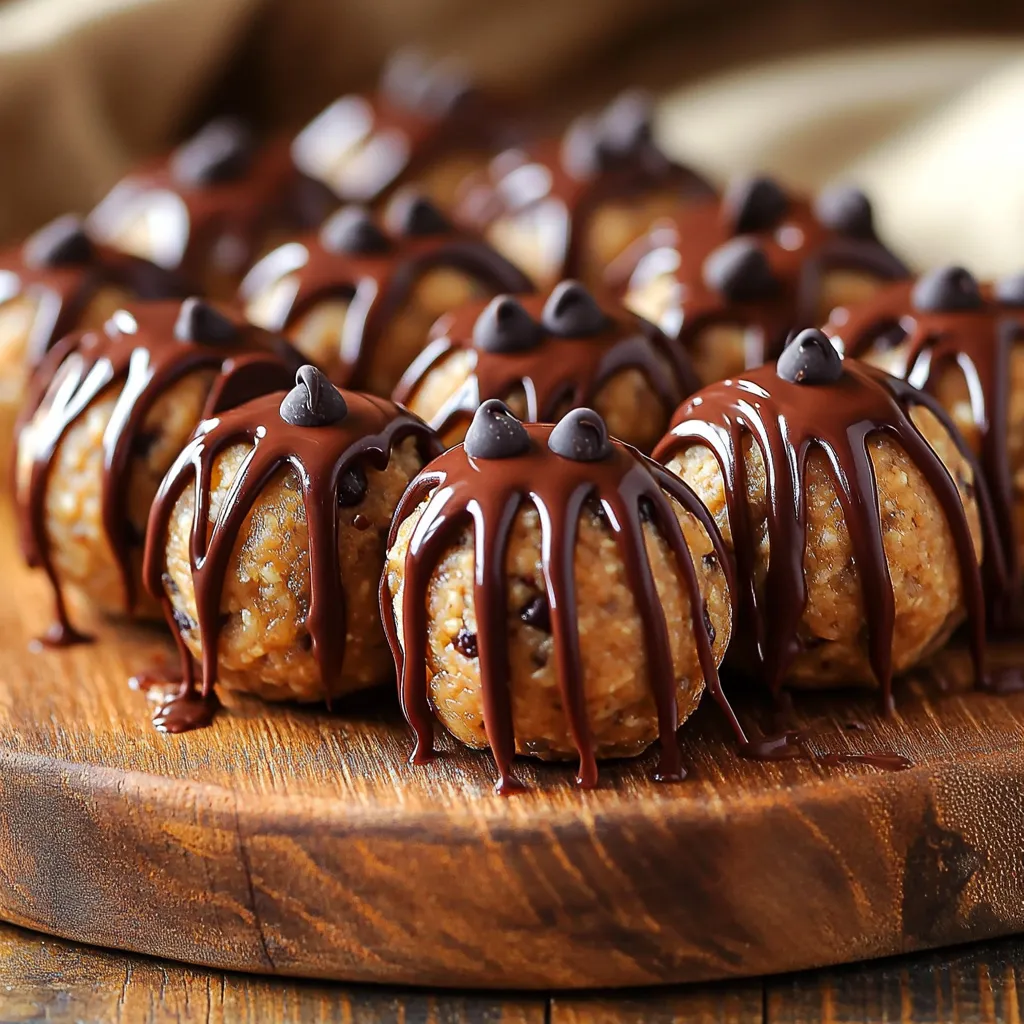
No-Bake Peanut Butter Chocolate Protein Balls Delight

Are you craving a tasty snack that won’t ruin your diet? Look no further! My No-Bake Peanut Butter Chocolate Protein

- 1 ½ cups rolled oats - 1 cup canned pumpkin puree - ½ cup almond flour - 8 oz cream cheese, softened - 1 egg These main ingredients create a rich and hearty base for the bars. Rolled oats give a chewy texture. Canned pumpkin puree adds moisture and flavor. Almond flour brings a nutty taste. Cream cheese makes the cheesecake layer creamy and smooth. The egg helps bind everything together. - ¼ cup brown sugar - ¼ cup maple syrup - ½ teaspoon vanilla extract - 1 teaspoon cinnamon - ½ teaspoon nutmeg - ½ teaspoon baking powder - ¼ teaspoon salt This mix of baking essentials sweetens and spices the bars. Brown sugar and maple syrup add depth. Vanilla extract enhances the flavor. Cinnamon and nutmeg give a warm, fall aroma. Baking powder helps the bars rise, while salt balances the sweetness. - 2 tablespoons powdered sugar - Whipped cream Optional toppings elevate these bars. A dusting of powdered sugar adds sweetness. Whipped cream offers a light and airy contrast. Together, they make the bars even more irresistible. 1. Preheat your oven to 350°F (175°C). 2. Line an 8x8 inch baking pan with parchment paper. Leave some paper hanging over the edges. This helps lift out the bars later. 3. In a large bowl, mix together the rolled oats, almond flour, brown sugar, maple syrup, vanilla extract, cinnamon, nutmeg, baking powder, and salt. Stir well until everything is combined. 1. In another bowl, beat the softened cream cheese until smooth. 2. Add the canned pumpkin puree, egg, and powdered sugar. Mix until smooth. Make sure there are no lumps. 3. This creamy filling is what makes the bars so delicious! 1. Spread half of the oat mixture into the baking pan. Press it firmly down to form the crust. 2. Pour the pumpkin cheesecake filling on top of the crust. Spread it evenly. 3. Sprinkle the remaining oat mixture over the filling. Make sure it covers the filling well. 4. Bake in the oven for 30-35 minutes. Look for lightly golden edges and a set center. 5. Once baked, remove the pan from the oven. Let the bars cool completely before lifting them out using the parchment paper. 6. Cut into squares or bars, and enjoy your tasty treat! To ensure even baking, use a light-colored pan. Dark pans absorb more heat, which can cause uneven baking. Rotate the pan halfway through to promote even cooking. For the best texture of the cheesecake filling, make sure your cream cheese is at room temperature. This helps it blend smoothly with the pumpkin. Avoid overmixing after adding the egg, as this can incorporate too much air and make the filling puffy. For presentation, serve the bars on a pretty platter. A light dusting of cinnamon on top adds a nice touch. You can also place a dollop of whipped cream next to each slice. This makes the bars look inviting and delicious. Pair these bars with a warm cup of tea or coffee for a cozy treat. The warm spices in the bars go well with a rich, dark brew. If you need alternatives for almond flour, you can use oat flour or all-purpose flour. These will yield slightly different textures but still taste great. For cream cheese, consider using a vegan cream cheese for a dairy-free option. If you want to swap out the sweeteners, coconut sugar or honey can replace brown sugar. For maple syrup, agave nectar works well and keeps the bars sweet and moist. {{image_2}} You can add a twist to your pumpkin cheesecake oatmeal bars. One great idea is to make chocolate pumpkin cheesecake oatmeal bars. Just mix in some cocoa powder with the oat crust. This rich flavor pairs well with pumpkin. You can also sprinkle in chocolate chips. They melt into the filling, adding a sweet surprise. If you need gluten-free options, use gluten-free oats and almond flour. This keeps the bars tasty and safe for those with gluten allergies. For vegan adaptations, swap the egg with a flax egg. Just mix one tablespoon of ground flaxseed with three tablespoons of water. Let it sit until it thickens. You can also use vegan cream cheese. This keeps the same creamy texture while being plant-based. For festive occasions, you can add cranberries or pecans. Sprinkle chopped pecans on top for a nice crunch. Dried cranberries add a tart flavor that brightens the dish. Both options make the bars more colorful and perfect for celebrations. To keep your pumpkin cheesecake oatmeal bars fresh, start by letting them cool completely. This helps maintain their texture. Wrap the bars tightly in plastic wrap or aluminum foil. You can also place them in an airtight container. For short-term storage, the fridge works well. If you want to store them for longer, the freezer is your best friend. Just make sure to wrap them tightly to avoid freezer burn. Store them in a freezer-safe container or bag for added protection. When stored in the fridge, these bars last about five days. They stay fresh and tasty. In the freezer, they can last up to three months. Just remember to label your containers with the date. This way, you can easily track how long they’ve been stored. To enjoy your bars warm, reheating is easy. You can use the microwave for a quick fix. Heat them for about 15 to 20 seconds. Check to see if they are warm enough. If not, heat for a few more seconds. If you prefer the oven, preheat it to 350°F (175°C). Place the bars on a baking sheet and heat for about 10 minutes. This method helps keep the texture and flavor intact. Enjoy your delicious bars! Can I use fresh pumpkin instead of canned? Yes, you can use fresh pumpkin. Just make sure to cook and puree it first. Fresh pumpkin may have more moisture, so adjust the other liquids if needed. How do I know when the bars are done baking? The bars are done when the edges turn light brown. The center should be set but still a bit soft. A toothpick should come out clean or with just a few crumbs. Are these bars nut-free? Yes, these bars can be nut-free. Just use rolled oats and avoid almond flour. You can replace almond flour with all-purpose flour or a nut-free flour blend. Can I make this recipe dairy-free? Yes, you can make this recipe dairy-free. Use a dairy-free cream cheese alternative and check if your maple syrup is processed without dairy. Can I double the recipe? Sure! Just double all the ingredients. Use a larger baking pan or bake in two pans. Adjust the baking time as needed. What is the nutrition info for Pumpkin Cheesecake Oatmeal Bars? Each bar has about 150 calories, 4 grams of protein, 7 grams of fat, and 20 grams of carbs. This can vary based on brands and specific ingredients used. In this post, we explored how to make delicious Pumpkin Cheesecake Oatmeal Bars. We covered essential ingredients and provided clear steps for preparation, baking, and serving. You learned helpful tips, tasty variations, and storage advice. As you try this recipe, have fun experimenting with flavors and textures. These bars can delight anyone, young or old. Enjoy the process and savor the delicious results!

Pumpkin Cheesecake Oatmeal Bars Irresistibly Delicious

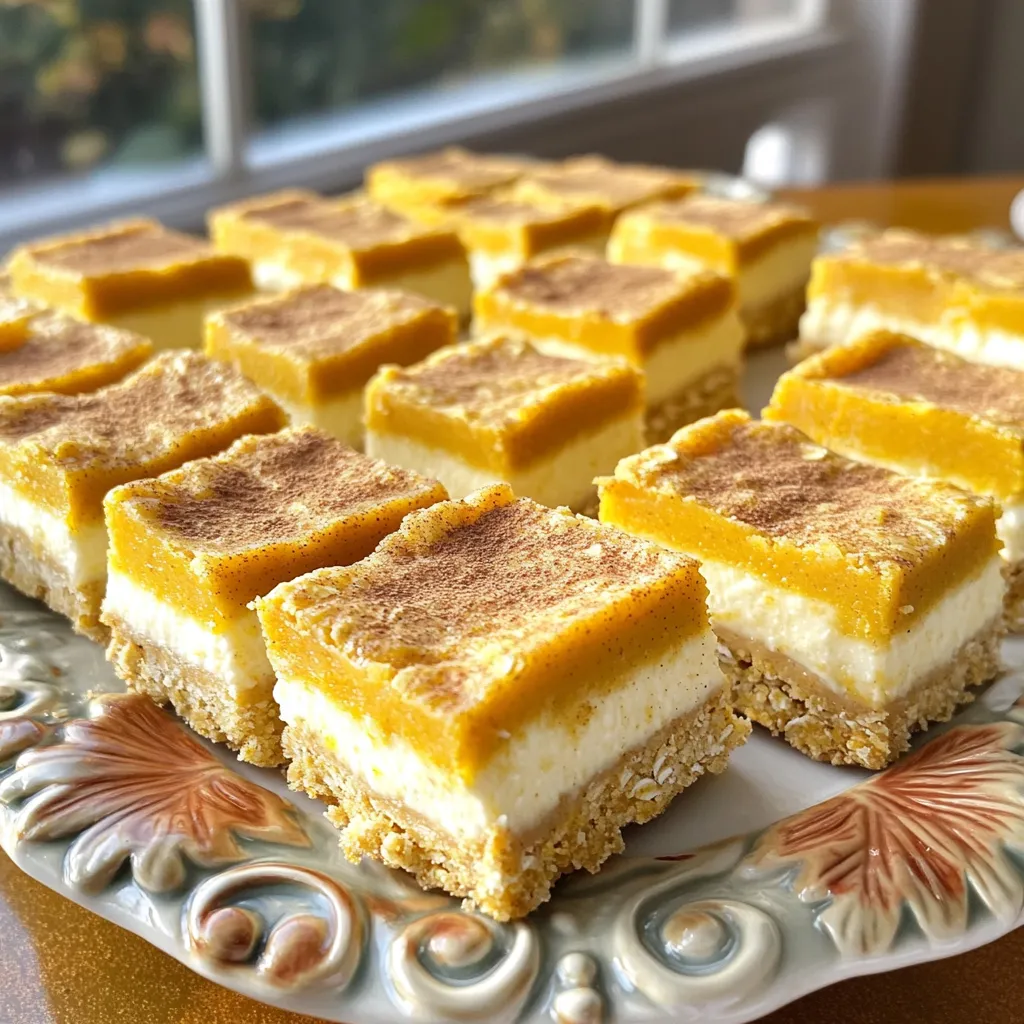
If you crave a cozy dessert that combines the best of fall flavors, these Pumpkin Cheesecake Oatmeal Bars are for

- Cauliflower florets - All-purpose flour - Almond milk or milk of your choice To make these delicious wings, you need fresh cauliflower. Choose a medium head and cut it into bite-sized florets. The all-purpose flour helps create a crispy coat. Use almond milk or any milk you prefer to make a smooth batter that sticks well to the cauliflower. - Garlic powder - Onion powder - Smoked paprika These seasonings add great flavor. Garlic powder gives a nice kick, while onion powder adds depth. Smoked paprika brings a subtle smokiness, making every bite tasty. - Sweet chili sauce - Soy sauce - Sesame oil - Fresh cilantro and lime wedges for garnish The sauce is what makes these wings shine. Sweet chili sauce adds sweetness and spice. Soy sauce brings umami, while sesame oil adds a nutty flavor. To finish, fresh cilantro and lime wedges add brightness. Enjoy garnishing your wings for a lovely presentation! To start, take a large bowl and combine the flour, garlic powder, onion powder, smoked paprika, salt, and pepper. Mix them well to blend the flavors. Next, gradually whisk in the almond milk. Keep whisking until you get a smooth batter. This batter is key for a tasty coating. Now, it's time to coat the cauliflower. Dip each floret into the batter. Make sure it gets fully covered. Then, take the coated florets and roll them in the panko breadcrumbs. This step adds crunch and texture. Ensure each piece is evenly coated for the best outcome. Preheat your air fryer to 375°F (190°C). This usually takes about 5 minutes. Once preheated, lightly spray the air fryer basket with cooking spray. Place the breaded cauliflower wings in a single layer. Avoid overcrowding to ensure even cooking. Air fry them for 10-12 minutes. Halfway through, shake the basket to ensure they crisp up all around. For the crispiest wings, keep an eye on them as they cook. To get the best texture, balance the flour and panko. Use equal parts flour and panko for a crunchy coating. If you want extra crunch, you can add a bit more panko. This helps create a nice crust. To prevent sogginess, avoid overcrowding the air fryer. Space the cauliflower wings apart, so they cook evenly. Want to amp up the flavor? Try adding a pinch of cayenne pepper or smoked paprika to the batter. You can also sprinkle some nutritional yeast for a cheesy twist. For dipping sauces, sweet chili sauce works great. You might also enjoy ranch or a spicy sriracha mayo for a kick. These wings shine when served hot. Pair them with fresh lime wedges for a zesty touch. Chopped cilantro adds freshness, too. For drinks, a crisp sparkling water or a light beer complements the flavors well. This makes for a fun snack or a great side for your main dish. {{image_2}} For a vegetarian or vegan twist, you can swap the all-purpose flour. Use chickpea flour or almond flour instead. These options offer great flavor and texture. For the milk, almond milk works well, but you can also use oat milk or soy milk. Both are creamy and add a nice taste. When it comes to sauces, try using a homemade vegan sweet chili sauce. Combine maple syrup with chili paste for a tasty alternative. You can also use coconut aminos instead of soy sauce for a soy-free option. Want to turn up the heat? Add hot sauce to your batter for spicy wings. Mix in some cayenne pepper or chili powder for an extra kick. You can also try a buffalo sauce to make them even spicier. For those who prefer sweet flavors, consider using different syrups. Maple syrup or agave nectar mixed with chili sauce can create a sweet and tangy taste. This gives your wings a unique twist that everyone will love. If you want to try other veggies, broccoli works well. Cut it into bite-sized pieces and follow the same steps as for cauliflower. You can also use Brussels sprouts or zucchini. When cooking these veggies, make sure to adjust the time. Zucchini cooks faster, so check for doneness after 8 minutes. For Brussels sprouts, you may want to cut them in half to ensure they cook evenly. This way, you can enjoy a variety of veggie wings! After enjoying these tasty wings, let them cool down. Use airtight storage containers to keep them fresh. If you plan to eat them soon, store them in the fridge. They last about 3-5 days there. For longer storage, freeze the wings in a freezer-safe bag. They will stay good for about 2-3 months in the freezer. To keep your wings crispy, use the air fryer again. Preheat it to 350°F (175°C). Place the wings in a single layer and heat them for about 5-7 minutes. This keeps them crunchy. You can also use an oven set to 375°F (190°C) for similar results. Cover them loosely with foil to avoid burning. These wings are perfect for meal prep. You can make them ahead for busy weeknights. Cook a big batch and store them in portions. They work great for lunches or snacks. Pair them with a side salad or some fresh veggies for a full meal. Yes, you can! To make these wings gluten-free, use gluten-free flour instead of all-purpose flour. There are great options like almond flour or rice flour. For the panko, look for gluten-free panko breadcrumbs. They work well and give a nice crunch. If you want more heat, add cayenne pepper or red pepper flakes to the batter. You can also mix some hot sauce into the sweet chili sauce before tossing the wings. This will give your wings that extra kick! Yes, you can use frozen cauliflower. Just remember to thaw it first. Pat it dry to remove extra moisture. This helps the batter stick better. Cooking time may need to be a little longer. Check until they are crispy and golden brown. You now have all the tools to make delicious cauliflower wings. From the main ingredients to storage tips, you can try this recipe with confidence. Remember to experiment with flavors and textures to find what you love best. And don’t forget, you can make these wings to fit your diet, whether vegetarian or vegan. Enjoy your flavorful snack, and share it with friends. It’s a great way to introduce healthy meals while having fun in the kitchen!

Air Fryer Sweet Chili Cauliflower Wings Delight

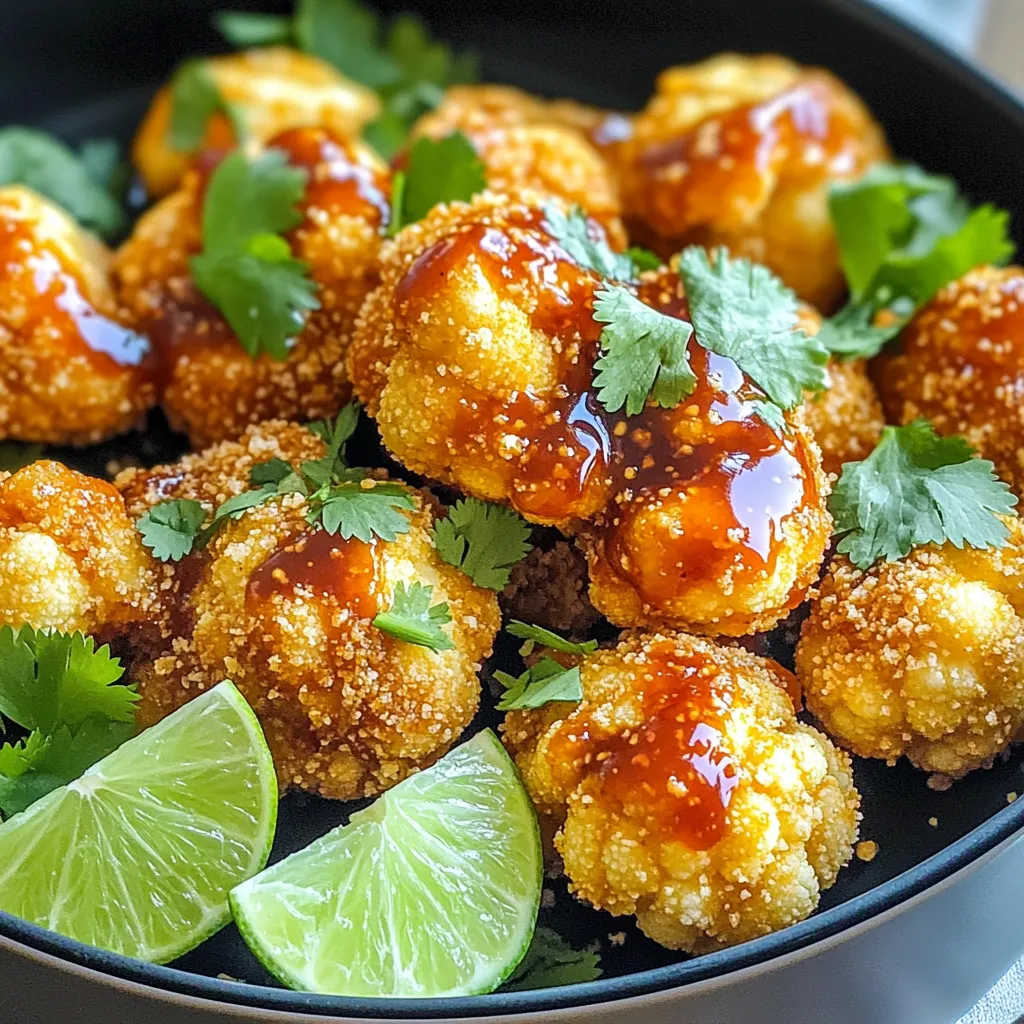
Are you ready to transform your snack game? With these Air Fryer Sweet Chili Cauliflower Wings, you can enjoy a

- 4 boneless, skinless chicken breasts - 1 packet (1 oz) ranch seasoning mix - 1 can (10.5 oz) cream of chicken soup - 1 cup chicken broth - ½ cup sour cream - 1 cup shredded cheddar cheese - 1 cup baby potatoes, halved - 1 teaspoon garlic powder - 1 teaspoon onion powder - Salt and pepper to taste In this recipe, the chicken breasts form the base of our dish. They soak up all the rich flavors as they cook. The ranch seasoning mix brings a zesty kick to the creamy sauce. The cream of chicken soup adds a smooth texture. Next, we have the chicken broth, which keeps the chicken moist and tender. Sour cream enhances the creaminess and gives depth to the flavor. Shredded cheddar cheese melts beautifully, adding a sharp taste that everyone loves. The baby potatoes round out the meal, soaking up all the delicious sauce. For seasonings, garlic powder and onion powder boost the flavor profile without overpowering the dish. Salt and pepper are essential to balance everything out and make each bite delightful. With these ingredients, you’ll create a meal that is not only easy but also full of flavor. Enjoy the process of making this comforting dish! - First, place the chicken breasts at the bottom of the slow cooker. Make sure they are spread out evenly. This helps them cook well and stay juicy. - Next, mix the creamy ranch sauce in a medium bowl. Combine the ranch seasoning mix, cream of chicken soup, chicken broth, sour cream, garlic powder, onion powder, salt, and pepper. Stir until everything is smooth and well-blended. - Now, pour the creamy ranch mixture over the chicken. Make sure each piece is coated well. This is what makes the chicken so flavorful! - Then, add the halved baby potatoes on top of the chicken. This way, they soak up all the tasty sauce while cooking. - Cover the slow cooker. Cook on low for 6-8 hours or on high for 3-4 hours. The chicken should be tender and fully cooked. - About 30 minutes before you serve, sprinkle the shredded cheddar cheese over the chicken and potatoes. Cover the cooker again and let the cheese melt. - Once everything is done, shred the chicken using two forks right in the slow cooker. Stir it all together to mix the flavors. - Serve hot, and don’t forget to garnish with fresh parsley. It adds color and a nice touch! To get the best results with chicken in a slow cooker, follow these tips: - Start with thawed chicken. Frozen chicken can cook unevenly. - Layer smartly. Place chicken at the bottom for even cooking. - Don’t peek. Each time you open the lid, you lose heat and cooking time. To prevent overcooking, use these strategies: - Choose the right setting. Low is best for tenderness. High cooks faster but may dry out the meat. - Check doneness. Chicken is done when it reaches 165°F. A meat thermometer helps! To enhance the creamy ranch chicken flavor, try adding: - Extra spices like smoked paprika or cayenne for heat. - Fresh herbs like thyme or rosemary for a fresh twist. For garnish, use fresh parsley. It adds color and a touch of brightness. Pair this dish with simple side dishes: - Steamed vegetables like green beans or broccoli for color and crunch. - Rice or mashed potatoes to soak up the creamy sauce. When serving, use a large platter. Shred the chicken and mix in the baby potatoes. This makes for a beautiful, inviting presentation. Garnish with parsley before serving for a pop of color. {{image_2}} - Alternatives for chicken: You can use turkey breasts or thighs. For a plant-based option, try chickpeas or tofu. - Cream soup options: If you want a lighter choice, use cream of mushroom soup or a homemade white sauce. Both will add great flavor. - Gluten-free version: Ensure your ranch seasoning and cream soup are gluten-free. Many brands offer safe options for gluten-free diets. - Dairy-free adaptations: Swap out sour cream with coconut yogurt. Use dairy-free cheese to keep it creamy without dairy. - Adding vegetables or herbs: Toss in diced carrots, bell peppers, or spinach for extra nutrition. Fresh herbs like thyme or rosemary will enhance the flavor. - Adjusting spice levels: If you like it spicy, add crushed red pepper flakes. For a milder taste, stick to just the ranch seasoning. To keep your Slow Cooker Creamy Ranch Chicken fresh, store leftovers properly. First, let the dish cool down to room temperature. Then, divide it into smaller portions. This helps cool it faster and makes it easy to reheat later. Use airtight containers for storage. Glass containers work great since they do not stain. You can also use plastic containers. Ensure they are freezer-safe if you plan to freeze the dish. When it comes to reheating, you have two good options: the oven or microwave. The oven keeps the chicken juicy and the potatoes soft. Heat it at 350°F (175°C) for about 20-25 minutes. Cover it with foil to keep moisture in. The microwave is quicker. Place your portion on a microwave-safe plate. Heat it for 1-2 minutes, checking every 30 seconds. Stir to ensure even heating. Keep in mind that the microwave might dry it out a bit. Freezing is a great way to save your Slow Cooker Creamy Ranch Chicken. To freeze, let the dish cool completely. Then, transfer it to a freezer-safe container. Remove as much air as possible to prevent freezer burn. For best results, use it within 3 months. To thaw, move the container from the freezer to the fridge. Let it sit overnight. If you're in a hurry, you can use the microwave’s defrost setting. Just be careful not to cook it while thawing. It takes about 6-8 hours on low or 3-4 hours on high. The chicken needs time to cook slowly until it is tender and juicy. The longer cooking time allows the flavors to blend, creating a rich taste. Yes, you can use frozen chicken breasts. However, you must adjust the cooking time. It may take an extra hour on low or about 30 minutes on high. Always ensure the chicken is fully cooked before serving. Here are some great sides to complement the recipe: - Rice or quinoa for a hearty base - Steamed vegetables like broccoli or green beans - A fresh salad with light dressing - Garlic bread for a fun twist Yes, you can adapt this recipe for an Instant Pot. First, use the sauté function to brown the chicken. Then, add the creamy ranch mixture and potatoes. Cook on high pressure for about 10-12 minutes. Allow it to naturally release pressure for 10 minutes before serving. This method gives you a quicker, yet still delicious, meal. This blog post shared a simple way to make Slow Cooker Creamy Ranch Chicken. We covered key ingredients, cooking steps, and tips for flavor. You learned how to customize the dish and store leftovers. Remember, this recipe is flexible and allows for dietary changes. Simple adjustments can make it uniquely yours. Enjoy cooking this dish, and don't hesitate to get creative. Cooking should be fun and rewarding. Try it out, and enjoy the delicious results!

Slow Cooker Creamy Ranch Chicken Irresistible Recipe

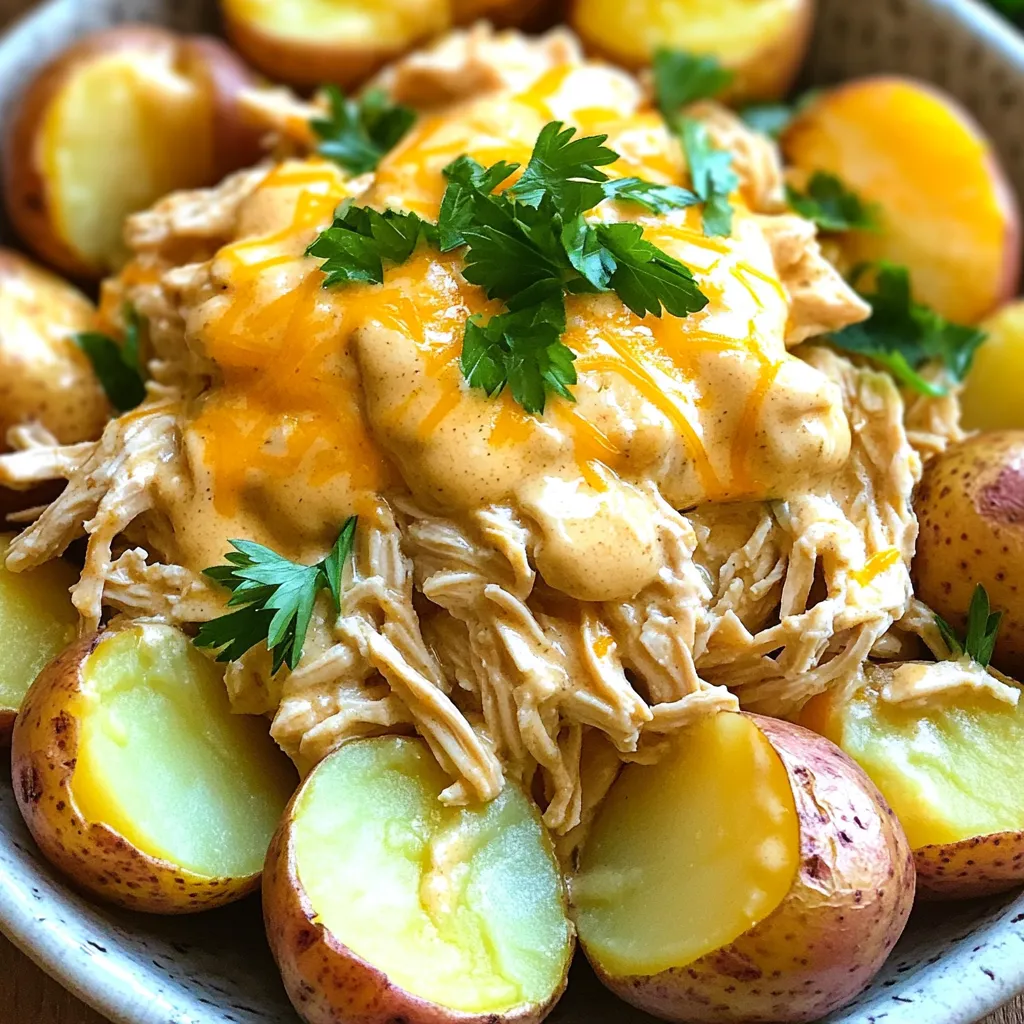
Are you craving a hearty meal that requires minimal effort? You’re in luck! My Slow Cooker Creamy Ranch Chicken is

- 2 cans (15 oz) white beans (cannellini or navy) - 1 medium onion, diced - 3 cloves garlic, minced - 2 large carrots, diced - 2 celery stalks, diced - 4 cups vegetable broth - 1 cup coconut milk (or heavy cream) - 1 teaspoon dried thyme - 1 teaspoon dried oregano - 1 cup kale, chopped - Salt and pepper to taste - 2 tablespoons olive oil - Fresh parsley for garnish This soup is easy to make with simple, fresh ingredients. You start with white beans, either cannellini or navy. They give the soup a creamy texture and are full of protein. Next, you need a medium onion. Dice it up to add flavor. Garlic plays a big role too. Use three cloves, minced, for a tasty kick. Carrots and celery provide sweetness and crunch. Dice two large carrots and two celery stalks to add to the mix. For the base, you will use vegetable broth. Four cups will create a rich flavor. Then, for that creamy finish, pick coconut milk or heavy cream. One cup works perfectly. Don't forget the herbs! One teaspoon each of dried thyme and oregano will heighten the taste. You’ll also need one cup of fresh kale for a burst of color and nutrients. Finally, season with salt and pepper to your liking. Use two tablespoons of olive oil to sauté the veggies and bring it all together. Top it off with fresh parsley for a nice garnish. Start by heating olive oil in a large pot over medium heat. Once hot, add the diced onion, carrots, and celery. Sauté these for about 5-7 minutes until they soften. The onion should turn translucent. Next, stir in the minced garlic, dried thyme, and dried oregano. Cook for another minute until you smell the herbs. This step builds a strong flavor base for your soup. Now, it’s time to add the white beans. You will use two cans of drained and rinsed beans, either cannellini or navy. Pour these into the pot, along with the vegetable broth. Bring everything to a gentle simmer. After it simmers, you can use a fork or a potato masher to lightly mash some of the beans. This will help thicken the soup and give it a nice texture. Pour in the coconut milk and stir well to mix. Let the soup simmer for another 5-10 minutes. This allows all the flavors to meld together. After that, add the chopped kale and cook for 2-3 minutes until it wilts. Finally, season your soup with salt and pepper to taste. Remove it from the heat and let it cool slightly before serving. To boost the flavor of your creamy one-pot Tuscan white bean soup, try adding spices like: - 1 teaspoon smoked paprika - 1 teaspoon cumin These spices add warmth and depth. Fresh herbs like basil or rosemary can also brighten the soup. Using homemade broth makes a big difference. Homemade broth has richer flavors than store-bought options. If you can, use your own. If not, choose a low-sodium store-bought broth to control salt levels. To thicken the soup, mash some of the white beans. This gives the soup a nice, creamy texture. You can use a fork or a potato masher for this. For a creamier soup, swap coconut milk for heavy cream. Coconut milk adds a light sweetness, while heavy cream makes it richer. You can also blend a portion of the soup for a smooth finish. Serve the soup in deep bowls. Garnish with chopped fresh parsley for a pop of color. Drizzle extra coconut milk on top for visual appeal. Pair the soup with crusty bread. A simple green salad also complements the meal well. Enjoy your delicious creation! {{image_2}} You can switch ingredients to fit your needs. For a dairy-free option, use coconut milk instead of cream. Almond milk works too but may alter the flavor. If you want more greens, try spinach or Swiss chard. Both add nutrients and taste. You can even mix in bell peppers or zucchini for extra flavor. Want to make this soup heartier? Add cooked chicken or sausage. These proteins boost nutrition and flavor. If you like heat, sprinkle in chili flakes or paprika. This will give your soup a nice kick. Adjust the amount based on your spice level preference. You can enjoy this soup in different ways. To make it thicker, let it simmer longer. This gives it a stew-like texture. If you want a fun snack, serve it as a dip with crusty bread or crackers. This makes for a great appetizer or party dish. Enjoy experimenting with your own variations! To store leftovers, let the soup cool completely. Transfer it to an airtight container. This soup lasts in the fridge for up to four days. When you want to reheat, pour the soup into a pot. Heat over medium until warm. Stir occasionally to avoid sticking. You can also use a microwave. Just place it in a microwave-safe bowl and heat in short bursts, stirring in between. For longer storage, you can freeze the soup. First, let it cool down completely. Then, pour it into freezer-safe bags or containers. Make sure to leave some space for expansion. This soup can last in the freezer for up to three months. To thaw, place the container in the fridge overnight. For a quicker option, you can use the microwave or place the bag in cold water. Once thawed, reheat it in a pot or microwave until hot. You can use several other beans. Here are some great options: - Chickpeas: They add a nutty flavor and a nice texture. - Pinto beans: These have a creamy feel and work well in soups. - Black beans: They offer a richer taste and color. Each type of bean brings its own unique flavor. You can mix and match based on your taste. Yes, using fresh herbs can enhance the soup's flavor. Fresh herbs are brighter and more fragrant. Here are some great choices: - Fresh thyme: Use about three times as much as dried. - Fresh oregano: It gives a nice punch to the dish. - Fresh basil: Add it at the end for a fresh twist. Fresh herbs can uplift your soup's taste. They add a lively flavor you will love. This soup is already vegetarian with its ingredients. To keep it vegetarian, focus on these tips: - Use vegetable broth instead of chicken broth. - Ensure your coconut milk is dairy-free. - Add more veggies like spinach or zucchini for extra flavor. By following these steps, you can enjoy a hearty, vegetarian soup. It will be just as creamy and delicious! This blog post covered how to make a delicious white bean soup. We discussed the key ingredients, steps to prepare the base, and how to build the soup's rich flavor. I shared tips to enhance taste and texture, plus fun variations to try. Finally, I outlined proper storage methods to keep leftovers fresh. Experiment with this soup in your own kitchen. Enjoy the process and make it your own!

Creamy One-Pot Tuscan White Bean Soup Delight

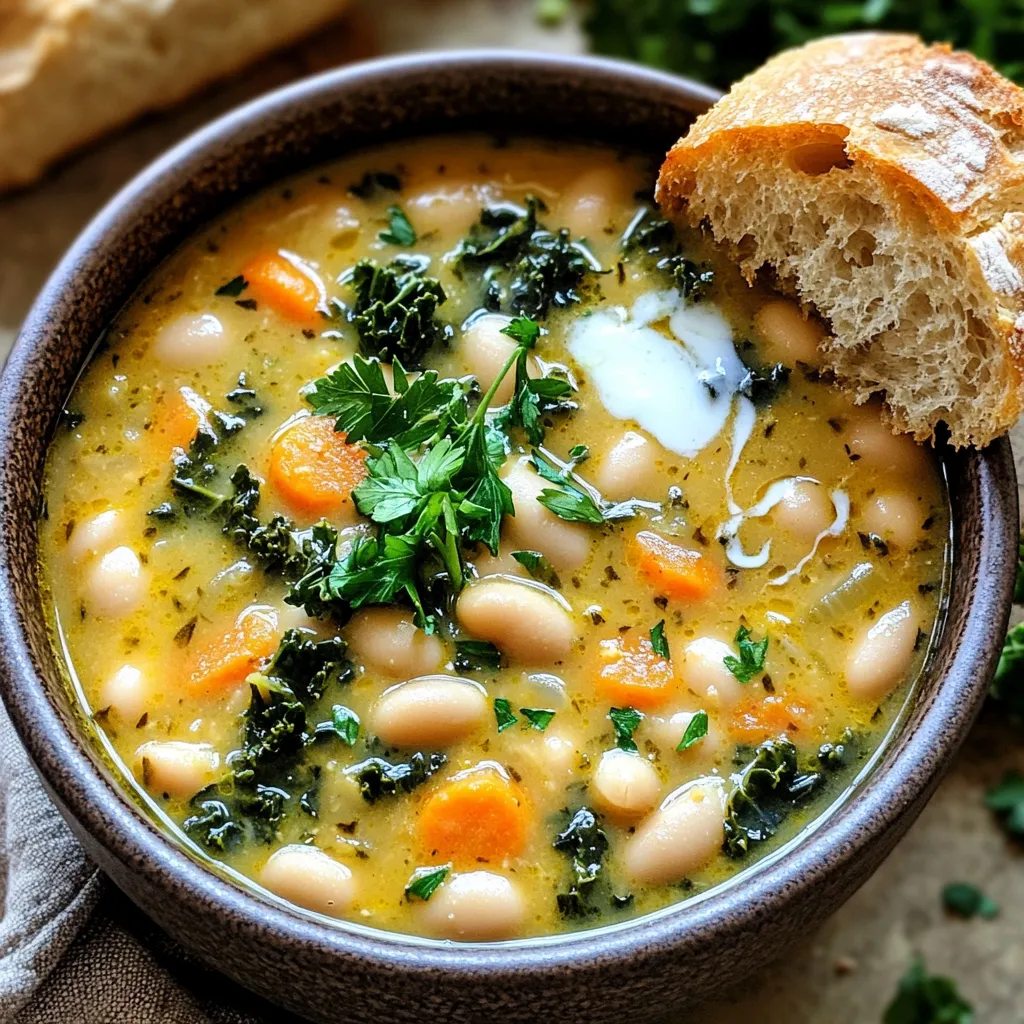
Welcome to a comforting bowl of goodness! Today, I’ll show you how to make a creamy, one-pot Tuscan white bean

- 1 cup apple cider - 1 ½ cups all-purpose flour - 1 teaspoon baking powder - ½ teaspoon baking soda - ¼ teaspoon salt - 1 teaspoon ground cinnamon - ½ teaspoon ground nutmeg - ½ cup granulated sugar - 1 large egg - ½ cup milk - ¼ cup unsalted butter, melted - 1 teaspoon vanilla extract - 1 cup powdered sugar (for glaze) - 2-3 tablespoons apple cider (for glaze) If you have dietary needs, there are great swaps. You can use gluten-free flour instead of all-purpose flour. For a dairy-free version, try almond milk and coconut oil instead of milk and butter. If you need an egg-free option, use applesauce or a flax egg. These swaps keep the flavor rich and tasty. Using high-quality ingredients makes a big difference. Fresh apple cider gives a strong, sweet flavor. Good flour helps with texture and rise. Fresh spices add warmth and depth. Quality ingredients ensure your donuts taste great and look appealing. Always choose the best you can find for the best results. To start, you need to reduce the apple cider. Pour 1 cup of apple cider into a small pan. Heat it over medium heat until it boils. Then, lower the heat and let it simmer. You want the cider to thicken. This takes about 15 to 20 minutes. You should end up with about ⅓ cup of cider. Once it’s done, let it cool a bit before using. Next, get a large mixing bowl. In it, whisk together the dry ingredients. You will need 1 ½ cups of all-purpose flour, 1 teaspoon baking powder, ½ teaspoon baking soda, and ¼ teaspoon salt. Add 1 teaspoon of ground cinnamon and ½ teaspoon of ground nutmeg for flavor. Lastly, mix in ½ cup of granulated sugar. Make sure everything is well combined. Now, you’ll mix the wet ingredients. In a different bowl, whisk 1 large egg, ½ cup of milk, ¼ cup of melted unsalted butter, and 1 teaspoon of vanilla extract. Don't forget to add the reduced apple cider. Mix until the mixture is smooth. Slowly add this wet mixture to the dry ingredients. Stir gently until just combined. The batter should still be a bit lumpy, so don’t overmix. Preheat your oven to 375°F (190°C) and grease your donut pan with cooking spray. Spoon the batter into each well of the donut pan. Fill them about ¾ full to allow space for rising. Bake for 10 to 12 minutes. You know they’re done when they turn golden brown. Use a toothpick to check; it should come out clean. Let them cool in the pan for 5 minutes. Then, move them to a wire rack to cool completely. While the donuts cool, it’s time to make the glaze. In a small bowl, whisk together 1 cup of powdered sugar and 2 to 3 tablespoons of apple cider. Keep mixing until it’s smooth. You want a drizzle-like consistency for the glaze. Once the donuts are fully cool, dip the tops into the glaze. Let the excess drip off before placing them back on the wire rack. This will help the glaze set nicely. Enjoy your delicious homemade apple cider glazed donuts! To make your apple cider glazed donuts fluffy, you need the right mix. Here are some best practices: - Use fresh ingredients for the best flavor. - Measure your flour correctly. Too much flour makes dense donuts. - Mix the batter until it's just combined. Lumpy is okay! - Don’t open the oven door too soon while baking. This keeps the heat in. Even the best cooks make mistakes. Here are some common ones: - Overmixing the batter can lead to tough donuts. - Not reducing the apple cider enough affects flavor. Aim for about ⅓ cup. - Filling the donut pan too full can cause overflow. Fill only ¾ full. - Forgetting to grease the pan can ruin your donuts. Always grease it well! Having the right tools makes baking easier and more fun. Here’s what I recommend: - A non-stick donut pan helps the donuts release easily. - A whisk makes mixing dry and wet ingredients faster. - Measuring cups and spoons ensure accurate ingredient amounts. - A wire rack is essential for cooling and glazing the donuts. - A small bowl for mixing the glaze keeps it neat and easy. With these tips, you will create the perfect apple cider glazed donuts every time! {{image_2}} You can make these donuts even more special by adding flavors. For a chocolate twist, mix in some cocoa powder into your dry ingredients. Use about ¼ cup for a rich taste. You can also add chocolate chips to the batter for extra sweetness. Caramel is another great option. Drizzle warm caramel over the glazed donuts for a gooey treat. You can even mix caramel into the glaze. Just replace some apple cider with caramel syrup for a fun change. Glazing is where you can get creative! While the apple cider glaze is sweet and tangy, you can try other glazes too. A simple vanilla glaze is easy to make. Just mix powdered sugar with milk and vanilla extract. You might also want to top the donuts with a chocolate glaze. Melt chocolate chips with a little butter and dip the donuts in. For a crunchy finish, add chopped nuts or sprinkles on top of the glaze. If you need gluten-free donuts, swap the all-purpose flour with a gluten-free blend. Make sure it has xanthan gum for the right texture. For a vegan option, replace the egg with a flax egg. Mix 1 tablespoon of ground flaxseed with 2.5 tablespoons of water. Let it sit until it thickens. Use plant-based milk and butter as well. These swaps will give you tasty donuts that everyone can enjoy! To keep your apple cider glazed donuts fresh, place them in an airtight container. Make sure they cool completely before storing. If you leave them out, they may become dry. Store them at room temperature for up to two days. For longer storage, the fridge is a good option. When you want to enjoy a warm donut, use the microwave. Heat one donut for about 10-15 seconds. This will make it soft and tasty again. If you have an oven, preheat it to 350°F (175°C). Place the donuts on a baking sheet and heat for 5-7 minutes. This method helps keep the glaze nice. You can freeze apple cider glazed donuts for up to three months. Wrap each donut in plastic wrap and then place them in a freezer bag. When you want to eat one, take it out and let it thaw in the fridge overnight. For a warm treat, reheat it in the microwave or oven as noted above. Yes, you can use store-bought apple cider. It saves time and gives good flavor. Just choose a cider without added sugars or preservatives. This will keep the taste fresh and natural. To adjust for fewer donuts, cut the recipe in half. Use ½ cup apple cider, ¾ cup flour, and other ingredients accordingly. This will give you about six donuts. Just remember to bake them for a shorter time. If you don’t have a donut pan, you can use a muffin tin. Just fill the cups about halfway. This will give you donut holes instead of full donuts. They will still taste great! To make the glaze thicker, add more powdered sugar. If you want it thinner, add a bit more apple cider. Mix until you reach your desired consistency. It should drizzle nicely over the donuts. These donuts stay fresh for about two days at room temperature. Store them in an airtight container. For longer storage, refrigerate them for about a week or freeze them for up to a month. Just reheat before serving. In this post, we explored the key ingredients for making delicious donuts and how to prepare them step-by-step. We discussed tips for the best texture and common mistakes to avoid, plus ways to customize your recipe. Finally, we covered storage options to keep your treats fresh. Enjoy crafting your perfect batch of donuts. Remember, quality ingredients and a little creativity go a long way!

Apple Cider Glazed Donuts Irresistible Homemade Treat

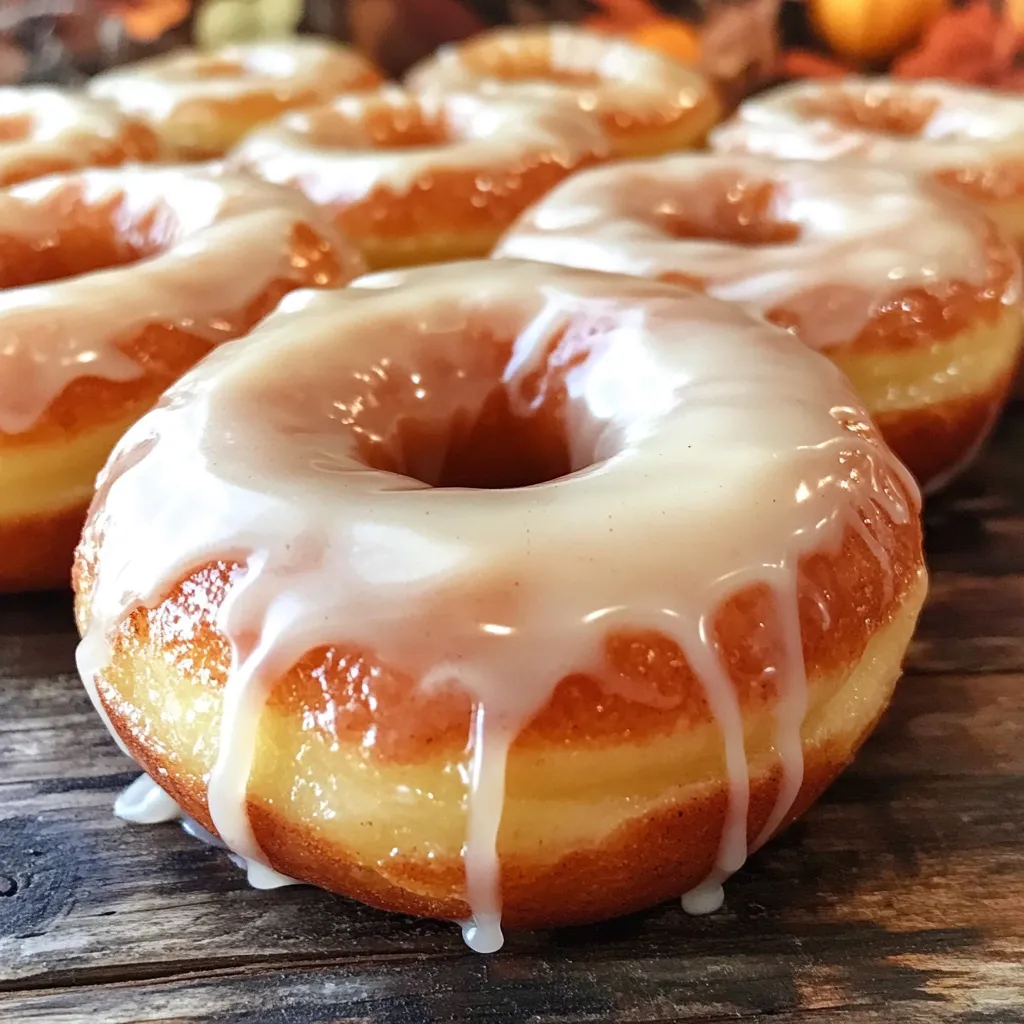
If you’re craving a sweet fall treat, look no further! In this guide, I’ll show you how to make Apple

To make bakery-style chocolate pumpkin muffins, you'll need the following ingredients: - 1 cup canned pumpkin puree - 1/2 cup granulated sugar - 1/2 cup brown sugar, packed - 1/2 cup vegetable oil - 2 large eggs - 1 teaspoon vanilla extract - 1 1/2 cups all-purpose flour - 1/2 cup unsweetened cocoa powder - 1 teaspoon baking soda - 1 teaspoon baking powder - 1/2 teaspoon salt - 1 teaspoon ground cinnamon - 1/2 teaspoon ground nutmeg - 1/2 cup chocolate chips (milk or dark) - Optional: Pumpkin seeds for topping These ingredients work together to create a rich, moist muffin. The pumpkin adds moisture and flavor, while the cocoa makes it chocolatey. The sugars give sweetness, and the spices add warmth. The chocolate chips melt into gooey pockets of goodness. You can use pumpkin seeds on top for a nice crunch. Each ingredient plays a key role in achieving that perfect bakery-style muffin. - Preheat the oven to 350°F (175°C). - Line a muffin pan with cupcake liners or grease it with cooking spray. - In a large bowl, whisk together the pumpkin puree, granulated sugar, brown sugar, vegetable oil, eggs, and vanilla extract. Mix until it is smooth and well combined. - In a separate bowl, sift the all-purpose flour, cocoa powder, baking soda, baking powder, salt, ground cinnamon, and ground nutmeg. This helps to mix the dry ingredients evenly. - Gradually fold the dry ingredients into the wet mixture. Stir gently until just combined, leaving a few lumps. - Then, fold in the chocolate chips until they are spread throughout the batter. - Spoon the batter into the muffin pan, filling each cup about 3/4 full. If you want, sprinkle some pumpkin seeds on top. - Bake in the preheated oven for 18-20 minutes. Check for doneness by inserting a toothpick into the center. It should come out clean. - Let the muffins cool in the pan for about 5 minutes. Then, transfer them to a wire rack to cool completely. To make the best muffins, avoid over-mixing the batter. Mix just until the dry and wet ingredients combine. A few lumps are okay. Over-mixing can make your muffins tough. Next, test for doneness with a toothpick. Insert it into the center of a muffin. If it comes out clean, your muffins are ready. If it has wet batter, bake a few more minutes. For even baking, rotate your muffin pan halfway through. This helps all muffins bake evenly. If your oven has hot spots, this step is key. Also, adjust for altitude or humidity. If you live in a high area, reduce the sugar a bit. This keeps the muffins from collapsing. In humid weather, you may need a bit more flour. Serve your muffins warm with a dusting of powdered sugar. You can also drizzle melted chocolate on top for a treat. Pair these muffins with coffee or tea for a cozy snack. The warm flavors of pumpkin and chocolate blend well with these drinks. Enjoy! {{image_2}} You can switch up the chocolate in your muffins. Use milk chocolate for a sweet bite. Dark chocolate gives a rich taste and pairs well with pumpkin. You can also add nuts like walnuts or pecans. Dried fruits like cranberries or raisins add a nice chew and sweetness. Want to change the spice game? Try adding ginger or cloves for a warm flavor. You can also make pumpkin spice muffins by boosting the cinnamon and nutmeg. This gives your muffins a classic fall taste that everyone loves. For a healthier twist, use whole wheat flour. It adds fiber and makes the muffins heartier. You can also replace the sugars with alternatives like honey or maple syrup. These swaps keep your treats tasty while cutting down on refined sugars. To keep your muffins fresh, store them in an airtight container. This helps seal in moisture. You can use a plastic container or a zip-top bag. Line it with a paper towel to absorb extra moisture. Make sure not to stack the muffins too high. This prevents them from getting squished. Store them at room temperature for up to three days. If you want them to last longer, consider freezing. Freezing muffins is easy and keeps them tasty. First, let the muffins cool completely. Then, wrap each muffin in plastic wrap. This keeps out air and prevents freezer burn. Place the wrapped muffins in a freezer-safe bag. Label the bag with the date. You can freeze them for up to three months. To reheat, take out a muffin and unwrap it. You can use the microwave for quick heating. Heat on medium for about 30 seconds. If you prefer, you can also use the oven. Preheat it to 350°F (175°C) and heat for about 10 minutes. Enjoy your delicious muffins as if they were fresh! Yes, you can use homemade pumpkin puree. Just make sure it is smooth. Homemade puree can add fresh flavor to your muffins. It’s best to drain any excess water from it. This helps keep your muffins from being too wet. You can replace eggs with applesauce or mashed bananas. Use 1/4 cup of either for each egg. This keeps the muffins moist and adds natural sweetness. You can also use flaxseed meal mixed with water. Combine 1 tablespoon of flaxseed with 2.5 tablespoons of water. Let it sit for a few minutes before adding. To make gluten-free muffins, swap all-purpose flour for a gluten-free blend. Look for blends that work for baking. Check that the blend contains xanthan gum, as it helps provide structure. This way, your muffins will still rise and be fluffy. The key to moist muffins is not over-mixing the batter. Mix just until combined; lumps are fine. Also, using the right amount of oil and adding pumpkin helps keep them moist. Don't skip the chocolate chips; they add moisture and flavor. Yes, you can double the recipe easily. Just use double the ingredients listed. Make sure your mixing bowls are large enough to hold the extra batter. This way, you can enjoy more muffins to share with friends or family. These pumpkin chocolate chip muffins are simple and fun to make. We covered ingredients, steps, and tips to perfect your bake. Remember to mix wet and dry ingredients carefully. Adjust flavors as you like, and don’t forget about storage tips. Bake these muffins for a tasty treat anytime. Your kitchen will smell amazing, and everyone will enjoy them. Try different variations to find your favorite. Happy baking!

Bakery-Style Chocolate Pumpkin Muffins Easy Recipe

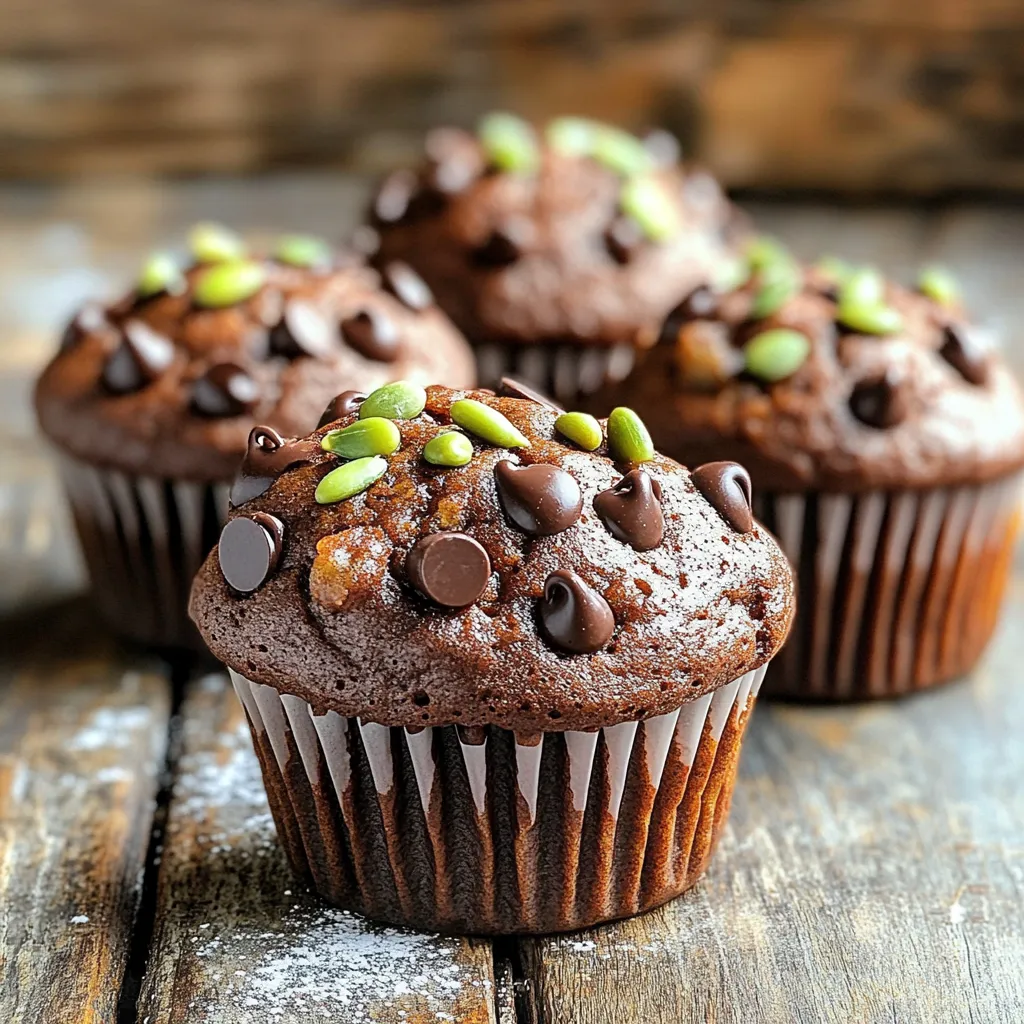
Are you ready to bake some bliss? These Bakery-Style Chocolate Pumpkin Muffins combine the cozy taste of fall with rich

- 1 ripe avocado, mashed - 1 cup brown sugar - 1/2 cup white sugar - 1/4 cup coconut oil, melted - 1 small egg - 1 teaspoon vanilla extract - 1 1/2 cups all-purpose flour - 1 teaspoon baking soda - 1/2 teaspoon salt - 1 cup chocolate chips (dark or semi-sweet) - 1/2 cup chopped walnuts (optional) The star of this cookie is the ripe avocado. It adds creaminess and healthy fats. The mix of brown and white sugar gives a nice sweetness. Coconut oil keeps the cookies moist and adds flavor. Feel free to experiment! Here are a few ideas: - Chopped nuts (like walnuts or pecans) for crunch - Dried fruit for sweetness - Oats for a chewy texture These add-ins can make your cookies unique and fun. Avocados are not just tasty; they are good for you too. They are rich in healthy fats, which can help lower bad cholesterol. They also provide fiber, which helps with digestion. Using avocado in cookies makes them feel less guilty. You still get that yummy chocolate flavor, but with a boost of nutrition. Enjoying these cookies means you can treat yourself while being kind to your body. {{ingredient_image_1}} First, gather all your ingredients. You need one ripe avocado, brown sugar, white sugar, melted coconut oil, one egg, and vanilla extract. Next, measure out all-purpose flour, baking soda, salt, chocolate chips, and optional walnuts. Preheat your oven to 350°F (175°C). Line a baking sheet with parchment paper for easy cleanup. In a large bowl, mash the avocado until it’s smooth. Mix in the brown sugar and white sugar until creamy. Then, add the melted coconut oil, egg, and vanilla. Beat these ingredients together until they blend well. In another bowl, whisk the flour, baking soda, and salt. Gradually add this mixture to the wet ingredients and stir until just combined. Finally, fold in the chocolate chips and walnuts if you choose to use them. Using a tablespoon or cookie scoop, drop spoonfuls of dough onto the prepared baking sheet. Make sure to leave space between each cookie, as they will spread while baking. Bake your cookies for 10-12 minutes. Look for golden brown edges. Once done, take them out and let them cool on the sheet for about 5 minutes. After that, transfer the cookies to a wire rack to cool completely. Enjoy the delicious aroma as they cool! To mash avocado well, choose a ripe one. The skin should be dark green. Press gently; it should feel soft. Cut the avocado in half and remove the pit. Use a fork to mash it in a bowl. Aim for a smooth, creamy texture. This ensures even mixing in your cookies. For the best cookies, mix the avocado well with sugars until smooth. This helps to blend flavors. When adding dry ingredients, mix just until combined. Over-mixing can make the cookies tough. The right balance keeps them soft and chewy, with a rich chocolate flavor. Avoid using unripe avocados; they will not mash well. Also, don’t skip the coconut oil. It adds moisture and flavor. Make sure your oven is preheated. Unbaked dough can spread too much if the oven is cold. Lastly, leave space between cookies on the baking sheet. They need room to grow! Pro Tips Use Ripe Avocado: Ensure your avocado is perfectly ripe for the best flavor and texture. A ripe avocado will be slightly soft to the touch but not mushy. Chill the Dough: For thicker cookies, chill the dough for about 30 minutes before baking. This will help prevent spreading and create a chewy texture. Experiment with Sweeteners: Feel free to substitute part of the sugars with maple syrup or honey for a different flavor profile and added moisture. Storing Cookies: Store your cookies in an airtight container at room temperature for up to a week, or freeze them for longer storage. Just make sure to separate layers with parchment paper. {{image_2}} To make these cookies gluten-free, swap out the all-purpose flour. You can use a 1:1 gluten-free flour blend. This blend works well in most baking recipes. Just be sure to check the label for any added ingredients. The rest of the recipe stays the same. You still get that soft, chewy texture. For a vegan version, replace the egg. You can use a flax egg instead. To make a flax egg, mix 1 tablespoon of ground flaxseed with 2.5 tablespoons of water. Let it sit for about 5 minutes until it thickens. Also, choose dairy-free chocolate chips. This keeps the cookies plant-based and just as tasty. Want to jazz up your cookies? Try adding nuts like walnuts or pecans. They add a nice crunch. You can also add spices like cinnamon or nutmeg for a warm flavor. For a fun twist, mix in some dried fruit, like cranberries or cherries. These additions make each bite exciting and unique. To keep your cookies fresh, store them in an airtight container. This helps retain their moisture. I recommend placing parchment paper between layers to avoid sticking. You can keep them at room temperature for up to five days. If you want them to last longer, refrigeration is an option. Just remember to let them come to room temperature before eating. If you want to save some for later, freezing is easy. First, let the cookies cool completely. Then, place them on a baking sheet in a single layer. Freeze them for about an hour until firm. After that, transfer the cookies to a freezer-safe bag or container. They can last for up to three months in the freezer. Just label the bag with the date so you remember. To enjoy your cookies warm, you can reheat them. Preheat your oven to 350°F (175°C). Place the cookies on a baking sheet. Heat them for about 5-7 minutes. This will bring back their soft texture. If you're in a hurry, you can also use the microwave. Heat them for about 10-15 seconds. Just be careful not to overheat them, or they might get tough. Yes, you can use ripe avocados. They should be soft and easy to mash. This helps create a smooth cookie dough. Ripe avocados add creaminess and healthy fats to the mix. These cookies taste rich and delicious. The avocado adds a subtle flavor. You still get the sweet, chocolatey taste you love. Many people find these cookies even better than classic ones. The texture is soft and chewy, just like you want. You can use unsalted butter or vegetable oil instead of coconut oil. Both options work well. Butter gives a rich flavor, while vegetable oil keeps it light. Choose whichever you prefer for your cookies. These cookies last about a week at room temperature. To keep them fresh, store them in an airtight container. You can also freeze them for up to three months. Just thaw them when you're ready to enjoy! Avocado chocolate chip cookies are a fun twist on a classic treat. We discussed key ingredients, preparation steps, and tips for perfecting texture. You learned to avoid common mistakes and explore gluten-free and vegan options. Storing and reheating these cookies keeps them fresh and tasty. In the end, these cookies are not just delicious, but also healthier. Enjoying them can add joy to your baking adventures!

Avocado Chocolate Chip Cookies Healthy and Tasty Treat

Craving a sweet treat that’s both healthy and delicious? You’re in the right place! In this blog post, I’ll show

The right ingredients make all the difference in your Chocolate Chip Banana Bread Muffins. Here’s what you need: - 3 ripe bananas, mashed - 1/3 cup melted coconut oil - 1/2 cup brown sugar - 1 large egg, beaten - 1 teaspoon vanilla extract - 1 teaspoon baking soda - Pinch of salt - 1 teaspoon ground cinnamon - 1 1/2 cups all-purpose flour - 1/2 cup semi-sweet chocolate chips - 1/4 cup chopped walnuts (optional) Ripe bananas are key. They add sweetness and moisture. Coconut oil gives a nice texture. Brown sugar adds a rich flavor. The egg binds the mix. Vanilla and cinnamon elevate the taste. Baking soda helps muffins rise. Salt balances sweetness. Flour forms the base. Chocolate chips bring joy. Walnuts add crunch, but they’re optional. Gather these ingredients to make your muffins shine. The process is simple, and the reward is delicious! {{ingredient_image_1}} - Preheat the oven and prepare muffin tin First, set your oven to 350°F (175°C). Line a muffin tin with paper liners or lightly grease it with non-stick spray. This keeps the muffins from sticking. - Mix the wet ingredients In a large bowl, mash three ripe bananas. Then, add 1/3 cup of melted coconut oil. Mix until you see no lumps. Next, stir in 1/2 cup of brown sugar, one beaten egg, and 1 teaspoon of vanilla extract. Blend these well together. - Combine dry ingredients with wet mixture Sprinkle 1 teaspoon of baking soda, a pinch of salt, and 1 teaspoon of ground cinnamon over the wet mixture. Mix it well. Gradually add 1 1/2 cups of all-purpose flour. Stir until just combined, but don’t overmix. This keeps the muffins soft. - Fold in chocolate chips and walnuts Now, gently fold in 1/2 cup of semi-sweet chocolate chips. If you like, add 1/4 cup of chopped walnuts. Distribute them evenly throughout the batter. - Bake the muffins Scoop the batter into the muffin tin. Fill each cup about 2/3 full. Bake in the oven for 18-22 minutes. Check if they are done by inserting a toothpick in the center. If it comes out clean, they are ready. - Cooling process and serving suggestions Let the muffins cool in the tin for 5 minutes. Then, transfer them to a wire rack to cool completely. Serve them warm with honey or whipped cream. Enjoy them with coffee or tea for a perfect treat! - Avoiding overmixing: Mix the batter just enough. Overmixing can make the muffins tough. Stir until you see no dry flour. It’s okay if you have lumps; they help keep the muffins soft. - Ensuring ripe bananas: Use very ripe bananas for the best flavor and texture. They should be brown and soft. Ripe bananas add natural sweetness and moisture to your muffins. - Correct oven temperature: Always preheat your oven to 350°F (175°C). A hot oven helps the muffins rise well. Use an oven thermometer to check the temperature if you can. - Adding spices: Spice it up with ground cinnamon or nutmeg. These spices bring warmth and depth to the flavor. Just a teaspoon can make a big difference. - Pairing suggestions with toppings: Serve your muffins warm and top them with honey or whipped cream. For a fun twist, try adding a smear of peanut butter or a sprinkle of nuts on top. - Using high-quality chocolate: Choose semi-sweet chocolate chips for a rich taste. High-quality chocolate melts well and enhances the overall flavor of the muffins. Pro Tips Use Overripe Bananas: The riper the bananas, the sweeter your muffins will be. Look for bananas with brown spots for optimal flavor. Don’t Overmix: When adding the flour, stir just until combined. Overmixing can lead to dense muffins instead of light and fluffy ones. Add a Touch of Sea Salt: A sprinkle of sea salt on top before baking enhances the chocolate flavor and creates a delightful contrast. Storage Tips: Store any leftover muffins in an airtight container at room temperature for up to 3 days or freeze them for longer storage. {{image_2}} You can change up the flavor of these muffins easily. One fun twist is to make peanut butter chocolate chip banana muffins. Just add 1/2 cup of creamy peanut butter to your wet mix. This adds a rich taste that blends well with banana. For those who need nut-free options, skip the walnuts. You can still enjoy a great texture and taste. Another option is to add some dried fruits, like raisins or cranberries. Shredded coconut also gives a nice tropical touch. If you want gluten-free muffins, use a gluten-free flour blend instead of all-purpose flour. Many blends work well and keep the muffins soft. For a vegan version, swap the egg for a flax egg. To make a flax egg, mix 1 tablespoon of ground flaxseed with 2.5 tablespoons of water. Let it sit for a few minutes to thicken. You can also use maple syrup instead of brown sugar for a natural sweetener. If you want to cut back on sugar, try using less brown sugar or a sugar substitute. Mashed bananas add natural sweetness, so you can reduce the added sugar. This way, you keep the flavor without too much sweetness. To keep your muffins fresh, store them in an airtight container. This will prevent them from drying out. You can also use a zip-top bag. Place a piece of parchment paper inside the bag to absorb moisture. Store them at room temperature for up to three days. If you want to keep them longer, refrigeration is not the best choice. It can make them dry. For the best flavor, enjoy them within the first two days. If you plan to keep them longer, freezing is a great option. To freeze your muffins, first let them cool completely. This will prevent ice crystals from forming. Wrap each muffin tightly in plastic wrap. Then place them in a freezer bag or container. Be sure to label the bag with the date. You can freeze them for up to three months. When you’re ready to eat one, remove it from the freezer. Unwrap it and place it on a plate. Let it thaw at room temperature for about 30 minutes. For a warm muffin, you can microwave it for 15-20 seconds. Enjoy your treat warm! How do I make muffins fluffy? To make muffins fluffy, you need to use ripe bananas. They add moisture and natural sweetness. Mix the wet and dry ingredients separately before combining them. This keeps the batter light. Don't overmix; stir until just combined. This helps create air pockets for fluffiness. Can I use unripe bananas? Using unripe bananas is not ideal. They lack the sweetness and moisture of ripe ones. Unripe bananas can lead to dense muffins. For the best flavor and texture, always choose ripe, spotty bananas. They bring out the best taste in your muffins. What can I substitute for coconut oil? You can substitute melted butter or vegetable oil for coconut oil. Both options work well and keep the muffins moist. If you want a dairy-free choice, use canola or avocado oil. Each option will still give you tasty results. How do I know when the muffins are done? To check if the muffins are done, insert a toothpick into the center of one muffin. If it comes out clean or with a few crumbs, they are ready. Bake for 18-22 minutes at 350°F (175°C). Keep an eye on them to avoid overbaking. In this post, we explored how to make delicious banana muffins. We covered the ingredients, provided clear steps, and shared useful tips. You learned about flavor variations and how to store your muffins for freshness. Remember, the key to great muffins is ripe bananas and careful mixing. Enjoy baking and sharing these treats. They are sure to please everyone. Your kitchen will be full of tasty smells and happy faces!

Chocolate Chip Banana Bread Muffins Simple Treat

Looking for a simple yet delightful treat? You’ve come to the right place! This blog post reveals how to make

To make these tasty cinnamon sugar pretzel bites, gather the following items: - 1 ½ cups warm water (110°F to 115°F) - 2 tablespoons granulated sugar - 2 teaspoons active dry yeast - 4 cups all-purpose flour - ½ cup baking soda - 1 teaspoon salt - ½ cup unsalted butter, melted - ½ cup granulated sugar (for coating) - 2 tablespoons ground cinnamon - Coarse sea salt (optional, for topping) When measuring ingredients, precision matters. Use a liquid measuring cup for warm water. For granulated sugar, a dry measuring cup works best. If you want to be exact, use a kitchen scale. This can help ensure each bite is perfect! If you need substitutes, here are some options: - For warm water, you can use milk for a richer taste. - If you lack active dry yeast, instant yeast works fine. - You can swap all-purpose flour with bread flour for a chewier bite. - Coconut oil or margarine can replace unsalted butter, making it dairy-free. - Instead of granulated sugar, you can use brown sugar for a deeper flavor. These substitutes can help you make the recipe your own! {{ingredient_image_1}} First, grab a large mixing bowl. Pour in 1 ½ cups of warm water. Make sure it’s between 110°F and 115°F. Next, add 2 tablespoons of granulated sugar. Sprinkle in 2 teaspoons of active dry yeast. Stir gently to mix and wait about 5 minutes. You should see bubbles forming. This means your yeast is active! Now, add 4 cups of all-purpose flour and 1 teaspoon of salt. Stir until a dough starts to form. Once mixed, knead the dough on a floured surface for about 5 minutes. You want it smooth and elastic. After kneading, place the dough in an oiled bowl. Cover it with a kitchen towel and let it rise in a warm place for about 1 hour. It should double in size. While the dough rises, get your baking sheets ready. Preheat your oven to 450°F (230°C). Line two baking sheets with parchment paper. In a large pot, bring 10 cups of water to a boil. Carefully add ½ cup of baking soda. Be cautious, as it will bubble up! Once the dough has risen, punch it down. Place it on a floured surface and divide it into small portions. Roll each portion into ropes that are about 1 inch thick. Cut these ropes into bite-sized pieces. Now, boil the pretzel bites in batches for about 30 seconds each. Use a slotted spoon to remove them and let them drain on paper towels after boiling. In a shallow bowl, mix ½ cup of granulated sugar and 2 tablespoons of ground cinnamon. Dip each boiled pretzel bite into ½ cup of melted butter. Then roll them in the cinnamon sugar mixture until they are well-coated. Place the pretzel bites on your prepared baking sheets, leaving about 1 inch between them. If you like, sprinkle some coarse sea salt on top for added flavor. Bake in the preheated oven for 10-12 minutes, or until they turn golden brown. Let them cool slightly before serving. Enjoy your tasty snack delight! To get the best texture for your pretzel bites, focus on kneading. Knead the dough for at least five minutes. This makes it smooth and elastic. If the dough feels too sticky, add a little more flour. When you boil the bites, make sure your water is bubbling hot. This helps create that classic chewy crust. One common mistake is skipping the rise time. Letting the dough rise is key for flavor. If you rush this step, your bites may turn out dense. Another mistake is not boiling long enough. Boil each bite for thirty seconds. This step is important for that perfect pretzel flavor. Lastly, don’t forget to coat them well in butter before rolling in cinnamon sugar. This keeps the sugar from falling off during baking. For a great presentation, serve your pretzel bites warm. Place them in a basket lined with a cloth. This keeps them cozy and fresh. You can pair them with chocolate or caramel sauce for dipping. If you want, sprinkle a bit of coarse sea salt on top for extra flavor. Enjoy these bites at parties or game nights for a big hit! Pro Tips Use Warm Water: Ensure your water is between 110°F to 115°F to activate the yeast properly without killing it. Knead Thoroughly: Knead the dough until it’s smooth and elastic, which helps develop the gluten for a better texture. Boil for Flavor: Boiling the pretzel bites in a baking soda solution adds the classic pretzel flavor and gives them their chewy texture. Cool Before Serving: Let the pretzel bites cool slightly before serving to enhance their flavor and texture. {{image_2}} You can make these pretzel bites gluten-free! Just swap the all-purpose flour for a good gluten-free blend. Look for one that has xanthan gum. This helps mimic the texture of regular dough. Follow the same steps in the recipe. The taste will still shine through, and everyone can enjoy them. To make vegan cinnamon sugar pretzel bites, replace the melted butter with coconut oil or a plant-based butter. For the dough, use a non-dairy milk like almond or soy instead of water. This keeps the bites soft and tasty. Your friends won’t even know they are vegan! You can get creative with flavors! Add cocoa powder to the dough for a chocolate twist. Just use 1/4 cup in place of some flour. For pumpkin spice bites, mix pumpkin puree into the dough. A teaspoon of pumpkin spice in the cinnamon sugar is also a great touch. You can even top with chocolate chips before baking. The options are endless! To keep your cinnamon sugar pretzel bites fresh, store them in an airtight container. This helps maintain their soft texture. If you do not have an airtight container, wrap them tightly in plastic wrap. You can keep them at room temperature for up to two days. For longer storage, move them to the fridge. They will stay good for about a week there. When you're ready to enjoy your pretzel bites again, reheating is easy! Preheat your oven to 350°F (175°C). Place the bites on a baking sheet. Heat them for about 5-7 minutes until they are warm again. This method keeps them soft and tasty. You can also use a microwave, but that may make them a bit chewy. If you want to save some for later, freezing works well. Allow the pretzel bites to cool completely first. Then, place them in a single layer on a baking sheet. Freeze them for about an hour until firm. After that, transfer them to a freezer-safe bag. They can last for up to three months in the freezer. When ready to eat, simply reheat them as mentioned above! You can make pretzel bites without yeast by using baking powder instead. Combine flour, baking powder, salt, and warm water in a bowl. Mix until a dough forms. Knead the dough for a few minutes, then shape it into bites. Boil and bake like the original recipe. This method gives you a quick and easy version. The bites will be less chewy but still tasty! Yes, you can use bread flour instead of all-purpose flour. Bread flour has more protein, which helps create a chewier texture. This can make your pretzel bites extra delicious. Just remember that the dough might be a bit stiffer. If it feels too dry, add a touch more water. Cinnamon sugar pretzel bites taste great with various dipping sauces. Here are some of my favorites: - Chocolate sauce: A rich, sweet option that kids love. - Caramel sauce: Adds a buttery touch to the sweet bites. - Cream cheese frosting: Offers a tangy flavor that contrasts nicely. - Nutella: A chocolate-hazelnut option for a fun twist. - Honey: Simple and sweet, a classic choice. Serve these bites warm with your favorite dip. Enjoy the flavors! You now have a complete guide to making pretzel bites. We explored ingredients, steps, tips, and fun variations. Remember to avoid common mistakes for the best results. With storage tips, you can enjoy them later. Whether you prefer sweet or savory, there’s a pretzel bite for you. Dive in and get creative in the kitchen! Enjoy your pretzel-making journey!

Cinnamon Sugar Pretzel Bites Tasty Snack Delight

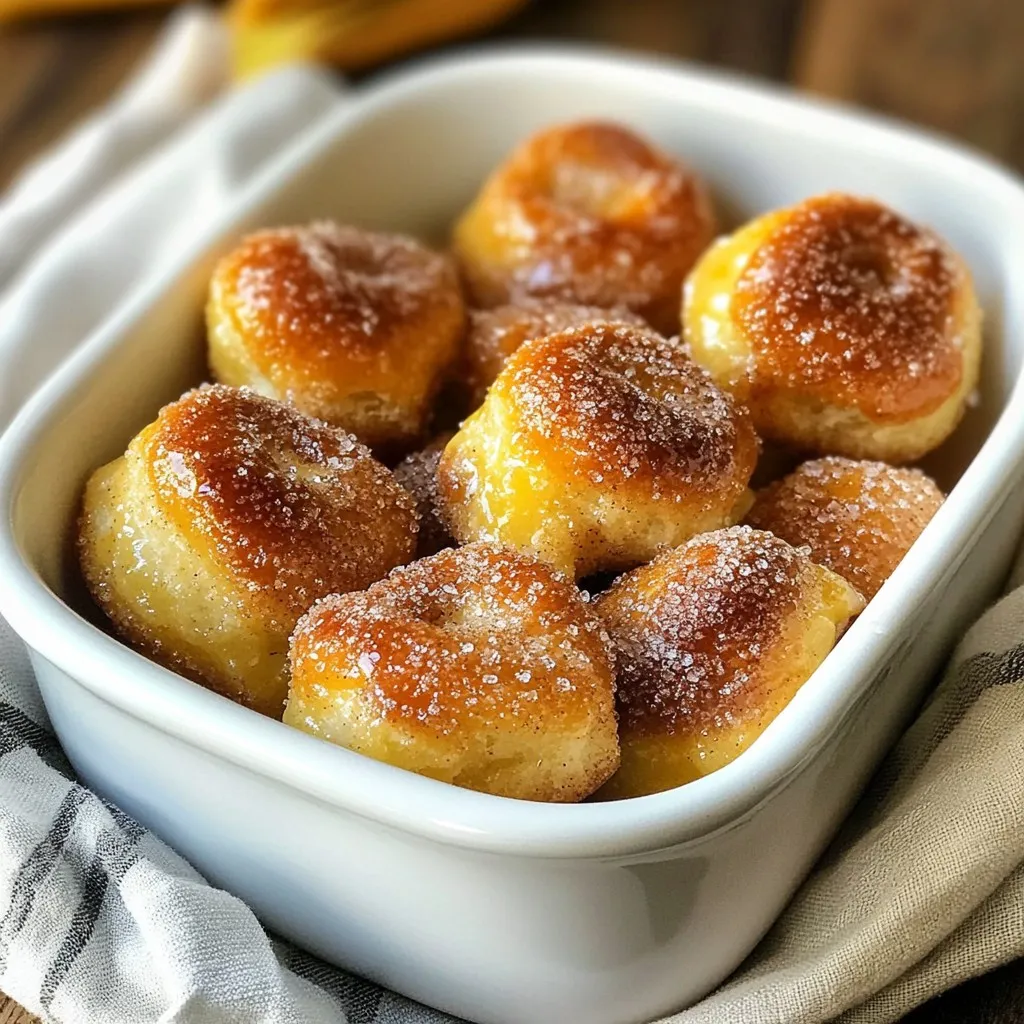
Craving a sweet and salty snack? Cinnamon Sugar Pretzel Bites are your answer! These tasty bites combine soft pretzel goodness

Older posts
Newer posts
← Previous Page1 … Page19 Page20 Page21 … Page164 Next →

dsad

© 2026 easycookingbite • Built with GeneratePress

Our Policies

  • Copyright Policy
  • Cookie Policy
  • GDPR Policy
  • Privacy Policy
  • Disclaimer
  • Terms Of Use

More Information

  • Home
  • About
  • Contact
  • Appetizers
  • Dessert
  • Dinner
  • Drinks
©2026, easycookingbite About Back To Top