Skip to content
DisclaimerTerms Of UseGDPR PolicyCookie Policy

easycookingbite

  • Home
  • Drinks
  • Appetizers
  • Dinner
  • Dessert
  • About
  • Contact
  • Privacy Policy
DisclaimerTerms Of UseGDPR PolicyCookie Policy

Lily

To make rich and decadent brown butter blondies, you need the following ingredients: - 1 cup unsalted butter - 1 cup brown sugar, packed - 1/2 cup granulated sugar - 2 large eggs - 1 teaspoon vanilla extract - 2 cups all-purpose flour - 1/2 teaspoon baking powder - 1/4 teaspoon baking soda - 1/4 teaspoon salt - 1 cup chocolate chips - 1/2 cup chopped nuts (optional) Each ingredient plays a key role. The unsalted butter gives a rich flavor. Brown sugar helps create that chewy texture. Granulated sugar adds sweetness and a slight crunch. Eggs bind everything together and add moisture. Vanilla extract enhances the overall flavor. All-purpose flour forms the base of your blondies. Baking powder and baking soda help them rise. Salt balances the sweetness. Chocolate chips add joy in every bite. Finally, nuts offer a nice crunch, but they are optional. With these ingredients, you can create a treat that is both tasty and memorable. Now, gather them all, and get ready to make something special! To make great brown butter, start with unsalted butter in a medium saucepan. Heat it over medium heat. Keep stirring as it melts. Watch closely for the color change. You want a deep golden hue. This takes about 5 to 7 minutes. The nutty aroma is key here. It tells you that the butter is ready. Once it reaches that perfect color, remove it from the heat. Let it cool slightly before using. This helps to avoid cooking the eggs later. In a large mixing bowl, combine brown sugar and granulated sugar. Pour in the cooled brown butter. Whisk them together until well mixed. Next, add the eggs one at a time. Mix thoroughly after each egg. Then, add the vanilla extract. Keep stirring until the mixture is smooth. This step is crucial for the final texture. In another bowl, sift together the flour, baking powder, baking soda, and salt. This helps to break up any lumps. Gradually add the dry mix to the wet ingredients. Use a folding technique to combine them. Be gentle to avoid overmixing, which can lead to tough blondies. Finally, fold in chocolate chips and nuts if you are using them. Make sure they are evenly spread throughout the batter. First, preheat your oven to 350°F (175°C). Next, prepare your baking dish lined with parchment paper. Leave some overhang for easy removal later. Pour the batter into the dish and spread it evenly. Bake for 25 to 30 minutes. The edges should turn golden brown. Use a toothpick to check for doneness. It should come out with a few moist crumbs. Once done, let the blondies cool in the pan for about 10 minutes. Use the parchment to lift them out. Allow them to cool completely before cutting into squares. To get the best texture, start with room temperature ingredients. This helps them mix well and create a nice, smooth batter. Use cold eggs or butter, and your blondies might turn out dense. Also, avoid overmixing the batter. If you mix too much, the blondies could become tough. Mix just until you see no dry flour. You can make your blondies more fun by adding mix-ins. Try using different types of chocolate. Semi-sweet, milk chocolate, or even dark chocolate can change the flavor. Nuts like walnuts or pecans add a nice crunch. If you want something sweet, consider adding dried fruits or toffee bits for extra taste. Make your blondies look fancy by serving them warm with vanilla ice cream. A scoop on top makes them extra special. Drizzling caramel sauce over the blondies adds a sweet touch. For a little extra flavor, sprinkle some sea salt on top. This contrast will enhance the sweetness. {{image_2}} You can switch up the classic blondie recipe for new flavors. Brown butter maple blondies give a sweet twist. Just add maple syrup to the batter for a rich taste. The flavor pairs well with the nutty brown butter. Espresso chocolate chip blondies add a kick of coffee. Mix in espresso powder with your dry ingredients. This adds a bold flavor that works great with chocolate chips. You'll enjoy a deeper taste that wakes you up! Need gluten-free blondies? You can use almond or oat flour instead of regular flour. Both options work well and keep the blondies soft. Just remember to adjust the measurements slightly for the best results. For vegan blondies, swap out the butter and eggs. Use coconut oil or vegan butter for a buttery taste. Applesauce or flaxseed can replace the eggs. These options keep the blondies moist and delicious. Fall brings a chance to try spice blondies with pumpkin. Add pumpkin puree and warm spices like cinnamon and nutmeg. This gives your blondies a cozy flavor perfect for autumn. During the holidays, make blondies with cranberries and white chocolate. The tartness of cranberries balances the sweet chocolate. It's a festive treat that looks and tastes great for any gathering! To keep your blondies fresh, store them at room temperature. Place them in an airtight container. This keeps them soft and tasty. If you want to store them longer, use the fridge. Just make sure they are in a sealed container. For longer storage, freeze your blondies. Wrap them tightly in plastic wrap, then place them in a freezer bag. When you're ready to enjoy your blondies again, use safe reheating methods. You can microwave them for about 10-15 seconds. This warms them without drying them out. You can also use an oven. Preheat it to 350°F and heat the blondies for about 5-7 minutes. This keeps their tasty texture and moistness. At room temperature, your blondies last about 3-5 days. If you store them in the fridge, they stay good for about a week. In the freezer, they can last up to three months. Just make sure to wrap them well to prevent freezer burn. Blondies and brownies are both delicious treats. The main difference lies in the sugar. Blondies use brown sugar, giving them a rich, caramel flavor. Brownies, on the other hand, use cocoa powder, which gives them a chocolate taste. Also, blondies tend to be chewier and denser. Brownies are usually fudgier and softer. Both are great, but each has a unique taste. Yes, you can substitute brown sugar for granulated sugar in this recipe. Brown sugar adds moisture and a deeper flavor. If you use only brown sugar, your blondies will be even more chewy. If you want a lighter taste, use half brown and half granulated sugar. This balance gives you a nice texture. To check if your blondies are done, look for golden edges. Insert a toothpick into the center. If it comes out with a few moist crumbs, they are ready. If the toothpick has wet batter, bake a few more minutes. Keep an eye on them, as overbaking can make them dry. Yes, you can make blondies in advance. They taste great after a day or two. Once baked, let them cool completely. Store them in an airtight container at room temperature. For longer storage, you can freeze them. Just wrap them tightly in plastic wrap and foil. When ready to eat, thaw them at room temperature. Yes, you can make nut-free blondies easily. Simply leave out the chopped nuts in the recipe. The blondies will still be tasty and chewy. You can also add more chocolate chips for extra flavor. This will keep your blondies delicious without any nuts. This blog shared a clear guide to making delicious blondies. We covered ingredients, instructions, tips, variations, storage, and FAQs. You learned how to brown butter and mix in flavors. Now, you can create perfect blondies that suit your taste. Experiment with different ingredients to make these treats your own. Enjoy every bite and share them with friends! Happy baking!

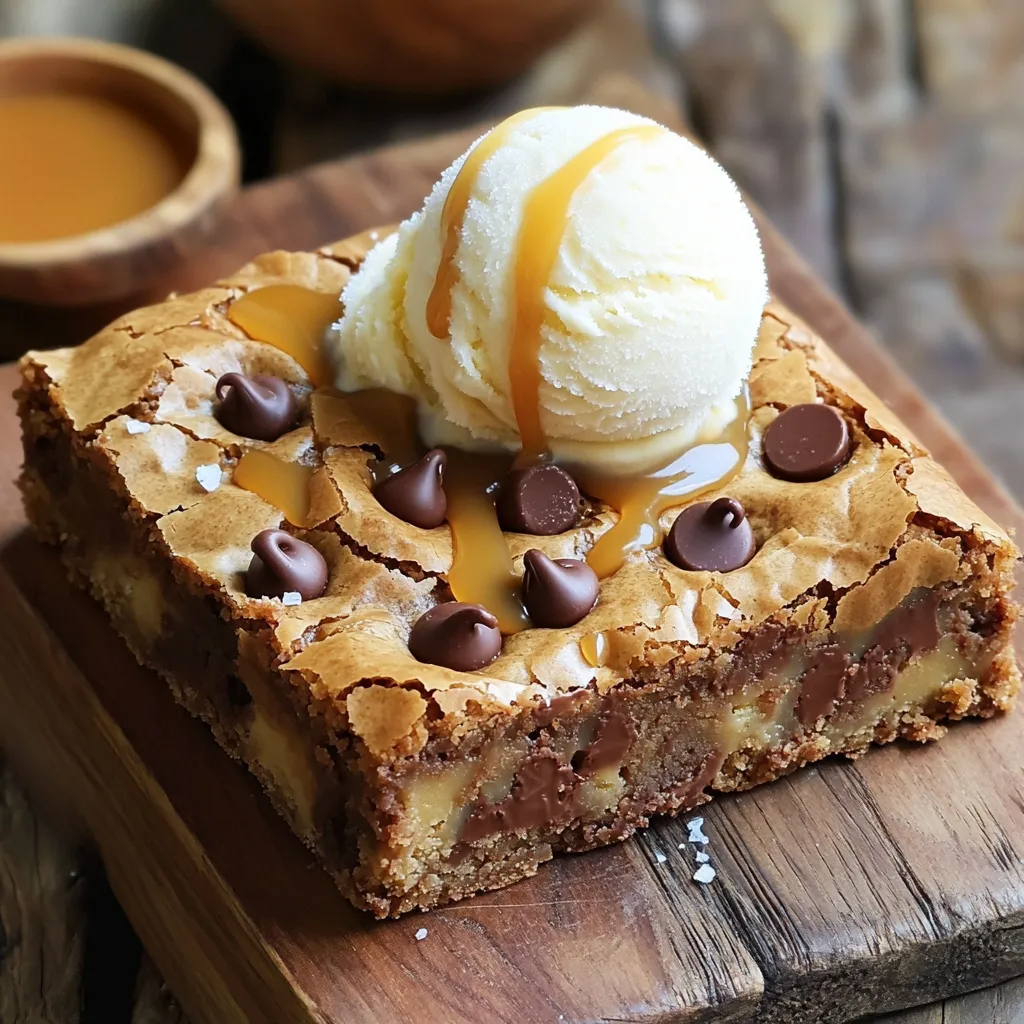
Brown Butter Blondies Rich and Decadent Treat

If you’re craving a sweet treat that packs a punch, look no further! Today, I’m sharing my recipe for Brown

- 1 pound boneless chicken breast, cut into bite-sized pieces - 1 tablespoon cornstarch (for extra crispiness) - 1/4 cup honey - 2 tablespoons sriracha sauce - 1 tablespoon soy sauce (or tamari for gluten-free) - 1 tablespoon apple cider vinegar - 1 teaspoon garlic powder - 1 teaspoon onion powder - 1 teaspoon smoked paprika - Salt and pepper to taste - Chopped green onions - Sesame seeds To make these air fryer sweet and spicy chicken bites, you need fresh ingredients. Start with chicken breast. Cut it into small bite-sized pieces. This helps them cook evenly and makes for easy eating. For the marinade, mix honey and sriracha for sweetness and heat. Add soy sauce for umami flavor. Apple cider vinegar adds a nice tang. Garlic and onion powders bring depth to the taste. Smoked paprika gives a hint of smokiness. Don't forget to season with salt and pepper to balance the flavors. Finally, you’ll want to garnish your chicken bites. Chopped green onions add freshness. Sesame seeds provide a nice crunch and a touch of elegance. These ingredients come together to create a dish that is both tasty and delightful. First, grab a large mixing bowl. Add 1/4 cup honey, 2 tablespoons sriracha sauce, and 1 tablespoon soy sauce. Then, pour in 1 tablespoon apple cider vinegar. Sprinkle in 1 teaspoon garlic powder, 1 teaspoon onion powder, and 1 teaspoon smoked paprika. Add salt and pepper to taste. Mix all these ingredients well. This is your marinade. Next, add 1 pound of bite-sized chicken pieces to the bowl. Make sure each piece gets coated in the marinade. Cover the bowl and let it sit in the fridge for at least 30 minutes. If you can wait, marinate for up to 2 hours. This lets the flavors soak in. After marinating, it’s time to get the air fryer ready. Preheat your air fryer to 400°F (200°C). This usually takes about 5 minutes. While it heats, take the chicken out of the marinade. Toss the chicken pieces in a bowl with 1 tablespoon cornstarch. Make sure each piece is coated. This helps the chicken get extra crispy. Now, it’s time to cook! Place the chicken pieces in a single layer in the air fryer basket. If your basket is small, cook in batches. Avoid overcrowding; this keeps your chicken crispy. Set the air fryer to cook at 400°F (200°C) for 10 to 12 minutes. Shake the basket halfway through to cook evenly. The chicken is done when it turns golden brown and reaches 165°F (75°C). Once cooked, take the chicken bites out and let them rest for a few minutes. Then, place them on a serving platter. You can garnish with chopped green onions and sesame seeds for a nice touch. To make your chicken bites crispy, coat them with cornstarch. This helps create a crunchy layer. Toss the marinated chicken in cornstarch before you air fry. Ensure each piece is well-coated. This step is key for that perfect crunch. Marinate your chicken for at least 30 minutes. If you have more time, let it sit for up to 2 hours. This allows the flavors to soak in. A longer marination helps the chicken taste better. Don’t skip this step if you want bold flavor. Do not overcrowd the air fryer basket. Cook the chicken in batches if needed. This ensures the heat circulates well. If you pile the chicken, it may steam instead of crisp. Air fry each batch for 10-12 minutes. Make sure to shake the basket halfway through for even cooking. {{image_2}} You can turn up the heat in these chicken bites. To make it spicier, add more sriracha sauce. You can also mix in chili flakes or hot sauce. If you like a smoky flavor, try adding chipotle powder. This gives a nice kick without being too overpowering. You can also use different hot sauces for unique flavors. Experiment and find your perfect spice level. To make this dish gluten-free, swap soy sauce for tamari. Tamari tastes just as good and keeps the flavor intact. You can also use coconut aminos, which adds a hint of sweetness. Make sure to check the labels of all sauces. Some sauces may contain gluten, so it's best to be safe. This way, everyone can enjoy these tasty bites. If you don’t have an air fryer, you can bake the chicken bites. Set your oven to 400°F (200°C). Line a baking sheet with parchment paper for easy cleanup. Spread the chicken pieces in a single layer. Bake for about 20-25 minutes or until golden brown. Remember to flip them halfway for even cooking. You can also pan-fry them in a skillet with a bit of oil. This will give them a lovely crisp outside while keeping the inside juicy. After cooking, let the sweet and spicy chicken bites cool. Place them in an airtight container. Store in the fridge for up to 3 days. This keeps the chicken fresh and safe to eat. To reheat, use your air fryer. Set it to 350°F (175°C). Cook the chicken bites for about 5-7 minutes. This method keeps them crispy. You can also use a microwave, but the texture may not be as good. You can freeze leftover chicken bites for later. Place them in a freezer-safe bag. Squeeze out excess air and seal tightly. They will last for about 2 months in the freezer. When ready to eat, thaw in the fridge overnight. Reheat in the air fryer for best results. Yes, you can use frozen chicken. However, you need to thaw it first. This ensures that the chicken cooks evenly. You can thaw the chicken overnight in the fridge or use the microwave. After thawing, cut it into bite-sized pieces as the recipe suggests. To adjust the spice level, you can change the amount of sriracha. For less heat, use less sriracha. If you want more spice, add more sriracha. You can also add some red pepper flakes for extra kick. Taste the marinade first to find the right balance for you. These chicken bites pair well with rice or noodles. You can also serve them with a fresh salad or steamed veggies. For a fun twist, try them with a side of sweet potato fries. They add a nice contrast to the flavors of the chicken. This post covers how to make tasty chicken bites. We explored key ingredients and marinade tips. I shared step-by-step cooking instructions for the air fryer. You learned tricks for crispiness and marinating. We also looked at variations and storage tips. In conclusion, making chicken bites is simple and fun. Experiment with different flavors to match your taste. Enjoy your cooking adventure!

Air Fryer Sweet and Spicy Chicken Bites Recipe

Looking for an easy and tasty dish that packs a punch? Try my Air Fryer Sweet and Spicy Chicken Bites!

To make Slow Cooker Creamy Garlic Mashed Potatoes, gather these items: - 3 pounds Yukon Gold potatoes, peeled and chopped - 4 cloves garlic, minced - 1 cup chicken or vegetable broth - 1 cup heavy cream or half-and-half - 4 tablespoons unsalted butter - Salt and pepper to taste - Fresh chives, chopped (for garnish) These ingredients create rich, tasty mashed potatoes that everyone will love. You can switch things up a bit! For a lighter version, use skim milk instead of heavy cream. If you want more flavor, try adding roasted garlic instead of raw. You can also use red potatoes for a different texture and taste. Want it spicy? Add some crushed red pepper flakes. I trust several brands for quality ingredients: - For potatoes, look for Idaho or local farm-fresh options. - Use Swanson or Pacific Foods for broth; both are rich and flavorful. - For cream, I like Horizon Organic or Land O’Lakes for their freshness. - For butter, European-style options like Kerrygold add a nice touch. Choosing quality ingredients makes a big difference in flavor! To start, gather your ingredients. You will need: - 3 pounds Yukon Gold potatoes, peeled and chopped - 4 cloves garlic, minced - 1 cup chicken or vegetable broth - 1 cup heavy cream or half-and-half - 4 tablespoons unsalted butter - Salt and pepper to taste - Fresh chives, chopped (for garnish) First, place the chopped potatoes and minced garlic into your slow cooker. Make sure to spread them out evenly. Next, pour in the broth. The broth should cover the potatoes well. If it does not, add a little extra. This helps the potatoes cook nicely. Now, it’s time to cook. Cover the slow cooker and set it to low for 6-8 hours. If you're in a hurry, you can cook on high for 3-4 hours. Check the potatoes with a fork. They should be soft and tender when done. After cooking, drain any extra broth if there is too much. Then, add the heavy cream and butter to the potatoes. Use a potato masher or a hand mixer to mash them. If you want a creamier texture, add more cream. Taste the mashed potatoes and season with salt and pepper to your liking. Finally, transfer the mashed potatoes to a serving dish. For a nice touch, garnish with chopped chives. Enjoy this creamy delight! To make your mashed potatoes taste amazing, use simple seasonings. I love adding salt and fresh ground pepper right before mashing. You can also try garlic powder for an extra kick. Fresh herbs like thyme or rosemary can brighten the flavor. Just chop them finely and mix them in before serving. A squeeze of lemon juice can also bring out the richness. For creamy mashed potatoes, Yukon Gold potatoes work best. They are buttery and smooth. Russet potatoes can be used too, but they might be a bit fluffier. Make sure to peel and chop them into even pieces for even cooking. This helps them cook at the same rate and become tender. The right tools can make a big difference. A slow cooker is key for this recipe. It allows the potatoes to cook slowly and evenly. Use a potato masher for that classic texture, or a hand mixer for creamier results. A large mixing bowl will help when adding cream and butter. Lastly, have a good knife for chopping the potatoes and garlic. This makes prep quick and easy. {{image_2}} If you want a vegan dish, swap heavy cream with coconut milk or almond milk. Use vegan butter instead of regular butter. This keeps the creamy texture while being dairy-free. You can still enjoy garlic mashed potatoes without the dairy. Make sure to check the broth for animal products. Vegetable broth works great for a rich taste. You can take this dish to new heights with flavor. Add fresh herbs like rosemary or thyme for an earthy taste. For cheese lovers, mix in some grated Parmesan or cheddar. This adds a rich, cheesy note. You can even stir in some sour cream for extra creaminess. Garlic powder or roasted garlic can deepen the garlic flavor, too. For special meals, serve these mashed potatoes in a fancy dish. Create a small well in the center and drizzle extra cream. Top with freshly chopped chives for a pop of color. Pair these mashed potatoes with roasted meats or veggies. They make a great side for holidays or family gatherings. Everyone will love the creamy texture and rich taste! After your meal, let the mashed potatoes cool. Place them in an airtight container. Make sure to cover the container tightly. Store them in the fridge for up to three days. This keeps the creamy garlic flavor fresh and delicious. To reheat, place the mashed potatoes in a pot over low heat. Add a splash of broth or cream. Stir often to keep them from sticking. You can also use a microwave. Heat in short bursts, stirring in between. This helps keep them creamy and smooth. You can freeze leftover mashed potatoes. Transfer them to a freezer-safe bag or container. Press out as much air as possible. Label the bag with the date. They will stay good for up to two months. To thaw, place in the fridge overnight before reheating. Yes, you can make these mashed potatoes ahead of time. After cooking, let them cool. Store the cooled mashed potatoes in an airtight container in the fridge. They will last for about three days. When you're ready to serve, reheat them gently. You can add a little milk or cream to bring back the creamy texture. If you need a substitute for heavy cream, try half-and-half or whole milk. You can also use sour cream for a tangy twist. Greek yogurt works well too. Each option adds a different flavor, but they will still make your mashed potatoes creamy and delicious. To fix runny mashed potatoes, start by adding more potatoes. You can also mix in some instant potato flakes. They will help absorb extra liquid. If you want a quick fix, try cooking them on low heat for a bit longer. This will let some moisture evaporate and thicken the potatoes. This blog post covers how to make perfect mashed potatoes. We discussed ingredients, cooking steps, and tips for great flavor. You learned about variations for different diets and occasions. We also explored storage methods for leftovers and answered common questions. In summary, mastering mashed potatoes adds joy to any meal. Experiment with flavors and enjoy the process. Your mashed potatoes can impress family and friends. Keep it fun and creative in the kitchen.

Slow Cooker Creamy Garlic Mashed Potatoes Delight

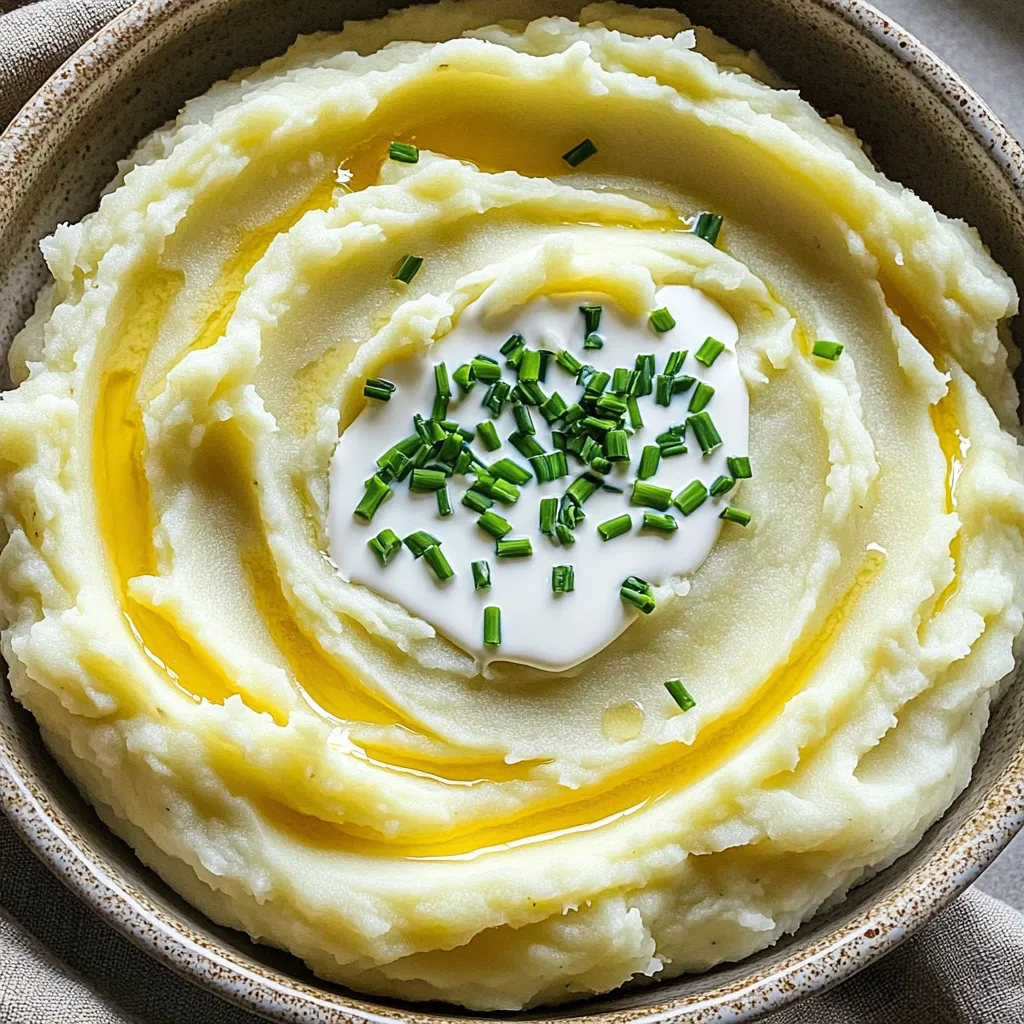
If you love creamy, flavorful mashed potatoes, this recipe is just for you! My Slow Cooker Creamy Garlic Mashed Potatoes

- 4 salmon fillets - 1/3 cup teriyaki sauce - 2 cups cooked jasmine rice - 1 cup broccoli florets - 1 red bell pepper, sliced - 1 carrot, julienned - 2 green onions, sliced - 1 tablespoon sesame seeds - 1 tablespoon olive oil - Salt and pepper to taste - For garnishing, top with sliced green onions and sesame seeds. - Serve with lime wedges for a fresh twist. - Each bowl is perfect for one serving, making four bowls total. This recipe is simple and quick. You get a healthy meal, full of flavor, all in one pan. The salmon cooks perfectly, and the veggies stay crisp. Enjoy these rice bowls any night of the week! - Preheating the oven Start by preheating your oven to 400°F (200°C). This temperature helps cook the salmon and veggies just right. Line a large baking sheet with parchment paper. It makes for easy cleanup later. - Marinating the salmon In a mixing bowl, combine 1/3 cup of teriyaki sauce with 1 tablespoon of olive oil, salt, and pepper. Add 4 salmon fillets to this mixture. Make sure to coat them well. Let them marinate for 10-15 minutes. This step makes the salmon flavorful and tender. - Preparing the vegetables While the salmon marinates, grab a bowl. Toss 1 cup of broccoli florets, 1 sliced red bell pepper, and 1 julienned carrot in a drizzle of olive oil, salt, and pepper. This will season the veggies and enhance their taste. - Arranging ingredients on the sheet pan Once the salmon has marinated, arrange the fillets in the center of the baking sheet. Spread the seasoned veggies around the salmon. This layout helps everything cook evenly and makes a pretty presentation. - Baking time and temperature Slide the baking sheet into the preheated oven. Bake for 15-20 minutes. The salmon is done when it flakes easily with a fork. The veggies should be tender but still crisp. - Final assembly of the rice bowls If you haven't cooked the jasmine rice yet, do that while the salmon and veggies bake. Divide 2 cups of cooked rice among serving bowls. Once the salmon and veggies are ready, place a salmon fillet on top of each rice bowl. Spoon some of the pan juices over the salmon for extra flavor. - How to plate the dish Serve the rice bowls in colorful dishes. This adds visual appeal. Make sure each bowl has salmon and veggies on top of the rice. - Drizzling pan juices Carefully spoon some of the pan juices over the salmon. This adds moisture and enhances the overall flavor of the dish. - Adding toppings Finish each bowl with sliced green onions and a sprinkle of sesame seeds. These toppings add crunch and flavor. For a zesty touch, consider adding a lime wedge on the side for your guests to squeeze over the dish. - Ensuring perfect salmon texture: Bake the salmon until it flakes easily with a fork. This usually takes 15 to 20 minutes at 400°F. Overcooking will make it dry, so check it early. - Vegetable cooking time adjustment: Cut veggies into similar sizes for even cooking. Broccoli florets, bell pepper slices, and julienned carrots should all be tender and bright. If you like them softer, add them to the pan a few minutes early. - Utilizing pan juices effectively: After baking, pour those tasty pan juices over the salmon. They add flavor and moisture. Don’t waste them! - Optimal marination time: Marinate the salmon for 10 to 15 minutes. This allows the teriyaki sauce to soak in, enhancing the flavor. If you have more time, longer marination can deepen the taste. - Enhancing teriyaki flavor: Add some ginger or garlic to the marinade for extra zest. A splash of lime juice can brighten the dish too. - Creative serving ideas: Serve your rice bowls in colorful bowls for a fun look. Layer the rice, salmon, and veggies for a nice view. - Using colorful bowls and garnishes: Top with sliced green onions and sesame seeds for crunch. A lime wedge adds color and flavor. Use chopsticks to serve for a fun experience! {{image_2}} You can switch up the protein in this dish. Try chicken or tofu for a new twist. Both options cook well with teriyaki sauce. For vegetables, feel free to get creative. Snow peas, asparagus, or zucchini can add great flavor. You can even use frozen veggies for quick prep. If you need a gluten-free option, look for gluten-free teriyaki sauce. Many brands offer tasty versions without soy sauce. You can also make your own with coconut aminos and honey. Baking is easy, but grilling adds a nice char. Just marinate the salmon and veggies, then grill them on medium heat. You can also use an air fryer. Cook the salmon and veggies at 375°F for about 10-15 minutes. This method keeps them crispy. For stovetop cooking, pan-sear the salmon in a hot skillet. Cook the veggies in another pan until tender. Then, serve with the rice. Spices can change the game. Adding ginger or chili flakes gives a spicy kick. Fresh herbs like cilantro or basil add brightness too. Try different sauces to mix things up. A sweet chili sauce or peanut sauce can work great. They bring a new taste to your bowl. For extra flavor, serve with dipping sauces. A spicy mayo or soy sauce on the side can enhance every bite. Enjoy experimenting! To store leftovers, place the salmon and rice in airtight containers. It helps keep them fresh. Use parchment paper between layers to avoid sticking. The dish lasts in the fridge for 3 to 4 days. Always cool it down before sealing. For freezing, store salmon and rice in separate containers. This keeps flavors intact. You can freeze the broccoli and other veggies too, but it's best to cook them fresh. To thaw, place in the fridge overnight. If in a rush, use cold water for quick thawing. To reheat salmon, place it in the oven at 350°F for about 10 minutes. This keeps it moist. For rice, use a splash of water in a microwave-safe bowl. Cover it to avoid drying out. Stir halfway through heating. Avoid reheating multiple times to keep the texture nice. What is the best way to cook salmon? The best way to cook salmon is to bake it. Preheat your oven to 400°F (200°C). This method helps keep the fish moist and flaky. You can also grill or pan-sear salmon, but baking is simple and effective. Can I make this dish ahead of time? Yes, you can make this dish ahead of time. Prepare the salmon and veggies, then store them in the fridge. When ready to eat, just bake them in the oven. You can also cook the rice ahead and heat it when serving. How do I know when my salmon is cooked? You know salmon is cooked when it flakes easily with a fork. The inside should be a light pink color. Use a food thermometer if you want to be sure. The safe cooking temperature is 145°F (63°C). What can I use instead of teriyaki sauce? If you don’t have teriyaki sauce, you can use soy sauce mixed with honey. This mix gives a nice sweet and salty flavor. You can also try hoisin sauce or a simple mix of soy sauce and ginger for a twist. Are there vegetarian options available? Yes, you can easily make this dish vegetarian. Use tofu or tempeh in place of salmon. Make sure to marinate them in the teriyaki sauce for added flavor. You can also add more veggies to fill the bowl. Is this dish gluten-free? The dish can be gluten-free if you use gluten-free teriyaki sauce. Check the label to ensure it has no wheat. The other ingredients, like rice and veggies, are naturally gluten-free. How can I make this dish low-carb? To make this dish low-carb, skip the rice. You can serve the salmon and veggies on a bed of leafy greens or cauliflower rice instead. This keeps the meal light and healthy while still being tasty. This blog post shows you how to make a tasty salmon dish with teriyaki sauce. We covered ingredients, step-by-step instructions, and helpful tips. You can customize it with different proteins or veggies. Plus, I shared how to store and reheat leftovers. Cooking can be fun and simple. With these recipes, you can enjoy great meals at home. I hope you try this dish and share your results. Enjoy cooking and tasting every bite!

Sheet-Pan Teriyaki Salmon Rice Bowls Simple Recipe

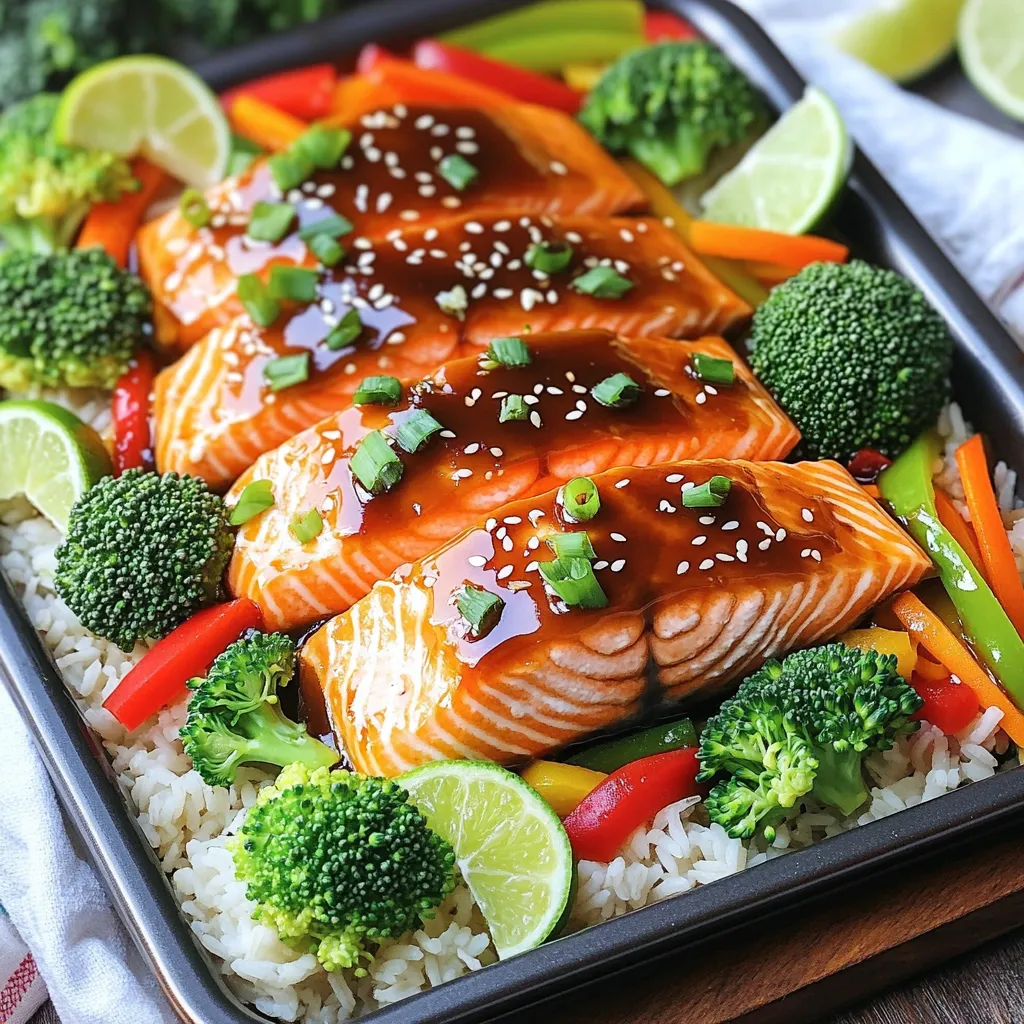
Looking for a quick and tasty dinner idea? Try my Sheet-Pan Teriyaki Salmon Rice Bowls! This simple recipe packs healthy

To make the perfect Chocolate Chip Banana Bread Muffins, you need the following ingredients: - 3 ripe bananas, mashed - 1/2 cup unsalted butter, melted - 1/2 cup granulated sugar - 1/4 cup brown sugar, packed - 2 large eggs - 1 teaspoon vanilla extract - 1 teaspoon baking soda - 1/2 teaspoon salt - 1 1/2 cups all-purpose flour - 1 cup semi-sweet chocolate chips - 1/2 teaspoon cinnamon (optional) For those who prefer metric measurements, here’s a quick guide: - 3 ripe bananas = about 450 grams - 1/2 cup unsalted butter = 115 grams - 1/2 cup granulated sugar = 100 grams - 1/4 cup brown sugar = 50 grams - 2 large eggs = about 100 grams - 1 teaspoon vanilla extract = 5 milliliters - 1 teaspoon baking soda = 5 grams - 1/2 teaspoon salt = 2.5 grams - 1 1/2 cups all-purpose flour = 190 grams - 1 cup semi-sweet chocolate chips = 175 grams - 1/2 teaspoon cinnamon = 1.5 grams Understanding volume versus weight helps with precision in baking. Using a kitchen scale can ensure that your ingredients are accurate. If you need alternatives, here are some great options: - For a dairy-free muffin, use coconut oil or a dairy-free butter. - If you want gluten-free muffins, swap all-purpose flour for a gluten-free blend. - You can try using honey or maple syrup instead of granulated sugar for natural sweetness. These swaps allow you to enjoy the muffins while meeting dietary needs. {{ingredient_image_1}} 1. Preheat your oven to 350°F (175°C). This step is key for even baking. 2. Prepare your muffin tin. Line it with paper liners or spray it with non-stick spray. This keeps muffins from sticking. 3. In a large bowl, mash the ripe bananas until smooth. 4. Pour in the melted butter and mix well. This adds moisture and richness. 5. Stir in the granulated and brown sugars until fully combined. This mixture will sweeten your muffins. 6. Add the eggs one at a time. Mix well after each addition. This helps bind everything together. 7. Now, add the vanilla extract. It adds great flavor to your muffins. 8. In a separate bowl, whisk together the baking soda, salt, flour, and cinnamon if you’re using it. This ensures even distribution of dry ingredients. 1. Gradually add the dry mixture to the wet mixture. Stir gently until just combined. Overmixing can make your muffins tough. 2. Fold in the chocolate chips carefully. Make sure they are evenly spread throughout the batter. 3. Pour the batter into the prepared muffin tin. Fill each cup about 3/4 full. This allows room for rising. 4. Bake for 18-22 minutes. Use a toothpick to check doneness. It should come out clean when done. 1. Once baked, remove the muffin tin from the oven. Let them cool in the tin for 5 minutes. 2. After that, transfer the muffins to a wire rack. This helps them cool evenly. 3. For serving, sprinkle some powdered sugar on top. You can enjoy them warm with butter or cream cheese for extra flavor. To get the best texture, use ripe bananas. They add moisture and flavor. Mix the wet and dry ingredients separately first. This helps avoid lumps and gives a smooth batter. Do not overmix! Stir just until combined. Overmixing makes the muffins tough. Common mistakes include measuring flour incorrectly. Always spoon flour into your cup and level it off. If you pack flour, your muffins may turn out dense. Also, check your baking soda. Old baking soda can make your muffins flat. You can enhance flavor by adding nuts or dried fruits. Walnuts or pecans give a nice crunch. Dried cranberries or raisins add sweetness. You can also try extra spices. A pinch of nutmeg or cardamom adds warmth. Cinnamon is great too. It pairs well with chocolate and banana. Consider mixing in a bit of cocoa powder for a richer taste. This twist makes your muffins even more chocolatey. If you want healthier swaps, use applesauce instead of butter. It keeps muffins moist with fewer calories. You can also reduce sugar by half. The ripe bananas already add sweetness. For allergy-friendly options, try using almond milk or coconut milk. These work well in place of regular milk. You can make these muffins gluten-free by using a blend of gluten-free flours. Just check your labels to ensure they’re safe. These tips help you create tasty muffins tailored to your needs! Pro Tips Use Very Ripe Bananas: The riper the bananas, the sweeter and more flavorful your muffins will be. Look for bananas with a lot of brown spots for the best flavor. Don’t Overmix the Batter: To achieve a light and fluffy texture, mix the wet and dry ingredients until just combined. A few lumps are perfectly fine! Add Extra Chocolate Chips: For a more indulgent treat, sprinkle some additional chocolate chips on top of the batter before baking. It adds a delicious melty surprise! Cool Completely Before Storing: Allow the muffins to cool completely on a wire rack to prevent them from becoming soggy when stored. This keeps them fresh and tasty! {{image_2}} You can change the taste of your muffins easily. For example, try peanut butter chocolate chip muffins. Just mix in 1/2 cup of creamy peanut butter with the butter. This adds a rich flavor that pairs well with chocolate. Another fun choice is nutty chocolate chip banana muffins. Add 1/2 cup of chopped walnuts or pecans to the batter. The nuts give a nice crunch and a boost of protein. You can also adapt these muffins to fit the seasons. In the fall, add 1 teaspoon of pumpkin spice to the batter. This spice mix adds warm flavors, making your muffins feel cozy. For a summer twist, try incorporating fresh berries. Blueberries or raspberries work great. Just fold in 1 cup of your favorite berries before baking. They add a burst of flavor and a pop of color. Want to make mini muffins? Use a mini muffin tin and adjust the bake time. Bake them for 10-12 minutes instead of 18-22 minutes. They make great snacks or fun bites for kids. If you prefer jumbo muffins, fill each cup more and bake longer. Bake for about 25-30 minutes. Serve them warm with a spread of butter or cream cheese. They are perfect for a brunch or special occasion. To keep your muffins fresh, store them in an airtight container. Place them at room temperature. This method keeps them soft for about three days. If you live in a warm climate, it is better to refrigerate them. Refrigeration can extend freshness but may change the texture slightly. To freeze muffins, let them cool completely. Wrap each muffin in plastic wrap. Then, place them in a freezer bag or container. This helps prevent freezer burn. You can freeze them for up to three months. When you are ready to eat them, take one out and unwrap it. Reheat the muffin in the microwave for about 20-30 seconds. You can also warm it in the oven at 350°F for about 10-15 minutes. These muffins stay fresh for about three days at room temperature. If refrigerated, they last about a week. Look for signs of spoilage like mold or a sour smell. If they feel dry or hard, it’s best to toss them. Enjoy them while they are fresh for the best taste! If you lack ripe bananas, you can quickly ripen them. Place unripe bananas in a brown paper bag. This traps ethylene gas, speeding up the ripening. You can also bake them! Wrap unripe bananas in foil and bake at 300°F for about 15-20 minutes. They will turn soft and sweet. Yes, you can make these muffins without eggs! You can use a few substitutes. Use 1/4 cup of applesauce or mashed banana instead of one egg. You can also use 1 tablespoon of ground flaxseed mixed with 2.5 tablespoons of water. This helps bind the muffins. The texture may change a bit but will still taste great. To check if the muffins are done, insert a toothpick into the center. If it comes out clean, they are done! You can also press gently on the top. If it springs back, they are ready. Finally, the muffins should have a nice golden color on top. These muffins are tasty on their own. However, you can serve them warm with butter or cream cheese. They also pair well with coffee or tea for breakfast. For a fun twist, try adding fresh fruit or yogurt on the side. Enjoy your muffins with a smile! In this post, I shared how to make delicious chocolate chip banana muffins. You learned about the key ingredients, step-by-step instructions, and helpful tips for perfect results. I also covered fun variations and storage methods. With these guidelines, baking muffins should be fun and easy. Remember, you can adjust flavors or ingredients to fit your taste. Enjoy baking, and share these treats with friends and family!

Chocolate Chip Banana Bread Muffins Simple and Tasty

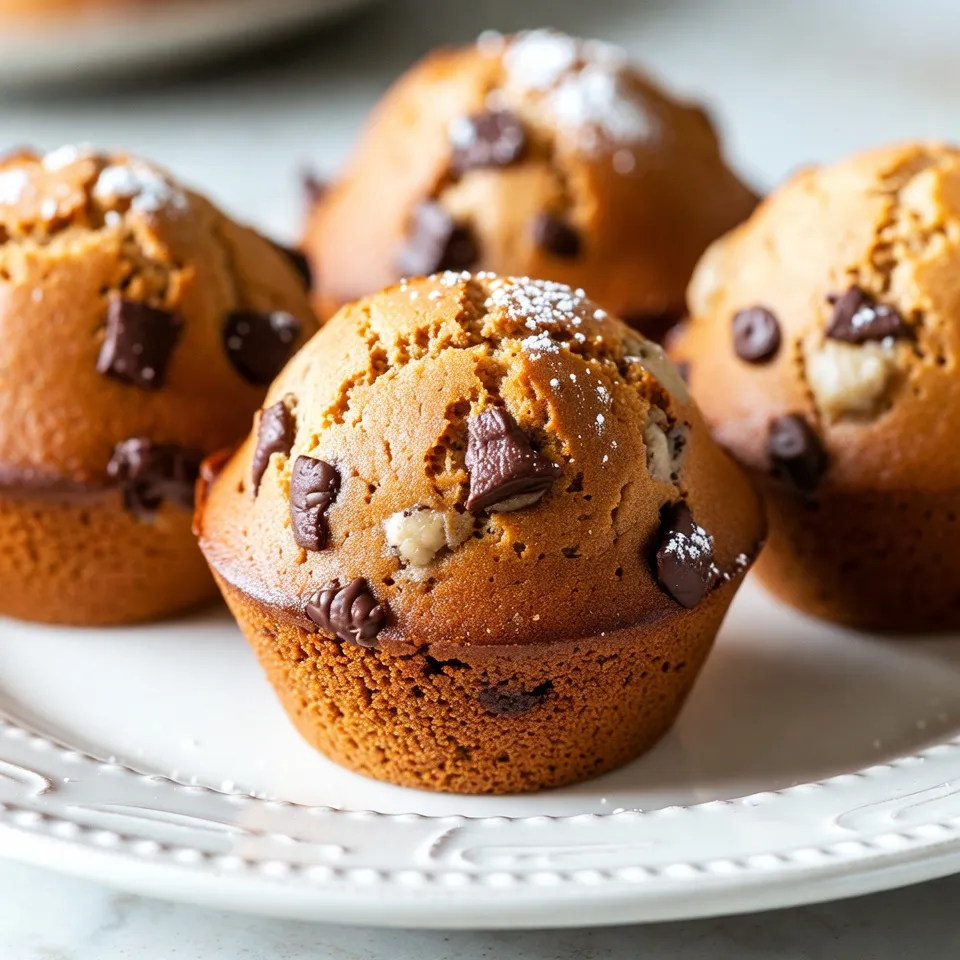
Welcome to the world of Chocolate Chip Banana Bread Muffins! These simple, tasty treats are a game-changer for breakfast or

- 2 cups cooked chicken, shredded or diced - 1 cup plain Greek yogurt - 1/2 cup celery, finely diced - 1/2 cup red grapes, halved - 1/4 cup almonds, chopped - 1 tablespoon Dijon mustard - 1 tablespoon honey - 1 tablespoon fresh lemon juice - Salt and pepper to taste - 1 head of romaine or butter lettuce, leaves separated In this chicken salad, the basics shine. You need cooked chicken as the main protein. I prefer using shredded or diced chicken. The Greek yogurt replaces heavy mayo and adds creaminess. Finely diced celery gives a nice crunch. Halved red grapes add sweetness. Lastly, chopped almonds give a great nutty flavor. - Fresh herbs like parsley or dill - Chopped bell peppers or cucumbers You can make this dish even better by adding fresh herbs. Parsley or dill work well. You can also toss in some chopped bell peppers or cucumbers for extra texture and flavor. - Best types of lettuce: romaine or butter lettuce - Serve with lemon wedges or extra grapes For wrapping, romaine or butter lettuce is the best choice. They hold the filling well without breaking. You can serve these wraps with lemon wedges for a fresh touch. Extra grapes on the side add sweetness for a perfect bite. {{ingredient_image_1}} - Combine Chicken and Greek Yogurt Start with a large bowl. Add 2 cups of cooked chicken, either shredded or diced. Pour in 1 cup of plain Greek yogurt. Mix well until the chicken is fully coated. - Mix in Vegetables and Nuts Next, add 1/2 cup of finely diced celery, 1/2 cup of halved red grapes, and 1/4 cup of chopped almonds. Stir everything together until combined. - Prepare the Dressing In a small bowl, whisk together 1 tablespoon of Dijon mustard, 1 tablespoon of honey, and 1 tablespoon of fresh lemon juice. Pour this dressing over the chicken mixture. Stir well and season with salt and pepper to taste. - Spoon the Mixture into Lettuce Leaves Take a lettuce leaf from your head of romaine or butter lettuce. Spoon a generous amount of the chicken salad into the center of the leaf. - Rolling or Folding Techniques You can either roll the leaf around the filling or fold it over to secure the mixture. Both methods work well for holding all the tasty goodness inside. - Plating and Garnishing Arrange the wraps on a serving platter. For a pop of color, garnish with extra grapes or a sprinkle of chopped almonds. - Serving Suggestions Serve your wraps with lemon wedges for a zesty kick. Enjoy these wraps as a light meal or a fun snack! You can adjust this recipe to fit your taste. Want it sweeter? Add more honey. Prefer a crunch? Toss in extra almonds. Don't like grapes? Try diced apples or raisins instead. You can also add herbs like dill or parsley for fresh flavor. Making this dish ahead is a breeze. Prepare the chicken salad and store it in the fridge for up to two days. Just before serving, fill the lettuce leaves. This keeps the wraps crisp and fresh. Using rotisserie chicken is a quick and easy option. Just shred the meat and mix it with the yogurt. It saves time and adds great flavor. You can also cook chicken from scratch. Grill, bake, or boil it, then shred it for this recipe. Store any leftovers in an airtight container. Keep the chicken salad separate from the lettuce. This will help the lettuce stay crisp. The salad can last for three days in the fridge. Avoid reheating the chicken salad, as it tastes best cold. Pro Tips Select the Right Chicken: For the best flavor and texture, use rotisserie chicken or leftover grilled chicken. <strong.Add Crunch: In addition to almonds, consider adding chopped apples or walnuts for extra crunch and flavor. <strong.Making Ahead: This chicken salad can be made a day in advance. Just keep it covered in the fridge and add to lettuce wraps when ready to serve. <strong.Variation Ideas: Experiment with different herbs like dill or parsley to give your chicken salad a fresh twist. {{image_2}} You can switch up the protein in your salad. Try using tuna or chickpeas. Both options add great flavor and texture. Tuna offers a rich taste, while chickpeas are perfect for a plant-based meal. If you want more protein, consider adding hard-boiled eggs. Chop them finely and mix them in. They add creaminess and extra protein to your wraps. The dressing can change the whole dish. You can stick with yogurt-based dressings for a light touch. They keep it creamy and fresh. Another option is a creamy avocado dressing. This adds richness and a unique flavor. Just mash ripe avocados and mix with lemon juice and yogurt. It’s simple and tasty! While romaine or butter lettuce works well, you can explore other greens. Try using collard greens or Swiss chard. These leaves are sturdy and can hold more filling. You can even use cabbage for a crunchy twist. Each green adds a different flavor and texture. Enjoy experimenting with what you have on hand! To keep your Greek yogurt chicken salad fresh, store it in the fridge. Use an airtight container. It will stay good for up to three days. Always check for any signs of spoilage before eating. You can freeze the chicken salad for later use. Place it in a freezer-safe container. Make sure to leave some space at the top for expansion. It will last about two months in the freezer. To enjoy, let it thaw in the fridge overnight. For the best taste and freshness, eat the salad within three days. If you follow proper storage tips, it will taste great. Use fresh ingredients to enhance the flavor and texture. You can use sour cream or buttermilk. Both provide a similar creamy texture. If you want a dairy-free option, try silken tofu blended until smooth. This gives a nice consistency while keeping it healthy. Yes! To make it vegan, use chickpeas or shredded jackfruit instead of chicken. Replace Greek yogurt with a dairy-free yogurt, like coconut or almond yogurt. This keeps the taste while making it plant-based. To keep lettuce fresh, store it in a cool, dry place. Try wrapping the lettuce in a damp paper towel and placing it in a plastic bag. This helps keep the leaves crisp and ready to use. Some great sides include fresh fruit, veggie sticks, or a light soup. A simple green salad also works well. These sides add more color and nutrition to your meal. Absolutely! You can prepare the chicken salad a day before. Store it in the fridge in an airtight container. Just assemble the wraps right before serving for the best crunch. This blog post explored the tasty Greek Yogurt Chicken Salad Lettuce Wraps. We looked at the main ingredients: chicken, yogurt, fresh veggies, nuts, and ideal seasonings. I shared step-by-step instructions for making the wraps and tips for customizations. Plus, we discussed storage and variations, if you want to switch things up. Remember, you can use different proteins or dressings. Make these wraps your own. Enjoy this healthy dish anytime!

Greek Yogurt Chicken Salad Lettuce Wraps Delight

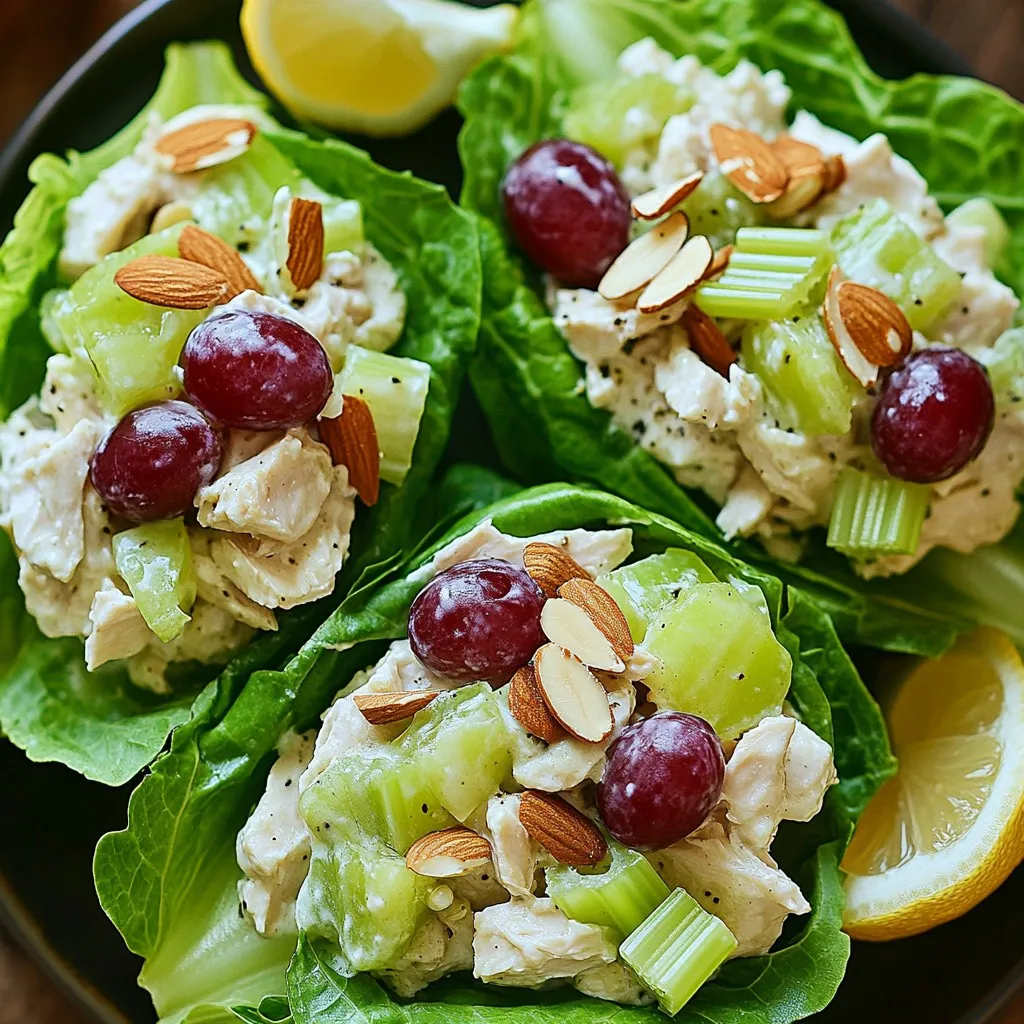
Are you ready to spice up your lunch? Greek Yogurt Chicken Salad Lettuce Wraps Delight offers a fresh twist on

- 2 boneless, skinless chicken breasts, cut into bite-sized pieces - 1 cup long-grain white rice - 2 cups chicken broth The main ingredients make this dish hearty and filling. The chicken breasts provide protein, while the rice serves as a great base. Chicken broth adds flavor and helps cook the rice just right. This combo will keep you satisfied. - 1 bell pepper, diced (red or green) - 1 cup corn kernels (fresh or frozen) - 1 small onion, diced - 3 cloves garlic, minced The vegetables add color and crunch. I love using bell peppers for their sweetness. Corn adds pops of flavor, while onion and garlic bring depth. Together, they make every bite exciting and fresh. - 2 tablespoons Cajun seasoning - 1 teaspoon smoked paprika - Salt and pepper to taste - Fresh parsley, chopped for garnish Seasonings bring life to the dish. Cajun seasoning adds a kick, while smoked paprika gives a warm, rich flavor. A pinch of salt and pepper balances everything. Finish with fresh parsley for a bright touch. This is how you elevate simple chicken and rice to something special. {{ingredient_image_1}} Start by prepping your chicken and vegetables. Cut the two boneless, skinless chicken breasts into bite-sized pieces. This helps them cook evenly. Dice one bell pepper, and chop one small onion. If you use fresh corn, cut it off the cob. If using frozen corn, you can skip this step. Next, mix all the ingredients in a bowl. In a large mixing bowl, combine the chicken pieces, one cup of long-grain white rice, the diced bell pepper, one cup of corn, the diced onion, and three minced garlic cloves. Drizzle one tablespoon of olive oil over the mixture. Then, add two tablespoons of Cajun seasoning, one teaspoon of smoked paprika, and salt and pepper to taste. Toss everything together until well coated. This step builds flavor in every bite. Now it’s time to assemble the foil packs. First, cut four large pieces of aluminum foil, about 12 inches long each. Lay them flat on your work surface. Divide the chicken and rice mixture evenly among the four pieces of foil. Make sure each packet gets a good amount of chicken and veggies for balanced flavor. Carefully pour half a cup of chicken broth over each portion on the foil. This broth adds moisture and enhances the taste of the dish. Fold the foil packets over tightly. Seal them well to create a pocket. This keeps all the flavors trapped inside while cooking. You can choose to grill or bake your foil packs. Preheat your grill to medium-high heat or your oven to 400°F (200°C). Cook the packets for about 25 to 30 minutes. Check that the chicken is cooked through and the rice is tender. If you use a grill, keep the packets on a direct heat source. For the oven, place them on a baking sheet. Once cooked, remove the packets from heat. Let them sit for a few minutes before opening. Be careful, as the steam will be hot! Serve the contents in bowls, and finish with fresh chopped parsley for a pop of color. Enjoy your flavorful meal! To get juicy chicken and fluffy rice, follow these steps: - Cut chicken into small, even pieces. This helps it cook faster and uniformly. - Use long-grain white rice. It cooks well and has a nice texture. - Make sure to pour the chicken broth evenly over each pack. This keeps the rice moist. - Seal the foil tightly. This traps steam, helping everything cook evenly. Spice up your meal with these ideas: - Add a pinch of cayenne for extra heat. This will give your dish a nice kick. - Try adding some diced tomatoes for a tangy flavor. - Use smoked sausage instead of chicken for a different taste. - Swap Cajun seasoning with Creole seasoning for a milder flavor. Make your dish look as good as it tastes: - Serve the foil pack contents in a bowl to show off the colors. - Sprinkle fresh parsley on top for a pop of green. - Add some lime wedges on the side for a zesty twist. - Consider serving with a side salad to balance the meal. Pro Tips Use Fresh Ingredients: Opt for fresh vegetables and herbs whenever possible to enhance the flavors of your dish. Choose the Right Foil: Heavy-duty aluminum foil works best for grilling as it prevents tearing and leaking during cooking. Let the Packets Rest: Allow the foil packets to sit for a few minutes after cooking to let the steam settle and flavors meld. Customize Your Spice Level: Adjust the amount of Cajun seasoning based on your preference for spiciness; add more for a kick! {{image_2}} You can change the proteins and veggies in this recipe. Try shrimp or sausage for a twist. Shrimp cooks fast and adds a nice flavor. Sausage gives a hearty taste. For veggies, use zucchini or asparagus. These options are fresh and will make your meal colorful. You can cook these foil packs in the oven or on the grill. The oven gives even heat, but the grill adds a smoky flavor. On the grill, watch for flare-ups. Campfire cooking is fun too! Wrap the packs in heavy foil and place them on hot coals. Turn them often for even cooking. You can adjust the heat to fit your taste. For a milder dish, use less Cajun seasoning. You can also add a dollop of sour cream for creaminess. For kids, keep it simple. Use no spice or just a hint of seasoning. This way, everyone can enjoy the meal. To store leftovers, let the foil packs cool first. Then, place them in a clean, airtight container. You can also wrap them tightly in plastic wrap or foil. This keeps the food fresh and prevents spills. Leftovers stay good for up to three days in the fridge. Make sure to reheat them well before eating. If you want to freeze pre-cooked packets, let them cool completely. Wrap each packet in plastic wrap, then place them in a freezer bag. This keeps out air and prevents freezer burn. You can freeze them for up to three months. To reheat, thaw the packets overnight in the fridge. Then, cook them in the oven at 350°F (175°C) for about 20 minutes. Make sure they are hot all the way through. Planning meals ahead saves time during busy weeks. You can prepare the foil packs in advance and store them in the fridge. Portion out meals into individual packets. This makes it easy to grab and cook when you need a quick dinner. You can also mix and match ingredients for variety. Yes, you can prepare these foil packs in advance. Just follow these steps: - Mix all ingredients as directed. - Divide the mixture into the foil packs. - Seal them up tightly. - Store the packs in the fridge for up to 24 hours. When you're ready to cook, just place the packs on the grill or in the oven. This method saves time and makes meal prep easy. If you don't have chicken broth, you have options. Here are a few alternatives: - Vegetable broth gives a nice flavor. - Water works too, but add extra seasoning. - White wine can add a unique taste. Each substitute will change the flavor a bit, so choose what fits your meal. To cook the rice well in foil packs, follow these tips: - Use long-grain white rice for best results. - Ensure you pour enough liquid over the rice. Use 1/2 cup of broth for each pack. - Check the cooking time. About 25-30 minutes is ideal. - Let the packs rest after cooking. This helps steam the rice to perfection. Following these steps will ensure a tasty and well-cooked meal every time. This blog post outlines how to create delicious Cajun Chicken & Rice Foil Packs. You’ll learn about key ingredients like chicken, rice, and tasty veggies. We discussed easy steps for preparation, cooking, and serving. Tips for enhancing flavors and variations keep your meals exciting. Remember to store leftovers properly for later. This method not only simplifies cooking but also brings great flavor to your table. Enjoy making these foil packs for quick meals any day!

Cajun Chicken & Rice Foil Packs Savory and Simple Meal

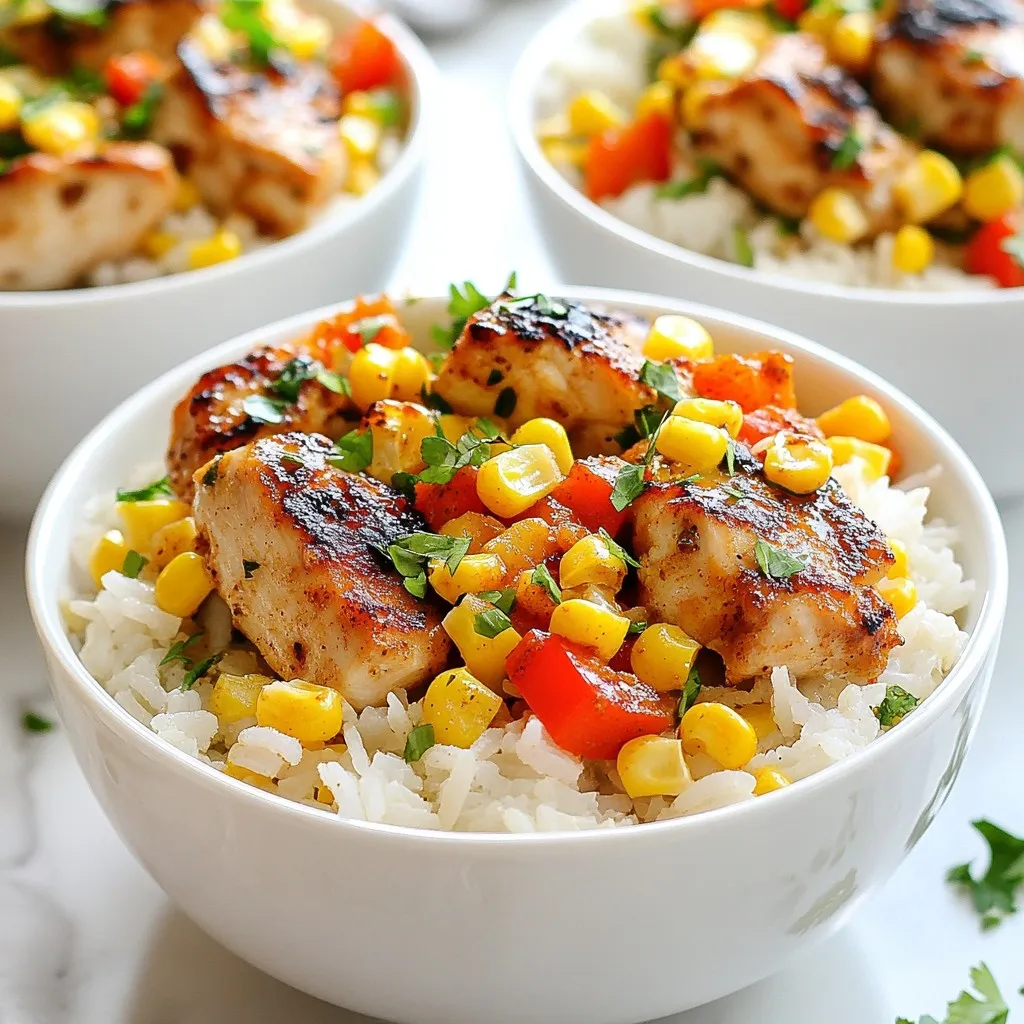
Craving a meal that’s both tasty and easy? Look no further! Cajun Chicken & Rice Foil Packs are your answer.

Here’s what you need for One Pot Creamy Garlic Shrimp Pasta: - Fettuccine pasta: 8 oz - Medium shrimp: 1 lb, peeled and deveined - Garlic: 4 cloves, minced - Heavy cream: 1 cup - Chicken broth: 1 cup - Cherry tomatoes: 1 cup, halved - Spinach: 1 cup, roughly chopped - Parmesan cheese: 1/2 cup, grated - Olive oil: 2 tablespoons - Salt and pepper: to taste - Fresh parsley: chopped, for garnish Each ingredient plays a role in making this dish rich and tasty. The fettuccine acts as a hearty base. The shrimp adds protein and a sweet flavor. Garlic gives an aromatic punch. Heavy cream brings creaminess, while chicken broth adds depth. Cherry tomatoes add a pop of freshness. Spinach gives a nice color and nutrients. Parmesan cheese finishes the dish with a savory touch. Olive oil helps meld all flavors and provides a nice cooking medium. Salt and pepper enhance every bite, and fresh parsley adds a bright look. Feel free to adjust these ingredients based on what you have at home. Cooking is about creativity and fun! First, heat 2 tablespoons of olive oil in a large pot over medium heat. Add 4 minced garlic cloves and sauté for about 1 minute. You want the garlic fragrant but not burnt. Next, add 1 pound of peeled and deveined shrimp to the pot. Cook the shrimp for 2-3 minutes until they turn pink and opaque. Once cooked, remove the shrimp and set them aside. In the same pot, add 1 cup of chicken broth and 1 cup of heavy cream. Stir the mixture well and bring it to a gentle simmer. Then, add 8 ounces of fettuccine pasta to the pot. Make sure the pasta is submerged in the liquid. Cook according to the package instructions, usually about 10-12 minutes. Stir occasionally to keep the pasta from sticking. When the pasta is nearly cooked, add 1 cup of cherry tomatoes, halved, and 1 cup of roughly chopped spinach to the pot. Cook for another 2-3 minutes until the spinach wilts and the tomatoes soften. Reduce the heat to low, then return the cooked shrimp to the pot. Mix in ½ cup of grated Parmesan cheese until melted and well combined. Finally, season with salt and pepper to taste. Let it sit for a few minutes to thicken before serving. To make this dish shine, adjust the seasoning to your taste. Start with a pinch of salt and pepper. Taste as you mix in the shrimp and cheese. If you want a lighter version, you can substitute heavy cream with half-and-half or coconut milk. This change keeps it creamy while reducing calories. To avoid clumping, stir the pasta often while it cooks. This keeps it from sticking together. For an even creamier texture, add more heavy cream or a splash of pasta water. The starchy water helps bind the sauce to the pasta. Serve the pasta in large bowls for a cozy feel. Top it with fresh parsley and an extra sprinkle of Parmesan cheese. These colorful toppings make the dish look appealing. Choose wide, shallow bowls to show off the creamy sauce and vibrant colors of the shrimp and veggies. {{image_2}} You can switch the pasta type for this dish. Try penne or spaghetti instead of fettuccine. They work well and cook similarly. You can also use gluten-free pasta if you need it. For protein, shrimp works great, but chicken or tofu are good swaps. If using chicken, cook it until golden brown before adding the broth. For tofu, use firm or extra-firm. Just sauté it until it's crispy on the outside. Want to boost the taste? Add spices like red pepper flakes for heat. Fresh herbs like basil or thyme can add a nice touch too. Just toss them in when you add the veggies. You might also want to include other vegetables. Bell peppers or zucchini can add color and flavor. Cook them with the garlic for a tasty mix. To make this dish gluten-free, use gluten-free pasta. Most brands work well without changing the taste. For lactose-free options, swap the heavy cream with coconut milk or almond milk. Nutritional yeast can replace Parmesan cheese for a cheesy flavor without dairy. This keeps the dish creamy and tasty. To store leftovers of your One Pot Creamy Garlic Shrimp Pasta, let it cool down first. Place it in an airtight container to keep it fresh. You can store it in the fridge for up to three days. Glass or plastic containers work well. Make sure the lid fits tightly to prevent air from getting in. When you are ready to enjoy your pasta again, reheat it gently. You can use a microwave or a stovetop. If using a microwave, heat it in short bursts, stirring in between. This helps keep the pasta moist. If using a stovetop, add a splash of chicken broth or cream to avoid drying out. Heat on low and stir often until warm. Enjoy your meal just like the first time! Cooking this dish takes about 30 minutes in total. You will spend around 10 minutes prepping your ingredients. The cooking process will take the remaining 20 minutes. Yes, you can make this dish ahead of time. Cook it fully and let it cool. Store it in an airtight container in the fridge. It will stay fresh for up to 3 days. When ready to eat, simply reheat it in a pan with a splash of broth or cream to keep it creamy. This pasta goes great with many sides. Here are some tasty options: - A simple mixed green salad - Garlic bread for a crunchy bite - Steamed broccoli for added veggies - A light tomato basil soup for warmth These sides will enhance your meal and add variety. This blog post lays out a simple and tasty one-pot creamy garlic shrimp pasta recipe. You learned about the key ingredients and easy steps for cooking. I also shared tips to boost flavor and suggested variations based on your needs. You now have guidance for storage and reheating too. Cooking should be fun and stress-free. Enjoy making this dish and sharing it with others. Happy cooking!

One Pot Creamy Garlic Shrimp Pasta Quick and Simple

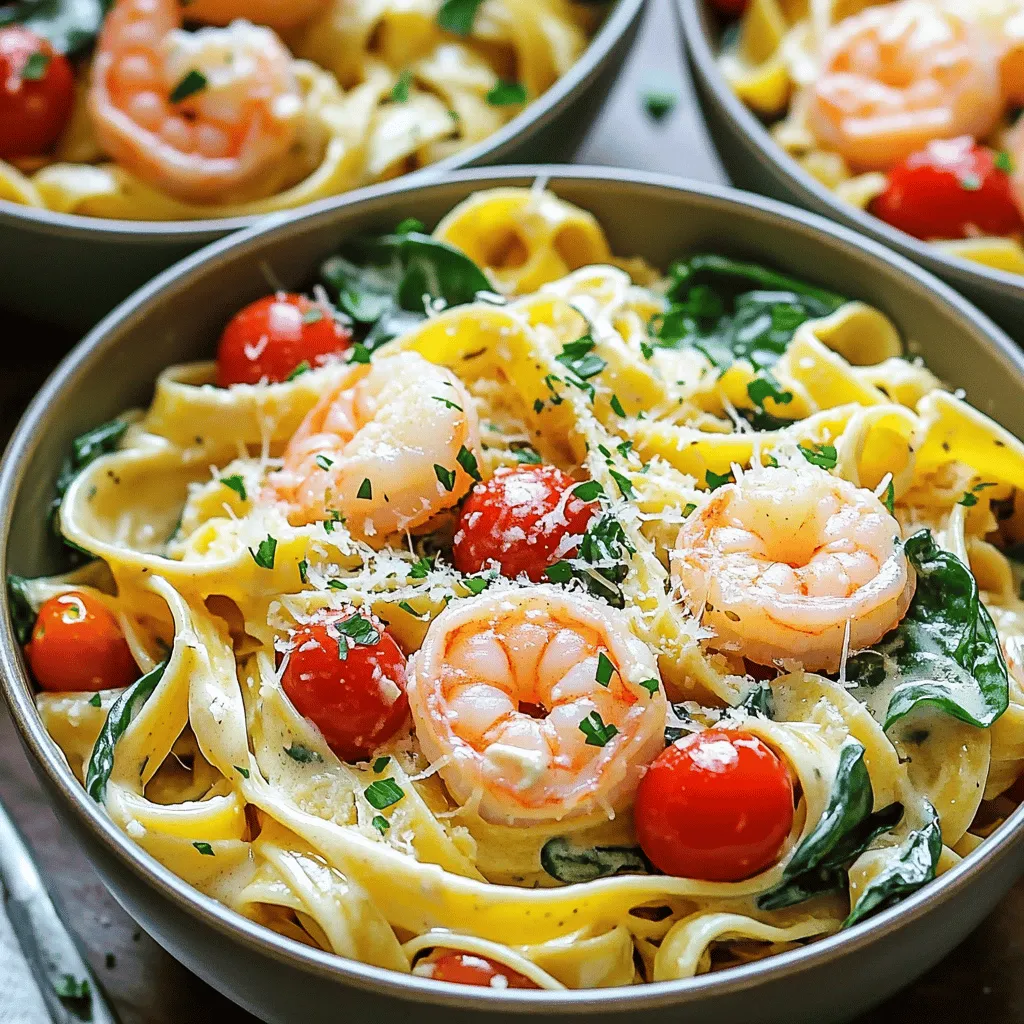
Looking for a quick and tasty meal that impresses? You’ve found the right dish! This One Pot Creamy Garlic Shrimp

To make this no bake chocolate peanut butter fudge, you will need: - 1 cup creamy peanut butter - 1 cup powdered sugar - 1 cup semi-sweet chocolate chips - 1/4 cup coconut oil - 1 teaspoon vanilla extract - 1/4 teaspoon sea salt - Optional: chopped nuts or sprinkles for topping When picking your ingredients, focus on quality. Choose a creamy peanut butter that you love. Check that it has no added sugar or oils for the best taste. For the chocolate chips, look for semi-sweet ones. They should melt well and add a rich flavor. If you can, opt for organic ingredients. This choice can enhance the taste and make your fudge even better. If you have allergies, you can still enjoy this fudge. Use sunbutter in place of peanut butter. This works well for nut allergies and keeps the creamy texture. For powdered sugar, you can try a sugar-free version if you want to cut back on sugar. If you can’t use coconut oil, look for a light olive oil or vegetable oil. Always check labels for allergens when shopping. Making No Bake Chocolate Peanut Butter Fudge is easy and quick. You only need about 15 minutes to mix the ingredients. Then, let it chill for at least 2 hours. This fudge is rich and creamy. It’s a perfect treat for any occasion! 1. Mix Peanut Butter and Sugar: In a medium bowl, add 1 cup of creamy peanut butter and 1 cup of powdered sugar. Stir them together until the mix is smooth. 2. Melt Chocolate and Oil: In a microwave-safe bowl, place 1 cup of semi-sweet chocolate chips and 1/4 cup of coconut oil. Heat them in the microwave. Do this in 30-second bursts. Stir between each time until the chocolate is melted. 3. Add Flavor: Once the chocolate mix is smooth, add 1 teaspoon of vanilla extract and 1/4 teaspoon of sea salt. Stir until combined. 4. Combine Mixtures: Gently fold the chocolate mixture into the peanut butter mixture. Keep stirring until both are fully mixed and the color is uniform. 5. Prepare the Baking Dish: Line an 8x8 inch square baking dish with parchment paper. Leave some paper hanging over the sides. This helps you lift the fudge out later. 6. Pour and Spread: Pour the fudge mix into the lined dish. Use a spatula to spread it evenly. If you want, add chopped nuts or colorful sprinkles on top for decoration. 7. Chill: Put the dish in the refrigerator. Let it chill for at least 2 hours, or until it is set. 8. Cut and Serve: Once the fudge is firm, lift it out using the parchment paper. Cut the fudge into squares. For a visual guide, check out online videos that show how to make no bake fudge. Seeing the steps can make it even easier! When making no bake chocolate peanut butter fudge, some mistakes can happen. One common error is not mixing the peanut butter and powdered sugar enough. If you skip this step, your fudge can end up grainy. Another mistake is overheating the chocolate. Always melt it in short bursts. This helps keep the chocolate smooth. Also, don't forget to line your baking dish with parchment paper. This makes it easy to lift the fudge out later. For smooth and creamy fudge, ensure all ingredients are at room temperature. I recommend mixing the peanut butter with the powdered sugar until it is well combined. When melting the chocolate, add coconut oil to keep it silky. The sea salt will enhance the flavors, making every bite delightful. After pouring the fudge into the dish, spread it evenly. This helps it set correctly in the fridge. Presentation matters when serving fudge. Cut the fudge into squares for easy serving. I love to place them on a decorative plate. For a touch of flair, drizzle melted chocolate or peanut butter on top. You can also add colorful sprinkles or chopped nuts for texture. This adds visual appeal and makes it fun for guests! {{image_2}} You can change the taste of your fudge easily. Try adding extracts like almond or mint. A teaspoon of espresso powder can give a rich depth. You can also mix in spices like cinnamon for warmth. These small changes can make a big impact on your fudge. If you want a healthier fudge, you can use sugar-free ingredients. Try sugar-free powdered sugar or a natural sweetener. You can also replace the chocolate chips with dark chocolate that has less sugar. This keeps the fudge tasty while cutting down on sugar. Toppings can make your fudge fun and unique. Chopped nuts add crunch, while colorful sprinkles can brighten it up. You can also use mini marshmallows or dried fruits like cranberries. Get creative with what you have on hand! To keep your no bake chocolate peanut butter fudge fresh, store it in an airtight container. This helps prevent it from drying out or absorbing other smells. If you're stacking fudge, place parchment paper between layers. This keeps it neat and easy to separate. Keep the fudge in the fridge to maintain its firmness. A cool temperature is key for preserving the texture. You can freeze this fudge for longer storage. Cut it into squares before freezing. Wrap each piece tightly in plastic wrap, then place them in a freezer-safe bag. When you're ready to enjoy, simply remove the fudge from the freezer. Let it thaw in the fridge for a few hours. Avoid thawing at room temperature, which can change its texture. When stored properly, this fudge lasts up to two weeks in the fridge. If frozen, it can last up to three months. Always check for any changes in smell or texture before eating. Fudge that looks or smells off should be discarded. Enjoying this sweet treat while it's fresh will give you the best taste! Yes, you can use crunchy peanut butter. This choice adds texture to the fudge. The chunks of peanuts will give each bite a delightful crunch. Just remember, the fudge may be a bit thicker. Mix it well to ensure the chocolate blends in smoothly. You can use butter instead of coconut oil. Melt the butter with the chocolate chips. It will create a rich and creamy fudge. You can also try using vegetable oil if you prefer a lighter taste. Adjust the amount to match the original recipe. If your fudge is too soft, chill it longer. Place it in the fridge for an extra hour. You can also add more powdered sugar. This will help thicken the fudge and improve the texture. If all else fails, you can freeze it for a firmer treat. This article covers all you need to know about making fudge. We explored ingredients, preparation steps, and tips for the best results. You learned how to avoid common mistakes and how to store your fudge properly. Remember, you can customize flavors and toppings to suit your taste. In the end, making fudge is about fun and creativity. Get into the kitchen, try new variations, and enjoy your sweet creations! Making fudge is a great way to share joy with friends and family.

No Bake Chocolate Peanut Butter Fudge Delight

Indulge in the sweet and creamy bliss of No Bake Chocolate Peanut Butter Fudge. With just a few simple ingredients,

To make Caramel Apple Cheesecake Bars, you will need the following ingredients: - 1 ½ cups graham cracker crumbs - ½ cup unsalted butter, melted - 2 tablespoons sugar - 2 (8 oz) packages cream cheese, softened - 1 cup sugar - 3 large eggs - 2 teaspoons vanilla extract - 2 cups chopped apples (preferably Granny Smith or Honeycrisp) - 1 teaspoon cinnamon - 1 cup caramel sauce (store-bought or homemade) - ¼ cup chopped pecans (optional) These ingredients come together to create a rich and creamy dessert. The graham cracker crumbs form a crunchy crust. The melted butter helps bind the crumbs. Sugar sweetens the crust and the filling. Cream cheese gives the bars a smooth texture. Eggs help the cheesecake set perfectly. Vanilla adds a lovely flavor. Chopped apples bring a fresh, fruity touch. Cinnamon adds warmth and spice. Caramel sauce drizzled on top creates a sweet finish. Lastly, pecans add crunch if you choose to include them. To make these delicious caramel apple cheesecake bars, follow these easy steps. First, preheat your oven to 325°F (165°C). Take a 9x13-inch baking pan and line it with parchment paper. Leave some paper hanging over the edges. This helps you lift the bars out later. In a mixing bowl, add 1 ½ cups of graham cracker crumbs, ½ cup of melted unsalted butter, and 2 tablespoons of sugar. Mix these until the crumbs are well coated. Press this mixture firmly into the bottom of the lined pan to make your crust. Bake it in the oven for 10 minutes, then let it cool a bit. Now, in a large bowl, take 2 packages of softened cream cheese and 1 cup of sugar. Beat them together until smooth and creamy. Add 3 large eggs, one at a time. Mix well after each egg. Finally, stir in 2 teaspoons of vanilla extract until everything is combined. Next, fold in 2 cups of chopped apples and 1 teaspoon of cinnamon. Make sure to mix gently until the apples are evenly spread in the cream cheese mixture. Pour the cream cheese mixture over your cooled crust. Spread it evenly across the surface. Then, drizzle 1 cup of caramel sauce on top. Use a knife to swirl the caramel into the cream cheese mixture. If you like, you can sprinkle ¼ cup of chopped pecans on top for extra crunch. You are now ready to bake! Keep an eye on the time as it cooks. Using room temperature cream cheese is key. Cold cream cheese can clump up and ruin your filling. Let it sit out for about 30 minutes before mixing. This way, it blends smoothly with sugar and eggs, making a creamy mix. For even baking, check your oven temperature with a thermometer. Ovens can be off by a few degrees. Bake your bars until the center is slightly jiggly. This ensures they stay creamy without being undercooked. When serving, let the bars cool completely before cutting. Chilling them in the fridge for at least four hours helps them set well. Use a sharp knife for clean cuts. Drizzle extra caramel on top for a nice touch before serving. Enjoy the sweet, tart flavors! {{image_2}} When making caramel apple cheesecake bars, you can switch things up for fun. - Alternative crust options: Try using crushed cookies like Oreos or graham crackers for a different flavor. You can even use almond flour to make a gluten-free crust. Each option adds its own unique taste. - Different apple varieties: Granny Smith apples work great, but Honeycrisp adds a sweet twist. You can also use Fuji or Braeburn apples for a mix of tart and sweet. Each apple type changes the flavor and texture. - Swaps for caramel sauce: You can use butterscotch or chocolate sauce if you want a twist. For a healthier option, try date caramel. It adds sweetness without refined sugar and gives a nice touch to the bars. These variations help you make the recipe your own. Don’t be afraid to mix and match! To keep your Caramel Apple Cheesecake Bars fresh, use a few simple steps. - Recommended storage containers: Use an airtight container. This keeps the bars moist and prevents them from absorbing other odors. If you do not have one, wrap the bars tightly in plastic wrap before placing them in a regular container. - Freezing options: You can freeze these bars for up to three months. Cut them into squares first. Wrap each piece in plastic wrap, then place them in a freezer-safe bag or container. Label with the date, so you know when to enjoy them. - Reheating tips: When ready to eat, thaw the bars in the fridge overnight. For a warm treat, heat them in the microwave for about 10-15 seconds. This makes the caramel a bit gooey and delicious. Enjoy your sweet treat! How long can I refrigerate the cheesecake bars? You can refrigerate the cheesecake bars for up to five days. Keep them in an airtight container. This helps them stay fresh and tasty. Can I make these bars ahead of time? Yes, you can make these bars a day or two ahead. Just refrigerate them after they cool. Chilling helps the flavors meld together beautifully. What can I substitute for pecans? If you don't have pecans, try walnuts or almonds. You can also skip nuts entirely if you prefer a nut-free version. The bars will still taste amazing! Is it possible to use store-bought caramel sauce? Absolutely! Store-bought caramel sauce saves time and works well. Just drizzle it over the bars before serving. Homemade or store-bought, both options taste great! This blog post covered how to make delicious Caramel Apple Cheesecake Bars. We explored key ingredients, like cream cheese and chopped apples. You learned the step-by-step instructions, tips for great texture, and variations to customize your bars. We also discussed how to store leftovers effectively. Remember, these bars are fun to make and share! Enjoy experimenting with the flavors. Each bite will remind you of fall, making it a great treat any time. So, gather your ingredients and start baking!

Caramel Apple Cheesecake Bars Delightful Dessert Treat

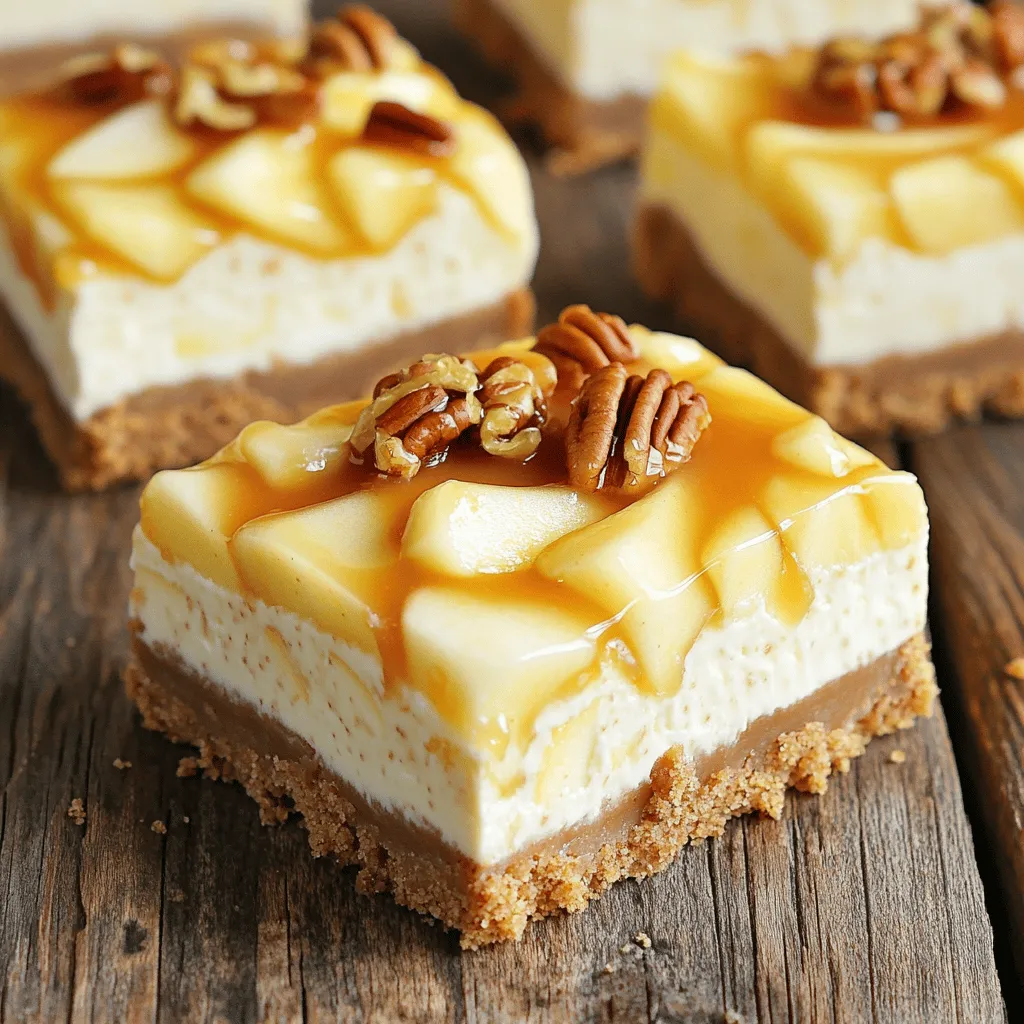
Are you ready to indulge in a sweet, creamy treat? These Caramel Apple Cheesecake Bars are the perfect dessert for

Older posts
Newer posts
← Previous Page1 … Page23 Page24 Page25 … Page164 Next →

dsad

© 2026 easycookingbite • Built with GeneratePress

Our Policies

  • Copyright Policy
  • Cookie Policy
  • GDPR Policy
  • Privacy Policy
  • Disclaimer
  • Terms Of Use

More Information

  • Home
  • About
  • Contact
  • Appetizers
  • Dessert
  • Dinner
  • Drinks
©2026, easycookingbite About Back To Top