Skip to content
DisclaimerTerms Of UseGDPR PolicyCookie Policy

easycookingbite

  • Home
  • Drinks
  • Appetizers
  • Dinner
  • Dessert
  • About
  • Contact
  • Privacy Policy
DisclaimerTerms Of UseGDPR PolicyCookie Policy

Lily

- 20 jumbo pasta shells - 2 cups cooked chicken, shredded - 1 cup ricotta cheese - 1 cup shredded mozzarella cheese (plus extra for topping) - 1 cup Alfredo sauce (store-bought or homemade) - 1/2 cup grated Parmesan cheese - 1 cup fresh spinach, chopped - 2 cloves garlic, minced - Salt and pepper to taste - 1 teaspoon Italian seasoning - Fresh parsley for garnish These ingredients create a rich and creamy dish. First, you need jumbo pasta shells. They hold the filling well. Next, cooked chicken is key. It adds protein and flavor. I love using shredded chicken for a tender bite. Ricotta cheese gives that creamy texture, while mozzarella adds stretch and melt. Alfredo sauce is essential for that classic flavor. You can use store-bought for ease or make your own. Grated Parmesan cheese adds a sharp taste, balancing the creaminess. Fresh spinach adds color and nutrients. Minced garlic boosts the overall flavor. Don’t forget salt, pepper, and Italian seasoning for seasoning. These spices make all the difference. Finally, fresh parsley is perfect for garnish. It adds a pop of color and freshness. With this list, you’re ready to create Loaded Chicken Alfredo Stuffed Shells that everyone will love! 1. Preheat your oven to 375°F (190°C). This step gets your oven ready. 2. Cook the jumbo pasta shells until they are al dente. Follow the package directions. Once done, drain and set them aside to cool slightly. 1. In a large bowl, mix together the shredded chicken, ricotta cheese, and 1 cup of mozzarella cheese. 2. Add half of the Alfredo sauce, chopped spinach, minced garlic, Italian seasoning, salt, and pepper. 3. Stir the mixture until it is well combined. You want a creamy, flavorful filling. 1. Take each cooked shell and fill it generously with the chicken and cheese mixture. 2. Place the stuffed shells seam-side up in a greased 9x13 inch baking dish. 3. Pour the remaining Alfredo sauce evenly over the stuffed shells. 4. Sprinkle additional mozzarella and Parmesan cheese on top. This method ensures that every shell is covered in rich, creamy goodness. Enjoy the simple joy of creating a cozy dish! To ensure your shells don't stick together, cook them in a large pot. Use plenty of water and add a pinch of salt. This helps keep the pasta from clumping. Stir gently while cooking. Once done, drain the shells and rinse them with cold water. This stops the cooking and cools them down. Filling the shells can be tricky. A simple way to fill them is using a spoon. But I find a piping bag works even better. It allows you to fill each shell with ease. Just cut a small hole in the corner and squeeze the filling right in. Add a variety of veggies to your mix. Chopped bell peppers or mushrooms can boost the taste. You can also try adding zucchini or roasted eggplant for a new twist. Each veggie brings its own flavor and texture. Don't forget about cheese! You can mix in different types for more depth. Try adding cream cheese for extra creaminess. Or sprinkle some feta for a tangy touch. Each cheese can change the whole dish. Explore and find your favorite combos! {{image_2}} After enjoying your loaded chicken Alfredo stuffed shells, store any leftovers in the fridge. Use an airtight container to keep them fresh. These stuffed shells can last up to 3-4 days in the refrigerator. To reheat, try using the oven. Preheat it to 350°F (175°C). Place the shells in a baking dish, add a splash of Alfredo sauce on top, and cover with foil. Heat for about 15-20 minutes until warm. This method helps keep the shells moist and tasty. If you want to save some for later, freezing is a great option. First, let the stuffed shells cool completely. Then, place them in a single layer on a baking sheet. Freeze until firm, about 1-2 hours. Once frozen, transfer the shells to a freezer-safe bag or container. Be sure to label them with the date. You can freeze them for up to 3 months. When ready to eat, thaw in the fridge overnight. Then, bake them at 350°F (175°C) for about 30-35 minutes. Pour some Alfredo sauce on top before baking for extra flavor. Enjoy your delicious meal later! For a great meal, I love to serve a fresh salad with my Loaded Chicken Alfredo Stuffed Shells. A simple green salad works well. Use mixed greens, cherry tomatoes, and cucumber. Toss it with a light vinaigrette. This adds a refreshing crunch to the dish. You can also serve garlic bread alongside the stuffed shells. The warm, buttery bread complements the creamy flavors of the Alfredo sauce. Just slice a loaf of Italian bread, spread garlic butter, and bake until golden. It’s a simple yet tasty side. To make your dish look even better, garnish with fresh herbs. I suggest using chopped parsley. It adds a pop of color and a burst of flavor. Just sprinkle the parsley on top right before serving. This small touch makes your meal feel special and inviting. Enjoy your cooking adventure! Stuffed shells can last in the fridge for about 3 to 5 days. Make sure to store them in an airtight container. This keeps them fresh and tasty. If you want to enjoy them later, consider freezing them. Yes, you can use homemade Alfredo sauce. In fact, it can add a fresh taste. Just make sure your sauce is thick enough to coat the shells. A creamy sauce enhances the overall flavor. You can use several proteins in this dish. Ground turkey, ground beef, or even shrimp work well. Tofu is a great option for a vegetarian twist. Each protein adds its unique flavor, making the dish versatile and fun. You now have a clear guide to making delicious stuffed shells. We covered essential ingredients, preparation steps, and tips to enhance flavor. Remember to mix in your favorite veggies or cheeses to suit your taste. Don't forget the storage and serving ideas to make meal prep easy. Enjoy your creamy, cheesy dish with friends and family, and be sure to show off your cooking skills! Happy cooking!

Loaded Chicken Alfredo Stuffed Shells Easy Dinner Idea

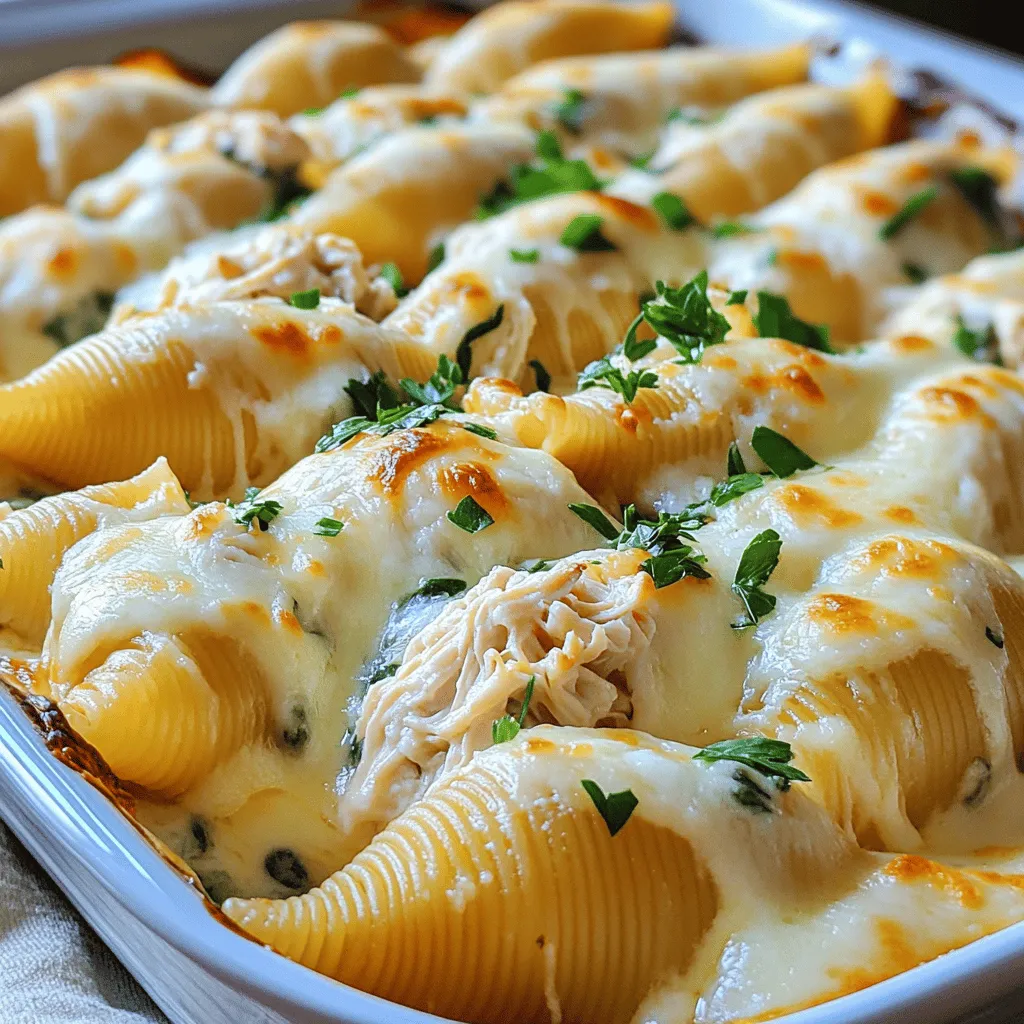
Looking for a quick and tasty dinner idea? Loaded Chicken Alfredo Stuffed Shells are your answer! These cheesy, creamy shells

- 3 ripe bananas, mashed - 1/3 cup melted coconut oil - 1/2 cup brown sugar - 1 large egg - 1 teaspoon vanilla extract - 1 teaspoon baking soda - Pinch of salt - 1 1/2 cups all-purpose flour - 1/2 cup semi-sweet chocolate chips - 1/4 cup chopped walnuts (optional) Each ingredient plays a key role in making your banana bread great. Ripe bananas give natural sweetness. The more spots, the better! Coconut oil keeps the bread moist. Brown sugar adds depth and a slight caramel flavor. The egg binds everything together. Baking soda helps the bread rise. The flour gives it structure. Chocolate chips add a rich taste, while walnuts add a nice crunch. You can switch out some ingredients if needed. If you don't have coconut oil, use melted butter or vegetable oil. For brown sugar, white sugar works too, but it will change the flavor slightly. If you want a vegan option, replace the egg with a flax egg. Just mix 1 tablespoon of ground flaxseed with 2.5 tablespoons of water. Let it sit for a few minutes to thicken. For flour, whole wheat flour is a great option, but it may change the texture a bit. First, set your oven to 350°F (175°C). This temperature helps the banana bread rise well. While the oven heats, grease a 9x5 inch loaf pan. Use coconut oil or cooking spray for the best results. This step prevents the bread from sticking. In a big mixing bowl, mash 3 ripe bananas with a fork. Aim for a smooth texture. Next, stir in 1/3 cup of melted coconut oil. This adds flavor and moisture. Then, mix in 1/2 cup of brown sugar, 1 large egg, and 1 teaspoon of vanilla extract. Stir until combined. Now, sprinkle 1 teaspoon of baking soda and a pinch of salt into the bowl. Mix these in well. This helps the bread rise. Gradually fold in 1 1/2 cups of all-purpose flour. Be careful not to overmix. The batter should stay a bit lumpy. Finally, gently fold in 1/2 cup of semi-sweet chocolate chips and 1/4 cup of chopped walnuts if you like. Pour the batter into the greased loaf pan. Smooth out the top for an even bake. Place the pan in the preheated oven. Bake for 60-65 minutes. Check if it is done by inserting a toothpick in the middle. If it comes out clean, your bread is ready. After baking, let the banana bread cool in the pan for about 10 minutes. Then, transfer it to a wire rack to cool completely. This step helps keep the bread soft and moist. Enjoy your delicious creation! To get that great texture, use ripe bananas. They should be soft and brown. This gives your bread natural sweetness. Mash them well with a fork. Mix the wet and dry ingredients gently. Overmixing can make the bread tough. You want it light and fluffy. Store your banana bread at room temperature. Wrap it in plastic wrap or foil. This keeps it moist for a few days. For longer storage, place it in the fridge. It can stay fresh for up to a week. If you want to save it for later, freeze it. Slice it first, then wrap it well. This way, you can thaw just what you need. Serve your banana bread warm for the best taste. Add a pat of butter on top. It melts into the bread and tastes great. You can also sprinkle extra chocolate chips for fun. For a twist, try adding a scoop of ice cream alongside. The warm bread with cold ice cream is pure joy! {{image_2}} You can make your banana bread more fun by adding nuts or fruits. Try adding chopped walnuts for a nice crunch. Pecans also work well if you want a rich flavor. Dried fruits like raisins or cranberries add sweetness. If you like fresh fruit, blueberries or strawberries can bring a burst of flavor. Just remember to adjust the amount so the bread doesn't get too wet. Chocolate chips make this banana bread special, but you can switch it up. Use dark chocolate for a richer taste. Milk chocolate gives a sweeter touch. For a fun twist, try white chocolate chips or even chocolate chunks. You can mix different types of chocolate too, if you want a variety in every bite. If you want a healthier version, you can swap some ingredients. Instead of coconut oil, use applesauce to cut fat. Replace brown sugar with honey or maple syrup for a natural sweetener. To boost fiber, you can use whole wheat flour instead of all-purpose flour. These swaps keep the bread tasty while making it a bit better for you. To keep your chocolate chip banana bread fresh, store it in an airtight container. Place the bread in a cool, dry area. It will last for about 3 days at room temperature. If you want to keep it longer, consider freezing it. To freeze banana bread, wrap it tightly in plastic wrap. Then, place it in a freezer-safe bag. This method helps prevent freezer burn. You can freeze it for up to 3 months. When you're ready to enjoy it, simply thaw it overnight in the fridge. To reheat banana bread, slice off the amount you want. Place the slices on a microwave-safe plate. Heat for 10-15 seconds or until warm. You can also warm it in the oven. Preheat the oven to 350°F (175°C) and bake for about 10 minutes. Enjoy your warm, delicious banana bread again! Yes, you can use frozen bananas. Just let them thaw first. They will mash easily, just like fresh ones. This adds natural sweetness. Using frozen bananas can save you time. Plus, it's a great way to use overripe bananas. To check if your banana bread is done, use a toothpick. Insert it into the center of the loaf. If it comes out clean, your bread is ready. If you see wet batter, bake it a bit longer. Typically, it takes about 60 to 65 minutes to bake. Yes, you can make this recipe vegan. Simply swap the egg for a flax egg. To make a flax egg, mix one tablespoon of ground flaxseed with three tablespoons of water. Let it sit for a few minutes until it thickens. This will work well in your banana bread. You can also use a plant-based butter instead of coconut oil. To make the best banana bread, know your ingredients and preparation method. Use the right tips and tricks for texture and freshness. Consider fun variations and storage options to keep it tasty. Remember, baking is a chance to get creative. Enjoy your delicious banana bread with friends and family. With practice, you’ll make it even better each time. Happy baking!

Chocolate Chip Banana Bread Irresistible and Easy Recipe

If you’re craving a sweet treat that is both easy to make and delightful to eat, you’re in luck! This

To make pumpkin coffee cake donuts, you need simple, fresh ingredients. Here’s what to gather: - 1 ½ cups all-purpose flour - 1 teaspoon baking powder - ½ teaspoon baking soda - ½ teaspoon salt - 1 teaspoon ground cinnamon - ½ teaspoon ground nutmeg - ¼ teaspoon ground cloves - ½ cup granulated sugar - ½ cup brown sugar, packed - ½ cup canned pumpkin puree - ½ cup Greek yogurt - 2 large eggs - 2 teaspoons vanilla extract - ½ cup unsalted butter, melted - ½ cup walnuts, chopped (optional) - ½ cup streusel topping (for garnish) Each ingredient plays a key role. The flour gives structure, while the baking powder and soda help the donuts rise. The spices add warmth and flavor. The pumpkin puree keeps them moist and delicious. Greek yogurt adds a nice tang and richness too. If you like nuts, walnuts add crunch. You can also customize with more spices or flavors. The streusel topping gives a sweet finish. It’s all about balance and creating a treat that tastes like fall. - Preheat your oven to 350°F (175°C) and grease a donut pan. This step is key for easy removal. - In a mixing bowl, whisk together the flour, baking powder, baking soda, salt, cinnamon, nutmeg, and cloves. Mix until everything is well combined. - In a separate bowl, combine the granulated sugar, brown sugar, pumpkin puree, Greek yogurt, eggs, and vanilla extract. Stir until the mixture is smooth and creamy. - Gradually add the melted butter into the pumpkin mixture. Stir gently until everything is fully combined. - Now, slowly fold in the dry ingredients. Be careful not to overmix. If you want some crunch, add chopped walnuts at this stage. - Pour the batter into the prepared donut pan, filling each cavity about ¾ full. This helps them rise perfectly. - Bake in the preheated oven for 12-15 minutes. Check if they are done by inserting a toothpick into a donut. It should come out clean. - Allow the donuts to cool in the pan for a few minutes. Then, carefully transfer them to a wire rack to cool completely. To get the best texture in your donuts, avoid overmixing the batter. When you mix too much, your donuts can become tough. Mix just until you see no dry flour. Also, use room-temperature ingredients. This helps the batter come together smoothly. You can perfect the flavor by adding spices. Try using cardamom or ginger for a warm twist. These spices give a nice depth to your pumpkin coffee cake donuts. If you want more crunch, add more walnuts. They not only add texture but also a lovely nutty flavor. While the donuts cool, prepare the streusel topping. This adds a sweet, crumbly layer on top. You can make it by mixing flour, brown sugar, and melted butter until crumbly. For an extra treat, drizzle icing on top. Mix powdered sugar with milk for the perfect drizzle. This makes your donuts look great and taste even better. {{image_2}} To make these donuts even more special, you can add coffee extract to the batter. This twist gives your donuts a rich coffee flavor. Simply mix in one teaspoon of coffee extract with your wet ingredients. The result is a tasty blend of pumpkin and coffee that pairs well with your morning brew. If you're looking for a gluten-free treat, it's easy to swap the all-purpose flour. Use a gluten-free flour blend instead. Make sure to check the blend for xanthan gum, which helps with texture. This option allows everyone to enjoy these delicious donuts without worry. You can also make a vegan version of these donuts. Replace the eggs with flaxseed meal. Mix one tablespoon of flaxseed meal with two and a half tablespoons of water. Let it sit for five minutes until it thickens. Instead of Greek yogurt, use unsweetened apple sauce. This keeps the donuts moist and adds a hint of sweetness. Enjoy these tasty vegan donuts with no guilt! Keep your leftover donuts in an airtight container at room temperature. This keeps them fresh and tasty for a few days. I like to use a glass container with a tight lid. It helps lock in the moisture, so the donuts stay soft. You can freeze these donuts for up to 2 months. Place them in a freezer-safe bag or container. Make sure to remove as much air as possible. When you're ready to enjoy them, thaw the donuts at room temperature. You can also heat them up for a warm treat. To enjoy fresh-tasting donuts, warm them in the microwave or oven. For the microwave, heat for about 10-15 seconds. In the oven, set it to 350°F and warm for about 5 minutes. This makes the donuts soft again and brings out their flavors. Enjoy with a cup of coffee! Yes, you can! If you don't have a donut pan, use a muffin tin instead. Simply fill the muffin cups about halfway with the batter. Bake for 15-20 minutes, or until a toothpick comes out clean. You can also make donut holes by using a mini muffin pan. These will cook faster, so check at around 10-12 minutes. To boost pumpkin flavor, try adding spices like ginger or allspice. A splash of vanilla extract can also help. You may use a bit of orange zest to give a bright note. If you want a richer taste, add a little maple syrup or brown sugar. Each of these tips can make your donuts pop with flavor. Pair these donuts with a hot cup of coffee or tea. They also go well with apple cider, a fall favorite. For a fun twist, serve them with a scoop of vanilla ice cream. You can also add fresh fruit like sliced apples or pears. This adds freshness and balance to the sweet donuts. You've learned how to make delicious pumpkin donuts from scratch. We covered the key ingredients, easy steps, and some helpful tips for perfecting your treats. I shared fun variations for different diets and how to store your leftovers. Remember, the best donuts come with a little practice. Enjoy experimenting with flavors and toppings. Your homemade donuts can bring joy to any gathering. Keep sharing your creations and enjoy every bite!

Pumpkin Coffee Cake Donuts Perfect for Fall Mornings

Are you ready to indulge in the cozy taste of fall? These Pumpkin Coffee Cake Donuts are just what you

- 1 pound chicken breast, diced - 1 pound andouille sausage, sliced (or vegan sausage for a meat-free option) - 1 large onion, diced - 1 green bell pepper, diced - 1 red bell pepper, diced - 3 cloves garlic, minced - 1 can (14.5 oz) diced tomatoes, undrained - 2 cups chicken or vegetable broth - 1 tablespoon Cajun seasoning - 1 teaspoon dried thyme - 1 teaspoon smoked paprika - 1 cup long-grain rice, rinsed - 1 cup frozen shrimp, peeled and deveined - Salt and pepper to taste In this jambalaya, I use hearty chicken and flavorful andouille sausage. You can also swap in vegan sausage if you want to keep it plant-based. The mix of onion, green bell pepper, and red bell pepper adds a nice crunch and sweetness. Garlic brings a robust taste that makes the dish shine. I love using diced tomatoes for extra moisture and flavor. The Cajun seasoning brings a spicy kick, while thyme and smoked paprika round out the taste. Long-grain rice cooks perfectly in the slow cooker, soaking up all the flavors. Finally, the shrimp adds a touch of elegance. - Chopped green onions - Chopped parsley Garnishes make a big difference. Chopped green onions add a fresh crunch, while parsley gives a lovely color. I often sprinkle these on top right before serving. It makes each plate look inviting. - Vegan options - Rice alternatives If you prefer a vegan meal, use tofu or extra vegetables instead of chicken and sausage. You can also use chickpeas for added protein. For rice, feel free to try quinoa or cauliflower rice. They both work well and keep the dish light. Just adjust the cooking time if you choose a different grain. Start by prepping your ingredients. Dice 1 pound of chicken breast and slice 1 pound of andouille sausage. For veggies, chop 1 large onion, 1 green bell pepper, and 1 red bell pepper. Next, mince 3 cloves of garlic. Once everything is ready, combine the chicken, sausage, onion, bell peppers, and garlic in your slow cooker. Mix them well so they blend together. Now, pour in 1 can of undrained diced tomatoes and 2 cups of chicken or vegetable broth. Add 1 tablespoon of Cajun seasoning, 1 teaspoon of dried thyme, and 1 teaspoon of smoked paprika. Season with salt and pepper to your taste. Next, add 1 cup of rinsed long-grain rice. Stir gently to make sure the rice gets mixed in with the other ingredients. You can choose to cook on low or high. For low, set it for 6 hours. For high, set it for 3 hours. Both methods work well, but low gives a richer flavor. Make sure to check the time. When cooking on low, it takes longer but develops great taste. On high, it cooks faster, but keep an eye on it. In the last 30 minutes, it’s time to add the shrimp. Use 1 cup of frozen shrimp that is peeled and deveined. Just toss them into the slow cooker and stir gently to mix them in. You’ll know the shrimp is done when it turns pink and opaque. This usually takes about 30 minutes. Once cooked, remove the lid and give the jambalaya a good stir. Adjust any seasonings if needed. Balancing flavors To make great jambalaya, you need to balance flavors. Start with the base. Use a mix of chicken and andouille sausage for a rich taste. Fresh veggies add sweetness. The Cajun seasoning gives a kick. Don’t forget to taste as you go. Adjust seasonings until it feels just right. Adjusting spice levels If you like it spicy, add more Cajun seasoning. You can also include a dash of hot sauce. If you prefer mild, cut back on the seasoning. You can always add spice later, but you can’t take it out. Avoiding mushy rice To keep rice from getting mushy, rinse it well before adding. This removes extra starch. Add it in the middle of cooking, not at the start. This way, it cooks just right. Ensuring even cooking Layer ingredients wisely. Put heavier items like meat on the bottom. Spread veggies on top. Stir it gently once halfway through. This helps everything cook evenly. Food pairings Jambalaya pairs well with crusty bread. A fresh green salad can lighten the meal. Serve it with a side of coleslaw for crunch. Presentation ideas For a pretty plate, use a large bowl. Spoon jambalaya in the center. Top with fresh green onions and parsley. A squeeze of lemon adds brightness. This makes the dish look as good as it tastes. {{image_2}} You can make a tasty vegetarian jambalaya by using tofu or a mix of veggies. Tofu has a nice texture and soaks up flavors well. Cut it into small cubes for even cooking. Use bell peppers, zucchini, and corn for great taste. Don't forget to spice it up! Add Cajun seasoning or a pinch of cayenne pepper for a kick. This gives a nice depth to your dish while keeping it plant-based. Seafood jambalaya is a fun twist! You can use shrimp, scallops, or even crab. Each brings a different flavor to the pot. If you pick larger seafood, like crab, cut down the cooking time. Shrimp cooks fast, so add it in the last 30 minutes. This way, it stays tender and juicy. For a richer taste, add a splash of white wine before cooking. Want to make it a one-pot meal? Add beans or lentils to boost protein and fiber. They cook well in the slow cooker and add a nice texture. You can also include more veggies, like spinach or carrots. This makes your jambalaya even more colorful and healthy. Feel free to mix and match your favorite ingredients. Each change keeps it fresh and exciting! After making Slow Cooker Jambalaya, you may have leftovers. Store them in the fridge. Place the jambalaya in an airtight container. This helps keep it fresh. Use it within three to four days for the best taste. You can also freeze jambalaya for later. To do this, let it cool first. Then, transfer it to a freezer-safe container. Leave some space at the top. This allows for expansion when freezing. Jambalaya can stay in the freezer for up to three months. When you're ready to eat, thaw it in the fridge overnight. This keeps the flavors intact. Reheat your jambalaya in several ways. The best method is using the stove. Place it in a pot over low heat. Stir it often to avoid sticking. You can also use the microwave. Heat it in short bursts, stirring between each. To avoid overcooking, check the jambalaya often. It should be warm all the way through but not dry. If it seems dry, add a splash of broth or water. This keeps it moist and tasty. Slow Cooker Jambalaya cooks for about 6 hours on low or 3 hours on high. This time helps all the flavors mix well. The slow cook brings out the taste of the chicken, sausage, and spices. You can check if it's done by looking at the rice. It should be tender and fluffy. Yes, you can use brown rice instead of white rice. However, you need to adjust the cooking time. Brown rice takes longer to cook. If you choose brown rice, add an extra hour to the cooking time. Make sure to check the rice for doneness before serving. If you want a different flavor, you can use other sausages. Turkey sausage or chicken sausage works well. For a meat-free option, try vegan sausage. You can also use mushrooms for a hearty texture. The choice will change the taste, but it will still be delicious. Yes, you can make it spicy! Add more Cajun seasoning or a dash of hot sauce. You can also add diced jalapeños or crushed red pepper flakes. Adjust the spice to your taste. This will give your jambalaya a nice kick! Jambalaya pairs well with many sides. You can serve it with crusty bread or cornbread. A simple green salad with a light dressing also works. For a fun touch, add a scoop of coleslaw. These sides will balance the rich flavors of the jambalaya. You learned how to make Slow Cooker Jambalaya with chicken, sausage, and shrimp. We covered ingredients, cooking steps, and tips to get the best flavor. Don’t forget the toppings and serving ideas to impress your guests. Experiment with variations like vegetarian or seafood versions for fun new tastes. Whether you store leftovers or serve hot, this dish brings comfort and joy. Dive in and enjoy the rich flavors of your homemade jambalaya!

Savory Slow Cooker Jambalaya Flavorful and Easy Meal

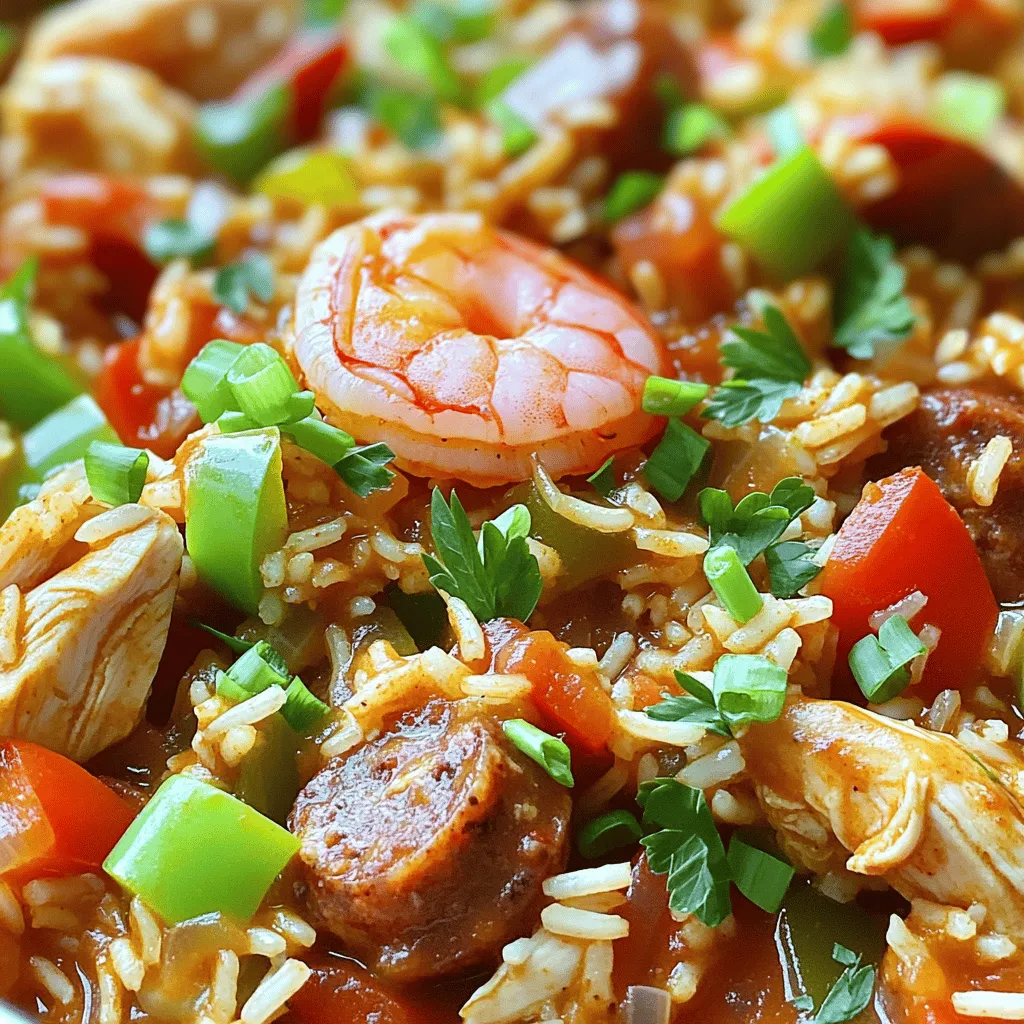
If you’re craving a warm, hearty meal, my Savory Slow Cooker Jambalaya is a must-try! This dish combines tender chicken,

To create your tasty Spicy Chili Garlic Noodles, you'll need: - 8 oz rice noodles - 3 tablespoons vegetable oil - 5 cloves garlic, minced - 2 tablespoons fresh ginger, grated - 2-3 tablespoons chili paste (adjust based on heat preference) - 3 tablespoons soy sauce - 1 tablespoon rice vinegar - 1 tablespoon sesame oil - 1 cup bell peppers, sliced (mix of red, yellow, and green) - 1 cup bok choy or spinach - 2 tablespoons green onions, chopped - Sesame seeds for garnish These ingredients come together to form a dish that packs a punch with flavor. The rice noodles serve as the perfect base, while garlic and ginger add warmth. Chili paste gives it a spicy kick, and soy sauce adds depth. You can take your noodles to the next level with a few extra ingredients. Consider adding: - Sliced carrots for crunch - Mushrooms for umami - Peas for sweetness - Tofu for protein These add-ins not only enhance the taste, but they also bring in more texture. Feel free to mix and match these options based on what you have. Garnishing is key to making your dish visually appealing. Use: - Chopped green onions for freshness - Sesame seeds for a nutty flavor - Fresh cilantro for a herbaceous note These toppings add color and brightness to your dish. They also provide a little extra flavor, making each bite even more enjoyable. Enjoy your cooking! First, cook the rice noodles. Boil water in a pot. Add the noodles and cook them as the package says. This usually takes about 4-6 minutes. Stir them gently to prevent sticking. Once done, drain the noodles and set them aside. Next, heat a large skillet or wok on medium-high heat. Pour in three tablespoons of vegetable oil. Add five cloves of minced garlic and two tablespoons of grated ginger. Sauté for one minute until you smell the flavors. Stir in two to three tablespoons of chili paste. Cook for another minute to mix well with the garlic and ginger. Now, add one cup of sliced bell peppers. You can use a mix of red, yellow, and green. Stir-fry these for about three to four minutes. The peppers should be tender but still crisp. Then, add one cup of bok choy or spinach. Cook this for two to three minutes until it wilts down. Now it’s time to bring everything together. Add the cooked rice noodles to the skillet. Pour in three tablespoons of soy sauce and one tablespoon of rice vinegar. Toss everything together so the noodles get coated well. Finally, drizzle one tablespoon of sesame oil over the dish. Toss it again for even flavor. Remove the skillet from heat. Serve warm and garnish with two tablespoons of chopped green onions and a sprinkle of sesame seeds. Enjoy your spicy chili garlic noodles! To adjust the spice level, start with less chili paste. You can always add more later. For a milder dish, use just 1 tablespoon. If you love heat, go for 3 tablespoons. Taste as you mix. This way, you control the spice. Stir-frying is quick. Keep your heat high and your ingredients moving. Use a large skillet or wok. This helps food cook evenly. Add garlic and ginger first; they need time to release flavors. Stir them for one minute. Then add chili paste and mix well for another minute. For tender veggies, keep an eye on the clock. Bell peppers take about 3-4 minutes. They should be bright and crisp. Add bok choy or spinach last. Cook them until just wilted, about 2-3 minutes. This keeps them colorful and tasty. {{image_2}} You can easily make this dish vegetarian or vegan. Just skip any animal products. Use vegetable broth instead of chicken broth for extra flavor. Replace soy sauce with tamari if you need it gluten-free. You can also add more veggies like carrots, zucchini, or mushrooms. These add color and nutrition. If you want to add protein, chicken, shrimp, or tofu works great. For chicken, cut it into thin strips. Cook it first before adding garlic and ginger. For shrimp, add them when you stir-fry the bell peppers. They cook fast and stay juicy. Tofu is a great choice too. Use firm tofu, cut it into cubes. Sauté it until golden for more flavor. Finding gluten-free options is easy. Many brands offer rice noodles that are gluten-free. Look for them in stores or online. For sauces, make sure your soy sauce is gluten-free. Tamari is a good choice here. Always check labels to ensure there are no hidden gluten sources. Enjoy your spicy chili garlic noodles without worry! After enjoying your spicy chili garlic noodles, let them cool. Transfer them to an airtight container. Store in the fridge for up to three days. This keeps the flavors fresh and the noodles tasty. To reheat, place the noodles in a skillet. Add a splash of water or soy sauce. Heat over medium heat for about five minutes. Stir often to ensure even heating. This method keeps your noodles moist and flavorful. I recommend using glass containers with tight lids. They help keep the noodles fresh. You can also use BPA-free plastic containers. Make sure they are microwave safe for easy reheating. I recommend rice noodles for this dish. They cook quickly and have a soft texture. You can also use egg noodles or wheat noodles if you prefer. Just remember to adjust cooking times. For rice noodles, soak them in hot water until they soften. This usually takes about 10 minutes. Yes, you can make this dish ahead of time! Cook the noodles and vegetables first. Store them in the fridge for up to two days. When you are ready to eat, simply heat everything in a pan. Add fresh chili paste or sesame oil to boost the flavors again. If you don’t have chili paste, you can use sriracha or red pepper flakes. Both will add heat and flavor. Start with a small amount and taste as you go. You can also blend fresh chilies with garlic for a homemade chili paste. This will give you a fresh taste in your noodles. This post covered how to make spicy chili garlic noodles. We discussed key ingredients, optional flavors, and tasty garnishes. I showed you step-by-step cooking that ensures good taste. Plus, I shared tips for spice levels and perfect veggies. You can explore fun variations, storage, and expert answers to common questions. Now you can cook delicious noodles with your own twist. Enjoy the cooking process and flavor!

Spicy Chili Garlic Noodles Quick and Flavorful Dish

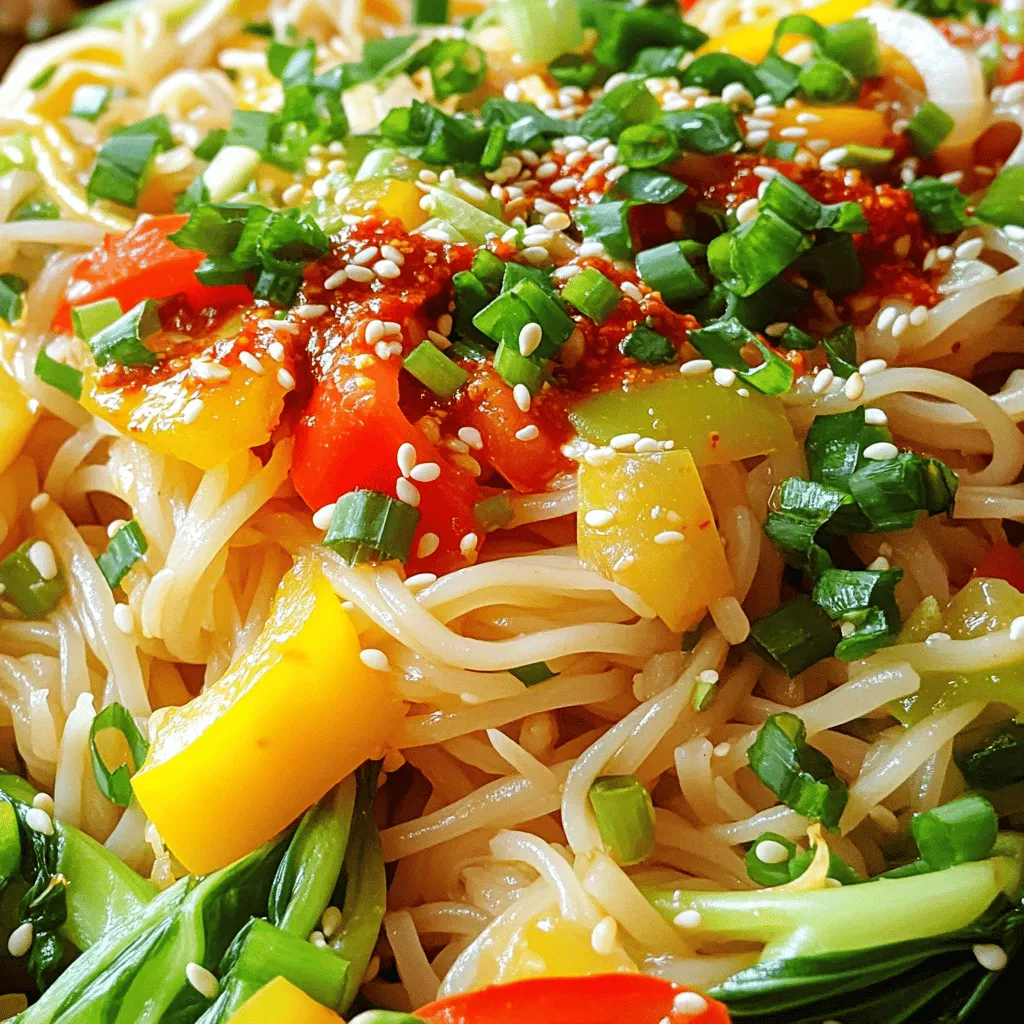
If you crave a quick and spicy meal, these Spicy Chili Garlic Noodles are for you! Packed with flavor, they

To make Air Fryer Garlic Breadsticks, you need the following ingredients: - 1 cup warm water (110°F) - 1 tablespoon sugar - 1 packet (2 ¼ teaspoons) active dry yeast - 2 ½ to 3 cups all-purpose flour - 1 teaspoon salt - 2 tablespoons olive oil - 3 tablespoons unsalted butter, melted - 4 cloves of garlic, minced - 1 teaspoon dried Italian herbs - ¼ cup grated Parmesan cheese (optional) - Fresh parsley for garnish (optional) Each ingredient plays a key role. The warm water activates the yeast. Sugar feeds it, making the bread rise. Flour gives the bread its structure. Salt adds flavor. Olive oil keeps the dough moist. Butter gives a rich taste, while garlic and herbs create that classic garlic bread flavor. Parmesan adds a delicious twist, and parsley makes it pretty. With these simple ingredients, you create something tasty. The best part? You control what goes in, making it healthier and fresher. Use whole wheat flour or fresh herbs for a fun twist! Start by gathering your ingredients. In a bowl, mix 1 cup of warm water at 110°F with 1 tablespoon of sugar and 1 packet of active dry yeast. Stir gently and let it sit for 5 to 10 minutes. You want it to look frothy, which means the yeast is active. This step is key for fluffy breadsticks. In a large mixing bowl, whisk together 2 ½ cups of all-purpose flour and 1 teaspoon of salt. Next, pour in the yeast mixture and 2 tablespoons of olive oil. Mix until a dough forms. If the dough feels sticky, add more flour little by little until it is easy to handle. Knead the dough on a floured surface for about 5 minutes. You want it smooth and elastic. This helps develop the gluten, which gives bread its structure. Once you knead the dough, place it in a greased bowl. Cover it with a damp cloth or plastic wrap. Let it rise in a warm spot for 1 hour. You want it to double in size. This step is essential for light and airy breadsticks. If your kitchen is cool, consider turning on the oven briefly to warm it. Then, turn it off and place the dough inside. Preheating your air fryer is key. Set it to 375°F (190°C) before cooking. This step helps the breadsticks cook evenly. It also gives a nice golden crust. Preheating takes just a few minutes. Use this time to prepare your breadsticks. Cook the breadsticks at 375°F (190°C) for 8-10 minutes. Check them after 8 minutes. You want them golden brown and cooked through. If they need more time, add a minute or two. Cooking time may vary by air fryer. Always watch closely to avoid burning. To cook evenly, don't crowd the basket. Place the breadsticks in a single layer. If needed, cook in batches. This keeps hot air flowing around each stick. You can also flip them halfway through cooking. This ensures they brown on all sides. Use these tips for perfect breadsticks every time! {{image_2}} To test if your dough is ready, look for size and texture. The dough should double in size after rising. If you gently press it with your finger, the dough should spring back. If it stays indented, it needs more time. This means the yeast is doing its job. For a bold flavor, use fresh garlic and herbs. Mince four cloves of garlic finely for the best taste. Mix in dried Italian herbs like oregano, basil, and thyme. This mix adds warmth and depth. You can also sprinkle grated Parmesan on top for a cheesy finish. To prevent your breadsticks from sticking, use a light spray of olive oil. This coats the air fryer basket and helps the breadsticks lift easily. Avoid overcrowding the basket; cook in batches if needed. This way, they will cook evenly and stay crispy. You can make these breadsticks even more fun by adding cheese. To do this, take a small piece of dough and flatten it. Place a cube of mozzarella or your favorite cheese in the center. Fold the dough over the cheese and seal the edges well. Shape it into a stick and follow the same steps for brushing with garlic herb butter. The cheese will melt and become gooey inside. This adds a nice surprise in each bite. For those who love heat, try adding spices. Mix in some crushed red pepper flakes into the garlic herb butter. You can also sprinkle some on top of the breadsticks before cooking. This gives them a spicy kick and makes them exciting to eat. Pair these sticks with marinara sauce for dipping. The sauce will help balance the heat. If you need a gluten-free version, swap the all-purpose flour for a gluten-free flour blend. Make sure the blend has xanthan gum, which helps with texture. Follow the same steps in the recipe. You may need to adjust the water amount, as gluten-free flours can absorb it differently. Enjoy the same great taste without the gluten! You will know the breadsticks are done when they turn golden brown. The outside should feel crisp, while the inside stays soft. A good test is to tap the breadstick lightly. If it sounds hollow, it's ready. Yes, you can make the dough ahead of time. After kneading, cover it and place it in the fridge. It will keep well for up to 24 hours. When you're ready to bake, just let it warm up before you shape it. These breadsticks pair well with many dishes. You can serve them with marinara sauce for dipping. They also go great with soups or salads. Try them beside pasta dishes or as a side for pizza. Enjoy experimenting! You now have a great guide to making air fryer garlic breadsticks. We covered the key ingredients, step-by-step baking, and cooking tips. Adding garlic and herbs boosts flavor, and you can try many fun variations. Check for doneness by looking for a golden hue, and feel free to prep the dough ahead. These breadsticks will impress your family or friends. Enjoy this easy recipe tonight!

Air Fryer Garlic Breadsticks Simple and Flavorful Recipe

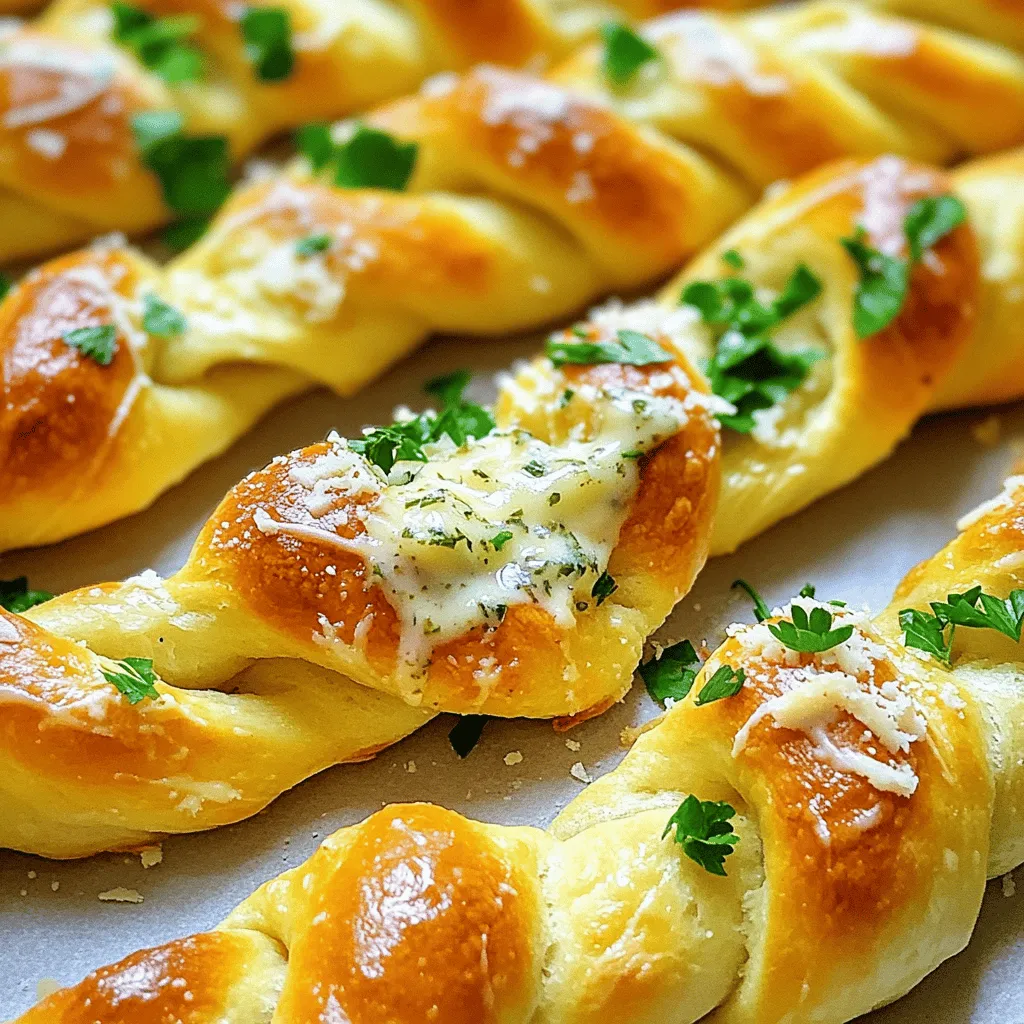
Get ready to elevate your snacking game with my Air Fryer Garlic Breadsticks! This simple and flavorful recipe transforms basic

To make these tasty pumpkin peanut butter bars, gather these simple items: - 1 cup canned pumpkin puree - 1/2 cup creamy peanut butter - 1/3 cup maple syrup - 1 teaspoon vanilla extract - 1 1/2 cups rolled oats - 1 teaspoon baking powder - 1/2 teaspoon ground cinnamon - 1/4 teaspoon nutmeg - 1/4 teaspoon salt - 1/2 cup chocolate chips (optional) You can easily swap some ingredients. For a nut-free option, use sun butter instead of peanut butter. If you prefer a vegan recipe, replace maple syrup with agave syrup. You can also try different sweeteners like honey or coconut sugar. Want to add texture? Toss in chopped nuts or seeds. Feel free to mix spices too, like ginger or allspice, for a new twist. These bars are not just tasty; they are also healthy. Each bar has around: - Calories: 150 - Protein: 4g - Fat: 7g - Carbohydrates: 20g - Fiber: 3g - Sugar: 6g These Pumpkin Peanut Butter Bars are a great snack. They offer good energy and nutrients. Enjoy them as a treat or a quick breakfast! First, gather all your ingredients. You will need: - 1 cup canned pumpkin puree - 1/2 cup creamy peanut butter - 1/3 cup maple syrup - 1 teaspoon vanilla extract - 1 1/2 cups rolled oats - 1 teaspoon baking powder - 1/2 teaspoon ground cinnamon - 1/4 teaspoon nutmeg - 1/4 teaspoon salt - 1/2 cup chocolate chips (optional) Next, preheat your oven to 350°F (175°C). Line an 8x8-inch baking pan with parchment paper. Leave some paper hanging over the sides. This makes it easy to lift out the bars later. In a large bowl, mix the pumpkin puree, peanut butter, maple syrup, and vanilla extract. Stir until it is smooth. In another bowl, whisk together the rolled oats, baking powder, ground cinnamon, nutmeg, and salt. This helps to blend the dry ingredients well. Now, add the dry mix to the wet mix. Stir everything until just combined. If you want some extra sweetness, fold in chocolate chips at this stage. Pour the mixture into your prepared baking pan. Use a spatula to spread it out evenly. Bake in the preheated oven for 25 to 30 minutes. The edges should look lightly golden. To check if they are done, insert a toothpick in the center. If it comes out clean, they are ready. Once baked, remove the pan from the oven. Let it cool in the pan for about 10 minutes. Use the parchment overhang to lift the bars out of the pan. Place the bars on a wire rack to cool completely. After they cool, cut them into squares. For a nice touch, serve them on a wooden platter. Drizzle extra peanut butter on top and sprinkle a dash of cinnamon. Enjoy these tasty treats! To get the right texture for your pumpkin peanut butter bars, focus on the wet and dry mix. Use creamy peanut butter; it blends well with the pumpkin. Ensure the pumpkin puree is smooth, so it mixes easily. The oats should be rolled oats, as they give a chewy texture. Adding chocolate chips can help balance the texture, too. Bake until the edges are golden, which helps with the firmness. When mixing, always start with the wet ingredients. Combine pumpkin puree, peanut butter, maple syrup, and vanilla first. Mix until smooth. Then, in a separate bowl, whisk the dry ingredients: oats, baking powder, cinnamon, nutmeg, and salt. Gradually mix the dry into the wet. Stir gently; over-mixing can make the bars dense. If you want to add chocolate chips, fold them in last to keep them intact. Serving your pumpkin peanut butter bars can be fun! Place them on a wooden platter for a rustic look. Drizzle extra peanut butter on top for added flavor. A sprinkle of cinnamon adds a nice touch. Pair these bars with a glass of almond milk or a warm cup of tea. They make a great snack or dessert, perfect for any time of day! {{image_2}} You can swap peanut butter for other nut butters. Almond butter works well. Cashew butter is also a great choice. Each nut butter adds a unique taste. Use sunflower seed butter for a nut-free option. This keeps the bars tasty and safe for all diets. To make these bars vegan, use maple syrup instead of honey. Use gluten-free oats to keep them gluten-free. This simple switch makes your bars safe for those with gluten issues. They remain just as delicious and satisfying. Add spices like ginger or allspice for extra warmth. Chopped nuts like walnuts or pecans add crunch. You can also mix in dried fruits like raisins or cranberries. These add flavors and textures that keep each bite exciting. To keep your Pumpkin Peanut Butter Bars fresh, store them in an airtight container. This helps to lock in moisture and flavor. Place a piece of parchment paper between layers to prevent sticking. You can store them at room temperature for a few days or in the fridge for a week. Freezing these bars is a great option for long-term storage. First, let the bars cool completely. Then, cut them into squares. Wrap each piece in plastic wrap or foil and place them in a freezer-safe bag. Be sure to label the bag with the date. They will stay fresh in the freezer for up to three months. When stored properly, these bars last about five days at room temperature. If you keep them in the fridge, they can last up to a week. Frozen bars can be kept for three months, making them a handy treat for later. Enjoying these bars fresh or frozen will always be a tasty choice! Yes, you can use fresh pumpkin. Just roast or steam your pumpkin first. Then, scoop out the flesh and puree it. This gives a nice flavor. However, canned pumpkin is easier and saves time. You can replace maple syrup with honey or agave syrup. Both options add sweetness. They also keep the bars moist. If you want a lower sugar option, use mashed bananas. Yes, these bars are perfect for making ahead. Just bake them and cool completely. Store them in an airtight container for up to a week. This makes for easy snacks later. If your bars are too crumbly, try adding more peanut butter or pumpkin. This will help bind them better. You can also add a bit of water or milk to help with moisture. Yes, you can use sun butter or soy nut butter. These options work well in place of peanut butter. They keep the same great taste while being nut-free. Make sure to check for allergies with these swaps. You learned about each ingredient for the Pumpkin Peanut Butter Bars. We explored substitutions, nutrition, and storage tips. I shared steps for preparing, baking, and cooling the bars. You now know how to achieve the right texture and mix ingredients well. These bars are flexible, with many variations for taste and diet. You can also store and freeze them easily. Enjoy creating your unique version of this tasty treat. Happy baking!

Pumpkin Peanut Butter Bars Healthy and Tasty Treat

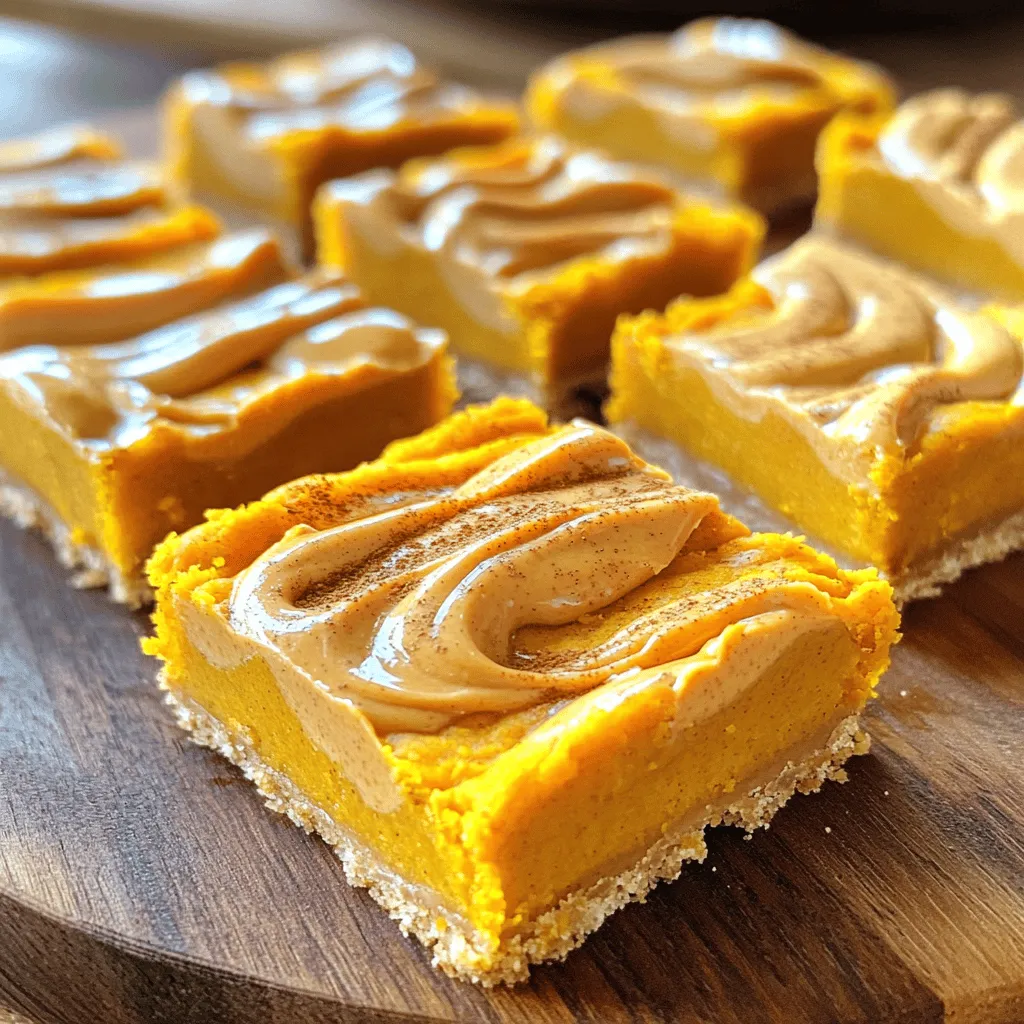
Are you ready to enjoy a healthy treat that tastes great? My Pumpkin Peanut Butter Bars are the perfect balance

For a delicious Creamy Tomato Tortellini Soup, we need the following essential ingredients: - 2 tablespoons olive oil - 1 medium onion, chopped - 2 cloves garlic, minced - 4 cups vegetable broth - 1 can (14 oz) crushed tomatoes - 2 teaspoons dried basil - 1 teaspoon dried oregano - 1 teaspoon sugar - 1 package (9 oz) cheese tortellini - 1 cup heavy cream or coconut cream for a dairy-free option - Salt and pepper to taste - Fresh basil leaves for garnish These ingredients work together to create a rich and creamy soup. The olive oil adds a nice base flavor, while the onion and garlic provide depth. The crushed tomatoes and broth form the heart of the soup. For some optional ingredients, consider: - Fresh vegetables like spinach or bell peppers for added nutrition. - A pinch of red pepper flakes for a spicy kick. - Grated cheese on top before serving for extra flavor. If you need dietary substitutions: - Use gluten-free tortellini to make this dish gluten-free. - Swap heavy cream for coconut cream or almond milk for a dairy-free option. - Adjust seasonings to suit your taste or dietary needs. Feel free to mix and match ingredients based on what you have on hand. This soup is flexible and easy to customize! To make this creamy tomato tortellini soup, start by gathering your ingredients. You will need olive oil, onion, garlic, vegetable broth, crushed tomatoes, dried basil, dried oregano, sugar, cheese tortellini, and cream. 1. Sautéing Onion and Garlic: Heat the olive oil in a large pot over medium heat. Add the chopped onion and cook for about five minutes. You want the onion to be soft and clear. This step adds great flavor. Then, add the minced garlic and stir for one more minute. The garlic should smell nice but not burn. 2. Simmering the Mixture: Next, pour in the vegetable broth and add crushed tomatoes, dried basil, oregano, and sugar. Mix it well. Bring this mixture to a simmer. Simmering helps meld the flavors and makes your soup tasty. - Timing for Cooking Tortellini: Add the cheese tortellini once the soup is simmering. Cook it as per the package instructions, which is usually about five to seven minutes. Make sure not to overcook it, or it will get mushy. - Incorporating Cream or Coconut Cream: After cooking the tortellini, lower the heat. Stir in the heavy cream or coconut cream until it mixes in fully. This step makes the soup rich and creamy. Heat it through for two to three minutes. - Signs of Doneness: Your soup is ready when it is hot and the tortellini is tender. Taste it and add salt and pepper as needed. Garnish with fresh basil leaves for a pop of flavor. To boost the taste of your creamy tomato tortellini soup, consider adding fresh herbs. Try mixing in parsley or thyme for a fresh twist. You can also sprinkle in a pinch of red pepper flakes for heat. Texture matters too! Top your soup with crispy croutons or a sprinkle of Parmesan cheese. These add a nice crunch and extra flavor. If you want a heartier meal, add protein like cooked chicken or beans. Mixing in spinach or zucchini can also add nutrients and color. One common mistake is overcooking the tortellini. Follow the package instructions closely. Overcooked pasta can become mushy and lose its shape. Another mistake is not seasoning enough. Taste your soup as you cook and adjust the salt and pepper. Proper seasoning can transform your dish. Don’t skip the garnishing step! Fresh basil leaves not only look great but add a burst of flavor. Always finish your soup with a garnish for that extra touch. {{image_2}} You can make this soup fit your diet easily. For a gluten-free option, use gluten-free tortellini. Many brands make this pasta that tastes great and holds up well. Check the store for options made from rice or chickpeas. If you want a vegan version, swap the heavy cream for coconut cream. This makes the soup rich and creamy without dairy. You can also use vegetable broth to keep it plant-based. Using fresh tomatoes can change the soup's flavor. Start with about 3-4 medium ripe tomatoes. Chop them up and add them in place of the canned tomatoes. Cook them down until soft for a fresher taste. If you don’t have tortellini, you can use other pasta types. Small shapes like shells or elbows work well. Just cook them as directed and add them to the soup. This keeps the meal fun and versatile, perfect for any night. To keep your creamy tomato tortellini soup fresh, store it in an airtight container. This helps prevent spills and keeps smells in check. You can refrigerate the soup for up to three days. For longer storage, freeze it. It lasts well in the freezer for about three months. Just make sure to let it cool before placing it in the freezer. When you’re ready to enjoy your leftovers, reheating is key. Use a pot on the stove for the best results. Heat over medium heat and stir often. This helps keep the flavors intact. To add moisture back, consider adding a splash of vegetable broth or water. This will help revive the creamy texture. If using the microwave, heat in short bursts, stirring in between. This ensures even heating without overcooking the soup. You can make this soup ahead of time. First, cook the soup as usual. After it cools, store it in an airtight container. It keeps well in the fridge for three to four days. If you want to freeze it, leave out the cream. When you reheat, add cream then. This way, the soup stays creamy and tasty. Yes, you can use chicken broth or beef broth. Chicken broth adds a rich flavor. Beef broth gives a deeper taste. If you prefer a lighter soup, stick with vegetable broth. Each broth changes the soup's flavor but keeps it yummy. This soup pairs well with many sides. A simple green salad works great. You can also serve crusty bread for dipping. Grilled cheese sandwiches are a classic choice too. For something different, try a cheese platter with fresh fruit. These sides make the meal more fun and filling. This blog post covered all you need for a great Creamy Tomato Tortellini Soup. You learned about essential ingredients and cooking steps. I shared tips to enhance flavors and avoid common mistakes. Variations cater to dietary needs, and I provided storage and reheating info for leftovers. With this guide, you can make a delicious soup that's perfect for any meal. Enjoy experimenting with flavors and ingredients to suit your taste!

Creamy Tomato Tortellini Soup Satisfying and Easy Meal

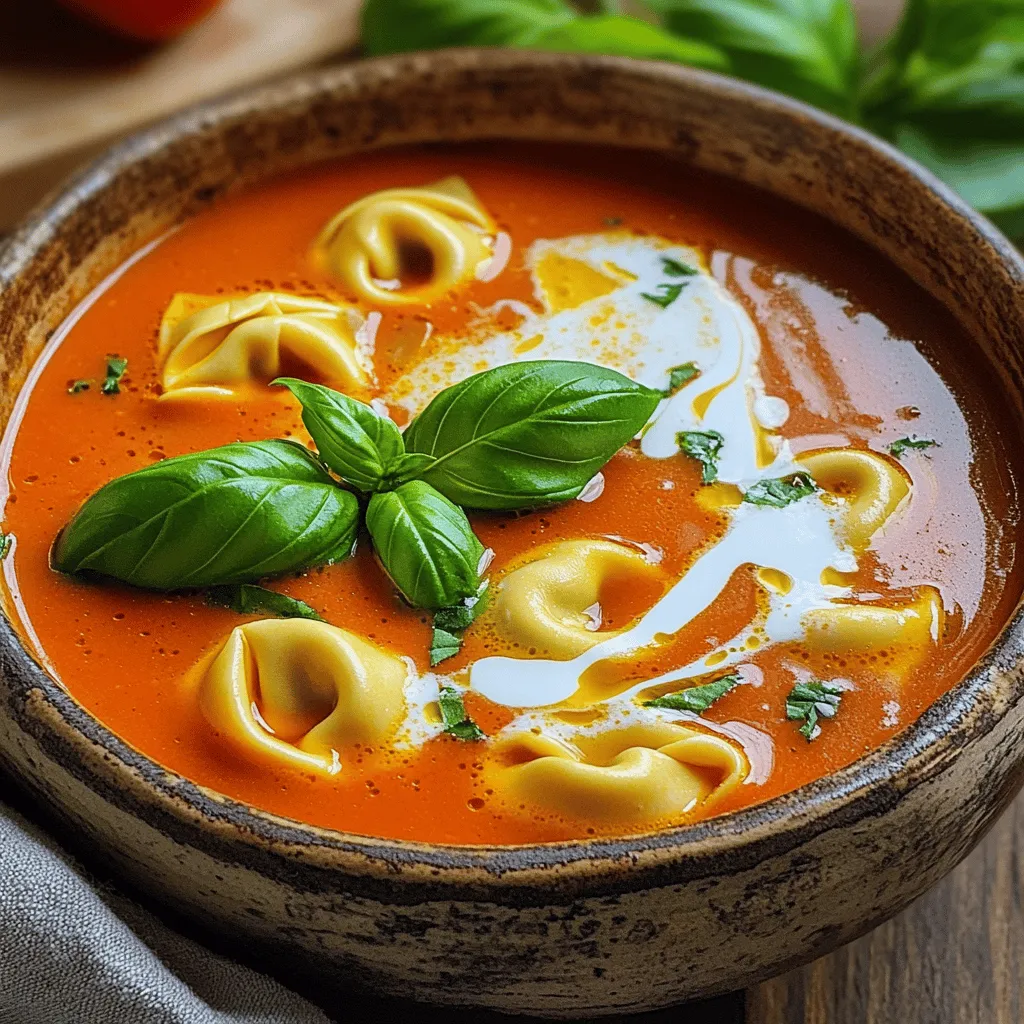
If you crave a warm, hearty dish that’s quick to make, you need to try my Creamy Tomato Tortellini Soup.

- 4 bone-in chicken thighs, skin on - 1 cup apple butter - 2 tablespoons Dijon mustard - 2 tablespoons apple cider vinegar - Olive oil for searing These main ingredients create a rich and tasty dish. The chicken thighs have juicy meat under crispy skin. The apple butter adds sweetness, while Dijon mustard brings a nice tang. - 1 teaspoon garlic powder - 1 teaspoon onion powder - 1 teaspoon smoked paprika - Salt and pepper to taste These spices enhance the flavor of the chicken. Garlic powder adds depth. Onion powder gives a sweet taste, and smoked paprika brings a warm, smoky note. Salt and pepper help balance all the flavors. - Fresh thyme sprigs for garnish Fresh thyme adds a bright touch to the dish. You can also try adding other herbs like parsley or rosemary. If you want a kick, consider adding red pepper flakes. For a fruity twist, swap apple butter with other fruit preserves like peach or apricot. First, set your oven to 400°F (200°C). This will get it hot and ready for the chicken. While the oven warms up, gather your ingredients. You will need four bone-in chicken thighs with skin. The skin adds great flavor and helps keep the meat juicy. In a small bowl, mix one cup of apple butter with two tablespoons of Dijon mustard. Add two tablespoons of apple cider vinegar for a nice tang. Next, sprinkle in one teaspoon each of garlic powder, onion powder, and smoked paprika. Finish with salt and pepper to taste. Whisk it all together until it looks smooth and shiny. This glaze will make your chicken extra tasty. Take a large oven-safe skillet and heat it over medium-high heat. Add a drizzle of olive oil; this helps to brown the chicken. Season the chicken thighs with salt and pepper on both sides. When the oil gets hot, place the chicken skin-side down in the pan. Sear them for about 5 to 7 minutes. You want the skin to be golden brown and crispy. Flip the chicken thighs over so the skin is up. Now, pour the apple butter glaze over the top. Make sure each thigh gets a good coat. Carefully move the skillet to your preheated oven. Bake for 25 to 30 minutes. The chicken is ready when it reaches an internal temperature of 165°F (75°C). Once done, take it out and let it rest a few minutes. Drizzle any leftover glaze from the pan over the chicken and garnish with fresh thyme sprigs. Enjoy your delicious meal! To get crispy chicken skin, start with dry skin. Pat the chicken thighs with paper towels. This helps remove moisture. Next, heat your skillet until it is hot. Add olive oil just before searing. Place the chicken skin-side down and don’t move it. Let it cook for 5-7 minutes. This will make a golden, crispy skin. When using apple butter, choose a good quality brand. Look for one with real apples and no added sugars. This makes your dish taste better. Mix the apple butter with Dijon mustard and vinegar. This adds a nice tang to the glaze. Make sure to coat the chicken evenly for the best flavor. Serve your apple butter glazed chicken with sides that complement its flavors. Roasted vegetables work well. Consider mashed potatoes or a fresh salad. You can also pair it with rice or quinoa for a hearty meal. Drizzle any extra glaze from the pan over the chicken before serving. Garnish with fresh thyme for a lovely touch. {{image_2}} You can use different cuts of chicken for this dish. Boneless thighs work well if you prefer less fat. Chicken breasts can also be an option. Just remember, the cooking time may change. You want the chicken to stay juicy. Check the internal temperature, aiming for 165°F. To make a spicy version, add some heat to the glaze. You can mix in cayenne pepper or red pepper flakes. Start with a small amount, then taste. Adjust it to your liking. This spicy kick pairs great with the sweet apple butter. It adds depth and excitement to every bite. If you want to switch it up, try other fruit preserves. Peach or apricot preserves can create a lovely flavor. They add a fruity sweetness that works well with chicken. You can also use cranberry sauce for a tart twist. Just keep the same ratios as the apple butter in the recipe. This way, you’ll still get that delicious glaze. To store leftover chicken thighs, let them cool first. Place the chicken in an airtight container. Keep it in the fridge for up to four days. Make sure to cover the chicken well to prevent dry skin. You can also wrap it tightly in plastic wrap if you prefer. When you reheat chicken thighs, do it slowly. Preheat your oven to 350°F (175°C). Place the chicken in an oven-safe dish. Cover it with foil to keep it moist. Heat for about 15-20 minutes, or until warm. You can also use a microwave, but the oven keeps the skin crispy. To freeze chicken thighs, let them cool completely. Wrap each thigh in plastic wrap. Then place the wrapped chicken in a freezer bag. Remove as much air as possible before sealing. Label the bag with the date. You can freeze the chicken for up to three months. When ready to use, thaw in the fridge overnight before reheating. Yes, you can use boneless chicken thighs. They cook faster than bone-in thighs. If you use them, adjust the baking time to about 20-25 minutes. Check the internal temperature to ensure it reaches 165°F (75°C). Apple butter glazed chicken goes well with many sides. Here are a few great options: - Mashed potatoes - Roasted vegetables - Green beans - Rice pilaf - Fresh salad These sides balance the sweet and savory notes of the dish. You can change the glaze to match your taste. If you want it sweeter, add more apple butter. For a tangy kick, add extra apple cider vinegar. A pinch of cayenne pepper can add heat. Play around until you find your perfect mix. Apple butter can be a healthy choice in moderation. It is lower in calories than regular butter. It also contains some vitamins from apples. However, it can be high in sugar. Always check the label or make your own to control the sugar content. Absolutely! Homemade apple butter works great in this recipe. It may even enhance the flavor. Just ensure it has a good balance of sweet and tart. Your homemade version can add a personal touch to the dish. In this post, we explored how to make delicious Apple Butter Glazed Chicken Thighs. We began with key ingredients and seasonings. Then, I shared step-by-step instructions for perfect cooking. You learned tips for crispy skin and tasty variations. Finally, I provided storage and reheating advice. This dish is easy to make and full of flavor. It’s perfect for family dinners or meal prep. Enjoy your cooking and impress your guests with this tasty recipe!

Savory Apple Butter Glazed Chicken Thighs Delight

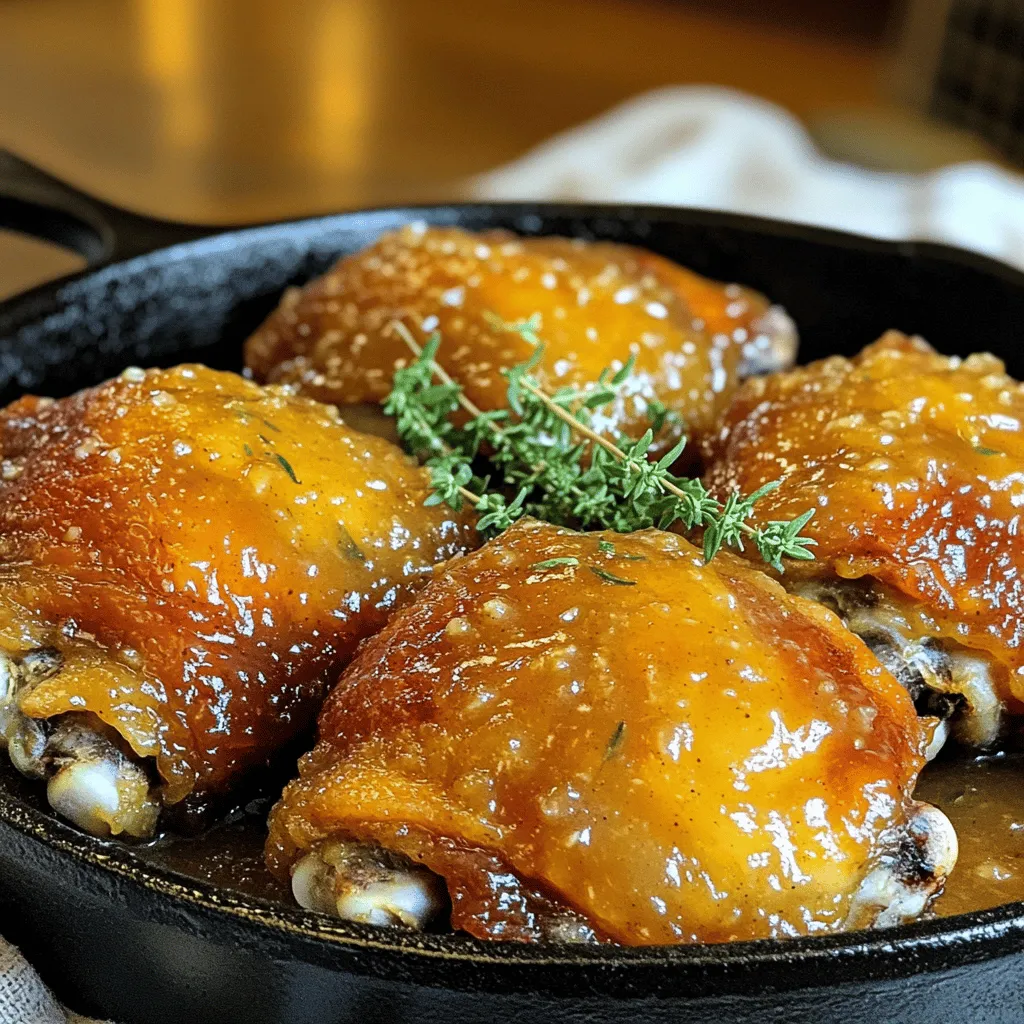
Are you ready to elevate your dinner game? This Savory Apple Butter Glazed Chicken Thighs Delight is the answer. With

- 1 package of pre-made pie crusts (two crusts) - 1 cup mini marshmallows - 1 cup chocolate chips (semi-sweet or dark) - 1/2 cup crushed graham crackers - 1 tablespoon unsweetened cocoa powder - 1 egg (beaten, for egg wash) - 1 tablespoon sugar (for sprinkling) - A pinch of sea salt For this recipe, I use a standard package of pre-made pie crusts. Each package holds two crusts. You will need about one cup of mini marshmallows and one cup of chocolate chips. You can choose semi-sweet or dark chips based on your taste. The crushed graham crackers add that classic s’mores flavor, so use half a cup. To enhance the chocolate flavor, I add a tablespoon of unsweetened cocoa powder. The egg wash helps seal the hand pies and gives them a nice shine. Sprinkle a tablespoon of sugar on top for extra sweetness, and a pinch of sea salt brings out all the flavors. You can swap the pre-made pie crusts with homemade dough if you prefer. For a healthier twist, use whole wheat flour for your crust. Instead of mini marshmallows, try using marshmallow fluff for a smoother texture. If you're not a fan of chocolate chips, peanut butter chips or caramel bits work well too. Want a nutty flavor? Add some crushed nuts to the filling. The options are endless! First, take your pre-made pie crusts. Roll them out on a floured surface. Use a round cutter, about 4 inches wide, to cut circles. You should get 6-8 circles from the dough. Make sure they are not too thin, or they can break. In a medium bowl, combine the mini marshmallows, chocolate chips, crushed graham crackers, cocoa powder, and a pinch of sea salt. Stir everything well until it’s mixed. This filling will give each hand pie that sweet, s’mores flavor. Now, place about 2 tablespoons of the filling in the center of each dough circle. Fold the dough over to make a half-moon. Press the edges to seal them tight. Use a fork to crimp the edges for extra security. This helps keep the filling inside while cooking. Brush the tops of your hand pies with the beaten egg. This gives them a nice golden color when cooked. Sprinkle sugar on top for a sweet finish. Preheat your air fryer to 350°F (175°C). Place the hand pies in a single layer in the basket. Cook them for about 8-10 minutes. They should be golden brown and puffed. If your air fryer is small, you may need to cook in batches. After cooking, let them cool for a few minutes before serving. Enjoy warm for the best gooey experience! To get that golden color, brush the tops of your hand pies with beaten egg. This creates a nice shine and helps them brown evenly. Sprinkle sugar on top for extra sweetness and crunch. Make sure your air fryer is preheated to 350°F. This helps the pies cook evenly and turn golden. If you have leftover hand pies, let them cool completely before storing. Place them in an airtight container. You can keep them in the fridge for about three days. If you want them to last longer, freeze them. Wrap each pie in plastic wrap and place them in a freezer bag. They can last up to a month in the freezer. Serve these hand pies warm for the best taste. Dust them with powdered sugar for a sweet touch. Pair them with chocolate sauce for dipping, or add extra mini marshmallows on the side. These options make your dessert even more fun and tasty! {{image_2}} You can use different types of chocolate in your hand pies. Semi-sweet chocolate chips are great, but dark chocolate adds a rich taste. Milk chocolate gives a sweeter flavor. You can even try white chocolate for a fun twist. Each type brings a unique taste. Mix and match to find your favorite! Add seasonal flavors for a fun twist. For fall, mix in pumpkin spice with your filling. You can also try peppermint extract for winter pies. Each season can inspire a new flavor. Get creative and make these hand pies special for any time of year! If you want a healthier option, use whole wheat pie crusts. They add fiber and nutrients. You can also swap chocolate chips for dark chocolate or use less sugar. Try adding fruit like sliced bananas or strawberries for more flavor. These swaps keep the taste while making your pies better for you! You can store leftover hand pies in the fridge. Place them in an airtight container. They stay fresh for up to three days. Let them cool completely before storing. This helps keep the crust crisp. To freeze hand pies, wrap each pie in plastic wrap. Then place them in a freezer bag. They can last for up to three months in the freezer. When ready to eat, thaw them in the fridge overnight. To reheat, use the air fryer for best results. Preheat the air fryer to 350°F (175°C). Cook the pies for about 5 minutes. This warms them and makes the crust crispy again. You can also use a microwave, but the crust may get soft. Yes, you can use homemade pie crust. Just make sure it’s rolled out thin. A thin crust helps keep the filling inside. It also cooks evenly in the air fryer. If you make your own, chill it for best results. To stop leaks, seal the edges well. Press the dough firmly and crimp with a fork. You can also add a bit of cornstarch to the filling. This helps absorb extra moisture and keeps it from seeping out. Yes, you can prepare them ahead. Assemble the pies, then freeze them before cooking. Just place them in a single layer on a tray. Once frozen, store them in a bag. When you’re ready, cook them straight from the freezer. These pies pair well with chocolate sauce. You can also serve them with whipped cream or ice cream. A side of fresh fruit adds a nice touch, too. For a fun twist, try serving with extra mini marshmallows. In this post, we covered how to make delicious S'mores Hand Pies. We discussed the ingredients, including substitutes, and guided you through each step, from crust to filling. I shared tips to get the perfect bake and storage methods for leftovers. You can also explore fun variations. With these insights, you can whip up tasty treats that impress. Enjoy baking and trying new flavors to make each hand pie special!

Air Fryer S’mores Hand Pies Tasty and Easy Recipe

Get ready for a treat! Air Fryer S’mores Hand Pies combine your favorite campfire snack with easy prep. You’ll love

Older posts
Newer posts
← Previous Page1 … Page25 Page26 Page27 … Page164 Next →

dsad

© 2026 easycookingbite • Built with GeneratePress

Our Policies

  • Copyright Policy
  • Cookie Policy
  • GDPR Policy
  • Privacy Policy
  • Disclaimer
  • Terms Of Use

More Information

  • Home
  • About
  • Contact
  • Appetizers
  • Dessert
  • Dinner
  • Drinks
©2026, easycookingbite About Back To Top