Skip to content
DisclaimerTerms Of UseGDPR PolicyCookie Policy

easycookingbite

  • Home
  • Drinks
  • Appetizers
  • Dinner
  • Dessert
  • About
  • Contact
  • Privacy Policy
DisclaimerTerms Of UseGDPR PolicyCookie Policy

Lily

- 1 lb salmon fillet, skin removed and cut into bite-sized cubes - 4 tablespoons unsalted butter, melted - 4 cloves garlic, minced - 1 tablespoon fresh lemon juice - 1 teaspoon fresh dill, chopped (or ½ teaspoon dried dill) - 1 teaspoon paprika - Salt and pepper to taste - Lemon wedges for serving - Chopped parsley for garnish The key to great garlic butter salmon bites is high-quality ingredients. Use fresh salmon for best flavor. Each ingredient plays a role in making this dish shine. Start with the salmon. It should be firm and bright in color. Cut it into bite-sized cubes. This helps with even cooking and makes for easy eating. Next, the butter. Use unsalted butter so you can control the saltiness. Melt it gently, then add minced garlic. Garlic gives a strong flavor that pairs perfectly with salmon. Fresh lemon juice adds a bright touch. It balances the richness of the butter. Dill brings a hint of freshness. You can use fresh or dried, depending on what you have on hand. Salt, pepper, and paprika round out the mix. Salt brings out the flavors. Pepper adds a gentle heat, and paprika gives a nice color. Optional garnishes like lemon wedges and chopped parsley make the dish look great. They also add extra flavor when serving. Each ingredient combines to create a tasty, easy-to-make dish that will impress anyone. To start, melt the butter in a bowl. Then, add minced garlic and lemon juice. Stir in chopped dill, paprika, salt, and pepper. Mix everything well until it’s smooth and creamy. This garlic butter mixture adds great flavor to the salmon. Next, take your salmon cubes and place them in the bowl. Toss the salmon gently in the garlic butter mixture. Make sure each piece is evenly coated. This step is key to ensuring that every bite bursts with flavor. Now, preheat your air fryer to 400°F (200°C). This should take about 5 minutes. While it heats, spray the air fryer basket lightly with cooking spray to prevent sticking. After that, arrange the salmon bites in a single layer. Leave some space between each piece for even cooking. Cook the salmon bites for 8 to 10 minutes. Shake the basket halfway through cooking to ensure even browning. When they turn golden brown and are cooked through, they are ready. Remove them from the air fryer and drizzle any leftover garlic butter over the top. Enjoy your delicious garlic butter salmon bites! To get perfectly cooked salmon, time is key. I recommend cooking the salmon bites for 8 to 10 minutes. Halfway through, shake the basket. This helps the bites cook evenly. Keep an eye on them to avoid overcooking. They should be golden brown and tender inside. To make the salmon even better, think about adding more herbs. Fresh basil or thyme can add a nice twist. You can also try a pinch of red pepper flakes for heat. Mixing in some lemon zest brightens the dish too. Don’t be afraid to play with flavors you love! If you want a new method, try oven-baking or pan-searing the salmon bites. For baking, set your oven to 400°F (200°C) and cook for about 12-15 minutes. For pan-searing, heat some oil in a skillet and cook for 4-5 minutes on each side. Each method gives a different texture and taste. {{image_2}} You can spice up your salmon bites with red pepper flakes. Just sprinkle a pinch into the garlic butter mix. This adds heat and makes each bite exciting. Adjust the amount based on your taste. A little goes a long way! If you're looking for a healthier option, try olive oil instead of butter. Olive oil brings a great flavor and is heart-friendly. Simply swap the same amount of butter for olive oil in the recipe. You still get that rich taste without the extra calories. You can also cook salmon bites in the oven or on the stove. For oven baking, preheat to 400°F (200°C). Place the bites on a lined baking sheet and cook for about 12-15 minutes. If pan-searing, heat a bit of oil in a skillet and cook for 3-4 minutes on each side. This gives you a crispy crust and juicy inside. Enjoy experimenting! To keep your garlic butter salmon bites fresh, store them in an airtight container. Place them in the fridge if you plan to eat them within two days. For longer storage, wrap the bites tightly in plastic wrap or foil, then put them in the freezer. They can last up to three months in the freezer. Always label your container with the date. This helps you keep track of how long they've been stored. When reheating your salmon bites, I recommend using the air fryer for the best results. Set your air fryer to 350°F (175°C) and cook for about 5 minutes. This method keeps the bites crispy. If you prefer using a microwave, place the bites on a microwave-safe plate. Heat them for 30-second intervals until warm. Be careful not to overheat, as this can make the salmon dry. Enjoy your tasty leftovers! Cook salmon bites for 8 to 10 minutes. Check them at the halfway mark. Shake the basket gently to help them cook evenly. Look for a golden brown color on the outside. The inside should be opaque and flake easily with a fork. This ensures they are done but not overcooked. Yes, you can use frozen salmon. First, thaw it in the fridge overnight. If you're short on time, place it in cold water for about an hour. Once thawed, cut it into bite-sized pieces. Follow the same steps for coating and cooking. Just be aware that cooking time may increase by a couple of minutes. Several sides go well with garlic butter salmon bites. Here are some ideas: - Steamed broccoli: It adds a nice crunch. - Garlic mashed potatoes: They are creamy and flavorful. - Quinoa salad: A light, healthy option to balance the dish. - Roasted asparagus: It brings a fresh taste to the table. - Mixed greens: A simple salad can brighten the meal. These sides enhance the flavors of the salmon and make for a complete meal. This recipe for garlic butter salmon bites highlights key ingredients like salmon, garlic, and lemon. You learned how to prepare and cook them in an air fryer for a quick meal. Don’t forget the optional garnishes to add a fresh touch. Remember, you can also tweak flavors or try different cooking methods. With simple storage and reheating tips, your leftovers won’t go to waste. Enjoy making this easy, tasty dish that fits any meal!

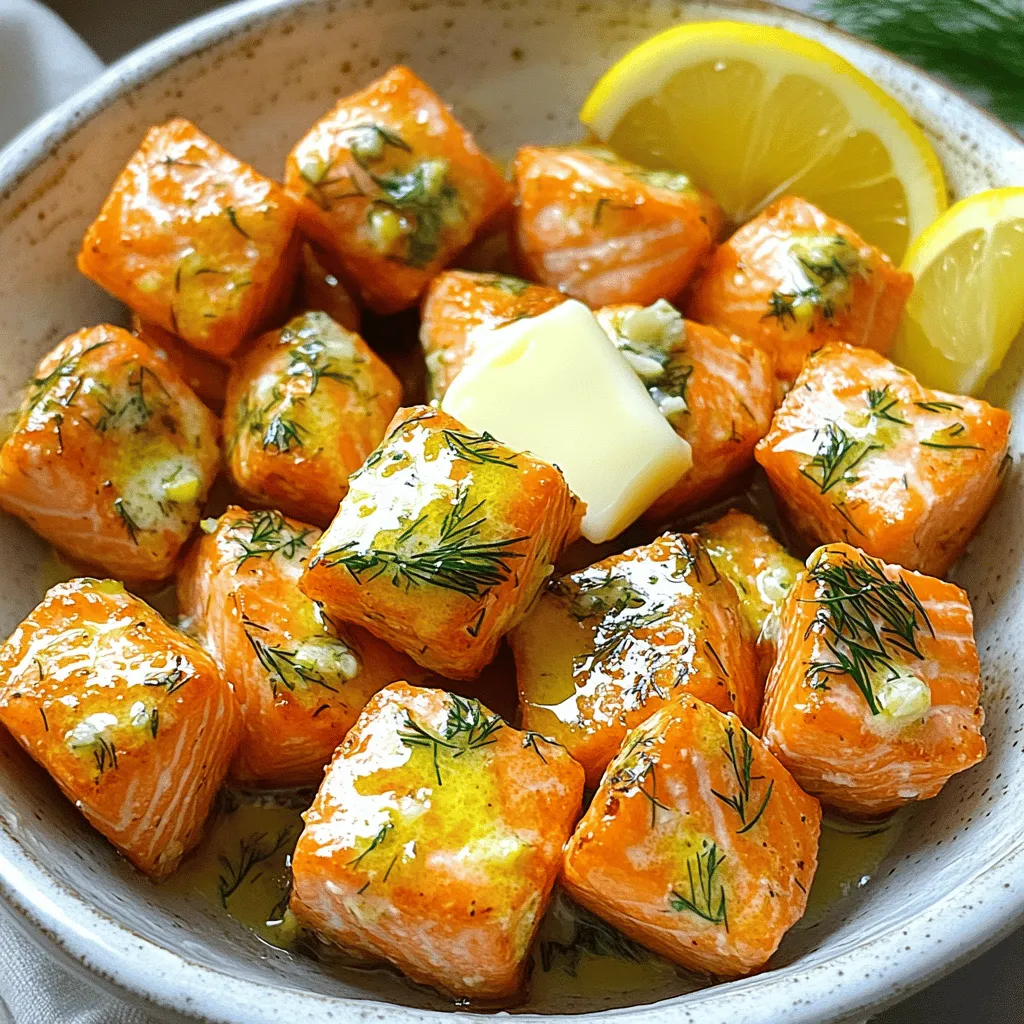
Garlic Butter Salmon Bites Air Fryer Recipe Delight

Are you ready to impress your family with a delicious meal in no time? These Garlic Butter Salmon Bites made

- 1 cup cottage cheese - 1 banana, sliced - 1/2 cup frozen mixed berries (strawberries, blueberries, raspberries) - 2 tablespoons honey or maple syrup - 1 tablespoon chia seeds - 1/2 teaspoon vanilla extract - 1/4 cup almond milk (or any milk of choice) - Toppings: granola, fresh fruits (sliced bananas, berries), nuts, seeds, and coconut flakes Cottage cheese is rich in protein. It helps build and repair muscles. One cup gives you about 25 grams of protein. This is great for energy and fullness. Bananas add natural sweetness and fiber. They provide potassium, which supports heart health. One banana gives you a quick energy boost. Frozen mixed berries are full of vitamins. They are high in antioxidants, which fight free radicals. They also have fiber to aid digestion. Honey or maple syrup is a natural sweetener. They add flavor and energy. Maple syrup has minerals like manganese and zinc. Chia seeds are tiny powerhouses. They add omega-3 fatty acids and fiber. They help you feel full longer and support digestion. Vanilla extract enhances flavor without added sugar. It adds warmth and sweetness to your bowl. Almond milk is a low-calorie option. It is dairy-free and has healthy fats. You can use any milk you like. Toppings like granola, fresh fruits, nuts, seeds, and coconut flakes add texture and flavor. They make your bowl fun and colorful. You can swap cottage cheese with Greek yogurt for a tangy flavor. Instead of a banana, use avocado for healthy fats. Fresh berries work well if you don’t have frozen ones. Just add ice to cool the bowl. For sweeteners, agave syrup is a great alternative to honey or maple syrup. Use flax seeds instead of chia seeds for a similar texture. Coconut milk can replace almond milk for a creamy taste. Feel free to mix up your toppings based on what you have. Enjoy customizing your smoothie bowl! To start, gather your ingredients. You will need: - 1 cup cottage cheese - 1 banana, sliced - 1/2 cup frozen mixed berries - 2 tablespoons honey or maple syrup - 1 tablespoon chia seeds - 1/2 teaspoon vanilla extract - 1/4 cup almond milk Add all these ingredients to your blender. The cottage cheese gives this smoothie bowl a creamy base. The banana adds natural sweetness and a smooth texture. The frozen mixed berries bring a burst of flavor and color. Blend the mixture on high until it turns smooth and creamy. If it gets stuck, stop and scrape down the sides. This step is key. You want a thick, smooth blend that is easy to eat with a spoon. Taste it before you pour it out. If you want it sweeter, add more honey or syrup. Blend again for a few seconds to mix it well. Pour the smoothie into a bowl. Now comes the fun part: toppings! Arrange your toppings in a pretty way. Use granola for crunch, fresh fruits for color, and nuts for healthy fats. Don’t forget seeds and coconut flakes for extra texture. Serve it right away for the best taste and enjoy every bite! When picking cottage cheese, look for smooth and creamy options. I prefer low-fat or full-fat, depending on my taste. Check the label for fresh dates. Freshness matters! If you want a thicker bowl, try using a small curd type. For a silkier texture, go for larger curds. Both choices work well in smoothies. You can boost flavor with simple add-ins. Consider adding a spoonful of nut butter for richness. A few grams of cocoa powder can add a chocolate twist. If you like spice, try a pinch of cinnamon or nutmeg. Fresh herbs like mint can also add a fun touch. I enjoy using honey for sweetness, but maple syrup works too! For a smooth and creamy bowl, blend your ingredients well. Start with the liquids, then add the cottage cheese and fruits. Blend until you achieve a creamy texture. If it’s too thick, add a splash of almond milk to loosen it up. For a thicker bowl, use less liquid. This way, you can pile on your toppings without a mess! {{image_2}} You can mix and match fruits to make your smoothie bowl unique. Some great choices include: - Mango: Adds a tropical twist. - Peaches: Gives a juicy sweetness. - Pineapple: Brings a refreshing zing. - Kiwi: Adds a fun green color. Feel free to use any fruit you love. Just remember to keep the balance of sweetness and tartness. If you prefer a dairy-free version, use plant-based cottage cheese. You can find brands that make this from almonds or soy. Substitute almond milk with oat or coconut milk for a creamy texture. Sweeten with maple syrup for a vegan option. This way, you still get the protein while enjoying the smoothie bowl. Change your toppings with the seasons. In spring, add fresh strawberries and mint. Summer is perfect for peaches and blueberries. For fall, think about pumpkin spice and pecans. In winter, use pomegranate seeds and citrus slices. Seasonal toppings keep your smoothie bowl exciting and fresh all year long! After enjoying your cottage cheese smoothie bowl, you may have some left. Store any leftovers in an airtight container. This keeps the bowl fresh and tasty. Place it in the fridge. Consume within two days for the best flavor and texture. You can freeze smoothie bowls to enjoy later! Pour the mixture into freezer-safe containers. Leave a little space at the top, as the mix expands when frozen. Smoothie bowls can last in the freezer for up to one month. When ready to eat, thaw in the fridge overnight or use the microwave in short bursts. Freshness depends on storage. In the fridge, your smoothie bowl stays good for two days. If you freeze it, it can last about a month. Always check for changes in smell or texture before consuming. Enjoy your smooth, protein-packed delight whenever you want! Cottage cheese is a great choice for smoothies. It is packed with protein, which helps you feel full longer. It also has calcium, good for your bones. The creamy texture makes your smoothie rich and smooth. Plus, it adds a mild flavor that blends well with fruits. Using cottage cheese can boost your breakfast or snack. Yes, you can use fresh fruits! Fresh bananas and berries can give the smoothie a bright taste. However, frozen fruits make your smoothie cold and thick. If you choose fresh fruits, you may want to add ice. This keeps your smoothie refreshing and cool. Fresh fruits will also keep the nutrients intact, so feel free to mix it up! To lower the calories, you can make a few easy swaps. First, use low-fat cottage cheese instead of regular. This change cuts down on fat without losing protein. Second, replace honey or maple syrup with a sugar-free sweetener. You can also skip the nuts and granola toppings, as they add extra calories. Finally, use less almond milk to reduce the overall calorie count. These small changes can help you enjoy a lighter smoothie bowl! You learned about creating tasty smoothies with cottage cheese. We covered key ingredients and their health benefits. I provided tips for perfect texture and flavor. Plus, you discovered fun variations and storage tips. Remember, making these smoothies can be a healthy and easy choice. Play with ingredients to find what you love. Enjoy your smoothie journey and keep exploring new flavors!

Cottage Cheese Smoothie Bowl Protein Packed Delight

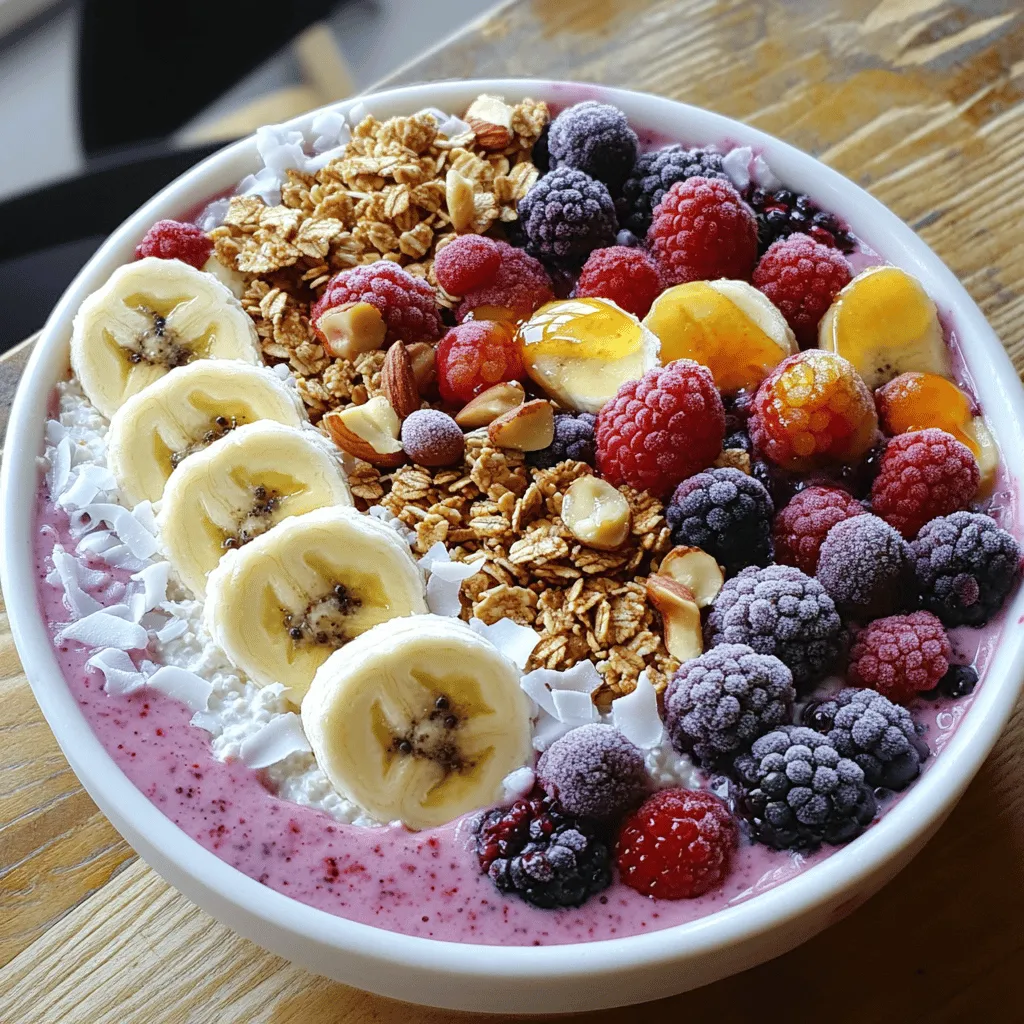
Dive into the world of Cottage Cheese Smoothie Bowls! Packed with protein, this dish fuels your body and delights your

To make your Creamy Sun-Dried Tomato Penne, gather these ingredients: - 12 oz penne pasta - 1 cup sun-dried tomatoes (in oil, drained and chopped) - 1 medium onion, diced - 3 cloves garlic, minced - 2 cups vegetable broth - 1 cup heavy cream (or coconut cream for a vegan option) - 1 cup baby spinach - ½ cup grated Parmesan cheese (or nutritional yeast for vegan option) - 1 teaspoon dried basil - 1 teaspoon dried oregano - Salt and pepper to taste - 2 tablespoons olive oil - Fresh basil leaves for garnish For the best taste, choose high-quality ingredients. Look for sun-dried tomatoes packed in oil. This adds a rich flavor. Fresh basil enhances aroma and taste. Use fresh garlic and onion for a vibrant taste. If possible, pick organic vegetables. Organic options often have better flavor and fewer chemicals. You can swap some ingredients if needed. Use gluten-free penne for a gluten-free meal. Coconut cream works well for a vegan option. Nutritional yeast can replace Parmesan cheese for a vegan twist. If you want more greens, try kale instead of spinach. Don’t have vegetable broth? Water can work, but it may lack flavor. Start by gathering your ingredients. You will need: - 12 oz penne pasta - 1 cup sun-dried tomatoes (in oil, drained and chopped) - 1 medium onion, diced - 3 cloves garlic, minced - 2 cups vegetable broth - 1 cup heavy cream (or coconut cream for a vegan option) - 1 cup baby spinach - ½ cup grated Parmesan cheese (or nutritional yeast for vegan option) - 1 teaspoon dried basil - 1 teaspoon dried oregano - Salt and pepper to taste - 2 tablespoons olive oil - Fresh basil leaves for garnish Chop the sun-dried tomatoes and dice the onion. Mince the garlic, too. Measure out everything and have it ready. This makes cooking smooth and fun. In a large pot, heat the olive oil over medium heat. When hot, add the diced onion. Sauté it for about 5 minutes. You want it to be soft and translucent. Next, stir in the minced garlic. Cook it for 1 minute until it smells great. Add the chopped sun-dried tomatoes. Sauté these for 2 minutes. Now, pour in the vegetable broth and bring it to a gentle boil. Once boiling, add the penne pasta. Stir it well to prevent sticking. Reduce the heat and cover the pot. Let it simmer for 12-15 minutes. Stir it often. You want the pasta to be al dente, or firm to the bite. Once the pasta is cooked, stir in the heavy cream, dried basil, dried oregano, and grated Parmesan cheese. Mix it well until the sauce looks creamy. Now add the baby spinach. Cook for another 2-3 minutes until the spinach wilts. Season with salt and pepper to taste. Remove the pot from heat. Let it sit for a couple of minutes to thicken. When ready to serve, dish it into bowls. Garnish with fresh basil leaves and sprinkle more Parmesan cheese on top if you like. Enjoy your creamy sun-dried tomato penne! To cook pasta just right, start with a large pot. Use plenty of water. When boiling, add a good amount of salt. This adds flavor from the start. Stir the pasta right after adding it to the pot. This helps prevent sticking. Cook until it's al dente, which means firm but not hard. This usually takes about 12-15 minutes based on the package instructions. Remember, the pasta will continue cooking in the sauce, so pull it off the heat slightly early. For a rich and creamy sauce, heavy cream works best. If you want a vegan option, use coconut cream. Both will give you a thick texture. When adding the cream, mix it in slowly. This will help it blend evenly. You can also add more cheese if you like. Parmesan adds flavor and creaminess. Make sure to stir well after adding it. If the sauce seems too thick, add a splash of vegetable broth to loosen it up. You can boost the flavor of your penne in many ways. Fresh herbs, like basil or parsley, brighten the dish. You can also add a pinch of red pepper flakes for heat. If you love garlic, add more minced garlic when cooking the onions. For a protein boost, cooked chicken or shrimp works well. Just stir them in when you add the spinach. This makes the dish heartier and more filling. Adjust the seasoning with salt and pepper to match your taste. {{image_2}} You can easily make this dish vegan. Swap the heavy cream for coconut cream. Use nutritional yeast instead of Parmesan cheese. This adds a cheesy flavor without dairy. You can also add more veggies, like mushrooms or bell peppers. They give extra flavor and texture. If you want to add protein, chicken works great. Cook diced chicken in the pot before adding the onion. Shrimp is also an excellent choice. Add shrimp when you mix in the cream. They cook quickly and will be tender. Both options make the dish heartier and more filling. To make this dish gluten-free, choose gluten-free penne pasta. There are many good brands available now. Follow the same steps as the recipe. Just adjust the cooking time. Gluten-free pasta may need a bit less time to cook. Check it often to avoid overcooking. To keep your creamy sun-dried tomato penne fresh, follow these steps. First, let it cool to room temperature. Next, transfer the pasta to an airtight container. This will help prevent drying out. Make sure to seal it tightly. When you want to reheat your penne, use a saucepan. Add a splash of vegetable broth or water to keep it moist. Heat over medium-low heat and stir often. This will help it warm evenly without sticking. The creamy penne lasts in the fridge for about 3-5 days. If you want to freeze it, portion it out into smaller containers. It will stay fresh for up to three months in the freezer. To enjoy later, thaw it overnight in the fridge before reheating. Yes, you can use other pasta shapes. Fusilli, farfalle, or even spaghetti work well. Just adjust the cooking time according to the pasta you choose. For example, thicker pasta may need a bit longer to cook. To spice up your creamy sun-dried tomato penne, add red pepper flakes. Start with a pinch and taste as you go. You can also use spicy sun-dried tomatoes if you like heat. Another great option is to mix in some diced jalapeños. This dish pairs well with a simple salad. A fresh green salad with a lemon vinaigrette works great. You can also serve garlic bread or a side of roasted vegetables. These sides add color and flavor to your meal. We explored key ingredients and suggested high-quality options for your dishes. I shared tips for cooking perfect pasta and creating a creamy sauce. Variations such as vegan and gluten-free options ensure everyone can enjoy. Proper storage helps keep your food fresh, and I answered common questions. Remember, cooking is about having fun and being creative. Use these insights to experiment and enjoy your meals more!

Creamy Sun-Dried Tomato Penne One Pot Delight

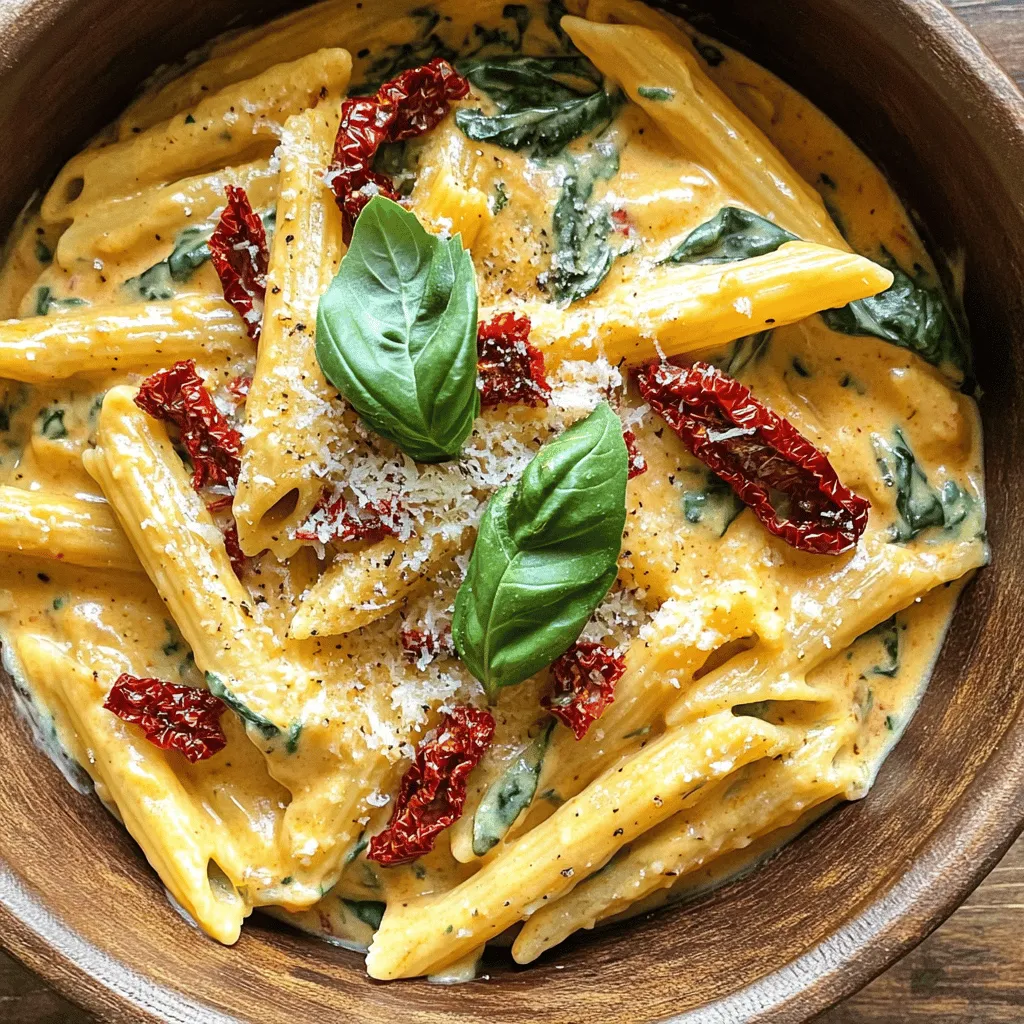
Welcome to my kitchen! If you crave a simple, tasty dish, this Creamy Sun-Dried Tomato Penne One Pot is for

- 12 oz pasta (fettuccine or penne) - 2 cups cherry tomatoes, halved - 1 cup fresh ricotta cheese - 2 cloves garlic, minced - 1 tablespoon olive oil - 1 tablespoon balsamic vinegar - 1 teaspoon dried basil - 1 teaspoon dried oregano - Salt and pepper to taste - Fresh basil leaves for garnish - Grated parmesan cheese for serving When I create creamy tomato ricotta pasta, I focus on fresh and simple ingredients. The pasta is the base. You can use fettuccine or penne, which both hold the sauce well. I prefer cherry tomatoes for their sweet flavor. They add a burst of freshness to the dish. For the creamy part, fresh ricotta cheese is key. It gives a rich texture and taste. I add garlic for depth. Olive oil brings everything together, while balsamic vinegar adds a tangy kick. Herbs like dried basil and oregano enhance the flavor. Salt and pepper are important for balance. Finally, fresh basil leaves brighten the dish, and grated parmesan adds a savory finish. This combination creates a meal that is both easy and delicious. It captures the essence of Italian cooking while being quick to prepare. You will enjoy making this dish as much as you will enjoy eating it! {{ingredient_image_1}} 1. Start by boiling a large pot of salted water. 2. Add 12 oz of pasta, like fettuccine or penne. 3. Cook according to package instructions until al dente. 4. Drain the pasta and set it aside. 1. In a large skillet, heat 1 tablespoon of olive oil over medium heat. 2. Add 2 minced garlic cloves and sauté for about 1 minute. 3. Be careful not to burn the garlic; it should smell fragrant. 4. Now, add 2 cups of halved cherry tomatoes to the skillet. 5. Sprinkle in salt, pepper, 1 teaspoon of dried basil, and 1 teaspoon of dried oregano. 6. Cook for 5 to 7 minutes, until the tomatoes soften and release juices. 7. Stir in 1 tablespoon of balsamic vinegar and remove from heat. 1. In a mixing bowl, combine the cooked pasta with the sautéed tomatoes. 2. Add in 1 cup of fresh ricotta cheese. 3. Toss everything gently until the pasta is fully coated and creamy. 4. Taste and adjust seasoning with more salt and pepper if needed. Enjoy this easy and flavorful creamy tomato ricotta pasta! To boost the taste of your creamy tomato ricotta pasta, fresh herbs work wonders. Try adding: - Fresh basil: It adds a sweet and aromatic touch. - Fresh parsley: This brings a bright flavor and a splash of color. You can also play with seasonings. Consider using: - Red pepper flakes for some heat. - A splash of lemon juice for brightness. - Spinach or kale for added nutrition and color. Achieving a creamy consistency is key. Here are some tips: - Use high-quality ricotta cheese; it makes a big difference. - Mix the ricotta with a bit of pasta water for smoothness. When choosing pasta, I recommend: - Fettuccine for a flat, saucy embrace. - Penne for the perfect bite and sauce-holding ability. Serving your pasta well makes it even more inviting. Here are my favorite ideas: - Use shallow bowls for a beautiful display. - Drizzle a bit of olive oil on top for shine. - Add some halved cherry tomatoes and fresh basil leaves for color. For side dishes, consider: - A simple green salad with lemon vinaigrette. - Garlic bread for a classic touch. These tips will help you create a dish that looks as good as it tastes! Pro Tips Use Fresh Ingredients: Always opt for fresh cherry tomatoes and high-quality ricotta cheese to enhance the flavor of your dish. Don't Overcook Pasta: Ensure you cook the pasta al dente, as it will continue to cook slightly when mixed with the hot sauce. Customize Your Herbs: Feel free to experiment with fresh herbs like thyme or parsley to add a unique twist to the recipe. Save Pasta Water: Reserve a cup of pasta cooking water before draining; it can be added to the sauce for a creamier consistency if needed. {{image_2}} You can boost your creamy tomato ricotta pasta by adding protein. Chicken is a great choice. Just cook diced chicken breast in the skillet before adding the tomatoes. Shrimp also works well. Sauté shrimp until pink, then add the cherry tomatoes. For a vegetarian option, toss in some white beans or lentils. They add protein and keep the dish hearty. You can also use tofu. Just cube it and sauté until golden. These additions will make your meal more filling and add new flavors. If you need lactose-free options, consider using goat cheese or lactose-free ricotta. Both will keep your dish creamy and delicious. For a vegan version, use cashew cream or silken tofu blended until smooth. Nutritional yeast can add a cheesy flavor without dairy. You can also swap out the cheese for a vegan ricotta. Look for brands that use almonds or soy. This way, everyone can enjoy the dish, no matter their dietary needs. To make this dish gluten-free, you can choose pasta made from rice or lentils. Quinoa pasta is another great option. Just cook according to package instructions. When preparing the dish, be sure to check all sauces and ingredients for gluten. Use fresh herbs and spices to enhance flavor. This way, you keep the dish tasty while making it suitable for those with gluten sensitivities. To store leftovers, let the pasta cool. Place it in an airtight container. This keeps it fresh for up to three days. Avoid letting it sit out for too long. You want to keep it safe and tasty. To reheat the pasta, use a skillet on low heat. Stir it gently to warm it up. You can also microwave it in short bursts. Add a splash of water or olive oil to keep it moist. This helps prevent dryness. To freeze the pasta, let it cool completely. Place it in a freezer-safe container or bag. Make sure to remove as much air as possible. Use it within three months for best taste. When ready to eat, thaw it in the fridge overnight. Reheat gently to enjoy its creamy goodness again. You can add a pinch of red pepper flakes for heat. This spice gives a nice kick. You could also use cayenne pepper or hot sauce. Start with a small amount. You can always add more if you want it spicier. Fresh jalapeños or sliced chili peppers also work well. Mix them in while cooking the tomatoes for a tasty boost. Yes, you can use any pasta you like. Fettuccine and penne are great choices. However, you could try spaghetti, rigatoni, or even gluten-free pasta. Just remember to adjust the cooking time. Check the package for exact times. Cooking until the pasta is al dente gives the best texture. This recipe is already vegetarian! It skips meat and focuses on rich flavors. You can add more veggies like spinach, zucchini, or bell peppers. These will add color and nutrients. Just sauté them with the garlic and tomatoes. You could also use mushrooms for a meaty texture. Enjoy the creamy, flavorful dish without meat! This blog post covered a flavorful creamy tomato ricotta pasta. We explored easy steps, key ingredients, and ways to enhance flavor. You can substitute proteins or try different cheeses for variety. I shared tips on storage and reheating for leftovers, too. Get creative in the kitchen and adapt this dish to fit your tastes. Enjoy your cooking and impress your family with this easy, delicious meal!

Creamy Tomato Ricotta Pasta Easy and Flavorful Delight

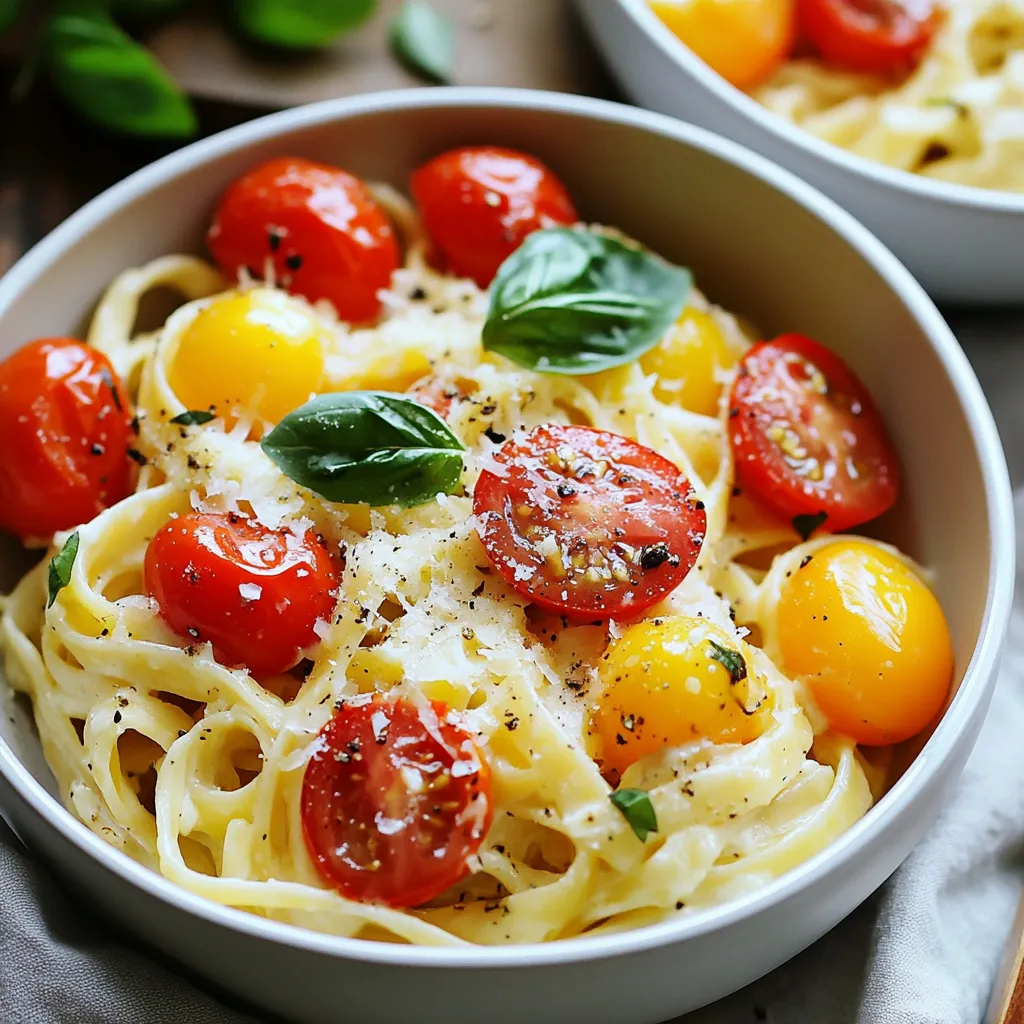
Craving a quick and tasty dinner? Look no further! My Creamy Tomato Ricotta Pasta is both easy and delicious. With

To make Teriyaki Tofu Stir-Fry, you will need: - 14 oz firm tofu, drained and pressed - 2 tablespoons cornstarch - 2 tablespoons vegetable oil - 1 red bell pepper, sliced - 1 green bell pepper, sliced - 1 cup broccoli florets - 1 cup snap peas - 3 green onions, chopped - 2 garlic cloves, minced - 1-inch piece ginger, grated - ½ cup teriyaki sauce - Sesame seeds for garnish Each serving of Teriyaki Tofu Stir-Fry provides a balanced mix of nutrients. Here’s what you get: - Calories: Approximately 250 - Protein: 14g - Carbohydrates: 30g - Fats: 10g - Fiber: 5g This dish is high in protein from the tofu and packed with vitamins from the vegetables. You can easily swap some ingredients based on your taste or what you have at home: - Tofu: Use tempeh for a firmer texture. - Vegetable Oil: Substitute with coconut oil for a different flavor. - Bell Peppers: Any color bell pepper works well, or use zucchini. - Teriyaki Sauce: Create your own mix with soy sauce, honey, and rice vinegar. - Green Onions: Chives or shallots can replace them for a milder taste. These substitutions keep the dish tasty while matching your needs. {{ingredient_image_1}} To start, drain and press 14 ounces of firm tofu. This step is key to getting a nice texture. Once pressed, cut the tofu into bite-sized cubes. Next, toss these cubes in 2 tablespoons of cornstarch. The cornstarch coating helps the tofu crisp up when cooked. Make sure every piece is covered evenly. Heat 1 tablespoon of vegetable oil in a large non-stick skillet or wok over medium-high heat. Let the oil get hot before adding the tofu. Carefully place the tofu cubes in the skillet. Fry them for about 8 to 10 minutes. You want them to be golden brown and crispy on all sides. Once done, take the tofu out and set it aside. In the same skillet, add another tablespoon of vegetable oil. Now, toss in the sliced red and green bell peppers, broccoli florets, and snap peas. Stir-fry these veggies for about 5 to 7 minutes. You want them to be tender but still crisp. Then, add 2 minced garlic cloves and 1-inch grated ginger. Stir-fry for another 1 to 2 minutes until you can smell the aroma. Now, reduce the heat to medium. Return the crispy tofu to the skillet. Pour in ½ cup of teriyaki sauce. Gently toss everything together until well coated. Cook for an additional 2 to 3 minutes. This allows the sauce to thicken slightly and cling to your stir-fry. Before serving, remove the skillet from heat. Sprinkle with chopped green onions and sesame seeds for a lovely finish. Enjoy your colorful and tasty Teriyaki Tofu Stir-Fry! To get that perfect crispy tofu, start with firm tofu. Drain and press it well. This removes extra moisture. Cut the tofu into bite-sized cubes. Coat them in cornstarch. This helps create a nice crunch. Fry the tofu in hot oil until golden brown. This usually takes about 8-10 minutes. Don’t crowd the pan; this keeps the tofu crispy. For this stir-fry, I love using bell peppers, broccoli, and snap peas. Red and green bell peppers add color and sweetness. Broccoli brings crunch and nutrition. Snap peas offer a fresh bite. You can mix in other veggies too. Carrots, mushrooms, or zucchini work great. Just make sure to cut them into similar sizes for even cooking. Want to amp up the flavor? Add minced garlic and grated ginger when you cook the veggies. They bring warmth and depth to the dish. You can also sprinkle in some sesame seeds for extra crunch. If you like heat, add a pinch of red pepper flakes. For a twist, try adding a splash of lime juice before serving. This brightens the flavors and adds zest. Pro Tips Use Extra Firm Tofu: For the best texture in your stir-fry, opt for extra firm tofu. It holds its shape better and becomes crispier when cooked. Prep Ahead: To save time on busy nights, pre-cut your vegetables and tofu in advance. Store them in the fridge until you're ready to cook. Customize Your Veggies: Feel free to swap out the vegetables based on your preference or what you have on hand. Carrots, zucchini, or mushrooms can add great flavor. Adjust Sauce to Taste: If you prefer a sweeter or saltier dish, adjust the amount of teriyaki sauce to your liking. You can also add a splash of soy sauce for extra flavor. {{image_2}} You can easily switch tofu with other proteins. Chicken, shrimp, or beef work well. Just cut them into bite-sized pieces, like the tofu. Cook them until golden brown before adding the veggies. Adjust the cooking time based on the protein you choose. Chicken may take longer, while shrimp cooks faster. This keeps the stir-fry quick and flavorful. If you want a vegan dish, tofu is perfect. Just ensure you use a gluten-free teriyaki sauce. Many brands offer this option. You can also use tamari, a gluten-free soy sauce, for a similar flavor. For a nutty taste, try adding toasted sesame oil instead of regular oil. This adds depth and keeps it vegan-friendly. To change the heat level, add chili flakes or sriracha. Mix these into the teriyaki sauce for a spicy kick. Start with a small amount, then taste as you go. If you prefer less heat, leave these out or use sweet chili sauce instead. This gives a nice balance of sweet and spicy without being too hot. To keep your teriyaki tofu stir-fry fresh, store it in an airtight container. Let it cool to room temperature first. Place it in the fridge within two hours of cooking. This helps keep the flavors strong. It should stay good for about 3 to 4 days. When you want to enjoy your leftovers, heat them gently. You can use a pan, microwave, or oven. If using a pan, add a little oil and heat over medium. Stir it often until it's warm. If you're in a hurry, the microwave is quick! Place your stir-fry in a microwave-safe bowl and cover it. Heat for 1 to 2 minutes. Stir halfway to ensure even heating. If you've made more than you can eat, freezing is a great option. Place cooled stir-fry in a freezer-safe container. It can last up to 3 months in the freezer. When you're ready to eat, thaw it overnight in the fridge. Then, reheat it on the stove or microwave as mentioned above. This way, you can enjoy a tasty meal later! Yes, you can make Teriyaki Tofu Stir-Fry in advance. Store the cooked stir-fry in an airtight container. Keep it in the fridge for up to three days. When ready to eat, just reheat it in a skillet or microwave. This meal holds its flavors well, making it great for meal prep. Serve Teriyaki Tofu Stir-Fry with steamed jasmine rice or quinoa. You can also pair it with a fresh salad or a side of edamame. For extra crunch, try crispy spring rolls. These sides enhance the dish and make a complete meal. To make this recipe healthier, use less oil when frying the tofu. You can also add more veggies like carrots or zucchini. Opt for low-sodium teriyaki sauce to reduce salt. Lastly, serve it over brown rice instead of white rice for more fiber. These tweaks keep the dish tasty while boosting nutrition. In this blog post, we covered how to create a tasty Teriyaki Tofu Stir-Fry. We looked at essential ingredients, step-by-step instructions, and useful tips for cooking. I shared variations to try and storage methods for leftovers. You can enjoy this dish while adjusting flavors and ingredients to your taste. Don't hesitate to experiment and find what works best for you. Happy cooking!

Teriyaki Tofu Stir-Fry Flavorful and Quick Meal

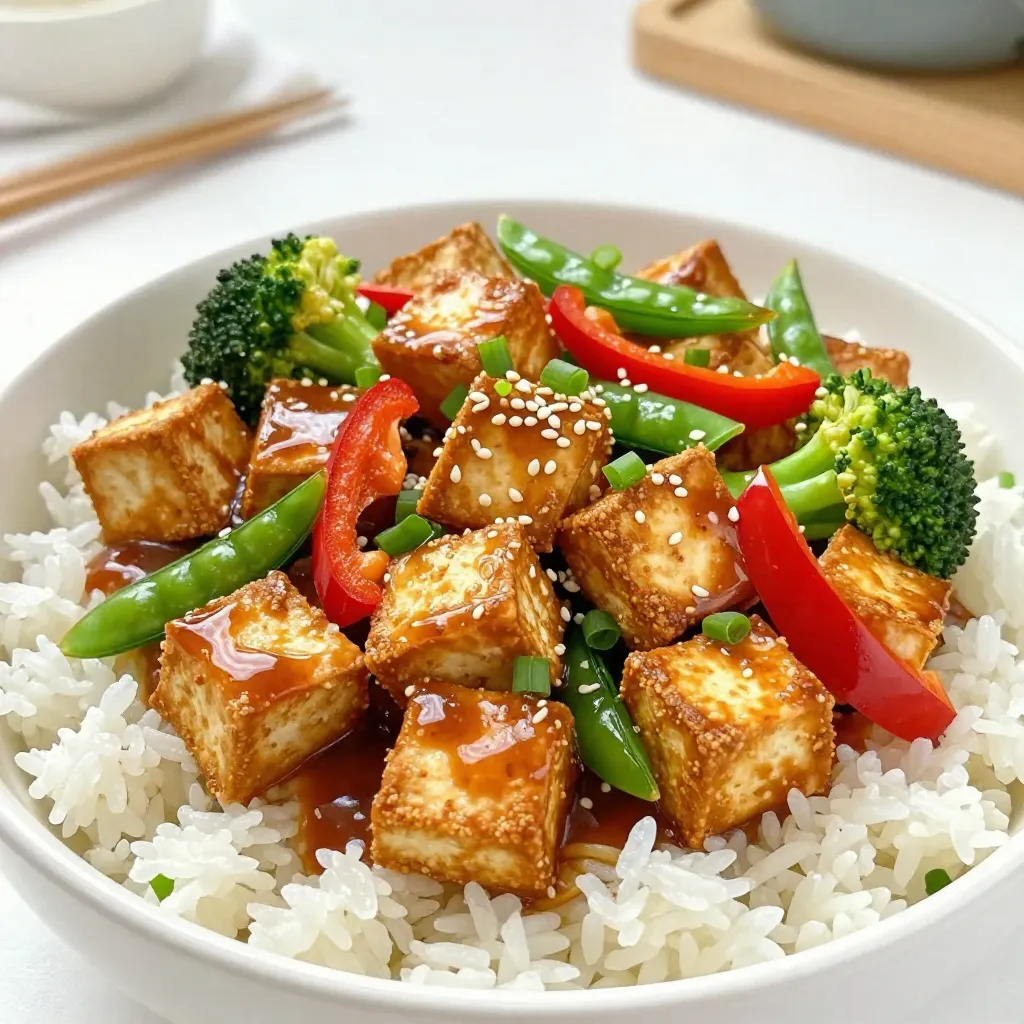
Are you ready to whip up a meal that’s both tasty and quick? This Teriyaki Tofu Stir-Fry is your new

For this dish, you will need the following main items: - 4 boneless, skinless chicken breasts - 1 cup fresh mozzarella cheese, shredded - 1/2 cup basil pesto, either store-bought or homemade - 1/4 cup sun-dried tomatoes, finely chopped These ingredients are key to making the chicken juicy and flavorful. The mozzarella gives a creamy texture, while the pesto adds a rich, herby taste. The sun-dried tomatoes bring a sweet and tangy twist. You will also need these simple seasonings and oil: - 1/2 teaspoon garlic powder - 1/2 teaspoon salt - 1/4 teaspoon black pepper - 2 tablespoons olive oil The garlic powder gives the chicken an extra kick. Salt and pepper enhance the flavors. Olive oil helps to sear the chicken and lock in moisture. To make the dish pop, consider these optional garnishes: - Fresh basil leaves Adding fresh basil not only makes the dish look great but also boosts the flavor. You can sprinkle them on top before serving for a fresh touch. {{ingredient_image_1}} Start with four boneless, skinless chicken breasts. Use a sharp knife to create a pocket in each breast. Slice horizontally, but don’t cut all the way through. This pocket will hold the tasty filling. Make sure to keep the edges intact. In a mixing bowl, combine one cup of shredded fresh mozzarella cheese, half a cup of basil pesto, and a quarter cup of finely chopped sun-dried tomatoes. Mix these well until they blend nicely. This filling adds creaminess and flavor to the chicken. Now, season the inside of each chicken pocket. Use half a teaspoon of garlic powder, half a teaspoon of salt, and a quarter teaspoon of black pepper. Rub these spices inside to enhance the taste. Then, spoon the pesto mozzarella mixture into each pocket. Pack it tightly so it doesn’t spill out during cooking. Heat two tablespoons of olive oil in a large oven-safe skillet over medium-high heat. Once hot, add the stuffed chicken breasts. Sear them for three to four minutes on each side until they turn golden brown. This step adds a nice crust that locks in moisture. Next, transfer the skillet to the preheated oven set to 375°F (190°C). Bake for 20 to 25 minutes. The chicken should reach an internal temperature of 165°F (75°C) to ensure it is fully cooked. After baking, let the chicken rest for five minutes. This helps the juices settle, making it even juicier. Garnish with fresh basil leaves for a bright finish. The best cooking temperature for pesto mozzarella stuffed chicken is 375°F (190°C). This heat allows the chicken to cook through without burning. It also helps keep the filling warm and gooey. Always use a meat thermometer to check the internal temperature. Aim for 165°F (75°C) for safe eating. To avoid dry chicken, start with fresh, high-quality breasts. Make pockets in the chicken but do not cut all the way through. This keeps moisture inside the chicken. Searing the chicken first creates a nice crust. It locks in juices. Baking the chicken until it reaches the right temperature also helps keep it moist. Let the chicken rest for five minutes before cutting. This step redistributes juices, making each bite tender. Serve pesto mozzarella stuffed chicken on a bed of sautéed spinach. This adds color and freshness. Roasted vegetables like bell peppers or zucchini also pair well. Drizzle extra pesto over the chicken for added flavor. Fresh basil leaves make a lovely garnish. You can also serve it with a side of rice or pasta for a complete meal. Pro Tips Use Fresh Ingredients: Always opt for fresh mozzarella and basil pesto for the best flavor. Fresh ingredients make a significant difference in taste and texture. Seal the Chicken Properly: If you’re worried about the filling leaking out, use kitchen twine to tie the chicken breasts closed instead of toothpicks for a more secure seal. Let it Rest: Allowing the chicken to rest for a few minutes after cooking helps the juices redistribute, ensuring each bite is moist and flavorful. Experiment with Fillings: Feel free to get creative with your stuffing! Try adding spinach, artichokes, or different cheeses to customize the flavor profile. {{image_2}} You can swap mozzarella for other cheeses. Try using provolone for a sharp taste. Goat cheese adds a creamy and tangy twist. For a stronger flavor, use aged cheddar. Each cheese melts well and adds a unique taste. Mix and match to find your favorite. Adding veggies can boost flavor and nutrition. Spinach works great with the cheese and pesto mix. You can also try sun-dried tomatoes for a tangy kick. Fresh spinach adds color and taste. Other options include roasted red peppers or artichokes. They all bring new life to the dish. Homemade pesto gives you control over flavors. You can adjust herbs, nuts, and oil to your liking. Store-bought pesto offers convenience and saves time. Both options work well, so choose what fits your schedule. If you have time, try making your own for a fresh taste. Store leftover pesto mozzarella stuffed chicken in an airtight container. It keeps well in the fridge for up to three days. Make sure the chicken cools before sealing to avoid steam build-up. This helps keep the chicken juicy and fresh. You can freeze the stuffed chicken for longer storage. Wrap each piece tightly in plastic wrap, then place it in a freezer bag. This keeps out air and prevents freezer burn. The chicken stays good for up to three months. Thaw it overnight in the fridge before cooking. To reheat the chicken, use the oven for best results. Preheat the oven to 350°F (175°C). Place the chicken in a baking dish, cover it with foil, and warm it for about 20 minutes. Check to ensure it reaches an internal temperature of 165°F (75°C). This keeps the chicken moist and tasty. You can check if the chicken is cooked by using a meat thermometer. The chicken should reach an internal temperature of 165°F (75°C). If you don’t have a thermometer, cut into the thickest part of the chicken. The meat should be white, and the juices should run clear. If the juices are pink, the chicken needs more time to cook. Yes, you can prepare the chicken ahead of time. You can stuff the chicken and then cover it. Keep it in the fridge for up to 24 hours. When you are ready to cook it, just follow the cooking steps. This saves time on busy days. Just remember to let it sit at room temperature for about 15 minutes before cooking. This dish pairs well with many sides. You can serve it on a bed of sautéed spinach to add color. Roasted vegetables also complement the flavors nicely. For a starch, consider serving it with rice or pasta. You can drizzle some extra pesto on the plate for added flavor. Fresh basil leaves make a lovely garnish too. This blog post covers how to make Pesto Mozzarella Stuffed Chicken. We explored key ingredients, including chicken, seasonings, and optional garnishes. You learned how to prep the chicken, make the filling, and choose cooking methods. I shared tips to keep the chicken juicy and ways to store leftovers. We also discussed variations, like cheese options and veggie add-ins. By following these steps, your dish will impress. Enjoy this tasty meal with your loved ones!

Pesto Mozzarella Stuffed Chicken Juicy and Flavorful Dish

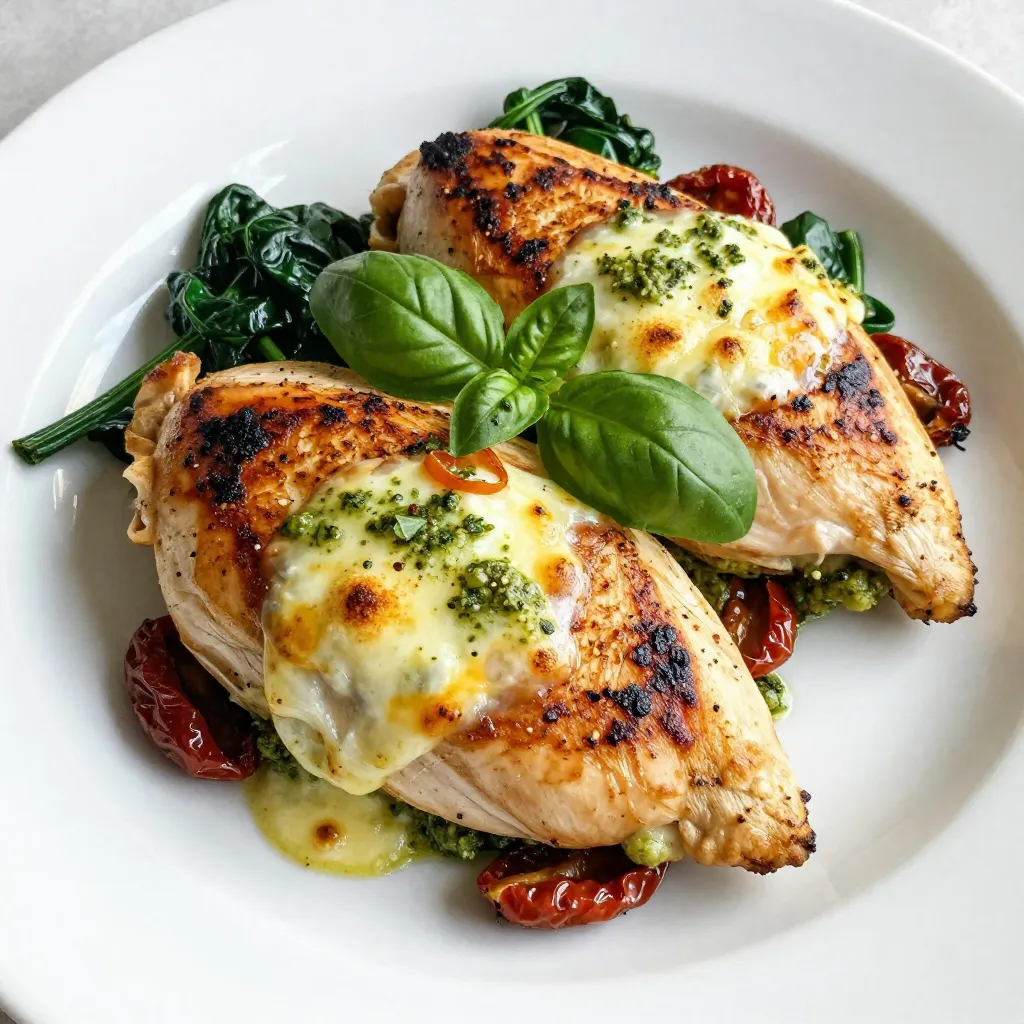
If you’re looking for a dish that bursts with flavor and impresses guests, you’ve found it. My Pesto Mozzarella Stuffed

To make this tasty caramel apple cheesecake dip, you will need: - 8 oz cream cheese, softened - 1/2 cup powdered sugar - 1 teaspoon vanilla extract - 1/2 cup sour cream - 1/2 cup caramel sauce, plus extra for drizzling - 1 medium apple, diced - 1/4 cup chopped pecans (optional) - Cinnamon for sprinkling (optional) - Graham crackers or sliced fruit for dipping For the best flavor, I suggest using Granny Smith or Honeycrisp apples. Granny Smith apples add a nice tartness. They balance sweet flavors well. Honeycrisp apples bring a crisp texture and sweet taste. They are juicy and delicious. You can add chopped pecans for a crunchy texture. They also add a nutty flavor. A sprinkle of cinnamon on top enhances the taste and gives warmth. Feel free to adjust these options to suit your taste! To start, grab a mixing bowl. Add 8 ounces of softened cream cheese. Use an electric mixer to beat it until smooth and creamy. This step ensures a nice base for your dip. Next, slowly add 1/2 cup of powdered sugar. Mix until it blends well. The sugar will sweeten the cream cheese. Then, add 1 teaspoon of vanilla extract and 1/2 cup of sour cream. Keep mixing until everything is smooth and combined. This mixture will be rich and tasty. Now, it’s time to add the fun stuff! Take a medium apple and dice it. I recommend using Granny Smith or Honeycrisp apples for their crunch. Gently fold the diced apple into the cream cheese mixture. If you like, add 1/4 cup of chopped pecans for a nice crunch. Next, drizzle in 1/2 cup of caramel sauce. Save some for later to drizzle on top. Use a spatula to swirl the caramel around. This creates a beautiful marbled effect. Make sure not to overmix; you want to see those caramel swirls! After mixing, transfer the dip to a serving bowl. Chill it in the refrigerator for at least 30 minutes. This step helps the flavors come together. When you are ready to serve, drizzle more caramel on top for a sweet touch. A sprinkle of cinnamon can add extra flavor. Serve your dip with graham crackers or sliced fruit. Arrange these around the bowl for a pretty display. This dip is fun, tasty, and perfect for sharing! To get a smooth and creamy dip, start with softened cream cheese. This helps mix it easily. Use an electric mixer to beat the cream cheese until it is fluffy. Add the powdered sugar slowly. Mixing this way prevents lumps. After that, add sour cream and vanilla. Keep mixing until you have a silky texture. To create a rich taste, add diced apples and chopped pecans. They give crunch and sweetness. The caramel sauce adds a nice touch. Drizzle the caramel in after mixing the other ingredients. Swirling it in creates a beautiful marbled look. This way, each scoop has a mix of flavors. You can also sprinkle a bit of cinnamon on top for extra warmth. Serve your dip in a fun bowl. It makes your dish look great. Arrange graham crackers or fruit around the bowl for easy dipping. Before serving, add a drizzle of caramel on top. A light sprinkle of cinnamon adds a nice finish. This makes your dip look as good as it tastes! {{image_2}} You can make this dip healthier with simple swaps. Use low-fat cream cheese instead of regular. You can also try Greek yogurt instead of sour cream. These changes cut calories but keep the flavor. Choose a sugar substitute for the powdered sugar. This way, you enjoy the dip without as much guilt. Adding spices can take this dip to a new level. Try mixing in a pinch of nutmeg or allspice for warmth. You can also add a splash of almond extract for a nutty twist. Vanilla is a classic choice that works well too. Feel free to experiment until you find your favorite blend. This dip fits any season with a few changes. In fall, add pumpkin puree to the mix. It gives the dip a cozy flavor. You can sprinkle some nutmeg or cinnamon on top for extra warmth. In summer, try using berries instead of apples. This keeps the dip fresh and fruity. To store your leftover caramel apple cheesecake dip, place it in an airtight container. Make sure the lid is on tight to keep it fresh. You can also use plastic wrap to cover it. This method helps prevent the dip from drying out. If you want to refresh the dip, simply stir it before serving. If it feels too thick, add a splash of cream or milk. You can also drizzle more caramel on top for extra flavor. Avoid reheating the dip, as it can change the texture. The dip lasts about 3 to 5 days in the refrigerator. Look for changes in color or smell. If the dip smells sour or shows mold, throw it away. Always trust your senses to keep your dip safe to eat. Yes, you can make this dip ahead of time. I suggest making it a day before. Just store it in an airtight container in the fridge. This helps the flavors blend better. Before serving, give it a quick stir and add more caramel on top. If you need a substitute for cream cheese, try using Greek yogurt. It gives a similar creamy texture. You could also use mascarpone for a richer taste. Both options keep the dip delicious and fun. The dip will stay good in the refrigerator for about 3 to 5 days. Just keep it in an airtight container. If you notice any off smells or changes in texture, it’s best to toss it out. Enjoy your dip while it's fresh! This blog post covered how to make a delicious apple dip. We looked at key ingredients, from apples to optional extras like cinnamon. Step-by-step instructions helped you prepare the creamy mixture and serve it well. I shared tips for the best texture and flavor layering. You also learned about fun variations and smart storage options. In the end, this dip is a tasty treat for any occasion. Enjoy creating your version!

Caramel Apple Cheesecake Dip Easy and Delicious Treat

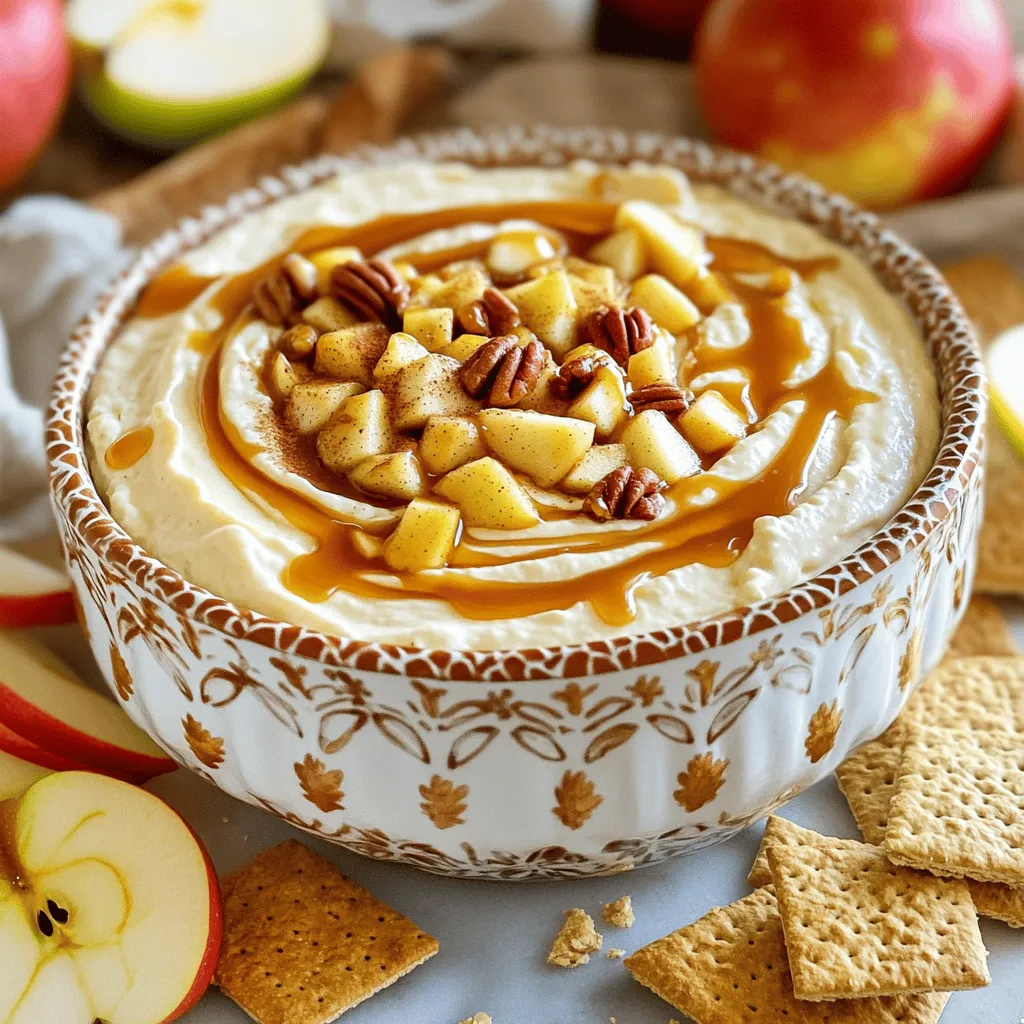
Get ready for a sweet treat that combines the best of fall flavors! My Caramel Apple Cheesecake Dip is easy

Here is what you need to make crispy Cajun shrimp tacos: - 1 lb large shrimp, peeled and deveined - 2 tablespoons Cajun seasoning - 1 cup buttermilk - 1 cup all-purpose flour - 1 cup cornmeal - 1 teaspoon garlic powder - 1 teaspoon paprika - 1 teaspoon salt - 1/2 teaspoon black pepper - Vegetable oil (for frying) - 8 small corn tortillas - 1 avocado, sliced - 1 cup shredded red cabbage - 1/2 cup fresh cilantro, chopped - Lime wedges (for serving) These ingredients come together to create a flavorful and easy meal. The shrimp bring a juicy texture and the Cajun seasoning adds that kick. The cornmeal and flour mix gives the perfect crunch when fried. The toppings like avocado and cabbage add freshness and color. Plus, don’t forget the lime! It gives a zesty finish that brightens every bite. Each ingredient plays a role in making these tacos a hit. Start by placing the shrimp in a large bowl. Add 2 tablespoons of Cajun seasoning. Mix well until the shrimp are fully coated. Let the shrimp marinate for at least 15 minutes. This step adds bold flavor and juiciness. Next, set up your coating. In one bowl, pour 1 cup of buttermilk. In another bowl, mix together 1 cup of all-purpose flour, 1 cup of cornmeal, 1 teaspoon of garlic powder, 1 teaspoon of paprika, 1 teaspoon of salt, and 1/2 teaspoon of black pepper. This mix gives the shrimp a crispy texture. Heat vegetable oil in a deep skillet over medium-high heat. Aim for about 350°F. Dip each shrimp into the buttermilk, letting the excess drip off. Then, dredge the shrimp in the flour and cornmeal mixture until fully coated. Carefully place the shrimp in the hot oil. Fry them in batches for about 3 to 4 minutes on each side. They should turn golden brown and crispy. Use a slotted spoon to remove them and place them on a plate lined with paper towels to drain excess oil. While the shrimp fry, warm the corn tortillas. Use a dry skillet over medium heat. Heat each tortilla for about 30 seconds on each side. This makes them soft and pliable, perfect for holding all the tasty fillings. Now it’s time to build your tacos. Place a few crispy shrimp onto each warmed tortilla. Top with shredded red cabbage and slices of avocado. Sprinkle fresh cilantro on top. Serve with lime wedges on the side for an extra burst of flavor. Enjoy every bite of this delightful meal! To achieve golden, crispy shrimp, follow these steps: - Use fresh shrimp. Fresh shrimp taste better and fry up nicely. - Ensure the oil is hot enough. Aim for 350°F. This helps create a crispy coat. - Fry shrimp in small batches. Overcrowding cools the oil and makes shrimp soggy. - Use a slotted spoon to remove shrimp. This lets excess oil drain off. For optimal flavor, marinate shrimp for at least 15 minutes. - Marinating longer, up to 30 minutes, can deepen the flavor. - Avoid marinating too long. Shrimp can turn mushy if left in buttermilk too long. Enhance your tacos with these sides and toppings: - Serve with lime wedges. Squeezing fresh lime adds a bright flavor. - Add fresh cilantro for a pop of color and taste. - Try adding a spicy sauce for extra heat. A drizzle of hot sauce can elevate the dish. - Pair with a light salad or chips for a complete meal. These tips will help you create the best crispy Cajun shrimp tacos! {{image_2}} Want to add some heat? You can increase the Cajun seasoning in the mix. Try adding a dash of hot sauce to the buttermilk. This step gives your shrimp a fiery kick. You can also mix in a pinch of cayenne pepper with the flour and cornmeal. This method packs a punch without losing flavor. Adjust the spice level to suit your taste. Not a fan of seafood? You can still enjoy tasty tacos! Replace the shrimp with crispy cauliflower. Cut cauliflower into small florets, season them with Cajun spices, and fry them just like shrimp. You could also use black beans or grilled veggies as a filling. Both options keep the spirit of the dish alive. These variations make a great meal for everyone. To take your tacos to the next level, choose the right sauce. A creamy chipotle sauce adds a nice smoky flavor. You could also use a classic salsa verde for a fresh taste. If you love heat, try a jalapeño ranch dressing. For something zesty, a squeeze of lime on top is perfect. These sauces enhance the dish and make it even more enjoyable. To keep your crispy Cajun shrimp and tacos fresh, follow these steps: - Shrimp: Place leftover shrimp in an airtight container. Keep it in the fridge for up to three days. - Tortillas: Store corn tortillas in a separate container. They can last for about two days in the fridge. - Assemble Tacos: It’s best to store shrimp and tortillas separately. This keeps the shrimp crispy and the tortillas soft. When you’re ready to enjoy leftovers, here’s how to reheat: - Shrimp: Preheat your oven to 350°F. Spread shrimp on a baking sheet. Bake for about 10 minutes. This helps keep them crispy. - Tortillas: Warm tortillas in a dry skillet over medium heat for about 30 seconds on each side. This brings them back to life without making them tough. You can freeze shrimp and tortillas if you want to save them for later: - Shrimp: After cooking, let shrimp cool completely. Place them in a freezer-safe bag. They can be frozen for up to three months. - Tortillas: Stack tortillas with parchment paper in between each one. Place them in a freezer bag. They can also freeze for three months. When you want to use them, thaw in the fridge overnight before reheating. This keeps their flavor and texture intact. Yes, you can use frozen shrimp. Just be sure to thaw them first. Place the shrimp in the fridge overnight or run them under cold water. This will help them cook evenly. Frozen shrimp may need a bit more seasoning since they can have less flavor than fresh shrimp. If you don’t have Cajun seasoning, you can make your own. Combine equal parts paprika and garlic powder. Add a bit of cayenne pepper for heat. You can also use chili powder or even taco seasoning. These will still give your shrimp great flavor. To make these tacos gluten-free, swap the all-purpose flour with a gluten-free blend. You can also use cornmeal for the coating. Make sure your corn tortillas are labeled gluten-free. This will keep your tacos tasty and safe for those with gluten allergies. In this blog post, we explored how to make delicious Cajun shrimp tacos. We covered the ingredients, step-by-step instructions, and helpful tips to ensure your shrimp are crispy and tasty. We even offered variations for heat lovers and vegetarian options. Always store leftovers properly and use our reheating tips for the best taste. Enjoy these tacos with your favorite toppings, and don’t hesitate to experiment. Cooking should be fun and rewarding, so get creative in the kitchen!

Crispy Cajun Shrimp Tacos Flavorful and Easy Meal

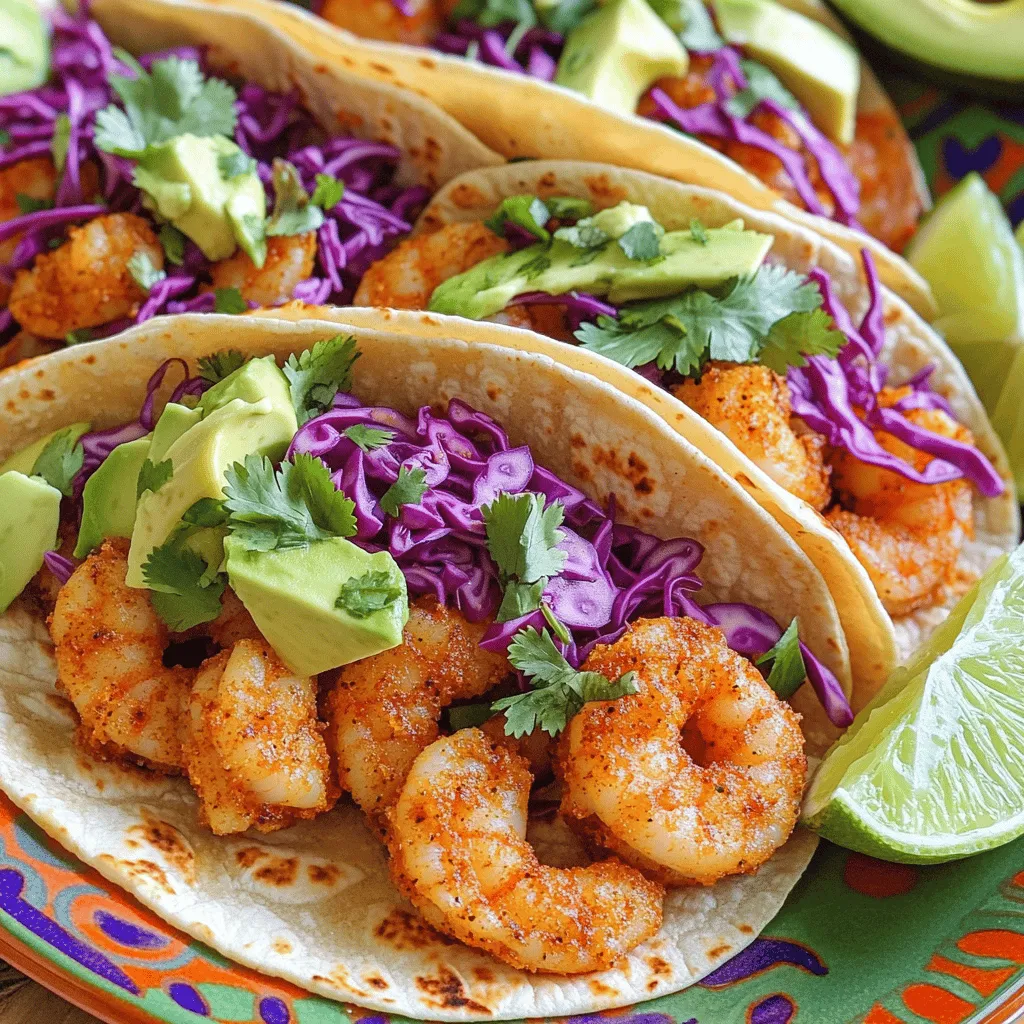
Do you crave tacos that pack a punch? Look no further! My Crispy Cajun Shrimp Tacos are a delightful twist

- 500g button or cremini mushrooms - 4 tablespoons unsalted butter - 3 tablespoons honey - 4 cloves garlic, minced - 1 tablespoon fresh thyme leaves (or 1 teaspoon dried thyme) - Salt and pepper to taste - Fresh parsley, chopped, for garnish - 1 tablespoon balsamic vinegar You need simple yet high-quality ingredients for honey garlic butter roasted mushrooms. Start with 500g of button or cremini mushrooms. These mushrooms are firm and flavorful. You can also use other types if you like. Next, grab 4 tablespoons of unsalted butter. Butter gives a rich flavor. You will also need 3 tablespoons of honey. Honey adds sweetness that balances the garlic. Next, use 4 cloves of minced garlic. Fresh garlic gives a strong taste. For seasoning, one tablespoon of fresh thyme leaves works well. If you don't have fresh thyme, use one teaspoon of dried thyme. Salt and pepper are also important for taste. Finally, chop some fresh parsley for garnish. It adds color and freshness to your dish. You can also add one tablespoon of balsamic vinegar. This is optional but adds depth. It gives a nice tang that pairs well with the sweet and savory flavors. With these ingredients, you can create a delightful side dish that is sure to impress! 1. Preheat your oven to 400°F (200°C). This helps the mushrooms cook evenly. 2. Clean your mushrooms under cool water. Make sure to trim the stems. 1. In a small pan, melt 4 tablespoons of unsalted butter over medium heat. 2. Add 4 cloves of minced garlic and sauté for 1-2 minutes. You want it fragrant, not brown. 3. Stir in 3 tablespoons of honey and 1 tablespoon of fresh thyme. If you like, add balsamic vinegar for a deeper flavor. 1. Place the cleaned mushrooms on a baking sheet lined with parchment paper. 2. Drizzle the honey garlic butter mixture over the mushrooms. Toss gently to coat them well. 3. Spread the mushrooms in a single layer. Season with salt and pepper. 4. Roast in the oven for 20-25 minutes. Toss halfway through for even cooking. 5. When golden brown and tender, remove from the oven. Garnish with chopped parsley before serving. - The best types for roasting are button or cremini mushrooms. Both have great taste and hold up well when cooked. - To clean mushrooms, use a damp cloth or paper towel. Avoid soaking them in water, as they absorb moisture. This can make them soggy. - Fresh garlic and herbs make a big difference in taste. They add depth and aroma to the dish. - Adjust the honey based on your taste. If you like it sweeter, add a bit more honey. A drizzle can make the dish shine. - To achieve golden brown mushrooms, roast them at 400°F. Toss them halfway through to ensure even cooking. - Overcrowding can lead to steaming, which makes mushrooms soft. Spread them out on the baking sheet for the best results. {{image_2}} Want to amp up the taste? You can add spices! Paprika adds a sweet kick. A dash of cayenne gives you heat. You can mix in both for a unique twist. Fresh herbs also boost flavor. Try rosemary for a woodsy taste. Oregano brings a nice, fragrant note. Just chop and toss them in with the mushrooms. Roasting is great, but grilling is fun too! Grilling adds a smoky flavor. Just brush the mushrooms with the honey garlic butter mix before grilling. Keep an eye on them, as they cook faster. You can also use a skillet on the stovetop. Heat the butter and garlic, then add the mushrooms. Sauté until they are golden and tender. This method is quick and easy. If you need a vegan option, substitute plant-based butter. It works just as well in this dish. You can still enjoy the sweet and savory notes. For gluten-free eaters, this recipe is already safe! Just make sure your honey is pure. Enjoy this tasty side without worry. To keep your honey garlic butter roasted mushrooms fresh, store them in an airtight container. This helps lock in moisture and flavor. Place them in the fridge within two hours of cooking. They stay good for up to three days. After that, the taste and texture can change. When it’s time to enjoy leftovers, use an oven or skillet to reheat. Preheat your oven to 350°F (175°C). Spread the mushrooms on a baking sheet and warm for about 10 minutes. If using a skillet, heat it on medium-low and add a splash of water. Stir gently to heat through while keeping them juicy. This method helps maintain their tender texture and rich flavor. Yes, you can freeze mushrooms! To do this, first, let them cool completely. Place them in a single layer on a baking sheet to freeze for a few hours. Once frozen, transfer them to a freezer-safe bag or container. They will keep for about three months. When ready to use, defrost them in the fridge overnight. This helps preserve their taste and texture better than defrosting in the microwave. You can store honey garlic butter roasted mushrooms in the fridge for up to three days. Make sure to place them in an airtight container. This keeps them fresh and tasty. Before serving, reheat them gently in the oven or on the stove. Yes, you can swap out button or cremini mushrooms for other types. Try shiitake or portobello mushrooms for a different taste. Both have great flavors and textures. Just make sure to clean and trim them well before cooking. These mushrooms pair well with many dishes. Serve them as a side with grilled chicken or steak. They also go great with pasta or on top of a salad. For a vegetarian option, enjoy them with quinoa or rice dishes. They add a burst of flavor to any meal! This blog post covered how to make honey garlic butter roasted mushrooms. We explored the main ingredients, step-by-step cooking instructions, and tips for flavor and texture. Variations allow for spice and herb adjustments to suit your taste. We also discussed storage and reheating methods to keep leftovers fresh. These mushrooms are easy to make and delicious. You can enjoy them as a side dish or snack. Each step is easy to follow and will impress your guests. Get ready to enjoy great flavors with simple ingredients!

Honey Garlic Butter Roasted Mushrooms Delightful Side

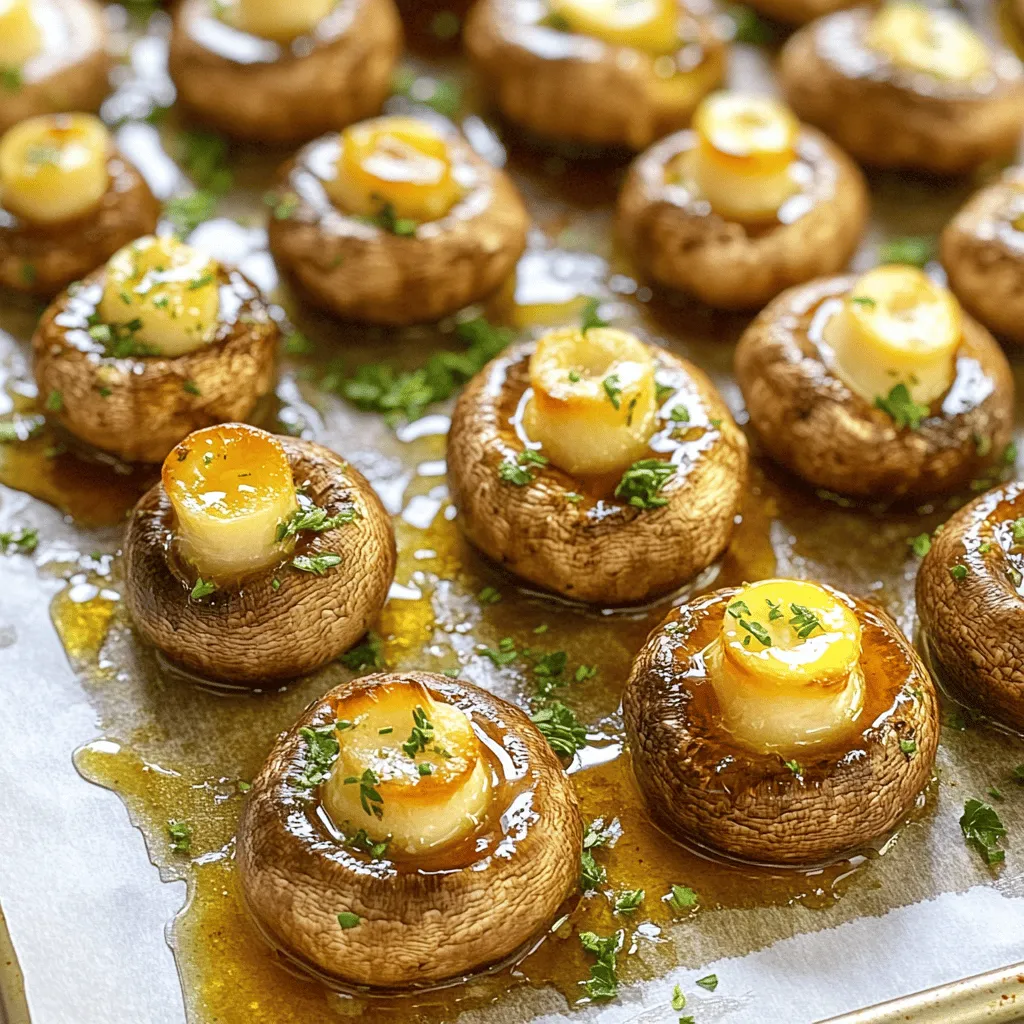
Looking to elevate your dinner table with a scrumptious side? Honey Garlic Butter Roasted Mushrooms are where it’s at! This

- 1 cup pumpkin puree - 1/2 cup sugar - 1/2 cup brown sugar, packed - 1/2 cup vegetable oil - 3 large eggs - 1 teaspoon vanilla extract The main ingredients create the rich foundation of the loaf. Pumpkin puree gives moisture and flavor. Sugar and brown sugar add sweetness and depth. Eggs bind the mix, while oil keeps the loaf tender. Vanilla adds a warm, inviting taste. - 1 1/2 cups all-purpose flour - 1 teaspoon baking powder - 1/2 teaspoon baking soda - 1/2 teaspoon salt - 1 teaspoon ground cinnamon - 1/2 teaspoon ground nutmeg The dry ingredients balance the wet ones. Flour provides structure, while baking powder and soda help the loaf rise. Salt enhances flavor. Cinnamon and nutmeg add a warm, spiced aroma. These spices turn the loaf into a fall favorite. - 1/2 cup unsweetened cocoa powder - 1/4 cup semi-sweet chocolate chips (optional) Chocolate elements bring a rich, bold flavor. Cocoa powder adds depth without extra sweetness. If you want more chocolate, add semi-sweet chips. They melt into the loaf, giving little pockets of joy. This creates a delightful contrast with the pumpkin. First, preheat your oven to 350°F (175°C). This step warms the oven for even baking. While the oven heats, grease a 9x5-inch loaf pan. Use cooking spray or butter to coat the pan. This helps the loaf come out easily after baking. In a large bowl, whisk together the pumpkin puree, sugar, brown sugar, and vegetable oil. Make sure the mixture is smooth. Then, add the eggs and vanilla extract. Whisk until everything blends well. The wet ingredients give the loaf moisture and flavor. In another bowl, whisk the all-purpose flour, baking powder, baking soda, salt, cinnamon, and nutmeg. This mix adds structure and spice to the loaf. Gradually add the dry ingredients to the wet mix. Stir gently until just combined. Be careful not to over-mix; this keeps the loaf soft. Now, divide the batter into two bowls. Sift cocoa powder into one bowl and mix it in. This creates the chocolate batter. To make the marble effect, scoop alternating spoonfuls of pumpkin and chocolate batter into the loaf pan. Use a knife to swirl them together lightly. Don't overdo the swirling; you want to see both colors. - Avoiding over-mixing: When you mix the batter, do it gently. Over-mixing can make the loaf tough. Mix until you see no dry flour. The batter should be lumpy, not smooth. This keeps the loaf soft and tender. - Allowing for proper cooling: After baking, let the loaf cool in the pan for 10-15 minutes. This helps it set. Then, move it to a wire rack to cool fully. This cooling time keeps the loaf from becoming soggy. - Checking for doneness: Use a toothpick to check the loaf. Insert it into the center. If it comes out clean, the loaf is ready. If it has batter on it, bake a little longer. Every oven is different, so keep an eye on it. - Adjusting baking time based on oven variations: Ovens can vary in heat. If your oven runs hot, check the loaf a little early. If it runs cool, it may need more time. Just be sure to test with a toothpick for best results. - Dusting with powdered sugar: After the loaf cools, dust the top lightly with powdered sugar. This adds a nice touch and looks pretty. It gives the loaf a sweet finish without being too much. - Drizzling chocolate glaze: For extra sweetness, drizzle chocolate glaze over the sliced loaf. Melt some chocolate with a bit of cream for a simple glaze. It makes the loaf look fancy and tastes amazing! {{image_2}} You can play with flavors in your loaf. Here are some ideas: - Spices: Add more spices like ginger or cloves for warmth. A pinch of allspice gives a nice kick too. - Extracts: Try almond or orange extract for a unique twist. Just a few drops can change the taste greatly. - Nuts: Walnuts or pecans add a nice crunch. Chop them up and fold them into the batter. - Dried Fruit: Raisins or cranberries add sweetness and chewiness. Mix them in for extra flavor. Want to adjust the recipe for special diets? Here’s how: - Gluten-Free: Use gluten-free flour blends instead of all-purpose flour. Make sure it has xanthan gum for better texture. - Vegan: Replace eggs with flax eggs. Mix one tablespoon of flaxseed meal with three tablespoons of water. Let it sit until it thickens. - Dairy-Free: Use applesauce instead of oil for a lighter loaf. This also adds moisture and sweetness. These variations let you enjoy this loaf in many ways! To keep your Bakery-Style Chocolate Pumpkin Marble Loaf fresh, you have two options. You can store it at room temperature or in the fridge. - Room Temperature: Store the loaf in a cool, dry place. Use an airtight container or wrap it tightly in plastic wrap. This helps keep it moist for about 3-4 days. - Refrigerator Storage: If you prefer to store it in the fridge, the loaf can last up to a week. Wrap it well to prevent it from drying out. Make sure to seal it tightly. This keeps air out and moisture in. Freezing is a great way to save your loaf for later. You can freeze it before or after baking. - Before Baking: Prepare the batter and spoon it into the loaf pan. Wrap the pan tightly in plastic wrap or foil. Freeze it for up to 3 months. When ready to bake, just remove it from the freezer and bake straight from frozen. Just add about 10-15 extra minutes to the baking time. - After Baking: Let the cooled loaf rest. Wrap it in plastic wrap, then foil. This helps prevent freezer burn. You can freeze it for up to 3 months. When reheating, thaw it in the fridge overnight. Then, warm it in the oven at 350°F (175°C) for 10-15 minutes. This brings back the fresh-baked taste. This blog post covered how to make a delicious pumpkin chocolate loaf. We discussed the key ingredients, step-by-step instructions, and helpful tips for the perfect bake. Remember, avoid over-mixing for a great texture. You can also explore variations for different tastes and dietary needs. Proper storage helps keep your loaf fresh for longer. Enjoy your baking journey! It's a fun way to treat yourself and share with others. Happy baking!

Bakery-Style Chocolate Pumpkin Marble Loaf Delight

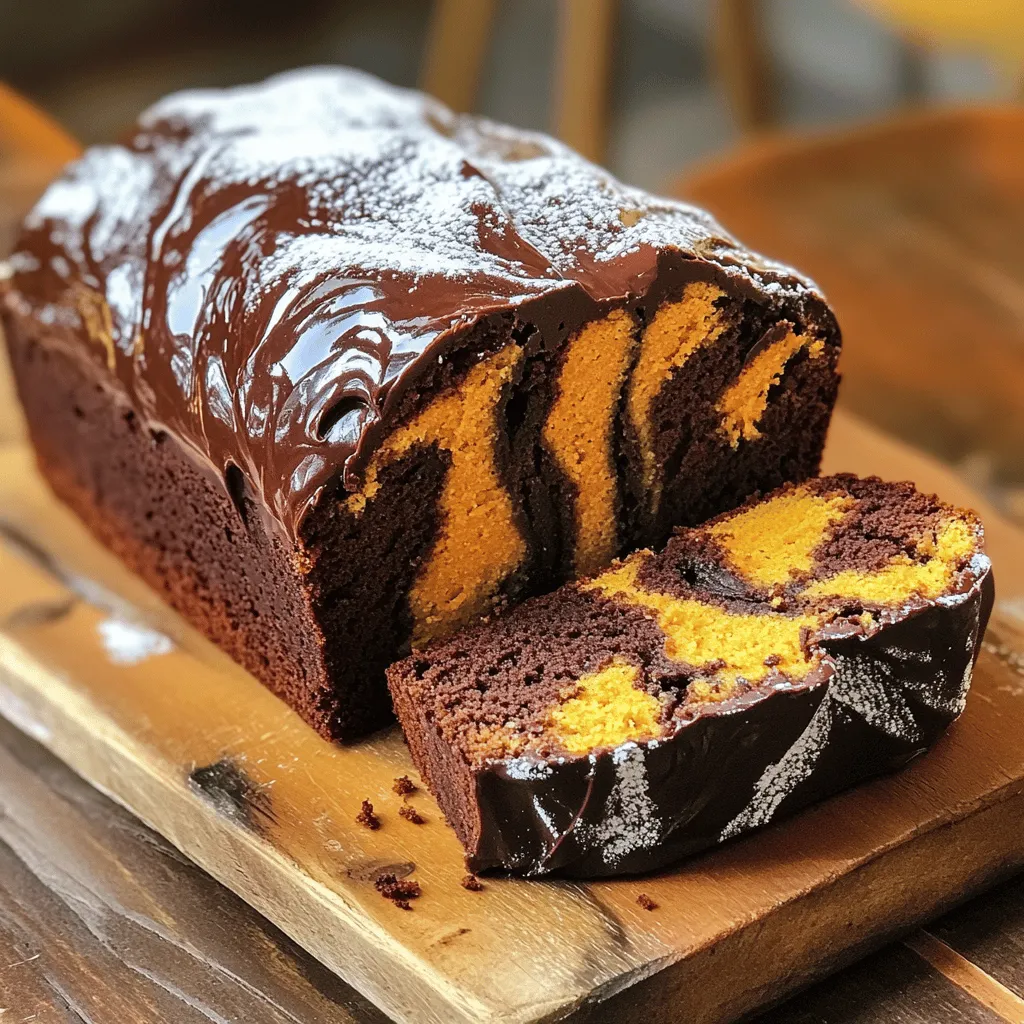
If you’re looking for a treat that combines the flavors of fall and rich chocolate, you’re in the right place!

Older posts
Newer posts
← Previous Page1 … Page36 Page37 Page38 … Page164 Next →

dsad

© 2026 easycookingbite • Built with GeneratePress

Our Policies

  • Copyright Policy
  • Cookie Policy
  • GDPR Policy
  • Privacy Policy
  • Disclaimer
  • Terms Of Use

More Information

  • Home
  • About
  • Contact
  • Appetizers
  • Dessert
  • Dinner
  • Drinks
©2026, easycookingbite About Back To Top