
Teriyaki Pineapple Meatballs Tasty and Simple Recipe
Craving a fun and tasty meal? Try my Teriyaki Pineapple Meatballs! This easy dish brings together juicy meatballs, tangy teriyaki
Craving a fun and tasty meal? Try my Teriyaki Pineapple Meatballs! This easy dish brings together juicy meatballs, tangy teriyaki
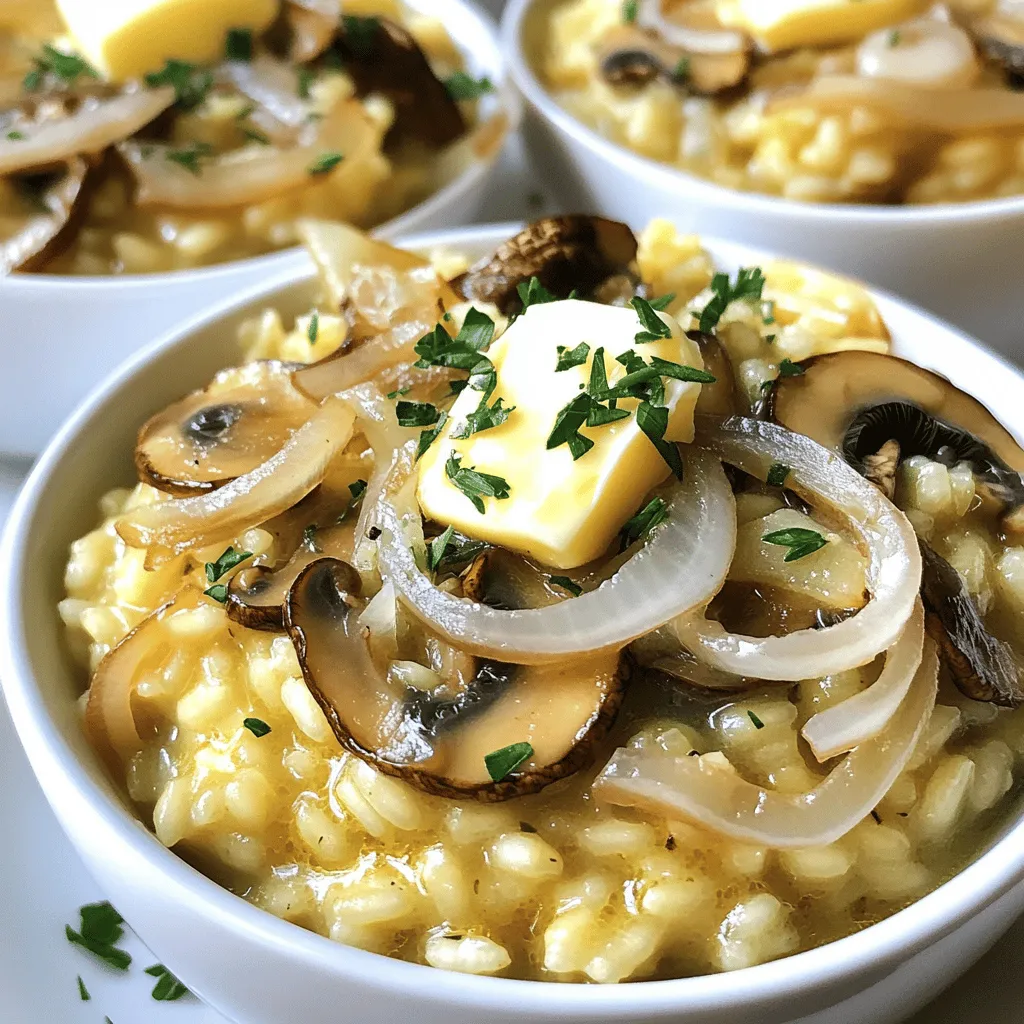
Welcome to my kitchen! Today, I am excited to share my Garlic Butter Mushroom Risotto recipe. This creamy dish is

If you love creamy desserts that are easy to make, you’re in the right place! My Raspberry Swirl Cheesecake combines

If you crave an easy yet tasty meal, look no further than Slow Cooker Butter Chicken Curry. This dish is
![- 8 oz. pasta (fusilli or rotini) - 1 cup cherry tomatoes, halved - 1 cup mozzarella balls, halved - 1/2 cup cooked and crumbled bacon or crispy chickpeas - 1/4 cup red onion, finely chopped - 1 cup fresh spinach, chopped - 1/4 cup creamy pesto (store-bought or homemade) - 1/2 cup Greek yogurt - 2 tablespoons olive oil - Salt and pepper to taste - Fresh basil for garnish When I make creamy pesto pasta salad, I love using fresh ingredients. Fresh produce adds great flavor and nutrition. The cherry tomatoes burst with sweetness. They balance the rich, creamy dressing well. Mozzarella balls provide a nice texture. They also add a mild taste that pairs perfectly with pesto. For protein, I often use crispy bacon. It gives a savory crunch that everyone enjoys. If you want a vegetarian option, crispy chickpeas work great too. They add a nice crunch and are full of protein. The red onion adds a sharp bite, but you can use less if you prefer a milder taste. Don't forget the spinach! It brings a pop of green and lots of vitamins. It’s great to sneak in more veggies without changing the dish's flavor. The creamy pesto is the star of this salad. You can use store-bought or homemade. I always recommend trying it fresh if you have time. Greek yogurt adds creaminess and a bit of tang. It lightens the dish while keeping it rich. Olive oil helps to bring everything together and adds a nice smoothness. Lastly, season with salt and pepper to taste. Fresh basil leaves on top make it look beautiful and fragrant. For the full recipe, check out the complete instructions! To start, boil water in a large pot. Add a good amount of salt to the water. This helps flavor the pasta. Once the water is boiling, add 8 oz. of pasta. Fusilli or rotini works well for this dish. Cook the pasta according to the package directions. Aim for al dente texture, which means it should be firm yet cooked through. This usually takes about 8 to 10 minutes. After cooking, drain the pasta and rinse it under cold water. This stops the cooking process and cools it down. Next, let’s mix the dressing. In a bowl, combine 1/4 cup of creamy pesto with 1/2 cup of Greek yogurt. This gives the salad a rich and creamy taste. Add 2 tablespoons of olive oil for extra flavor. Season with salt and pepper to taste. Mix all these ingredients well. Taste the dressing and adjust the seasoning if needed. You can add more pesto for a stronger flavor or more yogurt for a milder taste. Now, it’s time to mix everything. In a large mixing bowl, combine the cooled pasta with the other ingredients. Add 1 cup of cherry tomatoes, halved, and 1 cup of mozzarella balls, halved. For added crunch, mix in 1/2 cup of cooked and crumbled bacon or crispy chickpeas. Don’t forget to add 1/4 cup of finely chopped red onion and 1 cup of chopped fresh spinach. Stir everything gently to ensure even distribution of ingredients. Finally, pour the dressing over the pasta and veggie mixture. Gently toss everything together until it’s well coated with the creamy pesto dressing. Cover the salad and place it in the fridge. Let it chill for at least 30 minutes. This allows the flavors to meld together beautifully, making each bite delicious. Before serving, give the salad another toss and garnish it with fresh basil leaves. Enjoy your creamy pesto pasta salad! For the complete recipe, check the Full Recipe. You can choose between homemade or store-bought pesto. Homemade pesto tastes fresh and bright. It only takes a few ingredients like basil, garlic, nuts, and olive oil. If you're short on time, store-bought pesto works just fine. Look for brands with natural ingredients. To boost the flavor of your pesto, try adding a squeeze of lemon juice. This makes the taste more vibrant. Grating some fresh Parmesan cheese into the pesto also adds depth. You can mix in nuts like pine nuts or walnuts for crunch. Feel free to swap ingredients based on your taste. If you don’t like spinach, add arugula or kale. You can also use different pasta shapes like penne or farfalle. For a lighter option, use zucchini noodles instead of pasta. If you want a vegetarian dish, replace bacon with crispy chickpeas. For a gluten-free option, pick gluten-free pasta. Serve this salad cold or at room temperature. For the best taste, let it chill in the fridge for at least 30 minutes. This helps all the flavors blend well. To make it look great, garnish with fresh basil leaves just before serving. Pair it with grilled chicken or a light white wine for a complete meal. You can even serve it alongside a crisp green salad or garlic bread to round out the spread. {{image_2}} You can switch up your pasta to fit your needs. Here are some great options: - Gluten-free pasta options: Use gluten-free fusilli or rotini for a safe choice. - Alternative shapes for variety: Try penne or farfalle for fun shapes that hold the sauce well. Protein makes this dish filling and tasty. Here are some ideas: - Substituting bacon with other proteins: Swap bacon for grilled chicken or shrimp for a hearty meal. - Vegan alternatives to creamy pesto pasta salad: Use crispy chickpeas or tofu to keep it plant-based and delicious. Adding extra flavors can make this salad really pop. Consider these tips: - Adding other vegetables or herbs: Toss in bell peppers, zucchini, or fresh herbs like parsley for a fresh twist. - Incorporating spices for an extra kick: A dash of red pepper flakes or garlic powder can give your salad a nice zing. Explore the [Full Recipe] for all the details to make this creamy pesto pasta salad your own! To keep your creamy pesto pasta salad fresh, follow these steps: - Place the salad in an airtight container. - Always let it cool to room temperature first. - Refrigerate it immediately after serving. Using glass or plastic containers with tight lids works best. This helps to keep the flavors locked in and prevents any odors from the fridge affecting your dish. Your salad will stay fresh in the fridge for about three to five days. After that, it may start to lose its taste and texture. Look for these signs to know when to toss it: - A sour smell or off odor. - Any change in color, especially in the veggies. - A slimy texture, especially on the pasta. You can freeze creamy pesto pasta salad, but it may change in texture once thawed. If you want to freeze it, here are some tips: - Use a freezer-safe bag or container. - Leave some space for the salad to expand. - Consider freezing the salad without the dressing for better quality. When you're ready to eat it, thaw it in the fridge overnight. Toss it with fresh dressing to restore flavor before serving. Enjoy your meal with confidence! For the complete recipe, check out the full recipe link. For creamy pesto pasta salad, I like using fusilli or rotini. These shapes hold the sauce well. They also add a nice texture to each bite. You can use other types like penne or farfalle if you prefer. The key is to choose pasta that can catch the creamy pesto. Yes, you can make this salad ahead of time. It actually tastes better after sitting for a while. Just prepare it and keep it in the fridge. I suggest making it up to a day in advance. This allows the flavors to blend nicely. Just remember to cover it well to keep it fresh. To lighten this recipe, you can use whole wheat pasta. This choice adds fiber and nutrients. You can also replace bacon with grilled chicken or skip it altogether. Using low-fat Greek yogurt instead of regular can cut down on calories too. These changes help keep the taste while making it healthier. You can add many ingredients to change the flavors. Try adding bell peppers or olives for a twist. You could also mix in roasted vegetables for extra taste. If you want a kick, add some red pepper flakes. Fresh herbs like parsley or arugula can brighten the dish too. This allows you to make the salad your own! This blog post explored making a creamy pesto pasta salad. We covered key ingredients like pasta, tomatoes, and bacon. I shared step-by-step instructions for cooking and combining the salad. You learned tips for customization and serving, along with storage methods. Remember, the joy of cooking lies in experimenting. Don't hesitate to swap ingredients or try new flavors. Your salad can be unique and tailored to your taste. Enjoy every bite of your delicious creation!](https://easycookingbite.com/wp-content/uploads/2025/07/4c04bf9d-f91a-4bac-860b-f7772664f56d.webp)
Craving a tasty dish that’s easy to make? This Creamy Pesto Pasta Salad is your perfect solution! Packed with fresh
. - Peel and cut potatoes into fries. - Soak in cold water for 30 minutes. Start by peeling the russet potatoes. If you like the skin, you can leave it on. Cut them into long, even strips. This step helps the fries cook at the same rate. Soaking them in cold water for 30 minutes is key. This gets rid of extra starch, making them crispier when cooked. - Combine olive oil, garlic, salt, pepper, and paprika. In a large bowl, mix olive oil, minced garlic, salt, black pepper, and paprika. Stir well until you form a smooth seasoning paste. This mixture adds a great flavor to your fries. You can taste it to see if you want to add more salt or spice. - Coat fries with seasoning. - Preheat air fryer to 380°F (190°C). - Air fry for 15-20 minutes, shaking halfway. Add the soaked and dried fries to the bowl with the seasoning. Toss them well until they are fully coated. While you coat the fries, preheat your air fryer to 380°F (190°C). Place the fries in the basket in a single layer. Air fry them for 15 to 20 minutes. Remember to shake the basket halfway through for even cooking. - Sprinkle Parmesan onto fries. - Cook for an additional 2-3 minutes. When the fries turn golden and crispy, open the air fryer. Sprinkle grated Parmesan cheese over the fries. Cook them for an additional 2 to 3 minutes. This melts the cheese and gives it a nice, crispy texture. For the full recipe, check out the details above. Enjoy your delicious Air Fryer Garlic Parmesan Fries! Soaking potatoes is key. It removes excess starch and helps fries crisp up. Start by cutting your russet potatoes into even fries. Then, soak them in cold water for about 30 minutes. This simple step makes a big difference. After soaking, drain the fries and pat them dry with a towel. Less moisture means more crunch! Frying in a single layer is vital for crisp fries. When fries are too crowded, they steam instead of fry. This leads to soggy fries. Make sure to spread the fries out in the air fryer basket. You can cook in batches if needed. This way, each fry gets its chance to become golden and crispy. Adjusting flavors is easy and fun. Start with the basic seasoning mix of garlic, salt, pepper, and paprika. Feel free to taste and add more salt or spices if desired. You can also experiment with other flavors. Try adding chili powder for heat or herbs for freshness. Personalize your fries to match your taste buds! For the full recipe, check out the cooking steps mentioned earlier. {{image_2}} While Parmesan cheese shines in this recipe, you can mix it up. Try using mozzarella for a gooey bite. Feta adds a nice tang, while cheddar brings a sharp flavor. You could even experiment with vegan cheese if you want a plant-based twist. Each cheese gives fries a unique taste. Don’t be afraid to spice things up! You can add chili powder for heat or smoked paprika for a deep flavor. Garlic powder works well too, boosting the garlic taste. For something fresh, sprinkle in some dried herbs like oregano or thyme. A pinch of cayenne can really wake up the dish. If you're craving variety, switch out the potatoes. Sweet potatoes offer a sweet flavor and vibrant color. They also bring extra nutrients. Other root veggies like carrots or parsnips can also work great. Just cut them into fry shapes and follow the same steps for seasoning and cooking. Each choice gives you a new taste experience. For the complete recipe, check out the [Full Recipe]. After making Air Fryer Garlic Parmesan Fries, let them cool down first. Place the fries in an airtight container. Store them in the fridge for up to three days. This keeps them fresh and tasty. If you want to keep them longer, consider freezing them. To reheat fries and keep them crispy, use your air fryer again. Preheat the air fryer to 350°F (175°C). Place the fries in the basket and heat them for about 5-7 minutes. This method helps restore their crunch. If you use a microwave, the fries may become soggy. You can freeze both uncooked and cooked fries. For uncooked fries, spread them out on a baking sheet. Freeze them for about 1 hour. Once frozen, transfer the fries to a freezer bag. This prevents them from sticking together. For cooked fries, let them cool completely. Then, follow the same steps as uncooked fries. When you're ready to eat, just air fry them straight from the freezer. To make Air Fryer Garlic Parmesan Fries, follow these steps: 1. Prep the Potatoes: Peel and cut four large russet potatoes into fries. Soak them in cold water for 30 minutes. This helps remove extra starch and makes them crispier. 2. Seasoning Mixture: In a bowl, mix three tablespoons of olive oil, four minced garlic cloves, one teaspoon of salt, half a teaspoon of black pepper, and half a teaspoon of paprika. Stir until combined. 3. Coat the Fries: Drain and pat dry the soaked fries. Toss them in the seasoning mix until well-coated. 4. Preheat Air Fryer: Set your air fryer to 380°F (190°C). 5. Air Fry the Fries: Place the fries in a single layer in the basket. Fry for 15 to 20 minutes, shaking halfway through. 6. Add Parmesan: Once golden, sprinkle half a cup of grated Parmesan cheese on top. Cook for 2 to 3 more minutes until the cheese melts. 7. Serve: Remove the fries and garnish with two tablespoons of chopped fresh parsley before serving. Yes, you can use frozen fries! Just make sure they are not coated in extra oil or seasoning. Follow the same cooking steps but adjust the cooking time. Frozen fries may need a few extra minutes to get crispy. These fries pair well with many dips and dishes. Try serving them with: - Ketchup - Ranch dressing - Garlic aioli - Barbecue sauce - Burgers - Grilled chicken - Salads To make these fries healthier, consider these tips: - Use less olive oil. You can cut the amount in half for fewer calories. - Choose sweet potatoes for added nutrients. - Bake the fries instead of air frying for even less oil. - Skip the cheese or use a lighter cheese option. - Add more herbs and spices instead of oil for flavor. For the full recipe, check the details above! To make Air Fryer Garlic Parmesan Fries, we used simple ingredients, like russet potatoes and spices. Soaking the potatoes helps them crisp up. A few tips, such as avoiding overcrowding, enhance taste and texture. You can switch up the cheese or spices to keep things interesting. In the end, these fries are easy, tasty, and fun to make. Try them tonight!](https://easycookingbite.com/wp-content/uploads/2025/07/803b86d2-a7e6-4f31-b7dc-c58f03e8549c.webp)
Craving a delicious snack that’s quick and easy? Look no further! Air Fryer Garlic Parmesan Fries combine crispy, flavorful fries
![To make a delicious Summer Berry Spinach Salad, gather these key items: - 6 cups fresh baby spinach - 1 cup strawberries, hulled and sliced - 1 cup blueberries - 1 cup raspberries - 1/2 cup crumbled feta cheese - 1/2 cup candied walnuts - 1/4 red onion, thinly sliced These ingredients give the salad its fresh taste and vibrant look. The spinach acts as a healthy base, while the berries add sweetness and color. Feta cheese brings a creamy, salty kick, and walnuts add crunch. Feel free to customize this salad based on your taste. Here are some ideas: - Swap feta cheese for goat cheese for a tangy twist. - Use pecans instead of walnuts for a different nutty flavor. - Add avocado for creaminess, or toss in some grilled chicken for protein. - Try adding cucumber for extra crunch or a splash of citrus for brightness. These changes can make the salad unique and suit your palate better. The dressing ties everything together. Here are the simple ingredients you need: - 1/4 cup balsamic glaze - 2 tablespoons olive oil - Salt and pepper to taste Mix these together for a quick and tasty vinaigrette. The balsamic glaze adds sweetness, while olive oil gives smoothness. Adjust the salt and pepper to get the flavor just right. For the full recipe, check out the Summer Berry Spinach Salad section! Start by washing your fresh baby spinach. Use cold water and pat it dry. You can also use a salad spinner for this. This step is key to keeping the spinach crisp. Next, hull and slice your strawberries. Measure out your blueberries and raspberries too. Keep everything ready in front of you. In a large salad bowl, combine the baby spinach, sliced strawberries, blueberries, and raspberries. Gently toss these ingredients together. You want them to mix well without bruising the fruit. Now, add in the crumbled feta cheese and candied walnuts. Make sure they spread evenly throughout the salad for the best flavor. In a small bowl, whisk together the balsamic glaze and olive oil. Add salt and pepper to taste. This dressing is simple but packs a punch. Drizzle it generously over your salad. Toss the salad again to coat all the ingredients. Lastly, scatter the thinly sliced red onion on top. This adds a pop of color and flavor. For the full recipe, check out the [Full Recipe]. To keep your salad fresh, choose the best ingredients. Look for crisp spinach with vibrant green leaves. Select berries that are plump and firm. Wash all produce just before use. Do not wash spinach until you are ready to serve. This helps prevent wilting. Store any leftovers in an airtight container in the fridge. Serve this salad chilled for the best flavor. You can place it on a large platter for sharing or divide it into individual bowls. For a fun twist, add a sprinkle of extra feta and whole berries on top. This adds color and texture. If you want a crunch, serve with pita chips on the side. This salad pairs well with many proteins. Grilled chicken adds heartiness and flavor. You could also use shrimp for a seafood touch. For a meatless option, try adding chickpeas or grilled tofu. Each of these proteins boosts the salad's nutrition and taste. Experiment with different options to find your favorite match. For the full recipe, check out the Summer Berry Spinach Salad section. {{image_2}} You can swap fruits based on what is fresh. Use peaches, cherries, or blackberries. Each fruit adds a new flavor. For a tropical twist, try mango or pineapple. They pair well with the spinach and dressing. The key is to keep it colorful and vibrant. If you want to change the greens, use kale or arugula. These options bring a different taste and texture. Baby kale is tender and works great. Arugula adds a peppery kick. You can also mix spinach with other greens for more taste. To make this salad vegan, skip the feta cheese. Instead, use avocado or tofu for creaminess. Nuts can add protein and crunch. You can also try a vegan cheese alternative. Just make sure it melts well if you want a tasty topping. To store leftovers, place the salad in an airtight container. If you have dressing left, store it separately. This will keep the salad fresh and crisp for later. Use glass containers for the best results. They do not absorb odors. You can also use plastic containers that seal tightly. Make sure they are clean and dry before use. You don’t need to heat this salad. It tastes great cold. For best flavor, serve it straight from the fridge. If you prefer, drizzle extra dressing on top just before serving. Enjoy your Summer Berry Spinach Salad fresh! For the full recipe, check out the details above. Yes, you can make this salad ahead. Just prepare the spinach and berries. But wait to add the dressing until you are ready to serve. This keeps the salad fresh and crunchy. If you don’t have feta cheese, try goat cheese or cottage cheese. Both add a nice creaminess. You can also skip the cheese for a dairy-free option. This salad is already gluten-free! Just be sure to check the balsamic glaze label. Some brands may add gluten, so look for the gluten-free seal. This salad pairs well with grilled chicken or fish. You can also serve it with a warm quiche or a light soup. It makes a great side dish for summer meals. Yes, you can easily double or triple the recipe. Just keep the same ratios for the ingredients. This works great for parties or family gatherings. For the Full Recipe, check out the main article. This blog post covered the key ingredients and steps for making a delicious salad. I shared tips for freshness, serving, and pairing with proteins. You learned about variations for fruits and greens and how to store leftovers properly. Remember, using fresh ingredients makes a big difference in taste. Feel free to get creative with ingredients and enjoy your salad-making journey! Your unique flair will bring this dish to life.](https://easycookingbite.com/wp-content/uploads/2025/07/08692963-e965-41d6-a37f-e1f2163aeab1.webp)
Ready to brighten your meal with a burst of color and flavor? My Summer Berry Spinach Salad combines fresh greens

Are you ready to spice up your meals? This Cheddar Jalapeño Cornbread recipe promises bold flavors and easy steps. You’ll
![To make a delicious cinnamon roll mug cake, gather the following ingredients: - 4 tablespoons all-purpose flour - 2 tablespoons granulated sugar - 1/8 teaspoon baking powder - 1/8 teaspoon baking soda - 1/4 teaspoon ground cinnamon - 1/4 cup milk (or almond milk) - 1 tablespoon vegetable oil - 1/2 teaspoon vanilla extract - 1 tablespoon brown sugar - 1 teaspoon ground cinnamon (for the swirl) - Icing: 1 tablespoon powdered sugar + 1 teaspoon milk Each ingredient plays a key role in creating that warm, gooey, and sweet flavor we love. The flour gives structure, while the sugar adds sweetness. Baking powder and baking soda help the cake rise, making it fluffy. Ground cinnamon is essential for that classic cinnamon roll taste. The milk and oil keep the cake moist, and vanilla extract adds a nice depth of flavor. The brown sugar mixed with more cinnamon creates a delightful swirl that mimics the filling of a traditional cinnamon roll. Finally, the icing, made from powdered sugar and milk, is the perfect finishing touch, giving you that classic glaze. For the full recipe, check out the [Full Recipe]. 1. Mixing dry ingredients Start by taking a microwave-safe mug. Add 4 tablespoons of all-purpose flour, 2 tablespoons of granulated sugar, 1/8 teaspoon of baking powder, 1/8 teaspoon of baking soda, and 1/4 teaspoon of ground cinnamon. Stir them well until they blend nicely. 2. Adding wet ingredients Pour in 1/4 cup of milk, 1 tablespoon of vegetable oil, and 1/2 teaspoon of vanilla extract into the dry mix. Mix it all until you get a smooth batter. Make sure there are no lumps! 3. Creating the cinnamon swirl In a small bowl, combine 1 tablespoon of brown sugar with 1 teaspoon of ground cinnamon. This will be your tasty swirl. Gently dollop this mix over the batter in your mug. Use a toothpick or knife to swirl it in. This marble effect is what makes it special. 4. Microwave cooking instructions Place your mug in the microwave and cook on high for 1 minute and 30 seconds. Keep an eye on it! The cake should rise and feel firm to the touch. If it’s not done yet, microwave it in 10-second intervals until it’s perfect. - Checking for doneness To check if your mug cake is ready, gently press the top with your finger. It should spring back. If it sinks, it needs more time. - Troubleshooting: Common Microwaving Issues If your cake is too dry, try reducing the cooking time next time. If it’s too wet, cook it a few seconds longer. Adjusting the time can help you get the perfect mug cake. Enjoy your quick and delicious Cinnamon Roll Mug Cake! For the full recipe, refer back to the earlier section. To make your cinnamon roll mug cake just right, start with the flour. You can use all-purpose flour, but if you want a gluten-free option, try almond flour or a gluten-free blend. They will change the texture but still taste great. Next, think about sweetness. If you like it sweeter, add more sugar. For less sweetness, cut back. Adjust the ground cinnamon too. More spice gives a stronger flavor, while less will lighten it. Common mistakes can spoil your cake. Avoid over-mixing the batter; it can make your cake tough. Also, don’t skip checking the cooking time. Microwaves are different. If you overcook it, your cake may turn dry. To add more fun, consider mixing in nuts or dried fruits. Chopped walnuts or raisins can boost taste and texture. They give a nice crunch and chew. Swapping in flavored extracts can add a twist too. Almond extract or maple extract can change the flavor profile. Just a drop can make a big difference. Enjoy experimenting with your cake! For the full recipe, check out the details provided above. {{image_2}} You can have fun with your cinnamon roll mug cake by trying different flavors. Here are some ideas: - Chocolate cinnamon roll mug cake: Add cocoa powder to the dry mix. This twist gives you a rich chocolate flavor that pairs well with cinnamon. You can use 1 tablespoon of cocoa powder along with the flour. - Pumpkin spice variation: Mix in pumpkin puree and pumpkin spice to the batter. This variation gives a warm, autumn feel to your treat. Just add 2 tablespoons of pumpkin puree and 1/4 teaspoon of pumpkin spice for a cozy flavor. - Lemon zest for a fresh twist: Adding lemon zest brightens the cake. You can use about 1 teaspoon of fresh lemon zest. This adds a nice tang that balances the sweetness. You can also customize your mug cake for dietary needs: - Dairy-free adaptations: Use almond milk, coconut milk, or any dairy-free milk. This keeps the cake moist without using dairy. You can swap the milk in the recipe easily. - Sugar substitutes for lower-calorie options: Try using stevia or monk fruit sweetener instead of granulated sugar. This helps cut calories while still keeping the sweetness. Use the same amount as the sugar in the recipe for the best results. Want to dive deeper into these variations? Check out the Full Recipe for more ideas! To keep your cinnamon roll mug cake fresh, store it in the fridge. Use an airtight container to seal in moisture. This helps keep your cake soft and tasty. You can store it for up to two days. Yes, you can reheat mug cakes! To warm it up, place the mug in the microwave for about 10-15 seconds. This will bring back that fresh, soft texture. Make sure to check it often to avoid overcooking. You can prepare the dry ingredients ahead of time. Mix the flour, sugar, baking powder, baking soda, and cinnamon. Store this mix in a small jar or bag. This way, you can make your mug cake quickly. If you want to make multiple servings, prepare each mug separately. You can microwave them one after the other. Just keep an eye on the time as you cook each mug cake. This method helps everyone enjoy their own treat at the same time. Can I use different types of milk? Yes, you can use any milk you like. Almond milk or oat milk works great. Just make sure it’s unsweetened if you don’t want extra sugar. How long does it take to cool before eating? Let it cool for about 1 to 2 minutes. This will help it set and make it safer to eat. The mug can get hot, so be careful! What can I do if my mug cake is too dry? If your cake is dry, try adding a splash of milk. Mix it in gently. You can also enjoy it with extra icing. That will add moisture and flavor. What can I use instead of vegetable oil? You can swap vegetable oil for melted butter or coconut oil. Both will give your cake a rich taste. Use the same amount for best results. Can I omit the brown sugar swirl? Yes, you can skip the brown sugar swirl if you prefer. The cake will still taste good without it. You can add extra cinnamon to the batter for flavor. For more details, check the Full Recipe. This blog post covered how to make a delicious cinnamon roll mug cake. We explored ingredients, step-by-step instructions, and even tips for perfecting your cake. You can try fun variations and know how to store leftovers. Mug cakes are quick and easy, making them a great treat. With these simple steps, you can create a tasty dessert. Enjoy your baking and share your results!](https://easycookingbite.com/wp-content/uploads/2025/07/7b840af3-9d32-41e8-aca6-6dd1d349c520.webp)
If you’re craving a sweet treat in a hurry, this Cinnamon Roll Mug Cake is for you! It’s quick to
. {{image_2}} Cotija cheese adds a great flavor to Mexican street corn salad. But if you can't find it, don't worry! You can try other cheeses. Feta cheese works well. It has a similar salty taste. Parmesan is another good choice. It's hard and adds a nice bite. If you prefer vegan options, there are many ways to go. Nutritional yeast gives a cheesy flavor without dairy. You can also use vegan feta cheese. It melts nicely and gives that creamy texture we love. You can change up your salad with fresh veggies or fruits. Diced bell peppers add crunch and color. Cherry tomatoes can bring a sweet touch. Avocado chunks make it creamy and rich. Don't forget to adjust the spice levels! If you like it hot, add more jalapeño. If you want a milder flavor, skip it or use less. Each addition can change the taste, so feel free to explore. To keep your Mexican Street Corn Salad fresh, store it in the fridge. Place leftovers in an airtight container. Make sure the salad is completely cool before you seal it. This helps keep it safe and tasty. It will last about three to four days in the fridge. When you are ready to eat, you can give it a quick stir. If needed, add a splash of lime juice to freshen it up. If you want to save the salad for later, you can freeze it. However, the texture may change after thawing. To freeze, place the salad in a freezer-safe container. Leave a little space at the top for expansion. It can last up to three months in the freezer. When you are ready to eat it, thaw it in the fridge overnight. Reheat gently in a pan or microwave, adding a bit of lime juice to boost the flavor. For the Full Recipe, refer back to the ingredients and steps to enjoy this salad again. Mexican Street Corn Salad, or "Esquites," comes from Mexico. It features grilled corn, mixed with creamy dressing and spices. This dish is often served in cups at street stands. The flavors are bold and bright, making it a hit at parties and barbecues. You can enjoy it warm or chilled. I love how this salad captures the essence of street food while being easy to make at home. Yes, you can make this salad ahead of time. Prepare the salad and store it in the fridge. This allows the flavors to blend and deepen. I suggest letting it sit for at least 30 minutes. If you want to make it even earlier, mix everything except the dressing. Keep the dressing separate until you are ready to serve. This keeps the salad fresh and crunchy. If you can’t find cotija cheese, don't worry! You can use feta or queso fresco as great substitutes. They both have similar textures and flavors. For a dairy-free option, try nutritional yeast or a vegan cheese. Each of these options will still bring a creamy touch to your salad. Feel free to experiment and find what works best for you! For the full recipe, refer to the section above. This article explored how to make a delicious Mexican Street Corn Salad. You learned about key ingredients like fresh corn, mayo, and spices. I detailed step-by-step preparation, including grilling corn and making the dressing. Tips for enhancing flavor and serving options were shared. We also discussed variations and storage methods to keep the salad fresh. This dish is simple to make and full of flavor. Enjoy making it your own!](https://easycookingbite.com/wp-content/uploads/2025/07/1031e49c-b2d0-4710-b389-f7b8efea0e71.webp)
Are you ready to dive into a vibrant and tasty dish? Mexican Street Corn Salad is a perfect blend of
