Skip to content
DisclaimerTerms Of UseGDPR PolicyCookie Policy

easycookingbite

  • Home
  • Drinks
  • Appetizers
  • Dinner
  • Dessert
  • About
  • Contact
  • Privacy Policy
DisclaimerTerms Of UseGDPR PolicyCookie Policy

Lily

- 1 cup dried hibiscus flowers - 4 cups boiling water - 1/2 cup honey or agave syrup (adjust to taste) - 2 tablespoons fresh lime juice Hibiscus flowers are the star of this drink. They give a bright red color and a tart taste. You can find dried hibiscus flowers in stores or online. The sweetness comes from honey or agave syrup. You can change the amount to match your taste. Fresh lime juice adds a zesty kick that brightens the drink. - Fresh mint leaves - Lime slices Mint leaves add a refreshing touch. They also look nice in the glass. Lime slices can give a fun twist to the drink. Both garnishes make your drink more appealing and flavorful. - Heatproof container - Fine mesh sieve - Large pitcher You need a heatproof container to hold the hot water and hibiscus flowers. A fine mesh sieve helps you strain the tea, keeping the flowers out of your drink. Finally, a large pitcher is great for mixing and serving your iced tea. For a complete guide, check out the Full Recipe to create your Hibiscus Iced Tea Delight! To make hibiscus tea, start with dried hibiscus flowers. You can find these at most grocery stores or online. Measure 1 cup of dried hibiscus flowers and place them in a heatproof container. Next, boil 4 cups of water. Once boiling, pour the hot water over the hibiscus flowers. Let the mixture steep for 15 to 20 minutes. This time allows the flowers to release their vibrant color and flavor. After steeping, strain the tea through a fine mesh sieve into a large pitcher. This step removes the flowers, leaving you with a smooth tea. While the tea is still warm, stir in 1/2 cup of honey or agave syrup. Adjust the sweetness to suit your taste. Add 2 tablespoons of fresh lime juice for a zesty kick. This adds a refreshing twist and balances the sweetness. Mix well to combine all the flavors. Once mixed, let the tea cool to room temperature. Then, refrigerate it for at least 1 hour. Chilling the tea makes it even more refreshing. When you're ready to serve, fill tall glasses with ice cubes. Pour the chilled hibiscus iced tea over the ice. For a beautiful finish, garnish each glass with fresh mint leaves and a slice of lime. Enjoy your refreshing beverage! For the complete details, check out the Full Recipe. To make your hibiscus iced tea perfect, start with sweetness. You can adjust the honey or agave syrup to fit your taste. If you like it less sweet, use less syrup. If you want it sweeter, add more. Next, think about infusing extra flavors. You can add fresh herbs like mint or basil. Citrus fruits like orange or lemon can also add a nice twist. Feel free to experiment with what you enjoy the most. When brewing hibiscus tea, you can choose two methods: cold brew or hot brew. Cold brew is easy and refreshing. Just mix dried hibiscus flowers with cold water and let it steep in the fridge overnight. This method gives a lighter flavor. Hot brew is quick and intense. Boil water, pour it over the dried flowers, and let it steep for 15-20 minutes. This method brings out the bold taste of hibiscus. Garnishing your drink makes it look pretty and adds flavor. Try fresh mint leaves for a pop of color and taste. Lime slices work well too. You can also use edible flowers for a fancy touch. Get creative! For the Full Recipe, remember to follow the steps carefully. Each little detail helps make your hibiscus iced tea a delightful treat. {{image_2}} You can change the flavor of hibiscus iced tea easily. One fun way is by adding citrus fruits. Try using orange or lemon juice for a zesty kick. Their brightness pairs well with the tartness of hibiscus. Just squeeze in the juice while mixing your tea. You can also add slices of these fruits as a garnish. Another tasty option is to make berry-infused versions. You can use fresh or frozen berries like strawberries, raspberries, or blueberries. Just mash them slightly and add them while steeping the hibiscus flowers. This will create a colorful and fruity drink. The berries add natural sweetness and flavor. For an extra layer of taste, think about adding herbs or spices. Fresh mint leaves are great for a refreshing twist. Just muddle some mint leaves before adding them to your iced tea. This brings out the minty flavor and makes the drink more vibrant. You can also incorporate spices like ginger or cinnamon. A few slices of fresh ginger can add warmth and depth. If you prefer, sprinkle a bit of ground cinnamon for a cozy touch. Both options work well with the flavors of hibiscus. If you want to make your hibiscus tea more festive, try making cocktails. Start with a strong base of your hibiscus iced tea. Then, mix in your favorite spirits. Vodka or rum works well here. They blend nicely with the tartness of the hibiscus. When pairing with spirits, think about the flavor profiles. Light spirits like vodka keep it refreshing. Darker spirits like rum add warmth and richness. Don't forget to garnish with fruit slices or mint leaves to impress your guests. Enjoy your creative cocktails! For the full recipe, check out Hibiscus Iced Tea Delight. H3 - Nutritional Advantages of Hibiscus Tea Hibiscus tea is full of antioxidants. Antioxidants help fight free radicals in our body. These free radicals can cause damage to our cells. Drinking hibiscus tea may help lower blood pressure. Some studies show that it can reduce high blood pressure levels. This makes it a great drink for heart health. H3 - Digestive Benefits Hibiscus tea supports gut health. It helps to keep your digestive system running smoothly. The tea acts as a natural diuretic. This means it can help your body remove excess water. This can be good for people who retain fluid. H3 - Cautions & Side Effects Some people may have allergic reactions to hibiscus. If you notice any itching or swelling, stop drinking it. Also, hibiscus can interact with certain medications. If you take medication for blood pressure, consult your doctor before drinking hibiscus tea. Always be safe and informed when trying new foods. To make hibiscus iced tea, follow these steps: - Add 1 cup dried hibiscus flowers to a heatproof container. - Pour 4 cups of boiling water over the flowers. - Let it steep for 15-20 minutes. - Strain the mixture into a large pitcher. - While warm, stir in 1/2 cup honey or agave syrup. - Add 2 tablespoons fresh lime juice. - Let it cool, then refrigerate for at least 1 hour. - Serve over ice with mint and lime for garnish. You can find dried hibiscus flowers at many health food stores. Look in the tea or spice aisle. Local farmers' markets may also have them. If you prefer online shopping, sites like Amazon and specialty tea shops offer dried hibiscus. Yes, hibiscus tea can be served hot. To make hot tea, use the same brewing steps but skip the ice. Pour the boiling water directly onto the flowers and steep. You can add sweeteners and lime juice after steeping. For added flavor, try spices like cinnamon or enjoy it plain. The Full Recipe for Hibiscus Iced Tea is found in the "Hibiscus Iced Tea Delight." Follow the full recipe to enjoy this refreshing drink at home. Hibiscus iced tea is refreshing and easy to make. You learned about key ingredients like dried hibiscus flowers, sweeteners, and lime juice. I shared steps to brew and flavor your tea. You can also explore variations and health benefits. Remember, adjusting the sweetness and adding garnishes can enhance the drink. Enjoy experimenting with this vibrant beverage. It’s a treat for your taste buds and a boost for your health. Start brewing and savor each sip!

Hibiscus Iced Tea Refreshing and Healthy Beverage Recipe

Hibiscus iced tea is a vibrant, refreshing drink that’s both delicious and healthy. With just a few simple ingredients, you

- 4 boneless, skinless chicken breasts - Salt and pepper to taste - 1 cup all-purpose flour - 2 large eggs, beaten - 1 cup breadcrumbs (preferably Italian seasoned) - 1 cup freshly grated parmesan cheese - 2 cups marinara sauce (store-bought or homemade) - 2 cups shredded mozzarella cheese - 1 tablespoon dried oregano - 1 tablespoon fresh basil, chopped (or 1 teaspoon dried basil) - Olive oil spray The main players in this dish are the chicken breasts. They are the star of the show. I always pick boneless, skinless chicken because it cooks evenly and stays juicy. Season the chicken with salt and pepper to bring out its natural taste. Next, we need the breading components. The flour, eggs, and breadcrumbs help create that crispy outer layer. I use Italian seasoned breadcrumbs for extra flavor. The combination of parmesan and mozzarella cheese adds a rich taste. You can never have too much cheese, right? Finally, we have the marinara sauce. This rich, tangy sauce ties everything together. It adds moisture and flavor to the chicken, making each bite delicious. - Variations in cheese options - Additional herbs and spices - Suggested sides to accompany the dish To spice things up, you can use different types of cheese. Try provolone or gouda for a twist. Mixing cheeses can create a burst of flavors. You can also add more herbs and spices. A pinch of garlic powder or red pepper flakes can add a kick. Fresh parsley on top gives a nice touch. For sides, serve this chicken with spaghetti or a fresh salad. Garlic bread is a tasty option too. All these choices make the meal even more enjoyable. Check out the Full Recipe for everything you need! First, set your oven to 400°F (200°C). This temperature helps cook the chicken evenly. While it heats, take your chicken breasts. Season both sides with salt and pepper. This step adds flavor right from the start. Now, let’s set up your breading station. You need three shallow dishes. In the first one, place the flour. The second dish holds the beaten eggs. In the third dish, mix breadcrumbs, ½ cup of parmesan cheese, oregano, and basil. This mix gives the chicken a nice taste. To bread the chicken, start with the flour. Dredge each chicken breast in flour. Shake off any extra flour. Next, dip the chicken in the beaten eggs. Make sure it’s fully coated. Lastly, press the chicken into the breadcrumb mix. Coat it well on both sides. After breading, arrange the chicken on a baking sheet lined with parchment paper. Lightly spray the tops with olive oil spray. This helps the chicken crisp up nicely. Now, bake the chicken in your preheated oven for 25-30 minutes. You want it to be cooked through and golden brown. After this, take the chicken out. Spoon marinara sauce on each piece. Then, sprinkle with the rest of the parmesan and top with shredded mozzarella cheese. Return the chicken to the oven for another 10-15 minutes. The cheese should be bubbly and slightly golden. Enjoy this flavorful dish! For the complete recipe, check the [Full Recipe]. To get a crispy coating, olive oil spray is key. It adds moisture while allowing the breading to crisp. Before baking, spray the tops of the chicken well. This small step makes a big difference. Timing is also important while baking. Bake the chicken for 25-30 minutes first. Then add the sauce and cheese. Return it to the oven for another 10-15 minutes. This method ensures even cooking and a golden crust. When serving, presentation matters. Use a nice plate and sprinkle fresh chopped basil on top. This adds color and freshness. Serve the chicken with a side of spaghetti or a fresh garden salad. Both options complement the flavors well and make a complete meal. For an extra touch, drizzle some extra marinara sauce around the plate. It looks lovely and adds flavor. You can find the full recipe for more details on making this dish shine. {{image_2}} You can make this dish lighter without losing taste. First, try using skinless chicken thighs instead of breasts. They have more flavor and stay juicy. You can also replace breadcrumbs with crushed whole-grain cereal. This adds fiber and crunch. If you want lower calories, use less cheese or switch to part-skim mozzarella. For gluten-free options, use gluten-free breadcrumbs or almond flour. Both give a nice crust. You can also serve the chicken over zucchini noodles instead of pasta. This keeps the meal fresh and lower in carbs. Mixing up the sauce and cheese can change the whole dish. Instead of marinara, try pesto for a fresh twist. You can also use a spicy arrabbiata sauce for some heat. Don’t be afraid to experiment with different cheeses. Provolone or gouda can add new flavors. If you love herbs, add fresh parsley or thyme to the breadcrumbs. This gives a fragrant touch. You can even sprinkle some red pepper flakes on top if you enjoy a bit of spice. Each variation keeps the dish fun and exciting. For the full recipe, check out the Oven-Baked Chicken Parmesan section. To keep your oven-baked chicken parmesan fresh, store it properly. First, let it cool to room temperature. Then, place it in an airtight container. You can refrigerate it for up to four days. If you want to save it longer, freezing is a great option. Wrap the chicken tightly in plastic wrap, then place it in a freezer-safe bag. It can last for about three months in the freezer. When reheating chicken parmesan, the best method is to use the oven. Preheat your oven to 350°F (175°C). Place the chicken on a baking sheet and cover it with foil. This keeps the moisture in and helps the cheese stay gooey. Heat for about 15 to 20 minutes. To avoid sogginess, don’t reheat it in the microwave. The microwave can make the coating soft and mushy. You can also try reheating in a skillet over medium heat. Just add a little olive oil to crisp up the coating again. Enjoy your meal as if it just came out of the oven! For the full recipe, check out the instructions above. How long does it take to bake chicken in the oven? It takes about 25 to 30 minutes to bake chicken. The oven should be set at 400°F (200°C). This helps the chicken cook evenly and stay juicy. Can I use chicken thighs instead of breasts? Yes, you can use chicken thighs. They are juicier and have more flavor. Just adjust the cooking time. Thighs may need a few extra minutes to cook fully. What type of cheese is best for this recipe? I recommend using freshly grated parmesan and shredded mozzarella. These cheeses melt well and add great flavor. You can also mix in provolone for a twist. Can I use store-bought marinara sauce? Absolutely! Store-bought marinara sauce saves time and still tastes good. Just choose a brand you like. Homemade sauce is an option too if you have time. How do I know when the chicken is fully cooked? Check that the internal temperature reaches 165°F (75°C). You can use a meat thermometer for this. The chicken should also be golden brown on the outside. What can I use instead of breadcrumbs? You can use crushed crackers or panko for a crunchy coating. For a gluten-free option, try ground almonds or gluten-free breadcrumbs. These work well and taste great. Oven-baked chicken Parmesan is simple and tasty. You learned about the main ingredients, prep steps, and tips for perfecting the dish. Don’t forget to explore variations and storage methods too. With these tips, you can impress anyone at your table. Try new cheese or herbs to make it your own. Enjoy your cooking journey, and share the joy of this classic meal!

Oven-Baked Chicken Parmesan Flavorful and Easy Recipe

Looking for a tasty dinner that’s quick and easy? My Oven-Baked Chicken Parmesan recipe is just what you need! With

To create rich and tasty ricotta stuffed shells, gather these main ingredients: - 20 jumbo pasta shells - 2 cups ricotta cheese - 1 cup shredded mozzarella cheese - 1/2 cup grated Parmesan cheese - 1 egg, beaten - 2 cups marinara sauce (homemade or store-bought) - 1 teaspoon dried basil - 1 teaspoon dried oregano - Salt and pepper to taste - Fresh basil leaves for garnish These ingredients work together to make a creamy filling and a flavorful sauce. The jumbo shells hold all the goodness inside, making each bite a delight. You can boost the dish with these optional ingredients: - Spinach or kale for added greens - Ground meat like beef or sausage for protein - Ricotta flavored with garlic or lemon zest for a twist - Extra herbs like parsley or thyme for freshness Adding any of these options can give the dish a personal touch. Feel free to experiment and find what you love. Having the right tools makes cooking easier. Here are some helpful items for this recipe: - A large pot for boiling pasta - A mixing bowl for the ricotta filling - A spoon or piping bag for filling shells - A 9x13 inch baking dish for baking - Aluminum foil to cover the dish With these tools, you'll have everything you need to make your ricotta stuffed shells a success. Remember, the right equipment can simplify the cooking process. For the full recipe, check the details above. Start by cooking the jumbo pasta shells. Boil a large pot of salted water. Add the shells and cook them until they are al dente, about 8 to 10 minutes. Drain the shells carefully and set them aside to cool. This step is vital as it makes filling much easier. You want the shells soft but firm enough to hold the ricotta filling. Now, let’s prepare the ricotta filling. In a mixing bowl, combine 2 cups of ricotta cheese, 1 cup of shredded mozzarella, and 1/2 cup of grated Parmesan cheese. Add in 1 beaten egg, 1 teaspoon of dried basil, and 1 teaspoon of dried oregano. Don’t forget to season with salt and pepper, to taste. Mix all the ingredients well until they are fully blended. This filling brings a rich and creamy flavor. Next, it’s time to assemble the dish. Spread 1 cup of marinara sauce evenly on the bottom of a 9x13 inch baking dish. Then, take each pasta shell and fill it with the ricotta mixture. Place the filled shells in a single layer on top of the sauce. Pour the remaining marinara sauce over the stuffed shells. Make sure they are well coated. Finally, sprinkle the rest of the mozzarella and Parmesan cheese on top. Cover the dish with aluminum foil and bake at 375°F (190°C) for 25 minutes. After that, remove the foil and bake for an additional 10 to 15 minutes. You want the cheese to become bubbly and golden brown. Once done, let it cool for a few minutes. Garnish with fresh basil leaves before serving. Enjoy your flavorful dinner with this full recipe! To cook pasta shells, start with a large pot. Fill it with water and add salt. Bring the water to a boil. Add the jumbo shells and cook them until they are al dente. This usually takes about 10-12 minutes. Stir gently to prevent them from sticking. After cooking, drain the shells and let them cool slightly. This helps keep them from tearing when you fill them. Ricotta cheese is the star here, but you can mix it up! Try adding other cheeses to boost flavor. For a creamy touch, add mascarpone or cream cheese. Want a sharper taste? Use feta or goat cheese. Mixing different cheeses gives your ricotta stuffed shells a unique twist. Don’t forget the mozzarella! It melts beautifully and adds a delicious gooeyness. Garnishing can make your dish shine! Fresh basil leaves are a must for color and flavor. You can also sprinkle some extra Parmesan cheese on top. A drizzle of olive oil adds richness. For a kick, a pinch of red pepper flakes can work wonders. Serve the stuffed shells on individual plates for a lovely presentation. Enjoy your meal with a side salad for a complete dinner! For the complete recipe, don’t forget to check the Full Recipe. {{image_2}} For a meat lovers version of ricotta stuffed shells, add cooked meat to the filling. You can use ground beef, sausage, or even shredded chicken. Cook the meat in a pan until browned. Mix it into the ricotta filling before stuffing the shells. This addition gives a hearty twist and makes the dish even more filling. If you want a vegetarian option, consider adding spinach or zucchini to the ricotta filling. Cook fresh spinach until wilted, then squeeze out excess water before mixing it in. For zucchini, shred it and sauté lightly. Both options add color and nutrition to your meal without losing flavor. While marinara sauce is a classic choice, you can try different sauces for a new taste. Alfredo sauce offers a rich and creamy alternative. For a lighter option, use a simple tomato sauce with fresh herbs. You can even use pesto for a burst of flavor. Each sauce changes the dish's profile, making it exciting every time you prepare it. For more ideas, check out the Full Recipe. After you enjoy your Ricotta Stuffed Shells, store any leftovers right away. Place them in an airtight container. Make sure the lid seals tightly to keep them fresh. You can store them in the fridge for up to three days. If you want to keep them longer, freezing is a great option. To freeze your stuffed shells, let them cool first. After cooling, place them in a freezer-safe container. You can also wrap them in plastic wrap and then foil for added protection. Label the container with the date. Frozen stuffed shells can last up to three months. When you’re ready to eat, just thaw them in the fridge overnight. For the best taste when reheating, use the oven. Preheat it to 350°F (175°C). Place the shells in a baking dish and cover with foil. This keeps them moist. Heat for about 20-25 minutes. If you want to add a little crisp, remove the foil for the last 5 minutes. You can also use the microwave, but they may not stay as creamy. Just heat in short bursts to avoid drying them out. Enjoy your meal again just like the first time! Yes, you can make Ricotta Stuffed Shells ahead of time. Prepare the stuffed shells and place them in the baking dish. Cover them tightly with plastic wrap or foil. Store them in the fridge for up to two days. When you're ready to bake, remove the cover and add a bit more marinara sauce. Bake as usual, but add a few extra minutes to the cooking time. Making homemade marinara sauce is simple. You need a few basic ingredients. Here’s how you can do it: - Ingredients: - 2 tablespoons olive oil - 1 small onion, chopped - 2 cloves garlic, minced - 1 can (28 oz) crushed tomatoes - 1 teaspoon dried basil - 1 teaspoon dried oregano - Salt and pepper to taste 1. Heat olive oil in a pot over medium heat. 2. Add the chopped onion. Cook until soft. 3. Stir in minced garlic and cook for 1 minute. 4. Add crushed tomatoes, basil, oregano, salt, and pepper. 5. Simmer for 20-30 minutes, stirring occasionally. This sauce pairs perfectly with your Ricotta Stuffed Shells. If you need a substitute for ricotta cheese, use cottage cheese. Blend it until smooth for a similar texture. Cream cheese also works, but it will taste richer. For a dairy-free option, try blended tofu with a bit of lemon juice. Each substitute will offer a unique twist to your Ricotta Stuffed Shells. In this post, we explored how to make delicious ricotta stuffed shells. We covered the key ingredients, mixing the filling, and assembling the dish. I shared tips for perfect pasta and tasty cheese options. You learned about variations for meat lovers and vegetarians. We also discussed storage and reheating tips for leftovers. Enjoy making your own stuffed shells. It's fun and tasty! Experiment with flavors to find your favorite. Happy cooking!

Ricotta Stuffed Shells Flavorful and Easy Dinner Recipe

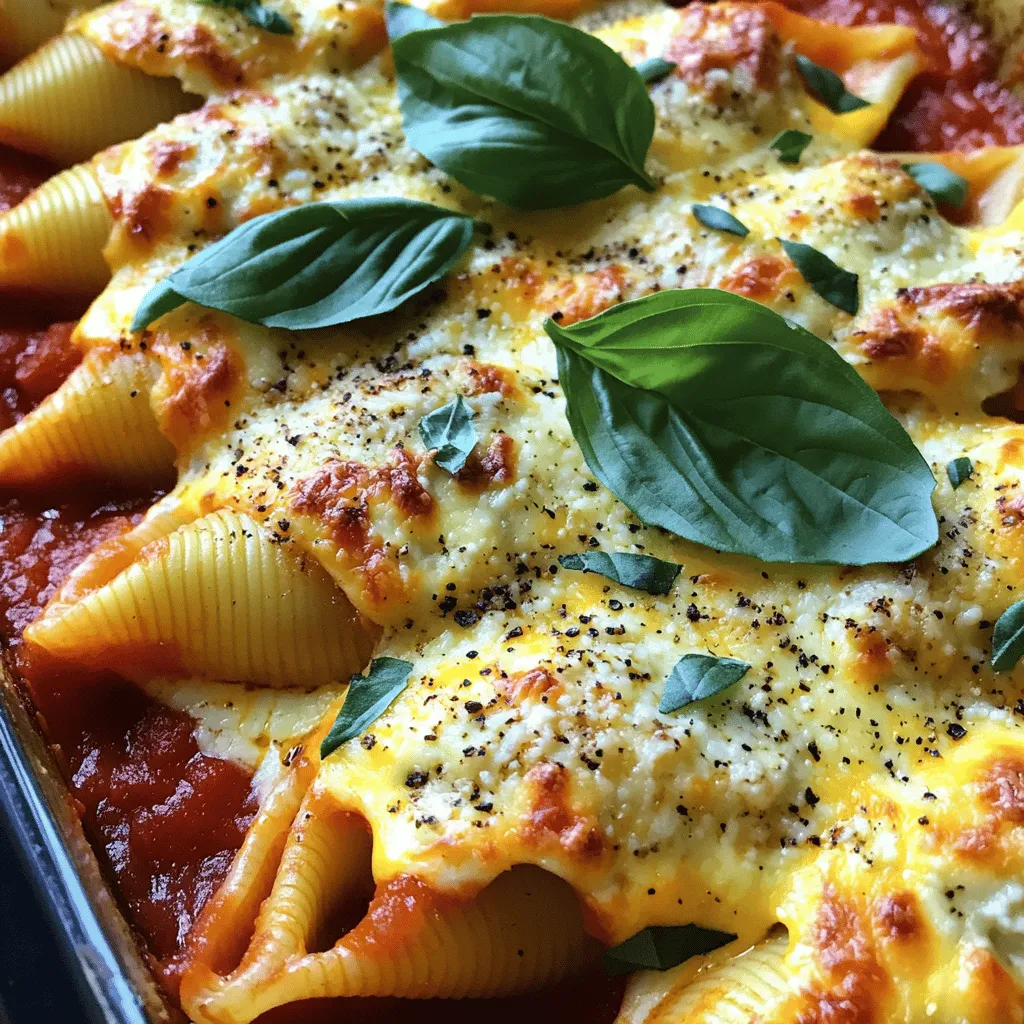
Are you ready to impress your family with a delicious dinner? My Ricotta Stuffed Shells recipe is flavorful, simple, and

- Pasta options: linguine or spaghetti - Fresh vegetables and herbs: garlic, red chili pepper, ginger, green onions, cilantro - Essential sauces and oils: soy sauce, sesame oil, rice vinegar - Seasonings: salt, pepper, crushed red pepper flakes This dish shines with simple, fresh ingredients. You can choose either linguine or spaghetti as your pasta base. I love linguine for its flat shape, but spaghetti works just as well. Next, we need fresh vegetables and herbs. Garlic is a must for that rich, aromatic flavor. The red chili pepper adds spice; you can adjust this based on your taste. Ginger gives a sweet heat that balances the dish. Green onions and cilantro add freshness and color. For essential sauces and oils, grab soy sauce for saltiness, sesame oil for nuttiness, and rice vinegar for a touch of tang. Finally, the seasonings are key. Use salt and pepper to taste. If you want more heat, sprinkle in crushed red pepper flakes. These ingredients come together to create a simple yet flavorful dish. For the full recipe, check the section above. First, boil a big pot of water. Add a pinch of salt to the water. This helps the pasta taste better. Cook 8 oz of linguine or spaghetti until it is al dente. This means it should still be firm. Drain the pasta in a colander, but save about 1/2 cup of the cooking water. You will need this later. Next, grab a large skillet and heat 4 tablespoons of olive oil over medium heat. Once hot, add 6 cloves of minced garlic and 1 sliced red chili pepper. Sauté them for about 2-3 minutes. You want the garlic to smell nice and turn golden, but not burn. This step adds a lot of flavor! Now, add 1 tablespoon of grated ginger to the skillet. Stir for about a minute. Then, reduce the heat to low. Add the cooked noodles into the skillet. Pour in 2 tablespoons of soy sauce, 1 tablespoon of sesame oil, and 1 tablespoon of rice vinegar. Toss everything together. If the noodles feel dry, add a little bit of the reserved pasta water. Season with salt and pepper to taste. If you want more heat, sprinkle in some crushed red pepper flakes. Finally, toss in 2 chopped green onions and 1/4 cup of chopped cilantro. Mix gently until everything is well combined. Enjoy your spicy garlic noodles! For the complete recipe, check out the [Full Recipe]. To achieve al dente pasta, cook the linguine for 8-10 minutes. Test it two minutes before the time ends. It should be firm but not hard. When you drain the pasta, save half a cup of the cooking water. This water helps make the sauce creamy. Balancing flavors is key. The garlic must shine without overpowering. Start with the right amount of garlic and chili. If it’s too strong, add more noodles. A pinch of sugar can also help tone down heat. To adjust spice levels, start with one red chili pepper. You can always add more later. If you want it mild, remove the seeds. For extra heat, sprinkle crushed red pepper flakes at the end. Using reserved pasta water effectively makes your dish shine. After you add noodles to the skillet, pour in a little pasta water. This helps combine flavors and creates a lovely sauce. If your noodles seem dry, add more water until you reach the desired consistency. For the full recipe, check out the Spicy Garlic Noodles section. {{image_2}} You can easily make this dish vegan. Instead of soy sauce, use tamari for a gluten-free option. For added protein, try tofu or tempeh. Simply cube the tofu and sauté it until golden before mixing it with the noodles. You can also add vegetables like bell peppers or broccoli for extra color and nutrients. To make this recipe gluten-free, swap the soy sauce for a gluten-free soy sauce or coconut aminos. Use gluten-free pasta, like rice noodles, to keep the dish safe for those with gluten allergies. Spicy garlic noodles pair well with many proteins. Consider adding grilled chicken, shrimp, or beef for a heartier meal. If you prefer a vegetarian option, sautéed mushrooms or chickpeas work nicely too. To add crunch, sprinkle toasted nuts or seeds on top. Sesame seeds or crushed peanuts offer a delightful texture. You can also garnish with extra green onions or cilantro for freshness. Serve in large bowls for a cozy feel, or on individual plates for a more refined look. To keep your spicy garlic noodles fresh, store them in an airtight container. Make sure the noodles cool first to avoid condensation. Refrigerate them within two hours of cooking for safety. They will stay good for about 3 to 5 days. When reheating, use a skillet for the best results. Add a splash of water or oil to prevent sticking. Heat over medium-low heat until warm. You can also freeze spicy garlic noodles for later. First, let them cool completely. Then, place them in a freezer-safe container or bag. Remove as much air as possible to avoid freezer burn. They can last up to three months in the freezer. When you're ready to eat, thaw them in the fridge overnight. Reheat them in a skillet, adding a little water if needed. This helps keep the noodles moist and tasty. For a quick meal, I recommend using the Full Recipe to create fresh, flavorful noodles anytime! If you need a soy sauce substitute, you can use tamari. Tamari is gluten-free and tastes similar. You can also use coconut aminos for a sweeter flavor. Both options work well in this recipe. To reduce the spice in this dish, skip the red chili pepper. You can also use less garlic, as it adds some heat. Adding more green onions and cilantro can give flavor without the spice. Another option is to add a pinch of sugar, which can balance the heat. Yes, you can make this dish ahead of time! Cook the noodles and store them in the fridge. Prepare the sauce and keep it separate. Mix them just before serving to keep the noodles fresh. For the best taste, reheat gently in a skillet over low heat. For the complete recipe, check out the full recipe section. In this post, we covered how to make spicy garlic noodles using simple ingredients. You learned to cook pasta, sauté aromatics, and combine flavors. I shared tips for perfecting your dish, looking at vegan options and serving ideas. Lastly, we talked about storing leftovers and answered common questions. With this knowledge, you can create a tasty meal that's both fun and easy. Enjoy experimenting with this recipe!

Spicy Garlic Noodles Simple and Flavorful Recipe

Ready for a meal that packs a punch? My Spicy Garlic Noodles blend heat and flavor in a simple dish

- 1 pound large shrimp, peeled and deveined - 3 tablespoons olive oil - 4 cloves garlic, minced - Zest of 1 lemon - Juice of 1 lemon - 1 teaspoon paprika - 1 teaspoon dried oregano - Salt and pepper to taste - Fresh parsley, chopped (for garnish) - 8-10 wooden or metal skewers When measuring ingredients, use a kitchen scale for accuracy. For liquids, a measuring spoon works best. Always level off dry ingredients with a knife for precision. Fresh ingredients like garlic and parsley add bright flavors, so don’t skip them. Choose shrimp that smell fresh, not fishy. Look for shrimp with a firm texture and a slight shine. If buying frozen shrimp, check the packaging for quality. Wild-caught shrimp often have better flavor than farmed shrimp. You can find great shrimp at local markets or grocery stores. For the best taste, remember to buy shrimp that are sustainably sourced. To learn more about the full recipe, refer to the Full Recipe mentioned earlier. To start, gather your ingredients. You’ll need olive oil, minced garlic, lemon zest, and lemon juice. Then add paprika, oregano, salt, and pepper. In a bowl, whisk them together. This creates a bright and zesty marinade. The olive oil helps keep the shrimp moist. The garlic and lemon give it a fresh flavor. Next, add the shrimp to the bowl. Make sure every shrimp gets a good coat of the marinade. This step is key for flavor. Cover the bowl and place it in the fridge. Let the shrimp marinate for at least 20 minutes. This allows the shrimp to soak up all the tasty goodness. Now, preheat your grill to medium-high heat. Take the skewers and thread the marinated shrimp onto them. Place about 4-5 shrimp on each skewer. Leave a little space between them. This helps them cook evenly. Once the grill is hot, place the skewers on it. Grill for 2-3 minutes on each side. You’ll know they’re done when they turn pink and opaque. After grilling, let the skewers rest for a minute. Finally, garnish with fresh parsley before serving for a nice touch. For the full recipe, check out the link. For great shrimp, preheat your grill to medium-high heat, about 400°F. This heat cooks the shrimp fast, keeping them juicy. Grill the shrimp for 2-3 minutes on each side. Look for a pink color and firm texture. Avoid overcooking, as shrimp can turn rubbery. To get the best grilled shrimp, marinate them well. Marinate for at least 20 minutes. This step infuses flavor without making the shrimp mushy. Use skewers to make turning easier. Leave a small gap between each shrimp for even cooking. This allows heat to circulate well. You need a few tools for grilling shrimp skewers. A good grill is key; gas or charcoal works well. Use long-handled tongs to flip the skewers safely. A meat thermometer helps check doneness without cutting into the shrimp. For wooden skewers, soak them in water for 30 minutes. This prevents burning on the grill. Check the full recipe for more tips! {{image_2}} You can switch up the marinade for different flavors. Try using lime juice instead of lemon. The zest of lime adds a fresh twist. You can also add honey for a touch of sweetness. Soy sauce can bring in a savory umami kick. For a spicy version, mix in some sriracha or red pepper flakes. These shrimp skewers are great on their own or with sides. Serve them with a fresh salad for a light meal. They go well with rice or quinoa, adding a nice texture. You can also pair them with grilled veggies for a colorful plate. If you want something creamy, a yogurt sauce works well too. If you like heat, sprinkle some cayenne pepper in the marinade. You can also use smoked paprika for a deeper flavor. Fresh herbs like cilantro or basil can add a bright taste. Experiment with different spices like cumin or coriander for a unique twist. The key is to find what you enjoy most. For the full recipe, check out the Lemon Garlic Grilled Shrimp Skewers section. After enjoying your lemon garlic grilled shrimp skewers, store any leftovers quickly. Place the shrimp in an airtight container. This keeps them fresh and tasty. Refrigerate them right away. They will last for up to two days. If you notice any strong smells or changes in color, it’s best to toss them. To reheat the shrimp, use the grill or a skillet. Heat the grill to medium-low. Place the skewers on the grill for about two minutes on each side. For a skillet, use medium heat and add a little oil. Cook the shrimp until they are warm. Avoid overcooking to keep them juicy and tender. If you want to freeze the shrimp, do so without the skewers. Place the shrimp in a single layer on a baking sheet. Freeze them for about one hour until firm. Then, transfer them to a freezer bag. Squeeze out the air and seal tightly. They can be frozen for up to three months. When ready to use, thaw them in the fridge overnight. For best results, refer to the full recipe for tips on marinating and grilling. Yes, you can use frozen shrimp. Just make sure to thaw them first. Place shrimp in the fridge overnight or run them under cold water. Using thawed shrimp helps the marinade soak in better and keeps the shrimp juicy when grilling. Large shrimp work best for skewers. They hold up well on the grill and cook evenly. Look for shrimp that are firm and have a fresh smell. Wild-caught shrimp often have better flavor than farmed shrimp. Marinate shrimp for at least 20 minutes. If you have more time, let them sit for up to 1 hour. This allows the flavors to penetrate the shrimp deeply. Avoid marinating for too long, as the acid from the lemon juice can make shrimp mushy. For the full recipe, check the details above. In this post, we explored how to make delicious grilled shrimp. You learned about essential ingredients, measuring tips, and how to ensure shrimp quality. We also covered marinade preparation, the grilling process, and key cooking tips. With ideas for variations and storage practices, you can enjoy grilled shrimp anytime. Remember, using fresh shrimp makes a big difference. Follow these steps for tasty results, and let your creativity shine!

Lemon Garlic Grilled Shrimp Skewers Flavorful Recipe

If you’re craving an easy, flavorful dish, try my Lemon Garlic Grilled Shrimp Skewers! This recipe pairs juicy shrimp with

To make a delicious Cabbage Roll Casserole, gather these main ingredients: - 1 large head of green cabbage, chopped - 1 pound ground turkey or beef - 1 cup cooked rice (jasmine or basmati) - 1 onion, finely chopped - 2 cloves garlic, minced - 1 can (15 oz) tomato sauce - 1 can (14.5 oz) diced tomatoes, undrained - 1 tablespoon Worcestershire sauce - 1 teaspoon dried oregano - 1 teaspoon smoked paprika - 1/2 teaspoon salt - 1/4 teaspoon black pepper These items create a hearty base. The cabbage brings crunch, while the meat adds protein. The rice binds everything together, making it filling. You can customize your casserole with these optional ingredients: - 1 cup shredded cheddar cheese (optional) - Fresh parsley, chopped for garnish Adding cheese gives a nice, melty top. You can also use other cheeses, like mozzarella or Monterey Jack. For a fresh touch, parsley makes a great garnish. This casserole is not only tasty but also nutritious. Here’s a quick look at what you get per serving: - Calories: 350 - Protein: 25g - Carbohydrates: 30g - Fat: 15g It offers a balanced meal with protein and vegetables. Plus, it fits well into a healthy diet. Check the full recipe for more details on serving sizes and adjustments for dietary needs. Start by gathering all your ingredients. You will need: - 1 large head of green cabbage, chopped - 1 pound ground turkey or beef - 1 cup cooked rice (jasmine or basmati) - 1 onion, finely chopped - 2 cloves garlic, minced - 1 can (15 oz) tomato sauce - 1 can (14.5 oz) diced tomatoes, undrained - 1 tablespoon Worcestershire sauce - 1 teaspoon dried oregano - 1 teaspoon smoked paprika - 1/2 teaspoon salt - 1/4 teaspoon black pepper - 1 cup shredded cheddar cheese (optional) - Fresh parsley, chopped for garnish Next, preheat your oven to 350°F (175°C). This step warms the oven for baking later. In a large skillet, heat a little oil over medium heat. Add the chopped onion and minced garlic. Cook them until the onion turns soft and clear. This should take about 5 minutes. Then, add the ground turkey or beef to the skillet. Cook it until it turns brown. Drain any extra fat from the pan. Now, stir in the cooked rice, tomato sauce, diced tomatoes, Worcestershire sauce, oregano, smoked paprika, salt, and pepper. Mix these well until they are heated through. This mixture gives the casserole its rich flavor. In a 9x13 inch baking dish, spread half of the chopped cabbage on the bottom. Pour half of the meat and rice mix over the cabbage. Layer the rest of the cabbage on top, followed by the remaining meat mixture. Cover the dish with aluminum foil and bake it for 45 minutes. After that, take off the foil. If you want cheese, sprinkle it on top now. Bake it uncovered for another 15 minutes until the cheese is melted and bubbly. Finally, let the casserole cool for 10 minutes before you serve it. Garnish with fresh parsley if you like. This dish is a warm hug on a plate! For the full recipe, check it out [here](#). To make a great cabbage roll casserole, start with fresh cabbage. Choose a large head that feels heavy. This will give you enough leaves to layer. Cut the cabbage into even pieces for uniform cooking. Cooking the meat until it browns adds flavor. Mix the rice well with the meat. This helps each bite have the same taste. Be sure to season the layers with salt and pepper. This step is key for a tasty dish. For this recipe, you need a few basic tools. A large skillet helps with browning the meat. A 9x13 inch baking dish is perfect for layering. Use a sharp knife and a cutting board for chopping. A spoon or spatula is great for stirring. If you have one, a meat thermometer can help ensure the meat is cooked well. Cabbage roll casserole tastes great on its own. You can serve it with a side salad for freshness. Add some crusty bread to soak up the sauce. For a special touch, sprinkle fresh parsley on top before serving. If you want a twist, try adding hot sauce for heat. This dish is perfect for family dinners or meal prep. For the full recipe, check out the detailed steps above! {{image_2}} You can easily make a vegetarian version. Start with a mix of veggies. Use mushrooms, bell peppers, and zucchini for a hearty base. Replace the meat with lentils or beans for protein. You can use quinoa instead of rice for extra texture. The flavors will still shine through. Add your favorite spices for a boost. If you prefer different meats, go ahead! Ground chicken or pork works great. You can also try sausage for a spicy kick. Each meat adds its own flavor. Just ensure it is cooked well before mixing it with the other ingredients. This flexibility keeps the dish exciting. To enhance the flavor, consider adding fresh herbs. Chopped basil or cilantro can freshen up the layers. A sprinkle of crushed red pepper will add a nice heat. You can also mix in a splash of soy sauce for depth. Experimenting with spices can create new tastes. Each tweak makes this meal your own! For the full recipe, check out the detailed instructions. After you enjoy your Cabbage Roll Casserole, let it cool. Once cool, store it in an airtight container. Place it in the fridge. Leftovers can stay fresh for up to four days. I recommend dividing it into smaller portions. This way, it’s easy to heat up later. To reheat, place the casserole in the microwave. Heat it on medium power. This usually takes about 3 to 5 minutes. Stir it halfway through to warm it evenly. You can also reheat it in the oven. Set the oven to 350°F (175°C). Bake until it is hot, usually around 20 minutes. Cover it with foil to keep it moist. You can freeze Cabbage Roll Casserole for later. Make sure it is fully cooled first. Transfer it to a freezer-safe container. Seal it tightly to prevent freezer burn. It can last up to three months in the freezer. When ready to eat, let it thaw overnight in the fridge. Then, reheat as described above. For the best taste, eat it within a month. Enjoy the full recipe for more tips! Cabbage Roll Casserole lasts about 3 to 5 days in the fridge. Make sure to store it in an airtight container. This keeps it fresh and tasty for a few days. When you reheat it, ensure it reaches a safe temperature to enjoy it fully. Yes, you can make Cabbage Roll Casserole in advance. Prepare the dish up to the baking step. Cover it well and place it in the fridge for up to 24 hours. When you're ready to bake, just add a few extra minutes to the cooking time. This makes it a great option for busy weeknights. You can use quinoa or cauliflower rice as a rice substitute. Both options provide a great texture. Quinoa adds protein, while cauliflower rice keeps it low-carb. Adjust the cooking time to ensure they mix well with the other ingredients. Enjoy experimenting with these options in the full recipe! Cabbage roll casserole is easy to make and packed with flavor. We covered key ingredients, step-by-step cooking methods, and helpful tips. You can also explore tasty variations, from vegetarian options to flavor boosts. Plus, you learned how to store leftovers and how long they last. These insights help ensure a delicious meal every time. Enjoy creating your perfect casserole and make it your own!

Cabbage Roll Casserole Tasty and Easy Weeknight Meal

Looking for a quick and tasty weeknight meal? Let me introduce you to Cabbage Roll Casserole. This dish is easy

- Dill pickle slices - Buttermilk - All-purpose flour - Cornmeal To make crispy fried pickles, gather the main ingredients first. Dill pickle slices are key for that tangy bite. Buttermilk adds moisture, making the pickles soft inside. All-purpose flour and cornmeal create a crunchy outside. This mix gives your fried pickles the perfect texture. - Garlic powder - Onion powder - Paprika - Black pepper - Salt Next, let’s spice things up! Garlic powder and onion powder add depth to the flavor. A touch of paprika gives a mild kick and beautiful color. Black pepper and salt enhance all the tastes. These seasonings make your fried pickles even more tempting. - Vegetable oil for frying Lastly, you need vegetable oil for frying. It should be hot enough to make the pickles crispy. This oil helps achieve that golden brown color we all crave. When you combine all these tasty ingredients, you create a snack that’s hard to resist. For the full recipe, check out the details above. Start by draining the pickle slices. Use a colander to remove as much liquid as possible. Next, lay the slices on paper towels. Pat them dry gently. This step is key for getting a crispy texture. After that, soak the dried pickles in buttermilk. Pour 1 cup of buttermilk into a shallow bowl. Add the drained pickles and let them soak for about 30 minutes. This helps the pickles absorb moisture and flavor. Now it's time to make the coating. In a different bowl, mix dry ingredients. Combine 1 cup of all-purpose flour, 1 cup of cornmeal, 1 teaspoon of garlic powder, 1 teaspoon of onion powder, 1 teaspoon of paprika, 1 teaspoon of black pepper, and 1 teaspoon of salt. Stir well to ensure everything is mixed evenly. This mixture will give your pickles a crunchy and flavorful coat. Next, heat the oil. Pour about 2 inches of vegetable oil into a deep skillet. Turn the heat to medium-high. You’ll know the oil is ready when a drop of batter sizzles upon contact. While the oil heats, remove the pickle slices from the buttermilk. Let the excess buttermilk drip off. Dredge each pickle slice in the coating mixture. Make sure they are fully coated for the best crunch. Carefully place the battered pickles in the hot oil. Fry them in batches to avoid overcrowding. Cook for 2-3 minutes on each side. Look for a golden brown color and a crispy texture. When done, transfer the fried pickles to a plate lined with paper towels. This helps drain off excess oil. Enjoy them hot with your favorite dipping sauce, like ranch dressing or spicy mayo. For the full recipe, check out the earlier section! The secret to crispy fried pickles lies in a few key steps. Let’s dig into these tips so you can get that perfect crunch every time. First, drying your pickles is vital. Excess moisture makes them soggy. After draining, pat them dry with paper towels. This simple step helps the coating stick better. Next, buttermilk plays a crucial role. Soaking the pickles in buttermilk adds flavor and moisture. I recommend letting them soak for about 30 minutes. This helps the coating to adhere nicely when frying. Now, let’s talk frying. The ideal oil temperature is around 350°F (175°C). If your oil is too cool, the pickles will absorb oil and become greasy. If it's too hot, they will brown too fast. Always test the oil with a drop of batter. It should sizzle! Avoiding overcrowding is also key. Fry your pickles in batches. This ensures even cooking and crispiness. If you crowd the pan, the oil cools down, leading to soggy pickles. For serving, pick your favorite dips. Ranch dressing is a classic choice, but spicy mayo works great too. You can even try a tangy barbecue sauce for a twist! Pair fried pickles with other snacks. They go well with wings, chips, or sliders. This way, you can create a fun snack spread for your next gathering. For the full recipe, check out the complete guide to making crispy fried pickles. {{image_2}} You can switch up the coating for your crispy fried pickles. For a gluten-free option, use rice flour or almond flour instead of regular flour. This change keeps the crunch while making it friendly for those avoiding gluten. You can also spice things up! Add cayenne pepper or chili powder to the coating for a spicy kick. A little heat makes these tasty snacks even better. Pickles come in many flavors. Instead of dill pickles, try bread and butter pickles. They add a sweet and tangy twist that many love. You can also make your own pickle slices at home. Homemade pickles let you control the flavor and crunch. It's a fun way to experiment with spices and herbs. Dipping sauces make fried pickles even more fun. Ranch dressing is a classic choice. Its creamy taste pairs perfectly with the crunch of pickles. You can also make spicy mayo by mixing mayonnaise with hot sauce. This sauce adds a nice kick and complements the flavor of the pickles. Don't forget to check out the Full Recipe for all the delicious details! If you have leftover crispy fried pickles, store them right. Place them in an airtight container. This keeps them fresh and tasty. Let the fried pickles cool before storing. If you put hot pickles in the fridge, they may become soggy. Store them in the fridge for up to three days. To reheat fried pickles, I recommend using the oven. Preheat the oven to 375°F (190°C). Place the pickles on a baking sheet. Bake for about 10 minutes. This way, they stay crunchy. You can use the microwave, but pickles may turn soft. If you must use a microwave, heat them in short bursts. Check every 30 seconds. You can freeze fried pickles for later. Allow them to cool completely first. Then, place them in a single layer on a baking sheet. Freeze them for about two hours. Once frozen, transfer them to a freezer bag. Remove as much air as possible. They can last up to three months in the freezer. When ready to eat, thaw them in the fridge overnight. Reheat in the oven for the best result. Enjoy your crispy fried pickles again! To make crispy fried pickles, follow these key steps: 1. Drain and Dry: Start by draining the pickle slices. Use paper towels to pat them dry. This removes extra moisture and helps them crisp up. 2. Soak in Buttermilk: Soak the pickles in buttermilk for about 30 minutes. This adds flavor and moisture. 3. Prepare Coating: In another bowl, mix flour, cornmeal, garlic powder, onion powder, paprika, black pepper, and salt. This will be your crispy coating. 4. Heat Oil: Heat oil in a pan. Aim for about 2 inches of oil. It’s ready when a drop of batter sizzles. 5. Dredge Pickles: Remove pickles from buttermilk. Let excess buttermilk drip off. Coat each slice in the dry mixture. 6. Fry in Batches: Fry the coated pickles in the hot oil. Do this in small batches to avoid crowding. Fry for 2-3 minutes on each side until golden brown. 7. Drain Excess Oil: Move the fried pickles to a plate lined with paper towels. This absorbs any leftover oil. Following these steps ensures you have a crispy and tasty treat every time. Fried pickles taste great with many dips. Here are some popular options: - Ranch Dressing: A classic choice that adds creaminess. - Spicy Mayo: Mix mayo with hot sauce for a kick. - Ketchup: Simple but always satisfying. - Honey Mustard: Sweet and tangy with a hint of spice. - Barbecue Sauce: Adds a smoky flavor. Feel free to try different dips and find your favorite! Yes, you can make fried pickles ahead of time. Here are some tips: - Prepare the Pickles: You can soak and coat the pickles earlier in the day. Keep them in the fridge until ready to fry. - Fry Just Before Serving: Fry the pickles right before serving for the best crunch. - Store Leftovers: If you have leftovers, store them in an airtight container in the fridge. The best fried pickles can often be found at local diners or bars. Here are some recommendations: - Southern Restaurants: Many serve fried pickles as an appetizer. - Food Trucks: Look for trucks that specialize in fried foods. - Local Pubs: Many pubs offer fried pickles alongside their beer options. Check out reviews or ask friends for their favorite spots. You might find a hidden gem near you! For the full recipe, visit the recipe section above. Crispy fried pickles are simple and fun to make. Start with dill pickle slices and buttermilk, then coat them with flour and cornmeal. Follow my steps for frying and use tips for the best texture. Remember, you can change the coating and try different dips. Store leftovers well and reheat to keep them crispy. Enjoy your tasty fried pickles at home or share them at your next gathering! Making them is easier than you think, and they always impress.

Crispy Fried Pickles Irresistibly Crunchy Snack Treat

Are you ready to crunch into something delicious? Crispy fried pickles are the ultimate snack treat. Their golden coating and

- Ground beef or turkey - Breadcrumbs - Green onions - Parmesan cheese - Egg - Garlic - Salt - Black pepper - Red pepper flakes - Honey - Soy sauce - Sriracha - Sesame oil - Fresh cilantro for garnish In this recipe, you will need ground beef or turkey as the base. I prefer beef for its rich flavor. Breadcrumbs help bind the meat mixture together and add texture. Fresh green onions bring a nice crunch and mild onion taste. Parmesan cheese adds a savory kick, while the egg helps hold everything in place. Garlic gives the meatballs a mouthwatering aroma and flavor. For seasoning, you will want salt and black pepper for taste. Red pepper flakes add heat, but feel free to adjust the amount based on your spice level. Honey is the star of the sauce, giving it sweetness. Soy sauce provides depth, and sriracha adds heat if you want more spice. Finally, you will need sesame oil for frying. It adds a great flavor to the meatballs. Fresh cilantro is perfect for garnish. It brightens up the dish and adds color. For the full recipe, check out the detailed instructions on how to create these delicious meatballs. - In a large mixing bowl, combine the ground beef, breadcrumbs, green onions, grated Parmesan, egg, minced garlic, salt, black pepper, and red pepper flakes. - Mix well until all ingredients are incorporated. You want a sticky and smooth texture. - Preheat the oven to 375°F (190°C). - Form small meatballs, about the size of a golf ball, and place them on a baking sheet. - Bake for 20 minutes or until browned and cooked through. This step gives them a nice crust. - In a small saucepan over medium heat, combine honey, soy sauce, and sriracha if you want extra heat. - Stir and let simmer for about 5-7 minutes until slightly thickened. This sauce adds a sweet and spicy kick. - Remove the meatballs from the oven and drizzle the sauce over them. - Toss gently to coat each meatball evenly with the sauce. - In a skillet, heat sesame oil over medium-high heat. Add the coated meatballs and cook for 2-3 minutes. Turn them occasionally until they are caramelized and crispy on the outside. For the full recipe, check the above details. Enjoy the rich flavors of your spicy honey garlic meatballs! To make great meatballs, size matters. Keep your meatballs about the same size. This way, they cook evenly. If some are bigger, they may not cook through. Use a small ice cream scoop to help with this. It makes the job easier and faster. To get that nice caramelized crust, heat your skillet well before adding the meatballs. Use sesame oil for a great flavor. Once they’re in the pan, don’t crowd them. Give them space to brown. Turn them gently so they don’t break apart. This step adds texture and taste. Want more heat? Adjust the spice levels! You can add more red pepper flakes for a kick. If you like it spicy, add sriracha to the mix. Start with a little, then taste. You can always add more heat later. Fresh herbs make a big difference. Chopped cilantro or green onions can brighten up the dish. Add them to the sauce or as a garnish. They bring freshness and enhance the overall flavor. Plating is key for impressing your guests. Serve the meatballs on a large platter. Use toothpicks for easy serving. Drizzle extra sauce over the meatballs for a glossy finish. Sprinkle sesame seeds or chopped green onions on top for color. Pair these meatballs with rice or noodles. They soak up the tasty sauce well. You can also serve them alongside a crisp salad for balance. This makes for a colorful and appealing meal. For the full recipe, check out the detailed steps above. {{image_2}} You can swap ground beef for ground chicken or turkey. These options offer a lighter taste. If you prefer plant-based meals, use lentils or chickpeas. They provide protein and a hearty texture. When using these proteins, add different flavors to enhance the dish. For example, ground turkey pairs well with herbs like thyme and rosemary. Feel free to change the sauce to fit your taste. You can use maple syrup or agave instead of honey. Each sweetener gives a unique twist. Adding spices like ginger or five-spice powder can change the flavor. If you want more heat, increase the sriracha or add hot sauce. This makes the dish more exciting and personal. Toppings can make your meatballs shine. Sprinkle sesame seeds on top for a nice crunch. Green onions add freshness and color. Consider serving these meatballs with rice or noodles. A side of steamed veggies makes a complete meal. For a fun touch, use toothpicks for easy serving. This makes sharing and enjoying them even better. Cooked meatballs last about three to four days in the fridge. Store them in an airtight container. This keeps them fresh and safe to eat. Let the meatballs cool before sealing them up. It helps prevent condensation, which can make them soggy. To freeze meatballs, first let them cool completely. Then, place them in a single layer on a baking sheet. Freeze for about an hour. Once frozen, transfer the meatballs to a freezer bag. Remove as much air as possible to avoid freezer burn. They can last up to three months in the freezer. Reheating Tips You can reheat the frozen meatballs using a few methods: - Oven: Preheat the oven to 350°F (175°C). Place the meatballs on a baking sheet and heat for about 15-20 minutes. - Microwave: Place meatballs on a microwave-safe plate. Heat in short bursts, about one minute at a time, until hot. - Stovetop: In a skillet, add a little oil and cook over medium heat. Turn the meatballs often for even warming. Whichever method you choose, keep an eye on them. You want them juicy and full of flavor, not dried out. Enjoy your leftovers! For the full recipe, check out the detailed steps above. To keep meatballs moist, use a few simple tips. First, add breadcrumbs soaked in milk. This adds moisture. You can also use ground beef with a higher fat content. This will help keep them juicy. Make sure not to overmix the meat. Mix just until combined. Finally, baking them instead of frying can help retain moisture. Yes, you can make these meatballs ahead of time! Prepare them and store them in the fridge for up to a day. For longer storage, freeze the uncooked meatballs. You can freeze them for up to three months. Just bake them from frozen, adding a few extra minutes to the cook time. This makes meal prep easy and fast. These meatballs pair well with many side dishes. Some popular choices include: - Steamed rice - Noodles - Roasted vegetables - A fresh green salad - Mashed potatoes Each of these sides complements the sweet and spicy flavors well. You can easily customize the heat! Start by adjusting the red pepper flakes. For less heat, use less than the recipe calls for. If you love spice, add more! Also, consider using more sriracha in the sauce. Taste as you go to find the perfect level for you. Yes, you can make this recipe gluten-free. Use gluten-free breadcrumbs instead of regular ones. You can also use a gluten-free soy sauce. This keeps the flavors intact while making it safe for those with gluten allergies. Enjoy all the flavors without worry! For the full recipe, check out the earlier sections. These spicy honey garlic meatballs are easy and fun to make. You learned how to mix the main ingredients and bake them to perfection. The honey garlic sauce adds great flavor. Remember to adjust spices to match your taste. You can even try different proteins or sauces for variety. Storing leftovers is simple; just refrigerate or freeze for later use. Enjoy them with rice or noodles for a tasty meal. Now, you have everything to create these delicious meatballs at home!

Spicy Honey Garlic Meatballs Flavorful and Easy Recipe

If you’re craving a meal that’s both delicious and easy to make, you’ve landed in the right spot! My Spicy

To make perfect zucchini fritters, you need a few key ingredients: - 2 medium zucchinis, grated - 1 teaspoon salt - ½ cup all-purpose flour - ¼ cup grated Parmesan cheese - 1 large egg - 1 green onion, finely chopped - 2 cloves garlic, minced - ½ teaspoon black pepper - ¼ teaspoon cayenne pepper (optional for heat) - 3 tablespoons olive oil (for frying) - Sour cream or Greek yogurt for serving - Fresh herbs (like dill or parsley) for garnish Each ingredient plays a role. The zucchini gives moisture and a light flavor. Flour binds everything together. The egg adds richness and helps the fritters hold shape. Parmesan brings a savory note that enhances the taste. Using fresh produce makes a big difference. Look for firm, shiny zucchinis. They should feel heavy for their size. Fresh green onions add a nice crunch and flavor. Garlic should smell strong and pungent. This freshness will elevate your dish. You can add more depth with optional ingredients. Try adding chopped bell peppers or corn for sweetness. Chopped spinach can boost nutrition and flavor. If you love heat, consider more cayenne pepper or a pinch of red pepper flakes. These choices can make your fritters unique and suit your taste. For the full recipe, check out the [Full Recipe]. Enjoy creating these delightful bites! Start by grating the zucchinis. Use a box grater or a food processor for this. Once grated, place them in a clean towel. Sprinkle the zucchinis with salt. Let them sit for about 10 minutes. This process draws out excess moisture, which is key for crispy fritters. After 10 minutes, twist the towel to squeeze out the liquid. Get as much moisture out as you can. Transfer the dry zucchini to a mixing bowl. In the bowl with the zucchini, add the flour, Parmesan cheese, and egg. Next, include the finely chopped green onion and minced garlic. Add black pepper and cayenne pepper for some heat, if you like. Mix all the ingredients well until they are fully combined. The batter should hold together but not be too dry. If it feels too wet, add a little more flour. Heat 2 tablespoons of olive oil in a large non-stick skillet over medium heat. Once the oil is hot, use a tablespoon to scoop the zucchini mixture. Drop it into the skillet, flattening each fritter slightly with the back of the spoon. Cook each fritter for about 3-4 minutes on one side. Flip them carefully and cook for another 3-4 minutes until they are golden brown and crispy. Place the fritters on a paper towel to absorb any extra oil. If you need to cook more, add more olive oil as needed. Serve them hot with sour cream or Greek yogurt on top, and sprinkle fresh herbs for a nice touch. Enjoy your crunchy and flavorful delight! For the complete recipe, check out the Full Recipe. To get that perfect crisp in your zucchini fritters, moisture control is key. After grating the zucchinis, sprinkle them with salt. Let them sit for ten minutes. This step pulls out excess water. Then, tightly squeeze the zucchini in a towel. You want to remove as much liquid as possible. Use a hot skillet with enough olive oil when you cook. Make sure the oil shimmers before adding the fritters. This helps them brown nicely. Avoid overcrowding the pan. Cook in batches if needed. Each fritter should have space to fry evenly. If you have leftover fritters, let them cool completely. Store them in an airtight container. Keep them in the fridge for up to three days. They can also be frozen. Place the fritters in a single layer on a baking sheet. Freeze them for an hour before transferring to a freezer bag. This prevents them from sticking together. When ready to eat, reheat in the oven for a crisp finish. One common mistake is not draining the zucchini well enough. If the batter is too wet, the fritters will not hold their shape. Another mistake is using too much flour. This can make the fritters dense. You want a light and airy texture. Finally, don’t skip the salt. It enhances the flavor and helps draw out moisture. Following these tips will lead to delicious, crunchy fritters every time. For the complete process, check the Full Recipe. {{image_2}} To make zucchini fritters gluten-free, swap all-purpose flour for a gluten-free blend. You can use almond flour or chickpea flour. These options give a nice texture and flavor. Just ensure the blend you choose is suitable for baking. Cheese adds great flavor to fritters. While I love Parmesan, you can try feta or cheddar. Feta gives a tangy taste, while cheddar offers a rich, creamy vibe. You can even mix cheeses for more depth. Spices can change the taste of your fritters. Try adding cumin for a warm flavor or paprika for a smoky kick. Fresh herbs like basil or cilantro also enhance the dish. Use what you love to make this recipe your own. For the full recipe, check out the details above. Store leftover zucchini fritters in an airtight container. Place a paper towel inside to absorb moisture. Keep them in the fridge for up to three days. When you're ready to enjoy them, just take them out and follow reheating instructions. You can freeze zucchini fritters too! Let them cool completely before freezing. Arrange them in a single layer on a baking sheet. Freeze until solid, then transfer to a freezer bag. They last up to three months in the freezer. For the best taste, try to use them within two months. To reheat, place the fritters in a preheated oven at 375°F (190°C). Bake for about 10 minutes, or until they are hot and crispy. You can also reheat them in a skillet over medium heat. Add a little olive oil for extra crunch. Enjoy your delicious zucchini fritters just like they were fresh! For the full recipe, refer back to the Zesty Zucchini Fritters section. Yes, you can make Zucchini Fritters ahead of time. Cook them fully and let them cool. Place them in an airtight container and store them in the fridge for up to three days. When ready to eat, just reheat them in a skillet for a few minutes. This keeps them crispy and delicious. Zucchini Fritters are great with many sides. You can serve them with: - Sour cream or Greek yogurt - Fresh herbs like dill or parsley - A simple salad (like arugula or mixed greens) - A light dipping sauce (like tzatziki) - Slices of lemon for zest These pairings add flavor and balance to your meal. To make Zesty Zucchini Fritters gluten-free, simply swap out the all-purpose flour for a gluten-free blend. You can use almond flour or chickpea flour, which also adds nice flavor. Just follow the Full Recipe for Zesty Zucchini Fritters, and you’ll have a tasty dish that everyone can enjoy! Zucchini fritters are simple and fun to make. We covered the main ingredients and tips to cook them perfectly. You learned how to achieve a great crisp and store any leftovers. There are tasty variations like gluten-free options and different cheeses to try. Remember, experimenting can lead to fun meals. Now, you have all the tools to make amazing zucchini fritters. Enjoy making and sharing this delicious dish!

Zucchini Fritters Crunchy and Flavorful Delight

If you’re looking for a tasty, easy-to-make snack or side dish, zucchini fritters are the answer! These crunchy, flavorful bites

To make teriyaki salmon and broccoli, gather these essential ingredients: - 2 salmon fillets (about 6 oz each) - 1 cup broccoli florets - 1/4 cup low-sodium soy sauce - 2 tablespoons honey - 1 tablespoon rice vinegar - 2 cloves garlic, minced - 1 teaspoon grated fresh ginger - 1 tablespoon sesame oil - 1 tablespoon cornstarch - 1/4 cup water - Sesame seeds for garnish - Chopped scallions for garnish - Cooked rice or quinoa (to serve, optional) These ingredients create a balance of sweet and savory flavors in your dish. You might want to add a few optional ingredients for extra taste: - Red pepper flakes for heat - Lime juice for brightness - Sliced bell peppers for crunch - Carrots for sweetness These ingredients can enhance the dish and make it your own. I recommend using fresh ingredients whenever possible. Fresh salmon has a better taste and texture. Fresh broccoli also retains its crunch and bright color. However, frozen ingredients work well too. Frozen salmon and broccoli can save time and still taste good. Just make sure to thaw them before cooking. This way, you get the best flavor and texture in your teriyaki salmon and broccoli dish. For the full recipe, click [Full Recipe]. To start, gather your ingredients. You need low-sodium soy sauce, honey, rice vinegar, garlic, and ginger. In a small saucepan, mix the soy sauce and honey. Add the rice vinegar, minced garlic, and grated ginger. Heat this mixture over medium heat. Stir it well and let it simmer for about two to three minutes. Next, you'll thicken the sauce. In a bowl, combine cornstarch and water to make a slurry. Slowly whisk this slurry into the simmering sauce. Keep stirring until it thickens, which should take about one minute. Once thick, remove it from the heat and set aside. Now, let's cook the broccoli. You can steam or microwave the florets. If you use a steamer, it should take about four to five minutes. The broccoli should be bright green and tender but still crisp. If you use a microwave, place the florets in a microwave-safe bowl. Add a little water and cover it. Microwave for the same time. Once cooked, set the broccoli aside. It’s time to cook the salmon. First, season the fillets with salt and pepper. In a non-stick skillet, heat sesame oil over medium-high heat. Once hot, add the salmon fillets skin-side down. Cook for about four to five minutes until the skin gets crispy. Carefully flip the fillets over. Now, pour half of the teriyaki sauce over the salmon. Cook for another three to four minutes. Your salmon should be cooked to your liking at this point. To serve, place the cooked broccoli on a plate. Add the salmon on top and drizzle with the remaining teriyaki sauce. Garnish with sesame seeds and chopped scallions. Enjoy your dish! For the full recipe, check the other sections. To get crispy salmon skin, start with dry fillets. Pat the skin with a paper towel. This step helps remove extra moisture. Next, heat your pan until it is hot. Add sesame oil to the pan. Place the salmon skin-side down gently. Don't touch it for the first few minutes. Let it cook until the skin is golden and crispy. Flip it carefully, then pour the teriyaki sauce over it. This will keep the skin crunchy. Steaming broccoli keeps it bright and crisp. To steam, use a steamer basket or a microwave-safe bowl. If using a steamer, fill the pot with water, but don't let it touch the broccoli. Steam for 4-5 minutes. If using a microwave, add a little water to the bowl and cover it. Microwave on high for about the same time. The goal is tender but still firm. This method locks in color and nutrients, making it tasty and healthy. Marinades are a great way to add flavor. For this dish, use the teriyaki sauce you made. You can marinate the salmon for 15-30 minutes before cooking. This will deepen the flavor. For garnishes, sprinkle sesame seeds and chopped scallions on top. These add a nice crunch and freshness. You can also serve it over rice or quinoa. This adds texture and makes your meal more filling. You can find the full recipe linked above for more details. {{image_2}} You can add brown sugar to your teriyaki sauce for a sweet twist. Use about 1-2 tablespoons, depending on your taste. Brown sugar gives a rich flavor and helps the sauce caramelize on the salmon. Just mix it in with the soy sauce and other ingredients in the saucepan. This small change can elevate your dish to a new level. Feel free to mix in other veggies for more color and nutrients. Carrots, bell peppers, or snap peas work well. Just chop them small so they cook evenly. Add these veggies when you steam the broccoli or sauté them with the salmon. This addition makes your meal more fun and healthy. If you need a gluten-free option, swap the soy sauce with tamari. Tamari is a great choice that keeps the flavor of the sauce. Make sure to check labels on all your ingredients. Some honey brands might add gluten. With these simple swaps, anyone can enjoy this meal. You can find the full recipe for Teriyaki Salmon and Broccoli [Full Recipe]. To keep your teriyaki salmon and broccoli fresh, let it cool first. Place the leftovers in an airtight container. Store it in the fridge for up to three days. This way, your meal stays tasty and safe. When you're ready to eat your leftovers, reheat them gently. You can use a microwave or a skillet. If using a microwave, cover the dish with a microwave-safe lid. Heat it for about 1-2 minutes. Stir halfway to ensure even heating. If using a skillet, add a splash of water and cover it. Heat on low until warm. You can freeze teriyaki salmon and broccoli for later use. First, let it cool completely. Place the meal in a freezer bag or container. Remove as much air as possible to prevent freezer burn. It can last up to two months in the freezer. Thaw it overnight in the fridge before reheating. For the best taste, enjoy your leftovers fresh! For the full recipe, check out the recipe section above. You can use tamari as a great soy sauce substitute. Tamari is gluten-free and has a rich flavor. Coconut aminos is another option. It offers a sweeter taste and is lower in sodium. If you like a different flavor, try liquid aminos. This option works well for many recipes. You can store your teriyaki sauce in the fridge for up to a week. Make sure to keep it in an airtight container. If you want to store it longer, you can freeze it. It will stay good for about three months in the freezer. Just thaw it in the fridge before using. Yes, you can use chicken, shrimp, or tofu instead of salmon. Chicken thighs or breasts work well. For shrimp, use large ones for better texture. Tofu should be firm, and I suggest pressing it to remove extra water. Each protein will absorb the teriyaki sauce differently, adding unique flavors to your dish. In this post, we explored how to make teriyaki salmon and broccoli. We covered essential ingredients, from salmon and broccoli to optional flavor boosters. Step-by-step, I shared how to prepare the teriyaki sauce and cook everything to perfection. You learned tips for crispy salmon skin and steaming broccoli right. We also discussed variations, storage tips, and common questions. Eating this dish can be simple and fun. Now, it’s time for you to try it!

Teriyaki Salmon and Broccoli Flavorful Dinner Recipe

Ready for a simple yet delicious meal? This Teriyaki Salmon and Broccoli recipe blends sweet and savory flavors with just

Older posts
Newer posts
← Previous Page1 … Page48 Page49 Page50 … Page83 Next →

dsad

© 2025 easycookingbite • Built with GeneratePress

Our Policies

  • Copyright Policy
  • Cookie Policy
  • GDPR Policy
  • Privacy Policy
  • Disclaimer
  • Terms Of Use

More Information

  • Home
  • About
  • Contact
  • Appetizers
  • Dessert
  • Dinner
  • Drinks
©2025, easycookingbite About Back To Top