Skip to content
DisclaimerTerms Of UseGDPR PolicyCookie Policy

easycookingbite

  • Home
  • Drinks
  • Appetizers
  • Dinner
  • Dessert
  • About
  • Contact
  • Privacy Policy
DisclaimerTerms Of UseGDPR PolicyCookie Policy

Lily

- Boneless chicken thighs - Fresh garlic and ginger - Vegetables: bell pepper, broccoli, snap peas When making Honey Garlic Chicken Stir Fry, you want fresh, high-quality ingredients. I love using boneless chicken thighs for their juicy texture. Next, fresh garlic and ginger add a wonderful flavor base. For veggies, I choose a mix of bell peppers, broccoli, and snap peas. They add color and crunch to the dish. - Honey - Soy sauce - Cornstarch The sauce is key to this recipe. I use honey for sweetness and soy sauce for a savory kick. Cornstarch helps thicken the sauce, giving it a rich texture. Together, these ingredients create a balanced flavor that enhances the chicken and veggies. - Sesame seeds - Chopped green onions - Cooked rice or noodles To finish, I sprinkle sesame seeds and chopped green onions on top. They add a nice crunch and fresh taste. Serving this stir fry over cooked rice or noodles makes it a complete meal. For an extra touch, drizzle a little honey on top before serving. Enjoy this simple yet tasty meal! For the full recipe, click here: [Full Recipe]. First, you need to make the sauce. In a small bowl, mix together the honey, soy sauce, minced garlic, and minced ginger. This sauce is the heart of the dish. It brings sweet and savory flavors that make the chicken shine. Set this mixture aside for now. Next, heat 1 tablespoon of vegetable oil in a large skillet or wok over medium-high heat. Once hot, add the sliced chicken thighs. Season them with a pinch of salt and pepper. Cook the chicken for about 5-7 minutes, stirring often. You want it browned and fully cooked. Once done, remove the chicken from the skillet and set it aside. In the same skillet, add the remaining tablespoon of oil. Now, toss in the bell pepper, broccoli, and snap peas. Stir-fry the vegetables for about 3-4 minutes. You want them bright and tender-crisp. This step keeps the veggies fresh and adds color to your dish. Now it's time to bring everything together. Return the cooked chicken to the skillet with the vegetables. Pour the honey garlic sauce over the mixture and stir well to coat everything evenly. For a thicker sauce, stir in the cornstarch slurry. Cook for an additional 1-2 minutes until the sauce thickens slightly. This process creates a delicious Honey Garlic Chicken Stir Fry that looks as good as it tastes. You can find the full recipe to enjoy this dish at home. To get the best texture, slice the chicken evenly. This helps it cook fast and stay juicy. Heat your skillet or wok well before adding oil. A hot pan gives a nice sear. Stir often, but not too much. Let the food brown for great flavor. When cooking veggies, keep them bright and crisp. Cook them just until tender, not mushy. Want to boost taste? Add a pinch of red pepper flakes for heat. A splash of rice vinegar can bring a tangy twist. Consider adding hoisin sauce for sweetness and depth. For a fresh kick, toss in some lime juice at the end. Fresh herbs like basil or cilantro can also brighten the dish. Use a large skillet or wok for even cooking. A non-stick pan will help prevent sticking. A wooden spoon or spatula is great for stirring. For cutting, a sharp chef’s knife will make prep easy. Don't forget a cutting board for safety and ease. A good pair of tongs can help flip the chicken without mess. {{image_2}} You can swap the chicken for shrimp, beef, or tofu. Each choice gives a new taste. Shrimp cooks quickly and adds a nice sweetness. Beef brings a rich flavor, while tofu absorbs the sauce well. Each protein option works great with the honey garlic sauce. Feel free to mix in other vegetables. Carrots add a nice crunch, while zucchini offers a soft texture. You can also use mushrooms for a hearty bite. Green beans or bok choy are great choices too. The key is to choose vegetables you enjoy. To make this recipe gluten-free, use tamari instead of soy sauce. It has a similar flavor without gluten. Always check labels to avoid any hidden gluten. This way, everyone can enjoy this tasty meal. To keep your honey garlic chicken stir fry fresh, store leftovers in an airtight container. Make sure to let the dish cool down before sealing it. This helps prevent moisture buildup, which can make the food soggy. It is best to eat the leftovers within three days. Simply reheat in the microwave or on the stove until warm. If you want to freeze your stir fry, portion it out first. Use freezer-safe bags or containers. Remove as much air as possible to prevent freezer burn. You can freeze it for up to three months. When you're ready to eat, thaw it in the fridge overnight. Reheat on the stove over low heat. Add a splash of water or broth to keep it moist. In the fridge, honey garlic chicken stir fry stays good for about three days. In the freezer, it can last up to three months. Always check for any off smells or changes in color before eating. Proper storage keeps your meal safe and tasty! For the full recipe, refer to the earlier section. Honey garlic chicken stir fry is a quick and tasty dish. It features tender chicken, bright veggies, and a sweet and savory sauce. The honey adds a nice sweetness, while garlic brings a bold flavor. This dish is colorful and packed with nutrients. You can serve it over rice or noodles for a complete meal. Yes, you can prep this dish ahead of time. You can chop the veggies and marinate the chicken. Store them in airtight containers in the fridge. When you are ready to cook, just stir-fry everything together. If you have leftovers, they can be stored in the fridge for up to three days. Reheat in a skillet or microwave for a quick meal. To adjust the spice level, you can add red pepper flakes or sliced chili peppers. Start with a small amount and mix it in. Taste before adding more. This way, you can control the heat without overwhelming the dish's flavors. You can also use spicy soy sauce for an extra kick. Yes, you can use other meats in this recipe. Shrimp, beef, or tofu work well too. If using shrimp, cook until they turn pink. For beef, slice it thin and cook until browned. Tofu should be firm, and you can pan-fry it for a crispy texture. Each option gives a new twist to the honey garlic stir fry. For the full recipe, check the earlier sections. This blog post covered a tasty honey garlic chicken stir fry. We looked at main ingredients like chicken, fresh garlic, and colorful veggies. You learned how to prepare the sauce and cook everything step-by-step. Tips for perfecting your stir fry and ways to customize the dish were also shared. Remember, you can switch proteins or go gluten-free. Storing leftovers properly can help you enjoy this meal again. This dish is easy, healthy, and sure to please. Enjoy your cooking!

Honey Garlic Chicken Stir Fry Simple and Tasty Meal

Looking for a quick and tasty meal? Try my Honey Garlic Chicken Stir Fry! This dish combines tender chicken thighs

- 2 cups rolled oats - 1 cup pecans, roughly chopped - 1/2 cup unsweetened shredded coconut - 1/4 cup sunflower seeds - 1/4 cup maple syrup - 2 tablespoons coconut oil, melted - 1 teaspoon vanilla extract - 1 teaspoon cinnamon - 1/2 teaspoon salt - 1/2 cup dried cranberries (optional) Gathering the right ingredients is key for great maple pecan granola. I love using rolled oats for a chewy texture. Pecans add a nice crunch and flavor. The unsweetened shredded coconut gives a hint of sweetness. Sunflower seeds boost the nutty notes and add healthy fats. Maple syrup is our sweetener. It gives that lovely flavor we crave. Coconut oil helps everything crisp up nicely. Vanilla extract adds warmth and depth. Cinnamon brings in a cozy spice note, while salt enhances all the flavors. You can add dried cranberries for a fruity touch. They give a burst of tartness that pairs perfectly with the sweet maple. I recommend using these ingredients to create a delicious granola mix. For the full recipe and detailed steps, check out the Full Recipe section. First, you need to preheat your oven. Set it to 350°F (175°C). This step helps the granola bake evenly. Line a baking sheet with parchment paper to make cleanup easy later. Next, grab a large mixing bowl. Add 2 cups of rolled oats, 1 cup of roughly chopped pecans, 1/2 cup of shredded coconut, and 1/4 cup of sunflower seeds. Stir these dry ingredients well. This mix gives your granola a great crunch and flavor. In a small bowl, combine the wet ingredients. Whisk together 1/4 cup of maple syrup, 2 tablespoons of melted coconut oil, 1 teaspoon of vanilla extract, 1 teaspoon of cinnamon, and 1/2 teaspoon of salt. Make sure everything blends nicely. This mixture adds sweetness and richness to your granola. Now, pour the wet mixture over the dry ingredients. Stir until all the dry ingredients get coated. Spread the mixture evenly on your baking sheet. Bake for 20-25 minutes. Stir the granola every 10 minutes. This ensures it browns evenly. Once golden and fragrant, remove it from the oven. Let it cool completely on the baking sheet. It will become crunchy as it cools. If you like, stir in 1/2 cup of dried cranberries after it cools. Store your granola in an airtight container. For the full recipe, check the details above. To make sure your granola is crunchy, follow a few key steps. First, use rolled oats, as they bake better than quick oats. Second, spread the mixture evenly on the baking sheet. This allows for even toasting. Stir every ten minutes while baking. This helps the granola brown evenly. After baking, let it cool completely on the sheet. It will harden as it cools, giving you that perfect crunch. You can boost the flavor of your granola in many ways. Add spices like nutmeg or ginger for warmth. A pinch of sea salt can enhance the sweetness of the maple syrup. For a fruity twist, toss in dried fruits like cranberries or apricots. If you like a hint of chocolate, mix in some dark chocolate chips after baking. These small changes can create a granola that suits your taste perfectly. Maple pecan granola is versatile and fun to serve. You can enjoy it with yogurt and fresh fruit for a wholesome breakfast. Sprinkle it over salads for a crunchy texture. It also makes a great topping for desserts like ice cream. For a quick snack, grab a handful straight from the jar. The options are endless! Check out the Full Recipe for more ideas on how to enjoy this tasty treat. {{image_2}} You can switch out pecans for other nuts. Almonds, walnuts, or cashews work well. Each nut brings a unique taste and texture. Try using a mix for more flavor. Just keep the total nut amount the same. This way, your granola will still crunch. If you like it sweeter, add more maple syrup. Honey or agave syrup can also work great. For less sweetness, use less syrup or try unsweetened applesauce. Balance the flavors until it fits your taste. The aim is a granola that you love! You can add seeds or dried fruits for extra flavor. Chia seeds or pumpkin seeds add nutrition. Dried fruits like raisins, apricots, or blueberries give a nice chew. Try spices like nutmeg or ginger for a twist. Get creative and make it your own! Check out the Full Recipe for more tips on making this tasty Maple Pecan Granola! To keep your Maple Pecan Granola fresh, store it in an airtight container. Glass jars work well, but plastic containers are fine too. Make sure the container is completely sealed to keep out air and moisture. You can store it at room temperature, away from heat and sunlight. This helps maintain its crunch and flavor. When stored properly, your granola can last up to two weeks. If you want it to last longer, consider freezing it. Granola can stay fresh for three months in the freezer. Just make sure to use a freezer-safe container. When you want to eat it, let it thaw at room temperature. If your granola loses its crunch, don't worry! You can easily bring it back to life. Preheat your oven to 300°F (150°C). Spread the stale granola on a baking sheet in a single layer. Bake it for about 5 to 10 minutes. Keep an eye on it to avoid burning. Let it cool, and it should be crunchy again. Enjoy this tasty treat in various ways, like on yogurt or as a snack. For the full recipe, check out the complete details. You can customize your granola easily. Try adding different nuts, seeds, or dried fruit. You might like almonds, walnuts, or pumpkin seeds. You can swap maple syrup for honey or agave. Adjust the cinnamon for more or less spice. Mix in chocolate chips for a sweet treat. Yes, you can make this granola gluten-free. Choose certified gluten-free oats when you shop. Most nuts and seeds are naturally gluten-free too. Just make sure all your ingredients are safe. This way, everyone can enjoy your tasty granola. Maple Pecan Granola can be a healthy choice. It has whole grains from oats and healthy fats from nuts. The maple syrup adds natural sweetness, but it’s still sugar. Add dried fruit for extra vitamins. Enjoy in moderation for a balanced snack. Watch for the color and smell. Your granola will turn golden brown and smell great. Stir it every ten minutes for even toasting. It usually takes about 20 to 25 minutes. Let it cool completely; it will get crunchier as it cools. Absolutely! You can use any nuts or seeds you like. Almonds, cashews, or hazelnuts all work well. You can also try chia seeds or flaxseeds for extra nutrition. Feel free to mix and match for your perfect granola. For the full recipe, check out the detailed instructions above. Maple pecan granola is a tasty snack or breakfast. It has a crunchy texture and sweet flavor. You can make it with simple ingredients. Here’s what you need: - 2 cups rolled oats - 1 cup pecans, roughly chopped - 1/2 cup unsweetened shredded coconut - 1/4 cup sunflower seeds - 1/4 cup maple syrup - 2 tablespoons coconut oil, melted - 1 teaspoon vanilla extract - 1 teaspoon cinnamon - 1/2 teaspoon salt - 1/2 cup dried cranberries (optional) These ingredients create a perfect balance of flavors. The oats give it body, while pecans add crunch. Coconut adds a tropical twist, and sunflower seeds boost nutrition. Maple syrup is the sweetener that ties it all together. To make this granola, start by preheating your oven to 350°F (175°C). Next, mix the dry ingredients in a large bowl. This includes the oats, pecans, coconut, and sunflower seeds. In another bowl, whisk the wet ingredients together. This step ensures even flavor in every bite. Once combined, spread the mixture onto a parchment-lined baking sheet. Bake for 20-25 minutes. Stir every 10 minutes to help it toast evenly. The granola is done when it turns golden brown and smells amazing. Let it cool completely on the baking sheet. As it cools, it will become crunchy. You can add dried cranberries at this stage for a fruity flavor. Transfer the granola to an airtight container for storage. This recipe makes about 8 cups. You can serve it with yogurt and fresh fruit. It is also great on salads or desserts. Enjoy the delicious crunch of maple pecan granola! You now have a simple way to make Maple Pecan Granola. We covered the key ingredients, from oats to cranberries. You learned how to mix, bake, and store your granola. I shared tips to make it crunchy and tasty. Plus, you can customize it to fit your taste. This recipe is healthy and easy to make. Enjoy it alone or with yogurt. Get creative with flavors and ingredients. Making your own granola is fun, so dive in and start baking!

Maple Pecan Granola Crunchy and Flavorful Treat

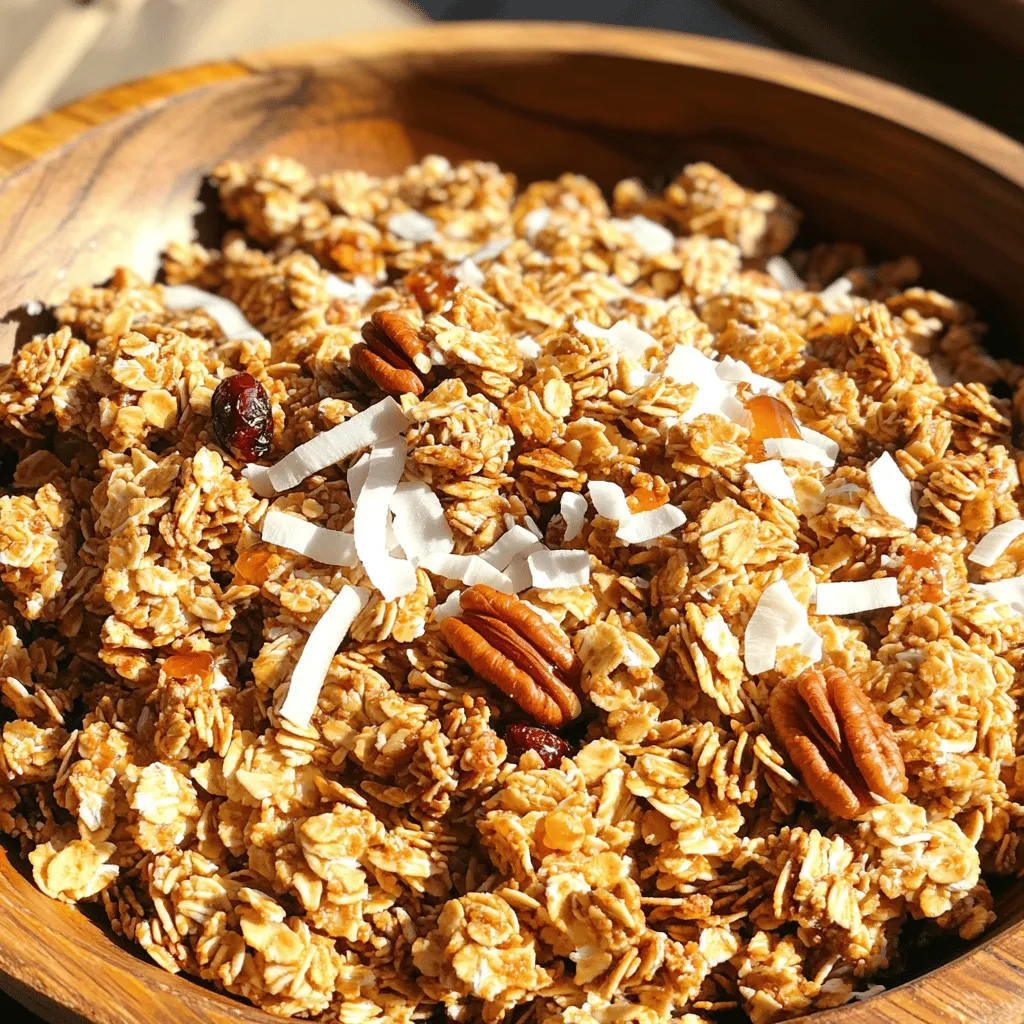
Are you ready for a crunchy and flavorful treat? Maple Pecan Granola is here to satisfy your cravings! Packed with

- Large head of cauliflower - All-purpose or gluten-free flour - Water or plant-based milk - Garlic powder - Onion powder - Smoked paprika - Buffalo sauce (store-bought or homemade) - Olive oil - Fresh cilantro or parsley - Optional: blue cheese or ranch dressing For these Buffalo Cauliflower Bites, start with a large head of cauliflower. Cut it into bite-sized florets. This way, every piece gets crispy and tasty. Next, you need flour. You can use all-purpose flour or gluten-free flour if you prefer. This flour will help create a nice batter that sticks to the cauliflower. For the liquid part, use either water or plant-based milk. This choice depends on your taste. Mix these main ingredients well. Now, we move to the seasonings. Add garlic powder, onion powder, and smoked paprika to the mix. These spices bring a lot of flavor. You will love how they make each bite pop! Finally, don’t forget about the sauces and garnishes. Buffalo sauce is key. You can buy it or make your own. A drizzle of olive oil helps the sauce stick better. Fresh cilantro or parsley adds a nice touch on top. If you like dipping sauces, blue cheese or ranch dressing works great. This recipe is simple yet full of flavor. You can find the Full Recipe to guide you through every step. Enjoy making these bites your way! First, preheat your oven to 450°F (230°C). This helps the bites get crispy. Next, line a large baking sheet with parchment paper. This keeps them from sticking. Now, let’s mix the batter. In a large bowl, whisk together the flour, water or plant-based milk, garlic powder, onion powder, smoked paprika, salt, and black pepper. Keep mixing until it’s smooth. This batter will coat the cauliflower well. Take each cauliflower floret and dip it into the batter. Make sure each piece is fully coated. Let any extra batter drip off. This helps them cook better. Then, place the coated florets on your baking sheet. Make sure they stay in a single layer. Don’t let them touch each other. This helps them crisp up nicely. Bake the florets in the preheated oven for about 25 minutes. They should turn golden and crispy during this time. While they bake, mix the buffalo sauce and olive oil in a bowl. This combo adds a rich, spicy flavor to the bites. Once the cauliflower is done, take it out of the oven. Toss the baked bites in the buffalo sauce mixture until they’re well coated. Return the sauced bites to the baking sheet and bake for another 10 minutes. This final bake helps the sauce set. After that, carefully remove them from the oven. Let them cool slightly before serving. You can garnish with fresh cilantro or parsley. Enjoy your Buffalo Cauliflower Bites! For the full recipe, check the earlier section. To get that perfect crunch, you must place the cauliflower bites in a single layer on the baking sheet. If they touch, they will steam instead of crisp. This simple step makes a big difference. You may also need to adjust the baking time based on your oven. If your bites are not golden after 25 minutes, add a few more minutes for extra crunch. Spice up your Buffalo cauliflower bites by adding different spices. Try cayenne pepper for heat or smoked paprika for depth. You can also switch out seasonings. Use Italian herbs for a different twist or even curry powder for a unique flavor. Experimenting can lead to tasty surprises. Pair your Buffalo cauliflower bites with dipping sauces for extra flavor. Blue cheese or ranch dressing works great. For a fresh touch, try a yogurt dip with herbs. You can also get creative with garnishing. Sprinkle fresh cilantro or parsley on top for color. A squeeze of lime adds a zesty kick too. These small touches make your dish pop! {{image_2}} You can prepare Buffalo cauliflower bites in different ways. - Air-fried Buffalo cauliflower bites: This method uses less oil, making them lighter. The air fryer gives them a nice crispy texture. Just coat the florets as you normally would and cook them in the air fryer for about 15 minutes at 400°F. Shake the basket halfway through for even cooking. - Fried Buffalo cauliflower bites: If you want a more indulgent snack, try frying them. Heat oil in a deep pan and fry the coated florets until they turn golden brown. This method gives a super crunchy outside and a tender inside. Just be careful with the hot oil! Buffalo sauce is just the start. You can switch up the flavors easily. - Different sauces: Try BBQ sauce for a sweet twist. You can also use honey to add sweetness or a spicy sauce for more heat. The options are endless! - Alternative coatings: Instead of flour, you can use panko breadcrumbs for added crunch. Nutritional yeast is a great choice for a cheesy flavor without dairy. Mix and match to find your favorite! You can easily adapt this recipe for different diets. - Gluten-free options: Use gluten-free flour instead of all-purpose flour. This way, everyone can enjoy these bites without worry. - Vegan adaptations: The recipe is mostly vegan already! Just ensure your buffalo sauce is plant-based. You can also use plant-based milk in the batter. Enjoy tasty bites that fit your diet! For the full recipe, check out the detailed instructions. After making Buffalo Cauliflower Bites, let them cool completely. Cooling prevents sogginess. Place them in an airtight container. You can also use parchment paper between layers. This keeps them crispy. Store the bites in the fridge for up to four days. To reheat, use the oven for the best results. Preheat your oven to 375°F (190°C). Place the bites on a baking sheet. Heat for about 10-15 minutes. This method keeps them crispy. If you use a microwave, they may become soft. If you must use it, heat them in short bursts. Check often to avoid overcooking. You can freeze Buffalo Cauliflower Bites for later. First, let them cool completely. Then, arrange them in a single layer on a baking sheet. Freeze until solid, about one hour. After that, transfer them to a freezer-safe bag. Remove as much air as possible. They can last up to three months in the freezer. To reheat frozen bites, thaw them overnight in the fridge. Then, follow the reheating instructions above. This keeps them crispy and flavorful. To make Buffalo Cauliflower Bites crispy, follow these techniques: - Single Layer: Place florets in a single layer on the baking sheet. This helps air circulate around them. - High Heat: Bake at a high temperature, like 450°F (230°C). This creates a nice crunch. - Batter Thickness: Keep the batter thin. Too much batter can make them soggy. - Final Bake: After tossing in buffalo sauce, bake again for 10 minutes. This helps set the sauce. Yes, you can use frozen cauliflower. However, make sure to thaw it first. Drain any excess water after thawing. This prevents sogginess in your bites. Frozen cauliflower may take longer to bake. Keep an eye on them for doneness. Buffalo Cauliflower Bites pair well with these appetizers and sides: - Dipping Sauces: Blue cheese or ranch dressing are great choices. - Veggie Sticks: Carrots and celery add a nice crunch. - Salads: A fresh green salad complements the spice well. - Nachos: They make a tasty side with cheesy nachos. To reduce the spice levels in buffalo sauce, try these tips: - Mix with Butter: Combine buffalo sauce with melted butter. This cuts the heat. - Add Sweetness: A bit of honey or sugar can balance the spice. - Use Mild Sauce: Choose a milder buffalo sauce or a BBQ sauce instead. - Serve with Creamy Dip: Offer ranch or blue cheese as a cooling dip. The total cook time for Buffalo Cauliflower Bites is about 40 minutes: - Prep Time: 15 minutes to get everything ready. - First Bake: Bake for 25 minutes to crisp up the batter. - Final Bake: Bake for another 10 minutes after tossing in buffalo sauce. Absolutely! Here are some tips for prepping in advance: - Make Ahead: You can coat the cauliflower ahead of time and store in the fridge. - Reheat Later: Bake them again to crisp them up. - Store in Air-tight Container: Keep leftovers in an airtight container in the fridge. They can last up to 3 days. - Enjoy Cold or Hot: They taste great warm or at room temperature, so they are easy to serve. For the full recipe, follow our detailed instructions, and enjoy making this delicious snack! Buffalo cauliflower bites are a tasty and easy snack. You now know how to prepare them, from mixing ingredients to baking. Use your favorite sauces and spices for extra flavor. Store leftovers correctly to keep them fresh. Don’t forget to try different cooking methods and flavor options. With these tips, you'll impress everyone with your cooking skills. Enjoy your delicious bites!

Buffalo Cauliflower Bites Crispy and Flavorful Snack

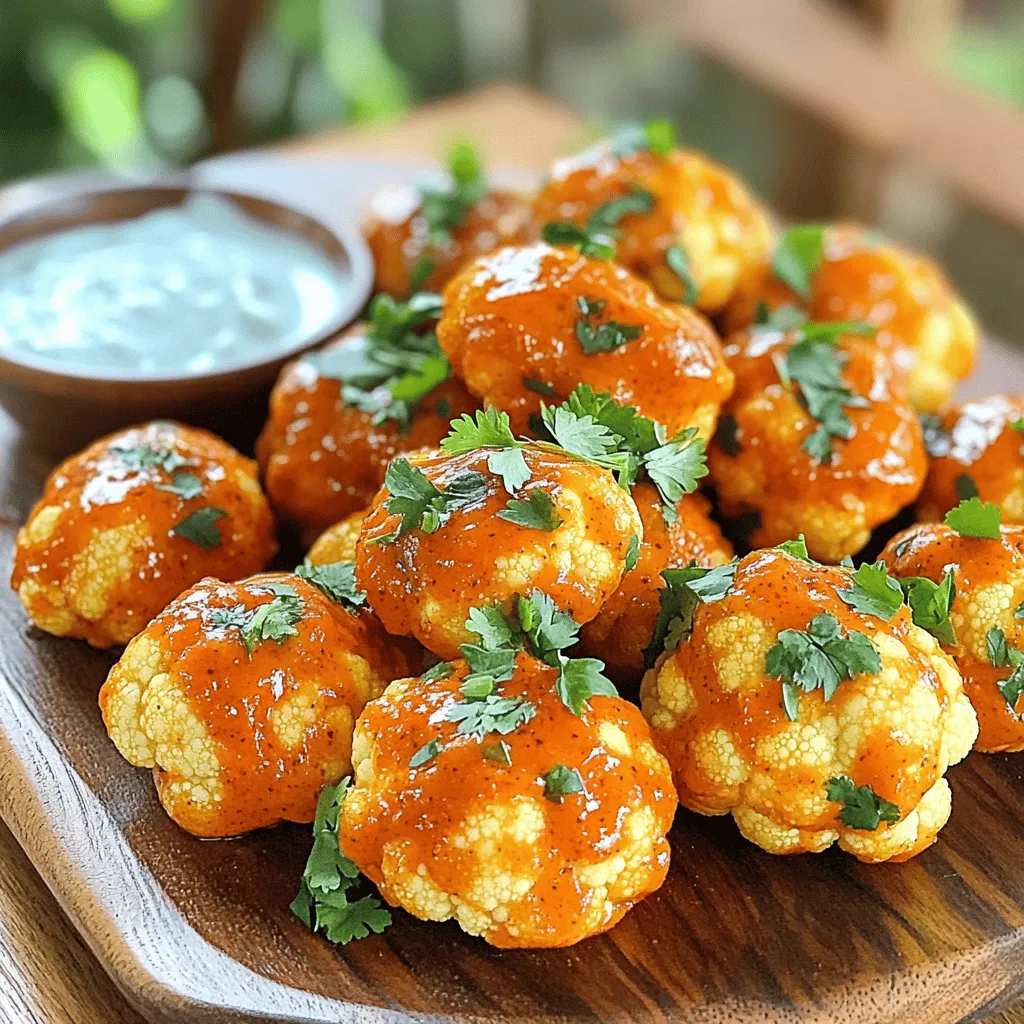
Are you ready to elevate your snacking game? Buffalo Cauliflower Bites are the perfect mix of crispy texture and bold

For a bright and tasty Spicy Thai Noodle Salad, gather these fresh ingredients: - 8 oz rice noodles - 1 cup shredded carrots - 1 cup cucumber, thinly sliced - 1 red bell pepper, julienned - 1 cup red cabbage, shredded - 1/4 cup fresh cilantro, chopped - 1/4 cup green onions, chopped - 1/2 cup unsalted roasted peanuts, roughly chopped - 1/4 cup soy sauce (or tamari for gluten-free) - 3 tablespoons lime juice - 2 tablespoons sesame oil - 1 tablespoon brown sugar - 1-2 tablespoons Sriracha sauce (adjust for desired heat) - Salt and pepper, to taste These ingredients create a mix of colors and flavors. Rice noodles form the base of the salad. They soak up the tasty dressing well. Fresh veggies add crunch and nutrients. Carrots and cucumbers bring a nice sweetness. Red bell pepper and red cabbage give it a pop of color. Cilantro and green onions add fresh herbs that lift the dish. Peanuts give a satisfying crunch. The dressing combines soy sauce, lime juice, sesame oil, and brown sugar. This mix balances salty, sour, and sweet flavors. Sriracha adds the spice. You can adjust the heat to fit your taste. For a detailed guide on how to prepare this dish, check the Full Recipe. To start, cook the rice noodles. Follow the package instructions for the best results. After cooking, drain and rinse the noodles with cold water. This stops the cooking and keeps them from getting mushy. Set them aside to cool completely. Next, let’s whip up the dressing. In a small bowl, combine soy sauce, lime juice, sesame oil, brown sugar, and Sriracha. Use a whisk to mix everything well. You can adjust the Sriracha based on how spicy you like it. Taste it to find your perfect heat level! Now, grab a large mixing bowl. Add the shredded carrots, sliced cucumber, julienned red bell pepper, and shredded red cabbage. Toss the veggies together gently. This mix will add color and crunch to your salad! It’s time to bring everything together. Add the cooled rice noodles to the veggie mixture. Pour the dressing over the top. Toss everything gently to coat the noodles and veggies evenly. You want every bite to be full of flavor! Next, stir in the chopped cilantro and green onions. They add a fresh taste and vibrant color. Season with salt and pepper to your liking. Mix it well for a balanced flavor profile. For a great presentation, serve this salad in a large bowl. Just before serving, top it with chopped peanuts for a nice crunch. You can also add extra cilantro and lime wedges on the side for a pop of color and zest. Enjoy this dish fresh for the best taste! To cook rice noodles well, follow these steps: - Boil water in a large pot. - Add the rice noodles, stir them gently. - Cook for 4-6 minutes, or until soft. - Drain and rinse under cold water to stop cooking. This keeps them from sticking together. I often use a splash of oil to help, too. Not everyone loves heat, and that’s okay! You can adjust the spice in your salad. Start with one tablespoon of Sriracha. Taste, then add more if you want it spicier. You can also use sweet chili sauce for a milder kick. Want to make this salad even better? Add some fun extras! Try: - Sliced bell peppers for crunch. - Avocado for creaminess. - Roasted sesame seeds for a nutty flavor. These additions can make your salad more exciting. Don't shy away from experimenting and finding your favorite mix! For the full recipe, check out the details above. {{image_2}} You can make this salad even better with added protein. For chicken, use grilled or shredded cooked chicken. It adds a nice texture and flavor. If you like shrimp, sauté them until they are pink and tender. Toss them in just before serving. For a plant-based option, try cubed tofu. Make sure to pan-fry it until golden. This gives the tofu a crispy edge. Each option enhances your salad, making it a full meal. If you want to keep it vegetarian, skip the meat and stick to the fresh veggies. Add more protein-rich ingredients like chickpeas or edamame. They will add nutrients and keep you full. You can also try adding sliced avocado for creaminess and a boost of healthy fats. Adjust the flavors with extra lime juice or a splash of soy sauce for more depth. To make this salad gluten-free, use tamari instead of soy sauce. It still packs the same flavor without gluten. Check your rice noodles; most are gluten-free, but always read the label. You can even swap rice noodles with zucchini noodles for a fresh twist. Just spiralize the zucchini and toss it in. Enjoy your spicy Thai noodle salad without worrying about gluten! To keep your Spicy Thai Noodle Salad fresh, store leftovers in an airtight container. This helps prevent moisture loss and keeps flavors intact. Place the salad in the fridge. It will stay good for about three days. If you have leftovers with peanuts, it’s best to store them separately. This keeps the peanuts crunchy. When you are ready to eat your leftovers, you can enjoy them cold or warm. If you prefer warm noodles, heat them gently. Use a microwave-safe bowl and cover it to avoid drying out. Heat for 30 seconds, stir, then heat for another 30 seconds if needed. Add a splash of water to keep it moist. Freezing this salad isn’t the best option. The texture of the noodles and veggies can change. However, if you want to freeze it, do so without the dressing and peanuts. Store the noodles and veggies in a freezer-safe bag. When ready to eat, thaw overnight in the fridge, then add fresh dressing and peanuts before serving. This way, you maintain the salad's crunch and flavor. Spicy Thai Noodle Salad is a fresh, vibrant dish. It features rice noodles mixed with crisp veggies and a spicy dressing. The crunch from peanuts adds a lovely texture. You get flavors from lime, soy sauce, and Sriracha. Each bite is a delicious balance of sweet, salty, and spicy. Yes, you can make this salad ahead of time. It stays fresh in the fridge for a few hours. Just prepare the noodles and veggies, then add the dressing before serving. This keeps everything crisp and tasty. To make the salad less spicy, reduce the Sriracha. Start with just one tablespoon. You can also add more lime juice or sugar to balance the heat. This way, you keep the flavor without it being too hot. You can use other noodles if you can't find rice noodles. Try soba noodles, udon, or even spaghetti. Just cook them according to package instructions. The texture might change, but the salad will still taste great. Absolutely! This dish is perfect for meal prep. The salad keeps well in the fridge. Just store the dressing separately until you're ready to eat. This helps keep the salad fresh and crunchy. For the complete guide to making this tasty dish, check out the Full Recipe. This blog post shared a tasty recipe for Spicy Thai Noodle Salad. We covered all the ingredients you need and detailed steps to prepare it. Tips also helped you cook rice noodles just right and adjust spice levels. You learned about variations to fit your diet, from adding proteins to making it gluten-free. Finally, I provided storage tips for leftovers. Now, you can easily try this dish at home. Enjoy creating your own flavorful salad!

Spicy Thai Noodle Salad Flavorful and Fresh Delight

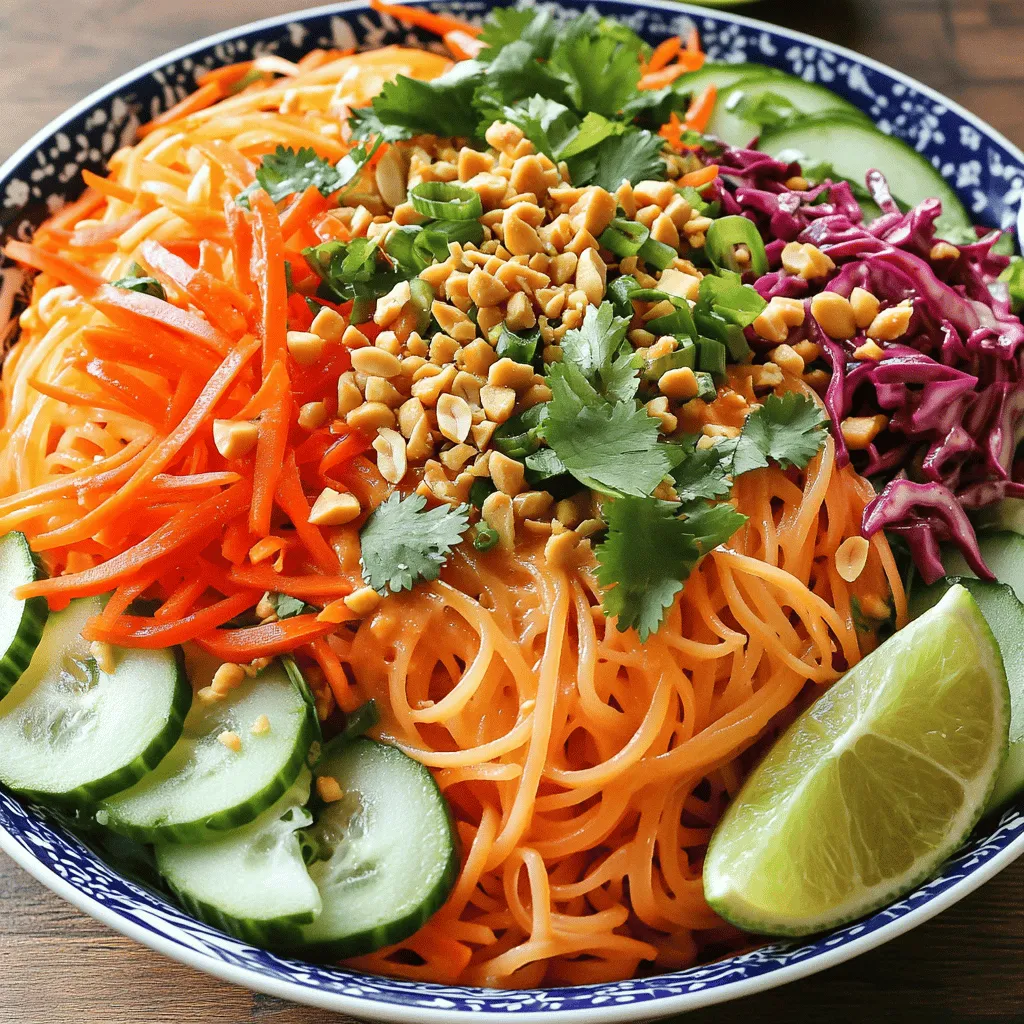
Looking for a salad that packs a punch? You’ve found it! My Spicy Thai Noodle Salad is vibrant, fresh, and

- 1 cup canned chickpeas, drained and rinsed - 1/4 cup tahini - 4 cloves roasted garlic - 2 tablespoons lemon juice - 2 tablespoons olive oil - 1/2 teaspoon ground cumin - Salt to taste - 2-3 tablespoons water - Paprika and fresh parsley for garnish The main ingredients of roasted garlic hummus are simple and easy to find. You start with chickpeas. They give the dip its creamy base. Tahini adds a nutty taste and smooth texture. Roasted garlic is the star of the show. It brings a sweet, rich flavor that makes the hummus special. Fresh lemon juice adds a bit of brightness, while olive oil gives it a nice finish. Ground cumin gives depth to the flavor. Salt brings all these tastes together. Water helps adjust the thickness of the hummus, making it just right for dipping. - Extra spices for flavor enhancement - Alternative garnishes You can add some extra spices to change the taste. Try smoked paprika or cayenne pepper for heat. You can also use different garnishes. Chopped olives or a drizzle of balsamic glaze can make it look fancy. These options let you personalize your hummus to fit your taste buds. For the full recipe, check the detailed steps to make this delicious dip! - Preheat your oven to 400°F (200°C). - Take a head of garlic and slice off the top. This exposes the cloves. - Drizzle a bit of olive oil on top. Wrap the garlic tightly in aluminum foil. - Roast it in the oven for 30-35 minutes. Check if it's soft by squeezing a clove. It should feel tender and smell sweet. - In a food processor, combine the main ingredients: drained chickpeas, tahini, roasted garlic, lemon juice, olive oil, cumin, and salt. - Blend until the mix is smooth. If it’s not creamy, you may need to blend longer. - Scrape down the sides of the bowl as needed to mix everything well. - If your hummus is too thick, add water one tablespoon at a time. Blend after each addition until you get your desired texture. - Taste your hummus. Adjust the seasoning with more salt or lemon juice if needed. - This mix of flavors is key for a perfect dip. For the complete recipe, check out the [Full Recipe]. To make great hummus, start with fresh ingredients. Use canned chickpeas that are stored well. Check the date on the can. For the best flavor, use quality tahini. Look for tahini made from fresh, toasted sesame seeds. This will add a rich taste to your hummus. Roasted garlic hummus pairs well with many foods. Serve it with pita chips, fresh veggies, or crunchy crackers. You can also spread it in wraps for a tasty lunch. Try adding it to sandwiches for extra flavor. Hummus is very versatile, so get creative! You can even make a hummus platter with various toppings, like olives or feta cheese. For the complete recipe on how to make roasted garlic hummus, check out the Full Recipe. {{image_2}} You can easily change the taste of your roasted garlic hummus. Start by adding fresh herbs. Basil or cilantro can give a bright twist. Just mix in a handful before blending. You will love the fresh taste they bring. Another option is to add roasted red peppers or sun-dried tomatoes. These add a sweet, rich flavor that pairs well with hummus. Simply chop them finely and blend them in with the other ingredients. This adds both color and taste to your dip. Roasted garlic hummus is naturally gluten-free. You can enjoy it without any worries. If you want to make it even more special, use chickpeas from dried beans. Just soak them overnight and cook them until soft. For vegan variations, this recipe is perfect. All ingredients are plant-based. You can serve it with veggies, pita bread, or crackers. The options are endless for everyone to enjoy. For the full recipe and tips, check out the Full Recipe link. To keep your hummus fresh, store it in an airtight container. This way, it won’t dry out. Place it in the fridge right after you finish eating. If you want to make it last longer, you can freeze it. Just scoop it into a freezer-safe container and leave some space on top. This helps it expand as it freezes. In the fridge, hummus lasts about 5 to 7 days. Always check for signs of spoilage. If it starts to smell sour or has an off color, it’s best to toss it. Look for any mold on the surface. If you see any, throw it out. Fresh hummus should be smooth and creamy. If it separates, just stir it up again. For the full recipe, check out the link to create your own delicious roasted garlic hummus! To make roasted garlic, first preheat your oven to 400°F (200°C). Slice the top off a whole head of garlic. This shows the garlic cloves. Drizzle some olive oil over the cut side. Wrap the garlic in foil and place it in the oven. Roast for 30-35 minutes. The garlic should be soft and golden. Once cool, squeeze the roasted garlic from the cloves into a bowl. It will have a sweet and mild flavor. You can use raw garlic, but the taste will change. Raw garlic has a sharp and strong flavor. Roasted garlic is sweet and smooth. If you prefer a milder taste, stick to roasted garlic. The texture will also differ. Hummus with raw garlic might be grainy, while roasted garlic makes it creamy. Roasted garlic hummus pairs well with many things. Here are some ideas: - Pita chips - Fresh veggies like carrots and cucumbers - Crackers - Toasted bread - Grilled meats or fish These items add crunch and flavor, making your dip more enjoyable. For the complete roasted garlic hummus recipe, check out the [Full Recipe]. It includes all the steps and tips to make this tasty dip. Roasted garlic hummus combines simple ingredients for rich flavor. We discussed main components and optional additions to enhance taste. The step-by-step guide made preparation easy. I shared tips to perfect your hummus and suggested serving ideas for every occasion. You can even customize it based on your diet. Store your leftovers properly for lasting freshness. Overall, this hummus recipe is tasty, healthy, and versatile. Enjoy experimenting with flavors that excite your taste buds!

Roasted Garlic Hummus Flavorful and Simple Dip

Are you ready to elevate your snacking game? In this article, I’ll show you how to make Roasted Garlic Hummus—an

To make apple cinnamon overnight oats, you will need: - 1 cup rolled oats - 1 ½ cups almond milk (or any milk of choice) - 1 medium apple, diced - 1 teaspoon cinnamon - 1 tablespoon maple syrup (or honey) - ½ teaspoon vanilla extract - 2 tablespoons chia seeds - A pinch of salt - Optional toppings: chopped nuts, raisins, or additional apple slices You can easily swap some ingredients if needed. - Use any milk you like, such as oat or coconut milk. - For the apple, try pears or berries for a twist. - If you want less sugar, skip the maple syrup or honey. - You can use ground flaxseed instead of chia seeds. - If you don't have cinnamon, pumpkin spice works well. These apple cinnamon overnight oats are healthy and filling. Each serving has: - Calories: About 300 - Protein: 8g - Carbohydrates: 52g - Fiber: 10g - Sugars: 10g - Fat: 6g This dish gives you energy and nutrients to start your day. For the full recipe, check out the detailed steps in the article. First, gather all your ingredients for apple cinnamon overnight oats. You’ll need rolled oats, almond milk, a medium apple, cinnamon, maple syrup, vanilla extract, chia seeds, and a pinch of salt. This step takes just a few minutes. It sets you up for a smooth cooking process. In a medium bowl, add the rolled oats and almond milk. Next, dice the apple and toss it in. Sprinkle in the cinnamon, maple syrup, vanilla extract, chia seeds, and salt. Use a spoon to mix everything together. Make sure the oats soak in the milk. The oats should be fully covered. This step is key for creamy oats. Once mixed, cover the bowl with a lid or plastic wrap. Place it in the fridge overnight. If you’re short on time, let it sit for at least four hours. Chilling helps the oats absorb the liquid. In the morning, give the oats a good stir. If you prefer a creamier texture, add a splash of milk. Enjoy your tasty apple cinnamon overnight oats! For the full recipe, check out the previous section. To achieve the best texture in your apple cinnamon overnight oats, use rolled oats. They soak up the liquid well and stay chewy. If you want a creamier mix, add a splash of milk in the morning. Mixing in chia seeds also helps thicken the oats. They absorb moisture and create a lovely texture. Adjusting sweetness is easy with this recipe. If you like it sweeter, add more maple syrup or honey. You can also use ripe apples for extra natural sweetness. Taste the mix before you refrigerate it. This way, you know just how sweet you want it. To make your oats even more exciting, try adding different flavors. A pinch of nutmeg can give a warm spice. You can mix in fresh berries for a fruity twist. If you enjoy nuts, add chopped walnuts or pecans for crunch. You can also sprinkle in a little cocoa powder for a chocolatey touch. Check out the Full Recipe for more ideas! {{image_2}} You can switch up the fruit in your apple cinnamon overnight oats. Try adding bananas for a creamy texture or berries for a burst of flavor. Pears also work great, adding a nice sweetness. Mix and match to find your favorite combo. Remember, fresh or frozen fruit can both be used. Just chop them small so they mix well with the oats. If you want a dairy-free version, almond milk is a great choice. Other options include oat milk, coconut milk, or soy milk. Each milk adds a different taste to your oats. You can also use water if you prefer something lighter. It will still be tasty, just a bit less creamy. For nut-free options, skip the nuts entirely. You can use seeds instead. Sunflower seeds or pumpkin seeds add a nice crunch. If you want a nutty flavor without nuts, try using nut-free butters like sunflower seed butter. This way, you can enjoy all the taste without the nuts. For the full recipe, check out the detailed instructions above. Store your apple cinnamon overnight oats in an airtight container. This keeps them fresh and safe. Place the container in your fridge right after mixing. Always check the lid is secure. They can stay good for a few days. I recommend eating them within three days for the best taste. You can freeze your overnight oats if you need to save leftovers. Use a freezer-safe container. Leave some space at the top because the oats will expand when frozen. To thaw, move them to the fridge overnight. You can also microwave them for a quick warm-up. Just add a splash of milk to help with the texture. When stored properly, your apple cinnamon overnight oats last up to five days in the fridge. If you freeze them, they can last for about three months. However, the texture may change slightly after thawing. Always check for any off smells or changes in color before eating. I suggest tasting a small bit if you are unsure. Yes, you can easily make apple cinnamon overnight oats vegan. Just use almond milk or any plant-based milk. Maple syrup is also a great sweetener for vegan oats. This way, you keep all the flavor while making it vegan-friendly. You can store overnight oats in the fridge for up to five days. Just make sure to use a sealed container. This keeps the oats fresh and tasty for breakfast all week long. If you see any change in smell or texture, it's best to toss them out. If you don’t have chia seeds, you can use ground flaxseeds. They add a similar texture and boost nutrition. You can also skip them if you want a simpler recipe. Just remember that chia seeds help thicken the oats, so your mix may be thinner without them. For more details, check the Full Recipe. This blog post detailed the key ingredients for delicious overnight oats. I shared substitution ideas and nutritional benefits. The step-by-step guide covered mixing and refrigeration, ensuring your oats turn out great. Tips on texture and flavor will help you customize your bowl. I discussed variations, including dairy-free and nut-free options, and provided storage tips for freshness. In summary, overnight oats are flexible and easy. With the right approach, you can make them tasty and healthy! Enjoy your delicious creations!

Apple Cinnamon Overnight Oats Simple and Tasty Recipe

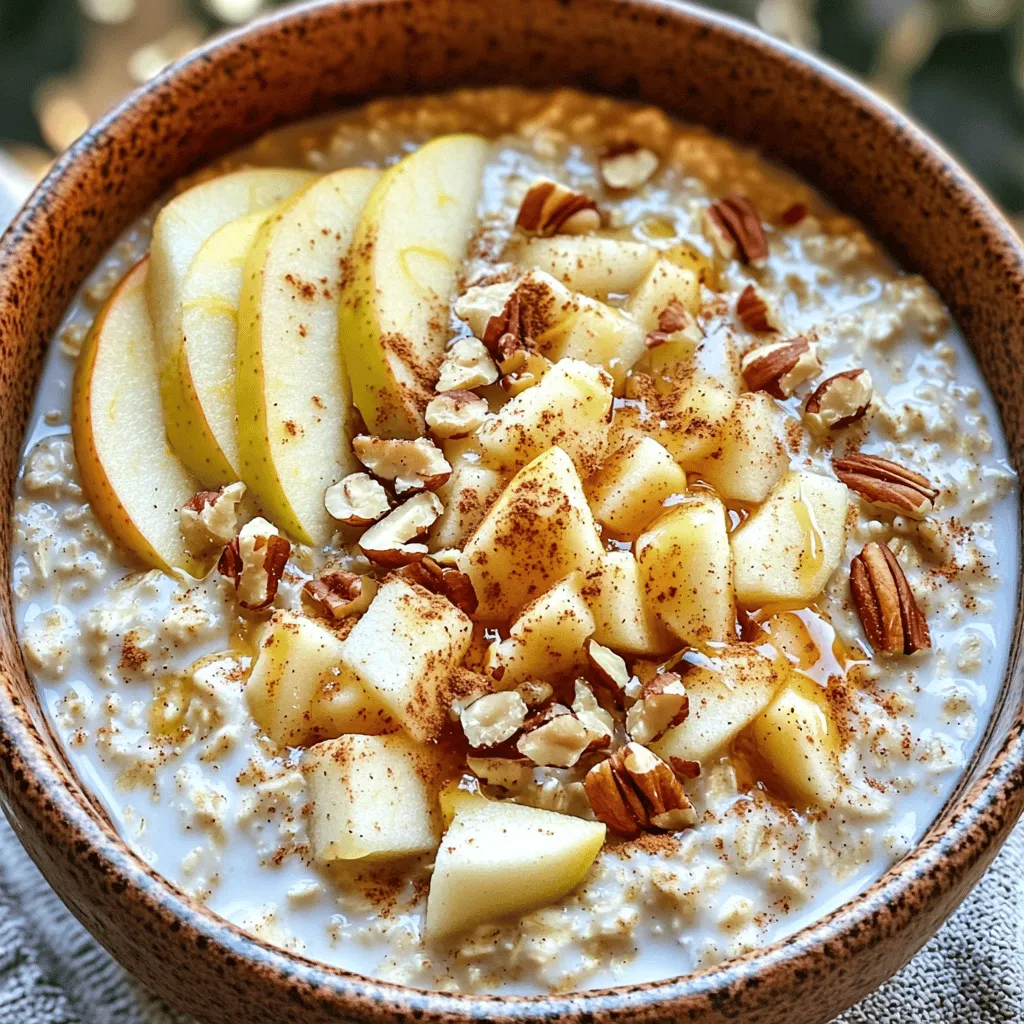
Looking for an easy and tasty breakfast? Apple Cinnamon Overnight Oats are the perfect mix! This simple recipe combines fresh

For these tasty vegan tacos, you will need: - 1 cup walnuts, finely chopped - 1 tablespoon olive oil - 1 small onion, diced - 2 cloves garlic, minced - 1 teaspoon chili powder - 1 teaspoon cumin - 1 teaspoon smoked paprika - 1/2 teaspoon salt - 1/4 teaspoon black pepper - 1 tablespoon soy sauce - 8 small corn tortillas - 1 cup shredded lettuce - 1 cup diced tomatoes - 1 avocado, sliced - Fresh cilantro, for garnish - Lime wedges, for serving Choosing high-quality ingredients makes a big difference. Fresh walnuts add great taste and texture. Look for organic walnuts if possible. Use fresh herbs, like cilantro, for bright flavor. Pick ripe avocados for creaminess. Always buy fresh produce for the best taste in your tacos. Avoid canned tomatoes; fresh ones taste better and add more color. If you have allergies, don't worry. You can swap out some ingredients. - Use sunflower seeds instead of walnuts for a nut-free option. - If you are soy-free, try coconut aminos in place of soy sauce. - For gluten-free tacos, choose corn tortillas or lettuce wraps. - If you can’t have onions, use shallots or skip them altogether. These simple swaps let you enjoy vegan tacos without worry. For the full recipe, check the earlier section. To make the walnut meat, start by finely chopping the walnuts. Use a food processor for this. Pulse them until they look crumbly. Do not turn them into nut butter. Next, heat olive oil in a skillet over medium heat. Add the diced onion and cook it until it turns soft and clear. This takes about five minutes. Then, add minced garlic and cook for one more minute. You want the garlic to smell great. Now, mix in the chopped walnuts along with chili powder, cumin, smoked paprika, salt, and black pepper. Stir everything well and cook for about five minutes. You’ll want to stir occasionally. Finally, pour in the soy sauce. Cook for another two to three minutes. This lets the walnuts soak up the flavor. Now it’s time to put your tacos together. Take a corn tortilla and place a big scoop of the walnut mixture right in the center. Next, add some shredded lettuce for crunch. Then, sprinkle diced tomatoes on top. Don’t forget to add slices of creamy avocado. This will make your tacos taste amazing. Garnish with fresh cilantro for extra flavor. Serve with lime wedges on the side. Squeezing fresh lime juice adds a nice kick! Warming the tortillas is key for great tacos. Use a dry skillet and heat it over medium heat. Place the tortillas in the skillet for about 30 seconds. Flip them and heat the other side for the same time. You want them soft and easy to fold. If you want, you can wrap them in a clean kitchen towel to keep them warm. Enjoy your tasty vegan tacos with walnut meat! For a full recipe, be sure to check the detailed instructions. To store leftover walnut meat, let it cool completely. Then, place it in an airtight container. You can keep it in the fridge for about five days. Be sure to label the container with the date. If you want to store it longer, freeze the walnut meat. It will last up to three months in the freezer. Just thaw it overnight in the fridge before using. A good taco sauce can make your tacos shine. To make a simple sauce, combine 1/4 cup of diced tomatoes, 1 tablespoon of lime juice, and 1 teaspoon of chili powder. Mix them well in a small bowl. You can also add a pinch of salt for taste. If you want some heat, add a dash of hot sauce. This sauce adds great flavor and freshness to your tacos. To make your tacos even tastier, think about texture. Warm your corn tortillas in a dry skillet until they are soft. This step makes them pliable and less likely to tear. You can also lightly toast them for a crispy edge. When assembling, layer the walnut meat first, then add crunchy lettuce and juicy tomatoes. The mix of textures will make each bite delightful. {{image_2}} You can add many fillings to your vegan tacos. Some great options include: - Black beans - Corn - Sautéed bell peppers - Roasted zucchini - Shredded carrots These fillings bring color and flavor. Mix and match what you like. The more, the merrier! Want to spice things up? You can adjust heat levels easily. Here are some tips: - Add fresh jalapeños for a kick. - Use chipotle powder for a smoky heat. - Try diced hot peppers in your walnut meat. - Serve with a spicy salsa or hot sauce. Taste as you go. Find the heat that suits you! Tortillas are key to great tacos. You can choose from several types: - Corn tortillas are classic and gluten-free. - Flour tortillas are soft and chewy. - Lettuce wraps are great for a low-carb option. - Whole wheat tortillas add more fiber. Try different tortillas to find your favorite. Each brings a unique taste! For the complete experience, check out the Full Recipe for Vegan Tacos with Walnut Meat! To keep your vegan tacos fresh, store them in an airtight container. I recommend separating the walnut meat from the tortillas and toppings. This helps keep everything crisp and tasty. Place the walnut meat in the fridge for up to three days. Make sure your container has no moisture to avoid sogginess. You can freeze the walnut meat for later use. First, let it cool completely. Then, place it in a freezer-safe bag. Squeeze out all the air before sealing. You can freeze it for up to three months. When you're ready to use it, thaw it overnight in the fridge. Reheating is easy and keeps your tacos tasty. For the walnut meat, heat it in a skillet over medium heat. Stir it often until it's hot. This keeps it from drying out. If you want to reheat tortillas, warm them in a dry skillet. Just heat them for about 30 seconds on each side. Enjoy your tacos as if they were fresh! For the full recipe, check out the link above. Yes, you can use other nuts! Pecans or almonds work well. Just chop them finely. Each nut will give a different taste and texture. If you like a sweeter flavor, try pecans. Almonds add a nice crunch too. Remember, the key is to keep a crumbly texture. This helps mimic the meat in the tacos. You can serve many tasty sides with vegan tacos. Here are some ideas: - Mexican rice - Refried beans - Grilled vegetables - Guacamole - Salsa These sides add more flavor and texture. You can also add a fresh salad. It will balance the meal nicely. Making tacos gluten-free is easy! Use corn tortillas instead of flour tortillas. Corn tortillas are naturally gluten-free. Be sure to check the label for any added ingredients. You can also use lettuce wraps. They make a fresh and crunchy alternative. This way, everyone can enjoy the tacos! For the full recipe, check below. In this blog post, we covered key ingredients and detailed instructions for making vegan tacos. We looked at the importance of ingredient quality and how to substitute for allergens. I shared tips for perfecting your taco fillings and sauces. You learned storage methods to keep leftovers fresh. Finally, I provided fun variations and answered common questions. Now, it's time to get cooking and enjoy these delicious, healthy tacos!

Vegan Tacos with Walnut Meat Flavorful and Easy Recipe

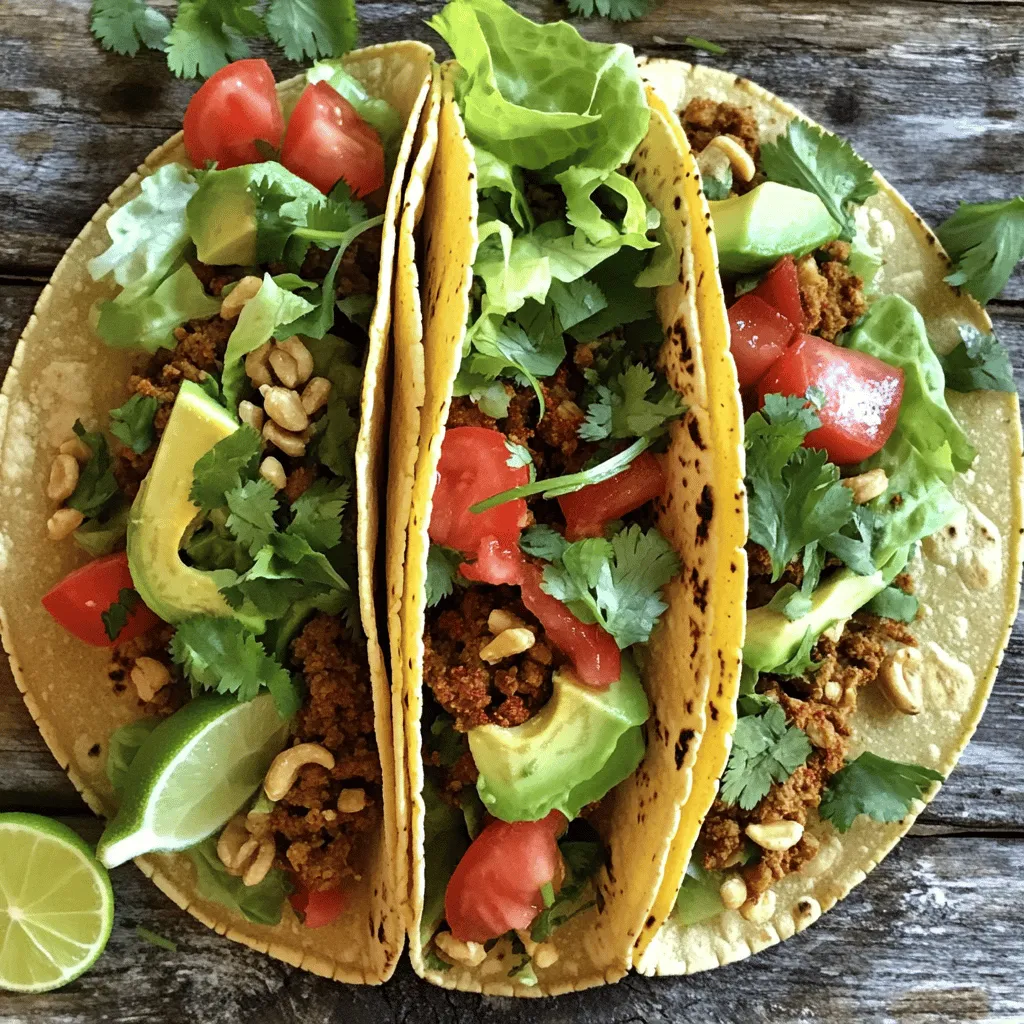
If you’re searching for a tasty vegan meal that’s simple to make, you’re in the right place! My Vegan Tacos

- 1 cup rolled oats - 1/2 cup almond butter or peanut butter - 1/2 cup pumpkin puree - 1/4 cup honey or maple syrup - 1 tablespoon pumpkin pie spice - 1/2 teaspoon vanilla extract - 1/4 cup mini chocolate chips (optional) - 1/4 cup chopped nuts (walnuts or pecans) - Pinch of salt These ingredients blend well to create a tasty snack. Each one adds flavor and nutrition. Pumpkin spice energy bites provide good energy. They are rich in fiber and healthy fats. Oats and pumpkin add nutrients. Almond or peanut butter gives protein. Honey or maple syrup adds natural sweetness. This recipe yields about 12 to 15 bites. Each bite is a perfect snack. You can easily double the recipe for more. Enjoy them after a workout or as a quick treat. Mixing the Base Ingredients Start by gathering your ingredients. In a large bowl, mix 1 cup of rolled oats, 1/2 cup of almond butter (or peanut butter), 1/2 cup of pumpkin puree, and 1/4 cup of honey or maple syrup. Stir until the mixture becomes thick and well combined. This forms a solid base for your bites. Adding Flavor Enhancements Next, add 1 tablespoon of pumpkin pie spice, 1/2 teaspoon of vanilla extract, and a pinch of salt to the bowl. Mix everything thoroughly to ensure each bite has a burst of flavor. If you want some extra sweetness, fold in 1/4 cup of mini chocolate chips and 1/4 cup of chopped nuts like walnuts or pecans. This step brings texture and taste to your energy bites. Forming the Energy Bites Now comes the fun part! Grab small amounts of the mixture and roll them into balls about 1 inch in diameter. You can also use a cookie scoop for evenly-sized bites. Place the formed energy bites on a parchment-lined baking sheet or plate. After forming your bites, refrigerate them for at least 30 minutes. This helps them firm up nicely. When ready to serve, you can enjoy them right away or store them in an airtight container in the fridge. They last up to a week. To make your energy bites look even more delicious, arrange them in a small bowl. Sprinkle a bit of pumpkin spice on top for color. You can also add a few pecan halves on top for a nice touch. This makes them not only tasty but also visually appealing! For the full recipe, check out the detailed instructions above. When mixing the ingredients, start with the sticky ones. Combine almond butter and pumpkin puree first. This helps them blend well with the oats. Use a strong spoon or spatula. If it feels tough, get your hands in there! Mixing with your hands gives you better control. The key to great energy bites is balance. Too much pumpkin puree makes them too wet. If your mix is too dry, add a bit of honey or maple syrup. Aim for a thick, moldable dough. It should hold together when you roll it into a ball. If they crumble, add a splash of water or more nut butter. To boost the taste, try adding mini chocolate chips or nuts. They add sweetness and crunch! You can also toss in seeds, like chia or flaxseeds. Feel free to experiment with different spices. A hint of cinnamon or nutmeg can change the game. For more details, check out the Full Recipe. {{image_2}} You can change the nut butter to fit your taste. Almond butter is great, but you can use peanut butter, cashew butter, or sunflower seed butter. Each one gives a new flavor. Sunflower seed butter is a good choice for nut-free options. This change keeps the bites creamy and tasty. While pumpkin pie spice is a classic, you can mix it up! Try adding cinnamon, nutmeg, or even ginger. Each spice adds its own twist. If you love heat, a pinch of cayenne pepper can make them exciting. Don’t hesitate to experiment and find your favorite blend. You can swap out honey for other sweeteners. Maple syrup works well for a vegan choice. Agave nectar or brown rice syrup are also good options. For a lower sugar option, try using mashed dates or pureed figs. These substitutes keep the bites sweet and delicious without all the sugar. Feel free to be creative with your ingredients. The Full Recipe gives you a solid base, but the fun comes from making it your own! To keep your Pumpkin Spice Energy Bites fresh, store them in an airtight container. This helps keep moisture out and flavors in. Place a piece of parchment paper between layers if you stack them. You can also wrap them individually in plastic wrap for easy grab-and-go snacks. If you want to keep them longer, consider freezing some. Just make sure they are well-wrapped to avoid freezer burn. When stored in the refrigerator, these energy bites last up to a week. After that, they may lose their taste and texture. If you freeze them, they can last for about three months. Just remember to thaw them in the fridge before eating. Always check for any off smells or changes in texture before you enjoy them. This helps ensure you are eating a safe and tasty snack. Yes, you can easily make these energy bites vegan. Just swap the honey for maple syrup. Use almond butter or peanut butter as your base. Both options are vegan-friendly. This way, you keep the taste and texture while making them plant-based. Pumpkin spice energy bites last about a week in the fridge. Store them in an airtight container. This keeps them fresh and tasty. They may dry out if left uncovered, so be sure to seal them well. If you don't have pumpkin puree, you can use applesauce. It adds sweetness and moisture. You might also try mashed banana for a different flavor. Both options work well in the recipe and keep it moist. Yes, these energy bites are healthy! They contain fiber from oats and healthy fats from nut butter. Pumpkin puree adds vitamins A and C. If you control the sweetener, you can keep the sugar low. Overall, they make a great snack or breakfast option. Absolutely! You can freeze these energy bites for up to three months. Just place them in a freezer-safe container. To enjoy, thaw them in the fridge overnight. This way, you have a quick, healthy snack ready when you need it. For the full recipe, check out the entire section above! Pumpkin spice energy bites are a fun snack that you can make at home. They are easy to prepare and packed with flavor. When I made them for the first time, I loved how simple the steps were. What ingredients do I need for pumpkin spice energy bites? You need just a few basic items. Here’s what you should gather: - 1 cup rolled oats - 1/2 cup almond butter or peanut butter - 1/2 cup pumpkin puree - 1/4 cup honey or maple syrup - 1 tablespoon pumpkin pie spice - 1/2 teaspoon vanilla extract - 1/4 cup mini chocolate chips (optional) - 1/4 cup chopped nuts (walnuts or pecans) - Pinch of salt These items create a tasty mix full of flavor. The rolled oats provide a good base. Almond butter or peanut butter adds creaminess. Pumpkin puree gives it that warm, fall feel. Honey or maple syrup brings sweetness, while pumpkin pie spice adds a cozy touch. How do I make these energy bites? Making pumpkin spice energy bites is quick and fun. You start by mixing the rolled oats, almond butter, pumpkin puree, and honey or maple syrup in a large bowl. Stir until the mix is thick and well combined. Next, add the pumpkin pie spice, vanilla extract, and salt. Stir it all together until the flavors blend. If you want an extra treat, fold in the mini chocolate chips and chopped nuts. This adds a nice crunch and sweetness. Now, it's time to shape the bites. Use your hands to form small balls, about one inch wide. You can also use a cookie scoop to make them all the same size. After shaping, place the energy bites on a parchment-lined baking sheet. Chill them in the fridge for at least 30 minutes. This helps them firm up and makes them easier to eat. Once they are ready, store the bites in an airtight container. They can last in the fridge for up to a week. I love serving these bites in a colorful bowl. A sprinkle of pumpkin spice on top makes them look extra special. You can even add a few pecan halves for a nice touch. If you want more details about the recipe, check out the Full Recipe. These pumpkin spice energy bites are easy to make and full of flavor. You can mix oats, nut butter, and pumpkin for a tasty snack. Adding spices and optional ingredients can make them unique. Keep in mind how to store these bites for longer freshness. Always feel free to adjust the recipe to your taste. Enjoy experimenting with nut butters or sweeteners! These bites are not just tasty, they can also be nutritious. Try making them and share your results. Enjoy your homemade treats!

Pumpkin Spice Energy Bites Tasty and Simple Snack

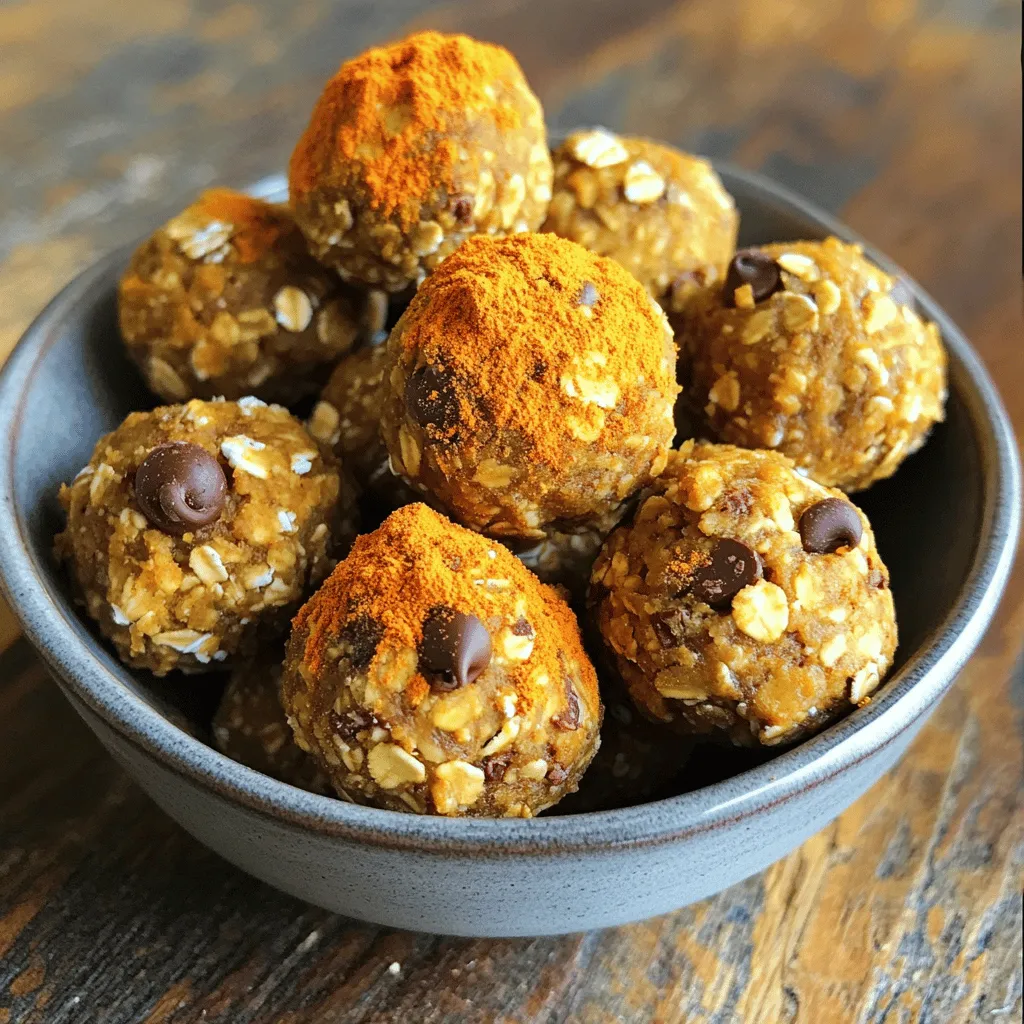
Are you ready to spice up your snack game? With my Pumpkin Spice Energy Bites, you can enjoy fall flavors

To make a tasty Peach Avocado Salad, you will need the following: - 2 ripe peaches, sliced - 2 ripe avocados, diced - 1 cup arugula or mixed salad greens - 1/4 cup red onion, thinly sliced - 1/4 cup crumbled feta cheese - 1/4 cup walnuts or pecans, toasted - 2 tablespoons balsamic glaze - 1 tablespoon olive oil - Salt and pepper to taste - Fresh basil leaves for garnish These ingredients create a vibrant salad full of flavor and nutrition. If you can't find peaches, try using nectarines or plums. They bring a similar sweetness. For avocados, you can replace them with ripe mango or even cucumber for a fresh crunch. If feta isn't your style, try goat cheese or a dairy-free cheese. These swaps still keep your salad fresh and tasty. The best time to find ripe peaches is during summer. Look for them from June to September. Avocados are usually perfect in spring and summer. Buy them when they feel slightly soft to the touch. Fresh ingredients make a big difference in flavor. Shop at local markets for the best taste! 1. First, gather all your ingredients. You need ripe peaches, avocados, arugula, and red onion. 2. Slice the peaches into thin wedges. Make sure they are sweet and juicy. 3. Dice the avocados into bite-sized cubes. Use ripe ones for the best flavor. 4. In a large bowl, add the sliced peaches and diced avocados. 5. Toss in the arugula or mixed greens. Add the thinly sliced red onion next. 6. Gently fold in crumbled feta cheese. It adds a nice salty flavor. 7. Lastly, sprinkle in toasted walnuts or pecans for extra crunch. 1. In a small bowl, measure out the balsamic glaze and olive oil. 2. Whisk them together until they blend well. This creates a smooth dressing. 3. Taste it, and feel free to adjust with more glaze or oil. 1. Transfer the salad mix to a clean serving platter. 2. Drizzle the dressing evenly over the salad. Toss gently to coat all the ingredients. 3. Season with salt and pepper to enhance the flavors. 4. For a beautiful touch, garnish with fresh basil leaves. This adds a nice aroma. 5. Serve right away to keep the salad fresh and crisp. Enjoy this Peach Avocado Delight Salad! Find the [Full Recipe](#). To make your Peach Avocado Salad burst with flavor, try adding a squeeze of fresh lemon juice. The citrus adds brightness and cuts through the creaminess of the avocado. Fresh herbs, like mint or cilantro, can also elevate your salad. They add a nice twist and make each bite exciting. A pinch of chili flakes can bring a hint of heat. This balance of flavors makes your salad unforgettable. Achieving the perfect crunch is key. Use fresh arugula or mixed greens for a crisp base. The combination of soft peaches and creamy avocados pairs well with crunchy nuts. Toasted walnuts or pecans add a delightful crunch. Ensure your peaches are firm, not too ripe, to maintain texture. If you like a bit more crunch, consider adding cucumber slices or radishes. Preparation can be quick and easy. Slice peaches and avocados just before serving to keep them fresh. Pre-chop your onions and nuts in advance. Store them in airtight containers in the fridge. You can also buy pre-washed salad greens to save time. For the dressing, whisk together balsamic glaze and olive oil ahead of time. This way, you can enjoy your salad in just ten minutes. For the full recipe, check out the detailed instructions. {{image_2}} You can make your Peach Avocado Salad even better. Try adding other fruits. Berries like strawberries or blueberries add sweetness. You can also add diced cucumber for crunch. Shredded carrots bring color and extra vitamins. These additions boost nutrition and flavor. This salad fits many diets. For vegan options, skip the feta cheese. Use dairy-free cheese or leave it out. For gluten-free diets, confirm your dressing is gluten-free. Low-carb eaters can skip the nuts or use fewer fruits. This way, you can enjoy the salad without worry. While balsamic glaze is great, you can switch it up. A simple lemon vinaigrette brightens the flavors. Try adding honey to the dressing for sweetness. You could also use a spicy dressing for a kick. These options keep the salad fresh and exciting. To keep leftover Peach Avocado Salad fresh, store it in an airtight container. Place the salad in the fridge right away. This helps keep the flavors intact. Avoid pressing down on the salad. This can bruise the avocado and peaches. The salad will stay fresh for about one day in the fridge. After that, the avocado may brown and the flavors change. For the best taste, eat it quickly. If you store the dressing separately, it can last about a week. You can prepare parts of the salad in advance. Slice the peaches and avocados just before serving. This keeps them bright and fresh. You can wash and dry the greens ahead of time. Keep them in a sealed bag or container. Mix the dressing in a small jar, and store it in the fridge. This way, you can enjoy a fresh salad anytime. For the full recipe, check out the Peach Avocado Delight Salad. Yes, you can make this salad ahead of time. However, keep in mind that avocados brown quickly. To prevent this, store the salad in an airtight container. You can also add lemon juice to the avocado to slow browning. If you want the best taste, add the dressing just before serving. This keeps the salad fresh and crisp. When selecting peaches, look for ones that feel soft but not mushy. The skin should have a nice color and a slight give when you press it gently. For avocados, choose ones that yield slightly to pressure. The skin should be dark, but not too dark. Avoid any with large indentations or bruises. Picking ripe fruits ensures your salad tastes amazing. You can add several proteins to make this salad a full meal. Grilled chicken or shrimp works well and adds great flavor. You can also use chickpeas for a plant-based option. For a twist, try adding bacon or even salmon. These proteins pair nicely with the sweet peaches and creamy avocados in the salad. Peach Avocado Salad combines fresh flavors and textures. You learned about the key ingredients and their substitutes. Seasonal tips help you find the best peaches and avocados. Step-by-step instructions guide you through preparation and plating. Tips enhance flavor and save time. Variations allow you to customize for dietary needs. Finally, storage tips ensure your salad stays fresh. Enjoy making this delicious dish that pleases everyone!

Peach Avocado Salad Fresh and Healthy Delight

Are you ready to elevate your salad game? My Peach Avocado Salad is a true fresh and healthy delight. Packed

- 2 pounds Yukon Gold potatoes, peeled and cubed - 4 cloves of garlic, peeled - 1/2 cup heavy cream - 1/4 cup unsalted butter, softened To make creamy garlic mashed potatoes, you need these main ingredients. Yukon Gold potatoes give a rich, buttery flavor. They are perfect for mashing. Garlic adds a nice kick. I love using fresh garlic for the best taste. Heavy cream makes the potatoes rich and smooth. Unsalted butter brings in extra creaminess. - 1/4 cup grated Parmesan cheese - Chopped fresh chives for garnish If you want to take your mashed potatoes up a notch, add grated Parmesan cheese. It gives a sharp taste that balances well with the creaminess. Fresh chives offer a pop of color and a mild onion flavor. They make your dish look great and taste better. - Salt and black pepper - Alternative herbs Salt and black pepper are the basics for flavor. Always taste as you go. You can also add herbs like thyme or rosemary for a twist. These herbs can enhance the flavor profile. Experiment with different seasonings to find your favorite mix. To start, peel and cube 2 pounds of Yukon Gold potatoes. These potatoes are creamy and perfect for mashing. Cut them into even pieces, about 1-2 inches. This helps them cook at the same rate. Next, peel 4 cloves of garlic. You can add more if you love garlic. Place the cubed potatoes and garlic in a large pot. Cover them with cold water, filling the pot about an inch above the potatoes. Now, add a pinch of salt to the water. This step helps flavor the potatoes as they cook. Bring the water to a boil over medium-high heat. Once boiling, reduce the heat and let it simmer. Cook for about 15-20 minutes until the potatoes are tender. You can check by poking them with a fork. After cooking, drain the potatoes and garlic. Return them to the pot to let off some steam. This makes them fluffier. Grab a potato masher and start mashing the potatoes and garlic together. Press down firmly but gently. If you want a smoother mash, you can use a ricer or a food mill. This gives the potatoes a light and airy texture. Keep mashing until you reach your desired smoothness. Avoid over-mashing, as it can turn gummy. Now, it’s time to make these mashed potatoes creamy. Add 1/4 cup of softened unsalted butter to the pot. Then, pour in 1/2 cup of heavy cream. Stir the mixture well until it’s creamy and well combined. For an extra touch, you can mix in 1/4 cup of grated Parmesan cheese. This adds a rich flavor that pairs well with garlic. Finally, season with salt and black pepper to taste. Start with a little and adjust as needed. If you want to enhance the flavor, feel free to add chopped fresh chives for garnish. For the full recipe, check out [Full Recipe]. Enjoy your creamy garlic mashed potatoes! To get the best creamy texture, choose Yukon Gold potatoes. They are buttery and smooth. Cut them into even cubes for even cooking. Boil them until soft, about 15 to 20 minutes. Test with a fork; they should break apart easily. Using warm cream helps mix better. Cold cream can cool down your potatoes. Warm it gently on the stove or in the microwave. Then, pour it in when mashing. This makes your mashed potatoes extra creamy. For more garlic flavor, you can use roasted garlic instead of raw. Roasting gives a sweet, mellow taste. Simply wrap the garlic in foil and bake until soft. You can also add fresh herbs like thyme or rosemary. Chop them finely and mix them in for a fresh touch. If you want a bold flavor, try adding some garlic powder. It adds depth without the raw bite. You can also sprinkle a bit of smoked paprika for a unique twist. Creamy garlic mashed potatoes pair well with many dishes. They are great with meats like roasted chicken or steak. They also complement fish nicely. For a vegetarian meal, serve them with grilled veggies. Be creative with presentation. Use a piping bag to create swirls on a plate. Add a sprinkle of chives on top for color. You can also serve them in a hollowed-out bread bowl for fun. For detailed instructions, check out the Full Recipe. {{image_2}} You can switch up the garlic in your mashed potatoes. Roasted garlic gives a sweet, rich flavor. To roast garlic, wrap unpeeled cloves in foil and bake them until soft. This change adds depth and warmth to your dish. You can also blend different garlic herbs. Try mixing garlic with rosemary or thyme. These herbs add fresh notes that enhance the potato’s creamy texture. If you want vegan mashed potatoes, use plant-based milk and vegan butter. Coconut milk adds a nice twist. You can still have creamy potatoes without dairy. For a low-carb version, replace potatoes with cauliflower. Steam cauliflower until soft, then mash it with garlic. This option is flavorful and fits well into low-carb diets. Cheese lovers can enjoy cheesy mashed potatoes. Try adding cheddar, gouda, or cream cheese for a rich taste. Each cheese brings its own unique flavor. You can also mix in crispy bacon or sautéed mushrooms. Bacon adds a salty crunch, while mushrooms offer earthy tones. Both additions make your mashed potatoes even more satisfying. For the full recipe, check out the Creamy Garlic Mashed Potatoes section. To keep your creamy garlic mashed potatoes fresh, store them in the fridge. Place the leftovers in an airtight container. This helps the potatoes stay moist and tasty. They can last up to four days in the fridge. If you want to save them for longer, freezing is a great choice. To freeze mashed potatoes, use freezer-safe bags or containers. Flatten the bags before sealing. This helps save space and speeds up thawing. Mashed potatoes can last for about two months in the freezer. When you're ready to eat them, just thaw them in the fridge overnight. Reheating mashed potatoes can be tricky. You want to keep them creamy, not dry. One method is the stovetop. Place the potatoes in a pot over low heat. Add a splash of cream or milk to help revive the creaminess. Stir gently until heated through. For the microwave, use a microwave-safe dish. Cover the dish with a damp paper towel. This keeps moisture in while they heat. Heat in short bursts of one minute, stirring in between. This way, they warm evenly and stay smooth. To make mashed potatoes creamier, use Yukon Gold potatoes. They have a buttery flavor and smooth texture. Mash the potatoes while they are warm. This helps mix in the cream and butter better. Add heavy cream, as it provides richness. You can also use warm cream instead of cold. This change makes a big difference in texture. For extra creaminess, add softened cream cheese or sour cream. Yes, you can prepare mashed potatoes in advance. Cook them as usual, then let them cool. Store them in an airtight container in the fridge for up to two days. When ready to serve, reheat them on low heat. Add a splash of cream or milk to restore creaminess. Stir often to prevent sticking. The best potatoes for mashed potatoes are Yukon Gold and Russet potatoes. Yukon Gold potatoes are creamy and smooth. They hold their shape well when mashed. Russet potatoes are fluffy and absorb flavors easily. Both types make great mashed potatoes, but Yukon Gold is my favorite. To add more garlic flavor, try roasting the garlic first. Roasting mellows the garlic and adds depth. You can also use garlic powder for a stronger taste. Add it during the mixing stage for even flavor. For a bold twist, mix in garlic oil. This method infuses the mashed potatoes with rich garlic flavor. If your mashed potatoes are lumpy, don't worry. You can fix them easily. First, try mashing them a bit more. If they are still lumpy, use a potato ricer. This tool will smooth them out. Another option is to blend them quickly with a hand mixer. Just be careful not to overmix, or they will become gummy. In this blog post, we explored how to make creamy garlic mashed potatoes. We discussed the right ingredients, including Yukon Gold potatoes and garlic. You learned step-by-step instructions, from preparation to mashing. I shared tips for improving texture and flavor, plus some fun variations. Now, you can enjoy delicious mashed potatoes with ease and confidence. With these techniques, your next meal will impress everyone at the table. Enjoy your cooking adventure!

Creamy Garlic Mashed Potatoes Rich and Savory Delight

If you love creamy garlic mashed potatoes, you’re in for a treat! In this post, I’ll share my favorite recipe

Older posts
Newer posts
← Previous Page1 … Page50 Page51 Page52 … Page83 Next →

dsad

© 2025 easycookingbite • Built with GeneratePress

Our Policies

  • Copyright Policy
  • Cookie Policy
  • GDPR Policy
  • Privacy Policy
  • Disclaimer
  • Terms Of Use

More Information

  • Home
  • About
  • Contact
  • Appetizers
  • Dessert
  • Dinner
  • Drinks
©2025, easycookingbite About Back To Top