Skip to content
DisclaimerTerms Of UseGDPR PolicyCookie Policy

easycookingbite

  • Home
  • Drinks
  • Appetizers
  • Dinner
  • Dessert
  • About
  • Contact
  • Privacy Policy
DisclaimerTerms Of UseGDPR PolicyCookie Policy

Lily

When making Caramel Apple Monkey Bread, fresh and simple ingredients make all the difference. Here’s what you will need for this sweet treat: - 2 cans (16.5 oz each) refrigerated biscuit dough - 2 medium apples, peeled, cored, and diced - 1/2 cup brown sugar - 1/4 cup granulated sugar - 1 tablespoon ground cinnamon - 1/2 cup unsalted butter, melted - 1 cup caramel sauce (store-bought or homemade) - 1/2 cup chopped walnuts (optional) - Powdered sugar for dusting (optional) These ingredients create layers of flavor and texture. The biscuit dough forms the base, while the apples add a juicy crunch. Brown sugar and cinnamon give it a sweet and spicy kick. The caramel sauce ties it all together, making each bite irresistible. You can even add walnuts for a nutty crunch. This dish is fun to make and even more fun to eat! You can find the Full Recipe above for detailed steps and tips. - Preheat oven to 350°F (175°C). - Grease a bundt pan with cooking spray or butter. - In a bowl, combine brown sugar, granulated sugar, and ground cinnamon. - Open the biscuit dough and cut each biscuit into quarters. - Toss the biscuit pieces with diced apples and half of the sugar-cinnamon mix. - Layer the biscuit mixture in the bundt pan. Add optional chopped walnuts if you like. - Drizzle the remaining melted butter over the top. Pour caramel sauce over everything. - Sprinkle the rest of the sugar-cinnamon mixture on top. - Bake for 30-35 minutes until golden brown. Check with a toothpick to make sure it’s done. This recipe is simple and fun. You can make it with kids or friends. Enjoy the sweet smell while it's baking! - Use cold apples for a firmer texture. Cold apples keep their shape during baking. This gives your monkey bread a nice crunch. - Let the bread cool before inverting for easier removal. Cooling helps it set and keeps it from falling apart. - Consider adding vanilla extract or nutmeg for extra flavor. A splash of vanilla brings warmth. Nutmeg adds a nice spice that pairs well with apples. - Substitute pecans for walnuts for a different nutty taste. Pecans offer a softer crunch and a rich flavor that complements caramel. {{image_2}} You can make this dish even more fun by adding seasonal flavors. For a twist, use pears or pumpkin instead of apples. Pears add a soft, sweet bite that blends well with caramel. Pumpkin brings warmth and spice, perfect for fall. You can also try different apple types. Each kind has its own taste. For example, Granny Smith apples give a tart kick, while Honeycrisp apples add sweetness. Mix and match to find your favorite combo. Want to enjoy this treat but need a healthier version? You can make it gluten-free. Just swap regular biscuit dough for gluten-free dough. Many brands offer great options that taste just as good. If you're watching your sugar, try using alternative sweeteners. You can use stevia or monk fruit instead of brown and granulated sugar. This keeps the sweetness without all the calories. These changes let everyone enjoy this sweet snack! Store leftover monkey bread in an airtight container at room temperature. This keeps it soft and tasty for a few days. If you want it to last longer, refrigerate it. Just make sure it's sealed well to avoid drying out. Reheat in the microwave for a few seconds to warm it up. If you prefer a crispier texture, bake it briefly in the oven. This brings back that fresh, warm taste. Enjoy it as a sweet snack any time! Total time is approximately 50 minutes. This includes prep and bake time. You will love how quick it comes together! Yes, you can prepare it a day in advance and bake when ready. Just store it in the fridge until you're set to bake. This makes it a great option for gatherings. Pair with vanilla ice cream or whipped cream for added indulgence. The warmth of the bread with the cold cream is a perfect match. The Full Recipe for Caramel Apple Monkey Bread is detailed in the ingredients and step-by-step section above. You'll find everything you need to create this delicious treat! Caramel Apple Monkey Bread is easy and fun to make. We covered the ingredients, step-by-step instructions, tips, and variations. This tasty treat is perfect for any gathering. You can enjoy different flavors by using various fruits or nuts. Don't forget storage tips to keep leftovers fresh. With this guide, you’re ready to create your delicious monkey bread. Enjoy its warm, gooey goodness with family and friends. Make it today and savor the flavors!

Caramel Apple Monkey Bread Irresistible Sweet Snack

Are you ready for a sweet treat that’s impossible to resist? This Caramel Apple Monkey Bread combines warm, gooey caramel

To make a tasty cauliflower rice stir-fry, gather these key items: - 1 medium head cauliflower (to make rice) - 1 cup mixed bell peppers, diced (red, yellow, green) - 1 carrot, julienned - 1 cup snap peas, trimmed - 2 green onions, chopped - 3 cloves garlic, minced - 1 tablespoon grated ginger - 3 tablespoons soy sauce (or tamari for gluten-free) - 1 tablespoon sesame oil - 1 tablespoon olive oil - 1 teaspoon sesame seeds (for garnish) - Salt and pepper to taste These fresh vegetables give color and crunch. Cauliflower serves as a great rice substitute. You can get creative with add-ins and toppings. Here are some ideas: - Cooked chicken, shrimp, or tofu for protein - Chopped nuts like cashews or almonds for crunch - Fresh herbs like cilantro or basil for extra flavor - A splash of lime juice for brightness - Hot sauce for heat Feel free to mix and match based on what you have. Cauliflower rice is low in carbs and calories. It offers a good dose of vitamins C and K. The mixed veggies add fiber and antioxidants. This meal is packed with nutrients while being quick to prepare. It fits well into a healthy eating plan. Enjoy a delicious meal that nourishes your body without compromising flavor. For the full recipe, check out the section above! To start, you need to make the cauliflower rice. Take a medium head of cauliflower. Remove the leaves and stem. Cut it into small florets. You can use a food processor or a box grater. Pulse the florets until they look like rice. This will take about 30 seconds. If you use a box grater, it will take a bit longer. Set the cauliflower rice aside for later. Next, heat a large skillet or wok on medium-high heat. Add one tablespoon of olive oil. Once the oil is hot, toss in three cloves of minced garlic and one tablespoon of grated ginger. Stir quickly for about 30 seconds. This will bring out the nice aroma. Then, add one cup of diced bell peppers, one julienned carrot, and one cup of trimmed snap peas. Stir-fry these veggies for about 3 to 4 minutes. You want them to be tender but still a little crisp. Now it’s time to add the cauliflower rice. Stir it into the pan with the vegetables. Mix well and cook for another 5 to 7 minutes. You want the cauliflower to be tender and heated through. Once that’s done, drizzle three tablespoons of soy sauce and one tablespoon of sesame oil over the mix. Stir everything well to combine. Finally, season with salt and pepper to taste. Remove it from heat and top with chopped green onions and a sprinkle of sesame seeds. Serve your delicious cauliflower rice stir-fry right away! For the full recipe, check the details above. To make great cauliflower rice, start with a fresh head of cauliflower. Cut the head into florets. Use a food processor to pulse it into small bits. Aim for the size of real rice grains. If you don’t have a food processor, a box grater works too. Make sure to avoid over-processing, or it will turn mushy. To boost flavor, always sauté garlic and ginger first. This step wakes up the dish and adds depth. Use a mix of colorful bell peppers for a vibrant look. They also add sweetness and crunch. Add a splash of soy sauce and sesame oil for umami flavors. Don’t forget to season with salt and pepper. One mistake is using wet cauliflower rice. It can make your stir-fry soggy. Always dry it well after processing. Another error is overcooking the veggies. You want them tender-crisp, not mushy. Lastly, don’t skip the sesame seeds; they add a nice crunch and finish. For the full recipe, check out the detailed instructions above. {{image_2}} You can easily make this dish vegetarian or vegan. Just skip any meat and focus on veggies. Use more colorful peppers, carrots, and snap peas for extra crunch. You can also add mushrooms for a meaty texture. For flavor, sprinkle in some nutritional yeast. It gives a cheesy taste without dairy. Feel free to mix in any vegetables you love. Broccoli, zucchini, and spinach all work well. Adding protein boosts the meal's heartiness. For a chicken version, use diced, cooked chicken. Just toss it in when you add the cauliflower rice. If you prefer tofu, use firm tofu and cube it. Sauté it until golden brown before mixing it with the veggies. Shrimp also makes a great addition. Cook them until pink and add them with the cauliflower rice. If you want more grain-free options, try other veggies. You can use shredded zucchini or spiralized carrots for a twist. They add flavor and keep it light. Another option is to mix in some chopped nuts, like cashews or almonds. They add crunch and healthy fats. These alternatives keep your meal exciting and fresh. For the full recipe, check the details above. You can keep leftover cauliflower rice stir-fry in the fridge. Place it in an airtight container. It stays fresh for up to three days. For best taste, eat it within two days. Make sure it cools down before sealing. This helps prevent moisture build-up. Freezing is a great option if you want to save some stir-fry for later. Use a freezer-safe container or bag. Leave some space at the top for expansion. It can last for about one month in the freezer. When you’re ready to eat, let it thaw in the fridge overnight. Reheat your stir-fry on the stove for best results. Use medium heat and add a splash of water or oil. This keeps it moist and tasty. Stir often until it’s heated through. You can also microwave it. Cover with a microwave-safe lid and heat for about two minutes. Stir halfway through to avoid hot spots. For more tips, check the Full Recipe. Cauliflower rice is a low-carb alternative to regular rice. You make it by grating or processing cauliflower into small pieces. It has a mild flavor and absorbs the taste of spices and sauces well. This makes it a great base for many dishes, including stir-fries. Yes, you can prepare cauliflower rice ahead of time. Simply grate or process the cauliflower and store it in an airtight container. It will last in the fridge for about 3-5 days. You can also freeze it for up to a month. Just make sure to thaw it before cooking. To make cauliflower rice stir-fry gluten-free, swap regular soy sauce for tamari. Tamari is made without wheat and has a similar taste to soy sauce. Always check labels to ensure products are gluten-free. This way, everyone can enjoy this tasty dish! You can serve cauliflower rice stir-fry with many options. Try adding grilled chicken, shrimp, or tofu for protein. A side of steamed broccoli or a fresh salad works well too. You can even pair it with a light sauce or dressing to elevate the flavors. For the complete cooking instructions, check out the Full Recipe. In this post, we explored how to make a tasty cauliflower rice stir-fry. We covered key ingredients and optional add-ins for flavor. You learned step-by-step instructions, handy tips, and variations like vegetarian options. Storage ideas were also shared to keep your leftovers fresh. Remember, you can customize your dish to fit your taste. Enjoy making this healthy meal that’s simple and fun!

Cauliflower Rice Stir-Fry Fast and Flavorful Meal

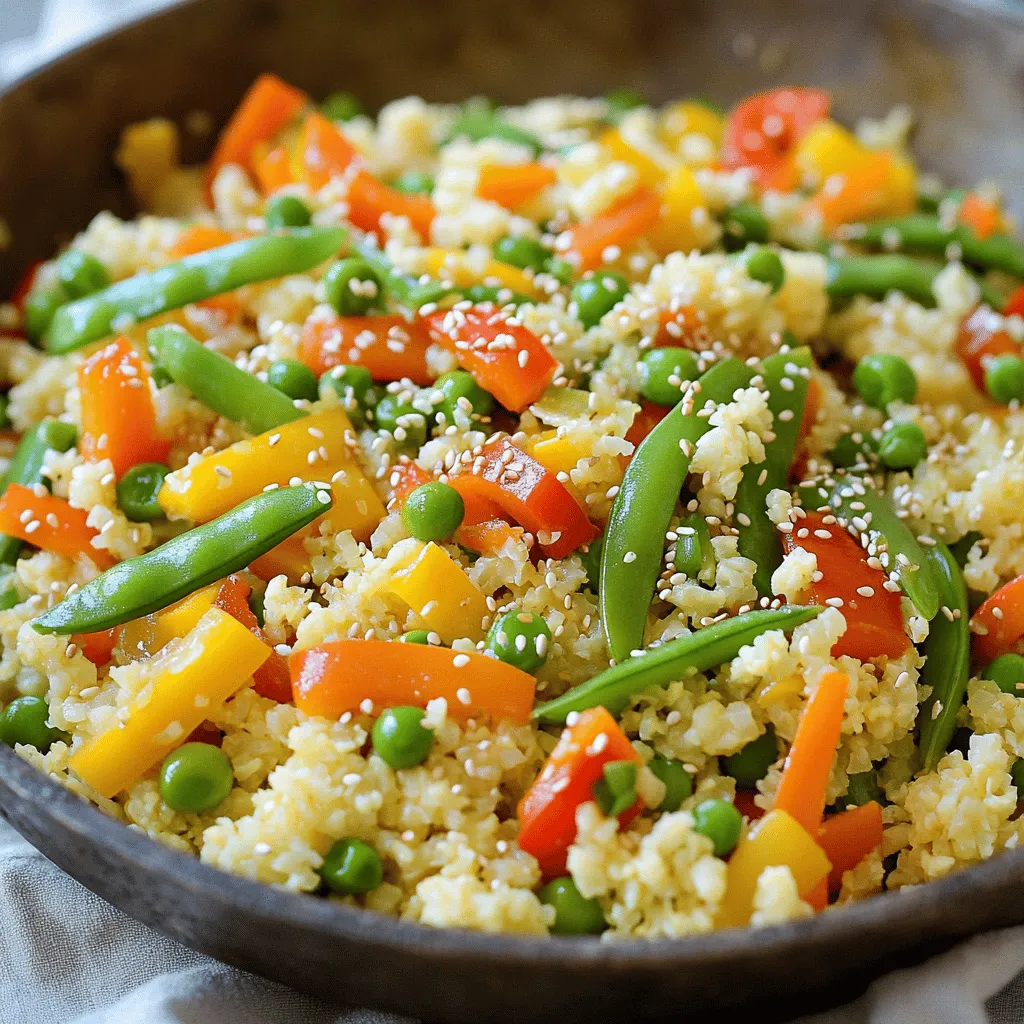
Looking for a quick, healthy meal? Try my Cauliflower Rice Stir-Fry! This dish is easy to make and packed with

To make cheesy spinach stuffed shells, you will need: - 20 jumbo pasta shells - 2 cups fresh spinach, chopped - 1 cup ricotta cheese - 1 cup shredded mozzarella cheese - 1/2 cup grated Parmesan cheese - 1 large egg - 2 cloves garlic, minced - 1 teaspoon dried Italian herbs (oregano, basil, thyme) - Salt and pepper to taste - 2 cups marinara sauce - 1 tablespoon olive oil - Fresh basil leaves for garnish You can swap some ingredients for different flavors. Replace ricotta with cottage cheese for a lighter taste. Use goat cheese instead for a tangy twist. If you want more veggies, add mushrooms or bell peppers. For a dairy-free option, try cashew cheese. Fresh ingredients make a big difference in flavor. Look for bright green spinach without spots. Check if the pasta shells are intact and not broken. When buying cheese, choose whole milk varieties for creaminess. Local farmers' markets often have fresh herbs. This way, you ensure your dish is vibrant and tasty. To make cheesy spinach stuffed shells, start by preheating your oven to 375°F (190°C). Boil 20 jumbo pasta shells in salted water. Cook until they are al dente, then drain and let them cool. In a skillet, heat 1 tablespoon of olive oil over medium heat. Add 2 minced garlic cloves and cook for about one minute. Next, add 2 cups of chopped spinach. Cook until the spinach wilts, which takes around 2 to 3 minutes. Remove the skillet from heat and let the spinach cool a bit. In a bowl, mix 1 cup of ricotta, 1/2 cup of mozzarella, 1/2 cup of grated Parmesan, and 1 large egg. Add the sautéed spinach, 1 teaspoon of dried Italian herbs, and some salt and pepper. Stir the mixture until it's well combined. Spread 1 cup of marinara sauce on the bottom of a 9x13 inch baking dish. Now, stuff each jumbo shell with the cheese and spinach mix. Place the stuffed shells into the baking dish. Pour the remaining marinara sauce over the shells, and top with the rest of the mozzarella cheese. Cover the dish with aluminum foil, then bake for 25 minutes. After that, remove the foil and bake for another 10 minutes. The cheese should be bubbly and golden. Allow it to cool for a few minutes before serving. If you like, garnish with fresh basil leaves to add a nice touch. To ensure your cheesy spinach stuffed shells turn out great, attention to detail is key. The first step is to watch the pasta. Cook it just until it’s al dente. Overcooking will make the shells too soft to hold the filling. Next, sauté the garlic and spinach. This step adds depth to the flavor. Always let the mixture cool slightly before stuffing the shells. This prevents burning your fingers and ensures the cheese melts perfectly during baking. When you stuff the shells, be gentle. You want them full but not bursting. Finally, covering the dish with foil traps moisture. This keeps the shells from drying out while baking. A visual guide can help you see each step clearly. When you boil the shells, they should look firm but not hard. The sautéed spinach should be bright green and wilted. When mixing the cheese, aim for a creamy texture. As you stuff the shells, each should resemble a little pillow full of goodness. Before baking, your dish should look vibrant with red marinara and white cheese. After baking, the cheese should be bubbly and slightly golden. A picture of the final dish can inspire you to dig in. For an added touch, fresh basil leaves on top will make it look restaurant-worthy. For the full recipe, check the details in the earlier sections. To keep your pasta shells firm, cook them only until al dente. Follow the package instructions closely. Start checking them a couple of minutes before the time ends. Drain them right away and rinse with cold water. This stops the cooking process. If you let them sit in hot water, they will turn mushy. Seasoning is key to making these shells pop with flavor. I suggest adding salt and pepper to your cheese mixture. Also, consider fresh herbs like basil or parsley for an extra boost. You can even mix in a pinch of red pepper flakes for some heat. Use quality marinara sauce, as it adds depth. A good sauce makes a big difference. To make your dish look appealing, layer the marinara sauce on the bottom of the baking dish. After stuffing the shells, arrange them neatly. Pour more sauce on top and sprinkle with mozzarella cheese. Once baked, let them cool slightly. Garnish with fresh basil leaves for a bright finish. Serve with a side salad for a complete meal. For the full recipe, check out the previous section. {{image_2}} You can switch up the cheeses in this dish. Try using goat cheese for a tangy taste. Feta cheese adds a salty kick that works well too. For a creamier filling, use mascarpone instead of ricotta. Each cheese brings its own unique flavor, making your stuffed shells special. You can boost the nutrition by adding proteins or extra veggies. Cooked chicken, ground turkey, or even sausage can make these shells heartier. If you like more veggies, try adding mushrooms or bell peppers to the filling. This not only adds flavor but also makes the dish more colorful. Baking is my favorite way to cook these stuffed shells. It gives the cheese a nice, bubbly crust. However, you can also cook them on the stovetop. Just simmer the shells in a pan with marinara sauce until heated through. Both methods work well, so choose what fits your time and taste. For the complete recipe, check out the Full Recipe. To keep your cheesy spinach stuffed shells fresh, store them in an airtight container. Make sure they cool to room temperature before sealing. This helps avoid sogginess and keeps the flavors intact. You can store them in the fridge for up to three days. When reheating, preheat your oven to 350°F (175°C). Place the shells in a baking dish and cover them with foil. This keeps the shells moist. Heat for about 15 to 20 minutes. You can also add a splash of marinara sauce on top to enhance the moisture. If you prefer using a microwave, cover the dish with a damp paper towel. This keeps the steam in and prevents drying out. If you want to freeze stuffed shells, do it before baking. Place them in a single layer on a baking sheet. Freeze until firm, then transfer to a freezer-safe container. They can last up to three months in the freezer. To bake, let them thaw overnight in the fridge. Then, add a bit more marinara sauce and bake as usual. Enjoy your delicious meal later without losing flavor! For the full recipe, check out the Cheesy Spinach Stuffed Shells section. Cheesy Spinach Stuffed Shells stay fresh for about three to five days in the fridge. Store them in an airtight container to keep them safe from air and moisture. Always check for any signs of spoilage before eating. If they smell off or look strange, it’s best to toss them out. Yes, you can make these stuffed shells ahead of time. Prepare them, then cover and refrigerate them for up to a day before baking. This makes it easy to enjoy a warm meal on a busy day. Just remember to bake them longer if they are cold from the fridge. To reheat Cheesy Spinach Stuffed Shells, use the oven for the best results. Preheat the oven to 350°F (175°C). Place the shells in a baking dish and cover with foil. Heat for about 20 minutes or until warm. You can also use the microwave, but this may make the pasta a bit soft. Enjoy these shells hot for the best taste! You learned about the ingredients and steps for making Cheesy Spinach Stuffed Shells. I shared tips for cooking, storing, and serving these delicious shells. Remember, you can tweak the recipe to suit your taste. Try different cheeses, add meat, or change how you cook them. With these ideas, you can impress anyone with your dish. Enjoy your cooking adventure!

Cheesy Spinach Stuffed Shells Flavorful Pasta Delight

Get ready to indulge in a warm bowl of Cheesy Spinach Stuffed Shells! This pasta dish is easy to make

To create a tasty Coconut Lime Shrimp, you'll need the following ingredients: - 1 pound large shrimp, peeled and deveined - 1 cup coconut milk - 2 tablespoons fresh lime juice - Zest of 1 lime - 3 cloves garlic, minced - 1 tablespoon fresh ginger, grated - 1 tablespoon honey - 1 teaspoon chili flakes (adjust to taste) - 1/4 cup fresh cilantro, chopped - Salt and pepper to taste - 2 tablespoons coconut oil (or vegetable oil) This dish is all about bright flavors. The shrimp soak up the coconut milk and lime, creating a sweet and tangy taste. Fresh garlic and ginger add a nice kick. Honey balances the flavors, while cilantro brings a fresh finish. You can find the full recipe at [Full Recipe]. Enjoy your cooking! - Combine: - 1 cup coconut milk - 2 tablespoons fresh lime juice - Zest of 1 lime - 3 cloves garlic, minced - 1 tablespoon fresh ginger, grated - 1 tablespoon honey - 1 teaspoon chili flakes (adjust to taste) - Salt and pepper to taste Mix these ingredients well. This creates a flavorful marinade that makes the shrimp shine. Next, add 1 pound of large shrimp, peeled and deveined. Toss the shrimp in the marinade to coat them evenly. This step is key for great flavor. Let the shrimp marinate for 20-30 minutes in the refrigerator. This allows the flavors to soak in deeply. Now, heat 2 tablespoons of coconut oil in a large skillet over medium-high heat. Once the oil is hot, add the marinated shrimp in a single layer. Cook the shrimp for 2-3 minutes on each side. They should turn pink and opaque when done. Remove the skillet from heat. You can sprinkle chopped cilantro over the shrimp for a fresh touch. For extra flavor, drizzle some of the remaining marinade over the shrimp as you serve. For the full recipe and more tips, check out the complete guide! To make your Coconut Lime Shrimp burst with flavor, always choose fresh ingredients. Fresh shrimp, limes, and herbs give the best taste. The zest from the lime adds a bright note, while fresh cilantro brings a nice finish. You can also adjust the chili flakes to control the heat level. If you like it spicy, add more chili flakes. For less heat, use fewer flakes or omit them altogether. Cooking shrimp well is key. First, do not overcrowd the skillet. This ensures even cooking. If you add too many shrimp, they will steam instead of sear. Cook shrimp just until they turn pink and opaque. Overcooking makes them tough. Watch them closely, as they cook fast. When serving Coconut Lime Shrimp, pair it with light sides. Rice, quinoa, or a fresh salad work well. These sides balance the rich coconut flavor. For garnishes, sprinkle extra cilantro on top. A slice of lime on the side adds a pop of color and flavor. For a touch of elegance, drizzle some of the leftover marinade over the shrimp. You can find the full recipe at the beginning of this article. {{image_2}} You can easily swap shrimp for chicken or tofu. Both options work well with the marinade. For chicken, cut it into bite-sized pieces. Cook it for about 5-7 minutes until it’s no longer pink. Tofu is a great plant-based choice. Use firm tofu and cut it into cubes. Cook the tofu for about 4-5 minutes until golden brown. Adjust the cooking times based on the protein you choose. Adding tropical fruits can boost the dish's flavor. Mango or pineapple pieces add sweetness and freshness. You can toss these fruits in right before serving. Fresh herbs can also change the taste. Try adding basil or mint for a nice twist. These herbs mix well with the coconut and lime. You can make this dish dairy-free and gluten-free. The recipe is already dairy-free since it uses coconut milk. For gluten-free, just ensure your ingredients are certified. If you want to cut down on sugar, use a sugar substitute in place of honey. This way, everyone can enjoy Coconut Lime Shrimp without worry. For more details, check the Full Recipe. To store leftovers, place Coconut Lime Shrimp in an airtight container. This keeps the shrimp fresh and prevents odors from mixing. You can keep it in the fridge for up to three days. If you wait longer, the shrimp may lose flavor and texture. To freeze, first, let the shrimp cool completely. Place it in a freezer-safe bag, removing as much air as possible. You can freeze Coconut Lime Shrimp for up to three months. For the marinade, freeze it separately in an ice cube tray. This way, you can easily use it later. When reheating, I recommend using a skillet over low heat. This method warms the shrimp gently without overcooking. You can also add a splash of coconut milk to keep it moist. Avoid microwaving, as it may make the shrimp tough. Enjoy your flavorful dish by warming it carefully! To add more heat, you can increase the chili flakes in the recipe. Start with a teaspoon, then taste. If you want more spice, add more. You can also use fresh chili peppers for a bolder flavor. Slicing jalapeños or serranos into the marinade gives a nice kick. For smoky heat, try adding smoked paprika. Yes, you can use frozen shrimp! First, thaw them in the fridge overnight or under cold water. Don’t forget to peel and devein if needed. Pat the shrimp dry with paper towels before adding them to the marinade. This helps the shrimp soak up the flavors better. Coconut lime shrimp pairs well with rice or quinoa. You can serve it over coconut rice for extra flavor. Steamed veggies, like broccoli or snap peas, make great sides too. You might also try a fresh salad with citrus dressing to brighten the meal. Coconut milk offers some health benefits. It is rich in healthy fats, which can support heart health. It also contains vitamins C and E, which are good for your skin. However, it is high in calories, so use it in moderation. If you're watching your fat intake, consider using light coconut milk. This blog post covered the ingredients, steps, and tips for making Coconut Lime Shrimp. I shared how to create a delicious marinade and the cooking process to get juicy shrimp. Remember, fresh ingredients enhance flavor, and you can substitute proteins as needed. Store leftovers properly to maintain taste. Feel free to experiment with spices and sides to customize your meal. Enjoy your cooking journey and create something tasty!

Coconut Lime Shrimp Flavorful and Easy Dinner Delight

If you’re craving a burst of tropical flavor for dinner, look no further! This Coconut Lime Shrimp recipe combines tender

For my pumpkin spice overnight oats, I use these key ingredients: - 1 cup rolled oats - 1 cup almond milk (or any milk of choice) - 1/2 cup pumpkin puree - 1 tablespoon maple syrup (adjust for sweetness) - 1 teaspoon pumpkin spice blend - 1/2 teaspoon vanilla extract - Pinch of salt These ingredients work together to create a smooth and creamy texture. The oats soak up the milk and flavors overnight. The pumpkin adds natural sweetness and a rich taste. You can personalize your oats with these fun toppings: - Chopped nuts - Dried cranberries - A dollop of yogurt These toppings add crunch and extra flavor. I love how they make breakfast special. If you need to swap ingredients, here are some easy options: - Use any milk you like, such as soy or oat milk. - Substitute pumpkin puree with applesauce for a different taste. - Maple syrup can be replaced with honey or agave syrup. These swaps keep your oats tasty while fitting your needs. You can enjoy a delicious breakfast without stress. For the full recipe, check the earlier section. To start, gather your ingredients. You need rolled oats, almond milk, pumpkin puree, maple syrup, pumpkin spice blend, vanilla extract, and a pinch of salt. In a medium bowl or mason jar, combine the rolled oats with the almond milk. Mix well until the oats are fully covered in the milk. Next, add the pumpkin puree, maple syrup, pumpkin spice blend, vanilla extract, and a pinch of salt. Stir the mixture until all the ingredients blend well. You want a smooth and creamy texture. Cover your bowl or jar with a lid or plastic wrap. Place it in the fridge overnight. If you're in a hurry, let it chill for at least four hours. This time allows the oats to soak up all the flavors and thicken nicely. In the morning, take your oats out of the fridge. Give them a good stir. If they seem too thick, add a splash more almond milk. This helps you reach your desired consistency. For serving, I like to use a clear glass. It shows off the layers and colors of the oats. Top with your favorite options like chopped nuts, dried cranberries, or a dollop of yogurt. You can also sprinkle a bit of extra pumpkin spice on top for a nice touch. Enjoy your healthy, fluffy start! To get the best texture for your pumpkin spice overnight oats, focus on the oats and milk ratio. Use one cup of rolled oats with one cup of almond milk. This balance keeps the oats creamy and thick. If your oats feel too thick in the morning, just add a splash of milk. Stir well and enjoy a smooth, fluffy texture. For a festive touch, serve your oats in clear glasses. This makes the layers look pretty. You can add a sprinkle of pumpkin spice on top for extra flair. If you're hosting a brunch, create a toppings bar. Offer options like chopped nuts or dried cranberries. Guests will love customizing their bowls, making it fun for everyone. To make your pumpkin spice oats even richer, try adding a pinch of nutmeg or cinnamon. These spices boost the pumpkin flavor. You can also mix in a spoonful of peanut butter or almond butter for creaminess. This adds a nutty taste that pairs well with the pumpkin spice. Experiment until you find your favorite blend! {{image_2}} You can change up the flavor of pumpkin spice overnight oats with seasonal fruits. In fall, add chopped apples or pears for crunch. In winter, try dried figs or dates for sweetness. In spring, mix in berries for a fresh twist. Each fruit pairs well with the warm spice of pumpkin. This keeps your oats exciting and fun all year. To make your oats vegan, use almond milk or coconut milk. Both give a creamy texture. For a gluten-free option, ensure your oats are labeled gluten-free. Most rolled oats are naturally gluten-free. You can also swap maple syrup for agave nectar if you prefer. These simple swaps keep your dish healthy and tasty. Want to amp up the protein? Add a scoop of your favorite protein powder. Mix it in when you combine the oats and liquid. Greek yogurt is another great choice. You can stir in a dollop before serving. This helps keep you full longer. Plus, it adds a creamy texture to your overnight oats. For the full recipe, check out the complete details above. To keep your pumpkin spice overnight oats fresh, store them in an airtight container. You can use a glass jar or a plastic bowl with a tight lid. This method helps the oats stay moist and prevents them from absorbing smells from the fridge. You can enjoy your pumpkin spice overnight oats for up to five days in the fridge. If you want to keep them longer, consider freezing them. Just remember, the texture may change a bit after thawing. So, it’s best to eat them fresh. If you prefer warm oats, heat them in the microwave. Place the oats in a bowl and add a splash of almond milk. Microwave for about 30 seconds, then stir. Repeat until they reach your desired warmth. Enjoy your cozy, delicious oats! For the full recipe, check below. Yes, you can use quick oats. Quick oats will make the dish softer and creamier. They absorb liquid faster than rolled oats. This change may alter the texture a bit. If you like a smooth finish, quick oats work well. To make this recipe dairy-free, use almond milk or oat milk. These options give a nice flavor. You can also try coconut milk for a creamier texture. Just be sure to check for added sugars if you want to keep it healthy. You can use sweet potato puree or butternut squash puree. Both offer a similar taste and texture. You can also blend cooked carrots for a different twist. Each option keeps your oats tasty and healthy. To adjust sweetness, add more or less maple syrup. Start with a small amount and taste as you go. Honey or agave syrup can also work well. Just remember that different sweeteners can change the flavor. Great toppings include chopped nuts, dried cranberries, or yogurt. You can also try fresh fruit like bananas or apples. A sprinkle of extra pumpkin spice adds a nice touch too. Get creative with toppings to make it your own. For the full recipe, check out the complete guide to making these delicious pumpkin spice overnight oats! This blog post covered key tips for making pumpkin spice overnight oats. We explored essential ingredients, optional toppings, and smart substitutions. You learned step-by-step instructions, from prep to serving ideas. I shared tips for perfecting the texture and enhancing flavors. We also looked at seasonal twists and dietary variations, plus storage info and FAQs. Enjoy creating your delicious oats, and feel free to innovate with your flavor choices. Happy cooking!

Pumpkin Spice Overnight Oats Fluffy and Healthy Start

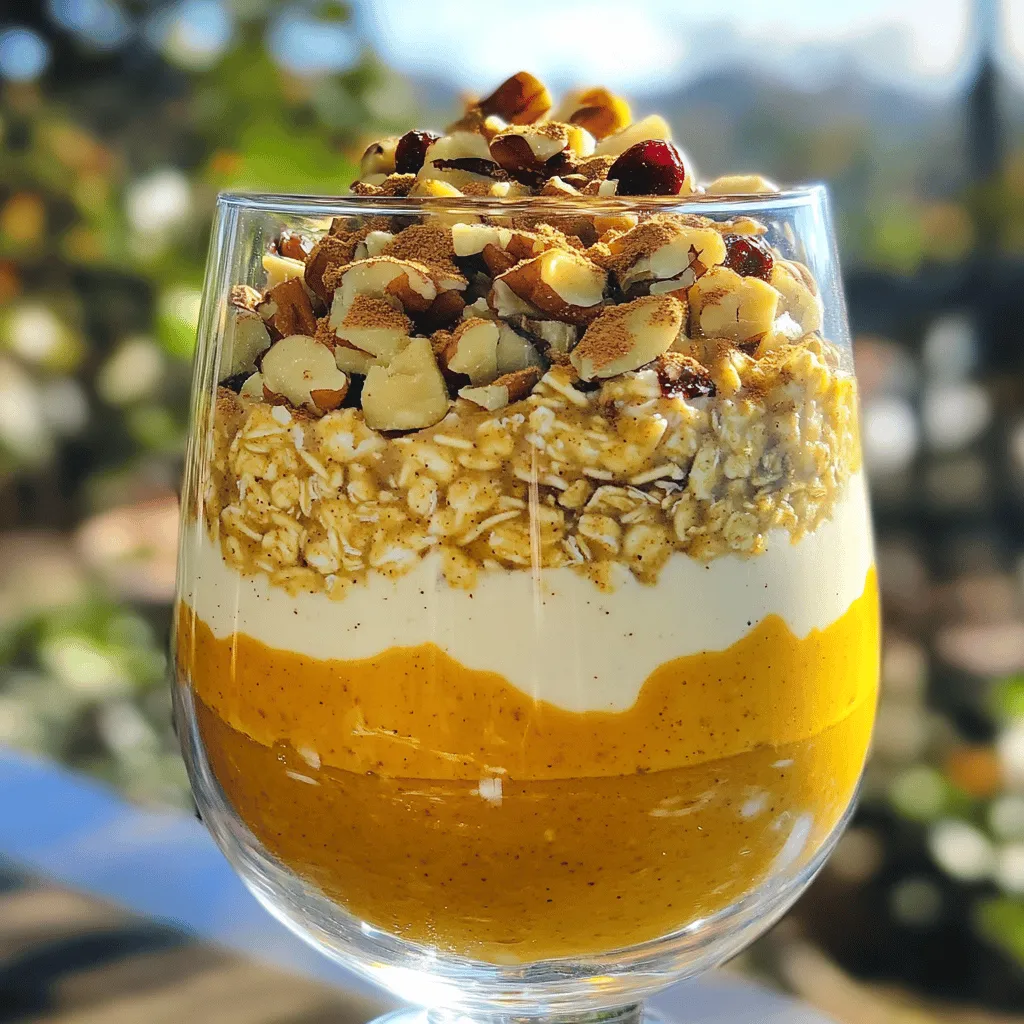
Looking for a cozy and healthy breakfast? Try my Pumpkin Spice Overnight Oats! This simple recipe combines creamy oats with

To make balsamic glazed Brussels sprouts, you need a few simple ingredients. Each one plays a key role in creating the rich flavor profile. Here’s what you’ll need: - Fresh Brussels sprouts: One pound, halved for even cooking. - Balsamic vinegar: Three tablespoons will give your sprouts a tangy sweetness. - Honey: Two tablespoons add a lovely caramel note. - Olive oil: Two tablespoons help with roasting and add richness. - Garlic: Two cloves, minced for an aromatic kick. - Salt and pepper: To taste, these basic seasonings enhance all flavors. - Walnuts: A quarter cup, chopped, for crunch and nuttiness. - Feta cheese: A quarter cup, crumbled (optional), adds creaminess and saltiness. You can find the full recipe for Balsamic Bliss Brussels Sprouts at the end of this article. Each ingredient adds a unique touch to this flavorful side dish, making it a perfect complement to many meals. Enjoy the process of bringing these ingredients together to create something delicious! First, wash the Brussels sprouts well. This step removes dirt and particles. Next, cut each sprout in half. This helps them cook evenly. For best flavor, season the sprouts with salt and pepper. You can also add garlic for an extra kick. A light coat of olive oil helps the seasoning stick. Now, preheat your oven to 400°F (200°C). This temperature gives the sprouts a nice, crispy texture. Spread the halved sprouts on a baking sheet in a single layer. Make sure they aren't crowded. This helps them roast better. Cook them for about 20 to 25 minutes. Halfway through, stir them to ensure even cooking. They should turn golden brown and crispy on the outside. While the Brussels sprouts roast, you can make the glaze. In a small saucepan, mix balsamic vinegar and honey. Heat it over medium flame. Bring the mix to a simmer. Cook for about 5 to 7 minutes. You want it to reduce and thicken. The right consistency is key for a great glaze. Once it thickens, take it off the heat. Once the Brussels sprouts are done, drizzle the balsamic glaze over them for a sweet and tangy finish. For the full recipe, check out Balsamic Bliss Brussels Sprouts. Enjoy! To make your Brussels sprouts shine, use simple seasonings. I recommend: - Garlic for a savory kick - Salt and pepper for balance - A sprinkle of chili flakes for warmth These flavors blend well with the balsamic glaze. When serving, try pairing your Brussels sprouts with: - Grilled chicken for protein - Quinoa for a hearty meal - Roasted pork for something rich While roasting is great, you can also sauté Brussels sprouts. This method cooks them faster and gives them a nice color. Just remember to keep the heat medium-high. For even cooking, stir them often. This way, every piece gets that great glaze. You can also steam them before glazing. This keeps them tender and helps the flavor soak in well. Just ensure they finish cooking on the stovetop to get a bit of crispiness. To impress your guests, think about how you serve the dish. Use a large, colorful bowl to add visual interest. You can also garnish with fresh herbs, like parsley or chives, for a pop of color. For an extra touch, consider drizzling a bit of extra balsamic glaze over the top. This not only enhances flavor but also looks stunning on the plate. Remember, we eat with our eyes first! {{image_2}} You can switch up the sweetener in this recipe. Try maple syrup or agave. Both add a unique twist. For crunch, you can use different nuts like pecans or almonds. Both bring their own flavor. If you want creaminess, try goat cheese instead of feta. It gives a nice tang. If you follow a vegan diet, swap honey for maple syrup. This keeps the dish sweet without using animal products. For gluten-free needs, all the listed ingredients work well. Just ensure any added nuts or cheeses are certified gluten-free. You can make these Brussels sprouts in an air fryer. Cook them at 375°F for about 15-18 minutes. Shake the basket halfway for even cooking. Grilling is another fun option. Toss the sprouts with olive oil and place them in a grill basket. Cook over medium heat for about 10-15 minutes, turning occasionally. Both methods create a delicious char. To keep your balsamic glazed Brussels sprouts fresh, store them in the fridge. Place them in an airtight container. This helps prevent moisture loss. Make sure to cool them down before sealing the container. For best results, eat them within 3 days. When reheating, I suggest using an oven. This keeps the sprouts crispy. Preheat your oven to 350°F (175°C) and spread the sprouts on a baking sheet. Heat them for about 10 minutes. If you use a microwave, place them in a bowl. Heat for 1-2 minutes, but this may make them soggy. Yes, you can freeze balsamic glazed Brussels sprouts. To freeze, let them cool completely first. Spread them in a single layer on a baking sheet. Once frozen, transfer them to a freezer bag. They last up to 3 months. When ready to eat, thaw overnight in the fridge. Reheat in the oven for the best texture. Yes, you can use frozen Brussels sprouts. Just remember that their cooking time will need some adjustment. Start by thawing them completely first. Pat them dry to remove excess moisture. This helps in achieving a crispy texture. Then, roast them in the oven for about 25 to 30 minutes. Check them often to avoid overcooking. To add some heat, try using red pepper flakes or cayenne pepper. You can mix them with the olive oil before roasting. A little goes a long way, so start with a small amount. You can also add some sliced jalapeños for a fresh kick. This will give your dish a nice spicy twist while keeping that sweet balsamic flavor. These Brussels sprouts pair well with many dishes. Try serving them alongside roasted chicken or grilled steak. They also go great with quinoa or rice for a vegetarian option. Add a fresh salad to balance the meal. For a comforting touch, serve them with creamy mashed potatoes. You can find the full recipe for Balsamic Bliss Brussels Sprouts in the recipe section. This includes all the details you need to make this delightful side dish. We explored the key ingredients and steps to make delicious balsamic-glazed Brussels sprouts. I shared tips for flavors, cooking methods, and serving ideas. You can adapt the recipe to fit your diet or try new cooking techniques. Remember, leftovers can be stored and reheated to keep that great taste. Enjoy the journey of cooking these sprouts and impress your friends and family with your skills. The best part? You can make this dish your own!

Balsamic Glazed Brussels Sprouts Flavorful Side Dish

Looking for a side dish that brings a burst of flavor to your table? Balsamic Glazed Brussels Sprouts are the

For the base of this dish, I use: - 2 lbs boneless skinless chicken thighs, cut into bite-sized pieces - 1 large onion, finely chopped - 4 cloves garlic, minced - 1 tablespoon ginger, minced The chicken thighs give a rich flavor and nice texture. Onion, garlic, and ginger add depth. They create a fragrant base that awakens the senses. To bring warmth and spice, I add: - 2 tablespoons garam masala - 1 tablespoon ground cumin - 1 tablespoon ground coriander - 1 teaspoon turmeric - 1 teaspoon chili powder (adjust to taste) - Salt and pepper These spices work together to create an aromatic blend. Garam masala is the star, adding a warm, complex flavor. Adjusting the chili powder lets you control the heat level. The sauce needs rich liquid, so I include: - 1 can (14 oz) crushed tomatoes - 1 cup coconut milk - 1 tablespoon lemon juice Crushed tomatoes form the sauce base, while coconut milk adds creaminess. Lemon juice brightens the dish, giving it that perfect balance. For the full recipe, you can check the details above. Start by gathering your ingredients. In a large bowl, mix the chicken with spices and vegetables. Use boneless skinless chicken thighs for tenderness. Add the chopped onion, minced garlic, and ginger. Then, sprinkle in the garam masala, ground cumin, ground coriander, turmeric, chili powder, salt, and pepper. To ensure every piece of chicken gets coated, use your hands to mix. This helps the spices infuse deeply into the meat. You want every bite to burst with flavor. Next, transfer the chicken mixture to your slow cooker. Pour the crushed tomatoes and coconut milk on top. Gently stir to combine everything. Make sure the chicken is well-covered with the sauce. Set your slow cooker on low for 6 to 8 hours or on high for 3 to 4 hours. The chicken should be very tender when done. The longer cooking time allows the flavors to meld beautifully. In the last 30 minutes of cooking, stir in the lemon juice. This adds a nice brightness to the dish. Before serving, taste and adjust the seasonings as needed. If you want more heat, add a little more chili powder. When ready, serve your Chicken Tikka Masala over hot basmati rice or with naan. Garnish with fresh cilantro for a pop of color and flavor. Enjoy your flavorful comfort dish! For the complete recipe, check the [Full Recipe]. - Preparing ingredients in advance: Before you start, chop your chicken and veggies. This saves time later. Mix your spices too. When you prep ahead, cooking becomes a breeze. You can enjoy your meal without stress. - Ensuring even cooking: Cut your chicken into even pieces. This helps them cook at the same rate. Layer your ingredients in the slow cooker. Place the chicken at the bottom, then add the tomatoes and coconut milk. This way, all flavors blend nicely. - Substitutions for traditional ingredients: If you can’t find garam masala, use curry powder instead. It won’t taste the same, but it will still be good. For coconut milk, try heavy cream for a rich taste. These swaps can save you time and trips to the store. - Importance of seasoning balance: Taste as you cook. Seasoning makes your dish pop. Adjust salt and spice levels to your liking. If it feels bland, add a bit more chili powder or salt. A balanced flavor is key to a great meal. - Complementary side dishes: Serve your Chicken Tikka Masala with basmati rice or warm naan. These pair well and soak up the sauce. They add texture and flavor to your meal. - Garnishing ideas: Fresh cilantro brightens up the dish. Sprinkle it on top before serving. You can also add a squeeze of lemon juice for extra zing. These small touches make your meal look and taste amazing. For more detailed instructions, check the Full Recipe. {{image_2}} You can make this dish without meat. Try using tofu or chickpeas instead of chicken. Tofu brings a nice texture and absorbs flavors well. Just press it to remove excess water and cut it into cubes. For chickpeas, use canned ones for ease. Rinse them well before adding to the slow cooker. Both options give you a hearty meal that’s just as satisfying. Adjusting the spice level is easy. Start with less chili powder if you prefer mild food. You can always add more later. For a spicy kick, increase the chili powder or add fresh chilies. Remember, the heat can build up, so taste as you go. This way, you can find the perfect balance for your palate. If you want a creamier sauce, there are options. You can use yogurt or heavy cream instead of coconut milk. Yogurt gives a tangy flavor, while cream adds richness. Just make sure to stir it in during the last 30 minutes of cooking. This keeps the texture smooth and delicious. Each option offers a unique twist to the classic flavor. For the full recipe, see the Full Recipe section. After cooking, let your chicken tikka masala cool. Place it in airtight containers. This method keeps it fresh. You can store it in the fridge for up to four days. Remember to seal it well to avoid smells from other foods. If you want to keep it longer, freezing is a great option. Divide the dish into smaller portions. This helps with quick meals later. Use freezer-safe containers or bags. When ready to eat, thaw it overnight in the fridge. Reheat it on the stove or in the microwave. Stir well and check that it heats evenly. In the fridge, chicken tikka masala lasts about four days. If you freeze it, it can last up to three months. After that, the flavor may fade. Always label your containers with the date. This way, you know when to use them. You can tell when the chicken is done by checking its temperature. It should reach 165°F (75°C). The chicken should be tender and easy to shred with a fork. You may also notice that the juices run clear, not pink. If the chicken looks dry or tough, it might have cooked too long. For optimal results, cook on low for 6 to 8 hours or high for 3 to 4 hours. Yes, you can use chicken breasts. However, they cook faster and might dry out if overcooked. Chicken thighs have more fat and stay moist, making them ideal for slow cooking. If you use breasts, reduce the cooking time. Check for doneness at around 3 to 4 hours on low, or 2 to 3 hours on high. Great side dishes include basmati rice, naan, or pita bread. These help soak up the rich sauce. You can also add a fresh salad or steamed vegetables for balance. Don’t forget to sprinkle fresh cilantro on top for added flavor. This blog post covered the key ingredients and steps to make a flavorful Chicken Tikka Masala using boneless chicken thighs, spices, and coconut milk. I shared tips for slow cooking and variations for personalizing the dish. Remember, the right seasonings and proper cooking techniques make all the difference. Enjoy experimenting with flavors and sides. Discover what suits your taste best, and delight in every bite!

Slow Cooker Chicken Tikka Masala Flavorful Comfort Dish

Are you ready to dive into a slow cooker dish that’s bursting with flavor? This Slow Cooker Chicken Tikka Masala

To make Spicy Thai Peanut Noodles, you need the following fresh and vibrant ingredients: - 8 oz rice noodles - 1 cup bell peppers (mixed colors), thinly sliced - 1 cup carrots, julienned - 1 cup snap peas, trimmed - 1/4 cup green onions, chopped - 1/4 cup roasted peanuts, roughly chopped - 1 tablespoon sesame oil - 2 cloves garlic, minced - 1 tablespoon fresh ginger, minced - 1/4 cup peanut butter (creamy) - 3 tablespoons soy sauce - 1 tablespoon sriracha (adjust to taste) - 1 tablespoon lime juice - Salt and pepper to taste - Fresh cilantro, for garnish (optional) Gathering these ingredients sets you up for a quick and tasty meal. The rice noodles provide a soft base, while the veggies add crunch and color. Roasted peanuts give a delightful crunch, and the spicy sauce ties everything together. You can find the full recipe in the next section to guide you through the cooking process. Enjoy the mix of flavors! First, get a large pot and fill it with water. Bring the water to a boil. Once it boils, add 8 oz of rice noodles. Cook them according to the package instructions until they are al dente. This usually takes about 4 to 6 minutes. After that, drain the noodles in a colander. Rinse them under cold water to stop the cooking process. Set the noodles aside for later. Next, take a large skillet or wok. Heat 1 tablespoon of sesame oil over medium-high heat. Once the oil is hot, add 2 cloves of minced garlic and 1 tablespoon of minced ginger. Stir-fry these for about 30 seconds until they smell great. Add 1 cup of thinly sliced bell peppers, 1 cup of julienned carrots, and 1 cup of trimmed snap peas. Stir-fry the vegetables for about 3 to 4 minutes until they are tender but still crisp. In a small bowl, whisk together 1/4 cup of creamy peanut butter, 3 tablespoons of soy sauce, 1 tablespoon of sriracha, and 1 tablespoon of lime juice. Mix until the sauce is smooth. If it feels too thick, add a little warm water. Keep adding until it is just right for you. Now, add the cooked noodles to the skillet with the veggies. Pour the peanut sauce over the noodles. Toss everything together well so all the noodles are covered with sauce and mixed with veggies. Cook for another 2 to 3 minutes to heat everything through. Remove the skillet from heat. Stir in 1/4 cup of chopped green onions and 1/4 cup of roughly chopped roasted peanuts. Season with salt and pepper to taste. Serve the noodles in bowls. You can add garnishes like fresh cilantro or more crushed peanuts for extra flavor. Enjoy your delicious meal! For the full recipe, check the section above. To make the best Spicy Thai Peanut Noodles, always cook the noodles al dente. This means they should be firm but not hard. Overcooked noodles can turn mushy and lose their texture. Adjust the heat level with sriracha to fit your taste. Start with a little, then add more for extra spice. Using high heat for stir-frying is key. It helps the veggies stay crisp and bright. When you rinse the cooked noodles with cold water, it stops the cooking process. This keeps them from sticking together and helps them stay separate. Garnish your dish with fresh cilantro and extra peanuts for crunch. You can also add lime wedges on the side. A squeeze of lime adds a nice zing and enhances the flavors. For a fun twist, try serving the noodles in bowls for a pop of color. For the full recipe, visit [Full Recipe]. {{image_2}} You can easily make this dish gluten-free. Just swap rice noodles for gluten-free noodles made from rice or quinoa. For vegan options, skip the honey and use maple syrup or agave nectar instead. You can also choose a vegan-friendly sauce instead of soy sauce. If you want to change the veggies, try using zucchini, broccoli, or green beans instead of bell peppers, carrots, and snap peas. Seasonal veggies like asparagus or mushrooms can also work great. They add a fresh twist to your meal. For extra protein, add tofu or chicken. If using tofu, choose firm tofu for the best texture. Sauté it until golden brown before adding it to the dish. For chicken, slice it thinly and cook it in the skillet first. Make sure it is cooked through before adding the noodles. These variations keep your meal exciting and allow you to cater to your taste or dietary needs while preparing Spicy Thai Peanut Noodles. For the complete recipe, check out the Full Recipe section. To keep your Spicy Thai Peanut Noodles fresh, store leftovers in a tight container. Make sure the lid seals well. This helps prevent air and moisture from ruining your meal. In the fridge, these noodles will last for about 3 to 4 days. Always check for any signs of spoilage before eating. You can freeze this dish for later use. To do this, let the noodles cool completely first. Then, place them in a freezer-safe container. Make sure to remove as much air as possible before sealing. This will help prevent freezer burn. When you want to eat them, thaw the noodles overnight in the fridge. When it’s time to enjoy your noodles again, the best way to reheat them is in a skillet. Heat it over medium-low heat and add a splash of water or broth. This helps keep the noodles from drying out. Stir often until everything is hot. Avoid using a microwave if you want to keep the texture nice. Microwaves can make them soggy, which isn't ideal for this tasty dish. Spicy Thai Peanut Noodles can last about 3 to 4 days in the fridge. To keep them fresh, store them in an airtight container. This helps prevent them from drying out or absorbing other odors. Always check for any signs of spoilage before eating. Yes, you can prepare Spicy Thai Peanut Noodles ahead of time. Cook the noodles and veggies, then store them separately from the sauce. Mix everything together just before serving. This keeps the noodles and veggies crisp and fresh. If you have a peanut allergy, you can use sunflower seed butter or almond butter. Both options give a creamy texture. You can also try tahini, which is made from sesame seeds. Each choice will alter the flavor slightly, but they all work well. The spice level of Spicy Thai Peanut Noodles depends on how much sriracha you use. For a mild dish, reduce the sriracha. For more heat, add more sriracha or even some chili flakes. You can always adjust it to match your taste. To make Spicy Thai Peanut Noodles nut-free, simply skip the peanut butter. Use sunflower seed butter or tahini instead. You can also omit the peanuts on top and use crispy rice or seeds for crunch. This way, everyone can enjoy the dish safely. For the complete recipe, check out the Full Recipe section. This recipe for Spicy Thai Peanut Noodles is a great way to enjoy tasty food. We used fresh rice noodles, colorful veggies, and a creamy peanut sauce. Each step is easy to follow, from cooking the noodles to stir-frying your ingredients. You can tweak the spice and swap ingredients based on your diet. Don't forget, storing leftovers correctly can save you time later. With these tips and tricks, you can create a dish that's not only delicious but fills you with pride. Enjoy cooking and sharing this flavorful meal!

Spicy Thai Peanut Noodles Flavorful and Quick Recipe

Are you craving a delicious, quick meal? Look no further! My Spicy Thai Peanut Noodles offer bold flavors in under

- 500g baby bella mushrooms, cleaned and stems trimmed - 4 tablespoons unsalted butter - 4 cloves garlic, minced - 2 tablespoons fresh parsley, finely chopped - 1 tablespoon fresh thyme, leaves only - 1 teaspoon dried oregano - Salt and pepper to taste - 1 tablespoon lemon juice - Zest of 1 lemon These ingredients make our herbed garlic butter mushrooms rich and flavorful. Each one plays a key role in creating a delicious dish. Baby bella mushrooms give a deep, earthy taste. The unsalted butter adds a creamy richness. Minced garlic brings a bold flavor. Fresh herbs like parsley and thyme brighten everything up. Dried oregano adds a hint of warmth. Using lemon juice and zest adds zing, balancing the richness. Always taste and adjust the salt and pepper. This way, you get the perfect flavor for your dish. I recommend using fresh herbs when possible. They bring a vibrant taste that dried herbs can’t match. For the best results, choose mushrooms that are firm and free of spots. You can find the Full Recipe at the end of this section. Preparing these ingredients will set you up for a flavorful cooking experience. Start by melting the butter in a large skillet over medium heat. Watch it closely as it becomes foamy. This is when you will add the minced garlic. Sauté it for about one minute. You want it to smell great but not brown. Next, raise the heat to medium-high. Add the cleaned baby bella mushrooms into the skillet. Stir them well to coat each mushroom in the garlic butter. Season them with salt, pepper, and dried oregano. Toss in fresh thyme too. Cook for about five to seven minutes. Stir occasionally until the mushrooms turn tender and nicely browned. Once the mushrooms are ready, remove the skillet from the heat. Stir in the fresh parsley, lemon juice, and lemon zest. Toss everything together so the flavors mix well. Taste and adjust the seasoning. Add more salt or pepper if needed. Serve hot, and feel free to garnish with extra parsley if you like. For the complete instructions, check the Full Recipe. Choose baby bella mushrooms for rich flavor. They have a nice firm texture. You can also use cremini or white button mushrooms. Look for mushrooms that are smooth and dry. Avoid any with dark spots or wrinkled skin. Fresh mushrooms should feel firm, not soft. Sautéing mushrooms is easy and fun. Heat your skillet before adding butter. This helps mushrooms brown well. Make sure they are not crowded in the pan. If they are, they will steam and become rubbery. Stir them often, but don’t stir too much. Garlic and herbs bring out the best in mushrooms. Use fresh garlic for a strong taste. Add parsley and thyme for freshness. A hint of lemon juice brightens the dish. If you like heat, consider adding red pepper flakes. This will give your mushrooms an extra kick. For a twist, try adding a splash of soy sauce. {{image_2}} You can make Herbed Garlic Butter Mushrooms even heartier by adding proteins. Chicken and shrimp work great here. For chicken, chop it into small pieces. Cook it first in the skillet until it turns golden. Then, add the mushrooms and follow the recipe. For shrimp, add them after the garlic but before the mushrooms. Cook until they turn pink, then add the mushrooms. This adds a nice twist and makes it a full meal. If you want a vegan version, you can easily swap the butter. Use a plant-based butter or olive oil instead. The flavors will still shine through. You can even choose coconut oil for a different taste. Just follow the same steps for cooking, and you’ll have a delightful dish that everyone can enjoy. Feel free to play with the herbs and spices. If you love basil, add some fresh leaves. Rosemary can also give a lovely aroma. For a spicy kick, try adding a pinch of red pepper flakes. You can mix and match to find what you enjoy most. This recipe is all about making it your own. For the full recipe, check out the details provided earlier! To keep your herbed garlic butter mushrooms fresh, you should refrigerate them. Place the mushrooms in an airtight container. This helps lock in their flavor. If you don't have one, use plastic wrap over a bowl. Make sure to seal it well. You can store the mushrooms for up to three days. After that, they may lose their taste and texture. Always let them cool down to room temperature before putting them in the fridge. This prevents moisture build-up, keeping them from getting soggy. When reheating your mushrooms, do it gently. Use a skillet over low heat. This way, the mushrooms warm up without becoming rubbery. Stir them often to heat evenly. If you prefer the microwave, use a microwave-safe dish. Cover it with a paper towel to keep moisture in. Heat in short bursts, checking every 30 seconds. Watch for any signs of spoilage. If the mushrooms smell off or have a slimy texture, it’s best to toss them. Fresh mushrooms should always taste and smell good. Enjoy your herbed garlic butter mushrooms! For the full recipe, check it out here. Yes, you can make Herbed Garlic Butter Mushrooms ahead of time. Cook them fully, then let them cool. Store in an airtight container in the fridge for up to three days. Reheat them gently in a skillet before serving to maintain their flavor and texture. Herbed Garlic Butter Mushrooms work well with many dishes. They complement grilled meats like steak or chicken. Serve them alongside pasta for a hearty meal. You can also use them as a topping for crostini or in a savory omelet. Their rich flavor enhances any dish. To prevent soggy mushrooms, make sure to dry them well before cooking. Avoid soaking them in water. Cook them over medium-high heat, allowing moisture to evaporate. Stir them only occasionally to let them brown nicely. This helps achieve that perfect, firm texture. Yes, this recipe is gluten-free. The ingredients used are naturally gluten-free. You can enjoy Herbed Garlic Butter Mushrooms without worry. Just ensure that any additional foods paired with them are also gluten-free if you have dietary restrictions. You can use dried herbs instead of fresh ones, but the flavor will differ. Generally, use one-third the amount of dried herbs compared to fresh. Dried herbs are more concentrated. Still, fresh herbs add brightness and freshness that dried ones lack. For a richer taste, I recommend using fresh herbs when possible. Check out the Full Recipe for detailed instructions and enjoy your cooking! This article shares a simple recipe for Herbed Garlic Butter Mushrooms. We explored the right ingredients and steps to cook them perfectly. You learned how to select fresh mushrooms and avoid rubbery results. We also discussed variations and storage tips to keep flavors fresh. Try making this dish at home. Your taste buds will thank you. Enjoy the rich flavors and the satisfaction of cooking your own delicious mushrooms!

Herbed Garlic Butter Mushrooms Rich and Flavorful Dish

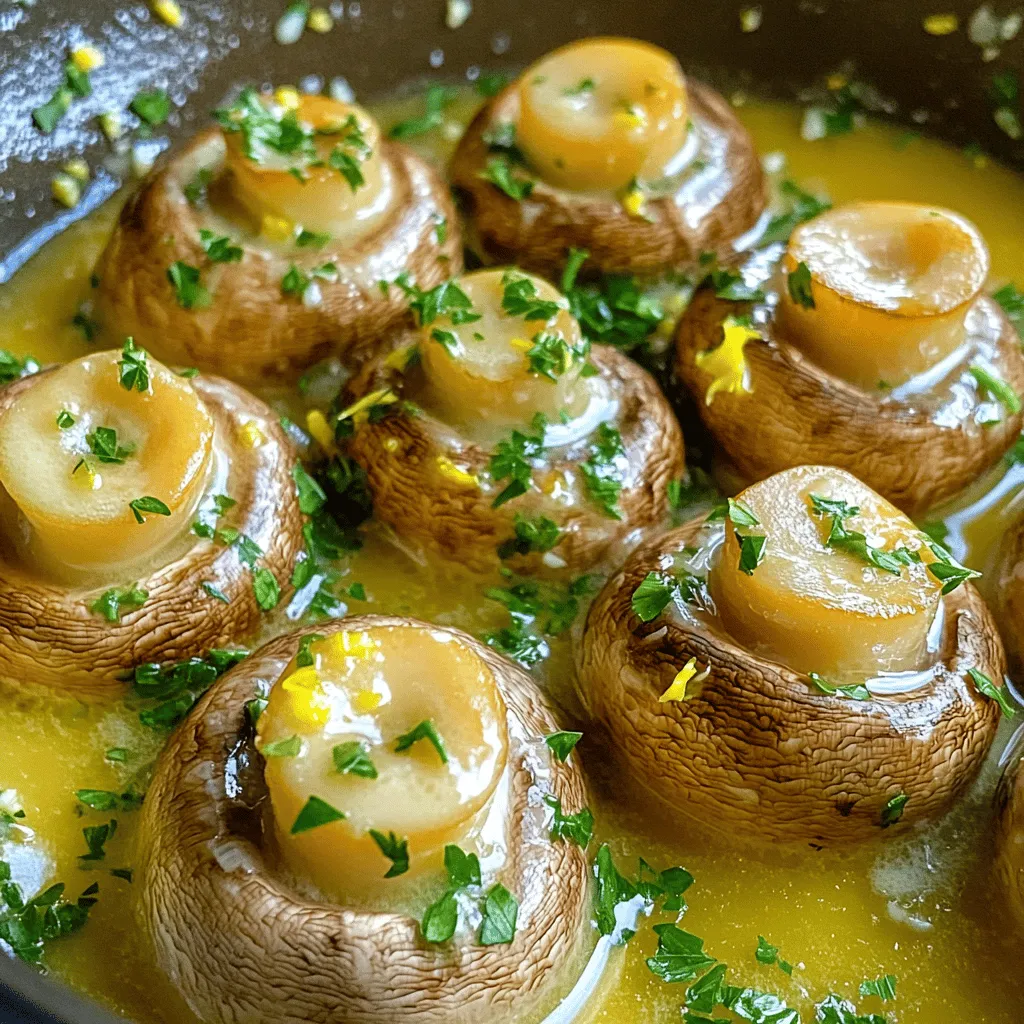
Are you ready to elevate your cooking game? Herbed Garlic Butter Mushrooms are rich, tasty, and easy to make! This

- 1 lb (450g) boneless chicken thighs, cubed - 1 cup plain yogurt - 2 tablespoons tandoori masala (store-bought or homemade) - 1 tablespoon ginger-garlic paste - 1 tablespoon lemon juice - 1 tablespoon olive oil - 1 teaspoon ground cumin - 1 teaspoon paprika - 1/2 teaspoon cayenne pepper (adjust for desired heat) - Salt to taste - Fresh cilantro for garnish - 1 red onion, cut into wedges - 1 bell pepper, cut into squares Gather these ingredients before you start. Chicken thighs work best for this dish. They stay juicy and flavorful when grilled. You’ll use plain yogurt to make the marinade creamy and tangy. Tandoori masala is the spice that gives this dish its unique flavor. If you can’t find it, you can make your own. You also need ginger-garlic paste, lemon juice, olive oil, ground cumin, paprika, and cayenne pepper. Adjust the cayenne to control the heat. Remember to add salt to taste. Fresh cilantro will add a pop of color and flavor as a garnish. The veggies, red onion and bell pepper, add color and taste to the skewers. - Skewers (wooden or metal) - Grill or oven - Mixing bowl You can use wooden or metal skewers. If you choose wooden skewers, soak them in water for 30 minutes. This will help prevent burning on the grill. You’ll need either a grill or an oven to cook the skewers. A mixing bowl is important for combining the marinade. - Naan bread - Raita (yogurt sauce) - Lemon wedges These optional ingredients can elevate your meal. Naan bread is great for wrapping the chicken. Raita adds a cool, creamy touch. Lemon wedges can brighten the flavors. Enjoy your Tandoori Chicken Skewers with these delicious sides! To make a tasty marinade, you start by mixing yogurt and spices. Combine the following in a bowl: - 1 cup plain yogurt - 2 tablespoons tandoori masala - 1 tablespoon ginger-garlic paste - 1 tablespoon lemon juice - 1 tablespoon olive oil - 1 teaspoon ground cumin - 1 teaspoon paprika - 1/2 teaspoon cayenne pepper - Salt to taste Stir well until everything blends. This mix brings out rich flavors in the chicken. Next, add chicken to the marinade. Make sure each piece is covered well. Cover the bowl with plastic wrap. Place it in the fridge for at least 2 hours. For a stronger flavor, let it marinate overnight. This time lets the chicken soak up all the good spices. While the chicken marinates, prepare your skewers. If you use wooden skewers, soak them in water for 30 minutes. This keeps them from burning on the grill. Now, preheat your grill or oven to medium-high heat, about 400°F (200°C). This sets the stage for a nice char. Now, it’s time to put everything on the skewers. Take the marinated chicken and thread it onto the skewers. Alternate pieces of chicken with colorful veggies like red onion and bell pepper. This not only looks great but adds more flavor. Grill the skewers for 15 to 20 minutes. Turn them often to ensure even cooking. The chicken should be fully cooked with nice grill marks. When done, let them rest for a couple of minutes. Garnish with fresh cilantro before serving. This step adds a pop of color and freshness to your dish. For the complete process, check out the full recipe. Enjoy your flavorful grilled delight! When making tandoori chicken skewers, marination is key. You can choose between two methods: overnight or quick marination. - Overnight marination: This is the best choice for deep flavors. It allows the spices to fully soak into the chicken. Ideally, marinate for 8-12 hours in the fridge. - Quick marination: In a hurry? Marinate for at least 2 hours. While it won’t be as rich, you still get good taste. Just be sure to coat every chicken piece well. Getting the perfect char on your skewers takes a bit of skill. Here’s how to do it right: - Preheat your grill: Aim for medium-high heat. This helps to cook the chicken evenly. - Use soaked wooden skewers: Soaking prevents burning. Keep them in water for 30 minutes before grilling. - Turn the skewers often: This ensures even cooking and prevents dryness. Cook for about 15-20 minutes. Look for a nice char and clear juices to know they’re done. How you serve your tandoori chicken skewers can enhance the meal. Here are some fun ideas: - Plating: Use a large platter for a beautiful presentation. - Add color: Include lemon wedges and fresh cilantro. They brighten up the dish. - Pair with sides: Serve with naan bread or a cool raita for dipping. These add texture and balance to the meal. Use these tips to make your tandoori chicken skewers flavorful and fun! For the full recipe, check out the details in the recipe section. {{image_2}} If you want a meat-free option, try using tofu or vegetables. Firm tofu works best. Cut it into cubes and marinate it just like the chicken. You can also use a mix of veggies. Bell peppers, zucchini, and mushrooms taste great when grilled. They soak up the marinade well, giving you that tasty flavor. Skewering the tofu or veggies with onions adds a nice touch. Adjusting the heat in your marinade is easy. For a milder flavor, use less cayenne pepper. You can even skip it if you prefer. If you like it spicy, add more cayenne or some chili powder. This way, you can cater to everyone's taste. It’s fun to play with the spice levels to find what you love. Enhance your meal with tasty sides and sauces. Serve the skewers with naan bread for a nice touch. Raita, a yogurt sauce, cools down the heat and adds creaminess. Lemon wedges brighten up the dish and add freshness. You can also try a side salad for crunch. These accompaniments make your tandoori chicken skewers even more delicious. To store leftover tandoori chicken skewers, first let them cool. Place the skewers in an airtight container. You can add a layer of parchment paper between layers to prevent sticking. Refrigerate them within two hours of cooking. When you want to eat them again, preheat your oven to 350°F (175°C). Bake for about 10-15 minutes until hot. If you want to save some skewers for later, freezing is a great option. First, remove the chicken from the skewers. Place the marinated chicken in a freezer-safe bag. Remove as much air as possible before sealing. You can freeze it for up to three months. When you're ready to grill, thaw the chicken in the fridge overnight before cooking. Cooked tandoori chicken skewers can stay fresh in the fridge for about three to four days. After that, the quality may drop. If you notice any off smells or colors, it's best to toss them. Enjoy your skewers while they are fresh for the best taste! To check if the chicken is done, use a meat thermometer. Insert it into the thickest part of the meat. The internal temperature should reach 165°F (75°C). If you don’t have a thermometer, cut into a piece. The meat should be white with no pink inside. Yes, you can use chicken breast. It has less fat than thighs. This change may make the chicken a bit drier, so be careful not to overcook it. Marinating longer can help keep it moist. Tandoori masala is a spice mix used in Indian cooking. It usually includes cumin, coriander, paprika, and other spices. You can find it at Indian grocery stores or online. Many brands sell it ready-made. Yes, you can bake the skewers in the oven. Preheat the oven to 400°F (200°C). Place the skewers on a baking sheet lined with parchment paper. Bake for about 15-20 minutes or until cooked through, turning halfway. These skewers pair well with naan bread, rice, or a fresh salad. Raita, a yogurt sauce, is a great dip. You can also serve lemon wedges for a fresh kick. For the full details on making Tandoori Chicken Skewers, check out the [Full Recipe]. This blog shared a simple recipe for Tandoori Chicken Skewers, highlighting key ingredients and steps. I discussed how to marinate chicken, prepare the grill, and grill the skewers for the best taste. You can adjust spice levels and try vegetarian alternatives for variety. Cooking and sharing these skewers create fun moments with family and friends. Enjoy trying this recipe and making it your own!

Tandoori Chicken Skewers Flavorful Grilled Delight

Craving something smoky, spicy, and saucy? Tandoori chicken skewers are the ultimate grilled treat! In this post, I’ll guide you

Older posts
Newer posts
← Previous Page1 … Page57 Page58 Page59 … Page83 Next →

dsad

© 2025 easycookingbite • Built with GeneratePress

Our Policies

  • Copyright Policy
  • Cookie Policy
  • GDPR Policy
  • Privacy Policy
  • Disclaimer
  • Terms Of Use

More Information

  • Home
  • About
  • Contact
  • Appetizers
  • Dessert
  • Dinner
  • Drinks
©2025, easycookingbite About Back To Top