Skip to content
DisclaimerTerms Of UseGDPR PolicyCookie Policy

easycookingbite

  • Home
  • Drinks
  • Appetizers
  • Dinner
  • Dessert
  • About
  • Contact
  • Privacy Policy
DisclaimerTerms Of UseGDPR PolicyCookie Policy

Lily

- 1 pound chicken breast, diced - 1 pound potato gnocchi - 4 cloves garlic, minced - 2 cups spinach leaves - 1 cup cherry tomatoes, halved - 1 teaspoon Italian seasoning - 1/2 teaspoon red pepper flakes (optional) - 2 tablespoons olive oil - Salt and pepper to taste - 1/2 cup grated parmesan cheese - Fresh basil leaves for garnish - Large skillet - Cooking utensils - Measuring spoons and cups To make a great Garlic Chicken Gnocchi Skillet, you need fresh, quality ingredients. The chicken brings protein and flavor, while the gnocchi adds a soft, pillowy texture. Garlic is key here; it gives the dish its signature aroma and taste. Spinach and cherry tomatoes add color and nutrition. Use a large skillet for even cooking. This helps all the flavors blend nicely. I recommend using a sturdy spatula for stirring. Measuring spoons and cups are essential for accuracy. When you gather your ingredients, the fun begins! This recipe is quick and easy. You can whip it up in about 25 minutes. Make sure to check out the Full Recipe for all the cooking steps. To start, season the chicken breast. Use salt, pepper, and Italian seasoning. This mix boosts flavor. Next, heat 1 tablespoon of olive oil in a large skillet over medium heat. Add the chicken to the skillet. Cook for 5-7 minutes until golden. Make sure it’s cooked through. Remove the chicken and set it aside. Now, let’s sauté the garlic and tomatoes. In the same skillet, add another tablespoon of olive oil. Toss in the minced garlic and optional red pepper flakes. Sauté for about 1 minute. You want it fragrant, but not burnt. Next, add the halved cherry tomatoes to the skillet. Cook for 3-4 minutes. They should start to soften and burst. For the gnocchi, you can use fresh or shelf-stable. If using fresh gnocchi, cook it in the skillet. It usually takes 2-3 minutes until it floats. For shelf-stable gnocchi, prepare it in a separate pot and drain before adding it. Once the gnocchi is ready, combine it with the garlic and tomatoes. Now, mix in the spinach and cooked chicken. Stir gently. Cook until the spinach wilts, about 1-2 minutes. Finally, sprinkle the grated parmesan cheese over the dish. Toss everything to combine. Taste and adjust seasoning if needed. Let it sit for a couple of minutes for the cheese to melt. For the full recipe, check the detailed steps provided above. To cook gnocchi just right, timing is key. Fresh gnocchi cooks fast. When they float, they are done. This usually takes about 2 to 3 minutes. If you use shelf-stable gnocchi, cook them in a pot first. Drain them well before adding to the skillet. This helps keep the dish light and fluffy. You can make this dish your own by adding extra veggies or proteins. Consider bell peppers, zucchini, or mushrooms. You can also swap the chicken for shrimp or tofu for a fun twist. Try adding a handful of peas or asparagus for color and flavor. The options are endless! To boost the flavor, use fresh herbs like parsley or thyme. You can also try adding lemon zest for a bright touch. For a spicier kick, increase the red pepper flakes. A dash of smoked paprika can add depth too. Experiment with different seasonings to find what you love most. For full recipe details, check out the complete guide! {{image_2}} You can easily make this dish vegetarian. Instead of chicken, try using mushrooms or zucchini. These veggies add great texture and flavor. You can also add extra spinach or kale for more greens. When you replace chicken, cook the veggies until they are soft. This will give you a tasty, hearty meal. If you need a gluten-free version, look for gluten-free gnocchi. Many brands offer great options made from rice or potato. Check the packaging to make sure it fits your needs. Cooking times may vary, so follow the instructions on the package. This way, you can enjoy the same great taste without the gluten. Want to add more flavor? Try different cheeses like feta or mozzarella. You can also add spices like smoked paprika or fresh herbs. These simple changes can make your meal feel new and exciting. You can mix and match flavors to suit your taste. Don't be afraid to experiment! For the full recipe, check out the detailed steps to create this delightful dish. Store leftover garlic chicken gnocchi in an airtight container. This helps keep it fresh and tasty. Make sure to cool it first before sealing. It will last in the fridge for 3 to 4 days. When you reheat it, add a splash of water or broth. This keeps it from drying out. To freeze the dish, let it cool completely. Then, place it in a freezer-safe container. You can also use a freezer bag. Squeeze out the air before sealing. It can stay frozen for up to 3 months. When you’re ready to eat, thaw it in the fridge overnight. Reheat it on the stove or in the microwave until warm. Garlic chicken gnocchi stays fresh in the fridge for about 4 days. If frozen, it can last up to 3 months. Always check for any off smells or changes in color before eating. If in doubt, throw it out! Yes, you can use frozen gnocchi. Frozen gnocchi cooks quickly and tastes great. Just add them directly to the skillet without thawing. Make sure to cook them until they float. This usually takes around 2-3 minutes. I recommend checking the package for exact times. Frozen gnocchi is a time-saver and still gives you that nice chewy texture. You have many tasty options for sides. Here are some of my favorites: - Garlic bread: A classic choice that pairs well. - Mixed green salad: A fresh salad adds crunch and color. - Roasted veggies: Try zucchini, bell peppers, or asparagus. - Steamed broccoli: It adds a healthy touch and a pop of green. These sides enhance the meal and balance the flavors. Making this dish dairy-free is simple. Here are some swaps: - Use nutritional yeast: It gives a cheesy flavor without dairy. - Skip the parmesan: You can leave it out and still enjoy the dish. - Use dairy-free cheese: Many brands offer good dairy-free options. These changes allow everyone to enjoy the meal. Yes, this recipe is great for meal prep. Here are some tips: - Cook in bulk: Double the recipe to have more servings. - Store in containers: Use airtight containers for easy storage. - Reheat properly: Warm it in the skillet or microwave. This dish stays fresh in the fridge for about 3-4 days. You will love having a quick meal ready! For the full recipe, be sure to check out the details above! In this post, I covered a simple garlic chicken gnocchi skillet recipe. You learned about the key ingredients, essential equipment, and step-by-step instructions for cooking. I shared tips on making the gnocchi just right and how to customize the dish to fit your taste. Remember to explore variations like vegetarian or gluten-free options. Finally, storing leftovers correctly extends their freshness. This recipe is easy to make and brings delicious flavors to your table. Enjoy your cooking adventure with this tasty meal!

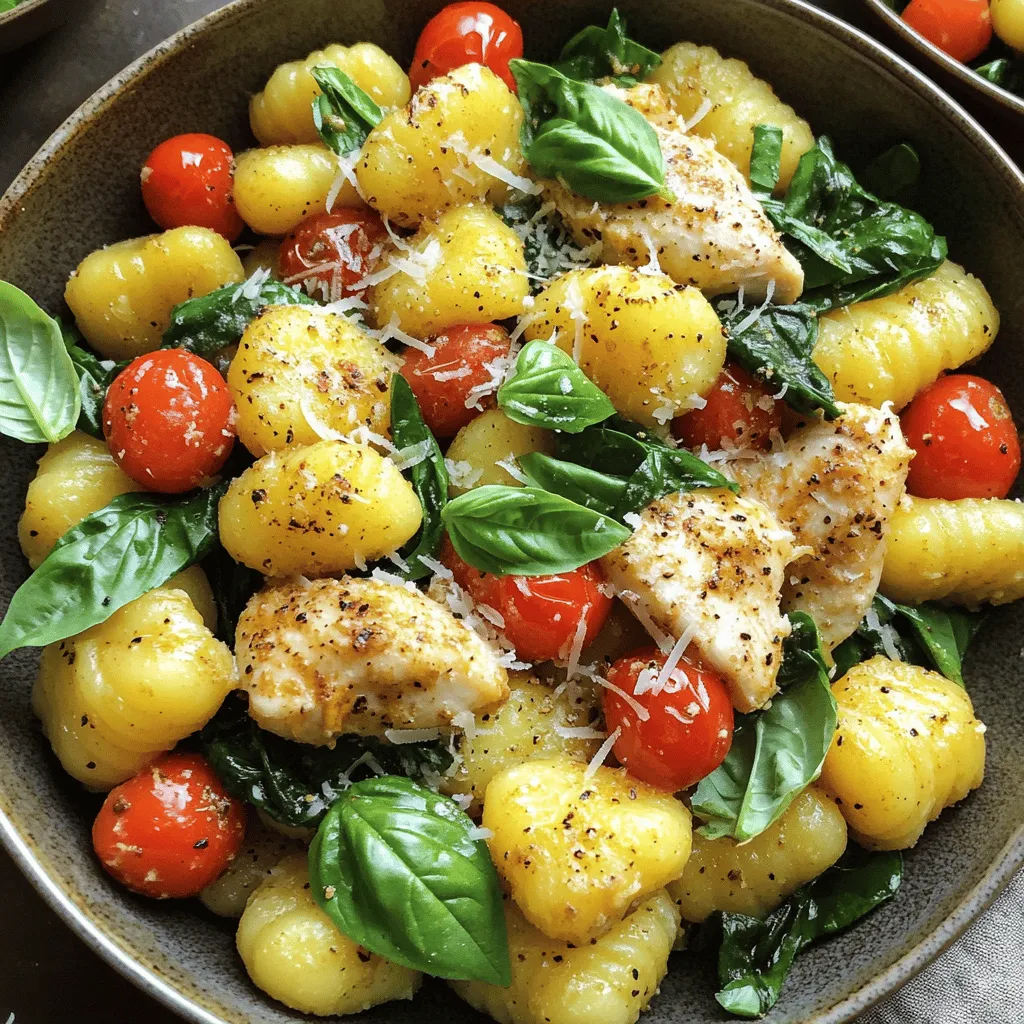
Garlic Chicken Gnocchi Skillet Tasty One-Pan Meal

Are you ready for a delicious one-pan meal that’s quick and easy? This Garlic Chicken Gnocchi Skillet packs amazing flavors

Let’s gather everything we need for this tasty dish. Here’s a simple list of ingredients: - 1 cup brown or green lentils, rinsed - 1 medium onion, chopped - 3 cloves garlic, minced - 1 medium carrot, diced - 1 medium red bell pepper, chopped - 2 teaspoons ground cumin - 1 teaspoon ground coriander - 1 teaspoon ground cinnamon - 1/2 teaspoon smoked paprika - 1/4 teaspoon cayenne pepper (optional, for heat) - 1 can (14 oz) diced tomatoes, with juices - 4 cups vegetable broth - 1 cup fresh spinach, chopped - Salt and pepper to taste - 2 tablespoons olive oil - Fresh cilantro or parsley for garnish You can find the full recipe [Full Recipe]. Each ingredient brings its own charm to the dish. The lentils are hearty and filling, while the spices add warmth and depth. The veggies add freshness and color. You’ll love how easy it is to make this meal in your Instant Pot! - Set the Instant Pot to Sauté mode. - Heat 2 tablespoons of olive oil until hot. - Add 1 chopped onion and cook until translucent, about 3-4 minutes. - Stir in 3 minced garlic cloves, 1 diced carrot, and 1 chopped bell pepper. Cook for another 2-3 minutes. - Mix in 2 teaspoons of ground cumin, 1 teaspoon of ground coriander, 1 teaspoon of ground cinnamon, and 1/2 teaspoon of smoked paprika. - If you like heat, add 1/4 teaspoon of cayenne pepper. - Cook for about 1 minute until fragrant. - Add 1 cup of rinsed lentils, 1 can of diced tomatoes (with juices), and 4 cups of vegetable broth to the pot. - Stir everything together so it combines well. - Close the lid and set the valve to “Sealing.” - Pressure cook on high for 15 minutes. You can follow the [Full Recipe] for more details on this delightful dish. How to rinse lentils properly Rinsing lentils is key. Place them in a fine-mesh sieve. Rinse under cool water for about 30 seconds. This removes dust and small debris. You want your lentils clean before cooking. Best practices for sautéing vegetables in Instant Pot To get great flavor, use the Sauté mode. Heat olive oil in the pot. Add onions first; cook for 3-4 minutes until soft. Then, mix in garlic, carrot, and bell pepper. Stir them for 2-3 minutes. This builds a tasty base for your dish. Suggestions for spice adjustments If you like heat, add more cayenne pepper. For a richer taste, bump up the cumin. You can also try adding a pinch of nutmeg for depth. Adjust spices to match your own taste. Ways to enhance with herbs or additional ingredients Fresh herbs make a big difference! Add chopped cilantro or parsley at the end. You can also stir in a squeeze of lemon juice for brightness. If you want more veggies, try adding zucchini or sweet potatoes. Recommended pairings (rice, bread, etc.) Serve these lentils over fluffy rice or with warm pita bread. They also pair well with couscous for a nice twist. You can create a full meal in minutes. Ideal garnishes for presentation Garnish with fresh herbs like cilantro or parsley. A drizzle of olive oil can add flavor and shine. If you want an extra touch, sprinkle toasted nuts on top. They add crunch and contrast to the soft lentils. {{image_2}} You can boost your Moroccan instant pot lentils with protein. Here are some tasty options: - Chicken: Add diced chicken breast for a hearty meal. - Sausage: Use slices of sausage for a smoky flavor. - Tofu: For a vegetarian option, try firm tofu. If you want vegan protein, here are some substitutes: - Chickpeas: Add canned or cooked chickpeas for extra protein. - Quinoa: This grain packs a protein punch. You can switch up the veggies based on what you have. Here are some ideas: - Zucchini: Chop and add for a fresh taste. - Sweet Potatoes: Diced sweet potatoes bring a sweet note. - Kale: Substitute spinach with kale for more texture. Seasonal swaps can add fun: - Spring: Use asparagus or peas for bright flavors. - Fall: Try pumpkin or butternut squash for warmth. Changing spices can create new tastes. Here’s what to try: - Ras el Hanout: This mix adds depth and warmth. - Garam Masala: For a different twist, use this spice blend. Adjust the heat level to your liking: - Mild: Skip the cayenne for a gentle taste. - Spicy: Add more cayenne or fresh chili peppers for kick. Experiment with these variations to make the dish your own! For more details, check out the Full Recipe. To store leftovers, place them in an airtight container. Make sure the dish cools down first. This helps keep the lentils fresh. You can store them in the fridge for up to five days. After that, they may lose flavor and texture. For freezing Moroccan lentils, use freezer-safe containers. Leave some space at the top, as the lentils may expand. They stay good in the freezer for about three months. To thaw, move the container to the fridge overnight. You can also use a microwave on low power. You can reheat lentils in a microwave or on the stove. If using the stove, heat them on low. Stir often to keep the texture nice. Add a splash of water or broth if they seem dry. This keeps the flavors fresh and vibrant. Cooking lentils in an Instant Pot is quick. Brown or green lentils take about 15 minutes. Red lentils cook even faster, usually around 10 minutes. Always add time for pressure build-up and release. Yes, you can use dried lentils. Rinse them well before adding. They will absorb more liquid, so adjust the broth amount. Dried lentils also need more time to cook. Moroccan lentils pair well with many sides. Here are some great options: - Couscous: Fluffy and light, it soaks up flavors. - Rice: White or brown rice adds texture. - Salads: A fresh salad brightens the meal. - Flatbreads: Serve with pita or naan for dipping. Yes, this recipe is gluten-free. All the ingredients, like lentils and spices, contain no gluten. If you add bread or couscous, opt for gluten-free options. This blog post covered how to make a tasty Moroccan lentil dish in an Instant Pot. You learned about key ingredients like lentils, veggies, and spices. We walked through easy steps from sautéing to pressure cooking. Plus, I shared tips on adding proteins, adjusting flavors, and storing leftovers. In closing, this dish is healthy, simple, and full of flavor. You can easily change it up based on what you like or have on hand. Enjoy making this meal for you and your loved ones!

Moroccan Instant Pot Lentils Simple and Flavorful Dish

Are you ready to make a delicious and simple meal? This Moroccan Instant Pot Lentils recipe packs a punch with

For the 10 Minute Honey Garlic Shrimp, gather these key items: - 1 pound large shrimp, peeled and deveined - 3 tablespoons honey - 3 tablespoons soy sauce (low sodium recommended) - 4 cloves garlic, minced - 1 tablespoon fresh ginger, minced - 2 tablespoons sesame oil (or olive oil) - 1 teaspoon red pepper flakes (adjust to taste) - 2 green onions, thinly sliced (for garnish) - Sesame seeds (for garnish) - Cooked rice or quinoa (for serving) These ingredients come together to create a tasty dish. The shrimp is the star, but the honey and garlic add depth. To make this dish, you will need: - A large skillet - A small bowl - A whisk or fork - A cutting board - A sharp knife These tools help you cook quickly and efficiently. The skillet is key for that perfect sauté. Feel free to change some ingredients to suit your taste: - Use chicken or tofu instead of shrimp for different proteins. - Swap honey for maple syrup for a vegan option. - Use tamari instead of soy sauce for a gluten-free version. - Add vegetables like bell peppers or snap peas for more color and flavor. These swaps keep the dish fun and fresh. Experimenting can lead to new favorites! For the full recipe, check the details provided. To start, gather your ingredients. You need shrimp, honey, soy sauce, garlic, ginger, sesame oil, red pepper flakes, green onions, and sesame seeds. First, peel and devein the shrimp if needed. This saves time later. Mince the garlic and ginger finely. This ensures you get their full flavor. In a small bowl, mix the honey, soy sauce, garlic, ginger, and red pepper flakes. Whisk them together until they blend well. Set this sauce aside; you will use it soon. Now, heat the sesame oil in a large skillet over medium-high heat. Wait until the oil shimmers; this means it's hot. Add the shrimp in a single layer. Let them cook for about 2-3 minutes. Watch as they turn pink and opaque. This is your sign they are cooking well. Next, pour the honey garlic sauce over the shrimp. Stir gently to coat each shrimp evenly. Cook for another 2-3 minutes. This lets the sauce thicken and cling to the shrimp. Stir occasionally to keep the shrimp from sticking. Once done, take the skillet off the heat. To serve, use a large bowl. Place a bed of cooked rice or quinoa at the bottom. This helps soak up the sauce. Add the shrimp on top. Drizzle any extra sauce over them for great flavor. For a colorful touch, sprinkle sliced green onions and sesame seeds on top. These give a nice crunch and look good. Enjoy this quick dish right away for the best taste! For the full recipe, refer back to the ingredients and instructions. When making honey garlic shrimp, a few mistakes can ruin your dish. First, do not overcook the shrimp. They should turn pink and opaque in just 2-3 minutes. If you cook them too long, they become tough. Second, make sure your sauce ingredients are mixed well. If the honey settles at the bottom, it won't coat the shrimp evenly. Lastly, be careful with the heat. If your skillet is too hot, the sauce may burn. To get that perfect sauce, start by mixing the honey, soy sauce, garlic, ginger, and red pepper flakes. Whisk them well until they blend smoothly. You want a thick but pourable sauce. If your sauce is too thin, let it cook a bit longer after adding it to the shrimp. Stir it often. This helps it thicken without burning. If it’s too thick, add a splash of water or extra soy sauce to loosen it up. Cooking shrimp is simple if you follow a few best practices. Always use fresh or well-thawed shrimp. Frozen shrimp can be watery if not thawed properly. Heat your skillet before adding oil. This ensures the shrimp sears well. Place the shrimp in a single layer in the skillet. Avoid crowding them. This helps them cook evenly. Finally, add the sauce at the right time. Pour it in when the shrimp are just about done. This way, they soak up the flavors without overcooking. For the complete recipe, check the Full Recipe section. {{image_2}} Want a kick? Add more heat! Mix in extra red pepper flakes. For a bolder flavor, try fresh chopped chili peppers. This twist makes the dish exciting and full of zest. You can also use sriracha or chili paste for more spice. Adjust the heat to your liking. If you prefer a plant-based option, swap shrimp for tofu. Use firm or extra-firm tofu for the best texture. Cut the tofu into cubes and follow the same steps. Sauté the tofu until golden brown. Then, pour the honey garlic sauce over it. This creates a tasty dish that everyone can enjoy. Boost nutrition by adding veggies. Bell peppers, snap peas, or broccoli work great. Cut the vegetables into bite-sized pieces. Sauté them for a few minutes before adding shrimp or tofu. This method not only adds color but also makes the meal more filling. You can even serve it over a bed of greens for added crunch. For the full recipe, check out the [Full Recipe]. After enjoying your honey garlic shrimp, let the leftovers cool down. Place them in an airtight container. Store the container in the fridge. The shrimp will stay fresh for 2-3 days. Just make sure to seal it well to keep moisture out. To reheat your shrimp, you have a few options. You can use a microwave for quick heating. Place the shrimp on a plate and cover it with a damp paper towel. Heat in short bursts of 30 seconds until warm. You can also reheat them on the stove. Just add a bit of oil to a pan and heat over medium. Stir gently until warmed through. If you want to save your honey garlic shrimp for later, freezing is a great option. Place the cooled shrimp in a freezer-safe bag. Remove as much air as possible before sealing. Label the bag with the date. The shrimp can last up to 3 months in the freezer. When you're ready to eat, thaw in the fridge overnight. Then, reheat as mentioned above for a quick meal. For the complete recipe, check out the Full Recipe section! You can serve honey garlic shrimp with cooked rice or quinoa. Both soak up the sauce well. Steamed broccoli or snap peas add a nice crunch. You might also enjoy a fresh salad on the side. Pairing it with garlic bread can be a fun option, too. Yes, you can use frozen shrimp. Just thaw them before cooking. Place them in cold water for about 15 minutes. This helps them cook evenly. Ensure they are peeled and deveined for best results. Frozen shrimp may take a bit longer to cook, so keep an eye on them. To make your honey garlic shrimp less sweet, reduce the honey amount. Try using only two tablespoons instead of three. Adding a splash of lime juice can also balance the sweetness. You can include more soy sauce for a savory touch. Adjusting the red pepper flakes will add a nice kick, too. Check the full recipe for more tips! This blog post covered all you need for cooking honey garlic shrimp. We listed essential ingredients, tools, and smart substitutions. I walked you through each step, from preparation to serving. You learned helpful tips for perfect sauce and shrimp. We explored tasty variations and how to store leftovers. Remember, cooking is fun! Don’t hesitate to experiment with flavors. Your skills will grow with practice. Dive in and enjoy the process. Happy cooking!

10 Minute Honey Garlic Shrimp Quick and Flavorful Dish

Are you in a rush but craving a tasty meal? Look no further! This 10 Minute Honey Garlic Shrimp recipe

When making white chocolate strawberry cookies, quality ingredients matter. Here’s what you need: - 1 cup unsalted butter, softened - 1 cup brown sugar, packed - 1/2 cup white sugar - 2 large eggs - 2 teaspoons vanilla extract - 2 1/2 cups all-purpose flour - 1 teaspoon baking soda - 1/2 teaspoon salt - 1 cup dried strawberries, chopped - 1 cup white chocolate chips - Optional: powdered sugar for dusting Each ingredient plays a key role. The butter gives the cookies their rich flavor. Brown sugar adds moisture and a hint of caramel. The eggs bind everything together, while the flour builds the cookie's structure. Baking soda helps them rise, creating a soft texture. Dried strawberries add a burst of fruity flavor, and white chocolate chips provide sweetness and creaminess. If you want a fancy touch, sprinkle powdered sugar on top before serving. With these ingredients, you can create cookies that are simple yet delightful. Get ready to enjoy a sweet treat! For the complete steps, check out the Full Recipe. 1. Preheat and prepare the baking sheet: Start by setting your oven to 350°F (175°C). Line a baking sheet with parchment paper. This will help prevent sticking and make clean-up easy. 2. Cream the butter and sugars together: In a large bowl, add 1 cup of softened unsalted butter, 1 cup of brown sugar, and 1/2 cup of white sugar. Mix them together until you see a light and fluffy texture. This step adds air, which helps make the cookies soft. 3. Incorporate eggs and vanilla extract: Now, add 2 large eggs to the bowl, one at a time. Make sure to mix well after each egg. Then, stir in 2 teaspoons of vanilla extract. This adds great flavor to your cookies. 1. Combine dry ingredients separately: In another bowl, whisk together 2 1/2 cups of all-purpose flour, 1 teaspoon of baking soda, and 1/2 teaspoon of salt. Mixing these separately helps ensure even distribution in the dough. 2. Gradually mix dry ingredients into the wet mixture: Slowly add the dry mix to the wet ingredients. Stir just until combined. Don’t overmix, or your cookies may turn out tough. 3. Fold in strawberries and chocolate chips: Gently fold in 1 cup of chopped dried strawberries and 1 cup of white chocolate chips. Make sure they are spread evenly throughout the dough for tasty bites in every cookie. 1. Scoop and space the dough on the sheet: Use a cookie scoop or a tablespoon to drop rounded balls of dough onto the prepared baking sheet. Space them about 2 inches apart. This gives them room to spread while baking. 2. Baking time and visual cues for doneness: Bake your cookies in the preheated oven for about 10-12 minutes. Look for lightly golden edges and set centers. This means they are done! Let them cool on the baking sheet for 5 minutes before moving them to a wire rack to cool completely. These steps will guide you to the perfect batch of white chocolate strawberry cookies. For a detailed overview, check the Full Recipe. To get the right cookie texture, follow these tips: - Use softened butter. This helps create a light and fluffy dough. - Do not overmix. Mix the dough just enough to combine all ingredients. Overmixing makes the cookies tough. - Watch the baking time. Pull them out when the edges are golden, and the centers are set. Measuring flour correctly is key for perfect cookies. Here’s how to do it: - Fluff the flour. Stir it in the bag to aerate it. - Spoon and level. Use a spoon to fill your measuring cup, and then level it off with a knife. Don’t pack the flour down! You can add extra fun to your cookies. Here are some ideas: - Nuts. Chopped walnuts or almonds add great crunch. - Other flavors. Try adding a dash of almond extract for a twist. For recommended baking techniques, consider these tips: - Chill the dough. If your dough is too soft, chill it for 30 minutes. This helps the cookies hold their shape. - Use parchment paper. It prevents sticking and makes cleanup easy. Try these tips to make your white chocolate strawberry cookies even more delightful! If you want to explore the recipe fully, check the Full Recipe. {{image_2}} You can make these cookies even more fun! Try using fresh strawberries instead of dried ones. Fresh strawberries add a juicy burst of flavor. They also make the cookies a bit softer. Just chop the fresh strawberries into small pieces. Make sure to pat them dry to avoid too much moisture in the dough. Another option is to mix in different types of chocolate. You might like dark chocolate or milk chocolate along with the white chocolate. Each type brings its own taste and richness. You can also use a mix of chocolate chips for a delightful surprise in every bite. Want to make these cookies gluten-free? It’s easy! You can swap the all-purpose flour for a gluten-free blend. Just make sure your blend has a good mix of flours for the best texture. Also, check that other ingredients are gluten-free. If you follow a vegan diet, you can still enjoy these cookies. Replace the butter with vegan butter. Use flax eggs instead of regular eggs. To make a flax egg, mix one tablespoon of ground flaxseed with three tablespoons of water. Let it sit for a few minutes to thicken. Finally, use dairy-free white chocolate chips for a perfect treat. These variations keep your cookies exciting and allow everyone to enjoy them! For the full recipe, check the link above. To keep your white chocolate strawberry cookies fresh, follow a few simple steps. First, let the cookies cool completely. This helps prevent moisture build-up. Then, store them in an airtight container. This keeps them soft and chewy. Use a container made of glass or plastic. Avoid metal, as it can change the taste. Place a piece of bread in the container. This will help keep the cookies moist. If you want to save some cookies for later, freezing is a great option. To freeze cookie dough, scoop the dough into balls. Place them on a baking sheet lined with parchment. Freeze them for about an hour. Once they are firm, transfer the balls to a freezer bag. Be sure to label the bag with the date. To thaw baked cookies, just take them out of the freezer. Let them sit at room temperature for about 30 minutes. You can also warm them in the oven for a few minutes. This brings back their fresh-baked taste. Enjoy your cookies anytime with these easy storage tips! Can I use fresh strawberries instead of dried? Yes, you can use fresh strawberries. However, they add more moisture. This can change the cookie's texture. If you choose fresh, chop them small and reduce the butter slightly. How long do these cookies last? These cookies stay fresh for about a week at room temperature. Keep them in an airtight container. For longer storage, you can freeze them for up to three months. What can I substitute for white chocolate chips? You can use milk chocolate or dark chocolate chips. If you prefer, try butterscotch chips or even nuts for a different flavor. Can I make these cookies ahead of time? Absolutely! You can prepare the dough and chill it in the fridge. This helps the flavors blend. Bake them fresh when you are ready. Why are my cookies spreading too much? Too much butter or not enough flour can cause spreading. Ensure you measure your flour correctly. Also, chill the dough for 30 minutes before baking to help control the spread. How to fix dry or crumbly cookies If your cookies turn out dry, you likely used too much flour. Add a little milk or melted butter to the dough. Mix until it comes together but don't overdo it. For detailed guidance, check the [Full Recipe](#) for White Chocolate Strawberry Cookies. In this article, we covered ingredients, steps, tips, variations, and storage for perfect cookies. Each part plays a key role in creating tasty treats. Remember, you can swap in fresh strawberries or try gluten-free options. Keep your cookies fresh in a sealed container. With these insights, you’re set to bake amazing cookies. Enjoy the process and most importantly, enjoy the delicious results!

White Chocolate Strawberry Cookies Delightful and Simple

Do you love the sweet taste of strawberries mixed with rich white chocolate? If so, you’re in for a treat!

To make your budget-friendly tacos, you need a few key items. Here’s what you’ll need: - 1 can chickpeas, drained and rinsed - 1 tablespoon olive oil - 1 teaspoon ground cumin - 1 teaspoon smoked paprika - 1/2 teaspoon chili powder - Salt and pepper to taste - 6 small corn tortillas - 1 avocado, sliced - 1 cup shredded lettuce - 1 tomato, diced - Hot sauce (optional) These ingredients create a filling meal that bursts with flavor without breaking the bank. You can make your tacos even better with a few optional items. Think about adding: - Fresh cilantro for a bright touch - Lime wedges for a zesty kick - Cheese for creaminess - Sliced jalapeños for heat These extras can turn a simple dish into something special. They also help you customize your meal to fit your taste. Finding affordable ingredients is key to cooking on a budget. Here are my top tips: - Buy in bulk: Opt for bulk items like chickpeas and spices. They often cost less. - Use store brands: Store brands usually offer the same quality for a lower price. - Check for sales: Look at weekly ads for deals on fresh produce and canned goods. - Visit local markets: Farmers’ markets can have great prices on fresh veggies. By following these tips, you can stretch your dollar and enjoy tasty meals. For the full recipe, check out the Budget-Friendly Spicy Chickpea Tacos. Start by heating a skillet over medium heat. Add one tablespoon of olive oil. Once the oil is hot, add the can of chickpeas that you drained and rinsed. Next, sprinkle in one teaspoon of ground cumin, one teaspoon of smoked paprika, and half a teaspoon of chili powder. Then, add salt and pepper to your taste. Stir everything well to coat the chickpeas. Cook them for about five to seven minutes. You want them to be slightly crispy and fragrant. This step adds great flavor to your tacos. While the chickpeas cook, grab a separate pan to heat your tortillas. Place them in the pan for about 30 seconds on each side. You want them to be warm and pliable. This makes it easier to fold them later. Heating the tortillas also enhances their taste. If you have a gas stove, you can heat them directly over the flame for a smoky flavor. Just be careful not to burn them! Now, it’s time to build your tacos! Take a warm tortilla and place a generous scoop of the spiced chickpeas in the center. Next, add a few slices of avocado on top. Then, pile on some shredded lettuce and diced tomato. If you like heat, drizzle a bit of hot sauce over everything. Finally, fold the tortilla in half and give it a gentle press. Your tasty, budget-friendly spicy chickpea tacos are ready to enjoy! For the full recipe, check out the complete instructions. To boost flavor, use fresh spices. Fresh spices add a bright taste. You can try herbs like cilantro or parsley. A squeeze of lime juice also brightens the dish. If you like heat, add more chili powder. You can also add a dash of hot sauce for a kick. For a creamy touch, use Greek yogurt instead of sour cream. Store any leftover tacos in a sealed container. Keep the chickpeas and toppings separate from the tortillas. This keeps the tortillas from getting soggy. You can store leftovers in the fridge for up to three days. When ready to eat, reheat the chickpeas on the stove. Warm the tortillas for about 30 seconds before serving. If you don’t have chickpeas, use black beans or lentils. Both options work well in tacos. No corn tortillas? Try flour tortillas instead, or use lettuce wraps for a low-carb option. If you lack avocado, try using guacamole or salsa. You can mix and match based on what you have. This lets you create a unique meal every time. {{image_2}} You can easily make these tacos vegetarian. Replace chickpeas with black beans or lentils. Both options are filling and cheap. You can also add more veggies like bell peppers or mushrooms. Just sauté them with the spices. This adds flavor and texture to the dish. If you want an extra protein kick, add cooked quinoa or scrambled eggs. Quinoa is great because it is cheap and packed with protein. Scrambled eggs can make the tacos more filling. You can also throw in some cheese for added richness. Love heat? Add fresh jalapeños or a dash of cayenne pepper. You can mix hot sauce into the chickpeas for extra spice. Try adding diced serrano peppers for more flavor. The heat will make your tacos even more exciting. For a delicious meal on a budget, try my full recipe for budget-friendly spicy chickpea tacos! After making your Budget-Friendly Spicy Chickpea Tacos, you may have some extras. Store leftover chickpeas in an airtight container. Keep them in the fridge for up to three days. If you have leftover tortillas, wrap them in foil or plastic wrap. They will stay fresh for about a week. For fresh veggies, like lettuce and tomatoes, store them in separate containers. This keeps them crisp and tasty. I love to freeze tacos for quick meals later. Start by letting the tacos cool down. Wrap each taco in plastic wrap or foil. Place them in a freezer-safe bag. They can stay in the freezer for up to three months. When you're ready to eat, just thaw them in the fridge overnight. This keeps the flavors fresh. To reheat your tacos, you can use the oven or a skillet. For the oven, preheat it to 350°F (175°C). Place the wrapped tacos on a baking sheet for about 10-15 minutes. If you use a skillet, heat it over medium heat. Unwrap the tacos and warm them for about 2-3 minutes on each side. This makes them crispy again. Enjoy your delicious Budget-Friendly Spicy Chickpea Tacos any day! To make these tacos gluten-free, choose corn tortillas. Most corn tortillas are naturally gluten-free. Check the label to be sure. You can also use lettuce leaves as wraps. This keeps the taco fresh and crunchy. You can serve tacos with many side dishes. Here are some tasty options: - Rice or quinoa for a filling base - Black beans for extra protein - Guacamole for creamy goodness - Salsa for a fresh kick - Corn salad for sweetness These sides add flavor and nutrition to your meal. Yes, you can use dried chickpeas! Just soak them overnight. After soaking, cook them until tender. This may take 1-2 hours. Canned chickpeas save time, but dried ones are cheaper. Both work well in the tacos. For the full recipe, refer to the earlier section on Budget-Friendly Spicy Chickpea Tacos. This blog post covered how to make tasty budget-friendly tacos. We explored key ingredients, from chickpeas to spices. I shared tips for saving money while shopping. You learned step-by-step instructions for preparing and assembling your tacos. We discussed clever ways to spice things up and store leftovers. You can also try fun variations to suit your tastes. In closing, making delicious tacos on a budget is easy. Use the tips here for great meals without spending too much.

Cheap Meals to Make When You Are Broke Today

Are you tired of eating the same boring meals when money is tight? You’re not alone! I know how hard

- 2 boneless, skinless chicken thighs, sliced - 4 cups chicken broth - 2 packs of instant ramen noodles (discard flavor packets) - 2 tablespoons chili paste (or Korean gochujang for a smoother heat) - 1 tablespoon soy sauce - 2 garlic cloves, minced - 1 tablespoon olive oil - 1 teaspoon sesame oil - 1 cup baby spinach - 1 green onion, thinly sliced - 1 large boiled egg, halved (for topping) - Salt and black pepper to taste - ½ cup heavy cream - 1 tablespoon lemon juice - ¼ teaspoon red pepper flakes (for garnish) When I create the Fiery Chicken Ramen with Creamy Garlic Sauce, I always start with fresh, high-quality ingredients. The chicken thighs give a rich flavor. I slice them into bite-sized pieces for easy cooking. The chicken broth forms the base of this dish and brings warmth. I prefer using low-sodium broth to control the salt level. The instant ramen noodles are quick and absorb the broth well. I discard the flavor packets, as I want my own spice blend. The chili paste brings the heat, while soy sauce adds depth. Minced garlic gives a fragrant kick to the broth. Olive oil and sesame oil work together for a balanced taste. Baby spinach adds color and nutrients. The green onion not only garnishes but also brightens flavors. I always top my ramen with a boiled egg for creaminess. Lastly, heavy cream and lemon juice create a smooth sauce. The red pepper flakes add the finishing touch. When you gather these ingredients, you set the stage for a delightful meal. You can find the full recipe for this dish to help you create it at home. Seasoning the Chicken Start by taking your sliced chicken thighs. In a bowl, season them with salt, black pepper, and chili paste. Mix it all together well. This step packs the chicken with flavor, making it taste great in your ramen. Marinating the Chicken Let the seasoned chicken marinate for about 10 minutes. This time allows the spices to soak in. While it marinates, you can get your broth ready. Sautéing Garlic In a large pot, heat the olive oil over medium heat. Add the minced garlic and sauté it until it becomes fragrant, which should take about 1 minute. Be careful not to burn it, as burnt garlic can ruin the flavor. Adding Chicken Broth After the garlic is ready, pour in the chicken broth. Add the soy sauce, too. Bring the mixture to a gentle simmer. This broth is the heart of your ramen, so let it bubble gently. Incorporating the Chicken Now, add the marinated chicken into the simmering broth. Cook it for about 5 to 7 minutes. Stir it occasionally until the chicken is fully cooked and tender. Cooking Ramen Noodles Once the chicken is cooked, add the instant ramen noodles to the pot. Cook them according to the package instructions, usually about 3 to 4 minutes. The noodles will soak up that spicy broth, making them extra tasty. Whisking the Creamy Garlic Sauce While the noodles are cooking, take a small bowl. In it, whisk together the heavy cream, lemon juice, and sesame oil until smooth. This creamy sauce will add richness to your ramen. Combining Ingredients Once the noodles are done, stir in the baby spinach and cook for another minute. It will wilt nicely. Pour in the creamy garlic sauce and stir everything together. Make sure it’s well mixed. Bowl Presentation Tips When you’re ready to serve, ladle the ramen into deep bowls. This helps keep the broth warm and allows for slurping! Topping Ideas Top each bowl with a halved boiled egg, sliced green onions, and a sprinkle of red pepper flakes for an extra kick. You can also add some sesame seeds for a nice touch. For the full recipe, check out the previous details. - Using Homemade Chicken Broth: Making your broth boosts flavor. Use bones and scraps. Simmer for hours. This creates a rich, deep taste. You can control the salt and spices. Homemade broth adds love to your dish. - Adjusting Spice Levels: Spice is key in this ramen. If you want less heat, use less chili paste. You can add more after tasting. For a milder option, use gochujang. Mix in a little at a time. Always taste as you go! - Optimal Chicken Cooking Times: Cook the chicken for 5-7 minutes. Stir occasionally to avoid sticking. You want it tender, juicy, and fully cooked. Check with a meat thermometer. It should read 165°F for safety. - Ensuring Udon Noodles are Perfectly Cooked: Follow the package directions for timing. Usually, it takes about 3-4 minutes. Stir gently to keep them from clumping. They should be soft yet firm. Drain quickly to avoid overcooking. - Garnishing Ideas: Use sliced green onions for color. A sprinkle of red pepper flakes adds flair. Place a halved boiled egg on top for richness. Consider adding sesame seeds for crunch. Fresh herbs can brighten the dish. - Serving Recommendations: Serve in deep bowls for slurping. This helps capture the broth. Use colorful chopsticks for fun. You can even add a side of pickled veggies. This makes your meal feel special and complete. For the complete recipe, check out the Full Recipe. {{image_2}} You can change the protein in this dish. If you want a vegetarian option, use tofu. - Using Tofu for a Vegetarian Option: Tofu is a great choice. Press it to remove extra moisture. Cut it into bite-sized cubes. Sauté it in olive oil until golden. Then, add it to the broth just like chicken. - Substituting Pork or Beef: If you prefer pork or beef, that works too. Choose tender cuts. Slice them thin. Cook them in the broth until they are just right. Adjust the cooking time based on the meat you choose. To make the recipe your own, you can tweak the flavors. - Adding Different Vegetables: Feel free to add your favorite vegetables. Carrots, bell peppers, or mushrooms all work well. Slice them thin and toss them in the broth with the noodles. They add crunch and color! - Using Different Sauces: Change the sauce for a new taste. Sriracha can add a nice kick. You can also try teriyaki for a sweet twist. Just mix it in with the broth to get the flavor right. How you serve your ramen can change the whole vibe of the meal. - Serving as a Stir-Fry: Instead of soup, you can serve it as a stir-fry. Just skip the broth. Sauté the chicken and veggies together in a pan. Add the sauces for flavor. Serve it over rice for a hearty meal. - Creating a Ramen Salad: For a fresh take, make a ramen salad. Cook the noodles and cool them down. Toss them with veggies, a splash of soy sauce, and sesame oil. This makes a light, tasty dish perfect for lunch. Try these variations to make the dish suit your taste. For the full recipe, check the earlier section. How to Store in the Refrigerator To keep your fiery chicken ramen fresh, let it cool first. Then, pour it into an airtight container. Make sure to store it in the fridge. It will stay good for about 3 days. Freezing Tips for Longer Preservation If you want to save it longer, freezing works great! Separate the broth and noodles. Use freezer-safe containers. The broth lasts up to 3 months. The noodles can be frozen too, but they may change texture. Best Methods for Reheating Ramen To reheat your ramen, the stovetop is best. Pour the ramen into a pot. Heat it on medium until warm. Stir often to keep it even. You can also use the microwave. Just make sure to cover the bowl to avoid splatters. How to Maintain Texture and Flavor To keep the noodles from getting soggy, don’t overheat. Add a splash of water if it looks dry. The creamy garlic sauce adds flavor, so stir it in while warming. Enjoy your meal just like the first time! What can I substitute for chili paste? You can use sriracha or hot sauce. If you want a milder heat, try sweet chili sauce. Can I use fresh ramen noodles instead of instant? Yes, fresh ramen noodles work great! Just adjust the cooking time. They usually cook faster than instant noodles. How long does the ramen last in the fridge? The ramen lasts about three days in the fridge. Store it in a sealed container for best results. What can I add to make it less spicy? To reduce the heat, add more cream or broth. You can also use less chili paste when cooking. What is the secret to perfect ramen broth? The key is to use quality chicken broth. Simmer it gently and add flavors like garlic and soy sauce. How to ensure the chicken stays tender? Cook the chicken just until it is no longer pink. Overcooking can make it tough. Use a meat thermometer for best results. Is this recipe suitable for meal prep? Yes, this recipe is great for meal prep. Just store the broth and noodles separately until ready to eat. Can I make this recipe dairy-free? Absolutely! Substitute heavy cream with coconut milk or a dairy-free cream alternative for a tasty option. For the full recipe, check out the details above. This blog post provided a detailed guide to making a creamy ramen dish. You learned about the essential ingredients, cooking techniques, and tips for enhancing flavor. Exploring variations and storage options opens up creativity and makes meal prep easier. Cooking can be fun and rewarding. Don't hesitate to experiment with different flavors or proteins. Enjoy your delicious ramen creation, and share it with family and friends!

Fiery Chicken Ramen with Creamy Garlic Sauce Delight

Craving something bold and comforting? Let me guide you through making Fiery Chicken Ramen with Creamy Garlic Sauce. This dish

To make Easy Creamy Garlic Shrimp, you need these simple items: - 1 pound large shrimp, peeled and deveined - 4 cloves garlic, minced - 1 tablespoon olive oil - 2 tablespoons unsalted butter - 1 cup heavy cream - 1 teaspoon paprika - 1 teaspoon dried Italian herbs (oregano, thyme, basil) - Salt and pepper to taste - Fresh parsley, chopped (for garnish) - Lemon wedges (for serving) You can customize this dish with fun add-ins. Try adding: - Spinach or kale for extra greens - Cherry tomatoes for color and sweetness - Red pepper flakes for spice - White wine for a richer flavor If you are out of shrimp, use chicken or scallops. Just adjust the cooking time. Fresh ingredients make a big difference in taste. Fresh shrimp taste sweeter and have a better texture. Fresh garlic adds a strong, vibrant flavor that dried garlic cannot match. Choose high-quality cream for a rich sauce. When possible, buy local and seasonal produce. The better your ingredients, the better your dish will be. Start by gathering all your ingredients. You need: - 1 pound large shrimp, peeled and deveined - 4 cloves garlic, minced - 1 tablespoon olive oil - 2 tablespoons unsalted butter - 1 cup heavy cream - 1 teaspoon paprika - 1 teaspoon dried Italian herbs - Salt and pepper to taste - Fresh parsley, chopped - Lemon wedges Next, mince the garlic. This step is vital for a strong flavor. Then, wash and prepare the shrimp. Make sure they are peeled and deveined for easy cooking. Set everything aside for quick access. Heat a large skillet over medium heat. Add the olive oil. Once hot, toss in the minced garlic. Sauté it for about one minute. You want it fragrant, not browned. Next, add the shrimp into the skillet. Sprinkle salt, pepper, and paprika on top. Cook for about 3-4 minutes. Stir occasionally until the shrimp turn pink and opaque. Once cooked, remove the shrimp from the skillet. Keep them warm by setting them aside. In the same skillet, melt the butter. After it melts, pour in the heavy cream. Stir well to combine. This will create a rich and creamy sauce. Add the dried Italian herbs and simmer for 3-4 minutes. You want the sauce to thicken slightly. Return the shrimp to the skillet. Gently stir them in the creamy sauce. Heat everything through for another 2 minutes. Taste your dish and adjust the seasoning if needed. Remove from heat and garnish with chopped parsley. Serve your Easy Creamy Garlic Shrimp over jasmine rice or with crusty bread. Don't forget the lemon wedges for squeezing over the dish. Enjoy! To make a rich, creamy sauce, use heavy cream. This cream gives a nice thickness. Heat it slowly to avoid burning. Stir in the butter after removing the shrimp. This keeps the sauce smooth. Add herbs like oregano and thyme for flavor. Taste and adjust the salt and pepper as needed. For the best shrimp, start with large, fresh shrimp. Ensure they are peeled and deveined. Cook them quickly over medium heat. When they turn pink and opaque, they are done. Remove them from the heat to avoid overcooking. This keeps them tender and juicy. Serve creamy garlic shrimp over jasmine rice. The rice absorbs the sauce well. You can also pair it with crusty bread. This lets you scoop up the sauce. For a fresh touch, add lemon wedges on the side. They enhance the dish's flavors and add brightness. For the complete recipe, check out the Full Recipe. {{image_2}} You can swap shrimp for chicken or scallops. For chicken, use boneless thighs or breasts. Cut them into small pieces and cook until golden. Scallops cook fast, just like shrimp. They turn sweet and juicy in this creamy sauce. This change keeps the dish tasty and quick. To make this dish vegetarian, use mushrooms instead of shrimp. Button or cremini mushrooms work well. Sauté them until they are tender and brown. You can also add spinach or zucchini for more flavor and color. The creamy sauce will still taste great with these veggies. Want to spice things up? Add red pepper flakes for heat. This will give your dish a nice kick. You can also use fresh herbs like basil or cilantro. They add freshness and depth. Infusing your sauce with lemon zest adds brightness. This makes the dish even more delicious. To store leftovers, let the shrimp cool to room temperature. Place the shrimp in an airtight container. Make sure to cover the container tightly. Store it in the fridge for up to 3 days. This keeps the shrimp fresh and tasty. When reheating, place the shrimp in a skillet over low heat. Add a splash of cream to help keep it creamy. Stir gently until everything is warm. Avoid high heat, as this can overcook the shrimp and make it rubbery. You can freeze this dish if you want to save it for later. Place the shrimp in a freezer-safe container. Make sure to leave some space at the top for expansion. It can last in the freezer for about 2 months. To enjoy later, thaw it in the fridge overnight before reheating. For a full recipe, check out Easy Creamy Garlic Shrimp. I recommend using large shrimp for this dish. They have a nice bite and cook well. Fresh shrimp is always best, but frozen works too. Just be sure to thaw them fully before cooking. Yes, you can use light cream. It will make the sauce a bit thinner, but still tasty. Heavy cream adds richness and a thick texture, which is hard to beat. This recipe is naturally gluten-free. Just ensure that your butter and any added ingredients are gluten-free. Always check labels to be safe. You can find the full recipe for Easy Creamy Garlic Shrimp at the beginning of this article. Enjoy the creamy, rich flavors and the easy steps! This blog post covered the key ingredients for creamy garlic shrimp, including fresh options and substitutions. I shared step-by-step guidance for preparation, cooking, and finishing touches. Remember to master the sauce and cook shrimp perfectly for great taste. You can also try variations with chicken or vegetarian options. Store or freeze leftovers easily. I hope these tips help you create a delightful meal that impresses. Enjoy cooking and experimenting with this dish!

Easy Creamy Garlic Shrimp Tasty and Quick Dish

If you’re craving a quick and tasty meal, look no further! My Easy Creamy Garlic Shrimp recipe combines rich flavors

- 1 lb large shrimp, peeled and deveined - 2 cups fresh spinach, roughly chopped - 1 cup canned artichoke hearts, drained and quartered - 1 cup heavy cream - 1/2 cup sun-dried tomatoes, chopped - 1 cup shredded mozzarella cheese - 1/4 cup grated Parmesan cheese - 2 tablespoons olive oil - 1 teaspoon Italian seasoning - Salt and pepper to taste - Fresh basil, for garnish Gather all these items for the Tuscan shrimp with spinach artichokes. The large shrimp bring a sweet flavor. Fresh spinach adds a vibrant color and nutrients. Canned artichoke hearts provide a unique texture and taste. For creaminess, use heavy cream. Sun-dried tomatoes add depth and a tangy kick. The mozzarella and Parmesan cheese melt beautifully, making a rich sauce. To season, olive oil gives a nice base flavor. Italian seasoning brings warmth and aroma. Use salt and pepper to taste, and finish with fresh basil for a pop of freshness. You can find the complete details in the Full Recipe. To start, heat 2 tablespoons of olive oil in a large skillet over medium heat. Add 1 medium diced onion. Sauté until it turns translucent, about 3-4 minutes. Next, add 3 minced garlic cloves and 1 teaspoon of Italian seasoning. Cook for 1-2 minutes until you smell the garlic. Now, it’s time to add the shrimp. Pour in 1 pound of large shrimp, peeled and deveined. Season with salt and pepper. Cook for 3-4 minutes, stirring occasionally. The shrimp should turn pink and opaque. Once the shrimp is ready, stir in 1/2 cup of chopped sun-dried tomatoes, 2 cups of roughly chopped fresh spinach, and 1 cup of drained and quartered canned artichoke hearts. Mix everything well. Cook for about 2 minutes until the spinach wilts. Now it’s time for the sauce. Reduce the heat to low and pour in 1 cup of heavy cream. Stir to mix everything. Let it simmer for 2-3 minutes. This will thicken the sauce slightly. Add 1 cup of shredded mozzarella cheese and 1/4 cup of grated Parmesan cheese. Stir until the cheese melts and the sauce becomes creamy. Taste and adjust the seasoning if needed. Remove the skillet from heat. Garnish with fresh basil before serving. This dish is now ready to enjoy! For the full recipe, check the details above. To ensure shrimp are perfectly cooked, watch their color. They turn pink and opaque when done. Don't overcook them or they will get tough. Just three to four minutes in a hot skillet is all you need. Preventing cream from curdling is key for a smooth sauce. Always add cream at a low heat. Stir it gently after adding to keep it creamy. If you see curds, reduce heat and whisk quickly. For added flavor, try herbs like thyme, parsley, or oregano. They blend well with the shrimp and artichokes. You can also add a pinch of red pepper flakes for some heat. If you want to switch up the cheese, try using goat cheese or feta. They add a nice tang to the dish. You can mix mozzarella with any cheese you like for a unique taste. Pair this dish with a side of rice or crusty bread. They soak up the creamy sauce very well. A light salad can also balance the meal nicely. For drinks, a crisp white wine works well, like Sauvignon Blanc. It enhances the flavors of the shrimp. You can also serve it with sparkling water with lemon for a nice touch. For an elegant dining experience, serve in shallow bowls. Drizzle any extra sauce on top and garnish with fresh basil. A sprinkle of extra Parmesan adds a lovely finish. You can find the Full Recipe for more details on making this dish. {{image_2}} If shrimp is not your favorite, try chicken or tofu instead. Both options work well. Chicken adds a nice flavor and is easy to cook. Tofu keeps the dish light and is great for a plant-based meal. You can also switch up the veggies. Instead of spinach, use kale or Swiss chard. These greens add a unique taste and texture. You might even try bell peppers for a sweet crunch or mushrooms for an earthy flavor. Want to spice things up? Add red pepper flakes for a kick. Just a pinch can change the whole dish. If you like bright flavors, squeeze in some lemon juice or add lemon zest. This will wake up your taste buds and balance the creaminess. For a gluten-free meal, make sure all your ingredients are certified gluten-free. Most of the items in this dish are gluten-free. Just check the labels on your sauces and seasonings. If you need a dairy-free version, replace heavy cream with coconut milk. You can also use dairy-free cheese for a creamy finish. This way, everyone can enjoy Tuscan shrimp without missing out. For the full recipe, check out the complete details. To store leftovers properly, let the dish cool first. Place it in an airtight container. This helps keep the shrimp and sauce fresh. In the fridge, Tuscan shrimp lasts about 3 to 4 days. Always check for freshness before eating. For freezing, use a freezer-safe container. Make sure to leave some space for expansion. The dish will freeze well for about 2 to 3 months. When you're ready to eat, thaw it overnight in the fridge. Reheat on the stove over low heat, stirring gently. This helps maintain the creamy texture. You can make Tuscan shrimp in advance. This dish is perfect for meal prep. Cook it, then let it cool before storing. Use glass or BPA-free plastic containers for easy storage. These containers help keep the flavors intact. Enjoy the ease of having a delicious meal ready to go! Making Tuscan Shrimp with Spinach Artichokes takes about 30 minutes in total. You need 15 minutes for prep and 15 minutes for cooking. This quick time makes it a great choice for busy nights. Yes, you can use frozen shrimp! Just thaw them first. Place the shrimp in the fridge overnight or run them under cold water. Fresh shrimp have a slightly better taste, but frozen works well too. You can serve this dish with many sides. Here are a few ideas: - Rice or quinoa for a filling base - Pasta to soak up the creamy sauce - A fresh salad for a light touch - Garlic bread to enjoy with the sauce These sides will make your meal even better! For the Full Recipe, check it out to see how to make this delicious dish. This blog post offers a simple guide to making Tuscan Shrimp with Spinach Artichokes. Key ingredients include shrimp, spinach, and creamy cheeses. I shared step-by-step cooking instructions and useful tips for success. You can customize recipes with different proteins or flavors. Remember to store leftovers carefully. This dish is quick to prepare, making it perfect for any weeknight dinner. Enjoy your delicious meal and the satisfaction of creating something special.

Tuscan Shrimp with Spinach Artichokes Delicious Dish

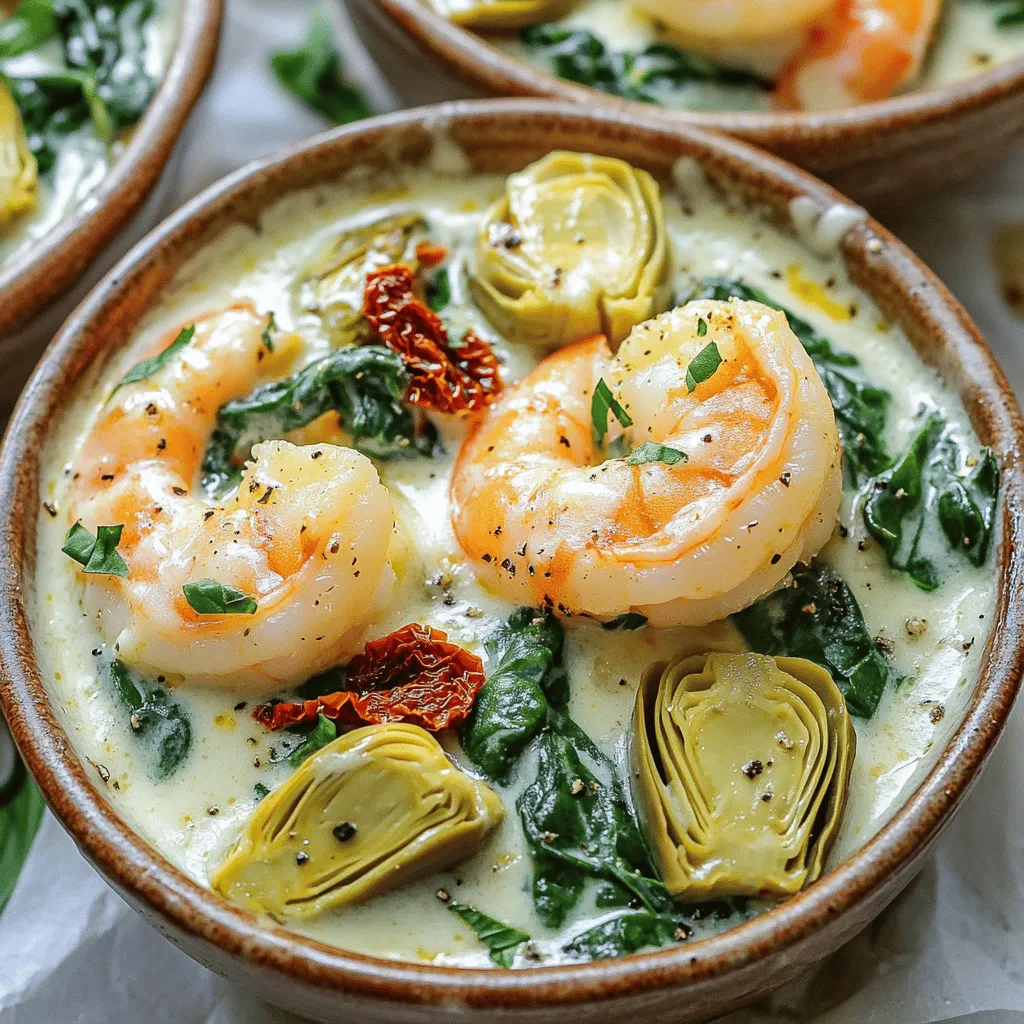
Are you ready to indulge in a creamy, flavorful dish? Tuscan Shrimp with Spinach Artichokes combines succulent shrimp, fresh spinach,

- 1 lb ground beef (80/20 blend for juiciness) - 1 large onion, thinly sliced - 4 slices Swiss cheese - 2 tablespoons unsalted butter - 1 tablespoon olive oil - 1 cup beef broth - 1 teaspoon sugar - 1 teaspoon salt - Fresh parsley, chopped (for garnish) The heart of the French Onion Soup Burgers lies in its main ingredients. The ground beef should be an 80/20 blend. This mix offers the right fat content, ensuring your burger stays juicy and flavorful. A large onion, when sliced thin, transforms into sweet, caramelized goodness during cooking. Four slices of Swiss cheese melt beautifully on top, adding creaminess and depth. Cooking essentials include two tablespoons of unsalted butter and one tablespoon of olive oil. This combo starts the onion caramelization process. The beef broth is crucial, adding a rich flavor that ties all the elements together. For seasoning, you need just a teaspoon of sugar and salt. Sugar helps with caramelization, while salt enhances the flavors. Finally, don’t forget the fresh parsley for a pop of color and freshness when serving. You can find the full recipe for French Onion Soup Burgers, which details how to bring all these ingredients together, creating a dish that is both tasty and satisfying. To start, I melt butter and olive oil in a skillet over medium heat. The mix gives a nice base for the onions. Next, I add sliced onions, sugar, and salt. I cook them for about 15-20 minutes. I stir often until they turn golden brown. This step adds sweet and rich flavor to the burgers. While the onions cook, I form the ground beef into patties. I make them about 3/4 inch thick. Then, I season each patty with thyme, salt, and pepper. This blend makes the beef taste great. I find that seasoning is key to juicy, flavorful burgers. Once the patties are ready, I preheat my grill or griddle over medium-high heat. I cook the burgers for 4-5 minutes on each side. I check for my desired doneness. During the last minute, I add a slice of Swiss cheese on top of each patty. I cover the grill to melt the cheese. This step creates a delicious, gooey topping for the burgers. For the full recipe, check out the details provided earlier. To make great caramelized onions, you need patience. Stir the onions often for even cooking. This way, they will brown nicely. Keep the heat at medium. This helps control the caramelization. If the heat is too high, the onions may burn. This is not what we want. Use a meat thermometer to check your burger's doneness. This tool helps you avoid overcooking. I like my burgers medium, around 160°F. After cooking, let the burgers rest for a few minutes. This keeps them juicy and tasty. To make your burgers shine, serve with extra caramelized onions on top. Add a small bowl of broth for dipping. This adds to the fun of eating. Finally, garnish with fresh parsley. It gives a nice pop of color and freshness to your dish. For the complete recipe, check the Full Recipe section. {{image_2}} You can change the flavor of your French onion soup burgers easily. Try using blue cheese or cheddar instead of Swiss cheese. Both give a tasty twist. If you want more depth, add sautéed mushrooms. They bring a rich umami flavor that pairs well with the sweet onions. Looking for a lighter meal? Use ground turkey or chicken instead of beef. This switch keeps the burger juicy but cuts down on fat. You can also serve the burger on lettuce wraps. This option is fresh and low-carb, making it perfect for anyone watching their diet. French onion soup burgers shine when paired with yummy sides. Serve them with crispy French fries for a classic combo. A simple side salad also works well, adding freshness. If you're hosting a party, these burgers can be perfect sliders. Just cut them smaller, and watch guests enjoy them! For the full recipe, refer to the above section. To keep your French onion soup burgers fresh, store leftovers in an airtight container in the fridge. This helps keep the flavors locked in. It’s best to keep the caramelized onions separate. This way, they stay fresh and won't make the burgers soggy. When you're ready to enjoy your leftovers, reheat the burgers in the microwave or on the stovetop. If using the stovetop, place them in a skillet over low heat. This helps to warm them evenly. For the caramelized onions, warm them in a small saucepan. Stir gently until they are hot. If you want to save some burgers for later, you can freeze uncooked patties. They last up to 3 months in the freezer. Just wrap them tightly in plastic wrap or foil. When you're ready to cook, thaw the patties in the refrigerator overnight. This keeps them safe and tasty. Enjoy these burgers, even days later! French Onion Soup Burgers blend two classic dishes. French onion soup dates back to the 18th century. It comes from France, where cooks made it from simple ingredients. The burger, however, is American, with roots in the early 20th century. By combining these two, you get a juicy burger topped with sweet, caramelized onions and melty cheese. This dish honors both traditions, creating a new favorite. Yes, you can! For the best flavor, prepare the caramelized onions in advance. Cook them and store them in the fridge. They stay fresh for up to three days. You can also form the burger patties ahead of time. Wrap them in plastic and freeze. When you're ready to cook, simply thaw the patties and grill them. This saves time when you want to enjoy this tasty meal. Many sides go well with these burgers. Here are some great options: - French fries for a classic combination - A fresh side salad for a light touch - Onion rings for extra crunch - Roasted vegetables for a healthy choice These sides complete the meal, making it even more enjoyable. This blog post covers how to make delicious French Onion Soup Burgers. We explored key ingredients like ground beef, onions, and Swiss cheese. You learned how to caramelize onions and shape the patties. We highlighted tips for cooking, serving, and storage. In summary, enjoy experimenting with flavors and variations. Making these burgers can elevate your next meal or gathering. With practice, you'll master this tasty dish that combines comfort and creativity.

French Onion Soup Burgers Tasty and Juicy Dish

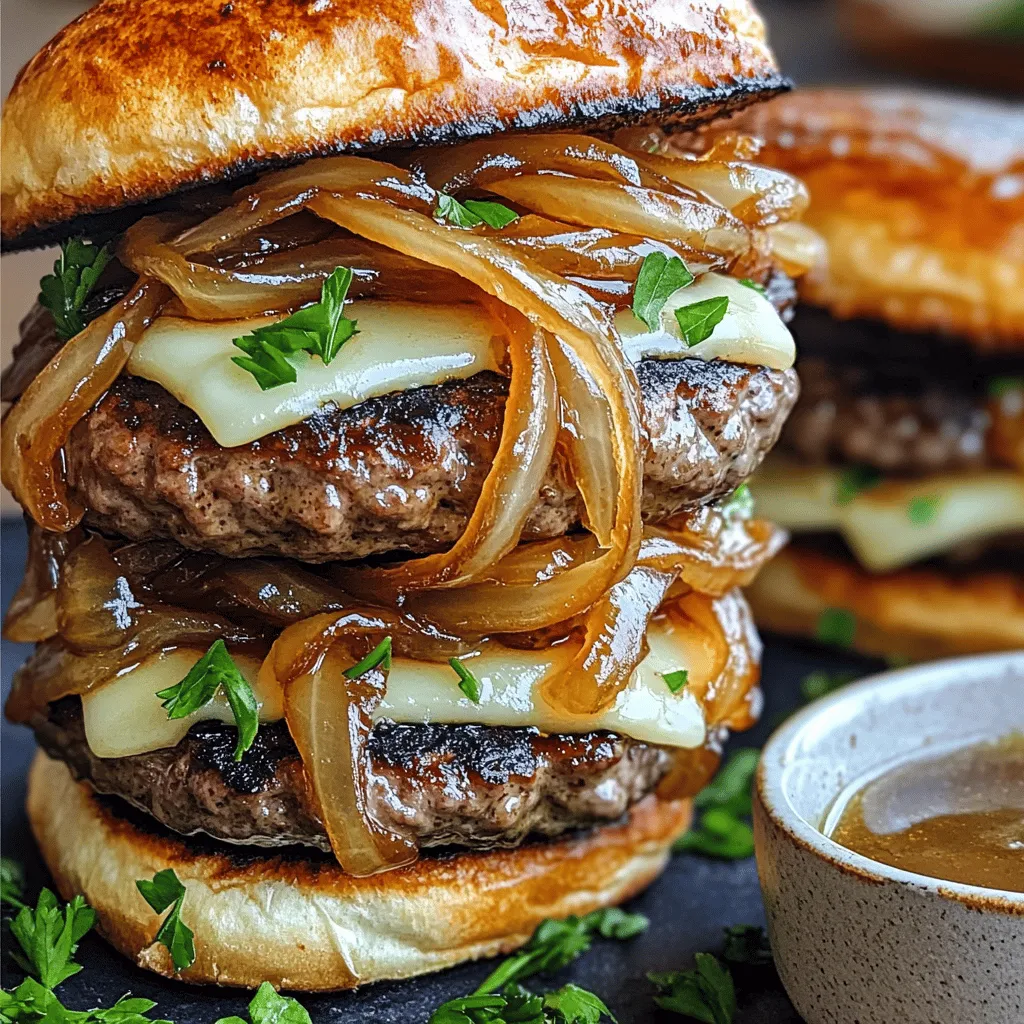
Are you ready to take your burger game to the next level? French Onion Soup Burgers combine the bold flavors

To create a delicious Grilled Shrimp Bowl with Avocado Corn Salsa, you will need: - 1 lb large shrimp, peeled and deveined - 2 tablespoons olive oil - 1 teaspoon smoked paprika - 1 teaspoon garlic powder - 1 teaspoon cumin - Salt and pepper to taste - 2 cups cooked quinoa or brown rice These main ingredients form the tasty base of your dish. The shrimp bring a sweet, briny flavor, while spices add depth. Quinoa or brown rice gives you a hearty base to soak up all the flavors. For the bright and fresh avocado corn salsa, gather: - 1 cup corn (fresh or frozen) - 1 avocado, diced - 1 medium tomato, diced - 1/4 red onion, finely chopped - Juice of 1 lime This salsa is a colorful mix. The corn offers crunch, while avocado gives creaminess. Lime juice adds a zesty kick, balancing the richness of the avocado. You can enhance your bowl with: - Fresh cilantro, chopped, for garnish - Additional spices or toppings Fresh cilantro adds a pop of flavor and color. You can also add extra spices, like chili powder or a sprinkle of cheese, for fun twists. For the full recipe, check the [Full Recipe]. First, let's marinate the shrimp. In a bowl, mix the shrimp with olive oil, smoked paprika, garlic powder, cumin, salt, and pepper. Toss well to coat the shrimp evenly. Let it sit for at least 15 minutes. This helps the shrimp soak up all the flavors. Next, preheat your grill to medium-high heat. Make sure your grill is clean. This step helps prevent the shrimp from sticking. A well-oiled grill is key for a great cook. Now, it’s time to grill the shrimp. If you’re using skewers, thread the marinated shrimp onto them. If you have wooden skewers, soak them in water for 30 minutes beforehand. This keeps them from burning. Place the skewers on the grill once it's hot. Cook the shrimp for about 2-3 minutes on each side. They should turn pink and opaque when done. Remove them from the grill and set aside. While the shrimp cook, prepare the salsa. In a medium bowl, add corn, diced avocado, tomato, red onion, and lime juice. Sprinkle in some salt and pepper. Mix gently to combine the ingredients. Be careful not to mash the avocado; you want nice chunks for texture. For a fresh taste, use ripe avocado and fresh ingredients. This makes the salsa bright and flavorful. Now you’re ready to build your delicious Grilled Shrimp Bowl with Avocado Corn Salsa! Check the Full Recipe for more details. To make sure your shrimp don’t stick, oil your grill well. A clean grill helps too. Use a paper towel dipped in oil, and wipe down the grates. This simple step keeps your shrimp intact when flipping. For perfect grill marks, preheat the grill to medium-high heat. Place the shrimp on the grill without moving them for 2-3 minutes. When you see nice marks, flip them. This gives you that restaurant look at home. Choosing a ripe avocado is key. Look for an avocado that feels slightly soft when you squeeze it. If it’s too hard, wait a few days. A ripe avocado adds a creamy texture to your salsa. Balancing the flavors in the salsa is also important. Use fresh lime juice to add brightness. The lime cuts through the richness of the avocado. Mix in some salt to enhance all the flavors. Remember, taste as you go! For ideal pairings, serve your shrimp bowl with a light salad. A simple green salad works well. You can also add a slice of crusty bread for crunch. When it comes to presentation, use clear bowls for a colorful display. Layer the quinoa or rice at the bottom. Top with shrimp and salsa. Finish with a sprinkle of cilantro for a pop of color. This makes your dish look as good as it tastes! {{image_2}} You can easily switch the shrimp for chicken or tofu. Chicken adds a hearty texture. Use boneless, skinless chicken breasts for the best results. Cut them into bite-sized pieces for even cooking. Tofu is a great choice for vegetarians. Press it to remove excess water, then marinate just like the shrimp. Feel free to add different vegetables to the salsa. Try bell peppers for crunch or diced cucumber for freshness. You can also mix in fruits like mango for a sweet twist. Experiment with herbs, too! Fresh basil or mint can brighten the flavors and add depth. If you want to change things up, switch to other grains. Couscous or farro are great options that cook quickly. They add a nutty flavor and texture. For a low-carb choice, use cauliflower rice. It’s light and will soak up all that delicious salsa. To keep your grilled shrimp and avocado corn salsa fresh, follow these tips: - Shrimp: Store in an airtight container. Use within 2 days for best taste. - Salsa: Place in a separate container. Consume within 1 day to avoid browning. - Containers: Glass or BPA-free plastic containers work well. Label them with dates for easy tracking. Reheat grilled shrimp gently to keep them tender: - Shrimp: Warm in a skillet over low heat. Stir often for even heating. Do not overcook. - Salsa: Enjoy cold for the best taste. If you prefer warm, heat briefly in the microwave. This helps keep the avocado from getting mushy. Freezing is great for longer storage: - Shrimp: Freeze in a single layer on a baking sheet. Once firm, transfer to a freezer bag. - Salsa: Freeze ingredients separately. Avoid freezing avocado, as it changes texture. - Thawing: Thaw shrimp overnight in the fridge. For salsa, let it sit at room temperature for a bit before mixing again. With these tips, you can enjoy your Grilled Shrimp Bowl with Avocado Corn Salsa later. For the complete recipe, check the Full Recipe section. You should grill shrimp for about 2-3 minutes per side. This time works well for large shrimp, which cook fast. When they turn pink and opaque, they are done. Avoid overcooking, as shrimp can become tough and chewy. Yes, you can prepare the salsa ahead. To keep the avocado fresh, add lime juice right before serving. Store the salsa in an airtight container in the fridge. This helps to slow down browning. Mix gently to avoid mashing the avocado. Pair your grilled shrimp bowl with simple sides. Here are some great options: - Grilled vegetables for added flavor. - A fresh green salad to balance the meal. - Crusty bread to soak up any juices. These sides complement the shrimp and salsa well. You can also try different grains or dips. Feel free to explore your favorites! For the full recipe, check out the [Full Recipe] section. In this post, we explored a tasty grilled shrimp bowl. We covered key ingredients like shrimp, quinoa, and fresh avocado corn salsa. I shared easy steps for marinating and grilling shrimp. You learned tips for making delicious salsa and different ways to serve it. Now, enjoy experimenting with flavors and make this meal your own. Feel free to switch ingredients or try new combinations. Cooking should be fun, so let your creativity shine and savor every bite!

Grilled Shrimp Bowl with Avocado Corn Salsa Delight

Get ready for a fresh and vibrant meal that’s perfect for any occasion! My Grilled Shrimp Bowl with Avocado Corn

Older posts
Newer posts
← Previous Page1 … Page71 Page72 Page73 … Page79 Next →

dsad

© 2025 easycookingbite • Built with GeneratePress

Our Policies

  • Copyright Policy
  • Cookie Policy
  • GDPR Policy
  • Privacy Policy
  • Disclaimer
  • Terms Of Use

More Information

  • Home
  • About
  • Contact
  • Appetizers
  • Dessert
  • Dinner
  • Drinks
©2025, easycookingbite About Back To Top