Skip to content
DisclaimerTerms Of UseGDPR PolicyCookie Policy

easycookingbite

  • Home
  • Drinks
  • Appetizers
  • Dinner
  • Dessert
  • About
  • Contact
  • Privacy Policy
DisclaimerTerms Of UseGDPR PolicyCookie Policy

Lily

Here are the ingredients you will need for this cozy soup. Each item adds to the rich flavor and creamy texture. - 4 large russet potatoes, peeled and diced - 1 medium onion, chopped - 3 cloves garlic, minced - 4 cups vegetable broth - 1 cup sharp cheddar cheese, shredded - 1 cup heavy cream - 1 teaspoon dried thyme - 1 teaspoon paprika - Salt and pepper to taste - 4 green onions, sliced (for garnish) - Croutons (optional, for garnish) These ingredients come together to create a warm and filling meal. The russet potatoes give the soup its heartiness. The sharp cheddar cheese adds a rich, cheesy flavor. Heavy cream makes the soup extra creamy, while the garlic and onion provide depth. Use fresh herbs to enhance the flavor. For the best taste, choose good quality broth. You can adjust the seasoning based on your preference. Having these ingredients on hand makes it easy to whip up this comforting soup. Check out the Full Recipe for detailed instructions on how to prepare this delicious dish! To start, you need to prep the potatoes, onion, and garlic. First, peel the russet potatoes and dice them into small cubes. This helps them cook evenly. Next, chop the onion into small pieces. Mince the garlic cloves as well. Before you cook, seasoning is key. Add salt and pepper to the vegetables in the slow cooker. This step boosts the flavor as they cook. Don’t skip this part! Now, let’s set up the slow cooker. You can choose to cook on low for six hours or high for three hours. I recommend using low for a richer flavor. As the soup cooks, keep an eye on the time. Check the potatoes for tenderness. They should be soft when poked with a fork. After cooking, it’s time for the fun part! You can either mash the potatoes slightly with a potato masher or blend them for a smooth texture. Both options work well, so choose what you like best. Next, stir in the heavy cream and shredded cheddar cheese. This makes the soup creamy and rich. Make sure the cheese melts completely. If you want it thicker, let it cook on low for an extra 15 to 20 minutes. Once done, serve the soup in bowls. Garnish with sliced green onions and croutons if you like. For the full recipe, check out the section above! To make your soup burst with taste, try adding spices and herbs. You can use: - 1 teaspoon garlic powder - 1 teaspoon onion powder - 1 teaspoon dried parsley These will boost the flavor without much effort. For cheese lovers, swap out cheddar for: - Gruyere - Monterey Jack - Pepper Jack Each cheese gives a unique taste and texture to the soup. It’s fun to experiment! Control the soup’s texture by how you mash the potatoes. If you want chunks, mash gently. For a smooth soup, use an immersion blender. Adjust the creaminess by adding more or less heavy cream. If you want to prepare it ahead, cook as usual. Store it in the fridge and reheat when ready. The soup tastes great the next day! Garnishes can make your soup pop! Beyond green onions and croutons, try: - Fresh herbs like thyme or basil - A dollop of sour cream - Crispy bacon bits Pair your soup with crusty bread or a fresh salad. This makes a cozy meal. Try adding a light vinaigrette salad for a refreshing touch. For the full recipe, check it out. {{image_2}} You can change the type of potatoes for new flavors. For a sweeter touch, try sweet potatoes. They add a nice twist. You can also use Yukon Gold potatoes for a creamier texture. Swap out the vegetable broth for chicken broth if you like. This will add a bit more depth to your soup. Adding other veggies can make it even better. Diced carrots or chopped celery can add color and crunch. Try adding a handful of spinach or kale for extra nutrition. These simple swaps can transform your soup into something unique. If you need a gluten-free option, this soup is easy to adapt. Use gluten-free broth and check the cheese label to ensure it fits your needs. For a dairy-free version, replace the heavy cream with coconut milk. Nutritional yeast can add a cheesy flavor without dairy. If you're looking for low-calorie options, consider using less cream or cheese. You can also cut down on potatoes and add more veggies. This keeps the soup filling but lowers the calories. Want to kick up the flavor? Try adding cooked bacon or diced ham. These proteins bring a savory depth to the soup. You can also add spices for a bit of heat. Cayenne pepper or diced jalapeños can spice things up nicely. Experimenting with your soup can lead to fun results. Try mixing in herbs like rosemary or fresh parsley to refresh the flavor. These changes can make your cozy bowl of soup feel new and exciting. Check out the Full Recipe for more ideas. To store your leftover cheesy potato soup, let it cool first. Then, transfer it to an airtight container. This keeps the soup fresh. You can store it in the fridge for about 3 to 4 days. If you notice any change in smell or color, it’s best to toss it out. Always check before using! You can freeze this soup, but make sure it cools down completely. Pour the soup into freezer-safe bags or containers. Leave some space at the top, as soup expands when it freezes. This soup can last in the freezer for up to 3 months. To reheat, thaw it in the fridge overnight. Then, warm it on the stove over low heat. Stir it often to keep the texture nice and creamy. For the best results, reheat on the stove rather than the microwave. This keeps the soup creamy and avoids hotspots. If you use the microwave, do it in short bursts. Stir in between to ensure even heating. To refresh the soup after reheating, add a splash of cream or broth. This helps restore its rich flavor and creamy texture. Check your seasoning too, and adjust if needed. Enjoy your warm, cheesy soup! This soup takes about 6 hours on low or 3 hours on high. The long, slow cook makes the potatoes soft and creamy. If you use a higher setting, keep an eye on the time. You want the potatoes tender but not mushy. Yes, you can! You can make this soup on the stove. Cook the potatoes and onion in a pot for about 30 minutes. Once the potatoes are soft, mash some and add the cheese and cream. This method is quicker but requires more attention. This soup pairs well with many sides. Here are some favorites: - Fresh bread or rolls - A light salad - Crispy bacon bits - Grilled cheese sandwiches - Crackers for crunch These sides balance the soup's creaminess and add texture. Absolutely! You can make the soup a day ahead. Store it in the fridge once it's cooled. When ready to eat, warm it on low heat. Stir well, and add a little more cream if needed. This makes the soup even richer! This soup can be nutritious, but it depends on your choices. It has potatoes, which are good for you. If you want a lighter version, use low-fat cream or cheese. You can also add more veggies like carrots or spinach. This keeps the flavor but makes it healthier. This blog post covered how to make Slow Cooker Cheesy Potato Soup. I shared simple steps from prepping ingredients to enhancing flavors. You learned about ingredient swaps and how to adjust for diets. Additionally, tips on storage and reheating keep your soup tasty. In the end, this dish is comforting and flexible. It fits many tastes and needs. Enjoy making it and sharing with others!

Slow Cooker Cheesy Potato Soup Cozy Comforting Meal

Warm up your kitchen with my Slow Cooker Cheesy Potato Soup! This creamy, cheesy delight is perfect for chilly nights

- 2 cups fresh strawberries, hulled and sliced - 2 cups fresh blueberries - 1 cup vanilla Greek yogurt - 1 cup heavy whipping cream - 1/4 cup powdered sugar - 1 teaspoon pure vanilla extract - 1 package ladyfinger cookies or pound cake, cut into cubes - Fresh mint leaves for garnish Gathering fresh fruits is key for this trifle. Strawberries and blueberries not only look great but taste amazing. You want ripe berries, so choose ones that smell sweet and feel firm. For the cream mixture, I recommend using vanilla Greek yogurt. It adds creaminess and a rich flavor. The heavy whipping cream makes the trifle light and fluffy. When you add powdered sugar, it sweetens the cream just right. A splash of pure vanilla extract gives it a lovely aroma. The base can be ladyfinger cookies or pound cake, depending on your taste. Ladyfingers are light and soak up the flavors well. Pound cake adds a nice density. For garnish, fresh mint leaves give a pop of color and freshness. They also enhance the dessert's flavor. When you layer the trifle, these ingredients create a beautiful presentation. You can find the full recipe to guide you through the entire process. - Whip heavy cream until soft peaks form. - Add powdered sugar and vanilla extract. This step is key for a rich taste. The whipped cream adds a light texture. - Start with strawberries, then add cookies. - Spoon yogurt, followed by blueberries. Layering is fun and lets you create a colorful dish. The berries provide both flavor and color. - Repeat layers and finish with whipped cream. - Chill for 1 hour before serving. Chilling allows the flavors to blend well. This dessert looks beautiful and tastes even better! You can find the Full Recipe for more details. - Use a clear glass trifle bowl for visual appeal. This shows off the lovely layers. - Serve in individual dessert cups for portion control. This makes it easy for guests. - For a fluffier texture, chill the mixing bowl and beaters before you start. - Avoid overbeating to prevent a grainy texture. Stop when stiff peaks form. - Consider adding a splash of lemon juice for brightness. This adds a fresh twist. - Experiment with flavored yogurts for a twist. Try berry or vanilla yogurt for fun. For more details, check the Full Recipe. {{image_2}} You can switch up the fruits in this trifle. Try using raspberries or blackberries instead of strawberries. These berries add a tart flavor and a lovely color. You can also add layers of peaches or kiwi for a fun twist. Peaches bring a sweet and juicy taste, while kiwi adds a bright pop of green. Mixing different fruits can make your trifle even more colorful and tasty. If you need gluten-free options, don’t worry! You can use gluten-free ladyfinger cookies or gluten-free pound cake. These will still provide that great texture. You can also try gluten-free granola instead of cookies. The granola adds a nice crunch and flavor. This way, everyone can enjoy the trifle without worries. For a dairy-free version, swap heavy cream with coconut cream. Coconut cream gives a rich and creamy texture. You can also use dairy-free yogurt in place of Greek yogurt. This will keep your trifle delicious and light. These simple changes make it easy for anyone to enjoy this treat. For the full recipe, check out the detailed instructions and ingredients list. Keep the trifle refrigerated for up to 2 days. This dessert tastes best when fresh, but it can last a bit longer. Cover the trifle with plastic wrap to maintain its freshness. This helps keep the whipped cream light and fluffy. Freezing the trifle is not recommended. The flavors and textures may be compromised when thawed. The cream can separate, and the fruit may become mushy. It’s best to enjoy this dessert fresh. While best enjoyed fresh, you can serve leftovers the next day. If the trifle has settled, stir it lightly before serving. This helps mix the layers again and keeps it delicious. Serve it chilled for a refreshing treat. For the full recipe, check out the Red, White and Blueberry Trifle instructions. Yes, you can prepare it a day in advance and chill it overnight. This helps the flavors blend well. Just be sure to cover it tightly with plastic wrap. Pound cake or even sponge cake can work well as alternatives. Both options add a soft texture that pairs nicely with the cream and fruit layers. It should form stiff peaks and hold its shape without collapsing. This means it will stay fluffy on top of your trifle. If you overbeat it, it may turn grainy, so watch closely! This article showed how to create a tasty fruit trifle. You learned about the fresh fruits and creamy mixture needed. I provided easy steps to layer the dessert and tips for a beautiful presentation. You also discovered fun variations and storage tips to keep it fresh. In the end, this trifle is a versatile treat. Whether you follow the recipe exactly or make it your own, enjoy the process and have fun!

Red, White and Blueberry Trifle Simple Summer Dessert

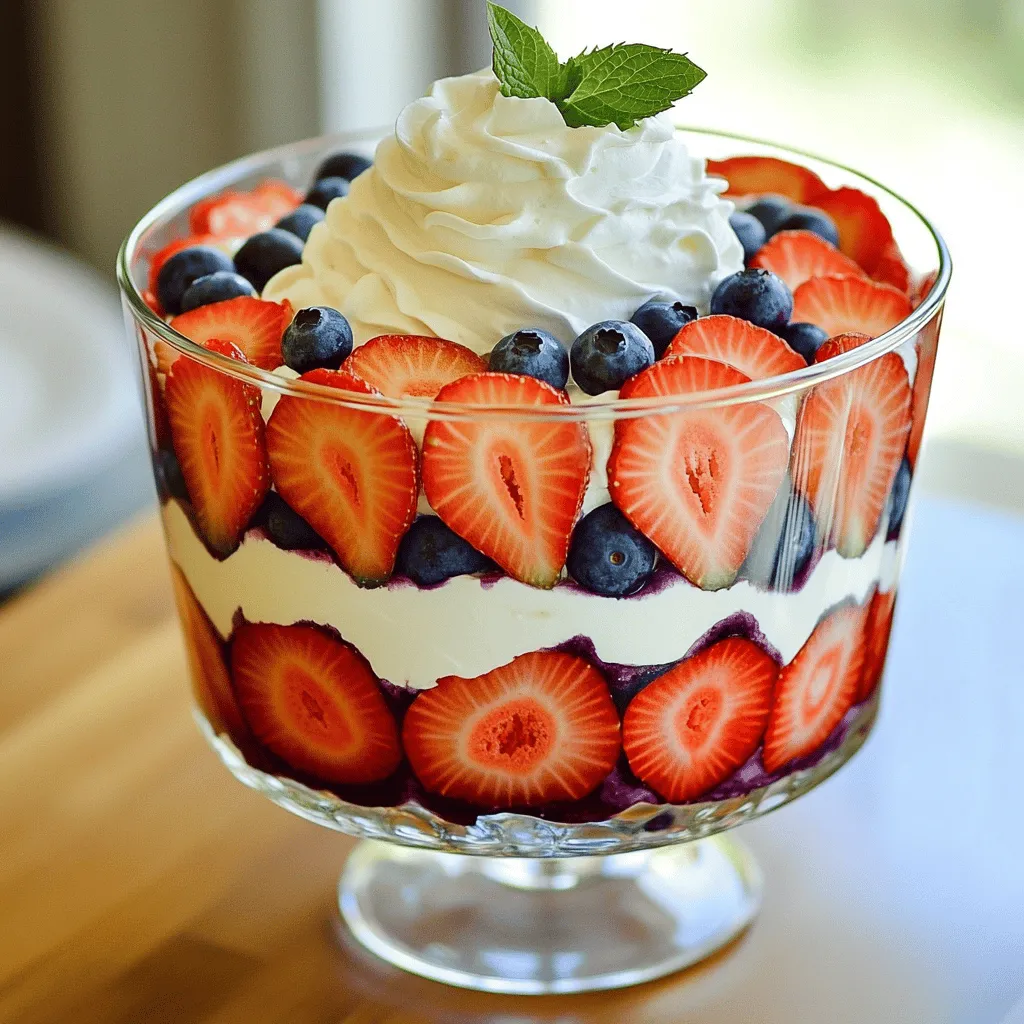
Looking for a refreshing summer treat? Try my Red, White and Blueberry Trifle! This simple dessert combines fresh strawberries, blueberries,

To create a perfect red velvet cake, you need these ingredients: - 2 ½ cups all-purpose flour - 1 ½ cups granulated sugar - 1 teaspoon baking soda - 1 teaspoon baking powder - 1 teaspoon salt - 1 teaspoon unsweetened cocoa powder - 1 ½ cups vegetable oil - 1 cup buttermilk, room temperature - 2 large eggs, room temperature - 2 tablespoons red food coloring - 1 teaspoon vanilla extract - 1 teaspoon white vinegar - 1 cup cream cheese, softened - ½ cup unsalted butter, softened - 4 cups powdered sugar - 1 teaspoon vanilla extract (for frosting) - Fresh raspberries and mint leaves for garnish You might need to swap some ingredients. Here are some ideas: - All-purpose flour: You can use cake flour for a lighter texture. - Buttermilk: If you don’t have buttermilk, mix milk with a bit of vinegar. - Vegetable oil: You can use canola oil or melted coconut oil. - Red food coloring: Natural beet juice offers a great color without artificial dyes. - Cream cheese: Greek yogurt can be a lower-fat option for frosting. Accurate measuring leads to great results. Here are some tips: - Use dry measuring cups for flour and sugar. Scoop and level off with a knife. - For liquid ingredients, use a clear measuring cup with markings. Check at eye level. - Room temperature items: Eggs and buttermilk mix better when they are at room temp. - Sift dry ingredients together for a light, fluffy cake. This helps to avoid lumps. Following these tips ensures your red velvet cake turns out perfectly every time! For the full recipe, check out the Red Velvet Dream Cake . 1. First, preheat your oven to 350°F (175°C). Grease and flour two 9-inch round cake pans. 2. In a big bowl, sift together: - 2 ½ cups all-purpose flour - 1 ½ cups granulated sugar - 1 teaspoon baking soda - 1 teaspoon baking powder - 1 teaspoon salt - 1 teaspoon unsweetened cocoa powder 3. In another bowl, whisk together: - 1 ½ cups vegetable oil - 1 cup buttermilk, room temperature - 2 large eggs, room temperature - 2 tablespoons red food coloring - 1 teaspoon vanilla extract - 1 teaspoon white vinegar 4. Gradually mix the wet ingredients into the dry ingredients. Blend until just combined. 5. Pour the batter evenly into the prepared pans and smooth the tops with a spatula. 6. Bake for 25-30 minutes. Check with a toothpick; it should come out clean. 7. Let the cakes cool in the pans for 10 minutes. Move them to wire racks to cool fully. - Use room temperature ingredients. This helps the batter mix well. - Do not over-mix the batter. This keeps the cake light and fluffy. - Check the cakes a few minutes before the timer goes off. Ovens can vary in heat. 1. In a bowl, beat together: - 1 cup cream cheese, softened - ½ cup unsalted butter, softened 2. Mix until smooth and creamy. 3. Gradually add: - 4 cups powdered sugar - 1 teaspoon vanilla extract 4. Beat until fluffy and well combined. 5. Once the cakes are cool, place one layer on a plate. Spread a thick layer of frosting on top. 6. Place the second layer on top and frost the entire cake. 7. For a beautiful touch, top with fresh raspberries and mint leaves. For the complete details and measurements, check the Full Recipe. Avoid these common mistakes to make your red velvet cake perfect. First, do not skip the buttermilk. It adds moisture and tang. Also, check your oven's temperature. An oven that is too hot can dry out the cake. Another mistake is over-mixing the batter. This can make the cake tough. Mix until just combined for the best texture. Lastly, be sure to cool your cakes completely before frosting. This helps the frosting stay thick and creamy. To keep your red velvet cake moist, use room temperature ingredients. This includes eggs and buttermilk. They mix better and help the cake rise. Adding vegetable oil instead of butter is another trick. Oil keeps the cake soft and moist longer. You can also use a simple syrup. Brush it on the cake layers before frosting to add extra moisture. When decorating your red velvet cake, start with a smooth base layer. Use a spatula to spread your cream cheese frosting evenly. For a fun touch, add fresh raspberries and mint leaves on top. This not only adds color but also flavor. You can also use a piping bag for fancy designs. Swirls and rosettes can make your cake look special. Don’t be afraid to get creative with your decoration! {{image_2}} You can play with flavors in your red velvet cake. Try adding orange zest for a citrus kick. Or, mix in some almond extract for a nutty twist. You can even swap out buttermilk for flavored yogurt. This can give your cake a fun taste and a new texture. While cream cheese frosting is classic, you have options! Try a chocolate ganache for a rich touch. A whipped cream frosting can lighten the cake. For something unique, consider a vanilla bean buttercream. Each frosting adds a different flair to your red velvet cake. Mix-ins can elevate your cake even more. Toss in some chocolate chips for sweetness. Walnuts or pecans add a nice crunch. Dried fruits, like cherries or cranberries, can bring a burst of flavor. Experiment with these add-ins to make your cake truly yours. For the full recipe, check out the detailed steps above! To keep your red velvet cake fresh, store it in an airtight container. If you slice the cake, wrap each piece in plastic wrap. This keeps the cake moist and tasty. Store the cake in the fridge if you won't eat it in two days. The cool air helps it stay fresh longer. You can freeze leftover red velvet cake for later. First, let it cool completely. Then, wrap it tightly in plastic wrap. After that, put it in a freezer bag or container. Label it with the date. It can last in the freezer for up to three months. When you're ready to eat it, thaw it overnight in the fridge. To reheat a slice of cake, place it in the microwave for about 10-15 seconds. This warms it up without drying it out. If you want to serve it cold, take it out of the fridge about 30 minutes before eating. This will soften the frosting and bring out its flavor. Enjoy it with some fresh raspberries or mint leaves for a lovely touch! Red velvet cake gets its red color primarily from the food coloring added to the batter. Traditionally, the cake also contains cocoa powder. This ingredient can react with acids in buttermilk and vinegar, giving it a slight reddish hue. However, modern recipes often rely on red food coloring to achieve that vibrant look. This striking color makes the cake stand out at any event. You can use different types of flour, but all-purpose flour works best. If you want a gluten-free version, consider using a gluten-free all-purpose blend. Just make sure the blend contains xanthan gum for structure. Avoid using cake flour, as it may make the cake too soft, affecting the texture. To check if your cake is done, insert a toothpick into the center. If it comes out clean or with a few crumbs, your cake is ready. The edges should also start to pull away from the pan slightly. Keep an eye on the clock, but always trust the toothpick test for accuracy. The best way to serve red velvet cake is chilled or at room temperature. A slice pairs well with a dollop of cream cheese frosting. You can also add fresh raspberries or mint leaves for a lovely touch. This cake is perfect for birthdays, anniversaries, or any celebration. For the complete recipe, you can refer to the Full Recipe section. It includes all the ingredients and steps needed to create this delicious red velvet cake. You now know how to make a great red velvet cake. We covered all the key ingredients and even discussed substitutes. I shared step-by-step instructions for baking and frosting. You learned common mistakes to avoid and tips for moistness. Remember, you can add your own flavors or mix-ins to personalize it. Store your cake properly to keep it fresh. I hope you feel ready to bake your own delicious red velvet cake. Enjoy every bite!

Red Velvet Cake Delicious and Easy Baking Recipe

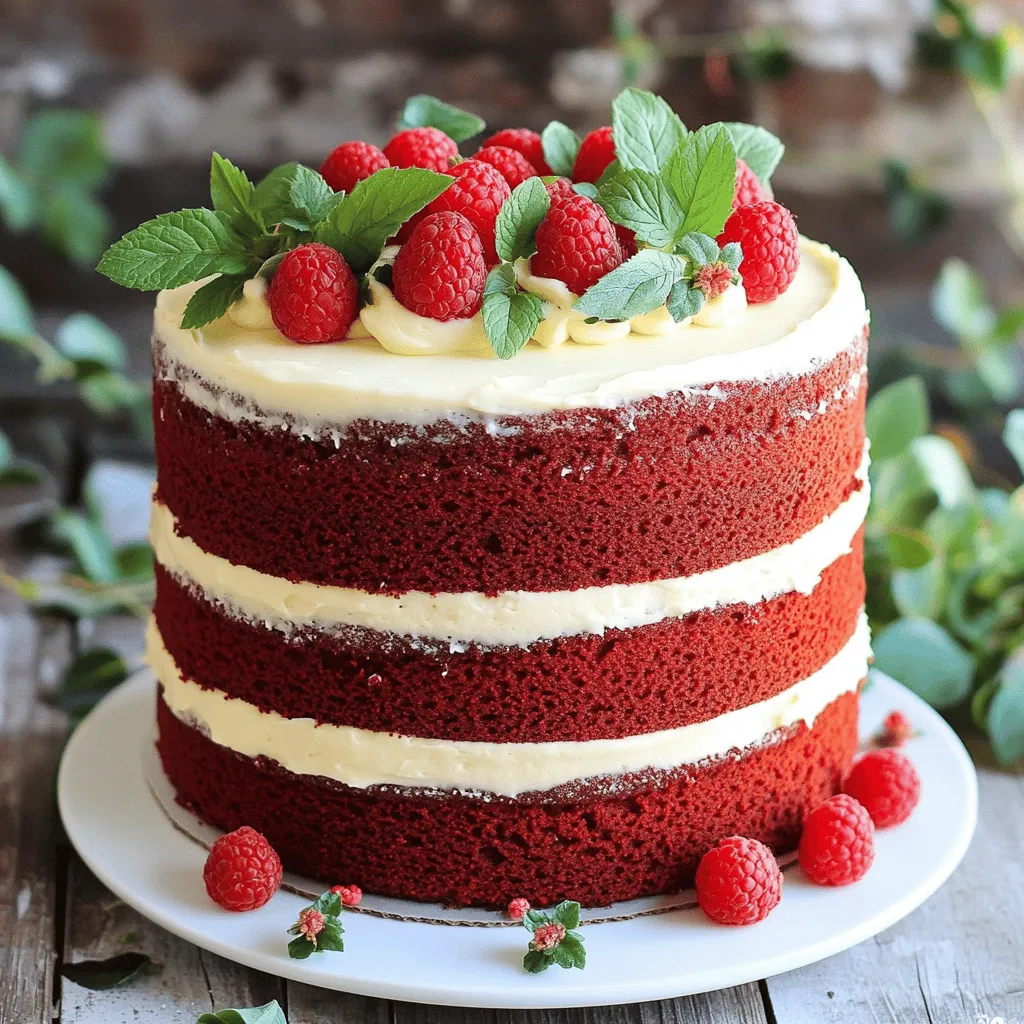
Craving a sweet treat that’s as impressive as it is simple? Let me guide you through my delicious and easy

To make a classic apple pie, you need fresh and simple ingredients. Here’s what you will want to gather: - 6 medium-sized Granny Smith apples, peeled, cored, and sliced - ¾ cup granulated sugar - ½ cup brown sugar, packed - 2 tablespoons all-purpose flour - 1 teaspoon ground cinnamon - ¼ teaspoon ground nutmeg - 1 tablespoon lemon juice - 1 tablespoon unsalted butter, cut into small pieces - 1 package (14 oz) pre-made pie crusts (2 crusts) - 1 egg, beaten (for egg wash) - Pinch of salt Using Granny Smith apples gives a nice tart flavor that pairs perfectly with the sweet sugars. The mix of granulated and brown sugar enhances the pie’s taste and texture. Adding flour helps thicken the juices from the apples. Spice it up with cinnamon and nutmeg for a cozy feel. Lemon juice brightens the flavors and keeps the apples fresh. The butter adds richness, making the pie even more delicious. A pinch of salt balances the sweetness. Finally, pre-made pie crusts save time while still giving you that homemade touch. Check out the Full Recipe for step-by-step guidance! - Preheat your oven to 425°F (220°C). - Combine sliced apples with sugars, flour, spices, and lemon juice. Toss until coated. This mixture gives your pie a sweet and tangy taste. I love using Granny Smith apples. They add a nice tartness. You can also mix in some sweeter apples. This balance enhances the flavor. - Fit one pie crust into the pie pan, fill with apple mixture, cover with second crust, and seal edges. Press the bottom crust firmly. Pour in the apple filling, spreading it evenly. Dot small pieces of butter on top for richness. Place the second crust on top. Trim the edges and pinch them to seal. This step keeps the filling inside. - Brush egg wash, make slits in the top crust, and bake for 45-50 minutes until golden. The egg wash gives your crust a beautiful shine. The slits let steam escape, preventing sogginess. Watch for a golden crust. If the edges brown too fast, cover them with foil. Enjoy the sweet aroma filling your kitchen! To get a flaky crust, use cold ingredients. Cold butter and water help keep the dough light. When you mix the dough, be gentle. Don’t overwork it. Overworking makes the crust tough. Instead, mix just until it comes together. Use a mix of tart and sweet apples. This gives the pie great flavor. Granny Smith apples are tart, while Honeycrisp adds sweetness. After mixing the apples with sugar and spices, let the filling rest. This allows the juices to mix. Pour the filling into the crust once it rests for a few minutes. Watch the crust closely while baking. You want it golden brown before taking it out. This usually takes about 45 to 50 minutes. After baking, let the pie cool for at least 2 hours. This cooling time helps the filling set. If you cut it too soon, the filling may run out. For a complete guide, check the Full Recipe. {{image_2}} You can change the apples for your pie. Try Honeycrisp or Fuji apples. They add a sweet and tart taste. You can also mix types of apples for more depth. Another fun idea is to add cranberries or raisins. They bring a nice pop of flavor and a bit of color. Think about adding a splash of vanilla or almond extract. These flavors make the pie smell amazing. You can also add a sprinkle of nutmeg or allspice. These spices give warmth and depth to your pie. Each small change can make your pie unique. You have choices for your pie crust. A homemade crust is super tasty and flaky. It also allows you to control the ingredients. Store-bought crusts save time but can be just as good. You can also try a lattice top crust. It looks beautiful and lets steam escape while baking. Both options can make your classic apple pie shine. Check the Full Recipe for more details. After you bake your apple pie, let it cool down. Once it's cool, cover it with plastic wrap or foil. Store leftovers in the fridge for up to 3-4 days. This keeps the pie fresh and tasty. I recommend enjoying it within this time for the best flavor. You can freeze your apple pie if you have extra. Here’s how: - Unbaked Pie: Wrap it tightly in plastic wrap and then foil. This helps keep out air and prevents freezer burn. You can bake it straight from the freezer. Just add a few extra minutes to the cooking time. - Baked Pie: Allow it to cool completely. Wrap it in plastic wrap and foil. This keeps the pie moist. It can last in the freezer for up to 3 months. To enjoy your apple pie later, reheating is key: - Oven Method: This is my favorite! Preheat your oven to 350°F (175°C). Place the pie on a baking sheet and heat for about 15-20 minutes. The crust will get nice and crisp again. - Microwave Method: For a quick fix, use the microwave. Heat a slice for about 30-60 seconds. It won't be as crispy, but it's fast and easy. Now you can savor your homemade apple pie whenever you want! For the full recipe, check out the earlier sections. To avoid a soggy crust, try blind baking. This means pre-baking the crust before adding the filling. Place parchment paper in the crust, fill it with pie weights or dried beans, and bake for 10 minutes. Remove the weights and bake for another 5 minutes. Also, use a thicker filling. This helps absorb moisture. You will have a crispier bottom crust. For a great apple pie, I recommend mixing apple types. Use Granny Smith for tartness and Honeycrisp for sweetness. Fuji apples are sweet and juicy, too. A mix gives you a nice flavor and good texture. You want apples that hold their shape when baked. Yes, you can make apple pie ahead of time! Store it in the fridge for up to two days before baking. You can also freeze the unbaked pie for up to three months. Wrap it well in plastic wrap and aluminum foil. When ready, bake it straight from the freezer, adding a few extra minutes to the bake time. Peeling the apples is not a must, but it helps with texture. Peeling gives a smooth filling. Leaving the skin on adds color and nutrients. If you choose to keep the skin, wash it well. A mix of peeled and unpeeled apples can create a unique taste. Your pie is done when the filling bubbles and the crust is golden brown. Check for a thick, shiny filling. You may also see some juices oozing through the slits in the top crust. Let it cool before slicing. This helps the filling set and makes serving easier. You can make a great apple pie with just a few simple steps. Start with perfect Granny Smith apples for a mix of sweet and tart. Follow the guide to prepare your filling, assemble, and bake the pie. Remember to let it cool and rest for the best taste. You can even add your own twist with extra flavors or crust designs. With these tips, you can enjoy a delicious homemade pie that impresses everyone. Happy baking!

Classic Apple Pie Irresistible Homemade Delight

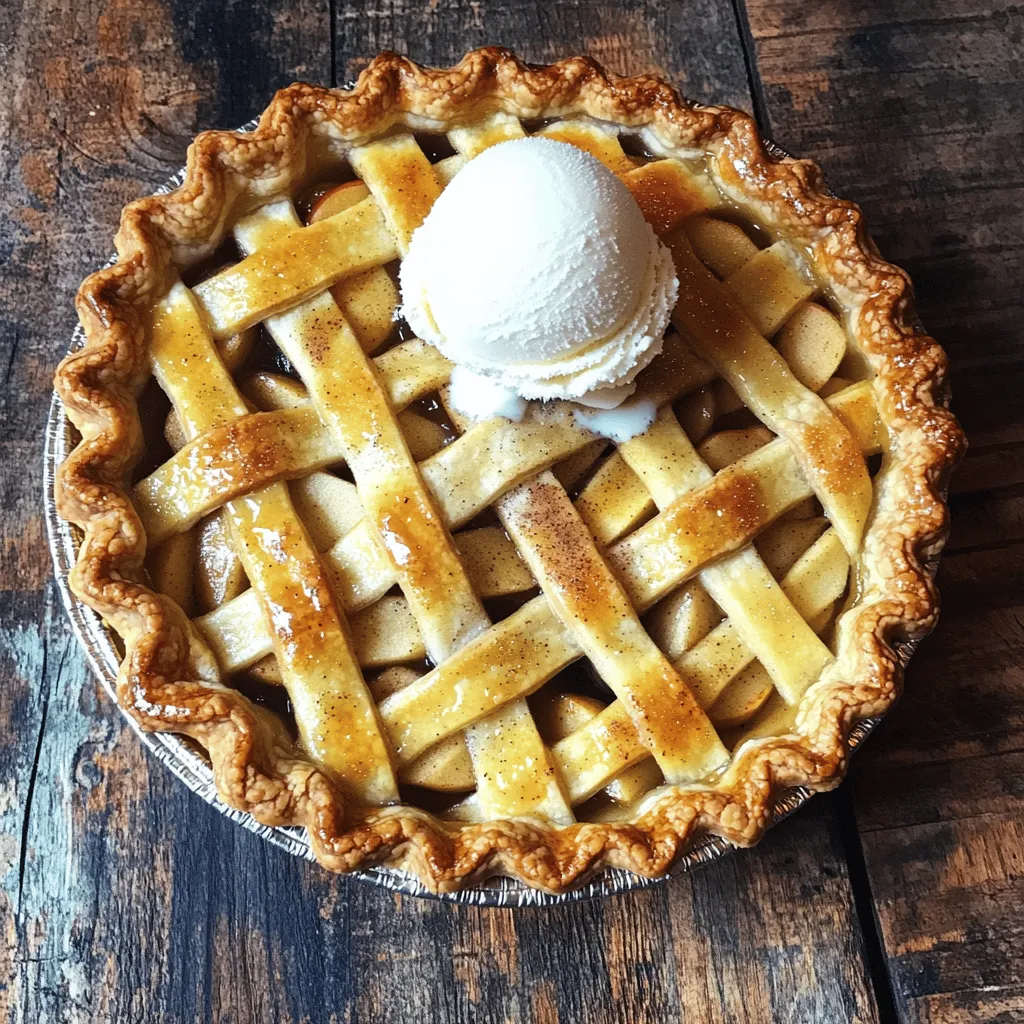
Are you ready to make the best apple pie? Classic Apple Pie: Irresistible Homemade Delight gives you every detail you

- 2 ¾ cups all-purpose flour - 1 teaspoon baking soda - ½ teaspoon baking powder - 1 teaspoon salt - 1 cup unsalted butter, softened - 1 ½ cups granulated sugar - 1 large egg - 1 tablespoon lemon zest (from about 2 lemons) - 2 tablespoons fresh lemon juice - 1 teaspoon vanilla extract - 1 ½ cups powdered sugar (for glazing) - 2 tablespoons fresh lemon juice (for glazing) - Lemon slices and zest for garnish (optional) You will need some basic items for these cookies. Start with the flour, baking soda, baking powder, and salt. These dry ingredients give the cookies structure. Next, get butter and sugar. The butter should be soft. This helps it mix well, making the cookies light. You also need an egg, lemon zest, lemon juice, and vanilla extract. These add flavor and moisture to the dough. For the glaze, gather powdered sugar and more lemon juice. This glaze gives the cookies a sweet and tart finish. If you like, use lemon slices or extra zest for a pretty touch on top. With all these ingredients ready, you will make a tasty treat! For the full recipe, check the cooking instructions later. 1. Preheat the oven and line baking sheets: Start by preheating your oven to 350°F (175°C). Line your baking sheet with parchment paper. This helps the cookies not stick. 2. Combine dry ingredients and cream butter/sugar mixture: In a bowl, mix together 2 ¾ cups of flour, 1 teaspoon of baking soda, ½ teaspoon of baking powder, and 1 teaspoon of salt. In a separate bowl, beat 1 cup of softened butter and 1 ½ cups of granulated sugar until fluffy. This takes about 3 minutes. 3. Add egg and flavorings to the mixture: Add 1 large egg, 1 tablespoon of lemon zest, 2 tablespoons of fresh lemon juice, and 1 teaspoon of vanilla extract to the butter mixture. Beat until mixed well. 1. Combine wet and dry ingredients, shape cookies, and set on baking sheet: Slowly add the dry mixture to the wet mixture. Mix on low until combined. Do not overmix! Use a cookie scoop to drop dough onto the prepared baking sheet. Space them 2 inches apart. 2. Baking time and tips for doneness: Bake the cookies for 8-10 minutes. Look for lightly golden edges. The middle may seem soft, but it will firm up while cooling. 1. How to make the glaze: In a small bowl, whisk together 1 ½ cups of powdered sugar and 2 tablespoons of fresh lemon juice. Mix until smooth and pourable. 2. Techniques for glazing cookies: Once the cookies are cool, drizzle the glaze over each cookie. You can use a spoon or a piping bag for neat lines. 3. Optional garnishing ideas: If you want, add small lemon slices or more lemon zest on top of the glaze while it is still wet. This adds a nice touch! For the full recipe and additional tips, check out the [Full Recipe]. Enjoy making your glazed lemon sugar cookies! To make the best glazed lemon sugar cookies, start with measuring flour correctly. Use a spoon to scoop flour into your measuring cup. Then level it off with a knife. This method helps avoid too much flour, which can make cookies dry. Room temperature butter is key. It blends well with sugar, creating a light and fluffy mixture. If your butter is cold, it won’t mix properly. Leave it out for about 30 minutes before use. Avoid overmixing the dough. Once you add dry ingredients, mix just until combined. Overmixing can make cookies tough. You want a soft and tender cookie, so stop mixing as soon as everything blends. To enhance lemon flavor, add more lemon zest. This gives a bright, zesty taste. You can also mix in a bit of lemon extract for an extra kick. For alternate glazes, try a simple vanilla glaze. Just mix powdered sugar with milk and vanilla. This adds sweetness without the tartness of lemon. You can also sprinkle in chopped nuts or shredded coconut for added texture. {{image_2}} You can switch up the flavor of your glazed lemon sugar cookies with different citrus. Try using lime zest for a fresh twist. Lime adds a bright and tangy taste that pairs well with the sweetness. Orange zest is another great option. It brings a sweet, fruity aroma that brightens the cookies. For seasonal variations, think about adding blood orange zest in winter. It gives a lovely color and flavor that stands out. If you need to make your cookies gluten-free, use a gluten-free flour blend. Many blends work well in cookies. Look for one that includes xanthan gum for a better texture. If you want a vegan option, replace the butter with coconut oil or a plant-based butter. You can use a flax egg instead of a regular egg. Just mix one tablespoon of ground flaxseed with two and a half tablespoons of water. Let it sit until it thickens. These changes keep the cookies tasty while fitting different diets. Store your glazed lemon sugar cookies at room temperature in an airtight container. This keeps them soft and fresh for about a week. Avoid placing them in direct sunlight. You can add a piece of bread to the container. This helps keep cookies moist. You can separate layers of cookies with parchment paper. This method prevents them from sticking together. If you want to keep the glaze intact, wait until the cookies cool completely before storing them. This ensures the glaze sets properly. For long-term storage, you can freeze both unbaked dough and baked cookies. To freeze unbaked dough, scoop the dough onto a lined baking sheet. Freeze the dough balls until firm, then transfer them to a freezer bag. This method saves space and keeps the dough fresh for up to three months. If you prefer to freeze baked cookies, let them cool completely. Then, place them in an airtight container or freezer bag. They can last up to three months in the freezer. To thaw, simply take them out and let them sit at room temperature for about 30 minutes. If you want to enjoy them warm, pop them in a preheated oven at 350°F (175°C) for a few minutes. This will bring back their fresh-baked goodness. You can tell when cookies are done by looking at their edges. The edges should be lightly golden. If the center looks a bit soft, don’t worry. They will firm up as they cool. Gently touch the center with your finger. If it springs back, they are ready to come out. Yes, you can make the dough ahead of time! Just shape it into a ball and wrap it in plastic. Store it in the fridge for up to three days. If you want to keep it longer, freeze the dough for up to three months. When ready to bake, let it thaw in the fridge overnight and then scoop and bake as usual. If you lack fresh lemons, you can use bottled lemon juice. About two tablespoons of bottled juice works well. You can also use lemon extract as an option. One teaspoon of extract can replace the zest and juice. Just remember, the flavor may not be as bright as fresh lemons, but it will still taste good! Baking cookies is simple with the right ingredients and steps. You learned about the key components like flour, butter, and eggs. I shared tips for perfect texture and flavor. Don’t forget to experiment with different citrus and dietary options. Storing cookies properly keeps them fresh longer. I hope you feel excited to try these recipes. Happy baking!

Glazed Lemon Sugar Cookies Tasty and Simple Recipe

Craving something sweet, bright, and delicious? You’ll love these Glazed Lemon Sugar Cookies! This simple recipe combines fresh lemon zest

- 3 medium apples, peeled, cored, and diced (preferably Granny Smith) - 1 teaspoon lemon juice - 1/2 cup brown sugar - 1 teaspoon ground cinnamon - 1/4 teaspoon nutmeg - 1 tablespoon cornstarch - 1 tablespoon unsalted butter For the apple pie filling, I recommend using Granny Smith apples. They add a nice tartness that balances the sweetness. The lemon juice keeps the apples fresh and bright. The brown sugar, cinnamon, and nutmeg bring warmth and depth to the flavors. - 2 cups cream cheese, softened - 1 cup granulated sugar - 1 teaspoon vanilla extract - 3 large eggs - 1 cup sour cream The cream cheese is key for a rich, smooth texture. Be sure to let it soften so it blends well. The granulated sugar adds sweetness, while the vanilla extract gives a lovely aroma. Sour cream adds creaminess and a slight tang. - 1 1/2 cups graham cracker crumbs - 1/4 cup granulated sugar - 1/2 cup unsalted butter, melted For the crust, graham cracker crumbs create a nice crunch. Mixing them with sugar and melted butter makes a great base. Press it firmly into the pan to ensure it holds together after baking. Following the full recipe will guide you through each step for this delightful dessert. Enjoy making your apple pie stuffed cheesecake! To make the apple pie filling, start by melting the butter in a saucepan over medium heat. Once melted, add in the diced apples, lemon juice, brown sugar, cinnamon, nutmeg, and cornstarch. Stir everything well to mix the flavors. Cook this mixture until the apples become tender, which takes about 5 to 7 minutes. After that, set the filling aside to cool. This step is key, as it keeps the apples from cooking too much in the oven. Next, it's time to make the crust. In a medium bowl, combine the graham cracker crumbs, granulated sugar, and melted butter. Mix these ingredients until they are well combined. Press this mixture evenly into the bottom of a 9-inch springform pan to create a solid layer. Bake the crust in your preheated oven for 10 minutes, then remove it and let it cool slightly. A good crust holds everything together and adds a nice crunch. Now, we move on to assembling the cheesecake. First, pour half of the cheesecake batter over the cooled crust. Next, spoon the cooled apple pie filling evenly on top of this layer. Pour the remaining cheesecake batter over the filling, smoothing the top with a spatula. Finally, place the cheesecake in the oven and bake it for about 60 to 70 minutes. The center should be set but still have a slight jiggle. After baking, turn off the oven and crack the door open. Letting the cheesecake cool in the oven for 1 hour helps prevent cracks. Once cooled, cover it with plastic wrap and refrigerate for at least 4 hours, or overnight for the best results. This chilling step enhances the flavor and texture. For the full recipe, check out the details above. To get a smooth and creamy cheesecake, use room-temperature cream cheese. Cold cream cheese makes lumps. Beat the cream cheese until it is fluffy. This takes about three minutes. Add sugar slowly while mixing. This helps mix better, too. Don't overmix once you add the eggs. You want a smooth batter, but overmixing adds air. Too much air causes cracks when baking. One big mistake is not measuring your ingredients. Use a kitchen scale for accuracy. Another error is baking at the wrong temperature. Make sure your oven is at 325°F. This is key for even cooking. Also, don’t skip the cooling steps. Cooling in the oven helps avoid cracks. Lastly, don't rush the chilling process. A full chill makes your cheesecake firm and creamy. Let your cheesecake cool in the oven first. After baking, crack the door and let it cool for an hour. This helps prevent cracks. Then, wrap it well and chill it for at least four hours. Overnight chilling gives the best flavor and texture. Before serving, let it sit at room temperature for about 30 minutes. This makes each slice easier to cut and enjoy. For extra flair, drizzle caramel sauce on top before serving. For the full recipe, check the details above. {{image_2}} You can switch up your stuffed cheesecake by using other fruits. Try peaches, cherries, or blueberries. These fruits add unique flavors and colors. Each fruit has its own taste profile, so feel free to mix and match. For example, combine apples and cranberries for a tart twist. Just adjust the sugar to balance the flavors. This way, you keep your cheesecake exciting and fresh. Get creative with themes for special occasions. For a holiday, add spices like ginger and nutmeg for a warm flavor. A fall theme can use pumpkin puree mixed with the apple pie filling. For summer, think about a tropical vibe with coconut and pineapple. You can even create a fun birthday cheesecake with colorful sprinkles and chocolate. Themed variations let you express your creativity and impress your guests. If you need gluten-free options, swap regular graham crackers for gluten-free ones. You can use almond flour or oat flour for the crust. For a low-sugar version, replace sugar with natural sweeteners like stevia or monk fruit. These options keep the taste rich without the extra sugar. Always check the labels to ensure everything fits your dietary needs. This way, everyone can enjoy a slice of your delicious cheesecake! For the full recipe, check out the [Full Recipe]. To store leftover cheesecake, first, let it cool completely. Then, cover it tightly with plastic wrap. You can also use an airtight container. This keeps the cheesecake fresh for up to five days in the fridge. If you want to keep it longer, freezing is a great option. You can freeze the cheesecake for up to three months. To do this, slice the cheesecake and wrap each piece in plastic wrap. Then, place the wrapped pieces in a freezer-safe bag. Make sure to label the bag with the date. This helps you know when to enjoy your delicious dessert. To reheat a frozen slice, take it out and let it sit in the fridge overnight. This helps it thaw slowly. If you're in a hurry, you can use the microwave. Heat it on low power for 20-30 seconds. Be careful not to overheat. Enjoy your tasty treat at room temperature or slightly warm. Apple Pie Stuffed Cheesecake can last in the fridge for about 5 to 7 days. Store it in an airtight container to keep it fresh. If you want to save it longer, you can freeze it. In the freezer, it can last up to 3 months. Just wrap it well to prevent freezer burn. Yes, you can make this cheesecake a day or two ahead of time. It actually tastes better after chilling overnight. Just make sure to cover it tightly with plastic wrap. This helps keep it moist and flavorful. You can serve this cheesecake with whipped cream on top. A drizzle of caramel sauce makes it even better. You can also add a sprinkle of cinnamon or serve it with vanilla ice cream. Fresh apple slices can add a nice touch too. For more ideas, check out the Full Recipe for Apple Pie Stuffed Cheesecake. You now know how to make a tasty Apple Pie Stuffed Cheesecake. We covered the key ingredients, step-by-step baking, and useful tips to avoid mistakes. Remember to try different flavors and options, like gluten-free versions. Proper storage helps keep your cheesecake fresh longer. Enjoy sharing this sweet treat! It’s perfect for any gathering. Happy baking!

Irresistible Apple Pie Stuffed Cheesecake Delight

Welcome to a dessert lover’s dream! Today, I’m sharing my recipe for Irresistible Apple Pie Stuffed Cheesecake Delight. Imagine creamy

To make the best homemade cinnamon rolls, you need the right ingredients. The perfect blend creates soft and fluffy rolls. Here’s what you need: - 4 cups all-purpose flour - 1/4 cup granulated sugar - 1 packet (2 1/4 teaspoons) instant yeast - 1/2 teaspoon salt - 1 cup whole milk, warmed - 1/4 cup unsalted butter, melted - 2 large eggs - 1 tablespoon ground cinnamon - 1/2 cup brown sugar, packed - 1/4 cup unsalted butter, softened (for filling) - 1 cup powdered sugar (for icing) - 2 tablespoons milk (for icing) - 1 teaspoon vanilla extract (for icing) Each ingredient plays a key role in creating that delightful taste and texture. Flour gives body, while sugar adds sweetness. Yeast helps the rolls rise. The milk and butter keep them moist. Eggs provide richness. Ground cinnamon delivers that warm flavor we love in cinnamon rolls. For the icing, powdered sugar, milk, and vanilla create a creamy topping. This icing makes the rolls even more tempting. You can find the full recipe to guide you step by step. Enjoy baking! - Activate the Dough: In a large bowl, mix the warm milk, melted butter, and sugar. Sprinkle the yeast over this mix. Let it sit for about 5-10 minutes until it froths. - Mix the Dough: Add the eggs and salt, then slowly mix in the flour. Stir until a soft dough forms. Knead the dough on a floured surface for 5-7 minutes until smooth. - First Rise: Place the dough into a greased bowl. Cover it with a towel and let it rise in a warm spot for about 1 hour until it doubles in size. - Prepare the Filling: In a small bowl, mix the softened butter, brown sugar, and cinnamon until well blended. This will create a sweet layer for your rolls. - Roll Out the Dough: After the dough rises, punch it down. Roll it out on a floured surface into a rectangle, about 16x12 inches. - Spread and Roll: Evenly spread the filling over the dough, leaving a small edge. Starting from one end, roll the dough tightly into a log. Cut the log into 12 equal slices. - Second Rise: Place the rolls in a greased 9x13 inch baking dish. Cover them and let rise again for about 30 minutes. - Preheat Oven: Set your oven to 375°F (190°C) so it's hot and ready. - Bake: Bake the cinnamon rolls for 25-30 minutes. They should turn golden brown. This method creates soft and fluffy cinnamon rolls. For the complete experience, check out the Full Recipe. Enjoy the process and the delightful smell that fills your kitchen! - Kneading Techniques: Kneading is key to soft rolls. You should knead the dough for about 5 to 7 minutes. The dough should feel smooth and elastic. If it sticks to your hands, add a little flour. Use the heel of your hand to push the dough, then fold it back. This method develops gluten, which helps the rolls rise. - Rise Conditions: The best place for dough to rise is a warm, draft-free spot. An ideal temperature is around 75°F to 80°F (24°C to 27°C). If your kitchen is cool, you can turn on the oven for a minute, then turn it off. Place the bowl in there to help the dough rise. Humidity also helps, but if it’s dry, cover the dough with a damp cloth. - Making the Icing: For the icing, mix powdered sugar, milk, and vanilla extract. The icing should be smooth, not runny. If it’s too thick, add a bit more milk. For a twist, you can add a pinch of cinnamon or even some maple syrup for added flavor. - Applying Icing: Wait until the rolls are warm but not too hot. Drizzle the icing over the rolls for a nice finish. Use a spoon or whisk for even coverage. This gives a professional look and adds that sweet touch everyone loves. - Dense Rolls: If your rolls are dense, it’s often due to not kneading enough. Also, check if the dough rose properly. If it didn’t double in size, it might be due to old yeast or a cold environment. Always check the yeast’s expiration date before using it. - Over-baking Tips: To avoid dry cinnamon rolls, keep an eye on the time. Bake until they are golden brown, usually 25 to 30 minutes. You can also cover them with foil if they brown too quickly. A toothpick inserted in the center should come out clean, but not too dry. {{image_2}} You can make your cinnamon rolls even better with a few tasty twists. Here are some fun options: - Nutty Options: Add walnuts or pecans for a delicious crunch. Chop them up and sprinkle them on the filling. This will add a nice texture and flavor. - Fruit Fillings: Want a fruity taste? Try adding raisins, cranberries, or even diced apples. Mix them into the filling or layer them with the cinnamon sugar. They will bring a sweet and tangy flavor. The icing can change the whole feel of your cinnamon rolls. Here are two popular ideas: - Cream Cheese Icing: For a richer taste, mix 8 oz of cream cheese with 1 cup of powdered sugar, 2 tablespoons of milk, and 1 teaspoon of vanilla extract. This icing will make your rolls feel extra special. - Chocolate Icing: If you love chocolate, try this! Melt 1/2 cup of chocolate chips. Stir in 1 tablespoon of butter and 2 tablespoons of milk until smooth. Drizzle this over your warm rolls for a sweet twist. You can still enjoy cinnamon rolls if you have special dietary needs. Here are some tips: - Gluten-Free Options: Use a gluten-free flour blend instead of all-purpose flour. Make sure to add 1 teaspoon of xanthan gum to help with the texture. - Vegan Options: Substitute the butter with coconut oil or a vegan butter. Use almond or soy milk in place of whole milk. For eggs, use flaxseed meal mixed with water. This can give you soft and fluffy rolls without any animal products. These variations let you enjoy cinnamon rolls that fit your taste and needs! For the full recipe, check out the main section. - Room Temperature: You can keep leftover cinnamon rolls at room temperature for 1-2 days. Just wrap them in plastic wrap or store them in an airtight container. This keeps them soft and fluffy. - Refrigeration: If you want to store them longer, refrigerate the rolls. Place them in a container with a lid. They can last up to a week in the fridge. Just remember, cold air can dry them out. - Freezing Directions: To freeze baked rolls, let them cool completely. Then, wrap each roll tightly in plastic wrap. Place them in a freezer bag. They can last for about 2-3 months in the freezer. - Reheating Tips: When you are ready to enjoy them again, take the rolls out of the freezer. Let them thaw in the fridge overnight. To reheat, place them in a preheated oven at 350°F (175°C) for about 10-15 minutes. This keeps them soft and warm. - Ideal Pairings: Cinnamon rolls go great with coffee or tea. A glass of milk also makes a tasty drink. You can serve them with fresh fruit or yogurt for a nice balance. Each bite of sweet roll pairs well with a hot drink. Enjoy your rolls warm for the best taste! How to store leftover cinnamon rolls? You can store leftover cinnamon rolls at room temperature. Place them in an airtight container. They will stay soft for 1 to 2 days. For longer storage, refrigerate them. Just remember to warm them up before eating. Can I make cinnamon rolls ahead of time? Yes, you can make cinnamon rolls ahead of time. Prepare the rolls, then cover them tightly. Place them in the fridge for up to 24 hours. When you're ready to bake, let them rise for about 30 minutes at room temperature before baking. What can I substitute for instant yeast? You can use active dry yeast as a substitute. Just use the same amount. But you need to activate it in warm water first. Let it sit for about 5 to 10 minutes until it bubbles. Can I use active dry yeast instead of instant yeast? Yes, you can use active dry yeast. The rolls will still rise well. Just remember to activate it first in warm water. Why are my cinnamon rolls not rising? Your rolls may not rise due to old yeast. Always check the expiration date. Also, ensure your dough is in a warm spot. If it's too cold, it won’t rise. How can I make the dough softer? To make the dough softer, add more milk or butter. Knead it until smooth and elastic. Avoid adding too much flour, as this can make it dry. What’s the best way to ensure even baking? To ensure even baking, rotate your baking dish halfway through. This helps the rolls bake evenly. Also, check that your oven is properly calibrated. How do I know when my cinnamon rolls are done? Your cinnamon rolls are done when they are golden brown. You can also test them with a toothpick. If it comes out clean, they are ready to enjoy! For the full recipe, refer back to the earlier section. You now have all the steps to make perfect cinnamon rolls. From gathering ingredients to baking, each part is key. Remember, the right rise makes a big difference. Don't forget to try different flavors and icings to find your favorite. Storing and reheating properly will keep them fresh. With these tips, you can enjoy soft, sweet rolls anytime. Happy baking!

Best Homemade Cinnamon Rolls Soft and Fluffy Delight

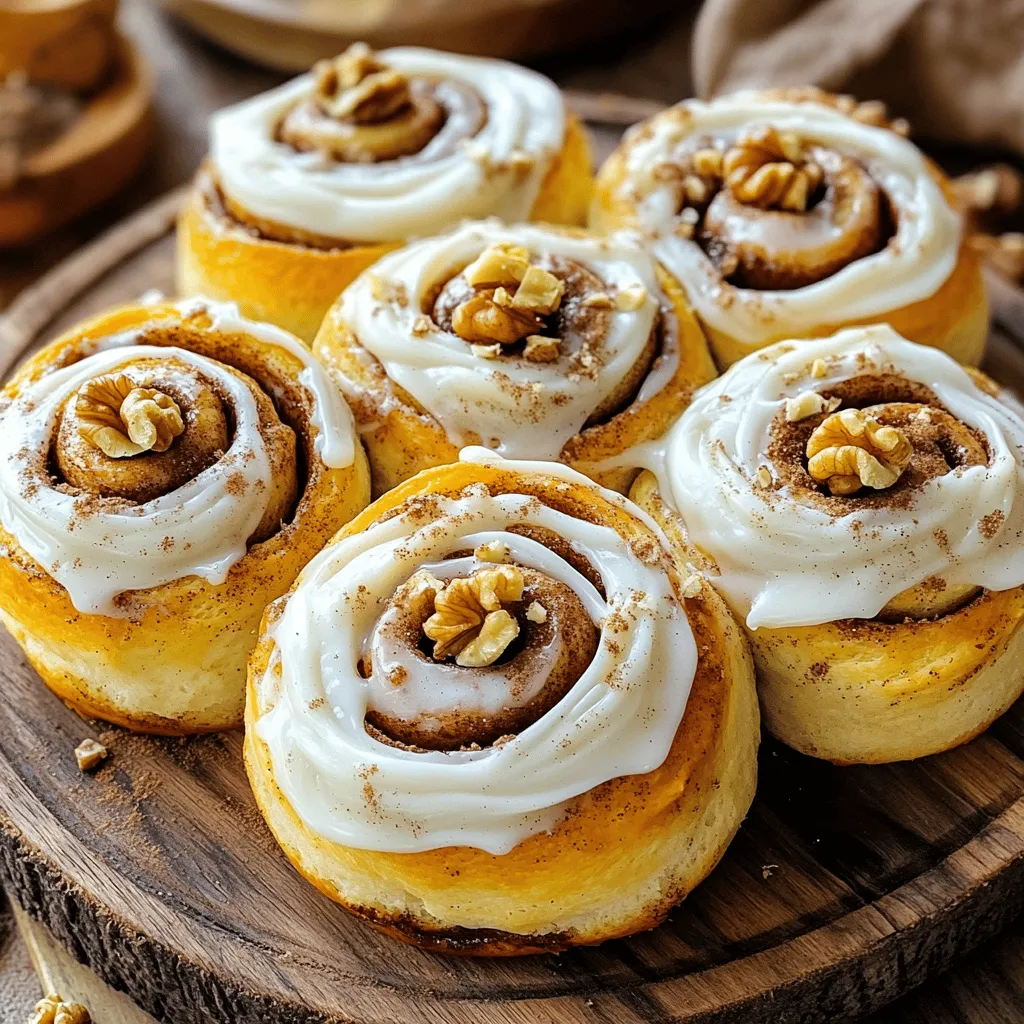
Welcome to the world of homemade cinnamon rolls, where each bite is like a warm hug! In this post, I’ll

Here’s what you need for the best strawberry pie. Gather these fresh ingredients: - 2 cups fresh strawberries, hulled and sliced - 1 ½ cups strawberry preserves or jam - 1 tablespoon lemon juice - 2 tablespoons cornstarch - 1 tablespoon sugar - 1 teaspoon vanilla extract - 1 pre-made pie crust (store-bought or homemade) - Whipped cream for serving (optional) Using fresh strawberries makes a big difference in flavor. Choose bright red ones. They should feel firm. For the preserves, look for a brand with real fruit. This adds sweetness and depth. Lemon juice brightens the pie and balances the sweetness. Cornstarch helps thicken the filling. Sugar adds a touch of sweetness, and vanilla gives a warm flavor. You can use a store-bought pie crust for ease or make your own. If you make your own, roll it out to fit a 9-inch pie plate. The whipped cream is optional but adds a nice touch when serving. For the full recipe, check out the Best Strawberry Pie section. - Preheat oven to 425°F (220°C). - Roll out the pie crust into a 9-inch pie plate. Starting with the crust is key. If you use a store-bought crust, just unroll it. If you make your own, roll it out evenly. Place it in the pie plate and crimp the edges. This gives your pie a nice look. - Combine strawberry preserves, lemon juice, cornstarch, sugar, and vanilla extract in a saucepan. - Fold sliced strawberries into the thickened mixture and pour into the pie crust. Next, grab a medium saucepan. Mix strawberry preserves, lemon juice, cornstarch, sugar, and vanilla extract. Heat it over medium heat. Stir until it bubbles and thickens. This takes about 5 to 7 minutes. Then, gently fold in your sliced strawberries. Make sure they get coated well. Pour this mixture into your pie crust. Spread it evenly for the best taste. - Bake for 20-25 minutes until golden brown. - Let cool on a wire rack for 1 hour before serving. Now it's time to bake! Place your pie in the oven and bake for 20 to 25 minutes. You want the crust to be golden brown. The filling should be bubbling. Once it’s done, take it out and let it cool on a wire rack for at least 1 hour. This helps it set up nicely. After that, it’s ready to slice and serve! Enjoy this best strawberry pie with a scoop of whipped cream if you like. For the full details on how to make this pie, check out the Full Recipe! To make the best strawberry pie, you need great strawberries. Look for bright red and firm strawberries. These will give your pie a nice color and texture. Avoid strawberries with blemishes or soft spots. These can spoil your pie and ruin the flavor. To bring out the sweet taste of strawberries, add a pinch of salt to your filling. This small step makes a big difference. Also, consider adjusting sugar based on how ripe your strawberries are. Ripe strawberries taste sweeter, so you might need less sugar. Taste the mixture as you go to find the right balance. Getting a flaky crust is key to a great pie. Use cold ingredients when making your crust. Cold butter and water help create layers in the dough. Blind baking the crust is another trick for extra crispiness. This means baking the crust alone for a short time before adding the filling. It helps keep the crust from getting soggy. For the full recipe, check the details provided earlier. {{image_2}} You can switch things up with the fruit in this pie. Consider using peaches or blueberries instead of strawberries. This change gives a new taste while keeping the pie sweet and juicy. Another fun idea is to mix strawberries with rhubarb. The tartness of rhubarb adds a nice balance to the sweetness of strawberries. This combo makes for a refreshing twist. If you want a healthier pie, you can try using honey or agave syrup instead of regular sugar. These natural sweeteners add flavor without as many calories. You can also use a whole grain crust. This crust adds fiber and nutrients, making the pie a bit more nutritious without losing taste. To add a new layer of taste, consider a splash of balsamic vinegar. This may sound odd, but it deepens the sweet strawberry flavors. You can also play with fresh herbs like basil or mint. A small amount of these herbs can brighten the pie and make it stand out. These unique touches can impress your family and friends while keeping the recipe fun. For the full recipe, check out the Best Strawberry Pie section. You should store your strawberry pie in the fridge. Cover it well. It will stay fresh for up to 3 days. If you want to keep it longer, freeze it. Wrap the pie tightly in plastic wrap. It can last in the freezer for up to 2 months. To reheat slices, use your oven. Set it to a low temperature. Heat for a few minutes until warm. You can also enjoy the pie cold from the fridge. Both ways are delicious! A: Pre-bake the pie crust before adding the filling. This step helps keep the crust crisp. When you bake the crust alone for a short time, it forms a barrier. This barrier stops moisture from the filling from soaking into the crust. I recommend baking it for about 10 minutes at 425°F (220°C). Keep an eye on it to prevent burning. A: Yes, but thaw and drain excess moisture before using them. Frozen strawberries can work well when fresh ones are not available. After thawing, press the strawberries gently to remove extra liquid. This step is important. Too much liquid can make your pie runny. A: Whipped cream, vanilla ice cream, or fresh mint make great accompaniments. Whipped cream adds a light touch. Vanilla ice cream pairs well with the pie's sweetness. Fresh mint gives a nice contrast and enhances the flavor. You can serve all three for a delightful treat. You can make a delicious strawberry pie with simple steps and fresh ingredients. Start with ripe strawberries and a pre-made crust. Follow the easy cooking and baking instructions to achieve a perfect golden pie. Don't forget to try variations like adding peaches or herbs for more flavor. Store leftovers well, and you'll have tasty treats for days. I hope you enjoy making this pie as much as I do! It’s a fun and rewarding process, and you’ll impress your friends and family with your baking skills.

Best Strawberry Pie Flavorful and Easy Recipe Guide

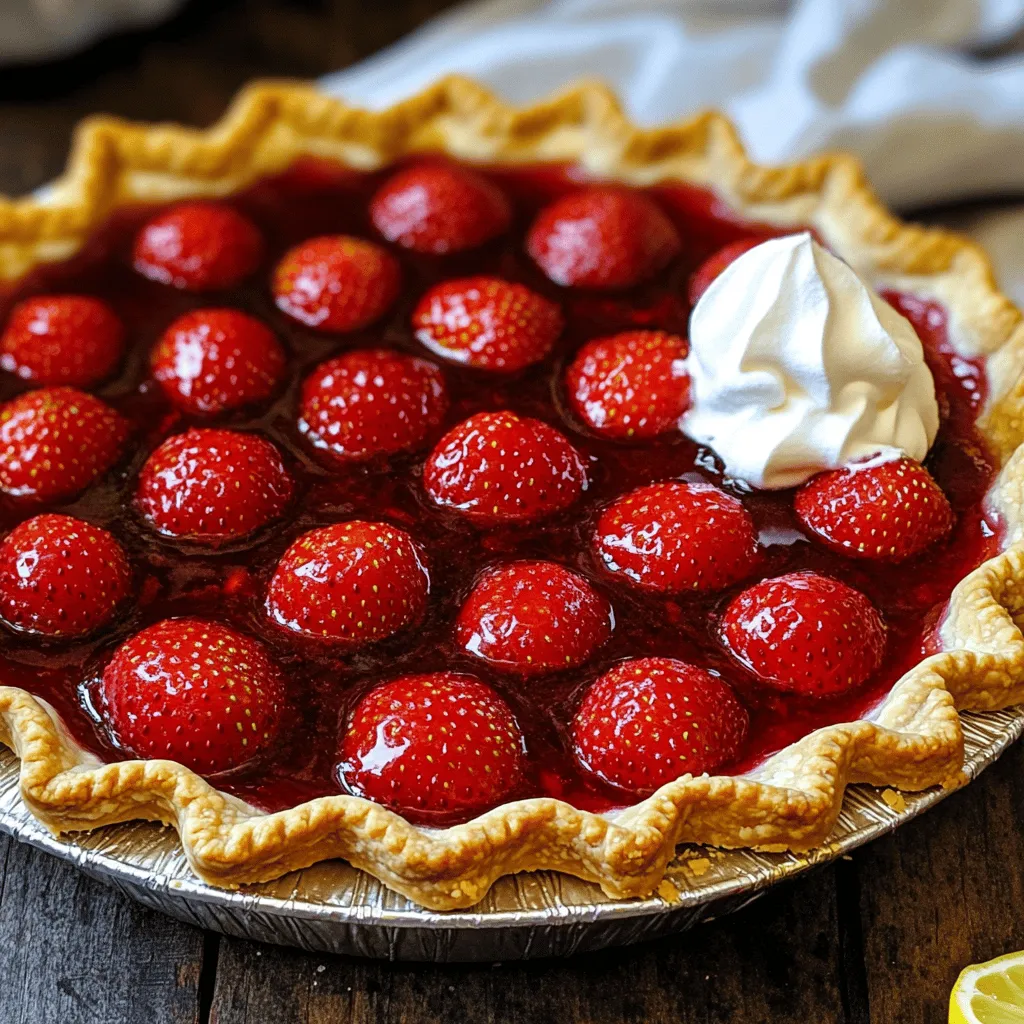
Looking for the best strawberry pie recipe? You’re in the right place! This easy guide covers everything, from fresh ingredients

- 1 ½ cups graham cracker crumbs - ⅓ cup granulated sugar - ½ cup unsalted butter, melted - 16 oz cream cheese, softened - ¾ cup granulated sugar - 2 large eggs - 2 tablespoons all-purpose flour - Zest of 1 lemon - ⅓ cup fresh lemon juice - 1 cup fresh raspberries (plus extra for garnish) - 1 teaspoon vanilla extract The ingredients for Raspberry Lemon Cheesecake Bars are simple yet essential. Each one plays a key role in creating that perfect balance of flavors. The graham cracker crumbs form a crunchy, sweet crust. They mix with sugar and melted butter to create a base that holds everything together. Cream cheese gives the filling its rich, smooth texture. Lemon zest and juice add that bright, tangy flavor. Fresh raspberries burst with sweetness and color. This combination makes each bite refreshing and delightful. If you want a little extra flair, consider adding some powdered sugar for dusting and whipped cream for serving. These optional ingredients can elevate your bars to a new level of deliciousness. For the full recipe, follow the detailed steps to make these tasty treats! 1. Preheat your oven to 325°F (160°C). Line an 8x8-inch baking pan with parchment paper. Make sure to leave some paper hanging over the sides. This will help you lift the bars out later. 2. In a medium bowl, combine: - 1 ½ cups graham cracker crumbs - ⅓ cup granulated sugar - ½ cup unsalted butter, melted Mix these ingredients until they blend well. 3. Press the crust into the baking pan. Use your fingers or a flat tool to make it even. Bake the crust for 10 minutes. After baking, set it aside to cool slightly. 1. In a large mixing bowl, beat together: - 16 oz cream cheese, softened - ¾ cup granulated sugar Mix until the mixture is smooth and creamy. This takes about 2-3 minutes. 2. Add 2 large eggs, one at a time. Mix well after adding each egg. Scrape down the sides of the bowl if needed. 3. Blend in: - 2 tablespoons all-purpose flour - Zest of 1 lemon - ⅓ cup fresh lemon juice - 1 teaspoon vanilla extract Mix just until combined. Avoid overmixing to keep it light. 4. Gently fold in: - 1 cup fresh raspberries Be careful not to crush them too much. 1. Pour the filling over the crust. Spread it evenly across the top. 2. Bake in the preheated oven for 25-30 minutes. The edges should be set, but the center can have a slight jiggle. Do not overbake. 3. Cool the bars at room temperature for about 30 minutes. After that, transfer them to the fridge. Chill for at least 2 hours, until they are completely set. 4. Cut into bars. Garnish with extra fresh raspberries if you like. You can find the full recipe above to guide you through the steps. Enjoy making these tasty treats! To get a creamy cheesecake, use softened cream cheese. Beat it well with sugar. This helps to blend them smoothly. Mix for about 2-3 minutes. Add eggs one at a time. This keeps your cheesecake from being lumpy. To avoid cracks, don’t overbake your bars. Bake until the edges set but the center jiggles. Let them cool slowly. First, cool at room temperature, then chill in the fridge. This helps the texture stay smooth and creamy. You can serve raspberry lemon cheesecake bars with many toppings. Try a dusting of powdered sugar for a sweet touch. Whipped cream adds a nice creamy layer. Fresh raspberries on top make it look pretty and taste even better. These bars pair well with drinks too. A cup of tea or a glass of lemonade works great. You can also serve them with a scoop of vanilla ice cream. This adds a nice contrast to the tangy cheesecake. For the full recipe, check out the details above. Enjoy making these delicious treats! {{image_2}} You can change the flavor of these bars easily. If you want a new taste, try other berries. Strawberries, blueberries, or blackberries work great. Just swap the raspberries for your berry of choice. This adds a fun twist to the recipe. You can also add chocolate. Mix in some chocolate chips or chunks. White chocolate works well too! Just fold them in with the raspberries. This gives your cheesecake a rich and creamy flavor. If you need a gluten-free option, use gluten-free graham cracker crumbs. They work just like regular crumbs in the crust. You can find these at most grocery stores. This way, everyone can enjoy the treat. For those watching their sugar, try using less sugar in the filling. You can also use a sugar substitute like stevia. Both options keep the taste great while cutting calories. Adjust as needed for your taste. Want more ideas? Check out the Full Recipe for tips on customizations! You can store your Raspberry Lemon Cheesecake Bars in the refrigerator. First, let them cool completely. Then, cover them tightly with plastic wrap or store in an airtight container. This keeps them fresh for about 5 days. To enjoy the best taste, eat them within this time. If you want to keep them looking nice, use parchment paper between layers. For long-term storage, freezing is a great option. Cut the bars into squares before freezing. Wrap each piece in plastic wrap, then place them in a freezer-safe bag. This helps prevent freezer burn. They can last up to 3 months in the freezer. To thaw, take the bars out and leave them in the fridge overnight. This keeps their texture smooth. When ready to serve, you can add fresh raspberries or a dusting of powdered sugar for a special touch. Enjoy every bite! Raspberry Lemon Cheesecake Bars last about 5 days in the fridge. Keep them in an airtight container. This will help keep them fresh and tasty. Yes, you can make these bars a day or two before you need them. This gives the flavors time to blend. Just store them in the fridge until you are ready to serve. You can use Greek yogurt or mascarpone cheese as a substitute for cream cheese. Both will give a creamy texture. However, the taste will be slightly different. Low-fat cream cheese also works if you want a lighter option. Yes, these bars freeze well. Wrap each bar in plastic wrap and then in foil. They can last up to three months in the freezer. When you want to eat them, thaw them in the fridge overnight. Yes, you can use frozen raspberries. Just make sure to thaw them first and drain any excess liquid. This will help keep your cheesecake bars from getting too watery. Using frozen raspberries can also save you time and still give great flavor. In this blog post, we explored the delicious Raspberry Lemon Cheesecake Bars. We covered the key ingredients, step-by-step instructions, and useful tips. You learned how to make a creamy filling and a perfect crust. We also discussed variations and storage solutions. Remember, these bars are versatile and easy to customize. Enjoy experimenting with flavors and toppings! Don't be afraid to share your own creations. Happy baking!

Raspberry Lemon Cheesecake Bars Simple and Delicious

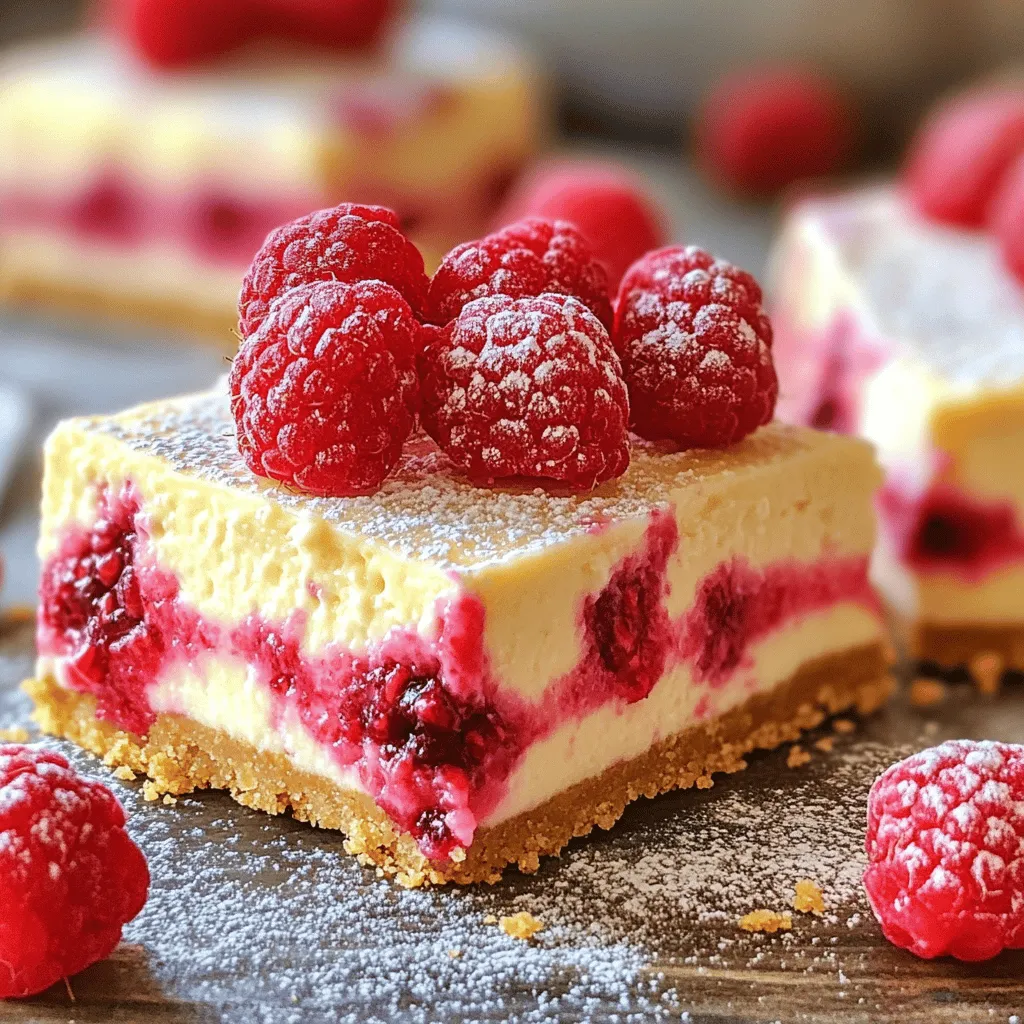
Are you ready to indulge in a sweet and tangy treat? These Raspberry Lemon Cheesecake Bars are simple, delicious, and

To create the best banana pudding, you need a few key ingredients. Here’s a simple list: - 4 ripe bananas, sliced - 1 cup granulated sugar - 1/4 cup cornstarch - 1/4 teaspoon salt - 2 3/4 cups whole milk - 4 large egg yolks - 2 tablespoons unsalted butter - 2 teaspoons pure vanilla extract - 1 box (about 12 oz) vanilla wafers - Whipped cream for topping - Optional: crushed vanilla wafers for garnish Each ingredient plays a vital role. The ripe bananas add natural sweetness and creaminess. Granulated sugar enhances the flavor. Cornstarch thickens the pudding, giving it that perfect texture. Whole milk makes it rich and creamy, while egg yolks help bind everything together. Unsalted butter adds a velvety finish, and pure vanilla extract gives a warm flavor. Vanilla wafers provide a crunchy layer and contrast to the smooth pudding. Finally, whipped cream adds a light and airy touch on top. For added flair, use crushed vanilla wafers as a garnish. This gives your pudding an extra crunch and looks pretty too. You can find the full recipe to guide you through the steps for making this delicious treat. 1. Mixing dry ingredients In a medium saucepan, combine the granulated sugar, cornstarch, and salt. Use a whisk to mix these dry ingredients well. This step sets the base for your pudding. 2. Incorporating the milk Slowly add the whole milk to the dry mix. Keep whisking to prevent lumps. This will create a smooth mixture that is essential for a creamy pudding. 3. Tempering the egg yolks In a separate bowl, whisk the egg yolks until they become slightly thick. Gradually add a few spoonfuls of the heated milk mixture into the egg yolks. Whisk as you add to avoid cooking the eggs. This process, called tempering, helps keep the pudding smooth. 1. Combining mixtures on the stove Pour the tempered egg mixture back into the saucepan with the remaining milk. Place it on medium heat. Keep stirring constantly to ensure it cooks evenly. 2. Achieving the right thickness Continue to cook until the mixture thickens and starts to bubble, about 5-7 minutes. This is when your pudding transforms into a rich, creamy delight. 1. Layering ingredients in a serving dish In a 2-quart serving dish or individual cups, start layering your ingredients. Begin with a layer of vanilla wafers. Then, add a layer of sliced bananas. Pour a layer of the creamy pudding over the top. Repeat this process until all ingredients are used, finishing with pudding on top. 2. Covering and refrigerating Cover the dish with plastic wrap. Make sure the wrap touches the pudding to avoid a skin. Refrigerate for at least 4 hours, or overnight for best results. This chilling time allows the flavors to meld beautifully. Choosing ripe bananas for flavor Use ripe bananas for the best taste. They should be yellow with a few brown spots. These bananas are sweet and soft, which enhances the pudding's flavor. Avoiding lumps in the pudding To avoid lumps, whisk the dry ingredients well before adding milk. When you add milk, do it slowly and keep whisking. This helps create a smooth mixture. Techniques for optimal layering Layering is key for a beautiful pudding. Start with vanilla wafers at the bottom. Then, add sliced bananas and creamy pudding. Repeat these layers until you reach the top. End with pudding for a nice finish. Creative serving ideas Serve banana pudding in parfait cups for a fun twist. This makes it easy for guests to enjoy. You can also layer it in a glass dish for a stunning view. Pairing with beverages Banana pudding pairs well with sweet tea or coffee. A light dessert wine can also enhance the flavors. Choose a drink that complements the sweetness. Enhancing presentation with garnishes Top your pudding with whipped cream and crushed vanilla wafers. Add a few banana slices on top for color. This makes your banana pudding not just tasty but also pretty to look at. For the full recipe, check the details above. {{image_2}} Want to jazz up your banana pudding? You can easily add flavors. Chocolate or peanut butter can take your dessert to new heights. Just mix in chocolate pudding or smooth peanut butter into the creamy base. These flavors blend well with the bananas and make it unique. You might also think about nuts or dried fruits. Adding chopped walnuts or pecans gives a nice crunch. Dried fruits like raisins or cranberries add sweetness. These add-ins create layers of flavor and texture. If you need a vegan version of banana pudding, you can swap out a few ingredients. Use plant-based milk like almond or coconut. Instead of eggs, try silken tofu or vegan pudding mix. This way, you keep it creamy and delicious. For gluten-free options, look for gluten-free vanilla wafers. You can also thicken your pudding with gluten-free cornstarch. This way, everyone can enjoy this delightful dessert without worry. Explore these variations to find your favorite twist on the classic banana pudding. Check out the full recipe to make this treat your own! To keep your banana pudding fresh, store it in the fridge. Use an airtight container. If you have leftovers, cover them tightly with plastic wrap. This keeps moisture in and prevents drying out. Make sure the wrap touches the pudding’s surface. This stops a skin from forming on top. When storing assembled pudding, layer it just like you would for serving. Start with vanilla wafers, then bananas, and finish with pudding. Cover it well. This method keeps all flavors intact and ready for later. In the fridge, your banana pudding stays good for about 3-4 days. After this, the bananas may brown and the texture can change. For the best taste and look, enjoy it fresh. You can freeze banana pudding, but it changes in texture. If you freeze it, eat it within a month. To thaw, place it in the fridge overnight. Stir gently before serving to smooth it out. Remember, once thawed, do not refreeze. Enjoy the deliciousness of your banana pudding! For the full recipe, check it out here: [Full Recipe]. How to prevent browning of bananas? To stop bananas from turning brown, you can use lemon juice. Just squeeze a little over the sliced bananas. The acid helps keep them fresh and bright. Can I make banana pudding ahead of time? Yes, you can make banana pudding a day before serving. Just layer it and chill it in the fridge. This gives the flavors time to blend together, making it even better. What are the best alternatives for vanilla wafers? If you don’t have vanilla wafers, try using graham crackers or shortbread cookies. Both add a nice crunch and flavor to your pudding. Is it possible to make banana pudding without eggs? Absolutely! You can skip the eggs by using a cornstarch-based pudding. This keeps the texture creamy without using eggs. What makes this the best banana pudding recipe? This recipe brings together fresh bananas, creamy pudding, and crunchy wafers. The balance of flavors makes it a crowd favorite. Plus, it’s easy to make! How do I adjust the recipe for larger servings? To make more servings, simply double the ingredients. For instance, use 8 bananas instead of 4. Make sure you have a larger dish to hold everything. You can follow the Full Recipe for the complete guide. We covered all the key elements to make the best banana pudding. You learned about essential ingredients, step-by-step instructions, and creative variations. Remember to pick ripe bananas and layer carefully for the best flavor. With a few simple tips, like avoiding lumps, your pudding will shine. Don't forget about storage; properly refrigerating keeps it fresh longer. Enjoy making this treat, and feel free to get creative with flavors. Your homemade banana pudding will impress everyone!

Best Banana Pudding Delightful and Easy Recipe Guide

Welcome to my guide for the best banana pudding! This delightful treat is creamy, sweet, and oh-so-easy to make. You’ll

Older posts
Newer posts
← Previous Page1 … Page74 Page75 Page76 … Page78 Next →

dsad

© 2025 easycookingbite • Built with GeneratePress

Our Policies

  • Copyright Policy
  • Cookie Policy
  • GDPR Policy
  • Privacy Policy
  • Disclaimer
  • Terms Of Use

More Information

  • Home
  • About
  • Contact
  • Appetizers
  • Dessert
  • Dinner
  • Drinks
©2025, easycookingbite About Back To Top