Skip to content
DisclaimerTerms Of UseGDPR PolicyCookie Policy

easycookingbite

  • Home
  • Drinks
  • Appetizers
  • Dinner
  • Dessert
  • About
  • Contact
  • Privacy Policy
DisclaimerTerms Of UseGDPR PolicyCookie Policy

Lily

The main components of this dish are simple yet flavorful. You need boneless chicken breast, fresh vegetables, soy sauce, and sesame oil. The chicken gives protein and a nice texture. Fresh vegetables bring color and crunch to the meal. Using fresh vegetables is key to great taste. When veggies are fresh, they hold their flavor and nutrients. This makes your stir fry not just tasty, but healthy too. The best choices include bell peppers, broccoli, sugar snap peas, and carrots. Each adds unique flavors and textures. You can enhance the stir fry with optional ingredients. Adding nuts like cashews or almonds gives a nice crunch. You might also use different sauces, like teriyaki or oyster sauce, for extra flavor. For dietary restrictions, consider swapping the chicken for tofu or shrimp. These options still give great taste and texture. If you want to avoid gluten, you can use gluten-free soy sauce. This way, everyone can enjoy the meal! Start by marinating the chicken. In a medium bowl, mix sliced chicken with soy sauce and a pinch of salt and pepper. Let it sit for 15 minutes. This helps the chicken soak up all those tasty flavors. Next, heat sesame oil in a large skillet or wok over medium-high heat. Add the marinated chicken. Cook it until golden brown and done, about 5 to 7 minutes. This method gives the chicken a nice sear, locking in the juices. Now, it's time to stir fry the vegetables. In the same skillet, add minced garlic and grated ginger. Sauté for about 30 seconds until you smell that great aroma. Then, toss in the sliced bell pepper, broccoli florets, sugar snap peas, and julienned carrots. Stir fry these for about 4 to 5 minutes. You want them to be tender-crisp, not mushy. This keeps your dish bright and fresh. Once the vegetables are ready, return the cooked chicken to the skillet. Toss everything together. If you prefer a thicker sauce, add the cornstarch mixture now. Stir for about 1 to 2 minutes until the sauce thickens. Finish with chopped green onions. Taste your stir fry and adjust the seasoning with extra soy sauce, salt, and pepper if needed. Serve it hot over cooked rice or noodles. This makes for a delightful meal! For the complete cooking process, check out the Full Recipe. To stir fry well, you need the right heat. Use a large skillet or a wok. Heat it on high. This helps the chicken and veggies cook fast. The goal is to keep them crisp. If the heat is too low, they will steam instead. If you face sticking, use enough oil. Sesame oil works great for flavor. If your food starts to burn, reduce the heat. Stir constantly to avoid any sticking. If you notice uneven cooking, cut your veggies to similar sizes. This helps them cook evenly. Adding more flavor is easy. You can use garlic and ginger, which brighten any dish. Soy sauce adds umami and saltiness. For a spicy kick, try chili flakes or sriracha. Mix in a bit of honey for sweetness. This balances the salty taste. Always taste as you cook. Adjust salt and sweetness as needed. Adding a splash of vinegar can also heighten flavors. Don't forget to garnish with green onions or sesame seeds for extra flair. For the full recipe, check out the detailed cooking steps. {{image_2}} You can swap chicken for many other proteins. Tofu is a great choice for a plant-based meal. It absorbs flavors well. Use firm or extra-firm tofu for the best texture. Beef is another option. Thinly slice flank or sirloin steak. Cook it just like the chicken, but reduce the cooking time to about 3-5 minutes. Shrimp cooks fast, so add it last. Cook shrimp for 2-3 minutes until they turn pink and opaque. Always adjust cooking times based on the protein. This way, you ensure everything is cooked just right. Feel free to get creative with vegetables! Seasonal veggies add fresh flavors. In spring, use asparagus or snap peas. In summer, swap in zucchini or bell peppers. In autumn, add sweet potatoes or butternut squash. Winter is great for carrots and Brussels sprouts. Pair bold flavors with milder ones. For example, combine spicy chili peppers with sweet bell peppers. This mix keeps your stir fry exciting and tasty. You can find the full recipe [here](#). After you enjoy your chicken and vegetable stir fry, store the leftovers right away. You want to keep them fresh. Here are some best practices: - Cool it down: Let the stir fry cool at room temperature for about 30 minutes. - Use airtight containers: Choose containers that seal well to prevent air from spoiling your food. - Label and date: Write the date on each container. This helps you know when you made it. Your stir fry can last in the fridge for about 3 to 4 days. If you want to keep it longer, consider freezing it. In the freezer, it can last up to 2-3 months. When you’re ready to eat your leftovers, reheating them properly is key. Here’s how to maintain their taste and texture: - Stovetop method: This is the best way! Heat a little oil in a pan over medium heat. Add the stir fry and cook until it’s hot. Stir it often to keep it from sticking. - Microwave method: If you’re in a hurry, use the microwave. Place your stir fry in a microwave-safe bowl. Cover it with a damp paper towel. Heat it in short bursts of 30 seconds, stirring in between. This keeps it from drying out. By following these tips, you can enjoy your chicken and vegetable stir fry even days later. For the complete cooking process, check out the Full Recipe. To make this dish gluten-free, use tamari instead of regular soy sauce. Tamari is a great choice. It has a similar taste but no gluten. You can also try coconut aminos. This option is naturally sweet and soy-free. Always check labels to ensure the products are gluten-free. Yes, you can prep this stir fry ahead of time. Marinate the chicken for flavor. You can do this the night before. Chop the vegetables and store them in the fridge. This saves time when you cook. Just remember to keep the chicken and veggies separate until cooking. White rice or brown rice works well with this stir fry. For noodles, try rice noodles or udon. To cook rice, rinse it and boil it for about 15 minutes. For noodles, follow the package instructions. This will give you a great base for your stir fry. Access the detailed recipe and cooking instructions for Chicken and Vegetable Stir Fry 🥦. You learned how to make a tasty chicken and vegetable stir fry. We covered key ingredients, like fresh veggies and chicken tips. You found ways to enhance flavors and swap ingredients for your diet. We also shared storage advice for leftovers and reheating methods. Now, you can enjoy a delicious meal anytime. Remember, stir fry offers flexibility, so have fun experimenting with your favorite flavors. Happy cooking!

Chicken and Vegetable Stir Fry Easy Flavorful Meal

Looking for a quick, tasty meal? This Chicken and Vegetable Stir Fry is perfect for you! With fresh veggies and

To make this healthy meal, gather these simple ingredients: - 1 cup rolled oats - 2 cups almond milk (or any milk of choice) - 1 apple, diced (preferably a sweet variety like Fuji or Honeycrisp) - 1 teaspoon ground cinnamon - 2 tablespoons maple syrup (or honey) - 1/4 cup Greek yogurt (optional, for creaminess) - 1/4 cup walnuts, chopped (or your favorite nuts) - A pinch of salt - Extra apple slices and cinnamon for topping Each ingredient in Apple Cinnamon Overnight Oats brings health benefits. - Rolled oats: They are high in fiber. This helps with digestion and keeps you full. - Almond milk: A low-calorie option, it is rich in vitamins and minerals. - Apples: Apples add sweetness and provide vitamins. They are also high in fiber. - Cinnamon: This spice may help lower blood sugar. It adds flavor without calories. - Maple syrup: A natural sweetener, it contains antioxidants. - Greek yogurt: This adds protein and creaminess. It’s good for your gut. - Walnuts: They are packed with healthy fats and can boost brain health. You can easily swap ingredients based on your needs: - Rolled oats: Use quick oats if you need them to soak faster. - Almond milk: Any milk works, like cow's milk or oat milk. - Apple: Any sweet apple will work, such as Gala or Granny Smith. - Maple syrup: Honey or agave syrup can replace maple syrup. - Greek yogurt: For a dairy-free option, use coconut yogurt. - Walnuts: Any nuts, like almonds or pecans, can be used. Now you have everything you need to get started on your Apple Cinnamon Overnight Oats. For the full recipe, check out the detailed instructions and enjoy a tasty and healthy meal! To make Apple Cinnamon Overnight Oats, start by gathering your ingredients. You will need rolled oats, almond milk, a diced apple, ground cinnamon, maple syrup, Greek yogurt, chopped walnuts, salt, and some extra apple slices for topping. In a medium bowl, mix the rolled oats and almond milk first. Then add the diced apple, ground cinnamon, maple syrup, and a pinch of salt. If you want creaminess, add Greek yogurt too. Stir everything well until it is nicely blended. Mixing is key to great overnight oats. Make sure you break up any clumps of oats. A sturdy spoon or spatula works best. You want every oat to soak up the milk and flavors. Mixing ensures you get a tasty bite every time you dig in. Take your time with this step. It’s worth it for the perfect blend of flavors! After mixing, divide the mixture into jars or containers. Use ones with lids for easy storage. Top each jar with chopped walnuts for crunch. Seal the jars and place them in the fridge. Let the oats sit overnight, or at least for four to six hours. This resting time helps the oats absorb the liquid. When ready to eat, stir the oats again. If they are too thick, add a splash of almond milk. Finish with apple slices and a sprinkle of cinnamon. Enjoy this healthy meal! For the full recipe, check the earlier section. To make the best overnight oats, start with rolled oats. They soak well and keep a nice texture. Use a good ratio of oats to liquid. I suggest one part oats to two parts milk. This ensures they stay creamy, not too runny. Mix all your ingredients well before refrigerating. Stirring lets the flavors blend. If you want more creaminess, add Greek yogurt. It makes the oats rich and smooth. Also, remember to add a pinch of salt. This helps balance the sweetness. You can boost the flavor of your overnight oats with extras. Try adding nuts for crunch. Chopped walnuts work great, but almonds or pecans are tasty too. Dried fruits like raisins or cranberries add sweetness and chewiness. Want a spice kick? Mix in nutmeg or ginger. You can also swap maple syrup for honey or agave. These small changes can make a big difference. Avoid using instant oats. They can turn mushy and lose texture. Stick to rolled oats for the best outcome. Don’t skip the soaking time. This step is key for the oats to absorb the milk and flavors. Also, watch your liquid amount. Too much can make your oats soupy. If it’s too thick, you can always add milk before eating. Lastly, remember to seal your containers well. This keeps the oats fresh and tasty overnight. For a full recipe, check out the Apple Cinnamon Overnight Oats 🥣. {{image_2}} You can play with flavors in your apple cinnamon overnight oats. Want a nutty twist? Add some almond butter or peanut butter to the mix. This will make it creamy and rich. For a fruity touch, toss in some berries or sliced bananas. These fruits add a pop of color and flavor. You can even swap apples for pears if you like. Each fruit brings a new taste to the dish. If you need a gluten-free option, use certified gluten-free oats. Most rolled oats are safe, but always check the label. You want to ensure there is no cross-contamination. Almond milk is naturally gluten-free, which is great for this recipe. The other ingredients, like maple syrup and nuts, are also gluten-free. This way, everyone can enjoy a tasty breakfast without worry. To make your overnight oats vegan, simply skip the Greek yogurt. Instead, add a bit more almond milk or use coconut yogurt for creaminess. You can also use agave syrup instead of honey. Both sweeteners will keep the taste sweet and enjoyable. With these simple swaps, you keep the dish healthy and plant-based. You can enjoy a delicious meal that fits your diet perfectly. Try these variations to keep your apple cinnamon overnight oats exciting. Each option allows you to explore new flavors while sticking to the healthy basics of the recipe. For the full recipe, check the previous section. To keep your Apple Cinnamon Overnight Oats fresh, store them in the fridge. Use airtight containers or jars. This helps keep out air and moisture, which can spoil your oats. Make sure the lids fit well. You can also keep them in the back of the fridge, where it's coolest. You can store your prepared overnight oats in the fridge for up to five days. After that, they may lose their taste and texture. If you notice any off smells or changes, it's best to toss them. Always check before you eat. When you want to enjoy your leftovers, you can eat them cold or warm them up. If you choose to reheat, place them in a microwave-safe bowl. Heat in short bursts, stirring in between, until warm. If the oats seem thick, add a splash of milk to loosen them. Enjoy them fresh and tasty! For the full recipe, check the earlier section. Apple Cinnamon Overnight Oats can stay fresh for up to five days in the fridge. Store them in airtight containers to keep out air and moisture. The oats will soak up the flavors and get softer over time. If you notice any odd smells or changes in color, throw them away. Yes, you can use instant oats, but the texture will change. Instant oats cook faster and become mushy more quickly than rolled oats. If you prefer a creamier mix, instant oats work well. Just adjust the liquid a bit, as they absorb more. Toppings can take your oats to the next level. Here are some great options: - Fresh fruit: berries, banana slices, or more diced apples - Nuts: almonds, pecans, or more walnuts for crunch - Seeds: chia seeds or hemp seeds for added nutrition - Sweeteners: a drizzle of honey or more maple syrup, if you like it sweet - Spices: a sprinkle of nutmeg or more cinnamon for extra flavor Mix and match based on your taste! This article covered how to make Apple Cinnamon Overnight Oats. We explored the key ingredients, their benefits, and substitutions. The step-by-step instructions guide you to the perfect dish. Useful tips help avoid common mistakes and improve flavors. Finally, variations and storage tips ensure you enjoy these oats longer. Remember, each bowl can be a new adventure. Try different flavors and toppings to make it yours. With practice, you'll master the art of overnight oats. Enjoy your tasty, healthy breakfast daily!

Apple Cinnamon Overnight Oats Healthy Simple Meal

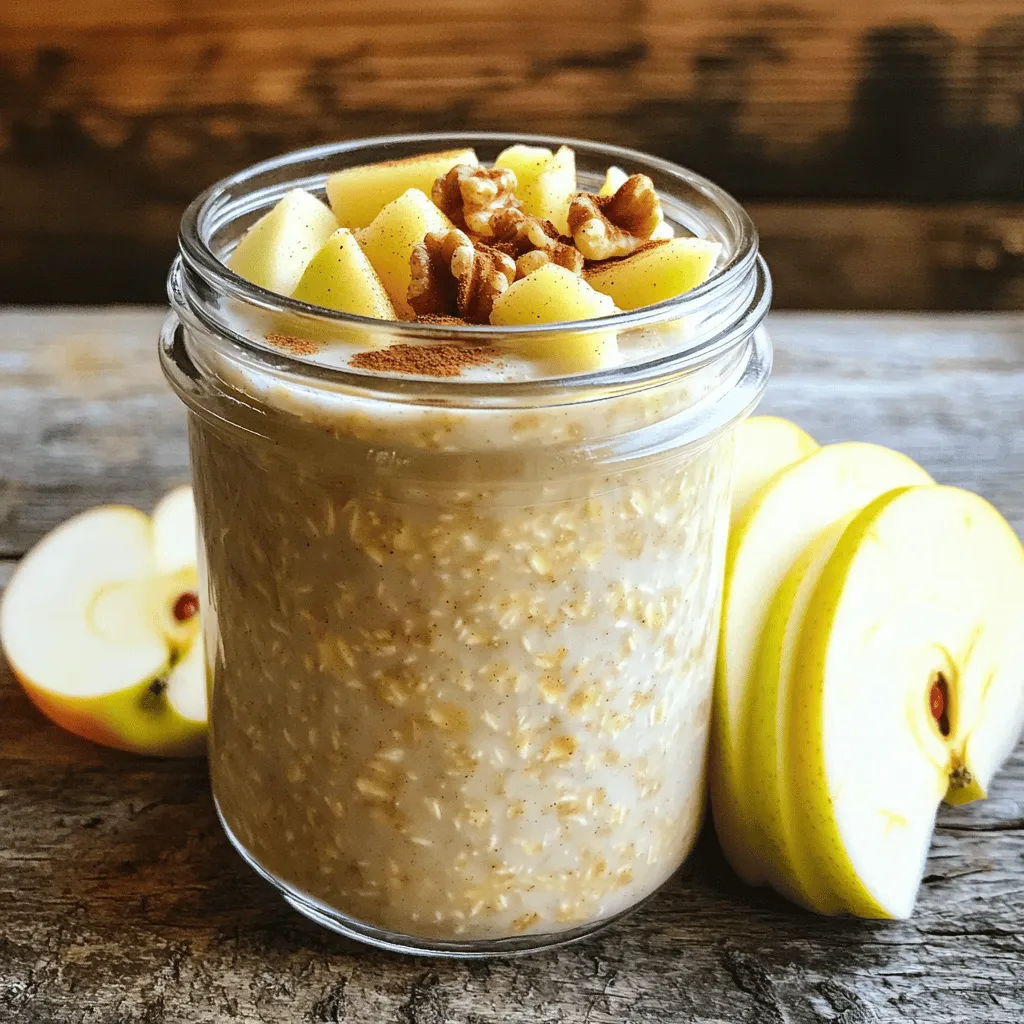
Start your day right with Apple Cinnamon Overnight Oats! This simple, healthy meal combines delicious flavors with vital nutrients. In

To make a hearty Lentil Vegetable Soup, you'll need simple, fresh ingredients. These items come together to create a warm and comforting bowl of goodness. Here’s what you need: - Green or brown lentils (1 cup, rinsed) - Olive oil (1 tablespoon) - Medium onion (1, diced) - Garlic cloves (2, minced) - Carrots (3, diced) - Celery stalks (2, diced) - Red bell pepper (1, diced) - Zucchini (1, diced) - Canned diced tomatoes (1 can, 14 oz) - Vegetable broth (6 cups) - Dried thyme (1 teaspoon) - Cumin (1 teaspoon) - Bay leaf (1) - Salt and pepper (to taste) - Fresh parsley (for garnish) Each ingredient plays a key role. The lentils add protein and fiber. The vegetables bring color and flavor. Olive oil helps to sauté and enrich the taste. Canned tomatoes add a sweet and tangy touch. Broth brings depth to the soup. Fresh herbs like parsley not only make the dish pretty but also add a fresh taste. You can find all these ingredients easily at your local store. For the full recipe, check out the details on how to prepare this delicious dish. 1. Sautéing onions and garlic Start by heating the olive oil in a large pot over medium heat. When the oil is warm, add the diced onion. Cook it for about five minutes, stirring often. The onion should turn translucent. Then, add the minced garlic and stir for one more minute. This step adds a strong and tasty base to the soup. 2. Adding vegetables Next, toss in the diced carrots and celery. Sauté these for about five minutes. They will soften and blend well with the onion and garlic. After that, add the red bell pepper and zucchini. Cook for another three to four minutes. The goal is to make the vegetables tender but still crisp. 3. Incorporating lentils and liquids Now, it’s time for the star ingredient: lentils! Add the rinsed lentils to the pot along with the canned tomatoes and their juice. Pour in the vegetable broth, and stir in the dried thyme, cumin, bay leaf, salt, and pepper. Mix everything well to ensure all the flavors combine. 1. Bringing to a boil Turn up the heat and bring the mixture to a boil. This step will help all the flavors meld together. 2. Simmering the soup Once boiling, reduce the heat to low. Cover the pot and let it simmer for about 30 to 35 minutes. Stir occasionally. You want the lentils to be tender and the soup to thicken slightly. 3. Final seasoning adjustments After 30 minutes, taste the soup. You might want to add more salt or pepper. Remove the bay leaf before serving. This ensures a smooth and enjoyable texture. - Best ways to serve Lentil Vegetable Soup Serve the soup hot, straight from the pot. It pairs well with crusty bread or a simple salad. - Garnishing tips Sprinkle fresh parsley on top for a bright color and fresh flavor. You can also add a swirl of olive oil for richness. - Pairing options For a full meal, enjoy it with a slice of whole grain bread or a side of roasted veggies. This soup is comforting and healthy, making it a perfect choice for any day. To boost the flavor of your lentil vegetable soup, I recommend using spices and herbs like thyme, cumin, and bay leaves. These add depth to your dish. You can also try adding smoked paprika or a pinch of cayenne for a warm kick. Balancing seasoning is key. Always taste your soup as it cooks. A little salt or pepper can elevate the dish. Don't forget to finish with fresh herbs like parsley for a bright touch. Getting the perfect lentils is easy. Rinse them well before cooking. This removes dirt and helps them cook evenly. I suggest simmering the lentils just right. If you cook them too long, they may turn mushy. To keep your vegetables firm, add them at different times. Start with heartier veggies like carrots and celery. Add softer ones like zucchini and bell peppers later. This keeps them vibrant and tender. Simmering time is important. Let your soup cook gently for 30-35 minutes. This melds the flavors and allows the lentils to soften. Lentils are powerhouses of nutrition. They are high in protein and fiber. They also pack essential vitamins and minerals. Pair them with colorful vegetables for even more health benefits. This soup is vegan and gluten-free, making it a great choice for many diets. You can even serve smaller portions as a side dish. This way, you can enjoy it with other meals too. For the full recipe, check out the [Full Recipe]. {{image_2}} You can switch the lentils for different types. Red lentils cook faster and turn soft. French green lentils hold their shape better and add texture. For vegetables, use what is fresh and in season. In summer, try yellow squash or fresh peas. In winter, consider adding sweet potatoes or kale for warmth. If you want more protein, add cooked chicken, turkey, or sausage. You can also use beans like chickpeas or kidney beans. These options make the soup heartier. Want some heat? Add a pinch of red pepper flakes or diced jalapeños. This will give your soup a nice kick. You can also explore different cuisines. For an Italian twist, add basil and oregano. For Indian flavors, toss in curry powder and coconut milk. Each version brings a new taste experience. If you like a creamy soup, blend part of it until smooth. You can also stir in some cream or coconut cream for richness. For low-sodium options, use low-sodium broth. You can also skip added salt until the end. Taste it first to see if it needs more. To make it kid-friendly, use mild spices. You can add cheese on top as a fun touch. Kids may love it more with some bread on the side. For extra health benefits, you can include superfoods like spinach or chia seeds. They boost nutrition without changing the flavor much. To store leftover soup, let it cool first. Pour the soup into an airtight container. Make sure to leave some space at the top for expansion. Seal the container tightly and place it in the fridge. This way, you keep it fresh for up to five days. For proper cooling methods, divide large amounts into smaller containers. This helps the soup cool down faster. Remember, never leave hot soup out for more than two hours. For freezing soup, use freezer-safe containers or bags. Leave space for the soup to expand as it freezes. Label each container with the date. This helps you track how long it has been stored. When you want to eat the soup, thaw it in the fridge overnight. You can also use the microwave for quick thawing. When ready to eat, heat it on the stove. Stir occasionally to ensure even heating. This soup lasts about five days in the fridge. If you freeze it, it can last up to three months. Look for signs of spoilage to avoid eating bad soup. Foul smells, mold, or off colors mean it’s time to toss it. Always trust your senses; if it seems off, it probably is. For a delightful experience, follow the Full Recipe and enjoy your hearty lentil veggie delight! How long does it take to make Lentil Vegetable Soup? It takes about 45 minutes to make this soup. You spend 10 minutes prepping and 35 minutes cooking. This makes it a quick and tasty meal. Can I use dried herbs instead of fresh? Yes, you can use dried herbs. Use about one-third the amount. Dried herbs pack a strong flavor, so adjust to your taste. What can I add to make this soup heartier? You can add more vegetables like potatoes or sweet potatoes. Adding cooked grains, like rice or quinoa, also boosts heartiness. What do I do if my soup is too thick? If your soup is too thick, add more vegetable broth or water. Stir well and heat until warm. This will help get the right consistency. How to reduce the acidity of the soup? To reduce acidity, add a pinch of sugar. This helps balance the flavors. Stir well and taste again to adjust as needed. Tips for making the soup ahead of time You can make the soup a day ahead. Let it cool, then store it in the fridge. Reheat on the stove when ready to serve. Is Lentil Vegetable Soup gluten-free? Yes, Lentil Vegetable Soup is gluten-free. All the ingredients are gluten-free, making it safe for those with gluten sensitivities. What are the best types of lentils for soup? Green and brown lentils work best for soup. They hold their shape and add a nice texture. Red lentils can become mushy, so use them with care. Can I use frozen vegetables in this recipe? Yes, you can use frozen vegetables. They are a great time saver. Just add them during the cooking phase and adjust the cooking time as needed. For the complete cooking instructions, check out the Full Recipe. Lentil Vegetable Soup is a simple, healthy choice. We covered ingredients, step-by-step instructions, and tips to enhance flavor. You learned about variations and how to store leftovers properly. Embrace this recipe as a satisfying meal that you can tweak to your tastes. With practice, you’ll master it and impress others. Enjoy creating your own delicious bowl today!

Lentil Vegetable Soup Simple and Flavorful Comfort

Lentil Vegetable Soup is a warm hug in a bowl. It’s simple, tasty, and packed with nutrition. With just a

- 4 bone-in, skin-on chicken thighs - 1 pound baby potatoes, halved - 1 large red onion, cut into wedges - 3 cloves garlic, minced - 1 cup cherry tomatoes, halved These main ingredients create a hearty base for the dish. The chicken thighs give great flavor and moisture. Baby potatoes add texture and soak up the juices. Red onion brings a bit of sweetness. Garlic adds depth, while cherry tomatoes provide a burst of freshness. - 2 teaspoons dried oregano - 1 teaspoon dried thyme - 1 lemon, zested and juiced - 3 tablespoons olive oil - Salt and pepper to taste The herbs and seasonings elevate the dish. Oregano and thyme offer that classic Greek taste. Lemon zest and juice brighten up the flavors. Olive oil adds richness. Salt and pepper balance everything out, making the dish pop. - Fresh parsley Fresh parsley brings a nice color and a hint of earthiness. It also adds a final touch that makes the dish look beautiful. You can sprinkle it on before serving for that perfect finish. {{ingredient_image_1}} - Marinating Process Start by mixing olive oil, lemon juice, lemon zest, minced garlic, oregano, thyme, salt, and pepper in a large bowl. This creates a tasty marinade. Add the chicken thighs to the bowl, making sure they are fully coated. Let the chicken marinate for at least 15 minutes. If you can wait longer, it will taste even better! - Chicken Skin Preparation The skin on the chicken helps keep it moist and adds flavor. Make sure it's intact and clean. You can score the skin lightly with a knife. This helps the marinade soak in and gives you crispier skin when cooked. - Cutting and Tossing Potatoes Take your baby potatoes and cut them in half. This helps them cook faster. In a large baking sheet or oven-safe skillet, put the potatoes. Drizzle a little olive oil, and add salt and pepper. Toss them well to coat every piece. - Onion and Tomato Assembly Cut the red onion into wedges. Add these to the baking sheet with the potatoes. Then, halve the cherry tomatoes and scatter them around the potatoes. The tomatoes will add sweetness and color to your dish. - Baking Temperature and Time Preheat your oven to 400°F (200°C). Place the pan with the chicken and vegetables in the oven. Bake for about 40-45 minutes. Make sure the chicken reaches an internal temperature of 165°F (75°C). The potatoes should be fork-tender. - Final Touches for Crispy Skin For crispy skin, turn on the broiler for the last 3-5 minutes. Watch closely to avoid burning. This step makes the chicken skin golden brown and crispy, adding a nice texture to your meal. Marinating is key for great flavor. Let the chicken soak up the marinade for at least 15 minutes. If you have more time, aim for an hour or overnight. This time allows the chicken to absorb all those tasty herbs and spices. If you lack some ingredients, don't worry! You can swap lemon juice for vinegar or use any favorite oil. Try different herbs like basil or rosemary. Just keep the main idea: you want a mix of acid, oil, and spices. A meat thermometer is your best friend. Insert it into the thickest part of the chicken. You want it to read 165°F (75°C) for the chicken to be safe. This tool helps you avoid any guesswork. For the potatoes, avoid overcooking by cutting them into even halves. This ensures they cook through at the same time as the chicken. Check them around the 30-minute mark. If they're fork-tender, you're good to go! Want to add more flavor? Consider sprinkling in some paprika or garlic powder. These can change the dish and add depth. When it comes to herbs, fresh is often best. Fresh parsley brightens the dish. However, dried herbs work fine too. Just remember, dried herbs are stronger than fresh. Use about a third of the amount if you're switching. This way, you keep the flavor balanced and bright! Pro Tips Marinate Longer: For deeper flavor, marinate the chicken thighs for at least 1 hour or overnight in the refrigerator. Crispier Skin: To achieve an extra crispy skin, pat the chicken dry with paper towels before marinating and use a higher oven temperature. Add More Veggies: Feel free to add other vegetables like bell peppers or zucchini for more color and nutrition. Leftover Magic: Leftovers make a great addition to salads or wraps the next day—just shred the chicken and mix it in! {{image_2}} - Using Chicken Breasts You can swap chicken thighs for chicken breasts. Chicken breasts cook faster, so check them early. Marinate them the same way. They will still soak up that lovely lemon and herb flavor. - Substituting with Salmon Salmon works great too! Use skin-on fillets for a crispy finish. Place the salmon on the sheet for the last 15 minutes of cooking. This way, it stays tender and juicy. - Carrots and Zucchini Carrots add sweetness, and zucchini brings moisture. Slice carrots into sticks and cut zucchini into half-moons. Toss them with oil, salt, and pepper before adding to the pan. They cook nicely with the chicken. - Bell Peppers and Olives Add bell peppers for color and flavor. Use any color you like! Olives add a briny kick. Slice the peppers and mix in pitted olives. This combo brightens the dish and adds great taste. - Mediterranean Spice Variations Try different spices to change the flavor. Add sumac or cumin for warmth. A pinch of cinnamon can also add a unique twist. Just mix these spices into your marinade for a new taste. - Adding Spice with Green Chilies If you like heat, add green chilies. Chop them up and toss them in with the tomatoes. They will give a nice kick that pairs well with the chicken and potatoes. Adjust the amount based on your spice level preference. After your meal, let the chicken and potatoes cool down. Place leftovers in airtight containers. This keeps the flavors fresh. I recommend using glass containers. They do not stain and are easy to clean. Store in the fridge for up to three days. For reheating, use the oven for best results. Preheat your oven to 350°F (175°C). Place the leftovers in a baking dish. Cover with foil to avoid drying out. Heat for about 20 minutes or until warm. You can also use a microwave, but oven reheating keeps the skin crispy. If you want to freeze leftovers, let them cool completely. Use freezer-safe bags or containers. Remove as much air as possible to prevent freezer burn. Label the bags or containers with the date. You can freeze them for up to three months. When you’re ready to eat, thaw in the fridge overnight. For quick thawing, place the sealed bag in cold water for about an hour. Once thawed, reheat as mentioned before. For fresh ingredients, always check for signs of spoilage. Chicken should smell fresh and not have a slimy texture. Potatoes should be firm with no sprouting. If stored well, cooked chicken lasts in the fridge for three days. Potatoes can stay fresh for about a week if kept cool and dry. Remember, the sooner you eat your leftovers, the better they taste! Yes, you can prepare One Pan Greek Chicken and Potatoes ahead of time. Marinate the chicken and chop the veggies a few hours in advance. Store them in the fridge until you are ready to cook. This helps the flavors mix well. Just remember to bring everything to room temperature before baking for the best results. This dish pairs well with several sides. Here are some ideas: - Greek salad with cucumbers and feta - Tzatziki sauce for a cool dip - Crusty bread to soak up the juices - Steamed green beans for a fresh crunch These options enhance the meal and add more flavors to your plate. Yes, this recipe is great for meal prep. You can make a batch and store it for later. Here’s how to adjust servings for larger families: - Double the chicken and potatoes for more servings. - Use a larger baking sheet or two pans to fit everything. - For fewer servings, cut the chicken and potatoes in half. - Adjust the seasoning as needed, keeping the same ratios. - Always check the internal temperature of the chicken to ensure it's cooked through. Meal prepping this dish saves time and gives you quick, tasty meals for busy days. This blog covered a tasty One Pan Greek Chicken and Potatoes recipe. You learned about the main ingredients, like chicken thighs and baby potatoes, and the vital herbs and seasonings. We discussed prep steps, cooking tips, and variations to try. In closing, don't hesitate to experiment with flavors or use different proteins. Storing tips ensure your meal stays fresh. Enjoy making this dish, and share your results! Happy cooking!

One Pan Greek Chicken and Potatoes Easy Dinner Meal

Are you looking for a simple yet delicious meal? One Pan Greek Chicken and Potatoes is the answer. This easy

For this tasty dish, you need the following main ingredients: - 1 lb ground chicken - 1 tablespoon sesame oil - 3 garlic cloves, minced - 1 inch ginger, grated - 1 red bell pepper, finely diced - 1 cup mushrooms, finely chopped - 1 carrot, shredded - ¼ cup soy sauce (or tamari for gluten-free) - 1 tablespoon rice vinegar - 1 tablespoon honey or agave syrup - 2 teaspoons sriracha (adjust to taste) - 1 tablespoon cornstarch mixed with 2 tablespoons water - 12 large lettuce leaves (butter or romaine) These ingredients come together to create a flavorful filling. The ground chicken offers protein, while the veggies add crunch and color. You can enhance your wraps with optional garnishes: - Chopped green onions - Crushed peanuts These toppings add texture and flavor. They give your wraps a nice crunch and freshness. If you have special dietary needs, you can make some swaps: - Use ground turkey or tofu instead of chicken for a different protein. - Switch soy sauce for coconut aminos to avoid gluten. - Replace honey with maple syrup for a vegan option. These substitutions keep the dish tasty while catering to your needs. Enjoy experimenting with flavors that suit your taste! {{ingredient_image_1}} First, gather all the ingredients. You will need: - 1 lb ground chicken - 1 tablespoon sesame oil - 3 garlic cloves, minced - 1 inch ginger, grated - 1 red bell pepper, finely diced - 1 cup mushrooms, finely chopped - 1 carrot, shredded - ¼ cup soy sauce (or tamari for gluten-free) - 1 tablespoon rice vinegar - 1 tablespoon honey or agave syrup - 2 teaspoons sriracha (adjust to taste) - 1 tablespoon cornstarch mixed with 2 tablespoons water - 12 large lettuce leaves (butter or romaine) - Chopped green onions and crushed peanuts for garnish Make sure your workspace is clean and organized. This helps you cook faster and easier. Heat a large skillet over medium-high heat. Pour in the sesame oil. Add minced garlic and grated ginger. Sauté for about 30 seconds. You want them fragrant, not browned. Next, raise the heat to high. Add the ground chicken to the skillet. Cook it until it’s brown. Break it apart with a spatula as it cooks. Once the chicken is cooked, toss in the diced red bell pepper, chopped mushrooms, and shredded carrot. Stir-fry for 3 to 4 minutes. The veggies should be tender but still bright. In a small bowl, mix the soy sauce, rice vinegar, honey, and sriracha. Pour this mixture into the skillet. Stir well to combine the flavors. Add the cornstarch-water mix to the skillet. Stir constantly for about 2 to 3 minutes. The sauce will thicken nicely. Remove the skillet from heat and let it cool for a few minutes. To serve, take a large lettuce leaf. Spoon the chicken mixture onto the leaf. Garnish it with chopped green onions and crushed peanuts. Enjoy these wraps right away for a fresh, light meal. They are perfect for lunch or dinner! To get the best flavor, use fresh ingredients. Fresh garlic and ginger make a big difference. Sauté them in sesame oil, and enjoy the aroma. When you add ground chicken, cook it until it is fully browned. This adds depth and a nice texture. Mix in the veggies like red bell pepper and mushrooms. They should be tender but still crunchy. This keeps your dish lively and fresh. One common mistake is overcooking the chicken. If you cook it too long, it can become dry. Avoid using too much soy sauce, as it can make the dish salty. Also, don’t skip the cornstarch-water mix. This helps thicken your sauce nicely. Lastly, don't forget to let the mixture cool before serving. This helps the flavors meld together before you enjoy it. This recipe serves four, but you can easily adjust it. If you want to serve more, just double the ingredients. If you’re cooking for two, cut the recipe in half. Use smaller lettuce leaves if you want bite-sized wraps. You can also prepare extra filling and save it for later. This way, you have a quick meal ready whenever you want. Pro Tips Tip Title: Use Fresh Ingredients: Fresh garlic, ginger, and vegetables will enhance the flavor of your dish significantly. Tip Title: Adjust Spice Levels: Feel free to adjust the amount of sriracha according to your heat preference for a milder or spicier dish. Tip Title: Prepare in Advance: You can prepare the chicken mixture ahead of time and store it in the fridge for up to 2 days before serving. Tip Title: Use Different Greens: Experiment with different types of lettuce or greens, like iceberg or collard greens, for unique flavors and textures. {{image_2}} To make this dish vegetarian or vegan, swap the ground chicken for crumbled tofu or tempeh. Both options soak up flavors well. You can also try using lentils or chickpeas for added protein. Adjust the soy sauce and sriracha based on taste. Adding veggies like zucchini or bell peppers can enhance the mix. If you love heat, add extra sriracha or chili flakes to the meat mixture. You can also use hot chili oil for more spice. For a milder taste, reduce the sriracha or skip it altogether. Sweet chili sauce can offer a nice flavor twist without heat. Feel free to play with proteins! Ground turkey or beef works great as a substitute. You can also use shrimp or fish for a unique twist. Each protein brings its own flavor and texture. Just adjust cooking times to ensure everything is cooked through. To store leftover firecracker ground chicken, let it cool first. Place it in an airtight container. It will stay fresh for up to four days in the fridge. Keep the lettuce leaves separate. This keeps them crisp and fresh. When ready to eat, take the chicken out of the fridge. Heat it in a skillet over medium heat. Stir it often until it's warm. You can also use a microwave. Just heat it for 1-2 minutes, stirring halfway through. Make sure it’s hot all the way through. You can freeze leftover chicken too. Place it in a freezer-safe bag or container. It can last for up to three months in the freezer. When you want to eat it, thaw it overnight in the fridge. Reheat it as described above. This way, you can enjoy your wraps later! Yes, you can make the filling ahead. Cook the ground chicken and veggies as directed. Let it cool and store it in the fridge. When ready to eat, just reheat the filling and serve in fresh lettuce leaves. This saves time and keeps the wraps crisp. Butter lettuce is my top choice. Its leaves are soft and easy to fold. Romaine is another great option. It has a nice crunch and holds the filling well. Both types make your wraps fun and tasty. Yes, you can easily make this recipe gluten-free. Swap regular soy sauce for tamari. Tamari is a gluten-free soy sauce that tastes great. Check other ingredients too, like vinegar and sweeteners, to ensure they are gluten-free. To change the spice level, add more or less sriracha. Start with a small amount if you want it mild. You can always add more later. For extra heat, try adding red pepper flakes or fresh chili. Taste as you go to find what you like. This blog post covered everything you need for Firecracker Ground Chicken Lettuce Wraps. We looked at key ingredients, cooking steps, and how to serve them. I shared tips to boost flavor and avoid common mistakes. You also learned about fun variations based on your diet. Storing and reheating the wraps is easy, too. In the end, these wraps are tasty and versatile. Feel free to get creative and enjoy your meal!

Firecracker Ground Chicken Lettuce Wraps Simple Recipe

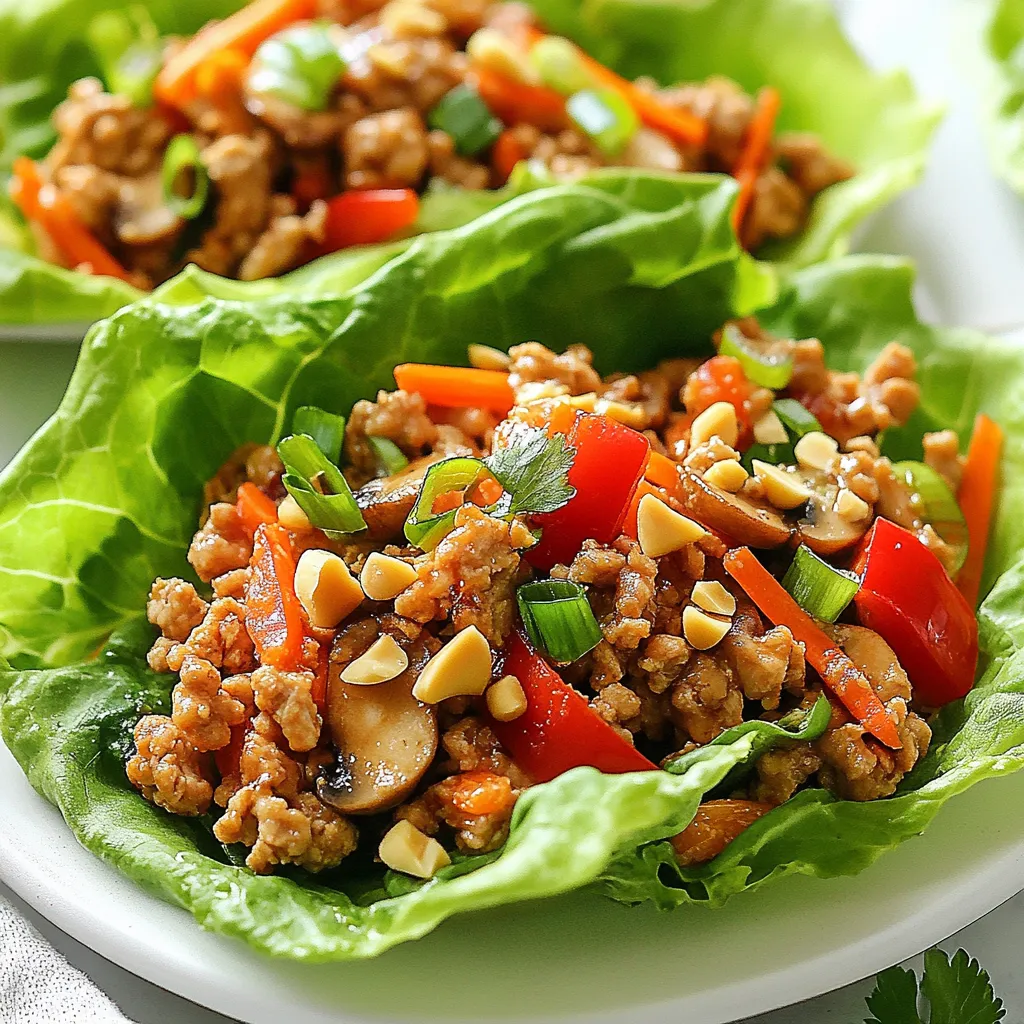
Are you ready to spice up your dinner routine? Firecracker Ground Chicken Lettuce Wraps are here to save the day!

To make Lemon Herb Grilled Salmon, you need fresh and simple ingredients. Here’s what you'll gather: - 4 salmon fillets (6 oz each) - 2 tablespoons olive oil - 2 tablespoons fresh lemon juice - Zest of 1 lemon - 2 cloves garlic, minced - 1 tablespoon fresh dill, chopped (or 1 teaspoon dried dill) - 1 tablespoon fresh parsley, chopped - Salt and pepper to taste - Lemon wedges, for serving Each ingredient plays a key role in the flavor. The salmon is rich and buttery. Olive oil adds a nice sheen and helps with cooking. Fresh lemon juice and zest bring brightness. Garlic gives it a savory bite. Dill and parsley add freshness. Salt and pepper enhance all these flavors. Using quality ingredients makes a big difference in taste. Fresh herbs elevate the dish. If you can, use organic lemons for the best flavor. For the full recipe, check the details on how to combine these ingredients into a delightful meal. To start, gather your ingredients. In a small bowl, mix together olive oil, lemon juice, lemon zest, minced garlic, dill, parsley, salt, and pepper. Use a whisk to blend them well. This mix is your marinade. It will add great taste to the salmon. Now, get your salmon fillets ready. Place them in a shallow dish or a resealable bag. Pour the marinade over the salmon. Make sure each piece is coated well. Cover the dish or seal the bag tight. Place it in the fridge for at least 30 minutes. This helps the flavors soak into the fish. When you're ready to grill, preheat your grill to medium-high heat. Oil the grill grates to stop the salmon from sticking. Take the salmon from the marinade and let the extra drip off. Place the fillets skin-side down on the grill. Grill for about 4-5 minutes. Then, flip the salmon gently and cook for another 3-4 minutes. The salmon should be just cooked through and flake easily when done. Once finished, remove the salmon from the grill and let it sit for a couple of minutes. Serve it with lemon wedges for a fresh touch. For the full recipe, check out the complete guide. When grilling salmon, start with a clean grill. Oil the grates to keep the fish from sticking. Place the salmon skin-side down on the grill. This helps keep the fish intact while cooking. Use medium-high heat for the best results. Cook for about 4-5 minutes without moving the fish. Then, flip it carefully and grill for another 3-4 minutes. When done, the salmon should flake easily. To boost flavor, use fresh herbs like dill and parsley. The lemon juice and zest add brightness to the dish. Garlic gives a nice depth to the marinade. For heat, add a pinch of red pepper flakes. Always taste the marinade before adding it to the fish. Adjust salt and pepper for your preference. Remember, a good marinade makes the salmon shine. A beautiful plate makes the meal more inviting. Serve the grilled salmon on a large platter. Garnish it with fresh herbs and lemon wedges. This adds color and freshness to your dish. Arrange the salmon fillets neatly for a nice look. You can also drizzle some extra marinade over the top. For a pop of color, add some sliced cherry tomatoes or radishes. For the full recipe of Lemon Herb Grilled Salmon, check the earlier section. {{image_2}} You can change the herbs in this dish for fun. Try using basil instead of dill. Basil gives a fresh taste that pairs well with the lemon. If you want a bolder flavor, add rosemary. Its strong scent makes the salmon pop. You can also mix herbs. A blend of dill and parsley offers a nice balance. Experimenting with fresh or dried herbs can change the dish's flavor. If you don’t have a grill, don't worry! You can cook salmon in the oven. Preheat it to 400°F. Place the salmon on a baking sheet. Bake for about 12-15 minutes. This method keeps the fish moist while cooking. You can also pan-sear the salmon. Heat oil in a skillet over medium heat. Cook the salmon for about 4-5 minutes on each side. Both methods keep the flavors vibrant and delicious. When it comes to serving Lemon Herb Grilled Salmon, presentation is key. Serve the salmon on a large platter with lemon wedges. Adding fresh herbs on top makes it look pretty. Pair it with sides like steamed veggies or a crisp salad. You can also serve it with rice or quinoa. These sides balance the dish and make it hearty. Don't forget to drizzle some extra lemon juice on top for that zesty kick! For the full recipe, check out the details! To store your leftover Lemon Herb Grilled Salmon, place it in an airtight container. Make sure to let the salmon cool down first. Refrigerate it right away. This way, it stays fresh for up to three days. If you want to store it longer, consider freezing. When you are ready to enjoy your leftovers, you can reheat the salmon. The best way is to use the oven. Preheat your oven to 350°F (175°C). Place the salmon on a baking sheet. Cover it with foil to keep it moist. Heat for about 10-15 minutes or until warm. You can also use a microwave, but the oven keeps it better. If you have more salmon than you can eat, freezing is a great option. Wrap each fillet tightly in plastic wrap. Then, place the wrapped salmon in a freezer-safe bag. Remove as much air as possible. Frozen salmon can last for up to three months. When you're ready to cook it, thaw in the fridge overnight. This ensures it stays juicy and flavorful. For the full recipe, check out the earlier section. I recommend marinating the salmon for at least 30 minutes. This time allows all the tasty flavors to soak in. You can marinate it for up to two hours for a stronger flavor. Just don’t go too far. If you marinate too long, the fish can become mushy. Yes, you can use frozen salmon. Just make sure to thaw it first. You can leave it in the fridge overnight or run it under cold water. Once thawed, follow the recipe as normal. This way, you still get that fresh taste! This salmon pairs well with many sides. You can serve it with steamed veggies, such as broccoli or asparagus. A fresh salad with lemon vinaigrette works too. For grains, try serving it over rice or quinoa. Make sure to add lemon wedges for that extra zing! Yes, you can grill salmon without skin. If you do, be careful. The fillet may stick to the grill. Use a grill mat or foil to help. This way, you can still enjoy that lovely grilled flavor. To check if the salmon is done, use a fork. Gently flake the fish. If it flakes easily and is opaque, it’s ready. You can also use a meat thermometer. Aim for an internal temperature of 145°F (63°C). You can add more flavor by using different herbs and spices. Try adding basil, thyme, or even a pinch of smoked paprika. You can also mix in some honey for a sweet touch. Get creative and see what you enjoy! For the full recipe, be sure to check out the Lemon Herb Grilled Salmon! This blog post outlined a simple way to make Lemon Herb Grilled Salmon. You learned about the key ingredients, marinade steps, and grilling techniques. I shared tips for flavor and presentation, plus variations to keep things interesting. Remember, you can store leftovers and reheat them easily. By trying this recipe, you can enjoy salmon that's tasty and healthy. Cooking is fun, and sharing meals makes it even better. Now, it’s your turn to fire up the grill and enjoy this delicious dish!

Lemon Herb Grilled Salmon Flavorful and Tasty Dish

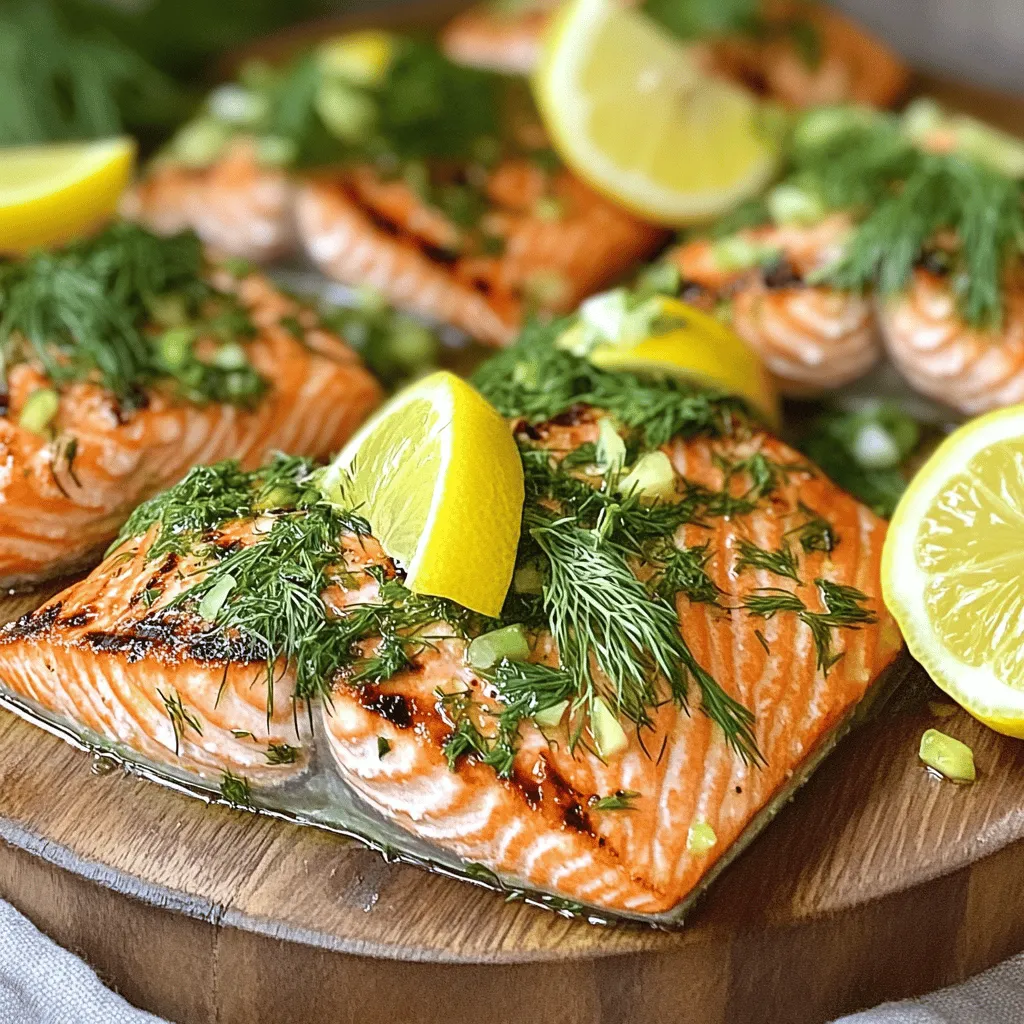
Looking for a delicious and easy dinner idea? Try my Lemon Herb Grilled Salmon! This dish is packed with bright

- 4 boneless, skinless chicken breasts - 2 ripe mangoes, diced - 1 red bell pepper, diced - 1/2 red onion, finely chopped - 1 jalapeño, deseeded and minced - 2 tablespoons fresh cilantro, chopped - 2 tablespoons lime juice - 1 tablespoon olive oil - 1 teaspoon ground cumin - Salt and pepper to taste Mango Salsa Chicken shines with fresh and vibrant ingredients. The chicken gives you a juicy base. Ripe mangoes add sweetness and a tropical twist. The red bell pepper brings a nice crunch and color. In the salsa, finely chopped red onion adds zest. The jalapeño gives just the right kick. Fresh cilantro brightens the flavors. Lime juice ties everything together with a tangy touch. Olive oil keeps the salsa smooth. Ground cumin adds depth and warmth. Gather these ingredients for a dish that is easy and full of flavor. For the full recipe, follow the steps listed later. Enjoy the process of making this fresh summer meal! First, preheat your grill to medium-high heat. This helps get those nice grill marks on the chicken. While the grill heats up, gather and prepare your ingredients. You will need to dice the mangoes and red bell pepper. Finely chop the red onion and jalapeño. Next, in a large bowl, combine the diced mangoes, red bell pepper, red onion, jalapeño, cilantro, lime juice, and a pinch of salt. Mix well and set this aside. Letting the flavors meld for about 15 minutes makes the salsa taste even better. Now it’s time to season the chicken. Rub each breast with olive oil, ground cumin, salt, and pepper. Make sure every piece is evenly coated. Once seasoned, place the chicken on the grill. Cook each breast for about 6-7 minutes on each side. Use a meat thermometer to check the internal temperature. It should reach 165°F (75°C) for safe eating. After grilling, remove the chicken from the grill and let it rest for a few minutes. Resting helps keep the chicken juicy. When ready to serve, place each chicken breast on a plate. Top it generously with the fresh mango salsa. For an extra pop, garnish with more cilantro and a wedge of lime. This will make your dish look as good as it tastes! For the complete recipe, follow [Full Recipe]. To grill mango salsa chicken well, set your grill to medium-high heat. This temperature helps cook the chicken evenly. Each side should grill for about 6-7 minutes. Keep an eye on the time. You want the chicken to reach an internal temperature of 165°F (75°C). This ensures it is safe to eat. Letting the chicken rest after grilling is key. This step keeps the juices inside, making the chicken tender and juicy. Selecting ripe mangoes is essential for a bright salsa. When choosing mangoes, look for ones that are slightly soft to the touch. They should have a sweet smell at the stem. To balance the flavors in your salsa, mix sweet and spicy elements. The sweetness of the mango pairs well with the heat from the jalapeño. Adding lime juice brightens the salsa and ties the flavors together. Let the salsa rest for about 15 minutes before serving. This time allows the flavors to meld beautifully. For a complete meal, consider serving mango salsa chicken with rice or quinoa. These sides soak up the delicious juices. You can also add a fresh salad with mixed greens for crunch. When it comes to drinks, pair the meal with a light white wine or a refreshing iced tea. This combination enhances the summer vibe of your dish. For more ideas, check out the Full Recipe to explore variations and side options. {{image_2}} Grilling and baking are both great ways to cook mango salsa chicken. - Grilled: Grilling gives the chicken a nice char and smoky flavor. You can cook it on medium-high heat for about 6-7 minutes on each side. - Baked: If you prefer baking, preheat your oven to 400°F (200°C). Place the seasoned chicken in a baking dish and cook for 25-30 minutes. For a super easy option, try a slow cooker. Just place the chicken in the slow cooker with all the salsa ingredients. Cook on low for 6-8 hours. This method keeps the chicken tender and juicy. You can swap ingredients in mango salsa chicken to match your tastes. If mangoes are not available, try using peaches or pineapple. For the bell pepper, zucchini works well too. Adjusting spice levels is easy. If you prefer less heat, leave out the jalapeño. Want it spicier? Add more jalapeño or a dash of hot sauce. Making mango salsa chicken fit your diet is simple. To make it gluten-free, check that all sauces are gluten-free. You can also use low-carb options. Instead of chicken, try using cauliflower steaks or portobello mushrooms for a vegetarian dish. These variations give everyone a chance to enjoy this tasty meal, no matter their dietary needs. For the full recipe, check out the details above. For best results, store any Mango Salsa Chicken leftovers in airtight containers. This keeps the chicken juicy and the salsa fresh. I recommend placing the chicken and salsa in separate containers. Leftover chicken stays good in the fridge for about three to four days. Always check for any off smells or changes in color before eating. To freeze Mango Salsa Chicken, let it cool completely. Then, wrap each chicken breast tightly in plastic wrap. Place the wrapped chicken in a freezer bag. This helps to prevent freezer burn. The salsa can also be frozen in a separate container. Use the frozen chicken within three months for the best flavor. When ready to eat, thaw the chicken in the fridge overnight. Reheat it in the oven or microwave until hot. Ensure it reaches an internal temperature of 165°F (75°C) before serving. You can use leftover chicken in many ways. Shred it for tacos or salads. Mix it into a stir-fry or pasta dish. The mango salsa adds a sweet touch to any meal. If you have extra salsa, try it on fish or with chips. This keeps your meals fun and fresh. You can create new dishes that are quick and easy with your stored ingredients. You can pair Mango Salsa Chicken with many tasty sides. Here are a few ideas: - Rice: White or brown rice works great. It soaks up the salsa juice. - Quinoa: This is a healthy option packed with protein. - Corn on the cob: Sweet corn adds a nice crunch to the meal. - Salad: A fresh green salad with lime dressing complements the dish well. - Black beans: They add a rich flavor and protein boost. These sides will enhance your meal and make it more filling. Yes, you can prepare the mango salsa ahead of time. Making it early helps the flavors blend. Here are some tips: - Make it the day before: This gives time for the flavors to mix well. - Store it in the fridge: Use a sealed container to keep it fresh. - Stir before serving: This helps redistribute the juices and flavors. Enjoying salsa that’s been resting can make it even tastier! The best way to know if chicken is done is by checking its temperature. Aim for an internal temperature of 165°F (75°C). Here are some best practices: - Use a meat thermometer: Insert it into the thickest part of the chicken. - Check the juices: If they run clear, the chicken is likely done. - Look for firmness: Cooked chicken feels firm when you press it. Following these steps will help you serve perfectly cooked chicken every time! Mango Salsa Chicken is a fresh, tasty meal you can easily make at home. We covered essential ingredients like chicken breasts, ripe mangoes, and lime juice. You learned the steps to grill the chicken and prepare the salsa. Remember the tips for juicy chicken and the best mangoes. Feel free to explore variations based on your taste. With proper storage, leftovers can turn into new meals. Enjoy making this dish for you and your loved ones!

Mango Salsa Chicken Flavorful and Easy Summer Meal

Mango Salsa Chicken is the perfect dish for your summer meals! It’s quick to make and bursting with fresh flavors.

To make this sweet and sour chicken, you will need: - 1 lb chicken breast, cut into bite-sized pieces - 1 bell pepper (red or yellow), diced - 1 small onion, diced - 1 cup pineapple chunks (fresh or canned) - 1 cup carrots, julienned - 1/2 cup sugar - 1/2 cup apple cider vinegar - 1/4 cup ketchup - 2 tablespoons soy sauce (low sodium) - 1 tablespoon cornstarch mixed with 2 tablespoons water - 2 cloves garlic, minced - 2 tablespoons vegetable oil - Salt and pepper to taste - Cooked white rice, for serving Feel free to add or change these ingredients: - Broccoli for extra crunch - Snap peas for a fresh touch - Sesame seeds for a nice garnish Here are some tools that will help you: - Large skillet or wok for cooking - Cutting board for chopping - Sharp knife for easy cutting - Mixing bowl for blending sauce - Measuring cups and spoons for accuracy These ingredients and tools will set you up for success in making sweet and sour chicken. For the complete recipe, check [Full Recipe]. Gather all your ingredients before you start cooking. This makes the process smooth and fun. Cut the chicken into small pieces. Dice the bell pepper and onion. Julienne the carrots. If using fresh pineapple, cut it into chunks. 1. Heat the vegetable oil in a large skillet over medium-high heat. 2. Add the chicken pieces and season with salt and pepper. Cook until browned, about 5-7 minutes. 3. Add the garlic, onion, bell pepper, and carrots to the skillet. Stir-fry for 3-4 minutes until the veggies soften. 4. In a bowl, mix the sugar, apple cider vinegar, ketchup, and soy sauce. Whisk until blended. 5. Pour the sauce over the chicken and veggies. Stir well to coat everything. 6. Bring the mix to a gentle simmer, then add the pineapple chunks. 7. Stir in the cornstarch mixture to thicken the sauce. Cook for another 2 minutes. 8. Taste and adjust seasonings if needed. Remove from heat. 9. Serve the sweet and sour chicken over warm white rice. Enjoy! Stir-frying is key for this dish. It cooks food quickly while keeping it crisp. Use high heat for the best results. Make sure to cut your ingredients evenly. This ensures they cook at the same rate. Always taste your dish before serving. Adjust flavors to make it perfect. Check the texture of the sauce; it should be thick but not gluey. For the full recipe, refer to the Sweet and Sour Chicken Delight . To make your sweet and sour chicken shine, balance the flavors well. You want the sauce to be sweet but not too sweet. Add a touch more vinegar if needed. Use fresh garlic for a stronger taste. A dash of crushed red pepper adds heat, if you like spice. Always taste your sauce before adding it to the chicken. One common mistake is overcooking the chicken. This can make it dry. Cook it just until it turns golden brown. Don’t skip the cornstarch mixture; it thickens the sauce. If you add the pineapple too early, it can get mushy. Always add it near the end of cooking. Serve sweet and sour chicken over warm white rice. This keeps the dish comforting. You can also add steamed broccoli or snap peas for a vibrant touch. For a fun twist, serve it in lettuce wraps. This adds crunch and freshness. Enjoy your meal with friends or family for a great time! {{image_2}} You can easily make sweet and sour chicken vegetarian or vegan. For a veggie twist, use tofu instead of chicken. Firm tofu works best. Press it to remove extra moisture, then cut it into cubes. Sauté the tofu until golden brown. You can also use seitan or tempeh for added texture. Replace the chicken broth with vegetable broth for a vegan sauce. Feel free to mix up the ingredients in this recipe. If you don't have chicken, try shrimp or pork. You can swap out the bell pepper for any other color or use zucchini instead. If you can’t find pineapple, use mango or peaches for a fruity kick. Instead of apple cider vinegar, rice vinegar gives a nice tang. The sauce can change the whole dish. You can make it sweeter by adding more sugar or honey. For a spicier kick, mix in some chili sauce or red pepper flakes. If you want a deeper flavor, add some ginger or sesame oil. Play with the ketchup ratio to create the perfect balance for your taste. Each of these variations keeps the essence of sweet and sour chicken. You can enjoy it while also making it your own! For the full recipe, check out the Sweet and Sour Chicken Delight. Store your sweet and sour chicken in an airtight container. It can last in the fridge for 3 to 4 days. Make sure it cools down to room temperature before sealing. This helps keep it fresh and tasty. You can freeze sweet and sour chicken for up to 3 months. Use a freezer-safe container or a heavy-duty freezer bag. To freeze, let the dish cool, then portion it out. Remove as much air as possible to prevent freezer burn. To reheat, thaw the chicken in the fridge overnight. Heat it on the stove over low heat. Stir it often to warm it evenly. You can also microwave it; cover it with a damp paper towel. This keeps it moist while reheating. If you want to enjoy it again, serve it over fresh rice. For the full recipe, check out the original instructions. Sweet and sour chicken comes from Chinese cuisine. It mixes flavors of sweet and tangy. This dish gained popularity in Western countries. It often features chicken, bell peppers, and pineapple. The sauce usually has vinegar, sugar, and soy sauce. Each region has its own twist on the recipe. Today, it’s a favorite in many homes. Yes, you can make sweet and sour chicken ahead of time. Cook the chicken and sauce, then store them in the fridge. Keep the rice separate to avoid sogginess. Reheat the chicken on the stove or in the microwave. This dish tastes great the next day, too. Just make sure to store it in an airtight container. Sweet and sour chicken goes well with many sides. Here are some great options: - Steamed white rice - Fried rice - Noodles - Stir-fried vegetables - Spring rolls - Egg rolls These sides complement the dish's flavors and add variety. You can mix and match to find your favorite combination. Want the full recipe? Check out the [Full Recipe]. In this blog post, I covered key points about making Sweet and Sour Chicken. I shared the essential ingredients and tools you'll need. The step-by-step guide lays out clear instructions for preparation and cooking. Tips for flavor and common mistakes help you get it right. I also offered variations for different diets and storage tips. Remember, practice makes perfect. Enjoy making your dish and impress others with your cooking skills!

Sweet and Sour Chicken Easy Recipe for Everyone

Are you ready to make a dish that everyone loves? Sweet and sour chicken is quick, tasty, and fun to

For Cheesy Spinach Artichoke Stuffed Shells, you need a few key items. Here is the essential list: - 20 large jumbo pasta shells - 1 cup ricotta cheese - 1 cup mozzarella cheese, shredded - 1/2 cup parmesan cheese, grated - 1 cup fresh spinach, chopped - 1 cup canned artichoke hearts, drained and chopped - 1/2 cup cream cheese, softened - 2 cloves garlic, minced - 1/4 teaspoon crushed red pepper flakes (optional) - Salt and pepper to taste - 1 jar (24 oz) marinara sauce - Fresh basil leaves for garnish (optional) These ingredients work together to create a creamy, cheesy filling that tastes amazing. You can also add optional ingredients for extra flavor. These can really make the dish pop: - 1/2 teaspoon Italian seasoning - 1/4 cup sun-dried tomatoes, chopped - 1/4 cup black olives, sliced Feel free to mix and match these ingredients based on your taste. Each addition can bring a new twist to your stuffed shells. For the full recipe, check out the details provided above. To make Cheesy Spinach Artichoke Stuffed Shells, follow these simple steps. 1. Preheat the oven. Set it to 375°F (190°C). This ensures even cooking. 2. Cook the pasta shells. Use a large pot with salted boiling water. Cook for about 9-10 minutes, so they are al dente. Drain and let them cool carefully. 3. Mix the filling. In a large bowl, combine: - 1 cup ricotta cheese - 1/2 cup mozzarella cheese, shredded - 1/4 cup parmesan cheese, grated - 1 cup fresh spinach, chopped - 1 cup canned artichoke hearts, drained and chopped - 1/2 cup cream cheese, softened - 2 cloves garlic, minced - 1/4 teaspoon crushed red pepper flakes (optional) - Salt and pepper to taste Stir these ingredients well until blended. This mix gives a creamy, cheesy taste. 4. Prepare the baking dish. Spread 1/2 cup of marinara sauce on the bottom of a 9x13-inch baking dish. This keeps the shells moist. 5. Stuff the shells. Gently fill each pasta shell with the spinach-artichoke mix. Place them in the dish, open side up. Take care not to break them. 6. Cover with sauce. Pour the rest of the marinara sauce over the stuffed shells. Make sure all shells are covered. This adds flavor and keeps them from drying out. 7. Add more cheese. Sprinkle the remaining mozzarella and parmesan cheese on top of the sauce. Cheese adds a nice golden crust. 8. Bake. Cover the dish with foil and bake for 20 minutes. This helps cook everything through. 9. Uncover and finish baking. Remove the foil and bake for an extra 10-15 minutes. Look for bubbly, golden cheese on top. 10. Let it rest. After baking, let the dish sit for 5 minutes. This makes it easier to serve. You can garnish with fresh basil leaves for a pop of color. By following these steps, you’ll create a dish that tastes great and looks amazing. Enjoy your cooking adventure with these delicious stuffed shells! For the complete recipe, refer to the Full Recipe section. To make Cheesy Spinach Artichoke Stuffed Shells, the right stuffing method matters. Use a spoon or a piping bag to fill each shell. This way, you pack in the flavor and cheese. Getting the filling just right takes practice. Aim for a generous amount, but don’t overstuff. It’s okay if some filling peeks out. For the best flavor, mix the cheeses well. Combine ricotta, mozzarella, and parmesan in a bowl. Add the chopped spinach and artichokes. Use fresh spinach for a bright taste. Minced garlic adds a nice punch. You can even add crushed red pepper flakes for heat if you like. Baking is key to perfect texture. Cover the dish with foil for the first part of cooking. This method steams the shells, keeping them moist. Remove the foil later to let the cheese brown. You want the top to be cheesy and golden. Many people overcook the pasta shells. Avoid this by cooking them just until al dente. This keeps the shells firm and not mushy. If they get too soft, they may break when you stuff them. Another mistake is not seasoning the filling enough. Taste it before stuffing the shells. If it lacks flavor, add more salt and pepper. Don't skip the garlic, as it brings the dish to life. Lastly, don't forget to cover the shells with marinara sauce. This keeps them from drying out. If you miss this step, they may turn out too dry. A little sauce goes a long way in keeping the dish moist and delicious. For the full recipe, check out the details above. Enjoy making these tasty stuffed shells! {{image_2}} If you have dietary restrictions, you can still enjoy Cheesy Spinach Artichoke Stuffed Shells. For a gluten-free option, use gluten-free pasta shells. If you're dairy-free, try a vegan ricotta made from nuts or tofu. You can also use nutritional yeast instead of cheese for a cheesy flavor without dairy. For flavor variations, consider adding sun-dried tomatoes or olives to the filling. You can mix in cooked chicken or shrimp for extra protein. If you like spice, add more crushed red pepper flakes. Each of these options brings a new twist to the dish. When serving these stuffed shells, think about what goes well on the side. A fresh green salad pairs nicely with the rich cheese. Garlic bread is another great choice, adding a nice crunch. For a drink, a light white wine or sparkling water with lemon works well. To make the dish look special, use a large platter for serving. Arrange the stuffed shells in a neat line and drizzle some marinara sauce on top. Garnish with fresh basil leaves to add a pop of color. A sprinkle of grated cheese on top can also elevate the dish's presentation. For the full recipe, check out the detailed steps and tips above! After enjoying Cheesy Spinach Artichoke Stuffed Shells, store any leftovers properly. Place them in an airtight container. This keeps the shells fresh and tasty for later. You can store them in the fridge for up to three days. When you are ready to eat, reheat them in the oven. Set it to 350°F (175°C) and heat for about 15-20 minutes. This way, the cheese gets nice and melty again. If you want to save some stuffed shells for a later date, freezing is a good option. Make sure to let the stuffed shells cool completely before freezing. Place them in a freezer-safe container or wrap them tightly with plastic wrap. They can stay in the freezer for up to three months. When you want to eat them, take out the shells and let them thaw in the fridge overnight. To reheat, place them in the oven at 350°F (175°C) for about 30-35 minutes. This ensures they are warm all the way through. For best results, cover them with foil while baking to prevent drying out. What can I substitute for ricotta cheese? You can use cottage cheese in place of ricotta. Blend it for a smoother texture. Cream cheese is another option. It adds richness but may change the flavor slightly. Can I make these stuffed shells ahead of time? Yes, you can prepare them in advance. Assemble the shells and cover them with sauce. Store in the fridge for up to 24 hours before baking. This saves time on busy days. How long do they take to bake? These stuffed shells take about 30 to 35 minutes to bake. Cover with foil for the first 20 minutes. This helps the cheese melt well. Remove the foil to get a lovely golden top. Can I use other vegetables in the filling? Yes! Feel free to add other veggies. Chopped mushrooms or zucchini work great. You can also use sun-dried tomatoes for a burst of flavor. Just make sure to chop them finely. Cheesy Spinach Artichoke Stuffed Shells are fun to make and tasty to eat. We covered the key ingredients that bring flavor and richness to this dish. I shared step-by-step instructions, tips for cooking, and common mistakes to avoid. You can explore various ingredient swaps and new ways to serve your stuffed shells. Proper storage keeps them fresh for later enjoyment. Remember, this dish can be a hit for any meal. Enjoy cooking and make it your own!

Cheesy Spinach Artichoke Stuffed Shells Delight

Are you ready to elevate your dinner game? Cheesy Spinach Artichoke Stuffed Shells Delight brings rich flavors straight from your

To make garlic butter corn on the cob, you need a few key items. Here’s the list: - 4 ears of fresh corn, husked - 1/2 cup unsalted butter, softened - 4 cloves garlic, minced - 1 tablespoon fresh parsley, chopped - 1 teaspoon smoked paprika - 1/2 teaspoon salt - 1/4 teaspoon black pepper These ingredients create a rich and savory flavor. The butter and garlic combine to give the corn a delightful taste. If you want to take your corn to the next level, consider these optional items: - 1 tablespoon grated Parmesan cheese Adding Parmesan gives the dish a tasty twist. You can also try a sprinkle of chili flakes for heat or lemon zest for brightness. When picking corn, look for bright green husks. The kernels should feel firm and plump when you squeeze them. Fresh corn has a sweet smell, which is a good sign of ripeness. Always choose corn that is in season for the best flavor. For the full recipe, check out the detailed instructions later in the article. To start, fill a large pot with water and add salt. Bring it to a boil. Once the water is bubbling, add your husked corn. Let it cook for 8 to 10 minutes. You want the corn to be tender but not mushy. After boiling, carefully remove the corn and let it cool for a few minutes. This step makes it easier to handle later. In a small mixing bowl, combine softened butter with minced garlic. Add chopped parsley, smoked paprika, salt, and black pepper. Mix everything together until it is smooth and well blended. This garlic butter mixture gives the corn its rich flavor. If you like cheese, consider adding grated Parmesan for extra taste. Once the corn is cool enough to touch, take a pastry brush and coat each ear with your garlic butter mix. Make sure to cover every part for the best flavor. If you decided to use Parmesan, sprinkle it over the buttered corn. For a smoky flavor, grill the corn on medium heat for 4 to 5 minutes. Rotate it occasionally until you see nice char marks. Serve the corn hot, drizzled with any leftover garlic butter for a tasty finish. Enjoy your garlic butter corn on the cob! To keep corn sweet and crisp, don't overcook it. Boil the corn for only 8-10 minutes. Test it for tenderness with a fork. If it feels soft but firm, it is ready. Overcooked corn can become mushy and lose its fresh taste. If you want a fun tip, try adding a splash of sugar to the water. It can enhance the corn's natural sweetness. Make sure your garlic butter is mixed well before you apply it. Use a pastry brush to coat each ear of corn. Brush it on all sides for the best flavor. If you have extra butter, drizzle it over the corn when serving. This extra touch makes it even tastier. And remember, you can also add some Parmesan cheese for a cheesy twist. Garlic butter corn goes well with many dishes. Serve it with grilled meats for a great summer meal. You can also pair it with fresh salads for a lighter option. For a fun twist, add lime wedges to the plate. A squeeze of lime gives the corn a bright flavor. Try serving it on a wooden board with a checkered cloth for a rustic look. These simple touches make the dish more inviting. {{image_2}} You can change the taste of garlic butter corn by adding herbs and spices. I like to use fresh herbs like basil or cilantro. These herbs add a bright flavor. You can also try thyme or dill for a unique twist. For spice lovers, add cayenne pepper for heat. Just a pinch can give a nice kick. Experiment with different blends to find your favorite mix. Grilling corn gives it a smoky flavor, while boiling makes it sweet and tender. I prefer grilled corn for the added char. It enhances the garlic butter taste. However, boiled corn is quicker and still delicious. If you’re short on time, boiling is the way to go. Try both methods and see which one you like best! You can elevate garlic butter corn with fun toppings. Crumbled feta or goat cheese adds creaminess. A squeeze of lime juice brightens up the flavor. For a crunchy texture, sprinkle on crushed nuts. You can also drizzle some chili oil for a spicy kick. Get creative with toppings to make your dish special! To store leftover corn, first let it cool. Wrap each ear in plastic wrap or foil. This keeps the corn moist. Place the wrapped corn in the fridge. It will stay fresh for about 3 to 5 days. If you have leftover garlic butter, store it in a sealed container. It can last for up to a week. To reheat your corn, the grill is best. Preheat the grill to medium. Place the corn on the grill for about 3 to 5 minutes. This helps keep the flavor and adds a nice char. You can also use the microwave. Wrap the corn in a damp paper towel. Heat it for 30 seconds to 1 minute. Check if it’s warm enough. If not, heat a bit longer. If you want to save corn for later, freezing is a great option. First, blanch the husked corn in boiling water for 5 minutes. This helps lock in the flavor. After blanching, cool the corn in ice water. Once cool, cut the kernels off the cob. Place the kernels in a freezer bag. Remove as much air as possible. Label the bag and freeze. It will stay fresh for up to 6 months. This way, you can enjoy garlic butter corn anytime! Yes, you can use frozen corn. Thaw it before cooking. Boil it for about 5 minutes, just until warm. This helps keep the corn sweet and tender. Fresh corn tastes best, but frozen is a good backup. Fresh garlic is the best choice. It gives a strong and bright flavor. I like to use whole cloves and mince them for the dish. If you want a milder taste, try roasted garlic. It adds a nice sweetness to the corn. To make this dish dairy-free, swap the butter for a plant-based alternative. Use coconut oil or vegan butter. You can still add the garlic and spices for flavor. The dish will taste great without dairy! Garlic butter corn on the cob makes a tasty treat. We covered essential and optional ingredients, tips for picking the best corn, and easy steps to get it just right. I shared ideas for flavor variations and how to store leftovers. Remember, the best corn shines with fresh flavors, and you can mix in your favorite spices too. With these tips, you can enjoy delicious corn whenever you want. Try the recipe, and you'll make it again and again!

Garlic Butter Corn on the Cob Simple and Tasty Dish

If you love sweet, juicy corn, then you’ll adore my Garlic Butter Corn on the Cob recipe! This dish is

Older posts
Newer posts
← Previous Page1 … Page92 Page93 Page94 … Page137 Next →

dsad

© 2025 easycookingbite • Built with GeneratePress

Our Policies

  • Copyright Policy
  • Cookie Policy
  • GDPR Policy
  • Privacy Policy
  • Disclaimer
  • Terms Of Use

More Information

  • Home
  • About
  • Contact
  • Appetizers
  • Dessert
  • Dinner
  • Drinks
©2025, easycookingbite About Back To Top