Skip to content
DisclaimerTerms Of UseGDPR PolicyCookie Policy

easycookingbite

  • Home
  • Drinks
  • Appetizers
  • Dinner
  • Dessert
  • About
  • Contact
  • Privacy Policy
DisclaimerTerms Of UseGDPR PolicyCookie Policy

Lily

When making honey garlic chicken thighs, you need some simple, fresh ingredients. Here’s what you’ll need: - 4 boneless chicken thighs - 1/3 cup honey - 3 cloves garlic, minced - 2 tablespoons soy sauce (low sodium recommended) - 1 tablespoon sesame oil - 1 teaspoon grated ginger - 1 teaspoon red pepper flakes (to taste) - Salt and pepper to taste - 1 tablespoon fresh cilantro, chopped (for garnish) - Sesame seeds (for garnish) These ingredients come together to create a sweet and savory dish that is hard to resist. Honey gives the chicken a rich sweetness, while garlic adds a punch of flavor. Soy sauce and sesame oil bring in some umami, and ginger offers a warming spice. The red pepper flakes add a kick, but you can adjust them to fit your taste. Using fresh cilantro and sesame seeds as a garnish makes the dish look beautiful. This dish is not only tasty but also easy to prepare. You can find the full recipe in the article, ensuring you have everything you need to make this meal a hit. - In a bowl, mix honey, minced garlic, soy sauce, sesame oil, grated ginger, red pepper flakes, salt, and pepper. This creates a rich and sticky marinade. - Put the chicken thighs into a resealable bag or a shallow dish. Pour the marinade over the thighs. Make sure each piece is coated well. - For the best flavor, marinate the chicken for at least 30 minutes. You can also marinate it for up to 4 hours for an even bolder taste. - First, preheat your oven to 400°F (200°C). This ensures even cooking. - Next, take the chicken from the marinade. Let any extra marinade drip off. Place the thighs on a baking sheet lined with parchment paper or a lightly greased dish. - Pour any leftover marinade over the chicken. Bake for about 25-30 minutes. The chicken should be cooked through with an internal temperature of 165°F (75°C). - To get a nice caramelized finish, broil the chicken for 2-3 minutes. Keep a close watch to avoid burning. - Once done, let the chicken rest for 5 minutes. This helps keep it juicy. - For a fresh touch, garnish with chopped cilantro and sesame seeds before serving. This adds flavor and makes the dish look great! Check out the Full Recipe for more details on making this dish. When choosing chicken thighs, you can pick between bone-in and boneless. Bone-in thighs have more flavor and stay juicy. Boneless thighs cook faster and are easier to eat. Next, think about skin-on versus skinless. Skin-on thighs give a crispy texture and added flavor. Skinless thighs are leaner and can be great for a lighter meal. To get maximum flavor, marinate your chicken for at least 30 minutes. If you have time, marinate for up to 4 hours. The honey and garlic will soak into the meat. Adjust spice levels by adding more or fewer red pepper flakes. This lets you control how spicy your dish becomes. If you prefer a milder taste, start with less and add more later. You can bake or grill the chicken thighs. Baking is easy and keeps the kitchen clean. Preheat your oven to 400°F (200°C) for the best results. If you choose to grill, keep an eye on the chicken. Grilling adds a smoky flavor that many love. Either way, use a meat thermometer to check the internal temperature. The chicken should reach 165°F (75°C) to be safe to eat. {{image_2}} You can use chicken breasts instead of thighs. Chicken breasts cook faster, so check them often. They are lean and still tasty with the honey garlic sauce. If you want a plant-based option, try tofu or tempeh. Press the tofu to remove extra water. Cut it into cubes for even cooking. Marinate it just like the chicken for full flavor. Feel free to tweak the sauce to your taste. Add red pepper flakes for a spicy kick or adjust the honey for more sweetness. If you want a unique twist, add citrus like lime or orange juice. This adds brightness to the dish. You can also mix in soy sauce or hoisin for extra umami flavor. Pair your honey garlic chicken thighs with simple side dishes. Rice or steamed vegetables work well. For a twist, make a honey garlic glaze to drizzle on the sides. This adds more flavor and looks great on the plate. Check out the Full Recipe for more ideas to elevate your meal. To store leftovers, let the chicken cool first. Place it in an airtight container. This keeps it fresh for up to three days. When reheating, use an oven or stovetop. This method helps keep the chicken moist. Heat it until the internal temperature reaches 165°F. You can also microwave it, but be careful of drying it out. If you want to freeze chicken thighs, wrap them tightly in plastic wrap. Then place them in a freezer bag. This helps prevent freezer burn. You can freeze them for up to three months. When you’re ready to use them, thaw in the fridge overnight. This keeps the chicken safe. After thawing, cook the chicken as you normally would. Enjoy your meal with the same great flavor! I suggest marinating chicken thighs for at least 30 minutes. For deeper flavor, you can marinate them for up to 4 hours. This lets the flavors soak in and makes the meat tender. Yes, you can use chicken breasts. They cook faster than thighs, so check them at around 20 minutes. The taste will be less rich since thighs have more fat. Adjust cooking time to avoid dry chicken. I love serving these thighs with steamed rice or quinoa. Roasted vegetables like broccoli or carrots also pair well. A fresh salad can add a nice crunch. You can also try mashed potatoes for a cozy meal. The chicken is fully cooked when it reaches an internal temperature of 165°F (75°C). Use a meat thermometer to check the thickest part of the thigh. This ensures it is safe to eat and juicy. This article shared easy steps to make honey garlic chicken thighs. We covered key ingredients, marinating, and baking tips. You learned how to select the best chicken and adjust flavors. You also discovered fun variations and storage tips. In closing, enjoy experimenting with this dish. Trust in your skills and have fun in the kitchen. Happy cooking!

Honey Garlic Chicken Thighs Flavorful and Easy Meal

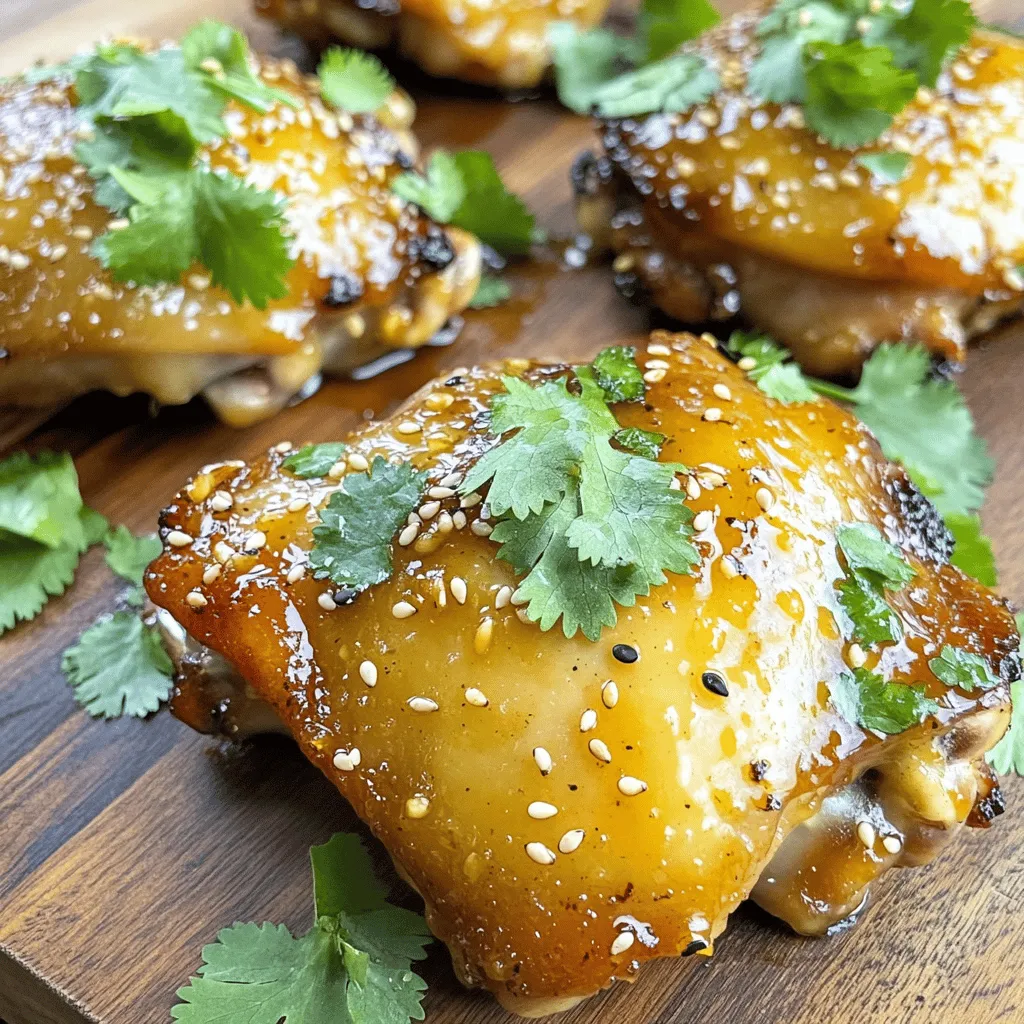
Looking for a quick meal that bursts with flavor? Honey Garlic Chicken Thighs are your answer! This dish combines sweet

To make a delicious creamy tomato basil soup, gather these ingredients: - 2 tablespoons olive oil - 1 medium onion, chopped - 3 cloves garlic, minced - 1 can (28 oz) crushed tomatoes - 4 cups vegetable broth - 1 teaspoon sugar - Salt and pepper to taste - 1 cup heavy cream (or coconut cream for a dairy-free option) - 1 cup fresh basil leaves, chopped - Optional: ½ teaspoon red pepper flakes for added heat These ingredients create a rich, comforting soup that warms the soul. The olive oil adds depth, while the onion and garlic build a strong flavor base. Crushed tomatoes give the soup its classic taste. Vegetable broth brings in a savory note, and sugar balances the acidity. The heavy cream makes the soup creamy and rich, while fresh basil adds a bright, herbal touch. If you like a bit of heat, red pepper flakes can spice things up. This combination of flavors makes for a simple yet delightful dish. For the full recipe, refer to the details above. Each ingredient plays a key role in creating a tasty soup you'll love. 1. In a large pot, heat 2 tablespoons of olive oil over medium heat. 2. Add 1 medium onion, chopped, and sauté until soft, about 5 minutes. 3. Stir in 3 cloves of minced garlic and cook for 1 minute. 4. Add 1 can (28 oz) of crushed tomatoes to the pot. 5. Pour in 4 cups of vegetable broth and 1 teaspoon of sugar. 6. Season with salt and pepper to taste. 7. Bring the mixture to a simmer and let it cook for about 20 minutes. I love this step because it fills the kitchen with a wonderful aroma. The flavors meld together, creating a rich base for the soup. 1. Remove the pot from heat and let it cool slightly. 2. Using an immersion blender, puree the soup until smooth. You can also use a regular blender in batches. 3. Return the pureed soup to low heat in the pot. 4. Stir in 1 cup of heavy cream, or coconut cream for a dairy-free option. Blending is key here! It transforms the chunky mixture into a silky smooth soup. The cream adds richness and makes it even more comforting. 1. Add 1 cup of fresh basil leaves, chopped, to the pot. 2. Stir well to combine and taste the soup. Adjust seasoning if needed. 3. For serving, garnish each bowl with fresh basil leaves and a swirl of cream. For presentation, consider serving with crusty bread on the side. This soup looks beautiful and tastes even better. Check out the Full Recipe for more details! To boost the taste of your creamy tomato basil soup, try these simple tips. First, add a pinch of sugar. This helps balance the acidity of the tomatoes. You can also mix in a dash of balsamic vinegar for a richer flavor. If you want more heat, sprinkle in some red pepper flakes. Using fresh herbs makes a big difference. Fresh basil has a bright taste that dried basil lacks. Crush the leaves before adding them to release their oils. If you use dried herbs, add them earlier in cooking. They need time to release their flavor. Achieving the right consistency is key to a great soup. If your soup is too thick, add more vegetable broth. If it’s too thin, let it simmer longer to reduce. Stir it often to prevent sticking. For blending, an immersion blender works best. It allows you to blend right in the pot. If you use a standard blender, let the soup cool first. Blend in small batches to avoid spills. Pair your soup with crusty bread. It’s perfect for dipping and adds nice texture. A simple grilled cheese sandwich also makes a great side. For garnishing, use fresh basil leaves on top. A drizzle of cream adds a nice touch, too. You can even sprinkle some grated cheese for a savory finish. These small details make your dish look and taste amazing. Enjoy your creamy tomato basil soup! For the full recipe, check out Creamy Tomato Basil Bliss. {{image_2}} To make a vegan creamy tomato basil soup, swap out the heavy cream. You can use coconut cream or cashew cream instead. Both add a rich texture without dairy. For a flavor boost, try adding nutritional yeast. This gives a cheesy note without any animal products. You can also add a splash of lemon juice for brightness. Check all your ingredients to make sure they are gluten-free. Canned tomatoes and vegetable broth are usually safe. For thickening, skip the flour. Instead, blend some cooked potatoes into the soup. This adds creaminess without gluten. Another option is to use cornstarch mixed with water as a thickener. You can add unique flavors from other cuisines to your soup. For a Mediterranean twist, add olives and feta cheese. If you like a spicy kick, mix in some diced jalapeños. For an Italian flair, stir in some pesto. Each of these additions can change the taste and make the soup exciting. Try experimenting with different herbs too, like oregano or thyme. For the full recipe, check out the Creamy Tomato Basil Bliss. After making creamy tomato basil soup, let it cool to room temperature. This helps avoid steam buildup in your container. Transfer the soup into an airtight container. You can store it in the fridge for up to four days. If you want to keep it longer, freezing is a great option. For freezing, make sure the soup is fully cooled. Use freezer-safe containers or bags. Leave some space at the top for expansion. You can freeze the soup for up to three months. When you're ready to eat, just thaw it in the fridge overnight. To reheat the soup, you can use a saucepan. Heat it on medium-low. Stir often to keep it from sticking. If you prefer, you can microwave it too. Use a microwave-safe bowl and cover it with a paper towel. Heat it in short intervals, stirring in between. To freshen up the flavors, consider adding a bit of fresh basil or a splash of cream. This can brighten the taste. If the soup seems thick, add a little vegetable broth to loosen it up. For the complete recipe, check out the Full Recipe section. How long does creamy tomato basil soup last in the fridge? Creamy tomato basil soup lasts about 3 to 5 days in the fridge. Store it in an airtight container. For the best taste, eat it sooner rather than later. Can I use fresh tomatoes instead of canned? Yes, you can use fresh tomatoes! About 2 pounds of ripe tomatoes will work well. Just peel and chop them before adding to the pot. How can I make this soup spicier? To add spice, mix in red pepper flakes or a dash of hot sauce. Start with a small amount and taste as you go. What can I use instead of heavy cream? If you want a lighter option, use coconut cream or half-and-half. For dairy-free choices, almond milk or cashew cream work great too. Is there a substitute for basil? If you don’t have basil, try oregano or parsley. These herbs add a different but tasty flavor. Calories and nutritional benefits A serving of creamy tomato basil soup has around 300 calories. It also offers vitamins A and C, and is rich in antioxidants from tomatoes. How to make the soup healthier without sacrificing flavor To make it healthier, reduce the cream and add more veggies like carrots or spinach. You can also use low-sodium broth for less salt while keeping great taste. This creamy tomato basil soup is easy and fun to make. You can sauté fresh ingredients, blend them, and enjoy a warm bowl of comfort. Feel free to tweak the flavors or try the variations presented. Remember, this recipe fits well into various diets, like vegan and gluten-free. Store leftovers carefully, and don’t hesitate to reheat for a tasty meal again. Keep exploring different ingredients to make it your own. Enjoy how simple cooking can bring great flavor to your table.

Creamy Tomato Basil Soup Simple Flavorful Delight

Are you craving a warm bowl of comfort? My Creamy Tomato Basil Soup is a simple joy you’ll want to

- 6 ripe peaches, peeled and sliced - 1 tablespoon lemon juice - Optional: Vanilla ice cream for serving - 1/2 cup granulated sugar - 1 teaspoon cinnamon - 1 tablespoon cornstarch - 1 teaspoon vanilla extract - 1 1/2 cups all-purpose flour - 1 tablespoon baking powder - 1/2 teaspoon salt - 1/4 cup cold unsalted butter, cubed - 3/4 cup milk - Extra sugar for topping - Baking dish (9x13 inch) - Mixing bowls - Pastry cutter or fork When making peach cobbler, fresh ingredients are very important. Use ripe peaches for the best flavor. The lemon juice helps bring out the sweetness. You can serve it with vanilla ice cream for a great treat. You also need some pantry staples. Granulated sugar sweetens the fruit. Cinnamon adds warmth and depth. Cornstarch thickens the peach filling. Vanilla extract gives a nice aroma. For the biscuit topping, you will need flour, baking powder, and salt. Cold butter is key for a flaky texture. Milk helps bring the dough together. Sprinkling extra sugar on top adds a sweet crunch. Gather your baking dish, mixing bowls, and a pastry cutter or fork. These tools help mix and shape the dough. This list makes sure you have everything for a perfect peach cobbler. For the full recipe, check out the Peach Paradise Cobbler. Start by washing and peeling the peaches. Slice them into thin pieces. In a large bowl, mix the peach slices with: - 1/2 cup granulated sugar (adjust for sweetness) - 1 teaspoon cinnamon - 1 tablespoon lemon juice - 1 tablespoon cornstarch - 1 teaspoon vanilla extract Stir well until the peaches are coated. This mix will bring out the natural sweetness. Now, transfer the peach filling into a greased 9x13 inch baking dish. Spread it evenly so it cooks well. In a separate bowl, measure out and whisk together the dry ingredients: - 1 1/2 cups all-purpose flour - 1 tablespoon baking powder - 1/2 teaspoon salt Next, take 1/4 cup of cold unsalted butter, cubed, and add it to the flour mix. Use a pastry cutter or your fingers to blend it until you see coarse crumbs. This step is key for a flaky biscuit. Slowly pour in 3/4 cup of milk. Stir just until the dough comes together. It should feel a bit sticky. Now it’s time to assemble! Using a spoon or your hands, drop spoonfuls of the biscuit dough over the peach filling. Don’t worry if some peaches peek through; it adds to the charm. For a nice touch, sprinkle extra sugar on top of the biscuit dough. Place the baking dish in your preheated oven at 375°F (190°C). Bake for 30-35 minutes. Keep an eye out for the biscuits to turn golden brown. You’ll also notice the peach filling bubbling up, which means it’s ready. When done, let it cool slightly before serving. Enjoy your warm peach cobbler with biscuit topping. For the full recipe, check the earlier section. To get the best biscuit topping, cold butter is key. Cold butter creates flaky layers in your biscuits. Make sure to keep it in the fridge until you are ready to mix. Another tip is to avoid overmixing your dough. If you mix too much, the biscuits can become tough. Mix just until the dough comes together. This will help keep your topping light and airy. You can enhance the flavor of your peach cobbler with different spices. Besides cinnamon, consider nutmeg or ginger for a warm twist. A pinch can change the whole dish. Adding a splash of almond extract can also boost the flavor. It adds a nice depth that pairs well with peaches. Just a little goes a long way! For the best experience, serve your peach cobbler warm. Top it with a scoop of vanilla ice cream. The cold ice cream melts into the warm cobbler, creating a delightful treat. Presentation matters too! Serve it in a bowl and sprinkle some cinnamon on top. This makes the dessert look inviting and delicious. Enjoy the beauty and taste of your peach cobbler! {{image_2}} You can easily switch up the fruit in your peach cobbler. Try using berries like blueberries or raspberries. They add a tangy twist to your dish. Apples also work well. Their crisp texture pairs nicely with the sweet peaches. If you want a mix, try a combination of peaches, apples, and berries. This mix gives you a fun, colorful cobbler with many flavors. If you need a gluten-free option, simply swap all-purpose flour with gluten-free flour. Look for a blend that works well for baking. You may also want to add a bit of xanthan gum to help with texture. Check other ingredients too. Some baking powders contain gluten, so pick one that is gluten-free. This way, everyone can enjoy your tasty cobbler. To make a vegan peach cobbler, replace the butter with a plant-based option. Coconut oil or vegan butter both work great. For the milk, use almond, oat, or soy milk. These swaps keep the flavor rich while making your dish plant-based. You can still enjoy all the goodness of peach cobbler without any animal products. To store leftover peach cobbler, let it cool first. Cover it tightly with plastic wrap or aluminum foil. You can also place it in an airtight container. This keeps it fresh and prevents it from drying out. In the fridge, it lasts about 3 to 4 days. If you want to freeze peach cobbler, follow these steps. First, let it cool completely. Cut it into portions for easy serving. Wrap each piece in plastic wrap, then place them in a freezer-safe bag. This way, it stays fresh for up to 3 months. To thaw, move it to the fridge overnight. For reheating, use the oven set at 350°F. Place the cobbler in an oven-safe dish. Cover it with foil to keep it moist. Heat for about 20 minutes, or until warm. When serving from the fridge, reheat the cobbler in the oven for the best results. This method keeps the biscuit topping crisp. If you use the microwave, heat it in short bursts to avoid sogginess. Always check the texture and flavor before serving. If it seems dry, add a scoop of vanilla ice cream on top for richness. Enjoy your peach cobbler with a perfect blend of warmth and sweetness! For the full recipe, refer to the earlier section. Look for a few clear signs to know if your peach cobbler is ready. First, check the biscuit topping. It should be golden brown and firm to the touch. Next, watch the peach filling. It needs to bubble around the edges of the dish. These bubbles show that the juices are hot and flavorful. If both these signs are present, your peach cobbler is done! Yes, you can use frozen peaches! Just remember to adjust the recipe slightly. First, thaw the peaches in a bowl. Drain any excess liquid to avoid a watery filling. When mixing the peaches with sugar, cinnamon, and lemon juice, use the same amounts. Frozen peaches may need a few extra minutes to bake. Check for the same signs of doneness: golden topping and bubbling filling. If your biscuit topping is too dry, don’t worry! You can fix it easily. Start by adding a bit more milk, one tablespoon at a time. Mix gently until the dough feels softer. Make sure you don't overmix, or it will get tougher. If you notice it during baking, you can brush the topping with melted butter or milk for extra moisture. Yes, you can make peach cobbler ahead! Prepare the filling and biscuit dough separately. Store each in the fridge for up to 24 hours. When you’re ready to bake, layer them in the baking dish. Bake as directed in the recipe. This way, you save time and still enjoy a warm dessert. Peach cobbler is a delightful dessert made with fresh peaches and a tender biscuit topping. We covered essential ingredients, easy steps, and tips for great results. Remember, using cold butter is key for perfect biscuits. You can customize your cobbler with different fruits or make it vegan. Store leftovers properly to enjoy later. Baking this sweet treat can bring joy to your table. Try it out, and savor each delicious bite!

Peach Cobbler with Biscuit Topping Simple and Delicious

Craving a warm, gooey dessert that’s simple to make? Look no further! This Peach Cobbler with Biscuit Topping is the

- 1 cup quinoa, rinsed - 2 cups vegetable broth (or water) - 1 can (15 oz) black beans, drained and rinsed - 1 cup corn kernels (fresh, frozen, or canned) - 1 red bell pepper, diced - 1 small red onion, diced - 2 cloves garlic, minced Quinoa is the star of the dish. It is a tiny grain that packs a big punch. It is high in protein and full of fiber. Black beans add a creamy texture and more protein. Fresh veggies like corn, red bell pepper, and onion bring color and crunch. - 1 teaspoon ground cumin - 1 teaspoon smoked paprika - Salt and pepper to taste Spices make this bowl special. Ground cumin gives a warm, earthy flavor. Smoked paprika adds a hint of smokiness. Salt and pepper enhance all the tastes, making the dish pop. - 1 avocado, sliced - Fresh cilantro - 1 lime, juiced Garnishes make a meal look great. Sliced avocado adds creaminess and healthy fats. Fresh cilantro gives a fresh taste. A squeeze of lime juice brightens the dish, making each bite refreshing. You can find the full recipe above to create your own Savory Quinoa and Black Bean Bowl. Start by rinsing 1 cup of quinoa under cold water. This helps remove any bitterness. In a medium saucepan, combine the rinsed quinoa with 2 cups of vegetable broth. Bring it to a boil over medium-high heat. Once it boils, reduce the heat to low, cover the pot, and let it simmer for about 15 minutes. You will know it’s done when the quinoa is fluffy and the liquid is absorbed. Fluff it gently with a fork to get that perfect texture. While the quinoa cooks, heat a large skillet over medium heat. You can add a splash of water or a bit of oil if you like. Add 1 small diced red onion and 1 diced red bell pepper to the skillet. Sauté these for about 5 minutes until they become soft. Next, add 2 minced garlic cloves, 1 teaspoon of ground cumin, and 1 teaspoon of smoked paprika. Stir for another minute. This step brings out the lovely flavors of the spices. Now it’s time to bring everything together! Stir in 1 can of drained black beans and 1 cup of corn. Cook this mixture for another 3-5 minutes until it is warmed through. Season with salt and pepper to taste. Once the quinoa is ready, gently mix it into the skillet with the black bean mixture. Squeeze fresh lime juice over the top to brighten the flavors. You can find the full recipe for the Savory Quinoa and Black Bean Bowl, including all the detailed steps and ingredients. Enjoy your delicious and healthy meal! To make the best quinoa, you must rinse it well. This removes the bitter coating. Use a fine-mesh strainer. Rinse under cool water for about 2 minutes. This simple step helps your quinoa taste great. Adjusting seasoning levels can change your dish. Start with the recipe's salt and pepper. After mixing, taste it. If you want more flavor, add more spices or salt. You can also add more lime juice for brightness. For a beautiful bowl, start with the quinoa and black bean mix. Use a large spoon to scoop it into the center of the bowl. Arrange the avocado slices on top. Sprinkle fresh cilantro over everything. This adds color and freshness. Choosing the right garnishes enhances your dish. Try adding sliced avocado, lime wedges, or a sprinkle of chili flakes. These not only look good but also add flavor. Prep ahead by washing and chopping your veggies. You can do this the night before. Store them in the fridge until you're ready to cook. This makes cooking faster and easier. Using canned black beans and corn saves time. They are ready to use and cut your prep time in half. If you prefer fresh, that works too, but it takes longer to prepare. For this Savory Quinoa and Black Bean Bowl, you can easily mix and match fresh or canned ingredients to suit your taste. {{image_2}} You can easily customize your savory quinoa and black bean bowl. Incorporating different proteins offers a fun twist. For example, grilled chicken adds a hearty touch. Alternatively, try diced tofu for a plant-based option. You can also boost the nutrition by adding greens. Spinach wilts nicely when mixed in. Kale adds a robust texture and color. To enhance the flavor, consider adding spices and herbs. Cilantro and parsley brighten the dish. You might enjoy a sprinkle of chili powder for some heat. Lemon zest can also add a fresh pop. For dressings or sauces, try a tangy vinaigrette. A drizzle of tahini adds creaminess and depth. If you want to switch things up, substitute quinoa with other grains. Brown rice offers a chewy texture and nutty flavor. Farro is another great choice, adding a unique bite. For gluten-free options, consider using millet or buckwheat. Both give a satisfying base without gluten. Store leftovers in an airtight container. This keeps them fresh and tasty. You can place the bowl in the fridge for up to four days. If you notice any strange smells or colors, it’s best to toss it out. To freeze, divide the dish into portions and place them in freezer-safe bags. Remove as much air as possible to avoid freezer burn. When you want to eat it, thaw in the fridge overnight. For reheating, microwave the bowl until hot. Stir halfway through to ensure even heating. Batch cooking is a great way to save time. Cook a large batch of quinoa on the weekend. You can store it in the fridge for up to five days. Keep the black beans and veggies separate to maintain their texture. Mix them together just before serving for the best taste. Check out the Full Recipe for more details! Quinoa is a superfood packed with protein. A cup of cooked quinoa has about 8 grams of protein. This makes it great for muscle growth and repair. It also has fiber, which helps digestion and keeps you full. Quinoa is rich in vitamins and minerals, too. It has iron, magnesium, and B vitamins, all important for your health. Eating quinoa can support heart health and help manage blood sugar levels. Yes, you can easily make this dish vegan! All the ingredients in the Savory Quinoa and Black Bean Bowl are plant-based. Use vegetable broth for extra flavor. You can skip the avocado if you're not a fan, or add extra veggies instead. This bowl is a great choice for anyone who wants a tasty vegan meal. You can easily scale this recipe up or down. If you want to serve more people, just double the ingredients. For fewer servings, cut the amounts in half. This recipe is flexible. You can make it fit your needs. Just remember to adjust the cooking times if you make a bigger batch. Enjoy your meal! This post covered a tasty quinoa dish. We talked about key ingredients like quinoa, black beans, and fresh veggies. I shared step-by-step cooking instructions and helpful tips for storing and serving. Cooking variations give you room to be creative. Finally, we answered common questions about nutrition and meal prep. With this recipe, you can enjoy a healthy meal tailored to your taste. Explore the flavors and make this dish your own! Enjoy your cooking journey!

Savory Quinoa and Black Bean Bowl Healthy Meal Idea

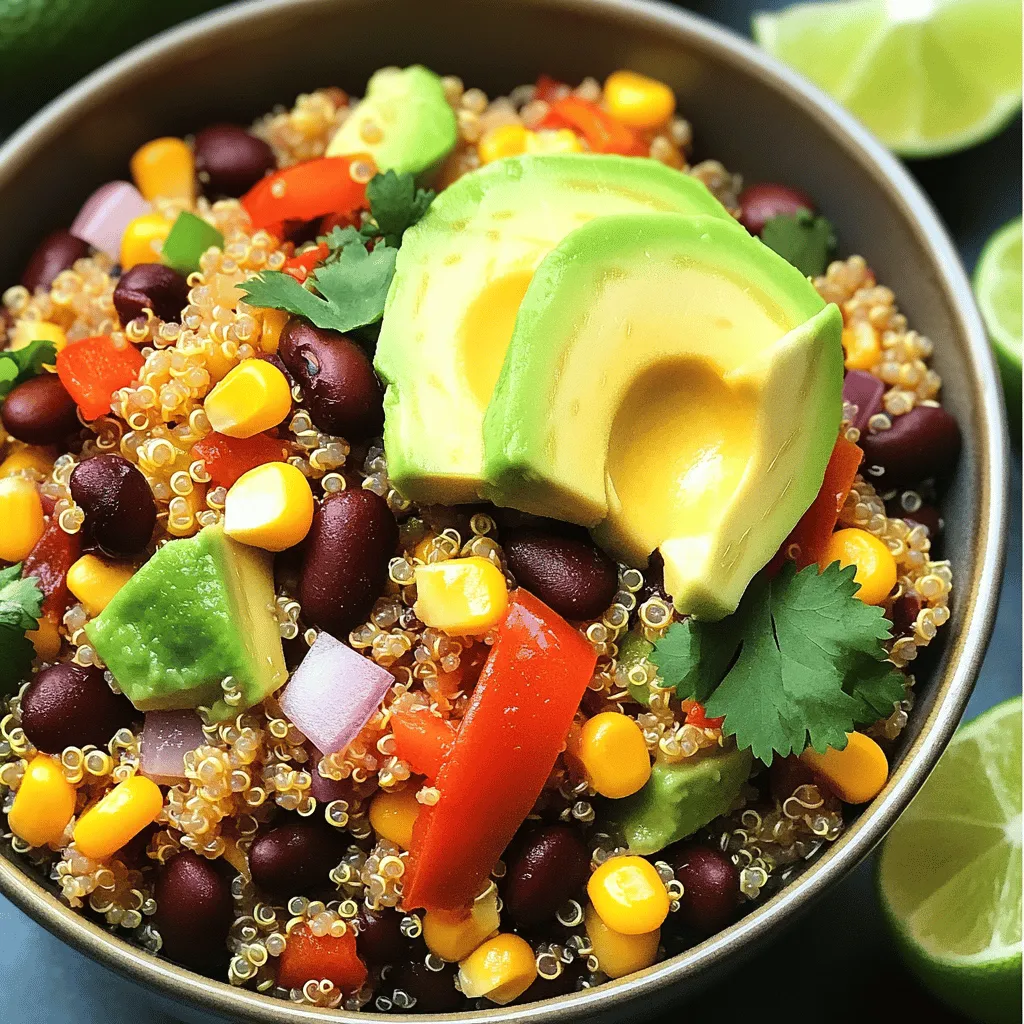
Looking for a simple, healthy meal idea? The Savory Quinoa and Black Bean Bowl is your answer! Packed with protein

You will need these fresh and pantry items: - 2 cups cooked white beans (cannellini or navy beans) - 4 cups vegetable broth - 1 medium onion, diced - 2 cloves garlic, minced - 2 medium carrots, diced - 2 celery stalks, diced - 1 teaspoon dried thyme - 1 teaspoon dried rosemary - 1 bay leaf - 1 cup kale, chopped - 1 (14.5 oz) can diced tomatoes, undrained - 2 tablespoons olive oil - Salt and pepper to taste - Fresh parsley, finely chopped (for garnish) Not all ingredients must be set in stone. You can swap out items based on what you have. - Use any white beans you like, such as great northern or pinto beans. - If you don’t have vegetable broth, chicken broth works well too. - For a boost of flavor, try using leeks instead of onions. - You can add spinach if you don’t have kale. - Any canned tomatoes will do, just avoid sweetened ones. This soup is not only tasty but also good for you. Here’s a rough guide: - Calories: 250 - Protein: 12g - Carbohydrates: 40g - Dietary Fiber: 10g - Fat: 6g - Sodium: 400mg This soup is a hearty meal. It's packed with nutrients and made with simple ingredients. Enjoy making it your own! {{ingredient_image_1}} To start, gather all your ingredients. You’ll need cooked white beans, broth, onion, garlic, carrots, celery, herbs, kale, and tomatoes. Chop the onion, carrots, and celery into small pieces. Mince the garlic. This prep makes cooking smooth and fast. Heat olive oil in a large pot over medium heat. Add the diced onion, carrots, and celery. Sauté them for 5 to 7 minutes. You want the onions to turn soft and clear. Next, add minced garlic and herbs. Sauté for 1 to 2 minutes until you smell the herbs. This step adds depth to your soup. Now pour in vegetable broth and add the bay leaf. Stir well to mix all the flavors. Add the diced tomatoes, including their juice, and the cooked white beans. Bring everything to a gentle simmer. Keep the heat low and cover the pot. Let the soup simmer for 15 to 20 minutes. This helps the flavors blend well. Afterward, remove the bay leaf and stir in chopped kale. Cook for another 5 minutes. The kale should be tender but still bright green. Before serving, taste the soup. Add salt and pepper as needed. This will ensure every bowl is flavorful. Enjoy your Tuscan White Bean Soup hot, garnished with fresh parsley. Herbs and spices bring life to your Tuscan white bean soup. I love using dried thyme and rosemary. These herbs add a warm and earthy flavor. Fresh herbs, like parsley, can brighten the dish. Just add them at the end for a fresh taste. You can also try adding a pinch of red pepper flakes. This gives a nice kick without being too hot. Lemon juice can enhance the soup's flavor too. A squeeze before serving makes it bright and tasty. Avoid using too much salt early on. It’s easy to over-season when you're excited. Taste the soup as it cooks. You can always add more salt later. Don’t skip the bay leaf! It adds depth to the flavor. Remember to take it out before serving. I’ve made this mistake before, and it’s not pleasant. Another mistake is overcooking the beans. They should be tender but not mushy. When you add them to the pot, let them warm up gently. This soup is perfect for meal prep. It keeps well in the fridge for about 3-5 days. Store it in airtight containers. If you want to freeze it, let it cool first. When reheating, do it slowly over low heat. This helps keep the flavors fresh. If the soup looks thick, add a splash of broth or water. Make a big batch and enjoy it throughout the week. You can serve it with crusty bread for a filling meal. Pro Tips Use Fresh Herbs: Fresh thyme and rosemary can elevate the flavor of your soup. If available, try using them instead of dried herbs for a more vibrant taste. Blend for Creaminess: For a creamier texture, blend a portion of the soup before adding the kale. This will give the soup a rich and velvety consistency. Customize Your Greens: While kale is a great choice, you can also use spinach or Swiss chard for a different flavor and texture. Just add them towards the end of cooking. Make It Ahead: This soup tastes even better the next day! Make a big batch and store it in the fridge for a quick, healthy meal throughout the week. {{image_2}} You can easily make this soup vegan or vegetarian. Start with the base recipe. Use vegetable broth and skip any meat. The beans and veggies give it a rich taste. Add more greens like spinach or Swiss chard for extra nutrients. You can also use smoked paprika to add depth and a smoky flavor without meat. If you want to add meat, try diced chicken or sausage. Cook the meat first, then add the other ingredients. For a seafood twist, shrimp works well. Add the shrimp during the last few minutes of cooking. This keeps it tender and juicy. Both options enhance the soup's flavor and make it heartier. In winter, root veggies like potatoes or parsnips fit nicely. In spring, add peas or asparagus for brightness. Summer brings zucchini and bell peppers, which add color and freshness. In fall, butternut squash adds sweetness. Use whatever is in season to keep the soup exciting and flavorful. Each season brings new tastes to enjoy! To store your leftover soup, let it cool first. Pour the soup into an airtight container. Make sure the lid is tight. You can keep it in the fridge for up to three days. If you need it to last longer, consider freezing it. When you're ready to enjoy your soup again, heat it gently. Pour the soup into a pot. Warm it on low heat, stirring often. You can also use the microwave. Heat it in short bursts, stirring in between. This keeps the soup creamy and tasty. To freeze the soup, use freezer-safe containers. Leave some space at the top for expansion. Label the containers with the date. The soup can last up to three months in the freezer. When you're ready to eat, thaw it in the fridge overnight before reheating. I love using cannellini beans for this soup. They have a creamy texture and mild flavor. Navy beans also work well. They offer a nice bite and hold up in the soup. If you use dried beans, soak and cook them first. Canned beans save time and are just as tasty. Always rinse canned beans to remove excess salt. Yes, you can easily make this soup in a slow cooker. Start by sautéing the onions, carrots, and celery in a pan. This step adds depth to the flavor. Then, add all ingredients to the slow cooker. Cook on low for 6-8 hours or on high for 3-4 hours. Your soup will still be rich and hearty. To adjust spice, you can add red pepper flakes. Start with a pinch for a mild heat. If you want more spice, add more flakes to taste. You can also include fresh ground black pepper. For a different flavor, try adding smoked paprika. Always taste as you go to find your perfect heat. Absolutely! This soup is packed with nutrients. It has fiber from beans and vitamins from vegetables. Kale adds iron and antioxidants. Using vegetable broth keeps it low in calories too. This soup is filling and nourishing, making it a healthy choice for any meal. Tuscan White Bean Soup is simple and tasty. You learned about the ingredients, cooking steps, and tips to improve flavor. I also covered healthy options and how to store leftovers. Remember, you can adapt this soup for any season or diet. Enjoy making this dish. It warms the heart and feeds the soul. You now have all you need to create your perfect bowl of soup. Make it your own!

Tuscan White Bean Soup Flavorful and Nourishing Meal

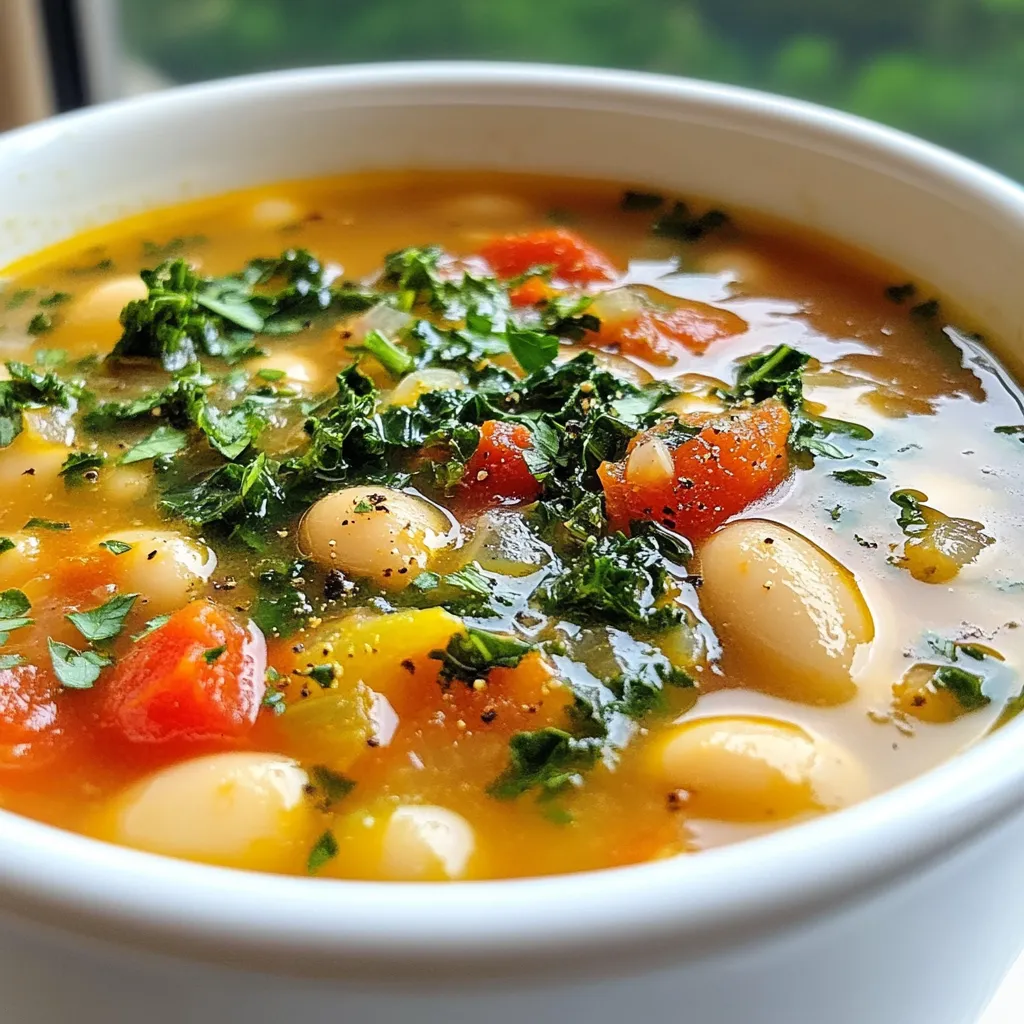
Are you ready to warm your soul with a bowl of Tuscan White Bean Soup? This dish is not just

To make classic beef enchiladas, you need a few key items. Here’s what you’ll need: - 1 lb ground beef - 1 small onion, chopped - 2 cloves garlic, minced - 1 can (15 oz) black beans, drained and rinsed - 1 can (10 oz) enchilada sauce (mild or spicy) - 1 cup corn kernels (fresh or frozen) - 1 tsp ground cumin - 1 tsp chili powder - 1 cup shredded cheddar cheese - 8 large flour tortillas These ingredients create a filling that is hearty and flavorful. The beef, beans, and spices mix well. You’ll enjoy the taste in every bite. You can add some fun garnishes to your enchiladas. Here are a few ideas: - Fresh cilantro for a burst of flavor - Sour cream for creaminess - Sliced jalapeños for heat - Avocado slices for a fresh touch These garnishes add color and enhance the meal. Feel free to mix and match! If you don't have some ingredients, don't worry! Here are some easy swaps: - Use turkey or chicken instead of ground beef for a lighter option. - Swap black beans with pinto beans for a different taste. - If you can't find flour tortillas, corn tortillas work well too. - Use any cheese you like, such as Monterey Jack or pepper jack. These substitutions still keep the enchiladas tasty and enjoyable. Don’t be afraid to get creative! {{ingredient_image_1}} First, gather all your ingredients. You need ground beef, onion, garlic, black beans, and corn. Make sure your cheese is shredded and ready. You will also need enchilada sauce and flour tortillas. This helps keep things organized. 1. In a large skillet, heat the pan over medium heat. 2. Add the ground beef, chopped onion, and minced garlic to the skillet. 3. Cook until the beef is browned and the onion is soft. This should take about 5 to 7 minutes. 4. Drain any excess fat from the skillet. This makes the enchiladas less greasy. 5. Now, stir in the black beans, corn, cumin, and chili powder. Mix well and cook for another 5 minutes. While your beef mixture cooks, preheat your oven to 375°F (190°C). This step is key for baking later. 1. Take a 9x13 inch baking dish. Spread a thin layer of enchilada sauce on the bottom of the dish. This helps keep the enchiladas from sticking. 2. Grab a tortilla and place about 1/4 cup of the beef mixture in the center. 3. Sprinkle some shredded cheddar cheese on top of the mixture. 4. Roll the tortilla tightly and place it seam-side down in the baking dish. 5. Repeat this step with the remaining tortillas. Once all the enchiladas are in the baking dish, it’s time to bake. 1. Pour the rest of the enchilada sauce over the top of the rolled tortillas. 2. Sprinkle any remaining cheese on top. 3. Bake in the preheated oven for about 20 minutes. You want the cheese to be bubbly and golden. 4. After baking, remove the dish from the oven and let it cool for a few minutes. 5. Before serving, garnish with fresh cilantro for a pop of color and flavor. Serve hot and enjoy your delicious beef enchiladas! To keep your tortillas crisp, warm them before filling. Heat each tortilla in a dry pan for about 30 seconds. This softens them and makes them easier to roll. You can also dip them in enchilada sauce briefly. This adds flavor and protects them from soaking up too much liquid in the pan. Cheddar cheese is my go-to for enchiladas. It melts well and adds great taste. You can also mix in Monterey Jack for a creamier texture. If you want a stronger flavor, try using pepper jack. This adds a nice kick to your dish. Always use fresh cheese for the best results. You can prepare enchiladas a day in advance. Just assemble them, cover with foil, and store in the fridge. When ready to bake, pour the sauce and sprinkle cheese on top. Bake as directed, adding a few extra minutes if they're cold. This saves you time and lets the flavors meld beautifully. Pro Tips Use Fresh Ingredients: Fresh onions and garlic will enhance the flavor of your beef enchiladas significantly. Opt for fresh corn kernels if available for added sweetness and texture. Customize the Heat: Adjust the spiciness of the enchiladas by choosing a mild or spicy enchilada sauce. You can also add chopped jalapeños or hot sauce to the beef mixture for an extra kick. Cheese Variations: While cheddar cheese is classic, you can experiment with other cheeses like Monterey Jack, pepper jack, or a blend of Mexican cheeses for a different flavor profile. Make Ahead: Prepare the enchiladas a day in advance and refrigerate them before baking. Just add a few extra minutes to the baking time if they're coming straight out of the fridge. {{image_2}} You can make a tasty vegetarian version of enchiladas. Start with black beans or lentils instead of beef. Use fresh veggies like bell peppers, zucchini, and spinach for a healthy mix. You can also add corn for sweetness. Choose a mild or spicy enchilada sauce to match your taste. Top with cheese or a dairy-free option like cashew cream. These enchiladas are filling and full of flavor. For those who love a kick, spicy beef enchiladas are perfect. Use ground beef mixed with jalapeños or hot sauce for a fiery touch. You could also try adding diced green chiles. This adds heat without losing flavor. Don't forget to use spicy enchilada sauce for more intensity. Serve with sour cream to cool down the spice. These will surely excite your taste buds. If you're watching carbs, there are great low-carb options. Instead of tortillas, use thin slices of zucchini or bell peppers. You can also use cauliflower rice as a base. For the filling, stick with ground beef and vegetables. Top it with cheese and enchilada sauce as usual. Bake until the cheese is golden. These low-carb enchiladas provide all the taste with fewer carbs. After you enjoy your beef enchiladas, store leftovers right away. Let them cool down first. Place them in an airtight container. They can last in the fridge for about 3 to 4 days. To save space, you can stack them. Just make sure they are covered well. Reheating your enchiladas is easy. You can use the oven or microwave. For the oven, preheat it to 350°F (175°C). Place the enchiladas in a baking dish. Cover with foil to keep them moist. Heat for about 15 to 20 minutes. If you use the microwave, put them on a plate. Heat in short bursts of 1 minute until warm. Add a splash of water to keep them soft. Freezing enchiladas is a great way to save them. Wrap each one tightly in plastic wrap. Then, place them in a freezer bag. Remove as much air as possible. They can stay fresh for about 2 to 3 months. When you want to eat them, thaw in the fridge overnight. Then, reheat as described above. Enjoy your tasty meal anytime! Beef enchiladas come from Mexico. They are a staple in Mexican cuisine. The word "enchilada" means "to season with chili." Traditionally, people filled tortillas with meat or cheese and then rolled them. They would cover the rolled tortillas with a spicy sauce. This dish has roots in ancient times, when people used corn tortillas. Yes, you can use corn tortillas. Corn tortillas give a different taste and texture. They are smaller and thicker than flour tortillas. They hold up well with filling and sauce. Just make sure to warm them a bit first. This helps them stay soft and not break when you roll them. You can prepare enchiladas a day in advance. Just follow the recipe until you fill the tortillas. Place them in the baking dish, cover with sauce and cheese, then wrap it tightly. Keep it in the fridge overnight. When you are ready to eat, just bake them. You may need to add a few extra minutes to the baking time. This blog post covers all you need to make delicious enchiladas. We explored crucial ingredients, cooking steps, and ways to avoid soggy tortillas. I shared tips for different variations and how to store your leftovers. Enchiladas are fun to make and enjoy. With these easy steps, you can impress anyone. Dive into your kitchen, get creative, and enjoy every flavorful bite with family and friends. Happy cooking!

Classic Beef Enchiladas Flavorful and Hearty Recipe

Get ready to dive into the world of Classic Beef Enchiladas! This hearty recipe is packed with flavor and perfect

When making Caribbean jerk chicken skewers, you need fresh ingredients. Here’s what you will need: - Chicken and marinade components - 1.5 lbs chicken breast, cut into cubes - 2 tablespoons olive oil - 1 tablespoon soy sauce - 1 tablespoon apple cider vinegar - 3 cloves garlic, minced - 1 tablespoon ginger, grated - 2 teaspoons allspice - 1 teaspoon thyme - 1 teaspoon cayenne pepper - 1 teaspoon cinnamon - 1 teaspoon black pepper - Salt to taste - Vegetables for skewering - 2 green onions, chopped - 1 bell pepper (yellow or red), cut into chunks - 1 red onion, cut into chunks - Skewer preparation - Skewers (soaked in water if wooden) Use fresh, high-quality ingredients to get the best flavor. The marinade brings a spicy kick. You can also add extra veggies to the skewers to enhance color and taste. This recipe makes a great meal for summer grilling. Check out the Full Recipe for more details on how to bring this dish to life! To start, you need to make the jerk marinade. In a large bowl, mix together these ingredients: - 2 tablespoons olive oil - 1 tablespoon soy sauce - 1 tablespoon apple cider vinegar - 3 cloves garlic, minced - 1 tablespoon ginger, grated - 2 teaspoons allspice - 1 teaspoon thyme - 1 teaspoon cayenne pepper - 1 teaspoon cinnamon - 1 teaspoon black pepper - Salt to taste Combine them well. This mix gives the chicken its bold flavor. Next, add 1.5 lbs of cubed chicken breast to the bowl. Make sure every piece is well-coated in the marinade. Cover the bowl and refrigerate for at least 2 hours. For the best taste, marinate overnight. After marination, it’s time to assemble the skewers. First, soak your wooden skewers in water to prevent burning. Then, grab your marinated chicken and some colorful veggies. I like to use: - 1 bell pepper (yellow or red), cut into chunks - 1 red onion, cut into chunks - 2 green onions, chopped Start by placing a piece of chicken on the skewer. Follow it with a chunk of bell pepper and a piece of red onion. Repeat this pattern until the skewer is filled. Don’t crowd the pieces; leave some space between them. This helps them cook evenly. Now, let’s get grilling! Preheat your grill to medium-high heat. Once hot, place the skewers on the grill. Cook for about 10-15 minutes, turning them occasionally. This ensures even cooking and nice grill marks. To check for doneness, use a meat thermometer. The internal temperature of the chicken should reach 165°F (75°C). When done, remove the skewers from the grill. Let them rest for a few minutes before serving. Garnish with chopped green onions for extra flavor. Enjoy your Caribbean Jerk Chicken Skewers! For more details, check out the Full Recipe. Marinating the chicken is key to great flavor. Aim for at least 2 hours in the fridge. I often marinate overnight for the best taste. You can boost the flavor by adding fresh herbs or citrus juice. Try lime or orange juice for a fruity twist. For the best jerk chicken skewers, heat the grill to medium-high. This range keeps the chicken juicy while giving it nice grill marks. To achieve those perfect marks, place the skewers at an angle on the grill. Turn them after a few minutes. This way, you get that beautiful char without burning the meat. Serve your jerk chicken skewers with rice and peas or a fresh salad. These sides balance the spicy flavors well. For a fun presentation, arrange the skewers on a colorful platter. Add lime wedges and fresh herbs for a bright touch. Don't forget to garnish with chopped green onions for an extra pop of color. For the full recipe, refer to the earlier section. {{image_2}} You can swap chicken for other meats in jerk skewers. Try pork or shrimp for a tasty change. Both options soak up the flavors well. If you prefer plant-based meals, use firm tofu or seitan. These options absorb the marinade nicely and give great texture. Adjust the heat to fit your taste. Want less spice? Cut down on cayenne pepper. For more kick, add extra cayenne or hot sauce. You can also switch up spices for different flavors. Try smoked paprika for a smoky taste or a dash of chili powder for warmth. Get creative with your jerk marinade! You can add mango or pineapple juice for a sweet twist. This adds tropical flair while keeping the classic taste. You can also mix in fresh herbs like cilantro or mint. This gives your skewers a refreshing edge. Don't hesitate to experiment with different fruits! To keep your Caribbean jerk chicken skewers fresh, follow these simple steps. First, let the skewers cool down to room temperature. Then, place them in an airtight container. You can also wrap them tightly in plastic wrap. This helps keep them juicy and full of flavor. Store them in the fridge for up to three days. If you want to keep them longer, consider freezing them. In the freezer, they can last for up to three months. Just be sure to label the container with the date. When it's time to enjoy your leftovers, reheating is key. The best method is to use an oven. Preheat your oven to 350°F (175°C). Place the skewers on a baking sheet. Cover them with foil to keep moisture in. Heat for about 10-15 minutes, or until they are warm. You can also use a microwave for quick reheating. However, this may make the chicken a bit dry. If you choose the microwave, cover the skewers with a damp paper towel. This helps keep the chicken tender. Always check that the chicken is heated to 165°F (75°C). This ensures it's safe to eat while keeping the flavors intact. For the full recipe, check out the details above. Caribbean jerk chicken bursts with spicy and sweet flavors. The magic lies in the jerk seasoning. This mix includes allspice, thyme, and fiery peppers. Each bite offers a taste of the islands. Historically, jerk cooking comes from Jamaica. Maroons, runaway slaves, first made it in the 18th century. They used spices to flavor meats and protect them from spoilage. Over time, the dish grew into a beloved Caribbean staple. Yes, you can cook these skewers in the oven. Preheat your oven to 400°F (200°C). Place the skewers on a baking sheet lined with parchment paper. Cook for about 20-25 minutes. Turn the skewers halfway through for even cooking. For best results, adjust the cooking time based on your oven's heat. Each oven is unique. Check that the chicken reaches 165°F (75°C) for safety. To make this recipe gluten-free, swap soy sauce for a gluten-free option. Tamari or coconut aminos work well. Always check labels to ensure no hidden gluten. Avoid cross-contamination by using separate utensils and cutting boards. Clean surfaces before preparing your food. These steps keep your meal safe and tasty. Pair your jerk chicken skewers with tasty sides. Here are some favorites: - Rice and peas - Grilled corn on the cob - Mango salsa - Coleslaw For drinks, enjoy a cold beer or fruity rum punch. These choices complement the skewers perfectly, enhancing your meal experience. In this blog post, we covered everything you need to know for delicious Caribbean jerk chicken skewers. From gathering ingredients to cooking techniques, each step is simple and fun. Remember, marinating the chicken is key for flavor. Grilling tips help you achieve those perfect marks while keeping the meat juicy. Embrace variations with different proteins or spice levels to suit your taste. Finally, don't forget to store any leftovers properly for future meals. Enjoy making these skewers with friends and family for a tasty treat!

Caribbean Jerk Chicken Skewers Flavorful Grilling Delight

Get ready to ignite your taste buds with Caribbean Jerk Chicken Skewers! These flavorful treats are perfect for any grilling

- 1 medium head of cauliflower, cut into florets - 1 cup elbow macaroni (or gluten-free pasta) - 2 tablespoons butter - 2 tablespoons all-purpose flour (or gluten-free flour) - 2 cups milk (dairy or non-dairy) - 1 ½ cups sharp cheddar cheese, shredded - ½ cup mozzarella cheese, shredded - 1 teaspoon garlic powder - ½ teaspoon onion powder - ½ teaspoon smoked paprika - Salt and pepper to taste - ¼ cup breadcrumbs (optional for topping) - Fresh parsley, chopped (for garnish) I love that this dish packs so much flavor. The key is using fresh ingredients. The cauliflower adds a nice texture. The elbow macaroni brings that comforting bite. For the cheese, I always use sharp cheddar. It gives a strong taste that melts well. Mixing in mozzarella makes it creamy and gooey. You can even switch to vegan cheese if you want a dairy-free option. When it comes to spices, garlic powder adds a savory kick. Onion powder gives it depth. Smoked paprika brings a hint of smokiness. Adjust the salt and pepper to your liking. If you want a crunchy top, sprinkle breadcrumbs before baking. For a fresh touch, I like to add parsley right before serving. It brightens the dish and adds color. This recipe is all about balance. You have comfort from the pasta and a healthy twist from the cauliflower. Don't forget to check out the Full Recipe for more tips! - Preheat your oven to 350°F (175°C). - Cook macaroni according to package instructions. - Steam cauliflower florets until tender, about 5-7 minutes. - Drain and set aside. - Melt butter in a pot and stir in flour to create a roux. - Gradually add milk while whisking. Then incorporate melted cheese and seasonings. - Mix cooked macaroni and steamed cauliflower with cheese sauce. - Pour mixture into a greased baking dish and top with breadcrumbs if desired. - Bake for 20-25 minutes until golden and bubbly. - Garnish with fresh parsley before serving. When you follow these steps, you create a creamy and cheesy dish. The combination of pasta and cauliflower makes it comforting and filling. You can find the full recipe above for all the details. Enjoy this dish with family and friends! Use freshly shredded cheese for the best taste and smoothness. Pre-shredded cheese has anti-caking agents that can affect texture. To adjust the thickness, play with the amount of flour and milk. More flour makes it thicker, while less gives a smoother sauce. Cook your cauliflower until tender, but avoid mushiness. This helps keep the right texture in your dish. For more flavor, try roasting the cauliflower. Roasting brings out a deeper taste that blends well with the cheese sauce. Pair your dish with a fresh side salad or garlic bread. This adds great crunch and flavor. You can serve it as a main dish or a comforting side. It fits any meal, making it super versatile. For the full recipe, check out the details above. {{image_2}} To make this dish gluten-free, swap the pasta and flour. Use gluten-free pasta and gluten-free flour. This way, you can enjoy creamy goodness without worry. It tastes just as good as the classic version! If you follow a keto diet, you can still enjoy this meal. Choose a low-carb pasta, like zucchini noodles or shirataki noodles. You can cut back on the flour too. This keeps the carbs low while still giving you a tasty dish. Adding protein can make this meal even better. You can mix in cooked chicken or crispy bacon for extra flavor. If you want more veggies, add broccoli or spinach. This adds nutrition and makes the dish heartier. You’ll love how easy it is to customize! Store any leftovers in an airtight container for up to 3 days. This keeps the dish fresh and tasty. When you are ready to eat, just grab it from the fridge. If you want to save some for later, freeze it before baking. This way, you can enjoy it fresh later. To cook, let it defrost overnight in the fridge. This helps it heat evenly. To reheat, use the oven for the best results. This keeps the topping crispy and delicious. For a quick meal, the microwave also works well. Just make sure to heat it in short bursts to avoid overcooking. Yes, you can prepare and refrigerate the uncooked dish until ready to bake. This makes it a great option for meal prep. Just cover it well with plastic wrap or foil to keep it fresh. When you're ready to enjoy it, simply pop it in the oven. Bake it as directed, adding a few extra minutes if it's cold from the fridge. To make this dish vegan, use non-dairy milk and vegan cheese alternatives. There are many tasty vegan cheeses available now. Look for ones that melt well. This way, you can enjoy a creamy and cheesy flavor without any dairy. Any pasta shape works, including shells, penne, or even zoodles for a lighter option. Zoodles, made from zucchini, add a fresh twist to this dish. You can also use gluten-free pasta if needed. Just make sure to cook it according to the package directions. This blog post outlined a tasty cauliflower mac and cheese recipe. It covered ingredients, step-by-step instructions, and helpful tips. You learned how to make a creamy cheese sauce and combine it with pasta and cauliflower. For a comforting meal, this dish is a reliable choice. Feel free to add your favorite proteins or make it gluten-free. Enjoy making and sharing this dish with those you love!

Cauliflower Mac and Cheese Simple Comfort Meal

Looking for a comforting dish that’s both tasty and healthy? Try my Cauliflower Mac and Cheese! This simple recipe swaps

- 4 bone-in chicken thighs, skin-on - 3 tablespoons honey - 2 tablespoons Dijon mustard - 1 tablespoon whole grain mustard - 2 tablespoons olive oil - 2 cloves garlic, minced - 1 teaspoon dried thyme - Salt and pepper to taste - 1 tablespoon apple cider vinegar - Fresh parsley, chopped Gathering the right ingredients is key to making honey mustard chicken thighs. The main ingredients like chicken thighs, honey, and mustard bring bold flavors. The honey adds sweetness, while the mustards give it a tangy kick. The additional ingredients work together to elevate the dish. Olive oil helps in cooking and adds richness. Garlic gives a nice aroma, and thyme adds depth. Don't forget salt and pepper to enhance all the flavors. Finally, fresh parsley serves as a bright garnish. It adds color and a fresh taste. Once you have everything ready, you'll make a dish that looks and tastes fantastic. For the complete list of steps, check the Full Recipe. - Preheat your oven to 400°F (200°C). - In a bowl, mix honey, Dijon mustard, whole grain mustard, olive oil, minced garlic, dried thyme, apple cider vinegar, salt, and pepper. Whisk it well to blend the flavors. - Pat the chicken thighs dry with a paper towel. Season both sides with salt and pepper. - Place the chicken in a zip-top bag or shallow dish. Pour the marinade over the chicken. Make sure each piece is well-coated. Seal the bag or cover the dish and refrigerate for at least 30 minutes or up to 2 hours. - Arrange the marinated chicken thighs skin-side up on a baking sheet lined with parchment paper. - Bake for about 35 to 40 minutes, until the skin is crispy and the internal temperature hits 165°F (75°C). - For an extra crispy skin, broil the chicken thighs for 2 to 3 minutes. Watch closely to avoid burning. - Remove the chicken from the oven and let it rest for 5 minutes before serving. - Garnish with freshly chopped parsley for a nice touch. For the full recipe, check out the [Full Recipe]. To make your honey mustard chicken thighs even tastier, marinate them longer. I suggest at least 30 minutes, but 2 hours works best. This extra time lets the flavors soak in. Adjust your seasoning as you like. If you want more sweetness, add more honey. For a kick, try more mustard. Trust your taste buds. For crispy skin, broil the chicken thighs at the end. Just 2-3 minutes under the broiler can make a big difference. Watch them closely to avoid burning. Using parchment paper on your baking sheet helps with cleanup. It prevents the skin from sticking, ensuring a perfect roast. Pair your chicken thighs with great sides. Roasted vegetables, rice, or mashed potatoes work well. A fresh salad adds color and crunch. For serving, arrange the chicken on a platter. Drizzle some sauce over the top for a beautiful look. Sprinkle chopped parsley for a pop of green. This makes your dish not just tasty but also pretty. {{image_2}} You can change the mustard in the recipe to match your taste. Spicy mustard adds a kick. Honey-infused mustard brings out more sweetness. You can even make your own mustard. Just mix mustard seeds with vinegar, salt, and spices. This way, you can control the flavor and heat. If you want to switch the chicken thighs, try turkey or tofu. Turkey has a similar texture and flavor. Tofu soaks up the marinade well. You can also change how you cook it. Grilling gives a nice smoky flavor, while slow-cooking keeps the meat tender and juicy. Adding vegetables makes the dish more colorful and healthy. Try carrots, bell peppers, or zucchini. They cook well alongside the chicken. You can also mix in herbs and spices. Rosemary, oregano, or paprika can add layers of flavor. A little experimentation can lead to amazing results. Check the [Full Recipe] for the base recipe and cooking instructions. To store leftovers, let the chicken cool first. Place it in an airtight container. This helps keep the chicken fresh. Use glass or plastic containers with tight lids. This will prevent any odor from other foods in the fridge. You can freeze marinated chicken for later use. Place the chicken in a freezer bag. Squeeze out as much air as possible before sealing. This keeps the chicken from getting freezer burn. To reheat, thaw it in the fridge overnight. Bake it at 375°F (190°C) until heated through. This will help maintain its juicy flavor. In the fridge, cooked chicken lasts about 3 to 4 days. If you freeze it, it can last up to 3 months. Look for signs of spoilage like a foul smell or slimy texture. If you notice either, it’s best to toss it out. Enjoy your Honey Mustard Chicken Thighs again with great care! To check if your chicken is cooked, use a meat thermometer. Insert it into the thickest part of the thigh. The internal temperature should reach 165°F (75°C). This ensures it is safe to eat. Also, check the juices. They should run clear, not pink. If you see any pink, keep cooking for a bit longer. Yes, you can use boneless chicken thighs. They cook faster than bone-in thighs. Adjust the cooking time to around 25-30 minutes. Boneless thighs are easier to eat. However, bone-in thighs have more flavor and stay juicier. It’s a trade-off based on your preference. If your chicken turns out dry, don’t fret! Make sure to marinate it well. A good soak adds moisture. Also, keep an eye on cooking time. Overcooking dries out chicken. Rest the meat after cooking. Letting it sit for a few minutes helps juices redistribute. This keeps your chicken moist and tasty. For more tips, check the Full Recipe. This blog post covered how to make a flavorful dish featuring bone-in chicken thighs. You learned about the key ingredients, preparation steps, and tips for enhancing flavor and texture. Experiment with different mustards and cooking methods for variety. Proper storage will keep your leftovers fresh, and you now know how to check for doneness. With these tools, you can create a delicious meal that delights friends and family. Enjoy your cooking journey!

Honey Mustard Chicken Thighs Flavorful and Simple Dish

Looking for a dish that’s both tasty and easy to make? Honey Mustard Chicken Thighs are your answer! With just

To make a tasty vegan chocolate mug cake, you need these simple ingredients: - 4 tablespoons all-purpose flour - 2 tablespoons unsweetened cocoa powder - 4 tablespoons almond milk (or other plant-based milk) - 2 tablespoons maple syrup - 1 tablespoon vegetable oil (or melted coconut oil) - 1/4 teaspoon baking powder - 1/4 teaspoon vanilla extract - A pinch of salt - Vegan chocolate chips (optional, for extra indulgence) These ingredients come together quickly, making this recipe perfect for a sweet craving. You can make your mug cake even better with these add-ins: - A sprinkle of cinnamon for warmth - A tablespoon of peanut butter or almond butter for creaminess - A few chopped nuts for crunch - A handful of fresh berries or banana slices for fruity flavor These options let you customize your cake to fit your taste. If you need to swap ingredients, here are some great ideas: - Use whole wheat flour instead of all-purpose flour for added fiber. - Replace maple syrup with agave nectar or date syrup for sweetness. - If you don’t have almond milk, try soy milk, oat milk, or coconut milk. - You can use applesauce instead of oil for a lower-fat option. These substitutes keep your mug cake vegan and delicious while giving you choices! To start, grab a microwave-safe mug. This mug will hold your delicious cake. Next, add these dry ingredients into the mug: - 4 tablespoons all-purpose flour - 2 tablespoons unsweetened cocoa powder - 1/4 teaspoon baking powder - A pinch of salt Mix these well with a fork. Make sure there are no lumps. Now, it's time for the wet ingredients. Add: - 4 tablespoons almond milk (or other plant-based milk) - 2 tablespoons maple syrup - 1 tablespoon vegetable oil (or melted coconut oil) - 1/4 teaspoon vanilla extract Stir until smooth. If you want a richer taste, fold in vegan chocolate chips. Now, let’s cook! Place your mug in the microwave. Cook it on high for 30-40 seconds. Watch closely as it cooks. The cake will rise and look set but still moist. Remember, it will keep cooking a bit after you take it out. For the best mug cake, do not overcook it. Every microwave is different. You might need to adjust the time. If it seems a bit wet, it’s fine. Let the cake cool for one minute before eating. For added flavor, top it with more chocolate chips, whipped coconut cream, or fresh berries. Enjoy your quick and easy vegan chocolate mug cake! To make a great vegan chocolate mug cake, focus on key points. First, measure your ingredients accurately. Too much flour makes the cake dry. Next, mix well but don’t overdo it. Overmixing can create a tough texture. When microwaving, keep an eye on the time. Start with 30 seconds and check. If it looks wet, add more time in 10-second bursts. Avoid opening the microwave door too soon. The cake needs time to rise. Enjoy your mug cake warm for the best taste. Let it cool for one minute before eating. This helps avoid burns and lets the flavors settle. Pair it with whipped coconut cream or fresh berries. You can also sprinkle more vegan chocolate chips on top. This adds texture and richness. Share it with friends for fun! Mug cakes are great for quick treats. Want to boost the flavor? Try adding a pinch of cinnamon or nutmeg. These spices add warmth and depth. You can also mix in a tablespoon of nut butter. This makes the cake richer and creamier. For extra texture, fold in nuts or seeds. They add crunch and healthy fats. If you love fruit, add mashed banana or applesauce. This can make your cake moist and flavorful. Enjoy experimenting! You can find more ideas in the Full Recipe. {{image_2}} You can change the flavor of your vegan chocolate mug cake. Here are a few fun ideas: - Peanut Butter: Swirl in a tablespoon of peanut butter before cooking. It adds a rich, nutty taste. - Mint Chocolate: Add a few drops of peppermint extract in place of vanilla. This gives a fresh twist. - Coffee: Mix in a teaspoon of instant coffee granules for a mocha flavor. It enhances the chocolate taste. Feel free to mix and match these flavors. This way, you can find your favorite! If you need a gluten-free version, don’t worry! You can use gluten-free flour blends instead of all-purpose flour. Look for blends that work in equal amounts. Here are some great options: - Almond Flour: This gives a nutty flavor and moist texture. - Coconut Flour: Use only a little, as it absorbs more liquid. A tablespoon is often enough. - Oat Flour: Just grind oats into a fine powder. It works well for a light texture. Using gluten-free options makes this mug cake easy for everyone to enjoy! Toppings can make your mug cake even better! Here are some ideas for tasty additions: - Vegan Whipped Cream: A dollop on top adds creaminess. - Fresh Berries: Strawberries or raspberries give a bright, fruity flavor. - Nuts: Chopped walnuts or almonds add crunch and health benefits. - Coconut Flakes: Toasted coconut on top adds texture and sweetness. Feel free to mix and match these toppings to create your dream dessert! Enjoy the process of making this cake your own. For the full recipe, check out the details above. If you have leftover vegan chocolate mug cake, store it in a sealed container. Make sure it cools to room temperature first. You can keep it in the fridge for up to three days. For best results, cover the top with plastic wrap or a lid. This helps keep it moist. To reheat your mug cake, place it in the microwave. Heat it for 10 to 15 seconds. Check if it's warm enough. If not, heat it a bit more. Be careful not to overheat. This will make the cake dry. The mug cake stays fresh in the fridge for about three days. If you want to keep it longer, you can freeze it. Wrap the mug cake tightly in plastic wrap, then place it in a freezer bag. It can last for up to three months in the freezer. When you're ready to eat it, thaw it overnight in the fridge. Reheat it as needed. For the full recipe, you can refer back to the main article. Yes, you can make this mug cake in an oven. Preheat the oven to 350°F (175°C). Use an oven-safe mug or small ramekin. Bake for about 10-12 minutes. Check for doneness with a toothpick. It should come out clean. You can use different plant-based options. For milk, try soy, oat, or rice milk. Maple syrup can be swapped for agave syrup or date syrup. Use coconut oil instead of vegetable oil. For a gluten-free option, choose almond flour or gluten-free flour. The mug cake is done when it rises and looks set. It should feel soft but not wet. Use a toothpick to test. If it comes out clean, your cake is ready. Remember, it continues to cook a bit after you take it out. This guide showed you how to make a tasty vegan chocolate mug cake. You learned the key ingredients, step-by-step instructions, and helpful tips. I shared ways to avoid mistakes and different flavor ideas. Storing or reheating is easy with the tips provided. Remember, you can customize this cake to fit your taste. Enjoy experimenting and creating your perfect mug cake!

Vegan Chocolate Mug Cake Quick and Simple Recipe

Craving something sweet but short on time? This Vegan Chocolate Mug Cake is your answer! In just minutes, you can

Older posts
Newer posts
← Previous Page1 … Page97 Page98 Page99 … Page137 Next →

dsad

© 2025 easycookingbite • Built with GeneratePress

Our Policies

  • Copyright Policy
  • Cookie Policy
  • GDPR Policy
  • Privacy Policy
  • Disclaimer
  • Terms Of Use

More Information

  • Home
  • About
  • Contact
  • Appetizers
  • Dessert
  • Dinner
  • Drinks
©2025, easycookingbite About Back To Top