Skip to content
DisclaimerTerms Of UseGDPR PolicyCookie Policy

easycookingbite

  • Home
  • Drinks
  • Appetizers
  • Dinner
  • Dessert
  • About
  • Contact
  • Privacy Policy
DisclaimerTerms Of UseGDPR PolicyCookie Policy

Lily

To make spicy tuna sushi bowls, you need fresh and high-quality items. Here are the essential ingredients: - 1 cup sushi rice - 1 ½ cups water - 1 tablespoon rice vinegar - 1 tablespoon sugar - ½ teaspoon salt - 8 oz sushi-grade tuna, diced - 2 tablespoons mayonnaise (preferably Japanese Kewpie mayo) - 1 tablespoon sriracha sauce (adjust for heat preference) - 1 teaspoon sesame oil - ½ avocado, sliced - 1 small cucumber, thinly sliced - 1 radish, thinly sliced - 2 green onions, chopped - Seaweed sheets, cut into strips (for garnish) - Sesame seeds (for garnish) - Pickled ginger (optional, for serving) These ingredients create a delightful mix of flavors and textures. Sushi rice gives a soft base. The tuna adds freshness, while the spicy mayo brings heat. If you can’t find an ingredient, don’t worry! Here are some easy swaps: - Sushi rice: You can use short-grain brown rice. It will have a nuttier flavor. - Sushi-grade tuna: Try diced salmon or cooked shrimp for a different taste. - Kewpie mayo: Regular mayo works, but Kewpie adds a unique flavor. - Sriracha sauce: Use chili sauce or a dash of hot sauce if you want a milder spice. - Vegetables: Add shredded carrots or radish sprouts for crunch. These options keep the dish fresh and fun! This dish is not just tasty; it also offers good nutrition. Here’s a quick overview of what you get in one serving: - Calories: About 500 - Protein: 30g - Carbohydrates: 60g - Fat: 15g The tuna gives you protein. The rice provides energy from carbs. Adding avocado adds healthy fats too. Enjoy this meal knowing it feeds your body well. For the full recipe, check out the instructions above! To make tasty sushi rice, start by rinsing the rice. Use cold water, and rinse it about 3-4 times. This step is key; it removes extra starch. Once rinsed, place the rice in a saucepan with 1 ½ cups of water. Bring it to a boil over medium-high heat. When it starts boiling, lower the heat, cover, and simmer for 18-20 minutes. After cooking, remove it from heat and let it sit for 10 minutes with the lid on. This resting time helps the rice finish cooking. Next, mix rice vinegar, sugar, and salt in a small bowl. Stir until dissolved. Then, gently fold this mix into the rice. Let the rice cool down to room temperature. While the rice cools, it’s time to make the spicy tuna mix. Start with 8 oz of sushi-grade tuna. Dice it into small pieces. In a bowl, combine the tuna with 2 tablespoons of mayonnaise and 1 tablespoon of sriracha sauce. You can adjust the sriracha based on how spicy you want it. Add 1 teaspoon of sesame oil to the mix. Stir everything together until the tuna is evenly coated. This mix is what gives the bowls their bold flavor. Now we can assemble our sushi bowls. Take the cooled sushi rice and divide it among 2-3 bowls. Top each bowl with a generous scoop of the spicy tuna mix you just made. Next, add sliced avocado, cucumber, and radish on top of the tuna. Sprinkle chopped green onions and sesame seeds over everything for extra flavor. Finally, garnish with strips of seaweed. If you like, serve with pickled ginger on the side. Your spicy tuna sushi bowls are now ready to enjoy! Check out the Full Recipe for more details. To make sushi rice, rinse it well. Rinse under cold water until it’s clear. This removes excess starch and keeps rice from being sticky. Use a ratio of 1 cup of sushi rice to 1 ½ cups of water. Bring it to a boil, then lower the heat. Cover and simmer for 18-20 minutes. Let it sit for 10 minutes after cooking. Then, mix in rice vinegar, sugar, and salt. This gives the rice a balanced flavor. You can control the spice in your tuna mix. Start with 1 tablespoon of sriracha. If you like it hotter, add more sriracha. Mix it well with mayonnaise and sesame oil to coat the tuna. Taste it before serving to find your perfect heat level. This way, you can enjoy the bowl just right for you. A well-presented bowl can make your meal special. Use colorful ingredients to create a vibrant look. Slice the avocado and cucumber thinly for a nice texture. Arrange the toppings neatly on the rice. Sprinkle sesame seeds and green onions on top for added flair. Don’t forget the seaweed strips for a pop! A beautiful bowl makes the meal more enjoyable. You can find the full recipe to guide you through this process. Enjoy your cooking! {{image_2}} You can swap out tuna for other proteins. Salmon works great and offers a rich flavor. Shrimp is another tasty option. Cook it quickly or use it raw if it's sushi-grade. For a beef twist, try thinly sliced steak. Each protein brings its own taste to the bowl. Add more color and crunch with various veggies. Shredded carrots add sweetness and texture. Bell peppers can enhance the taste with their crispness. Edamame is a fun choice and boosts protein. You can even add pickled vegetables for a tangy kick. The more veggies, the better the bowl. You don’t need fish for a delicious bowl. Instead, use marinated tofu or tempeh. These options soak up flavors well. Try using mushrooms for an umami touch. You can also add avocado and cucumber for a fresh taste. With these choices, everyone can enjoy a sushi bowl. For more ideas, check the Full Recipe. To keep your spicy tuna sushi bowls fresh, store them in airtight containers. Place any leftover sushi rice and toppings separately. The rice can dry out when kept with toppings. Ensure you refrigerate the containers within two hours to avoid spoilage. Leftovers are best eaten within 1-2 days for optimal taste. You can freeze sushi bowls, but it's not always ideal. The rice texture may change when thawed. If you choose to freeze, pack the rice and toppings separately. Use freezer-safe containers or bags for this. When you’re ready to eat, thaw in the fridge overnight. This helps preserve some texture. To reheat the rice, use a microwave. Add a splash of water to keep it moist. Cover the bowl with a damp paper towel to prevent drying out. Heat in short bursts, stirring in between. For the tuna mix, do not reheat, as it tastes best cold. Just add it fresh to the warm rice. Enjoy your meal! Sushi-grade tuna is the best quality fish. It is fresh and safe to eat raw. Fish labeled as sushi-grade has been handled carefully. It goes through strict freezing processes to kill parasites. This makes it safe for sushi and sashimi. You should always buy from trusted suppliers. Look for bright color and firm texture when choosing tuna. You can use regular mayonnaise if you must. However, Kewpie mayo gives a richer flavor. It has umami notes and a creamy texture. This enhances the taste of your spicy tuna mix. If you use regular mayo, add a bit of sesame oil. This will help mimic the flavor of Kewpie. The best restaurants serve spicy tuna sushi bowls with fresh ingredients. Look for sushi spots with good reviews. Some popular places include local sushi bars and Asian fusion restaurants. They often have unique twists on the classic bowl. You can also check online food apps for recommendations. Try to find places that focus on fresh seafood. In this post, we explored how to make delicious spicy tuna sushi bowls. We discussed key ingredients, easy instructions, and helpful tips to achieve the perfect dish. You can also try various proteins and veggies based on your taste. Remember, storage and reheating methods matter for leftovers too. Whether you’re a beginner or a pro, this guide can help you make tasty bowls. Dive in and enjoy the fun of sushi preparation!

Spicy Tuna Sushi Bowls Easy and Flavorful Recipe

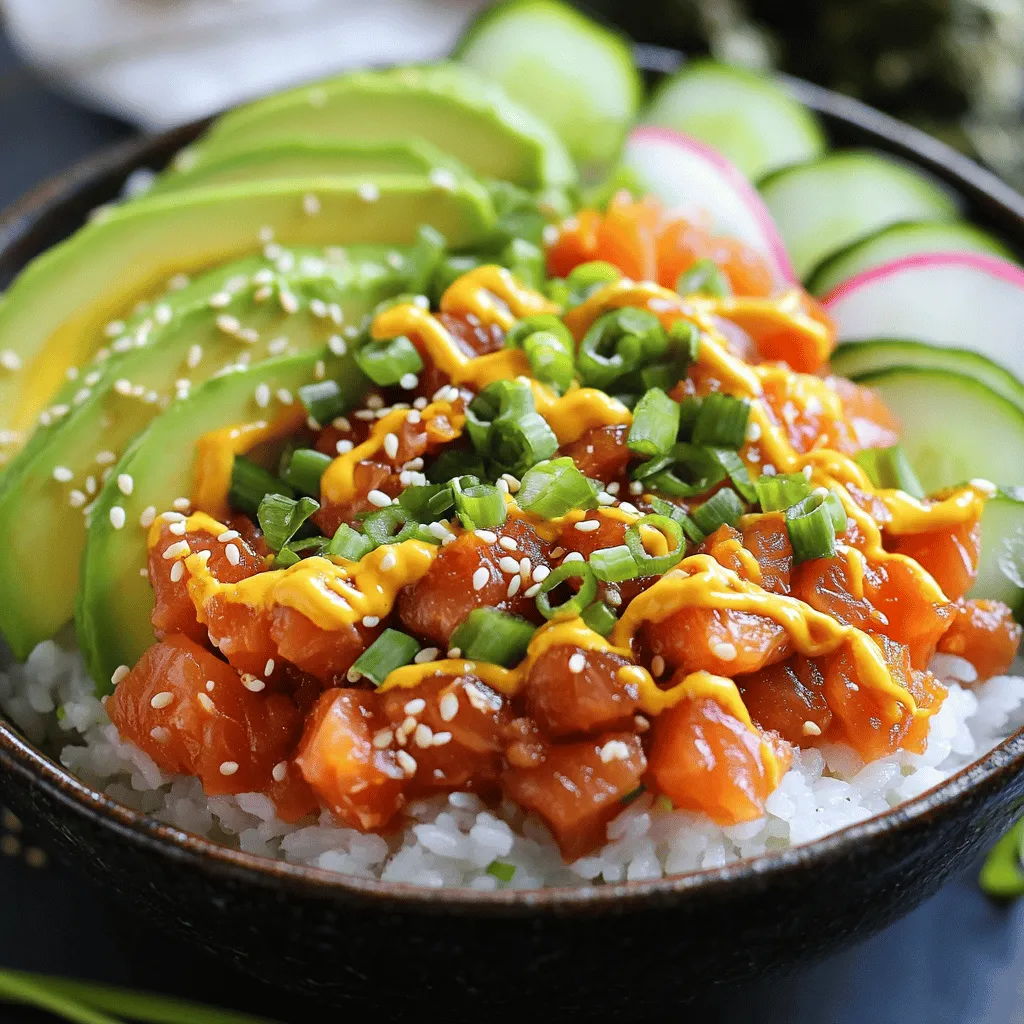
Craving something fresh and zesty? Spicy Tuna Sushi Bowls are the answer! This easy, flavorful recipe transforms simple ingredients into

To make delicious baked teriyaki salmon, you will need the following ingredients: - 4 salmon fillets (about 6 oz each) - ¼ cup low sodium soy sauce - ¼ cup honey or maple syrup - 2 tablespoons rice vinegar - 2 teaspoons sesame oil - 2 cloves garlic, minced - 1 teaspoon fresh ginger, grated - 1 tablespoon cornstarch mixed with 2 tablespoons water (slurry) - 1 tablespoon sesame seeds - 3 green onions, finely chopped - Optional serving suggestions: steamed broccoli and rice These simple ingredients come together to create a tasty dish. The salmon fillets are the star here. They are rich in flavor and healthy too. The marinade, made with soy sauce, honey, and rice vinegar, gives the salmon a sweet and tangy taste. Sesame oil adds a nice nutty flavor. Garlic and ginger bring warmth and depth. Using low sodium soy sauce helps keep the dish lighter. The cornstarch slurry helps thicken the sauce, making it sticky and delicious. Feel free to add steamed broccoli and rice for a full meal. They pair well with the salmon. This dish is easy to make and perfect for any night of the week. For the full recipe, check out the details above. - Preheat the oven to 375°F (190°C). - In a medium bowl, whisk together soy sauce, honey (or maple syrup), rice vinegar, sesame oil, minced garlic, and grated ginger. This mixture forms the teriyaki marinade. - Place the salmon fillets in a shallow dish. Pour the marinade over the salmon, ensuring each piece is well coated. - Allow the salmon to marinate for 15-20 minutes. This step infuses the fish with rich flavors. - Transfer the marinated salmon to a lined baking sheet, skin-side down. Pour any remaining marinade on top of the salmon. - Bake in the preheated oven for 15 minutes. After this time, remove the baking sheet from the oven. Slowly pour the cornstarch slurry over the salmon. This helps thicken the sauce. - Return the salmon to the oven and bake for an additional 5-10 minutes. The salmon should easily flake with a fork and have a slightly caramelized top. For the full recipe, refer to the earlier section. Enjoy your delicious baked teriyaki salmon! To make your baked teriyaki salmon shine, marination is key. I recommend marinating for at least 15-20 minutes. This time allows the flavors to soak into the fish. If you can, try to marinate for a full hour. You’ll taste the difference! For the best flakiness in salmon, avoid overcooking. Salmon is done when it easily flakes with a fork. Keep an eye on it, especially during the last few minutes of baking. If you see a hint of caramelization on top, that’s a sign it’s cooked just right. Baked teriyaki salmon pairs well with various sides. I love serving it with steamed broccoli and rice. The rice absorbs the teriyaki sauce, making each bite delicious. You could also add a fresh salad for a crunchy contrast. To make your plate look appealing, serve the salmon on a bed of rice. Drizzle extra teriyaki sauce from the baking sheet on top. Garnish with chopped green onions and sesame seeds for a final touch. This simple step makes your dish pop! For the full recipe, check out the earlier section. {{image_2}} You can make this recipe even better by swapping some ingredients. If you want a low-sugar option, try using coconut aminos. This sauce has a similar taste to soy sauce but is lower in sugar and sodium. It works great in the marinade. If you want to switch up your fish, salmon is not the only choice. You can use trout, cod, or even halibut. Each fish will give a different taste but will still soak up that tasty teriyaki flavor. You might wonder if you should grill or bake your salmon. Baking is easier and gives a nice, even cook. You can simply set it and forget it. Grilling gives a smoky flavor but needs more attention. If you want a quicker option, try an air fryer. To make teriyaki salmon in the air fryer, follow these steps: 1. Preheat the air fryer to 375°F (190°C). 2. Marinate your salmon as usual. 3. Place the salmon in the air fryer basket, skin-side down. 4. Cook for about 10-12 minutes, or until it flakes easily with a fork. This method keeps the salmon juicy and cooks it fast. For more details on the full recipe, check out the Full Recipe section. To keep your baked teriyaki salmon fresh, follow these steps. First, let the salmon cool down to room temperature. Then, wrap each piece in plastic wrap or foil. This will help keep the moisture in. Place the wrapped salmon in an airtight container. Store it in your fridge. You can safely store leftovers for up to three days. After that, the taste and texture may change. Reheating salmon can be tricky. You want to keep it moist and tasty. The best way is to use the oven. Preheat your oven to 275°F (135°C). Place the salmon on a baking sheet. Cover it with foil to trap the moisture. Heat it for about 15 minutes. You can also use the microwave, but be careful. Set it to a lower power level. Heat the salmon in short bursts of 30 seconds. Check it often to avoid overcooking. This way, your salmon stays juicy and delicious. For more details, check out the Full Recipe. How long to cook salmon for best results? For the best results, bake your salmon for about 20-25 minutes. Start with 15 minutes, then add a cornstarch slurry. This will help create a nice glaze. Always check that the salmon flakes easily with a fork. Can I freeze baked teriyaki salmon? Yes, you can freeze baked teriyaki salmon. Wrap it tightly in plastic wrap or foil. It will stay fresh for up to three months. Thaw it in the fridge before reheating for best results. What to serve with baked teriyaki salmon? I recommend serving baked teriyaki salmon with steamed broccoli and rice. The light flavors of the sides really complement the salmon. You can also add a fresh salad or some pickled vegetables for extra crunch. What are the nutritional values of the baked teriyaki salmon? Baked teriyaki salmon is rich in protein, omega-3 fatty acids, and various vitamins. Each serving contains about 350 calories, 34g of protein, and 20g of healthy fats. This makes it a nutritious choice for any meal. Is teriyaki salmon healthy? Yes, teriyaki salmon is a healthy dish when made with fresh ingredients. It offers a good balance of protein and healthy fats. Using low-sodium soy sauce and natural sweeteners, like honey, improves its health profile. Brief history of teriyaki sauce and its use in salmon dishes Teriyaki sauce has roots in Japan, dating back to the 17th century. The term "teriyaki" means "to grill" or "to broil." It became popular for its sweet and savory flavor, especially with fish like salmon. Cultural significance of teriyaki in Japanese cuisine Teriyaki is an important part of Japanese cuisine. It showcases the harmony of flavors and cooking methods. Using fresh, local ingredients reflects a deep respect for nature in Japanese culture. Teriyaki dishes are loved worldwide for their unique taste and versatility. This blog post detailed how to make baked teriyaki salmon using simple ingredients and steps. You learned about marinating, baking, and serving this tasty dish. The tips shared help improve flavor and presentation. Remember, you can swap ingredients and cooking methods to suit your taste. Storing leftovers properly keeps them fresh for later. With these guidelines, you can easily enjoy delicious teriyaki salmon at home. Embrace the joy of cooking this dish and impress family and friends with your skills. Happy cooking!

Baked Teriyaki Salmon Flavorful and Simple Recipe

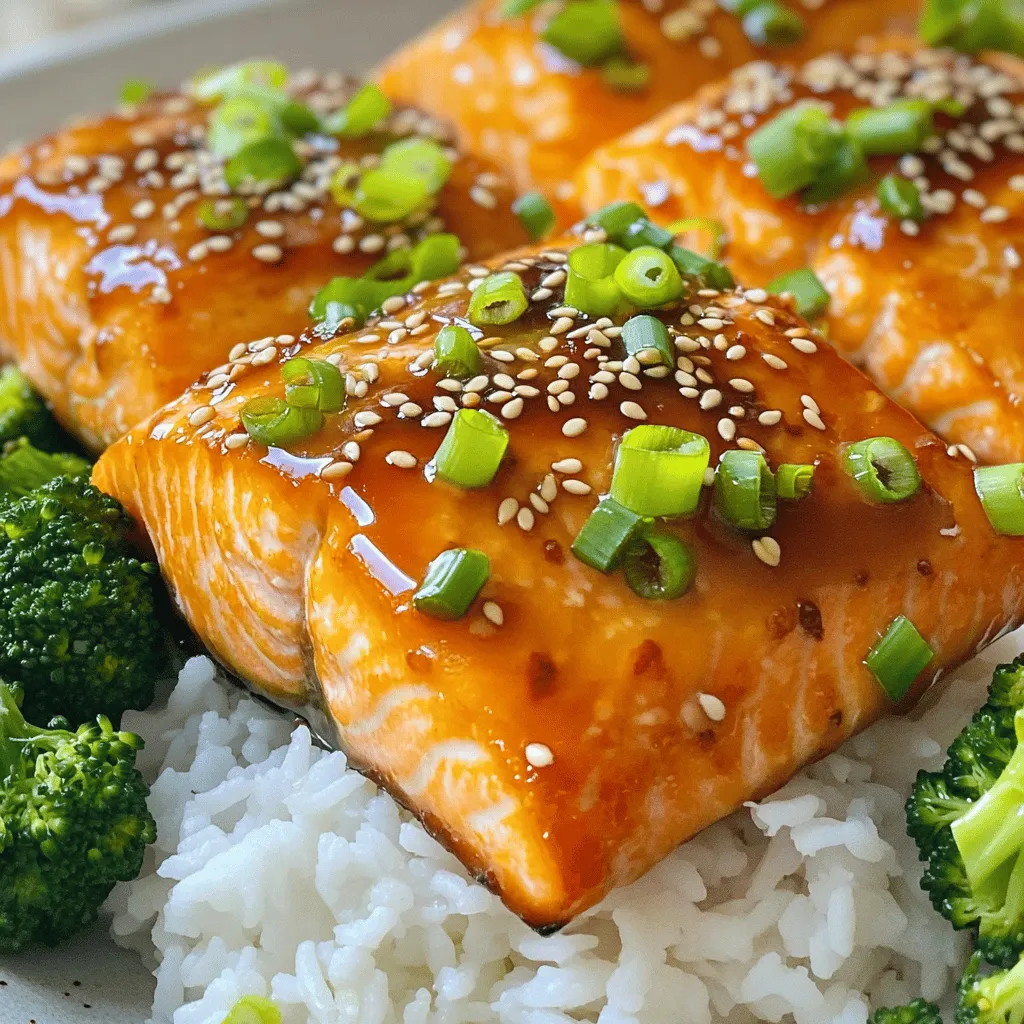
Looking for a quick and tasty meal? Try my Baked Teriyaki Salmon recipe! It’s packed with flavor and easy to

To make garlic butter steak bites, you need: - 1 pound sirloin steak, cut into 1-inch cubes - 4 tablespoons unsalted butter, divided - 4 cloves garlic, minced - 1 teaspoon fresh thyme leaves (or ½ teaspoon dried thyme) - 1 teaspoon fresh rosemary, chopped (or ½ teaspoon dried rosemary) - Salt and pepper, to taste - 2 tablespoons olive oil - Optional: Fresh parsley, chopped for garnish Choosing the right cut of steak is key. I love using sirloin for its great flavor and tenderness. You can also use ribeye or tenderloin if you want something richer. These cuts cook well and stay juicy. Always pick a steak with good marbling. This means it has some fat, which adds flavor and keeps it moist. Garlic and butter are the stars here. They make the steak bites rich and tasty. Fresh herbs like thyme and rosemary add a nice touch. You can adjust these herbs based on what you like. If you want a pop of color, sprinkle chopped parsley on top before serving. This not only looks good but adds freshness to the dish. Mixing flavors is fun, so feel free to experiment! For more details, check the Full Recipe. First, gather all your ingredients. You need sirloin steak, butter, garlic, thyme, rosemary, salt, pepper, and olive oil. Cut the sirloin steak into 1-inch cubes. Pat the steak cubes dry with paper towels. This step helps the meat brown well. Next, season the cubes with salt and pepper on all sides. Make sure each piece is well coated. Heat a large skillet over medium-high heat. Add 2 tablespoons of olive oil. Wait until the oil shimmers before adding the steak bites. Add them in a single layer, avoiding overcrowding. Sear the steak for 2-3 minutes on each side. This will help you reach your desired doneness. For medium-rare, aim for about 130°F. Once cooked, remove the steak from the skillet and set it aside. In the same skillet, lower the heat to medium. Add 2 tablespoons of butter and let it melt. Then, add minced garlic, thyme, and rosemary. Sauté the mix for about 30 seconds. Be careful not to burn the garlic. Finally, return the cooked steak bites to the skillet. Toss gently to coat them in the garlic butter. Cook for an extra 1-2 minutes until heated through. Once done, remove the skillet from heat. If you like, garnish with chopped fresh parsley. For serving, use a large platter or individual plates. Drizzle any remaining garlic butter sauce on top. This adds flavor and looks great. Pair your steak bites with mashed potatoes or a fresh salad for a full meal. For the complete recipe, check the [Full Recipe]. To get the best flavor, dry the steak cubes first. Use paper towels to remove moisture. This helps the steak sear better. Heat your skillet on medium-high until hot. Add olive oil, then place the steak bites in one layer. Avoid overcrowding the pan. Sear for 2-3 minutes on each side. This creates that nice brown crust. Perfectly seared steak bites take your dish to the next level. One mistake is not drying the steak before cooking. Another common error is overcrowding the pan. This causes steam instead of searing. Make sure to season well with salt and pepper. Do not rush the cooking time; let them brown properly. Lastly, don’t forget to let them rest after cooking. This keeps the juices inside, making them tender and juicy. You can boost flavor in many ways. Adding different herbs like oregano or basil can change the taste. Try a splash of Worcestershire sauce for extra depth. You can also mix in some red pepper flakes for heat. If you love cheese, sprinkle some grated Parmesan before serving. These small tweaks can create a unique twist on the classic dish. For the full recipe, check out the earlier section. {{image_2}} You can use different cuts of steak for your bites. Sirloin is great, but try ribeye for extra fat and flavor. Filet mignon offers a tender bite, while flank steak gives a nice chew. Each cut brings its own taste and texture. Switch up the flavors to keep things fresh. Try using soy sauce for a savory twist. You can add a splash of balsamic vinegar for a tangy kick. For a spicy touch, mix in red pepper flakes or chili powder. Fresh herbs like oregano or basil can also brighten the dish. Pair steak bites with vegetables for a complete meal. Bell peppers and onions roast well and add color. You can sauté mushrooms in the garlic butter for extra flavor. Serve with mashed potatoes or a fresh salad to create a balanced dish. After cooking, let the garlic butter steak bites cool down. Use an airtight container to keep them fresh. Store them in the fridge for up to three days. To keep the flavor, avoid using a shallow dish. The deeper the container, the better the taste stays. When you are ready to eat the leftovers, reheat them on the stove. Place the steak bites in a skillet over low heat. Add a small amount of butter or olive oil to keep them moist. Heat for about 5 minutes, stirring gently. This helps to revive their juicy flavor. You can also use a microwave, but it may dry them out. You can freeze the steak bites for later. First, let them cool completely. Then, place them in a freezer-safe bag. Try to remove as much air as possible. They will stay good for up to three months. To thaw, leave them in the fridge overnight. Reheat them the next day for a quick meal. For the full recipe, check the steps above! To make garlic butter steak bites, start with high-quality sirloin steak. Cut it into 1-inch cubes. Pat the cubes dry with paper towels. This step helps the steak brown well. Season the steak generously with salt and pepper. Next, heat 2 tablespoons of olive oil in a skillet over medium-high heat. When the oil shimmers, add the steak bites in a single layer. Sear for 2-3 minutes on each side. This gives a nice crust and flavor. Remove the steak bites and set them aside. Lower the heat and add 2 tablespoons of butter to the skillet. Once it melts, add minced garlic, thyme, and rosemary. Sauté for about 30 seconds, until fragrant. Then, return the steak bites to the skillet. Toss them gently in the garlic butter mixture. Heat everything through for 1-2 minutes. For the full recipe, refer to the detailed instructions above. The best way to season steak bites is with simple ingredients. Start with salt and pepper. Use a good amount to enhance the flavor. Fresh herbs like thyme and rosemary add depth. You can also add garlic for a rich taste. If you want more kick, try adding a pinch of red pepper flakes. Remember, seasoning enhances the natural flavor of the meat. Yes, garlic butter steak bites can be made ahead of time. Cook them as directed and let them cool. Once cooled, store them in an airtight container in the fridge. They can last for up to three days. When you're ready to eat, simply reheat them in a skillet. Add a splash of water or broth to keep them moist. This will bring back their juicy flavor and texture. In this article, we explored how to make delicious garlic butter steak bites. We covered ingredient choices, best cuts of steak, and the right seasonings. I shared step-by-step cooking methods to ensure perfect bites every time. You learned tips to enhance flavor and avoid common mistakes. Finally, we discussed ways to store and reheat your leftovers. Enjoy making these tasty bites and let your creativity shine in the kitchen!

Garlic Butter Steak Bites Flavorful and Easy Recipe

Are you ready to dive into a dish that’s both flavorful and easy to make? Garlic Butter Steak Bites will

To make Frozen Yogurt Granola Cups, you need these ingredients: - 2 cups Greek yogurt (plain or flavored) - 1 cup granola (your choice of flavor) - 1 cup mixed berries (strawberries, blueberries, raspberries) - 2 tablespoons honey or maple syrup - 1 teaspoon vanilla extract - 1/4 cup chopped nuts (almonds, walnuts, or pecans) - Fresh mint leaves for garnish (optional) When choosing Greek yogurt, opt for plain for a lower sugar option. Flavored yogurts can add sweetness but may have more sugar. For granola, select a brand that has whole grains and minimal added sugars. You can also make your own granola at home for the best taste and health. Nuts add crunch and healthy fats. Almonds and walnuts work great, but pecans add a nice sweetness. Fresh berries taste great, but frozen berries are just as good. Frozen berries are often picked at their peak ripeness, so they can be just as flavorful. If you use frozen berries, let them thaw slightly before adding them to the cups. This helps them blend better with the yogurt and granola. To make Frozen Yogurt Granola Cups, start by gathering your ingredients. You need Greek yogurt, granola, mixed berries, honey, vanilla, and nuts. In a mixing bowl, combine the Greek yogurt, honey, and vanilla extract. Stir until the mix is smooth. This smooth mixture is key for a tasty cup. Next, take a muffin tin and line it with cupcake liners. This helps with easy removal later. Spoon about one tablespoon of your yogurt mix into each liner. Spread it evenly across the bottom. Then, add about one tablespoon of granola on top. Press down slightly to secure it in place. Now, add a layer of mixed berries. You can use whole berries or slice larger ones. Top each cup with another tablespoon of the yogurt mix to cover the berries. Finish by sprinkling chopped nuts over the top. Finally, place the muffin tin in the freezer for at least four hours. To get a smooth yogurt mixture, make sure your yogurt is at room temperature. Cold yogurt can clump up, making it hard to mix. Stir the honey and vanilla extract in well. If you want an extra creamy texture, try using full-fat Greek yogurt. It blends better and tastes richer. Layering is key to great Frozen Yogurt Granola Cups. Start with yogurt, then granola, and finish with berries. Make sure to press each layer down lightly. This helps hold everything together when you take a bite. If you want more crunch, add more nuts on top. They add a nice texture. When you serve, peel away the liners carefully to keep the shape. For more detailed steps and insights, check the Full Recipe. You can make your granola cups special. Try different yogurts, like fruit-flavored or vanilla. You can also switch granola. Use chocolate or cinnamon granola for a twist. Want to add some extra fun? Mix in your favorite nuts or seeds. You can even swap berries for other fruits. Kiwi and mango are great choices! To boost flavor, consider adding a pinch of salt. It makes sweet flavors pop! You can also add spices. Cinnamon or nutmeg gives a warm touch. Want a creamy texture? Fold in a bit of nut butter. Almond or peanut butter works well. For a sweet zing, add a few drops of lemon or orange juice. One common mistake is overfilling the cups. Leave some space at the top. This helps them freeze well. Another mistake is not pressing the granola down. Press it firmly to hold the layers together. Lastly, don’t forget to freeze long enough. Four hours is the least you should aim for. If you skip this, your cups will be too soft. {{image_2}} You can have fun with flavors in your frozen yogurt granola cups. Try tropical flavors by adding coconut and pineapple. Mix in some mango for a fresh twist. If you love chocolate, use chocolate yogurt and add cocoa powder. You could even sprinkle chocolate chips on top for extra richness. The key is to play with what you like. Each flavor brings a new joy. Switch up the nuts and fruits to change the taste. Almonds, walnuts, or pecans work great. You can use any nut you prefer. For fruits, try bananas, peaches, or apples. Each fruit adds its own sweetness and texture. You can even mix different berries for a burst of flavor. The more you experiment, the more fun you will have. If you want a vegan option, use coconut yogurt or almond yogurt. These give a creamy texture without dairy. For sweetening, try agave syrup instead of honey. You can also use dairy-free granola. Make sure to check the labels for any hidden dairy. With these swaps, you can enjoy these treats without dairy while keeping them tasty. Try the full recipe to see how easy it is to create these custom cups! To keep your frozen yogurt granola cups fresh, store them in an airtight container. Line the container with parchment paper for extra protection. This helps avoid freezer burn and keeps them tasty. If you have extra cups, consider wrapping each one in plastic wrap before placing them in the container. This way, they stay fresh and easy to grab. Your frozen yogurt granola cups can last up to three months in the freezer. When you’re ready to enjoy them, take out as many as you want. Let them sit at room temperature for about five to ten minutes. This makes them easier to remove from the liners. You can also use a warm knife to help pop them out if they stick. Always check your cups for signs of spoilage. If you see ice crystals or a weird smell, it’s best to throw them away. If they look dry or have a change in texture, these are signs they are no longer good. Enjoy your frozen yogurt granola cups while they are fresh for the best taste! Frozen Yogurt Granola Cups are a great snack. They provide protein, fiber, and vitamins. Greek yogurt offers probiotics, which help gut health. Granola adds whole grains and healthy fats. Berries bring antioxidants and natural sweetness. Overall, these cups are a balanced treat. Yes, you can make these cups ahead. They freeze well and stay fresh for weeks. Prepare them one day and freeze for later. Just pull them out when you want a snack. This makes them a perfect option for busy days. To make these cups dairy-free, use coconut yogurt instead of Greek yogurt. Check for a brand that has good taste and texture. You can also try almond or cashew yogurt. These options still provide creaminess and flavor. You can get creative with toppings! Try using seeds like chia or flax. You can also add shredded coconut or dark chocolate chips. For more fruit, consider banana slices or kiwi. The options are endless, so mix and match! Adjusting sweetness is easy! If you prefer less sugar, use less honey or maple syrup. You can also try adding mashed banana or applesauce for natural sweetness. Taste the yogurt mixture and add more if needed. In this blog post, we explored making frozen yogurt granola cups. We covered ingredient choices, preparation steps, and tips for a smooth mix. You learned how to customize flavors and avoid common mistakes. We also shared ideas for variations and proper storage techniques. Frozen yogurt granola cups are versatile and easy to make. They offer a healthy treat for you and your family. With these simple steps, you can enjoy a delicious snack at home!

Frozen Yogurt Granola Cups Delightful and Healthy Treat

Looking for a cool and tasty treat? Frozen yogurt granola cups are the answer! These delightful snacks blend creamy yogurt

To make One Pan Honey Garlic Salmon, you need a few simple items. Here’s a list: - 2 salmon fillets (6 oz each) - 1/4 cup honey - 3 tablespoons soy sauce (low sodium) - 2 cloves garlic, minced - 1 tablespoon fresh ginger, grated - 1 tablespoon olive oil - Salt and pepper to taste - 1 cup green beans, trimmed - 1 cup cherry tomatoes, halved - 1 tablespoon sesame seeds (for garnish) - Fresh parsley, chopped (for garnish) These ingredients blend well. The honey adds sweetness. The soy sauce brings salt and umami. Garlic and ginger give a punch of flavor. Together, they make the salmon shine. The green beans and tomatoes add color and nutrition. Use fresh ingredients when possible. They make a big difference in taste. If you want more crunch, try adding bell peppers. For a twist, consider using maple syrup instead of honey. Each bite should make you smile. Check out the Full Recipe for more details on how to bring these flavors together. To start, preheat your oven to 400°F (200°C). This helps cook the salmon evenly. Next, prepare the honey garlic sauce. In a small bowl, mix together 1/4 cup honey, 3 tablespoons soy sauce, 2 cloves minced garlic, and 1 tablespoon grated ginger. Whisk until smooth. This sauce will be the star of your dish. Now, let's cook the salmon. Heat 1 tablespoon olive oil in a large oven-safe skillet over medium-high heat. While the oil heats, season 2 salmon fillets with salt and pepper. Once the oil is hot, carefully place the fillets skin-side down in the skillet. Sear them for about 2-3 minutes until the skin is crispy. This step adds great texture. After searing, pour the honey garlic mixture over the salmon fillets. Let it soak in for flavor. Next, it’s time to add some color. Include 1 cup of trimmed green beans and 1 cup of halved cherry tomatoes around the salmon in the skillet. Make sure the veggies get some honey garlic sauce too. Transfer the skillet to the preheated oven. Bake for 12-15 minutes. Check the salmon for doneness; it should flake easily with a fork. When it’s ready, sprinkle sesame seeds and chopped parsley on top. This adds a nice touch for presentation. This One Pan Honey Garlic Salmon is quick and easy. Enjoy your meal with the full recipe for perfect results! To make the best honey garlic salmon, balance is key. Pair savory soy sauce with sweet honey. Use fresh garlic for a sharp taste. If you find the dish too sweet, add a pinch of salt. If it lacks sweetness, drizzle in more honey. Taste as you go. This way, you can adjust to your liking. Cook salmon perfectly by following a few simple steps. First, always start with a hot pan. Sear the salmon skin-side down for 2-3 minutes. This helps get that nice, crispy skin. Use a spatula to gently check if it releases easily from the pan. If it sticks, give it more time. Once flipped, pour the honey garlic sauce over it. Bake until the salmon flakes easily with a fork, around 12-15 minutes. Make your dish look as good as it tastes. Arrange the salmon in the center of the plate. Place the green beans and cherry tomatoes around it. Drizzle any leftover sauce over the top. Finish with a sprinkle of sesame seeds and chopped parsley. This adds color and a pop of flavor. Your meal will look inviting and delicious. For more tips, check out the Full Recipe. {{image_2}} You can easily switch up the ingredients in this recipe. If you want, try using chicken or shrimp instead of salmon. Both options cook well with the honey garlic sauce. For vegetables, feel free to swap green beans and cherry tomatoes with bell peppers or zucchini. These veggies add color and flavor. You can also change the sauce. Instead of honey, use maple syrup for a different taste. Coconut aminos works great too if you want a soy sauce alternative. If you prefer to pan-sear only, skip the oven. Cook the salmon in a hot skillet for about 5-6 minutes on each side. Make sure the skin gets crispy! You can create other one-pan meals with honey garlic flavors. Try honey garlic chicken thighs or tofu. These dishes use the same sauce and cooking method, making meal prep easy and fun. To store your leftover One Pan Honey Garlic Salmon, let it cool first. Place it in an airtight container. This keeps the salmon fresh for up to three days. Be sure to separate the salmon from the veggies for better storage. You can keep them together, but they may lose texture when reheated. When it's time to enjoy your leftovers, the best way to reheat salmon is in the oven. Preheat your oven to 350°F (175°C). Place the salmon in an oven-safe dish and cover it with foil. This keeps the fish moist. Heat for about 10-15 minutes or until warmed through. For a quick option, you can use a microwave. Place the salmon on a microwave-safe plate, cover it with a damp paper towel, and heat in short bursts of 30 seconds. Keep an eye on it to avoid overcooking. To maintain the texture and flavor, avoid reheating too much. Salmon can dry out if heated too long. Always check for warmth in the center before serving. What sides pair best with honey garlic salmon? You can serve honey garlic salmon with many sides. Some great options include: - Steamed rice or quinoa for a filling base. - Roasted or steamed vegetables, like broccoli or asparagus. - A fresh green salad with a light dressing. These sides will balance the sweet and savory flavors of the salmon. Can I use frozen salmon for this recipe? Yes, you can use frozen salmon. Just make sure to thaw it fully before cooking. You can leave it in the fridge overnight or use the cold water method. Place the sealed salmon in a bowl of cold water for about an hour. This will help cook it evenly and keep it moist. How do I know when the salmon is fully cooked? Salmon is fully cooked when it flakes easily with a fork. The flesh should look opaque and be a light pink color. You can also use a food thermometer. The internal temperature should reach 145°F (63°C). This ensures it is safe to eat and still juicy. For more details, check the Full Recipe. This blog post covered a simple, tasty dish: One Pan Honey Garlic Salmon. We looked at key ingredients, step-by-step cooking, and tips for flavor and presentation. You can also swap ingredients and try different cooking methods. I hope you feel ready to make this dish yourself. Enjoy the balance of sweet and savory flavors you create. With practice, you'll impress everyone at the table with your cooking skills!

One Pan Honey Garlic Salmon Quick and Easy Dinner

Ready for a dinner that’s quick, easy, and full of flavor? My One Pan Honey Garlic Salmon is just what

- 1 cup dried chickpeas (soaked overnight) - 1 small onion, roughly chopped - 2 cloves garlic, minced - 1/4 cup fresh parsley, chopped - 1/4 cup fresh cilantro, chopped To make crispy baked falafel, you need key ingredients. Start with dried chickpeas. Soaking them overnight helps soften them. This is a crucial step for the right texture. Next, you want fresh herbs. Parsley and cilantro add bright flavor. You also need aromatics like onion and garlic. They bring out the best taste in your falafel. - 1 teaspoon cumin powder - 1 teaspoon coriander powder - 1/2 teaspoon baking powder - 1 teaspoon salt - 1/2 teaspoon black pepper Spices make your falafel pop. Cumin and coriander bring warmth and depth. They are classic falafel spices. Salt and black pepper enhance all the flavors. Baking powder helps make the falafel light and airy. This mix of spices is simple yet effective. - 1/4 cup tahini - 2 tablespoons olive oil (plus extra for drizzling) - 1 tablespoon lemon juice To bind your falafel, use tahini. It adds creaminess and flavor. Olive oil is another important ingredient. It helps with cooking and adds richness. A splash of lemon juice brightens the dish. These ingredients work together to create a delicious falafel. You can find the full recipe above. Start by soaking dried chickpeas overnight. This step is key for a good texture. Soaking makes the chickpeas softer and easier to blend. If you skip this, your falafel may end up dry and crumbly. Use one cup of dried chickpeas for this recipe. After soaking, drain and rinse them well. Use a food processor to blend the soaked chickpeas. Add in your chopped onion, minced garlic, parsley, cilantro, cumin, coriander, baking powder, salt, and black pepper. Pulse the mixture until it is finely chopped but not pureed. You want a chunky texture. If it feels too dry, add a splash of water. Next, mix in tahini, olive oil, and lemon juice. Pulse again until it reaches a hummus-like consistency. Now, it’s time to shape your falafel. Use your hands to form small balls or patties. Aim for about 1.5 inches in diameter. Place them on a baking tray lined with parchment paper. Drizzle a little olive oil over each falafel for extra crispiness. Bake in a preheated oven at 375°F (190°C) for 25–30 minutes. Flip them halfway through to ensure even browning. Look for a golden brown color and crisp edges. Enjoy your crispy baked falafel! For the full recipe, check the earlier section. To get the best crisp on your falafel, drizzle olive oil before baking. This oil helps the outside turn golden brown. It also adds flavor. Use just enough to coat the falafel. Too much oil can make them soggy. Prepare your baking tray with parchment paper. This helps prevent sticking. It also makes cleanup easy. Make sure to space your falafel out. This allows air to circulate, giving them a nice crunch. You can change up the herbs and spices in your falafel. If you want a different taste, try using fresh dill or mint. You can also add some heat with cayenne pepper or paprika. These changes keep things exciting. To add more texture, consider including cooked quinoa or oats. These ingredients can make your falafel heartier. They also keep them from being too dense. Crispy baked falafel pairs well with many sauces. Tzatziki or tahini sauce are great options. These dips add creaminess and flavor. You can also serve your falafel with fresh veggies and pita bread. For a pretty presentation, arrange them on a plate with lemon wedges. Add a sprinkle of fresh herbs on top. This makes your dish look inviting and fresh. Enjoy the meal, and don’t forget to share! {{image_2}} You can easily change the taste of your falafel. Spicy lovers might enjoy adding jalapeños. Just chop a few up and mix them in the falafel mix. This adds a nice kick! You can also play with herbs. Instead of just parsley and cilantro, try basil or mint. Each herb gives a fresh twist. Falafel can be served in many ways. You can wrap them in flatbread for a fun meal. Add some veggies and sauce, and you're all set! If you prefer a lighter option, try serving falafel in salads or grain bowls. They pair well with greens, tomatoes, and creamy sauces. Crispy baked falafel can fit any diet. Make sure every ingredient is vegan and gluten-free. Use gluten-free grains like quinoa or rice for a filling base. When shopping, check labels on tahini and spices. Some may contain gluten or animal products. This way, you ensure your meal meets your needs. For the full recipe, check out the detailed guide above! To keep your crispy baked falafel fresh, store them in an airtight container. Place parchment paper between layers to prevent sticking. This method helps keep them crispy. You can store them in the fridge for up to five days. If you find them losing their crunch, a quick reheat in the oven can bring back the texture. Freezing is a great choice for meal prep. Allow the falafel to cool completely before freezing. Arrange them in a single layer on a baking sheet and freeze for about an hour. Once frozen, transfer them to a freezer-safe bag. This way, they won’t stick together. For reheating, bake them at 375°F (190°C) for 15-20 minutes. This will help restore their crispy goodness. Always check for signs of spoilage. If the falafel smells off or has changed color, it’s best to toss them. To maximize their shelf life, store in a cool, dark place if you plan to consume them soon. Avoid leaving them out at room temperature for more than two hours. Proper storage helps maintain their flavor and texture, so follow these tips for the best results. You can make falafel without a food processor. First, soak the chickpeas overnight. Then, use a fork or a potato masher to mash the chickpeas. Chop the herbs and onion by hand. Mix all ingredients in a bowl. This method takes more time but still works well. Yes, you can use canned chickpeas. Canned chickpeas save time and are convenient. However, they can be softer, which may affect texture. Drain and rinse them before use. Using dried chickpeas gives a firmer bite. It’s best to weigh the pros and cons based on your needs. Look for a golden-brown color. The outside should be crisp, while the inside stays soft. You can also use a toothpick. Insert it into a falafel; it should come out clean when done. These cues help ensure perfect crispy baked falafel every time. Crispy baked falafel pairs well with many dips and sides. Consider serving tzatziki sauce or tahini dip. You can also add a fresh salad or pita bread. Garnish with lemon wedges for a burst of flavor. These options enhance your meal and make it delightful. Making crispy baked falafel is easy and fun. You need key ingredients like dried chickpeas, fresh herbs, and spices. Soak those chickpeas and blend to the right mix. Don’t forget the olive oil for crispness! You can add your favorite flavors, too. Serve them your way, whether in wraps or salads. With proper storage, leftover falafel can last. Follow these tips for tasty results every time. Enjoy experimenting as you master your falafel-making skills. Happy cooking!

Crispy Baked Falafel Healthy and Flavorful Treat

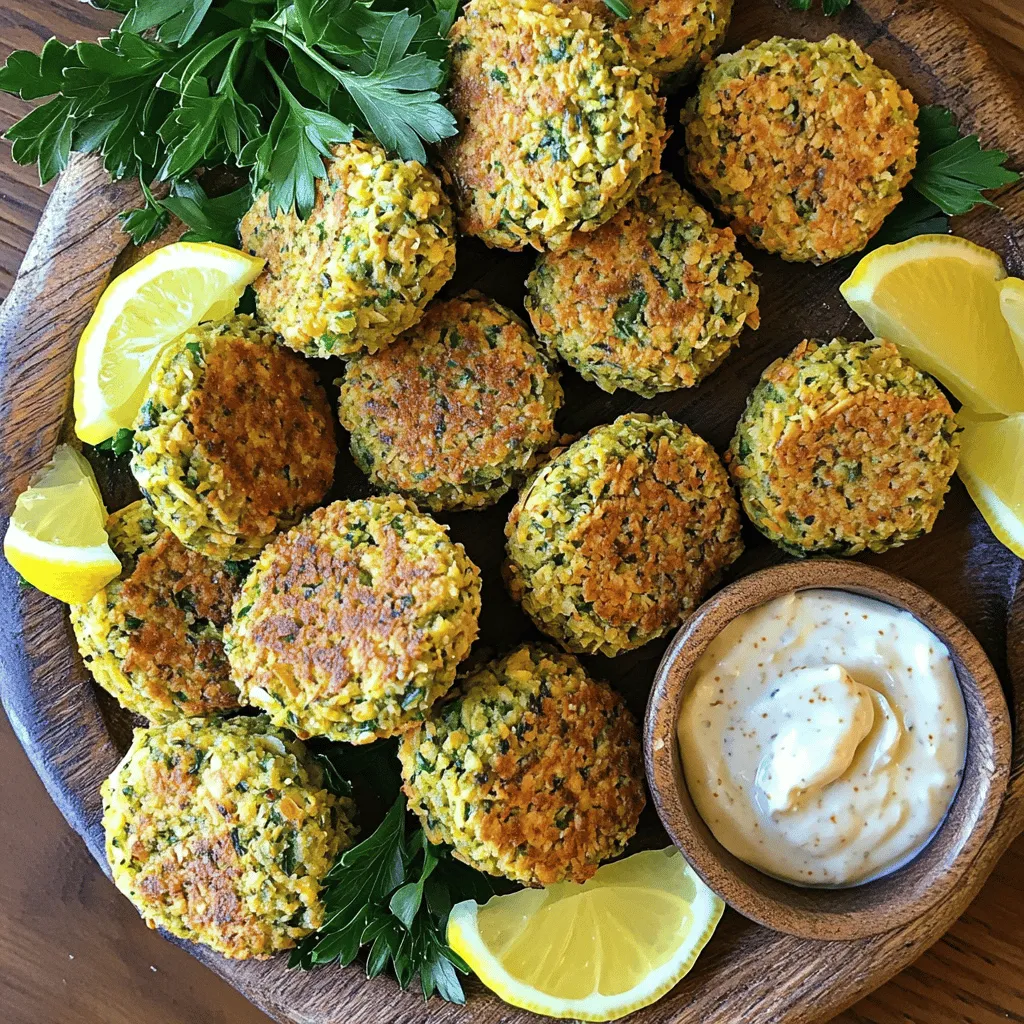
If you crave a tasty treat that’s crispy, healthy, and full of flavor, you’re in the right place! These crispy

- 2 boneless, skinless chicken breasts, diced - 1 tablespoon olive oil - 1 medium onion, diced - 2 cloves garlic, minced - 1 bell pepper (any color), diced - 1 cup corn (fresh or frozen) - 1 can (15 oz) black beans, rinsed and drained - 2 teaspoons taco seasoning - 1 teaspoon smoked paprika - Salt and pepper to taste - 1 cup diced tomatoes (fresh or canned) - 1 cup shredded cheddar cheese - Fresh cilantro, chopped (for garnish) - Lime wedges (for serving) - Ensure even cooking of chicken. Cut the chicken into small, uniform pieces. This helps it cook evenly. - Properly rinse and drain beans. Rinsing removes excess salt and helps avoid a mushy texture. - Fresh vs. canned tomatoes. Fresh tomatoes add brightness, but canned tomatoes save time and still taste great. Use what fits your needs. This list of ingredients makes the Tex Mex Chicken Skillet a simple yet tasty meal. Each part plays a role in the dish's overall flavor. Enjoy experimenting with these tips as you prepare your meal. For the complete recipe, check out the Full Recipe. 1. Start by heating the olive oil in a large skillet over medium heat. 2. Add the diced chicken breasts and sprinkle with salt, pepper, taco seasoning, and smoked paprika. 3. Cook the chicken for about 5-7 minutes until it is browned and cooked through. You want it golden and juicy. 1. Next, add the diced onion and minced garlic. Cook for another 2-3 minutes. This step brings out great flavors. 2. Stir in the diced bell pepper and corn. Cook for 4-5 minutes until the pepper is tender. 3. Then, add the rinsed black beans and diced tomatoes. Mix everything well. Let it simmer for about 5 minutes. This helps all the flavors blend nicely. 1. Now, sprinkle shredded cheddar cheese over the mixture. Cover the skillet and let it melt for about 2-3 minutes. This makes it creamy and rich. 2. Once the cheese is melted, remove the skillet from heat. Garnish with fresh cilantro for a burst of color and flavor. 3. Serve hot with lime wedges on the side. The lime adds a nice zesty kick to your dish. For the full recipe, check the section above. To get the best flavor from your Tex Mex Chicken Skillet, focus on your seasoning. Use fresh herbs when possible. They add a bright taste. Always season your chicken well before cooking. This helps lock in moisture. To avoid dry chicken, cook it on medium heat. This will help it stay juicy. Don’t rush the cooking process. A few extra minutes can make a big difference. If you cut the chicken too soon, it might lose its juices. For side dishes, I love serving this skillet with rice or warm tortillas. Both soak up the tasty sauce well. You can also add a fresh salad for a crunchy contrast. For a fun twist, turn the skillet meal into tacos. Just spoon the mixture onto tortillas and add your favorite toppings. Feel free to customize servings! You can add more veggies like zucchini or spinach. For a kick, toss in some jalapeños. Each addition can make the dish your own. For the best results, use a large, heavy skillet. A cast-iron skillet holds heat well, giving an even cook. Alternatively, a non-stick skillet is great for easy clean-up. Useful kitchen tools include a sharp knife for quick chopping and a sturdy spatula for stirring. A lid is handy for melting cheese evenly. These tools make cooking smooth and fun. {{image_2}} You can use different proteins in this dish. If you want a tasty change, try turkey or shrimp. Both cook quickly and absorb the flavors well. For vegetarian options, use tofu or tempeh. Both give you protein while keeping it meat-free. To spice things up, add jalapeños or cayenne pepper. This will bring heat and excitement to your skillet. If you like veggies, toss in zucchini or spinach. They add color and nutrients. Don’t be shy to mix in your favorites! You can serve this dish in many ways. A skillet meal is quick and fun, but you can also bake it as a casserole. Just add a bit more cheese and bake until golden. Another option is to make wraps or tacos. Just fill tortillas with the mixture for a great handheld meal. For the full recipe, check out the [Full Recipe]. Store your Tex Mex Chicken Skillet leftovers in a safe way. Use airtight containers to keep the food fresh. Glass or plastic containers with tight lids work well. Let the dish cool down before sealing it. This helps prevent moisture build-up inside. Freezing this dish is simple. Place the cooled chicken skillet in freezer-safe bags or containers. Remove as much air as you can to avoid freezer burn. Label the bags with the date for easy tracking. To thaw, move it to the fridge overnight. When ready to eat, reheat on the stove until hot. You can also use a microwave. In the fridge, your Tex Mex Chicken Skillet lasts about 3 to 4 days. In the freezer, it stays good for up to 3 months. Watch for signs of spoilage like off smells or changes in color. If it looks or smells bad, toss it out. Enjoy your tasty meal safely! The Tex Mex Chicken Skillet takes about 30 minutes to make. You need 15 minutes to prep the ingredients. Cooking takes another 15 minutes. This quick time makes it a great weeknight meal. Yes, you can make this dish ahead of time. Cook it fully and let it cool. Store it in an airtight container in the fridge. It lasts for three to four days. Just reheat it on the stove or in the microwave. This helps save time on busy nights. If you don’t have taco seasoning, you can make your own. Combine chili powder, cumin, garlic powder, and onion powder. Use equal parts for a tasty mix. You can also try other spice blends like fajita seasoning. These options add great flavor to your dish. For more tips, check the Full Recipe. We covered the key ingredients, from chicken to garnishes, and how to cook them well. I shared tips to keep your chicken juicy and your flavors strong. You learned about variations for proteins and serving styles, plus storage tips to keep leftovers fresh. Remember, cooking is about creativity and fun. With these steps, you can make a delicious Tex Mex Chicken Skillet that suits your taste. Now, get cooking and enjoy your meal!

Tex Mex Chicken Skillet Flavorful Weeknight Meal

Looking for a quick and tasty meal that packs a punch? My Tex Mex Chicken Skillet is perfect for busy

To make Quinoa Greek Salad, gather these fresh ingredients: - 1 cup quinoa, rinsed - 2 cups vegetable broth (or water) - 1 cup cherry tomatoes, halved - 1 cucumber, diced - 1/2 red onion, finely chopped - 1/2 bell pepper (any color), diced - 1 cup kalamata olives, pitted and sliced - 1/2 cup feta cheese, crumbled - 1/4 cup fresh parsley, chopped - 1/4 cup olive oil - 2 tablespoons lemon juice - 1 teaspoon dried oregano - Salt and pepper to taste Each ingredient in this salad adds unique health benefits: - Quinoa: This grain packs protein and fiber. It helps keep you full. - Cherry tomatoes: They are low in calories and high in vitamins A and C. - Cucumber: This crunchy veggie hydrates and is low in calories. - Red onion: It has antioxidants that can help with heart health. - Bell pepper: This veggie is rich in vitamins C and A, boosting your immune system. - Kalamata olives: They contain healthy fats that benefit your heart. - Feta cheese: This cheese adds calcium and protein. - Parsley: It offers vitamins K and C, improving overall health. When picking your ingredients, follow these simple tips: - Tomatoes: Look for bright, firm ones. They should have a sweet smell. - Cucumber: Choose cucumbers that feel firm and have smooth skin. - Onions: Pick ones that are dry and have no soft spots. - Bell peppers: Select ones with vibrant colors and no wrinkles. - Olives: Check for freshness by ensuring the jar is sealed and free from leaks. - Parsley: Look for bright green leaves with no yellowing. These tips ensure your salad is fresh and full of flavor. For the full recipe, check out the detailed instructions. To start, you need to cook the quinoa. First, rinse 1 cup of quinoa under cold water. This step removes any bitter taste. In a medium saucepan, mix the rinsed quinoa with 2 cups of vegetable broth or water. Bring this to a boil over high heat. Once boiling, lower the heat to low. Cover the pot and let it simmer for about 15 minutes. After that time, the quinoa should be fluffy and all the liquid will be gone. Remove it from heat and let it cool. While the quinoa cools, you can prepare the dressing. In a small bowl, whisk together 1/4 cup of olive oil and 2 tablespoons of lemon juice. Add 1 teaspoon of dried oregano, salt, and pepper to taste. Mix it well until the ingredients blend together. This dressing will add a bright taste to your salad. Now, it’s time to bring everything together! In a large mixing bowl, add 1 cup of halved cherry tomatoes, 1 diced cucumber, 1/2 finely chopped red onion, and 1/2 diced bell pepper. Then toss in 1 cup of pitted and sliced kalamata olives. Once the quinoa has cooled, fluff it with a fork. Add the quinoa to the bowl with the vegetables. Next, gently fold in 1/2 cup of crumbled feta cheese and 1/4 cup of chopped fresh parsley. Finally, pour the dressing over the salad mixture. Toss gently until all the ingredients are well coated. If you want more flavor, adjust the seasoning with extra salt and pepper. Cover the salad and let it chill in the refrigerator for at least 30 minutes. This waiting time helps the flavors blend nicely. Enjoy your fresh and flavorful Quinoa Greek Salad! For the full recipe, check out the details above. To cook quinoa right, I follow a few simple steps. First, I rinse the quinoa in cold water to remove any bitter taste. Then, I combine it with vegetable broth or water. I use a ratio of 1 cup of quinoa to 2 cups of liquid. I bring it to a boil and then reduce the heat. I cover the pot and let it simmer for about 15 minutes. Once done, I let it cool before fluffing it with a fork. Perfectly cooked quinoa is fluffy and has a nice bite. Mixing the ingredients right makes a big difference. I add all the chopped veggies to a large bowl first. This helps me see how colorful the salad is. I carefully fold in the quinoa after it cools. Folding gently prevents the quinoa from getting mushy. I also add the feta cheese last to keep it chunky. For serving, I love using a large bowl to show off the colors. I garnish with extra parsley and a sprinkle of feta on top. For a fun touch, I add a few whole olives on the side. This makes each serving look inviting. Chilling the salad for at least 30 minutes helps the flavors blend well. You can enjoy it as a main dish or a side dish. For the full recipe, check out the Quinoa Greek Salad Delight! {{image_2}} You can easily add protein to your Quinoa Greek Salad. This boosts flavor and makes it more filling. Here are some great options: - Grilled chicken: Cut it into bite-sized pieces and mix it in. - Shrimp: Cooked shrimp adds a nice touch and complements the salad. - Chickpeas: Canned or cooked chickpeas are a tasty choice for extra protein. - Tofu: Marinated and grilled tofu works well for a vegetarian option. Each protein brings its own flavor and texture. Choose what you love most! This salad is already gluten-free since quinoa is naturally gluten-free. To make it vegan, simply skip the feta cheese or use a plant-based version. You can also replace the honey in some dressings with maple syrup. Here are some tips: - Use a vegan feta made from nuts or tofu. - Replace the olive oil with avocado oil for a different taste. - Add more veggies like carrots or bell peppers for extra crunch and color. These adaptations keep your salad fresh and fun without losing its essence. While the classic dressing is delicious, you can switch it up! Here are some creative dressing ideas to try: - Tahini dressing: Blend tahini with lemon juice, garlic, and water for a creamy twist. - Balsamic vinaigrette: Mix balsamic vinegar with olive oil for a sweet and tangy flavor. - Avocado dressing: Blend ripe avocado with lime juice and a splash of water for smoothness. Feel free to experiment with flavors. Your Quinoa Greek Salad will shine with your unique touch! For the full recipe, click here. To keep your Quinoa Greek Salad fresh, store it in an airtight container. This helps seal in the flavors and moisture. Avoid using metal containers, as they can react with the salad's ingredients. Glass or BPA-free plastic containers work best. Always place the salad in the fridge right after serving. When stored properly, your Quinoa Greek Salad can last up to five days in the fridge. After this time, the veggies may lose their crunch and flavor. Always check for any signs of spoilage, like an off smell or sliminess. If you see any, it's time to toss it. Freezing Quinoa Greek Salad is not the best option, but you can do it if needed. If you plan to freeze it, leave out the feta cheese and fresh herbs. Place the salad in a freezer-safe bag or container. Squeeze out any air to prevent freezer burn. When ready to eat, thaw it in the fridge overnight and add fresh feta and herbs just before serving. For the full recipe, check out the Quinoa Greek Salad Delight 🥗. Yes, you can make Quinoa Greek Salad ahead of time. It tastes even better after chilling. The flavors mix well and create a delicious taste. Just store it in the fridge in a sealed container. You can prepare it a day in advance for a quick meal. If you don’t have feta cheese, you can use goat cheese or a dairy-free option. Crumbled tofu also works well for a vegan choice. Creamy ricotta can add a nice texture too. Each option gives a unique flavor to your salad. To spice up the salad, add chopped jalapeños or red pepper flakes. You can also mix in some cayenne pepper for a kick. Another idea is to use spicy olives. Adjust the amount to fit your taste. Enjoy the extra heat in every bite! For the full recipe, check out the details above. In this blog post, I covered how to make a delicious Quinoa Greek Salad. We looked at key ingredients and their health benefits, plus tips for choosing fresh produce. I shared step-by-step instructions to cook quinoa, make the dressing, and combine everything. You now know ways to adapt the salad and store leftovers. Enjoy making this salad for its taste and nutrition. I hope you try it soon!

Quinoa Greek Salad Fresh and Flavorful Recipe Today

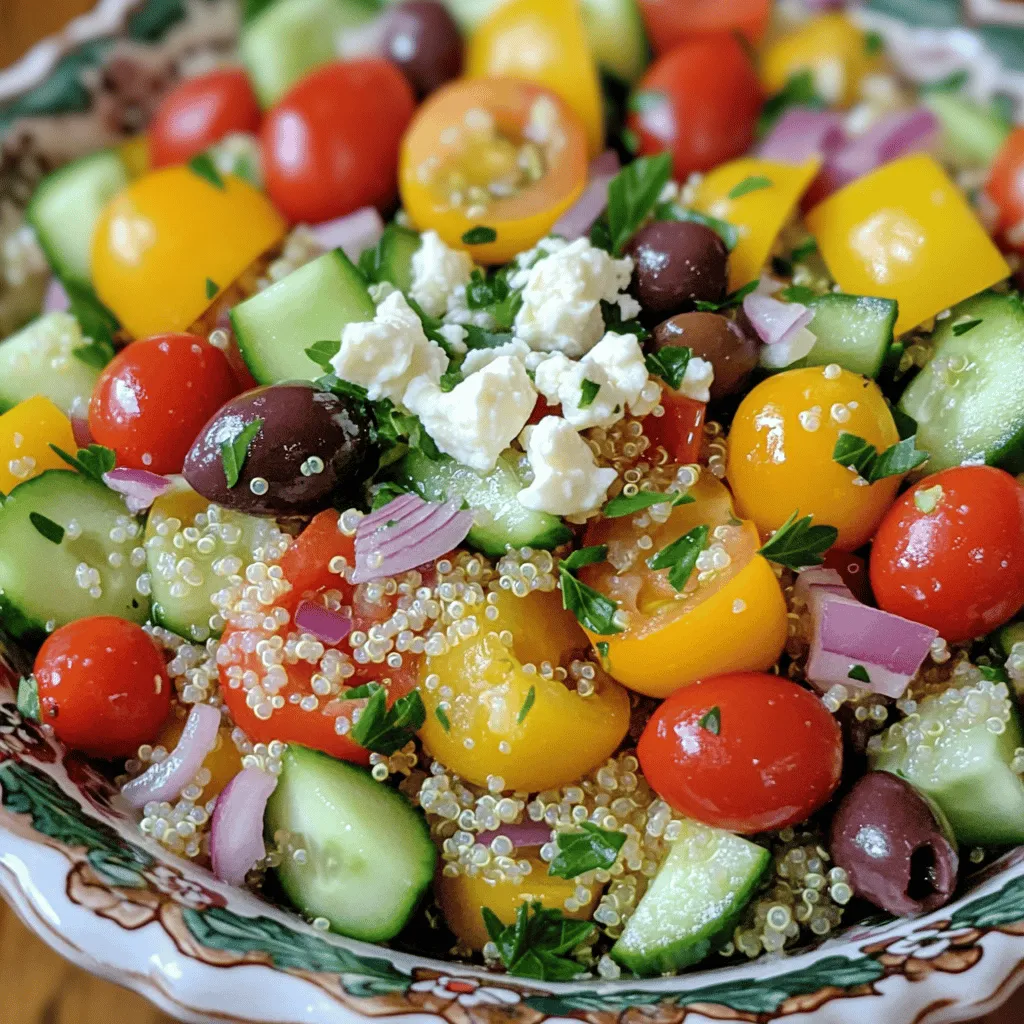
Are you ready to elevate your lunch game? This Quinoa Greek Salad is fresh, vibrant, and packed with flavor! I’ll

- 2 large sweet potatoes, sliced into thin rounds - 1 tablespoon olive oil - 1 teaspoon smoked paprika - 1 teaspoon garlic powder - 1 teaspoon cumin - Salt and pepper to taste - 1 cup black beans, rinsed and drained - 1 cup corn kernels (canned or frozen) - 1 cup shredded cheese (cheddar or a mix) - 1 avocado, diced - 1/4 cup fresh cilantro, chopped - 1 jalapeño, sliced (optional) - 1/2 cup Greek yogurt or sour cream (for drizzling) - Lime wedges for serving These loaded sweet potato nachos pack a punch! Each serving has about: - Calories: 350 - Protein: 12g - Carbohydrates: 45g - Fat: 15g - Fiber: 10g This dish is a great source of vitamins and minerals. Sweet potatoes provide beta-carotene, while black beans add fiber and protein. You can get creative with your toppings! Here are some ideas: - Fresh diced tomatoes for color - Sliced olives for a briny touch - Pickled red onions for a tangy bite - Hot sauce for extra heat - Chopped green onions for freshness Feel free to mix and match! The beauty of this recipe is its versatility. You can use the full recipe for more ideas. First, you need to gather your ingredients. Here’s what you need: - 2 large sweet potatoes, sliced into thin rounds - 1 tablespoon olive oil - 1 teaspoon smoked paprika - 1 teaspoon garlic powder - 1 teaspoon cumin - Salt and pepper to taste - 1 cup black beans, rinsed and drained - 1 cup corn kernels (canned or frozen) - 1 cup shredded cheese (cheddar or a mix) - 1 avocado, diced - 1/4 cup fresh cilantro, chopped - 1 jalapeño, sliced (optional) - 1/2 cup Greek yogurt or sour cream (for drizzling) - Lime wedges for serving Start by preheating the oven to 400°F (200°C). This helps the sweet potatoes cook evenly. Next, take a baking sheet and toss the sweet potato rounds with olive oil, smoked paprika, garlic powder, cumin, salt, and pepper. Mix well so each slice is coated. Now, spread the sweet potato slices on the baking sheet. Make sure they are in a single layer. Bake them for 20-25 minutes. Flip them halfway through for even cooking. You want them crispy and golden. After baking, remove them from the oven. Let’s layer these nachos. Take an oven-safe platter or a cast-iron skillet, and add the baked sweet potatoes in a nice layer. Now comes the fun part! Top the sweet potato slices with black beans and corn. Sprinkle the shredded cheese evenly over everything. Return your platter to the oven and bake for an additional 5-7 minutes. You want the cheese to melt and bubble. Once done, take it out and garnish with diced avocado, fresh cilantro, and sliced jalapeños if you like some heat. Drizzle Greek yogurt or sour cream on top. Serve with lime wedges for a zesty kick. Enjoy your loaded sweet potato nachos! For a complete guide, check the Full Recipe. To make your sweet potatoes crispy, slice them thinly. Aim for about 1/4 inch thick. Use a sharp knife for even cuts. Toss the slices in olive oil and your chosen spices. This helps them cook evenly. Spread them out on a baking sheet. Make sure they do not overlap. Bake them at 400°F (200°C) for 20-25 minutes. Flip halfway through for an even crisp. Cheese is key for tasty nachos. I love using sharp cheddar for its bold flavor. A cheese blend adds variety too. You can try Monterey Jack or pepper jack for a kick. These cheeses melt well and give a nice stretch. If you're feeling adventurous, add a sprinkle of queso fresco. It brings a creamy touch to your nachos. For perfect loaded sweet potato nachos, use a few key tools. A sharp knife helps cut the sweet potatoes. A large baking sheet ensures even cooking. Use parchment paper for easier cleanup. An oven-safe platter or cast-iron skillet is great for layering. This keeps everything warm and gooey. Finally, a spatula helps you serve the nachos without breaking them apart. Check out the Full Recipe for more tips! {{image_2}} You can easily make vegan loaded sweet potato nachos. Simply skip the cheese and yogurt. Use a vegan cheese that melts well. You can also add more veggies, like peppers or mushrooms. They add great flavor and texture. Try drizzling with a cashew cream for a rich taste. This keeps your dish creamy and vegan-friendly. To switch up the flavors, think about spice! Add more jalapeños for heat. Try using chipotle powder for a smoky kick. For a Tex-Mex vibe, mix in salsa or guacamole. You can even use different beans, like pinto or refried beans. These small changes can give your nachos a whole new life. Be creative and adjust to your taste! Don’t have black beans? Use chickpeas or lentils instead. They work well and add protein. Cheese can be swapped too. Try nutritional yeast for a cheesy flavor without dairy. Want a crunch? Top with crushed tortilla chips or nuts. These swaps let you enjoy loaded sweet potato nachos with what you have on hand. Check out the Full Recipe for more ideas! After enjoying your loaded sweet potato nachos, you may have some leftovers. To store them, let the nachos cool completely. Then, place them in an airtight container. They will stay fresh in the fridge for up to three days. Just remember, the sweet potatoes might get a bit soft in the fridge. When you’re ready to enjoy your leftovers, preheat your oven to 350°F (175°C). Place the nachos on a baking sheet. Heat them for about 10-15 minutes or until warm. This method keeps the sweet potatoes crisp. You can also use a microwave, but the texture won’t be the same. If you want to save your nachos for later, freezing is a great option. First, cool the nachos completely. Then, wrap them tightly in plastic wrap or foil. Place them in a freezer-safe bag or container. They can last in the freezer for up to two months. When you’re ready to eat them, thaw in the fridge overnight, then reheat in the oven for best results. Enjoy your loaded sweet potato nachos anytime! Yes, you can prepare sweet potato nachos ahead of time. Bake the sweet potatoes and let them cool. Store them in the fridge for up to two days. When ready to serve, layer the toppings and bake until warm. This saves time and keeps your nachos fresh without losing flavor. To make sweet potato nachos healthier, you can use less cheese or choose a lower-fat option. Adding more veggies like bell peppers and onions boosts nutrition. You can also swap Greek yogurt for sour cream. These changes keep the dish tasty while cutting calories. If you want a dairy-free option, try using nutritional yeast. It adds a cheesy flavor and is vegan-friendly. You can also use cashew cheese or almond cheese as great alternatives. These options keep your loaded nachos creamy and delicious without any dairy. You learned how to create loaded sweet potato nachos step-by-step. We covered ingredients, nutrition, and tasty toppings. You discovered tips to achieve crispy sweet potatoes and the best cheese options. Variations for vegan nachos and different flavors provided even more ideas. I also shared storage and reheating tips. Enjoy this fun dish! It’s healthy and satisfying, perfect for any meal or gathering. Get creative with your toppings and flavors!

Loaded Sweet Potato Nachos Tasty and Easy Recipe

Get ready to transform your snack game with my Loaded Sweet Potato Nachos! This easy recipe brings bold flavors and

- 2 large cucumbers - 1 teaspoon salt - 1 tablespoon rice vinegar - 1 tablespoon sesame oil - 2 teaspoons soy sauce - 1 teaspoon honey - 1 garlic clove, minced - 1 red chili, thinly sliced (adjust for heat) - 2 tablespoons toasted sesame seeds - 2 green onions, chopped - Fresh cilantro leaves for garnish To make the smashed cucumber salad, you need fresh ingredients. Cucumbers are the base. They give the dish its crunch and freshness. I like to use large cucumbers for this recipe. They provide more texture and flavor. Salt is essential in this dish. It draws out excess water from the cucumbers. This makes them crispier. Rice vinegar adds a tangy note. It balances the flavors well. Sesame oil gives a rich, nutty taste. Soy sauce adds umami, while honey brings a hint of sweetness. Minced garlic adds depth, and red chili gives a spicy kick. To finish, you sprinkle toasted sesame seeds and chopped green onions. They add a nice crunch and color. Don’t forget the fresh cilantro! It brightens the dish. You can find the full recipe above. Enjoy making this salad; it’s a delight! First, wash the cucumbers well under cold water. This step helps remove dirt and pesticides. Next, cut the cucumbers in half lengthwise. Then slice them into thick pieces. Aim for about one-inch chunks. Now it's time to salt the cucumbers. Place the cucumber pieces in a large bowl. Sprinkle one teaspoon of salt over them. Gently massage the salt into the cucumbers. Let them sit for 10-15 minutes. This process draws out excess water, making the salad crispier. After salting, drain the cucumbers and pat them dry with paper towels. Transfer the cucumbers to a clean bowl. Use a rolling pin or the bottom of a heavy pan to gently smash each cucumber piece. You want them slightly flattened, but not mushy. While the cucumbers rest, it’s time to mix the dressing. In a small bowl, whisk together rice vinegar, sesame oil, soy sauce, honey, and minced garlic. Mix until well combined. This dressing gives the salad a burst of flavor. Pour the dressing over the smashed cucumbers. Toss the cucumbers to coat them evenly. This step ensures every bite is full of flavor. Next, add the sliced red chili, toasted sesame seeds, and chopped green onions. Mix gently to distribute the dressing and toppings. Allow the salad to marinate for 5-10 minutes. This wait time helps the flavors blend together. The salad will be even tastier when served chilled. For full details, refer to the Full Recipe. To get the best smash on your cucumbers, start with fresh ones. Look for firm cucumbers with no soft spots. Cut them thick and give each piece a good smash with a rolling pin or a heavy pan. Aim for a nice, flat shape, but don’t crush them too much. You want them to hold together. To avoid mushy cucumbers, don’t smash them too hard. If you do, the water will seep out, making them soggy. After smashing, let them sit with salt. This extra step helps draw out moisture and keeps them crisp. Adding heat with chili can really boost the flavor of your salad. If you like it spicy, use a whole red chili. For less heat, just use half. Make sure to slice the chili thin so it mixes well. You can also add more ingredients for texture. Try mixing in diced bell peppers or shredded carrots. These add crunch and color. You can even toss in some nuts for a delightful surprise. Each ingredient brings its own flavor, making the salad even better. For more details, check out the Full Recipe. {{image_2}} You can easily switch some ingredients in this salad. For oils, consider using olive oil instead of sesame oil. It adds a different taste but still keeps things fresh. For vinegar, try apple cider vinegar if you want a tangy kick. This change can brighten the dish. If you want to make it a bit heartier, add proteins. Shrimp works great in this salad. Just cook it lightly and toss it in. Tofu is another excellent choice. It soaks up the dressing well and makes the dish filling. Making this salad in summer? Grab some fresh herbs like basil or mint. They add bright flavors that match the season. You can also toss in seasonal veggies like bell peppers or radishes. These add extra crunch and color. If you want to turn this salad into a main dish, make it a bit bigger. Add grilled chicken or fish on top. This way, it can be a complete meal, perfect for hot days. You’ll enjoy a crisp and tasty dish that feels light and refreshing. For the full recipe, check out the Crunchy Smashed Cucumber Salad. To keep your smashed cucumber salad fresh, store it in an airtight container. Make sure to remove any excess dressing before sealing. This helps avoid sogginess. Place the container in the fridge. The salad stays fresh for about 2 to 3 days. However, the texture can change over time. The cucumbers may lose some crunch, but the taste remains great. If you want to prepare this salad for a gathering, you can make it ahead of time. Just prepare the cucumbers and the dressing separately. Store the dressing in a small jar or bowl. This keeps the cucumbers crisp until serving. When you're ready, mix them together. Let it sit for about 10 minutes to blend the flavors. This way, you keep the salad fresh and delicious, just like in the Full Recipe. Can I use different types of cucumbers? Yes, you can use any cucumber type. English cucumbers work well. They have fewer seeds and a thinner skin. Regular cucumbers also work fine. Just make sure to wash them well. If you want, try Persian cucumbers for a sweeter taste. Is this recipe gluten-free? Yes, this smashed cucumber salad is gluten-free. The soy sauce can contain gluten, so choose a gluten-free brand. This way, you can enjoy all the flavors without worry. What to serve with smashed cucumber salad? You can serve this salad with grilled meats or fish. It pairs well with rice dishes, too. For a light meal, add it to a wrap or sandwich. The crunch complements many main dishes. Ideas for incorporating it into meals Use this salad as a topping for tacos. It adds a nice crunch and freshness. You can also mix it into grain bowls. Try adding it to a picnic spread for a refreshing touch. The options are endless! Smashed cucumber salad is tasty and easy to make. We covered the ingredients, preparation, and tips to enhance flavor. You can adjust the recipe with seasonal veggies or proteins. Remember to store leftovers properly for freshness. This salad adds a light crunch to any meal. Try it out for your next gathering or a summer dish. Enjoy exploring new flavors and making it your own!

Smashed Cucumber Salad Crisp and Refreshing Dish

Are you ready to make a dish that’s both crisp and refreshing? My Smashed Cucumber Salad is the perfect summer

Older posts
Page1 Page2 … Page61 Next →

dsad

© 2025 easycookingbite • Built with GeneratePress

Our Policies

  • Copyright Policy
  • Cookie Policy
  • GDPR Policy
  • Privacy Policy
  • Disclaimer
  • Terms Of Use

More Information

  • Home
  • About
  • Contact
  • Appetizers
  • Dessert
  • Dinner
  • Drinks
©2025, easycookingbite About Back To Top