![To make easy shrimp fried rice, gather these key ingredients: - 1 cup uncooked jasmine rice - 1 pound shrimp, peeled and deveined - 2 tablespoons vegetable oil - 3 garlic cloves, minced - 1 small onion, diced - 1 cup mixed vegetables (peas, carrots, and corn) - 2 large eggs, lightly beaten - 4 tablespoons soy sauce (low-sodium recommended) - 1 teaspoon sesame oil - 2 green onions, chopped - Salt and pepper to taste Jasmine rice gives your dish a lovely aroma and soft texture. Shrimp adds protein and flavor. Vegetable oil helps cook everything evenly. Garlic and onion provide depth and a savory taste. Mixed vegetables bring color and nutrients to your meal. Eggs add richness and help bind the dish. Soy sauce and sesame oil give that classic Asian taste. Green onions, salt, and pepper finish it off with freshness and seasoning. For a special touch, you might want to include: - Fresh cilantro - Additional protein like chicken or tofu Fresh cilantro adds a burst of flavor and color. You can also mix in chicken or tofu for extra protein. These options let you customize the dish to your taste. Try adding them for a unique twist! For the full recipe, visit the [Full Recipe]. Start by rinsing the jasmine rice under cold water. This helps remove excess starch. Keep rinsing until the water runs clear. Next, cook the rice following the package’s instructions. For the best texture, refrigerate the rice overnight. This makes the rice firmer and easier to fry. In a large skillet or wok, heat 1 tablespoon of vegetable oil over medium-high heat. Add minced garlic and diced onion. Sauté these until they smell great and the onion turns clear. Now, add the shrimp to the skillet. Cook them for about 2-3 minutes until they turn pink and opaque. Once done, remove the shrimp and set them aside. In the same skillet, add another tablespoon of vegetable oil. Pour in the mixed vegetables and stir-fry for about 2-3 minutes. They should be tender but still bright. Push the veggies to one side. Pour the beaten eggs into the empty side of the skillet. Scramble these eggs until they are fully cooked, then mix them with the vegetables. Now, it's time to add the rice. Break up any clumps as you add it to the skillet. Pour in the soy sauce and sesame oil. Finally, add the cooked shrimp back into the mix. Stir everything together and cook for an additional 4-5 minutes. This allows all the flavors to blend. Season with salt and pepper to taste. Stir in the chopped green onions just before serving. Serve hot, and feel free to garnish with fresh cilantro if you'd like. Check out the Full Recipe for more details! Using day-old rice is key to great fried rice. Fresh rice is moist and sticks together. Day-old rice dries out a bit, making it easier to fry. You want each grain to stand alone. This helps avoid clumps when cooking. Make sure you prep all ingredients before cooking. Chop and measure everything first. This saves time and keeps the cooking process smooth. When you cook quickly, you get better flavor and texture. To boost the taste, think about adjusting your seasonings. If you like more salt, add extra soy sauce. Or, try a splash of oyster sauce for a deeper flavor. Each change can give your dish a new twist. You can also experiment with different sauces. Swap soy sauce for teriyaki or hoisin sauce. These can change the dish from Asian-style to a more fusion flavor. Get creative and see what you like best! {{image_2}} You can swap shrimp for other proteins. Chicken is a great choice. Just cut it into small pieces and cook it until it’s fully done. Beef also works well. Use thin slices and cook them quickly. Tofu is a perfect option for a vegetarian dish. Press the tofu to remove excess water. Then, cut it into cubes and fry until golden. Each protein will bring its own flavor to the fried rice. Feel free to add more vegetables. Bell peppers add a sweet crunch and color. Chop them into small pieces and stir-fry with the other veggies. Broccoli is another great addition. Just cut it into small florets and cook until bright green. Snow peas give a nice snap, adding texture. Toss them in during the last few minutes of cooking for the best bite. Customizing your veggies helps you make the dish your own. If you crave heat, spice it up! You can add chili sauce for a kick. Sriracha or chili garlic sauce are tasty choices. Mix in a teaspoon or more to suit your taste. Fresh chili peppers like jalapeños can also heat things up. Slice them thin and sauté them with the garlic and onion. Adjust the heat level to match what you enjoy. Spicy shrimp fried rice brings a whole new level to this dish. For the complete cooking process, check out the Full Recipe. To keep your leftover shrimp fried rice fresh, use airtight containers. Glass or plastic containers work well. Make sure to cool the rice before sealing it. This helps prevent condensation inside the container. Label the container with the date. Store it in the fridge. This way, you can enjoy your meal later. When reheating, your goal is to keep the rice tasty. The best way to reheat is in a skillet. Heat a small amount of oil over medium heat. Add the rice and stir it often. If it seems dry, add a splash of water or soy sauce. This helps to bring back its moisture. You can also use a microwave. Place the rice in a microwave-safe dish. Add a few drops of water and cover it with a lid or a wet paper towel. Heat it in short bursts, stirring in between. This keeps the rice from becoming hard. Enjoy your meal again without losing that tasty texture! Homemade shrimp fried rice lasts about 3 to 4 days in the fridge. It is best to store it in an airtight container. This keeps the rice fresh and safe to eat. Always check for any signs of spoilage before eating. Yes, you can freeze shrimp fried rice. To do this, let it cool completely. Then, place it in an airtight container or freezer bag. Label it with the date. When you're ready to eat, thaw it in the fridge overnight. Reheat it in a pan over medium heat until hot. The best rice for fried rice is jasmine rice. It has a nice aroma and a fluffy texture. Basmati rice is also good but has a firmer texture. Other types, like long-grain rice, can work too. Just make sure to use day-old rice for the best result. Freshly cooked rice may become mushy when fried. In this blog post, we explored the key ingredients needed for easy shrimp fried rice. We covered step-by-step cooking instructions, tips for the best texture, and fun variations. You can create this dish with simple steps and personal twists. Enjoy leftovers with proper storage and reheating tips. Cooking fried rice is a great way to be creative in the kitchen. I hope you feel inspired to try making it today!](https://easycookingbite.com/wp-content/uploads/2025/07/39a83d98-b4ff-4fbe-a177-6649f4fd0098.webp)
Easy Shrimp Fried Rice Quick and Tasty Meal Guide
Looking for a quick and tasty meal? You’ve come to the right place! This Easy Shrimp Fried Rice recipe is
Looking for a quick and tasty meal? You’ve come to the right place! This Easy Shrimp Fried Rice recipe is

Are you ready to elevate your dinner game? This Parmesan Crusted Cod is a simple and tasty dish that will
![- Spinach - Strawberries - Red Onion Fresh produce is key to this salad. Spinach adds a bright green base. I use 4 cups of fresh spinach, washed and dried. Strawberries bring a sweet and juicy bite. Slice up 1 cup of strawberries for the right flavor. Red onion adds a sharp taste. I prefer 1/4 of a red onion, thinly sliced for balance. - Walnuts - Feta Cheese Next, we add nuts and cheese. Walnuts add a nice crunch and healthy fats. Toast 1/2 cup of walnuts to enhance their flavor. Feta cheese gives a creamy, tangy touch. Crumble 1/4 cup of feta cheese for the best results. - Balsamic Vinegar - Olive Oil - Honey - Seasonings The dressing ties everything together. I use 1/4 cup of balsamic vinegar for tang. Add 2 tablespoons of olive oil for richness. A tablespoon of honey brings sweetness. Don’t forget salt and pepper to taste. This simple dressing makes the salad pop. For the complete recipe, check [Full Recipe]. Start by making your dressing. In a small bowl, whisk together: - 1/4 cup balsamic vinegar - 2 tablespoons olive oil - 1 tablespoon honey - Salt and pepper to taste Whisk until blended and smooth. The dressing should taste balanced. If it’s too tangy, add more honey. If it’s too sweet, a splash of vinegar helps. Now, move to the salad. In a large bowl, combine: - 4 cups fresh spinach, washed and dried - 1 cup strawberries, sliced - 1/2 cup walnuts, toasted - 1/4 cup feta cheese, crumbled - 1/4 red onion, thinly sliced Mix these ingredients gently. This helps keep the spinach intact. Drizzle the dressing over the salad. Toss carefully to coat all the ingredients. This step is key. You want each bite to be flavorful. Taste the salad. Adjust the seasoning if needed, adding salt or pepper based on your liking. For a beautiful presentation, serve the salad in a large bowl or individual plates. You can sprinkle extra feta on top for a nice touch. Pair this salad with grilled chicken or a slice of crusty bread. It makes a great light meal or side dish. For the full recipe, check out the details above. Selecting Quality Spinach and Strawberries I always look for vibrant green spinach. The leaves should be crisp and free of brown spots. For strawberries, pick ones that are bright red and firm. Smell them too; ripe strawberries have a sweet scent. You want fresh ingredients for the best flavor. How to Toast Walnuts Toasting walnuts brings out their unique flavor. Start by placing them in a dry skillet over medium heat. Stir them often for about 5 minutes. You’ll know they are done when they smell nutty and are golden brown. Let them cool before adding to your salad. Substituting Ingredients You can easily swap ingredients if needed. Try using arugula instead of spinach for a peppery taste. If strawberries aren't available, use blueberries or apples. Each swap can give a new twist to this salad. Customizing the Dressing The dressing is simple yet can be changed. You might want to add a squeeze of lemon for brightness. If you enjoy a sweeter taste, increase the honey a bit. Mix and match until you find your favorite flavor. Preparing Ingredients in Advance Chop and wash your ingredients ahead of time. Store them in separate containers in the fridge. This step makes it easy to throw everything together when you are ready to eat. Keeping the Salad Fresh To keep your salad fresh, avoid dressing it until serving. This way, the spinach stays crisp. You can store the salad components in airtight containers. They will stay good for a few days, making meal prep a breeze. For the full recipe, check the [Full Recipe]. {{image_2}} Adding different elements to your spinach strawberry walnut salad can make it even better. Here are some fun ways to change it up. - Grilled Chicken: Adding grilled chicken makes the salad hearty. It gives you extra protein and adds a nice flavor. Just slice the chicken and mix it in with the salad. - Quinoa: If you want a plant-based protein, try quinoa. Cook the quinoa first, let it cool, and then add it to the salad. It adds a nice texture and boosts nutrition. - Adding Citrus Elements: Try adding citrus like orange or lemon. Squeeze some juice over the salad for a fresh zing. The bright flavor pairs well with strawberries. - Experimenting with Different Cheeses: While feta is great, you can try goat cheese or blue cheese. Each type adds a unique taste. Just crumble it over the salad to change the flavor profile. - Winter Ingredients: In winter, you can add roasted sweet potatoes or apples. These ingredients bring warmth and sweetness to the dish. They make the salad feel cozy and filling. - Fall Additions: In the fall, consider adding pomegranate seeds or dried cranberries. They add a pop of color and a burst of flavor. This makes the salad festive and fun. These variations keep your spinach strawberry walnut salad exciting and fresh. You can find the full recipe to get started! To keep your spinach strawberry walnut salad fresh, store it properly. If you have leftovers, place them in an airtight container. This helps to keep the flavors and textures intact. Try to eat the salad within two days for the best taste. For spinach, wrap the leaves in a damp paper towel. Then, place them in a plastic bag. This keeps the leaves crisp and fresh. Avoid storing spinach near fruits like apples and bananas. These fruits release gases that can cause spinach to spoil faster. How long can you store the salad? You can store this salad in the fridge for up to two days. After that, the spinach may wilt, and the strawberries may lose their freshness. Watch for signs of spoilage. If the salad looks slimy or smells off, it’s best to toss it. Mold is also a clear sign that the salad has gone bad. Best methods for reviving leftovers include adding fresh ingredients. You can toss in more spinach or some fresh strawberries to brighten the flavors. If the salad seems dry, drizzle a little extra dressing over it. When to discard? If the salad has been in the fridge for more than two days, it’s safer to throw it out. Always trust your senses. If it looks or smells bad, don’t eat it. Enjoy your spinach strawberry walnut salad while it’s fresh for the best experience! For the full recipe, check out the details above. You can store this salad in the fridge for up to three days. Keep it in an airtight container to maintain freshness. After three days, the spinach may wilt and the strawberries may spoil. Yes, you can make the salad ahead of time. To keep it fresh, store the dressing separately. Mix the salad ingredients without the dressing. When you are ready to eat, add the dressing and toss. This keeps the salad crisp and tasty. If you have nut allergies or do not like walnuts, you can use sunflower seeds or pumpkin seeds. These options add crunch without nuts. You can also skip nuts altogether and still enjoy a great salad. This salad is perfect for meal prep. Prep the spinach, strawberries, and onions in advance. Store them in separate containers. Add the walnuts and dressing just before serving. This helps keep everything fresh throughout the week. For a complete guide, check out the Full Recipe. This blog post covered everything you need for a Spinach Strawberry Walnut Salad. We discussed key ingredients like fresh produce, nuts, cheese, and dressings. I provided step-by-step instructions for preparation and serving. Tips for choosing fresh ingredients and making variations were also highlighted. In summary, you can easily customize this salad to fit your taste. It’s a delicious and healthy option for any meal. Storing and reheating tips ensure you enjoy leftovers at their best. Dive into your salad-making and enjoy the vibrant flavors!](https://easycookingbite.com/wp-content/uploads/2025/07/7dafd5b4-60ac-4397-8031-40747006a9a5.webp)
Looking for a fresh, vibrant salad that’s both easy to make and packed with flavor? The Spinach Strawberry Walnut Salad

Get ready to elevate your summer grilling game with my Grilled Lemon Herb Chicken Skewers! These tasty bites feature juicy

Looking for a fresh and tasty dish that’s easy to make? Thai Peanut Noodle Salad is your answer! With colorful

Craving a quick and tasty meal? Look no further than crispy air fryer chicken tenders! These golden bites are juicy
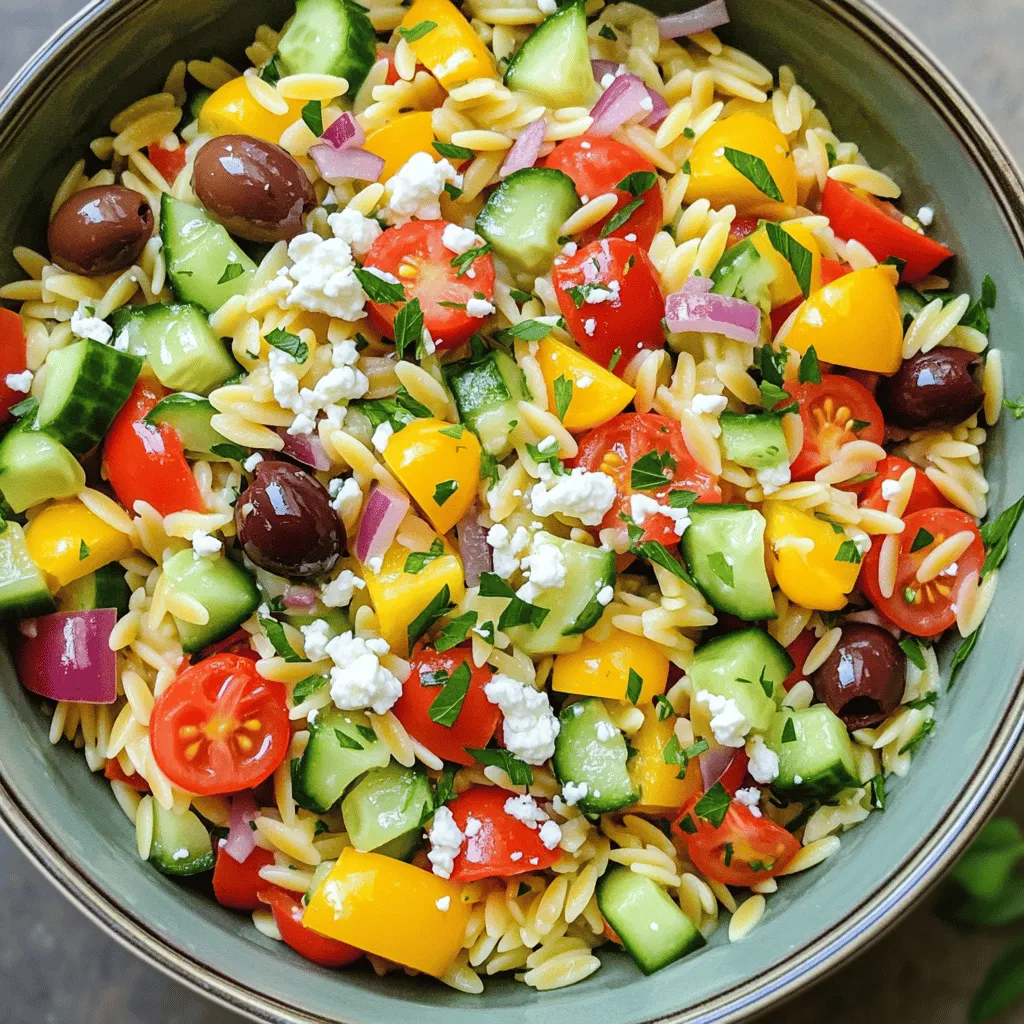
![- 1 cup orzo pasta - 1 large zucchini, diced - 1 red bell pepper, diced - 1 cup cherry tomatoes, halved - 1 cup cucumber, diced - ½ cup red onion, finely chopped - 1 cup corn kernels (fresh or frozen) - ½ cup feta cheese, crumbled - ¼ cup fresh basil leaves, chopped - 3 tablespoons olive oil - 2 tablespoons lemon juice - Salt and pepper to taste - Optional: 1 avocado, diced for added creaminess Gathering fresh ingredients is key. I love using local veggies. They taste better and are often more colorful. The orzo pasta is the heart of this dish. It absorbs flavors well, making each bite tasty. The zucchini adds crunch and a mild taste. Red bell pepper brings sweetness. Cherry tomatoes add juiciness and bright color. Cucumbers bring a refreshing bite. Red onion gives a nice sharpness. Corn kernels add a touch of sweetness. Feta cheese gives a salty creaminess that ties it all together. Fresh basil adds a lovely herbal note. For the dressing, lemon juice gives a zing. It brightens up the whole salad. Salt and pepper enhance the flavors. If you want creaminess, add diced avocado. It makes the salad even more delicious. Check out the Full Recipe for more details on how to make this vibrant dish! To start, cook the orzo pasta. Follow the package instructions carefully. Typically, this takes about 8 to 10 minutes. You want it to be al dente, so it holds up well in the salad. Once the orzo is cooked, drain it in a colander. Rinse it under cold water to stop the cooking process. This cooling step is important. It helps keep the orzo from getting mushy. Set the cooled orzo aside while you prepare the veggies. Next, grab a large mixing bowl. In this bowl, combine the diced zucchini, red bell pepper, halved cherry tomatoes, diced cucumber, chopped red onion, and corn. These colorful veggies bring life to your salad. Mix them well to ensure even distribution. After mixing, gently fold in the cooled orzo. Be careful not to mash the veggies. You want to keep everything looking fresh and vibrant. Now, it’s time to whip up the dressing. In a small bowl, whisk together the olive oil, lemon juice, salt, and pepper. This dressing adds a bright flavor to the salad. Pour this mixture over your orzo and veggie blend. Toss everything gently to coat it evenly. Finally, add the crumbled feta cheese and the remaining chopped basil. Fold these in carefully. If you like creaminess, you can add diced avocado right before serving. This will keep it fresh and tasty. For the best flavors, serve the salad immediately or chill it for about 30 minutes. For the full recipe, see above! To make your Summer Veggie Orzo Salad even better, think about adding fresh herbs. Basil, parsley, or dill can uplift the taste. You can also try spices like garlic powder or cumin for a new twist. These small changes can make a big difference in flavor. Adjusting the dressing’s acidity is key too. If you love tang, add more lemon juice. For a milder taste, use less. Taste the dressing before mixing it in. You want it to be just right! This salad is best served chilled or at room temperature. I love letting it sit in the fridge for 30 minutes. It helps the flavors blend nicely. When you are ready to serve, it’s fresh and vibrant. Pair the salad with protein for a full meal. Grilled chicken, shrimp, or chickpeas work great. They add more nutrients and make the dish filling. Presentation matters! To make your salad pop, consider garnishing with extra herbs or crumbled feta on top. It adds color and makes it look fancy. You can serve the salad in individual bowls or on a large platter. Individual bowls are fun for gatherings. A platter looks great on a buffet table. Either way, your Summer Veggie Orzo Salad will impress your guests. For the full recipe, check back to ensure you have all the steps covered! {{image_2}} You can easily make this salad vegan. Just swap feta cheese for a vegan cheese option. There are many tasty brands available. You can also boost the veggie power. Try adding seasonal favorites like asparagus or radishes. Fresh herbs like dill or parsley also work wonders. Want some protein? Grilled chicken or shrimp adds a nice touch. Simply cook them first and slice them before mixing. For a plant-based option, try chickpeas or black beans. They add protein and fiber, making the salad more filling. If you prefer something different, consider using quinoa or couscous instead of orzo. Both grains offer unique flavors and textures. For those who need a gluten-free option, look for gluten-free orzo. It's easy to find and cooks similarly to regular orzo. For the complete recipe, check out the Full Recipe. After making your Summer Veggie Orzo Salad, you can store it in the fridge. It stays fresh for up to three days. Use an airtight container to keep it crisp. Glass containers or plastic ones with tight lids work best. This way, your salad keeps its taste and texture. You can freeze orzo salad, but it may change in texture. If you plan to freeze it, leave out the fresh veggies like cucumber and tomatoes. Instead, add them after thawing. To freeze, place the salad in a freezer-safe bag and remove as much air as possible. When you want to eat it, thaw in the fridge overnight. Reheating your orzo salad can be tricky. The best method is to use a microwave. Heat it in short bursts, stirring in between. This keeps it warm without making it mushy. To avoid sogginess, you can add fresh herbs or veggies after reheating. This way, your salad stays tasty and vibrant. For the complete recipe, refer to the [Full Recipe]. To make this salad gluten-free, choose gluten-free orzo. Many brands offer it made from rice or corn. You can also use quinoa or brown rice as a base. Both options work well and keep the salad light and fresh. Yes, you can use frozen vegetables. They are convenient and often just as nutritious as fresh ones. However, they can lose some texture when thawed. Fresh veggies have a crisp bite that adds to the salad's appeal. If you choose frozen, thaw them in advance and pat dry before adding to the salad. You can add many seasonings to boost flavor. Try garlic powder for a savory touch. Fresh herbs like dill or mint also work well. A pinch of red pepper flakes can add some heat, while a splash of balsamic vinegar brings a nice tang. Experiment and find your perfect mix! For the full recipe, check out the detailed instructions. In this blog post, I covered how to make a delicious Summer Veggie Orzo Salad. We talked about key ingredients like orzo pasta, fresh veggies, and a simple dressing. I shared step-by-step instructions, useful tips, and variations for a perfect twist. Enjoy this colorful salad as a side or a main dish. It’s fresh, healthy, and easy to make. You can personalize it to your taste. There’s no wrong way to enjoy this salad. Get creative and make it yours!](https://easycookingbite.com/wp-content/uploads/2025/07/e84c3fa4-d428-4c24-9774-17d763bf2cab.webp)
Looking for a vibrant dish that screams summer? My Summer Veggie Orzo Salad combines fresh veggies, bright flavors, and hearty

Are you ready to step up your meal game? The Crispy Tofu Buddha Bowl is simple, fun, and full of
Looking for a fresh meal that bursts with flavor? This Greek Orzo Salad is your answer! Packed with crunchy veggies,

Are you craving a dish that’s both healthy and bursting with flavor? Teriyaki salmon bowls are your answer! In this
