![- 4 boneless, skinless chicken breasts - 2 ripe mangoes, diced - 1 red bell pepper, diced - 1/2 red onion, finely chopped - 1 jalapeño, deseeded and minced - 2 tablespoons fresh cilantro, chopped - 2 tablespoons lime juice - 1 tablespoon olive oil - 1 teaspoon ground cumin - Salt and pepper to taste Mango Salsa Chicken shines with fresh and vibrant ingredients. The chicken gives you a juicy base. Ripe mangoes add sweetness and a tropical twist. The red bell pepper brings a nice crunch and color. In the salsa, finely chopped red onion adds zest. The jalapeño gives just the right kick. Fresh cilantro brightens the flavors. Lime juice ties everything together with a tangy touch. Olive oil keeps the salsa smooth. Ground cumin adds depth and warmth. Gather these ingredients for a dish that is easy and full of flavor. For the full recipe, follow the steps listed later. Enjoy the process of making this fresh summer meal! First, preheat your grill to medium-high heat. This helps get those nice grill marks on the chicken. While the grill heats up, gather and prepare your ingredients. You will need to dice the mangoes and red bell pepper. Finely chop the red onion and jalapeño. Next, in a large bowl, combine the diced mangoes, red bell pepper, red onion, jalapeño, cilantro, lime juice, and a pinch of salt. Mix well and set this aside. Letting the flavors meld for about 15 minutes makes the salsa taste even better. Now it’s time to season the chicken. Rub each breast with olive oil, ground cumin, salt, and pepper. Make sure every piece is evenly coated. Once seasoned, place the chicken on the grill. Cook each breast for about 6-7 minutes on each side. Use a meat thermometer to check the internal temperature. It should reach 165°F (75°C) for safe eating. After grilling, remove the chicken from the grill and let it rest for a few minutes. Resting helps keep the chicken juicy. When ready to serve, place each chicken breast on a plate. Top it generously with the fresh mango salsa. For an extra pop, garnish with more cilantro and a wedge of lime. This will make your dish look as good as it tastes! For the complete recipe, follow [Full Recipe]. To grill mango salsa chicken well, set your grill to medium-high heat. This temperature helps cook the chicken evenly. Each side should grill for about 6-7 minutes. Keep an eye on the time. You want the chicken to reach an internal temperature of 165°F (75°C). This ensures it is safe to eat. Letting the chicken rest after grilling is key. This step keeps the juices inside, making the chicken tender and juicy. Selecting ripe mangoes is essential for a bright salsa. When choosing mangoes, look for ones that are slightly soft to the touch. They should have a sweet smell at the stem. To balance the flavors in your salsa, mix sweet and spicy elements. The sweetness of the mango pairs well with the heat from the jalapeño. Adding lime juice brightens the salsa and ties the flavors together. Let the salsa rest for about 15 minutes before serving. This time allows the flavors to meld beautifully. For a complete meal, consider serving mango salsa chicken with rice or quinoa. These sides soak up the delicious juices. You can also add a fresh salad with mixed greens for crunch. When it comes to drinks, pair the meal with a light white wine or a refreshing iced tea. This combination enhances the summer vibe of your dish. For more ideas, check out the Full Recipe to explore variations and side options. {{image_2}} Grilling and baking are both great ways to cook mango salsa chicken. - Grilled: Grilling gives the chicken a nice char and smoky flavor. You can cook it on medium-high heat for about 6-7 minutes on each side. - Baked: If you prefer baking, preheat your oven to 400°F (200°C). Place the seasoned chicken in a baking dish and cook for 25-30 minutes. For a super easy option, try a slow cooker. Just place the chicken in the slow cooker with all the salsa ingredients. Cook on low for 6-8 hours. This method keeps the chicken tender and juicy. You can swap ingredients in mango salsa chicken to match your tastes. If mangoes are not available, try using peaches or pineapple. For the bell pepper, zucchini works well too. Adjusting spice levels is easy. If you prefer less heat, leave out the jalapeño. Want it spicier? Add more jalapeño or a dash of hot sauce. Making mango salsa chicken fit your diet is simple. To make it gluten-free, check that all sauces are gluten-free. You can also use low-carb options. Instead of chicken, try using cauliflower steaks or portobello mushrooms for a vegetarian dish. These variations give everyone a chance to enjoy this tasty meal, no matter their dietary needs. For the full recipe, check out the details above. For best results, store any Mango Salsa Chicken leftovers in airtight containers. This keeps the chicken juicy and the salsa fresh. I recommend placing the chicken and salsa in separate containers. Leftover chicken stays good in the fridge for about three to four days. Always check for any off smells or changes in color before eating. To freeze Mango Salsa Chicken, let it cool completely. Then, wrap each chicken breast tightly in plastic wrap. Place the wrapped chicken in a freezer bag. This helps to prevent freezer burn. The salsa can also be frozen in a separate container. Use the frozen chicken within three months for the best flavor. When ready to eat, thaw the chicken in the fridge overnight. Reheat it in the oven or microwave until hot. Ensure it reaches an internal temperature of 165°F (75°C) before serving. You can use leftover chicken in many ways. Shred it for tacos or salads. Mix it into a stir-fry or pasta dish. The mango salsa adds a sweet touch to any meal. If you have extra salsa, try it on fish or with chips. This keeps your meals fun and fresh. You can create new dishes that are quick and easy with your stored ingredients. You can pair Mango Salsa Chicken with many tasty sides. Here are a few ideas: - Rice: White or brown rice works great. It soaks up the salsa juice. - Quinoa: This is a healthy option packed with protein. - Corn on the cob: Sweet corn adds a nice crunch to the meal. - Salad: A fresh green salad with lime dressing complements the dish well. - Black beans: They add a rich flavor and protein boost. These sides will enhance your meal and make it more filling. Yes, you can prepare the mango salsa ahead of time. Making it early helps the flavors blend. Here are some tips: - Make it the day before: This gives time for the flavors to mix well. - Store it in the fridge: Use a sealed container to keep it fresh. - Stir before serving: This helps redistribute the juices and flavors. Enjoying salsa that’s been resting can make it even tastier! The best way to know if chicken is done is by checking its temperature. Aim for an internal temperature of 165°F (75°C). Here are some best practices: - Use a meat thermometer: Insert it into the thickest part of the chicken. - Check the juices: If they run clear, the chicken is likely done. - Look for firmness: Cooked chicken feels firm when you press it. Following these steps will help you serve perfectly cooked chicken every time! Mango Salsa Chicken is a fresh, tasty meal you can easily make at home. We covered essential ingredients like chicken breasts, ripe mangoes, and lime juice. You learned the steps to grill the chicken and prepare the salsa. Remember the tips for juicy chicken and the best mangoes. Feel free to explore variations based on your taste. With proper storage, leftovers can turn into new meals. Enjoy making this dish for you and your loved ones!](https://easycookingbite.com/wp-content/uploads/2025/05/ab457469-db5d-4213-a277-91f214bf8a3e.webp)
Mango Salsa Chicken Flavorful and Easy Summer Meal
Mango Salsa Chicken is the perfect dish for your summer meals! It’s quick to make and bursting with fresh flavors.
Mango Salsa Chicken is the perfect dish for your summer meals! It’s quick to make and bursting with fresh flavors.
![To make this sweet and sour chicken, you will need: - 1 lb chicken breast, cut into bite-sized pieces - 1 bell pepper (red or yellow), diced - 1 small onion, diced - 1 cup pineapple chunks (fresh or canned) - 1 cup carrots, julienned - 1/2 cup sugar - 1/2 cup apple cider vinegar - 1/4 cup ketchup - 2 tablespoons soy sauce (low sodium) - 1 tablespoon cornstarch mixed with 2 tablespoons water - 2 cloves garlic, minced - 2 tablespoons vegetable oil - Salt and pepper to taste - Cooked white rice, for serving Feel free to add or change these ingredients: - Broccoli for extra crunch - Snap peas for a fresh touch - Sesame seeds for a nice garnish Here are some tools that will help you: - Large skillet or wok for cooking - Cutting board for chopping - Sharp knife for easy cutting - Mixing bowl for blending sauce - Measuring cups and spoons for accuracy These ingredients and tools will set you up for success in making sweet and sour chicken. For the complete recipe, check [Full Recipe]. Gather all your ingredients before you start cooking. This makes the process smooth and fun. Cut the chicken into small pieces. Dice the bell pepper and onion. Julienne the carrots. If using fresh pineapple, cut it into chunks. 1. Heat the vegetable oil in a large skillet over medium-high heat. 2. Add the chicken pieces and season with salt and pepper. Cook until browned, about 5-7 minutes. 3. Add the garlic, onion, bell pepper, and carrots to the skillet. Stir-fry for 3-4 minutes until the veggies soften. 4. In a bowl, mix the sugar, apple cider vinegar, ketchup, and soy sauce. Whisk until blended. 5. Pour the sauce over the chicken and veggies. Stir well to coat everything. 6. Bring the mix to a gentle simmer, then add the pineapple chunks. 7. Stir in the cornstarch mixture to thicken the sauce. Cook for another 2 minutes. 8. Taste and adjust seasonings if needed. Remove from heat. 9. Serve the sweet and sour chicken over warm white rice. Enjoy! Stir-frying is key for this dish. It cooks food quickly while keeping it crisp. Use high heat for the best results. Make sure to cut your ingredients evenly. This ensures they cook at the same rate. Always taste your dish before serving. Adjust flavors to make it perfect. Check the texture of the sauce; it should be thick but not gluey. For the full recipe, refer to the Sweet and Sour Chicken Delight . To make your sweet and sour chicken shine, balance the flavors well. You want the sauce to be sweet but not too sweet. Add a touch more vinegar if needed. Use fresh garlic for a stronger taste. A dash of crushed red pepper adds heat, if you like spice. Always taste your sauce before adding it to the chicken. One common mistake is overcooking the chicken. This can make it dry. Cook it just until it turns golden brown. Don’t skip the cornstarch mixture; it thickens the sauce. If you add the pineapple too early, it can get mushy. Always add it near the end of cooking. Serve sweet and sour chicken over warm white rice. This keeps the dish comforting. You can also add steamed broccoli or snap peas for a vibrant touch. For a fun twist, serve it in lettuce wraps. This adds crunch and freshness. Enjoy your meal with friends or family for a great time! {{image_2}} You can easily make sweet and sour chicken vegetarian or vegan. For a veggie twist, use tofu instead of chicken. Firm tofu works best. Press it to remove extra moisture, then cut it into cubes. Sauté the tofu until golden brown. You can also use seitan or tempeh for added texture. Replace the chicken broth with vegetable broth for a vegan sauce. Feel free to mix up the ingredients in this recipe. If you don't have chicken, try shrimp or pork. You can swap out the bell pepper for any other color or use zucchini instead. If you can’t find pineapple, use mango or peaches for a fruity kick. Instead of apple cider vinegar, rice vinegar gives a nice tang. The sauce can change the whole dish. You can make it sweeter by adding more sugar or honey. For a spicier kick, mix in some chili sauce or red pepper flakes. If you want a deeper flavor, add some ginger or sesame oil. Play with the ketchup ratio to create the perfect balance for your taste. Each of these variations keeps the essence of sweet and sour chicken. You can enjoy it while also making it your own! For the full recipe, check out the Sweet and Sour Chicken Delight. Store your sweet and sour chicken in an airtight container. It can last in the fridge for 3 to 4 days. Make sure it cools down to room temperature before sealing. This helps keep it fresh and tasty. You can freeze sweet and sour chicken for up to 3 months. Use a freezer-safe container or a heavy-duty freezer bag. To freeze, let the dish cool, then portion it out. Remove as much air as possible to prevent freezer burn. To reheat, thaw the chicken in the fridge overnight. Heat it on the stove over low heat. Stir it often to warm it evenly. You can also microwave it; cover it with a damp paper towel. This keeps it moist while reheating. If you want to enjoy it again, serve it over fresh rice. For the full recipe, check out the original instructions. Sweet and sour chicken comes from Chinese cuisine. It mixes flavors of sweet and tangy. This dish gained popularity in Western countries. It often features chicken, bell peppers, and pineapple. The sauce usually has vinegar, sugar, and soy sauce. Each region has its own twist on the recipe. Today, it’s a favorite in many homes. Yes, you can make sweet and sour chicken ahead of time. Cook the chicken and sauce, then store them in the fridge. Keep the rice separate to avoid sogginess. Reheat the chicken on the stove or in the microwave. This dish tastes great the next day, too. Just make sure to store it in an airtight container. Sweet and sour chicken goes well with many sides. Here are some great options: - Steamed white rice - Fried rice - Noodles - Stir-fried vegetables - Spring rolls - Egg rolls These sides complement the dish's flavors and add variety. You can mix and match to find your favorite combination. Want the full recipe? Check out the [Full Recipe]. In this blog post, I covered key points about making Sweet and Sour Chicken. I shared the essential ingredients and tools you'll need. The step-by-step guide lays out clear instructions for preparation and cooking. Tips for flavor and common mistakes help you get it right. I also offered variations for different diets and storage tips. Remember, practice makes perfect. Enjoy making your dish and impress others with your cooking skills!](https://easycookingbite.com/wp-content/uploads/2025/05/c47ba50c-7cb5-49d4-bda0-d9b09883bdd4.webp)
Are you ready to make a dish that everyone loves? Sweet and sour chicken is quick, tasty, and fun to

Are you ready to elevate your dinner game? Cheesy Spinach Artichoke Stuffed Shells Delight brings rich flavors straight from your
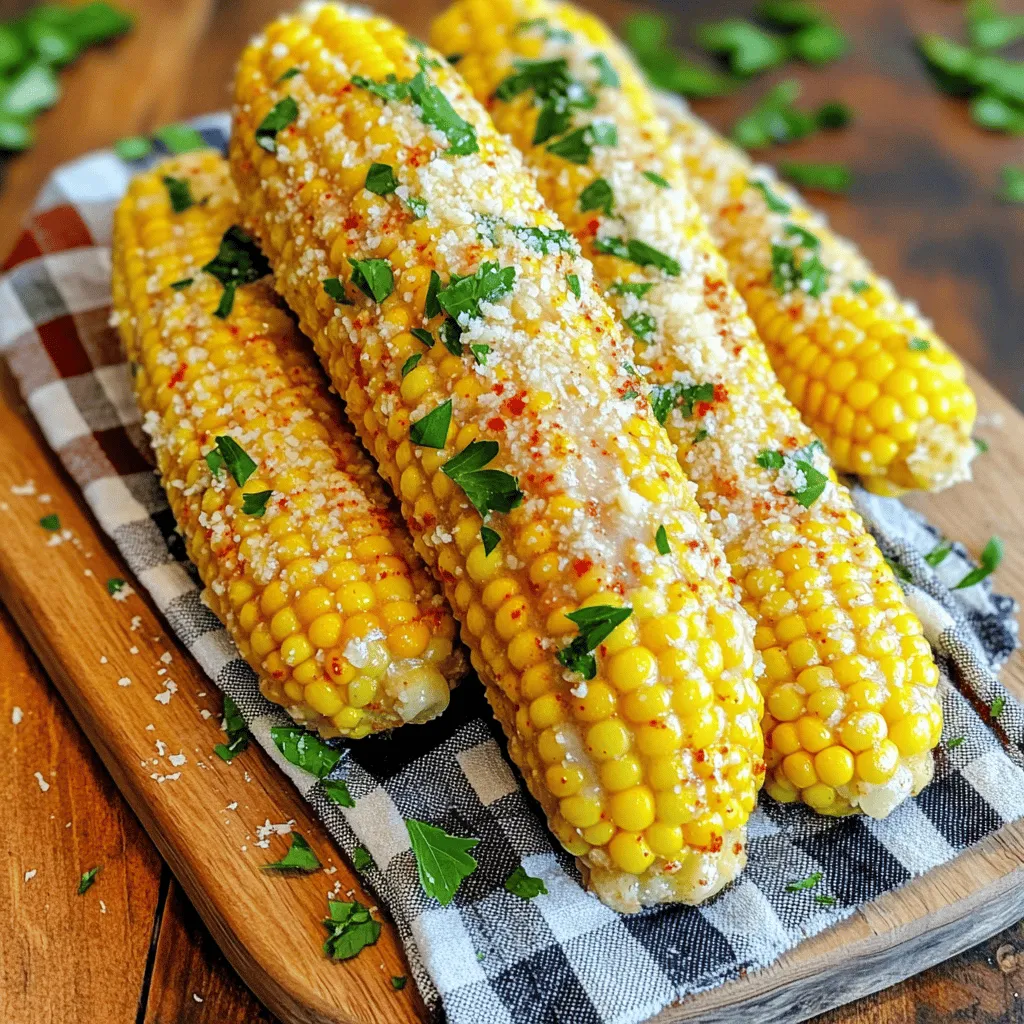
If you love sweet, juicy corn, then you’ll adore my Garlic Butter Corn on the Cob recipe! This dish is
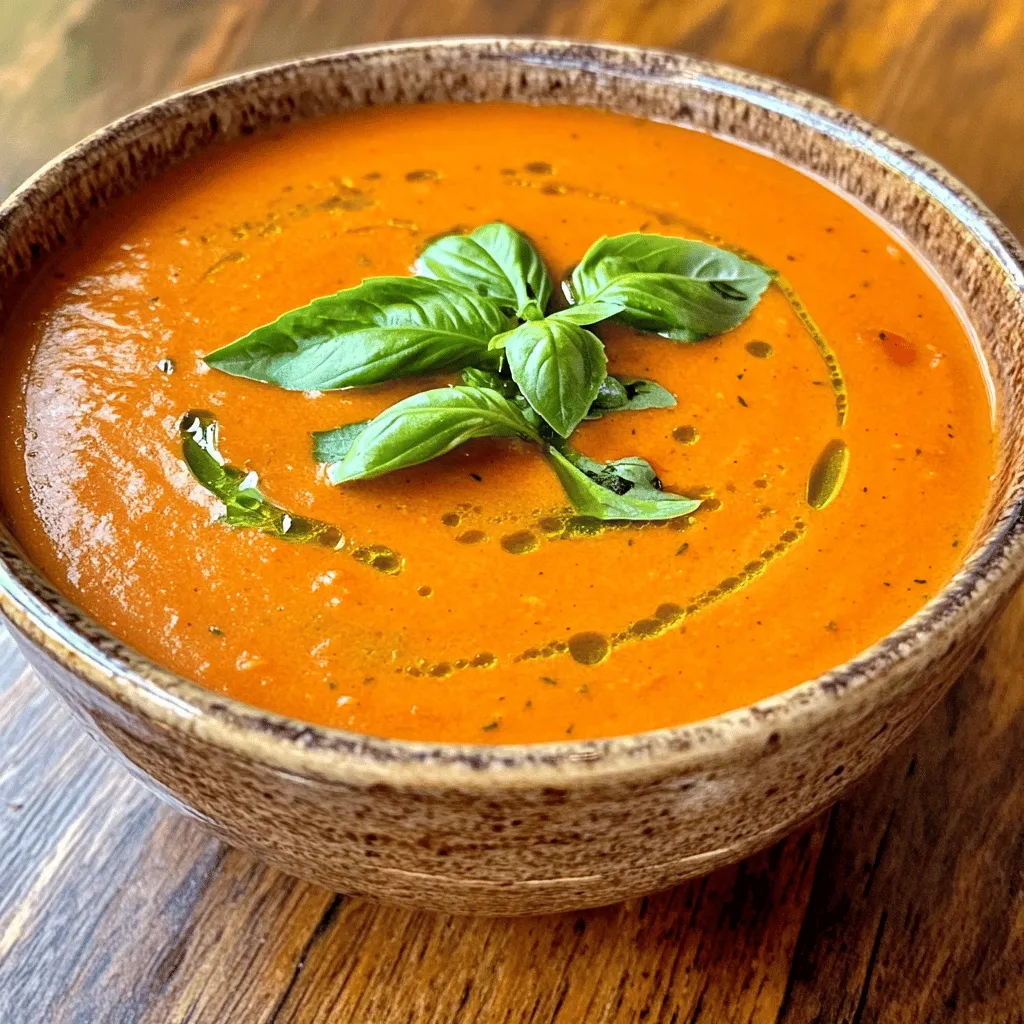
If you’re craving a bowl of warmth packed with flavor, you’ve come to the right place! This Creamy Tomato Basil
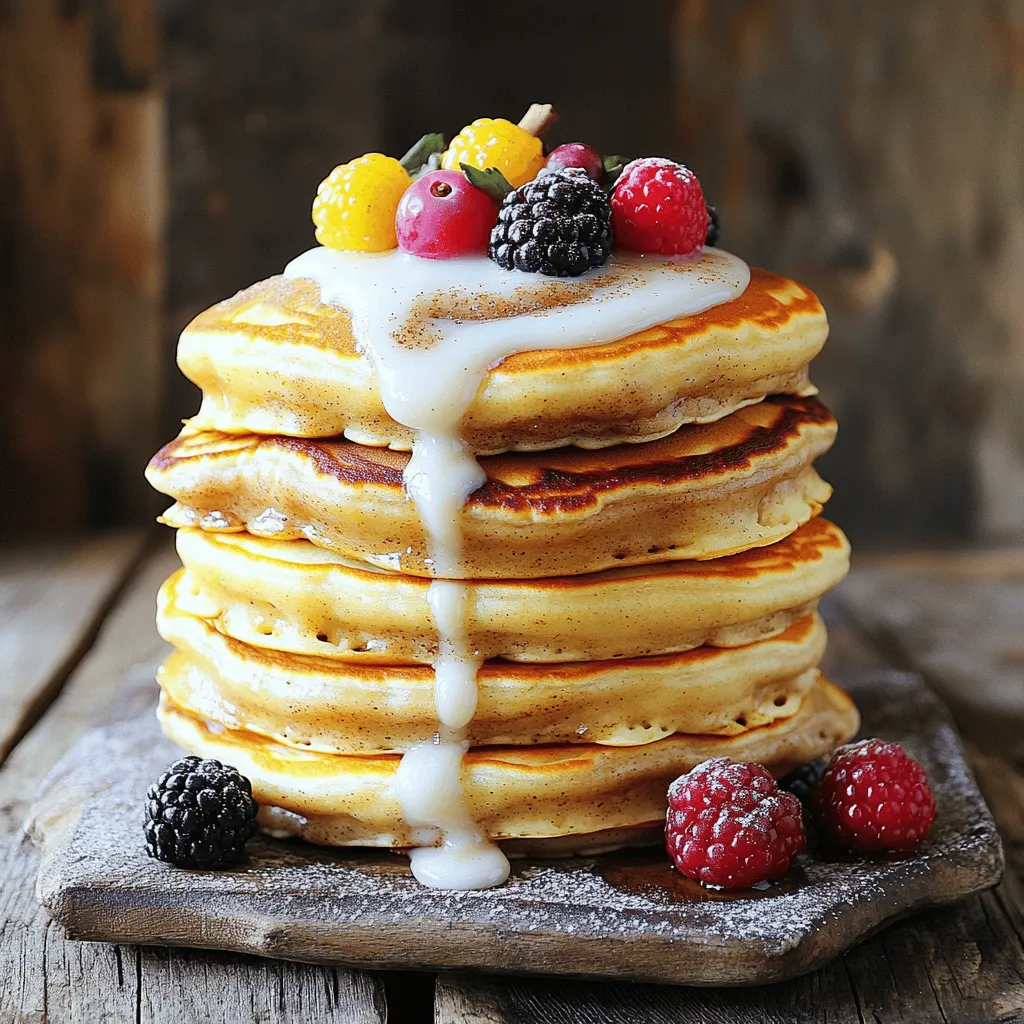
Imagine waking up to the smell of warm cinnamon rolls, but with a twist! Cinnamon roll pancakes blend the soft,
![- 4 large bell peppers (any color) - 1 cup quinoa, rinsed - 2 cups vegetable broth (or water) - 1 can (15 oz) black beans, rinsed and drained - 1 cup corn kernels (fresh or frozen) - 1 cup cherry tomatoes, halved - 1 teaspoon cumin - 1 teaspoon smoked paprika - 1 teaspoon garlic powder - Salt and pepper to taste - 1 avocado, diced (for topping) - Fresh cilantro or parsley for garnish - Lime wedges for serving These ingredients give your stuffed peppers a great mix of flavors and textures. Quinoa serves as a hearty base, while black beans add protein. The corn and tomatoes bring in a touch of sweetness. Cumin, smoked paprika, and garlic powder add depth. You can also customize the dish with your favorite toppings. Avocado and fresh herbs make a lovely finish. If you want more zing, lime wedges work great! For a full recipe, check out the details above. - Preheat your oven to 375°F (190°C). - Cut the tops off and remove seeds from the bell peppers. Start by choosing your bell peppers. I love using a mix of colors for a vibrant dish. Each pepper should stand upright in your baking dish. This helps keep the filling in place. - Combine quinoa and vegetable broth in a medium saucepan. - Bring to a boil then simmer until liquid is absorbed. Quinoa is a great base for this recipe. Rinse it well before cooking. This removes any bitter taste. Once you have it in the pot, let it boil. Then reduce the heat. Cover it and watch it puff up into fluffy goodness. - Mix cooked quinoa with black beans, corn, cherry tomatoes, and spices. - Spoon the mixture into each bell pepper. In a large bowl, combine your cooked quinoa with black beans, corn, and cherry tomatoes. The colors and textures will make your dish pop. Add in your spices—cumin, smoked paprika, and garlic powder. These add depth and flavor. Use a spoon to fill each pepper, packing the mixture gently. - Pour broth into the baking dish for steaming. - Cover with foil and bake, then uncover and bake again for tenderness. After filling the peppers, add a splash of vegetable broth to the baking dish. This helps steam the peppers. Cover the dish with foil and bake it for 25 minutes. This keeps the peppers moist. After that, uncover and bake for another 10-15 minutes. You want your peppers to be tender but not mushy. Try this recipe [Full Recipe] for all the details, and you will have a delicious and colorful meal ready to enjoy! To make these vegan stuffed bell peppers shine, adjust the spices to fit your taste. If you love heat, add a pinch of cayenne pepper. If you prefer milder flavors, use less cumin. This helps the dish match your palate perfectly. Cooking the quinoa just right is key for the best texture. Rinse it well before cooking to remove any bitterness. When you simmer it, make sure all the liquid is absorbed. You want fluffy quinoa that holds together in the peppers. These stuffed peppers taste great with a fresh salad or crispy tortilla chips. The crunch of the chips adds a fun texture. You can also serve them with a squeeze of lime. This gives a bright burst of flavor that elevates each bite. This recipe is naturally gluten-free, making it a great choice for many diets. If you want to swap out any ingredients, consider using brown rice or lentils instead of quinoa. Each option brings its own flavor and texture. The ingredients in these peppers pack a nutritional punch. Quinoa is high in protein and fiber, while black beans add even more protein. Bell peppers are rich in vitamins A and C. This meal is not just tasty; it’s also good for you! {{image_2}} You can change the filling to keep things fresh. Lentils or brown rice work well as bases. They both add texture and flavor. You can also mix in sautéed vegetables like zucchini or mushrooms. Tofu is a great option for extra protein. Simply crumble it and mix it in. This adds a nice twist while keeping it healthy. Want to change the flavor profile? Try adding curry powder for an Indian flair. This spice gives your dish warmth and depth. You can also go for a Mediterranean vibe. Add ingredients like olives and feta cheese. These will give a salty and tangy kick that’s simply delicious. Don’t be afraid to switch up your cooking methods. Cooking on a grill gives a smoky flavor that is hard to beat. Just make sure to monitor the peppers so they don’t burn. If you prefer a hands-off approach, use a slow cooker. This method is perfect for meal prep. Just set it and forget it, and enjoy your tasty stuffed peppers later! For the full recipe, check out the main article. You can refrigerate your vegan stuffed bell peppers in an airtight container. They will stay fresh for up to three days. If you want to keep them longer, freeze them. They can last for up to two months in the freezer. When you’re ready to enjoy your leftovers, the best way to reheat them is in the oven. This method warms the peppers evenly and keeps them tender. Preheat your oven to 350°F (175°C). Place the stuffed peppers in a baking dish and cover with foil. Bake for about 20 minutes. If you're in a hurry, you can use the microwave. Place the peppers on a microwave-safe plate. Heat them for about 2-3 minutes or until they are hot. Enjoy your meal again! Yes, you can prep the peppers and filling separately. Just assemble them before baking. This way, you save time on busy days. You can use brown rice, couscous, or farro instead of quinoa. Each of these adds its own flavor and texture. Peppers are done when they feel tender. You should also check that the filling is heated through. This usually takes about 35-40 minutes in total. Yes, all ingredients in this recipe are naturally gluten-free. You can enjoy this meal without worry! For a lighter version, use less oil. You can also reduce the quantity of avocado or leave it out entirely. This keeps the taste while cutting calories. Feel free to check the Full Recipe for more details! In this blog post, we explored how to make tasty vegan stuffed bell peppers. We covered the main ingredients needed, step-by-step cooking instructions, and tips for perfecting the dish. You learned about different fillings and cooking methods for unique twists. Remember, these peppers are easy to store and reheat, making them a great meal prep option. Enjoy experimenting with your own flavors and variations. This dish is not only healthy but also fun to make and share. Enjoy your cooking!](https://easycookingbite.com/wp-content/uploads/2025/05/d0a6dff4-d09e-4db8-80aa-b0fbef999582.webp)
Looking for a tasty and healthy meal? You’re going to love these Vegan Stuffed Bell Peppers! They are colorful, packed
![To make basil pesto chicken, gather these key items: - 4 chicken breasts (boneless, skinless) - 1 cup fresh basil leaves - 1/2 cup pine nuts (toasted) - 1/2 cup grated Parmesan cheese - 3 cloves garlic, minced - 1/2 cup extra virgin olive oil - Salt and pepper to taste - Juice of one lemon These ingredients create a rich and vibrant dish. The basil offers a fresh taste, while the Parmesan adds a nice depth. You can enhance your dish with these optional items: - 1 cup cherry tomatoes, halved (for garnish) - Fresh basil leaves, for garnish Garnishing with cherry tomatoes brightens the plate. Fresh basil leaves add even more fragrance. If you don’t have a specific ingredient, here are some great swaps: - Use walnuts instead of pine nuts for a different nutty flavor. - Swap Parmesan cheese with Pecorino Romano for a bolder taste. - Olive oil can be replaced with avocado oil for a lighter option. These substitutions keep the dish tasty and fun. You can adjust based on what you like or have at home. For the full recipe, check out the instructions above. To make basil pesto, gather fresh basil leaves, toasted pine nuts, Parmesan cheese, and garlic. Add these to a food processor. Pulse until finely chopped. Next, with the processor running, slowly drizzle in olive oil. This helps the pesto become smooth and creamy. Scrape down the sides as needed. Finally, add salt, pepper, and lemon juice to taste. Set your fresh pesto aside for later use. Prepare your chicken breasts by preheating the oven to 375°F (190°C). Pat the chicken dry with paper towels. This helps to get a nice sear. Season both sides with salt and pepper. Make sure to cover the chicken evenly. This step brings out the natural flavor of the meat. Heat a large oven-safe skillet over medium-high heat. Add a splash of olive oil to the pan. Once hot, add the seasoned chicken breasts. Sear each side for about 5 minutes, until golden brown. This locks in the juices. After browning, remove the skillet from heat. Spread a generous amount of basil pesto on each chicken breast. Transfer the skillet to the preheated oven. Bake for 20-25 minutes. Check that the chicken reaches an internal temperature of 165°F (74°C). When done, take it out and let it rest. Garnish with halved cherry tomatoes and fresh basil leaves before serving. You can find the full recipe [here]. To make great pesto, choose fresh basil. The brighter the green, the better the flavor. Use toasted pine nuts for a rich taste. Blend the nuts and basil first. This helps break them down well. Add garlic for a kick. Pour in olive oil slowly. This keeps your pesto smooth. Taste and adjust with salt, pepper, and lemon juice. Remember, you want a bold flavor that shines. To keep chicken juicy, watch the cooking time closely. Sear chicken breasts for just five minutes on each side. This gives a nice golden crust. Use a meat thermometer. Insert it into the thickest part. When it hits 165°F (74°C), your chicken is done. Let the chicken rest for a few minutes after baking. This helps the juices settle, making each bite tender. Make your dish look appetizing. Start with the chicken on a clean plate. Add a generous spoonful of pesto on top. Sprinkle halved cherry tomatoes around the chicken for color. Finish with fresh basil leaves for a pop of green. This not only looks great but adds extra flavor too. For a fun touch, serve with crusty bread or a light salad. Enjoy the beautiful meal you created! {{image_2}} You can play with your pesto to fit your taste. Instead of pine nuts, try walnuts or almonds for a different crunch. If you want a nut-free option, use sunflower seeds. You can mix in spinach or arugula with your basil for extra greens. For a twist, add sun-dried tomatoes for a rich flavor. Experiment with different cheeses too, like feta or goat cheese. Baking is great, but you can grill or pan-sear your chicken. Grilling adds a smoky taste that pairs well with pesto. If you choose to grill, marinate the chicken in pesto for a few hours for deeper flavor. For a quick method, you can also sauté the chicken in a skillet until cooked through. Each method gives you a unique flavor and texture. Basil pesto chicken shines with simple sides. Serve it with roasted vegetables like zucchini and bell peppers. A fresh salad with mixed greens and cherry tomatoes complements the dish well. For a heartier meal, pair it with pasta tossed in olive oil and garlic. You can even enjoy it with warm, crusty bread for a satisfying dinner. For the full recipe, check out the detailed instructions shared earlier. To store leftover Basil Pesto Chicken, let it cool first. Place the chicken in an airtight container. Cover it tightly and keep it in the fridge. This will keep the chicken fresh for up to three days. If you want to save it longer, consider freezing. You can freeze both the pesto and chicken. For the pesto, pour it into an ice cube tray. Once frozen, transfer the cubes to a zip-top bag. This way, you can use small amounts later. For the chicken, wrap each piece in plastic wrap before putting it in a freezer bag. It will last up to three months in the freezer. To reheat the chicken, take it out of the fridge or freezer. If frozen, let it thaw overnight in the fridge. Heat the oven to 350°F (175°C). Place the chicken in a baking dish and cover it with foil. Bake for about 20 minutes until warmed through. For the best taste, add fresh pesto on top just before serving. Enjoy your flavorsome meal from the Full Recipe! Yes, you can use store-bought pesto. It saves time and still tastes good. Just choose a brand with fresh ingredients. For the best flavor, look for a pesto that uses real basil and olive oil. Store-bought pesto works well when you are short on time. Still, making your own is easy and tasty. Boneless, skinless chicken breasts are the best choice. They cook evenly and stay tender. You can also use chicken thighs if you prefer more flavor. Thighs have more fat, which adds juiciness. Both options work with the basil pesto, so pick what you like. You can check the chicken’s internal temperature. Use a meat thermometer; it should read 165°F (74°C). If you don’t have a thermometer, cut into the thickest part. The meat should be white, not pink. This recipe ensures the chicken cooks well with the pesto. Enjoy your meal! Basil pesto chicken is easy and tasty. We covered all the key steps, from picking ingredients to cooking methods. Remember, fresh basil and the right chicken make a big difference. Use good storage tips to keep leftovers fresh. Experiment with flavors by trying different ingredients and serving ideas. Enjoy your creation and impress your friends and family with this simple yet delicious dish!](https://easycookingbite.com/wp-content/uploads/2025/05/795cd2de-ba71-4612-aae4-d9ef8b0f2c05.webp)
Are you ready to spice up your weeknight dinners? My Basil Pesto Chicken recipe is not only easy to make
![To make a tasty Easy Chicken and Rice Casserole, gather these ingredients: - 2 cups cooked rice (white or brown) - 2 cups cooked chicken, shredded or diced - 1 cup of broccoli florets (fresh or frozen) - 1 cup cheddar cheese, shredded - 1 cup cream of chicken soup (or homemade equivalent) - 1/2 cup milk - 1 teaspoon garlic powder - 1 teaspoon onion powder - 1/2 teaspoon paprika - Salt and pepper to taste - 1 tablespoon olive oil - Fresh parsley, chopped (for garnish) You can easily swap some ingredients in this recipe. Here are a few ideas: - Rice: You can use quinoa or cauliflower rice for a low-carb option. - Chicken: Swap chicken with turkey, or try cooked sausage for a different flavor. - Broccoli: Use other veggies like spinach, peas, or green beans if you prefer. - Cheese: Feel free to mix different cheeses like mozzarella or pepper jack. - Soup: If you want a healthier option, make a homemade cream sauce using chicken broth and flour. Each serving of this casserole offers a balance of nutrients. Here’s a quick look: - Calories: Approximately 400 - Protein: 30g - Carbohydrates: 35g - Fat: 15g - Fiber: 2g - Sodium: 600mg This dish serves six, so it’s a great meal for families or gatherings. Enjoy cooking this Easy Chicken and Rice Casserole! For the complete cooking details, check the Full Recipe. Start by gathering all your ingredients. You will need cooked rice, cooked chicken, broccoli, cheddar cheese, cream of chicken soup, milk, and some spices. Preheat your oven to 350°F (175°C). Grease a 9x13 inch baking dish with olive oil. In a large mixing bowl, combine the rice, chicken, and broccoli. Stir until everything mixes well. In another bowl, whisk together the cream of chicken soup, milk, garlic powder, onion powder, paprika, salt, and pepper. Pour this mixture over the rice and chicken. Stir until all is coated nicely. Transfer this mix into the greased baking dish and spread it out evenly. Top it with the shredded cheddar cheese. Cover the baking dish with aluminum foil. Place it in your preheated oven and bake for 25 minutes. This helps to heat everything through while keeping it moist. After 25 minutes, carefully remove the foil. Bake for another 10-15 minutes until the cheese is bubbly and slightly golden. This step adds a nice crust on top and enhances the flavor. To check if your casserole is done, look for the cheese to be melted and golden. You can also insert a fork into the center. If it feels hot and the mixture is bubbly, it's ready! Let it cool for a few minutes before serving. Garnish with chopped parsley for a fresh touch. Enjoy your Easy Chicken and Rice Casserole! For the complete recipe, click here [Full Recipe]. One common mistake is not cooking the rice fully. Use cooked rice for the best texture. Another mistake is adding too much liquid. The casserole should not be soupy. Lastly, don’t skip the cheese topping. It adds flavor and a nice crust. To boost flavors, try adding fresh herbs. Basil, thyme, or rosemary work well. You can also use dried herbs if fresh ones aren’t available. Garlic powder and onion powder are great too. They add depth without extra prep time. A pinch of red pepper flakes can add a kick if you like heat. A large mixing bowl is a must for combining ingredients. A whisk helps mix the soup and milk smoothly. Use a 9x13 inch baking dish to bake your casserole evenly. An aluminum foil sheet will keep the cheese from burning while it cooks. For easy serving, a spatula works wonders. Check out the Full Recipe for more details on tools and tips! {{image_2}} If you want a meatless meal, you can swap the chicken for hearty veggies. Use mushrooms, bell peppers, or zucchini to add great taste. You can also use lentils or chickpeas for protein. Replace the cream of chicken soup with a creamy mushroom soup or a homemade white sauce. This keeps the dish rich and satisfying without meat. You can easily switch the chicken with turkey or beef. Ground turkey works well and cooks quickly. Just brown it before mixing it in. For beef, use shredded or diced cooked beef. Adjust the seasonings to match your choice of meat. This way, the casserole stays flavorful and filling. Feel free to get creative with your veggies! Spinach, carrots, or green beans can add color and crunch. You can also mix different cheeses for a unique taste. Try mozzarella for a mild flavor or pepper jack for some spice. These swaps let you personalize the casserole to fit your taste. Check out the Full Recipe for more ideas! Once your Easy Chicken and Rice Casserole is done, let it cool. Store leftovers in an airtight container. This keeps the casserole fresh. Place it in the fridge for up to three days. If you have more leftovers, use a larger container. This prevents the casserole from drying out. To reheat, set your oven to 350°F (175°C). Place the casserole in an oven-safe dish. Cover it with foil to keep it moist. Heat for about 20 minutes. Check to see if it's warm all the way through. You can also reheat in the microwave. Use a microwave-safe dish and heat for about 3-5 minutes. Stir halfway to heat evenly. If you want to freeze the casserole, cool it completely first. Wrap it tightly in plastic wrap, then foil. This helps prevent freezer burn. It can last up to three months in the freezer. To reheat, thaw it in the fridge overnight. Then follow the reheating steps above. Enjoy your meal anytime with these simple steps! To make this recipe gluten-free, swap the cream of chicken soup for a gluten-free version. You can also use gluten-free rice or ensure your broth is gluten-free. Make sure to check all labels. Yes, you can use raw chicken. Just chop it into small pieces. Cook it in the casserole for about 40-45 minutes until it’s done. Make sure it reaches an internal temperature of 165°F. This casserole pairs well with a fresh salad or steamed veggies. You can also serve it with crusty bread or garlic bread for a complete meal. The casserole stays good in the fridge for about 3-4 days. Store it in an airtight container to keep it fresh. Yes, you can easily double the recipe. Just use a larger baking dish and adjust the cooking time as needed. Make sure to check for doneness before serving. This article covered everything you need for the Easy Chicken and Rice Casserole. You learned the ingredients, step-by-step instructions, and tips for success. I shared common mistakes and ways to boost flavors. The variations offered ideas for all diets. You also found storage tips to keep your leftovers fresh. Now, you can cook this dish with confidence. Enjoy creating a meal that your friends and family will love!](https://easycookingbite.com/wp-content/uploads/2025/05/da5f3737-8a4d-41b4-a7a4-3425a53be573.webp)
If you’re looking for a quick and delicious dinner, you’ve found it! In this blog post, I’ll show you how
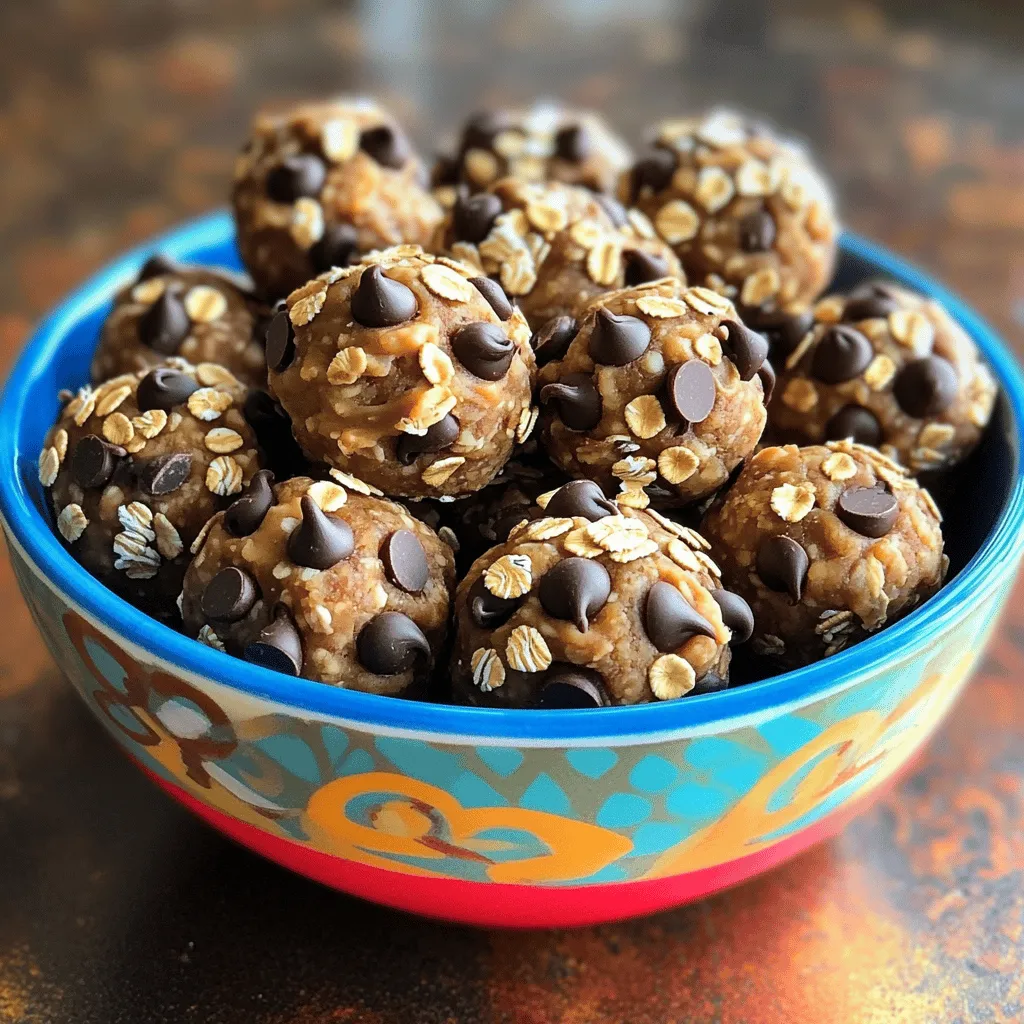
Looking for a quick and tasty snack to fuel your day? You’ve come to the right place! These Peanut Butter
