Skip to content
DisclaimerTerms Of UseGDPR PolicyCookie Policy

easycookingbite

  • Home
  • Drinks
  • Appetizers
  • Dinner
  • Dessert
  • About
  • Contact
  • Privacy Policy
DisclaimerTerms Of UseGDPR PolicyCookie Policy

Lily

To make this dish shine, you need key ingredients. Here’s what you’ll gather: - 1 block (14 oz) firm tofu, pressed and cubed - 2 tablespoons cornstarch - 3 tablespoons vegetable oil (divided) - 1 bell pepper (red or yellow), sliced - 1 cup broccoli florets - 1 carrot, julienned - 3 green onions, chopped - 2 garlic cloves, minced - 1 tablespoon fresh ginger, grated - 3 tablespoons soy sauce - 1 tablespoon sesame oil - 2 tablespoons honey or agave syrup - Sesame seeds, for garnish - Salt and pepper to taste You can customize your stir fry with more veggies. Here are some great options: - Snow peas for extra crunch - Mushrooms for an earthy flavor - Zucchini for a light touch - Spinach for a pop of color - Mixed bell peppers for variety These additions make the dish colorful and fun. To enhance the flavor, consider these sauces and seasonings: - Teriyaki sauce for a sweet twist - Chili paste for some heat - Hoisin sauce for depth - Lime juice for a zesty kick Using these sauces can take your stir fry to the next level. For the full recipe, check out the complete guide. First, we need to prep the tofu. Start by pressing it to remove moisture. Wrap the block of tofu in a clean kitchen towel. Place a heavy skillet on top for about 15 minutes. This helps make the tofu crispy. After pressing, cut the tofu into bite-sized cubes. Toss these cubes in a bowl with cornstarch until each piece is coated. This coating helps create a crunchy texture when we cook it. Next, heat 2 tablespoons of vegetable oil in a large non-stick skillet or wok over medium-high heat. Once the oil is hot, add the tofu cubes in a single layer. Cook the tofu for about 5 to 7 minutes. Turn the cubes occasionally so they brown evenly. You want them to be golden and crispy on all sides. When done, remove the tofu from the skillet and set it aside. Now, let’s stir-fry the vegetables. In the same skillet, add the last tablespoon of vegetable oil. Sauté the minced garlic and grated ginger for about 30 seconds. You want to smell those great aromas! Now, add the sliced bell pepper, broccoli florets, and julienned carrot. Stir-fry these veggies for about 4 to 5 minutes. They should be tender but still crisp. Return the crispy tofu to the skillet. In a small bowl, mix soy sauce, sesame oil, and honey or agave syrup. Pour this sauce over the stir-fry. Stir everything to combine and cook for another 2 minutes. Finally, season with salt and pepper to taste. Garnish with chopped green onions and sesame seeds before serving. Enjoy your Crispy Tofu Stir Fry! For the full recipe, check out the complete instructions above. To get crispy tofu, start with firm tofu. Press it to remove water. Wrap it in a clean towel and place a heavy object on top. Leave it like this for about 15 minutes. After pressing, cut the tofu into bite-sized cubes. Coat them in cornstarch. This layer helps create that crunch when you cook it. Use a large skillet or wok. Heat it on medium-high. Add vegetable oil before any ingredients. This helps prevent sticking. Stir-fry in small batches for best results. Avoid overcrowding the pan. This keeps everything cooking evenly and allows for browning. Don’t forget to keep your ingredients moving! Cook the tofu first and set it aside. This way, it stays crispy. Next, add garlic and ginger to the hot oil. They need only a short time to release flavor. After that, toss in your vegetables. Start with the harder ones, like carrots. Add softer ones, like bell peppers, last. This keeps them bright and crisp. Finally, return the tofu to the pan. Mix everything with your sauce. This combines all the flavors perfectly. For the full recipe, check the earlier section. {{image_2}} You can change up the protein in this dish. Instead of tofu, try tempeh for a nutty flavor. Seitan is another great option. It gives a chewy texture that many love. If you eat meat, chicken or shrimp works well too. Just cut them into small pieces and cook as you would with tofu. Feel free to mix and match your veggies. Snow peas or snap peas add a nice crunch. You can also use zucchini or mushrooms for added flavor. Bok choy or spinach can bring a fresh taste. Remember, the more colorful your stir fry, the more fun it is to eat! Sauces can make or break your dish. You can use teriyaki sauce for a sweet twist. If you like spice, try adding sriracha or chili paste. A peanut sauce can add a creamy texture. Experiment with different sauces to find your favorite blend. For the full recipe, check out the section above. To store leftover stir fry, let it cool first. Place it in an airtight container. Keep it in the fridge for up to three days. This helps keep the flavors fresh. If you want to keep it longer, consider freezing it. Freezing tofu and vegetables is easy. Cut the tofu into cubes and place them in a freezer bag. You can freeze cooked vegetables too. Make sure to remove as much air as possible. This prevents freezer burn. Use the frozen tofu within three months for best taste. To reheat your stir fry, use a skillet. Heat a little oil over medium heat. Add the stir fry and cook until hot, about five minutes. Stir it often to avoid sticking. You can also use a microwave. Heat it in short bursts, stirring in between. Enjoy your tasty meal again! For the full recipe, check the details above. Yes, you can use frozen tofu. Freezing tofu changes its texture. It becomes more porous, which helps it soak up flavors better. To use frozen tofu, let it thaw in the fridge overnight. After thawing, press it to remove extra water. Then, cut it into cubes and follow the rest of the recipe. This method can give you a nice, chewy bite. Crispy Tofu Stir Fry pairs well with many sides. You can serve it over steamed rice or quinoa for a filling meal. Noodles are another great option. Try rice noodles or soba noodles tossed with some soy sauce. For added nutrition, serve a side salad or steamed greens. You can also enjoy it with spring rolls for a fun appetizer. This recipe is already vegan-friendly if you skip honey. Instead, use agave syrup or maple syrup. Both options work well to add sweetness. Ensure that your soy sauce is vegan, too. Most soy sauces are vegan, but check the label to be sure. Enjoy the flavors without any animal products! You can find the full recipe here for more guidance. This blog post covered how to make a tasty crispy tofu stir fry. You learned about key ingredients, cooking steps, and tips for crispiness. We explored variations and storage methods for your leftovers. In the end, this dish is simple yet flexible. You can adjust it to your tastes and needs. Enjoy creating your own version of crispy tofu stir fry!

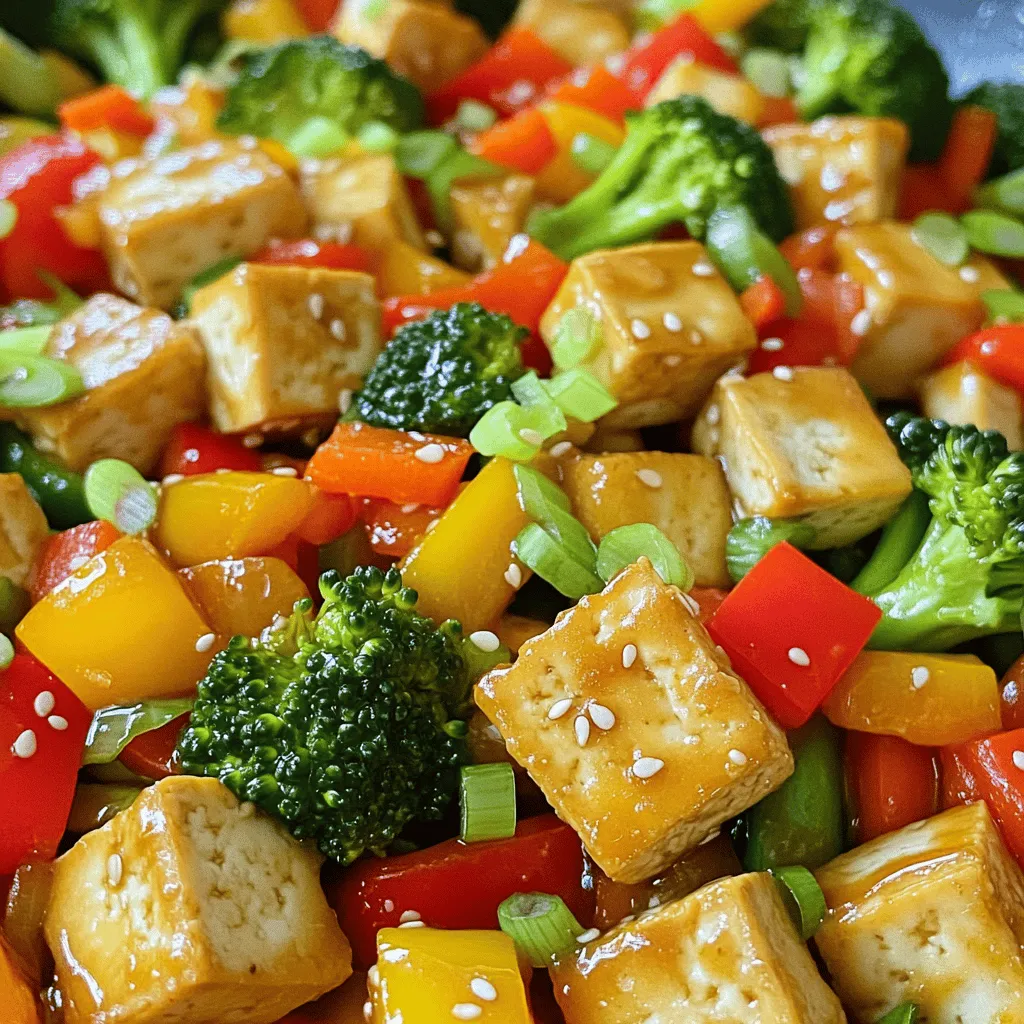
Crispy Tofu Stir Fry Flavorful and Easy Recipe

If you’re craving a quick and crunchy meal, this crispy tofu stir fry is for you! It’s packed with flavor,

- Fresh or canned peaches - Sugar - Lemon juice - Bisquick mix - Baking powder - Milk - Unsalted butter - Ground cinnamon - Salt The ingredients for this peach cobbler are simple and easy to find. You can use fresh peaches for the best flavor, but canned peaches work well too. If you choose canned peaches, make sure to drain and rinse them. This step helps remove excess syrup, keeping the cobbler from being too sweet. You need sugar to bring out the natural sweetness of the peaches. A little lemon juice adds brightness and balances the flavors. Bisquick mix is the star here. It makes the batter fluffy and light. - Alternatives for fresh peaches: If you can't find fresh peaches, use frozen peaches. Just thaw and drain them before using. Canned peaches are also a great option. - Sugar substitutes: You can use brown sugar for a deeper flavor. If you prefer, try a sugar alternative like stevia or monk fruit sweetener. - Dairy-free options for milk and butter: Use almond milk or coconut milk instead of regular milk. For butter, you can use coconut oil or a dairy-free butter substitute. Don't hesitate to play with these ingredients. The perfect cobbler is all about your taste! For the full recipe, check out the detailed instructions and enjoy this delightful treat. First, set your oven to 375°F (190°C). Preheating helps the cobbler cook evenly and rise well. In a large bowl, add 4 cups of fresh peaches. If you use canned peaches, make sure to drain and rinse them first. Sprinkle in 1/2 cup of sugar and 2 teaspoons of lemon juice. Mix gently until the peaches are well coated. Pour this mixture into a greased 9x13-inch baking dish. This step brings out the peach flavor. In another bowl, combine 1 cup of Bisquick mix with 1 tablespoon of baking powder. Then, add 1 cup of milk and 1/4 cup of melted unsalted butter. Mix in the remaining 1/2 cup sugar, 1 teaspoon of ground cinnamon, and a pinch of salt. Stir until just combined. The batter should be slightly lumpy, which is okay. This texture will help it rise nicely. Carefully spoon the Bisquick batter over the peach mixture in the baking dish. Do not stir. Just let the batter cover the peaches as best as you can. Bake in the preheated oven for about 35-40 minutes. Look for a golden brown top. Insert a toothpick in the center; if it comes out clean, it’s ready. Once baked, let it cool for a few minutes before serving. Enjoy your delicious peach cobbler! To get the best cobbler, focus on the batter. The batter should be slightly lumpy. This gives your cobbler a nice texture. When you mix the Bisquick, don't over-mix. Just combine until you see no dry spots. For better flavor, use fresh peaches when possible. Their sweetness makes a big difference. You can also add a splash of vanilla for extra warmth. Serve your peach cobbler warm for the best taste. A scoop of vanilla ice cream on top is a must. The cold ice cream melts into the warm cobbler. This combination is pure joy! You can also sprinkle some ground cinnamon for added flavor. Fresh mint leaves make a lovely garnish too. They add color and a hint of freshness. Watch out for overbaking. That can make your cobbler dry. Keep an eye on the color; you want it golden brown. Use a toothpick to check doneness. If it comes out clean, it's ready. If you notice burning around the edges, lower the oven temperature. You can also cover the dish with foil to prevent burning. Avoid undercooking by ensuring your batter spreads evenly. Remember, your goal is a soft, moist cobbler with juicy peaches. {{image_2}} You can change up the fruit in this peach cobbler. Try using berries, like blueberries or raspberries. Apples also work well and give a nice crunch. Mix and match fruits for fun flavors. Each fruit adds its own taste and texture. Keep the same amount of fruit as the recipe calls for. This way, your cobbler stays balanced and tasty. If you need a gluten-free option, don't worry! You can use gluten-free Bisquick. It works just like regular Bisquick but without gluten. Follow the same steps as the original recipe. Your cobbler will be just as delicious and soft. Make sure to check the labels on your ingredients to ensure they are gluten-free. Add spices or extracts to bring new flavors to your cobbler. Ground cinnamon is a classic choice, but you can also try nutmeg or cardamom. A splash of vanilla extract adds warmth too. For a twist, add a hint of almond extract. These little changes make a big difference in taste. Play around with the flavors to find your perfect mix. For the full recipe, check out the Peachy Paradise Cobbler. After enjoying your peach cobbler, let it cool. Cover it with plastic wrap or aluminum foil. You can also use an airtight container. Place it in the fridge if you plan to eat it in a few days. If you want to keep it longer, freeze it. Use a freezer-safe container or wrap it well to avoid freezer burn. To reheat your cobbler, warm it in the oven. Preheat your oven to 350°F (175°C). Place the cobbler in a baking dish and cover it with foil. Heat for about 15-20 minutes. This helps keep the topping soft and the peaches juicy. You can also microwave individual servings for a quick treat. Just heat for 30 seconds, then check if it’s warm enough. When stored properly, peach cobbler lasts about 3-4 days in the fridge. If frozen, it can last up to 3 months. Just remember to label your containers with the date. This way, you’ll know when to enjoy your delicious dessert. Always check for any changes in smell or texture before eating leftovers. Yes, you can use frozen peaches. Just thaw them first and drain any extra juice. This helps keep the cobbler from becoming too watery. Frozen peaches work great, and they still taste delicious! Bisquick makes it easy to create a tasty cobbler. If you don’t have it, you can use flour, baking powder, and salt to make your own mix. Just combine 1 cup of flour, 1 1/2 teaspoons baking powder, and a pinch of salt. This will give you a similar result. Absolutely! If you want more cobbler, just double all the ingredients. Use a larger baking dish, like a 12x18 inch pan. Keep an eye on the baking time. It might need a few extra minutes to cook through. Peach cobbler tastes amazing with vanilla ice cream. You can also serve it with whipped cream or yogurt. Fresh mint adds a nice touch too. For a fun twist, try it with a scoop of cinnamon ice cream! This blog explored a delicious peach cobbler recipe using simple ingredients. We discussed swaps for fresh peaches and offered alternatives for sugar and dairy. You learned step-by-step instructions, tips for perfect texture, and ways to enhance flavor. I also shared storage advice and common mistakes to avoid. Peach cobbler is versatile; feel free to explore variations with different fruits or gluten-free options. Enjoy baking and sharing this delightful treat. Let creativity flourish as you make it your own!

Peach Cobbler with Bisquick Simple and Tasty Recipe

If you crave a sweet dessert that’s quick and easy, you’ll love this Peach Cobbler with Bisquick recipe. This dish

- Fresh fruits and vegetables - 2 ripe mangos, diced - 2 ripe avocados, diced - 1 medium red onion, finely diced - 1 red bell pepper, diced - 1 jalapeño, seeded and minced - 1/2 cup fresh cilantro, chopped - Essential spices and seasonings - Juice of 2 limes - Salt and pepper to taste - Optional additions for flavor - You can add diced tomatoes for extra color. - A pinch of cumin brings a warm flavor. - Try adding garlic for a bold taste. I love using fresh produce in my cooking. Each ingredient in this salsa adds a unique taste. The mangos are sweet, while the avocados are creamy. The red onion and bell pepper give a nice crunch. Jalapeño adds just the right amount of heat. Cilantro brightens the dish and adds freshness. The lime juice ties everything together, creating a zesty kick. This salsa is quick to make and perfect for any gathering. You can serve it in a colorful bowl with chips. My version of mango avocado salsa is not just tasty; it’s also healthy. You can easily adjust it to fit your taste. Want more spice? Just add another jalapeño. Prefer it sweeter? Add more mangos. Check out the Full Recipe for more details on making this vibrant dish. How to prep the mango and avocado To start, choose ripe mangos and avocados. Gently press the fruit; it should feel soft but not mushy. Cut the mango by slicing around the pit, then dice it into small cubes. For the avocado, cut it in half, remove the pit, and scoop the flesh with a spoon. Dice it carefully to keep nice pieces. Mixing the vegetables and seasoning In a large mixing bowl, add the diced mango and avocado. Next, finely chop the red onion and red bell pepper. Toss them into the bowl. For some heat, add the minced jalapeño. Fresh cilantro gives great flavor, so chop it and mix it in too. Finally, squeeze the juice of two limes over the mixture and season with salt and pepper to taste. Proper techniques for folding ingredients without mashing Now, it’s time to mix! Use a gentle folding motion with a large spoon or spatula. This keeps the avocado and mango pieces intact and prevents mashing. Take your time and be careful. After mixing, let the salsa sit for about 10 minutes. This allows all the flavors to blend together nicely. This simple process brings a fresh and zesty delight to your table. For the complete recipe, refer to the [Full Recipe]. To pick the best mangoes, look for ones that feel slightly soft. You want them to give a little when you press gently. Their skin should have a nice golden hue, with some red blush if they are ripe. The scent should be sweet, hinting at their juicy flavor. For avocados, check for firmness. They should yield slightly when you press them. Avoid hard avocados as they need more time to ripen. When you slice them open, the flesh should be a bright green color without brown spots. To store ripe mangoes, keep them at room temperature for a few days. If they ripen too fast, put them in the fridge to slow it down. For avocados, if they are still hard, keep them at room temperature. Once ripe, store them in the fridge. You can mix in lime juice to add brightness. Lime balances the sweetness of mango and creaminess of avocado. Fresh cilantro gives a fresh kick. If you enjoy heat, add jalapeño or even a dash of cayenne pepper. To adjust the heat, start with a small amount of jalapeño. You can always add more later. For a milder salsa, remove the seeds from the jalapeño before mixing. Use spices like cumin for a unique twist. For more flavor ideas, check the Full Recipe for additional tips. With these tricks, you can create a salsa that suits your taste! {{image_2}} You can easily change up the ingredients in mango avocado salsa. For allergies, swap out mangos for peaches. This keeps the sweetness while removing mango allergens. If you want a different flavor, try adding diced pineapple. It gives a nice twist and adds tropical vibes. For a spicy kick, add more jalapeño or use a serrano pepper. If you prefer milder flavors, skip the jalapeño altogether. You can also try using green onions instead of red onion for a fresh taste. The goal is to make the salsa your own! Mango avocado salsa pairs well with many protein dishes. Serve it over grilled chicken or shrimp for a refreshing touch. It also works great atop fish tacos. The salsa's bright flavors balance rich proteins nicely. You can use the salsa in other ways too. Try it as a topping on grilled sandwiches or burgers. You can even mix it into your salad for a fresh boost. Get creative! The salsa adds color and flavor to any meal. To keep mango avocado salsa fresh, use an airtight container. This helps stop air from spoiling it. Store the salsa in the fridge right after you make it. It tastes best within 1 to 2 days. The longer it sits, the softer the avocados get. If you notice brown spots, just stir it well. The bright flavors will still shine through. Can salsa be frozen? Yes, you can freeze mango avocado salsa. However, the texture may change once thawed. To freeze, place the salsa in a freezer-safe bag. Remove as much air as possible before sealing. It can last up to 3 months in the freezer. To thaw, move the salsa to the fridge overnight. This helps keep the salsa from getting too watery. After thawing, stir it gently to mix the ingredients back together. You may want to add a little lime juice to refresh the taste. Enjoy the full recipe for a fresh flavor experience! What is the best way to serve mango avocado salsa? You can serve mango avocado salsa as a dip with tortilla chips. It also shines as a topping for grilled fish or chicken. For a fresh twist, add it to tacos or burrito bowls. Present it in a colorful bowl, and don’t forget lime wedges for extra zest. Garnishing with cilantro leaves adds to its charm. Can I make it ahead of time? Yes, you can make mango avocado salsa ahead of time. However, it tastes best fresh. If you make it early, the avocados might brown a bit. To slow this down, add lime juice to the mixture. Store it in an airtight container in the fridge for up to a day. Give it a gentle stir before serving to refresh the flavors. How can I adjust the recipe for larger servings? To serve more people, simply double or triple the ingredients. Use more mangos and avocados for balance. Keep the ratios of the other ingredients the same. If you're using a large bowl, mix well to combine everything. For a crowd, consider adding more lime juice to keep the salsa bright. Check the seasoning again for taste before serving. For the full recipe, refer to the complete instructions provided earlier. This blog post provided a complete guide to making mango avocado salsa. We covered ingredients, prep steps, and tips for choosing ripe fruits. You can enhance the salsa’s flavor with spices and fun mix-ins. We explored variations, serving ideas, and how to store your salsa. Remember to have fun with the recipe. Feel free to make it your own. Enjoy your fresh, tasty creation, and share it with friends!

Mango Avocado Salsa Fresh and Zesty Delight

If you’re craving a fresh, zesty dish, you’ll love this Mango Avocado Salsa. Bursting with vibrant flavors, it’s perfect for

To make a delicious Chocolate Chip Cookie Dough Dip, you only need a few simple ingredients. Each one plays a key role in creating that rich, sweet flavor. Here’s what you will need: - 1 cup all-purpose flour - 1/2 cup unsalted butter, softened - 1/2 cup brown sugar, packed - 1/4 cup granulated sugar - 2 teaspoons vanilla extract - 1/4 teaspoon salt - 1 cup cream cheese, softened - 1/2 cup powdered sugar - 1/2 cup mini chocolate chips - Assorted dippables (pretzels, graham crackers, apple slices, or assorted cookies) Each ingredient adds a unique touch to the dip. The flour gives it structure, while the butter and sugars add creaminess and sweetness. The cream cheese makes it smooth, and the mini chocolate chips bring that classic chocolate flavor. You can enjoy this dip with anything from pretzels to fruit slices. For the full recipe, check out the detailed instructions after this section. 1. Heat-treating the flour Start by heat-treating the flour. This step helps kill any bacteria. Spread the flour on a baking sheet. Bake it at 350°F (175°C) for 5-7 minutes. Stir halfway through to ensure even heat. Let it cool completely before using it. 2. Mixing the base ingredients In a large bowl, take the softened butter. Add brown sugar and granulated sugar. Beat them together until the mixture is light and fluffy. This should take about 2-3 minutes. 3. Incorporating the cream cheese Next, add the softened cream cheese to the bowl. Pour in the vanilla extract and add a pinch of salt. Beat these ingredients until they blend well and form a smooth mixture. 4. Combining the dry and wet ingredients Gradually add the cooled, heat-treated flour to the mixture. Mix it in until fully incorporated. Be sure not to leave any dry spots. 5. Chilling the dip before serving Slowly add in the powdered sugar. Mix until the dip is smooth and creamy. Stir in the mini chocolate chips so they spread evenly throughout. Transfer the dip to a serving bowl. Refrigerate it for 30 minutes to an hour. This helps the flavors meld together perfectly. For the full recipe, you can refer to the earlier section. How to properly heat-treat flour To make your dip safe, heat-treat your flour. Spread one cup of all-purpose flour on a baking sheet. Bake it at 350°F for 5 to 7 minutes. Stir halfway through. Let the flour cool completely before using it. Achieving the perfect creamy consistency For a smooth dip, use softened butter and cream cheese. Beat them well until fluffy. Mix in your sugars and vanilla. Gradually add the heat-treated flour. This method ensures a creamy texture without lumps. Suggestions for mixing and serving Use a large bowl for mixing. A hand mixer works best to combine the ingredients. Once the dip is ready, chill it for 30 minutes. This allows the flavors to blend nicely. Serve it in a fun bowl for extra appeal. Ideal dippers for Chocolate Chip Cookie Dough Dip Enjoy this dip with a variety of dippers. Some tasty options include pretzels, graham crackers, and apple slices. You can also use assorted cookies for a sweet twist. Each dipper adds its own flavor and texture. Presentation ideas for parties Make your dip stand out at gatherings. Use a bright, decorative bowl to hold the dip. Arrange your dippers around the bowl for a festive look. Sprinkle a few mini chocolate chips on top for a fun touch. This adds color and invites guests to dig in! {{image_2}} You can change up the taste of your Chocolate Chip Cookie Dough Dip in fun ways. One easy way is to add nuts. Chopped walnuts or pecans bring a nice crunch. They also add a rich flavor that pairs well with the sweet dip. You can even add other mix-ins, like toffee bits or coconut flakes. Just remember to keep the balance of flavors in mind. If you want a healthier version, try using alternative sweeteners. You can swap out regular sugar for honey or maple syrup. These options add sweetness without the extra calories. If you prefer a sugar-free choice, consider using stevia or monk fruit sweetener. Both work well and keep the dip tasty. You can also make themed dips for special occasions. For example, during the holidays, you could add peppermint extract for a minty twist. This makes it festive and fun! Another idea is to use seasonal flavors, like pumpkin spice in the fall. Just mix in some pumpkin puree and pumpkin pie spice for a cozy vibe. Another fun twist is to swap out chocolate for other flavors. Try using peanut butter instead of chocolate chips. This gives the dip a rich, nutty taste. You can even create a vanilla version by leaving out the chocolate and adding vanilla bean. It’s a great way to keep things fresh and exciting! To keep your Chocolate Chip Cookie Dough Dip fresh, store it in an airtight container. This will help prevent it from drying out. I recommend placing a piece of plastic wrap directly on the dip before sealing the lid. This extra step keeps moisture in and flavor intact. You can refrigerate it for up to five days. Can it be frozen? Yes, you can freeze this dip. Just make sure it is in a freezer-safe container. It will stay good for about three months. When you are ready to eat it again, let it thaw in the fridge overnight. The dip lasts about five days in the fridge. You will want to check for any signs of spoilage before serving. If you notice any odd smells or changes in texture, it’s best to toss it. Always remember to keep it tightly sealed to maintain freshness. For the best taste, enjoy it within the first few days. Can I eat cookie dough dip raw? Yes, you can eat cookie dough dip raw. This dip uses heat-treated flour, which makes it safe to eat. It tastes just like cookie dough, and it’s delicious! How do I make this dip gluten-free? To make it gluten-free, use gluten-free flour instead of all-purpose flour. Many brands offer a 1:1 gluten-free flour substitute. This will keep the dip tasty and safe for those with gluten allergies. What can I substitute for cream cheese? If you need a substitute for cream cheese, you can use Greek yogurt. It adds creaminess and a slight tang. Another option is ricotta cheese, which works well too. How to make it sweeter or less sweet To make the dip sweeter, add more powdered sugar. Start with a tablespoon at a time until it reaches your desired sweetness. For a less sweet dip, cut back on the sugar and add a pinch of salt to balance the flavors. Can I use regular chocolate chips instead of mini ones? Yes, you can use regular chocolate chips! They will add a different texture but still taste great. Just remember to chop them a bit if they are too large. To sum up, we explored making a tasty Chocolate Chip Cookie Dough Dip. You learned about the key ingredients and the step-by-step prep. We shared tips for the perfect dip and ways to present it. You can also try different mix-ins to keep it fresh and fun. Remember to store leftovers properly for later enjoyment. Enjoy creating this treat, whether for a party or a cozy night in!

Chocolate Chip Cookie Dough Dip Tasty and Simple Treat

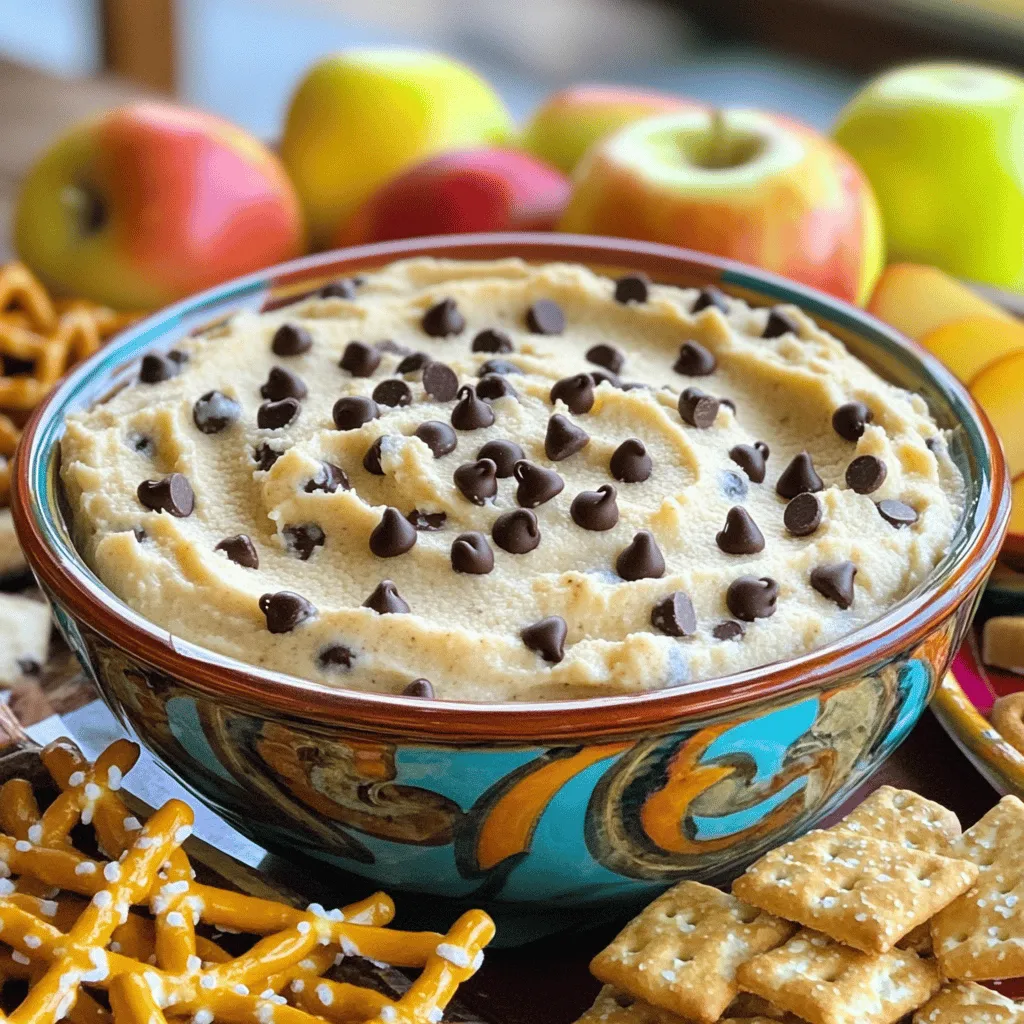
If you love cookie dough like I do, you’re in for a treat! This Chocolate Chip Cookie Dough Dip is

To make baked sweet potato fries, you will need: - 2 large sweet potatoes, peeled and cut into thin fries - 3 tablespoons olive oil - 1 teaspoon paprika - 1/2 teaspoon garlic powder - 1/2 teaspoon onion powder - 1/2 teaspoon cayenne pepper (optional) - Salt and pepper to taste - Fresh parsley, chopped (for garnish) You should gather these tools before you start: - A sharp knife for cutting - A large mixing bowl for tossing - A baking sheet lined with parchment paper - A spatula for flipping fries If you want to spice things up, consider these options: - A pinch of cumin for warmth - A drizzle of honey for sweetness - Fresh herbs like rosemary or thyme for added aroma These ingredients and tools make the process easy and fun. I love using fresh ingredients, as they bring out the sweet potato's natural flavor. Don't forget, the key to great fries is in the seasoning! For the full recipe, check out the list above. Start by peeling your sweet potatoes. Use a sharp peeler for ease. Once peeled, cut them into thin fries. Aim for uniform sizes to ensure even cooking. Thin fries cook faster and become crispier. Place the cut fries in a bowl with cold water. Let them soak for about 30 minutes. This step helps remove extra starch and makes frying crispier. After soaking, drain the fries and pat them dry with a towel. This removes excess moisture, which is key to crispiness. In a large mixing bowl, toss the dry fries with olive oil. Use about three tablespoons. This helps the seasoning stick and adds flavor. Next, add your spices: one teaspoon of paprika, half a teaspoon of garlic powder, half a teaspoon of onion powder, and salt and pepper to taste. If you like some heat, you can add half a teaspoon of cayenne pepper. Mix everything well. Make sure every fry is coated. This is where the magic happens, so don’t rush! Preheat your oven to 425°F (220°C). Line a baking sheet with parchment paper. Spread the seasoned fries in a single layer. Avoid overcrowding the fries; give them room to breathe. Bake in the oven for 20 to 25 minutes. Flip them halfway through for even cooking. Look for that golden brown color. If you want them extra crispy, you can bake a few minutes longer. Once done, take them out and let them cool for a few minutes. Garnish with fresh parsley for a pop of color. Enjoy your baked sweet potato fries as a tasty snack! For the full recipe, see above. When you cut sweet potatoes, aim for even pieces. This helps them cook well. Use a sharp knife for clean cuts. First, slice off the ends. Then, cut the potato in half lengthwise. After that, cut each half into long strips. Keep the fries thin for crispiness. Aim for about 1/4 inch thick. Uniform pieces mean they will bake evenly. To get those perfect crispy fries, follow a few key steps. First, soak the cut fries in cold water for 30 minutes. This removes excess starch, which helps them crisp up. After soaking, drain and pat them dry with a towel. Next, toss the fries in olive oil. Make sure each piece is coated well. Spread them out on a baking sheet without crowding. This allows heat to circulate. Bake at 425°F for 20-25 minutes. Flip them halfway through for even browning. While paprika and garlic powder are great, don’t stop there! Try different spices to mix it up. For a sweet twist, sprinkle cinnamon and a bit of brown sugar. If you like heat, add chili powder or cayenne pepper. You can also use dried herbs like rosemary or thyme for a fresh taste. Experiment with flavors to find your favorite combo. These simple changes can make your baked sweet potato fries exciting every time. {{image_2}} You can change up your sweet potato fries by adding different herbs. Fresh herbs like rosemary, thyme, or oregano give a nice twist. Just chop them finely and mix them into the fries with olive oil. This adds flavor and a lovely aroma. You can also try dried herbs if fresh ones are not available. Thyme works well, and so does sage. Each herb brings its unique taste to the dish. If you love heat, try making spicy sweet potato fries. Use cayenne pepper for a kick, or add chili powder for a different spice level. For more depth, mix in some cumin. You can also add hot sauce right before serving for extra flavor. This will make your fries stand out even more. Remember to balance the spice with a bit of sweetness from the potatoes. Both the oven and air fryer work well for making sweet potato fries. The oven gives you a classic baked texture. It’s great for a larger batch. Preheat it to 425°F and bake for 20-25 minutes. The air fryer cooks faster and makes fries extra crispy. Set it to 400°F and cook for about 15 minutes. Whichever method you choose, ensure the fries are in a single layer for the best results. For the complete recipe, check out the Full Recipe section above. To store leftover sweet potato fries, let them cool first. Then, place them in an airtight container. You can keep them in the fridge for up to three days. Make sure to separate layers with parchment paper to avoid sticking. For reheating, the oven works best. Preheat your oven to 400°F (200°C). Spread the fries on a baking sheet. Bake for about 10-15 minutes until they are hot and crisp again. You can also reheat them in an air fryer at 380°F (193°C) for 5-7 minutes. This helps keep the fries crispy. You can freeze sweet potato fries for later use. After cooking, let them cool completely. Place them in a single layer on a baking sheet and freeze for an hour. Once frozen, transfer them to a freezer bag. They can last up to three months in the freezer. When you want to cook them, you can bake them directly from frozen, just add a few extra minutes to the baking time. For the full recipe, check out the earlier section. To make baked sweet potato fries healthier, you can reduce the oil. Use just two tablespoons instead of three. You can also skip the salt and rely on herbs for flavor. Try using garlic powder or herbs like rosemary for taste without added sodium. Adding a sprinkle of nutritional yeast can give a cheesy flavor without extra calories. Yes, you can use other potatoes. Russet potatoes are a great choice. They will give you a nice crisp texture. Yukon Gold potatoes also work well and have a buttery taste. Just keep in mind that cooking times may vary slightly based on the type of potato you use. Baked sweet potato fries pair well with many dips. You can serve them with ketchup or a spicy mayo. A yogurt-based dip adds a creamy touch. They also go great with grilled chicken or fish. You can even toss them on a salad for extra crunch. For the full recipe, check out the earlier section! This blog post covered how to make tasty baked sweet potato fries. You learned about the key ingredients and tools needed, along with simple steps to prep and bake the fries. We shared tips for cutting, seasoning, and achieving a crispy texture. Unique variations and storage info were also included to help you get the most out of your fries. Remember, these fries are fun to make and enjoy. Try out different flavors and methods to find your favorite!

Baked Sweet Potato Fries Easy Healthier Snack Idea

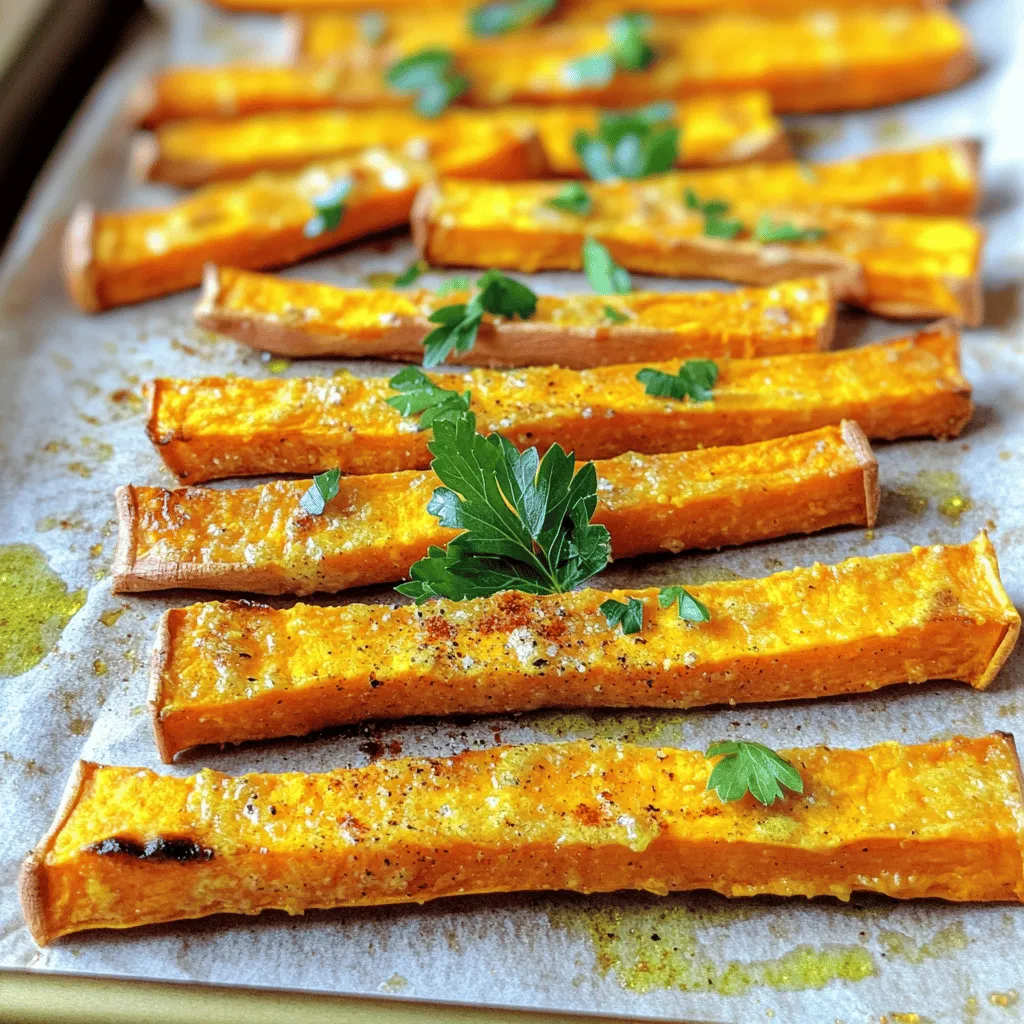
Looking for a quick, tasty snack that’s also good for you? Baked sweet potato fries are the answer! These fries

- 1 cup quinoa, rinsed - 2 cups vegetable broth (or water) - 1 ripe avocado, diced - 1 cup cherry tomatoes, halved - 1/2 cucumber, diced - 1/4 red onion, finely chopped - 1 cup black beans, drained and rinsed - 1/4 cup fresh cilantro, chopped - 2 tablespoons olive oil - 2 tablespoons lime juice - 1 teaspoon cumin - Salt and pepper to taste Using good ingredients makes a big difference. Choose fresh, ripe avocado. Look for vibrant cherry tomatoes and firm cucumbers. Fresh cilantro adds a nice touch. For quinoa, pick high-quality grains. Look for brands that are pre-rinsed to save time. Good vegetable broth enhances flavor. Avoid brands with too much salt or preservatives. If you don’t have quinoa, try farro or bulgur. Use canned beans for black beans if that’s easier. You can swap lime juice with lemon juice for a different taste. If you don’t like cilantro, try parsley or omit it. Cherry tomatoes can be replaced with diced bell peppers. These swaps keep the salad fresh and tasty. For a richer flavor, add some feta cheese or nuts. Start by rinsing 1 cup of quinoa under cold water. This step helps remove the bitter coating called saponin. Next, in a medium saucepan, combine the rinsed quinoa and 2 cups of vegetable broth or water. Bring this mixture to a boil over medium-high heat. Once it starts bubbling, reduce the heat to low. Cover the pot and let it simmer for about 15 minutes. You will know it's done when the quinoa is fluffy and all the liquid is absorbed. Use a fork to fluff the quinoa and set it aside to cool. While the quinoa cools, it’s time to chop the other ingredients. Dice 1 ripe avocado and place it in a large mixing bowl. Halve 1 cup of cherry tomatoes and add them to the bowl. Next, dice 1/2 cucumber and finely chop 1/4 of a red onion. Toss these chopped veggies in with the avocado and tomatoes. Rinse and drain 1 cup of black beans, then add them to the bowl. Finally, chop 1/4 cup of fresh cilantro and mix it in. This colorful mix will bring great flavor to your salad. In a small bowl, whisk together 2 tablespoons of olive oil, 2 tablespoons of lime juice, and 1 teaspoon of cumin. Add salt and pepper to taste. Pour this dressing over the vegetable mix. Now, add the cooled quinoa to the bowl. Gently toss everything together until well combined. It’s important to be gentle to keep the avocado intact. Taste the salad and adjust the seasoning if needed. Let the salad sit for at least 10 minutes. This helps the flavors blend and makes every bite tasty. For the full recipe, check the details above. When picking avocados, look for ones that feel slightly soft. Gently squeeze them in your hand. If they give a little, they are ripe. A dark green skin often means it is ready to eat. Avoid hard avocados; they are not ripe yet. If you find an overripe avocado, it may have brown spots inside. Always check before you buy. You can add tasty extras to your salad for more flavor. Try adding corn for sweetness and crunch. Bell peppers can add color and a fresh taste. You can also use feta cheese for a creamy touch. For some heat, a pinch of chili powder or sliced jalapeños works well. Adding nuts or seeds can give a nice crunch too. These add-ins can make your dish even better! Presentation matters when serving food. For this salad, use a large bowl for sharing. This makes it look inviting. You can also serve it on individual plates for a fancy touch. Garnish with extra cilantro leaves on top for color. Add a lime wedge on the side for a pop of brightness. These simple touches can make your salad stand out. For the full recipe, check above. {{image_2}} You can easily add more veggies to this salad. Consider bell peppers for crunch. Roasted corn adds sweetness. Spinach offers a leafy boost. Toss in some shredded carrots for color and taste. Each addition brings a new flavor and texture. If you want more protein, try chickpeas or lentils. These legumes mix well with quinoa. You can also add diced tofu or tempeh for a hearty bite. These options will make your salad filling and satisfying. While the lime dressing is great, you can switch it up. Try a balsamic vinaigrette for a tangy twist. A tahini dressing adds creaminess and depth. For a spicy kick, mix in some sriracha or hot sauce. Each dressing gives a new life to your salad. For the full recipe, don't forget to check out the instructions above. To keep your savory quinoa salad fresh, store it in an airtight container. This helps prevent moisture and keeps flavors intact. Place the salad in the fridge within two hours of making it. The cold temperature slows down spoilage. Always make sure the container seals tightly to avoid any odors from other foods. Freezing quinoa salad isn’t the best option due to the avocado. When frozen, avocado turns brown and mushy. However, you can freeze the quinoa separately. Cooked quinoa keeps well in the freezer. Simply portion it out in freezer bags. When you're ready to eat, thaw the quinoa and mix it with fresh ingredients. The salad will stay fresh in the fridge for about three days. If you notice any browning on the avocado, eat it right away. To extend freshness, add the avocado just before eating. You can also keep the dressing separate until serving. This will help maintain that vibrant taste. For more detailed steps, check the Full Recipe. Yes, you can make this salad ahead of time. Prepare the quinoa and let it cool. Mix the veggies and dressing in a bowl. Store all parts separately in the fridge. This keeps them fresh and crunchy. Combine them just before serving. The flavors blend well after sitting a bit. You can add many veggies to this salad. Try bell peppers for color and crunch. Carrots add sweetness and texture. Spinach or kale give extra nutrients. If you like heat, add some jalapeños. Mix and match to fit your taste. To store leftovers, place them in an airtight container. This keeps the salad fresh for up to three days. Keep the dressing separate if you can. This prevents the salad from getting soggy. When you’re ready to eat, just mix it again. Enjoy your tasty creation! This blog post covered all you need for a delicious salad. We reviewed quality ingredients, preparation steps, and helpful tips. I shared ways to ensure your dish looks great and tastes amazing. You learned about variations for different diets and how to store your salad properly. Remember, cooking should be fun and easy. Use these insights for your next meal. Enjoy your healthy salad adventure!

Savory Quinoa Salad with Avocado Rich and Healthy Dish

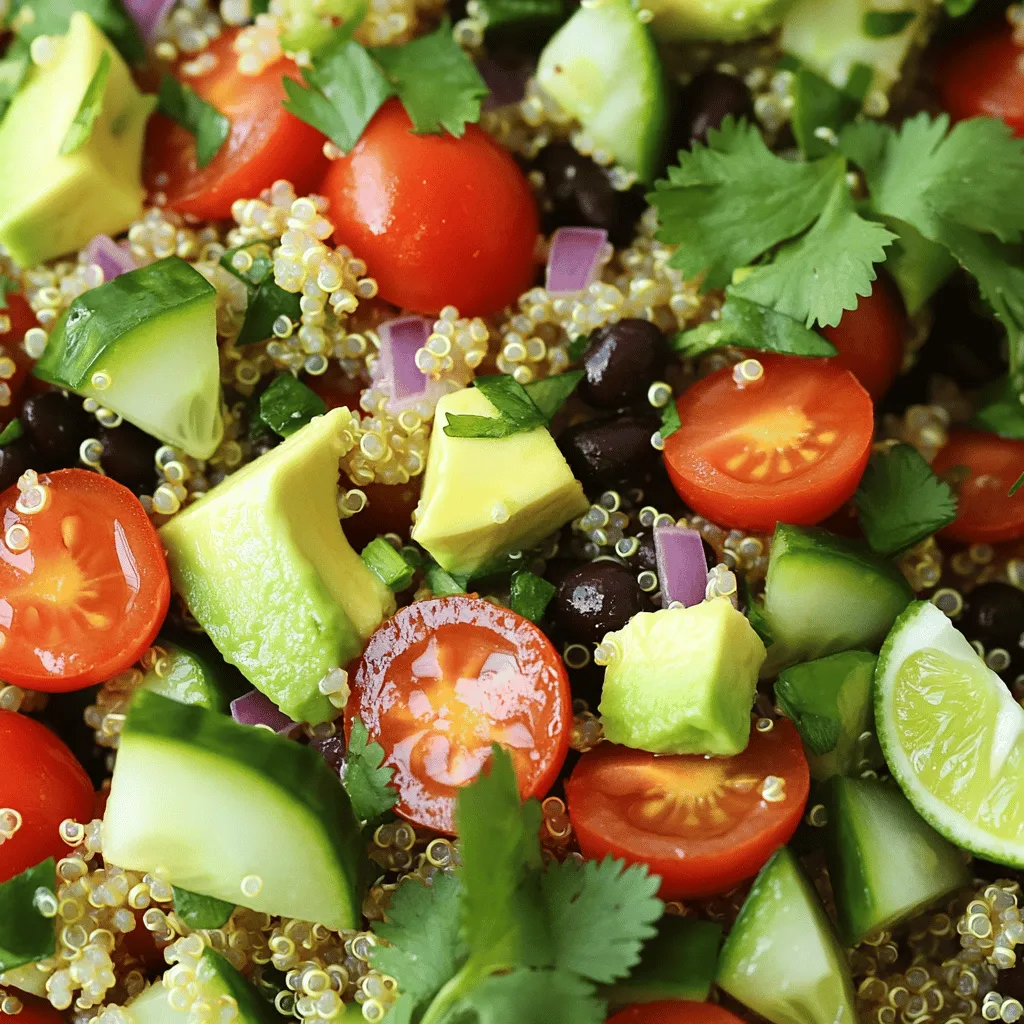
Are you ready to enjoy a dish that’s both rich and healthy? This Savory Quinoa Salad with Avocado is packed

- 1 cup Arborio rice - 4 cups coconut milk - 1/2 cup sugar - 1/4 teaspoon salt To make coconut milk rice pudding, you need a few simple ingredients. Arborio rice gives the pudding its creamy texture. Coconut milk adds a rich flavor and creaminess. Sugar sweetens the dish, and salt enhances the taste. - 1 teaspoon vanilla extract - 1/2 teaspoon ground cinnamon - 1/4 cup shredded coconut - Fresh mango slices or berries You can add more flavor with optional ingredients. Vanilla extract brings warmth, while cinnamon adds a hint of spice. Toasted shredded coconut on top gives a crunchy texture. Fresh mango slices or berries brighten the dish with color and taste. For the full recipe, check out Coconut Dream Rice Pudding. - Rinse and drain Arborio rice - Prepare additional toppings Start by rinsing the Arborio rice. Use cold water until the water runs clear. This helps remove excess starch. After rinsing, drain the rice well. Next, decide on your toppings. Toast some shredded coconut for a crunchy bite. You can also slice fresh mango or berries for a fruity touch. These toppings add flavor and color. - Combine ingredients in a saucepan - Bring to simmer and cook In a medium saucepan, combine the rinsed rice, coconut milk, sugar, and salt. Stir well to mix everything. Place the saucepan over medium heat. Bring the mixture to a gentle simmer, stirring occasionally. Once it starts simmering, reduce the heat to low. Cover the saucepan with a lid. Cook for about 30-35 minutes. Stir now and then. This ensures the rice cooks evenly and the pudding thickens. - Stir in vanilla and cinnamon - Serve and garnish When the rice is tender and the pudding thickens, remove it from the heat. Stir in the vanilla extract and ground cinnamon. Taste the pudding and adjust the sweetness if needed. Let the rice pudding cool slightly. You can serve it warm or chilled in bowls. Top each serving with toasted coconut. Add your fresh mango slices or berries for a beautiful finish. For the full recipe, check out the Coconut Dream Rice Pudding 🥥. To get the perfect creaminess, use Arborio rice. This rice absorbs liquid well and makes a rich pudding. Always rinse the rice before cooking to remove excess starch. This helps prevent clumping and keeps the texture smooth. For sweetness, start with half a cup of sugar. After cooking, taste the pudding. If you want it sweeter, add more sugar little by little. Remember, the toppings can also add sweetness. Fresh fruit or toasted coconut can change the flavor. You can serve coconut milk rice pudding warm or chilled. Warm pudding feels cozy on a cold day. Chilled pudding is refreshing in hot weather. For garnishing, get creative! Toast shredded coconut for a crunchy top. Fresh mango slices add color and flavor. Berries like strawberries or blueberries add a pop of sweetness. You can even drizzle honey or maple syrup for extra flair. For the complete recipe, check out Coconut Dream Rice Pudding. {{image_2}} You can easily make vegan coconut milk rice pudding. Just use the ingredients listed in the Full Recipe. The coconut milk gives it a rich taste without dairy. This pudding is also gluten-free. Arborio rice is naturally gluten-free, so you don’t need to change anything. This makes it a great option for many diets! Now, let's talk about adding flavors. You can spice up your pudding with cinnamon, nutmeg, or cardamom. These spices make it warm and cozy. You can also add fruits like mango, banana, or berries. Fresh fruit adds a nice touch and some sweetness. If you love chocolate, try stirring in cocoa powder or chocolate chips. For a coffee twist, mix in some instant coffee or espresso powder. These changes give you new dessert options. Each variation can turn your coconut milk rice pudding into a unique treat. Enjoy experimenting! To store leftovers, place the rice pudding in an airtight container. Make sure it cools down before sealing. You can keep it in the fridge for about 3 to 4 days. When you want to eat it again, the best way to reheat is on the stove. Pour some pudding into a saucepan and heat it over low heat. Stir often to avoid sticking. If it seems too thick, add a splash of coconut milk to loosen it up. Yes, you can freeze rice pudding! To do this, let it cool completely. Then, spoon it into freezer-safe containers, leaving some space at the top for expansion. You can freeze it for up to 2 months. To defrost properly, move the container from the freezer to the fridge. This should take about 6 to 8 hours. Once thawed, reheat it gently on the stove, just like with leftovers. Remember to stir it well and add a splash of coconut milk if needed. Enjoy your creamy coconut milk rice pudding anytime! For full instructions, check the Full Recipe. What is the difference between rice pudding and coconut pudding? Rice pudding uses milk and rice, while coconut pudding uses coconut milk. The coconut adds a rich, tropical flavor. The texture can be similar, but the taste is quite different. Coconut milk also makes the pudding creamier. Can I use regular milk instead of coconut milk? Yes, you can use regular milk. However, it will change the flavor. Coconut milk gives a sweet and creamy taste. If you want a dairy-free option, stick with coconut milk. It is rich and delicious. How long does coconut milk rice pudding last in the fridge? Coconut milk rice pudding lasts about four to five days in the fridge. Make sure to store it in an airtight container. If it thickens in the fridge, just add a splash of coconut milk when you reheat it. Why is my rice pudding too runny? If your rice pudding is too runny, it may need more cooking time. The rice should absorb most of the liquid. Try cooking it a bit longer over low heat. Stir it often to prevent sticking. What can I do if my pudding is too thick? If your pudding is too thick, add a little coconut milk. Stir it in slowly until you reach your desired consistency. You can also add water, but coconut milk keeps the flavor rich. Make sure to heat it gently while mixing. In this blog post, we covered how to make creamy coconut milk rice pudding. We discussed main and optional ingredients, offered step-by-step instructions, and shared helpful tips. I also highlighted variations for different diets and flavors. Proper storage techniques and common questions about rice pudding were addressed as well. Now, you have everything you need to enjoy this sweet treat. Experiment with flavors and toppings to make it your own. Happy cooking!

Coconut Milk Rice Pudding Creamy and Cozy Dessert

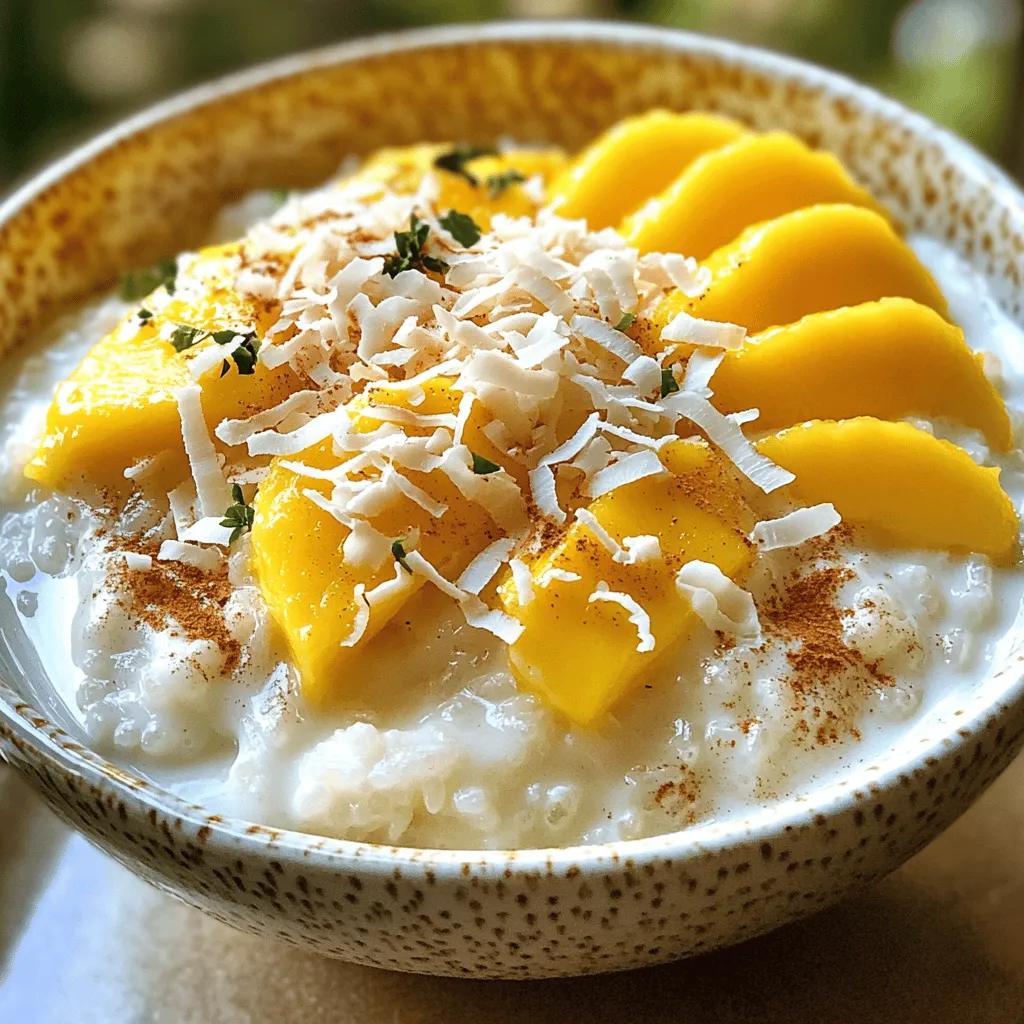
If you’re craving a sweet treat that warms your soul, look no further than my Coconut Milk Rice Pudding. This

- 4 medium zucchinis - 1 ripe avocado - 1 cup fresh basil leaves - 1/4 cup walnuts (toasted) - 2 cloves garlic - 2 tablespoons nutritional yeast (optional) - 2 tablespoons fresh lemon juice - 1/4 cup olive oil - Salt and pepper to taste - Cherry tomatoes, halved (for garnish) - Grated Parmesan cheese (optional for serving) I love using fresh ingredients for this dish. Start with four medium zucchinis. They are crisp and light. You can find them at any store or farmers' market. Next, grab one ripe avocado. This adds a creamy texture and rich flavor. You will also need one cup of fresh basil leaves. Basil gives the pesto a bright taste. It smells wonderful too! For flavor, let's toast a quarter cup of walnuts. Toasting brings out their nutty essence. You will also need two cloves of garlic. Garlic adds depth and richness to the pesto. If you like a cheesy taste, toss in two tablespoons of nutritional yeast. To dress the dish, use two tablespoons of fresh lemon juice. This gives a zesty kick. Combine it with a quarter cup of olive oil for smoothness. Don’t forget salt and pepper to taste. They will enhance all the flavors. Finally, add halved cherry tomatoes for garnish. They add a pop of color and sweetness. If you want, sprinkle some grated Parmesan cheese on top when serving. For the full recipe, check out the detailed instructions that follow! To make zucchini noodles, you can use a spiralizer or a vegetable peeler. - Using a spiralizer: Secure a zucchini and twist it to create long noodles. - Using a peeler: Peel the zucchini into long strips. Once you have your noodles, set them aside. Make sure to keep them dry so they don’t become too watery when cooked. For a tasty avocado pesto, gather these ingredients: - 1 ripe avocado - 1 cup fresh basil leaves - 1/4 cup toasted walnuts - 2 cloves garlic - 2 tablespoons nutritional yeast (optional) - 2 tablespoons fresh lemon juice - 1/4 cup olive oil - Salt and pepper to taste Now, blend the ingredients in a blender or food processor. - Start with the avocado, basil, walnuts, garlic, nutritional yeast, lemon juice, and olive oil. - Blend until smooth and creamy. You may need to scrape down the sides. If the pesto is too thick, add a splash of olive oil or water to reach your desired consistency. Season with salt and pepper. To combine the zucchini noodles with the avocado pesto, take a large mixing bowl. - Toss the zucchini noodles in the bowl with the pesto. - Make sure every noodle is coated well. For serving, you can add halved cherry tomatoes on top. If you like cheese, sprinkle some grated Parmesan cheese for extra flavor. This dish is fresh and colorful, perfect for a light meal! You can find the full recipe above. To make great zucchini noodles, start with fresh zucchinis. Choose firm ones, without soft spots. Avoid watery noodles by salting them. To do this, sprinkle salt on the noodles. Let them sit for 10-15 minutes, then pat dry with a clean towel. The ideal thickness for your noodles is about the width of a pencil. This size gives a good bite and allows the pesto to coat them well. If they are too thin, they may become mushy. A spiralizer is best for this job, but a vegetable peeler works fine too. You want your pesto to be smooth and creamy. If it seems too thick, add more olive oil or a splash of water. Blend well until it reaches your desired consistency. For flavor, taste as you mix. You can add more lemon juice or salt if you need it. If you want a twist, try different nuts. Pine nuts are classic, but walnuts add a nice depth. You can also use almonds or pecans for a unique flavor. Each nut gives the pesto a different taste. When serving, think about side dishes that complement your zucchini noodles. A light salad with fresh greens works well. You can also serve garlic bread or grilled veggies on the side. For garnishes, cherry tomatoes are perfect for a pop of color. They add freshness too. A sprinkle of grated Parmesan cheese can enhance the dish further. Add some crushed red pepper flakes for a bit of heat if you like. For the full recipe, check out the recipe section above. {{image_2}} You can switch zucchini with other veggies. Carrots, sweet potatoes, or cucumbers work well too. Each gives a different taste and texture. Low-carb diets can use these options instead of traditional pasta. You can also try spaghetti squash. It has a nice, stringy texture that mimics pasta. Pesto doesn’t have to be just basil. You can add herbs like parsley, cilantro, or mint. Each herb gives a fresh twist to the sauce. If you want a vegan option, skip the cheese. Use nutritional yeast for a cheesy flavor without dairy. You can also use sunflower seeds or cashews instead of cheese for added creaminess. You can make zucchini noodles and pesto ahead of time. Store them in separate containers to keep them fresh. Zucchini noodles can last for about three days in the fridge. Pesto can last up to a week. This way, you can have a quick lunch or dinner ready. Just toss the noodles with the pesto when you’re ready to eat. Add cherry tomatoes for a pop of color and flavor. To store leftover zucchini noodles, place them in a sealed container. Use a paper towel to absorb extra moisture. This will help keep them fresh. For avocado pesto, store it in a jar. Press plastic wrap directly onto the surface to prevent browning. Seal the jar tightly to keep air out. Zucchini noodles can last about three days in the fridge. Store them in the coldest part of your fridge. Avocado pesto will stay fresh for about four days. Always check for any signs of spoilage. Use airtight containers to extend their shelf life. To reheat zucchini noodles, use a skillet over low heat. Stir gently to avoid mushiness. You can also microwave them for a quick option. For pesto, reheat it gently in a small pot. Add a bit of olive oil to keep it smooth. Avoid high heat to preserve its flavor. For the complete dish, check the Full Recipe. How to make zucchini noodles without a spiralizer? You can use a vegetable peeler or a knife. Just slice the zucchini into long strips. Aim for a thin, flat shape. This gives you a fun noodle-like texture. Can I use store-bought pesto instead of homemade? Yes, you can use store-bought pesto. It saves time and still adds great flavor. Just check the ingredients to avoid unwanted additives. Are zucchini noodles healthy? Yes, zucchini noodles are very healthy. They are low in calories and carbs. They are also high in vitamins and minerals. This makes them a great choice for a light meal. What are the nutritional benefits of avocado pesto? Avocado pesto offers healthy fats from the avocado. It also contains vitamins and antioxidants from the basil. Walnuts add extra omega-3 fatty acids. This combination is great for heart health. What proteins pair well with zucchini noodles? Grilled chicken, shrimp, or tofu work well. These proteins add flavor and make your meal more filling. You can also try chickpeas for a plant-based option. Can I serve this dish cold? Yes, you can serve this dish cold. It makes a refreshing salad. Just toss the zucchini noodles with pesto and chill before serving. In this post, we explored how to make a delicious zucchini noodle dish with avocado pesto. We covered fresh ingredients, like zucchinis and basil, and included flavor boosters such as walnuts and garlic. I shared tips for perfecting your noodles and pesto, along with serving ideas and variations. Zucchini noodles are a healthy alternative to pasta and can suit many diets. Enjoy experimenting with different herbs and vegetables! Prepare this dish for a tasty meal that’s easy to store and reheat.

Zucchini Noodles with Pesto Fresh and Flavorful Dish

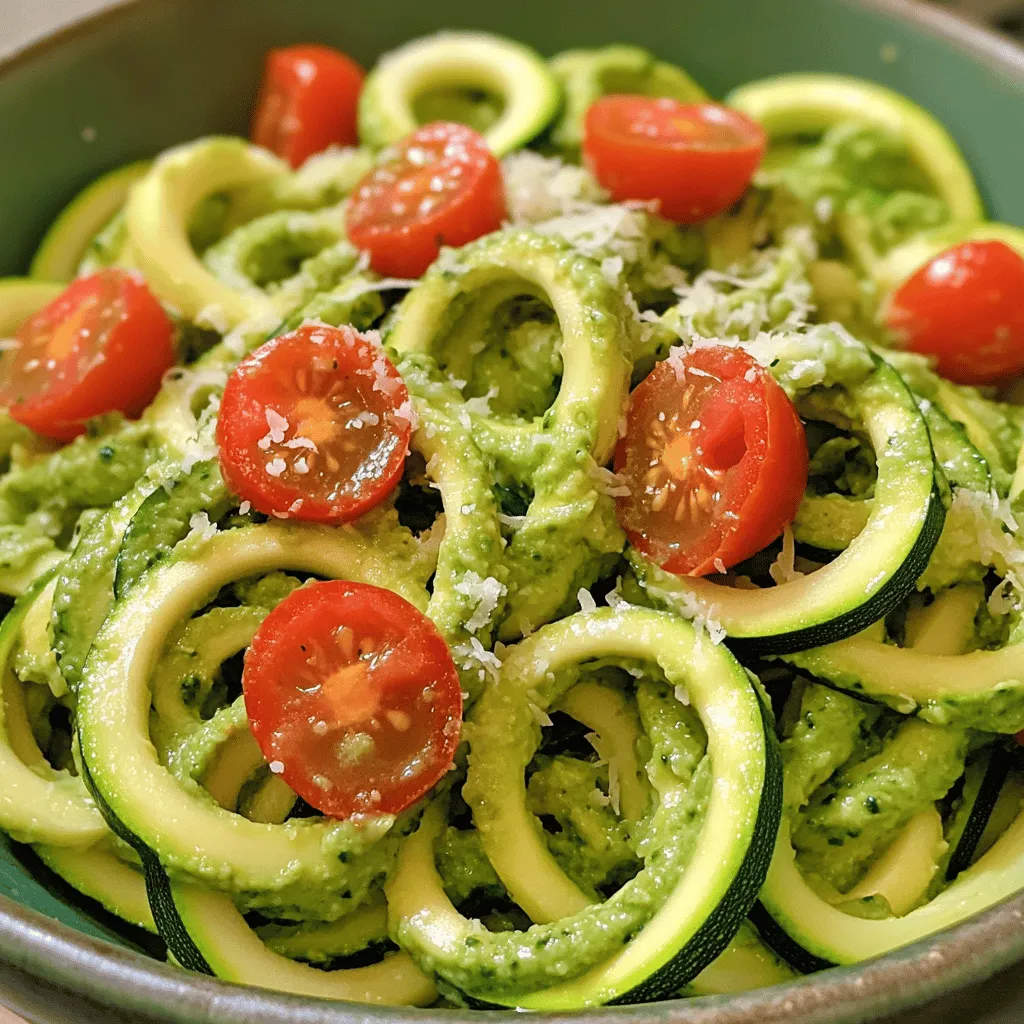
Are you looking for a fresh and flavorful dish that impresses? Zucchini noodles with pesto might be your answer! This

- 2 ripe bananas, mashed - 1 cup rolled oats - 1/2 cup almond flour - 1/4 cup honey or maple syrup - 1/4 cup dark chocolate chips (or raisins) - 1 teaspoon cinnamon - 1/2 teaspoon vanilla extract - 1/4 teaspoon baking soda - Pinch of salt These ingredients create a soft, chewy cookie. The ripe bananas add natural sweetness. The rolled oats give a hearty texture. Almond flour makes them tender and nutty. Honey or maple syrup adds a touch of sweetness. - Each cookie has about 80 calories. - They contain 2 grams of protein and 2 grams of fiber. - Bananas provide potassium and vitamins. Oats are great for heart health. Bananas help with muscle function and digestion. Oats are full of fiber, which keeps you full. This cookie is a tasty treat that is also good for you. Enjoy the benefits while indulging your sweet tooth! First, preheat your oven to 350°F (175°C). Line a baking sheet with parchment paper. This helps the cookies not stick. Next, in a large bowl, mix the ripe bananas with honey or maple syrup until it looks smooth. Then, add in the rolled oats, almond flour, cinnamon, vanilla extract, baking soda, and salt. Stir until everything is combined. The dough will be thick but sticky. Now it's time to shape the cookies! Use a tablespoon to scoop out the dough. Place each scoop on the baking sheet, leaving about 2 inches of space between them. This gives them room to bake. After that, flatten each cookie slightly with the back of the spoon or your fingers. They won’t spread much while baking, so make sure they are flat. Put the baking sheet in the preheated oven. Bake for about 10-12 minutes. You'll know they are done when the edges turn golden brown. Remove the cookies from the oven and let them cool on the baking sheet for a few minutes. After that, transfer them to a wire rack to cool completely. Enjoy your warm, tasty banana oatmeal cookies! For the full recipe, check the above section. To get the best texture for your cookies, be precise with your measurements. Use a measuring cup for the oats and flour. Too much flour can make the cookies dry. When mashing bananas, aim for a smooth consistency. I find using a fork works well. Make sure to mash them thoroughly. This helps the cookies stay moist and chewy. To boost flavor, consider adding spices. A dash of nutmeg or a bit of ginger can work wonders. You can also experiment with nuts or dried fruits. Walnuts and pecans add crunch. Dried cranberries or apricots bring a sweet twist. Just remember to chop them into small pieces for even distribution. If your cookies turn out too dry, try adding a splash of milk or an extra banana. This adds moisture back into the dough. If you want sweeter cookies, add a bit more honey or maple syrup. Taste the dough before baking to adjust sweetness. That way, you get the cookies just how you like them. For the full recipe, check the earlier section. {{image_2}} You can switch out honey or maple syrup in the recipe. Try using agave syrup for a low-glycemic option. Coconut sugar is another great choice. It adds a lovely caramel flavor. If you're looking for sugar-free options, use ripe bananas. They bring natural sweetness without added sugar. Remember, you might need to adjust the other wet ingredients to keep the dough balanced. For those who need gluten-free cookies, use gluten-free oats. They work just as well and keep the cookies chewy. If you want to make these cookies vegan, replace the honey or maple syrup with a plant-based sweetener. You can also skip the eggs by using applesauce or mashed bananas. Each of these options keeps the cookies moist and delicious. Want to change things up? Add peanut butter to the dough for a rich taste. It pairs perfectly with bananas. Almond butter or sunbutter are great alternatives too. You can also get creative with chocolate. Try using white chocolate chips or even chunks of dark chocolate. You can mix and match to find your favorite flavor! To keep your banana oatmeal cookies fresh, store them in an airtight container. This helps prevent them from drying out. You can keep them at room temperature for a few days. If you want them to last longer, put them in the fridge. Just remember that cold cookies may lose some softness. You can freeze the cookie dough for later use. Scoop the dough into balls and place them on a baking sheet. Freeze them for about an hour until firm. Then, transfer the balls to a freezer bag. When you're ready to bake, you can take them out and bake them straight from the freezer. For baked cookies, let them cool completely. Then, place them in an airtight container or a freezer bag. To eat, thaw them at room temperature or heat them in the microwave for a few seconds. Banana oatmeal cookies stay fresh for about 4-5 days at room temperature. If stored in the fridge, they can last up to a week. Check for signs of spoilage, like an off smell or mold, before eating. If they feel very hard or dry, it’s time to toss them. For the full recipe, check the section above. To make banana oatmeal cookies, start by gathering your ingredients. You need ripe bananas, rolled oats, almond flour, honey or maple syrup, dark chocolate chips or raisins, cinnamon, vanilla extract, baking soda, and salt. 1. Preheat your oven to 350°F (175°C) and line a baking sheet with parchment paper. 2. In a large bowl, mash the bananas and mix in honey until smooth. 3. Add oats, almond flour, cinnamon, vanilla, baking soda, and salt. Stir until mixed. 4. Fold in chocolate chips or raisins. 5. Scoop the dough onto the baking sheet, spacing them apart. 6. Flatten each scoop slightly with a spoon. 7. Bake for 10-12 minutes until golden brown on the edges. 8. Let them cool on a wire rack. This simple process gives you tasty cookies fast. You can find the full recipe above. Yes, you can use other flours. If you need a gluten-free option, try using gluten-free flour mixes. You can also use whole wheat flour for added fiber. Just keep in mind that different flours change the texture. Banana oatmeal cookies are a healthy choice. They have ripe bananas, which provide potassium and natural sweetness. Oats are great for fiber and can help with digestion. Using almond flour adds protein and healthy fats. Overall, these cookies can be a nutritious snack or treat. You've learned how to make delicious banana oatmeal cookies with simple ingredients. We covered the key components, step-by-step instructions, and helpful tips to ensure success. Remember, adjusting flavors and textures can make your cookies uniquely yours. Don't hesitate to experiment with variations and storage methods. With these insights, you'll enjoy tasty, healthy treats that satisfy your cravings. Get baking and enjoy every bite!

Savory Banana Oatmeal Cookies Quick and Easy Recipe

Are you ready to enjoy a delightful treat that’s both healthy and easy to make? My Savory Banana Oatmeal Cookies

To make Caprese stuffed avocados, gather these ingredients: - 2 ripe avocados - 1 cup cherry tomatoes, halved - 1 cup fresh mozzarella balls, drained - 1/4 cup fresh basil leaves, chopped - 2 tablespoons balsamic glaze - 1 tablespoon olive oil - Salt and pepper to taste - 1 teaspoon dried oregano (optional) When measuring ingredients, use a dry measuring cup for solids and a liquid cup for liquids. For fresh herbs, pack them lightly in the cup to get a good amount. When slicing cherry tomatoes, a sharp knife helps to avoid squishing them. Keep your ingredients as fresh as possible for the best flavor. If you can’t find fresh mozzarella, try using feta or goat cheese for a tangy twist. For balsamic glaze, mix balsamic vinegar with a touch of honey or maple syrup. If you want a lighter option, skip the cheese altogether or use a vegan cheese substitute. You can also swap out basil for parsley or cilantro if you prefer a different taste. Start by cutting the avocados in half. Use a sharp knife to slice through the skin. Carefully twist the two halves to separate them. Remove the pit using a spoon or knife. Scoop out a bit of the flesh to make room for the filling. Set the avocado halves aside on a plate. In a medium bowl, add the halved cherry tomatoes, fresh mozzarella balls, and chopped basil leaves. This mix brings fresh flavor to your dish. Drizzle olive oil and balsamic glaze over the mixture. Season with salt, pepper, and oregano if you like. Gently toss everything together. Make sure all ingredients are well mixed. Now, generously stuff each avocado half with this Caprese mixture. Let some of it overflow for a nice look. For the finishing touch, drizzle any leftover balsamic glaze over the stuffed avocados. This adds a glossy finish and extra flavor. You can sprinkle more fresh basil leaves on top for a pop of color. Serve these beautiful stuffed avocados right away. Enjoy this tasty meal idea! For the full recipe, refer to the recipe above. One serving of Caprese stuffed avocados has about 450 calories. You get this from the avocados, cheese, and olive oil. The healthy fats in avocados help keep you full. Each serving offers important nutrients: - Fat: 36g - Protein: 12g - Carbohydrates: 24g - Fiber: 11g - Sugars: 4g These nutrients come from fresh ingredients, making the meal both tasty and healthy. The ingredients in this dish provide great health benefits: - Avocados: They are high in healthy fats. They support heart health and lower cholesterol levels. - Cherry Tomatoes: These are rich in vitamins A and C. They can boost your immune system. - Mozzarella: This cheese offers calcium and protein. It helps in building strong bones. - Basil: This herb has anti-inflammatory properties. It can help reduce stress and improve digestion. - Balsamic Glaze: It adds flavor without extra calories. It may help with blood sugar control. You can find the full recipe for Caprese stuffed avocados in the article. Enjoy this dish knowing it is both delicious and healthy! {{image_2}} To make Caprese stuffed avocados, you need ripe avocados. Ripe avocados should feel slightly soft when you press them gently. If they feel hard, they are not ready yet. You can speed up ripening by placing them in a paper bag with a banana or apple. This method works because these fruits give off ethylene gas, which helps avocados ripen faster. Always check your avocados before using them. If they are overripe, they may be brown inside and not taste good. If you have any leftover stuffed avocados, store them in the fridge. Cover them tightly with plastic wrap to keep them fresh. To slow browning, squeeze some lemon juice over the exposed avocado flesh before wrapping. This juice acts as a barrier against air. Use these leftovers within a day for the best taste. If you wait too long, the avocado may spoil, and that’s no fun! Presentation is key for this dish! Start by placing the stuffed avocados on a nice plate. Add a drizzle of balsamic glaze around the plate for a pop of color. You can also sprinkle some extra basil leaves on top for a fresh look. For a gourmet touch, use a sprinkle of sea salt. This adds a bit of crunch and enhances the flavors. Remember, we eat with our eyes first, so make it look good! You can find the full recipe [here]. You can add other tasty fillings to your Caprese stuffed avocados. Try adding cooked chicken for protein. If you want more crunch, add diced cucumbers. You can also mix in roasted red peppers or artichoke hearts. Each choice gives a new twist to the dish. To enhance the flavors, consider adding spices. Red pepper flakes can add heat. A pinch of garlic powder gives a lovely aroma. You can also mix in some pesto for a rich flavor. These small changes can make a big difference in taste. If you have dietary needs, you can easily adjust this recipe. For a vegan option, use dairy-free cheese or skip it altogether. If you're gluten-free, this dish is naturally safe. You can also make it low-carb by using fewer tomatoes. Remember, the goal is to enjoy the meal while fitting your diet. For the complete recipe, check out the Full Recipe section. If you want to swap out mozzarella, try using feta cheese. Feta adds a tangy taste. You can also use goat cheese for a creamy texture. Both options work well with the other flavors. To make this recipe vegan, simply leave out the mozzarella. You can replace it with vegan cheese or skip cheese altogether. Use extra chopped herbs for flavor. Add some avocado to keep it creamy. Yes, you can prepare the filling ahead of time. Store the tomato and basil mixture in the fridge. Just stuff the avocados right before serving. This keeps them fresh and tasty. Avoid cutting the avocados too early to prevent browning. You learned about all the key parts of making a great avocado dish. We covered ingredients, measurements, and even substitutes. I shared step-by-step instructions to guide your cooking. You now know how to add fun variations and make healthy choices. Remember, ripe avocados are crucial for great taste. Use these tips to impress at your next meal. Enjoy experimenting and making this dish your own!

Caprese Stuffed Avocados Tasty and Easy Meal Idea

Looking for a fresh and quick meal idea? Try my Caprese Stuffed Avocados! This simple dish combines creamy avocados, ripe

Older posts
Newer posts
← Previous Page1 … Page38 Page39 Page40 … Page68 Next →

dsad

© 2025 easycookingbite • Built with GeneratePress

Our Policies

  • Copyright Policy
  • Cookie Policy
  • GDPR Policy
  • Privacy Policy
  • Disclaimer
  • Terms Of Use

More Information

  • Home
  • About
  • Contact
  • Appetizers
  • Dessert
  • Dinner
  • Drinks
©2025, easycookingbite About Back To Top