![- Chicken, sauces, and seasonings - 1 pound boneless, skinless chicken breasts, diced - 1/2 cup buffalo sauce (adjust for heat preference) - 1 tablespoon olive oil - 1 teaspoon garlic powder - 1/2 teaspoon onion powder - Salt and pepper to taste The chicken is the star here. I use boneless, skinless breasts for their lean quality. You can also use chicken thighs for more flavor. The buffalo sauce gives the dish its famous kick. Adjust the amount based on your heat preference. Olive oil helps the seasoning stick and adds richness. Garlic and onion powder deepen the taste. - Lettuce and vegetable fillers - 1 head of iceberg or butter lettuce, leaves separated - 1/2 cup diced celery - 1/2 cup shredded carrots For the wraps, I choose iceberg or butter lettuce. They stay crisp and hold the filling well. Celery adds crunch, and carrots bring a touch of sweetness. Both balance the heat of the buffalo sauce. - Optional toppings and garnishes - 1/4 cup blue cheese or feta cheese, crumbled (optional) - Fresh parsley or green onions for garnish Blue cheese or feta adds creaminess and tang to the wraps. Fresh parsley or green onions provide color and freshness. These toppings make each bite more exciting. For the full recipe, check out the [Full Recipe]. How do I prepare the chicken and seasoning? First, take 1 pound of diced chicken breast. In a medium bowl, mix the chicken with 1 tablespoon of olive oil, 1 teaspoon of garlic powder, 1/2 teaspoon of onion powder, salt, and pepper. Make sure each piece is coated well. This step adds flavor and keeps the chicken juicy. How do I cook the chicken in a skillet? Heat a non-stick skillet over medium heat. Add the seasoned chicken to the skillet. Cook the chicken for about 6 to 8 minutes. Stir it occasionally until it turns golden brown and is fully cooked. This method helps lock in moisture. How do I simmer with buffalo sauce? Once the chicken is cooked, reduce the heat to low. Pour in 1/2 cup of buffalo sauce. Stir the chicken to coat it evenly. Let it simmer for 2 to 3 minutes. This step enhances the flavor and makes the chicken spicy. How do I wash and dry the lettuce leaves? Take a head of iceberg or butter lettuce. Carefully separate the leaves. Rinse them under cold water to clean. Pat them dry with a paper towel. This keeps the wraps crisp and fresh. How do I fill the lettuce wraps? Place a few spoonfuls of the buffalo chicken mixture into each lettuce leaf. Add some diced celery and shredded carrots on top for crunch. This combination adds texture and flavor to your wraps. How do I add garnishes? If you like, sprinkle 1/4 cup of crumbled blue cheese or feta on top. You can also add fresh parsley or green onions for extra flavor. These toppings make the wraps look and taste even better. For the complete recipe, check the Full Recipe section. How to ensure chicken stays juicy To keep your chicken juicy, cook it over medium heat. This way, it cooks evenly without drying out. Use a meat thermometer to ensure it reaches 165°F. Let it rest for a few minutes after cooking. This helps the juices stay inside. Adjusting heat levels with buffalo sauce Buffalo sauce can be spicy. If you prefer less heat, start with less sauce. Add it in small amounts while cooking. Taste as you go. You can also mix it with butter or ranch dressing to tone down the heat. Tips for even seasoning When seasoning, make sure to coat all chicken pieces well. Use a bowl to mix the chicken with olive oil, garlic powder, onion powder, salt, and pepper. This helps the flavors spread evenly. Pairing with side dishes or dips Serve your wraps with fresh veggies, chips, or even a light salad. Dips like ranch or blue cheese work great too. They add a cool contrast to the spicy chicken. Presentation ideas for serving Make your meal look nice! Place the lettuce wraps on a big plate. Add a small bowl of extra buffalo sauce for dipping. Scatter some diced celery and carrots around for color. Best practices for a fun meal experience Let everyone build their own wraps. Set up a little station with all the fillings and toppings. This makes it more fun and interactive. Plus, everyone can customize their own wrap just how they like it. For the full recipe, check out the detailed instructions above. {{image_2}} You can change up the protein in these wraps. Try using turkey instead of chicken. Turkey gives a nice flavor and is leaner. If you prefer plant-based meals, use tofu. Tofu absorbs the buffalo sauce well and adds a good texture. You can also play with the sauces. If you want a sweeter taste, use BBQ sauce. Teriyaki sauce adds a unique twist with a touch of sweetness. Both options give you a different flavor while still keeping it fun. For those with gluten issues, you can easily make this recipe gluten-free. Just choose gluten-free buffalo sauce and check all your seasonings. Most are gluten-free, but it’s good to double-check. If you are vegan or vegetarian, swap the chicken for jackfruit or tempeh. Both options work well with buffalo sauce. You can also use a vegan cheese alternative if you want that cheesy flavor. These changes make the dish fit for everyone. Explore these variations to find your favorite way to enjoy buffalo chicken lettuce wraps. For an exact recipe, check out the Full Recipe for detailed instructions on how to make them! To keep your buffalo chicken lettuce wraps fresh, store them in a sealed container. Make sure to separate the chicken filling from the lettuce leaves. The chicken can last for about 3 to 4 days in the fridge. The lettuce will wilt faster, so use it within a day or two for the best crunch. You can reheat the chicken in a skillet on low heat. Stir it gently to keep it moist. If you want to use the microwave, cover the chicken with a damp paper towel to avoid drying it out. For the lettuce, it’s best to eat it fresh. If you must reheat, do so for only a few seconds. For crisp leaves, try placing them in cold water for a few minutes before serving. For the full recipe, check out the [Full Recipe]. How can I make buffalo chicken lettuce wraps spicier? You can add more buffalo sauce to the chicken. Mix in hot sauce for extra heat. You might also use diced jalapeños or crushed red pepper flakes. These add a nice kick! Can I prepare the chicken in advance? Yes, you can cook the chicken ahead of time. Store it in the fridge for up to three days. Just reheat it before serving. This saves time on busy days. What are some good dips to serve with these wraps? Some tasty dips are ranch dressing or blue cheese dressing. You can also try guacamole or salsa. Each adds a fun flavor to the wraps. What are the calorie counts per serving? Each serving of buffalo chicken lettuce wraps has about 300 calories. This makes it a great light meal option. You can adjust the calories by changing the toppings. Are there any health benefits to this recipe? Yes, these wraps are low in carbs and high in protein. The lettuce adds fiber and vitamins. Using lean chicken makes the meal healthy and satisfying. Buffalo chicken lettuce wraps are fun, tasty, and easy to make. We started with the main ingredients: chicken, sauces, and fresh veggies. I shared step-by-step prep and cooking instructions to help you create them. You also saw tips for juicy chicken and fun serving ideas. Don’t forget you can swap ingredients for different diets. Store leftovers well and reheat for a tasty meal later. Enjoy making these wraps with your own twist! They’re sure to be a hit at any table.](https://easycookingbite.com/wp-content/uploads/2025/07/1f37902b-c421-4d92-9599-136cb951cf3e.webp)
Buffalo Chicken Lettuce Wraps Flavorful and Easy Meal
Looking for a quick and tasty meal? Buffalo Chicken Lettuce Wraps are your answer! I’ll guide you through simple steps
Looking for a quick and tasty meal? Buffalo Chicken Lettuce Wraps are your answer! I’ll guide you through simple steps
![For this dish, you'll need: - 2 large chicken breasts, sliced into thin strips - 3 tablespoons olive oil - 1 tablespoon lemon juice - 2 cloves garlic, minced - 1 tablespoon dried oregano - 1 teaspoon paprika - Salt and pepper to taste This mix gives the chicken a rich flavor. The olive oil keeps it juicy. Lemon juice adds brightness. Garlic adds depth, while oregano and paprika give it that classic taste. For the tzatziki sauce, gather: - 1 cup Greek yogurt - 1 small cucumber, diced - A pinch of salt - Fresh herbs like parsley or dill This sauce is cool and refreshing. Greek yogurt is thick and creamy. The cucumber adds crunch. Herbs give it a fresh kick. You might want to add: - 4 pita breads - 1 tomato, diced - 1/4 red onion, thinly sliced - Fresh parsley or dill for garnish These toppings add color and taste. The pita holds everything together. Tomatoes provide sweetness, while onions add a bit of bite. Fresh herbs on top make it look great. For the full recipe, you can check out the Easy Chicken Gyros section. To start, you need to create a tasty marinade. This is key for flavor. Combine these ingredients in a bowl: - 3 tablespoons olive oil - 1 tablespoon lemon juice - 2 cloves garlic, minced - 1 tablespoon dried oregano - 1 teaspoon paprika - Salt and pepper to taste Mix them well. This blend will infuse your chicken with rich taste. Next, add the chicken strips. Make sure they are well-coated. Cover the bowl and place it in the fridge. Let the chicken marinate for at least 30 minutes. If you have time, let it sit for up to 2 hours. This helps the flavors deepen. Now, let’s cook the chicken. You can use a skillet or a grill pan. Heat it over medium-high heat. When it's hot, add the marinated chicken strips. Cook them for about 5-7 minutes. Stir occasionally to cook evenly. You want the chicken browned and no longer pink inside. As the chicken cooks, prepare your tzatziki sauce. Mix Greek yogurt, diced cucumber, a pinch of salt, and some herbs (like parsley or dill). This adds a fresh touch to your gyros. When the chicken is done, it’s time to assemble. Warm the pita breads in a dry skillet or microwave for a few seconds until soft. Now, grab a pita and add a generous amount of cooked chicken. Top it with diced tomato, red onion slices, and a big dollop of tzatziki. Roll up the pita tightly to encase the filling. Your Easy Chicken Gyros are ready to enjoy! For the full recipe, check here: [Full Recipe]. Marinating Times and Techniques Marinate your chicken for at least 30 minutes. For deeper flavor, go for 2 hours. Use a zip-top bag for easy mixing. It helps the chicken absorb all the tasty juices. Recommended Flavor Boosts Add a pinch of cayenne for heat. Honey can add a nice sweetness. Try fresh herbs like thyme or rosemary for extra flavor. Ideal Cooking Temperatures Aim for medium-high heat. This helps sear the outside while keeping the inside juicy. Use a meat thermometer to check. The chicken should reach 165°F for safety. Avoiding Common Cooking Mistakes Don't overcrowd the pan; this can steam the chicken. Cook in batches if needed. Let the chicken rest for a few minutes before serving. This helps keep it tender. How to Plate Your Gyros Lay the warm pita flat on a plate. Add the chicken in the center, making it the star. Layer toppings like fresh veggies and tzatziki on top. This creates a colorful dish. Garnishing Ideas for Visual Appeal Sprinkle fresh parsley or dill over the top. Add lemon wedges on the side. This brightens the plate and adds a pop of color. For more flair, drizzle extra tzatziki on top. For the full recipe and to explore more cooking tips, check out the Easy Chicken Gyros recipe. {{image_2}} You can easily switch chicken for other meats. Try beef or lamb for a different taste. Both meats work well with the same marinade. Just keep an eye on cooking times. For a vegetarian option, use grilled veggies like bell peppers or zucchini. You can also use tofu or tempeh for a vegan choice. They soak up flavors well and add protein. Want to spice things up? Add chili flakes or hot sauce for a kick. You can also mix in other spices like cumin or coriander for a different flavor. For marinades, try using yogurt or spices like turmeric. Each option offers a unique twist, so don't be afraid to experiment! Gyros can be served in many ways. Try them in salads or bowls for a fresh twist. You can layer cooked chicken, veggies, and tzatziki over a bed of greens. This makes a light and tasty meal. If you want to switch up the bread, use flatbreads or lettuce wraps. Both options create fun and healthy variations. For the full recipe, check out Easy Chicken Gyros. To store leftover gyros, place them in an airtight container. You can also wrap them tightly in plastic wrap. Keep them in the fridge for best results. - Best Storage Practices: Always let the gyros cool down to room temperature before storing. This helps prevent moisture build-up. - How Long Will They Last?: Leftover gyros can last up to three days in the fridge. However, they taste best when eaten fresh. Reheating gyros carefully keeps them tasty. Avoid overcooking to keep the chicken juicy. - Best Methods to Reheat: Use a skillet over medium heat for even reheating. You can also use a microwave, but be cautious. - Tips to Maintain Flavor and Texture: If using a microwave, cover the gyros with a damp paper towel. This helps keep them moist and prevents drying out. For the full recipe, check out Easy Chicken Gyros. I recommend marinating the chicken for at least 30 minutes. This gives the meat time to soak up all the flavors. You can marinate it for up to 2 hours if you want a stronger taste. The longer you wait, the more tender and tasty your chicken will be! Yes, you can use store-bought tzatziki. It saves time and still tastes great! Look for a brand that uses fresh ingredients. However, making your own is easy and fun. Just mix Greek yogurt, diced cucumber, and herbs. Many sides go well with chicken gyros. Here are a few ideas: - Greek salad with cucumbers and tomatoes - Crispy fries or roasted potatoes - Hummus with pita chips - Grilled vegetables for a healthy touch You can prepare parts of the gyros ahead of time. Marinate the chicken a day before. Cook it right before serving. You can also make tzatziki in advance and store it in the fridge. Just assemble the gyros when you're ready to eat. For a complete meal, serve the gyros with: - A side of Greek salad - Some crispy fries - Fresh pita bread Adding these sides makes the meal more filling and fun. You can find the full recipe for Easy Chicken Gyros above. Enjoy your cooking! This post covered how to make tasty chicken gyros. We detailed key ingredients like chicken, marinade, tzatziki, and optional toppings. I provided step-by-step cooking and assembly instructions. You learned tips for perfect marinating, cooking techniques, and how to present your dish well. Remember, you can switch proteins or flavors to make it fun. Store leftovers properly, and enjoy them later without losing taste. Making easy chicken gyros is simple and rewarding. Enjoy sharing this tasty dish with friends and family!](https://easycookingbite.com/wp-content/uploads/2025/07/8c25b7da-ed11-4898-88fd-a7abf8762b72.webp)
Craving a tasty meal that’s both simple and quick? You’ve landed in the right spot! My Easy Chicken Gyros recipe
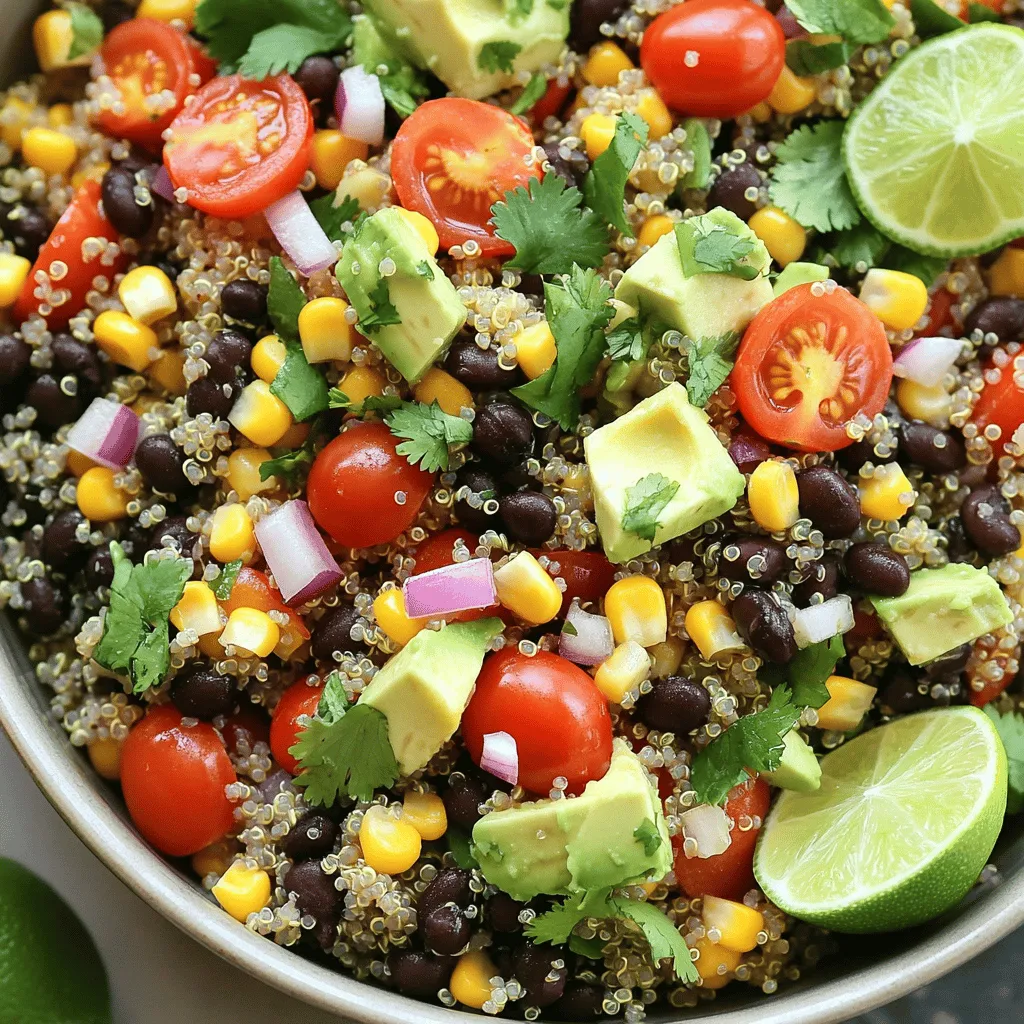
Looking for a dish that’s both flavorful and nutritious? The Tex-Mex Quinoa Salad is a tasty option! Packed with fresh

Looking to make delicious veggie sushi rolls at home? You’re in the right place! In this simple and healthy recipe
![To make spicy roasted chickpeas, you need a few key items. Here’s what you’ll need: - 1 can (15 oz) chickpeas, drained and rinsed - 2 tablespoons olive oil Chickpeas are the star of this dish. They give you a great base for that crunchy texture you crave. The right spices bring life to your chickpeas. Use these spices for a bold taste: - 1 teaspoon smoked paprika - 1 teaspoon cumin - 1/2 teaspoon cayenne pepper (adjust for desired spice level) - 1/2 teaspoon garlic powder - 1/2 teaspoon onion powder - Salt to taste These spices add warmth and depth. Feel free to adjust cayenne for more or less heat. Garnishes make your dish pop! Consider these options to enhance your snack: - Fresh lime juice (for serving) - Fresh cilantro leaves (for garnish) Adding lime juice gives a fresh zing. Cilantro adds a nice touch of green. For the full recipe and detailed instructions, check out the [Full Recipe]. First, you need to preheat your oven to 400°F (200°C). This step is key for crispiness. Next, take a can of chickpeas, drain it, and rinse them well. Drain them again and spread the chickpeas on a clean kitchen towel. Pat them dry to remove any extra moisture. This helps them get crunchy later. In a mixing bowl, add 2 tablespoons of olive oil. Then, mix in 1 teaspoon of smoked paprika, 1 teaspoon of cumin, and 1/2 teaspoon of cayenne pepper. Adjust the cayenne for how spicy you want it. Then, add 1/2 teaspoon of garlic powder and 1/2 teaspoon of onion powder. Don’t forget to add salt to taste. Stir well to combine everything into a nice spice blend. Now, take your dried chickpeas and add them to the spice blend. Toss them around until they are well coated. Spread the chickpeas out on a baking sheet lined with parchment paper. Make sure they are in a single layer for even roasting. Roast them in the oven for 25 to 30 minutes. Halfway through, shake the pan to help them crisp. Once they are golden and crunchy, take them out. Let them cool for a bit. Drizzle with fresh lime juice and garnish with cilantro. Enjoy your crunchy snack! For the full recipe, check out the details above. To make crispy roasted chickpeas, start with dry chickpeas. After rinsing, use a towel to remove all moisture. This step is key for crunch. For extra crispiness, roast them at a high temperature. I recommend 400°F (200°C). Make sure to spread them out in a single layer on the baking sheet. This helps hot air circulate and keeps them from steaming. Shake the pan halfway during cooking to ensure even crisping. One common mistake is not drying the chickpeas well. Wet chickpeas won’t get crispy. Another mistake is overcrowding the baking sheet. If chickpeas touch, they can steam and become soft. Avoid using too much oil. Just enough oil coats them for flavor and crunch. Lastly, don’t skip the shaking step! It helps all sides crisp up nicely. Serve your spicy roasted chickpeas in a bright bowl for a fun look. They pair well with yogurt or hummus for dipping. Adding fresh lime juice enhances the flavor. You can also sprinkle cilantro on top for a fresh touch. Enjoy them as a snack or appetizer. For more details and variations, check the Full Recipe. {{image_2}} You can change the spices in this recipe for spicy roasted chickpeas. Try using chili powder for a different heat. If you like a smoky flavor, add smoked salt. For a sweet twist, mix in some cinnamon. You can even use ranch seasoning for a fun flavor. The options are endless! This recipe is already vegan and gluten-free. Chickpeas are a great source of protein. You can enjoy these roasted chickpeas without worrying about gluten or animal products. Use a different oil if you prefer. Avocado oil or coconut oil works well too. There are many ways to serve spicy roasted chickpeas. You can use them as a topping for salads. They add crunch and flavor! Try mixing them into a grain bowl for extra texture. You can even serve them as a snack with yogurt or hummus. For a party, present them in a colorful bowl. They make a great appetizer to share! For the full recipe, check out the details above. After you make your spicy roasted chickpeas, store them in an airtight container. Make sure they are completely cool before sealing. If you store them while warm, moisture can form inside the container. This moisture makes them soggy, and we want to keep them crunchy! To bring back the crunch, reheat the chickpeas in the oven. Preheat your oven to 375°F (190°C). Spread the chickpeas on a baking sheet. Heat them for about 10 minutes. Check them often to avoid burning. This method revives their crispiness, making them just as tasty as when you first made them. Spicy roasted chickpeas last about 3 to 5 days at room temperature. If you want them to last longer, you can store them in the fridge. They will still be good for up to a week. However, the longer they sit, the less crunchy they become. For the best taste, enjoy them fresh or within a few days. You should roast chickpeas for 25 to 30 minutes. This time ensures they become golden and crunchy. Remember to shake the pan halfway through. This helps them cook evenly and get crispier. Yes, you can use dry chickpeas. Just soak them overnight and cook them first. This way, they will be soft enough to season and roast. Canned chickpeas are quicker, but dry ones can give a fresher flavor. You can use canola oil or avocado oil instead of olive oil. Both oils work well and have a mild taste. These oils also help the spices stick to the chickpeas. Yes, spicy roasted chickpeas are a healthy snack. They are high in protein and fiber. This makes them filling and good for your diet. With simple ingredients, they are a tasty option for any time of day. For the full recipe, check out the Crispy Spicy Roasted Chickpeas section. Spicy roasted chickpeas are easy to make and tasty. We covered the key ingredients, steps, and tips for crispiness. Remember to try different spices and garnishes to make it yours. Storing them well helps keep their crunch and flavor. Enjoy with your favorite dips or snacks. Now, you have all the tools to make your own perfect batch. Dive in and savor every bite!](https://easycookingbite.com/wp-content/uploads/2025/07/ed106025-8a39-40f9-8861-9369d397aa8a.webp)
If you’re looking for a snack that’s crunchy, spicy, and oh-so-satisfying, you’ve found it! Spicy roasted chickpeas are a perfect
![- 1 cup rolled oats - 1 ½ cups almond milk (or milk of choice) - 1 tablespoon chia seeds - Zest and juice of 1 lemon - 2 tablespoons maple syrup (or honey) - 1 teaspoon vanilla extract - 1 tablespoon poppy seeds - Fresh berries for topping (blueberries or raspberries) - Sliced almonds for garnish Lemon poppyseed overnight oats are simple to make. You start with rolled oats. They soak up liquid and get soft overnight. Almond milk gives a nice creaminess. If you prefer, you can use any milk you like. Next, chia seeds add fiber and help with thickening. Lemon zest and lemon juice bring a bright flavor. Maple syrup or honey sweetens the mix. Vanilla extract adds a warm note. Poppy seeds give a slight crunch and a unique taste. Finally, fresh berries are perfect for topping. You can use blueberries or raspberries. Sliced almonds add more crunch and flavor. - Additional sweeteners or fruit - Yogurt for creaminess - Coconut flakes for extra flavor You can change this recipe to fit your taste. Add more sweeteners if you like it sweeter. You can mix in yogurt for extra creaminess. Coconut flakes give a tropical twist. You can explore these options to create your own version of Lemon Poppyseed Overnight Oats. For the full recipe, check out the complete guide. - In a large bowl, mix 1 cup of rolled oats, 1 tablespoon of chia seeds, and 1 tablespoon of poppy seeds. - Add the zest of 1 lemon and the juice of that same lemon. Stir well. - In another bowl, combine 1 ½ cups of almond milk, 2 tablespoons of maple syrup, and 1 teaspoon of vanilla extract. Whisk until mixed. - Pour the wet mixture into the dry ingredients. Stir until everything blends well. - Divide the mixture into two jars. Seal them tightly and place them in the fridge. Let them chill overnight or for at least 6 hours. - In the morning, take the jars out. Stir the oats before you enjoy them. - If they seem thick, add a splash of almond milk for a creamier texture. - Top with fresh berries, like blueberries or raspberries. Sprinkle sliced almonds on top for crunch. For the full recipe, check the details above. Enjoy your Lemon Poppyseed Overnight Oats! To get the right thickness for your oats, adjust the liquid. If you want creamier oats, use less almond milk. If you prefer a thinner texture, add more milk. Stir the mixture well. This ensures that all the oats soak up the liquid evenly. You can boost flavor by adding spices. A pinch of cinnamon or nutmeg works great. If you like it sweeter, try different sweeteners. Honey and agave syrup can add a nice touch. They change the taste without overpowering the lemon. Get creative with your jars. Use clear containers to show off the colorful layers. Add fresh berries on top for a pop of color. You can also sprinkle sliced almonds for crunch. This makes your Lemon Poppyseed Overnight Oats look as good as they taste. For the full recipe, check out the [Full Recipe]. {{image_2}} You can mix lemon poppyseed oats in fun ways. Try blueberry lemon poppyseed. Just add fresh blueberries to your mix. They give a burst of sweetness. The blueberries blend perfectly with the lemon and poppy seeds. Another option is matcha lemon overnight oats. Matcha adds a unique green color and earthy taste. It pairs well with lemon's bright flavor. Just mix in one teaspoon of matcha powder with your dry ingredients. For those who follow a vegan diet, you can easily make swaps. Use maple syrup instead of honey for sweetness. Almond milk is a great choice, but any plant-based milk works well. You can also skip the yogurt if you want to keep it fully vegan. If you need gluten-free options, use certified gluten-free oats. They taste just as good. You still get all the nutrients and flavor without the gluten. You can change your overnight oats with the seasons. In summer, add fresh fruit like peaches or strawberries. They add a juicy sweetness that brightens your dish. For fall, think of flavors like pumpkin spice. Just add a bit of pumpkin puree and some cinnamon. This gives your oats a warm, cozy feel perfect for cooler days. These variations allow you to enjoy lemon poppyseed overnight oats all year long! For the full recipe, you can refer back to the main section. To keep your Lemon Poppyseed Overnight Oats fresh, use airtight containers. I prefer glass jars for easy serving. Store them in the refrigerator for up to five days. This way, you can enjoy a quick breakfast all week! You can eat your oats cold or warm them up. If you like them warm, heat them in the microwave for 30 seconds. Stir well after heating. You might want to add a splash of almond milk to make them creamy again. For toppings, fresh berries and sliced almonds are great. Add them just before serving for the best crunch! Yes, you can freeze overnight oats! To do this, pour the mixture into freezer-safe containers. Leave some space at the top, as they will expand. They can last in the freezer for up to three months. When you’re ready to eat them, thaw in the fridge overnight. This makes for an easy breakfast option for busy mornings! You can store overnight oats for up to five days in the fridge. They stay fresh in sealed jars. Just remember to stir before eating. If they get too thick, add a splash of milk. Yes, you can use quick oats. They will soak up the liquid faster. This may change the texture to be creamier and softer. If you like a chewier bite, stick with rolled oats. Absolutely! You can easily swap out ingredients. Use a different milk if you're dairy-free. For nut allergies, skip the almonds. You can even replace maple syrup with agave or a safe sweetener. Lemon poppyseed oatmeal is packed with nutrients. Oats provide fiber and help keep you full. Chia seeds add omega-3 fatty acids. Lemons give vitamin C for immunity. Poppy seeds add minerals like calcium and magnesium. To make this recipe nut-free, choose a nut-free milk. Oat milk or soy milk works great. Skip the sliced almonds as a topping. You can use sunflower seeds for crunch instead. Enjoy your nut-free oats without worry! Lemon poppyseed overnight oats are a tasty and easy breakfast option. You learned the key ingredients, preparation steps, and useful tips. I provided ideas for variations and storage tips. Get creative with flavors and toppings to keep your meals fun. Enjoy the health benefits and simplicity of these oats. Make them your way to fit your taste and needs. Start your day right with this quick, nutritious meal!](https://easycookingbite.com/wp-content/uploads/2025/07/a3193c76-fc72-4b8c-9a5c-a02aec3b6d3c.webp)
Wake up to a burst of fresh flavor with my Lemon Poppyseed Overnight Oats recipe! This quick and easy breakfast
![For a tasty One Pot Creamy Pesto Pasta, gather these key ingredients: - Pasta options: 12 oz (340g) of penne, fusilli, or spaghetti - Key flavor components: 1 tablespoon of olive oil, 3 cloves of minced garlic, and 3 cups of vegetable broth - Creamy elements: 1 cup of heavy cream and 1 cup of basil pesto (store-bought or homemade) - Fresh additions: 1 cup of halved cherry tomatoes and 1 cup of loosely packed spinach - Cheese and seasoning: ½ cup of grated Parmesan cheese, plus salt and pepper to taste When you combine these ingredients, you create a dish that is both simple and delicious. Each component adds its own flavor and texture, making every bite satisfying. The pasta absorbs the rich broth and cream, while the pesto gives it a fresh, herby kick. The cherry tomatoes and spinach add color and nutrition, making it a complete meal. You can find the complete recipe above to guide you through the cooking process. Enjoy making this easy yet gourmet dish! 1. Sauté aromatics in olive oil First, take a large pot. Heat 1 tablespoon of olive oil over medium heat. Add 3 cloves of minced garlic. Sauté for about 1 minute. You want it fragrant, not browned. 2. Cook pasta with vegetable broth Next, add 12 oz of your favorite pasta to the pot. Pour in 3 cups of vegetable broth. Bring this mixture to a boil. Once boiling, reduce the heat and simmer for 10 to 12 minutes. Stir often until the pasta is al dente and most of the liquid is absorbed. 3. Incorporate creamy elements Now, stir in 1 cup of heavy cream and 1 cup of basil pesto. Mix well until everything combines nicely. Let it cook for another 2 to 3 minutes. This will help the sauce thicken slightly. 4. Add vegetables Time to add some color! Toss in 1 cup of halved cherry tomatoes and 1 cup of spinach. Stir gently until the spinach wilts. This should take about 2 minutes. 5. Final touches Remove the pot from heat. Stir in ½ cup of grated Parmesan cheese. Season with salt and pepper to taste. If the pasta is too thick, add a splash of vegetable broth to loosen it up. Enjoy your One Pot Creamy Pesto Pasta! For the complete recipe, check out the [Full Recipe]. To get the best texture, cook your pasta until it is al dente. This means it should be firm but not hard. Test it a minute or two before the time is up. If you want a creamier sauce, you can adjust the consistency. Add more broth or a splash of cream as needed. For extra flavor, try adding more herbs or spices. A pinch of red pepper flakes can give it a nice kick. To save time, use pre-minced garlic. It’s quick and easy, and it saves you from chopping. When you chop vegetables, try to use a sharp knife. This helps you chop faster and safer. You can cook the pasta right in the sauce. This cuts down on extra dishes and makes cleanup easier. {{image_2}} You can easily change the pasta type to suit your needs. Try using gluten-free pasta if you want a different option. It works just as well and is just as tasty. You can also swap in proteins like chicken, shrimp, or tofu. Each choice adds a unique flavor and texture. For a vegan version, replace heavy cream and cheese. Use coconut cream or cashew cream instead. Nutritional yeast can add a cheesy flavor without dairy. To enhance the taste, add lemon zest. It brightens the dish and adds freshness. You can also mix in nuts like walnuts or pine nuts. They provide crunch and extra flavor. If you like some heat, sprinkle red pepper flakes or smoked paprika. This gives your pasta a nice kick. Each tweak allows you to customize your One Pot Creamy Pesto Pasta to your liking. For the full recipe, check out the relevant section above. To store leftover One Pot Creamy Pesto Pasta, follow these steps: - Refrigerate: Let the pasta cool down first. Place it in an airtight container. Store it in the fridge. It can last up to 3 days. - Freezing: For longer storage, freeze the pasta. Use a freezer-safe container. It can last up to 2 months. - Reheating: When ready to eat, thaw in the fridge overnight. You can reheat it in a microwave or on the stovetop. If using a microwave, heat in short bursts. For stovetop, add a splash of broth to loosen the pasta. Stir often to heat evenly. In the fridge, One Pot Creamy Pesto Pasta lasts about 3 days. Look for signs of spoilage: - Off smell or flavor - Slimy texture - Discoloration To extend freshness, store it properly and consume it quickly. Freezing is a great option for longer storage. Just remember to label your container with the date. How do I make this recipe in advance? You can prepare the One Pot Creamy Pesto Pasta ahead of time. First, cook the pasta and mix in the sauce as usual. Let it cool completely, then store it in an airtight container. You can keep it in the fridge for up to three days. When you are ready to eat, just reheat it on the stove over low heat. Add a splash of broth to help loosen the sauce. Can I use homemade pesto instead of store-bought? Absolutely! Homemade pesto can add a personal touch to your dish. Use fresh basil, garlic, nuts, cheese, and olive oil to make your pesto. This change can enhance the flavor and make the pasta feel more special. Just make sure it’s the same amount as the store-bought version, about one cup. How do I adjust servings for larger gatherings? To serve more people, simply multiply the ingredients. For example, if you want to serve eight people, double the ingredients in the Full Recipe. Be mindful of your pot size. You might need a larger pot or to cook in batches. Check the cooking time, as it may vary slightly with larger quantities. Caloric content per serving Each serving of One Pot Creamy Pesto Pasta has about 600 calories. This can change based on the specific ingredients you choose, like the type of pasta or if you use less cream. Nutrient breakdown This dish is a good source of protein, mainly from the cheese and heavy cream. It also offers healthy fats from the olive oil and pesto. If you choose whole grain pasta, it can be lower in carbs and higher in fiber. Dietary considerations If you need gluten-free options, use gluten-free pasta. The dish is vegetarian due to its ingredients. For a vegan option, substitute the heavy cream and cheese with plant-based alternatives. This blog post covered everything you need for a delicious pasta dish. We discussed the best ingredients, step-by-step instructions, and handy tips. You learned about ingredient swaps and fun flavor tweaks to make your meal unique. Proper storage and reheating tips help you enjoy leftovers without waste. Overall, you now have a complete guide to crafting a creamy, flavorful pasta dish that fits your taste. Take these ideas and make your next meal special!](https://easycookingbite.com/wp-content/uploads/2025/07/be392c5c-522c-4119-8674-461e05f9824f.webp)
Ready for a delicious meal that’s simple to make? One Pot Creamy Pesto Pasta is your answer! This dish combines

Looking for a fresh and crunchy side dish? My Crunchy Asian Slaw is your answer! Packed with vibrant veggies and

Are you looking for a quick, healthy meal that packs a punch? Try these Easy Veggie Egg Muffins! They’re perfect

Are you ready to impress your dinner guests with a dish that’s both tasty and easy to make? This Orange
