
Chocolate Covered Strawberry Smoothie Delicious Treat
Craving something delicious and healthy? The Chocolate Covered Strawberry Smoothie is the perfect treat! With fresh strawberries, cocoa powder, and
Craving something delicious and healthy? The Chocolate Covered Strawberry Smoothie is the perfect treat! With fresh strawberries, cocoa powder, and
. Use these ingredients to create a salad that is both fresh and healthy. To start, you need to prepare the apple and pecans. Here’s how: - Dicing the Apple: First, wash the apple. Then, cut it into quarters and remove the core. Slice each quarter into thin strips. Next, turn the strips and chop them into small cubes. I like using Granny Smith for a tart taste, but Honeycrisp works great too. - Chopping the Pecans: Take the pecans and place them on a cutting board. Use a sharp knife to chop them into smaller pieces. Aim for a rough chop to keep some crunch in the salad. Now for the chicken: - Shredding or Dicing Cooked Chicken: If you have cooked chicken, you can shred it with two forks or dice it. Just cut the chicken into small, bite-sized pieces. This makes it easier to mix with other ingredients later. Once your ingredients are ready, it’s time to mix: - Combining Chicken and Produce: In a large bowl, add the shredded or diced chicken. Then, toss in the diced apple, chopped pecans, finely chopped celery, and red onion. Mix gently to avoid crushing the apple. - Preparing the Dressing: In a smaller bowl, whisk together Greek yogurt, honey, Dijon mustard, lemon juice, salt, and pepper. Make sure it’s smooth and well-blended. This dressing adds a creamy touch to the salad. Now that everything is combined, let’s finish up: - Tossing Ingredients and Chilling: Pour the dressing over the chicken mixture. Fold gently until all pieces are coated. Then, cover the bowl and refrigerate the salad for at least 30 minutes. This chilling time helps the flavors blend well. - Serving Suggestions over Greens: When you’re ready to serve, place a generous scoop of the chicken salad over a bed of fresh greens like spinach or mixed greens. For a nice touch, sprinkle extra pecans and apple slices on top. For the complete recipe, check out the [Full Recipe]. Use the right apples in your salad. I recommend Granny Smith or Honeycrisp apples. They add a nice crunch and a tart flavor. The tartness works well with the creamy dressing. Chill the salad for at least 30 minutes. This time helps the flavors blend and become more tasty. Chilling also makes the salad refreshing. You want a creamy dressing, but not too thick. If your dressing seems too thick, add a splash of lemon juice or water. This will help it coat the chicken and apples evenly. Balance the flavors by tasting as you mix. Adjust with more salt, pepper, or honey if needed. This way, each bite will have a great taste. Prep your chicken ahead of time. Cook it and shred or dice it the day before. This saves you time when making the salad. You can also use rotisserie chicken as a shortcut. It is cooked and seasoned perfectly, saving you effort. Just shred and mix it in; it’s quick and easy. {{image_2}} If you want to switch things up, you can change the Greek yogurt. Use sour cream for a creamier texture. You can also try cottage cheese, which adds protein and a different taste. When it comes to nuts, pecans are great, but you can use walnuts or almonds too. Each nut brings its own flavor. Walnuts have a rich taste, while almonds add a nice crunch. To add more sweetness or tartness, consider dried cranberries or grapes. They enhance the flavor and add a pop of color. You can also mix in fresh herbs like parsley or dill. These herbs freshen up the dish and make it even tastier. For a fun twist, serve the chicken salad as a sandwich or wrap. Use whole grain bread or a tortilla for a healthy choice. If you have guests, you can get creative with plating. Use lettuce leaves as cups or stack the salad in a clear glass. This gives a nice view of the colorful layers. For the full recipe, check out the detailed instructions above! Apple Pecan Chicken Salad stays fresh in the fridge for up to three days. Store it in an airtight container to keep it crisp. Glass containers work well because they don’t stain and are easy to clean. Plastic containers are fine too, but ensure they are safe for food storage. You can freeze Apple Pecan Chicken Salad, but it may change texture. The apples and celery might get mushy. If you still want to freeze it, pack it in a freezer-safe bag or container. When ready to eat, thaw it in the fridge overnight. Serve it cold for the best taste. Look for signs of spoilage. If the salad smells off or has a slimy texture, throw it away. Always keep leftovers in the fridge and eat them within three days. This way, you stay safe and enjoy every bite. For more detailed steps, check the Full Recipe. The best apple for chicken salad is often a crisp variety. I recommend using Granny Smith or Honeycrisp apples. - Granny Smith: These apples are tart and crunchy. They add a nice zing to the salad. - Honeycrisp: These are sweet and juicy. They provide a lovely contrast to the savory chicken. Using the right apple can really boost the taste and texture of your salad. Think about what flavor you want to highlight in your dish! Yes, you can easily add more protein to this salad! Here are some great options: - Nuts: Add more pecans or try walnuts. They give a nice crunch and flavor. - Tofu: For a vegetarian option, use firm or extra-firm tofu. It can soak up flavors well. - Chickpeas: These are a tasty way to add protein and fiber. They mix well with the other ingredients. Each of these options can enhance your salad and make it even more filling. Making this salad lighter is simple! Here are a few tips: - Use less dressing: Start with half the amount of Greek yogurt or mayonnaise. - Swap yogurt: Use a low-fat yogurt or even a plant-based yogurt. - Skip the nuts: This will cut down on fat and calories. You can still get crunch from celery. These changes will keep the salad fresh and tasty while reducing calories. Enjoy your healthy twist! This blog post walked you through making a tasty Apple Pecan Chicken Salad. We discussed the key ingredients and how to prepare each one. Mixing and chilling the salad enhances its flavor. Remember, you can swap ingredients or serve it in different ways. This salad is great for meal prep and easy to store. You can enjoy it fresh or chilled, satisfying your taste buds with every bite. Have fun experimenting with flavors and make this dish your own!](https://easycookingbite.com/wp-content/uploads/2025/07/4ff088ce-55dc-4552-bcc5-7735468b7378.webp)
Are you ready for a fresh twist on classic chicken salad? Our Apple Pecan Chicken Salad combines crisp apples, crunchy
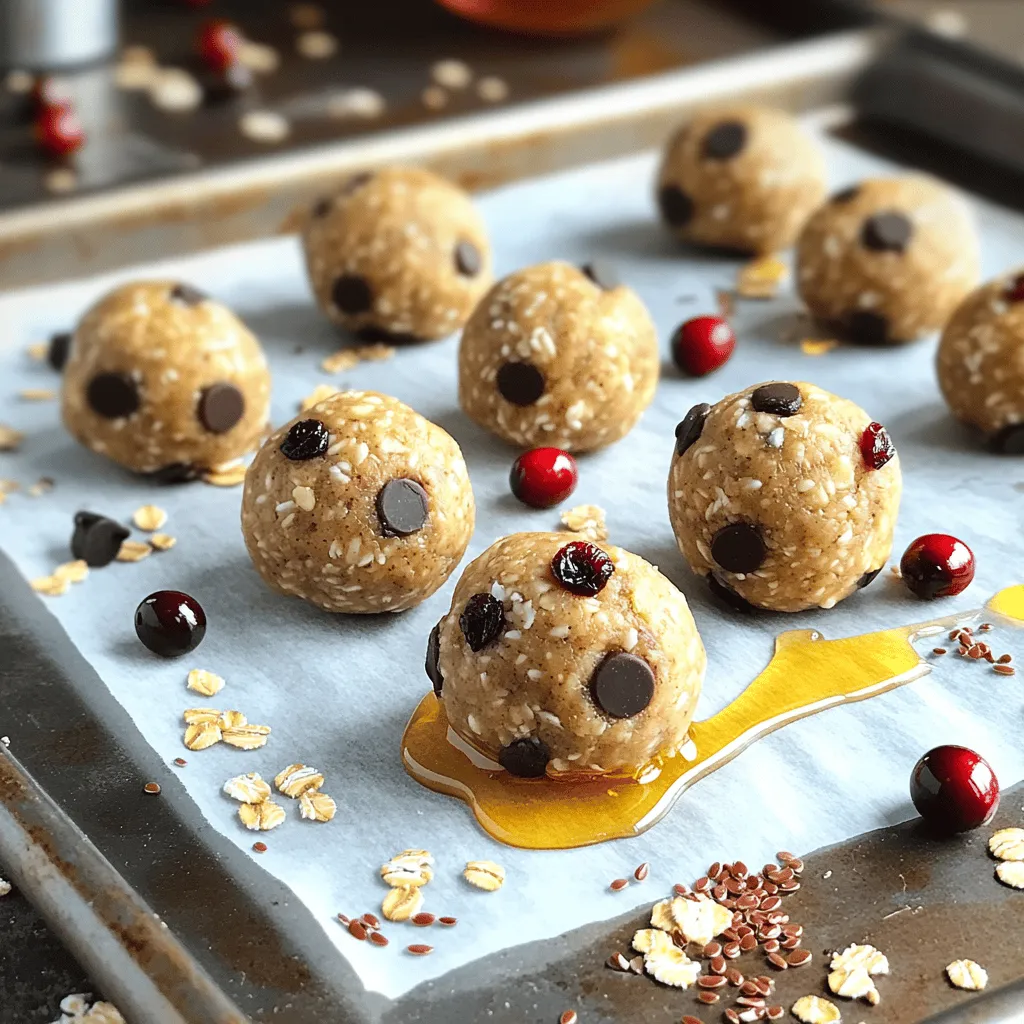
Looking for a tasty treat that’s also healthy? Peanut Butter Energy Balls are your answer! This easy snack recipe packs
![To make garlic shrimp pasta, gather these simple ingredients: - 8 oz linguine or spaghetti - 1 lb large shrimp, peeled and deveined - 4 tablespoons unsalted butter - 4 cloves garlic, minced - 1 teaspoon red pepper flakes (adjust to taste) - 1 lemon, juiced and zested - 1 cup cherry tomatoes, halved - ¼ cup fresh parsley, chopped - Salt and pepper to taste - Grated Parmesan cheese for serving (optional) These ingredients combine to create a bright and flavorful dish. Fresh shrimp and bright lemon zest create a lovely balance. The garlic adds depth, while the red pepper flakes give a nice kick. When choosing shrimp, opt for large or jumbo shrimp. They hold up well and taste great. Look for shrimp that are firm and have a mild scent. You can use fresh or frozen shrimp, but make sure to thaw frozen shrimp before cooking. For pasta, I recommend linguine or spaghetti. Both types work well with the sauce. You can also try fettuccine for a thicker bite. Always choose high-quality pasta for the best results. To take your garlic shrimp pasta to the next level, consider adding these optional ingredients: - ½ cup white wine for a splash of acidity - 1 cup spinach for added greens - ½ teaspoon smoked paprika for a smoky touch These ingredients can add layers of flavor and nutrition. Experiment with them to find what you like best. This dish is all about personal taste, so feel free to mix and match! For the full recipe, check out the detailed steps to create this delicious meal. Start by filling a large pot with water. Add a good amount of salt. Bring it to a boil over high heat. Once boiling, add your linguine or spaghetti. Follow the package directions to cook until al dente, which means firm to the bite. This step usually takes about 8 to 10 minutes. Reserve half a cup of the pasta water before draining. This water helps the sauce stick later. Drain the rest of the pasta and set it aside. While the pasta cooks, grab a large skillet. Melt two tablespoons of butter over medium heat. Add the shrimp to the pan. Season them with salt, pepper, and red pepper flakes. Cook the shrimp for 2 to 3 minutes on each side. They should turn pink and opaque. Once cooked, remove the shrimp from the skillet and keep them warm. This keeps them tender and juicy. In the same skillet, add the remaining two tablespoons of butter. Once melted, toss in the minced garlic. Sauté for about one minute until it smells amazing. Be careful not to burn the garlic; it can turn bitter. Next, add the halved cherry tomatoes. Cook for another 3 to 4 minutes. You want them to soften and burst with flavor. After this, return the shrimp to the skillet. Add the drained pasta, reserved pasta water, lemon juice, and lemon zest. Toss everything gently over medium heat. Make sure it is all mixed well and heated through. Finally, stir in the chopped parsley. Adjust the salt and pepper to your taste. Serve this dish hot, and don’t forget the grated Parmesan cheese if you like! You can find the full recipe [here]. To cook shrimp just right, use fresh shrimp if possible. Start with a hot skillet. Melt butter over medium heat. Add shrimp in one layer for even cooking. Cook them for 2-3 minutes on each side. They should turn pink and opaque. Overcooking makes shrimp tough, so keep an eye on them. If you like spice, add red pepper flakes during cooking for a kick. You can add more flavor to your Garlic Shrimp Pasta. Fresh herbs like basil or thyme brighten the dish. A splash of white wine in the skillet adds depth. For a tangy twist, try capers or olives. You can also mix in spinach or arugula for a healthy boost. Experiment with these extras to find your favorite combination! When tossing pasta, make sure it is hot. This helps the sauce stick better. Use the reserved pasta water if the dish seems dry. A splash of water helps bind the flavors. Gently toss the pasta and shrimp together with tongs. This keeps everything intact and well coated. Serve it warm for a delightful meal. For the full recipe, check out the Garlic Shrimp Pasta Delight. {{image_2}} If you prefer different proteins, chicken or scallops work well. For chicken, cut it into bite-sized pieces. Cook it in the same way as the shrimp until it's golden brown. This will add a nice twist to the dish. Scallops can also be sautéed quickly. They cook fast and have a sweet flavor. Use the same garlic sauce to keep the taste rich. For a tasty vegetarian version, swap shrimp for vegetables. Try using zucchini, bell peppers, or asparagus. You can sauté these veggies just like the shrimp. They will absorb all the wonderful flavors from the garlic sauce. This makes a bright and healthy dish. You can also add beans for extra protein and texture. You can use many pasta shapes for this dish. While linguine and spaghetti are great, try penne or fettuccine. Each shape holds the sauce differently. Penne’s tubes catch the sauce inside, making each bite flavorful. Fettuccine can give a nice creamy feel when tossed with the garlic sauce. Choose any shape you love to make it your own. For the complete experience, check out the Full Recipe. After enjoying your meal, store any leftover garlic shrimp pasta in a tight container. Let it cool down to room temperature first. Place it in the fridge for up to three days. Make sure to cover it well to keep it fresh. If you want to freeze garlic shrimp pasta, it’s best to do this right after cooking. Let it cool completely, then portion it into freezer-safe bags or containers. Squeeze out as much air as you can to avoid freezer burn. It can last for up to three months in the freezer. When you want to eat it, just remember to label the bags with the date. To reheat your pasta, the stovetop is best. Add a splash of water or broth to keep it moist. Heat it over low to medium heat, stirring often. If you prefer a microwave, place it in a bowl with a little water. Cover it and heat in short bursts, stirring in between. This keeps your garlic shrimp pasta tasty and prevents it from drying out. For extra flavor, you can add a squeeze of fresh lemon juice before serving. If you need the full recipe, check out the garlic shrimp pasta delight. Yes, you can make Garlic Shrimp Pasta ahead of time. Cook the pasta and shrimp, then store them separately in the fridge. When you are ready to eat, heat them up together with the garlic sauce. This way, your dish stays fresh and tasty. Just remember, the pasta may soak up some sauce. If you can't find shrimp, you can use chicken or scallops. Both options work well in this dish. Just cook them until they are fully done, like the shrimp. You can also use tofu or chickpeas for a vegetarian twist. These choices will still give you great flavor. To make Garlic Shrimp Pasta spicier, add more red pepper flakes. You can also include fresh chili peppers for heat. If you prefer it milder, cut back on the red pepper flakes. You can leave them out entirely for a gentle flavor. Adjust the spice to suit your taste. For the full recipe, check out the [Full Recipe]. This blog post covered the essential parts of making Garlic Shrimp Pasta. We discussed the right ingredients, how to cook the shrimp and pasta, and tips for great flavor. You learned about variations with other proteins and vegetarian options. Storage tips and answers to common questions help you get the best out of your dish. I hope you feel ready to create a delicious meal that satisfies. Enjoy experimenting and sharing this dish with others!](https://easycookingbite.com/wp-content/uploads/2025/07/39ea9e96-31de-4946-88cf-eb943b41ac7f.webp)
Looking for a quick dinner that’s packed with flavor? Garlic Shrimp Pasta is your answer! In just a few simple
Are you craving a quick and tasty meal that feels like a treat? Look no further than Easy Chicken Fried

If you’re looking for a crowd-pleaser that’s both tasty and simple, Buffalo Chicken Dip is your answer! This creamy, spicy
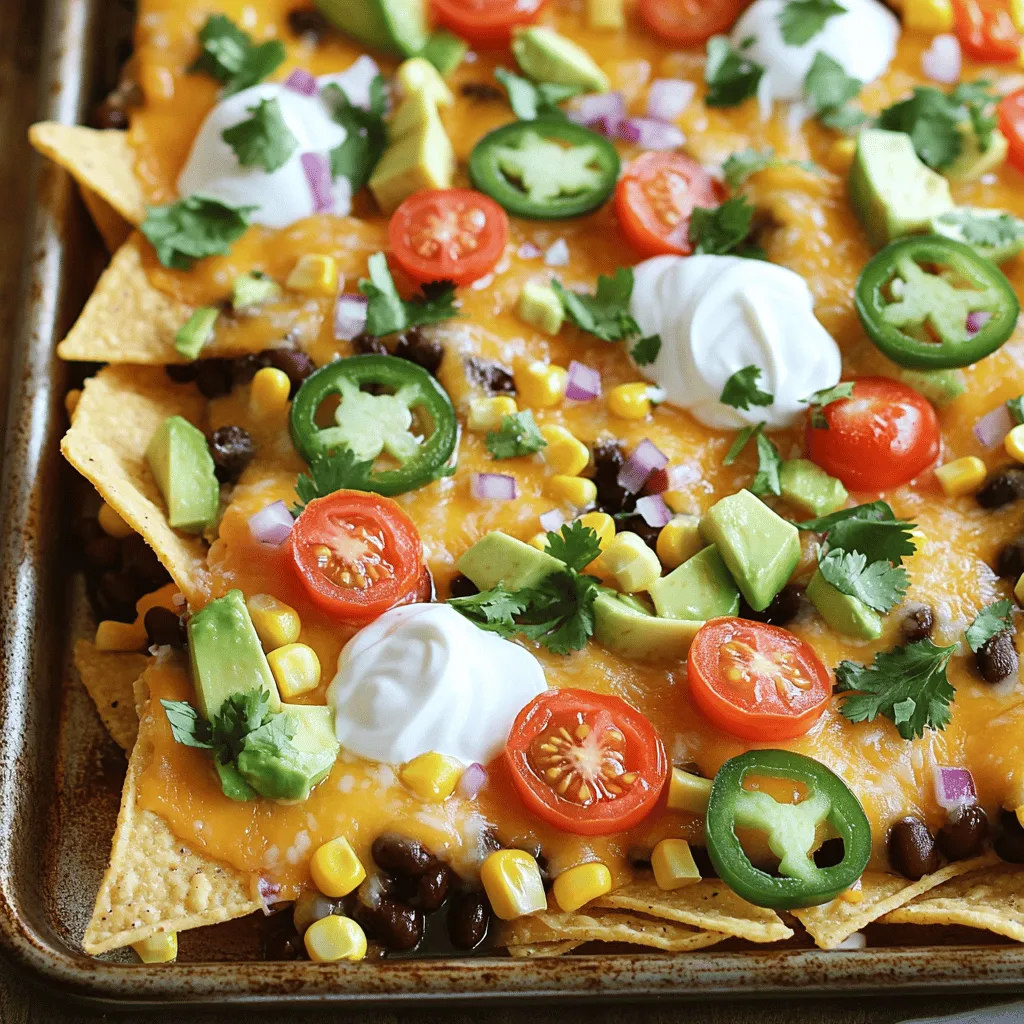
Craving a quick and tasty meal? I’ve got you covered with Sheet Pan Nachos! This cheesy and satisfying dish is
Are you ready to enjoy a delicious meal that’s both easy and satisfying? In this blog post, I’ll share my
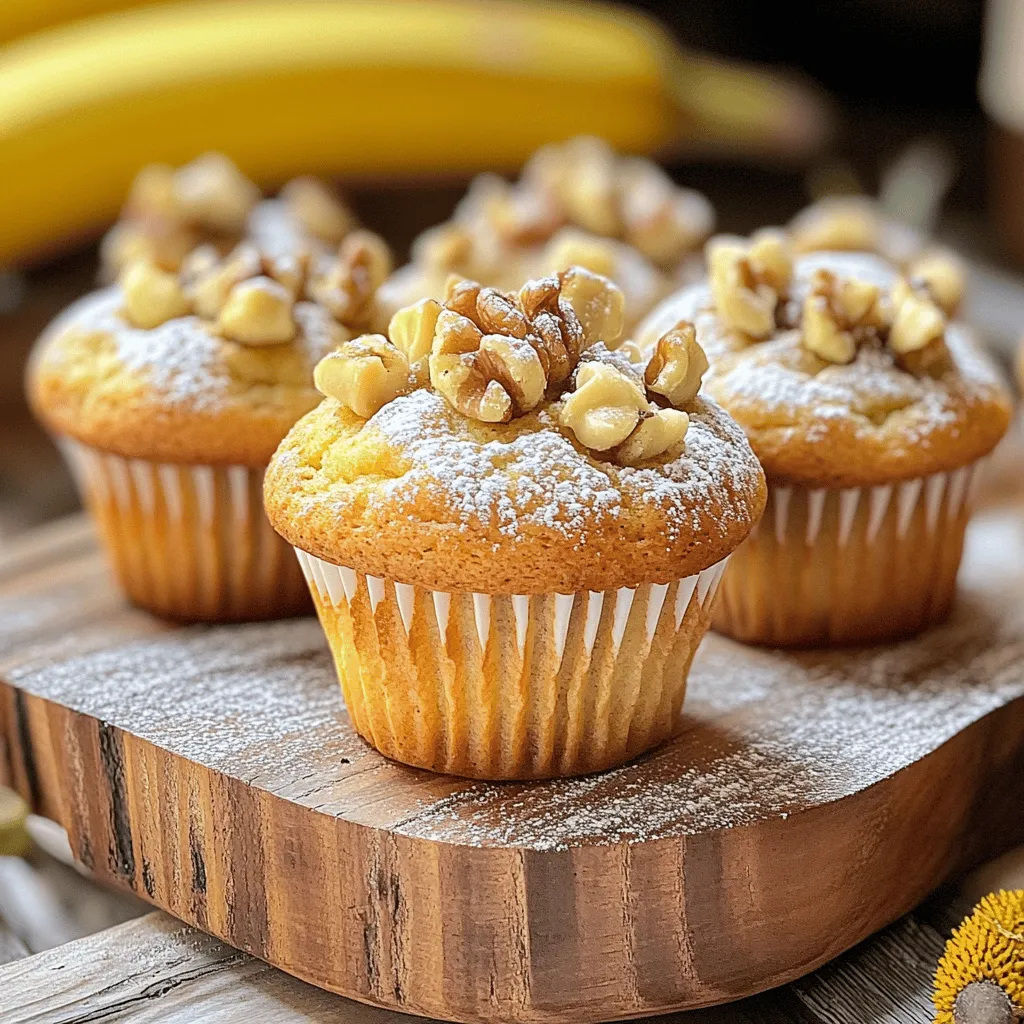
Are you ready to bake the softest, tastiest banana nut muffins ever? I’ll take you through a simple recipe that
![- 1 block firm tofu, drained and pressed - 2 tablespoons cornstarch - 3 tablespoons vegetable oil - 1 red bell pepper, sliced - 1 yellow bell pepper, sliced - 1 cup broccoli florets - 4 cloves garlic, minced - 1 tablespoon fresh ginger, minced - 2 tablespoons soy sauce (or tamari for gluten-free) - 1 tablespoon sriracha - 1 tablespoon rice vinegar - 1 teaspoon sesame oil The main ingredients create the heart of this dish. Firm tofu gives it structure. The cornstarch coats the tofu and makes it crispy. The colorful bell peppers and bright broccoli add flavor and crunch. Garlic and ginger kick it up a notch. The soy sauce, sriracha, and rice vinegar bring all the flavors together. - 2 green onions, sliced (for garnish) - Sesame seeds (for garnish) Garnishes add flair to your dish. Green onions lend freshness. Sesame seeds give a nice crunch and look great. You can swap ingredients based on what you have at home. Use any firm tofu or try tempeh for a different texture. If you don’t have bell peppers, use snap peas or carrots. For a gluten-free option, use tamari instead of soy sauce. Want it spicy? Add more sriracha or fresh chili. For the full recipe, you can refer to the complete guide above. Enjoy your cooking journey! Start with a block of firm tofu. Drain it well and press it to remove excess water. This step is key to achieving a crispy texture. Cut the tofu into bite-sized cubes. Place the cubes in a bowl and sprinkle cornstarch over them. Toss gently to coat every piece. The cornstarch will help the tofu get crispy when cooked. Heat 2 tablespoons of vegetable oil in a large skillet or wok over medium-high heat. Once the oil is hot, add the coated tofu cubes. Cook them for about 7 to 10 minutes. Turn them often until they are golden brown. After that, remove the tofu from the skillet and set it aside. In the same skillet, add one more tablespoon of oil. Then, toss in minced garlic and ginger. Sauté for about 30 seconds until you smell their aroma. Next, add sliced red and yellow bell peppers along with broccoli florets. Stir-fry these for about 5 to 7 minutes. You want them to be tender but still crisp. Return the golden tofu to the skillet. Pour in soy sauce, sriracha, and rice vinegar. Toss everything together gently. This will coat the tofu and veggies in the sauce. Drizzle sesame oil over the top and give it a final toss. Cook for one more minute to bring all the flavors together. Your dish is now ready to serve! Don't forget to check the [Full Recipe] for more details. To get crispy tofu, start with firm tofu. Drain and press it well. This helps remove excess moisture. Cut the tofu into bite-sized cubes. Coat them in cornstarch to create a crunchy crust. Heat vegetable oil in a skillet until it shimmers. Add the tofu cubes and don’t crowd the pan. This allows them to get golden brown on all sides. Stir-frying is my favorite method for this dish. Use a large skillet or wok. The high heat cooks the tofu and veggies quickly. For crispy tofu, pan-frying works best. You can also bake tofu if you prefer less oil. Just toss the coated cubes on a baking sheet and bake until golden. I love to enhance flavors with fresh herbs and spices. Garlic and ginger are key in this dish. They add depth and warmth. Using soy sauce gives a salty umami punch. Sriracha adds heat, but you can adjust it to your taste. For a tangy touch, rice vinegar works wonders. Finish with sesame oil for a nutty flavor. Enjoy experimenting with these tips in your Chili Garlic Tofu Stir Fry! For the full recipe, check out the [Full Recipe]. {{image_2}} You can change the veggies in this stir fry. Try using carrots, snap peas, or zucchini. Each vegetable adds its own taste and texture. For a colorful dish, mix and match your favorites. Just remember to cut them into similar sizes for even cooking. Tofu is a great protein, but you can switch it out. Chickpeas or tempeh work well. If you eat meat, try chicken or shrimp. Just make sure to adjust cooking times. Each protein brings its own flavor, making your meal unique. Love heat? Add more sriracha or some red pepper flakes. Want a milder dish? Cut back on the spicy sauce. You can also add sweet elements like honey or brown sugar to balance the spice. Taste as you go to find your perfect level of heat. For the full recipe, check out the previous sections. Store your Chili Garlic Tofu Stir Fry in an airtight container. It keeps well in the fridge for up to three days. Make sure to let it cool before sealing. This helps keep the tofu and veggies fresh. You can freeze the stir fry, but tofu may change in texture. To freeze, place it in a freezer-safe container. Use it within one month for the best taste. Thaw it overnight in the fridge before cooking. Reheat leftovers on the stove for the best flavor. Use medium heat and add a splash of water or oil to keep it moist. Stir often until it's hot. You can also use the microwave, but be careful not to overcook. To make tofu crispy, start with firm tofu. First, drain and press it to remove water. Cut the tofu into bite-sized cubes. Coat these cubes with cornstarch. This coating helps create a crunchy outer layer when cooked. Heat oil in your skillet until hot. Cook the tofu until golden brown on all sides. This method ensures a perfect crispy texture. Yes, this dish is already vegan. The main ingredients, like tofu and vegetables, are plant-based. Use tamari instead of soy sauce for a gluten-free option. This recipe is perfect for anyone who loves vegan meals. You can enjoy all the bold flavors without any animal products. You can serve this stir fry with several side dishes. Some great options are: - Steamed rice - Noodles - Quinoa - A fresh salad - Pickled vegetables These sides complement the bold flavors of the stir fry. They add balance and make your meal more filling. Chili Garlic Tofu Stir Fry lasts about 3 to 4 days in the fridge. Store it in an airtight container for best results. When you’re ready to eat, just reheat it on the stove or in the microwave. The flavors will still be tasty, and the dish will remain enjoyable. For the full recipe, check out the earlier section. Chili garlic tofu stir fry is a simple and tasty dish. We covered the main ingredients, how to prepare tofu, and cooking methods. I shared tips for crispy tofu and flavor boosts. You can change the recipe with different veggies or proteins to suit your taste. Remember to store leftovers properly for later enjoyment. This dish is easy to make and can fit any meal plan. Enjoy cooking and experimenting with the flavors!](https://easycookingbite.com/wp-content/uploads/2025/07/4bd0831c-550e-4e2f-bbe4-4f393b376a8d.webp)
Looking for a quick and tasty meal? You’ll love this Chili Garlic Tofu Stir Fry! It’s packed with flavor and
