Skip to content
DisclaimerTerms Of UseGDPR PolicyCookie Policy

easycookingbite

  • Home
  • Drinks
  • Appetizers
  • Dinner
  • Dessert
  • About
  • Contact
  • Privacy Policy
DisclaimerTerms Of UseGDPR PolicyCookie Policy

Lily

To make this dish, you need the following main ingredients: - 20 large pasta shells - 2 cups cooked chicken, shredded - 1 cup ricotta cheese - 2 cups shredded mozzarella cheese, divided - 1 cup grated Parmesan cheese, divided - 2 cups Alfredo sauce (store-bought or homemade) - 1 teaspoon garlic powder - 1 teaspoon Italian seasoning - Salt and pepper to taste - Fresh parsley, chopped (for garnish) These ingredients come together to create a creamy, cheesy delight. The large pasta shells hold the filling well, giving you a rich taste in every bite. You can add some optional ingredients to boost the flavor: - Spinach or kale for greens - Mushrooms for a savory touch - A pinch of red pepper flakes for heat These additions can enhance the dish. I love mixing in spinach for its color and health benefits. Gather these tools to make the process smooth: - A large pot for boiling pasta - A mixing bowl for the filling - A 9x13 inch baking dish - Aluminum foil for baking - A spatula for spreading the sauce Having the right tools makes cooking easier and more fun. I find that using a spatula helps me get the sauce just right. For the full recipe, check out the detailed instructions. First, gather all your ingredients. You will need 20 large pasta shells, 2 cups of shredded chicken, ricotta cheese, mozzarella, and Parmesan cheese. Also, have 2 cups of Alfredo sauce ready, along with garlic powder, Italian seasoning, and salt and pepper. Next, preheat your oven to 350°F (175°C). While the oven heats, cook the pasta shells according to the package instructions. Make sure to cook them until they are just al dente, then drain and set them aside. In a mixing bowl, mix the shredded chicken, ricotta cheese, 1 cup of mozzarella, and ½ cup of Parmesan. Add garlic powder, Italian seasoning, and a pinch of salt and pepper. Stir until everything is well combined. Now, it’s time to fill the pasta shells. Pour 1 cup of Alfredo sauce into the bottom of a 9x13 inch baking dish. Spread it evenly to cover the bottom. Take each cooked shell and fill it with the chicken and cheese mixture. Place the stuffed shells seam-side down in the dish. Once all the shells are filled, pour the rest of the Alfredo sauce over the top. Make sure to cover them well. Finally, sprinkle the remaining mozzarella and Parmesan cheese over the sauce. Cover the baking dish with aluminum foil. This helps keep moisture in while baking. Place it in your preheated oven and bake for 25 minutes. After that, remove the foil and bake for another 10 minutes. This will make the cheese bubbly and golden. Once done, take the dish out of the oven and let it cool for a few minutes. Before serving, sprinkle some freshly chopped parsley on top for a pop of color. Enjoy your delicious Chicken Alfredo Stuffed Shells! For the full recipe, check the recipe section above. To keep your pasta shells from sticking, cook them in plenty of water. Add a splash of oil to the boiling water. This small step helps prevent sticking. When you drain the shells, rinse them briefly in cold water. This stops the cooking and cools them down quickly. Cook the large pasta shells for about 9 to 11 minutes. Check the package for timing. You want them al dente, firm but not hard. After baking, the shells will soften more, so do not overcook them. Start with a large bowl for mixing your filling. Combine shredded chicken, ricotta, and cheeses well. Mix until you see no lumps. Adding garlic powder and Italian seasoning gives flavor. Use a spatula for even mixing. Taste your filling before stuffing to adjust seasoning if needed. {{image_2}} You can easily make vegetarian stuffed shells. Replace chicken with cooked spinach or mushrooms. You can also add diced zucchini or bell peppers. These veggies add flavor and color. Use the same cheese mix for creaminess. This way, you keep the richness without meat. Your guests will love this fresh twist! If you like heat, add spice to your stuffed shells. Mix chopped jalapeños or crushed red pepper flakes into the filling. For an even bigger kick, stir in some hot sauce with the Alfredo sauce. This spicy version brings a fun twist to the classic dish. Your taste buds will appreciate the extra flavor! For those needing cheese swaps, try using dairy-free cheese. Options like almond or cashew cheese work well. If you can't have lactose, use lactose-free cheese. You can also try ricotta made from tofu. It gives a creamy texture without dairy. Everyone can enjoy this dish with just a few changes. For the full recipe, check out the details above! To keep leftover stuffed shells fresh, place them in an airtight container. You can store them in the fridge for up to three days. Make sure the shells cool down before sealing. This helps to prevent moisture buildup. When you want to eat them, just grab the container from the fridge. If you want to save stuffed shells for later, freezing is a great option. First, let the shells cool completely. Then, place them in a freezer-safe container or wrap them tightly in plastic wrap. You can freeze them for up to three months. Label the container with the date. This way, you won't forget when you made them! When you're ready to enjoy your stuffed shells, reheating them correctly is key. For best results, use the oven. Preheat it to 350°F (175°C). Place the shells in a baking dish, adding a splash of Alfredo sauce to keep them moist. Cover the dish with foil to keep steam in. Heat for about 20 minutes or until they are warm throughout. This method keeps the cheese bubbly and the pasta tender. The best pasta for stuffed shells is large pasta shells. These shells hold plenty of filling. They are sturdy and have a nice shape. Other types of pasta, like manicotti, can work too, but shells are my favorite. They create a lovely bite-sized package of flavor. Yes, you can make this dish ahead of time. Prepare the stuffed shells and place them in the baking dish. Cover the dish with foil and refrigerate it. When you're ready to bake, just add a few extra minutes to the cooking time. This makes it great for meal prep or special occasions. To make homemade Alfredo sauce, start with butter and heavy cream. Melt ½ cup of butter in a pan over medium heat. Add 1 cup of heavy cream and stir. Then, slowly whisk in 1 cup of grated Parmesan cheese until smooth. Season with garlic powder, salt, and pepper to taste. This sauce is creamy and delicious. Yes, using rotisserie chicken is a great idea! It saves time and adds flavor. Just shred the chicken and mix it with your cheese filling. This option makes the recipe even quicker. You still get that tasty chicken in your stuffed shells without all the cooking. You learned how to make Chicken Alfredo Stuffed Shells with careful steps. We covered key ingredients and cooking tools, ensuring tasty results. Tips helped you avoid sticky shells and achieve the best mix. Variations showed how to adapt the dish for different diets. Finally, we discussed storage and reheating for leftovers. Now, you can enjoy this dish anytime, whether on a busy weeknight or for a special family meal. Try it out and make it your own!

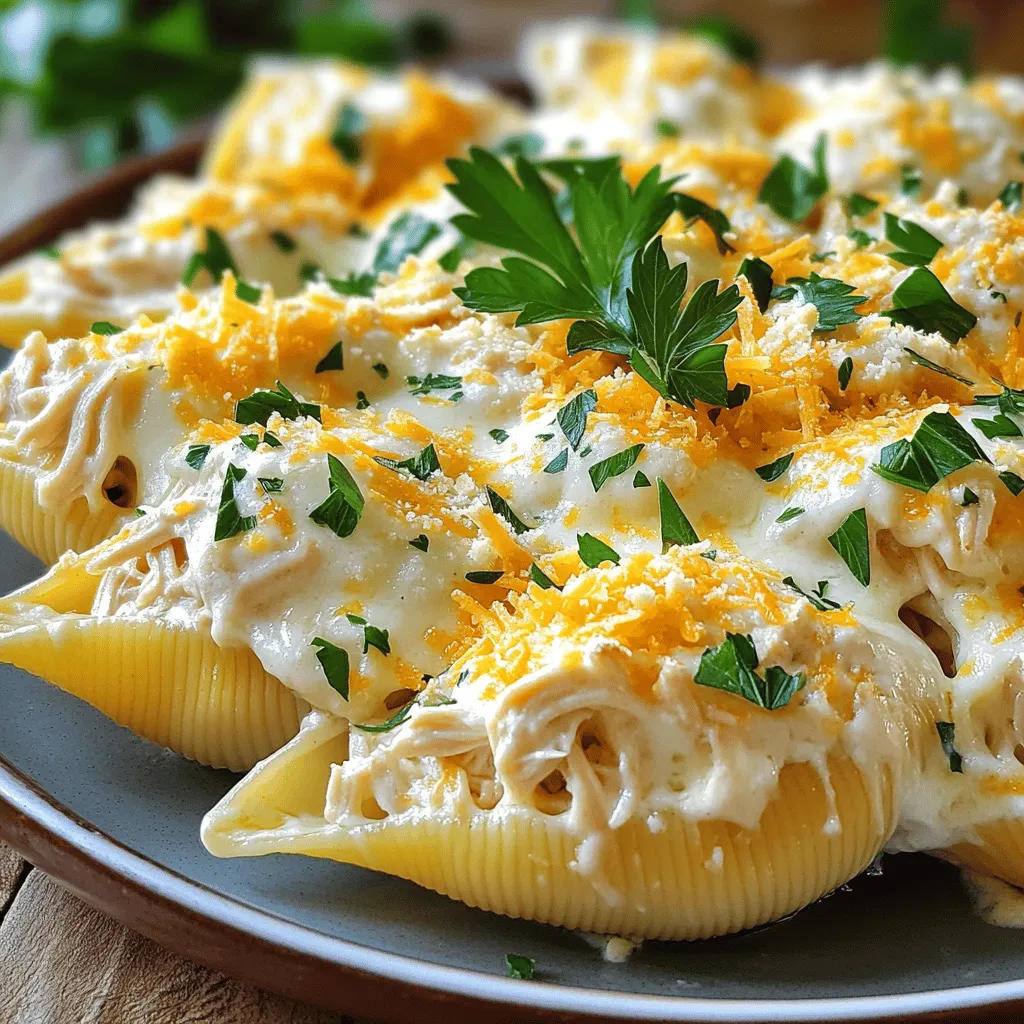
Delicious Chicken Alfredo Stuffed Shells Recipe

Are you ready to elevate your dinner game? In this blog post, I’ll share my favorite Chicken Alfredo Stuffed Shells

This recipe for easy veggie spring rolls is fun and bright. You can make them in about 30 minutes. They are perfect for a snack or a light meal. You can dip them in hoisin sauce for extra flavor. Here are the key ingredients you need: - 8 rice paper wrappers - 1 cup shredded carrots - 1 cup cucumber, julienned - 1 cup red bell pepper, julienned - 1 cup purple cabbage, shredded - 1 avocado, sliced - 1/2 cup fresh mint leaves - 1/2 cup fresh cilantro leaves - 1/4 cup green onions, sliced - 1/4 cup hoisin sauce (for dipping) - 1 teaspoon sesame seeds (for garnish) These ingredients create a crunchy and colorful mix. The fresh herbs add a burst of flavor. You can add more fun to your spring rolls. Try these options: - Cooked shrimp or chicken for protein - Sliced radishes for crunch - Avocado for creaminess - A dash of lime juice for zest These add-ins make your rolls even more tasty. You can mix and match based on what you like. Enjoy getting creative! To make spring rolls, you need a clean space. Clear a flat surface, like a counter or table. Gather your ingredients and tools. You will need a large shallow dish, a cutting board, a knife, and a clean towel. This setup makes the process easy and fun. Start with the rice paper wrappers. Fill a large shallow dish with warm water. Take one wrapper and dip it in the water for 10-15 seconds. It should become soft and pliable. Lay the wrapper flat on your clean surface. This step is key to making the rolls easy to handle. Now it’s time to fill your spring rolls. Place a handful of shredded carrots, cucumber, red bell pepper, and purple cabbage in the middle of the wrapper. Add a few slices of avocado for creaminess. Top with fresh mint and cilantro leaves. Finally, sprinkle some green onions on top. This mix creates a colorful and tasty filling. Rolling the spring rolls takes practice, but it’s simple. Start by folding the sides of the wrapper over the fillings. Then, roll from the bottom up. Tuck the ingredients in as you go. This helps keep the filling secure. Make sure the roll is tight but not too tight. Repeat this with the remaining wrappers. Once your rolls are ready, arrange them on a platter. Drizzle hoisin sauce on top for flavor. You can also sprinkle sesame seeds for a nice touch. Serve with extra hoisin sauce on the side for dipping. These rolls look great and taste even better. For more details, check the Full Recipe. When making veggie spring rolls, a few mistakes can ruin your fun. First, do not soak the rice paper too long. If you do, it will tear easily. Just dip it for about 10-15 seconds. Second, do not overfill the wrappers. Too much filling makes rolling hard. Keep it simple, and use a small handful of veggies. Lastly, avoid rolling them too tight. If you do, they may burst. Rolling spring rolls takes a bit of practice, but I have some tips. Start by placing your filling in the center of the softened rice paper. Fold the sides in first, then roll from the bottom up. Tuck the filling in as you go. This keeps everything inside. Make sure to keep the roll tight but not too tight. It should feel snug but not stressed. Handling rice paper can feel tricky, but it is easy with the right steps. Always keep a bowl of warm water handy. Dip each wrapper carefully in the water. Once it feels soft, take it out and lay it flat. If the wrapper sticks, use a clean surface. You can also place a damp cloth over them to keep them moist. This prevents them from drying out while you work. For the full recipe, check out the Crunchy Rainbow Veggie Spring Rolls section. Enjoy your cooking! {{image_2}} You can boost your spring rolls by adding protein. Tofu is a great choice. Use firm tofu, and press it to remove water. Cut it into strips and pan-fry until golden. For shrimp lovers, cook peeled shrimp in boiling water. They only need a few minutes until pink. If you prefer chicken, grill or poach it. Slice it thinly, so it fits well in the rolls. Each protein gives your rolls more flavor and keeps you full. Feel free to mix up the veggies in your rolls. Instead of carrots, try shredded zucchini for a fresh twist. You can use bell peppers of any color. They add sweetness and crunch. Snow peas are also a fun choice. They add a nice snap. Radishes can give a peppery kick. Just slice them thinly. Experimenting with vegetables keeps your spring rolls exciting and colorful! While hoisin sauce is a classic, many other dips work too. Try peanut sauce for a creamy, nutty flavor. Just mix peanut butter with soy sauce and a bit of lime juice. For a kick, make a spicy sauce with chili paste and soy sauce. If you like something tangy, mix rice vinegar with a little sugar. These sauces can change the taste of your spring rolls and make them even more enjoyable. To store leftover spring rolls, place them in an airtight container. If you have extra rice paper wrappers, keep them separate. This helps prevent the rolls from getting soggy. You can store them in the fridge for up to three days. When prepping spring rolls, you can assemble them ahead of time. Just wrap them in a damp paper towel to keep them moist. For reheating, avoid using the microwave, as it makes them chewy. Instead, heat them on a skillet for a few minutes until warm. The best way to keep spring rolls fresh is to store them dry. Always keep sauces separate until you are ready to eat. If you want to keep the veggies crisp, use a clean towel to cover them. This helps in keeping the moisture away. Yes, you can make these spring rolls ahead of time. Just prepare them and store them in the fridge. Wrap each roll in a damp paper towel. This keeps them moist and fresh. You can enjoy them later with your favorite dipping sauce. If you don’t have rice paper wrappers, try using lettuce leaves. Romaine or butter lettuce works great. You can also use whole wheat tortillas or nori sheets. Each option gives a different texture and taste, so feel free to experiment! To make these spring rolls gluten-free, use rice paper wrappers. They are naturally gluten-free. Make sure your hoisin sauce is gluten-free as well. Check the label to avoid any hidden gluten ingredients. This way, everyone can enjoy these tasty rolls. For serving, cut the spring rolls in half on a diagonal. This makes them easy to grab and eat. You can also cut them into smaller pieces for sharing. Just make sure you use a sharp knife to get clean cuts. This adds to their visual appeal! Spring rolls are fun to make and great to eat. You learned about the key ingredients, from rice paper to tasty add-ins. The steps for rolling were clear, making preparation easy. I shared tips to avoid common mistakes and ensure your rolls look perfect. You can try different proteins and veggies for new flavors. Don't forget about storage and meal prep to keep your rolls fresh. With this knowledge, you can create delicious spring rolls anytime. Enjoy this tasty treat that's sure to impress!

Easy Veggie Spring Rolls Quick and Tasty Recipe

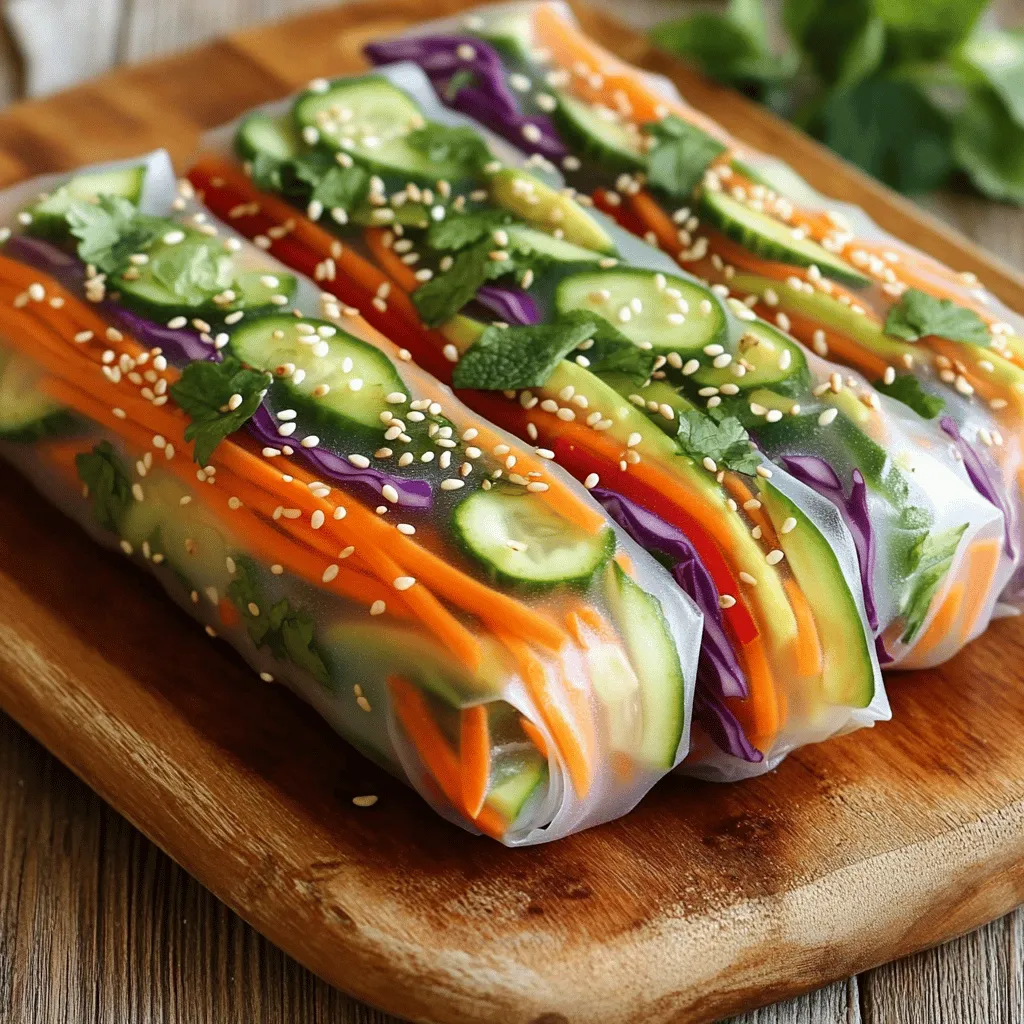
Are you ready to dive into a fresh and fun cooking adventure? My Easy Veggie Spring Rolls recipe is quick,

- 4 ripe bananas, sliced and frozen - 2 tablespoons unsweetened cocoa powder - 3 tablespoons creamy peanut butter These main ingredients create a rich and creamy base for your nice cream. Ripe bananas add natural sweetness and smoothness. Unsweetened cocoa powder gives a deep chocolate flavor, while creamy peanut butter adds richness and a nutty taste. - 1 tablespoon maple syrup (optional, for added sweetness) - 1 teaspoon vanilla extract - A pinch of sea salt You can adjust the sweetness by adding maple syrup. Vanilla extract enhances the flavor profile, while a pinch of sea salt balances the sweetness. Feel free to mix and match based on your taste. - Chopped peanuts - Dark chocolate shavings These toppings add a fun crunch and extra chocolatey goodness. Chopped peanuts bring texture, while dark chocolate shavings add a touch of elegance. You can get creative with your toppings to make this treat even more special. For the full recipe, check out the detailed instructions that guide you through each step of making this delicious Chocolate Peanut Butter Nice Cream. Start with ripe bananas. Peel them and slice them into small pieces. Place the slices in a single layer on a tray. Freeze the banana slices for at least two hours. This step is key for a creamy texture. If bananas are not frozen, the nice cream will be runny. Once the bananas are frozen, grab your food processor. Add the banana slices first. Pulse them until they appear crumbly. Then, blend continuously until they become smooth and creamy. This may take a few minutes. Next, add the unsweetened cocoa powder, creamy peanut butter, maple syrup, vanilla extract, and a pinch of sea salt. Blend again until everything mixes well. For a smooth consistency, stop and scrape down the sides if needed. After blending, transfer the nice cream into an airtight container. Freeze it for about one to two hours. This helps it firm up nicely. When you are ready to serve, scoop the nice cream into bowls. You can top it with chopped peanuts and dark chocolate shavings for extra crunch. Enjoy your creamy and tasty treat! You can easily adjust the sweetness of your nice cream. If you want it sweeter, add more maple syrup. Start with one tablespoon, then taste it. You can also swap the syrup for honey or agave if you like. Want to try a new flavor? Use different nut butters! Almond butter or cashew butter can change the taste. Each nut butter adds a unique twist. Mix it up and find your favorite combo. A good food processor makes nice cream easy. Look for one with a powerful motor. Brands like Cuisinart or Ninja work well. They help blend the bananas into a smooth texture. For storage, use airtight containers. Glass containers are great because they keep flavors fresh. You can also use plastic ones, but make sure they seal tight. Serving your nice cream can be fun! Use stylish bowls to make it look fancy. Add a sprinkle of cocoa powder on top for a special touch. Want to impress? Use a piping bag to swirl peanut butter on top. It looks great and tastes amazing. You can even add chopped peanuts and chocolate shavings for a tasty crunch. Enjoy your beautiful dessert! {{image_2}} You can change the taste of your nice cream easily. Adding berries, like strawberries or raspberries, makes it fruity. You can also mix in chopped apples or even mango. Each fruit adds a new flavor and a fun color. Trying different nut butters is another option. Almond butter or cashew butter can change the taste. Each nut butter brings its own twist. You can even try sunflower seed butter for a nut-free option. If you need a gluten-free treat, this recipe works great. All the ingredients are naturally gluten-free. Just check your nut butter to make sure it is safe. For those with nut allergies, you can use seeds instead of nuts. Sunflower seed butter can replace peanut butter. You can also use coconut cream for a creamy texture. These swaps keep it tasty and safe for everyone. Seasonal fruits can make your nice cream special. In summer, use fresh peaches or cherries for a bright taste. In fall, try adding pumpkin puree with warm spices like cinnamon. It gives a cozy feel and a fun twist to the recipe. You can also create holiday-themed nice cream. For Halloween, add orange food dye with pumpkin spice. For Christmas, use peppermint extract with crushed candy canes on top. These ideas make your treat festive and fun! To keep your nice cream fresh, store it in an airtight container. This helps prevent freezer burn. I recommend using a glass or high-quality plastic container. These are great for keeping the nice cream creamy. You can freeze nice cream for up to two weeks. After this, it may lose some taste and texture. When you store nice cream, use containers that seal tightly. This helps keep the flavor in and ice crystals out. I like to use containers that are about the size of the nice cream batch. This way, you avoid opening them too often. Choose containers made from glass or BPA-free plastic. These materials hold up well in the freezer. When you want to eat your nice cream, don’t rush the thawing. Take it out of the freezer and leave it at room temperature for about 5 to 10 minutes. This helps it soften without becoming runny. If it gets too soft, the nice cream may lose its texture. To keep the flavor strong, avoid leaving it out too long. Enjoy your Chocolate Peanut Butter Nice Cream at its best! Using non-frozen bananas will change the texture and consistency. Nice cream needs frozen bananas to get that creamy, smooth feel. If you use fresh bananas, your nice cream will be more like a smoothie. It will taste good, but it won’t have that nice creaminess. Freezing the bananas is key to making this treat rich and thick. You can make nice cream healthier by swapping some ingredients. For instance, use less peanut butter for fewer calories. You can also skip the maple syrup if you want less sugar. Adding a little spinach or avocado can boost nutrition without changing the taste much. These swaps help keep it tasty while making it better for you. Yes, this recipe is great for kids! It is full of natural sugars from bananas, which are healthier than candy. The peanut butter adds protein, making it filling. Plus, kids love the chocolate flavor. It’s a fun way to treat them while offering nutritious benefits. You can even let them help make it for added fun! Here’s a quick recap of the ingredients needed for Chocolate Peanut Butter Nice Cream: - 4 ripe bananas, sliced and frozen - 2 tablespoons unsweetened cocoa powder - 3 tablespoons creamy peanut butter - 1 tablespoon maple syrup (optional, for added sweetness) - 1 teaspoon vanilla extract - A pinch of sea salt - Chopped peanuts and dark chocolate shavings for topping (optional) For the instructions, blend the frozen bananas until smooth. Mix in the cocoa powder, peanut butter, maple syrup, vanilla, and salt. Freeze for 1-2 hours, scoop, and enjoy! In this blog post, I covered how to make Chocolate Peanut Butter Nice Cream using ripe bananas, cocoa powder, and peanut butter. I shared tips for preparation, blending, and serving, along with customizable options. You can create fun flavors and seasonal twists, too. Remember, nice cream is not only easy but also healthy, making it great for everyone. Enjoy experimenting with your ingredients and serving ideas. Your homemade treat is waiting for you!

Chocolate Peanut Butter Nice Cream Easy and Tasty Treat

Craving a delicious treat that’s both easy and healthy? Chocolate Peanut Butter Nice Cream is your answer! This creamy dessert

- 1 pound boneless, skinless chicken thighs - 1/4 cup honey - 1/4 cup Dijon mustard - 2 tablespoons soy sauce - 1 tablespoon olive oil - 2 cloves garlic, minced - 1 teaspoon smoked paprika - 1/2 teaspoon ground black pepper - 1 bell pepper (red or yellow) - 1 red onion - Wooden or metal skewers To make honey mustard chicken kabobs, you need simple ingredients. First, grab one pound of chicken thighs. They give a juicy flavor. Use a quarter cup of honey for sweetness. Add a quarter cup of Dijon mustard for a tangy kick. Next, gather the seasoning items. You will need two tablespoons of soy sauce, one tablespoon of olive oil, and two cloves of minced garlic. These flavors mix well. Don't forget the smoked paprika and black pepper for extra taste. For the veggies, choose one bell pepper and one red onion. Cut them into one-inch pieces. They add color and crunch. Finally, have wooden or metal skewers ready. If you use wooden skewers, soak them in water for thirty minutes. This helps prevent burning on the grill. You can find the full recipe [here](insert link). To start, you need to make the marinade. In a mixing bowl, whisk together: - 1/4 cup honey - 1/4 cup Dijon mustard - 2 tablespoons soy sauce - 1 tablespoon olive oil - 2 cloves garlic, minced - 1 teaspoon smoked paprika - 1/2 teaspoon ground black pepper Mix until smooth and well combined. This marinade adds a sweet and tangy flavor to the chicken. Marinating time is key. I recommend at least 30 minutes. If you can wait, two hours will give you even better flavor. The longer the chicken sits in the marinade, the tastier it gets. Before cooking, preheat your grill or grill pan. Get it nice and hot over medium-high heat. This step helps to give your kabobs a good sear and keeps the chicken juicy. When choosing a grilling method, I suggest using a gas or charcoal grill. Both methods work well. If you use a grill pan, make sure it is sturdy and non-stick for easy flipping. Now it’s time to thread the kabobs. Use either wooden or metal skewers. If you use wooden skewers, soak them in water for about 30 minutes. This prevents burning on the grill. Thread the marinated chicken, bell pepper, and onion onto the skewers. Alternate between chicken and vegetables for a colorful look. Cook the kabobs on the grill for about 10-12 minutes. Turn them occasionally to ensure even cooking. Check the chicken’s internal temperature. It should reach 165°F (75°C) to be safe to eat. Once cooked, take them off the grill and let them rest for a few minutes. This helps keep the juices inside. Enjoy your delicious honey mustard chicken kabobs! For the full recipe, click here. For the best kabobs, I always use chicken thighs instead of breasts. Chicken thighs have more fat, which keeps them juicy and tender. Breasts can dry out easily. When cooking, I focus on medium-high heat. This helps the chicken cook fast and stay moist. Always check that your chicken reaches 165°F (75°C) for safe eating. To boost the flavor, try adding a splash of lemon juice to your marinade. You can also use fresh herbs like parsley or thyme. Fresh herbs give a bright taste that dried herbs can’t match. If you use dried herbs, add them early in the marinade. This helps their flavors blend well. To prevent sticking on the grill, make sure to oil your grill grates. You can also brush a little oil on the skewers. When you thread the chicken and veggies, alternate them. This not only looks nice but also helps them cook evenly. Keep some space between each piece for better heat flow. For the complete recipe, check out the Full Recipe. {{image_2}} If you want to switch up your kabobs, try other meats. Chicken thighs work great, but you can use chicken breast for a leaner option. Pork tenderloin also adds a nice flavor. For beef lovers, sirloin steak makes a tasty choice. If you prefer a plant-based meal, tofu is a fantastic substitute. Firm tofu absorbs flavors well. You can also use tempeh or seitan for a heartier texture. Just be sure to marinate them like you would with chicken! Marinades are key to great taste. You can mix it up with different sauces. Try BBQ sauce for a smoky twist. Or use teriyaki for a sweet, Asian flair. You can add fresh herbs like rosemary or thyme for extra depth. Don’t forget about seasonal veggies! Add zucchini or mushrooms in summer. In fall, try butternut squash or Brussels sprouts. These veggies bring color and nutrition to your kabobs. Pair your kabobs with tasty sides. A fresh salad with mixed greens complements the flavors well. Grilled corn on the cob adds sweetness. Rice or quinoa can round out the meal, making it filling. For parties, serve the kabobs on a platter. Add toothpicks for easy eating. You could also arrange them on skewers with colorful plates. This makes your meal fun and festive. Check out the Full Recipe for more tips! To store leftover kabobs, let them cool first. Place them in an airtight container. This keeps the kabobs fresh in the fridge. They can stay good for up to three days. Make sure to separate the chicken from the veggies if you prefer. If you want to freeze kabobs, wrap them tightly in plastic wrap. Then, place them in a freezer bag. They can last for up to three months in the freezer. To reheat, thaw them overnight in the fridge. Then, warm them in the oven at 350°F until heated through. Food safety is very important. Always check the internal temperature of chicken. It should reach 165°F for safe eating. Store leftovers within two hours of cooking. This helps prevent bacteria growth. Keep your fridge below 40°F to ensure freshness. To check if your chicken is done, use a meat thermometer. The internal temperature should reach 165°F (75°C). This ensures safety and tenderness. You can also look for these signs while cooking: - The chicken should no longer be pink inside. - The juices should run clear when you cut into it. - The outside should have a nice golden color. Yes, you can grill indoors using a grill pan. Make sure to preheat your pan on medium-high heat. Here are some safety tips for using a grill pan: - Use oil to prevent sticking. - Keep the kitchen well-ventilated. - Watch for smoke; it can build up quickly. These kabobs pair well with many side dishes. Try serving them with: - A fresh garden salad. - Grilled corn on the cob. - Couscous or rice for a hearty meal. For drinks, you can enjoy: - A light white wine. - Iced tea with lemon. - Sparkling water for a refreshing touch. For the full recipe, check out the Honey Mustard Chicken Kabobs section. In this blog post, we covered how to make delicious honey mustard chicken kabobs. You learned about key ingredients, marinating tips, and grilling methods. We also explored flavor variations and serving suggestions. Remember, using chicken thighs makes for tender kabobs, and marinating adds great taste. With these tips, you can impress friends and family at your next gathering. Enjoy making kabobs that fit your taste and preferences!

Honey Mustard Chicken Kabobs Tasty and Easy Recipe

Are you ready to impress your family and friends with a fun and tasty meal? My Honey Mustard Chicken Kabobs

- 1 pound large shrimp, peeled and deveined - 3 cloves garlic, minced - 1/4 cup fresh lemon juice - Zest of 1 lemon - 3 tablespoons olive oil - 1 teaspoon smoked paprika - 1 teaspoon dried oregano - Salt and pepper to taste - Fresh parsley, chopped for garnish - Bamboo or metal skewers (if using bamboo, soak in water for 30 minutes before grilling) You will need some simple tools to make this dish. First, grab a large bowl for mixing. A whisk helps blend the marinade. Use a grill or grill pan for cooking. Finally, have a set of skewers ready for threading the shrimp. These tools make cooking easy and fun! Now, let’s dive into the flavors. The garlic adds a strong taste, while lemon juice brightens each bite. The smoked paprika gives a warm touch. Together, they create a tasty mix that makes shrimp shine. This recipe is quick and perfect for gatherings. You can serve these skewers as a main dish or a fun appetizer. Whip them up for friends or family, and watch them disappear! For the full details, check out the Full Recipe. To start, gather all your ingredients for the marinade. In a large bowl, mix the minced garlic, lemon juice, lemon zest, olive oil, smoked paprika, oregano, salt, and pepper. Whisk them together until smooth. This marinade adds a burst of flavor to the shrimp. The garlic and lemon work well together, creating a bright taste that shines through. Next, add your shrimp to the bowl with the marinade. Make sure each shrimp is well coated. This step is key; it allows the flavors to soak in. Cover the bowl with plastic wrap and place it in the refrigerator. Let it marinate for 30 minutes. This wait time helps the shrimp absorb all that tasty goodness. While the shrimp marinates, preheat your grill or grill pan over medium-high heat. Once it’s hot, take the marinated shrimp and thread them onto skewers. Aim for about 4-5 shrimp per skewer. This makes them easy to handle. Cook the skewers on the grill for 2-3 minutes on each side. The shrimp should turn pink and opaque. You can check their doneness with a meat thermometer; they should reach 120°F (49°C). After grilling, let the skewers rest for a couple of minutes. Then, garnish them with chopped parsley before serving. For a fun touch, add lemon wedges on the side! For the full recipe, refer to the beginning of the article. Creating the best marinade is key to tasty shrimp skewers. Start with fresh garlic. Mince it finely for strong flavor. Use freshly squeezed lemon juice. The zest adds a bright touch. Olive oil helps the shrimp stay juicy. Smoked paprika gives a nice depth. Don’t forget salt and pepper to taste. Let the shrimp soak in the marinade for at least 30 minutes. This step is crucial for great flavor. Preheat your grill to medium-high heat. This ensures even cooking. If you use bamboo skewers, soak them first to prevent burning. Arrange the shrimp on skewers, about 4-5 per skewer. Keep space between each shrimp for even grilling. Cook them for 2-3 minutes on each side. Look for a pink, opaque color to know they are done. An internal temperature of 120°F (49°C) means they are safe to eat. Let them rest for a few minutes after grilling. Serve the skewers on a colorful platter. Add lemon wedges for a zesty pop. Fresh parsley not only looks great but also adds flavor. Pair the skewers with a crisp salad or rice. A light drink like lemonade or white wine complements the dish. For a fun twist, serve with a garlic aioli or a spicy dipping sauce. These choices enhance your meal and make it special. For the full recipe, check the section above. {{image_2}} You can mix veggies with your shrimp skewers. Bell peppers, zucchini, and cherry tomatoes work great. Cut them into bite-sized pieces. Toss them in the same marinade as the shrimp. This adds color, flavor, and texture. Plus, it makes the dish more filling. Grill the skewers as usual. The veggies will cook nicely alongside the shrimp. Want to change things up? Try different marinades! A honey soy glaze gives a sweet and salty taste. Simply mix honey, soy sauce, and ginger. For a spicy kick, use sriracha mixed with lime juice. You could even go for a creamy yogurt marinade with herbs for a Mediterranean twist. Each option will give your shrimp a new flavor profile. Not all shrimp are the same! You can use fresh or frozen shrimp, depending on what you find. Large shrimp are the best choice for skewers. They hold up well on the grill. But, you can also try smaller shrimp for a different look. Just adjust the cooking time, as smaller shrimp cook faster. For more details on how to make these skewers, check the Full Recipe. After enjoying your lemon garlic shrimp skewers, store any leftovers right away. Place them in an airtight container. This keeps them fresh and tasty. Try to use them within two days for the best flavor. Let the skewers cool down to room temperature before sealing. When it’s time to eat the leftovers, reheating is key. Preheat your oven to 350°F (175°C). Place the skewers on a baking sheet. Heat them for about 5 to 7 minutes. This method warms the shrimp evenly without drying them out. You can also use a microwave. Just heat for 30 seconds at a time, checking until warm. If you want to save some skewers for later, freezing is an option. Wrap each skewer tightly in plastic wrap. Then, place them in a freezer-safe bag. Remove as much air as possible to prevent freezer burn. You can freeze them for up to three months. When ready to cook, thaw in the fridge overnight before reheating. For the full recipe and more tips, check out the [Full Recipe]. You can tell shrimp are cooked when they turn pink and opaque. They should curl into a C shape. If they stay straight, they might be overcooked. The internal temperature should reach 120°F (49°C). Use a meat thermometer to check this. Cook them for about 2-3 minutes on each side. It’s quick, so keep an eye on them while grilling. Yes, you can use frozen shrimp for skewers. Just make sure to thaw them first. Do this in the fridge overnight or under cold water. Pat them dry before marinating. This helps the marinade stick better. Frozen shrimp are often just as tasty as fresh. They can be a great option for a quick meal. Lemon garlic shrimp skewers go well with many sides. Here are some tasty options: - Rice (white, brown, or jasmine) - Quinoa (light and fluffy) - Grilled vegetables (zucchini, bell peppers, or corn) - Salad (with mixed greens and a light dressing) - Garlic bread (to soak up the juices) These sides add color and flavor to your meal. They also help balance the dish. For more details, you can check the Full Recipe for Lemon Garlic Shrimp Skewers. In this blog post, we explored the full recipe for lemon garlic shrimp skewers. You learned how to prepare the marinade, marinate the shrimp, and grill the skewers to perfection. We also covered tips to enhance flavor, suggested variations like adding veggies, and provided storage info for leftovers. Try these shrimp skewers for a tasty meal. They are simple and fun to make. Enjoy experimenting with your favorite ingredients! Happy grilling!

Lemon Garlic Shrimp Skewers Flavorful and Simple Recipe

Are you ready to elevate your dinner game? My Lemon Garlic Shrimp Skewers recipe is both flavorful and easy to

To make taco stuffed bell peppers, you need some key ingredients. Each one adds flavor and texture to your dish. Here is what you will need: - 4 large bell peppers (any color) - 1 lb ground turkey or beef - 1 cup cooked quinoa or rice - 1 can (15 oz) black beans, rinsed and drained - 1 cup corn (fresh, frozen, or canned) - 1 packet taco seasoning - 1 cup diced tomatoes (fresh or canned) - 1 cup shredded cheese (cheddar, Monterey Jack, or your favorite) - ¼ cup chopped cilantro (optional) - Salt and pepper to taste - Sour cream and avocado for serving (optional) These ingredients make the meal flavorful and fun. The bell peppers act like little bowls filled with a tasty taco mix. Ground turkey or beef gives it a hearty feel. Quinoa or rice adds a nice texture. The black beans and corn bring in healthy fiber. Taco seasoning gives it that classic taco flavor. Finally, cheese melts on top, making it extra delicious. Using fresh ingredients helps your meal taste better. Don't skip the toppings like sour cream and avocado. They add creaminess and freshness. For more details on how to prepare this dish, check the Full Recipe. - Preheat your oven to 375°F (190°C). This helps cook the peppers evenly. - Wash the bell peppers thoroughly. Cut the tops off and remove the seeds. Place them upright in a baking dish. - In a large skillet, add 1 pound of ground turkey or beef. Cook it over medium heat. Stir it often until it's browned. This takes about 5-7 minutes. - Once the meat is browned, mix in the taco seasoning, 1 can of rinsed black beans, 1 cup of corn, and 1 cup of diced tomatoes. Stir well and let it simmer for 5 minutes. This allows all the flavors to blend nicely. - In a large bowl, combine the meat mixture with 1 cup of cooked quinoa or rice. Stir in half of the shredded cheese. Season with salt and pepper to taste. - Spoon the filling into each bell pepper, packing it well. - Top each filled pepper with the remaining shredded cheese. - Cover the baking dish with aluminum foil. Bake in the oven for 25 minutes. - After 25 minutes, remove the foil. Bake for an additional 10 minutes until the cheese is melted and bubbly. - Once done, take them out of the oven. You can garnish with chopped cilantro if you'd like. Serve with sour cream and avocado on the side for extra flavor! For the complete recipe, check out the [Full Recipe]. To make your taco stuffed bell peppers truly shine, I recommend using fresh herbs. Fresh cilantro adds a bright taste that enhances the dish. You can also try adding spices like cayenne or paprika for an extra kick. These spices can boost flavor and create more depth in your meal. When it comes to serving, pair your stuffed peppers with side salads. A fresh green salad balances the meal perfectly. You can also offer toppings like avocado and sour cream. These toppings add creaminess and richness to each bite. Feel free to mix in your personal favorites. Jalapeños and olives can add a nice twist. Adjusting the seasoning while you mix allows you to customize the taste to your liking. Make sure to taste as you go, ensuring each bite is just right. Check out the Full Recipe for more details! {{image_2}} You can make tasty changes to the recipe for different diets. For a vegetarian option, use lentils instead of meat. This swap keeps the meal filling and adds fiber. If you need a gluten-free version, check ingredient labels carefully. Many taco seasonings and canned goods contain hidden gluten, so always read before you buy. Feel free to play with the ingredients! You can substitute other grains, like farro or barley, for quinoa or rice. This adds different textures and flavors. You can also experiment with different types of cheese. Try pepper jack for a spicy kick or feta for a tangy twist. Get creative with the seasoning! Try different blends, like fajita seasoning, to change the taste. You can also add unique toppings. Salsa, guacamole, or even sliced jalapeños can elevate your dish. Personalizing your Taco Stuffed Bell Peppers makes them fun and exciting. For the full experience, check out the Full Recipe for all the details! To keep your taco stuffed bell peppers fresh, store any leftovers in airtight containers. This helps to lock in the flavors and keep them safe. You can keep them in the fridge for up to 4 days. Make sure they cool down before sealing. If you want to save some for later, freeze the cooked stuffed peppers without toppings. This way, you can keep the flavors intact. When you're ready to eat, thaw them overnight in the fridge. Bake at 375°F until they are heated through. This method helps maintain the taste and texture. For a quick option, you can microwave the taco stuffed bell peppers. Just place them on a microwave-safe plate and heat until warm. If you want that crispy cheese topping, opt for the oven. Reheat them at 375°F until the cheese is bubbly and golden. Enjoy them just like they were fresh out of the oven! Yes, you can prepare and stuff the peppers ahead. This makes meal prep easy. Just follow the recipe and store the stuffed peppers in the fridge. When you're ready to eat, bake them as directed in the Full Recipe. They will taste fresh and delicious. Ground chicken, lentils, or mushrooms are great alternatives. Each option brings a unique flavor and texture. Ground chicken has a mild taste, while lentils add a hearty bite. Mushrooms provide an earthy flavor that pairs well with taco spices. Feel free to mix and match based on your taste and diet. Pre-cook the bell peppers briefly before stuffing for a tender texture. You can boil them for about 5 minutes or microwave them for 2-3 minutes. This step helps them cook evenly in the oven. Softer peppers make for a more enjoyable bite and a better overall dish. Taco stuffed bell peppers combine flavor and nutrition in a colorful package. We covered the key ingredients and easy steps you need to create this dish. With fun tips for serving and flavor variations, you can make each meal unique. Plus, leftovers store well for quick meals later. I hope you enjoy making this tasty dish that fits many diets. Happy cooking!

Taco Stuffed Bell Peppers Flavorful and Simple Meal

Taco Stuffed Bell Peppers are the easy meal you need in your life! With just a few simple ingredients, you

- 4 cups fresh spinach, washed and dried - 1 cup strawberries, hulled and sliced - ¼ red onion, thinly sliced - ½ cup candied pecans or walnuts - ½ cup feta cheese, crumbled - ¼ cup olive oil - 2 tablespoons apple cider vinegar - 2 tablespoons honey - 1 tablespoon poppy seeds - Salt and pepper to taste This spinach strawberry salad stands out for its bright colors and fresh flavors. Each ingredient plays a big role in making this dish great. First, the spinach gives a nice base. It’s crisp and healthy. Strawberries add sweetness and a pop of color. The red onion brings a sharp bite that balances the salad. Nuts and cheese enhance the texture. Candied pecans or walnuts add crunch and sweetness. Feta cheese adds creaminess and saltiness. The poppyseed dressing ties everything together. Olive oil provides richness. Apple cider vinegar adds a tangy kick. Honey sweetens the mix, while poppy seeds add a fun crunch. For the full recipe, check the details above. Enjoy making this fresh and tasty salad! In a small bowl, I whisk together the olive oil, apple cider vinegar, honey, and poppy seeds until smooth. This simple mix brings a bright flavor to the salad. After mixing, I season it with salt and pepper to taste. This step is key; it makes the dressing pop! Next, I grab a large salad bowl and add the fresh spinach. The bright green leaves form a lovely base. I layer on the sliced strawberries, which add sweetness and color. Then, I sprinkle on the candied pecans or walnuts for a crunchy bite. Crumbled feta cheese follows, giving a creamy texture. Finally, I add the thinly sliced red onion to provide a little zing. Now it's time to bring it all together! I drizzle the poppyseed dressing over the salad, ensuring every bite will be flavorful. I gently toss the salad, mixing all the ingredients while keeping it light. It’s important to serve immediately for the best taste and freshness. You can find the full recipe for this delightful salad in the recipe section. - Use fresh ingredients for optimal flavor. - Serve immediately to prevent wilting. To keep your salad bright and tasty, always choose fresh spinach and ripe strawberries. Fresh spinach adds a crisp texture, while ripe strawberries bring sweetness. If you let the salad sit too long, the spinach can wilt. This makes the salad less appealing. Toss it together and serve right away for the best taste. - Serve in a clear glass bowl. - Garnish with whole strawberries. A clear glass bowl shows off the colorful layers of the salad. You can see the green spinach, red strawberries, and the creamy feta. It makes the dish look fun and fresh. Adding whole strawberries on top gives a nice finish. It makes your salad pop and look special. - Consider added toppings like avocado or grilled chicken. For a twist, add sliced avocado for creaminess. If you want more protein, grilled chicken works great. This turns your salad into a full meal. Feel free to mix and match toppings to suit your taste. Remember, the Full Recipe has more ideas for tasty options! {{image_2}} You can easily change the fruit in your salad. Swap strawberries for other berries like blueberries or raspberries. Both will add a sweet burst of flavor. If you want a zesty twist, try adding citrus slices. Oranges and grapefruits pair well with spinach and add a nice brightness. If you want to make your salad more filling, add protein. Grilled chicken or shrimp works great here. They add a nice savory taste. For a vegetarian option, use chickpeas. They add texture and a boost of protein without meat. While poppyseed dressing is a favorite, you can mix it up. Try a lemon vinaigrette for a tangy twist. This adds a fresh zing to your greens. You can also experiment with different nuts or seeds in your salad. Almonds or sunflower seeds will give a nice crunch. For the full recipe and more ideas, check out the [Full Recipe]. You can keep this salad in the refrigerator for up to 1 day. Use an airtight container to keep it fresh. If you store it this way, it will taste good for a short time. Store leftover poppyseed dressing separately if you have any left. This dressing can last for up to a week when stored properly in the fridge. Just make sure to seal it tightly to keep it fresh. Before you serve, toss the salad ingredients together fresh. This keeps everything crisp and tasty. Avoid adding the dressing until you are ready to eat. This will prevent the salad from becoming soggy. For the full recipe, check out the details above! To make this salad, follow these steps: 1. Make the dressing: Whisk olive oil, apple cider vinegar, honey, and poppy seeds in a bowl. Add salt and pepper to taste. 2. Prepare the salad base: In a large bowl, add fresh spinach and layer with sliced strawberries. 3. Add toppings: Sprinkle candied pecans (or walnuts) and crumbled feta cheese on top. 4. Finish with onion: Add thinly sliced red onion for extra flavor. 5. Dress the salad: Drizzle the poppyseed dressing just before serving. 6. Toss gently: Mix the salad to coat everything in dressing. 7. Serve immediately: Enjoy for the best taste and freshness. Yes, but this salad is best enjoyed fresh. If you need to prepare it in advance, keep the ingredients separate. Store the salad base and dressing in airtight containers. Combine them just before serving for the best flavor and texture. This salad offers many health benefits. It is packed with vitamins, antioxidants, and healthy fats. Spinach is rich in iron and vitamins A, C, and K. Strawberries provide vitamin C and fiber. Nuts add healthy fats and protein. The olive oil also offers heart-healthy monounsaturated fats. Enjoy this salad for a tasty and nutritious boost! Yes, all ingredients in the poppyseed dressing are gluten-free. You can enjoy this salad safely if you follow a gluten-free diet. This article explained how to make a fresh and tasty Spinach Strawberry Salad with Poppyseed Dressing. You learned about key ingredients, step-by-step instructions, and helpful tips. Remember, using fresh ingredients makes a big difference. Feel free to customize the salad with other fruits or proteins. Store it properly for the best taste. Enjoy this salad as a healthy meal or side dish. With the right mix, you can impress anyone at your table.

Spinach Strawberry Salad with Poppyseed Dressing Delight

If you’re looking for a fresh, vibrant dish that bursts with flavor, this Spinach Strawberry Salad with Poppyseed Dressing is

To make Greek lemon chicken soup, gather these key ingredients: - 1 pound boneless, skinless chicken breast - 1 tablespoon olive oil - 1 medium onion, finely chopped - 2 garlic cloves, minced - 4 cups chicken broth - 1 cup water - 1 cup carrots, diced - 1 cup celery, diced - 1 cup orzo pasta - 3 large eggs - Juice of 2 lemons - Zest of 1 lemon - Salt and pepper to taste - Fresh dill, for garnish Each of these ingredients plays a vital role. The chicken gives the soup its main protein. The broth adds a rich base, while the lemon juice brings brightness. To boost the flavor of your soup, consider adding: - Crushed red pepper flakes (for heat) - Fresh herbs like parsley or thyme These optional ingredients can add extra layers of taste. A sprinkle of herbs can brighten the dish, while red pepper flakes give it a nice kick. If you need to swap an ingredient, try these options: - Use turkey instead of chicken for a different protein. - Substitute quinoa for orzo if you want a gluten-free choice. - Replace olive oil with avocado oil for a different flavor. Substitutions can help you adapt the recipe to what you have on hand. Don’t hesitate to get creative; cooking is all about personal taste. For the full recipe, check the detailed instructions provided above. To make Greek lemon chicken soup, start by gathering your ingredients. You need chicken, broth, veggies, and orzo. Chop the onion, garlic, carrots, and celery. This makes cooking easier and faster. 1. Heat the olive oil in a large pot over medium heat. 2. Add the chopped onion and sauté until it turns soft and clear, about 5 minutes. 3. Next, stir in the minced garlic and cook for 1-2 more minutes. 4. Add the chicken breasts, pouring in both chicken broth and water. 5. Bring the mix to a gentle boil. Then, lower the heat and let it simmer for 15-20 minutes. The chicken should be cooked through. 6. Once done, remove the chicken from the pot. Set it aside on a cutting board to cool. 7. Add the diced carrots and celery to the pot. Let them cook for about 10 minutes until they soften. 8. While the veggies cook, shred the cooled chicken into bite-sized pieces. 9. Stir the shredded chicken and orzo into the pot. Cook for another 8-10 minutes, or until the orzo is al dente. 1. In a bowl, whisk the eggs, lemon juice, and lemon zest until mixed well. 2. Slowly add a ladle of hot broth to the egg mix while whisking. This step helps the eggs warm up without cooking too fast. 3. Pour the tempered egg mixture back into the pot, stirring continuously. Cook for another 2-3 minutes to thicken the soup slightly. 4. Season with salt and pepper to taste. If you like heat, add crushed red pepper flakes. 5. For the best taste, serve hot, topped with fresh dill and lemon zest. Don’t forget the warm pita bread or a salad on the side for a full meal. You can find the full recipe above for more details. To get the best flavor, start with fresh ingredients. Use quality chicken and fresh herbs. Adding lemon juice enhances the soup's brightness. Don't skip the lemon zest; it adds a nice punch. You can also add crushed red pepper for a bit of heat. For a deeper taste, simmer the broth longer. This way, all the flavors blend well together. If your soup is too thick, add more broth or water. Stir it in slowly until you reach the right thickness. If you want a thicker soup, cook it longer after adding the eggs. The orzo helps create a nice texture but can soak up liquid. Always keep an eye on the consistency as it cooks. Serve the soup hot in bowls. Garnish each bowl with fresh dill and lemon zest. A drizzle of olive oil on top can add richness. Pair it with warm pita bread for a hearty meal. A simple side salad complements the soup nicely. For a twist, add olives or feta cheese on the side. Enjoy every bite of this delightful dish! {{image_2}} You can switch the chicken for other proteins. Turkey works well if you want a leaner choice. Shredded rotisserie chicken saves time too. For a richer flavor, try using duck. Each protein brings its own taste and texture. To make this soup vegetarian, skip the chicken. Use firm tofu instead for protein. You can also add beans like chickpeas or white beans. For broth, use vegetable stock instead of chicken broth. This keeps the soup hearty and flavorful. Add unique spices to change the flavor of your soup. Try cumin or coriander for a warm, earthy taste. A pinch of smoked paprika adds depth. Fresh herbs like mint or parsley give a fresh twist. You can also experiment with adding a splash of white wine for acidity. Just remember, balance is key! For the full recipe, check out the recipe above. Enjoy your cooking journey! You can store Greek Lemon Chicken Soup in an airtight container. Let the soup cool first. Place it in the fridge for up to three days. Make sure to keep it sealed to avoid spills and keep the flavors fresh. If you want to save the soup for later, freezing is a great option. Pour the cooled soup into freezer-safe bags or containers. Leave some space at the top for expansion. It can last in the freezer for about two months. When you're ready to eat, simply thaw it in the fridge overnight. To reheat the soup, pour it into a pot over low heat. Stir it often to avoid sticking. If it looks too thick, add a splash of water or broth to loosen it. You can also use the microwave for quick reheating. Just use a microwave-safe bowl and heat it in short bursts, stirring in between. This will keep it warm and tasty! For more details, check the Full Recipe. Greek Lemon Chicken Soup, known as Avgolemono, is a warm, comforting dish. It blends chicken, broth, and orzo pasta with a tangy lemon flavor. The creamy texture comes from whisked eggs mixed with lemon juice. This soup is both light and filling. It’s perfect for chilly days or when you feel under the weather. Making Greek Lemon Chicken Soup takes about 50 minutes in total. You can prep the ingredients in about 15 minutes. The cooking time is around 35 minutes. This includes simmering the chicken, cooking the veggies, and adding the orzo. It all comes together quickly, making it a great weeknight meal. Yes, you can make Greek Lemon Chicken Soup in advance. It stores well in the fridge for up to three days. Just cool it completely before putting it in an airtight container. When you're ready to eat, reheat it gently on the stove. You may want to add a little water to thin it out if it thickens too much. Greek Lemon Chicken Soup pairs well with warm pita bread or a light salad. You can also serve it with a side of roasted vegetables. For a complete meal, consider adding a Greek salad with olives and feta cheese. This makes a great combo that enhances the lemony flavors of the soup. If you want the full recipe, check out the Full Recipe section above! In this post, we explored Greek Lemon Chicken Soup. We discussed key ingredients and flavors. You learned about substitutions for sticking to your taste. I detailed the steps to prepare and cook the soup. I shared tips to perfect the flavor and adjust the texture. You learned about variations for dietary needs and how to store leftovers. Making this soup is rewarding. It brings warmth and joy to any meal. Enjoy your cooking!

Greek Lemon Chicken Soup Flavorful and Easy Recipe

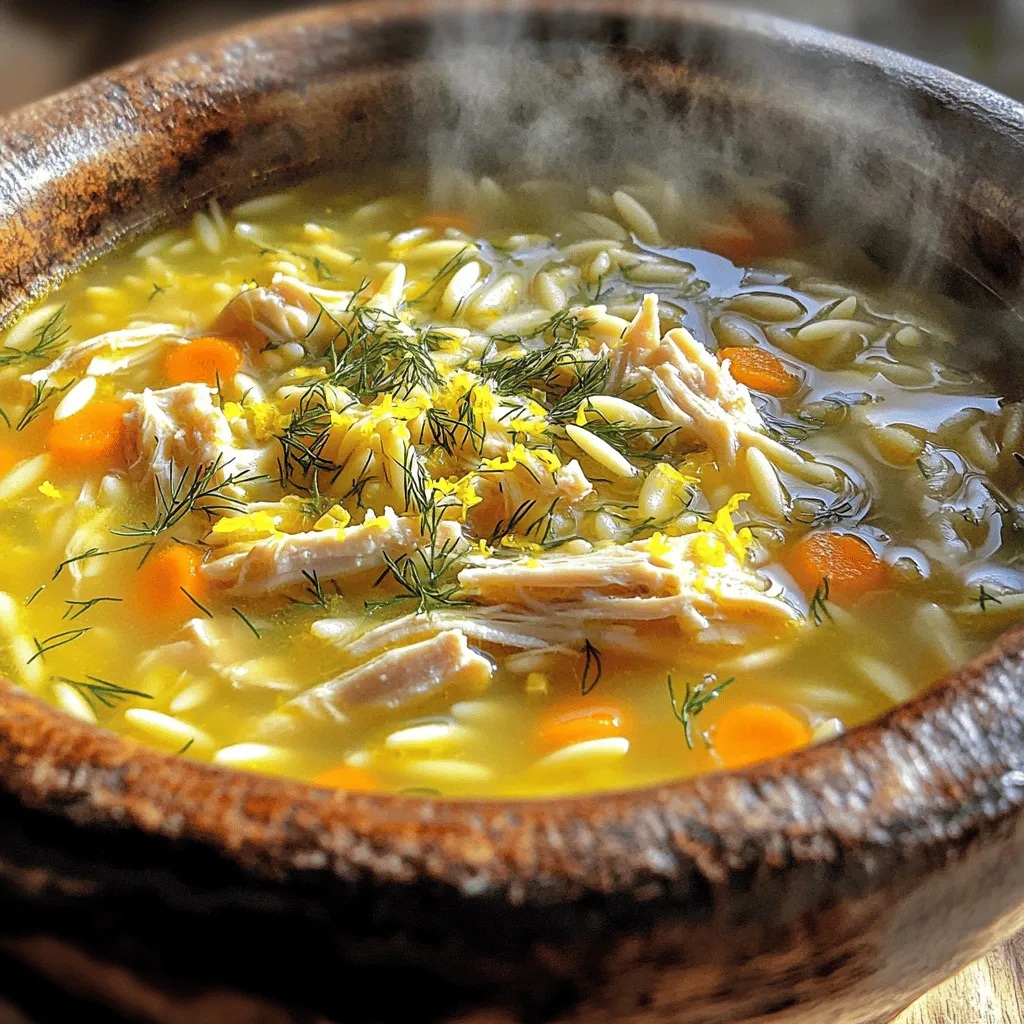
Looking for a warm, bright dish that soothes both body and soul? Greek Lemon Chicken Soup is your answer. This

- 1 cup silken tofu, drained - 1/2 cup dairy-free dark chocolate chips - 1/4 cup maple syrup - 1 teaspoon vanilla extract - 1/4 cup almond milk - A pinch of sea salt The main ingredients create the rich flavor of this mousse. Silken tofu gives it a smooth base. Dairy-free dark chocolate chips add depth and sweetness. Maple syrup provides a natural sweetness without being too heavy. The vanilla extract adds warmth. Almond milk helps blend everything smoothly. A pinch of sea salt enhances all the flavors. - Fresh berries - Mint leaves Garnishes can make your mousse look stunning. Fresh berries add color and a tart taste. Mint leaves bring a refreshing touch. You can mix and match these to fit your style. - Blender or food processor - Heatproof bowl or microwave for melting chocolate To make this mousse, you need a few tools. A blender or food processor blends the ingredients well. You also need a heatproof bowl to melt the chocolate. If you prefer, you can use a microwave to melt the chocolate in short bursts. For the full recipe, check the complete guide. Method 1: Double boiler To melt chocolate using a double boiler, fill a pot with water. Heat the water to a simmer. Place a heatproof bowl on top of the pot, ensuring it doesn’t touch the water. Add the dairy-free dark chocolate chips to the bowl. Stir often until the chocolate melts and is smooth. Remove the bowl from heat and let it cool slightly. Method 2: Microwave instructions If you prefer the microwave, put the chocolate chips in a microwave-safe bowl. Heat them in 30-second bursts. After each burst, stir the chocolate. Keep heating and stirring until it’s fully melted and smooth. Allow the melted chocolate to cool a bit before using it. Now, let’s combine the main ingredients. Start by adding the drained silken tofu, maple syrup, vanilla extract, almond milk, and a pinch of sea salt into a blender or food processor. Blend on high until the mixture is smooth and creamy. Next, pour in the melted chocolate. Blend again until everything is well mixed. Make sure to scrape down the sides of the bowl to get all the chocolate incorporated. If you want a sweeter mousse, taste it and add more maple syrup if needed. Blend again to mix in any extra sweetness. For the best flavor, chill the mousse in the refrigerator for at least 2 hours. This time allows the flavors to meld and the mousse to set properly. When you’re ready to serve, scoop the mousse into clear cups or bowls. This way, you can show off the beautiful, glossy texture. Top each serving with fresh berries and a sprig of mint. This adds a lovely touch of color and freshness to your dessert. Enjoy your rich, creamy vegan chocolate mousse! Using silken tofu is key for a smooth mousse. Silken tofu blends well and gives a creamy feel. When blending, ensure the mixture is fully smooth. Stop the blender to scrape down the sides. This helps mix all the ingredients evenly. A smooth mousse will feel rich and decadent. Taste your mousse before serving. You may want it sweeter. If so, add more maple syrup. Blend again after adding for the best result. You can also try agave syrup or coconut sugar. These are great alternatives for sweetness. Pair your mousse with fresh fruits like strawberries or raspberries. The tartness enhances the chocolate flavor. You can use clear cups for serving. This makes the mousse look appealing. For a fun touch, try mini jars or small bowls. Add mint leaves on top for color and freshness. For the complete recipe, check the Full Recipe. {{image_2}} For a raw version of this mousse, you can use different ingredients. Here’s what you need: - 1 cup raw cashews, soaked for 4-6 hours - 1/2 cup raw cacao powder - 1/4 cup maple syrup - 1/4 cup coconut milk - 1 teaspoon vanilla extract - A pinch of sea salt To make this mousse, blend the soaked cashews until smooth. Then add cacao powder, maple syrup, coconut milk, vanilla, and salt. Blend until creamy. Chill before serving. This raw mousse brings a rich flavor and creamy texture. You can add extra flavors to make your mousse unique. A splash of espresso or coffee can enhance the chocolate taste. Just mix in one tablespoon of brewed coffee to the blended mousse. You can also infuse flavors with citrus or spices. Try adding zest from an orange or a pinch of cinnamon. These add-ins create a delightful twist. If you need gluten-free options, this recipe is already safe for you. All ingredients are naturally gluten-free. For a sugar-free version, use a sugar substitute like stevia or erythritol. Adjust the amount to match your taste. These options let everyone enjoy this delicious dessert without worry. You can keep the vegan chocolate mousse in the fridge for up to five days. Store it in an airtight container to keep it fresh. Avoid letting it sit out at room temperature for too long, as this can change its texture and flavor. If you have leftovers, scoop them into small cups. This makes it easy to grab a treat later. Yes, you can freeze chocolate mousse! Freezing can extend its life for up to a month. To freeze, transfer the mousse into a freezer-safe container. Leave some space at the top, as it will expand. When you want to enjoy it again, let it thaw in the fridge overnight. This keeps the texture smooth and creamy. Enjoy your delicious vegan chocolate mousse whenever you like! You can find the full recipe above to make it again. Yes, you can use other types of tofu, like soft or firm. However, soft tofu works best. It will still give you a creamy texture. Firm tofu may make the mousse denser. If you want a lighter mousse, stick with silken or soft tofu. You can use cocoa powder instead. Mix it with a bit of maple syrup for sweetness. You might also try dark chocolate bars that are dairy-free. Just chop them up before melting. Always check labels on your ingredients. Look for dairy-free and egg-free options. Some brands may sneak in animal products. If you see terms like casein or whey, avoid those products. You can reduce the amount of maple syrup. You might also use less chocolate. Try a lower-calorie sweetener like stevia. If you want to cut fat, use less almond milk. Just remember, balance is key for taste! For the Full Recipe, check the earlier sections. This blog post covered how to make a delicious vegan chocolate mousse. We discussed key ingredients like silken tofu and dairy-free chocolate chips. You learned helpful steps for melting chocolate and blending the mix. I shared tips to adjust sweetness and achieve the right texture. We explored fun variations and storage tips for leftovers. In conclusion, making this mousse is easy and fun. With simple ingredients and steps, you can impress anyone. Enjoy experimenting with flavors and garnishes. Happy blending!

Vegan Chocolate Mousse Rich and Creamy Dessert Recipe

Craving a rich, creamy dessert that’s completely plant-based? Look no further! This Vegan Chocolate Mousse is simple to make and

To make garlic herb roasted potatoes, gather these ingredients: - 2 pounds baby potatoes, halved - 4 tablespoons olive oil - 6 cloves garlic, minced - 2 teaspoons dried rosemary - 2 teaspoons dried thyme - 1 teaspoon smoked paprika - Salt and freshly ground black pepper to taste - Fresh parsley, chopped (for garnish) Using high-quality ingredients makes a big difference. Choose firm baby potatoes for the best texture. Look for fresh garlic, as it adds strong flavor. Extra virgin olive oil enhances the taste and gives healthy fats. Dried herbs should be fragrant; old herbs lose their flavor. Fresh parsley adds color and freshness, making your dish pop. If you need swaps, here are some ideas: - Instead of baby potatoes, use regular potatoes, cut into small pieces. - You can replace olive oil with avocado oil for a different flavor. - If you lack fresh garlic, garlic powder works, but use less. - For herbs, try oregano or basil. They bring unique flavors. - If smoked paprika is unavailable, regular paprika is fine. For the full recipe, check out the details in the recipe section. Start with 2 pounds of baby potatoes. Rinse them well under cold water. Halve each potato to create even pieces. This helps them cook uniformly. In a large mixing bowl, add the halved potatoes. Pour in 4 tablespoons of olive oil. Mince 6 cloves of garlic and add them too. Sprinkle in 2 teaspoons of dried rosemary and 2 teaspoons of dried thyme. Add 1 teaspoon of smoked paprika, along with salt and black pepper to taste. Toss everything together until the potatoes are well coated. Preheat your oven to 425°F (220°C). Spread the coated potatoes on a large baking sheet. Place them cut side down. This helps them caramelize well. Roast for 25-30 minutes. Toss the potatoes halfway through for even cooking. They should be golden brown on the outside and soft inside. Once done, remove them from the oven. Garnish with fresh chopped parsley before serving. For the complete details, check the Full Recipe. To get your potatoes perfectly crispy, choose small baby potatoes. Their thin skins crisp up well. Cut them in half to allow the edges to brown. Make sure to coat them well with olive oil. This helps in achieving that lovely crunch. Spread them out on the baking sheet. Do not crowd the potatoes; give them space to breathe. Bake at 425°F for 25-30 minutes. Flip them halfway through for even crispness. You can add more flavor easily. Try adding fresh herbs like rosemary or thyme. Fresh herbs give a vibrant taste. For a kick, think about adding red pepper flakes. If you like cheese, sprinkle some grated Parmesan before roasting. This adds a nice crust and flavor. You can also switch the spices. Try garlic powder or onion powder for a different twist. Feel free to mix your favorite flavors in. One mistake is not cutting the potatoes evenly. Uneven pieces cook at different rates. Always make sure they are similar in size. Another common error is using too little oil. The oil helps brown the potatoes. Avoid overcooking them too. Check for doneness with a fork. They should be soft inside but crispy outside. Lastly, do not skip garnishing with parsley. It adds color and a fresh taste. For the complete recipe, check out the [Full Recipe]. {{image_2}} You can change the herbs in this dish to fit your taste. Try using fresh herbs like basil or cilantro for a bright twist. You can also use dried herbs like oregano or dill. Each herb gives the potatoes a unique flavor. Mixing different herbs can create a fun and tasty dish. Want to add more spice? You can sprinkle in some chili flakes for heat. A dash of lemon zest can brighten the flavors too. For a smoky taste, add a little more smoked paprika. You can even include grated cheese before roasting for a rich, savory touch. Adjusting flavors can make your potatoes stand out. This recipe is already vegan and gluten-free, thanks to simple ingredients. If you want a creamier texture, try adding a splash of vegetable broth. You can also serve these potatoes with a vegan dip or sauce. This way, you keep it fun and tasty while meeting your dietary needs. For more ideas, check the Full Recipe to inspire your creativity! Once you finish your meal, let the Garlic Herb Roasted Potatoes cool. Place them in an airtight container. This helps keep them fresh. Store the container in your fridge. They will last for about 3 to 5 days. If you want to keep them longer, consider freezing. When you are ready to eat leftovers, reheating is key. For best results, use an oven. Preheat it to 375°F (190°C). Spread the potatoes on a baking sheet. This helps them get crispy again. Heat for about 10 to 15 minutes. You can also use a skillet on medium heat. This adds a nice crunch while warming them through. Freezing Garlic Herb Roasted Potatoes is simple. First, let them cool completely. Then, spread them on a baking sheet in a single layer. Freeze them for about 1 to 2 hours. Once frozen, transfer them to a freezer-safe bag. Be sure to remove as much air as possible. They can last up to 3 months in the freezer. When you are ready to enjoy, bake them right from frozen for a tasty side dish. For the complete recipe, refer to the [Full Recipe]. Garlic Herb Roasted Potatoes stay fresh for about 3 to 5 days in the fridge. Store them in an airtight container. This keeps them tasty and prevents them from drying out. If you want them to last longer, consider freezing them. Yes, you can prepare these potatoes ahead of time. You can cut the baby potatoes and mix them with the oil and herbs. Keep them in the fridge for up to 24 hours before roasting. Just remember to take them out to reach room temperature before you roast them. This helps them cook evenly. These roasted potatoes go well with many main dishes. Try them with grilled chicken or fish. They also complement beef or pork nicely. For a veggie option, serve them with a hearty salad or roasted vegetables. They add a tasty touch to any meal! For the complete guide on making these delicious Garlic Herb Roasted Potatoes, check the Full Recipe. In this blog post, we covered what you need to make delicious Garlic Herb Roasted Potatoes. We discussed necessary ingredients, quality tips, and common substitutions. You learned step-by-step instructions for prepping and roasting potatoes to perfection. We shared tips for achieving crispiness and flavor. Variations explored different herbs and spice options. Lastly, we explained how to store leftovers and answered common questions. Enjoy experimenting with this recipe, and remember, the key is in the details. Happy cooking!

Garlic Herb Roasted Potatoes Simple and Tasty Dish

Are you ready to elevate your dinner game? Garlic Herb Roasted Potatoes are simple yet delicious. With just a few

Older posts
Newer posts
← Previous Page1 … Page5 Page6 Page7 … Page62 Next →

dsad

© 2025 easycookingbite • Built with GeneratePress

Our Policies

  • Copyright Policy
  • Cookie Policy
  • GDPR Policy
  • Privacy Policy
  • Disclaimer
  • Terms Of Use

More Information

  • Home
  • About
  • Contact
  • Appetizers
  • Dessert
  • Dinner
  • Drinks
©2025, easycookingbite About Back To Top