Skip to content
DisclaimerTerms Of UseGDPR PolicyCookie Policy

easycookingbite

  • Home
  • Drinks
  • Appetizers
  • Dinner
  • Dessert
  • About
  • Contact
  • Privacy Policy
DisclaimerTerms Of UseGDPR PolicyCookie Policy

Lily

- 4 ripe peaches: Look for peaches that are slightly soft but not mushy. The color should be vibrant and golden. A sweet scent is a good sign of ripeness. You can also use nectarines if you prefer. - 8 oz fresh mozzarella cheese: Fresh mozzarella works best. You can also try burrata for a creamier texture. Both types melt in your mouth, enhancing the dish's flavor. - 1 cup fresh basil leaves: Choose bright green leaves without brown spots. Gently smell the basil to check for freshness. You can tear the leaves to release more aroma and flavor. - Salt and pepper: Use sea salt or kosher salt for a coarser texture. Freshly cracked black pepper adds more flavor than pre-ground. - 2 tablespoons balsamic glaze: You can buy balsamic glaze or make your own by reducing balsamic vinegar. This adds a sweet and tangy flavor that pairs well with the peaches. - 1 tablespoon olive oil: Extra virgin olive oil offers the best flavor. Look for a fruity or peppery oil to complement the salad's sweetness. For the complete recipe, check out the Full Recipe section for detailed steps to create this delightful dish. To start, wash the peaches. Rinse them under cold water. This helps remove any dirt or wax. For perfect slices, use a sharp knife. Cut around the pit and slice the peaches into wedges. Aim for even pieces, about half an inch thick. Next, let's slice the mozzarella cheese. Use fresh mozzarella for the best taste. Place the cheese ball on a cutting board. Cut it into even slices, the same thickness as the peaches. This helps with both taste and look. Now, it’s time to layer the salad. Take a large platter and start with the peach slices. Alternate them with the mozzarella slices. Slightly overlap each piece for a beautiful look. This pattern not only pleases the eye but also combines flavors with each bite. Add fresh basil leaves next. Tuck whole leaves in between the peach and mozzarella layers. This adds a burst of flavor. Make sure to spread them out for a nice fresh taste. Drizzle balsamic glaze over the salad. Pour it evenly for the best coating. This glaze adds a sweet and tangy kick. Follow this with a drizzle of olive oil. It brings richness to the dish. For the final touches, season with salt and pepper. Keep it light to enhance the natural sweetness. Too much salt can overpower the dish. Now your Peach Caprese Salad is ready to enjoy! For the full recipe, please refer to the details above. For a lovely display, choose your serving style wisely. A rustic wooden board adds a homey touch. On the other hand, long white plates give a sleek, chic vibe. Both options work well for Peach Caprese Salad. To enhance the look, think about garnishing. Fresh basil leaves add color and a pop of green. A sprinkle of coarse sea salt can also brighten the dish. Serve this salad right after you make it for the best taste. Fresh peaches and basil shine when they are at their peak. If you want a cooler dish, chill it for just ten minutes. This slight chilling makes the flavors blend nicely. Pair your Peach Caprese Salad with light sides. Grilled chicken or shrimp complements the salad well. A simple bread, like a baguette, is also a great addition. For drinks, consider a crisp white wine. A sparkling water with a slice of lime can be refreshing too. Enjoying these pairings takes the meal to the next level. For the full recipe, check out the instructions above! {{image_2}} You can easily change the fruit in this salad. Nectarines work great as a peach swap. They offer a similar sweet flavor and juicy texture. Other fruits like plums or apricots can also be fun to try. Just ensure they are ripe for the best taste. For cheese, I love using fresh mozzarella. But you might prefer burrata for its creamy richness. Goat cheese can add a nice tang to your salad, too. Each choice brings a unique flavor twist. Adding nuts can enhance the texture of your salad. Prosciutto gives a savory touch that balances the sweetness of the peaches. Pecans add a nice crunch and a nutty flavor. Both options make your dish more exciting. You can also mix in other vegetables. Arugula adds a peppery taste, while mixed greens give a fresh bite. These greens can elevate your salad and add color. A homemade balsamic reduction can take this dish to the next level. To make it, simply simmer balsamic vinegar until it thickens. This quick recipe adds a rich flavor without much fuss. You can also infuse your dressing with other herbs. Try adding mint or thyme for a fresh twist. Experimenting with different herbs can create new flavor layers that surprise your taste buds. To keep your Peach Caprese Salad fresh, store leftovers in airtight containers. This method helps to keep the moisture in and prevents the salad from absorbing other flavors in the fridge. The best temperature for storage is in your refrigerator. Make sure to place the container on a shelf, not in the door. This will help maintain a steady and cool temperature. Peach Caprese Salad lasts about three days in the fridge. After that, the ingredients may start to spoil. Look for signs of spoilage, like browning peaches or mushy cheese. If the salad smells sour or off, it’s best to throw it away. For reheating, avoid using a microwave. Instead, try tossing the salad ingredients into a hot pan for a quick warm-up. This method helps keep the peaches from getting too soggy. You can also use leftovers in other dishes. Add them to a sandwich, mix them in with pasta, or blend them into a smoothie for a fruity twist. For a full recipe, check out the instructions earlier. A Peach Caprese Salad is a fresh twist on the classic Caprese. It combines juicy peaches with creamy mozzarella and fragrant basil. This salad is popular during summer when peaches are at their best. The sweet peaches balance the creamy cheese. The basil adds a burst of flavor. Drizzling balsamic glaze ties all the flavors together. It makes a bright and colorful dish that impresses guests. You can serve it as a starter or side dish. I love how easy and quick it is to make. You can find the full recipe above. Yes, you can prepare some parts of this salad ahead of time. Slice the peaches and mozzarella a few hours before serving. Just keep them in the fridge to stay fresh. Wait to add the basil and dressing until just before serving. This keeps the salad looking vibrant and tasty. If you want to chill it, place it in the fridge for about 10 minutes. This step can enhance the flavors without losing freshness. Choosing ripe peaches is simple. Look for peaches that feel slightly soft when you press them gently. A ripe peach should have a sweet smell. Check the skin color; it should be golden or yellow, not green. Avoid peaches with bruises or dark spots. If they are hard, leave them at room temperature for a few days to ripen. Enjoying ripe peaches makes this salad even better! This blog post shared how to make a tasty Peach Caprese Salad. We covered fresh fruits, cheese, herbs, and the right dressings. I shared step-by-step instructions on preparing ingredients and assembling the salad, plus tips for great presentation and flavor. Remember to experiment with variations and serving ideas to keep it fresh. Store your leftovers well to enjoy later. This salad is not only delicious, but it’s also easy to adjust. Now, get ready to impress your guests with this vibrant dish!

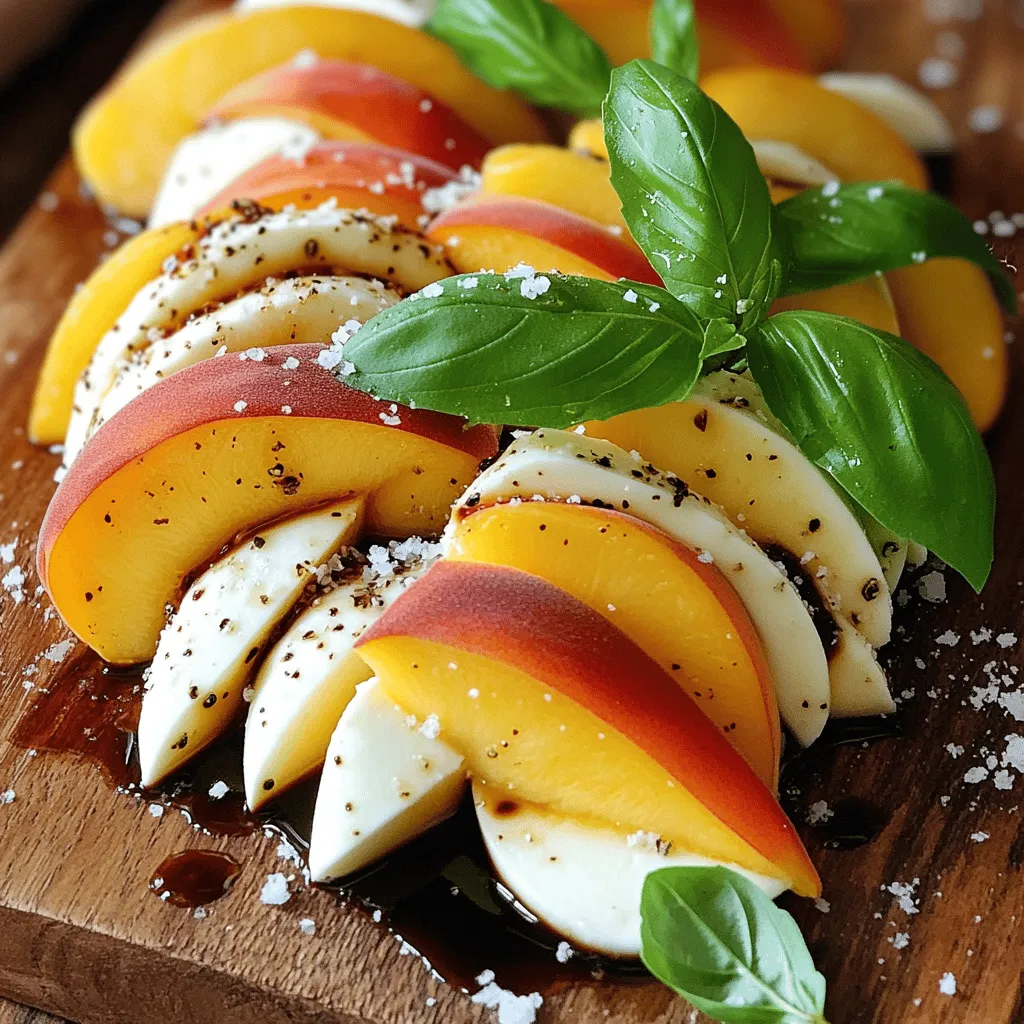
Peach Caprese Salad Flavorful and Fresh Delight

If you’re looking for a fresh and tasty dish that screams summer, you’ve found it! Peach Caprese Salad combines the

To make these crunchy cinnamon sugar apple chips, you will need a few simple ingredients. Here’s what you need: - 3 medium-sized apples (Fuji or Honeycrisp recommended) - 2 tablespoons granulated sugar - 1 tablespoon ground cinnamon - 1 teaspoon lemon juice - Pinch of salt - Cooking spray or parchment paper These ingredients come together to create a sweet and crispy snack. The apples provide the natural sweetness, while the cinnamon sugar adds a warm flavor. Using lemon juice helps keep the apples looking fresh and bright. You can also choose parchment paper or cooking spray to prevent the chips from sticking during baking. This recipe is perfect for sharing or enjoying alone, and you can find the full recipe at the end of this section. 1. Preheat your oven to 225°F (110°C). This low heat helps get the chips crispy. Line two baking sheets with parchment paper or spray them lightly with cooking spray. 2. Next, wash and dry the apples. I like to use Fuji or Honeycrisp for their sweetness. Slice the apples very thin, about 1/8 inch thick. A mandoline works great for this. 3. In a small bowl, mix 2 tablespoons of sugar, 1 tablespoon of ground cinnamon, and a pinch of salt. This is your sweet topping! 4. In another bowl, toss the apple slices with 1 teaspoon of lemon juice. This keeps the apples from turning brown and adds a nice tang. 1. Spread the apple slices in a single layer on the baking sheets. Make sure they don’t overlap. This helps them bake evenly. 2. Now, sprinkle the cinnamon sugar mixture over the apple slices. Be sure to cover them well for the best flavor. 3. Bake the slices in the preheated oven for about 1 to 1.5 hours. Flip the slices halfway through to ensure they cook evenly. Keep an eye on them, as the cooking time can change based on how thick you sliced the apples. 4. Check for doneness by feeling the chips. They should be dry and crisp when they are ready. Let them cool completely on the baking sheets. This helps them get even crunchier before you enjoy them! For the full recipe, refer back to the ingredients and steps shared earlier. To make the best cinnamon sugar apple chips, slice your apples thin. Aim for about 1/8 inch thick. This helps them bake evenly and become crispy. A mandoline is great for this task, but a sharp knife works too. Next, adjust the sweetness. If you like your chips sweeter, add a bit more sugar. For a spicier kick, increase the cinnamon. You can always taste the mixture before sprinkling it on the apple slices to find your perfect blend. Check for doneness by looking at the thickness of your slices. Thicker slices take longer to cook. If they feel soft, give them more time in the oven. The chips should be dry and crisp when done. For a fun presentation, serve the apple chips in a clear glass jar. It shows off their lovely color and shape. You can also use a rustic wooden bowl for a cozy look. To elevate your snack, pair the chips with dips. Try creamy yogurt or a sweet caramel sauce. These options add flavor and make your snack even more enjoyable. You can even sprinkle extra cinnamon sugar on top for a special touch before serving. {{image_2}} You can easily boost the taste of your cinnamon sugar apple chips. Adding nutmeg gives a warm kick. A sprinkle of ginger can also add a nice zing. Play with different apple types for varied flavors. Try tart apples like Granny Smith or sweet ones like Gala. Each type changes the taste and texture. Using different sweeteners can also change your snack. Honey or maple syrup can replace granulated sugar. These options give a richer flavor and a touch of natural sweetness. Adjust the amount to keep the balance right. For a lighter version, consider reducing the sugar. You can cut it in half without losing too much flavor. This lets the apple's natural sweetness shine through. I recommend using organic or locally sourced apples. They often taste better and are better for the environment. Plus, you support local farmers! This small change can make your snack even more enjoyable. Don't forget, fresh ingredients always lead to better results. For the full recipe, check out the section above and enjoy experimenting! To keep your cinnamon sugar apple chips fresh, use an airtight container. Glass jars work great, as do plastic containers with tight lids. This helps keep moisture out and crunch in. Store them in a cool, dry place, like a pantry or cupboard. Avoid areas with heat or humidity. Cinnamon sugar apple chips can last about one to two weeks when stored properly. After that, they may lose their crunch and flavor. Watch for signs of spoilage, like a soft texture or changes in color. If they feel chewy or look dark, it’s time to toss them. For a full recipe on making these tasty snacks, check out the earlier sections. Can I use other fruits for apple chips? Yes, you can use other fruits. Pears and bananas make great chips too. Just slice them thinly like apples. Each fruit will bring its own taste. You might need to adjust the baking time based on the fruit type. How do I make them without sugar? To make apple chips without sugar, skip the granulated sugar. Use spices like cinnamon and nutmeg for flavor. You can also sprinkle a little stevia or another sweetener if you want some sweetness. What is the best way to reheat apple chips? To reheat apple chips, use an oven or an air fryer. Set the oven to 200°F (95°C). Bake for about 10 minutes. This will help restore their crunch without burning them. Apple chips offer many health benefits. They are rich in fiber, which helps with digestion. Apples also provide vitamins like vitamin C. This boosts your immune system and keeps your skin healthy. Plus, they are low in calories! - Caloric content per serving: A serving of apple chips (about 1 ounce) has around 100 calories. This makes them a great snack choice. Enjoy them without guilt! You learned how to make delicious apple chips with simple ingredients and steps. Starting with fresh apples, you saw how to prepare and bake them for that perfect crunch. Tips and variations helped you customize flavors to your taste. Proper storage ensures you can enjoy these chips longer. Now, it's time to get creative, share your apple chip journey, and savor every bite!

Cinnamon Sugar Apple Chips Crunchy and Irresistible Snack

Are you looking for a healthy snack that’s both crunchy and sweet? Look no further! This recipe for Cinnamon Sugar

To make this chili, you need simple, fresh ingredients. Here’s the list you’ll want: - 2 medium sweet potatoes, peeled and diced - 1 can (15 oz) black beans, drained and rinsed - 1 can (14 oz) diced tomatoes (with their juices) - 1 medium onion, chopped - 3 cloves garlic, minced - 1 bell pepper (any color), chopped - 1 cup vegetable broth - 2 tablespoons olive oil - 1 tablespoon chili powder - 1 teaspoon cumin - 1 teaspoon smoked paprika - Salt and pepper to taste These ingredients create a rich, hearty base full of flavor. You can add fun toppings to make your chili even better. Here are my favorites: - 1 avocado, diced - Fresh cilantro, chopped - Lime wedges These toppings add freshness and a burst of flavor to each bowl. To prepare this chili, you need a few handy tools: - Large pot or Dutch oven - Sharp knife for chopping - Cutting board - Measuring spoons for precise spice amounts - Wooden spoon for stirring Having these tools ready will make cooking easy and enjoyable. To make Sweet Potato Black Bean Chili, start with your ingredients. Gather everything you need. Here is what to prepare: - 2 medium sweet potatoes, peeled and diced - 1 can (15 oz) black beans, drained and rinsed - 1 can (14 oz) diced tomatoes (with their juices) - 1 medium onion, chopped - 3 cloves garlic, minced - 1 bell pepper (any color), chopped - 1 cup vegetable broth - 2 tablespoons olive oil - 1 tablespoon chili powder - 1 teaspoon cumin - 1 teaspoon smoked paprika - Salt and pepper to taste - 1 avocado, diced (for topping) - Fresh cilantro, chopped (for garnish) - Lime wedges (for serving) Make sure to peel and dice the sweet potatoes first. Chop the onion and bell pepper, then mince the garlic. This prep makes cooking easier. 1. In a large pot, heat olive oil over medium heat. 2. Add the chopped onion and bell pepper. Sauté for about 5 minutes. They should start to soften. 3. Stir in the minced garlic. Cook for another minute until it smells good. 4. Now, add the diced sweet potatoes. Mix them thoroughly with the other veggies. 5. Sprinkle in chili powder, cumin, smoked paprika, salt, and pepper. Stir for 1-2 minutes to toast the spices. 6. Pour in the canned tomatoes with their juices and vegetable broth. Stir everything together. Bring the mixture to a boil. 7. Reduce the heat to low. Cover the pot and let it simmer for 25-30 minutes. The sweet potatoes should be tender. 8. After simmering, stir in the black beans. Cook for an additional 5 minutes to heat through. Adjust seasoning with salt and pepper. 9. Serve the chili hot in bowls. Top with diced avocado, chopped cilantro, and fresh lime juice. - Toast your spices well to bring out their flavors. - Use fresh ingredients whenever possible. They tend to have better taste. - Let the chili sit for a bit before serving. This helps the flavors blend. - Consider adding a dash of hot sauce if you like it spicy. For the full recipe, check out the details above. Enjoy cooking! One common mistake is not cutting sweet potatoes evenly. If they vary in size, some pieces may cook faster than others. Always aim for uniform cubes. Another mistake is skipping the step to toast the spices. Toasting enhances their flavor, making your chili taste richer. Don't rush the sautéing process either; this builds a solid base for your dish. Lastly, avoid adding too much liquid at once. You want a thick chili, not soup! To make your chili milder, reduce the chili powder. You can also skip the smoked paprika. If you like heat, add diced jalapeños or cayenne pepper. Start with a little, then taste as you go. Remember, you can always add more spice, but it’s hard to take it out! For a sweet kick, toss in a tablespoon of brown sugar. This balances out the heat and adds depth. You can boost the flavor with simple additions. Try adding corn for sweetness and texture. Fresh herbs like oregano or thyme add a lovely aroma. Want more umami? Mix in a tablespoon of soy sauce or nutritional yeast. You can also top with shredded cheese or sour cream for creaminess. For a zesty finish, squeeze fresh lime juice over the chili before serving. These little tweaks make a big difference! For the full recipe, check out the Spicy Sweet Potato & Black Bean Chili . {{image_2}} Sweet Potato Black Bean Chili is naturally vegan and gluten-free. You don’t need to change much. All the main ingredients are plant-based. The beans and sweet potatoes make it filling and nutritious. If you are gluten-sensitive, just check labels on broth and spices. Most brands offer gluten-free options. You can swap ingredients based on what you have. If you don’t have sweet potatoes, use regular potatoes or squash. For the black beans, any other beans work too, like kidney or pinto beans. Instead of bell peppers, try corn or zucchini for a twist. You can also make it spicier with jalapeños or hot sauce. You can easily cook this chili in different ways. For a slow cooker, add all the ingredients and cook on low for 6-8 hours or high for 3-4 hours. The flavors make a great mix! If you prefer an Instant Pot, use the sauté function first. After that, cook for 10 minutes on high pressure. This method saves time and keeps the chili tasty. You’ll love the easy, flavorful meals you can create with this recipe! For the full recipe, refer to the “Full Recipe” section. Store any leftover chili in an airtight container. Let it cool down first. Move it to the fridge within two hours. Leftover chili keeps well for about four to five days. Make sure to label the container with the date. This helps you remember when you made it. Freezing is a great option for this chili. Use a freezer-safe container or bag. Pour the cooled chili into it, leaving some space for expansion. Seal it tightly to prevent freezer burn. You can freeze the chili for up to three months. When you're ready to eat it, just pull it out. To reheat the chili, you have a few options. You can use the stove or microwave. If using the stove, pour the chili into a pot. Heat it on medium-low, stirring often, until it is warm. For the microwave, place the chili in a microwave-safe bowl. Heat it in short bursts of one to two minutes. Stir in between to ensure even heating. Always check the temperature before serving to make sure it's hot. Enjoy your warm, hearty meal! Sweet Potato Black Bean Chili lasts about 4 to 5 days in the fridge. Store it in an airtight container. This keeps it fresh and safe to eat. The flavors may even get better as it sits. Yes, you can make Sweet Potato Black Bean Chili ahead of time. It tastes great when made a day before. Just store it in the fridge and reheat it when ready to eat. This is perfect for busy days or meal prep. You can serve Sweet Potato Black Bean Chili with many tasty sides. Here are a few ideas: - Warm cornbread - Rice or quinoa - Tortilla chips - A simple green salad - Avocado slices or guacamole These sides add flavor and texture to your meal. For the full recipe, check out the Spicy Sweet Potato & Black Bean Chili. In this article, we explored all you need for Sweet Potato Black Bean Chili. We covered essential ingredients, preparation steps, and cooking methods. I shared tips to enhance flavor and avoid mistakes. You learned how to store and reheat leftovers, plus variations for any diet. Embrace this delicious recipe and make it your own. Enjoy each flavorful bite as you share it with others. Your chili will impress everyone and leave them asking for the recipe!

Sweet Potato Black Bean Chili Hearty and Filling Meal

Are you ready for a meal that warms your soul? Sweet potato black bean chili is not just hearty; it’s

To create delicious Carrot Cake Energy Bites, you need a few key ingredients. These ingredients work together to give the bites their yummy flavor and texture. Here’s what you’ll need: - 1 cup rolled oats - 1 cup finely grated carrots - 1/2 cup almond butter (or any nut butter of choice) - 1/4 cup honey (or maple syrup for a vegan option) - 1/2 teaspoon vanilla extract - 1 teaspoon ground cinnamon - 1/4 teaspoon nutmeg - 1/4 cup chopped walnuts or pecans (optional) - 1/4 cup raisins or dried cranberries (optional) - Pinch of salt Rolled oats form the base and give a chewy texture. Finely grated carrots add sweetness and moisture. Almond butter or your nut butter choice provides healthy fats and creaminess. Honey or maple syrup acts as a natural sweetener, making the bites tasty. Vanilla extract enhances flavor, making each bite rich. Ground spices like cinnamon and nutmeg bring warmth and comfort. You can add chopped nuts or dried fruit for extra crunch and flavor. Using fresh ingredients helps boost the taste. Always measure accurately for the best results. You can find the complete recipe in the "Full Recipe" section. Enjoy making these tasty and healthy treats! - Step 1: Combine ingredients in a mixing bowl. Start by adding 1 cup of rolled oats, 1 cup of finely grated carrots, 1/2 cup of almond butter, 1/4 cup of honey, and 1/2 teaspoon of vanilla extract into a large bowl. Mix them well until they form a sticky base. - Step 2: Mix spices and fold in optional add-ins. Next, add 1 teaspoon of ground cinnamon, 1/4 teaspoon of nutmeg, and a pinch of salt. Stir well to blend the spices. If you like, fold in 1/4 cup of chopped walnuts or pecans and 1/4 cup of raisins or dried cranberries for extra flavor. - Step 3: Roll the mixture into bite-sized balls. Take a small amount of the mixture and roll it into a ball about 1 inch in diameter. This step is fun! Place each ball on a parchment-lined baking sheet as you go. - Step 4: Refrigerate for setting. Once you have rolled all the mixture, pop the baking sheet into the fridge. Let the energy bites chill for at least 30 minutes. This helps them firm up and makes them easy to eat. These steps make for a simple yet rewarding recipe. You can find the Full Recipe for more details. Enjoy your energy bites! - Using fresh ingredients for enhanced flavor: Fresh carrots and pure nut butters make a big difference. They add a bright taste that really shines in every bite. - Recommended tools for mixing and rolling: Use a large mixing bowl and a sturdy spatula. A melon baller is great for rolling uniform bites. This helps keep your energy bites even in size. - Tips on achieving the right texture: Aim for a sticky yet firm mixture. If it feels too dry, add a bit more nut butter or honey. If it’s too wet, add more oats. Finding the right balance is key to great bites. - Overmixing the ingredients: Mixing too much can make your bites tough. Stir just enough to combine everything well. You want the textures to stay light and airy. - Not chilling long enough: Chilling helps the bites set and hold their shape. Make sure to refrigerate them for at least 30 minutes. This step is crucial for achieving the perfect energy bite. {{image_2}} You can easily change the flavor of these energy bites. To make them vegan, use maple syrup instead of honey. It’s a great sweetener that keeps them tasty. You can also swap almond butter for any nut butter you enjoy. Peanut butter adds a nice kick. Want more texture? Add coconut flakes or chocolate chips. Both options make your bites fun and delicious. Coconut gives a tropical hint, while chocolate adds sweetness. Try dried pineapple or apricots for a fruity twist. These energy bites are perfect for sharing. Consider packaging them in small jars or boxes. Add a ribbon for a nice touch. They make great gifts for friends or family. If you want to serve them at a party, arrange the bites on a colorful platter. You can even offer some dipping sauces, like yogurt or chocolate, on the side. This makes eating more fun! Remember, these tasty bites are super versatile. You can enjoy them anytime. Whether you need a quick snack or a sweet treat, they deliver both health and flavor. For the complete recipe, check out the Full Recipe. For storing your carrot cake energy bites, choose an airtight container. This will keep them fresh and tasty. I like using glass containers or plastic ones with a secure lid. They can stay in the fridge for up to a week. This keeps their flavor and texture just right. You can freeze these energy bites for longer storage. Simply place the bites on a baking sheet in a single layer. Freeze them for about two hours until firm. Once they are frozen solid, transfer them to a freezer-safe bag or container. They can last in the freezer for up to three months. When you want to enjoy them, take a few bites out and let them thaw in the fridge. This helps keep their flavor fresh and enjoyable. Can I use other nut butters? Yes, you can use any nut butter you like. Peanut butter, cashew butter, or sunflower seed butter work great. Each nut butter brings a unique taste. Just pick what you enjoy most! How can I make these energy bites gluten-free? To make these energy bites gluten-free, use certified gluten-free rolled oats. Many brands offer them. Always check the label to be sure. This small change keeps the bites safe for those with gluten allergies. What are the health benefits of these energy bites? These energy bites are packed with nutrients. Carrots add vitamins and fiber. Oats provide whole grains for energy. Nut butter gives healthy fats and protein. Together, they make a great snack for any time of day. How long do they last in the fridge or freezer? In the fridge, these energy bites last up to a week. Keep them in an airtight container for best results. If you freeze them, they can last up to three months. Just thaw them before enjoying! For detailed instructions, check the Full Recipe. It has everything you need to make these delicious bites. This blog post covered key ingredients for carrot cake energy bites and how to prepare them. You learned about storage tips and common mistakes to avoid. Remember to use fresh ingredients for better taste. Feel free to adjust flavors and try new variations. These energy bites are simple to make, fun to customize, and perfect for snacks. With the right techniques, you can enjoy these treats for weeks. Dive in, and enjoy making your delicious energy bites!

Carrot Cake Energy Bites Tasty and Healthy Treats

Looking for a tasty snack that’s both healthy and easy to make? Try these Carrot Cake Energy Bites! Packed with

- 2 pounds russet potatoes, peeled and cubed - 4 cloves garlic, minced - 1 cup heavy cream - 1/2 cup unsalted butter, at room temperature - Salt and freshly cracked black pepper, to taste - 2 tablespoons fresh chives, chopped (for garnish) - 1/4 cup grated Parmesan cheese (optional) To make creamy garlic mashed potatoes, gather these simple ingredients. The russet potatoes give a fluffy texture. Minced garlic adds a rich flavor. Heavy cream and butter create a smooth finish. Don't forget salt and pepper to enhance taste. Fresh chives make a beautiful garnish. If you love cheese, add Parmesan for extra richness. You can find the full recipe above to follow along easily. - Start with 2 pounds of russet potatoes, peeled and cubed. - Place the cubed potatoes in a large pot and cover them with cold water. - Add a pinch of salt to the water for flavor. - Bring the water to a boil over high heat. - Once boiling, reduce the heat to a simmer. - Cook for about 15 to 20 minutes until the potatoes are tender. - In a small saucepan, melt 1/2 cup of unsalted butter over medium heat. - Add 4 cloves of minced garlic to the melted butter. - Sauté the garlic for 2 to 3 minutes until it becomes fragrant. - Watch the garlic closely to avoid burning it. - After boiling, drain the cooked potatoes well in a colander. - Return the drained potatoes to the pot. - Use a potato masher or a ricer to mash the potatoes until they are smooth. - Gradually pour in 1 cup of heavy cream and the garlic butter. - Mix everything until the potatoes are creamy and well combined. - Taste the mashed potatoes and adjust the flavor with salt and black pepper. - If you like, stir in 1/4 cup of grated Parmesan cheese for extra flavor. This recipe is simple and rewarding. You can find the full recipe in the previous section. Enjoy your creamy garlic mashed potatoes! For creamy garlic mashed potatoes, use russet potatoes. They are starchy and fluffy. Yukon gold potatoes also work well. They have a buttery flavor. Always peel and cube your potatoes. This helps them cook evenly and mash smoothly. Mash your potatoes using a potato masher or a ricer. A ricer makes them extra fluffy. Don't over-mash, as that can make them gummy. Add cream slowly until you reach your desired consistency. For thicker potatoes, use less cream. For a creamier texture, add more. To boost the taste, consider adding more garlic or roasted garlic. You can also mix in sour cream for tanginess. Fresh herbs like chives or parsley add color and flavor. Garnish your dish with chopped herbs for a fresh touch. These small additions make a big difference in taste. For a richer flavor, sprinkle in some grated Parmesan cheese. If you want to explore more, check out the Full Recipe for variations and tips. {{image_2}} You can add fresh herbs to your creamy garlic mashed potatoes for a new taste. Try using rosemary or thyme. These herbs add a nice flavor. Chop them finely and mix them in when you add the cream. To boost the flavor more, you can sauté the herbs in the garlic butter. This brings out their oils and makes your dish pop. Using fresh herbs makes a big difference. If you want a vegan or dairy-free version, you can still enjoy this dish. Use coconut milk or almond milk instead of heavy cream. For butter, try using vegan butter or olive oil. You can also use plant-based cheese. There are many options available now. Look for vegan cream cheese or cashew cheese for a creamy texture. These swaps keep the dish tasty and satisfying. You can mix in extra ingredients to make your mashed potatoes unique. Roasted garlic gives a sweet and deep flavor. Just mash it into the potatoes. Cheese lovers can add shredded cheese like cheddar or feta. This adds a rich taste and creamy texture. You could also include vegetables like cooked carrots or peas for added color and texture. They make your dish not only delicious but also fun to look at. For the full recipe to get started, check out the Creamy Garlic Mashed Potatoes section. To keep your creamy garlic mashed potatoes fresh, store them in an airtight container. Place them in the fridge soon after they cool. This helps to keep their taste and texture. They stay good for about three to five days. After that, they may lose flavor and become dry. When you want to enjoy leftovers, avoid drying them out. The best way is to reheat them on the stovetop. Add a splash of heavy cream or milk. This helps restore their creaminess. Stir them over low heat until warm. You can also use the microwave, but cover the dish. Heat in short bursts, stirring in between to keep them moist. If you want to save mashed potatoes for later, freezing works well. First, let them cool completely. Then, scoop them into freezer-safe bags or containers. Remove as much air as possible before sealing. They will stay fresh for up to two months. To thaw, place them in the fridge overnight. Reheat as you normally would, adding cream if needed. Enjoy your creamy garlic mashed potatoes whenever you like! For the complete recipe, check out the Full Recipe section. Yes, you can make creamy garlic mashed potatoes ahead of time. Prepare them as usual, then store them in a sealed container in the fridge. To reheat, put them in a pot on low heat. Add a splash of cream or milk to keep them creamy. Stir often to avoid sticking. Russet potatoes work best for mashing. They are starchy and fluffy. Yukon Gold potatoes also make great mashed potatoes. They have a buttery flavor and creamy texture. You can mix both types for a unique taste. To make fluffier mashed potatoes, try these tips: - Use a potato ricer instead of a masher. - Let the cooked potatoes steam dry for a few minutes before mashing. - Avoid over-mixing, as this can make them gluey. Yes, you can use milk instead of heavy cream. However, the texture will change. The mashed potatoes may not be as rich and creamy. For a thicker result, use whole milk or add a bit of butter. Creamy garlic mashed potatoes pair well with many dishes. Try them with: - Grilled chicken or steak. - Roasted vegetables. - A rich gravy. These sides enhance the flavor and make a complete meal. Creamy garlic mashed potatoes are simple and delicious. We covered key ingredients, step-by-step prep, and helpful tips. You learned how to make them with variations and storage ideas. Whether serving them at a holiday meal or a weeknight dinner, these mashed potatoes will impress. Enjoy experimenting with different flavors and textures. With practice, you’ll perfect your own version of this comforting dish.

Creamy Garlic Mashed Potatoes Simple and Delicious Dish

If you’re ready to elevate your dinner game, you’ve come to the right place! Creamy garlic mashed potatoes are not

When making Cheddar Broccoli Soup, fresh and rich flavors shine through. Here’s what you need to gather: - 4 cups fresh broccoli florets - 1 medium onion, diced - 2 cloves garlic, minced - 4 cups vegetable broth - 2 cups aged cheddar cheese, shredded - 1 cup heavy cream - 2 tablespoons olive oil - 1 teaspoon salt - ½ teaspoon black pepper - ½ teaspoon smoked paprika - Optional garnishes: croutons and fresh chives These ingredients come together to create a warm, cheesy delight. The aged cheddar cheese adds a deep flavor. Fresh broccoli not only looks great but also brings a healthy crunch. Each bite wraps you in creamy goodness. I love to use vegetable broth for a rich base. It enhances the flavors without overpowering them. Don't forget the optional garnishes! Croutons provide a fun crunch, and fresh chives add a pop of color. This combo turns a simple bowl of soup into a beautiful dish. For the full recipe, check out the Cheesy Broccoli Bliss Soup section above. - Sauté the onion and garlic Start by heating olive oil in a large pot over medium heat. Add the diced onion. Cook for about 4-5 minutes until it turns soft and clear. Stir in the minced garlic and cook for another minute. You want to release its nice smell. - Add broccoli and vegetable broth Next, toss in the fresh broccoli florets. Pour in the vegetable broth. Bring this to a gentle boil. Cook for about 15 minutes. You want the broccoli to be nice and tender. - Blend the soup to desired consistency After cooking, remove the pot from the heat. Use an immersion blender to puree the soup. Blend until it is as smooth as you like. If you want some chunks, leave a few florets whole. - Incorporate cream and cheese Put the pot back on low heat. Stir in the heavy cream next. Add the shredded cheddar cheese as well. Mix everything until the cheese melts and the soup is creamy. - Season to taste Finally, season the soup with salt, black pepper, and smoked paprika. Taste it and adjust the seasonings if needed. Check out the Full Recipe for more details. Enjoy your creamy goodness! To boost the taste of your cheddar broccoli soup, try these ideas: - Add spices like garlic powder, onion powder, or nutmeg for warmth. - Fresh herbs like thyme or basil can add a bright touch. - For creaminess, use sharp cheddar or Gruyère cheese. Their flavors are rich and bold. You can choose how smooth or chunky to make your soup: - For a chunky soup, blend just half. Leave some broccoli pieces intact. - If you want it smooth, blend it all until creamy. - Always let the blender cool slightly before using. This keeps the hot soup safe. Serving your soup well makes it even better: - Pair it with warm, crusty bread or a fresh salad. - Top with croutons and fresh chives for a pop of color. - Ladle the soup into bowls and let the toppings shine. This makes a lovely presentation. For more details on making this dish, check the Full Recipe. {{image_2}} If you want to make this soup vegetarian, swap the vegetable broth for a rich mushroom broth. This adds depth without any meat. For a dairy-free option, use coconut milk in place of cream and almond cheese instead of cheddar. These swaps keep the soup creamy and flavorful, perfect for anyone avoiding dairy. You can enhance your cheddar broccoli soup with seasonal veggies. Try adding carrots or peas for extra color and taste. Sweet potatoes can add a nice sweetness, too. For protein, consider stirring in some cooked chicken or turkey. This makes the soup heartier and more filling. You can easily turn this soup into a casserole. Just pour it into a baking dish, top it with breadcrumbs or more cheese, and bake until bubbly. It’s a fun twist on the classic. You can also serve this soup as a starter. Use smaller bowls for a light beginning to a meal, or serve it as a main dish with crusty bread on the side. Enjoy experimenting with these variations to find your perfect blend! To keep your cheddar broccoli soup fresh, store it in an airtight container. This helps prevent odors from other foods. Let the soup cool completely before sealing. You can store it in the fridge for up to three days. If you want to enjoy it later, make sure to reheat it gently on the stove. Stir often to keep it from burning. If you want to save the soup for a longer time, freezing is a great option. First, let the soup cool down. Then, pour it into freezer-safe containers. Leave some space at the top for expansion. This soup can last up to three months in the freezer. When you are ready to eat, thaw it overnight in the fridge. Reheat it on the stove, stirring as it warms. Avoid using the microwave, as it can change the texture. How can I make Cheddar Broccoli Soup thicker? You can thicken Cheddar Broccoli Soup by adding more cheese or cream. You can also mix in a cornstarch slurry. Just mix one tablespoon of cornstarch with two tablespoons of cold water. Add this to the soup and stir until it thickens. Can I substitute the cheddar cheese for something else? Yes, you can use other cheeses. Gruyère or Monterey Jack work well. Each cheese gives a different taste. Feel free to mix your favorites! Is this soup healthy or low-calorie? Cheddar Broccoli Soup is creamy and rich, so it’s not low-calorie. However, you can make it healthier. Use low-fat cheese or light cream. Also, add more broccoli for fiber and nutrients. What can I serve with Cheddar Broccoli Soup? Serve your soup with crusty bread or a fresh salad. Croutons add crunch. A sprinkle of fresh chives on top makes it look nice too! How do I store my Cheddar Broccoli Soup properly? Cool the soup first before storing. Place it in an airtight container. It can last in the fridge for 3-4 days. If you want to keep it longer, freezing is a great option. Can I use frozen broccoli instead of fresh? Yes, frozen broccoli works well in this soup. It’s already blanched, so it cooks faster. Just add it to the pot and adjust your cooking time slightly. How do I fix bland soup? To fix bland soup, add more seasoning. A pinch of salt or a dash of hot sauce can help. You can also stir in a bit of lemon juice for brightness. Taste as you go to find the right balance. For the complete cooking journey, check out the Full Recipe for Cheddar Broccoli Soup. In this blog post, we explored how to make Cheddar Broccoli Soup. We discussed all the ingredients you need and laid out clear steps for cooking. I shared tips to enhance flavor and maintain texture. You can even adapt the recipe for dietary needs or seasonal veggies. Remember, this soup is comforting and versatile. It can be a light starter or a tasty main dish. Try experimenting with different cheeses or toppings. Enjoy creating a delicious bowl that suits your taste!

Cheddar Broccoli Soup Flavorful Creamy Comfort Food

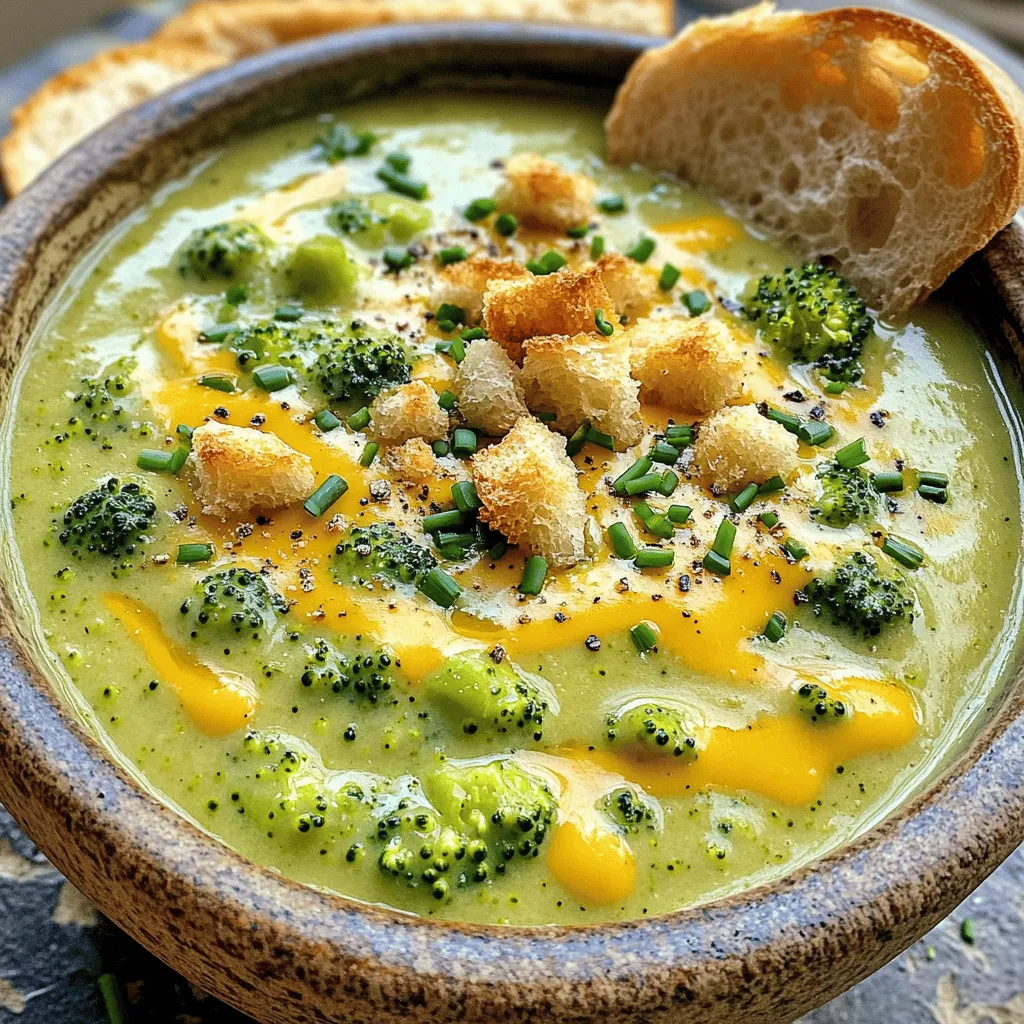
Looking for a bowl of warm, creamy comfort? This Cheddar Broccoli Soup is rich and flavorful, perfect for a cozy

To make classic hummus, you need a few simple ingredients. Each one plays a key role in creating that smooth, creamy texture and rich flavor. Here’s what you will need: - 1 can (15 oz) chickpeas, drained and rinsed - 1/4 cup tahini - 2 tablespoons olive oil - 2 tablespoons fresh lemon juice - 1 clove garlic, minced - 1/2 teaspoon cumin - 1/4 teaspoon smoked paprika - Salt to taste - Water as needed - Fresh parsley for garnish - Extra olive oil for drizzling - Pita bread or vegetable sticks for serving Chickpeas are the base of this recipe. They give hummus its creamy body. Tahini adds a nutty flavor. Olive oil makes the hummus rich and smooth. Fresh lemon juice brightens the taste. Garlic adds a punch of flavor. Cumin and smoked paprika give depth and warmth. You can adjust the spices to fit your taste. Adding more garlic or lemon juice can enhance the flavor. If you want to make it fancy, sprinkle some chopped parsley on top. It adds a nice color and freshness. You can find the Full Recipe for detailed steps. Each ingredient brings something special, so make sure to use fresh items for the best taste. Enjoy creating this simple and creamy delight! First, we need to prepare our ingredients for the classic hummus recipe. Start by rinsing and draining one can of chickpeas. This step helps remove extra salt and makes them taste fresher. Use a fine mesh strainer for this task. Next, measure out 1/4 cup of tahini and 2 tablespoons of olive oil. These two ingredients add creaminess and flavor to your hummus. Now it's time for the fun part! In your food processor, combine the rinsed chickpeas, tahini, olive oil, 2 tablespoons of fresh lemon juice, 1 clove of minced garlic, 1/2 teaspoon of cumin, 1/4 teaspoon of smoked paprika, and a pinch of salt. Blend everything together until it is smooth. You may need to scrape down the sides a few times to ensure all the ingredients mix well. After blending, check the texture. If your hummus looks too thick, add water one tablespoon at a time. Blend again after each addition until it reaches your desired consistency. Next, it's time to taste! Adjust the seasoning if needed. You can add more salt or lemon juice to enhance the flavor. Once you're happy with it, transfer the creamy hummus to a bowl. For the full recipe, refer to the complete ingredients and instructions. Enjoy your hummus with warm pita bread or veggie sticks! To make the best hummus, blending time matters. Blend the mix for at least two minutes. This helps break down the chickpeas fully, giving you that smooth texture. Stop to scrape down the sides of the bowl. This step ensures all the ingredients blend evenly. If you skip this, some parts may stay chunky. Want to kick up the flavor? Try adding more spices. A dash of cayenne or smoked paprika can add depth. If you like tang, squeeze in more lemon juice. Fresh garlic gives a sharp taste, while roasted garlic offers a sweet touch. Choose based on your mood. How you present hummus can impress your guests. Use a shallow bowl for serving. Make a small well in the middle. Drizzle olive oil into this well for a lovely look. A sprinkle of smoked paprika adds a nice color contrast. Serve with warm pita or fresh veggie sticks. This makes for a fun and healthy snack. For the full recipe, check out the details above. {{image_2}} You can spice up your classic hummus in fun ways. - Spicy hummus with red pepper flakes: Add a pinch of red pepper flakes for warmth. - Herb-infused hummus with fresh basil or cilantro: Blend in fresh herbs for a bright flavor. These changes give your hummus a new twist. They can excite your taste buds and impress your friends. Sometimes, you might need to change a few ingredients. - Low-fat tahini alternatives: Try sunflower seed butter or Greek yogurt for a lighter option. - Chickpea alternatives for a different base: Use white beans or lentils for a unique taste. These swaps keep your hummus fresh and interesting. They also help you accommodate different diets. Hummus is more than just a dip; it’s a versatile ingredient. - Pairing hummus with different dippers: Serve with pita chips, fresh veggies, or crackers. - Creative uses in recipes such as wraps or salads: Spread hummus on wraps or mix it into salads for extra flavor. These serving ideas show how hummus can fit into many meals. Explore these options for a tasty experience. Enjoy your hummus journey! To keep your hummus fresh, use airtight containers. Glass jars work great and seal well. You can also use plastic containers, but glass is better for taste. Store your hummus in the fridge right after making it. It lasts about five days in the refrigerator. Before serving, give it a good stir. This helps to mix any ingredients that may have settled. If you want to save hummus for later, freezing is a good option. Portion it into small containers or freezer bags. Leave some space at the top for expansion. Label the bags with the date for easy tracking. To thaw, move the hummus to the fridge overnight. If you need it faster, you can thaw it in a bowl of cold water. After thawing, mix it well, adding a little olive oil or water for texture. This keeps your hummus creamy and tasty. Homemade hummus lasts about 4 to 7 days in the fridge. Store it in an airtight container to keep it fresh. Make sure to check for any off smells or changes in texture before eating. Yes, you can make hummus without tahini. Try using almond butter or sunflower seed butter instead. You can also add more olive oil for creaminess. If you want to keep the flavor bright, add extra lemon juice. You can use other legumes like white beans or black beans. For a veggie base, try mashed avocado or cooked cauliflower. These options can give your hummus a different twist without losing the creamy texture. Making hummus at home is simple and fun. You start with key ingredients like chickpeas, tahini, and garlic. We covered easy steps for blending and adjusting flavors. I shared tips for creamy texture and creative garnishes. You can also try different flavors or swaps in ingredients. Remember, storage matters for keeping your hummus fresh. In the end, this delicious dip can enhance any meal or snack. Enjoy making your perfect hummus!

Classic Hummus Recipe Simple and Creamy Delight

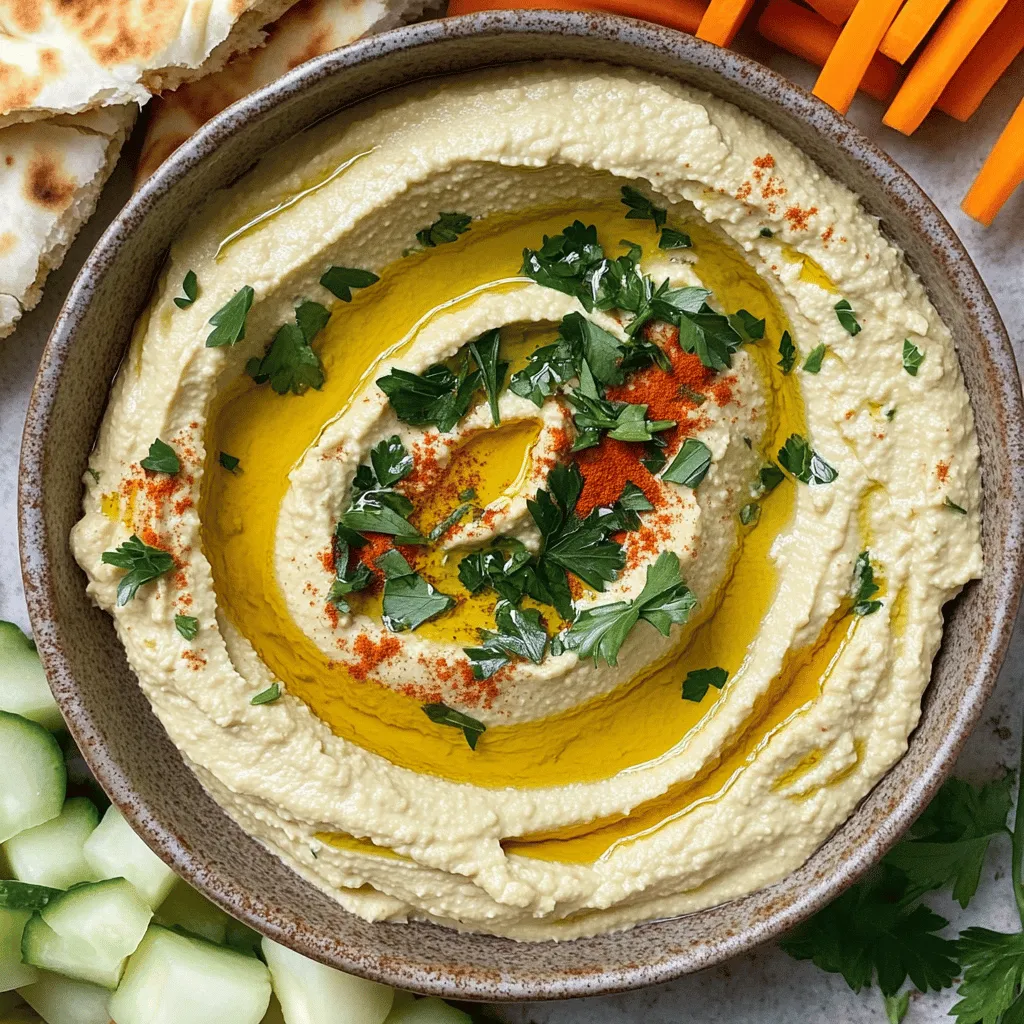
Are you ready to make the ultimate classic hummus? My Classic Hummus Recipe Simple and Creamy Delight is perfect for

To make honey garlic chicken thighs, gather these ingredients: - 4 bone-in, skin-on chicken thighs - 1/4 cup honey - 4 cloves garlic, minced - 2 tablespoons soy sauce - 1 tablespoon apple cider vinegar - 1 teaspoon grated ginger - Salt and pepper to taste - 2 tablespoons olive oil - 1 teaspoon sesame seeds (for garnish) - Chopped green onions (for garnish) When measuring honey, use a liquid measuring cup. It helps to coat the cup for easy pouring. For minced garlic, use fresh cloves for the best taste. If you don't have ginger, use ground ginger as a substitute. Make sure you taste the marinade before adding it to the chicken. Adjust salt and pepper to your liking. You can swap chicken thighs for drumsticks or breasts. Both work well with the same marinade. Instead of honey, use maple syrup for a different flavor. If you want a gluten-free option, use tamari instead of soy sauce. You can omit apple cider vinegar if you prefer a sweeter dish. Fresh herbs can replace green onions for garnish, adding a nice touch. For the full recipe, check the details above. Start by gathering your ingredients for honey garlic chicken thighs. You will need: - 4 bone-in, skin-on chicken thighs - 1/4 cup honey - 4 cloves garlic, minced - 2 tablespoons soy sauce - 1 tablespoon apple cider vinegar - 1 teaspoon grated ginger - Salt and pepper to taste - 2 tablespoons olive oil - 1 teaspoon sesame seeds (for garnish) - Chopped green onions (for garnish) First, preheat your oven to 400°F (200°C). This helps the chicken cook evenly. Next, mix the marinade. In a bowl, whisk together honey, minced garlic, soy sauce, apple cider vinegar, ginger, salt, and pepper. This mix will give the chicken its sweet and savory flavor. Rinse the chicken thighs under cold water. Pat them dry with paper towels. This step is key for a crispy skin. Season both sides well with salt and pepper. In a large ovenproof skillet, heat olive oil over medium-high heat. Once hot, add the chicken thighs skin-side down. Sear them for about 5-7 minutes. You want the skin to be golden brown and crispy. After searing, carefully flip the chicken thighs over so the skin is facing up. Pour the marinade over them. Make sure each thigh is well-coated. This will enhance the flavor during baking. Now, transfer the skillet to your preheated oven. Bake the chicken for 25-30 minutes. You can check if it is done when the internal temperature hits 165°F (75°C). For extra caramelization, switch to broil for the last 2-3 minutes. Just keep an eye on it to prevent burning. Once cooked, remove the skillet from the oven. Let the chicken rest for 5 minutes before serving. This helps keep the juices inside. To ensure your chicken thighs turn out perfect, follow these tips: - Always use a meat thermometer to check the internal temperature. - Let the chicken rest after cooking. This keeps it juicy. - If you want more flavor, let the chicken marinate for a few hours or overnight. - For even cooking, try to use thighs of similar size. These steps will help you create a meal that is simple and tasty. You can find the full recipe for honey garlic chicken thighs in the earlier sections. Enjoy your cooking! When making honey garlic chicken thighs, some mistakes can ruin your meal. Here are a few to watch for: - Not drying the chicken: Wet chicken won't crisp up well. Use paper towels to pat it dry. - Skipping the marinade time: Letting the chicken soak in the marinade gives it more flavor. Aim for at least 30 minutes. - Overcooking the chicken: Use a meat thermometer. Chicken should reach 165°F (75°C) for safety. To cook chicken thighs right, follow these techniques: - Searing: Start by searing the chicken skin-side down in a hot skillet. This makes the skin crispy. - Oven baking: After searing, bake the chicken in the oven. This keeps it juicy and cooks it evenly. - Broiling: For extra caramelization, broil the chicken for a few minutes at the end. Keep a close eye on it to avoid burning. To make your honey garlic chicken thighs even tastier, consider these tips: - Add herbs: Fresh herbs like thyme or rosemary add a nice touch. Sprinkle them in the marinade. - Use quality honey: A good honey can make a huge difference. Look for pure honey, not syrup. - Experiment with spices: Try adding a pinch of red pepper flakes for some heat or smoked paprika for depth. For a full recipe, check out the section above. Enjoy your cooking adventure! {{image_2}} You can easily swap chicken thighs for other proteins. Try chicken breasts if you want a leaner cut. Pork chops work well too, adding a different flavor. Even tofu can replace chicken for a plant-based option. Adjust the cooking time based on the protein you choose. Adding veggies makes this dish more colorful and nutritious. Broccoli and bell peppers pair nicely with honey garlic sauce. Cut them into bite-sized pieces and add them to your skillet. You can toss them in with the chicken during the last 15 minutes of cooking. This method keeps them crisp and bright. Mix up the sauce for a new twist. Try using maple syrup instead of honey for a richer taste. You could also add chili paste for some heat. A splash of orange juice can brighten the flavor too. Experimenting with sauces keeps the dish exciting and fresh. For the full recipe, check out the Honey Garlic Chicken Thighs section. To keep your honey garlic chicken thighs fresh, let them cool first. Place the thighs in an airtight container. You can store them in the fridge for up to three days. If you want to extend their life, freezing is a great option. When you're ready to enjoy leftovers, preheat your oven to 350°F (175°C). Place the chicken thighs on a baking sheet. Cover them with foil to keep them moist. Heat for about 15-20 minutes until they are warm. You can also use a microwave, but this may dry them out. If you choose the microwave, heat in 30-second bursts until warm. To freeze, wrap each thigh tightly in plastic wrap or foil. Then, place them in a freezer bag. Be sure to label the bag with the date. These can last up to three months in the freezer. When you're ready to eat, thaw them in the fridge overnight. Then, reheat as mentioned above. This method keeps the flavor intact and makes meal prep easy! Cooking honey garlic chicken thighs takes about 45 minutes in total. This includes 10 minutes of prep time and 25-30 minutes of baking in the oven. To ensure they are done, check that the chicken reaches an internal temperature of 165°F (75°C). This will keep the meat juicy and safe to eat. Yes, you can use boneless chicken thighs. They will cook faster than bone-in thighs. You should reduce the baking time to about 20-25 minutes. The key is to still check the internal temperature to make sure it reaches 165°F (75°C). Boneless thighs can be just as tasty and tender! Honey garlic chicken thighs pair well with many sides. Here are some ideas: - Steamed rice - Roasted vegetables - Mashed potatoes - A fresh green salad - Noodles with stir-fried veggies These sides will complement the sweet and savory flavors of the chicken. You can mix and match based on your taste! For the full recipe, check out the full recipe section above. This blog post covered all you need for honey garlic chicken thighs. We explored ingredients, step-by-step cooking, and useful tips. You learned how to avoid common mistakes and enhance flavors. I shared different variations and storage info, ensuring your meals stay fresh. Remember, great chicken thighs can be made by anyone. Follow these steps, and you will impress your friends and family every time. Happy cooking!

Honey Garlic Chicken Thighs Simple and Tasty Meal

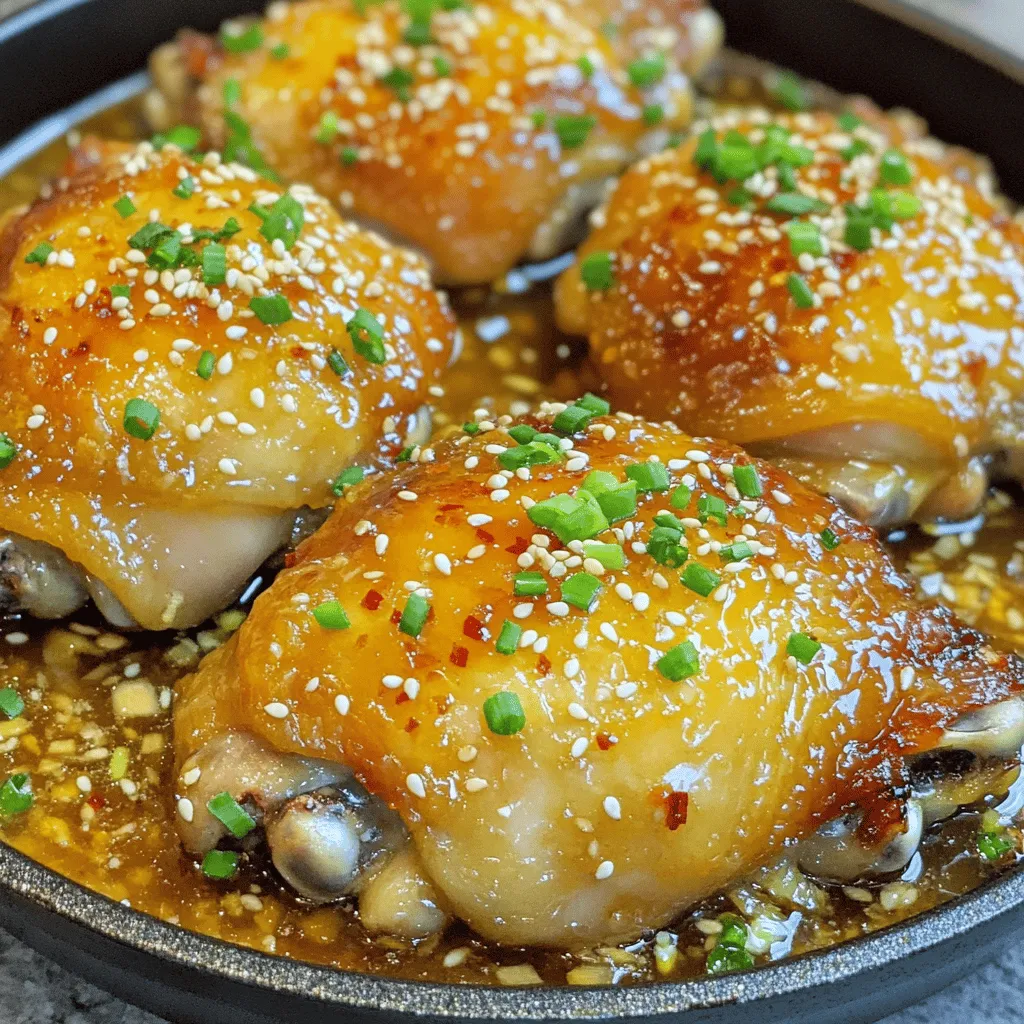
Are you ready to savor a dish that delights your taste buds? Honey Garlic Chicken Thighs are both simple to

To make these veggie spring rolls, you'll need fresh and crunchy vegetables. Here’s what to gather: - 1 cup shredded cabbage - 1 cup shredded carrots - 1/2 cup bean sprouts - 1/2 cup chopped bell peppers (any color) - 1/4 cup chopped green onions - 2 cloves garlic, minced These veggies add texture and bright colors. Feel free to mix and match your favorites! Seasoning makes your spring rolls pop! I like to add: - 1 tablespoon soy sauce - 1 teaspoon sesame oil - Salt and pepper to taste These seasonings enhance the flavors of the veggies. Adjust them to your taste for a personal touch. For the outer layer, you will need: - 1 package spring roll wrappers (about 8-10 wrappers) These wrappers hold all your tasty filling. Choose high-quality ones for the best results. Once you have all your ingredients, you are ready to start making these air fryer veggie spring rolls! Check out the Full Recipe for a detailed guide. To start, gather your ingredients. You will need: - 1 cup shredded cabbage - 1 cup shredded carrots - 1/2 cup bean sprouts - 1/2 cup chopped bell peppers (any color) - 1/4 cup chopped green onions - 2 cloves garlic, minced - 1 tablespoon soy sauce - 1 teaspoon sesame oil - Salt and pepper to taste In a large bowl, mix the cabbage, carrots, bean sprouts, bell peppers, green onions, and garlic. This mix gives the spring rolls their crunch and flavor. Next, drizzle in the soy sauce and sesame oil. Add salt and pepper to taste. Toss everything until well combined. This step is key to making sure every bite is tasty. Now, it’s time to roll! Take a spring roll wrapper and lay it flat with a corner pointing toward you. Spoon about 2 tablespoons of your veggie mix near the corner closest to you. Fold that corner over the filling and tuck it in tightly. Then, fold in the sides and keep rolling until you seal it up. Repeat this process with the remaining wrappers and filling. You want each roll to be tight so they don’t open during cooking. Before air frying, preheat your air fryer to 375°F (190°C) for about 5 minutes. This step ensures even cooking. Lightly spray or brush each spring roll with cooking spray or olive oil. This tiny bit of oil helps them get crispy. Place the rolls in the air fryer basket in a single layer. Avoid overcrowding; it’s better to cook in batches. Cook for 12-15 minutes, flipping them halfway to ensure they brown evenly. They should come out golden brown and crispy. Let them cool for a few minutes before serving. For a fun touch, serve with soy sauce or sweet chili sauce for dipping. Enjoy! To get the best crisp, ensure you preheat your air fryer. Preheating helps create that golden crunch. Lightly spray or brush the spring rolls with oil. This adds a nice layer for crispiness. Avoid overcrowding the basket. Cook in batches if needed. Flip the rolls halfway through cooking for even browning. You can prep the filling earlier in the day. Store it in the fridge for up to 24 hours. When ready, just roll the spring rolls. You can also wrap them in plastic wrap. This keeps them fresh until you’re ready to cook. If you want to freeze the rolls, do so before cooking. They can last up to a month in the freezer. One mistake is using too much filling. If you overstuff the rolls, they may burst. Another issue is not sealing the edges well. Make sure to press them tightly. Lastly, don’t skip the oil spray. Without it, your rolls may not crisp up properly. Follow these tips for a perfect snack every time! {{image_2}} You can add protein to your veggie spring rolls for extra flavor. Cooked shrimp, chicken, or tofu work well. Simply chop the protein into small pieces and mix it into your veggie filling. This gives you a heartier snack. If you're using tofu, make sure to press it first to remove excess water. This helps the tofu absorb flavors better. For a gluten-free version, choose rice paper wrappers instead of traditional spring roll wrappers. Rice paper gives a nice chewy texture. You can typically find rice paper at Asian markets or online. Make sure to check the label to ensure they are gluten-free. Also, use tamari instead of soy sauce for a gluten-free seasoning option. You can change the flavor of your spring rolls to suit your taste. Try adding fresh herbs like cilantro or mint for a fresh twist. You can also add spices like chili flakes for heat or curry powder for warmth. Another idea is to include different vegetables like zucchini or mushrooms. These small changes can create a completely new and exciting spring roll. For more detailed instructions and a full recipe, check out the [Full Recipe]. To keep your air fryer veggie spring rolls fresh, store them in an airtight container. You can place parchment paper between layers to avoid sticking. Make sure the rolls cool completely before sealing. This helps maintain their crispiness. Store them in the fridge for up to 3 days. When you're ready to enjoy your spring rolls again, preheat your air fryer to 375°F (190°C). Place the rolls in the basket in a single layer. Cook them for about 5-7 minutes. This will make them crispy again. You can also use an oven at the same temperature. Just keep an eye on them to avoid burning. If you want to save some for later, freezing is a great option. Before cooking, lay the rolled spring rolls on a baking sheet lined with parchment paper. Freeze them for about 1-2 hours until solid. Then transfer them to a freezer bag. They can last up to 3 months in the freezer. To cook from frozen, add an extra 3-5 minutes to the cooking time. Enjoy your crunchy snack anytime! Yes, you can make these spring rolls ahead of time. Prepare the filling and roll them up. Then, store them in the fridge for up to a day. Cover them with a damp cloth to keep them moist. When ready to cook, just pop them in the air fryer. This way, you save time and enjoy fresh spring rolls with little effort. Spring rolls taste great with many dipping sauces. Here are a few popular options: - Soy sauce - Sweet chili sauce - Peanut sauce - Hoisin sauce These sauces add extra flavor and enhance your spring rolls. Feel free to mix and match to find your favorite combo. You can tell when the spring rolls are done by looking for a golden brown color. They should also feel crisp to the touch. If you flip them halfway through cooking and see they are browning evenly, they are likely finished. Cook for 12-15 minutes total for the best results. Enjoy your perfectly cooked spring rolls! For the complete recipe, check out the Full Recipe. You learned how to make tasty spring rolls with fresh veggies and seasonings. Preparing the filling, rolling them up, and air frying is simple. I shared tips to get that perfect crisp and avoid common mistakes. You can customize these rolls with proteins or gluten-free options. Remember proper storage methods to keep them fresh. Enjoy experimenting with this recipe and make it your own. Spring rolls are fun to make and share!

Air Fryer Veggie Spring Rolls Crisp and Flavorful Snack

If you love crispy snacks that burst with flavor, you’re in for a treat! Today, I’ll show you how to

- Mixed mushrooms (cremini, shiitake, or button) - Coconut cream or cashew cream - Nutritional yeast for cheesiness I love using mixed mushrooms in this dish. They add depth and flavor. Cremini, shiitake, or button mushrooms all work well. Each type brings its own unique taste and texture. Coconut cream or cashew cream gives the stroganoff its creamy texture. Coconut cream is rich and smooth. Cashew cream is a bit lighter but equally tasty. Both options create a lovely sauce that clings to the pasta. Nutritional yeast provides a cheesy flavor without any dairy. It gives that extra umami punch. Plus, it adds vitamins, making your meal even better. - Gluten-free pasta options - Alternative cream substitutes - Additional spices for flavor enhancement If you need gluten-free options, many brands offer gluten-free pasta. Look for rice or chickpea pasta for great results. For the cream, you can swap coconut or cashew cream for silken tofu. Blend it until smooth for a new twist. You can also try oat cream for a lighter choice. Want more flavor? Add spices like garlic powder or onion powder. A dash of lemon juice can brighten the dish too. - Vegan, vegetarian, and gluten-free options - Nutritional benefits of key ingredients This recipe fits many diets. It is vegan and vegetarian, making it perfect for plant lovers. You can easily make it gluten-free with the right pasta choice. Mixed mushrooms are full of nutrients. They offer fiber, vitamins, and minerals. Coconut cream provides healthy fats. Nutritional yeast is packed with B vitamins. These ingredients come together to create a meal that is both tasty and nourishing. For the full recipe, check out the details above. Enjoy this creamy comfort bowl! To cook the pasta, start with a large pot. Fill it with water and bring it to a boil. Once boiling, add the wide pasta like fettuccine. Follow the package instructions for cooking time. This usually takes around 8-10 minutes. Stir the pasta occasionally to prevent sticking. When done, drain the pasta in a colander. Remember to reserve about 1/2 cup of the pasta water for later use. This starchy water can help thicken the sauce. In a large pan, heat olive oil over medium heat. Once the oil is hot, add finely chopped onion. Sauté the onion for about 3-4 minutes. You want it to turn translucent. After that, add two minced garlic cloves. Sauté for another minute until the garlic is fragrant. Using medium heat is key here. It helps to cook evenly without burning. Now, it’s time to focus on the mushrooms. Add the sliced mushrooms to the pan with the onion and garlic. Stir occasionally, cooking for about 5-7 minutes. You will see the mushrooms release their liquid and turn golden brown. Next, deglaze the pan by pouring in 1 cup of vegetable broth and 1 tablespoon of soy sauce. Add 1 teaspoon of smoked paprika and 1 teaspoon of dried thyme. Stir well and let it simmer for about 2-3 minutes. This allows the flavors to mix nicely. To thicken the sauce, lower the heat and stir in 1/2 cup of coconut cream. You can also use cashew cream for a different taste. Add 2 tablespoons of nutritional yeast for a cheesy flavor. Mix until well combined. If the sauce is too thick, feel free to add some reserved pasta water until it reaches your desired consistency. Finally, toss the cooked pasta into the mushroom sauce. Mix everything gently to combine. Season with salt and pepper to taste. You can find the full recipe for this creamy comfort bowl [here](#). - Overcooking mushrooms: Mushrooms should be tender but not mushy. Cook them until they are golden brown. This gives great flavor. - Skipping the pasta water reservation: Always save some pasta water. This starchy water helps your sauce cling to the pasta. - Additional herbs and spices: Try adding fresh thyme, rosemary, or a pinch of nutmeg. These will add depth. For a kick, a dash of cayenne can be great too. - How to balance flavors using acidity: A splash of lemon juice or a bit of vinegar brightens the dish. This makes the flavors pop and keeps it fresh. - Suggestions for protein-packed additions: Lentils work well for extra protein. They blend nicely with the sauce and add heartiness. - Ideas for different types of stroganoff: You can add spinach for a green twist. This not only adds color but also boosts nutrition. For the full recipe, check out the details above and enjoy making this comforting bowl of vegan mushroom stroganoff! {{image_2}} If you want a gluten-free vegan mushroom stroganoff, choose gluten-free pasta. Brands like Barilla and Banza offer great options. For the sauce, look for gluten-free soy sauce or tamari. These swaps make the dish safe for those avoiding gluten. You can use coconut cream or cashew cream for a rich texture. Coconut cream gives a sweet taste, while cashew cream adds a nutty flavor. If you need a nut-free option, consider using sunflower seed cream. This keeps the dish creamy without nuts. For an extra depth of flavor, add a splash of white wine. It enhances the overall taste and aroma. If you like some heat, sprinkle in chili flakes or a dash of sriracha. These bold twists make your stroganoff unique and exciting. To keep your vegan mushroom stroganoff fresh, store it in the fridge. Use airtight containers. Glass containers work well, as they don’t stain and seal tightly. Ensure the stroganoff has cooled before sealing. This helps avoid moisture build-up inside. It will stay fresh for about 3 to 5 days. When you reheat your stroganoff, aim to keep it creamy. The stovetop is my favorite method. Pour the stroganoff into a pan over low heat. Stir often to heat evenly. If it thickens too much, add a splash of vegetable broth or water. For the microwave, use a microwave-safe bowl. Heat in short bursts, stirring in between. This way, it warms evenly without drying out. You can enjoy leftover stroganoff cold too! It makes a tasty addition to salads. Just slice it up and toss it with greens, cherry tomatoes, and a light dressing. Another fun idea is to make a quick wrap. Spread cold stroganoff in a tortilla, add some fresh veggies, and roll it up for a tasty lunch! Vegan mushroom stroganoff lasts about 3 to 5 days in the fridge. To keep it fresh, store it in an airtight container. Make sure it cools down before you seal it up. This helps to prevent moisture build-up, which can make it soggy. Yes, you can freeze vegan mushroom stroganoff. Place it in a freezer-safe container or bag. Try to remove as much air as possible. It will stay good for about 2 to 3 months. When you’re ready to eat, thaw it in the fridge overnight. Warm it up on the stove or in the microwave. You might need to add a splash of broth or water to help with the texture. You can serve vegan mushroom stroganoff with many sides. Here are some great ideas: - Steamed broccoli - Garlic bread - Simple green salad - Roasted vegetables - Quinoa or rice Yes, this recipe is great for meal prep. You can make a big batch and divide it into portions. Store them in containers for easy lunches or dinners during the week. Just remember to keep the pasta and sauce separate if you want to maintain the best texture. Mix them together when you’re ready to eat. This way, you enjoy a fresh, tasty meal every time! For the full recipe, check the details above. Cooking vegan mushroom stroganoff is a fun and tasty adventure. You learned about key ingredients, like mixed mushrooms and coconut cream, and how to cook pasta just right. We discussed tips to enhance flavor, avoid mistakes, and create your perfect dish. In closing, this recipe offers great flavor and flexibility. Experiment with different add-ins and storage ideas. You can create a mushroom stroganoff that suits your tastes every time. Enjoy your cooking journey and the delicious meals that come from it!

Vegan Mushroom Stroganoff Creamy Comfort Bowl

Are you ready for a delicious and creamy comfort bowl? Vegan Mushroom Stroganoff is your answer! This dish is rich,

Older posts
Newer posts
← Previous Page1 … Page8 Page9 Page10 … Page29 Next →

dsad

© 2025 easycookingbite • Built with GeneratePress

Our Policies

  • Copyright Policy
  • Cookie Policy
  • GDPR Policy
  • Privacy Policy
  • Disclaimer
  • Terms Of Use

More Information

  • Home
  • About
  • Contact
  • Appetizers
  • Dessert
  • Dinner
  • Drinks
©2025, easycookingbite About Back To Top