Are you ready to indulge in a sweet treat that combines two classic desserts? Chocolate Dipped Cannoli Cones are here to satisfy your cravings! With a crunchy cone filled with rich, creamy goodness and a layer of smooth chocolate, this dessert will make your taste buds dance. In this guide, I’ll share easy steps, handy tips, and fun variations. Get ready to delight in this delicious dessert treat!
Why I Love This Recipe
- Decadent Flavor: The combination of rich ricotta and mascarpone creates a creamy, luscious filling that’s perfectly complemented by the chocolate dip.
- Fun Presentation: These cannoli cones are not only delicious but also visually stunning, making them an eye-catching dessert for any occasion.
- Customizable Toppings: With options like chopped pistachios or colorful sprinkles, you can personalize each cone to suit your taste or event theme.
- Easy to Make: This recipe comes together quickly, making it perfect for both novice and experienced bakers looking to impress.
Ingredients
Essential Ingredients for Cannoli Cones
To make these tasty treats, you need the following key ingredients:
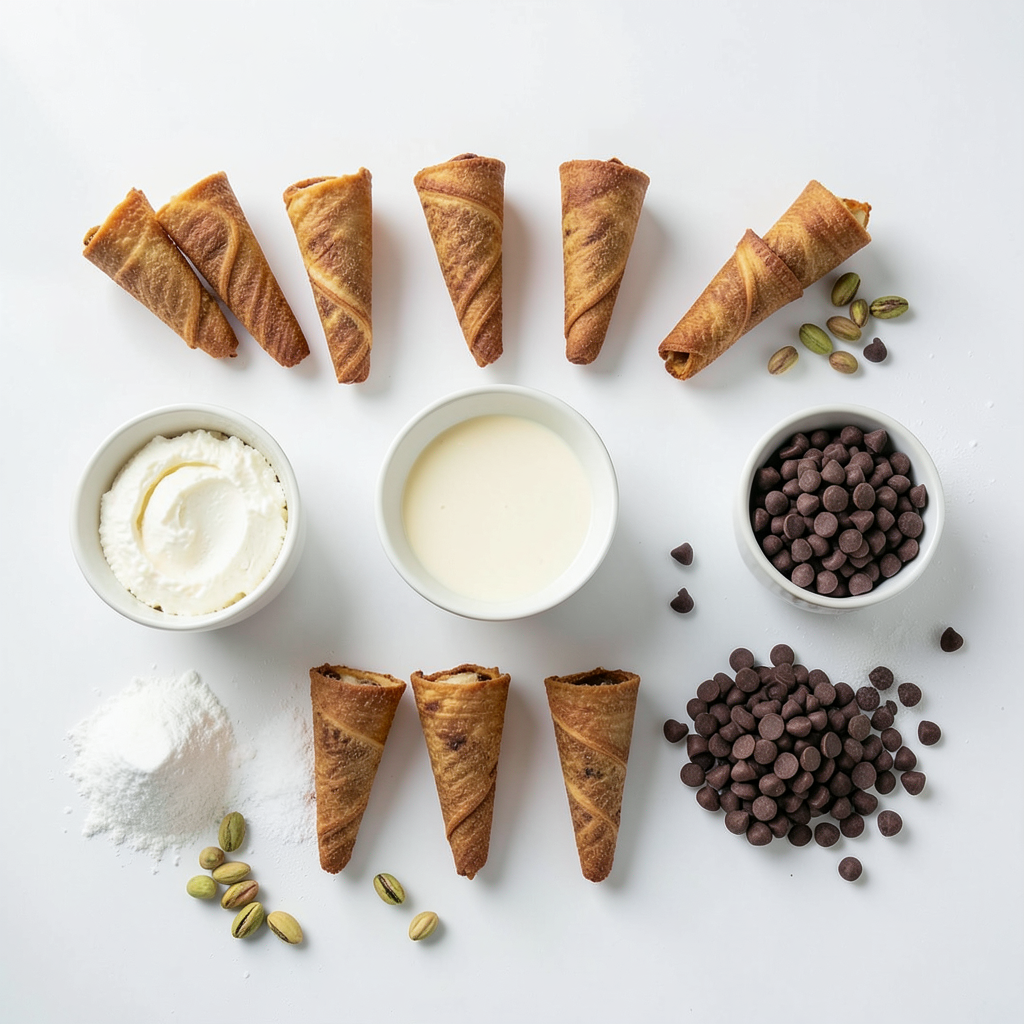
- 12 cannoli pastry cones (store-bought or homemade)
- 2 cups ricotta cheese
- 1 cup mascarpone cheese
- 3/4 cup powdered sugar
- 1 teaspoon vanilla extract
- 1/2 cup mini chocolate chips
- 1 cup semisweet chocolate chips (for dipping)
- 1 tablespoon coconut oil (for smooth melting of chocolate)
These ingredients create a creamy filling and a rich chocolate dip that makes each bite special.
Optional Ingredients for Variations
You can customize your cannoli cones with these fun extras:
- Chopped pistachios (great for a nutty crunch)
- Colorful sprinkles (for a festive touch)
- Other flavored extracts like almond or hazelnut (for unique flavors)
Feel free to get creative! Each added ingredient can change the taste and look of your cones.
Recommended Tools and Equipment
To make your chocolate dipped cannoli cones, gather these tools:
- Large mixing bowl
- Hand mixer or whisk
- Microwave-safe bowl
- Spoon or piping bag (for filling cones)
- Glass or muffin tin (for holding cones upright)
These tools will help you mix, fill, and dip your cones with ease.
Step-by-Step Instructions
Preparing the Filling
First, gather your ingredients. You need ricotta cheese, mascarpone cheese, powdered sugar, and vanilla extract. In a large bowl, add 2 cups of ricotta cheese and 1 cup of mascarpone. Next, sprinkle in 3/4 cup of powdered sugar and add 1 teaspoon of vanilla extract.
Blend the mix with a hand mixer or a whisk. You want it smooth and creamy. This takes just a few minutes. Once blended, fold in 1/2 cup of mini chocolate chips. Make sure the chips spread evenly through the cream.
Assembling the Cannoli Cones
Now, it's time to fill the cones. Take your cannoli pastry cones. Use a spoon to carefully fill each cone with the creamy mixture. Fill them generously, but don’t overstuff. You want a nice balance.
Once filled, place the cones on a tray. This makes it easy for the next step.
Melting the Chocolate and Dipping
For the chocolate, you will need 1 cup of semisweet chocolate chips and 1 tablespoon of coconut oil. This oil helps the chocolate melt smoothly.
In a microwave-safe bowl, combine the chocolate chips and coconut oil. Microwave in 30-second intervals. Stir the mix after each interval until everything is melted and smooth.
Now, dip the top rim of each filled cannoli cone into the melted chocolate. Let the excess drip off. Immediately sprinkle chopped pistachios or colorful sprinkles over the chocolate edge. This adds a nice touch.
Stand the dipped cones upright in a glass or muffin tin. This helps them hold their shape while the chocolate sets. Wait about 10-15 minutes for the chocolate to cool completely. You can also speed things up by putting them in the fridge for a few minutes.
Now your delightful Chocolate Dipped Cannoli Cones are ready to enjoy!
Tips & Tricks
Achieving the Perfect Cannoli Cream
To make the best cannoli cream, start with fresh ingredients. Use whole milk ricotta. I like to drain the ricotta overnight. This helps remove extra liquid and makes the cream thick. Mix ricotta and mascarpone for a rich flavor. Add powdered sugar to sweeten it. A touch of vanilla extract gives a nice flavor boost. Blend until smooth, but don’t overmix. Fold in mini chocolate chips for a sweet surprise.
Best Practices for Dipping in Chocolate
For the chocolate dip, use semisweet chocolate chips. Add a tablespoon of coconut oil. This helps the chocolate melt smoothly. Microwave in short bursts and stir often. Dip the top rim of each cone in the chocolate. Let excess chocolate drip off. While it’s still wet, sprinkle chopped pistachios or colorful sprinkles on top. This adds a fun crunch and color. Stand the cones in a glass or muffin tin to cool.
Serving Suggestions for Presentation
Presentation is key to impressing your guests. Place the chocolate-dipped cannoli cones on a nice platter. You can also arrange them in a tall glass for height. Add fresh berries around the cones for color. Drizzle some chocolate sauce on the plate for flair. For a touch of elegance, dust with powdered sugar before serving. Your guests will love the look and taste!
Pro Tips
- Chill the Filling: For the best flavor and texture, chill the ricotta filling for at least 30 minutes before filling the cones. This helps the flavors meld beautifully.
- Quality Chocolate: Use high-quality semisweet chocolate for dipping. The better the chocolate, the richer the flavor of your cannoli cones will be.
- Experiment with Flavors: Feel free to add other flavorings like orange zest or almond extract to the filling for a unique twist on the traditional cannoli.
- Serve Fresh: For the best experience, serve the cannoli cones shortly after preparing them. This ensures the cones remain crispy and the filling fresh.
Variations
Different Filling Ideas
You can play with the filling to create fun flavors. Instead of just ricotta and mascarpone, try adding cream cheese for a tangy twist. You might also mix in flavored extracts like almond or orange zest. For a fruity touch, add mashed berries or small pieces of fruit. This changes the flavor and adds color, making your dessert more inviting.
Alternative Toppings and Garnishes
The toppings can change your dessert's look and taste. Instead of pistachios, try chopped walnuts or hazelnuts for a different crunch. You can use shredded coconut for a tropical vibe. Sprinkles add a fun touch, especially for kids. For a more elegant look, drizzle melted white chocolate over the cones before serving. Each option makes the cannoli cones unique and fun.
Flavoring the Chocolate Dip
You can flavor the chocolate dip to match your filling. Add a pinch of sea salt for a salty-sweet contrast. If you love coffee, mix in instant espresso powder. For a minty taste, peppermint extract can brighten the chocolate. You can even use flavored chocolate, like dark or white chocolate, to change the dip’s character. These small tweaks can make your cannoli cones stand out at any gathering.
Storage Info
How to Store Leftover Cannoli Cones
To store leftover cannoli cones, place them in an airtight container. Keep the filled cones in the fridge. They stay fresh for up to two days. If you wait too long, the shell may become soggy. So, it’s best to eat them quickly!
Freezing Tips for Cannoli Cones
If you want to freeze your cannoli cones, fill only the empty shells. Wrap them tightly in plastic wrap. Then, place them in a freezer bag. They can last up to three months. When you're ready to enjoy, just thaw them in the fridge. Then, fill them with the cream.
Best Practices for Maintaining Freshness
For the best taste, do not fill the cones until you are ready to serve. This keeps the shells crispy. If you have leftover filling, store it separately in the fridge. Use it within three days. You can also fill new cones later for a fresh treat!
FAQs
Can I make my own cannoli cones?
Yes, you can make your own cannoli cones. To do this, you need dough made from flour, sugar, and eggs. Roll it thin and cut it into triangles. Then, wrap the triangles around metal cones and fry them until golden brown. This gives you fresh, crispy shells for your filling. Homemade cones add a special touch to your dessert.
How long do chocolate dipped cannoli cones last?
Chocolate dipped cannoli cones last up to three days. Store them in an airtight container in a cool place. If you keep them in the fridge, they may last a bit longer. However, the chocolate may soften the shells over time. For the best flavor, enjoy them fresh.
What can I use instead of ricotta cheese?
If you want to swap out ricotta cheese, try using cream cheese. It gives a rich taste and smooth texture. Another option is cottage cheese. Just blend it well to make it creamy. You can also use mascarpone cheese, which is rich and sweet. Each option adds a unique flavor to your cannoli filling.
You now know how to create delicious cannoli cones. We covered essential and optional ingredients, tools needed, and step-by-step instructions. Tips helped you perfect the filling and understand storage. You can experiment with different fillings and toppings to suit your taste.
Keep these tips in mind to make your cannoli cones the best they can be. Enjoy the fun and joy of making these treats, whether for yourself or as a special gift. Happy cannoli making!