Chocolate Dipped Pretzel Rods Irresistible Sweet Treats

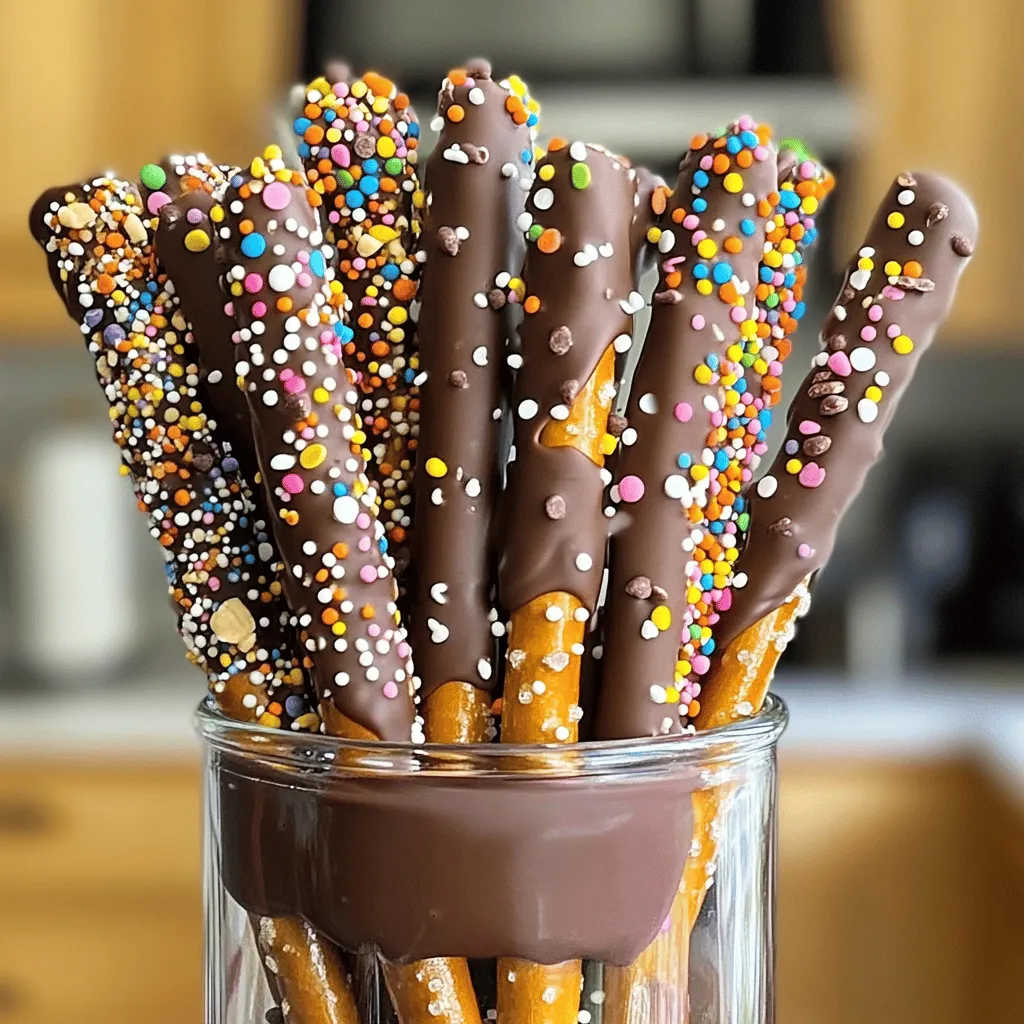
If you’re looking for a treat that’s both sweet and salty, chocolate dipped pretzel rods are the perfect snack! Easy to make and fun to customize, these delicious bites will impress everyone. With just a few basic ingredients, you can create a tasty treat for any occasion. Let’s dive into how to make these irresistible snacks and explore fun topping ideas that will elevate your flavor game!

Ingredients

To make chocolate dipped pretzel rods, you need simple ingredients that are easy to find. Here’s what you will need:

– 12 pretzel rods

– 1 cup semi-sweet chocolate chips

– 1 tablespoon coconut oil (or any neutral oil)

– 1/2 cup assorted toppings (sprinkles, crushed nuts, shredded coconut, mini chocolate chips, etc.)

These ingredients come together to create a sweet and salty treat. The pretzel rods give a nice crunch, while the chocolate adds sweetness. You can also mix and match toppings to suit your taste. I love using colorful sprinkles for a fun look, or crushed nuts for a little extra crunch.

If you want to explore more, check out the Full Recipe for detailed steps and tips. Enjoy crafting your own chocolate dipped pretzel rods!

Step-by-Step Instructions

Preparation of Workspace

Start by lining a baking sheet with parchment paper. This will help the pretzel rods not stick. Make sure to gather all your ingredients and tools. You will need pretzel rods, chocolate chips, coconut oil, and toppings. Keep them close by for easy access.

Melting the Chocolate

To melt the chocolate, use a microwave-safe bowl. Combine the semi-sweet chocolate chips with the coconut oil. Heat in the microwave in 30-second bursts. Stir well after each burst until the chocolate is smooth. If you don’t have a microwave, use a double boiler. Place a heat-safe bowl over simmering water, and stir until melted.

Dipping and Decorating

Once the chocolate melts, grab a pretzel rod. Hold it by one end and dip it into the chocolate. Twist it out to get an even coat. Let the extra chocolate drip back into the bowl. While the chocolate is still wet, roll the dipped part in your toppings. This is when the fun begins!

Cooling and Setting Process

Place the dipped pretzel rods on the lined baking sheet. Repeat the dipping with all pretzel rods. After dipping, chill them in the refrigerator for about 30 minutes. This helps the chocolate set well. For best results, avoid moving them until they are set.

Serving Suggestions

When ready to serve, take the pretzel rods out of the fridge. You can arrange them in a tall glass or jar. This makes for a fun display. For gifts, tie them with a colorful ribbon. You can pair them with hot cocoa or a sweet dip for extra fun.

Check the Full Recipe to make these delightful treats!

Tips & Tricks

Maintaining Smooth Chocolate

To keep your chocolate smooth, you need to control the heat. Melt your chocolate in short bursts. Microwave it for just 30 seconds at a time. Stir after each burst. This helps avoid hot spots that can scorch the chocolate.

Add one tablespoon of coconut oil to the chocolate. This will help it melt better and stay smooth. Coconut oil makes the chocolate shiny and gives it a nice finish.

If you see clumps in your chocolate, don’t panic. Just keep stirring. If the chocolate cools too much, you can heat it again for a few seconds.

Expert Dipping Techniques

When you dip your pretzel rods, hold them by one end. This makes it easy to control the dip. Dip the rod into the chocolate at an angle. This helps get a nice coat without too much mess.

Make sure to twist the rod as you pull it out. This lets the excess chocolate drip off. You want an even coating, so don’t rush this part. A good dip makes the pretzel look great and taste better.

Creative Decoration Ideas

Decorating your pretzel rods can be fun. Use colorful toppings to make them pop. Sprinkles, nuts, and mini chocolate chips work well. You can mix and match to create unique looks.

Think about the season too. Use red and green sprinkles for Christmas. For Halloween, go with orange and black. These small touches can make your treats stand out.

You can find the full recipe for these chocolate dipped pretzel rods to get started!

Variations

Flavorful Dipping Options

You can switch up the chocolate for your pretzel rods. White chocolate is a fun choice. It adds a sweet and creamy taste that pairs well with the salty pretzel. You can also melt flavored chocolates. You might try caramel or mint chocolate. Each type adds its own twist to the classic recipe.

Unique Topping Combinations

Mixing toppings can change your pretzel rods from good to great! Think about sweet and savory mixes. You can use crushed pretzels for a salty kick. Or add a sprinkle of sea salt for a great contrast. For holidays, try festive toppings. Red and green sprinkles for Christmas or pastel colors for Easter make them pop!

Different Types of Pretzels

Pretzel rods are popular, but don’t forget about pretzel bites. They are smaller and great for dipping too. If you need a gluten-free option, there are many brands out there. Just check the label to make sure. No matter the type, chocolate-dipped pretzels are always a hit.

For the full recipe, check out the details above!

Storage Info

Best Storage Practices

To keep your chocolate dipped pretzel rods fresh, you can store them at room temperature or in the fridge. If you choose room temperature, place them in a cool, dry spot away from sunlight. This keeps the chocolate smooth and tasty. If it’s hot, the fridge is better. Just make sure they are sealed well.

Use an airtight container to store your pretzel rods. This will keep them crunchy and prevent them from absorbing moisture. If you stack them, separate layers with parchment paper to avoid sticking.

Shelf Life of Chocolate Dipped Pretzel Rods

Chocolate dipped pretzel rods can last about two weeks if stored properly. After that, they may start to lose their crunch. Signs of spoilage include a dull appearance or a change in texture. If the chocolate looks white or chalky, that’s called bloom. This means it’s time to toss them. Enjoy your sweet treats while they’re at their best!

For the full recipe, check out the details above.

FAQs

Can I use other types of chocolate?

Yes, you can use different types of chocolate for your pretzel rods. If you like dark chocolate, go for it! Dark chocolate adds a rich flavor. If you prefer a sweeter taste, milk chocolate works great too. You can even mix chocolates for a fun twist. Just melt them the same way as the semi-sweet chocolate.

How do I make these pretzel rods gluten-free?

To make pretzel rods gluten-free, simply use gluten-free pretzels. Many brands offer gluten-free options that taste just as good. Check labels to ensure they are safe for your diet. You can also find recipes to make your own gluten-free pretzels at home if you want to try that route.

What occasions are these pretzel rods great for?

These pretzel rods are perfect for many events! They make great snacks for birthday parties and movie nights. You can serve them at holiday gatherings or bake sales too. They are also fun for kids’ parties or school events. People love them, and they look great on a snack table!

You now have all you need to make delicious chocolate-dipped pretzel rods. We covered the ingredients, preparation, and creative ways to decorate them. You learned tips to maintain smooth chocolate and got ideas for tasty variations. Remember to store them well to enjoy later. These treats are perfect for parties or just for fun. Get creative with flavors and toppings. Enjoy making and sharing them!

To make chocolate dipped pretzel rods, you need simple ingredients that are easy to find. Here’s what you will need: - 12 pretzel rods - 1 cup semi-sweet chocolate chips - 1 tablespoon coconut oil (or any neutral oil) - 1/2 cup assorted toppings (sprinkles, crushed nuts, shredded coconut, mini chocolate chips, etc.) These ingredients come together to create a sweet and salty treat. The pretzel rods give a nice crunch, while the chocolate adds sweetness. You can also mix and match toppings to suit your taste. I love using colorful sprinkles for a fun look, or crushed nuts for a little extra crunch. If you want to explore more, check out the Full Recipe for detailed steps and tips. Enjoy crafting your own chocolate dipped pretzel rods! Start by lining a baking sheet with parchment paper. This will help the pretzel rods not stick. Make sure to gather all your ingredients and tools. You will need pretzel rods, chocolate chips, coconut oil, and toppings. Keep them close by for easy access. To melt the chocolate, use a microwave-safe bowl. Combine the semi-sweet chocolate chips with the coconut oil. Heat in the microwave in 30-second bursts. Stir well after each burst until the chocolate is smooth. If you don’t have a microwave, use a double boiler. Place a heat-safe bowl over simmering water, and stir until melted. Once the chocolate melts, grab a pretzel rod. Hold it by one end and dip it into the chocolate. Twist it out to get an even coat. Let the extra chocolate drip back into the bowl. While the chocolate is still wet, roll the dipped part in your toppings. This is when the fun begins! Place the dipped pretzel rods on the lined baking sheet. Repeat the dipping with all pretzel rods. After dipping, chill them in the refrigerator for about 30 minutes. This helps the chocolate set well. For best results, avoid moving them until they are set. When ready to serve, take the pretzel rods out of the fridge. You can arrange them in a tall glass or jar. This makes for a fun display. For gifts, tie them with a colorful ribbon. You can pair them with hot cocoa or a sweet dip for extra fun. Check the Full Recipe to make these delightful treats! To keep your chocolate smooth, you need to control the heat. Melt your chocolate in short bursts. Microwave it for just 30 seconds at a time. Stir after each burst. This helps avoid hot spots that can scorch the chocolate. Add one tablespoon of coconut oil to the chocolate. This will help it melt better and stay smooth. Coconut oil makes the chocolate shiny and gives it a nice finish. If you see clumps in your chocolate, don’t panic. Just keep stirring. If the chocolate cools too much, you can heat it again for a few seconds. When you dip your pretzel rods, hold them by one end. This makes it easy to control the dip. Dip the rod into the chocolate at an angle. This helps get a nice coat without too much mess. Make sure to twist the rod as you pull it out. This lets the excess chocolate drip off. You want an even coating, so don’t rush this part. A good dip makes the pretzel look great and taste better. Decorating your pretzel rods can be fun. Use colorful toppings to make them pop. Sprinkles, nuts, and mini chocolate chips work well. You can mix and match to create unique looks. Think about the season too. Use red and green sprinkles for Christmas. For Halloween, go with orange and black. These small touches can make your treats stand out. You can find the full recipe for these chocolate dipped pretzel rods to get started! {{image_2}} You can switch up the chocolate for your pretzel rods. White chocolate is a fun choice. It adds a sweet and creamy taste that pairs well with the salty pretzel. You can also melt flavored chocolates. You might try caramel or mint chocolate. Each type adds its own twist to the classic recipe. Mixing toppings can change your pretzel rods from good to great! Think about sweet and savory mixes. You can use crushed pretzels for a salty kick. Or add a sprinkle of sea salt for a great contrast. For holidays, try festive toppings. Red and green sprinkles for Christmas or pastel colors for Easter make them pop! Pretzel rods are popular, but don’t forget about pretzel bites. They are smaller and great for dipping too. If you need a gluten-free option, there are many brands out there. Just check the label to make sure. No matter the type, chocolate-dipped pretzels are always a hit. For the full recipe, check out the details above! To keep your chocolate dipped pretzel rods fresh, you can store them at room temperature or in the fridge. If you choose room temperature, place them in a cool, dry spot away from sunlight. This keeps the chocolate smooth and tasty. If it’s hot, the fridge is better. Just make sure they are sealed well. Use an airtight container to store your pretzel rods. This will keep them crunchy and prevent them from absorbing moisture. If you stack them, separate layers with parchment paper to avoid sticking. Chocolate dipped pretzel rods can last about two weeks if stored properly. After that, they may start to lose their crunch. Signs of spoilage include a dull appearance or a change in texture. If the chocolate looks white or chalky, that’s called bloom. This means it’s time to toss them. Enjoy your sweet treats while they’re at their best! For the full recipe, check out the details above. Yes, you can use different types of chocolate for your pretzel rods. If you like dark chocolate, go for it! Dark chocolate adds a rich flavor. If you prefer a sweeter taste, milk chocolate works great too. You can even mix chocolates for a fun twist. Just melt them the same way as the semi-sweet chocolate. To make pretzel rods gluten-free, simply use gluten-free pretzels. Many brands offer gluten-free options that taste just as good. Check labels to ensure they are safe for your diet. You can also find recipes to make your own gluten-free pretzels at home if you want to try that route. These pretzel rods are perfect for many events! They make great snacks for birthday parties and movie nights. You can serve them at holiday gatherings or bake sales too. They are also fun for kids' parties or school events. People love them, and they look great on a snack table! You now have all you need to make delicious chocolate-dipped pretzel rods. We covered the ingredients, preparation, and creative ways to decorate them. You learned tips to maintain smooth chocolate and got ideas for tasty variations. Remember to store them well to enjoy later. These treats are perfect for parties or just for fun. Get creative with flavors and toppings. Enjoy making and sharing them!

Chocolate Dipped Pretzel Rods

Indulge in these irresistible chocolate dipped pretzel rods that are perfect for any occasion! With just a few simple ingredients, you can create delicious snacks that are both sweet and salty. Dip your pretzel rods in melted chocolate and customize them with fun toppings like sprinkles or crushed nuts. Ready in just 45 minutes, these treats are sure to impress. Click through to explore the full recipe and start making your own delightful snacks today!

Ingredients
  

12 pretzel rods

1 cup semi-sweet chocolate chips

1 tablespoon coconut oil (or any neutral oil)

1/2 cup assorted toppings (sprinkles, crushed nuts, shredded coconut, mini chocolate chips, etc.)

Instructions
 

Prepare the Workspace: Line a baking sheet with parchment paper to place the dipped pretzel rods on later. Make sure everything is within reach.

    Melt the Chocolate: In a microwave-safe bowl, combine the semi-sweet chocolate chips and coconut oil. Microwave in 30-second intervals, stirring after each interval, until the chocolate is completely melted and smooth.

      Dip the Pretzel Rods: Hold each pretzel rod by one end and dip it into the melted chocolate, twisting as you remove it to ensure even coverage. Let the excess chocolate drip off.

        Add Toppings: While the chocolate is still wet, immediately roll or dip the chocolate-covered part of the pretzel into your chosen toppings, allowing them to adhere.

          Cool and Set: Place the decorated pretzel rods on the prepared baking sheet. Repeat the dipping process with the remaining pretzel rods.

            Chill: Once all pretzel rods are dipped and decorated, place the baking sheet in the refrigerator for about 30 minutes, or until the chocolate has fully set.

              Serve: Remove the pretzel rods from the refrigerator and serve as a delightful snack or dessert.

                Prep Time: 15 minutes | Total Time: 45 minutes | Servings: 12 pretzel rods

                  - Presentation Tips: Arrange the finished pretzel rods in a tall glass or jar for a fun, decorative display. You can also tie them together with a colorful ribbon for gifting!

                    Leave a Comment

                    Recipe Rating