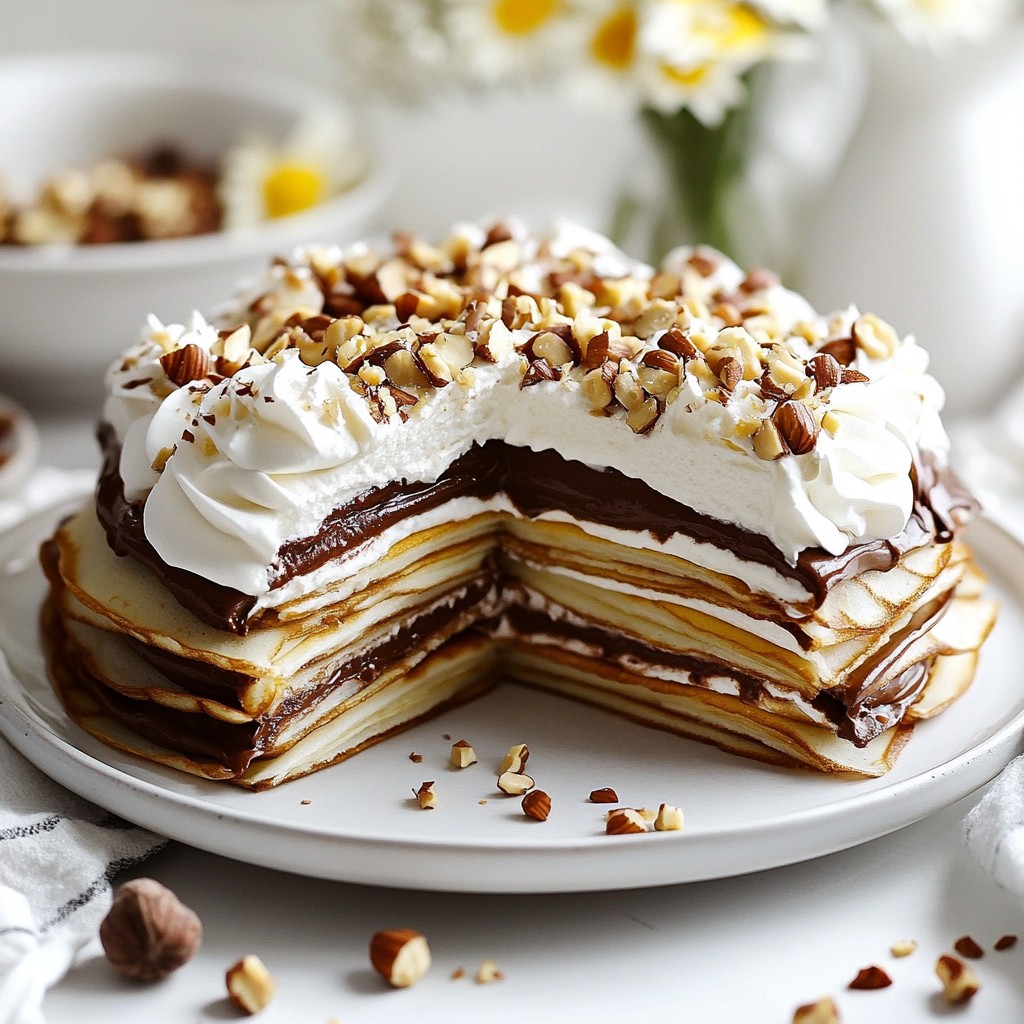
Craving a sweet treat that will wow your family and friends? Look no further! This Chocolate Hazelnut Crepe Cake combines rich chocolate and creamy hazelnut flavors into a delightful dessert. In this post, I'll guide you step-by-step through making your own masterpiece. From selecting the best ingredients to avoiding common mistakes, you’ll have all you need to impress. Let’s dive into this delicious adventure together!
Why I Love This Recipe
- Decadent Layers: This crepe cake features rich layers of chocolate hazelnut spread and fluffy whipped cream, creating a delightful contrast of textures and flavors.
- Impressive Presentation: The elegant stacking of crepes makes for a stunning dessert that is sure to impress your guests and elevate any occasion.
- Customizable: You can easily adjust the filling by adding different ingredients like fruits or flavored creams, allowing for endless variations of this cake.
- Make Ahead: This cake can be prepared in advance, and chilling it enhances the flavors, making it a perfect option for busy days or gatherings.
Ingredients
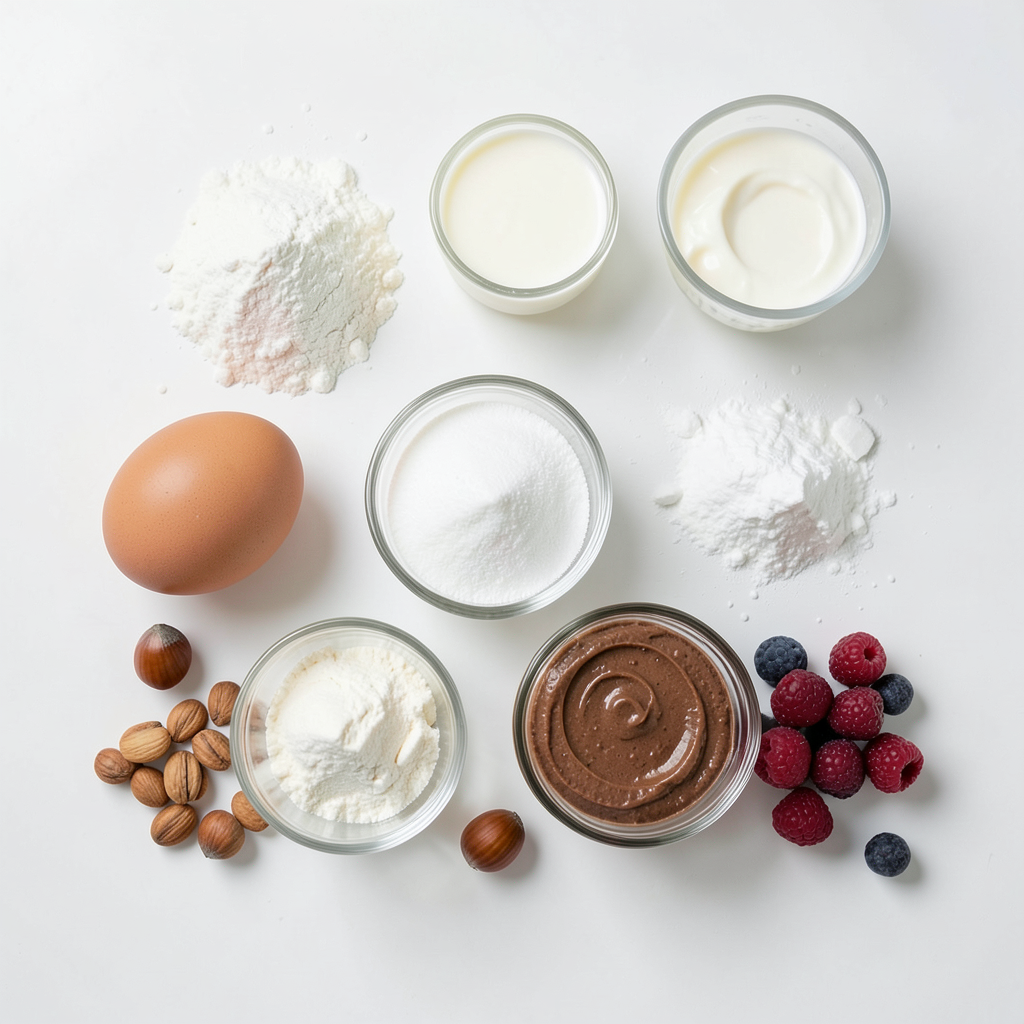
Complete List of Ingredients
To make the Chocolate Hazelnut Crepe Cake, gather these essential items:
- 2 cups all-purpose flour
- 4 large eggs
- 3 cups milk
- 1/4 cup granulated sugar
- 1/2 teaspoon salt
- 1 teaspoon vanilla extract
- 4 tablespoons unsalted butter, melted
- 1 cup chocolate hazelnut spread (such as Nutella)
- 1 cup heavy whipping cream
- 2 tablespoons powdered sugar
- 1/2 cup crushed hazelnuts (for garnish)
- Optional: fresh berries (for serving)
Ingredient Alternatives
If you need substitutes for any ingredients, here are some ideas:
- All-purpose flour: Use whole wheat flour or gluten-free flour.
- Eggs: Substitute with flaxseed meal mixed with water or applesauce for a vegan option.
- Milk: Almond milk or oat milk works well for dairy-free.
- Granulated sugar: Use coconut sugar or honey for natural sweetness.
- Heavy whipping cream: Coconut cream can replace it for a dairy-free option.
Tips for Selecting Quality Ingredients
Choosing the right ingredients makes a big difference. Here are my tips:
- Flour: Look for fresh all-purpose flour. Check the date on the bag.
- Eggs: Choose organic or free-range eggs for better flavor.
- Chocolate Hazelnut Spread: Pick a spread with natural ingredients. Avoid those with many additives.
- Heavy Cream: Select heavy cream with a high fat content for fluffiness.
- Hazelnuts: Buy whole hazelnuts and crush them yourself for better texture and taste.
Using these tips will enhance your Chocolate Hazelnut Crepe Cake. Happy baking!
Step-by-Step Instructions
Making the Crepe Batter
To start, you need to make the crepe batter. Grab a large mixing bowl. Add 2 cups of all-purpose flour, 4 large eggs, 3 cups of milk, 1/4 cup of granulated sugar, 1/2 teaspoon of salt, and 1 teaspoon of vanilla extract. Whisk everything together until it is smooth. This step is key. You want no lumps in your batter.
Next, stir in 4 tablespoons of melted unsalted butter. This gives the crepes a nice flavor. Once mixed, let the batter rest for 30 minutes. This helps the crepes become softer and more pliable when you cook them.
Cooking the Crepes Perfectly
Now, it’s time to cook the crepes. Heat a non-stick skillet over medium heat. Lightly grease it with a bit of butter. Pour in about 1/4 cup of batter. Quickly swirl the pan to cover the bottom evenly.
Cook the crepe for about 1-2 minutes. You’ll see the edges set, and the bottom should turn a light golden color. Carefully flip the crepe using a spatula and cook for another minute. Remove the crepe and stack it on a plate. Repeat this with the remaining batter.
Assembling the Chocolate Hazelnut Crepe Cake
Once your crepes are ready, it’s time to build the cake. Start with one crepe on a serving plate. Spread a layer of chocolate hazelnut spread on top of it. Use about 1/4 cup for each crepe.
Next, add a layer of whipped cream. To prepare this, whip 1 cup of heavy cream with 2 tablespoons of powdered sugar until soft peaks form. Be gentle with it.
Continue layering your crepes, alternating between hazelnut spread and whipped cream. Finish with a crepe on top. Once you've stacked them all, wrap the cake in plastic wrap. Chill it in the fridge for at least 1 hour. This step helps the flavors come together.
Before serving, sprinkle crushed hazelnuts on top and add fresh berries if you like. Slice into wedges and enjoy!
Tips & Tricks
Common Mistakes to Avoid
When making your Chocolate Hazelnut Crepe Cake, some mistakes can ruin your fun. Here are a few to watch for:
- Overmixing the batter: This can make your crepes tough. Mix until just combined.
- Skipping the resting time: Letting the batter rest for 30 minutes is key. It helps the flour absorb liquids and makes your crepes tender.
- Not greasing the pan: A non-stick skillet is great, but a little butter helps keep crepes from sticking.
- Cooking at too high a heat: A medium heat is best. It cooks the crepes evenly without burning them.
Pro Tips for Fluffy Whipped Cream
Fluffy whipped cream makes your cake special. Follow these tips for smooth results:
- Chill your bowl and beaters: Cold tools help the cream whip faster and stay fluffy.
- Don’t over-whip: Stop when you see soft peaks. Over-whipping can turn cream into butter.
- Add sugar slowly: Mix in powdered sugar gradually. This helps keep the cream light and airy.
How to Achieve Perfectly Layered Crepes
Stacking your crepes nicely makes your cake look stunning. Here’s how to do it right:
- Use a thin layer of batter: Pour just enough batter to coat the pan. This keeps crepes thin and easy to layer.
- Let each crepe cool: Allow them to cool slightly on a plate before stacking. This prevents them from sticking together.
- Alternate layers: Spread chocolate hazelnut spread and whipped cream between each crepe. This adds flavor and keeps layers distinct.
- Finish with a crepe: Top with a plain crepe. It gives a clean look and keeps fillings inside.
With these tips, your Chocolate Hazelnut Crepe Cake will look and taste amazing!
Pro Tips
- Let the Batter Rest: Allowing the crepe batter to rest for at least 30 minutes helps the gluten relax, resulting in more tender crepes.
- Use a Non-Stick Skillet: A non-stick skillet will help prevent the crepes from sticking and make flipping easier, ensuring they turn out perfectly golden.
- Layering Technique: When stacking the crepes, use a thin layer of chocolate hazelnut spread and whipped cream to keep the cake from becoming too heavy or soggy.
- Chill Before Serving: Chilling the assembled cake for at least an hour allows the flavors to meld and makes slicing easier.
Variations
Flavor Variations
You can add fun flavors to this cake. Try mixing in liqueurs or extracts. For example, a splash of hazelnut liqueur gives a nice touch. You might also add orange or almond extract for a unique taste. These small changes can make a big difference.
Dietary Substitutions
You can easily adapt this recipe for different diets. For a gluten-free option, use a gluten-free flour blend. It works well in the crepe batter. For vegans, substitute eggs with flax eggs and use plant-based milk. You can also use a vegan chocolate hazelnut spread. These swaps keep the taste great while meeting dietary needs.
Alternative Toppings and Garnishes
Garnishes can change the look and taste of your cake. Instead of just crushed hazelnuts, try using fresh berries. Strawberries or raspberries add color and a touch of tartness. You can also drizzle melted chocolate on top for extra richness. Use whipped cream for a light touch. These options make your cake even more appealing and delicious.
Storage Info
How to Store Leftovers
To keep your Chocolate Hazelnut Crepe Cake fresh, place it in the fridge. Use an airtight container or cover it tightly with plastic wrap. It will stay good for about 3 days. Each slice stays moist and tasty. If you like, you can also keep the crepes and filling separate. This helps keep the crepes from getting too soft.
Freezing Tips for Crepes
If you want to save crepes for later, you can freeze them. Stack the crepes with parchment paper between each one. This will stop them from sticking together. Wrap the stack in plastic wrap and then place it in a freezer bag. They will last for about 2 months in the freezer. When you want to use them, just thaw them in the fridge overnight.
Best Practices for Reheating Crepes
To reheat crepes, you can use a skillet. Heat the skillet on low heat. Place a crepe in the pan for about 30 seconds on each side. This will warm it without making it tough. You can also use the microwave. Just cover the crepe with a damp paper towel and heat for about 10-15 seconds. This keeps it soft and ready for more filling or toppings.
FAQs
What is a Chocolate Hazelnut Crepe Cake?
A Chocolate Hazelnut Crepe Cake is a layered dessert made of thin crepes. You stack these crepes with rich chocolate hazelnut spread and fluffy whipped cream. The result is a tasty and elegant cake. Each bite brings together soft crepes and sweet hazelnut flavor. It's perfect for any celebration or a special treat at home.
Can I make the crepes in advance?
Yes, you can make the crepes ahead of time. Once cooked, let them cool completely. Then, stack them between sheets of parchment paper. Place them in an airtight container in the fridge. They stay fresh for up to three days. This way, you save time when you are ready to assemble your cake.
How do I fix my crepe batter if it’s too thick?
If your crepe batter feels too thick, you can easily fix it. Just add a little milk, about a tablespoon at a time, and mix well. Keep checking the consistency. The batter should be smooth and pourable. A good crepe batter is similar to heavy cream. Adjusting it helps ensure your crepes cook evenly.
We explored how to make a delicious Chocolate Hazelnut Crepe Cake. You learned about essential ingredients and useful tips for selecting quality ones. I provided step-by-step guidance to make the batter and cook perfect crepes. We also discussed common mistakes and pro tips for whipped cream. Flavor variations and dietary substitutes make this cake versatile. Finally, I shared storage tips to keep your crepes fresh. Enjoy creating your own unique crepe cake masterpiece!