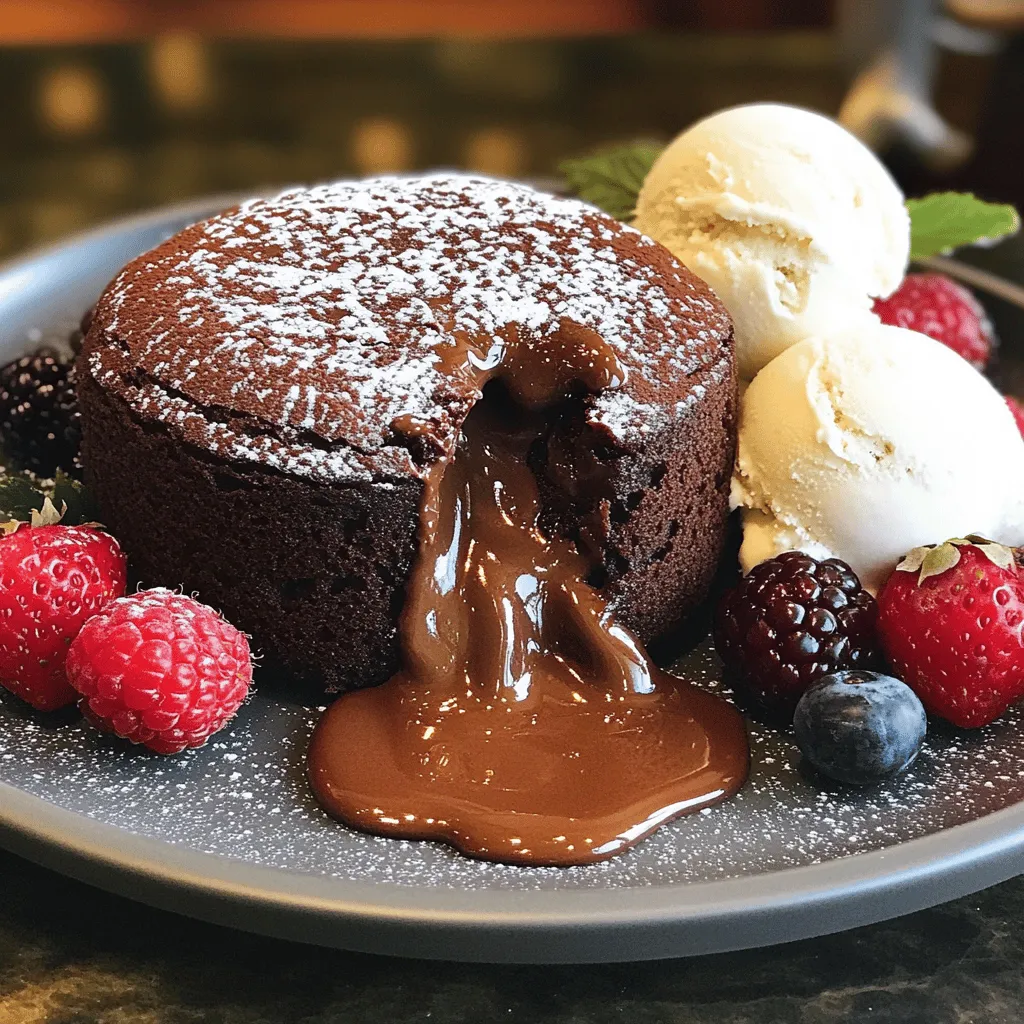
Are you ready to impress your friends with a dessert everyone loves? Chocolate Lava Cake is the ultimate indulgence, combining a rich exterior with a gooey, molten center. In this post, I’ll guide you step-by-step, sharing my secret tips and tricks. Whether you’re a baking pro or a beginner, you’ll find everything you need to create this mouthwatering delight. Let’s dive into this chocolatey adventure!
Ingredients
Essential Ingredients for Chocolate Lava Cake
To make a perfect chocolate lava cake, you need a few key items:
– 1 cup semi-sweet chocolate chips
– ½ cup unsalted butter
– 2 large eggs
– 2 large egg yolks
– ½ cup sugar
– 1 teaspoon vanilla extract
– ¼ cup all-purpose flour
– Pinch of salt
– Cocoa powder (for dusting)
These ingredients work together to create that rich, molten center. The chocolate chips give the cake its deep flavor, while the butter adds that lovely richness. Eggs and yolks provide structure, while sugar sweetens things up just right.
Optional Add-ins for Flavor Variations
Feeling adventurous? You can add fun flavors to your chocolate lava cake. Here are some ideas:
– A splash of espresso for a coffee kick
– A teaspoon of orange zest for a citrus twist
– A tablespoon of almond extract for a nutty flavor
Each of these choices gives your cake a new character. Feel free to mix and match to find your favorite!
Best Chocolate and Butter Choices
Choosing high-quality chocolate and butter is key. Look for:
– Semi-sweet chocolate with at least 60% cocoa for depth of flavor.
– Fresh, unsalted butter for a creamy taste without added salt.
These choices help create a dessert that is truly special. Remember, the better your ingredients, the better your cake will be.
Step-by-Step Instructions
Preparation and Preheating
Start by preheating your oven to 425°F (220°C). This high heat gives the cake its perfect gooey center. Next, grease four ramekins with butter. Dust them with cocoa powder. This step helps the cakes come out easily.
Mixing the Chocolate and Butter
For the chocolate and butter mix, grab a microwave-safe bowl. Add 1 cup of semi-sweet chocolate chips and ½ cup of unsalted butter. Microwave in 30-second intervals. Stir after each interval until it is smooth. This mixture should be rich and shiny.
Combining the Wet and Dry Ingredients
In a separate bowl, whisk together 2 large eggs, 2 egg yolks, and ½ cup of sugar. You want this mixture to be light and fluffy. Add 1 teaspoon of vanilla extract and mix well. Now, pour the melted chocolate mixture into the egg mix. Stir until fully combined.
Baking Time and Techniques
Sift in ¼ cup of all-purpose flour and add a pinch of salt. Gently fold this into your batter. Be careful not to over-mix. Divide the batter into the prepared ramekins, filling them about ¾ full. Bake for 12 to 14 minutes. The edges should be firm, but the center must stay soft.
How to Serve for Maximum Effect
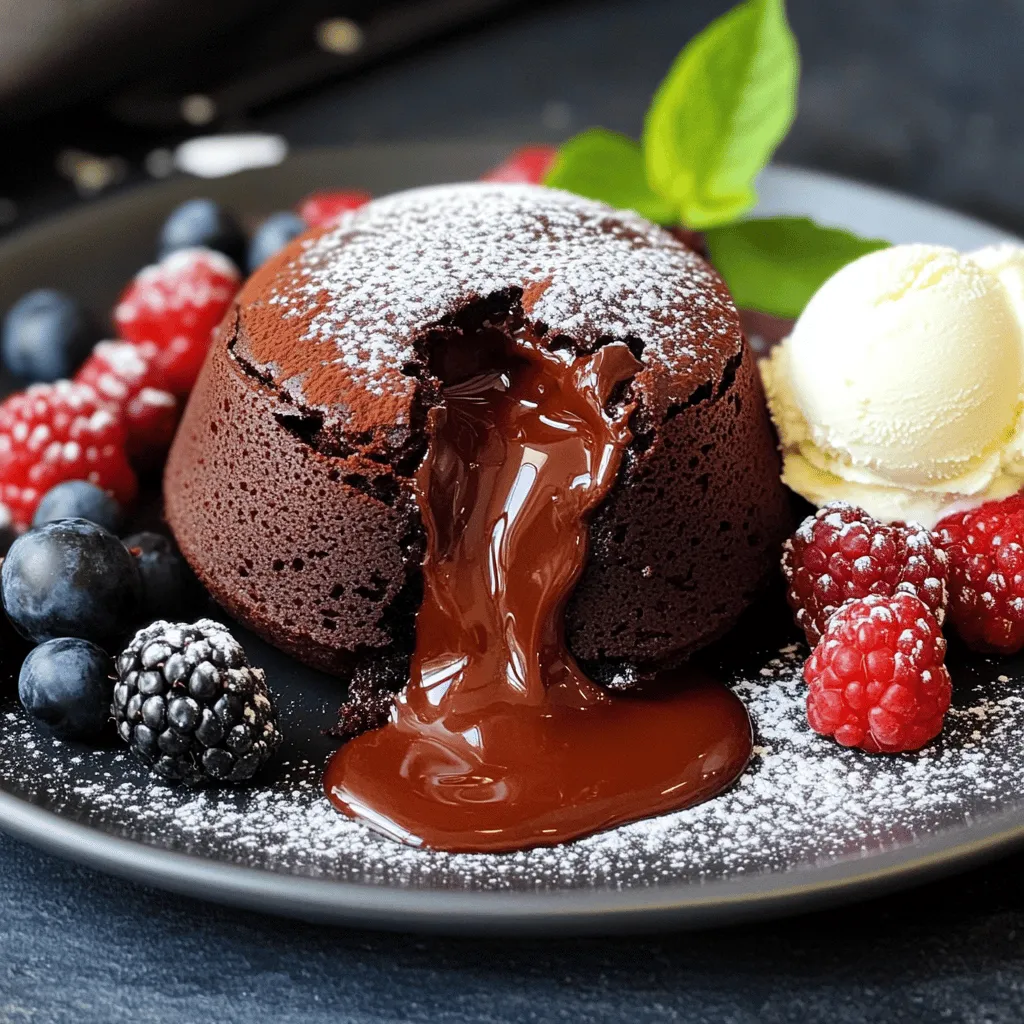
After baking, let the ramekins cool for 1 minute. Carefully run a knife around the edges to loosen the cakes. Invert each ramekin onto a plate. Lift it off gently to reveal the cake. Serve the lava cake while it is warm. Top with vanilla ice cream or whipped cream for a delightful touch. Dust the top with powdered sugar and add fresh berries for color. Enjoy this decadent treat!
Tips & Tricks
Ensuring a Perfect Lava Center
To get that gooey center, bake the cakes just right. You want the edges firm but the center soft. Keep a close eye on the timer. Start checking at 12 minutes. If the top looks set, it’s time to take them out.
Common Mistakes to Avoid
One common mistake is overmixing the batter. This can lead to a cake that’s too dense. Stir gently when combining the ingredients. Another mistake is not greasing the ramekins well. If they stick, you won’t have that lovely shape when serving.
Baking Substitutions for Dietary Restrictions
If you need to make swaps, here are some ideas. Use dairy-free chocolate and vegan butter for a dairy-free version. For gluten-free, try almond flour instead of all-purpose flour. These changes can still give you a delicious lava cake.
Variations
Different Flavor Profiles (Mint, Raspberry, etc.)
You can easily change the flavor of your lava cake. Try adding a few drops of peppermint extract for a minty twist. You can also mix in some raspberry puree to create a fruity taste. Both options give your cake a unique spin. Experiment with orange zest or espresso for more fun flavors. Each variation adds a new layer of joy to this classic dessert.
Gluten-Free and Dairy-Free Options
Making a gluten-free lava cake is simple. Use a gluten-free flour blend instead of all-purpose flour. For a dairy-free option, replace the butter with coconut oil or vegan butter. You can also use dairy-free chocolate chips. These swaps keep the cake soft and gooey. Your guests will love these options just as much as the original!
Adding Fillings and Toppings
Elevate your lava cake with fun fillings. You can add a spoonful of peanut butter or Nutella in the center before baking. This creates an extra surprise when you cut into the cake. Toppings like fresh berries, whipped cream, or a drizzle of caramel make it even more special. These additions enhance the flavor and look of your dessert. Remember to serve it warm for the best gooey experience.
Storage Info
Proper Storage Techniques for Leftovers
Store leftover chocolate lava cake in the fridge. Place cakes in an airtight container. This keeps them fresh for up to three days. If you don’t have a container, wrap each cake tightly in plastic wrap. This method also helps to avoid drying out.
Reheating Instructions for Best Results
To reheat, take the cake out of the fridge. Preheat your oven to 350°F (175°C). Place the cake on a baking sheet. Heat for about 10 minutes. Check to see if the center is warm. You want it gooey, not overcooked. If you prefer the microwave, use a low power setting. Heat for 20-30 seconds.
Freezing Chocolate Lava Cakes
You can freeze chocolate lava cakes for later. Wrap each cooled cake tightly in plastic wrap, then place it in a freezer-safe bag. Label the bag with the date. They can last up to three months in the freezer. To enjoy, thaw overnight in the fridge before reheating. Enjoy the gooey goodness again!
FAQs
How do I know when the lava cake is done?
You can tell when the lava cake is done by checking the edges. They should be firm, but the center must still look soft. A good rule is to bake for 12 to 14 minutes. If the top looks set but has a slight jiggle, it’s ready.
Can I make chocolate lava cake in advance?
Yes, you can make chocolate lava cake in advance. Prepare the batter and fill the ramekins. Then, cover and chill them in the fridge. When ready, bake them straight from the fridge. Just add a couple of extra minutes to the baking time.
What to do if the cake doesn’t ooze chocolate?
If the cake doesn’t ooze chocolate, it likely baked too long. Make sure to time it carefully next time. If you still want a gooey center, you can try baking at a lower temperature for a longer time. Experimenting helps find the perfect time for your oven.
Is it possible to make chocolate lava cake without ramekins?
Yes, you can make chocolate lava cake without ramekins. You can use muffin tins or silicone molds. Just adjust the baking time, as smaller portions may cook faster. Be sure to grease them well to prevent sticking.
What can I serve with chocolate lava cake?
You can serve chocolate lava cake with vanilla ice cream or whipped cream. Fresh berries like raspberries or strawberries add a nice touch, too. A drizzle of chocolate sauce can make it even more special. Feel free to get creative!
You’ve learned how to make delicious chocolate lava cake at home. We covered key ingredients, step-by-step instructions, and helpful tips. You can try fun flavor variations and even cater to special diets. Storing and reheating your cake will keep it fresh and tasty. Remember, practice makes perfect! Follow these tips to wow your friends and family. Enjoy the sweet reward of your yummy creation!