Chocolate Pumpkin Cheesecake Bars No-Bake Delight

WANT TO SAVE THIS RECIPE?

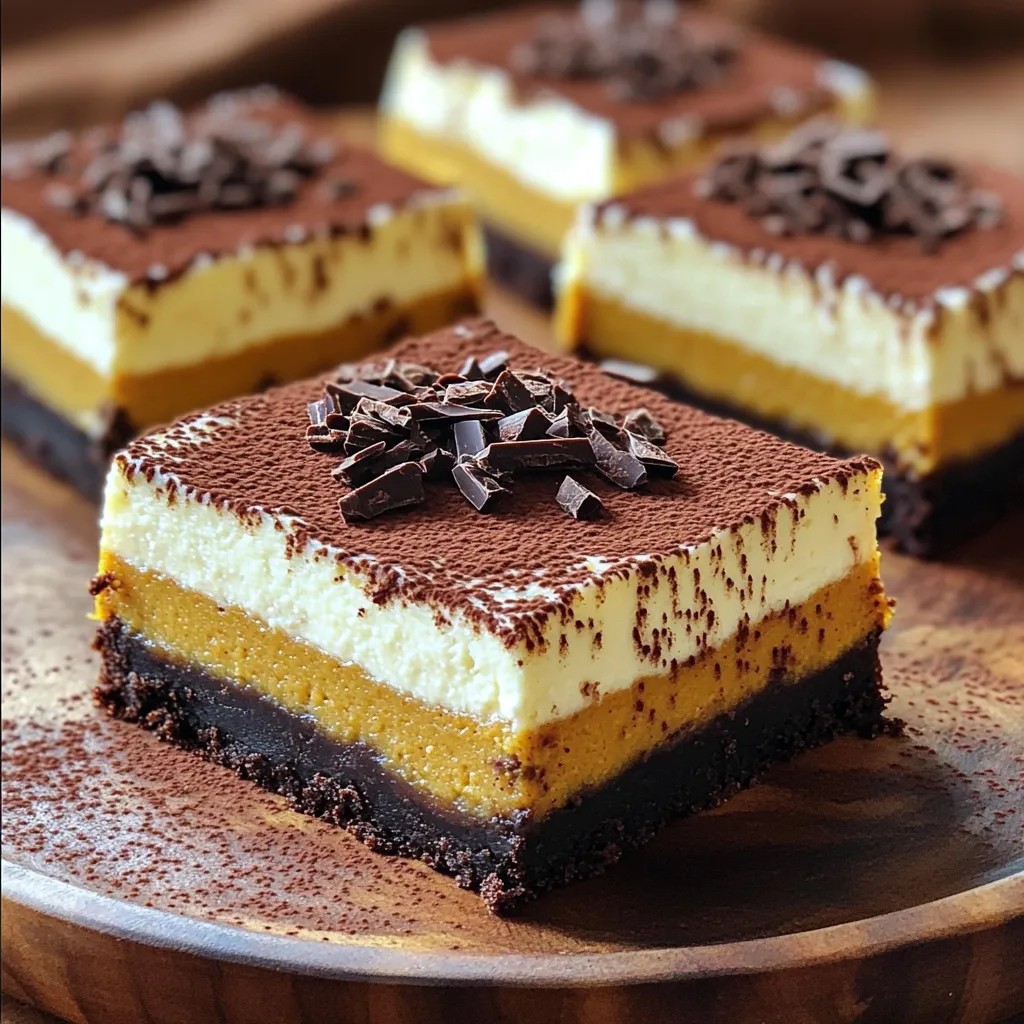
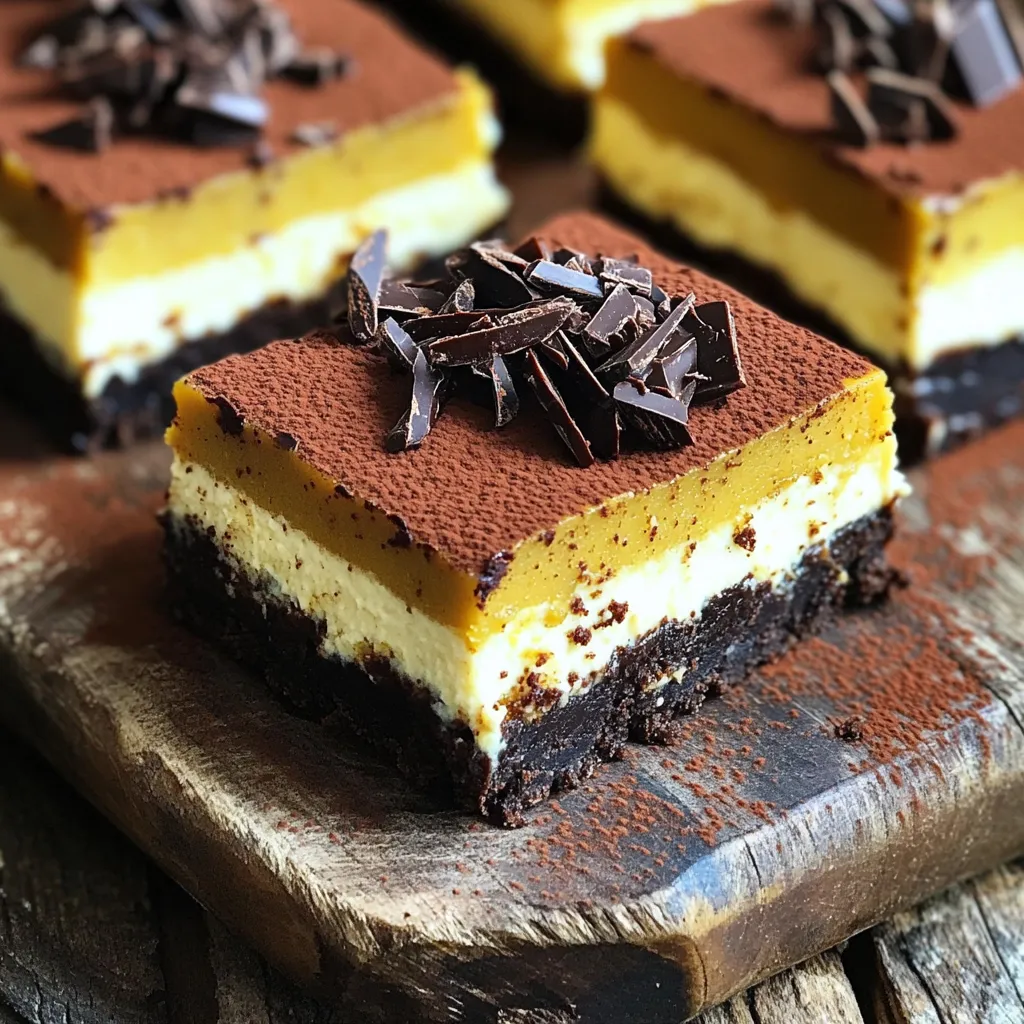
Dive into a world of flavors with my no-bake Chocolate Pumpkin Cheesecake Bars! This sweet treat combines rich chocolate and creamy pumpkin for a perfect fall dessert. Follow my easy steps to create a delightful dish that will impress friends and family. Whether you crave something easy or festive, this recipe has you covered. Let’s get started on making your new favorite dessert!

Ingredients

Main ingredients for the crust

To make a crust for the Chocolate Pumpkin Cheesecake Bars, you need three key items:

– 1 ½ cups graham cracker crumbs

– ½ cup unsweetened cocoa powder

– ½ cup unsalted butter, melted

These ingredients mix together to form a rich, chocolatey base that holds the filling nicely.

Key ingredients for the cheesecake filling

The cheesecake filling brings the flavor of fall to your bars. Here’s what you need:

– 1 cup cream cheese, softened

– 1 cup pumpkin puree (canned or fresh)

– ¾ cup powdered sugar

– ½ teaspoon vanilla extract

– 1 teaspoon ground cinnamon

– ½ teaspoon ground nutmeg

– ½ teaspoon ground ginger

– 1 cup whipped topping (like Cool Whip)

This combination makes the filling smooth and creamy with a wonderful pumpkin spice flavor.

Optional garnish and presentation elements

To make these bars extra special, consider adding a few garnishes:

– Dark chocolate shavings for a touch of elegance

– A sprinkle of cocoa powder for a rich look

– A dollop of extra whipped topping for creaminess

These small touches enhance both the look and taste of your dessert.

Step-by-Step Instructions

Preparing the crust

First, grab a medium bowl. In it, mix 1 ½ cups of graham cracker crumbs and ½ cup of unsweetened cocoa powder. Add ½ cup of melted unsalted butter. Stir until the mix looks like wet sand. Next, take a greased 9×9 inch baking pan and press the mixture firmly into the bottom. This forms the crust. Once done, place the pan in the freezer for about 15 minutes. This helps the crust set.

Making the cheesecake filling

Now, we’ll make the cheesecake filling. Take a large mixing bowl and beat 1 cup of softened cream cheese until it’s smooth and creamy. Then, add in 1 cup of pumpkin puree. Next, mix in ¾ cup of powdered sugar and ½ teaspoon of vanilla extract. Don’t forget to add 1 teaspoon of ground cinnamon, ½ teaspoon of ground nutmeg, and ½ teaspoon of ground ginger. Stir everything together until the mixture is smooth and well combined.

Assembling and chilling the bars

After the filling is ready, gently fold in 1 cup of whipped topping. This makes the filling light and fluffy. Now, take the crust out of the freezer. Pour the cheesecake filling over the crust and spread it evenly with a spatula. Smooth the top to make it look nice. Cover the pan with plastic wrap and place it in the fridge. Let it chill for at least 4 hours. This allows the filling to firm up. Once set, cut the cheesecake into bars and add dark chocolate shavings on top for a tasty finish.

Tips & Tricks

Achieving the perfect texture for the cheesecake

To get a creamy, smooth texture, start with soft cream cheese. This helps mix easily. When adding the pumpkin puree and sugar, mix slowly. Don’t rush it. The key is to fold in the whipped topping gently. This keeps the filling light and airy. If you mix too fast, it can become dense.

Substitutions for ingredients

You can swap ingredients for your taste. Instead of graham cracker crumbs, use crushed cookies for a different flavor. If you want a bit more sweetness, try adding more sugar to the filling. You can also replace the pumpkin puree with sweet potato for a unique twist. If you don’t have ground spices, use pumpkin pie spice as an easy option.

Presentation and serving suggestions

Presentation matters when serving dessert. Cut the bars into neat squares for a tidy look. Use a sharp knife for clean cuts. To make it special, add dark chocolate shavings on top. You can also sprinkle cocoa powder around the bars on the plate. Serve them on a nice platter. A dollop of extra whipped topping adds a nice touch. For a fun twist, add a few chocolate chips on top!

Variations

Alternative flavor combinations

You can change flavors to keep things fun. Try adding peanut butter for a nutty twist. Mixing in some maple syrup gives a sweet touch. If you love spices, add a hint of cardamom or cloves. These changes create unique taste profiles that can surprise your guests.

Ingredient swaps for dietary preferences

If you need gluten-free options, swap graham crackers for gluten-free crumbs. You can use coconut oil instead of butter for a dairy-free crust. For a vegan take, use a vegan cream cheese and plant-based whipped topping. These swaps still give you that creamy texture while meeting your dietary needs.

Using different toppings or crust types

Toppings can make a big difference. Consider crushed nuts for crunch or fresh fruit for freshness. You can also drizzle caramel or chocolate sauce on top for extra flair. For the crust, try a chocolate cookie crust for a richer taste. This simple change can elevate your dessert even more.

Storage Info

How to store leftover cheesecake bars

To store leftover cheesecake bars, place them in an airtight container. If you don’t have a container, you can wrap them tightly with plastic wrap. This keeps them fresh and prevents them from absorbing other smells in the fridge. Make sure to refrigerate them as soon as you’re done serving.

Best practices for freezing

If you want to freeze the bars, cut them into squares first. Then, wrap each piece in plastic wrap. This helps keep them from getting freezer burn. After wrapping, place the bars in a freezer-safe bag or container. These bars can last up to three months in the freezer. When you are ready to eat them, let them thaw in the fridge overnight.

Shelf life and freshness tips

These cheesecake bars stay fresh in the fridge for up to five days. Keep them covered to maintain their flavor and texture. If you notice any off smells or changes in texture, it’s best to toss them. For the best taste, enjoy them within a few days.

FAQs

Can I make these cheesecake bars ahead of time?

Yes, you can make these cheesecake bars ahead of time. In fact, they taste even better after chilling. I recommend making them a day in advance. Just store them in the fridge, covered, until you are ready to serve. This way, the flavors have time to blend, and the texture firms up nicely.

What can I use instead of whipped topping?

If you want to swap out whipped topping, there are a few great options. You can use heavy cream whipped to soft peaks. This gives a rich flavor. Another option is Greek yogurt for a tangy twist. Just keep in mind that using yogurt will change the taste a bit. Choose what fits your taste best!

How do I know when the cheesecake filling is set?

The cheesecake filling is set when it feels firm to the touch. After chilling for at least 4 hours, gently press the surface with your finger. If it springs back, it’s ready! You can also look for a slight sheen on the top. This shows that it has set well and is ready to cut into bars.

You learned how to create delicious cheesecake bars, from crust to filling. The main ingredients make a great base, while tips ensure the best texture. You can customize flavors and toppings to fit your taste. Remember to store leftovers properly to keep them fresh. Enjoy experimenting with variations and impress your friends with your cheesecake skills. With these steps, you’re ready to create something tasty. Now, go ahead and make your own cheesecake bars!

To make a crust for the Chocolate Pumpkin Cheesecake Bars, you need three key items: - 1 ½ cups graham cracker crumbs - ½ cup unsweetened cocoa powder - ½ cup unsalted butter, melted These ingredients mix together to form a rich, chocolatey base that holds the filling nicely. The cheesecake filling brings the flavor of fall to your bars. Here’s what you need: - 1 cup cream cheese, softened - 1 cup pumpkin puree (canned or fresh) - ¾ cup powdered sugar - ½ teaspoon vanilla extract - 1 teaspoon ground cinnamon - ½ teaspoon ground nutmeg - ½ teaspoon ground ginger - 1 cup whipped topping (like Cool Whip) This combination makes the filling smooth and creamy with a wonderful pumpkin spice flavor. To make these bars extra special, consider adding a few garnishes: - Dark chocolate shavings for a touch of elegance - A sprinkle of cocoa powder for a rich look - A dollop of extra whipped topping for creaminess These small touches enhance both the look and taste of your dessert. First, grab a medium bowl. In it, mix 1 ½ cups of graham cracker crumbs and ½ cup of unsweetened cocoa powder. Add ½ cup of melted unsalted butter. Stir until the mix looks like wet sand. Next, take a greased 9x9 inch baking pan and press the mixture firmly into the bottom. This forms the crust. Once done, place the pan in the freezer for about 15 minutes. This helps the crust set. Now, we’ll make the cheesecake filling. Take a large mixing bowl and beat 1 cup of softened cream cheese until it’s smooth and creamy. Then, add in 1 cup of pumpkin puree. Next, mix in ¾ cup of powdered sugar and ½ teaspoon of vanilla extract. Don’t forget to add 1 teaspoon of ground cinnamon, ½ teaspoon of ground nutmeg, and ½ teaspoon of ground ginger. Stir everything together until the mixture is smooth and well combined. After the filling is ready, gently fold in 1 cup of whipped topping. This makes the filling light and fluffy. Now, take the crust out of the freezer. Pour the cheesecake filling over the crust and spread it evenly with a spatula. Smooth the top to make it look nice. Cover the pan with plastic wrap and place it in the fridge. Let it chill for at least 4 hours. This allows the filling to firm up. Once set, cut the cheesecake into bars and add dark chocolate shavings on top for a tasty finish. To get a creamy, smooth texture, start with soft cream cheese. This helps mix easily. When adding the pumpkin puree and sugar, mix slowly. Don’t rush it. The key is to fold in the whipped topping gently. This keeps the filling light and airy. If you mix too fast, it can become dense. You can swap ingredients for your taste. Instead of graham cracker crumbs, use crushed cookies for a different flavor. If you want a bit more sweetness, try adding more sugar to the filling. You can also replace the pumpkin puree with sweet potato for a unique twist. If you don't have ground spices, use pumpkin pie spice as an easy option. Presentation matters when serving dessert. Cut the bars into neat squares for a tidy look. Use a sharp knife for clean cuts. To make it special, add dark chocolate shavings on top. You can also sprinkle cocoa powder around the bars on the plate. Serve them on a nice platter. A dollop of extra whipped topping adds a nice touch. For a fun twist, add a few chocolate chips on top! {{image_2}} You can change flavors to keep things fun. Try adding peanut butter for a nutty twist. Mixing in some maple syrup gives a sweet touch. If you love spices, add a hint of cardamom or cloves. These changes create unique taste profiles that can surprise your guests. If you need gluten-free options, swap graham crackers for gluten-free crumbs. You can use coconut oil instead of butter for a dairy-free crust. For a vegan take, use a vegan cream cheese and plant-based whipped topping. These swaps still give you that creamy texture while meeting your dietary needs. Toppings can make a big difference. Consider crushed nuts for crunch or fresh fruit for freshness. You can also drizzle caramel or chocolate sauce on top for extra flair. For the crust, try a chocolate cookie crust for a richer taste. This simple change can elevate your dessert even more. To store leftover cheesecake bars, place them in an airtight container. If you don’t have a container, you can wrap them tightly with plastic wrap. This keeps them fresh and prevents them from absorbing other smells in the fridge. Make sure to refrigerate them as soon as you're done serving. If you want to freeze the bars, cut them into squares first. Then, wrap each piece in plastic wrap. This helps keep them from getting freezer burn. After wrapping, place the bars in a freezer-safe bag or container. These bars can last up to three months in the freezer. When you are ready to eat them, let them thaw in the fridge overnight. These cheesecake bars stay fresh in the fridge for up to five days. Keep them covered to maintain their flavor and texture. If you notice any off smells or changes in texture, it’s best to toss them. For the best taste, enjoy them within a few days. Yes, you can make these cheesecake bars ahead of time. In fact, they taste even better after chilling. I recommend making them a day in advance. Just store them in the fridge, covered, until you are ready to serve. This way, the flavors have time to blend, and the texture firms up nicely. If you want to swap out whipped topping, there are a few great options. You can use heavy cream whipped to soft peaks. This gives a rich flavor. Another option is Greek yogurt for a tangy twist. Just keep in mind that using yogurt will change the taste a bit. Choose what fits your taste best! The cheesecake filling is set when it feels firm to the touch. After chilling for at least 4 hours, gently press the surface with your finger. If it springs back, it’s ready! You can also look for a slight sheen on the top. This shows that it has set well and is ready to cut into bars. You learned how to create delicious cheesecake bars, from crust to filling. The main ingredients make a great base, while tips ensure the best texture. You can customize flavors and toppings to fit your taste. Remember to store leftovers properly to keep them fresh. Enjoy experimenting with variations and impress your friends with your cheesecake skills. With these steps, you're ready to create something tasty. Now, go ahead and make your own cheesecake bars!

Chocolate Pumpkin Cheesecake Bars No-Bake

Indulge your senses with these delicious Chocolate Pumpkin Cheesecake Bars! Perfect for fall gatherings, this easy recipe combines a creamy pumpkin filling with a rich chocolate crust, creating a treat that everyone will love. With simple ingredients and straightforward instructions, you'll be able to impress your friends and family in no time. Click through to explore the full recipe and make these mouthwatering bars today!

Ingredients
  

1 ½ cups graham cracker crumbs

½ cup unsweetened cocoa powder

½ cup unsalted butter, melted

1 cup cream cheese, softened

1 cup pumpkin puree (canned or fresh)

¾ cup powdered sugar

½ teaspoon vanilla extract

1 teaspoon ground cinnamon

½ teaspoon ground nutmeg

½ teaspoon ground ginger

1 cup whipped topping (like Cool Whip)

Dark chocolate shavings, for garnish

Instructions
 

Prepare the crust: In a medium bowl, mix together the graham cracker crumbs, unsweetened cocoa powder, and melted butter until well combined. Press this mixture firmly into the bottom of a greased 9x9 inch baking pan to form the crust. Place in the freezer to set for about 15 minutes.

    Make the cheesecake filling: In a large mixing bowl, beat the softened cream cheese until creamy and smooth. Gradually add the pumpkin puree, powdered sugar, vanilla extract, ground cinnamon, nutmeg, and ginger. Mix until all ingredients are well combined and the mixture is smooth.

      Fold in whipped topping: Gently fold the whipped topping into the pumpkin and cream cheese mixture until just combined. This will give the filling a light, airy texture.

        Assemble the bars: Remove the crust from the freezer and pour the cheesecake filling over the set crust, spreading evenly. Smooth the top with a spatula.

          Chill: Cover the pan with plastic wrap and refrigerate for at least 4 hours, or until the filling is firm.

            Serve: Once set, cut the cheesecake into bars and garnish with dark chocolate shavings for extra flair.

              - Prep Time: 25 minutes | Total Time: 4 hours 25 minutes | Servings: 16 bars

                Presentation Tips: Serve the bars on a beautiful platter, optionally decorated with a sprinkle of cocoa powder or a dollop of additional whipped topping on each bar for an elegant touch.

                  WANT TO SAVE THIS RECIPE?

                  Leave a Comment

                  Recipe Rating