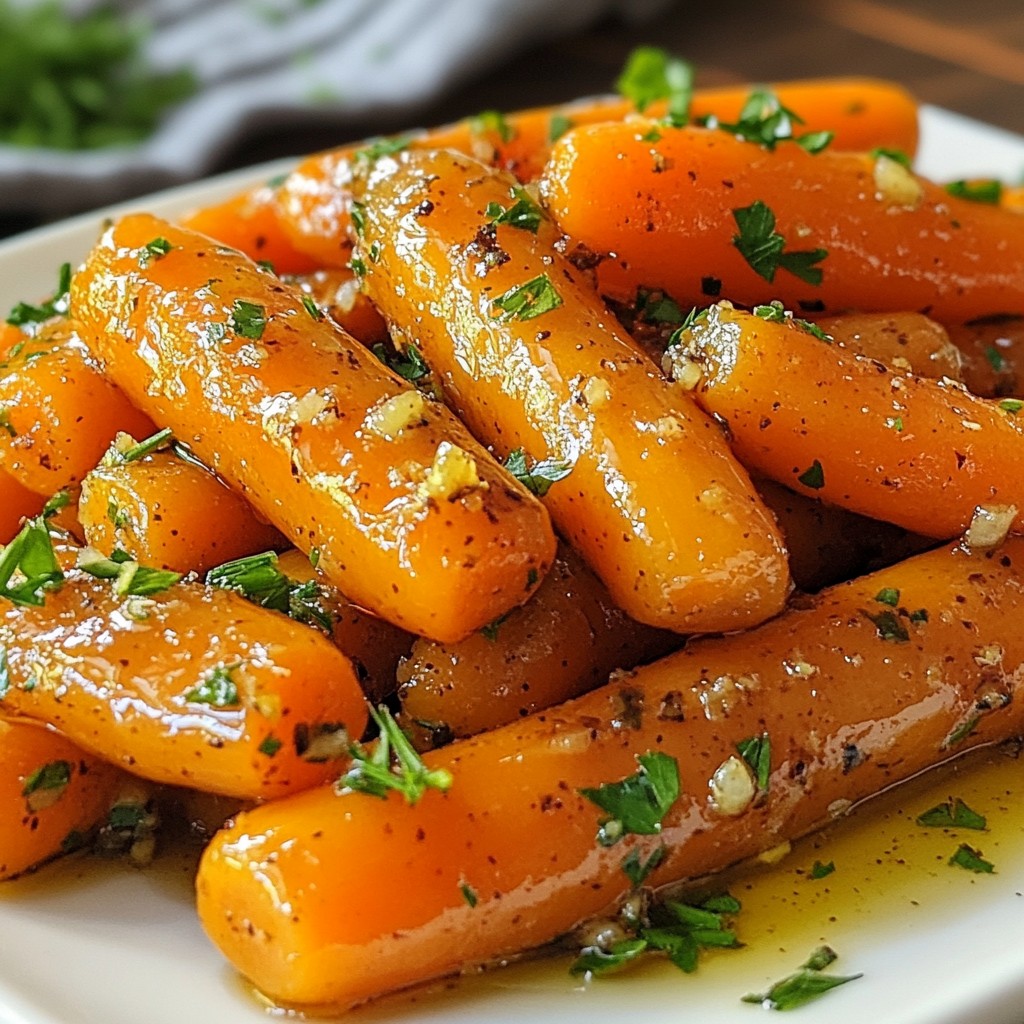
Looking for a simple and tasty side dish? Honey Garlic Glazed Carrots are just the treat you need! In this post, I'll share how to make these delicious carrots that are sweet, savory, and perfect for any meal. You won't just learn the basic recipe; I'll also give you tips, tricks, and variations to make this dish your own. Let’s dive into the world of flavor-packed carrots!
Why I Love This Recipe
- Quick and Easy: This recipe takes just 25 minutes from start to finish, making it a perfect side dish for busy weeknights.
- Healthful Ingredients: Made with fresh baby carrots and natural sweeteners, this dish is both nutritious and delicious.
- Flavor Harmony: The combination of honey and garlic creates a delightful balance of sweet and savory that complements any meal.
- Beautiful Presentation: These glazed carrots look stunning on a plate, making them an eye-catching addition to your dining table.
Ingredients
List of Ingredients
To make honey garlic glazed carrots, you will need the following:
- 500g baby carrots, peeled
- 2 tablespoons honey
- 3 cloves garlic, minced
- 2 tablespoons unsalted butter
- 1 tablespoon olive oil
- Salt and pepper to taste
- Fresh parsley, chopped (for garnish)
Substitutions and Alternatives
You can swap baby carrots for regular carrots. Just cut them into sticks. If you want a vegan option, use coconut oil instead of butter. Maple syrup can replace honey for a different sweet touch. If you need garlic alternatives, garlic powder works too.
Recommendations for Freshness
Choose bright orange, firm baby carrots. They should feel crisp, not soft. Store them in a cool, dry place or in the fridge. Keep them in a bag to stay fresh longer. Use them within a week for the best taste.

Step-by-Step Instructions
Preparation Steps
Start by gathering your ingredients. You need 500 grams of baby carrots, peeled. You also need honey, garlic, unsalted butter, olive oil, salt, and pepper. Don’t forget fresh parsley for garnish!
Next, measure out 2 tablespoons of honey. Mince 3 cloves of garlic. You want them small for even flavor. Set everything aside so it’s easy to grab while cooking.
Cooking Method Explained
In a large skillet, heat 2 tablespoons of olive oil and 2 tablespoons of unsalted butter over medium heat. Wait until the butter melts and bubbles.
Now, add the baby carrots to the skillet. Toss them in the butter and oil mix. Sauté the carrots for about 5 minutes. Stir them occasionally to get a nice golden color.
Once they look good, reduce the heat to low. Add the minced garlic, honey, salt, and pepper. Stir well to coat the carrots evenly. Cover the skillet and let them cook for 10 to 12 minutes. Check often until the carrots are tender and glazed.
If you want a deeper glaze, take off the lid. Increase the heat to medium-high for a few minutes. This helps caramelize the glaze. When done, remove from heat and taste. Adjust seasoning if needed. Finally, sprinkle fresh parsley on top for a pop of color.
Tips for Perfect Texture
For the best texture, choose fresh baby carrots. They should be firm, not soft. If your carrots are larger, cut them into smaller pieces. This helps them cook evenly.
Don’t rush the sautéing step. A good golden hue adds great flavor. Always check your carrots for tenderness. You want them soft but not mushy.
If you want extra sweetness, add more honey in the last minute of cooking. This gives a rich and sticky glaze. Enjoy your delicious honey garlic glazed carrots!
Tips & Tricks
Achieving the Perfect Glaze
To get that shiny glaze, focus on the heat. Start with medium heat to melt the butter. Add honey and garlic once the carrots are golden. Low heat helps the flavors blend well. Stir often to coat the carrots evenly. For a thicker glaze, remove the lid and increase heat for a few minutes. This caramelizes the glaze and adds depth.
Common Mistakes to Avoid
One common mistake is overcooking the carrots. You want them tender, not mushy. Keep an eye on the time; about 10-12 minutes should do it. Another mistake is using too much heat at the start. It can burn the garlic. Always start medium, then adjust as needed. Lastly, don’t skip seasoning! A pinch of salt and pepper makes a big difference.
Enhancing Flavor Options
Want to spice things up? Add herbs like thyme or rosemary during cooking. They pair well with honey and garlic. You could also try a splash of lemon juice for a zesty kick. If you love heat, a pinch of red pepper flakes adds a nice touch. Experimenting with flavors makes the dish more fun and unique.
Pro Tips
- Perfect Carrot Selection: Choose young, fresh baby carrots for optimal sweetness and tenderness. Look for vibrant color and firm texture.
- Honey Variations: Experiment with different types of honey, such as clover or wildflower, to enhance the flavor profile of your dish.
- Garlic Timing: To prevent garlic from burning, add it towards the end of cooking. This ensures a milder, sweeter garlic flavor.
- Garnish Wisely: Use fresh herbs like thyme or dill in addition to parsley for added depth and a fresh burst of flavor.
Variations
Honey Garlic Glazed Carrots with Herbs
You can add fresh herbs to your honey garlic glazed carrots. Try thyme or rosemary. These herbs bring a new flavor. Just chop them finely and stir them in during the last few minutes of cooking. This adds a fresh taste that pairs well with the sweetness of the glaze.
Adding Other Vegetables
You don’t have to stick to just carrots. You can mix in other veggies like green beans or bell peppers. Cut them into similar sizes as the carrots. This way, they cook at the same time. Just remember to adjust your cooking time based on the vegetable you add. You want everything to be tender and coated in that tasty glaze.
Adjusting Sweetness Levels
If you want your glaze sweeter, add more honey. Start with a teaspoon and taste as you go. If you prefer it less sweet, you can reduce the honey amount. You can also add a splash of vinegar for a tangy twist. This balances the sweetness and adds depth to the flavor.
Storage Info
Best Storage Practices
To keep your honey garlic glazed carrots fresh, you should store them in the fridge. Place the carrots in an airtight container. This keeps moisture in and odors out. Make sure they cool down before sealing them. This helps prevent condensation. Always label the container with the date. This way, you know when you made them.
Reheating Instructions
When you want to eat the glazed carrots again, reheating is simple. You can use a microwave or a skillet. If using a microwave, place the carrots in a bowl. Cover the bowl with a lid or a plate. Heat for 1-2 minutes on high. Stir halfway through to ensure even warming. If using a skillet, add a splash of water and heat on low. Stir until warmed through. This keeps them moist and tasty.
Shelf Life and Freezing Tips
These glazed carrots can last in the fridge for up to 3 days. If you want to keep them longer, freezing is a good option. To freeze, first, let the carrots cool completely. Place them in a freezer bag, removing as much air as possible. They can stay good for up to 3 months in the freezer. When ready to eat, thaw them in the fridge overnight. Reheat as mentioned above for a quick treat!
FAQs
Can I use frozen carrots?
Yes, you can use frozen carrots. They are convenient and save time. Thaw them first for best results. Cook them for a shorter time for a crisp bite.
How do I make the glaze thicker?
To thicken the glaze, use less liquid. You can simmer it longer, too. This helps the flavors concentrate. Adding a small amount of cornstarch mixed with water also works. Stir it in and heat until thick.
What main dishes pair well with glazed carrots?
Glazed carrots go well with many dishes. They pair nicely with roasted chicken or pork. Serve them alongside grilled steak or fish for a sweet touch. They also complement rice or quinoa dishes well, adding color and flavor.
This blog post covered ingredients, cooking steps, tips, variations, and storage for glazed carrots. You learned how to choose fresh ingredients and avoid common mistakes. Using simple swaps, you can make these carrots your own. Remember to store them well, and reheat for the best taste. Exploring these methods will help you create delicious meals. Experiment with flavors and enjoy your cooking journey!