Hot Chocolate Cookies Irresistible and Chewy Treat

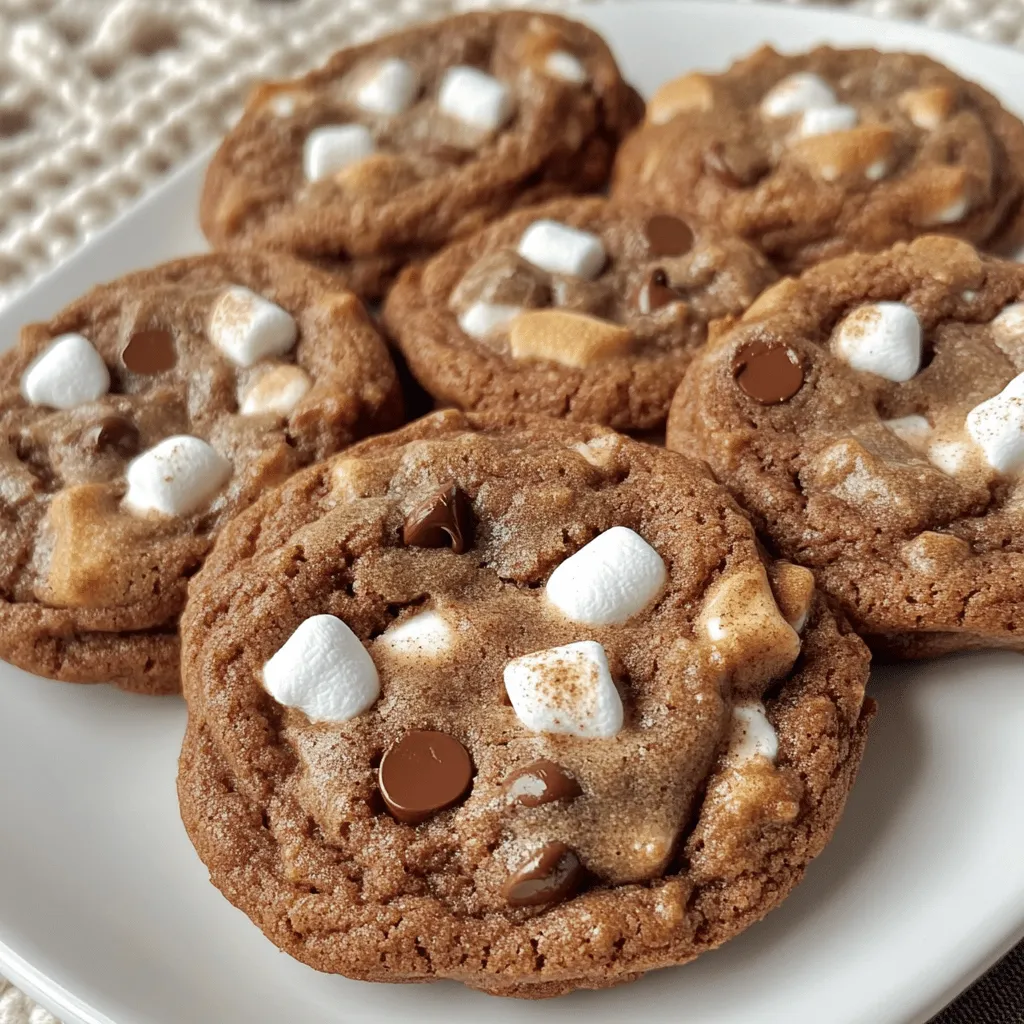
Craving something sweet and cozy? These Hot Chocolate Cookies are the perfect chewy treat for you! With their rich chocolate flavor, gooey marshmallows, and a hint of cinnamon, they warm your heart with every bite. In this post, I’ll share simple steps and tips to make these cookies a true delight. Get ready to impress family and friends with a batch of cookies that capture the joy of hot chocolate in cookie form!

Ingredients

For these hot chocolate cookies, you need a few simple yet essential ingredients. Each one plays a key role in making these cookies chewy and delicious. Here’s what you’ll need:

– 1 cup unsalted butter, softened

– 1 cup brown sugar, packed

– 1/2 cup granulated sugar

– 2 large eggs

– 2 teaspoons vanilla extract

– 2 cups all-purpose flour

– 1/2 cup cocoa powder

– 1 teaspoon baking soda

– 1/2 teaspoon salt

– 1 cup semi-sweet chocolate chips

– 1 cup mini marshmallows

– 1/2 teaspoon ground cinnamon (optional)

These ingredients create a rich, chocolatey flavor that makes every bite feel like a warm hug. The butter gives the cookies their rich texture, while brown sugar adds that lovely depth of flavor. The mini marshmallows? They melt slightly in the oven, giving you sweet pockets of gooey goodness.

If you want to mix it up, you can add the optional ground cinnamon for a spicy touch. It pairs well with the chocolate, adding warmth and a little twist.

This list covers everything you need for the full recipe. Happy baking!

Step-by-Step Instructions

Prepping the Ingredients

1. Preheat the oven and line the baking sheets: Start by setting your oven to 350°F (175°C). While it heats up, grab two baking sheets and line them with parchment paper. This helps the cookies not stick.

2. Creaming the butter and sugars: In a large bowl, add 1 cup of softened unsalted butter, 1 cup of packed brown sugar, and 1/2 cup of granulated sugar. Use a mixer or a wooden spoon to beat them together until the mixture is smooth and fluffy. This should take about 3 minutes.

3. Adding eggs and vanilla extract: Next, crack in 2 large eggs, one at a time. Mix well after adding each egg. Then, stir in 2 teaspoons of vanilla extract. This step adds a lovely flavor to your cookies.

Mixing Dry Ingredients

1. Whisking flour, cocoa powder, and leavening agents: In another bowl, whisk together 2 cups of all-purpose flour, 1/2 cup of cocoa powder, and 1 teaspoon of baking soda. This mix gives your cookies structure and that rich chocolate taste.

2. Incorporating salt and optional spices: Add 1/2 teaspoon of salt to the dry mix. If you like, sprinkle in 1/2 teaspoon of ground cinnamon. It adds warmth to the flavor.

Forming the Cookie Dough

1. Combining wet and dry ingredients: Slowly add the dry mix to the wet mixture. Stir gently until a dough forms. Be careful not to overmix; we want those cookies chewy!

2. Folding in chocolate chips and marshmallows: Now, fold in 1 cup of semi-sweet chocolate chips and 1 cup of mini marshmallows. This step is where the magic happens, making your cookies extra sweet and gooey.

3. Scooping dough onto baking sheets: Use a tablespoon or cookie scoop to drop rounded balls of dough onto the lined baking sheets. Leave about 2 inches between each cookie to allow them to spread.

Baking and Cooling

1. Baking instructions (temperature and time): Place the baking sheets in the preheated oven and bake for 10-12 minutes. The edges should be set, but the centers can stay a bit soft.

2. Cooling tips before serving: After baking, let the cookies cool on the sheets for 5 minutes. Then, transfer them to wire racks to cool completely. This helps them firm up while keeping that chewy center. For the full recipe, check out the previous section.

Tips & Tricks

Baking Tips for Perfect Cookies

To make your hot chocolate cookies chewy and delicious, follow these tips:

Ensuring the right dough consistency: Your cookie dough should be thick but not dry. If it’s too wet, add a little flour. If it’s too dry, a touch of milk can help. The right mix will give you soft centers.

Adjusting baking times for soft centers: Bake your cookies for about 10 to 12 minutes. The edges should look set, but the center should still look soft. This will ensure a gooey, melted chocolate experience.

Ingredient Substitutions

Sometimes you might not have all the ingredients. Here are some easy swaps:

Finding alternatives for butter and sugar: You can use coconut oil instead of butter. For sugar, try using maple syrup or honey. Adjust the amount since liquids will change the dough’s consistency.

Dairy-free or gluten-free options: For a dairy-free version, use almond milk and dairy-free chocolate chips. To make it gluten-free, substitute regular flour with a 1:1 gluten-free flour blend.

Enhancing Flavor and Texture

Want to take your cookies to the next level? Here are some ideas:

Adjusting cocoa powder for richer flavor: Use high-quality cocoa powder for a deeper chocolate taste. You can add an extra tablespoon of cocoa powder for a richer flavor.

Adding nuts or other mix-ins for variation: Mix in chopped nuts, like walnuts or pecans, for a crunchy texture. You can also add white chocolate chips or dried fruit for a fun twist.

Variations

Flavor Combinations

I love how simple it is to switch up flavors in hot chocolate cookies. Two of my favorite variations are:

Peppermint Hot Chocolate Cookies: Add 1 teaspoon of peppermint extract to the dough. This gives a refreshing zing that pairs perfectly with chocolate. You can also add crushed candy canes on top for a festive crunch.

Salted Caramel Hot Chocolate Cookies: Mix in 1 cup of caramel bits into the dough. After baking, sprinkle a little sea salt on top. This salty-sweet combo takes your cookies to the next level.

Topping Ideas

Toppings make hot chocolate cookies even more fun. Here are some ideas:

Decorative chocolate drizzle or sprinkles: Melt some chocolate and drizzle it over the cookies once they cool. Use colorful sprinkles to add a pop of color.

Adding flavored extracts for a twist: Besides vanilla, try almond or orange extract. A little goes a long way in enhancing the flavor.

Seasonal Variations

Make these cookies fit the season with some easy changes:

Fall flavors: pumpkin spice: Add 1 teaspoon of pumpkin spice to the dough for a warm autumn flavor. This makes the cookies cozy and perfect for chilly days.

Holiday-themed cookies with festive sprinkles: Use red and green sprinkles during the holidays. You can also add mini marshmallows on top right before baking for a cute touch.

These variations keep the recipe fresh and exciting. For the full recipe, check out the earlier section.

Storage Info

Best Practices for Storing Cookies

To keep your hot chocolate cookies fresh, use airtight containers. This helps seal in flavor and moisture. Avoid leaving cookies exposed to air and moisture. This exposure can make them hard and dry.

Freezing Cookie Dough

You can freeze cookie dough for later baking. Scoop the dough into balls and place them on a baking sheet. Freeze them for about an hour, then transfer them to a zip-top bag. When you want to bake them, take out the dough and thaw it in the fridge overnight. Bake as usual after thawing.

Shelf Life

Hot chocolate cookies stay fresh for about one week at room temperature. Store them in an airtight container for best results. You’ll know the cookies have gone bad if they become hard or develop an off smell. Enjoy these cookies while they are still soft and chewy for the best taste! For the complete recipe, check out the Full Recipe section.

FAQs

What is the best way to store hot chocolate cookies?

Store hot chocolate cookies in an airtight container. This keeps them fresh for days. You can separate layers with parchment paper to avoid sticking. Keep them in a cool, dry place. For longer storage, you can freeze them. They last about three months in the freezer.

Can I make the dough ahead of time?

Yes, you can make the dough ahead of time. Prepare the dough and shape it into balls. Place the balls on a baking sheet and freeze them. Once frozen, transfer the dough balls to a zip-top bag. When you want fresh cookies, bake them straight from the freezer. Just add a couple of extra minutes to the baking time.

How do I know when the cookies are done baking?

Check the cookies after ten minutes. The edges should look set, while the center remains soft. If the edges are golden brown, it’s time to take them out. Remember, cookies firm up as they cool. Avoid overbaking for that chewy texture.

Can I substitute chocolate chips for other mix-ins?

Yes, you can mix it up! Try using white chocolate chips, butterscotch chips, or peanut butter chips. You could even add nuts or dried fruit for a twist. Each option adds its own flavor and texture to the cookies.

Is there a way to make these cookies gluten-free?

You can easily make these cookies gluten-free. Use a gluten-free flour blend instead of all-purpose flour. Make sure the blend contains xanthan gum for better texture. Check labels on chocolate chips and marshmallows, as some may contain gluten. Enjoy a delicious gluten-free treat!

You now have the full guide to making delicious hot chocolate cookies. We covered the essential ingredients, step-by-step instructions, and helpful tips. You can also explore fun variations and storage methods. Remember, baking is a joy. Don’t be afraid to make changes and try new flavors. With practice, you’ll perfect these treats and make others happy. Enjoy your baking adventure and share your creations!

For these hot chocolate cookies, you need a few simple yet essential ingredients. Each one plays a key role in making these cookies chewy and delicious. Here’s what you’ll need: - 1 cup unsalted butter, softened - 1 cup brown sugar, packed - 1/2 cup granulated sugar - 2 large eggs - 2 teaspoons vanilla extract - 2 cups all-purpose flour - 1/2 cup cocoa powder - 1 teaspoon baking soda - 1/2 teaspoon salt - 1 cup semi-sweet chocolate chips - 1 cup mini marshmallows - 1/2 teaspoon ground cinnamon (optional) These ingredients create a rich, chocolatey flavor that makes every bite feel like a warm hug. The butter gives the cookies their rich texture, while brown sugar adds that lovely depth of flavor. The mini marshmallows? They melt slightly in the oven, giving you sweet pockets of gooey goodness. If you want to mix it up, you can add the optional ground cinnamon for a spicy touch. It pairs well with the chocolate, adding warmth and a little twist. This list covers everything you need for the full recipe. Happy baking! 1. Preheat the oven and line the baking sheets: Start by setting your oven to 350°F (175°C). While it heats up, grab two baking sheets and line them with parchment paper. This helps the cookies not stick. 2. Creaming the butter and sugars: In a large bowl, add 1 cup of softened unsalted butter, 1 cup of packed brown sugar, and 1/2 cup of granulated sugar. Use a mixer or a wooden spoon to beat them together until the mixture is smooth and fluffy. This should take about 3 minutes. 3. Adding eggs and vanilla extract: Next, crack in 2 large eggs, one at a time. Mix well after adding each egg. Then, stir in 2 teaspoons of vanilla extract. This step adds a lovely flavor to your cookies. 1. Whisking flour, cocoa powder, and leavening agents: In another bowl, whisk together 2 cups of all-purpose flour, 1/2 cup of cocoa powder, and 1 teaspoon of baking soda. This mix gives your cookies structure and that rich chocolate taste. 2. Incorporating salt and optional spices: Add 1/2 teaspoon of salt to the dry mix. If you like, sprinkle in 1/2 teaspoon of ground cinnamon. It adds warmth to the flavor. 1. Combining wet and dry ingredients: Slowly add the dry mix to the wet mixture. Stir gently until a dough forms. Be careful not to overmix; we want those cookies chewy! 2. Folding in chocolate chips and marshmallows: Now, fold in 1 cup of semi-sweet chocolate chips and 1 cup of mini marshmallows. This step is where the magic happens, making your cookies extra sweet and gooey. 3. Scooping dough onto baking sheets: Use a tablespoon or cookie scoop to drop rounded balls of dough onto the lined baking sheets. Leave about 2 inches between each cookie to allow them to spread. 1. Baking instructions (temperature and time): Place the baking sheets in the preheated oven and bake for 10-12 minutes. The edges should be set, but the centers can stay a bit soft. 2. Cooling tips before serving: After baking, let the cookies cool on the sheets for 5 minutes. Then, transfer them to wire racks to cool completely. This helps them firm up while keeping that chewy center. For the full recipe, check out the previous section. To make your hot chocolate cookies chewy and delicious, follow these tips: - Ensuring the right dough consistency: Your cookie dough should be thick but not dry. If it’s too wet, add a little flour. If it’s too dry, a touch of milk can help. The right mix will give you soft centers. - Adjusting baking times for soft centers: Bake your cookies for about 10 to 12 minutes. The edges should look set, but the center should still look soft. This will ensure a gooey, melted chocolate experience. Sometimes you might not have all the ingredients. Here are some easy swaps: - Finding alternatives for butter and sugar: You can use coconut oil instead of butter. For sugar, try using maple syrup or honey. Adjust the amount since liquids will change the dough’s consistency. - Dairy-free or gluten-free options: For a dairy-free version, use almond milk and dairy-free chocolate chips. To make it gluten-free, substitute regular flour with a 1:1 gluten-free flour blend. Want to take your cookies to the next level? Here are some ideas: - Adjusting cocoa powder for richer flavor: Use high-quality cocoa powder for a deeper chocolate taste. You can add an extra tablespoon of cocoa powder for a richer flavor. - Adding nuts or other mix-ins for variation: Mix in chopped nuts, like walnuts or pecans, for a crunchy texture. You can also add white chocolate chips or dried fruit for a fun twist. {{image_2}} I love how simple it is to switch up flavors in hot chocolate cookies. Two of my favorite variations are: - Peppermint Hot Chocolate Cookies: Add 1 teaspoon of peppermint extract to the dough. This gives a refreshing zing that pairs perfectly with chocolate. You can also add crushed candy canes on top for a festive crunch. - Salted Caramel Hot Chocolate Cookies: Mix in 1 cup of caramel bits into the dough. After baking, sprinkle a little sea salt on top. This salty-sweet combo takes your cookies to the next level. Toppings make hot chocolate cookies even more fun. Here are some ideas: - Decorative chocolate drizzle or sprinkles: Melt some chocolate and drizzle it over the cookies once they cool. Use colorful sprinkles to add a pop of color. - Adding flavored extracts for a twist: Besides vanilla, try almond or orange extract. A little goes a long way in enhancing the flavor. Make these cookies fit the season with some easy changes: - Fall flavors: pumpkin spice: Add 1 teaspoon of pumpkin spice to the dough for a warm autumn flavor. This makes the cookies cozy and perfect for chilly days. - Holiday-themed cookies with festive sprinkles: Use red and green sprinkles during the holidays. You can also add mini marshmallows on top right before baking for a cute touch. These variations keep the recipe fresh and exciting. For the full recipe, check out the earlier section. To keep your hot chocolate cookies fresh, use airtight containers. This helps seal in flavor and moisture. Avoid leaving cookies exposed to air and moisture. This exposure can make them hard and dry. You can freeze cookie dough for later baking. Scoop the dough into balls and place them on a baking sheet. Freeze them for about an hour, then transfer them to a zip-top bag. When you want to bake them, take out the dough and thaw it in the fridge overnight. Bake as usual after thawing. Hot chocolate cookies stay fresh for about one week at room temperature. Store them in an airtight container for best results. You’ll know the cookies have gone bad if they become hard or develop an off smell. Enjoy these cookies while they are still soft and chewy for the best taste! For the complete recipe, check out the Full Recipe section. Store hot chocolate cookies in an airtight container. This keeps them fresh for days. You can separate layers with parchment paper to avoid sticking. Keep them in a cool, dry place. For longer storage, you can freeze them. They last about three months in the freezer. Yes, you can make the dough ahead of time. Prepare the dough and shape it into balls. Place the balls on a baking sheet and freeze them. Once frozen, transfer the dough balls to a zip-top bag. When you want fresh cookies, bake them straight from the freezer. Just add a couple of extra minutes to the baking time. Check the cookies after ten minutes. The edges should look set, while the center remains soft. If the edges are golden brown, it’s time to take them out. Remember, cookies firm up as they cool. Avoid overbaking for that chewy texture. Yes, you can mix it up! Try using white chocolate chips, butterscotch chips, or peanut butter chips. You could even add nuts or dried fruit for a twist. Each option adds its own flavor and texture to the cookies. You can easily make these cookies gluten-free. Use a gluten-free flour blend instead of all-purpose flour. Make sure the blend contains xanthan gum for better texture. Check labels on chocolate chips and marshmallows, as some may contain gluten. Enjoy a delicious gluten-free treat! You now have the full guide to making delicious hot chocolate cookies. We covered the essential ingredients, step-by-step instructions, and helpful tips. You can also explore fun variations and storage methods. Remember, baking is a joy. Don’t be afraid to make changes and try new flavors. With practice, you'll perfect these treats and make others happy. Enjoy your baking adventure and share your creations!

Hot Chocolate Cookies

Indulge in the sweet comfort of Hot Chocolate Cookies, the ultimate chewy treat that captures the cozy essence of your favorite winter drink! With rich chocolate flavor, gooey marshmallows, and a hint of cinnamon, these cookies are perfect for sharing. Discover simple instructions and expert tips to create this delightful recipe that will impress family and friends. Click through to explore the full recipe and start baking your new favorite treat today!

Ingredients
  

1 cup unsalted butter, softened

1 cup brown sugar, packed

1/2 cup granulated sugar

2 large eggs

2 teaspoons vanilla extract

2 cups all-purpose flour

1/2 cup cocoa powder

1 teaspoon baking soda

1/2 teaspoon salt

1 cup semi-sweet chocolate chips

1 cup mini marshmallows

1/2 teaspoon ground cinnamon (optional)

Instructions
 

Preheat your oven to 350°F (175°C) and line two baking sheets with parchment paper.

    In a large mixing bowl, cream together the softened butter, brown sugar, and granulated sugar until smooth and fluffy, about 3 minutes.

      Beat in the eggs, one at a time, followed by the vanilla extract, ensuring everything is well combined.

        In another bowl, whisk together the flour, cocoa powder, baking soda, salt, and ground cinnamon (if using) until evenly mixed.

          Gradually add the dry ingredients to the wet mixture, stirring until a dough forms (do not overmix).

            Fold in the semi-sweet chocolate chips and mini marshmallows gently.

              Using a tablespoon or cookie scoop, drop rounded balls of dough onto the prepared baking sheets, leaving about 2 inches of space between each cookie.

                Bake in the preheated oven for 10-12 minutes, or until the edges are set but the centers are still slightly soft.

                  Remove from the oven and let the cookies cool on the baking sheets for 5 minutes before transferring them to wire racks to cool completely.

                    Prep Time: 15 minutes | Total Time: 30 minutes | Servings: Approximately 24 cookies

                      Leave a Comment

                      Recipe Rating