No-Bake Pumpkin Cream Pie Cups Irresistible Treat

WANT TO SAVE THIS RECIPE?

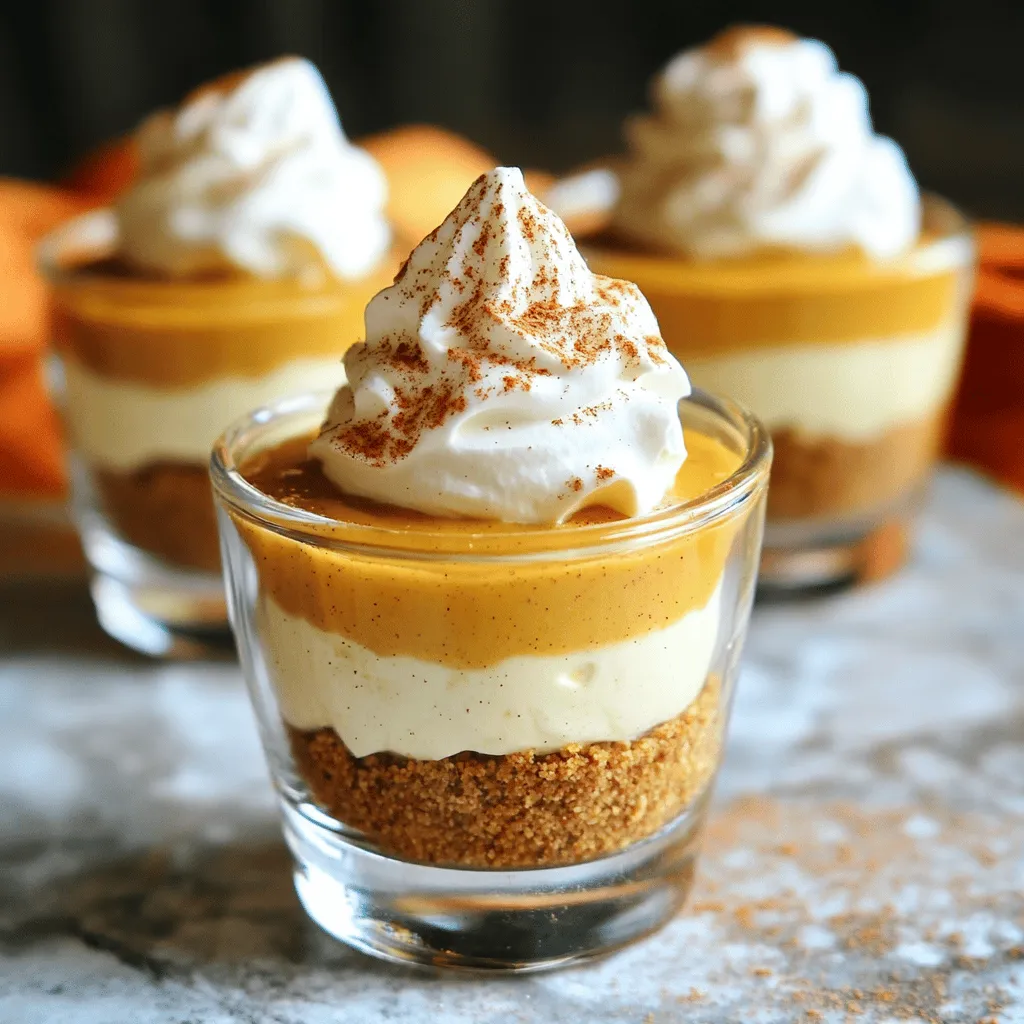
Craving a sweet treat that’s easy to make? Try my No-Bake Pumpkin Cream Pie Cups! They’re the perfect burst of fall flavors without turning on the oven. With simple ingredients like pumpkin puree, cream cheese, and graham cracker crumbs, you’ll whip up these delightful cups in no time. Plus, they chill beautifully, making them an ideal dessert for any occasion. Ready to impress your friends and family? Let’s dive into this tasty recipe!

Ingredients

Main Ingredients

– 1 cup pumpkin puree

– 1/2 cup cream cheese, softened

– 1 cup whipped topping, thawed

– 1/2 teaspoon vanilla extract

– 1/4 cup sugar

– 1 teaspoon pumpkin pie spice

These main ingredients create a rich, creamy filling. The pumpkin puree gives it flavor, while cream cheese adds a smooth texture. The whipped topping makes it light and fluffy. Sweetness comes from sugar, and vanilla adds depth. The pumpkin pie spice brings warmth and aroma.

Crust Components

– 1 cup graham cracker crumbs

– 1/4 cup melted butter

The crust is simple yet tasty. Graham cracker crumbs provide crunch and sweetness. Melted butter helps bind the crumbs. This mixture creates a sturdy base for the creamy filling. It’s easy to prepare and adds great flavor.

Garnishing Ingredients

– Whipped cream

– Ground cinnamon

Garnishes make these cups even better. A dollop of whipped cream on top adds richness. Ground cinnamon gives a lovely spice note. Together, they create a festive and inviting look. You can also add a sprinkle of cinnamon for extra flair.

Step-by-Step Instructions

Preparing the Pumpkin Cream Mixture

First, grab a mixing bowl. In it, combine the pumpkin puree, softened cream cheese, sugar, vanilla extract, and pumpkin pie spice. Stir these ingredients together until they form a smooth mixture. You want it well mixed but not too fluffy. Next, gently fold in the whipped topping. Be careful here; you don’t want to deflate it. The goal is to keep the mixture light and airy.

Making the Graham Cracker Crust

Now, take another bowl. Mix the graham cracker crumbs with melted butter. Stir until the crumbs are well coated. The mix should look like wet sand. This texture is key for a great crust. If it feels too dry, add a bit more melted butter.

Assembling the Cups

Time to build your pie cups! Start by adding a layer of the graham cracker mixture to the bottom of each serving cup. Press it down gently to form a crust. Next, spoon the pumpkin cream mixture over the crust, filling each cup to the top. If you have extra ingredients, repeat the layering. This will create a lovely layered effect.

Chilling and Serving

After assembling, place the cups in the refrigerator. They need to chill for at least 2 hours. This time allows the flavors to meld nicely. Just before serving, add a dollop of whipped cream on top of each cup. Finish with a sprinkle of cinnamon for that festive touch!

Tips & Tricks

Achieving the Perfect Creaminess

To get the best texture, start with softened cream cheese. This helps it mix well with the other ingredients. If the cream cheese is cold, it will clump. Let it sit at room temperature for about 30 minutes before you start.

When you fold in the whipped topping, do it gently. Use a spatula and scoop from the bottom. This keeps the air in the whipped cream. If you stir too hard, your mixture will lose its lightness.

Presentation Suggestions

For a beautiful display, serve your pie cups on a decorative tray. You can add small sprigs of mint or cinnamon sticks for extra charm. These small touches bring a festive vibe.

For garnishing, add a dollop of whipped cream on top of each cup. A sprinkle of cinnamon adds color and flavor. You can even use a zester to create orange zest curls for a pop of color.

Timing and Flavor Tips

Chilling the cups is key for great taste. Let them sit in the fridge for at least two hours. This time allows the flavors to mix well and the texture to set.

When serving to guests, keep the cups cool. If it’s warm in your kitchen, the cream may start to soften. Present the cups right from the fridge for the best experience.

Variations

Alternative Crust Options

You can change the crust to fit your taste. Try using Oreo crumbs instead of graham crackers. Just crush the cookies and mix them with melted butter. This adds a fun twist to your pie cups.

For those needing gluten-free options, use gluten-free graham crackers or almond flour. Mix the flour with melted butter. This will create a tasty base without gluten.

Flavor Variations

Get creative with spices! While pumpkin pie spice is great, you can try cinnamon or nutmeg for a different taste. Each spice adds its own flavor and aroma.

You can also add chocolate or caramel drizzle on top. This will give your dessert a rich layer. A touch of sweetness can make it even more special.

Dietary Adjustments

If you want a vegan version, use coconut cream instead of cream cheese. This gives a creamy texture and keeps it dairy-free. For the whipped topping, look for a plant-based option.

If you need sugar-free alternatives, use a sugar substitute. Options like stevia or erythritol work well. They keep the dessert sweet without added sugar.

Storage Info

How to Store Leftovers

To keep your no-bake pumpkin cream pie cups fresh, place them in an airtight container. This helps prevent any odors from other foods in the fridge. You can also cover each cup with plastic wrap. These cups stay fresh for about three days in the fridge. After that, they may lose their texture and flavor.

Freezing Tips

Yes, you can freeze these cups! To do this, first, let them chill in the fridge for a couple of hours. Once they are set, wrap each cup tightly in plastic wrap. Then, place them in a freezer-safe container. They can last for up to two months in the freezer.

When you’re ready to enjoy them, take them out and place them in the fridge to thaw overnight. This slow thaw helps keep the texture just right. Avoid microwaving them, as this can change their creamy consistency.

FAQs

Can I use fresh pumpkin instead of canned?

Yes, you can use fresh pumpkin. Fresh pumpkin gives a rich flavor. It also has more nutrients. However, it requires more work. You must roast and puree it first. Canned pumpkin is easy and quick. It is also consistent in texture. Both can work well, so choose what fits your needs.

How long do the cups last in the fridge?

These cups last about 3 to 4 days in the fridge. To keep them fresh, cover them with plastic wrap. This prevents air from drying them out. Store them in an airtight container for best results. Always check for any off smells or changes in texture before eating.

What can I use instead of cream cheese?

You can use dairy-free cream cheese for a vegan option. Silken tofu blended until smooth is another great choice. It gives a creamy texture without dairy. Greek yogurt can also work but will add tanginess. Choose what suits your diet or taste preferences.

This pumpkin cream cup recipe combines tasty ingredients like pumpkin puree, cream cheese, and spices. You learned how to prepare a graham cracker crust and layer the pumpkin mixture. Remember to chill your cups for the best flavor.

Trying different crusts or flavors can make this treat unique. Always store leftovers properly to keep them fresh. Enjoy your delicious creation and impress your guests!

- 1 cup pumpkin puree - 1/2 cup cream cheese, softened - 1 cup whipped topping, thawed - 1/2 teaspoon vanilla extract - 1/4 cup sugar - 1 teaspoon pumpkin pie spice These main ingredients create a rich, creamy filling. The pumpkin puree gives it flavor, while cream cheese adds a smooth texture. The whipped topping makes it light and fluffy. Sweetness comes from sugar, and vanilla adds depth. The pumpkin pie spice brings warmth and aroma. - 1 cup graham cracker crumbs - 1/4 cup melted butter The crust is simple yet tasty. Graham cracker crumbs provide crunch and sweetness. Melted butter helps bind the crumbs. This mixture creates a sturdy base for the creamy filling. It’s easy to prepare and adds great flavor. - Whipped cream - Ground cinnamon Garnishes make these cups even better. A dollop of whipped cream on top adds richness. Ground cinnamon gives a lovely spice note. Together, they create a festive and inviting look. You can also add a sprinkle of cinnamon for extra flair. First, grab a mixing bowl. In it, combine the pumpkin puree, softened cream cheese, sugar, vanilla extract, and pumpkin pie spice. Stir these ingredients together until they form a smooth mixture. You want it well mixed but not too fluffy. Next, gently fold in the whipped topping. Be careful here; you don’t want to deflate it. The goal is to keep the mixture light and airy. Now, take another bowl. Mix the graham cracker crumbs with melted butter. Stir until the crumbs are well coated. The mix should look like wet sand. This texture is key for a great crust. If it feels too dry, add a bit more melted butter. Time to build your pie cups! Start by adding a layer of the graham cracker mixture to the bottom of each serving cup. Press it down gently to form a crust. Next, spoon the pumpkin cream mixture over the crust, filling each cup to the top. If you have extra ingredients, repeat the layering. This will create a lovely layered effect. After assembling, place the cups in the refrigerator. They need to chill for at least 2 hours. This time allows the flavors to meld nicely. Just before serving, add a dollop of whipped cream on top of each cup. Finish with a sprinkle of cinnamon for that festive touch! To get the best texture, start with softened cream cheese. This helps it mix well with the other ingredients. If the cream cheese is cold, it will clump. Let it sit at room temperature for about 30 minutes before you start. When you fold in the whipped topping, do it gently. Use a spatula and scoop from the bottom. This keeps the air in the whipped cream. If you stir too hard, your mixture will lose its lightness. For a beautiful display, serve your pie cups on a decorative tray. You can add small sprigs of mint or cinnamon sticks for extra charm. These small touches bring a festive vibe. For garnishing, add a dollop of whipped cream on top of each cup. A sprinkle of cinnamon adds color and flavor. You can even use a zester to create orange zest curls for a pop of color. Chilling the cups is key for great taste. Let them sit in the fridge for at least two hours. This time allows the flavors to mix well and the texture to set. When serving to guests, keep the cups cool. If it’s warm in your kitchen, the cream may start to soften. Present the cups right from the fridge for the best experience. {{image_2}} You can change the crust to fit your taste. Try using Oreo crumbs instead of graham crackers. Just crush the cookies and mix them with melted butter. This adds a fun twist to your pie cups. For those needing gluten-free options, use gluten-free graham crackers or almond flour. Mix the flour with melted butter. This will create a tasty base without gluten. Get creative with spices! While pumpkin pie spice is great, you can try cinnamon or nutmeg for a different taste. Each spice adds its own flavor and aroma. You can also add chocolate or caramel drizzle on top. This will give your dessert a rich layer. A touch of sweetness can make it even more special. If you want a vegan version, use coconut cream instead of cream cheese. This gives a creamy texture and keeps it dairy-free. For the whipped topping, look for a plant-based option. If you need sugar-free alternatives, use a sugar substitute. Options like stevia or erythritol work well. They keep the dessert sweet without added sugar. To keep your no-bake pumpkin cream pie cups fresh, place them in an airtight container. This helps prevent any odors from other foods in the fridge. You can also cover each cup with plastic wrap. These cups stay fresh for about three days in the fridge. After that, they may lose their texture and flavor. Yes, you can freeze these cups! To do this, first, let them chill in the fridge for a couple of hours. Once they are set, wrap each cup tightly in plastic wrap. Then, place them in a freezer-safe container. They can last for up to two months in the freezer. When you're ready to enjoy them, take them out and place them in the fridge to thaw overnight. This slow thaw helps keep the texture just right. Avoid microwaving them, as this can change their creamy consistency. Yes, you can use fresh pumpkin. Fresh pumpkin gives a rich flavor. It also has more nutrients. However, it requires more work. You must roast and puree it first. Canned pumpkin is easy and quick. It is also consistent in texture. Both can work well, so choose what fits your needs. These cups last about 3 to 4 days in the fridge. To keep them fresh, cover them with plastic wrap. This prevents air from drying them out. Store them in an airtight container for best results. Always check for any off smells or changes in texture before eating. You can use dairy-free cream cheese for a vegan option. Silken tofu blended until smooth is another great choice. It gives a creamy texture without dairy. Greek yogurt can also work but will add tanginess. Choose what suits your diet or taste preferences. This pumpkin cream cup recipe combines tasty ingredients like pumpkin puree, cream cheese, and spices. You learned how to prepare a graham cracker crust and layer the pumpkin mixture. Remember to chill your cups for the best flavor. Trying different crusts or flavors can make this treat unique. Always store leftovers properly to keep them fresh. Enjoy your delicious creation and impress your guests!

No-Bake Pumpkin Cream Pie Cups

Indulge in the flavors of fall with these delightful No-Bake Pumpkin Cream Pie Cups! This easy recipe combines creamy pumpkin puree, rich cream cheese, and a buttery graham cracker crust for a perfect autumn treat. In just 20 minutes of prep, you can create a dessert that’s sure to impress. Don't miss out on this seasonal favorite—click through to explore the full recipe and wow your taste buds!

Ingredients
  

1 cup pumpkin puree

1/2 cup cream cheese, softened

1 cup whipped topping (thawed)

1/2 teaspoon vanilla extract

1/4 cup sugar

1 teaspoon pumpkin pie spice

1 cup graham cracker crumbs

1/4 cup melted butter

Whipped cream and cinnamon for garnish

Instructions
 

In a mixing bowl, combine the pumpkin puree, cream cheese, sugar, vanilla extract, and pumpkin pie spice. Mix until smooth and well combined.

    Gently fold in the whipped topping until the mixture is light and fluffy, taking care not to deflate it.

      In another bowl, mix the graham cracker crumbs with the melted butter. Stir until the crumbs are evenly coated and resemble wet sand.

        In serving cups or small glasses, add a layer of the graham cracker mixture to the bottom. Press down gently to form a crust layer.

          Spoon the pumpkin cream mixture over the graham cracker crust, filling the cups to the top.

            Repeat the layering process if you have extra graham cracker crumbs and pumpkin cream, creating a layered effect in your cups.

              Chill the assembled cups in the refrigerator for at least 2 hours to allow the flavors to meld and set.

                Just before serving, top each cup with a dollop of whipped cream and a sprinkle of cinnamon for a festive touch.

                  Prep Time: 20 minutes | Total Time: 2 hours 20 minutes | Servings: 6

                    - Presentation Tips: Serve the pie cups on a decorative tray, and consider garnishing with small sprigs of mint or additional cinnamon sticks for an autumnal feel.

                      WANT TO SAVE THIS RECIPE?

                      Leave a Comment

                      Recipe Rating