Latest & Greatest

browse recipes

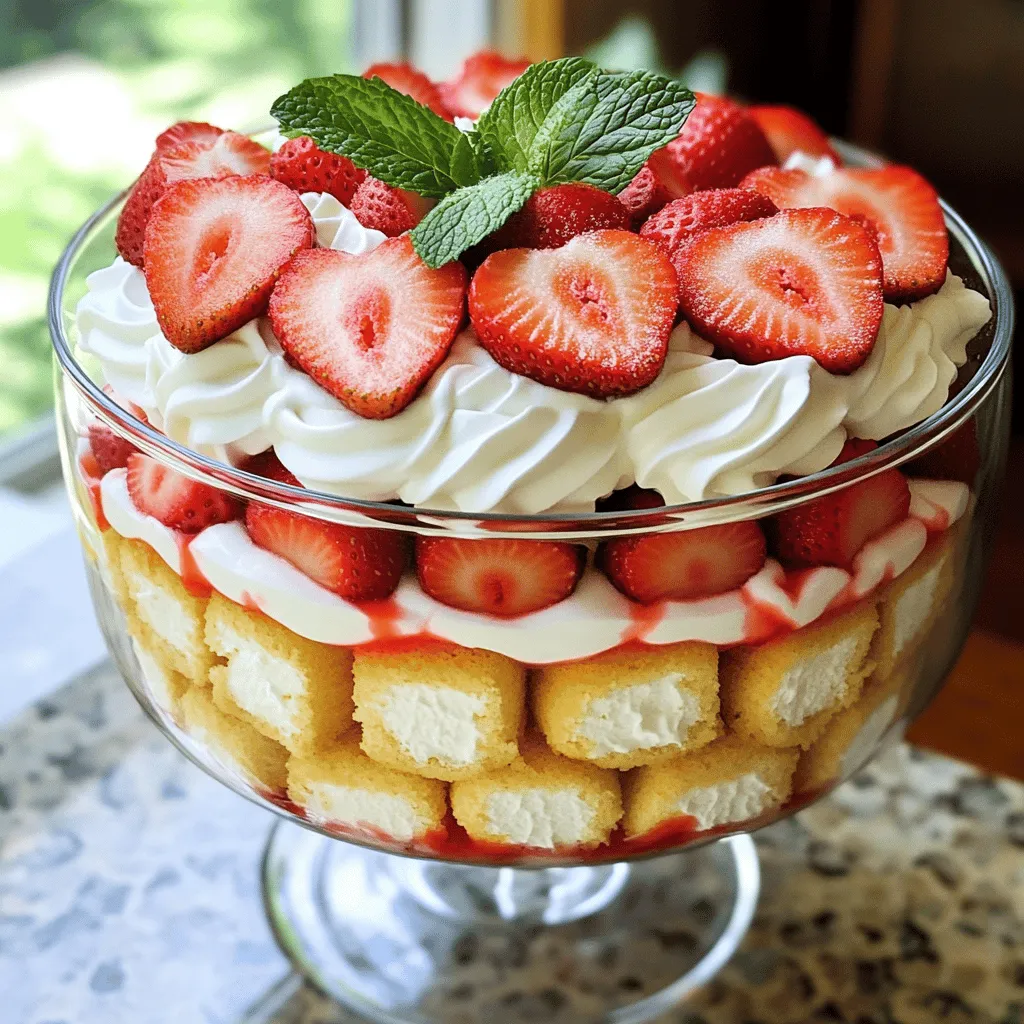
- Fresh strawberries and maceration process You need 2 cups of fresh strawberries. Make sure to hull and slice them. Mix them with 1/4 cup of granulated sugar and 1 teaspoon of lemon juice. This step helps bring out their sweet flavor. Let the strawberries sit for 15 minutes. This is called maceration. - Other ingredients needed for the trifle You will also need 1 cup of heavy whipping cream. Add 1/4 cup of powdered sugar and 1 teaspoon of vanilla extract to it. You will need a store-bought angel food cake, cut into cubes. Lastly, grab 1/2 cup of Greek yogurt to add creaminess. - Optional garnishes for presentation For a nice touch, consider using mint leaves or extra strawberry slices. These make your trifle look pretty and fresh. The garnishes add color and a pop of flavor. For the full recipe, check out the detailed instructions to create this delightful treat! 1. Preparing strawberries and the maceration time Start by hulling and slicing the fresh strawberries. Place them in a medium bowl. Add the granulated sugar and lemon juice. Toss gently to combine. Let this sit for about 15 minutes. This time allows the strawberries to macerate. They will release their sweet juices, making them extra tasty. 2. Whipping the cream and folding in yogurt In a large bowl, pour in the heavy whipping cream. Use an electric mixer to whip the cream until soft peaks form. Gradually add the powdered sugar and vanilla extract. Keep whipping until you see stiff peaks. Next, fold in the Greek yogurt. This makes the cream light and fluffy. 3. Layering the trifle components Grab a trifle dish or individual glasses. Start with a layer of angel food cake cubes. Then, add a layer of the sweetened strawberries. Follow this with a generous layer of whipped cream. Repeat these layers. Finish with whipped cream on top. Chill the trifle in the fridge for at least 2 hours. This helps the flavors blend perfectly. For the full recipe, check out the detailed steps above. Enjoy making this delightful treat! Whipping cream can be fun! To get stiff peaks, start with cold cream. Chill your bowl and beaters too. Cold tools help the cream whip better. Use an electric mixer for speed. Whip on high until soft peaks form. Then, add powdered sugar slowly. Add vanilla extract for great flavor. Keep whipping until stiff peaks form. This means the cream holds its shape. You can add other flavors to your whipped cream. A little cocoa powder gives a chocolate twist. Or try almond extract for a nutty flavor. You can even mix in a bit of coffee for a mocha taste. Layering is key in a trifle dish. Start with cake cubes at the bottom. Add a layer of strawberries next, then top with whipped cream. Repeat the layers until you fill the dish. For a great look, use clear glasses. This way, you can see the layers. Garnish the top with mint leaves and extra strawberry slices. This makes your trifle look fancy and inviting. Check out the Full Recipe for more details on making this dessert! {{image_2}} You can change the taste of your strawberry shortcake trifle by using other fruits. Blueberries, peaches, or even raspberries work great. Each fruit brings its own zest. For example, peaches add a sweet and juicy bite. You can mix and match to create your own flavor blend. You can also swap out the cake type. While angel food cake is light and fluffy, you can try pound cake or sponge cake. Pound cake gives a denser texture. It will hold up well against the cream and fruit. Sponge cake adds a soft texture that soaks up flavors. If you need a gluten-free version, you can use gluten-free cake mixes. Many brands offer great options that taste just as good. Check the label to make sure it fits your needs. For a dairy-free alternative, use coconut cream instead of heavy cream. It whips up nicely and adds a tropical flavor. You can also use almond milk yogurt instead of Greek yogurt. These swaps keep your trifle creamy and delicious without dairy. Feel free to explore these variations to make the trifle your own. For the full recipe, check it out in the main article! To keep your leftover trifle fresh, store it in the fridge. Use an airtight container. This helps keep the layers intact and prevents them from drying out. If you have a trifle dish, you can cover it with plastic wrap. Just make sure it’s tight. This keeps the flavor and texture nice. For best results, layer the trifle in smaller containers. Individual cups work well for easy serving. You can grab one and go! In the fridge, your trifle can last about 2 to 3 days. After that, the cake may become soggy. If it looks or smells off, it’s best to toss it. Freezing the trifle is not recommended. The whipped cream and fresh strawberries do not freeze well. They lose their texture and flavor. If you want to prep ahead, make the layers separately. Then, assemble it fresh before serving. This gives you the best taste and texture. For the full recipe, visit the recipe section of this article. Can I make the trifle ahead of time? Yes, you can make the trifle a day before. This helps the flavors mix well. Just cover it tightly and store it in the fridge. What can I substitute for heavy cream? You can use coconut cream or whipped coconut milk. These options work well for a lighter touch. They also add a nice flavor twist. How can I adjust sweetness for different tastes? You can add more or less sugar based on your taste. You can also use honey or maple syrup for a different sweetness. What is the best type of strawberries to use? The best strawberries are fresh, ripe, and sweet. Look for bright red berries with no bruises. They will give your trifle the best flavor. Can I use frozen strawberries in a pinch? Yes, you can use frozen strawberries. Just thaw them first and drain excess liquid. They may not taste as fresh, but they still work well. For the full recipe, check out the Strawberry Shortcake Trifle Delight section. This blog post covered everything you need to make a delicious strawberry shortcake trifle. We explored the key ingredients, from fresh strawberries to optional garnishes. You learned step-by-step instructions for preparing each layer and tips to whip perfect cream. We also discussed various flavor and dietary modifications to suit your needs. Finally, I shared proper storage techniques to keep your trifle fresh. Enjoy creating this tasty treat, and remember, the best part is sharing it with friends and family.

Strawberry Shortcake Trifle Delightful and Fresh Treat

Looking for a fresh and delightful dessert? You’re in for a treat with my Strawberry Shortcake Trifle! This layered dessert combines sweet strawberries, creamy…

My Latest Drinks

My Latest Dinners

hey,

i’m !

I’m so happy you’re here!

Every dish I share is made with love and care. I hope they bring you the same comfort and joy they bring me. Let’s make memories, one recipe at a time.

Spicy Roasted Chickpeas Crunchy and Flavorful Snack

Are you ready to elevate your snack game? Spicy roasted chickpeas are your new go-to treat! These crunchy bites pack bold flavors and are…

For this spicy roasted chickpeas recipe, you will need: - 1 can (15 oz) chickpeas, drained and rinsed - 2 tablespoons olive oil - 1 teaspoon smoked paprika - 1 teaspoon ground cumin - 1 teaspoon garlic powder - 1/2 teaspoon cayenne pepper (adjust for spice level) - Salt, to taste - Fresh parsley, chopped (for garnish) You can easily adjust the spice to fit your taste. If you want a milder snack, use less cayenne pepper. You can also swap olive oil with avocado oil for a different flavor. If you don't have smoked paprika, regular paprika works too. Each change can create a new twist on the recipe. Chickpeas are great for you! They are high in protein and fiber. This makes them filling and helps keep your energy up. Eating chickpeas can support heart health too. They contain vitamins and minerals, like iron and magnesium, that our bodies need. Plus, they are low in fat, which is a bonus for healthy snacking. With this recipe, you can enjoy a tasty treat and a healthy one at that! To make the best spicy roasted chickpeas, start with canned chickpeas. Drain and rinse them well. This removes the salty liquid. Next, dry them with a clean towel. Removing moisture is key. It helps the chickpeas get nice and crunchy. If you use dried chickpeas, soak them overnight before cooking. Preheat your oven to 400°F (200°C). This ensures even cooking. Line a baking sheet with parchment paper. It prevents sticking and makes cleanup easier. Toss the dried chickpeas in a bowl with olive oil and spices. The spices add flavor and kick. Spread them out in a single layer on the sheet. Roast for 20-25 minutes. Stir them halfway through to cook evenly. Keep an eye on them to avoid burning. After roasting, take them out of the oven. Let them cool for a few minutes. They will become crispier as they cool. To check for crunchiness, taste one. If it’s not crunchy enough, you can roast them a bit longer. Adjust the salt and spices to your liking before serving. For the full recipe, check the section above. Enjoy your delicious snack! To get your chickpeas super crispy, start by drying them well. After rinsing, use a clean towel to pat them dry. Removing all moisture is key. If you skip this step, they may come out soft. Spread them out on the baking sheet in a single layer. This helps hot air circulate around each chickpea, making them crispier. Roasting them at 400°F (200°C) also helps. Stir them halfway through to ensure even cooking. Finally, let them cool a bit after roasting. They will get even crunchier as they cool. If you love spice, feel free to add more cayenne pepper. If you prefer milder snacks, cut the amount down. You can also experiment with other spices. Try adding a dash of chili powder or some black pepper for a different kick. Taste the mixture before roasting to find your perfect spice level. Remember, you can always add more spice later, but it’s hard to take it out! When mixing the ingredients, use a large bowl. This gives you room to coat all the chickpeas evenly. Pour in the olive oil first, and then add your spices. Toss the chickpeas well until every one is covered. Don't be shy! If needed, use your hands to ensure even coating. This will help the spices stick during roasting. For extra flavor, consider adding a squeeze of lemon juice or a sprinkle of nutritional yeast before roasting. This will enhance the taste and make your snack even more delicious. For the full recipe, check out the cooking instructions above. {{image_2}} You can boost the flavor of your spicy roasted chickpeas with fun herbs and spices. Try adding a teaspoon of onion powder for depth. If you want a zesty kick, lemon zest works great. You can also use a dash of curry powder for a unique twist. Fresh herbs like thyme or rosemary can add a nice touch as well. Mix and match to find your favorite blend! If you don't have an oven, you can still enjoy crunchy chickpeas. An air fryer cooks them quickly and gives a great crunch. Set your air fryer to 400°F (200°C) and cook for about 15-20 minutes. Shake the basket halfway through for even cooking. You can also try stovetop cooking. Heat a skillet over medium heat, add the chickpeas, and stir frequently until they are crispy. Just make sure to watch them closely! You can serve spicy roasted chickpeas in many fun ways. Sprinkle them over salads for added crunch and flavor. Toss them into wraps or grain bowls for a protein boost. They make a great topping for soups too. You can even serve them as a snack with yogurt dip or your favorite hummus. The options are endless, so get creative and enjoy! After making spicy roasted chickpeas, let them cool completely. This helps keep them crunchy. Store them in an airtight container. Keep them at room temperature for a few days. If you want to enjoy them longer, store in the fridge. Just make sure the container is sealed well. When your chickpeas lose their crunch, don't worry! You can easily fix this. Preheat your oven to 400°F (200°C). Spread the chickpeas on a baking sheet. Bake for about 10 minutes. Keep an eye on them to avoid burning. This will bring back their crispy texture. Spicy roasted chickpeas last about 3 to 5 days at room temperature. If you store them in the fridge, they can last up to a week. For longer storage, you can freeze them. Place the cooled chickpeas in a freezer-safe bag. They can last up to 3 months in the freezer. Just thaw and re-crisp when you're ready to enjoy them again. For the full recipe, refer to the earlier section. Yes, you can use dried chickpeas. First, soak them overnight in water. Then, cook them until soft. This takes about 1-2 hours. After that, drain and rinse them. Then, follow the same steps as in the Full Recipe. Just remember to dry them well before roasting. This helps them get crispy. To make them less spicy, reduce the cayenne pepper. You can also leave it out entirely. Adding a bit more smoked paprika or garlic powder can balance the flavor. Another option is to mix in some honey or maple syrup for a sweet touch. This will help tone down the heat. Yes, roasted chickpeas are a healthy snack. They are high in protein and fiber, which keeps you full. They also have good fats from olive oil. This makes them a great alternative to chips or cookies. Enjoy them guilt-free! Healthy roasted chickpeas are packed with flavor and nutrients. We explored ingredients, cooking methods, and tips to get them crispy. Roasting transforms humble chickpeas into a crunchy snack with endless spice options. You can make them your own with herbs or by using an air fryer. Always store leftovers properly, so they stay fresh and delicious. Enjoy your snack, knowing it’s both tasty and healthy!